 Threads
Mid-Range Goodness!
Review Summary
At the end of the day, the B650 AORUS ELITE AX is almost a balanced feature set provider motherboard that the user can get for their daily driver need. The game is strong with the storage department of this motherboard and USB Type-C Gen 2×2 port provisions as well, though don’t expect to find a PCIe Gen 5 X16 slot.
Hours Tested: 17

Overall
-
Performance - 8/10
8/10
-
Design - 7/10
7/10
-
Build Quality - 9/10
9/10
-
Features - 8/10
8/10
-
Value - 8/10
8/10
Pros
- Effective VRM Cooling
- 2 NVMe Gen 5 SSD
- Plethora of USB ports
- USB Type-C Gen 2
- Quick Flash Plus
- EZ-Latch on PCIe Slot
- EZ-Latch on M.2 Ports
- Overall good performance
Cons
- No X4 PCIe Slot
- No External Temperature Sensor Ports
- No Debug LED


Earlier we took a look at the X670E AORUS MASTER motherboard from the GIGABYTE. In this content, we are taking a spin on the B650 AORUS ELITE AX motherboard which is aimed more towards the upper-budget segment while still boasting some good features but without breaking the bank.
- Why you can trust Tech4Gamers: Our reviews are based on dedicated hands-on testing by our team of experienced hardware experts. Find out more about how we test.
Key Takeaways
- The GIGABYTE B650 AORUS ELITE AX offers mid-range performance with a focus on durability, supporting AMD 7000 series CPUs and DDR5 slots while featuring solid connectivity and thermal management.
- You should get the Gigabyte B650 Aorus Elite AX if you seek a durable mid-range option with decent gaming and storage performance, along with strong connectivity via Wi-Fi 6E and 2.5GbE LAN.
- You should not get this motherboard if you heavily rely on multiple high-speed PCIe slots, as it lacks adequate high-speed slots and some connectivity options might not align with your preferences, especially if you require extensive PCIe bandwidth variety.
Let’s start with the specifications.
| Chipset | AMD X570 |
| Memory Support | Up to 128 GB DDR4, Dual channel, Supports DDR4 4400(O.C.) to 2133 MHz, ECC and non-ECC, XMP |
| Onboard Graphics | DisplayPort up to 3840×2160@144 Hz, HDMI up to 4096×2160@60 Hz |
| Audio | Realtek® ALC1220-VB codec, High Definition Audio, 2/4/5.1/7.1-channel, S/PDIF Out |
| LAN | Intel® GbE LAN (10/100/1000 Mbit) |
| Wireless Communication module | Wi-Fi 802.11a/b/g/n/ac/ax, Dual-Band 2.4/5 GHz, BLUETOOTH 5.0, up to 2.4 Gbps |
| Expansion Slots | PCI Express x16 slot (PCIe 4.0/3.0), PCI Express x16 slot at x4 (PCIEX4), 2 x PCI Express x1 slots (PCIe 4.0/3.0) |
| Storage Interface | M.2 connectors (SATA and PCIe 3.0/4.0), 6 x SATA 6Gb/s, RAID 0, RAID 1, RAID 10 |
| USB | USB 3.2 Gen 1 and 2, USB 2.0, USB Type-C™ port with USB 3.2 Gen 2 |
| Form Factor | ATX; 30.5cm x 24.4cm |
Packaging and Unboxing
Contents
Here’s a look at what’s provided in the box.
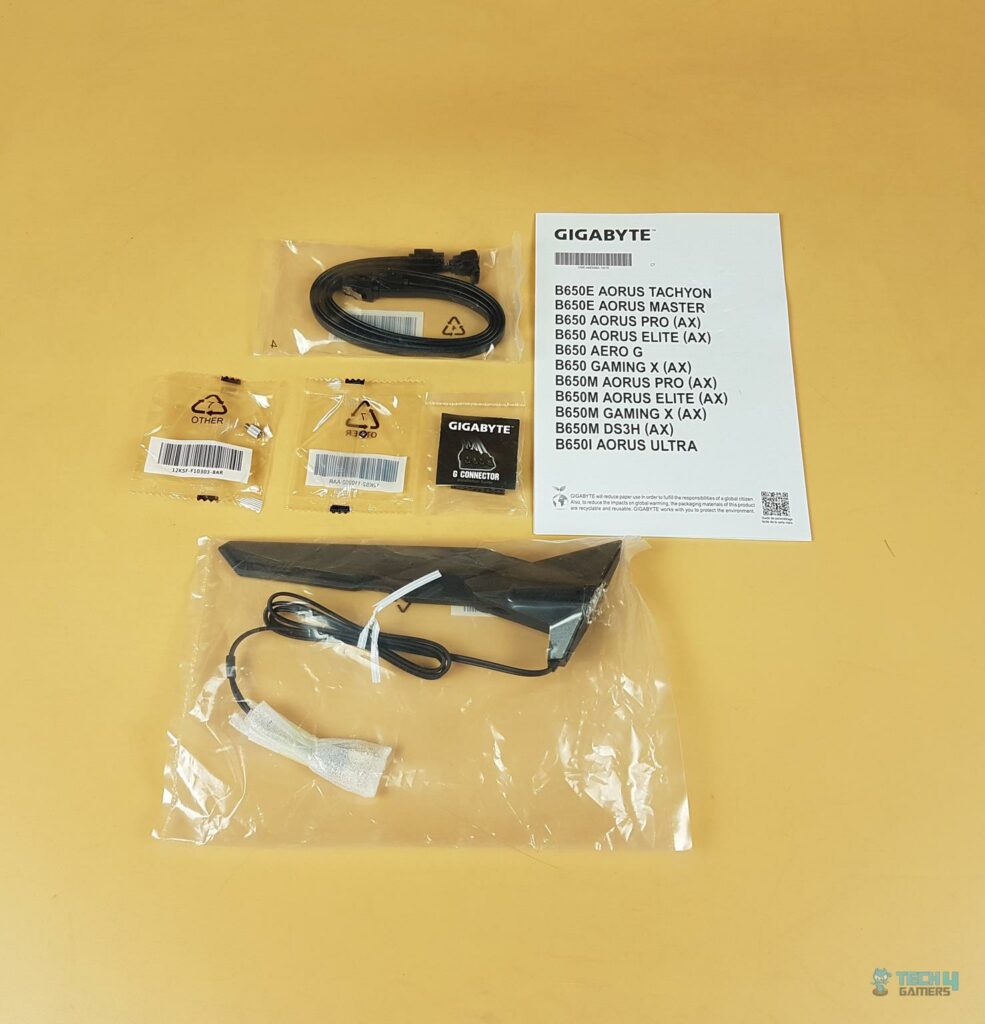
There is no user manual provided in the box.
Closer Look
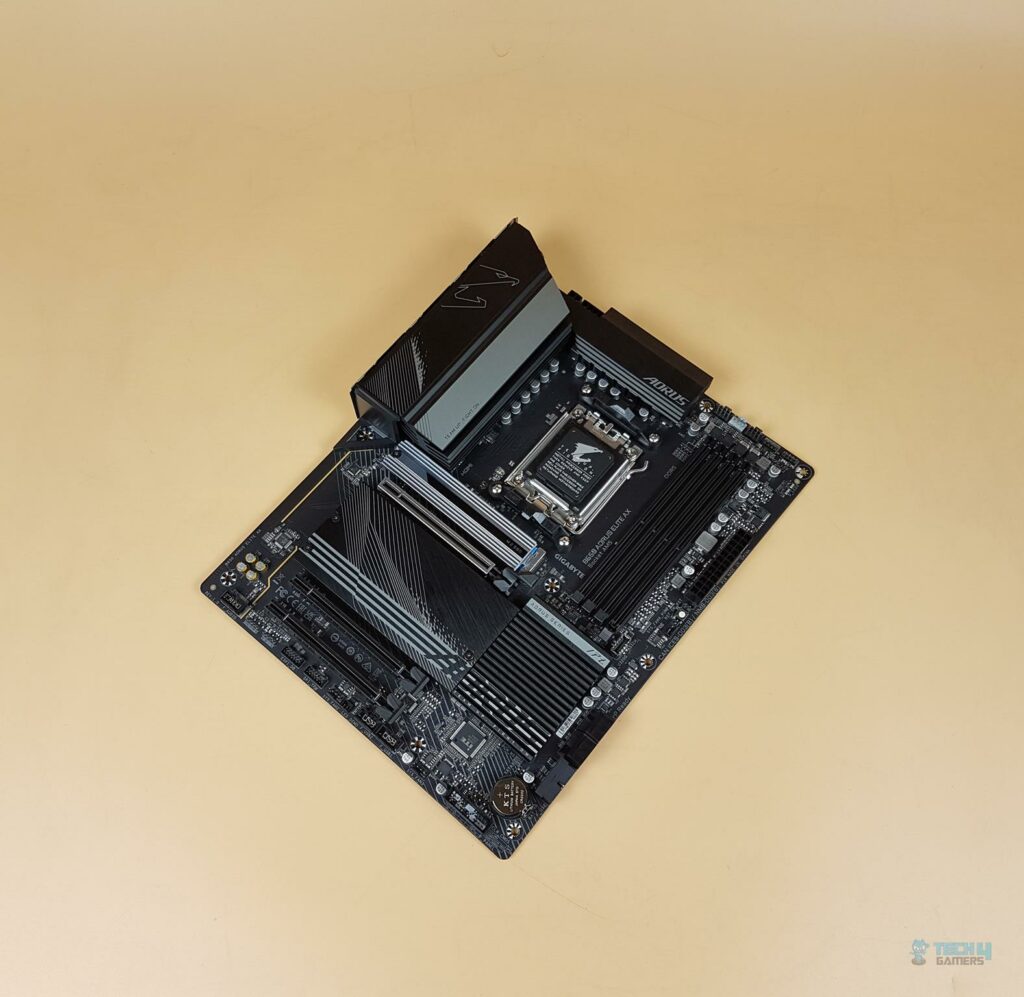
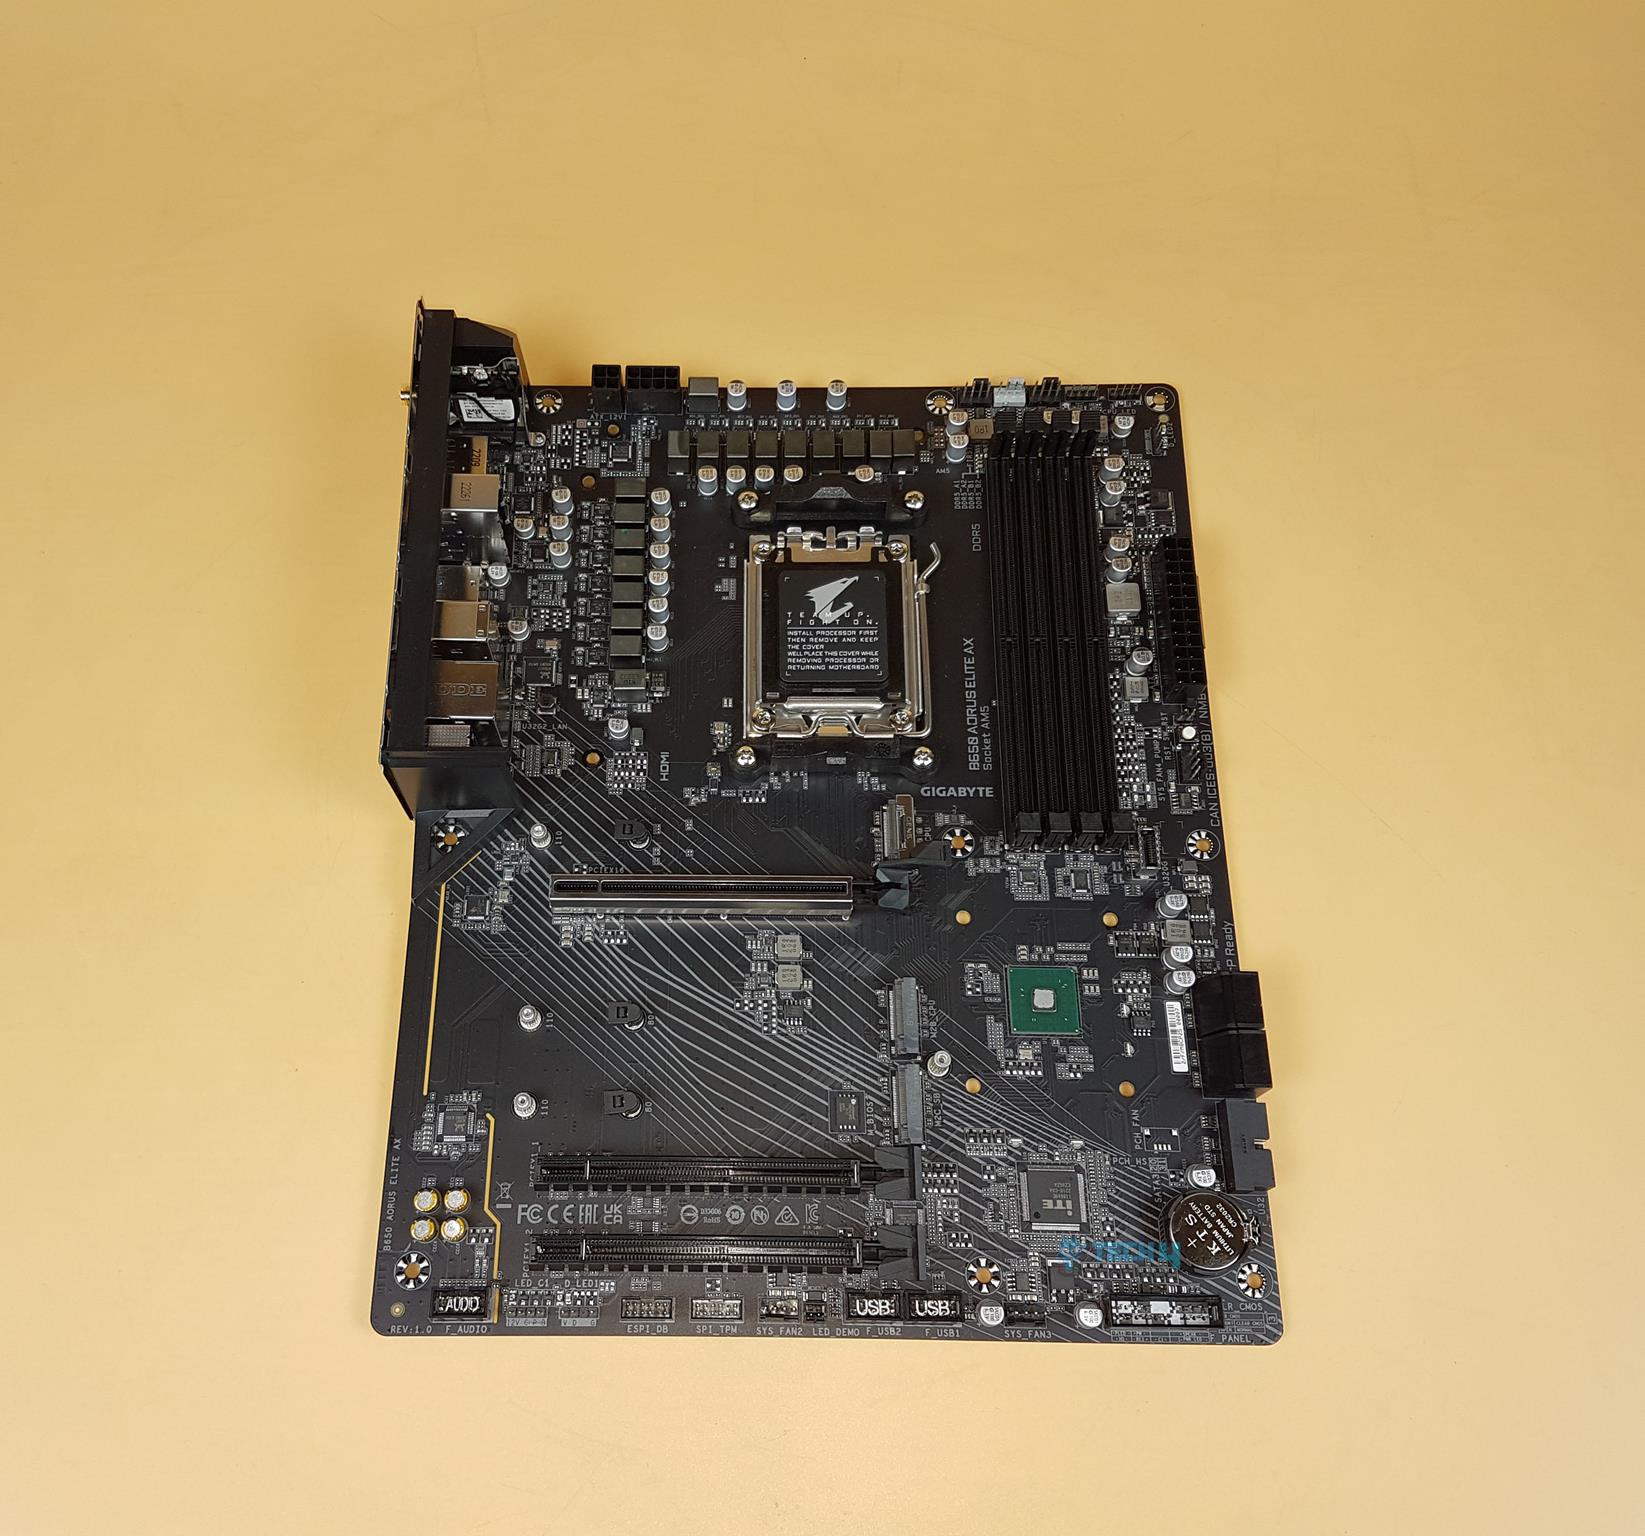
The Aorus B650 has a standard ATX size and is still adequately feature-rich. GIGABYTE has retained the stenciling and design element from the previous generation however, at the same time, they have gone to another level in the design department of the motherboard to deliver a solid product for the enthusiasts. Let’s start exploring the motherboard.
The following picture shows the block diagram of the B650 AORUS ELITE AX motherboard.
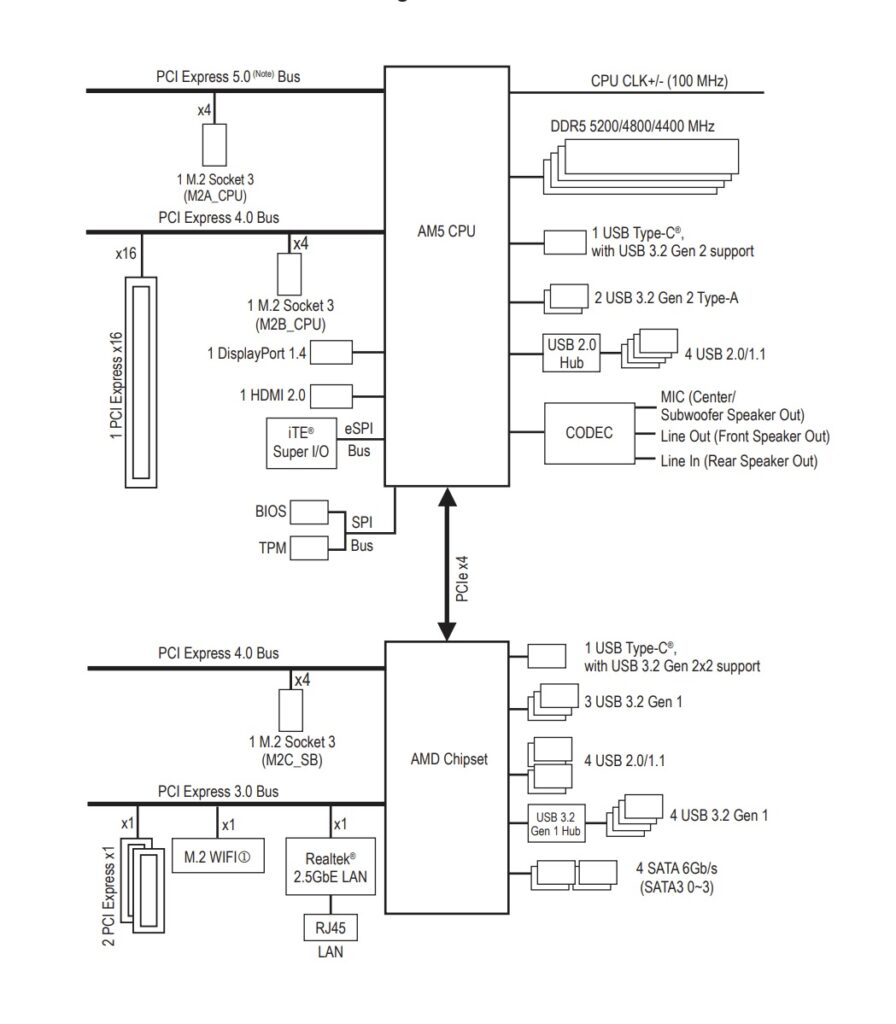
The motherboard supports M.2 Gen 5 but there is no Gen 5-based PCIe slot. We can see that the chipset is connected to the CPU socket using PCIe x4 bridging. Also, the DDR5 support of up to 5200MHz is mentioned.
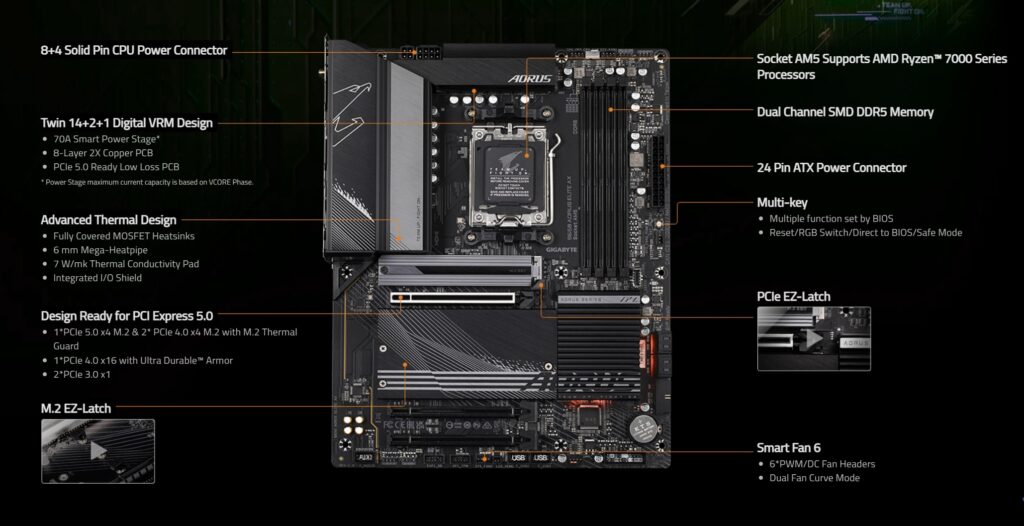
The above picture illustrates the overview of the motherboard layout and features.
The motherboard showcases a sleek black PCB with black and gray-toned heatsinks. The chipset cover integrates RGB elements.
Let’s dive in.
CPU Socket, Heatsink, VRM, and Power Delivery
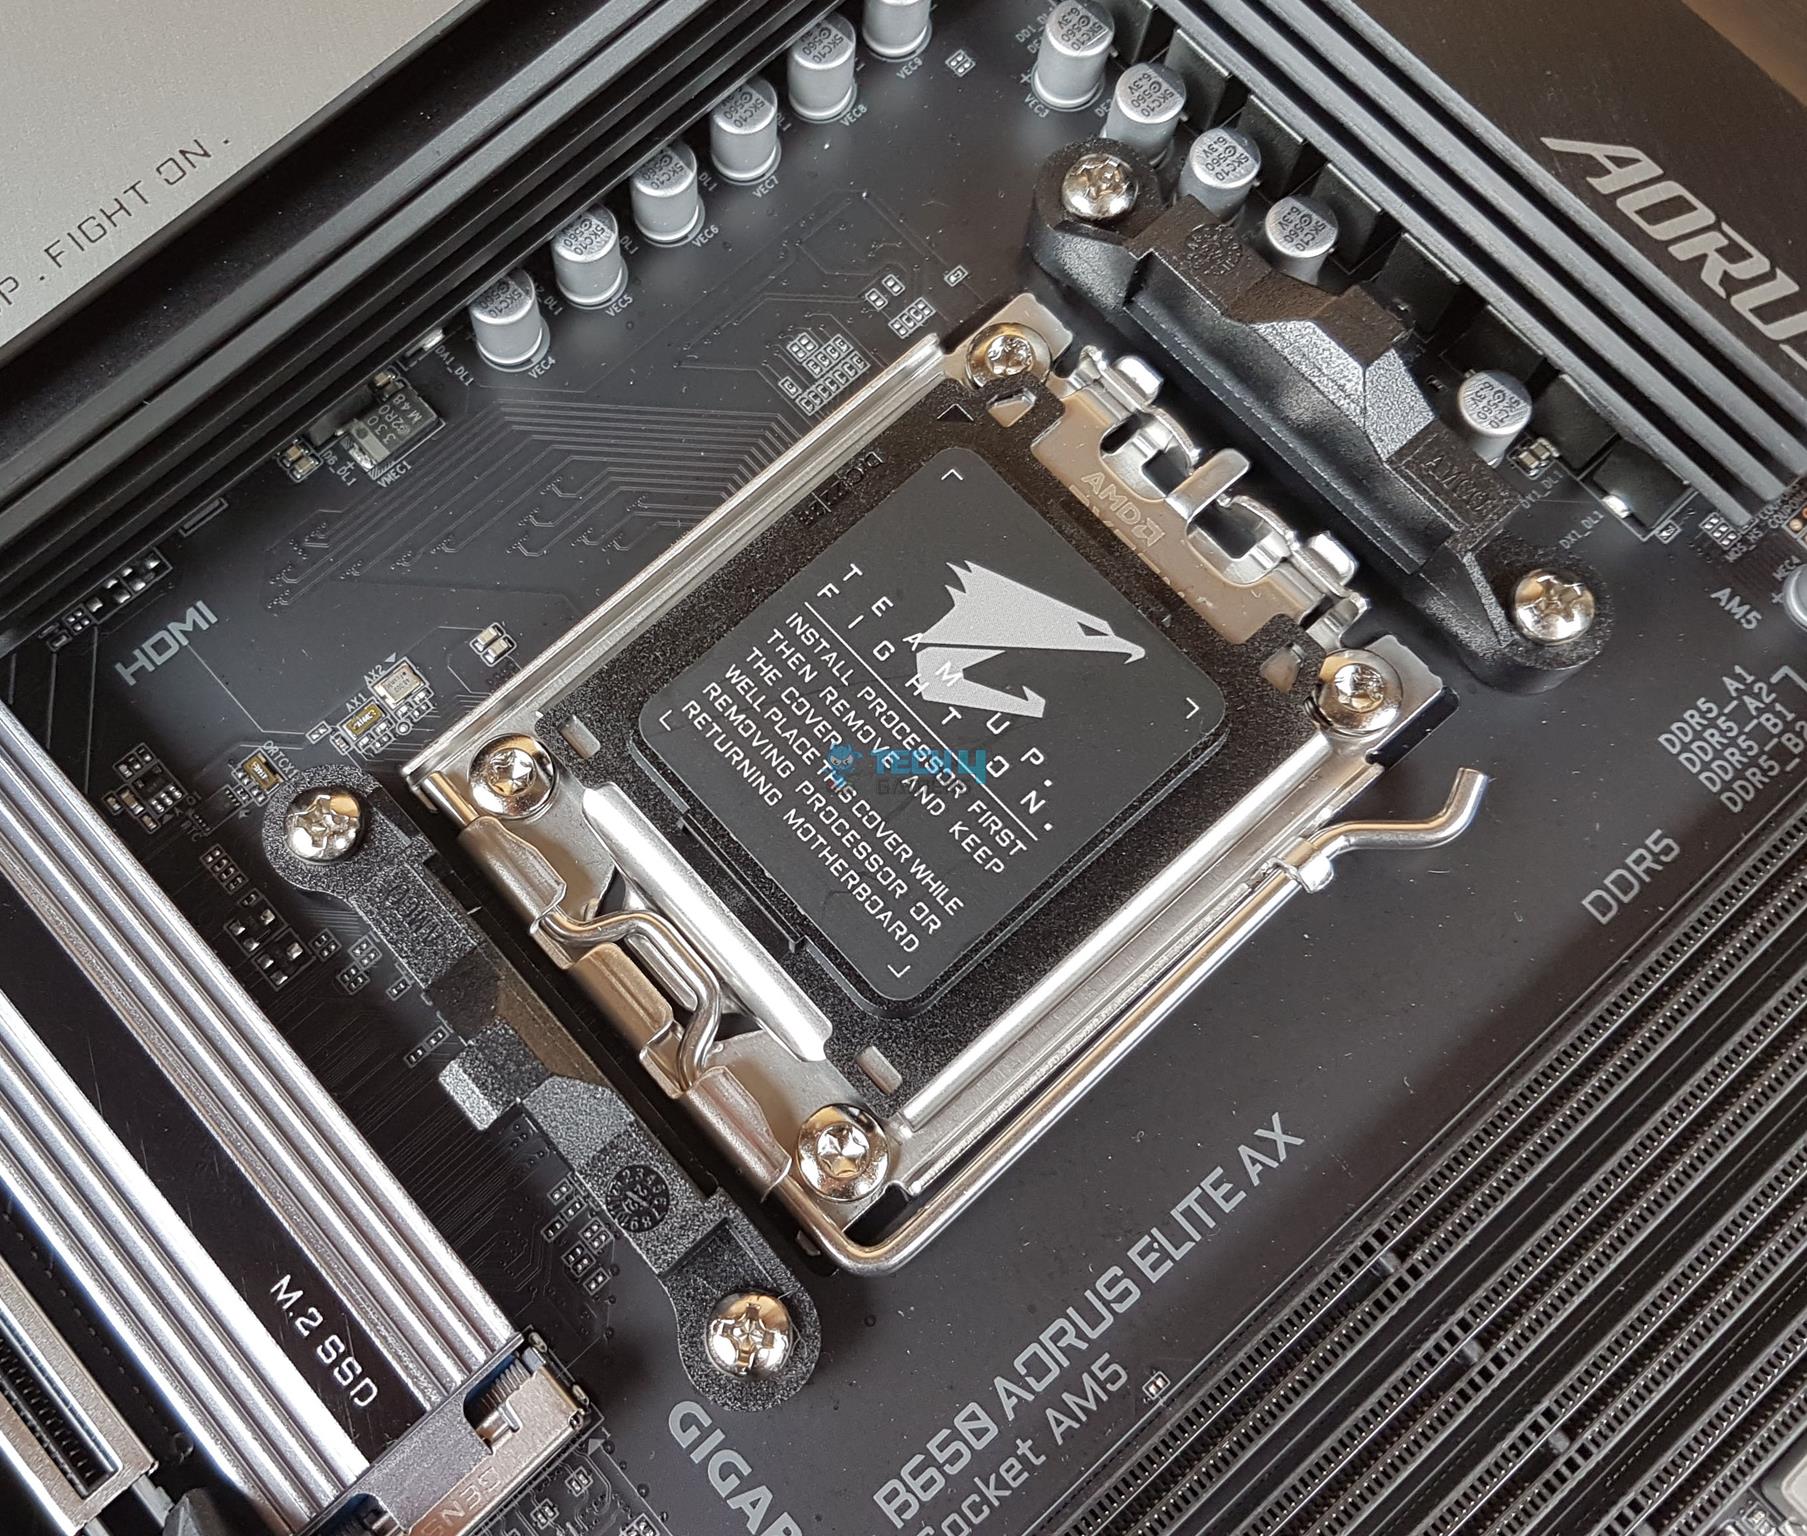
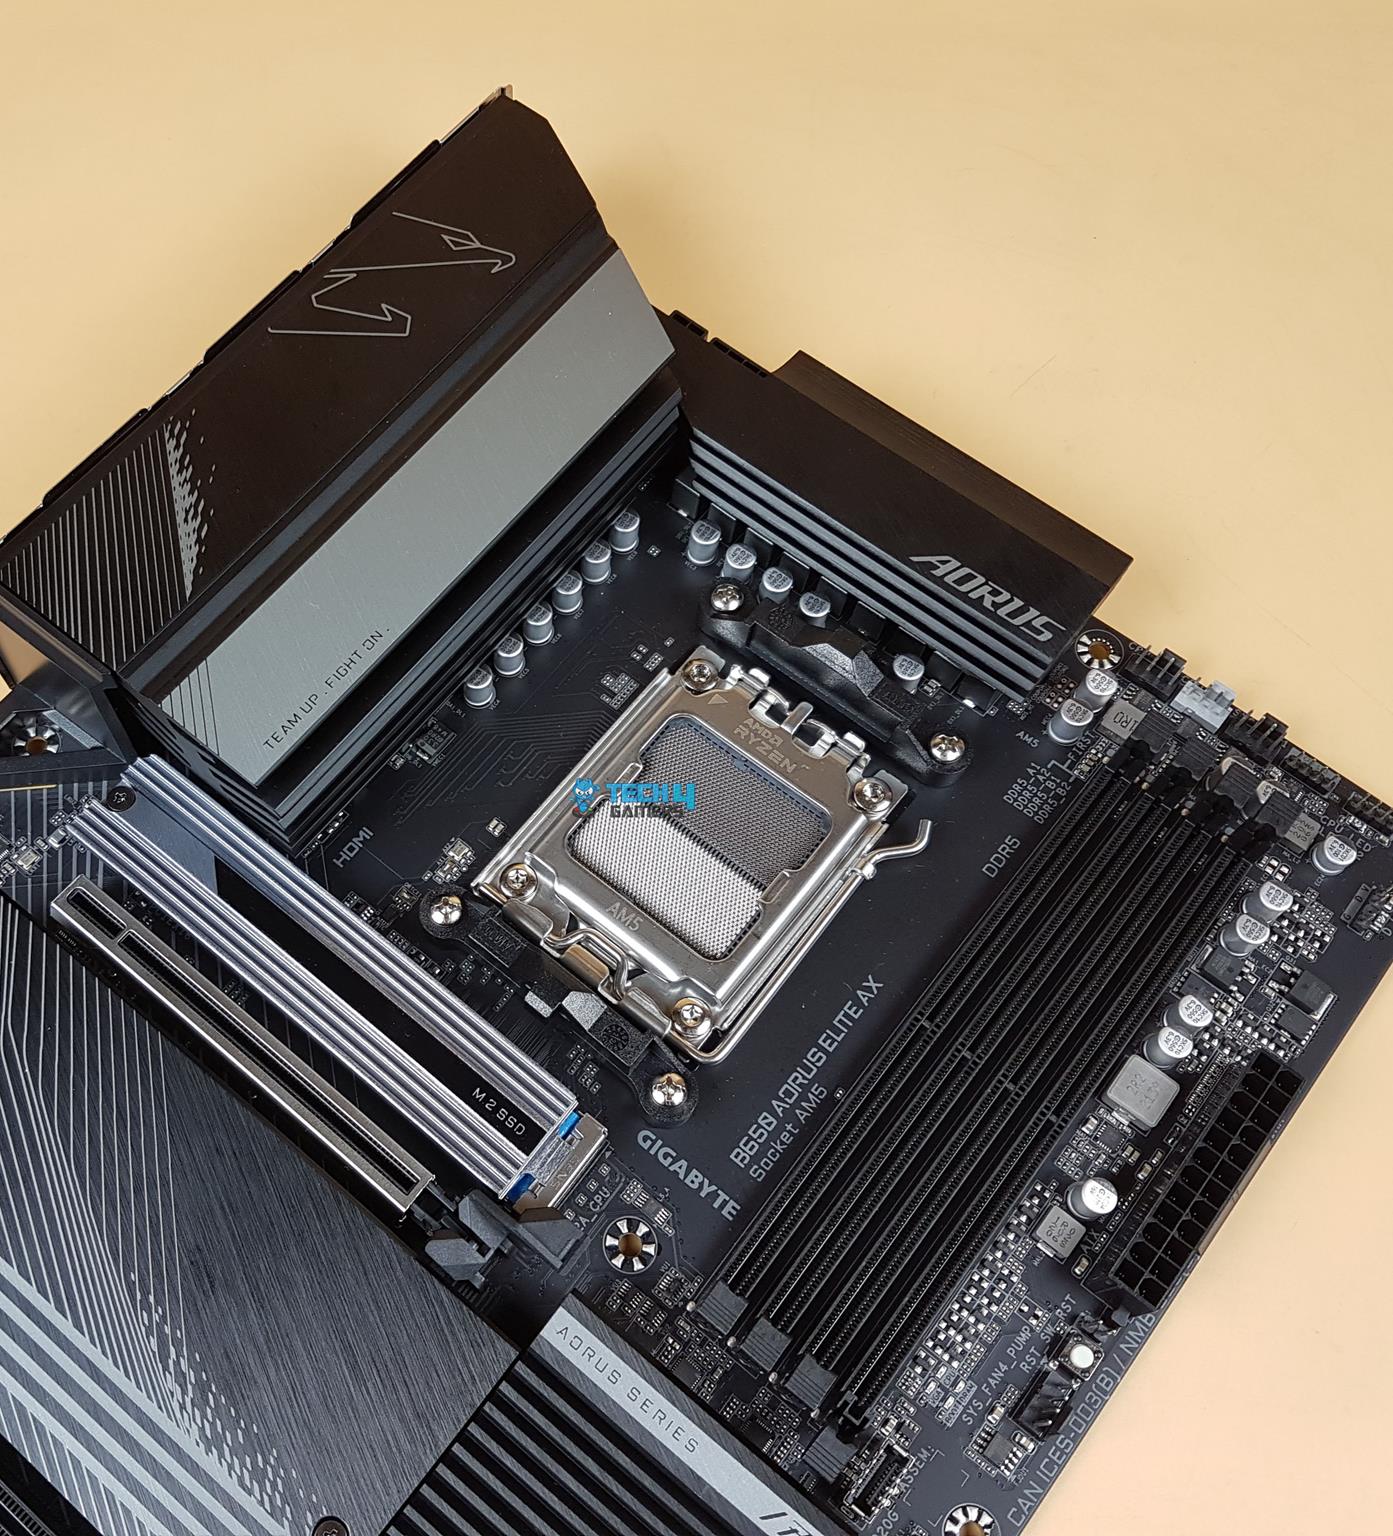
There is a protective cover over the socket area while the next image shows the socket without its protective cover. It appears divided into two sections, featuring brackets at the top and bottom.
Due to the identical size, any cooler that fits socket AM4 (using the stock AMD backplate or hook-style installation) can seamlessly work with the AM5.
The motherboard has support for an Integrated Graphics Processor as follow:
- 1 x DisplayPort, supporting a maximum resolution of 3840×2160@144 Hz, Support for DisplayPort 1.4 version and HDR.
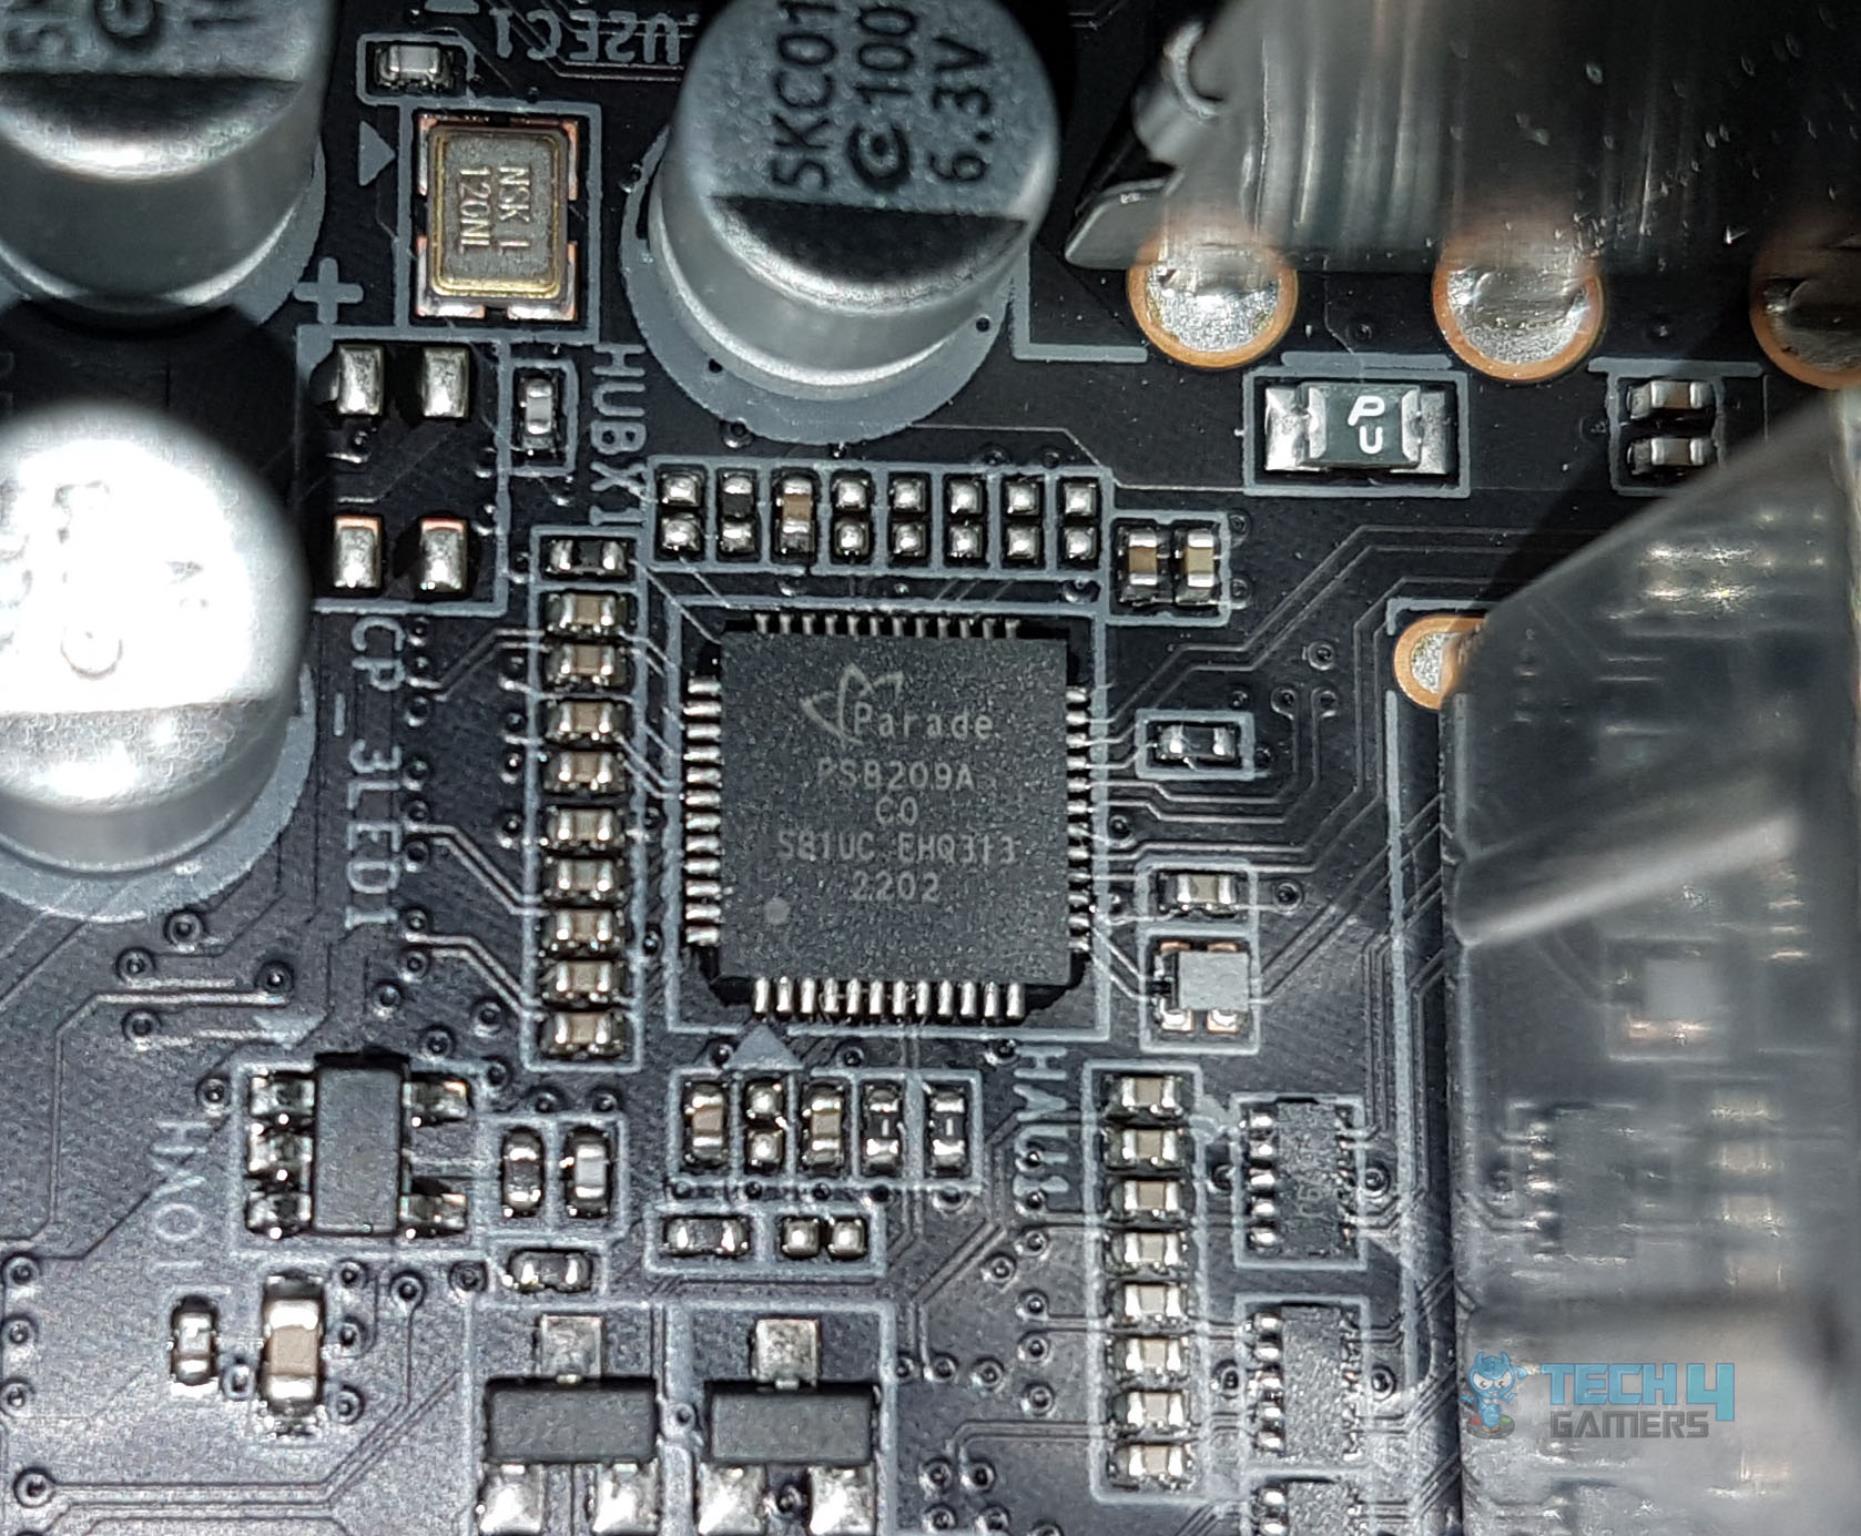
- 1 x HDMI port, supporting a maximum resolution of 4096×2160@60 Hz, Support for HDMI 2.1 version and HDCP 2.3.
The PS8209A is a low-power HDMI shifter and redriver which is compliant with HDMI 2.0 specifications up to 6.0Gbps.
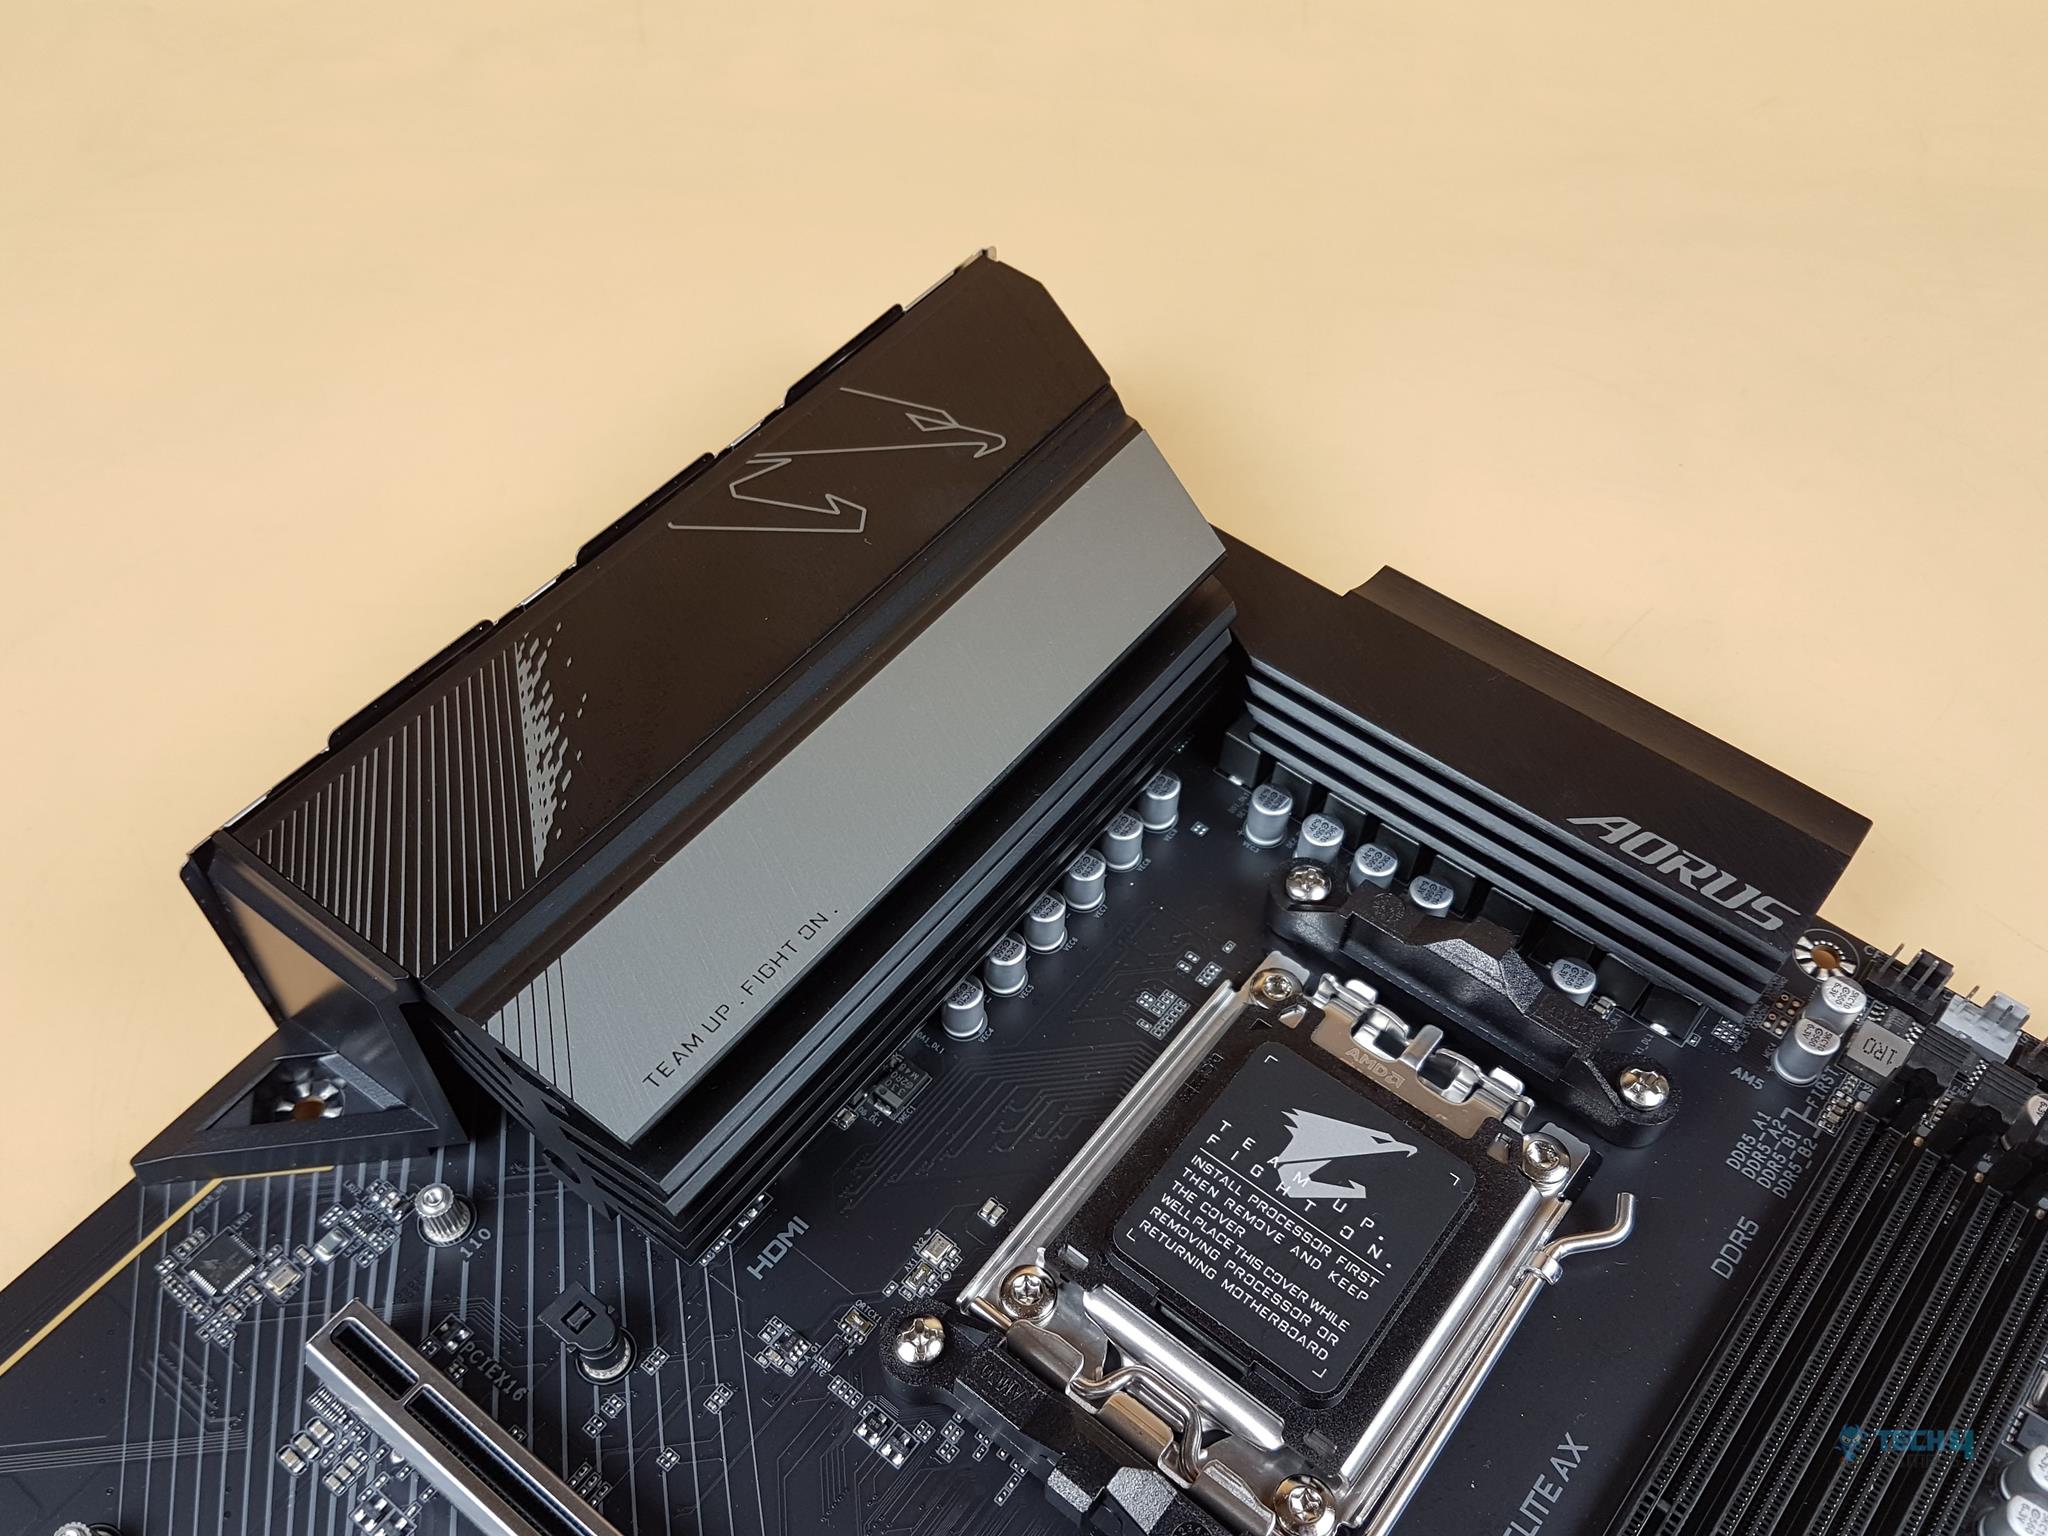
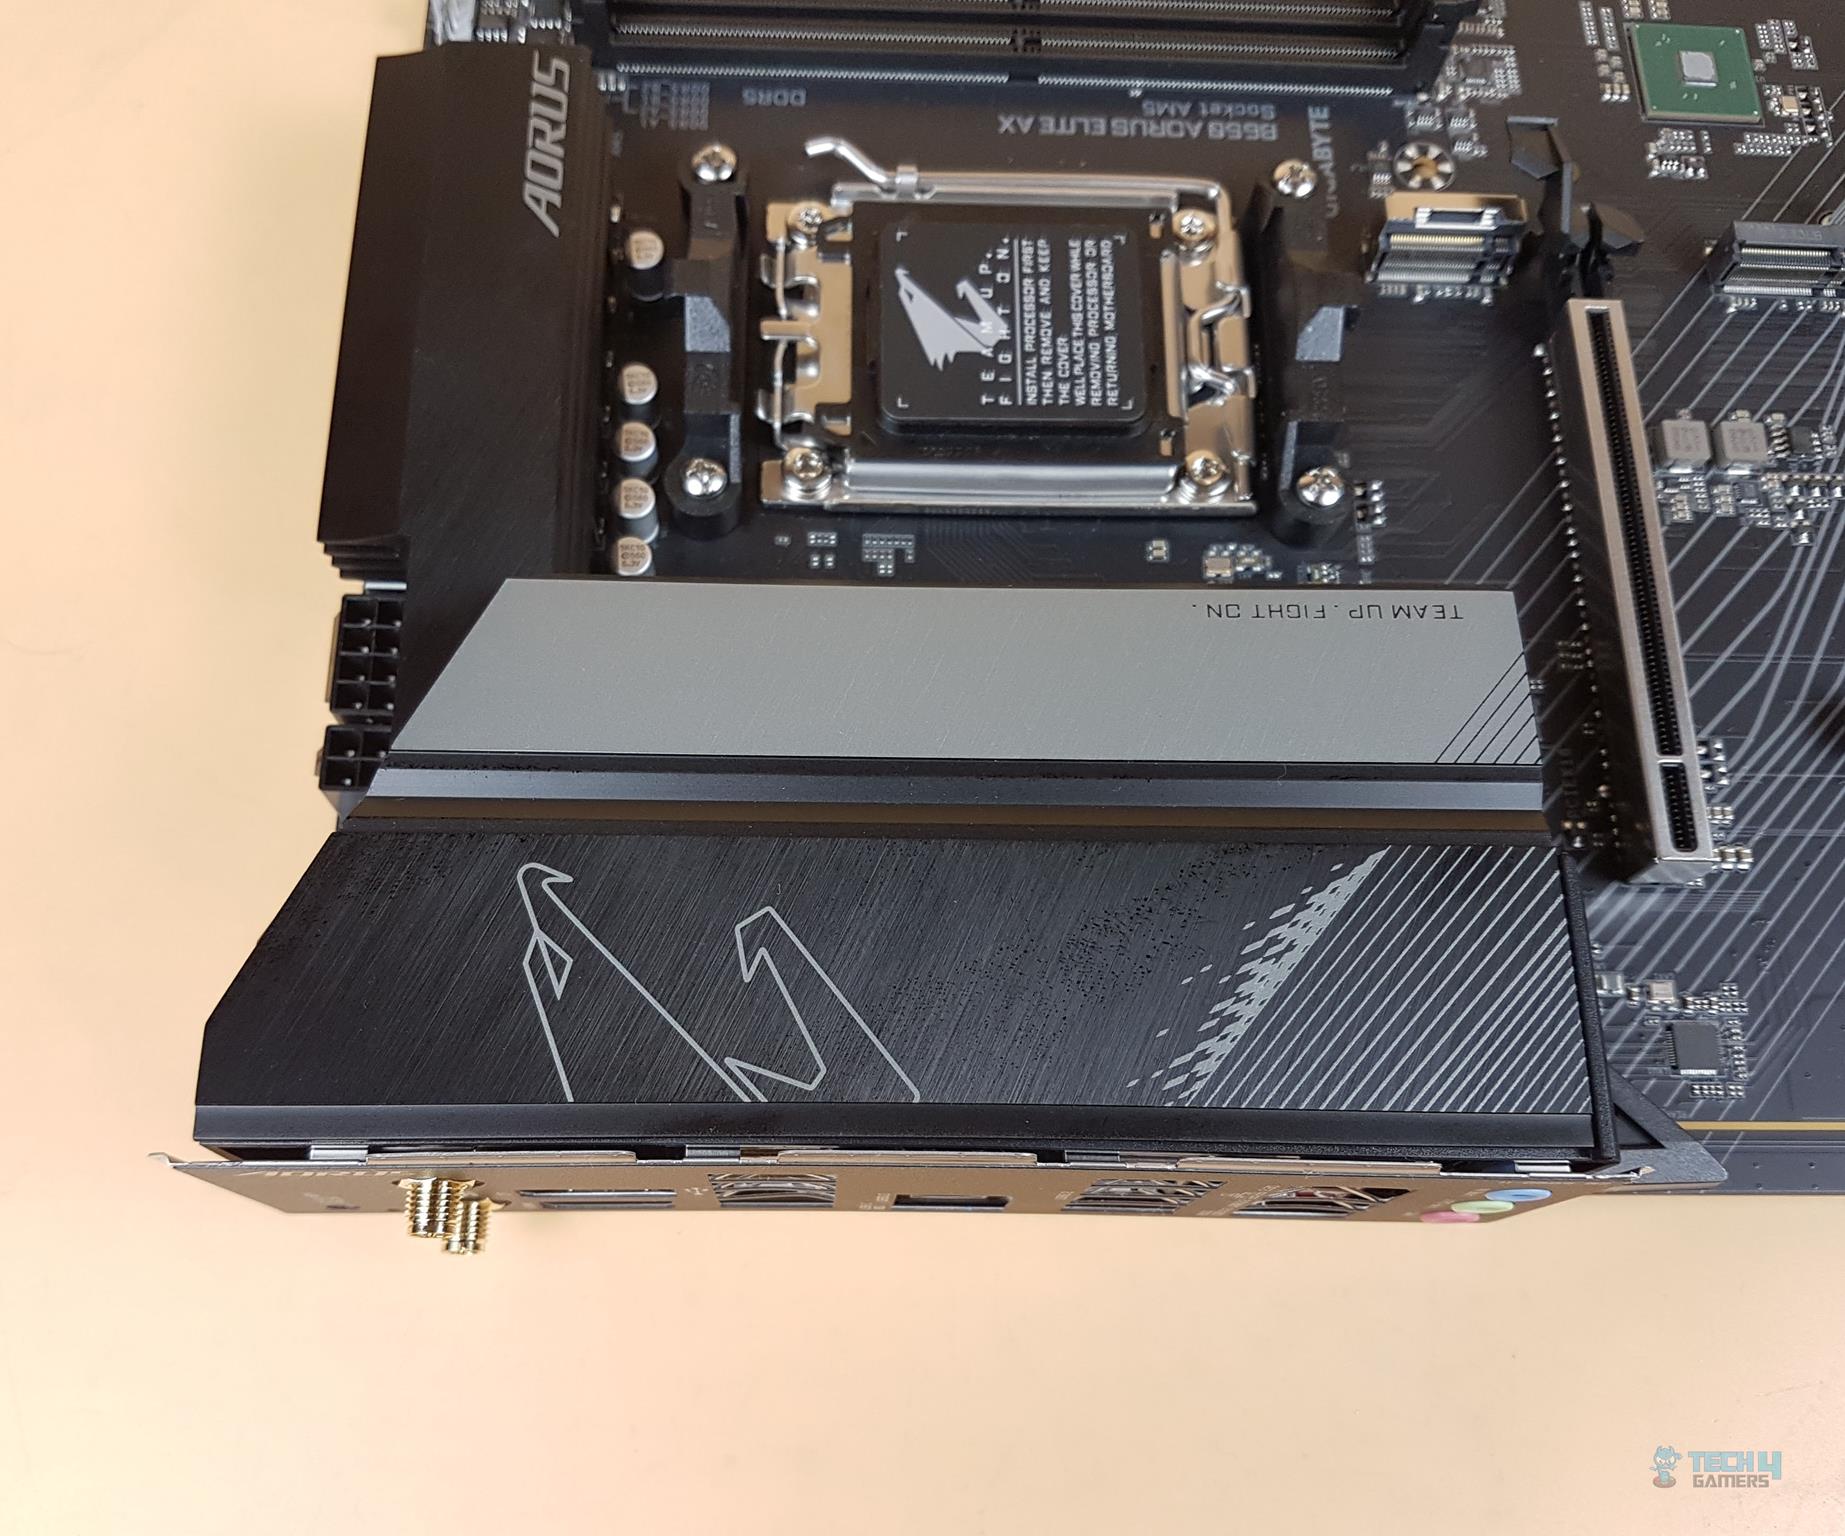
From a cooling perspective, GIGABYTE has implemented an effective solution. There is a massive heatsink underneath the I/O cover. TMOS is a single-piece heatsink. Its one-piece design and larger surface drastically improve the cooling performance against competitors’ multi-piece designs. TMOS features several channels and inlets on the heatsink.
The right picture shows the I/O cover from a different angle. The elegant design speaks for itself.
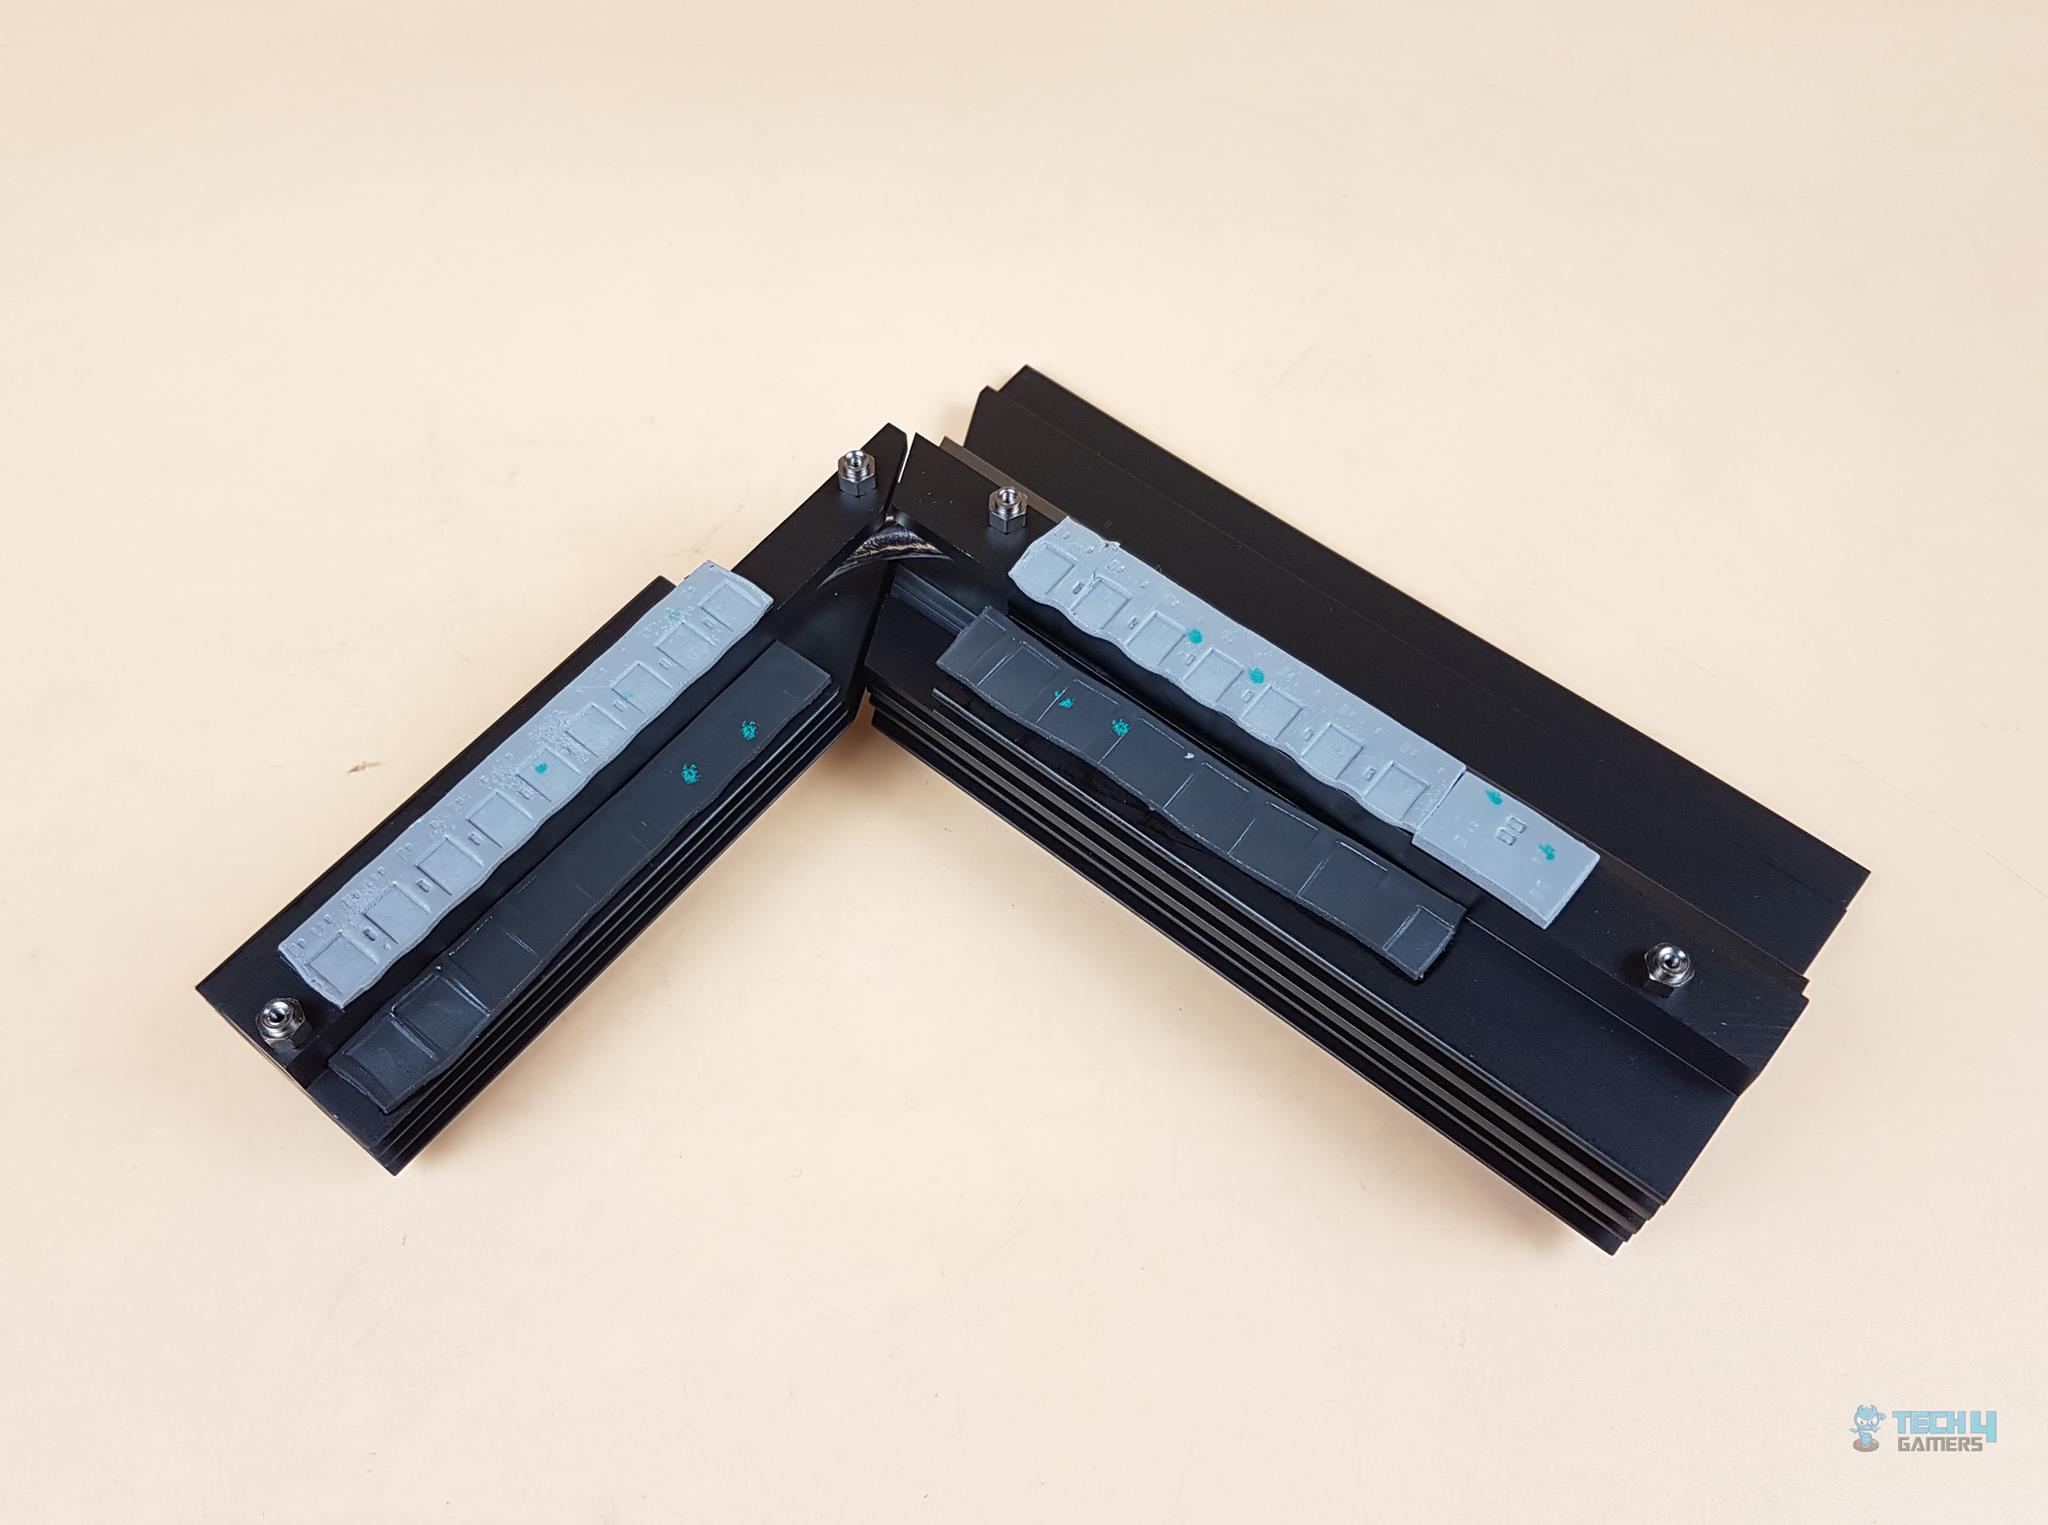
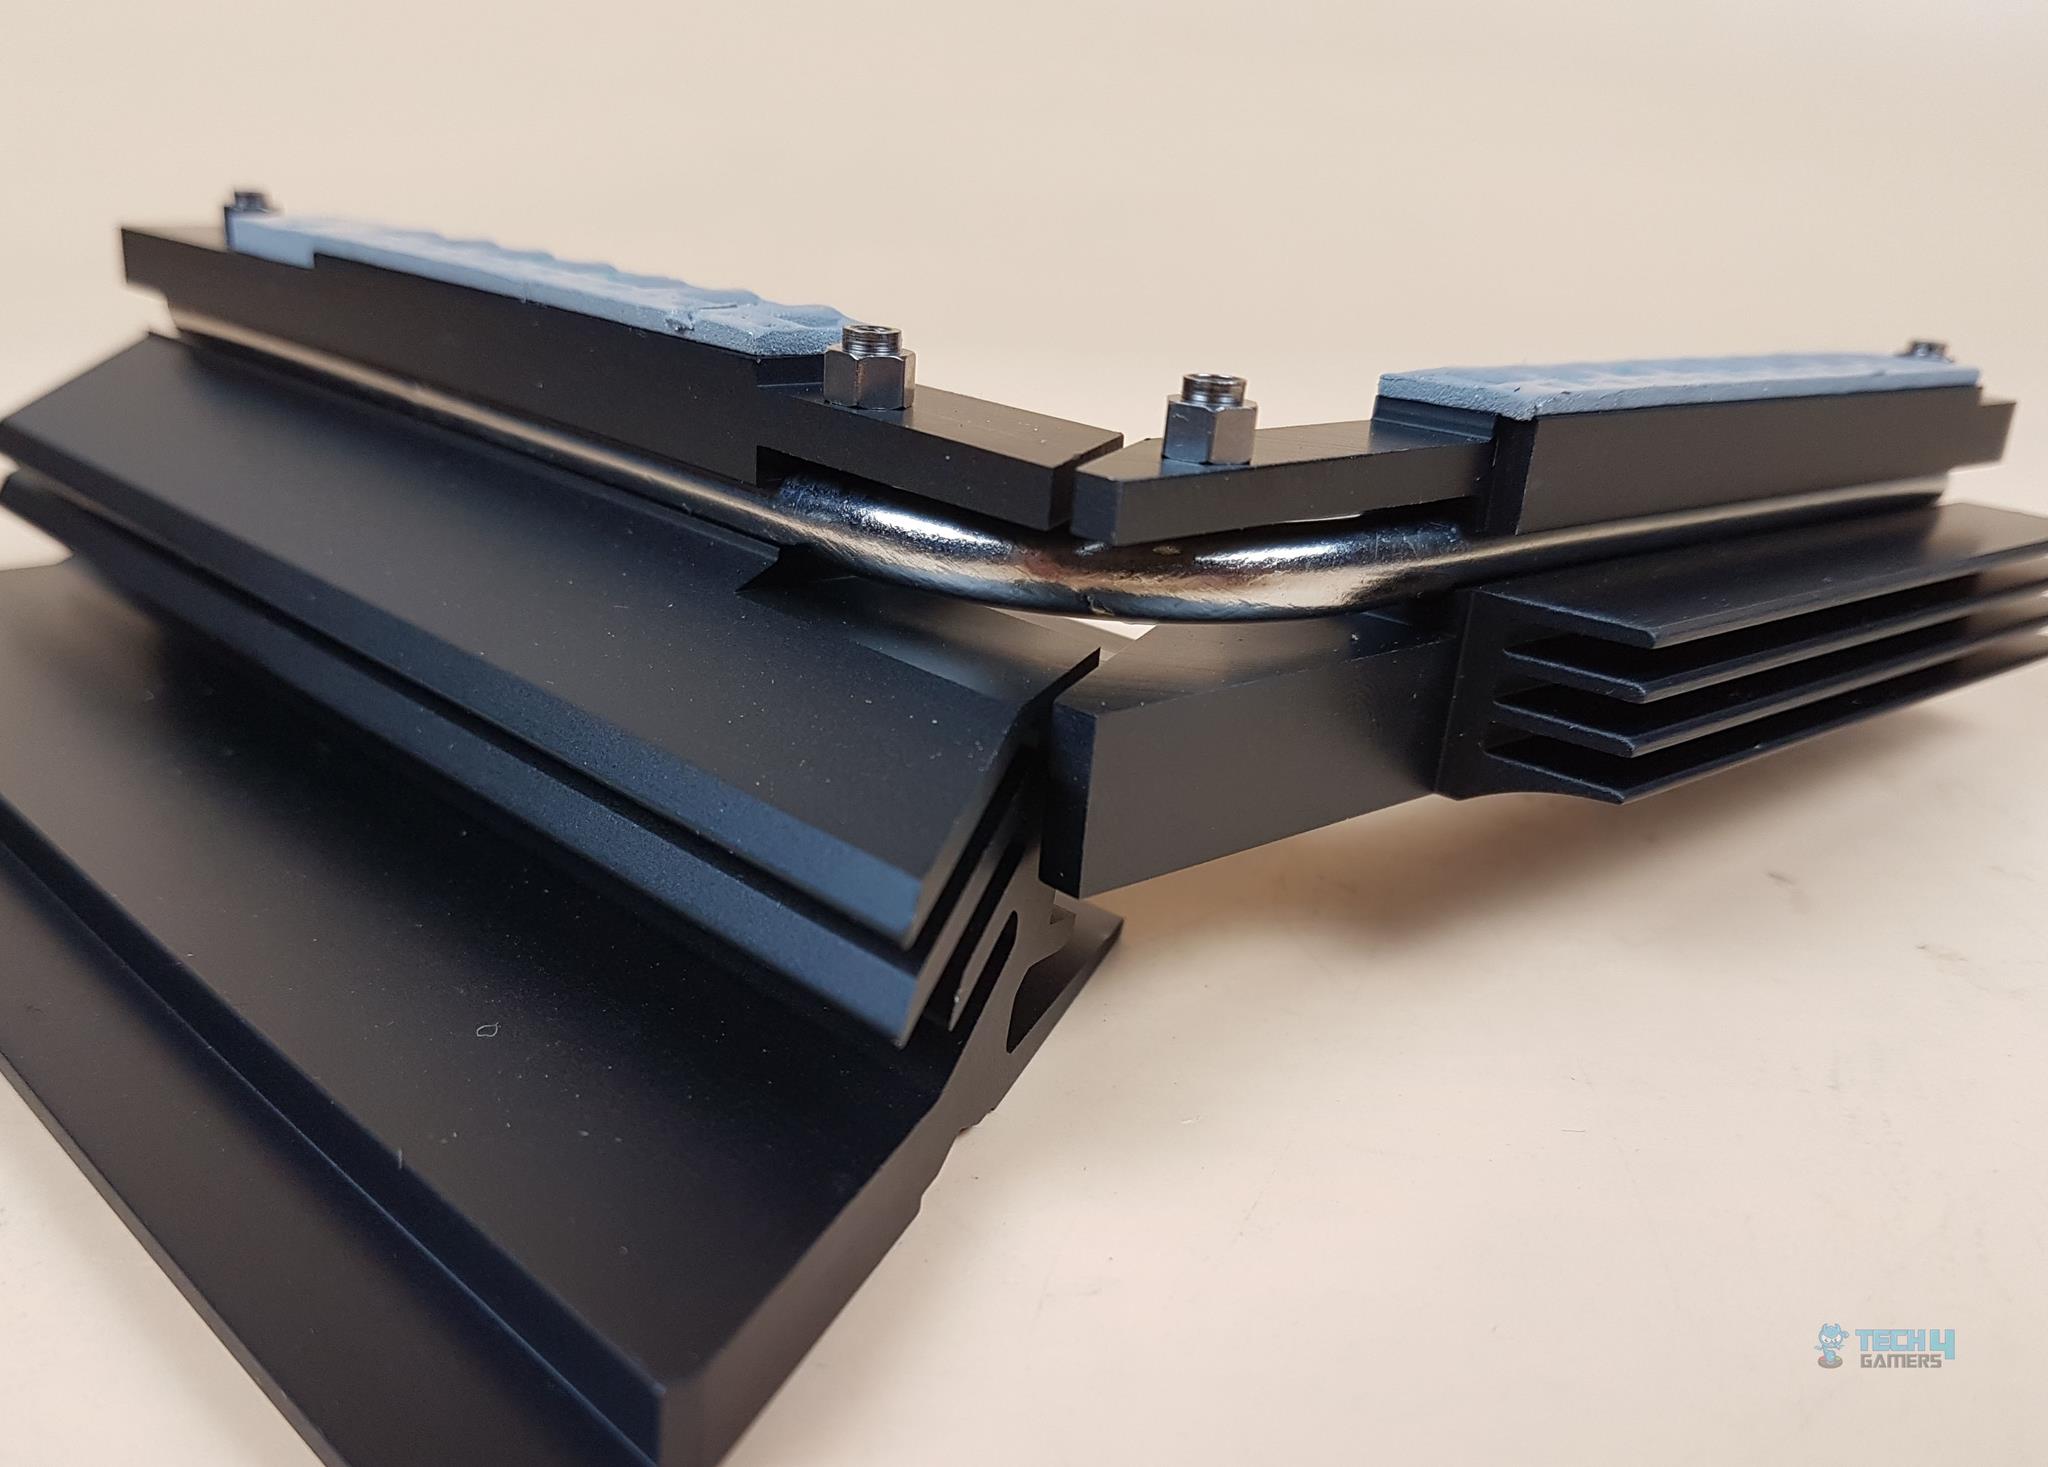
The above picture shows the beefy cooling solution for the provided MOSFETs and VRM. Both heatsinks are connected using a 6mm thick copper heat pipe. The thermal pads are rated for up to 7W/mK.
Since we are at it, let’s take a look at the power delivery of the motherboard.
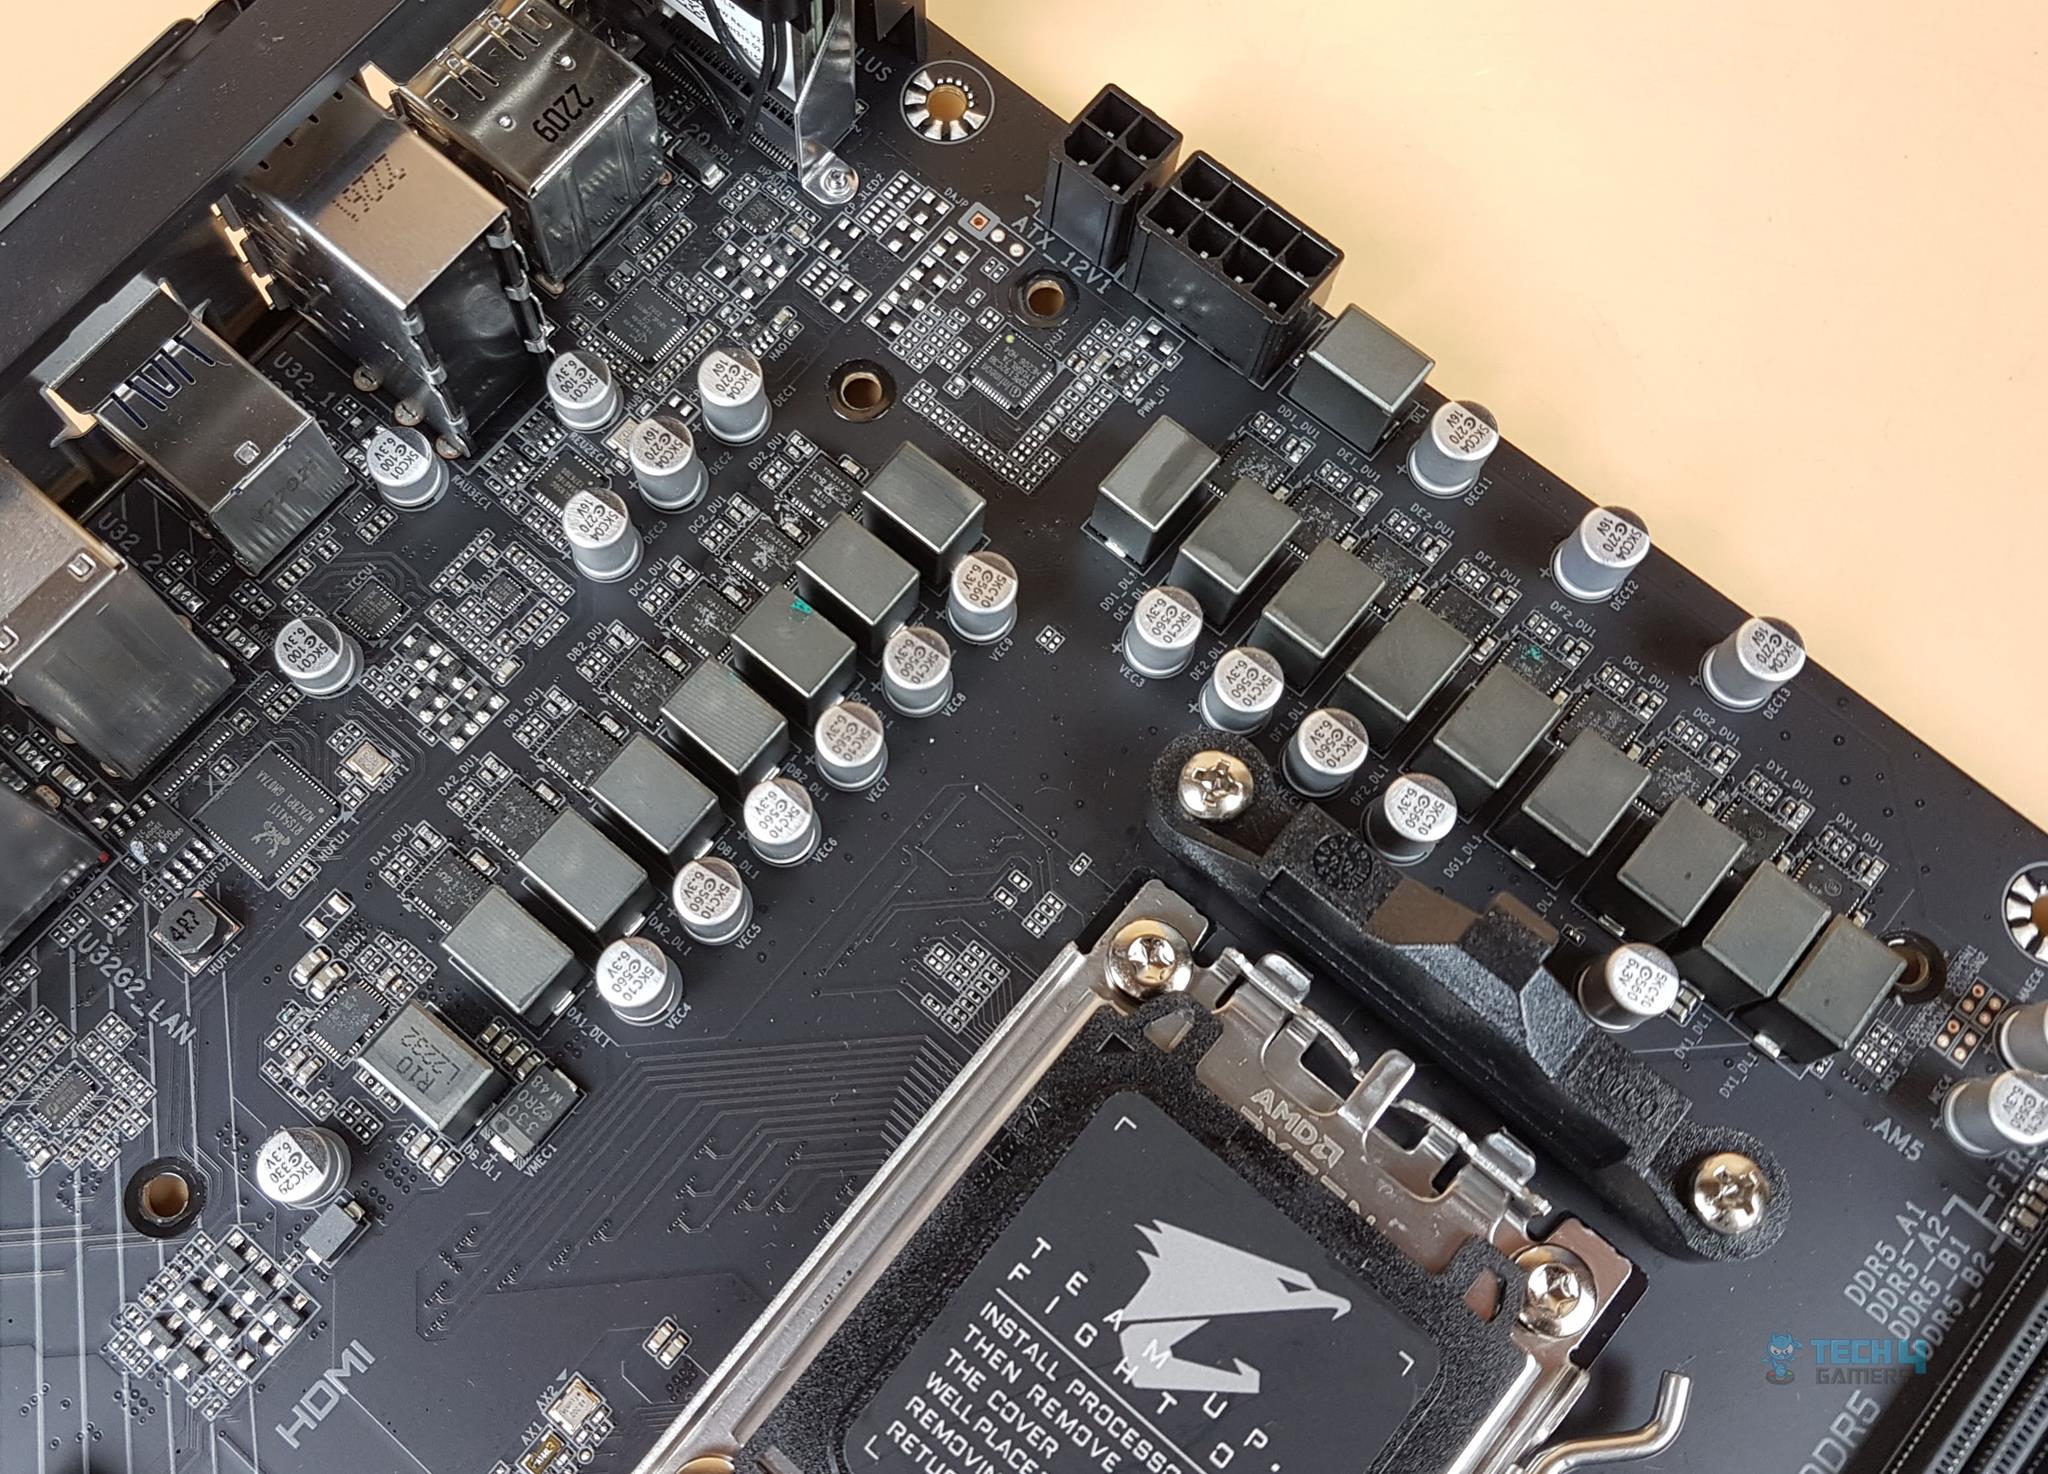
The B650 AORUS ELITE AX motherboard has adequate digital power phases. There are 14 phases in parallel (not direct) for the VCore. Then there are 2x MOSFETs for SOC using ON NCP303160 SPS 60A with a total of 120A for SOC for stable power delivery to the iGPU.
Lastly, we have 1x MOSFET for MISC using Renesas ISL99390 SPS 30A for stable power delivery to the PCIe lanes. In terms of power delivery, this motherboard seems adequate enough in this range though twin digital 14 phases sound like a doubler design to me.
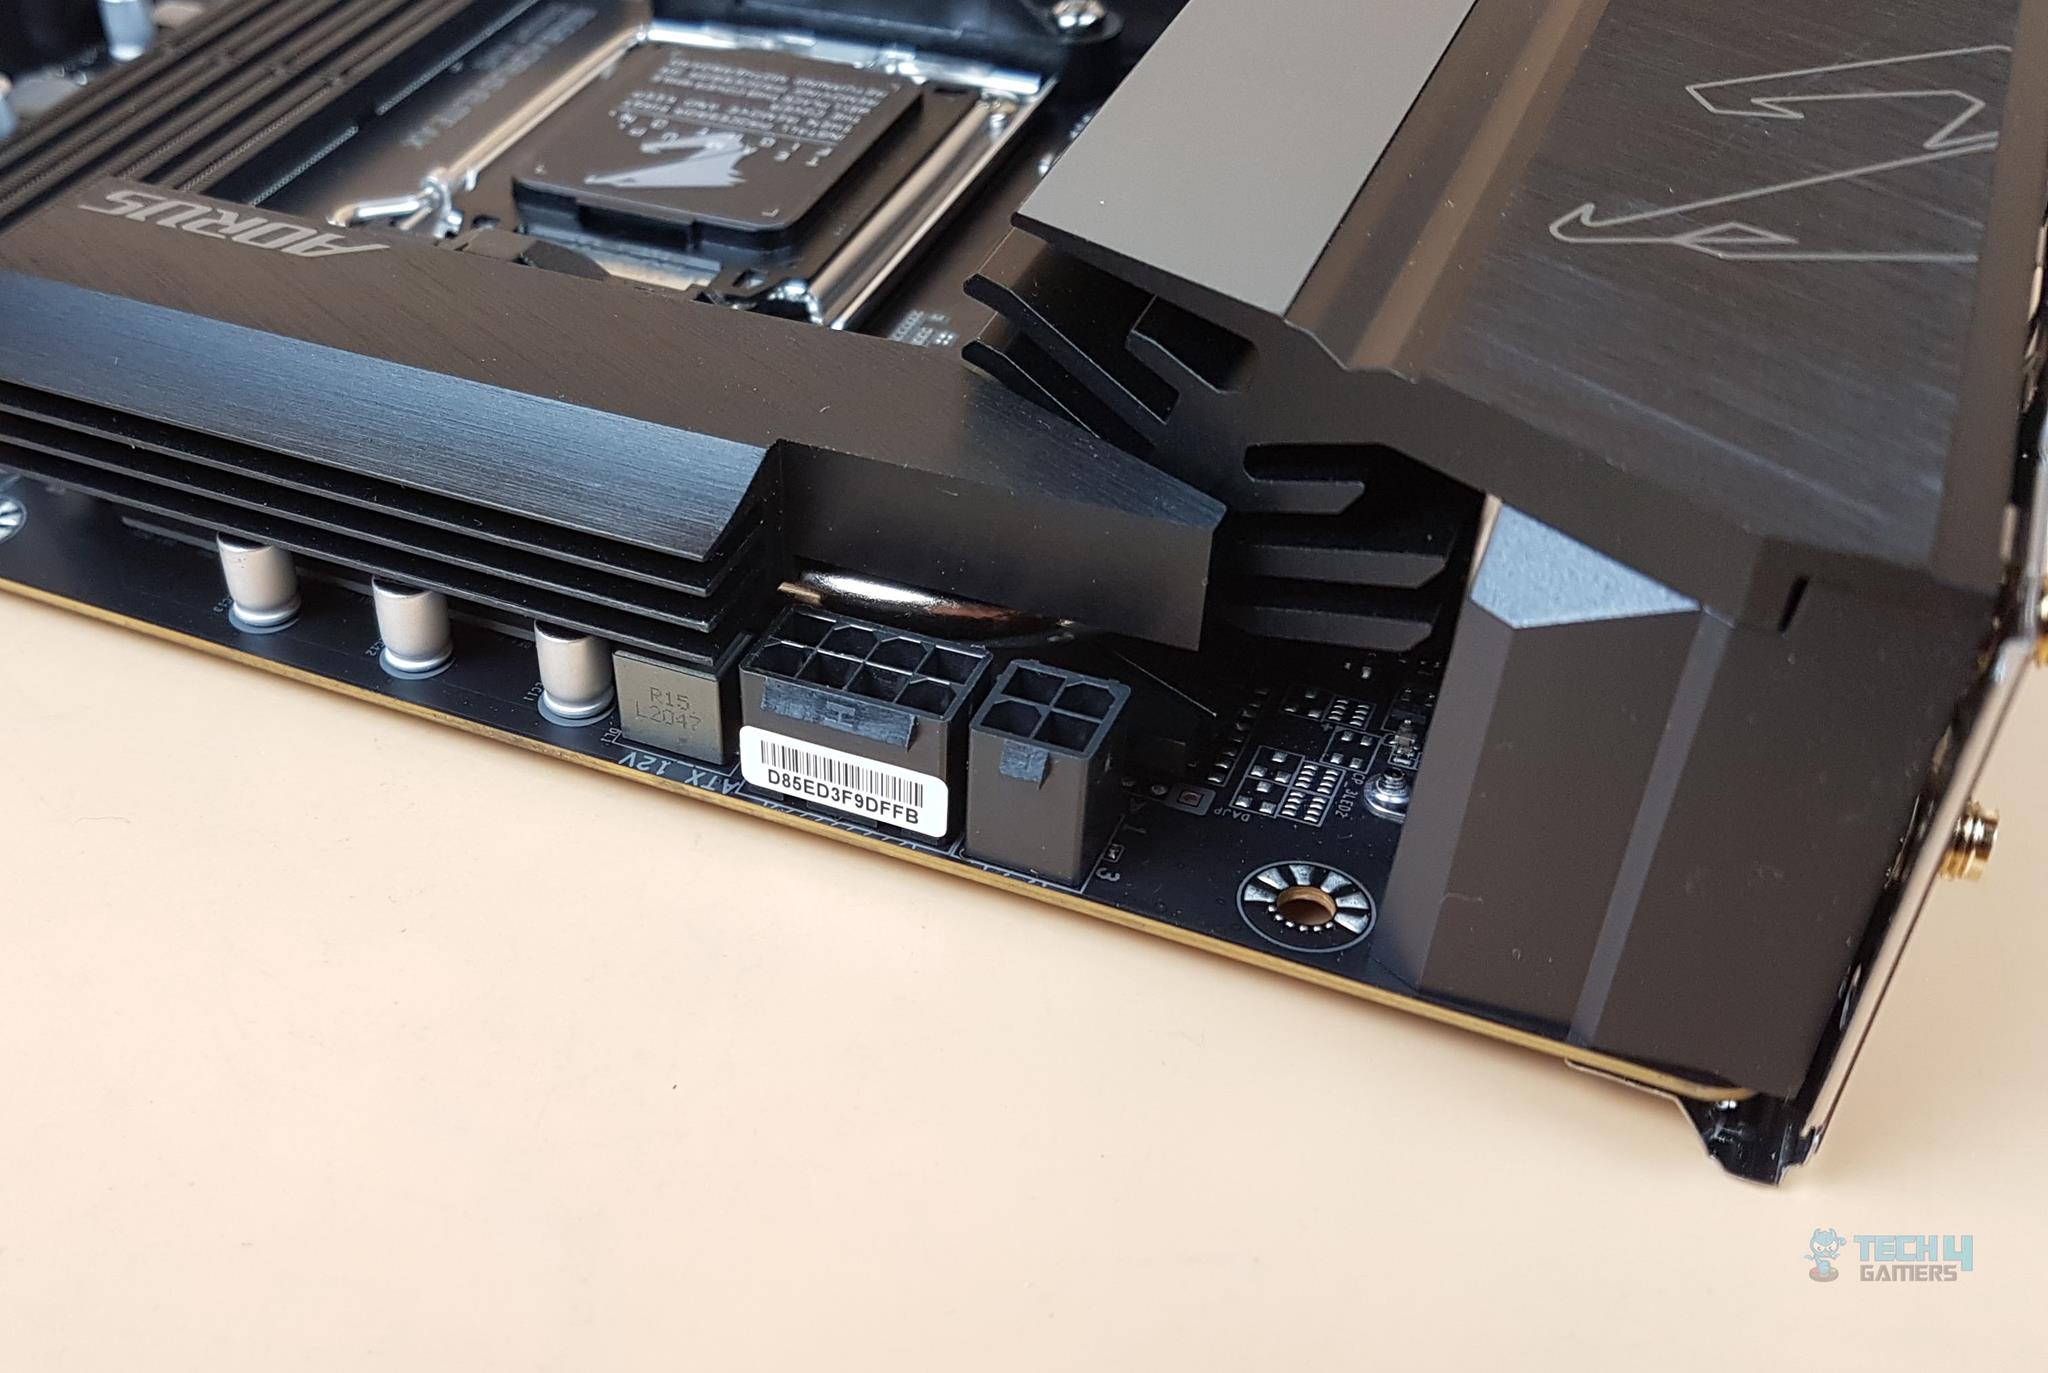
GIGABYTE has provided 1x 8-pin+1×4-pin EPS connectors to ensure a buttery smooth power supply.
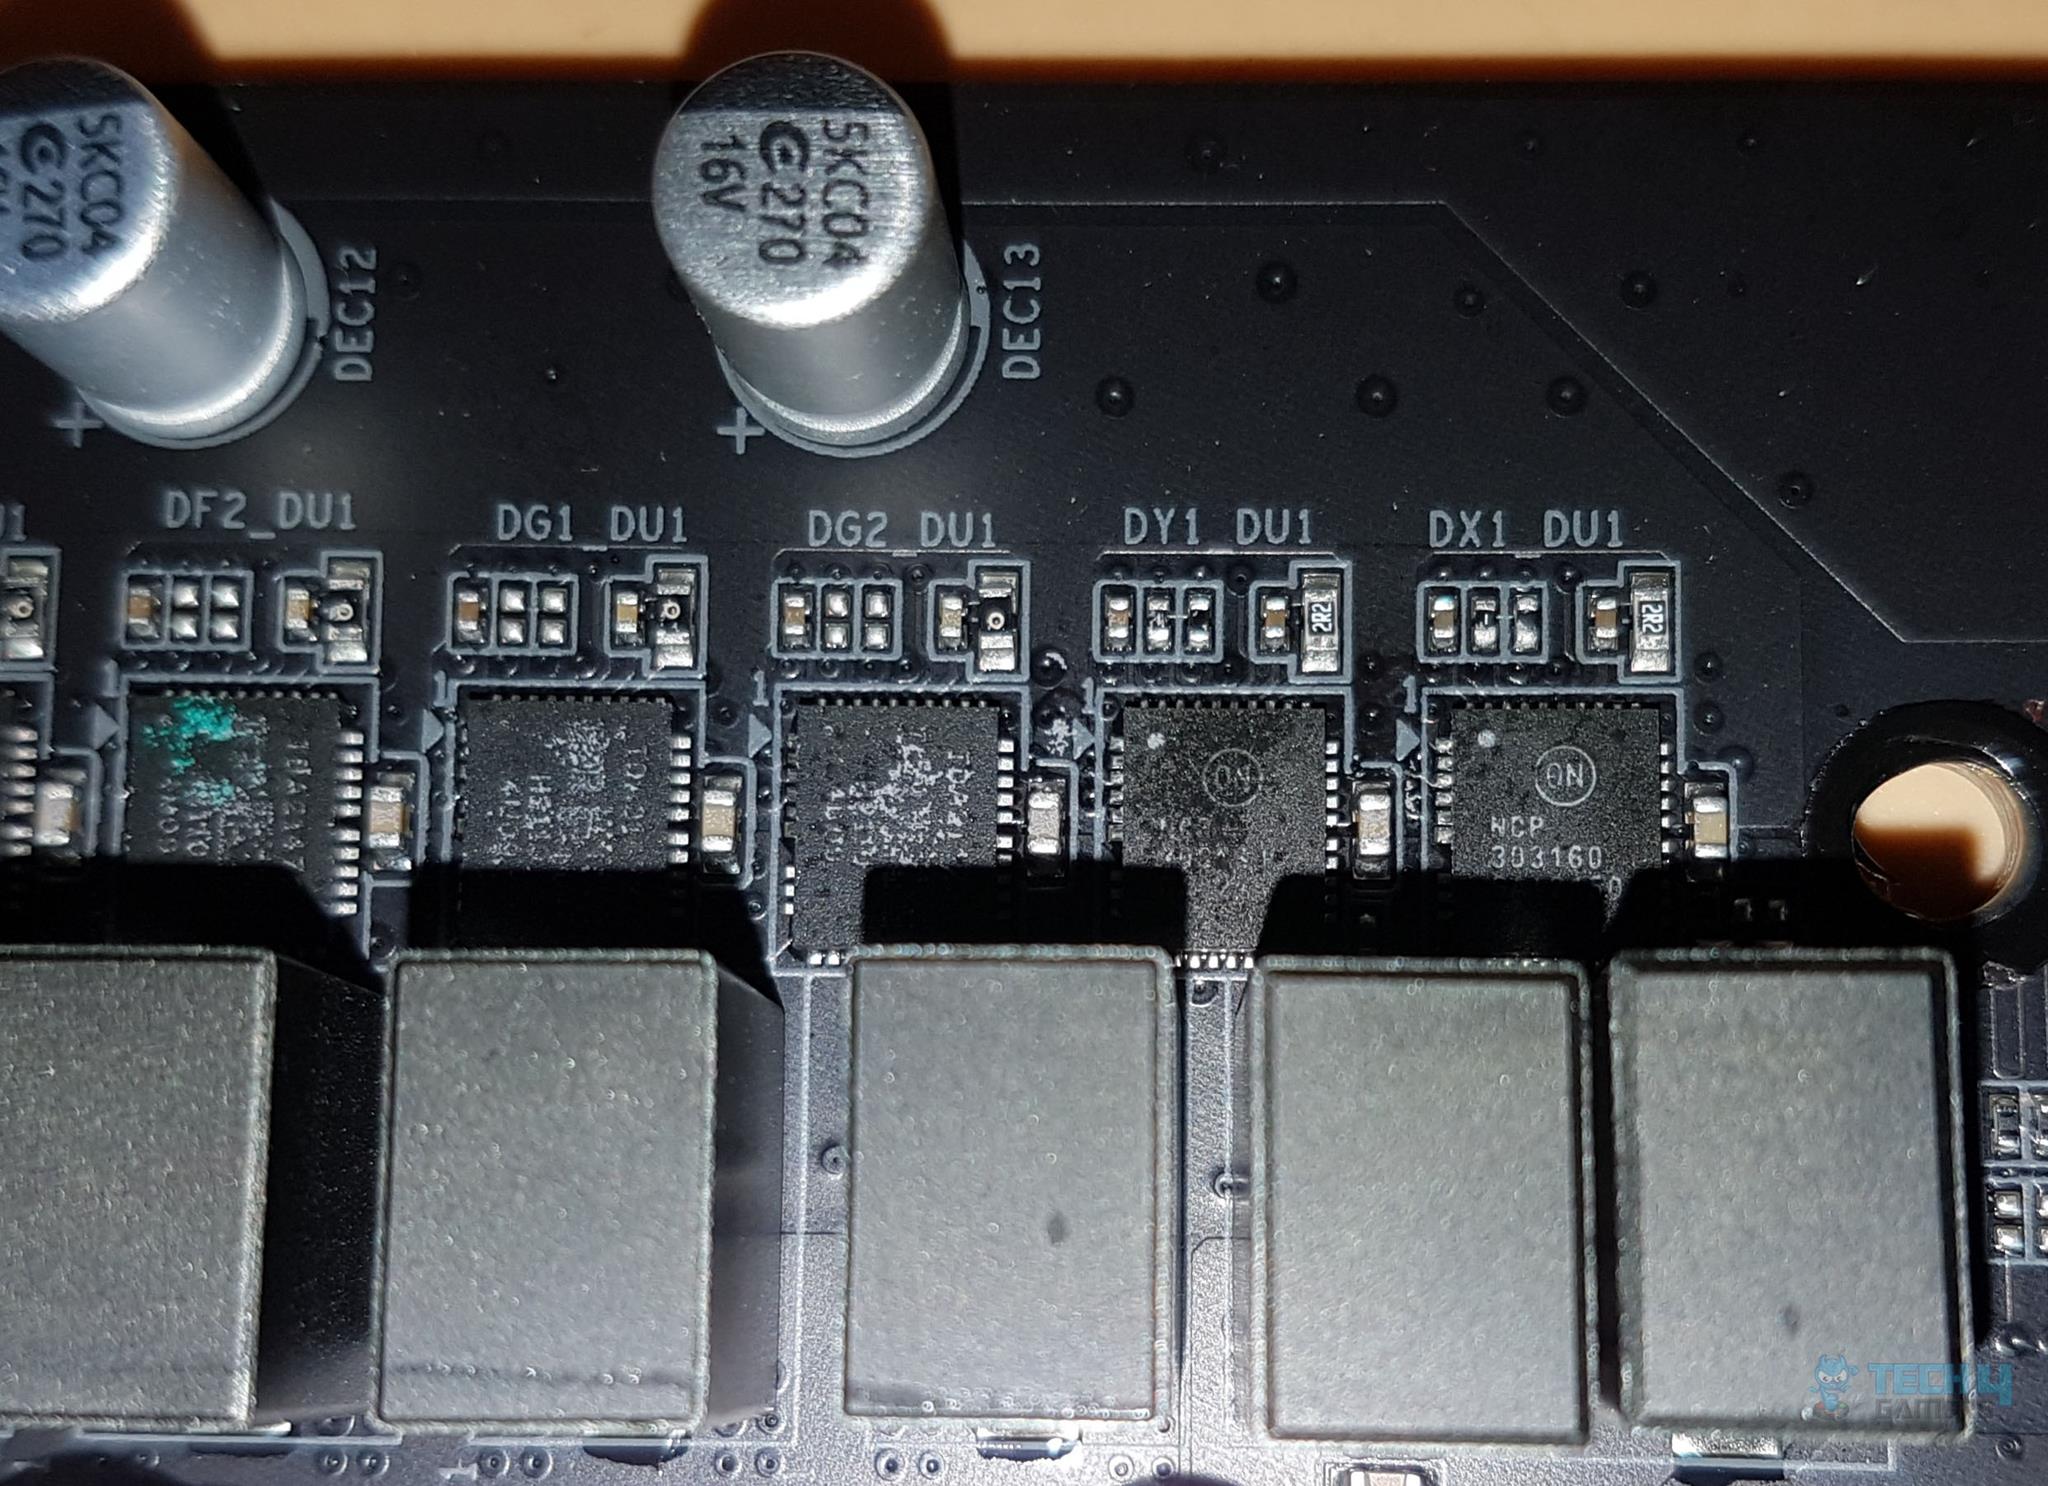
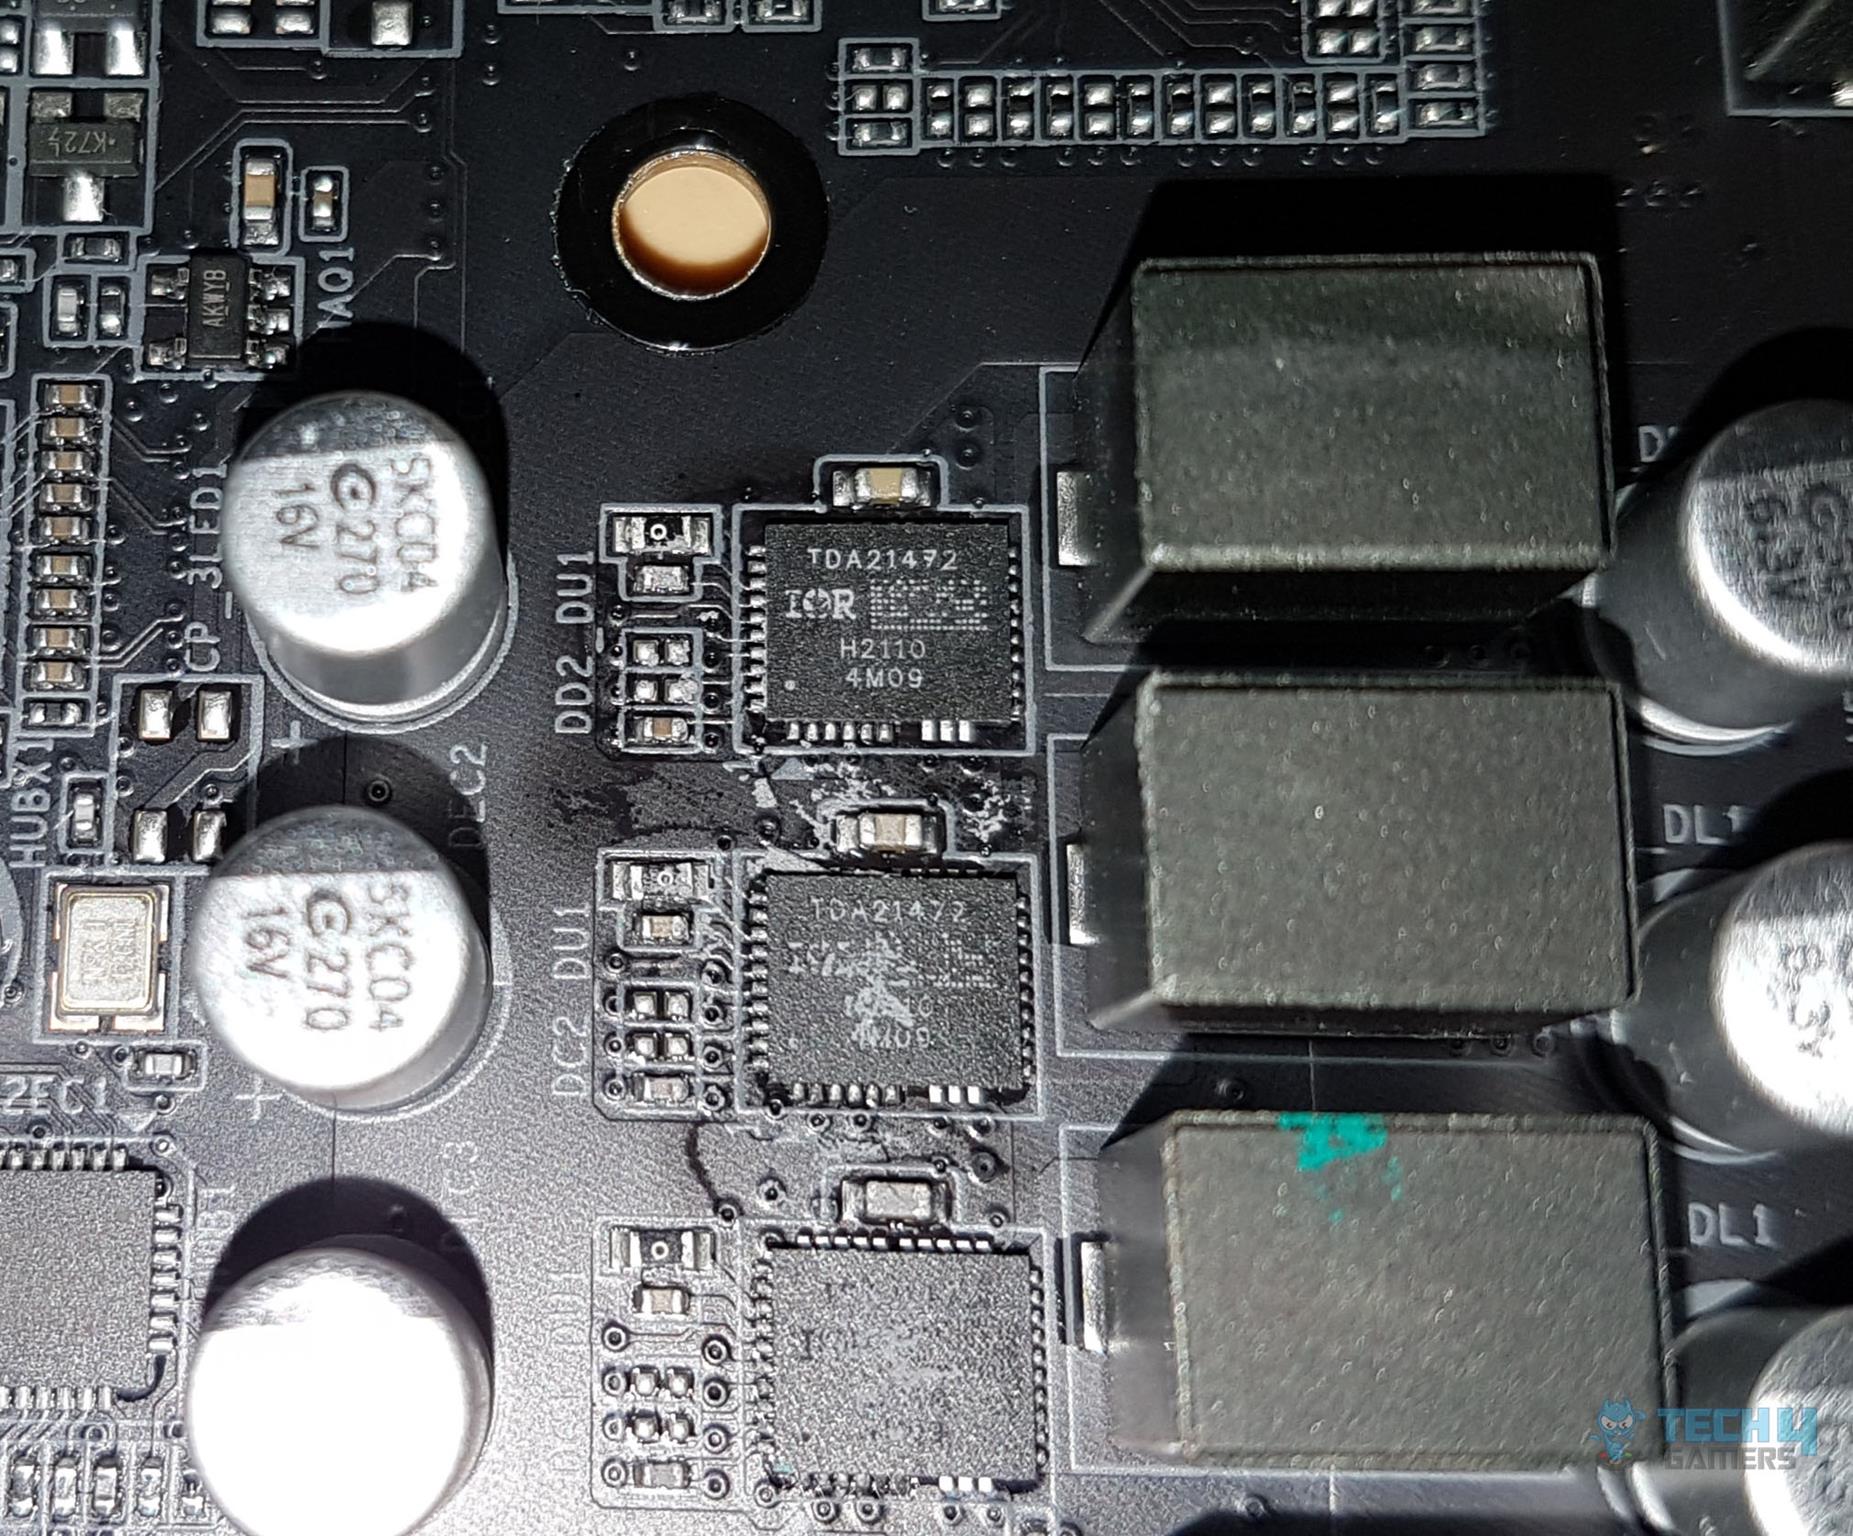
On the left, you can the SOC MOSFET ON NCP303160 while the image on the right shows the VCore MOSFET Infineon TDA21472.
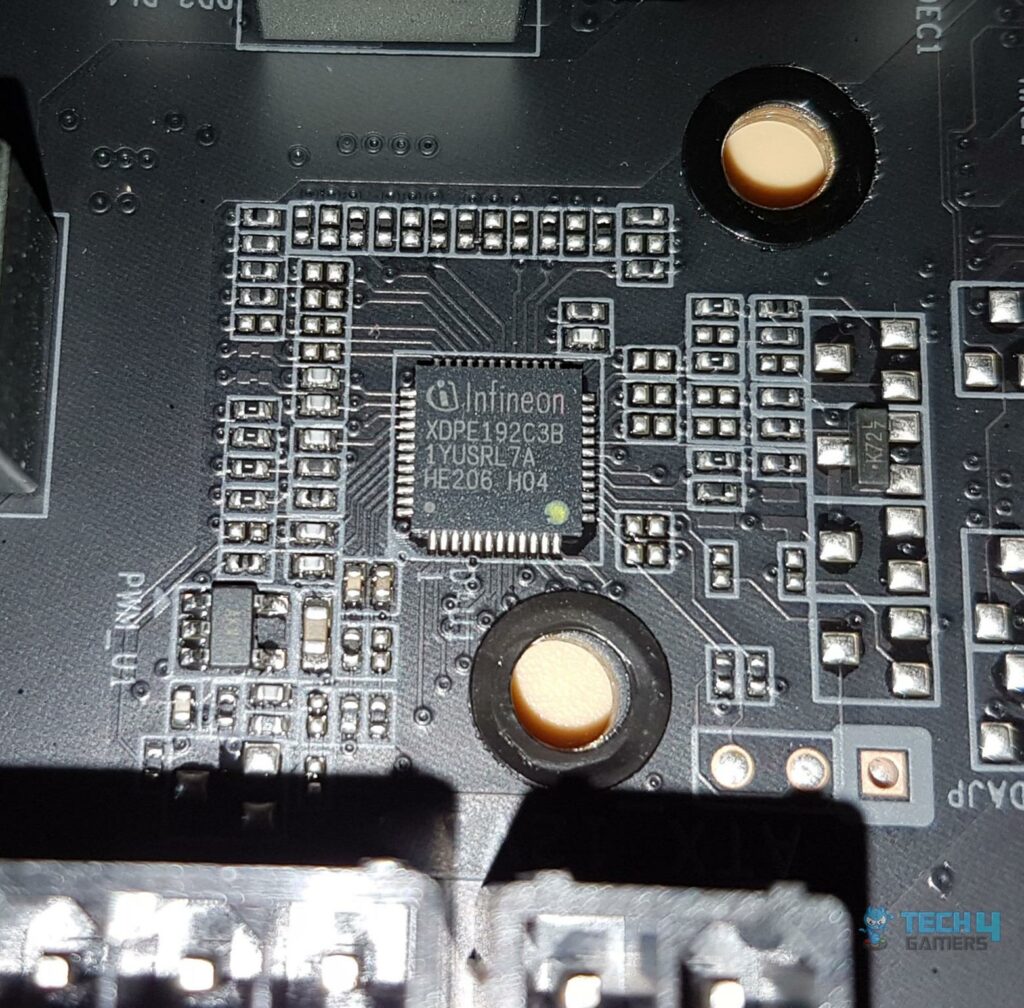
GIGABYTE has employed Infineon VRM controller XDPE192C3B for integrated control of all three types of MOSFETs.
DIMM Slots
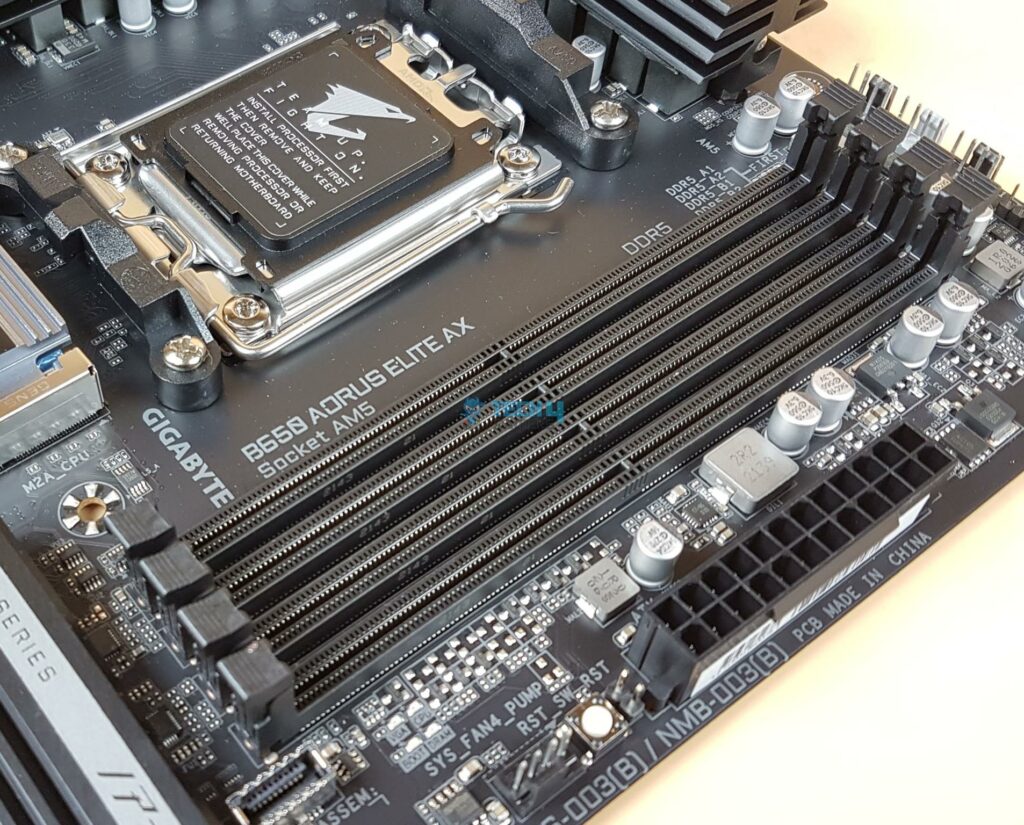
The B650 AORUS ELITE AX motherboard has 4x DDR5-based DIMM slots which are not SMD stainless-steel reinforced. There is no anti-plate bending support. The DDR5 up to 6600MHz is supported (with BIOS update).
By default, the board supports 4400, 4800, and 5200MHz. A total of up to 128GB RAM capacity is supported with a single stick density of 32GB. It supports un-buffered DIMM 1Rx8/2Rx8/1Rx16 memory modules.
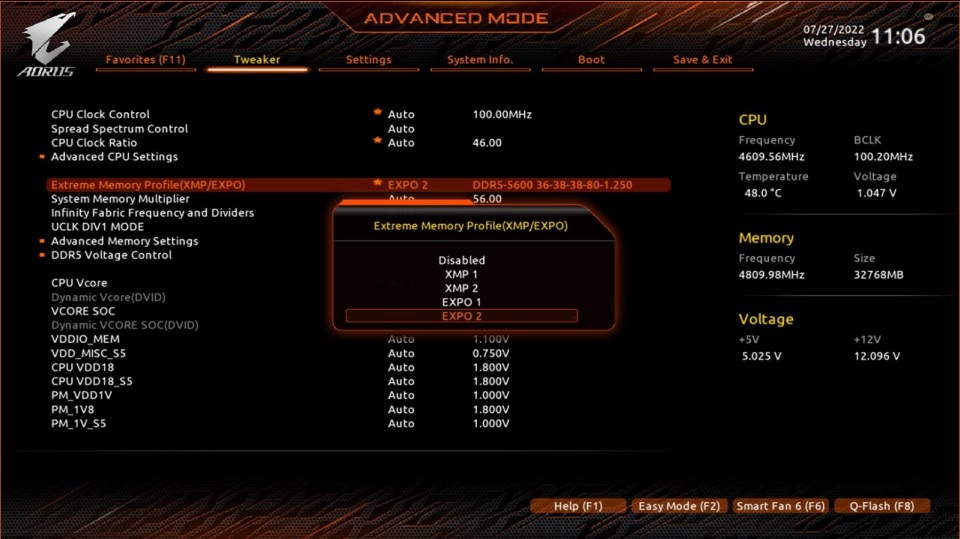
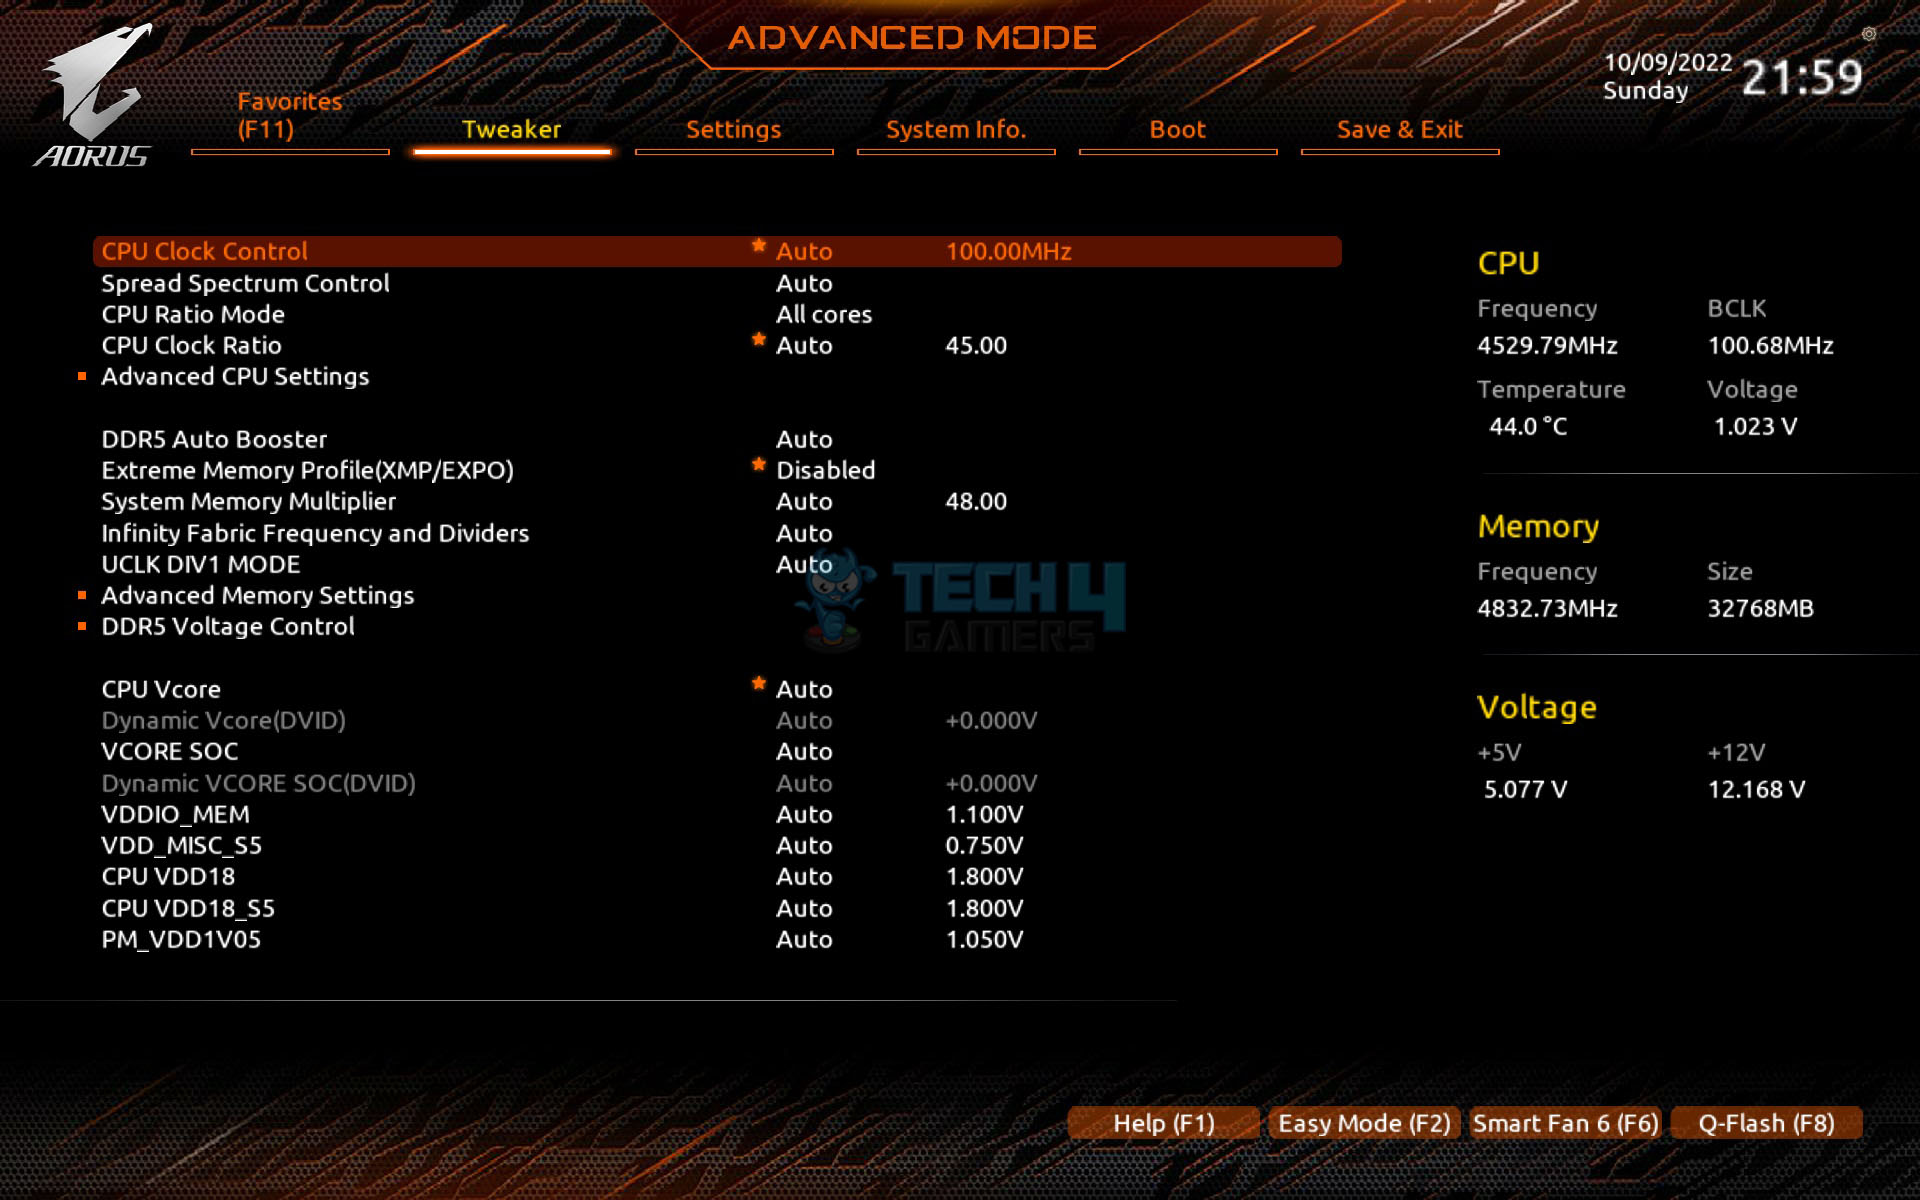
The board supports both AMD EXPO and Intel XMP profiles for overclocking. It also features DDR5 Auto Booster, boosting memory speed to 5000MHz with a simple one-click action in the UEFI/BIOS.
Users can create their own SPD profiles in Native, EXPO, and XMP 3.0 formats. Additionally, the board allows for rapid memory performance simulation based on user-defined clock and timing parameters.
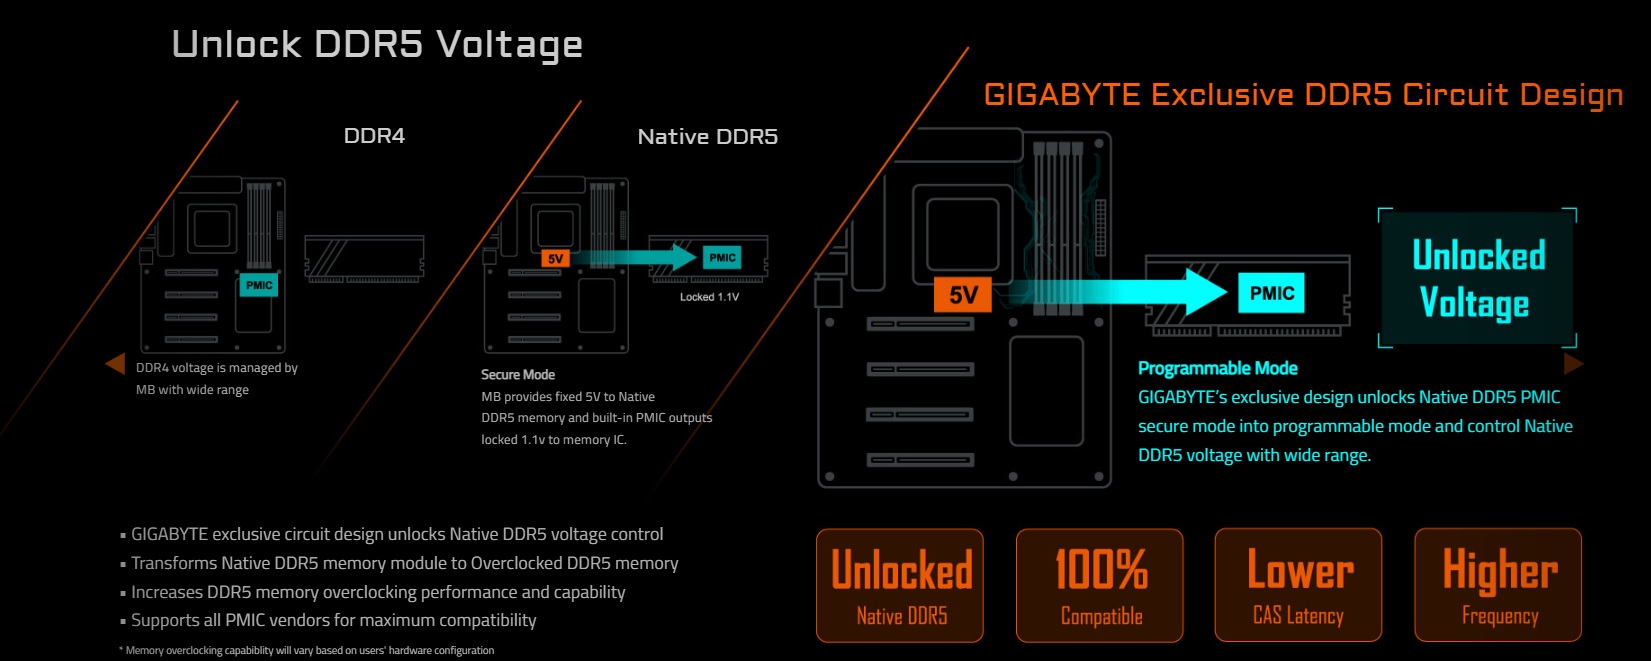
The B650 Aorus Elite allows us to bypass the PMIC voltage lock through the BIOS.
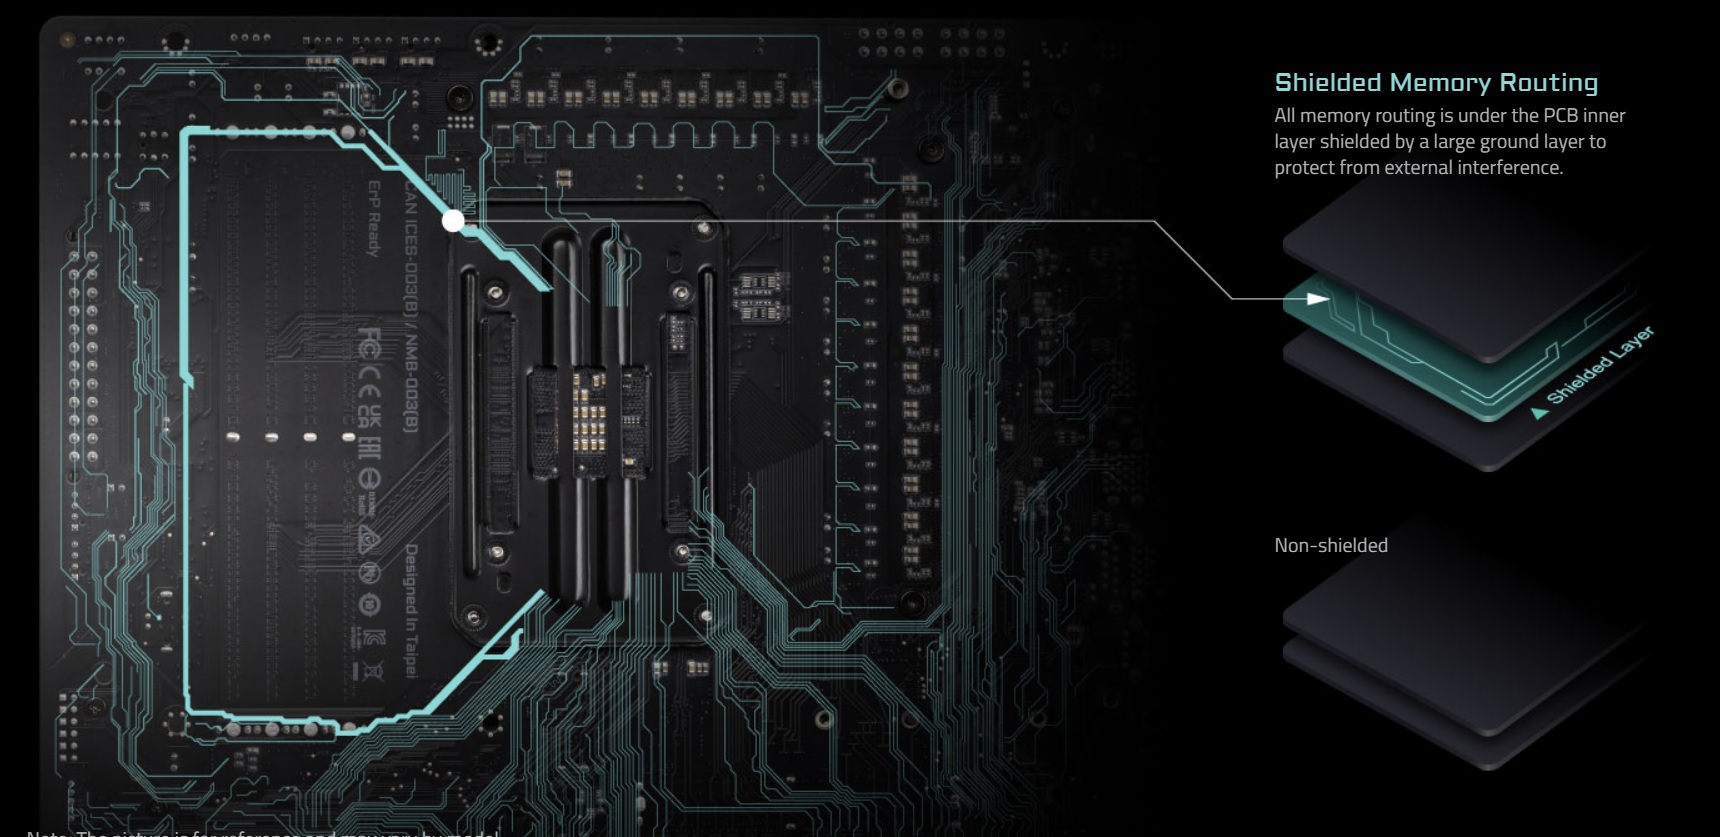
It also impresses with the PCB layering, notably in the separation of DDR5 circuitry. The memory operates on the inner layer, shielded between PCB layers. This shielding, combined with daisy-chaining routing, minimizes external interference, ensuring stable memory operations during intense overclocking.
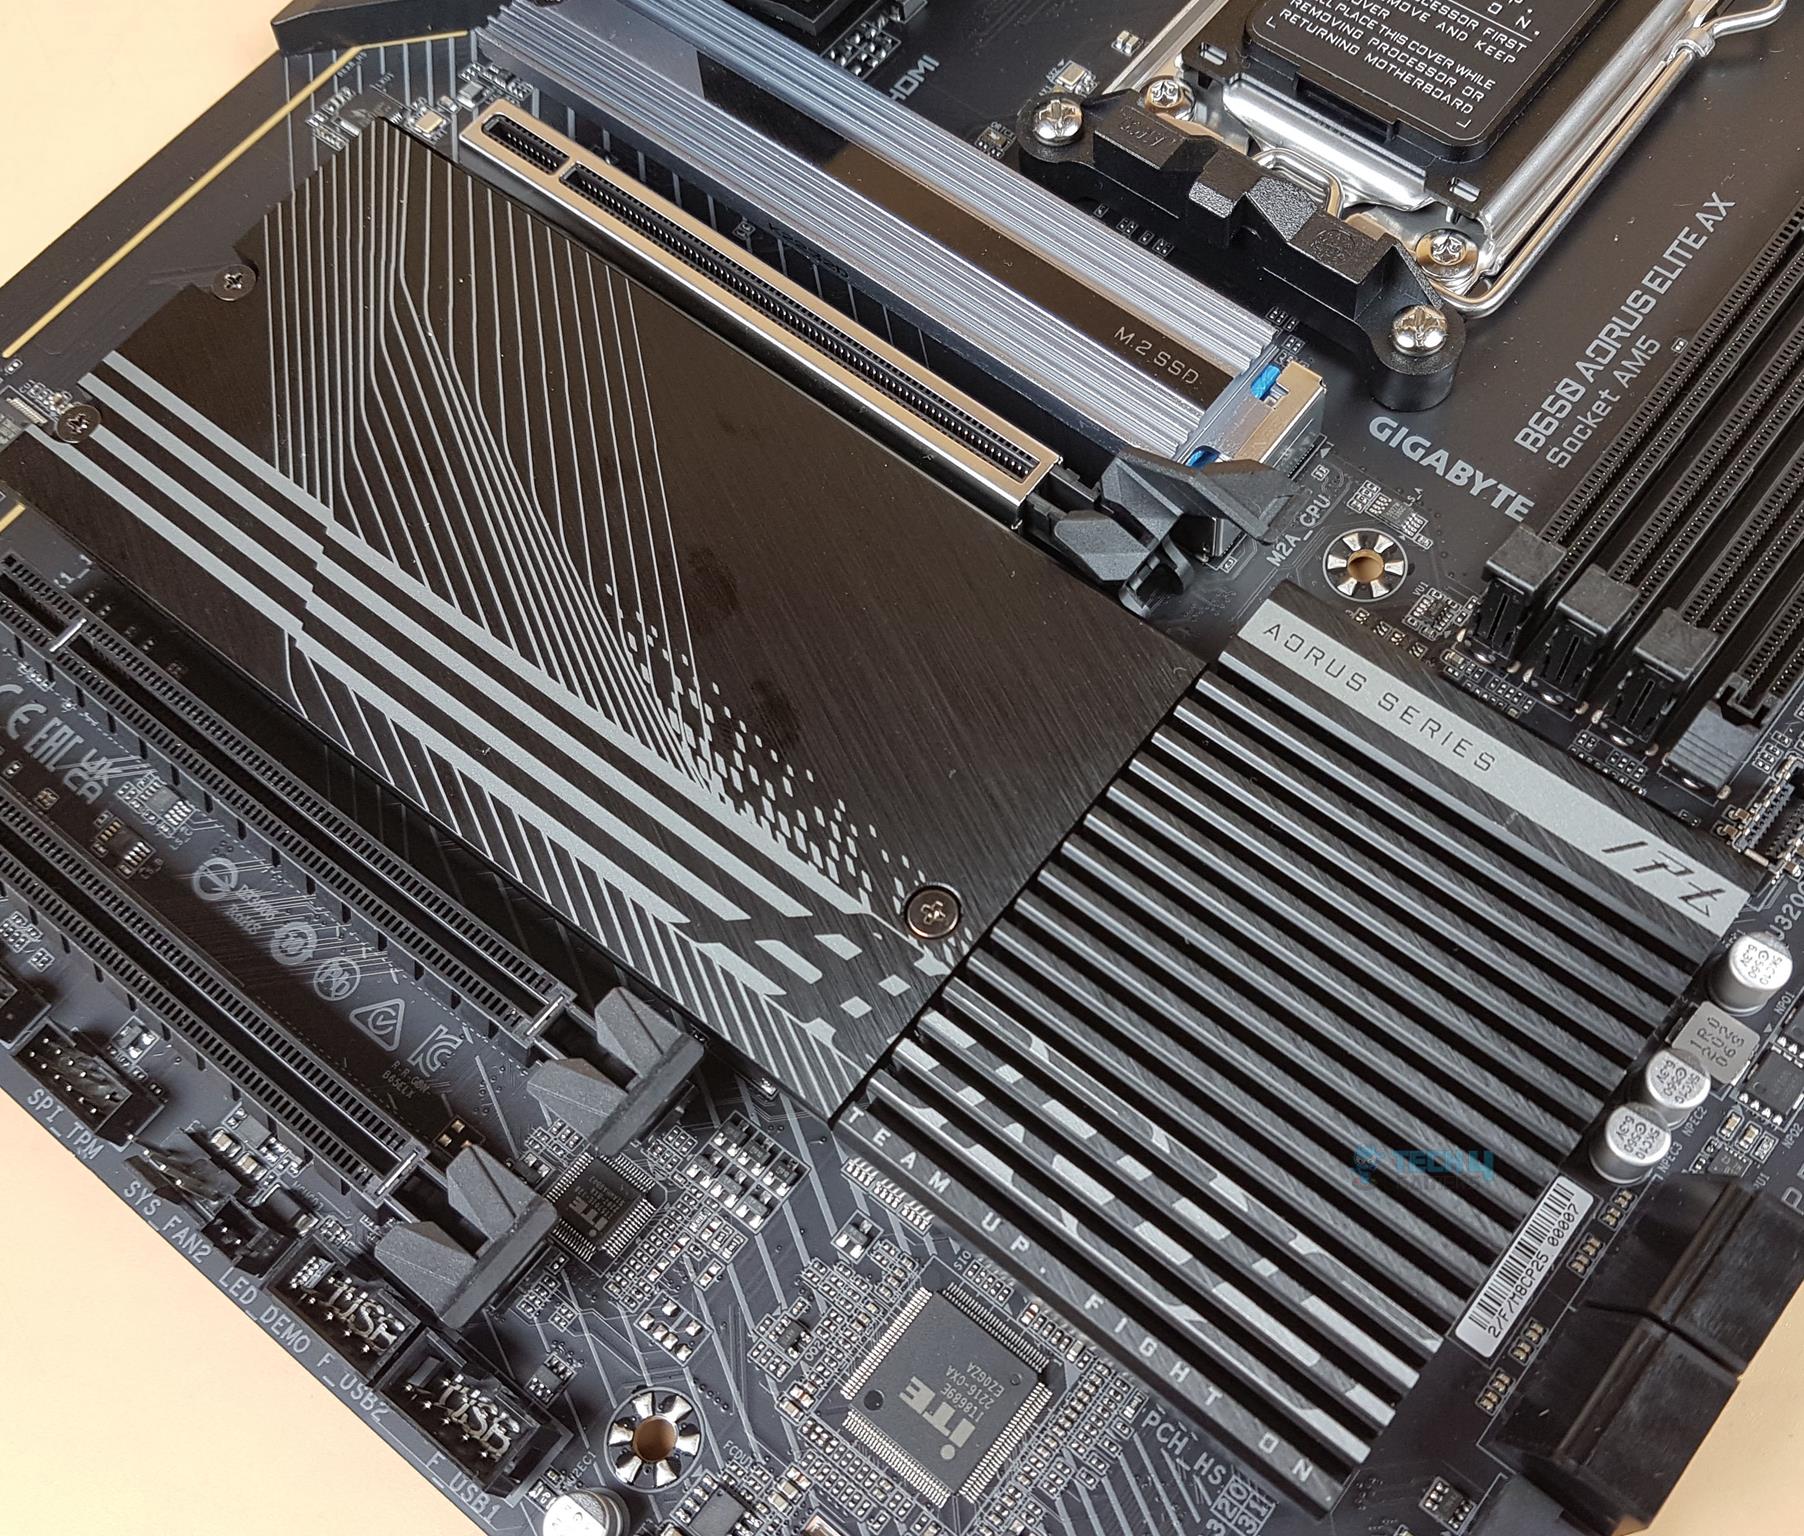
M.2 Ports and Thermal Guard
The motherboard has a total of 3x M.2 ports and we’ve have got some stylish M.2 covers for these ports.
The topmost slot has a single-layer heatsink with a thermal pad underneath for efficient heat transfer. M.2 SSD is written on the cover. This cover is separated from the other covers. It can be taken off by unscrewing a Philips screw and removing the cover from the slot.
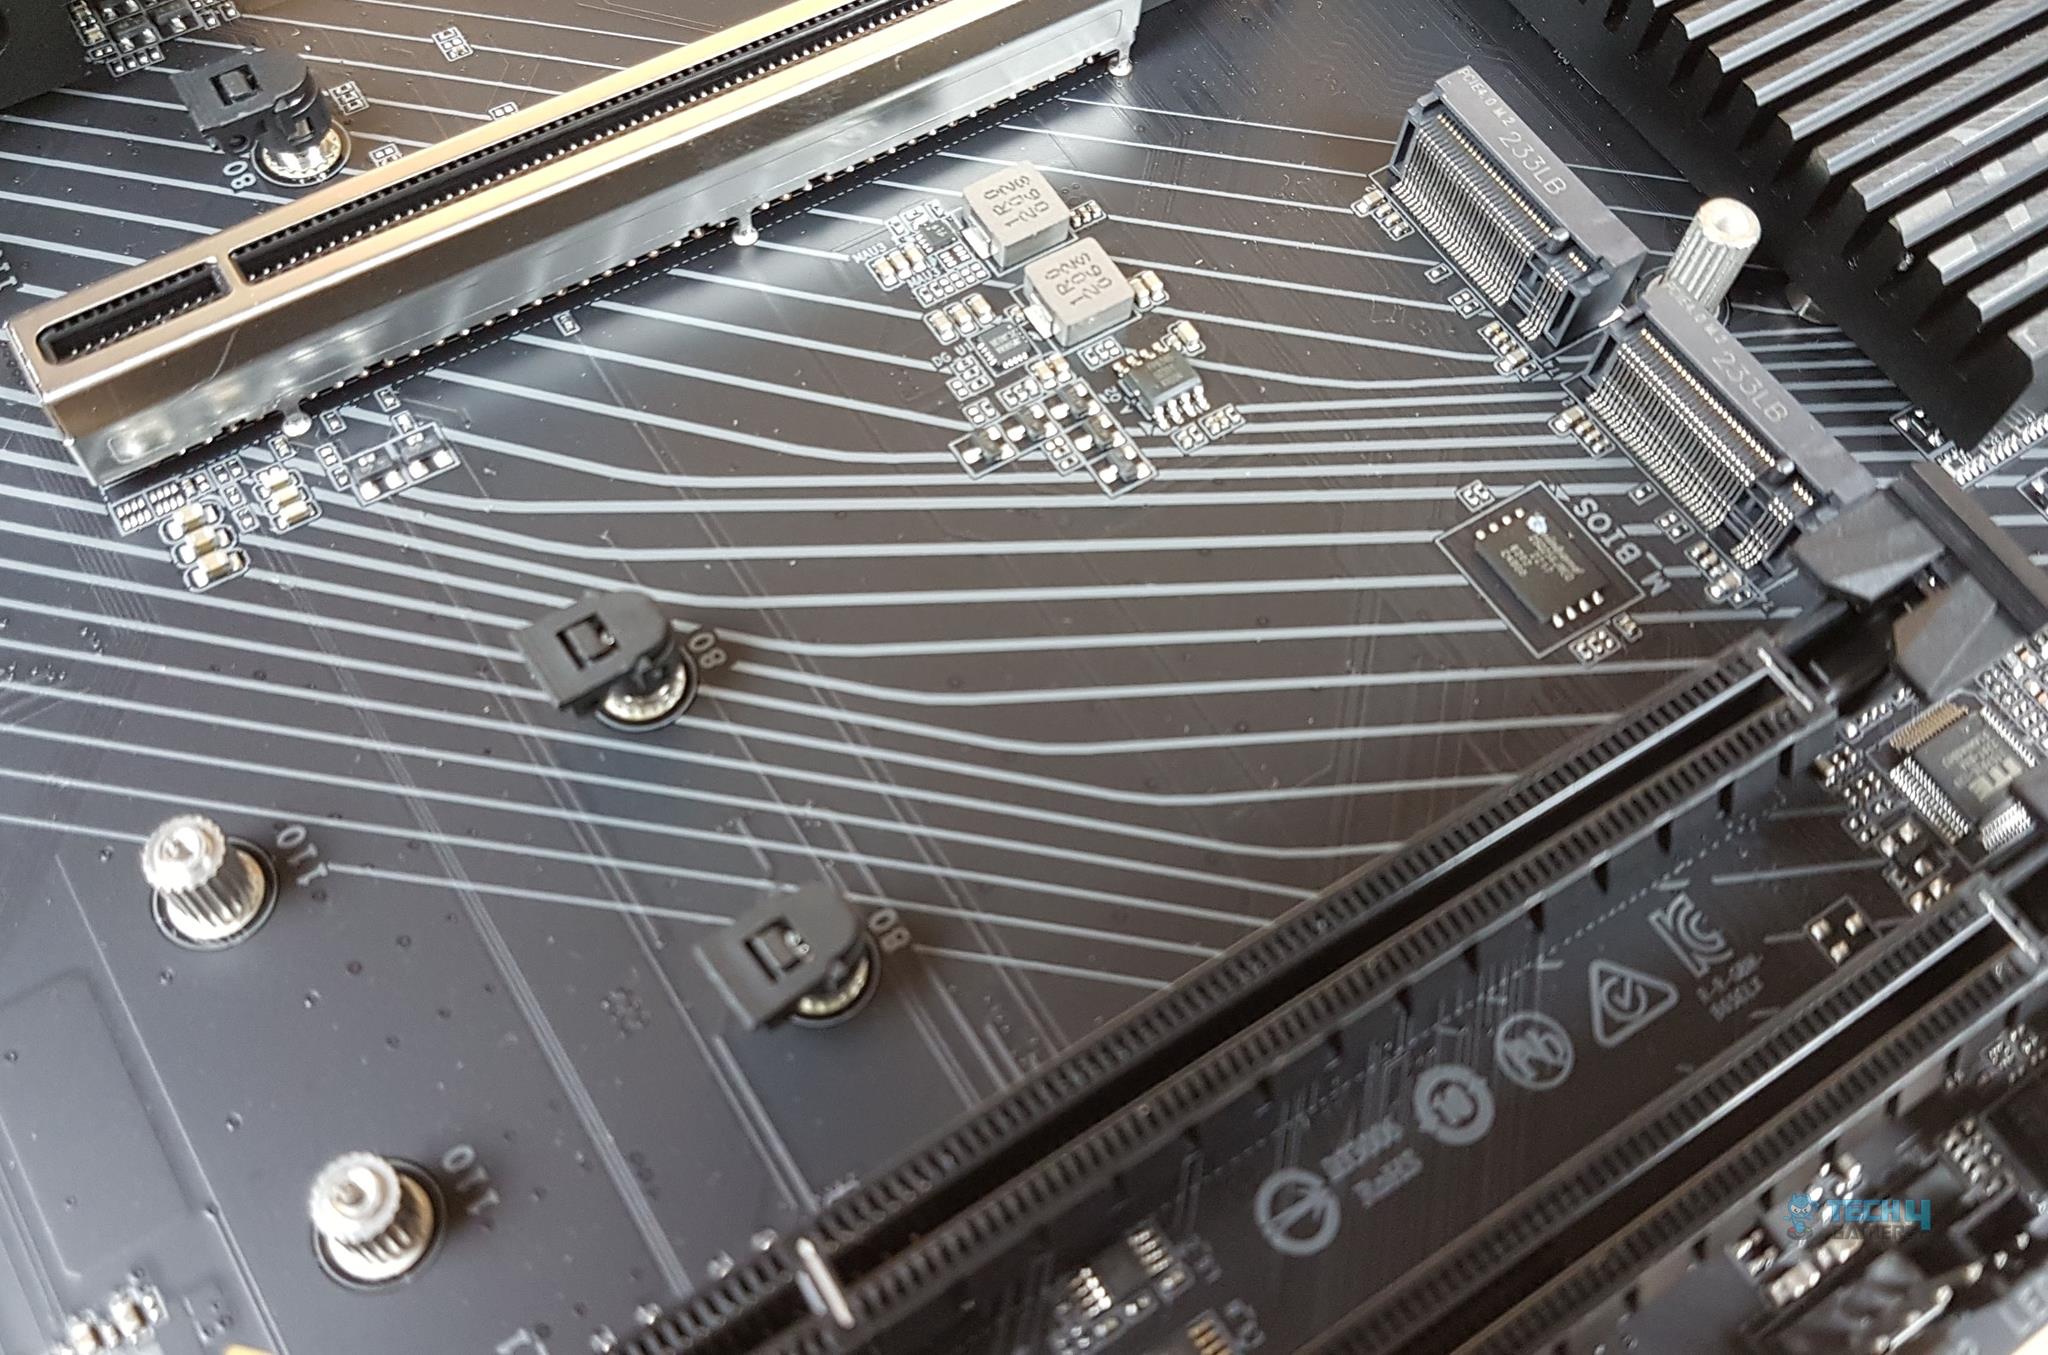
The above picture shows the 2x M.2 ports. The top slot is wired to the CPU and is labeled as M2B_CPU. The second port is wired to the chipset and is labeled M2C_SB. Both ports are Gen 4 x4 slots. These support the 22110/2280 form factors. These ports also feature the EZ-Latch mechanism making life easy.
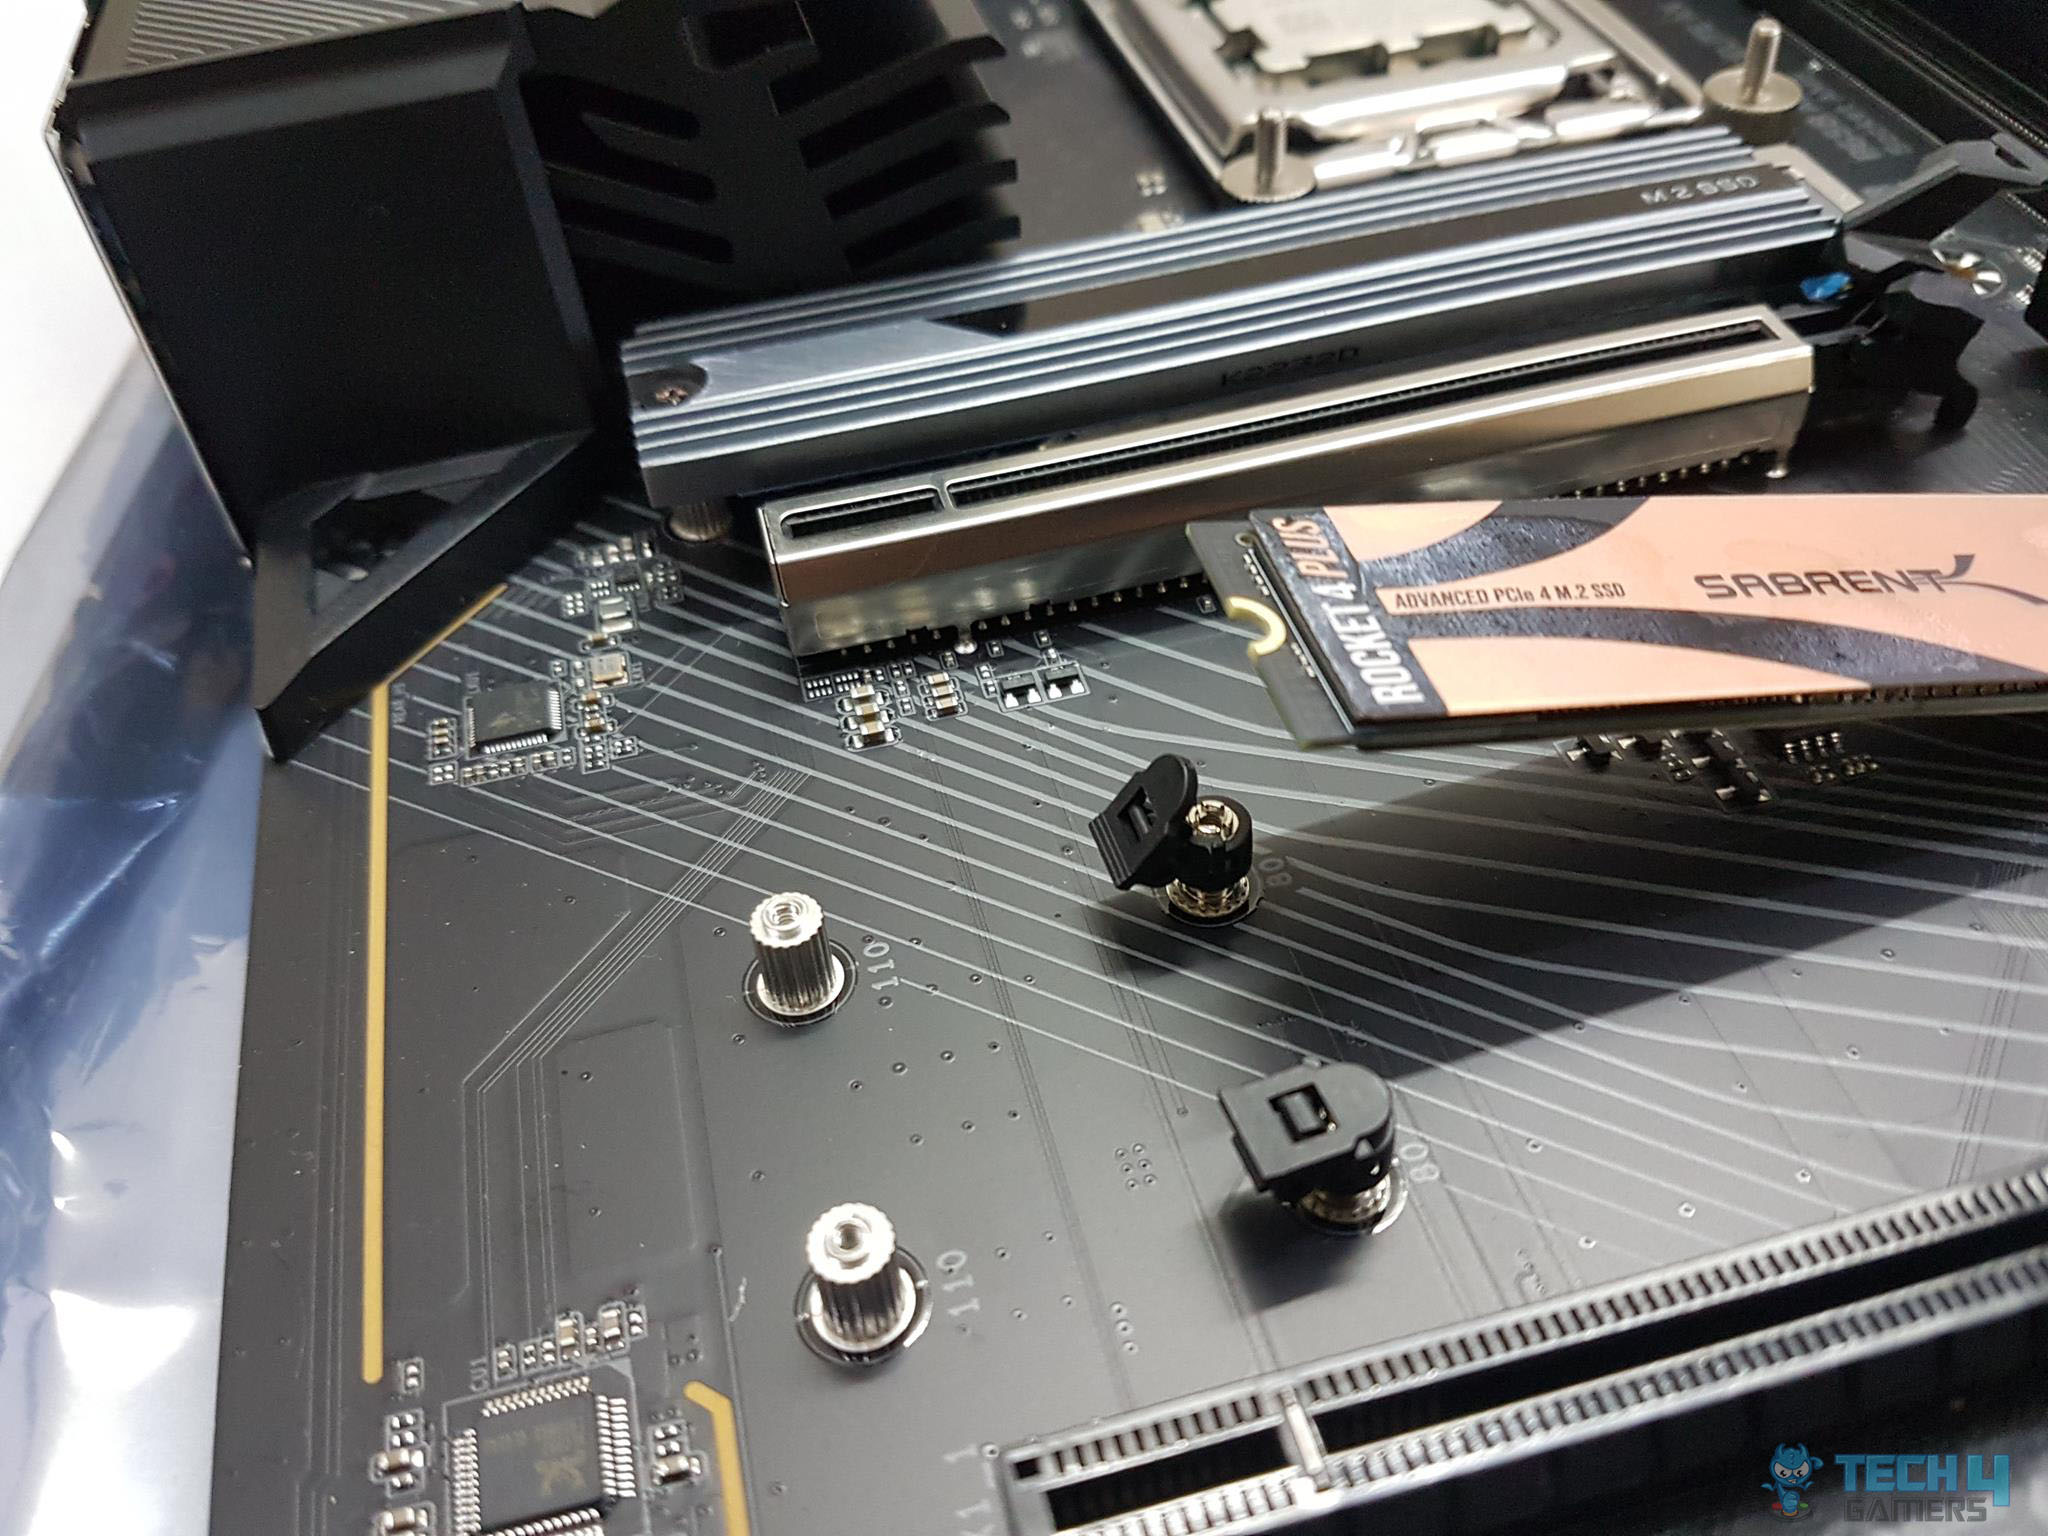
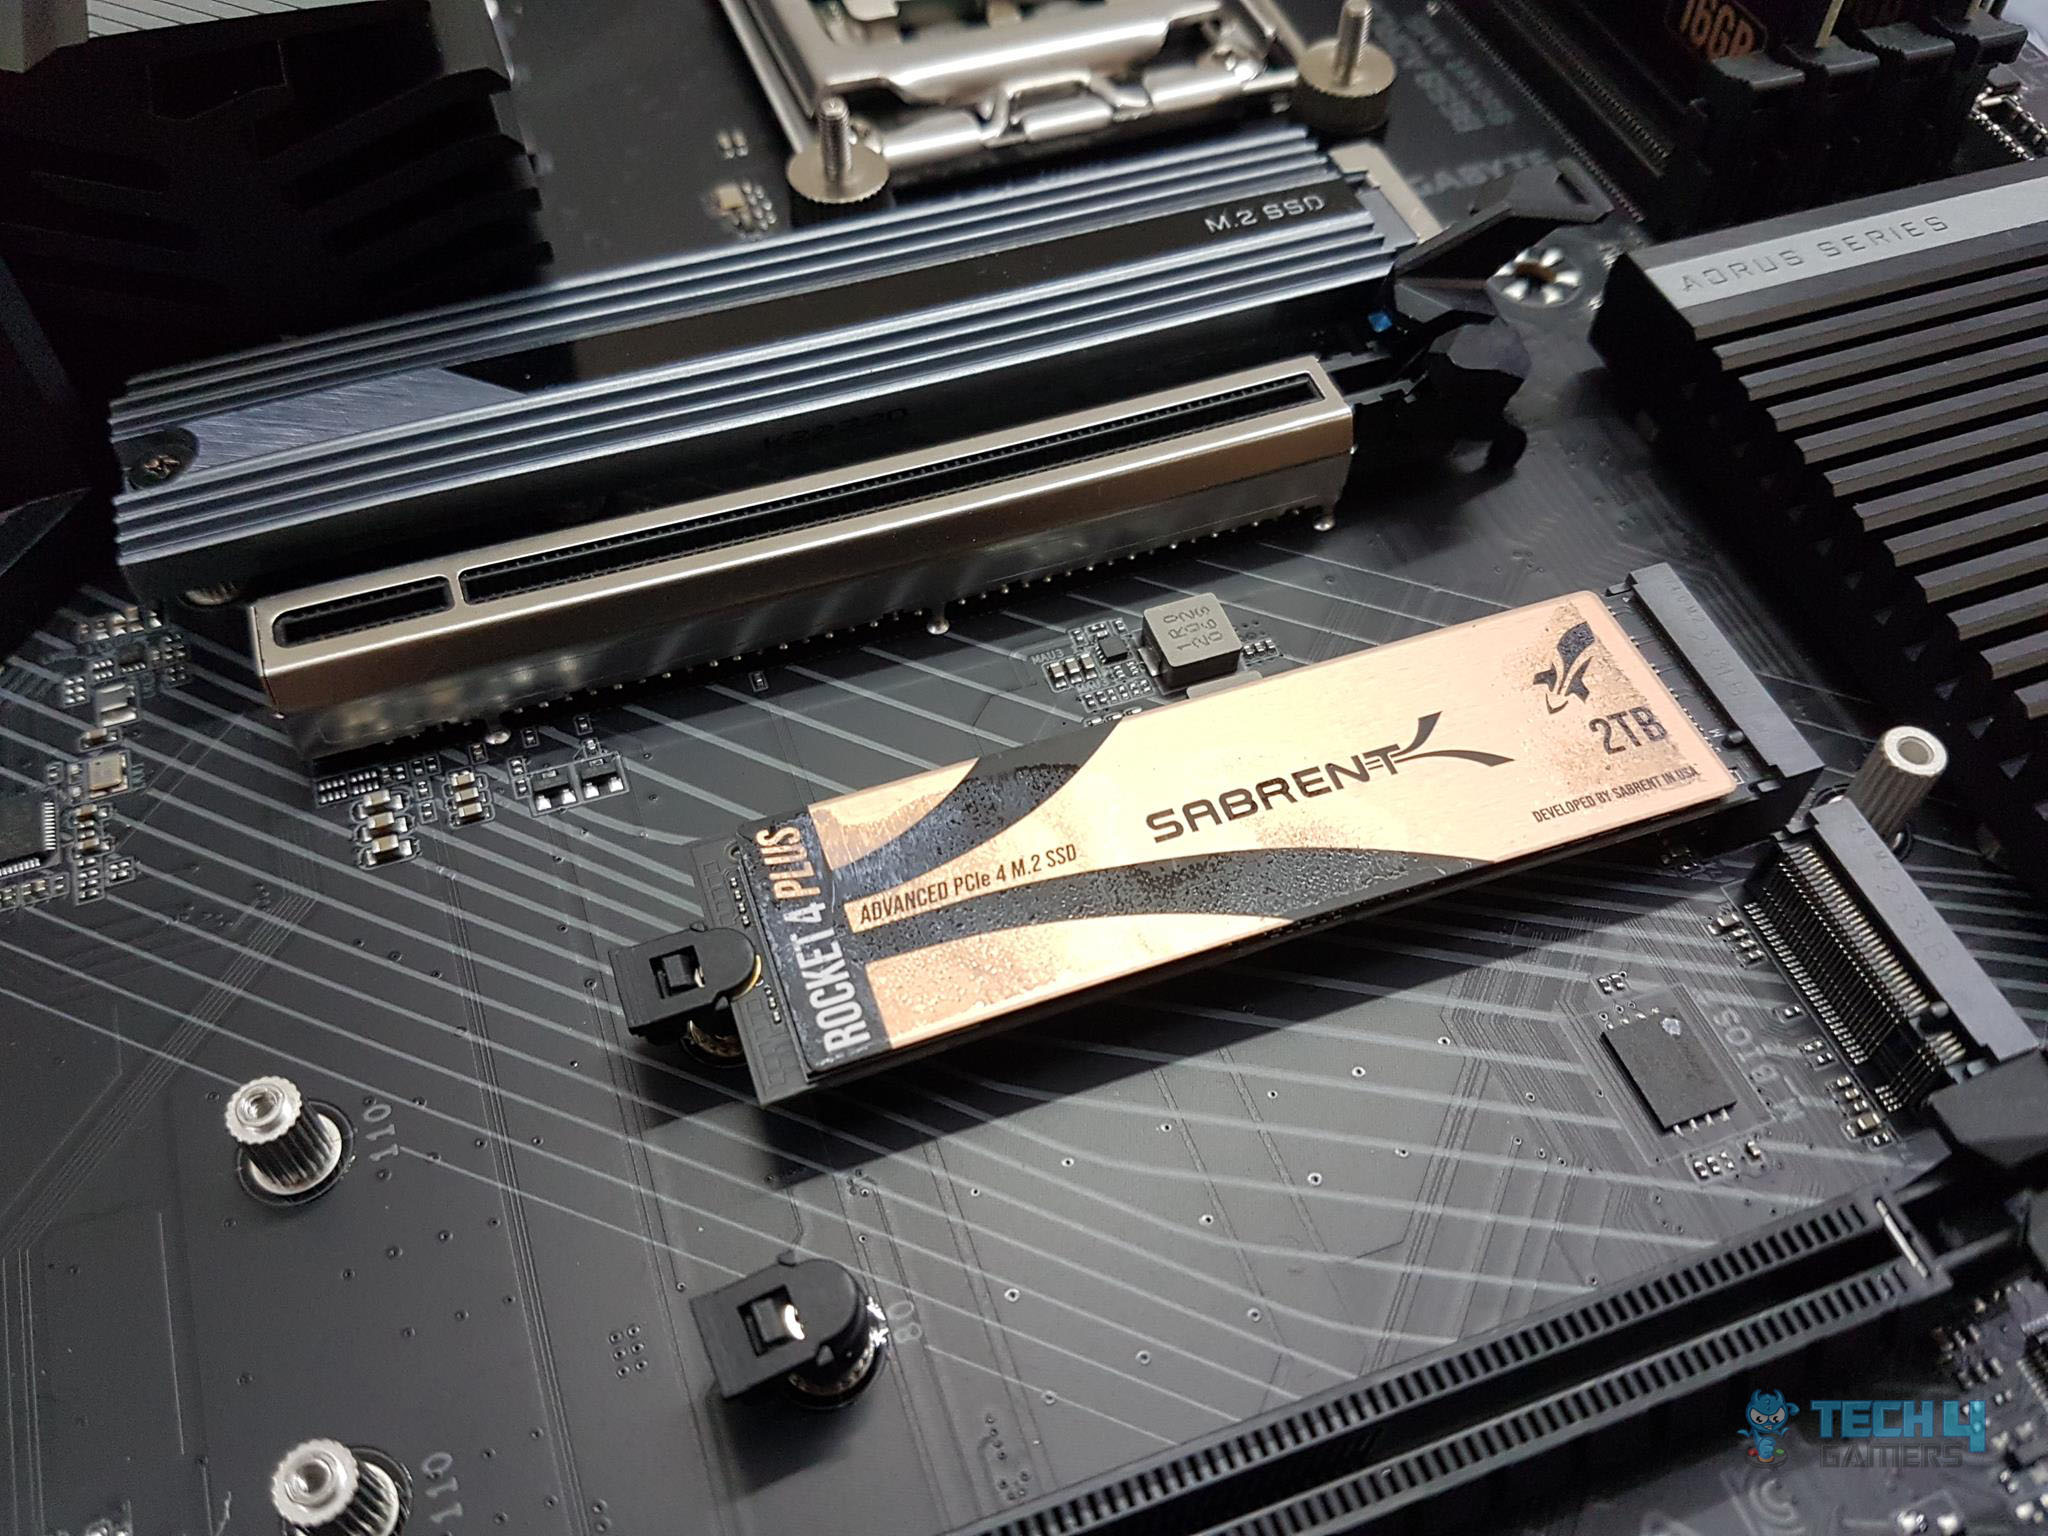
The above picture shows the installation of the Sabrent Rocket 4 Plus 2TB Gen 4 SSD. Insert the SSD in the socket. Lift the locking tab/notch off the screw mount. Press the SSD gently and push the locking notch on the mounting screw. That simple!

The above picture shows the M.2 NVMe port covers. They are made of aluminum material and have pre-applied thermal pads.
PCIe Slots and EZ-Latch Design
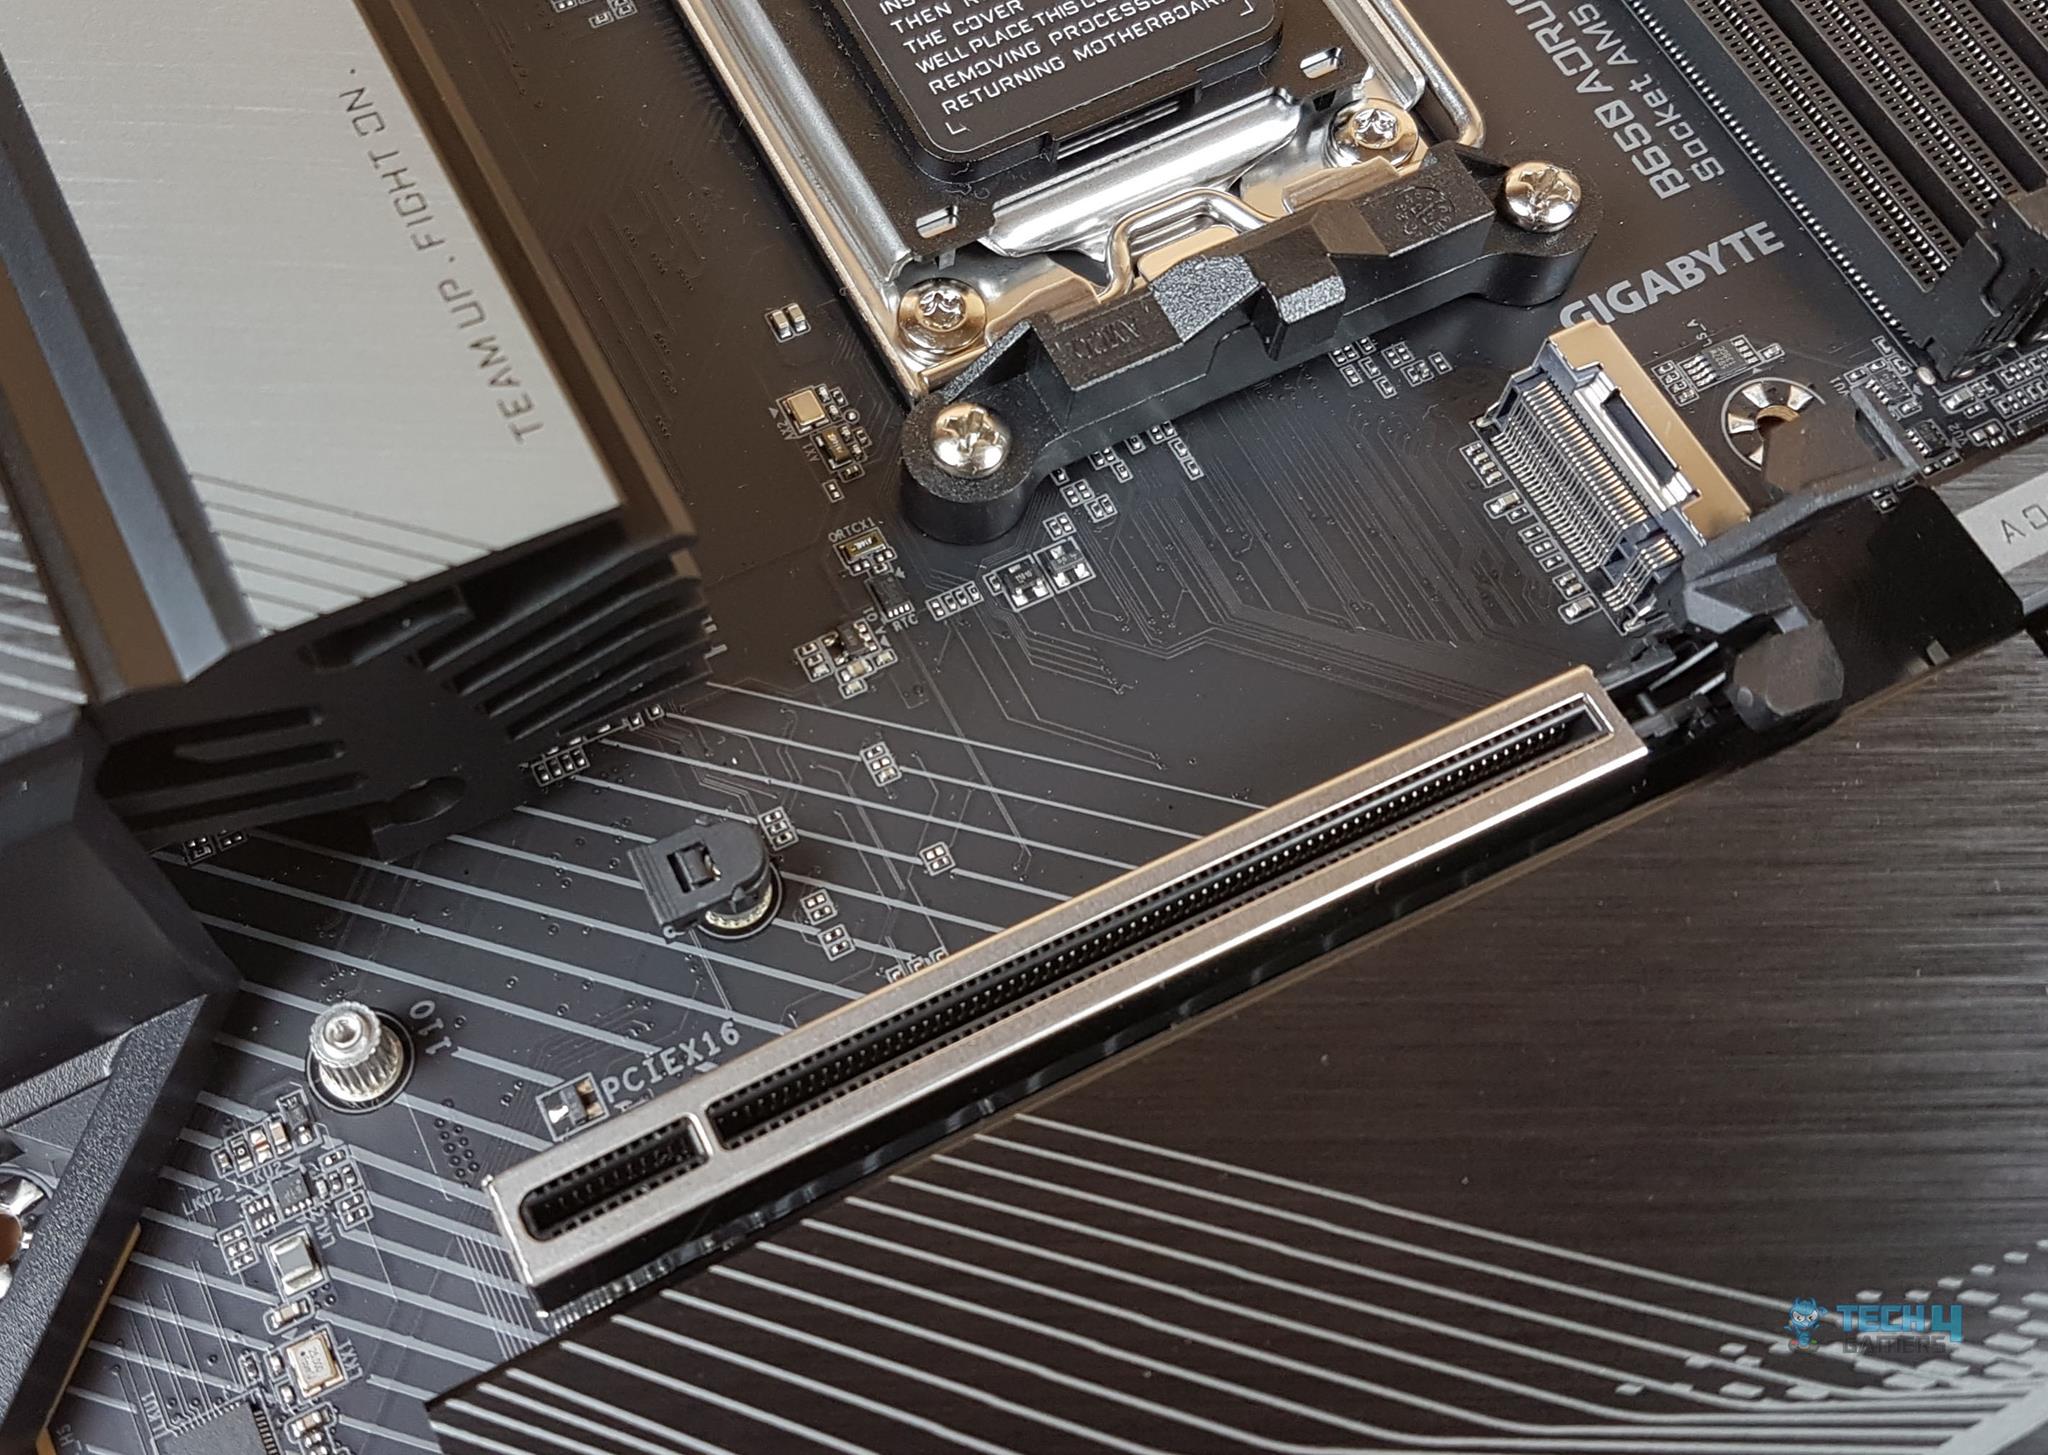
Now, let’s turn our attention to the PCIe slots on this motherboard. This motherboard has 3x PCIe slots.
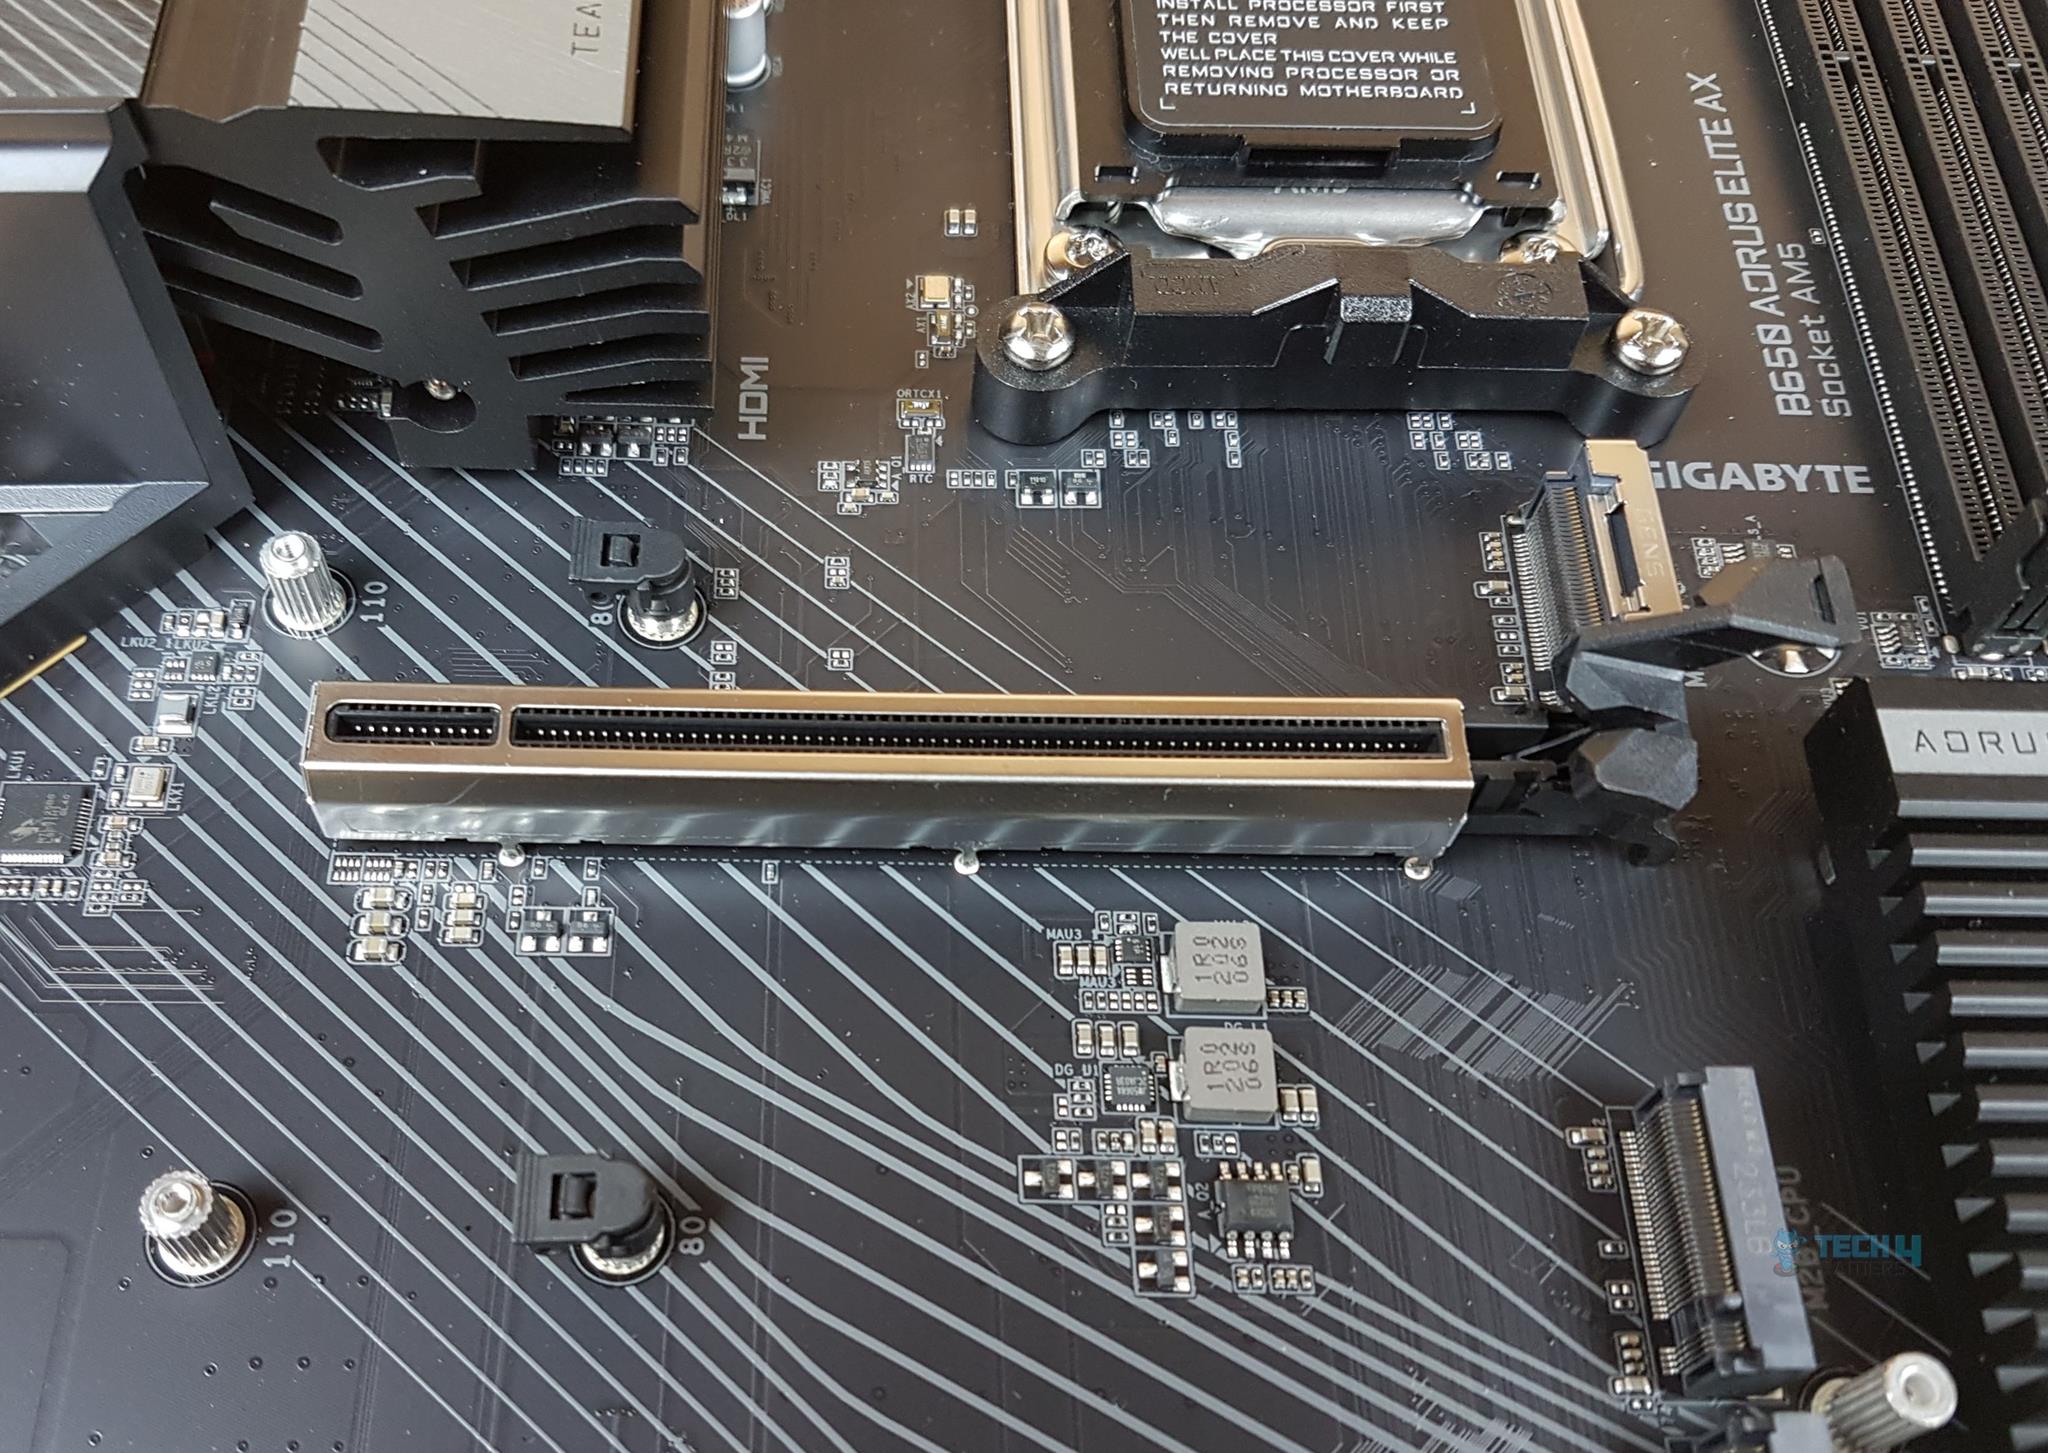
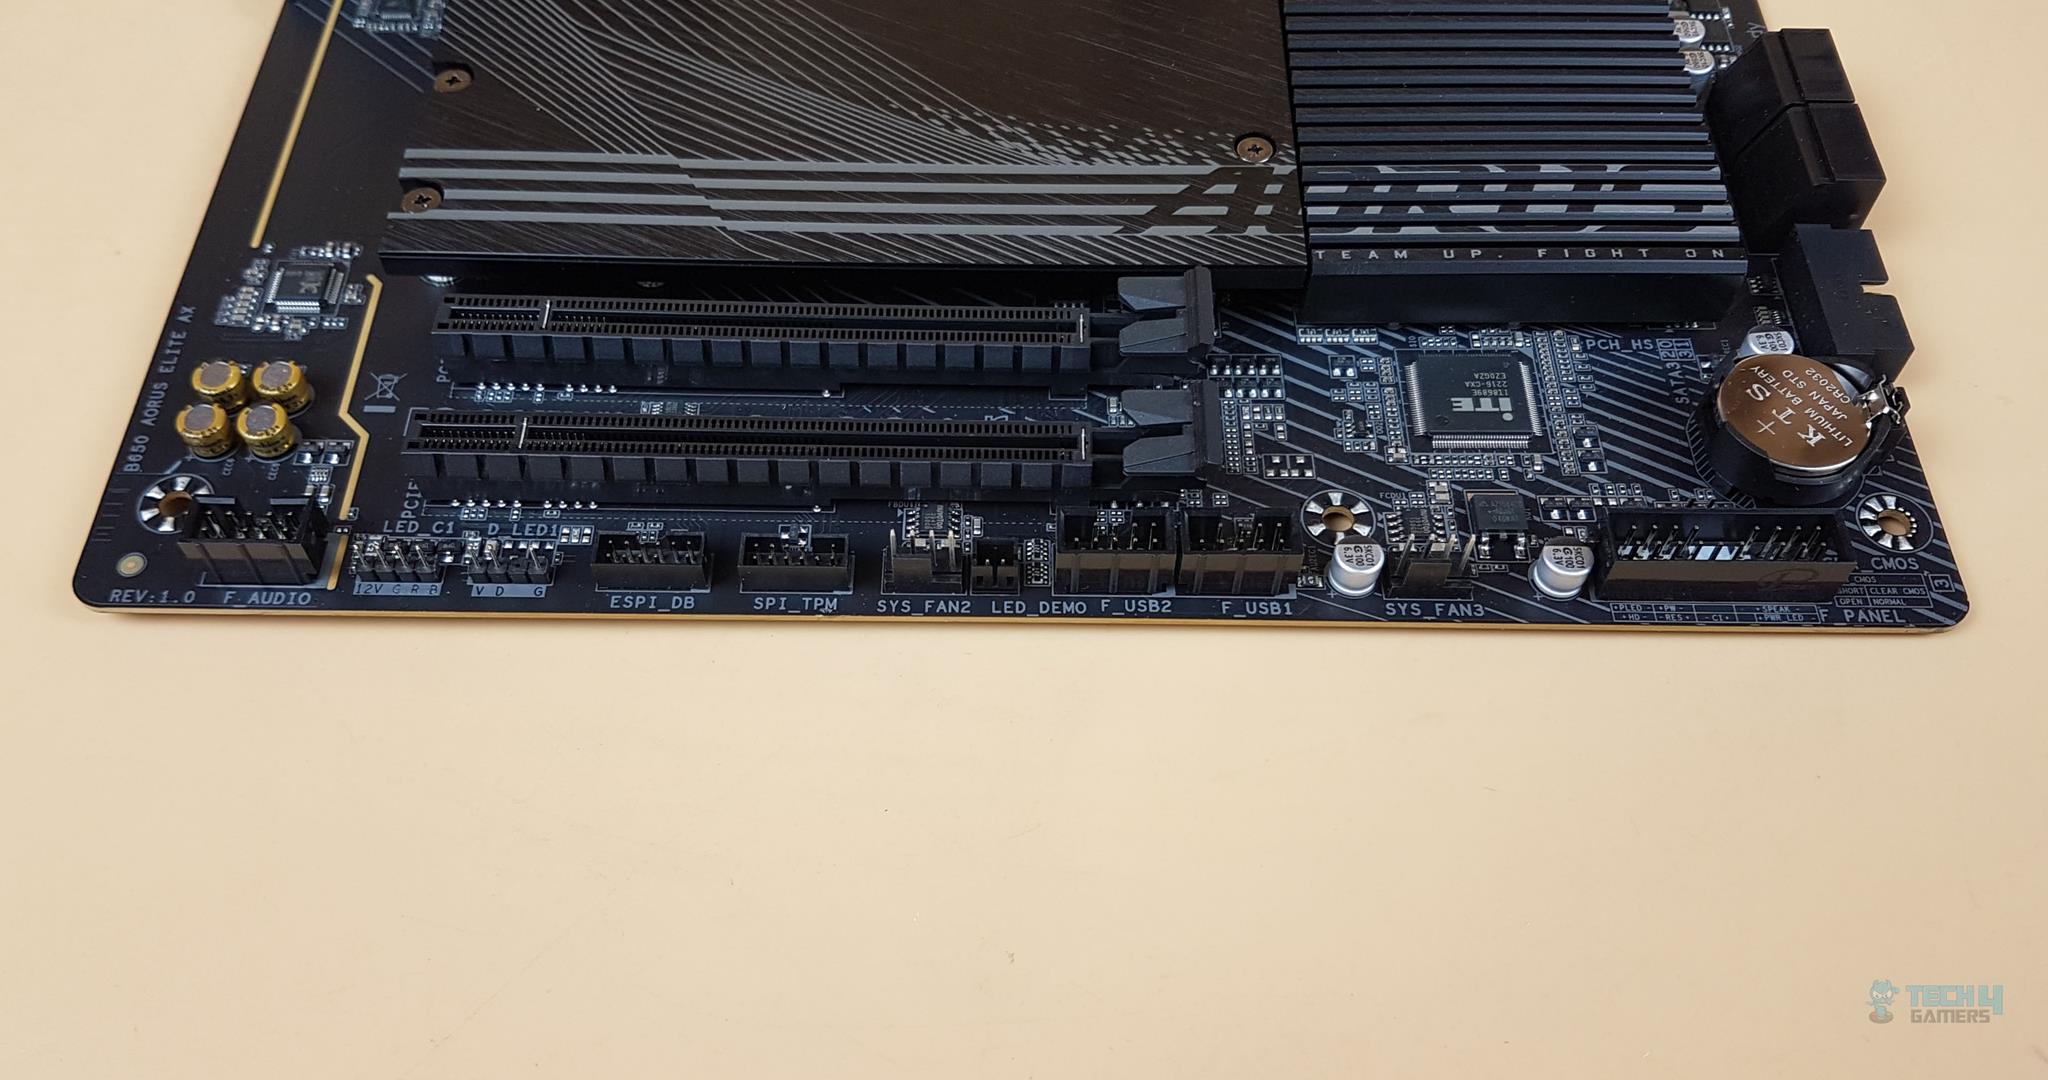
The top PCIe slot connects directly to the CPU socket, operating as a PCIe Gen 4 x4 slot. GIGABYTE introduces an extended PCIe locker, known as EZ-Latch, atop the standard locker. This facilitates the hassle-free removal of the graphics card from the slot, especially valuable in compact spaces around the top NVMe slot.
Notably, there are two non-stainless steel PCIe Gen 3 slots, both operating at X1 speed. It seems a compromise was made to share a single PCIe Gen 3 bus with wireless and wired connectivity, limiting these slots to X1 speed. Personally, I would have preferred sacrificing some USB ports for a dedicated X4 PCIe slot.
B650 Chipset
Now, it is time to take a look at the B650 chipset area.
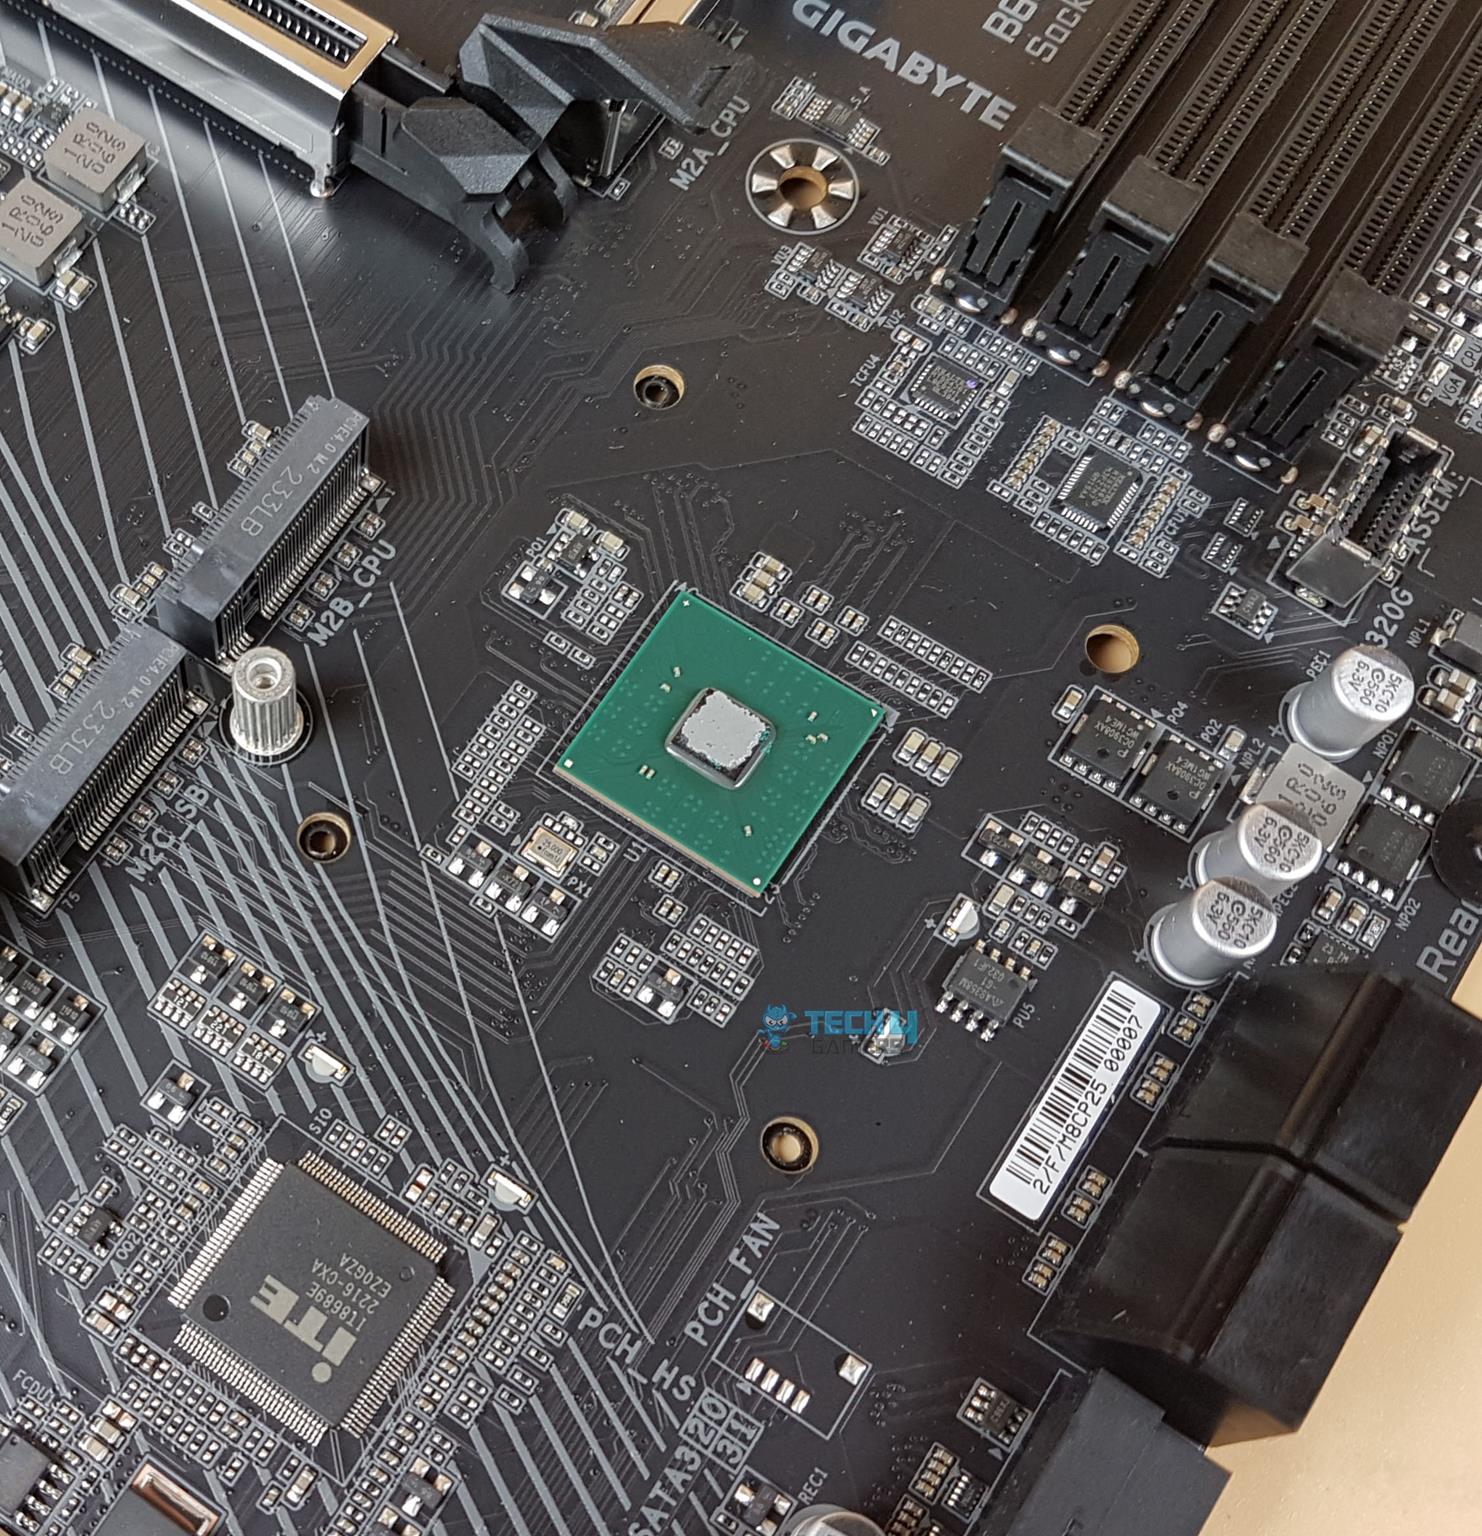
It’s evident we’re dealing with a single chipset, unlike the X670E, thanks to the cover’s size. To access it, simply remove the 4 screws at the PCB’s backside.
Behold the B650 chipset, displayed in the right image! We have a simple layout with a power delivery circuit on the right. I am guessing this chipset would draw near 7W or so hence we have a passive cooling for it.
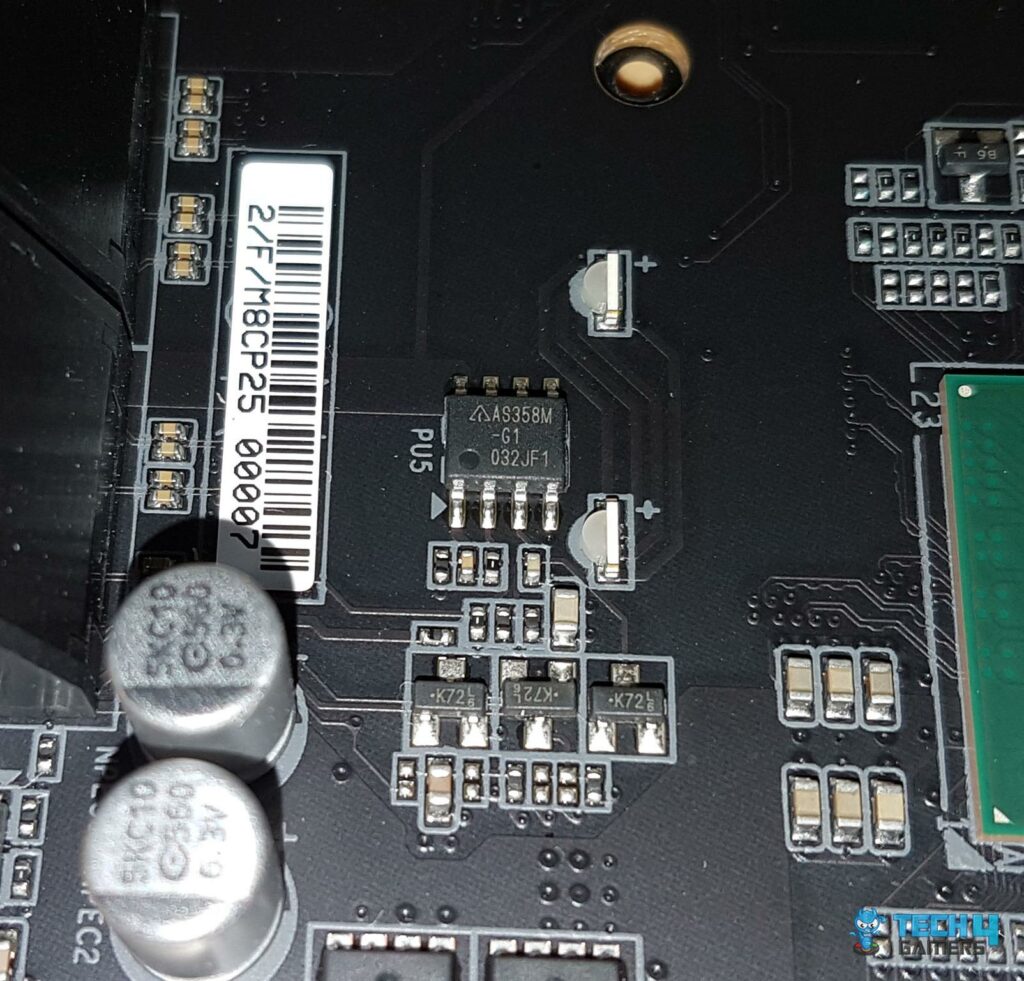
The power delivery to the chipset is being managed by AS358 and a couple of PDC3908X N-channel MOSFETs. These are 30V MOSFETs which (I think) are rated for 46 A.
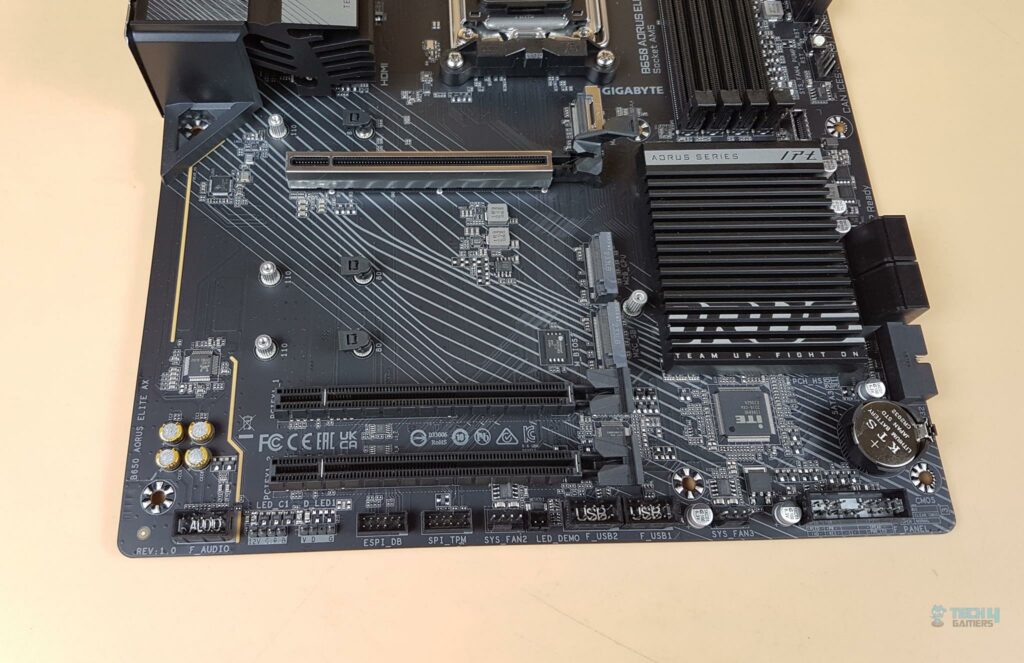
The above picture shows the lower section of the motherboard with all covers removed.
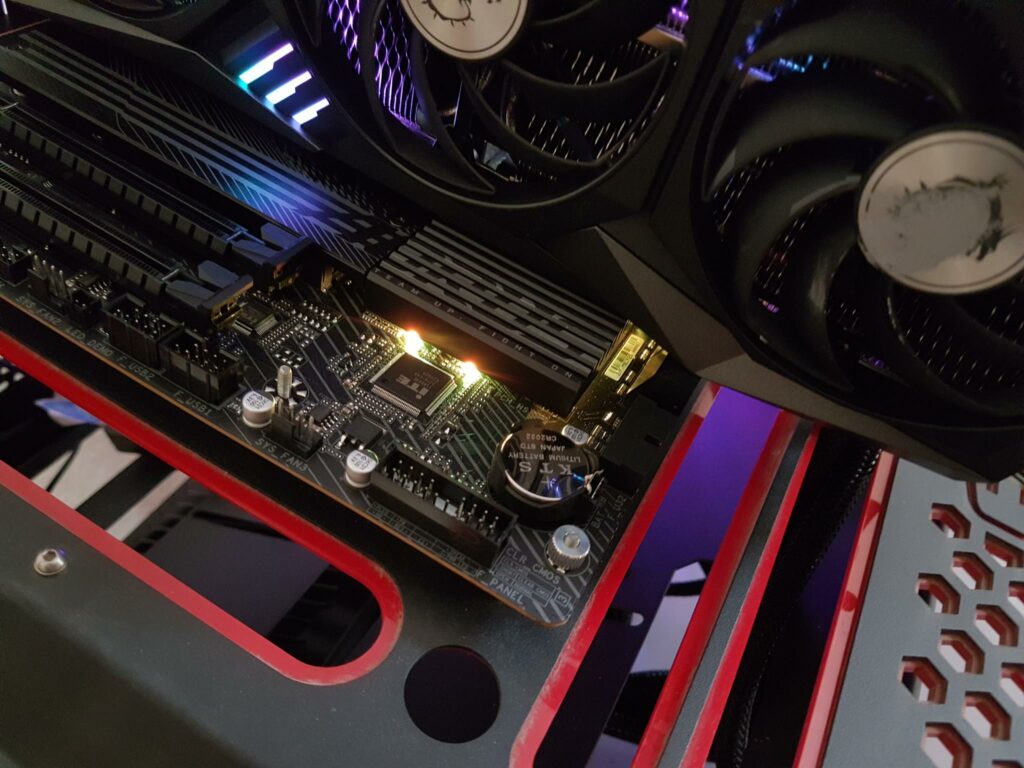
This is the only area on the motherboard with RGB lighting.
Audio Solution
The audio solution on this motherboard is pretty ordinary, using RealTek ALC897 codec to drive the audio solution. This is just an ok solution which could have been better in my opinion.
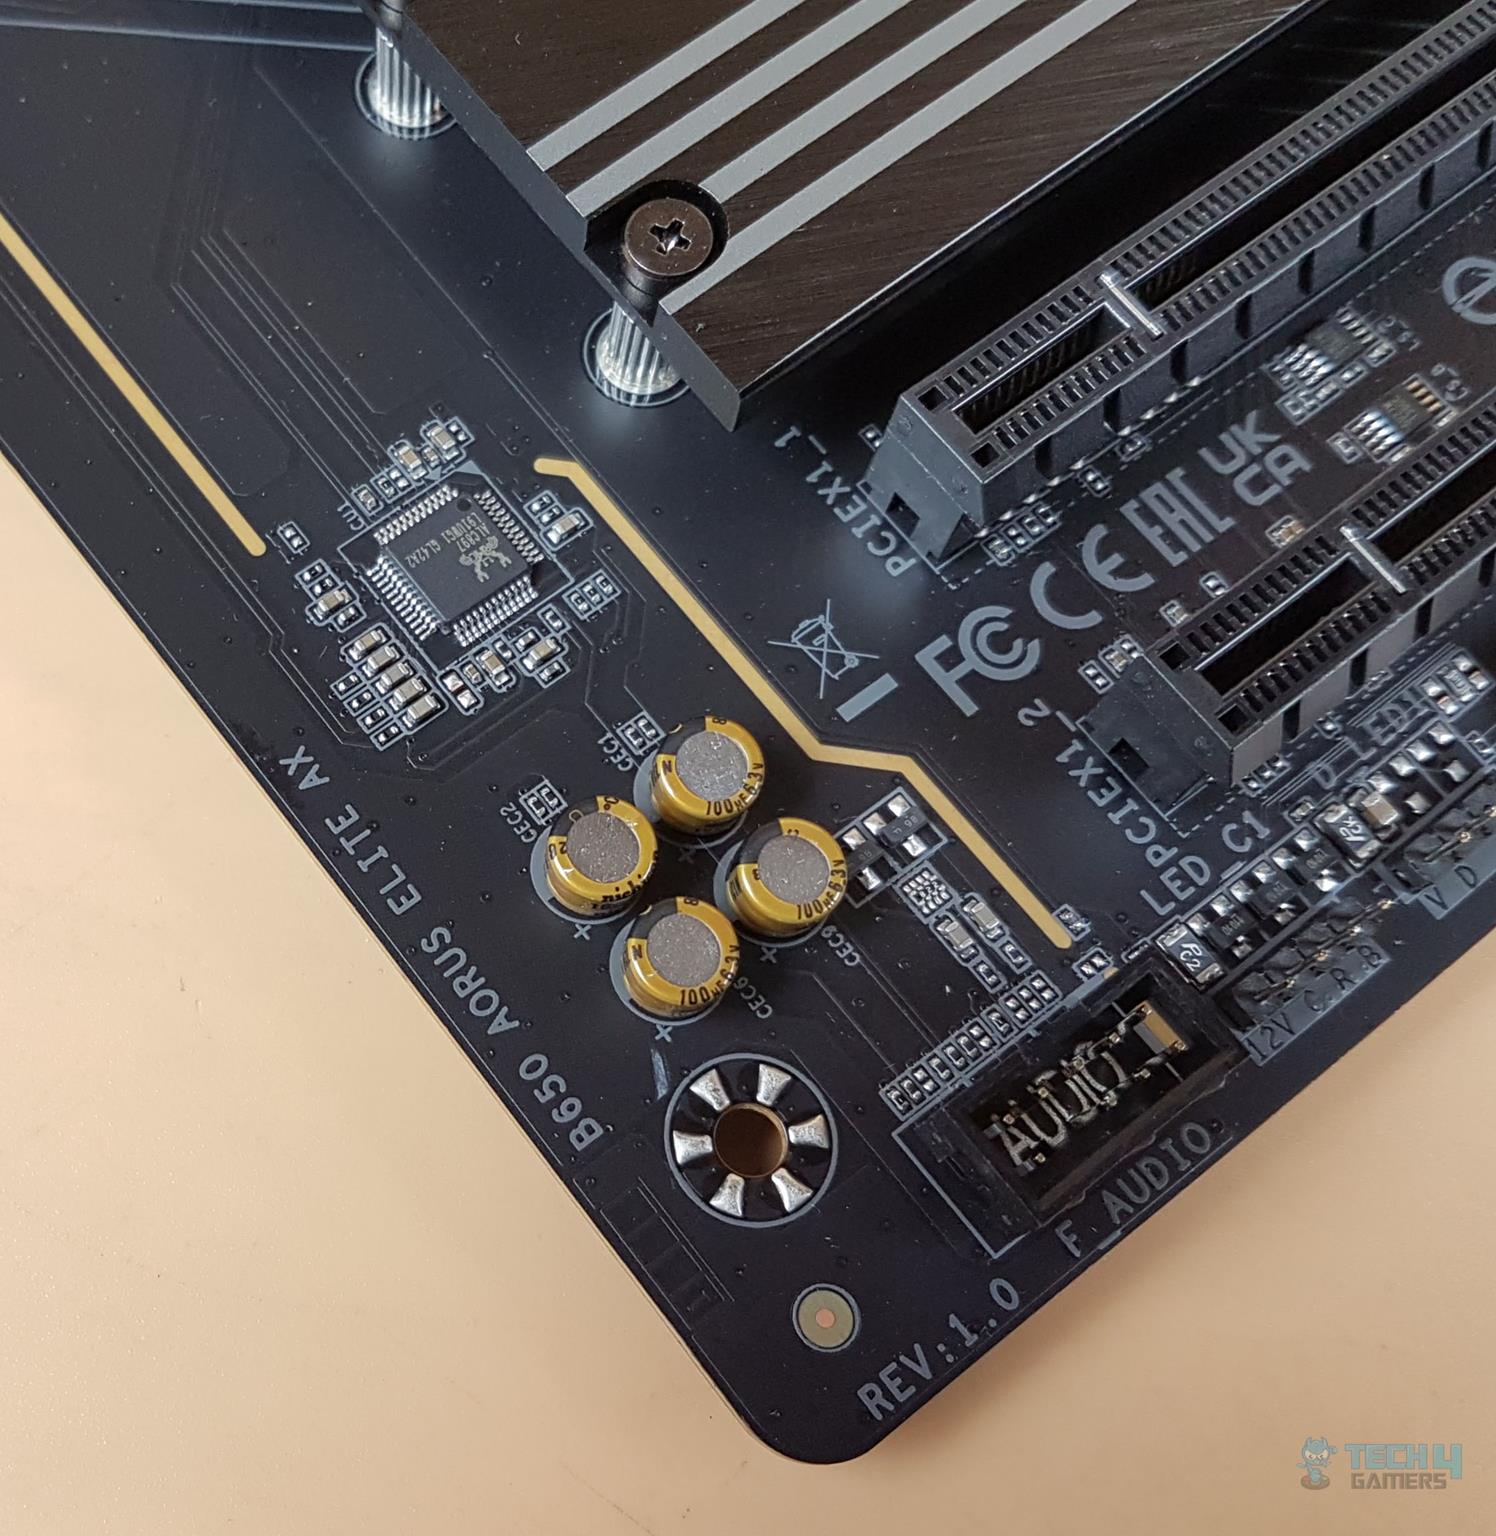

The picture displays the motherboard’s well-shielded Audio circuitry. It lacks high-end WIMA capacitors and uses only Fine-Gold capacitors for powering the circuit, not providing a Hi-Res Audio solution. The rightmost picture shows the ALC897-VB controller from Realtek.
Networking Connectivity
We have two main areas here:
- Wireless connectivity
- Wi-Fi
- Bluetooth
- Wired connectivity
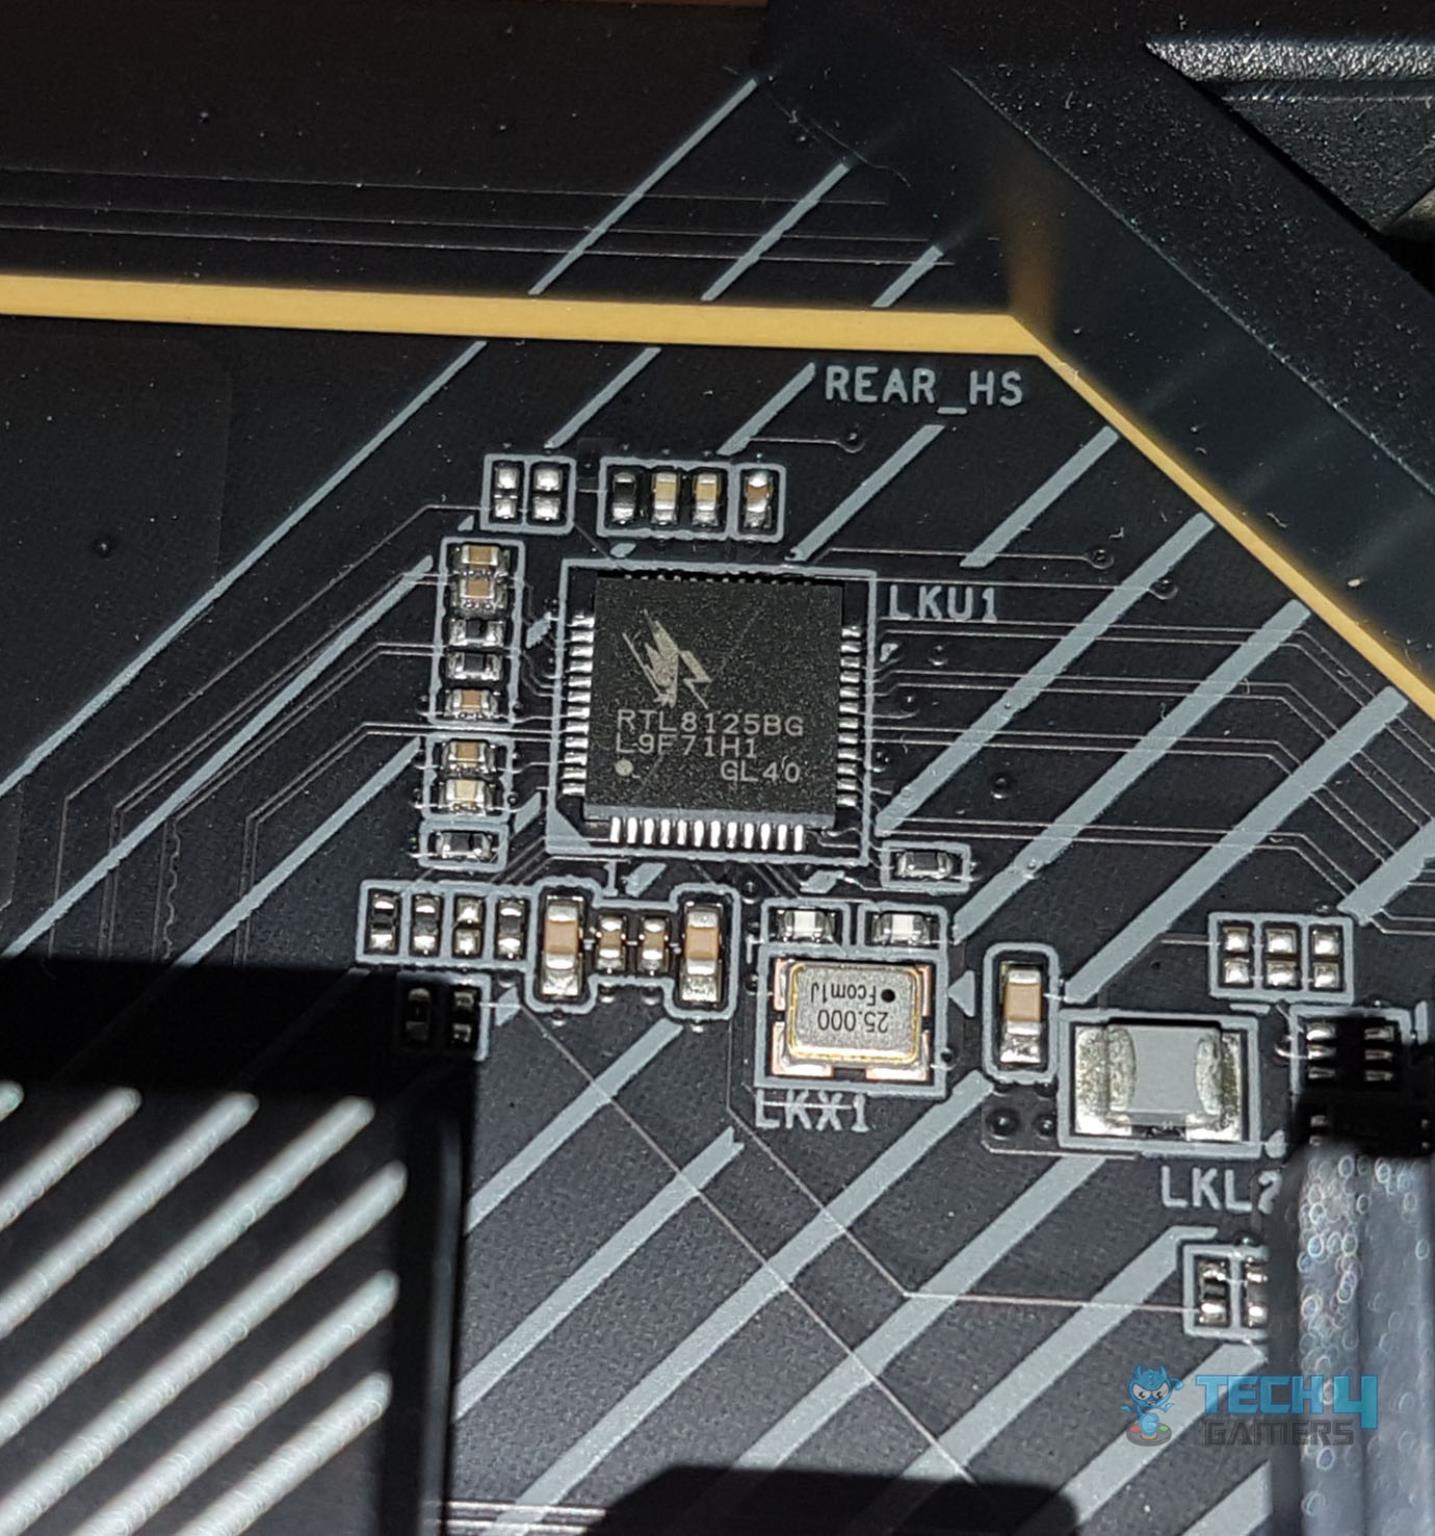
This motherboard packs a punch with its networking options. It boasts a single 2.5GbE LAN chip. The Ethernet port supports speeds from 10Mbps to 2.5Gbps.
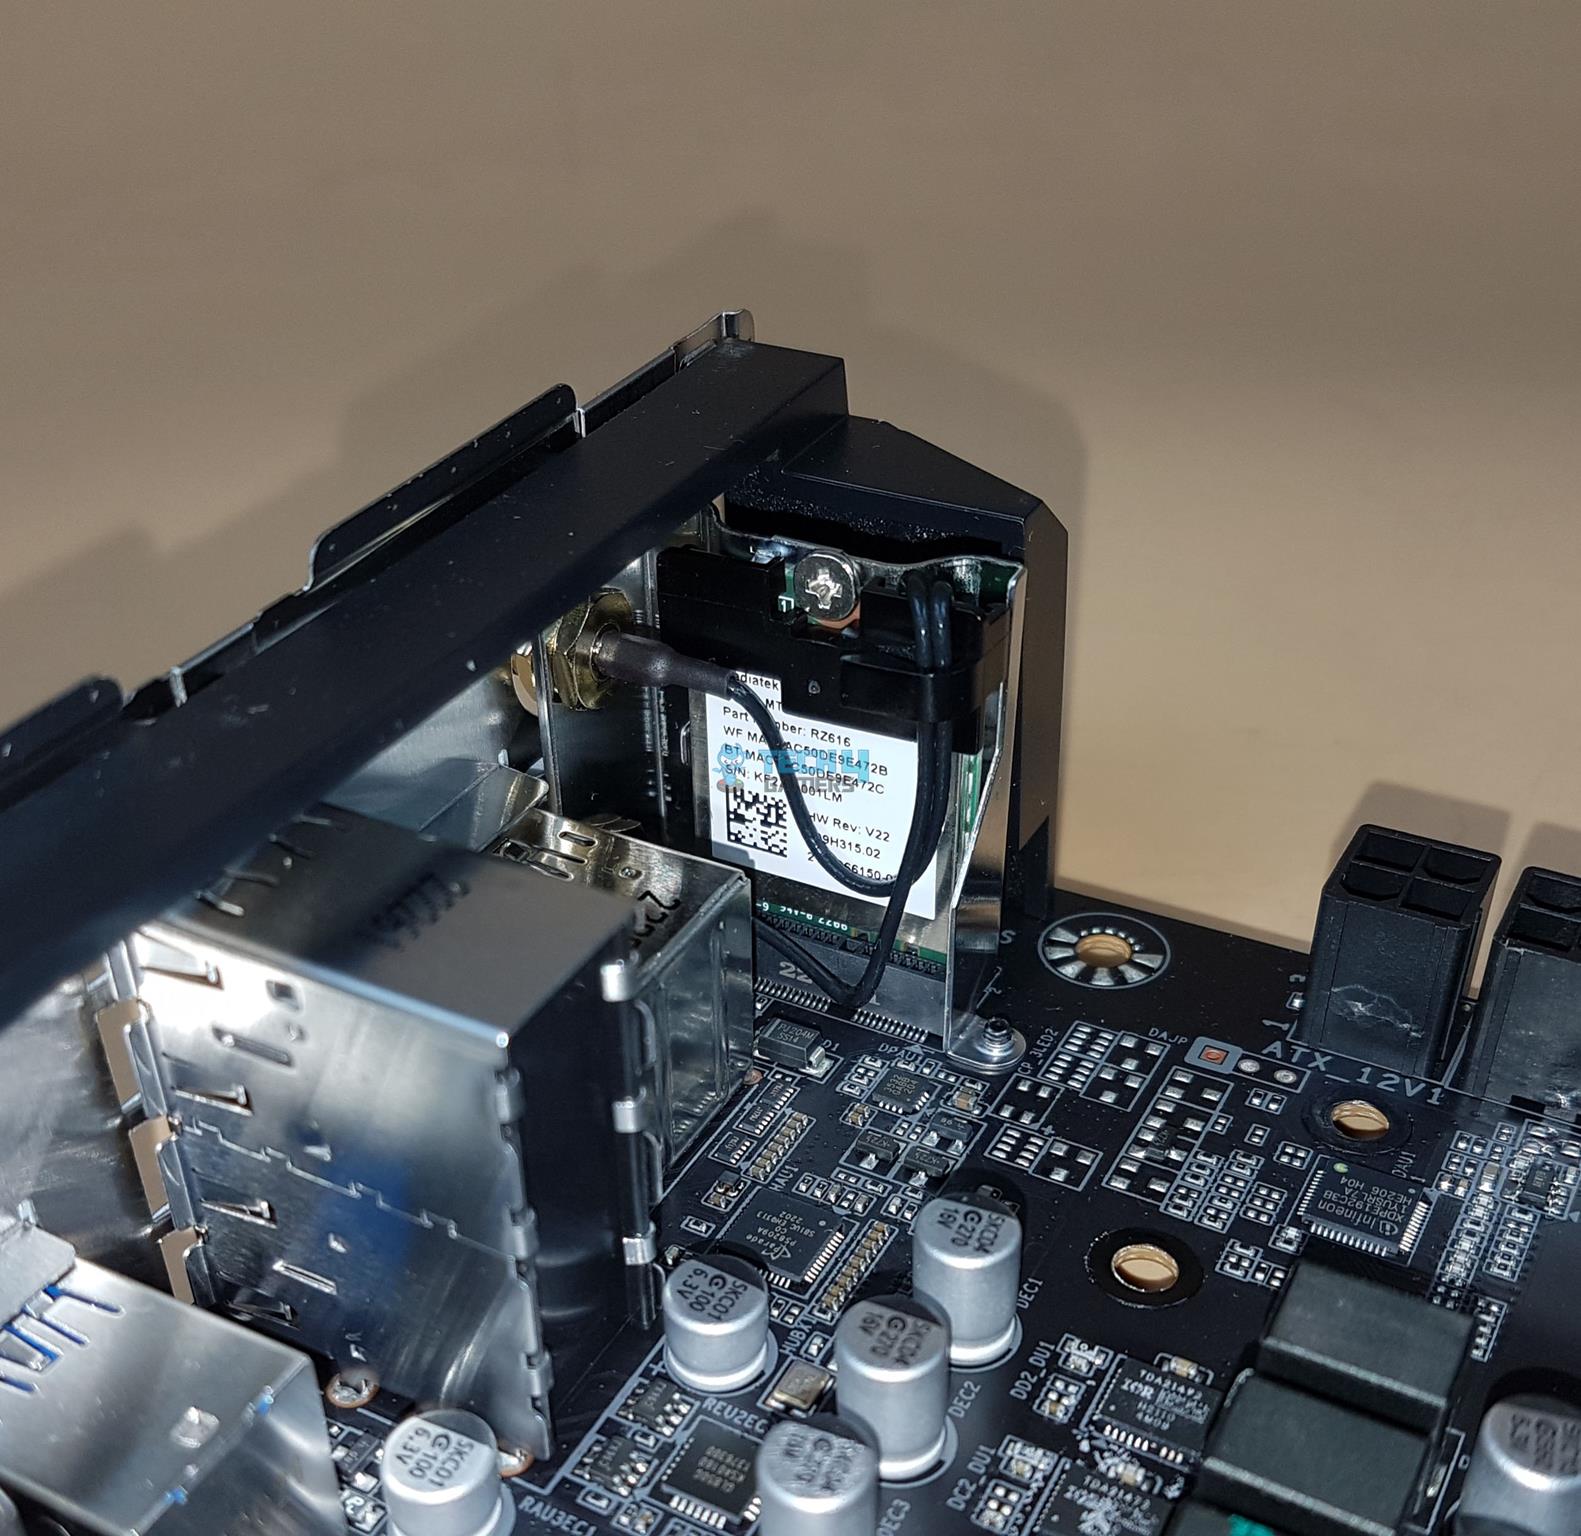
For wireless connectivity, it rocks an Intel Wi-Fi module using MediaTek MT7922 (RZ616) for Wi-Fi 6E. The Bluetooth 5.3 protocol rounds out its wireless features.
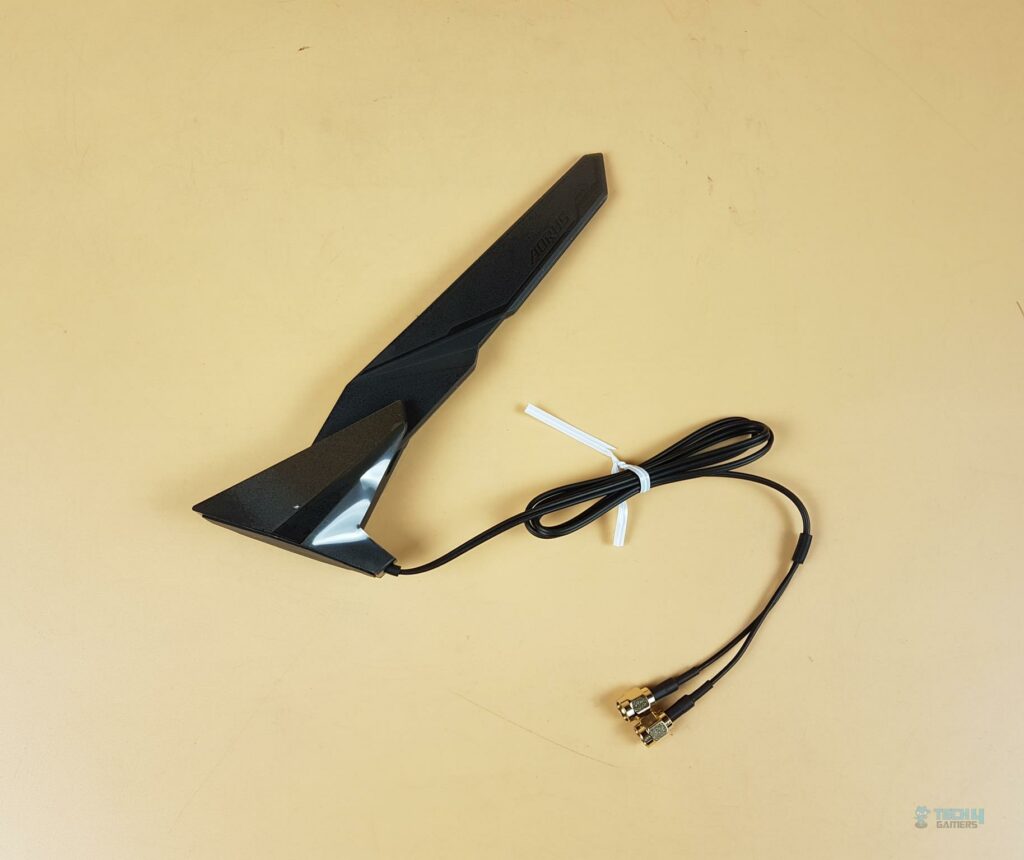
GIGABYTE has provided a Wi-Fi antenna in the box with a magnetic base for convenient mounting.
USB Connectivity
First, we take a look at USB connectivity from the CPU socket:
- 1 x USB Type-C® port on the back panel, with USB 3.2 Gen 2 support
- 2 x USB 3.2 Gen 2 Type-A ports (red) on the back panel
- CPU + USB 2.0 Hub: 4 x USB 2.0/1.1 ports on the back panel

RTS5411 is an advanced USB3.0 4-port HUB controller, which integrates USB3.0 and USB2.0 Transceivers, MCU, SIE, regulator, and charger circuits into a single chip.
Now, we take a look at the USB connectivity from the chipsets:
- 1 x USB Type-C® port with USB 3.2 Gen 2×2 support, available through the internal USB header
- 3 x USB 3.2 Gen 1 ports (1 port on the back panel, 2 ports available through the internal USB header)
- 4 x USB 2.0/1.1 ports available through the internal USB headers
- Chipset+USB 3.2 Gen 1 Hub: 4 x USB 3.2 Gen 1 ports on the back panel
We can see the plethora of USB connectivity options on this motherboard. This board has USB 3.2 Gen 2×2 over Type-C interface providing a theoretical bandwidth of 20Gbps. The rear USB 3.2 Gen 2 Type-C® is capable of a 10Gbps transfer rate.
Internal Connectors
Now that we have covered the main features, functions, and design of the motherboard, let’s take a look at the internal connectors.
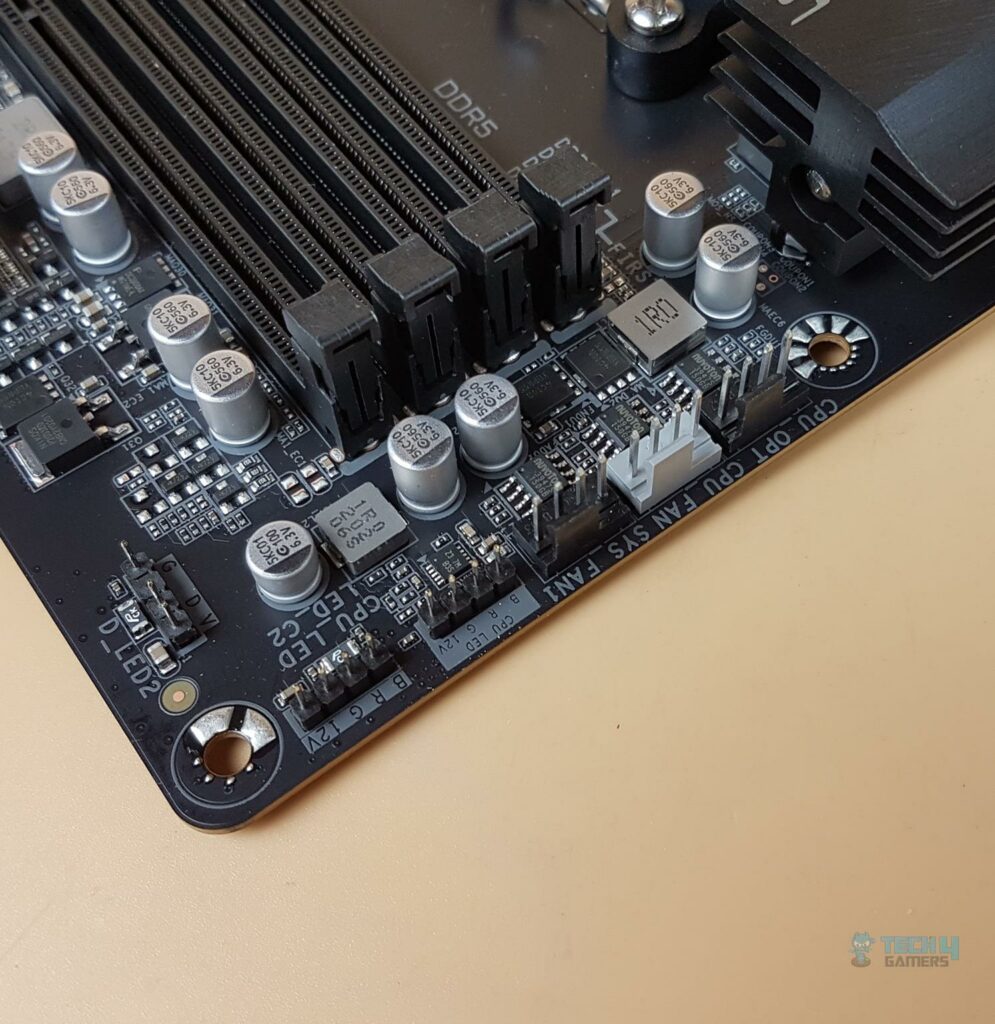
On the top of the motherboard we have:
- 4-Pin PWM CPU FAN Header
- 4-Pin PWM CPU OPT Header
- 4-Pin System Fan Header
- 2x Standard 12V 4-pin RGB Connectors
- 1x Standard 5V 3-pinA-RGB Connector
All fan headers including pump headers are rated for 2A, 24W power.
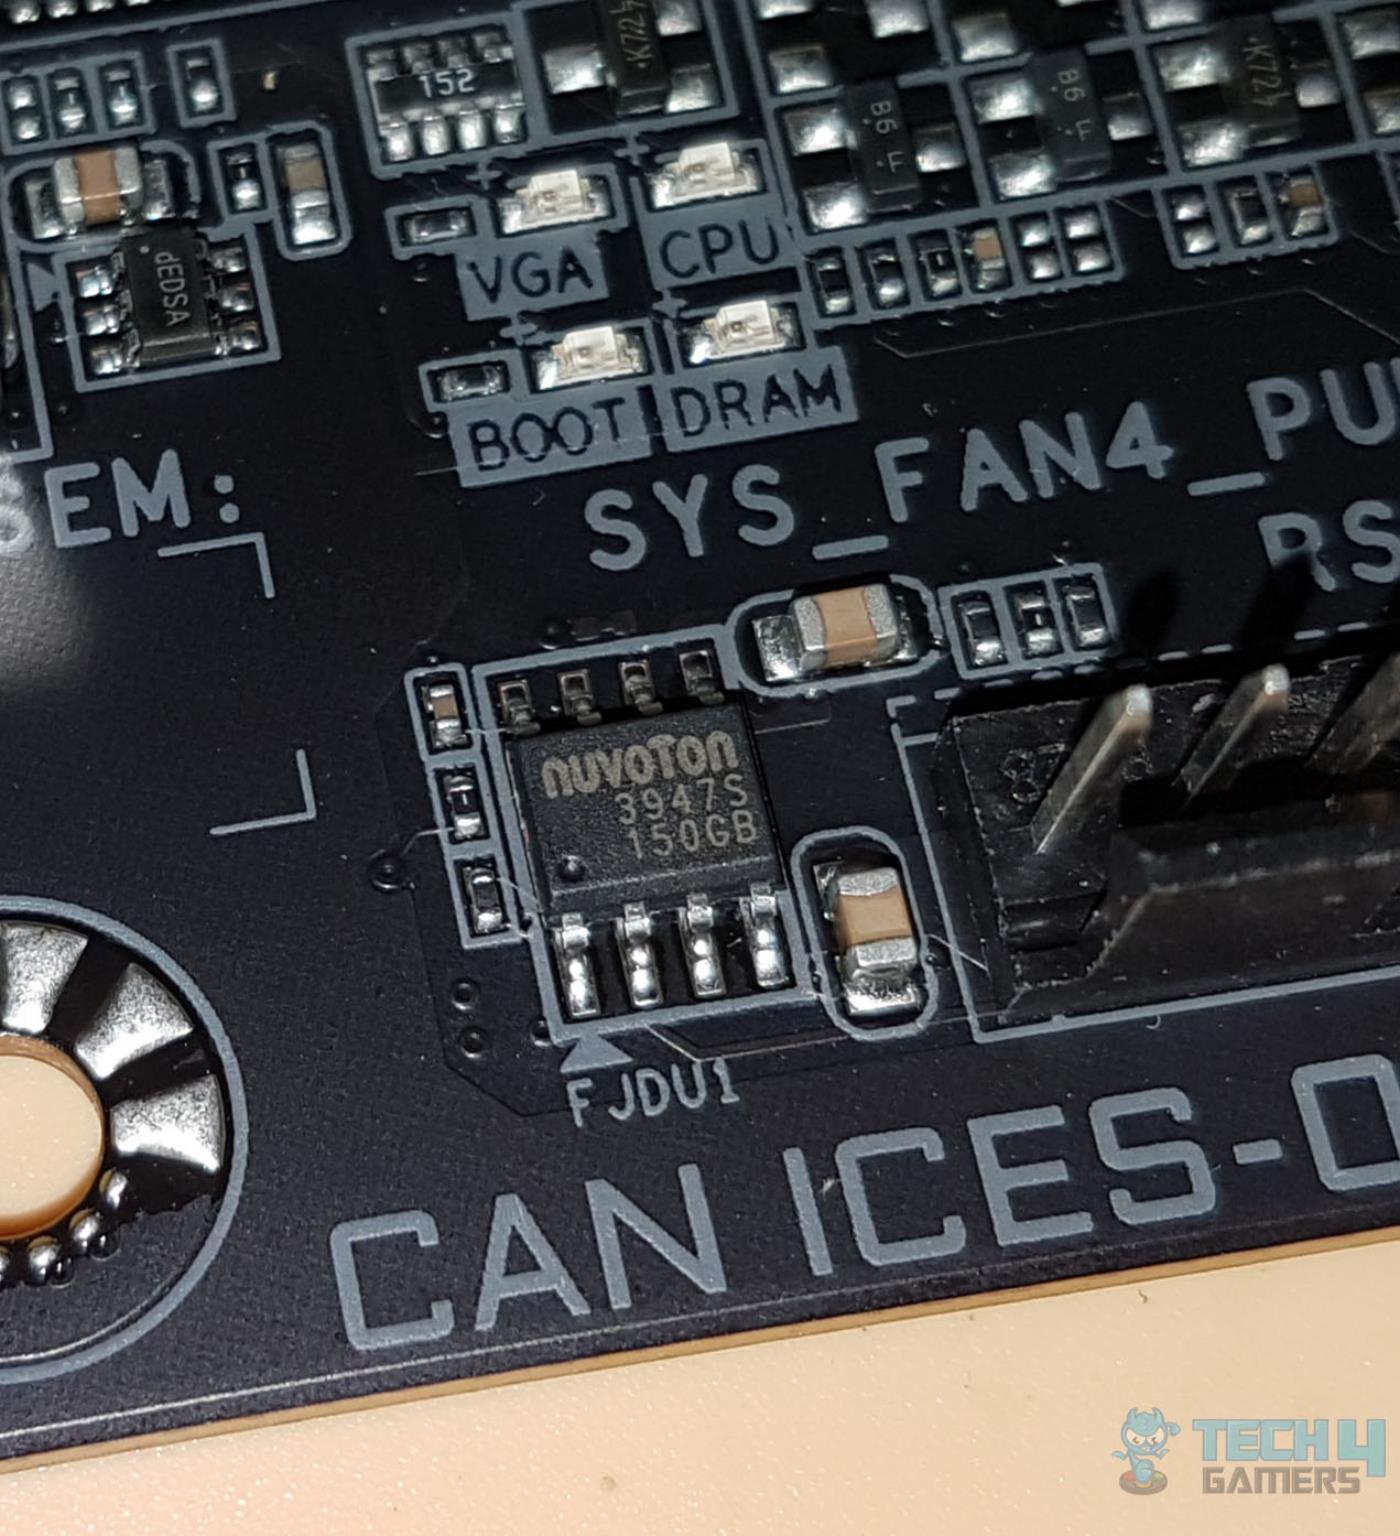
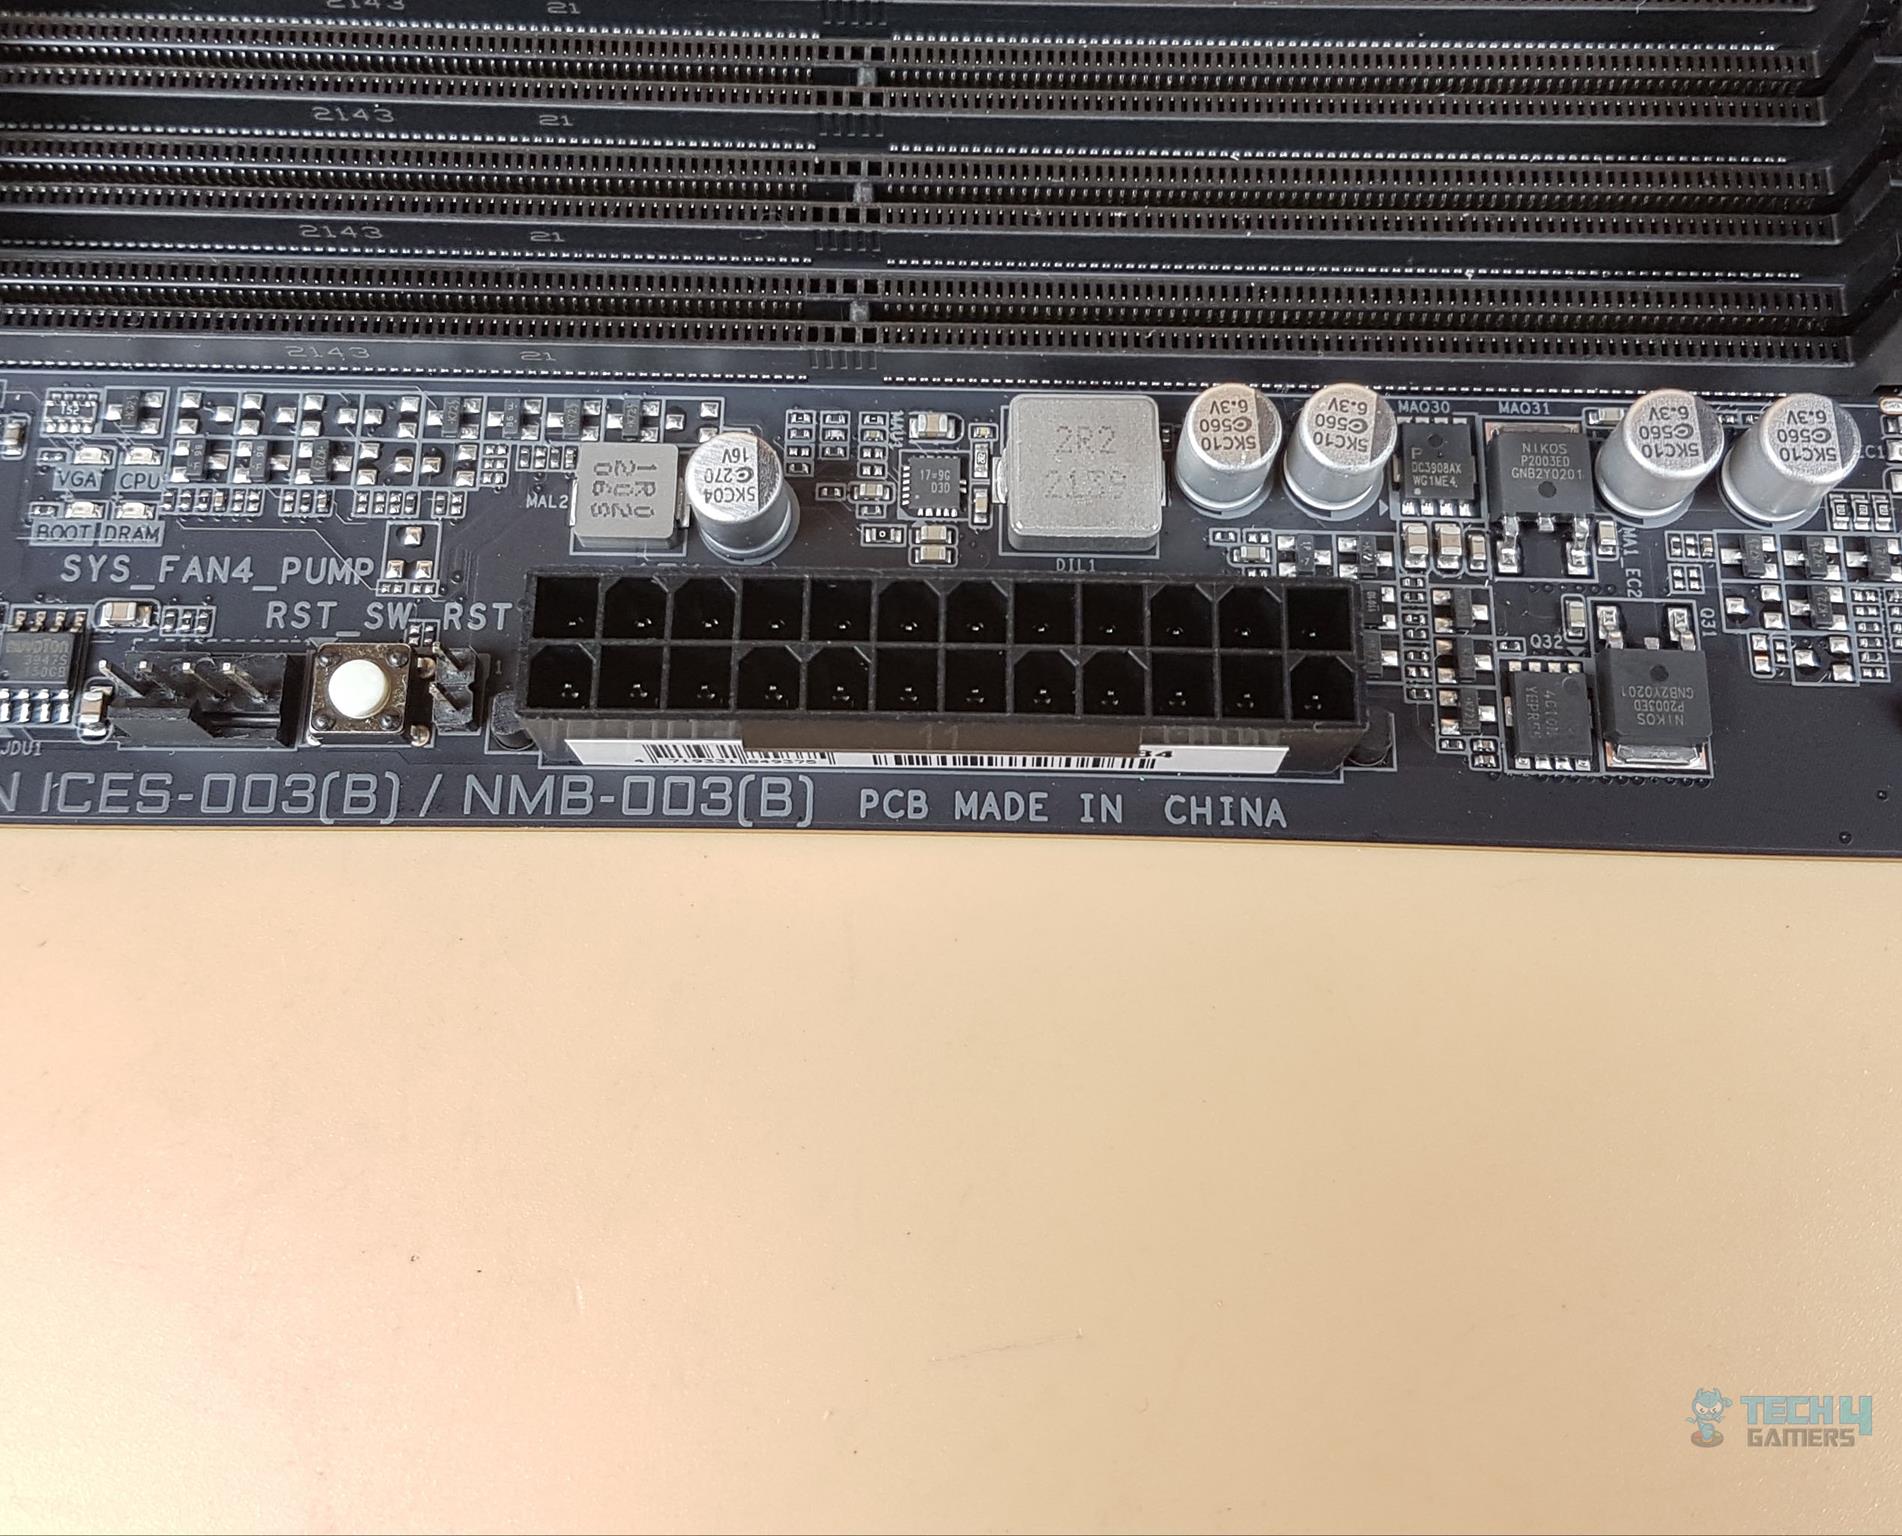
GIGABYTE is using nuvoton 3947S controller for the PWM fan headers. We have a solid pin 24-pin ATX connector here which is not stainless-steel reinforced.
We have the following:
- 1x 2-pin BIOS Reset Jumper
- 1x Reset Button
- 1x 4-pin PWM System Fan Header
There are LED indicators above. These are for the VGA, CPU, BOOT, and DRAM. They provide additional troubleshooting aid to the user above the debug LED.
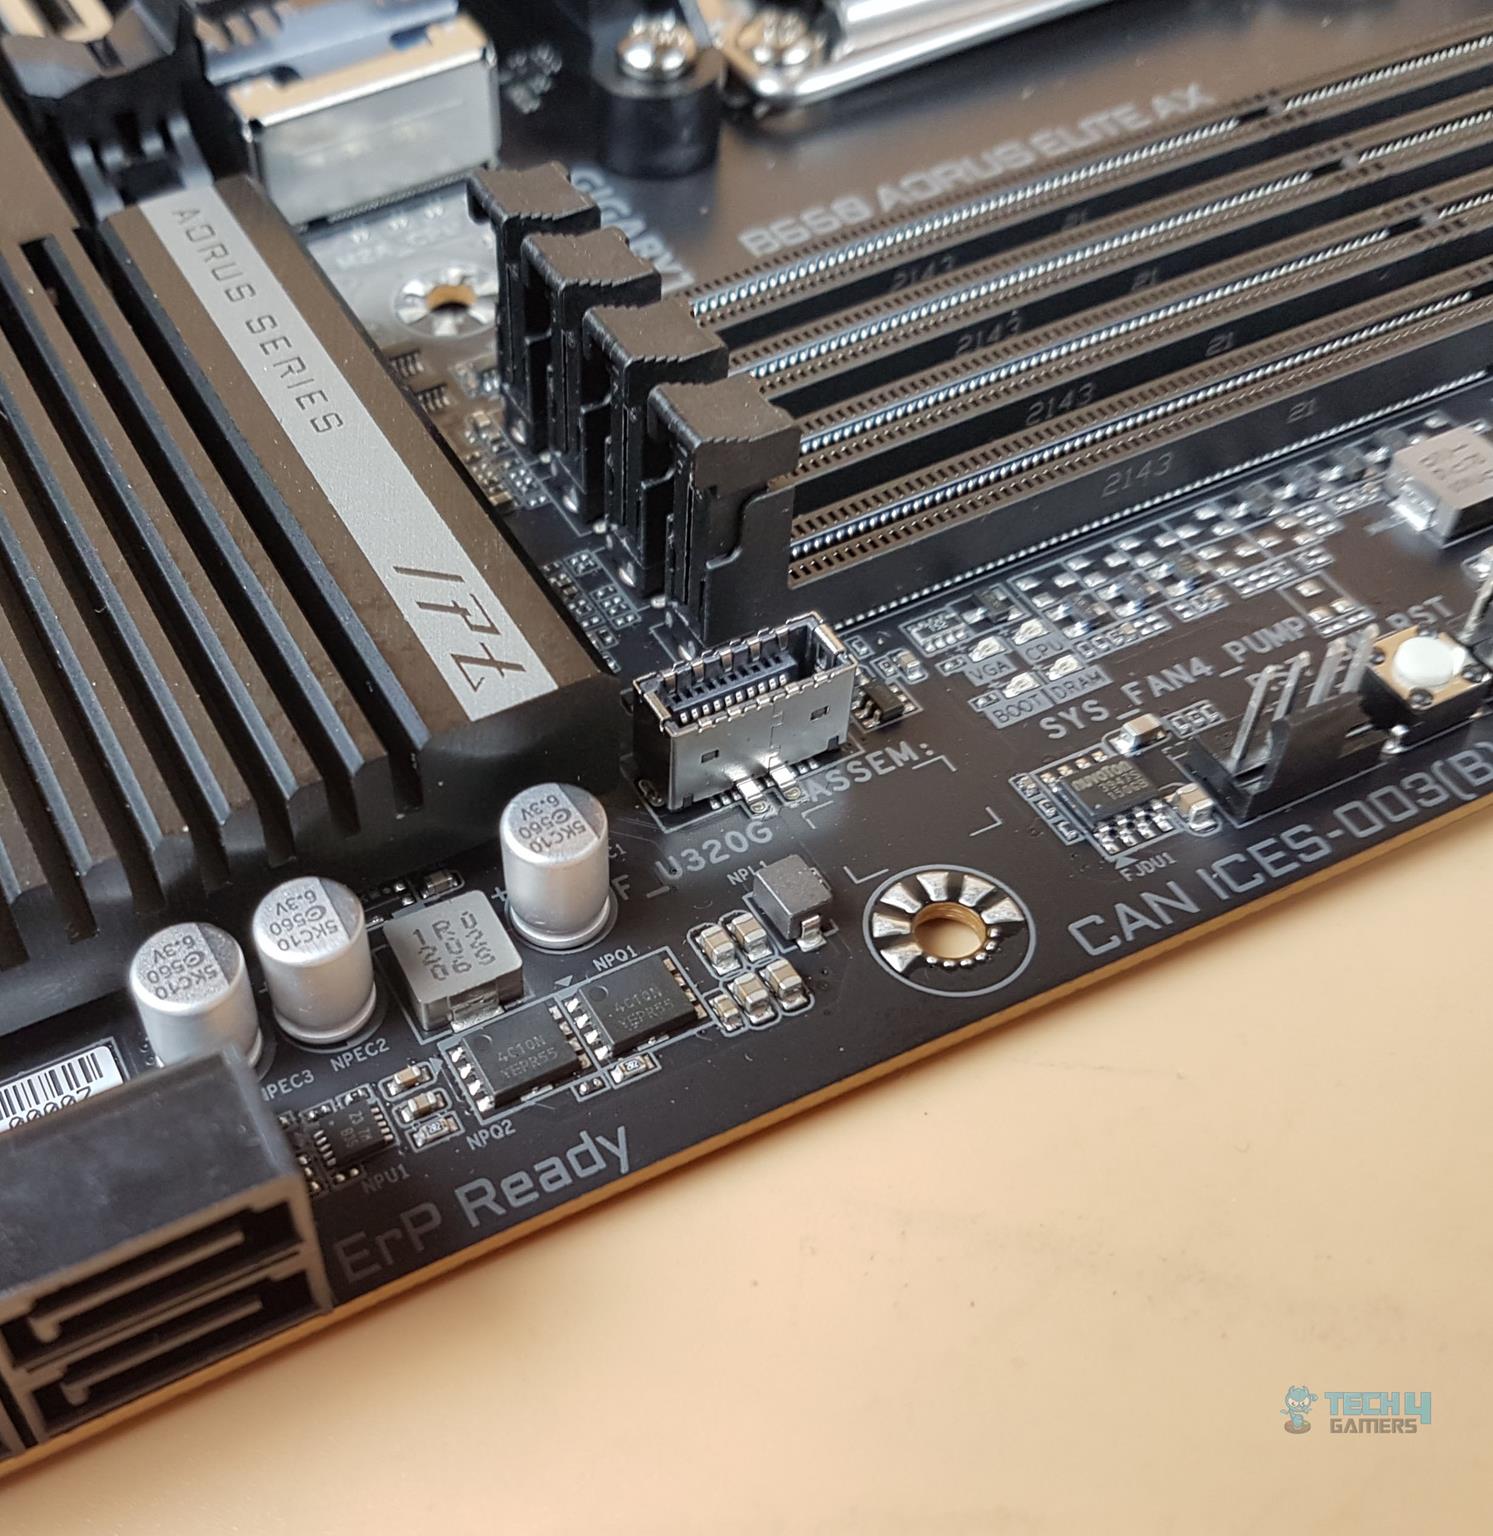
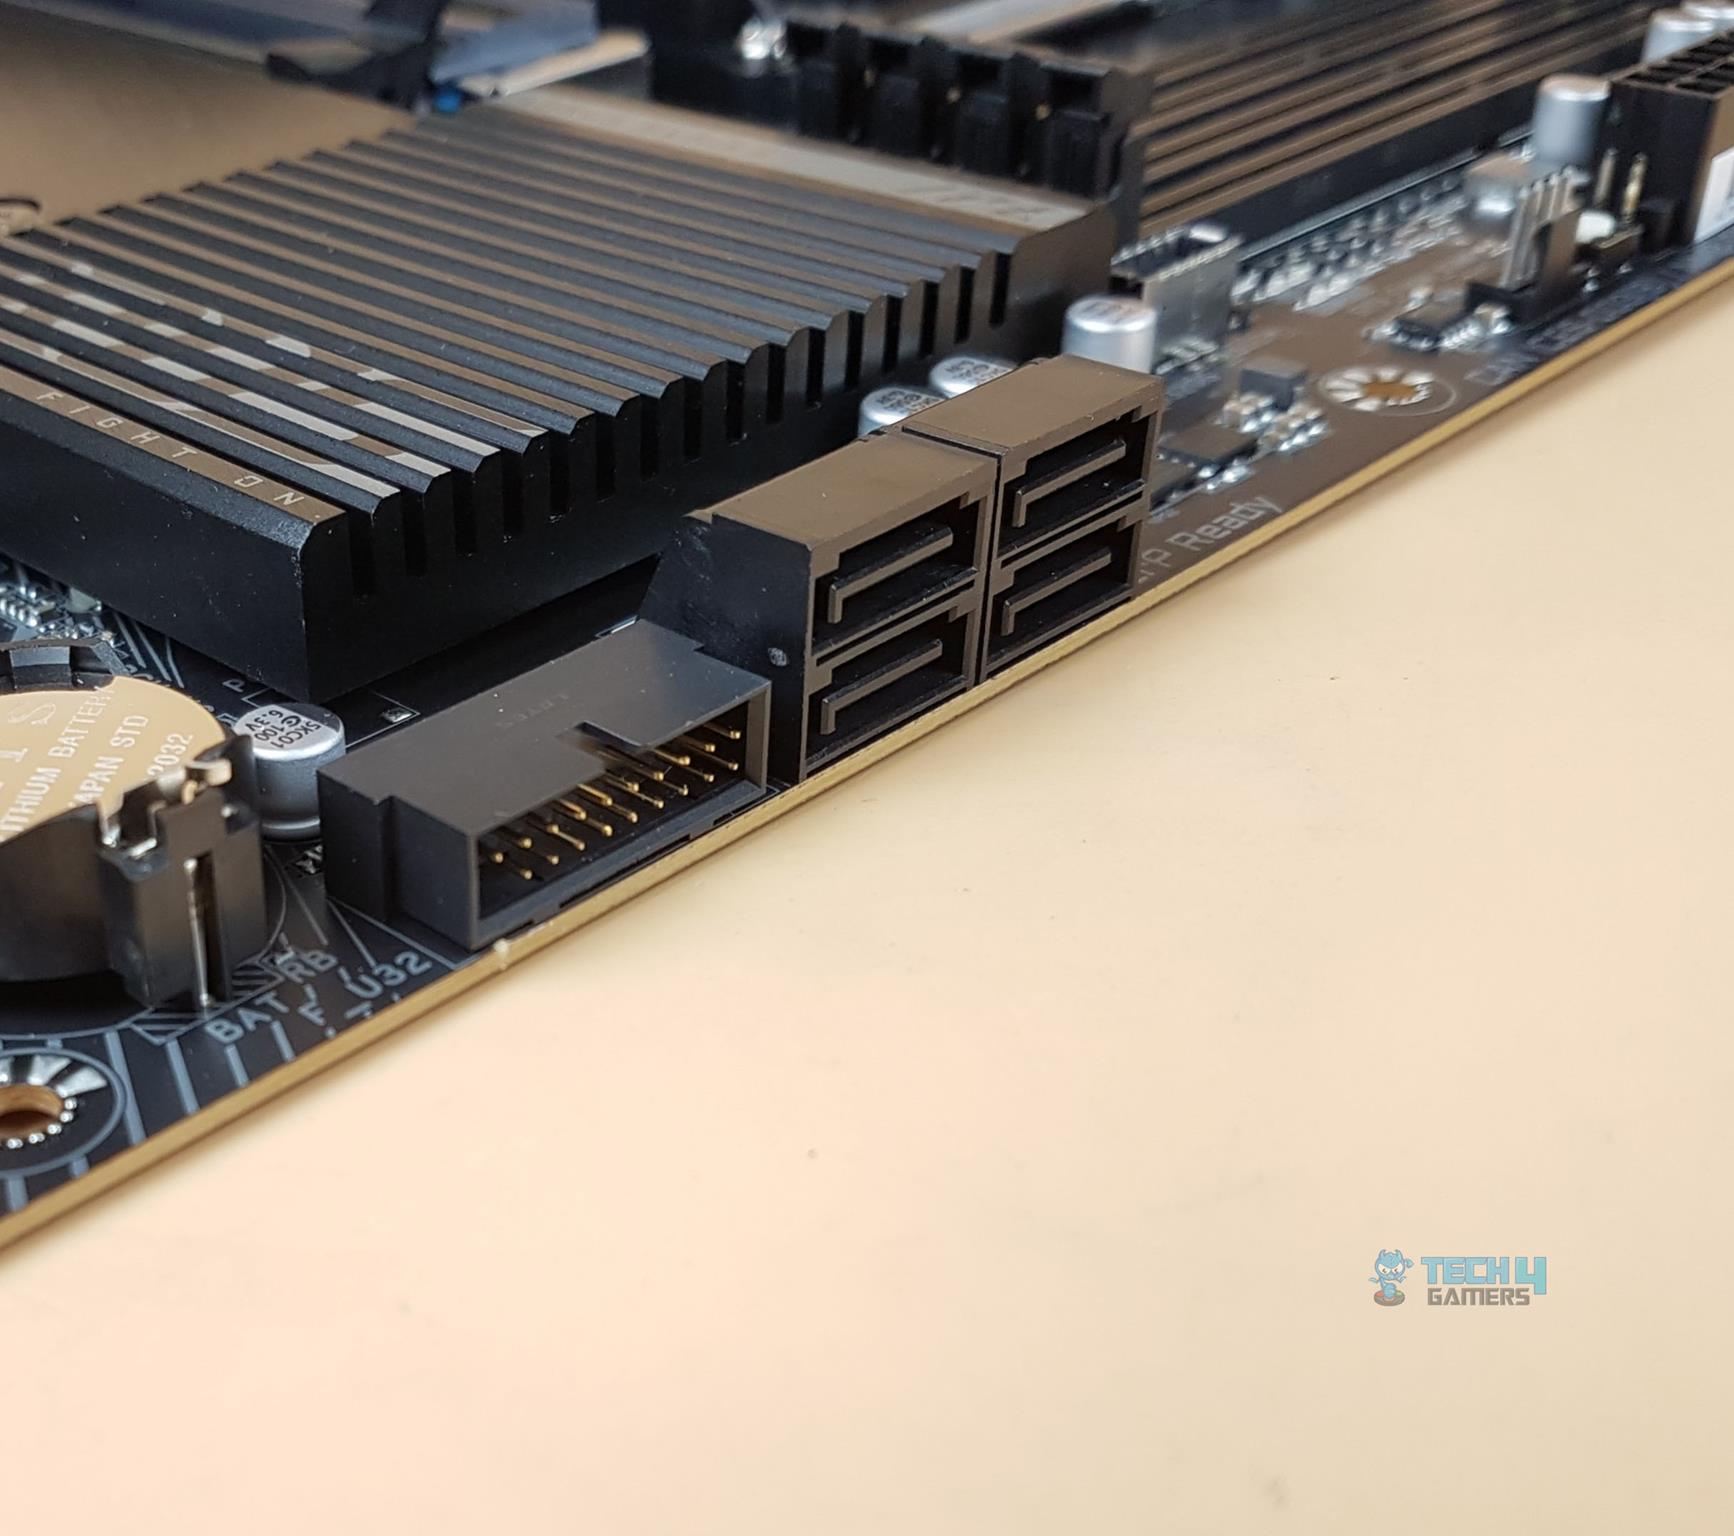
Next, we have a Front Panel USB 3.2 Gen 2×2 Type-C header and 4x S-ATA 6Gbps ports followed by a USB 3.2 Gen 1 header.
Starting from the right side, we have:
- System Panel Connector
- 1x 4-pin PWM System Fan Header
- 2x USB 2.0 Headers
- LED Demo Button
- 1x 4-pin PWM System Fan Header
- TPM Header
- ESPI_DB Header
- 3-pin 5V RGB Header
- 4-pin 12V RGB Header
- Front Panel Audio Header
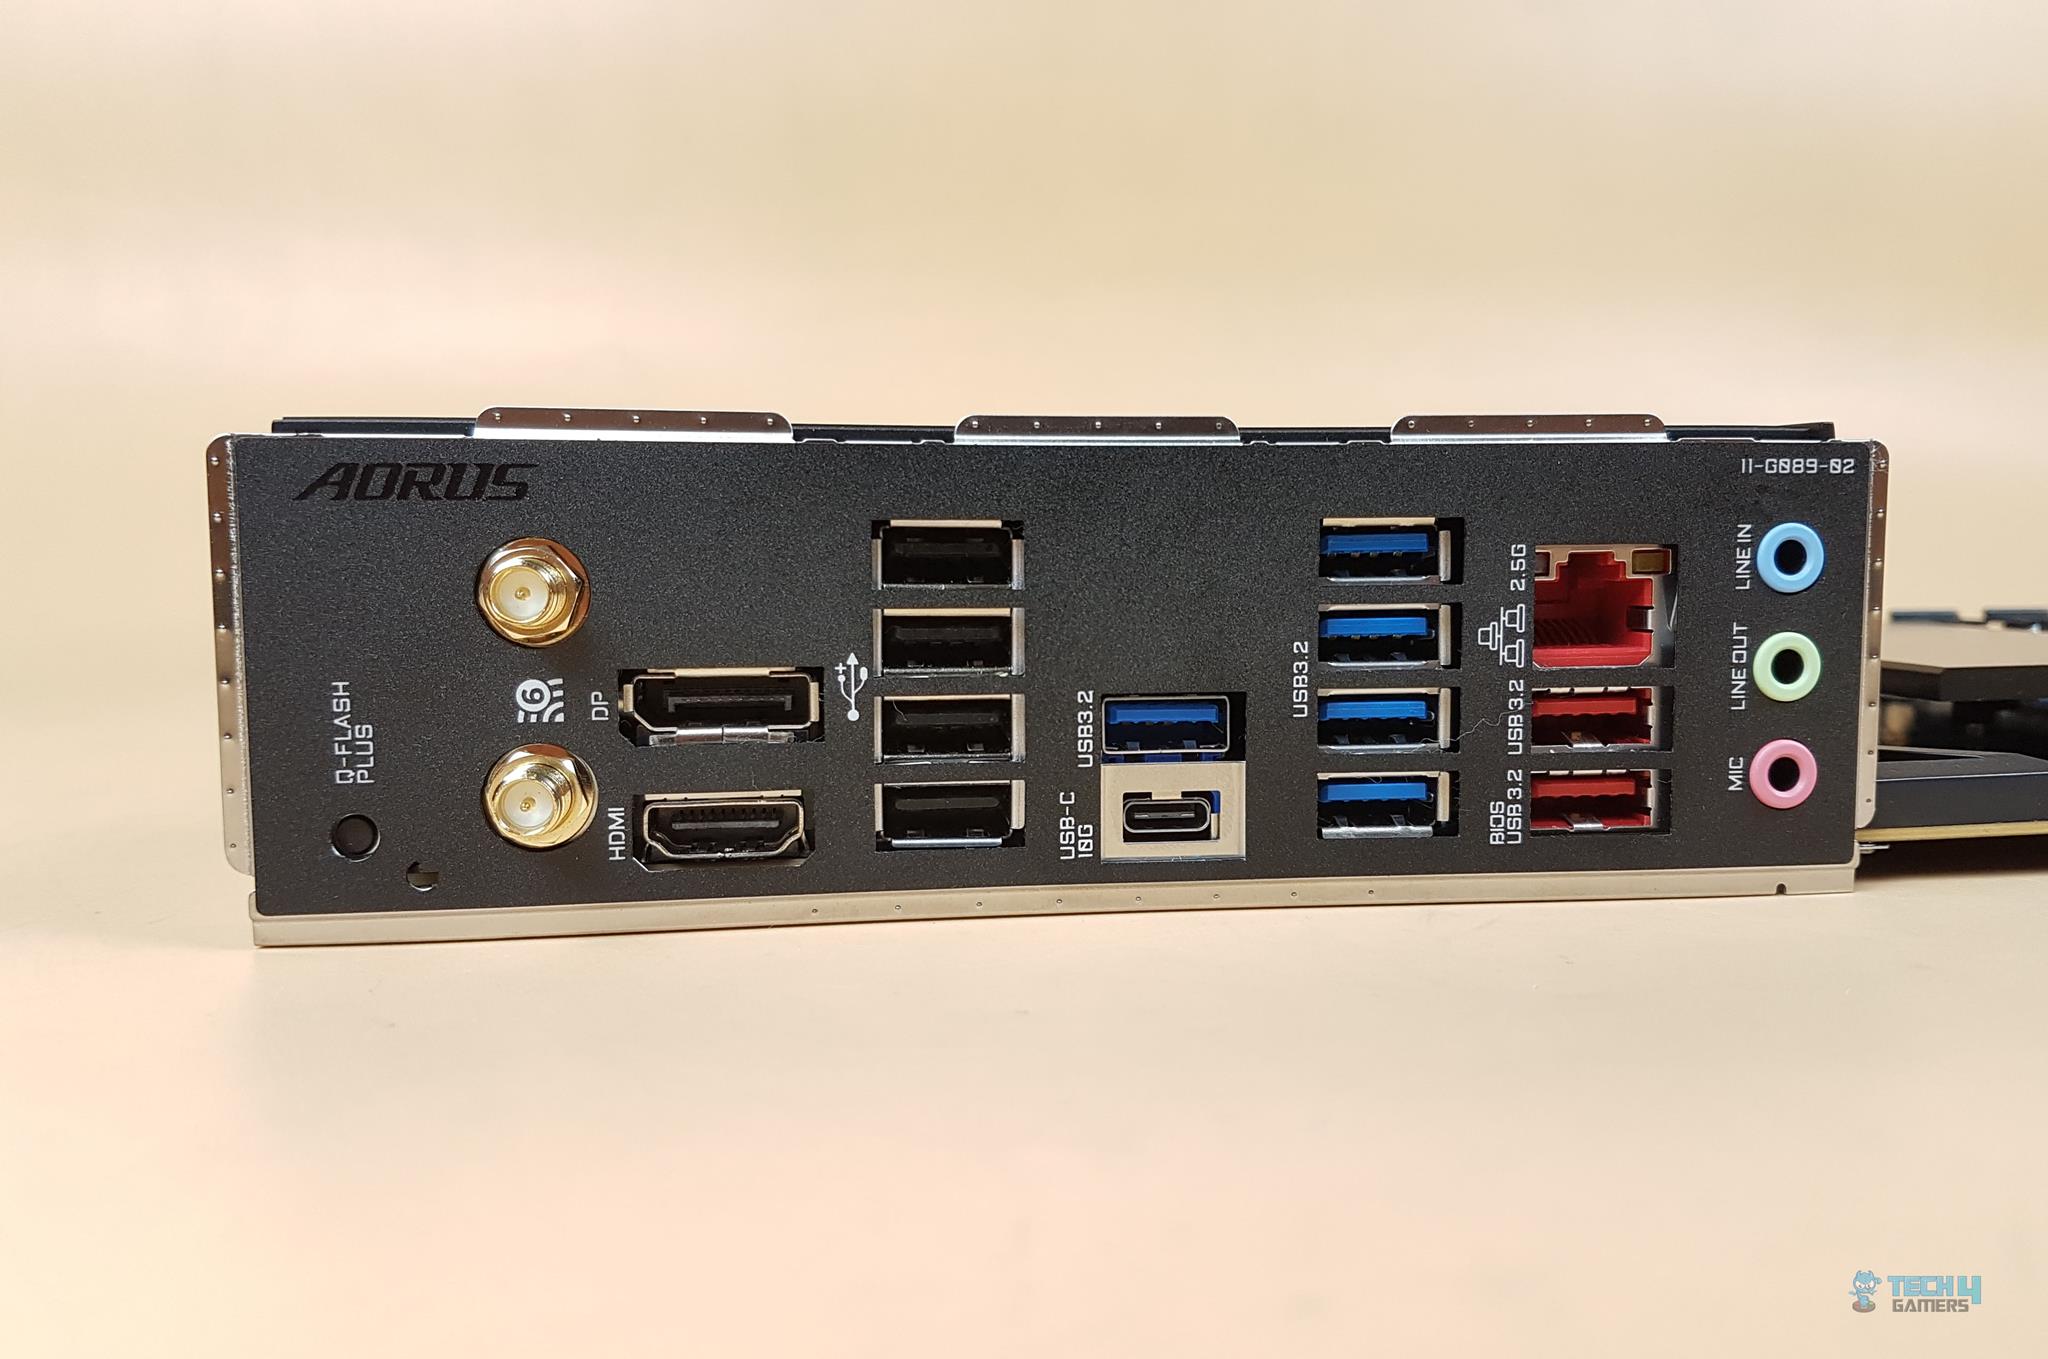
The following options are provided:
- 1 x Q-Flash Plus button
- 2 x SMA antenna connectors (2T2R)
- 1 x DisplayPort
- 1 x HDMI port
- 1 x USB Type-C® port, with USB 3.2 Gen 2×2 support
- 2 x USB 3.2 Gen 2 Type-A ports (red)
- 5 x USB 3.2 Gen 1 ports
- 4 x USB 2.0/1.1 ports
- 1 x RJ-45 port
- 3 x audio jacks
Q-Flash Plus enables BIOS updates without needing to install the CPU/RAM. The top of the button features a Q-Flash LED Indicator, and a dedicated USB 3.2 Gen 2 Type-A port facilitates the BIOS update. For easy identification, the label clearly marks it as the BIOS.
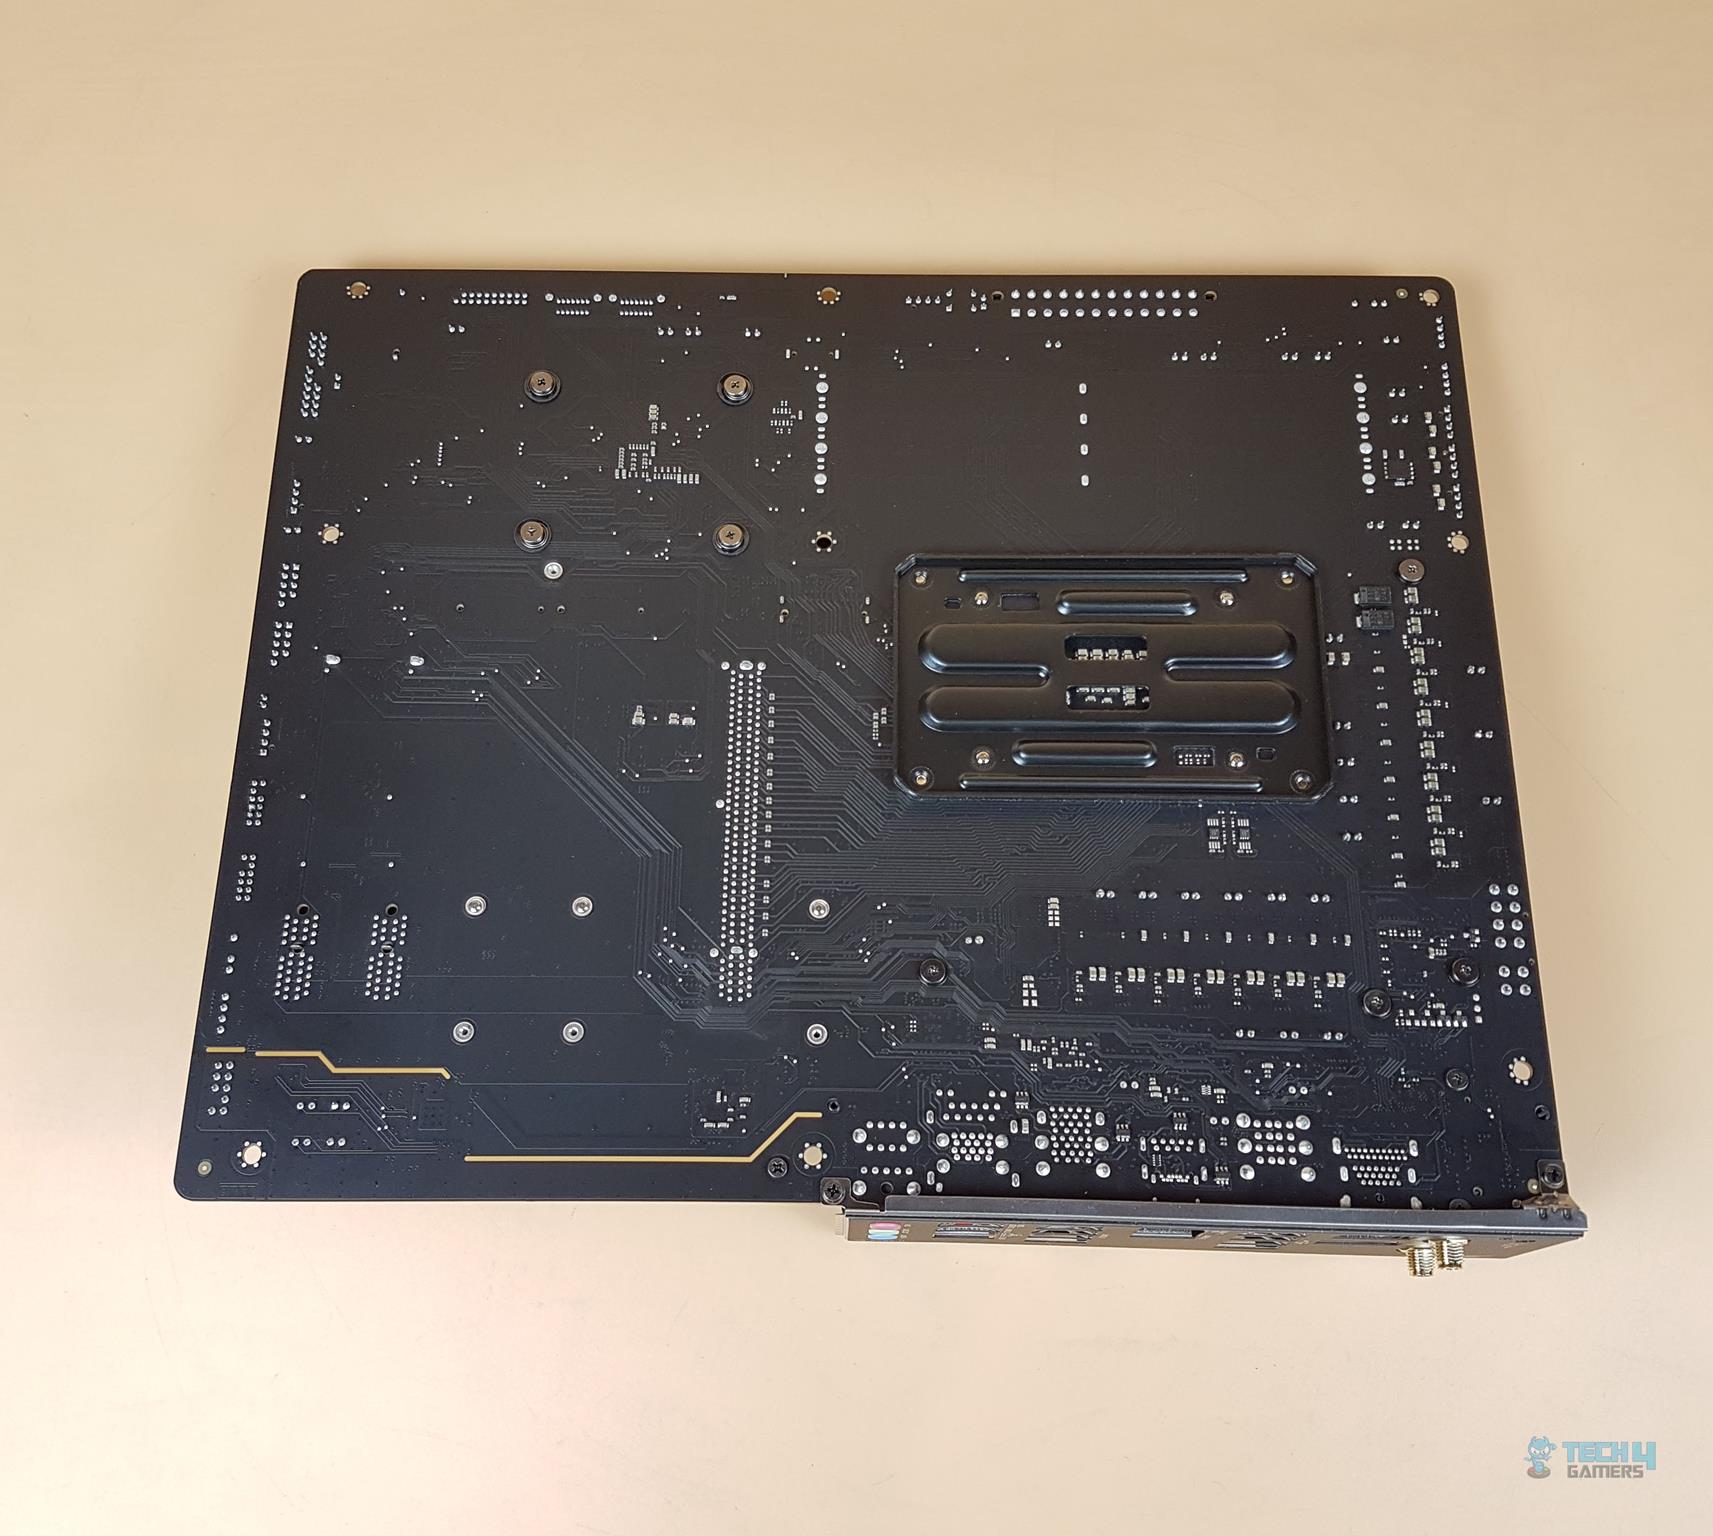
The left picture shows the backside view of the motherboard. There is a non-removable AMD backplate over the top. The chipset screws have rubber washers between them and the PCB. The right picture shows the PCB with all heatsink covers removed.
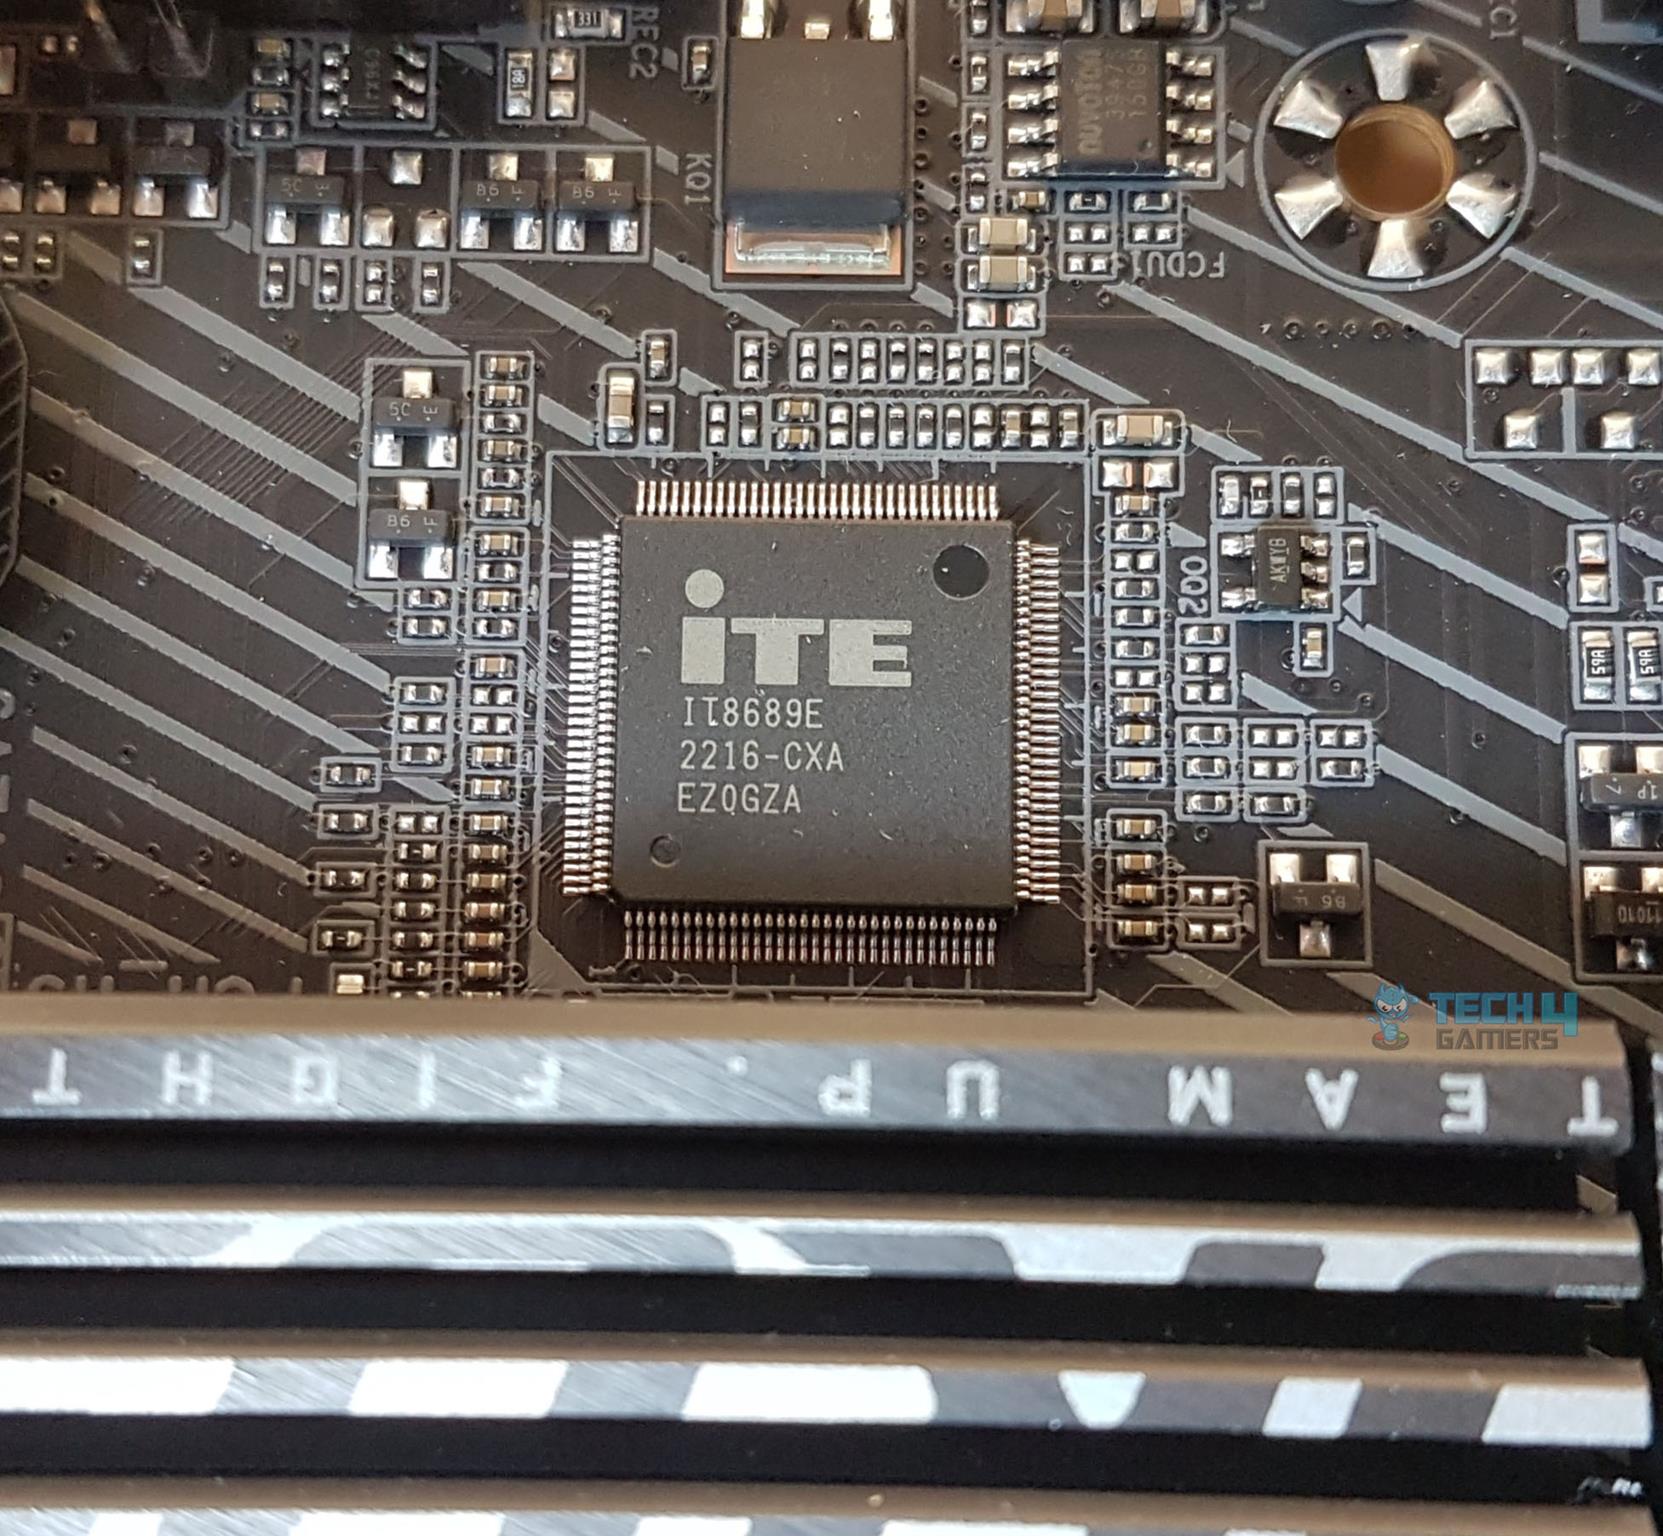
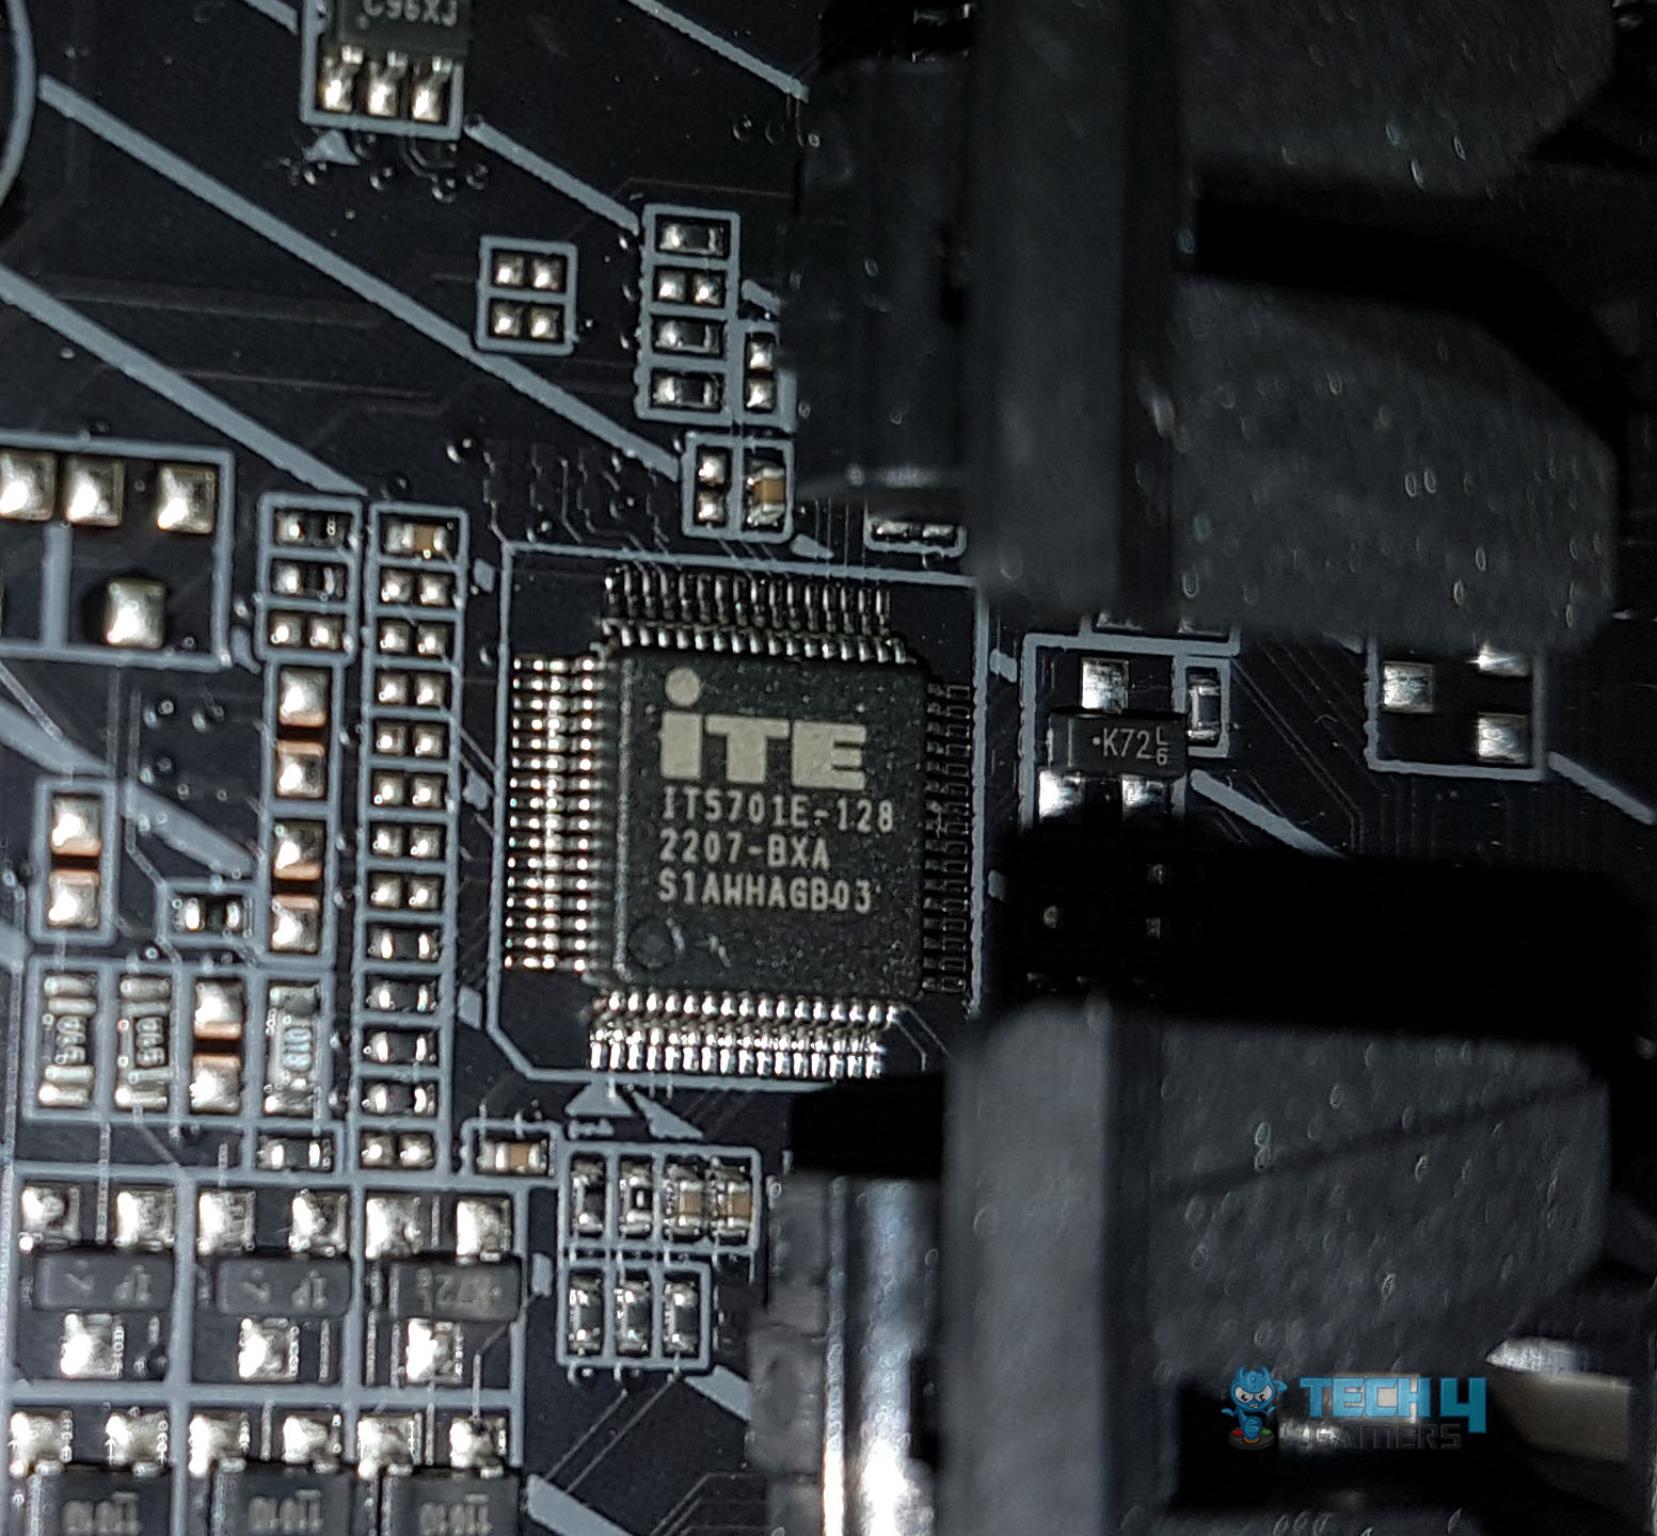
We have an iTE8689E chip for I/O control. The IT5701E controller, pictured on the right, is probably for the Q FLASH PLUS and RGB.
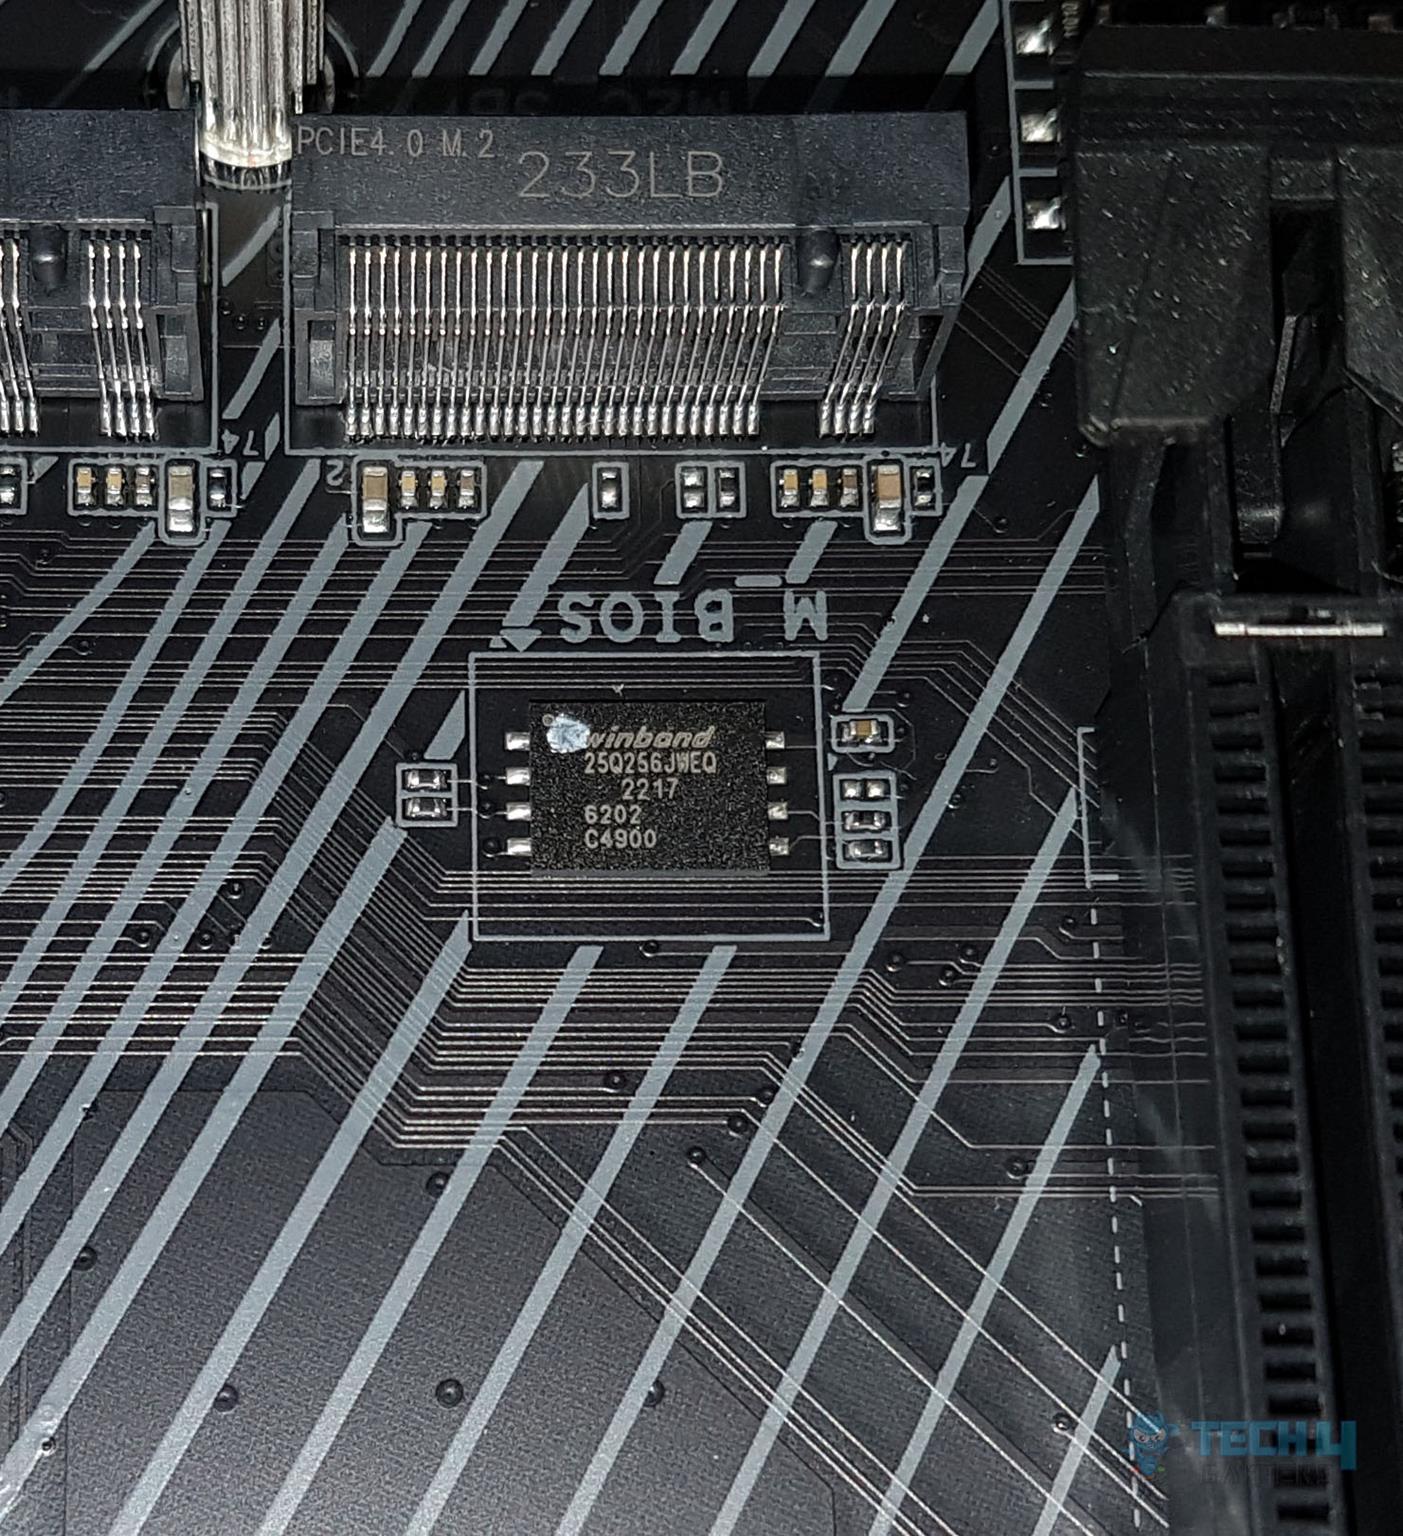
This motherboard is using 1 x 256 Mbit flash chip from winband which supports PnP 1.0a, DMI 2.7, WfM 2.0, SM BIOS 2.7, and ACPI 5.0.
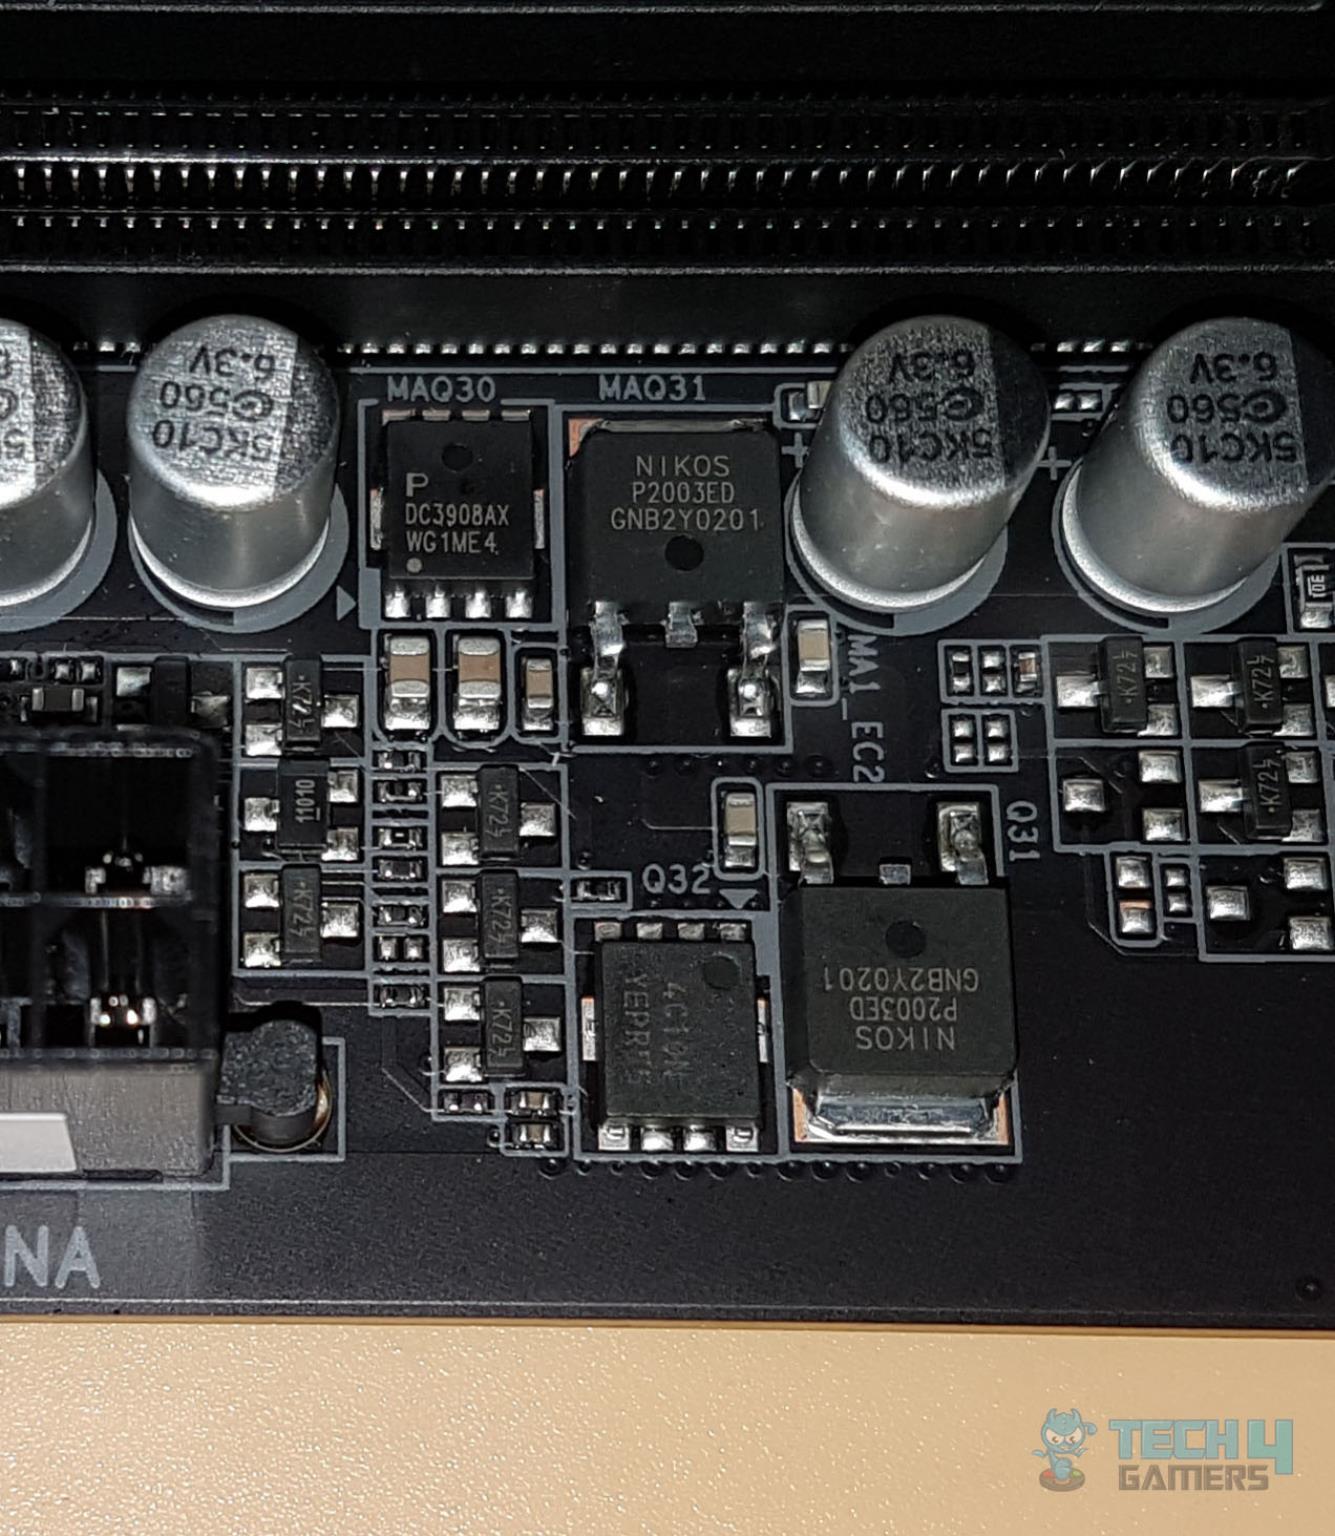
There are 2x NIKOS P2003ED coupled with 4C10N MOSFETs which are N-Channel rated at 30V, 46A. Then there is a PDC3908AX MOSFET in what seems to be a 3-high, 1-low configuration.
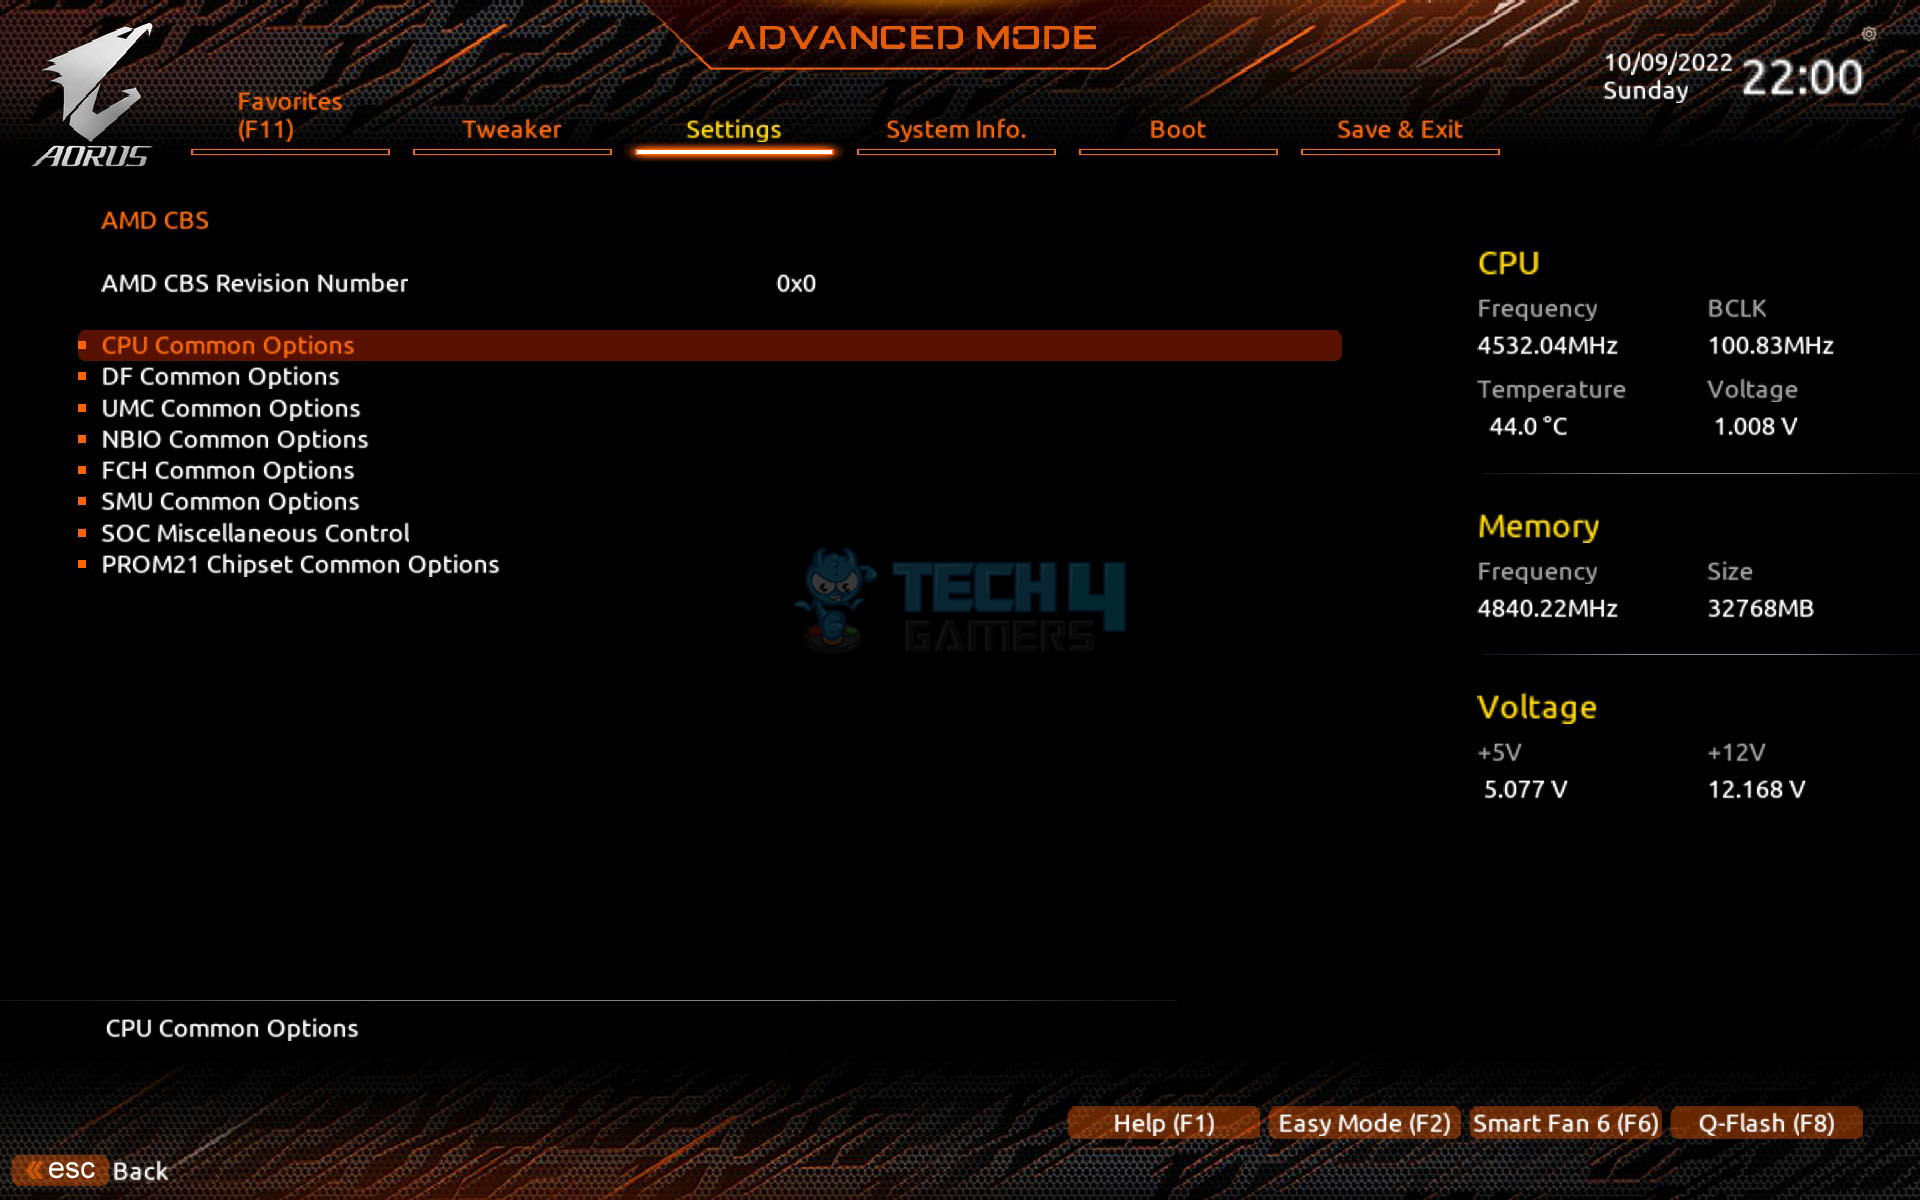
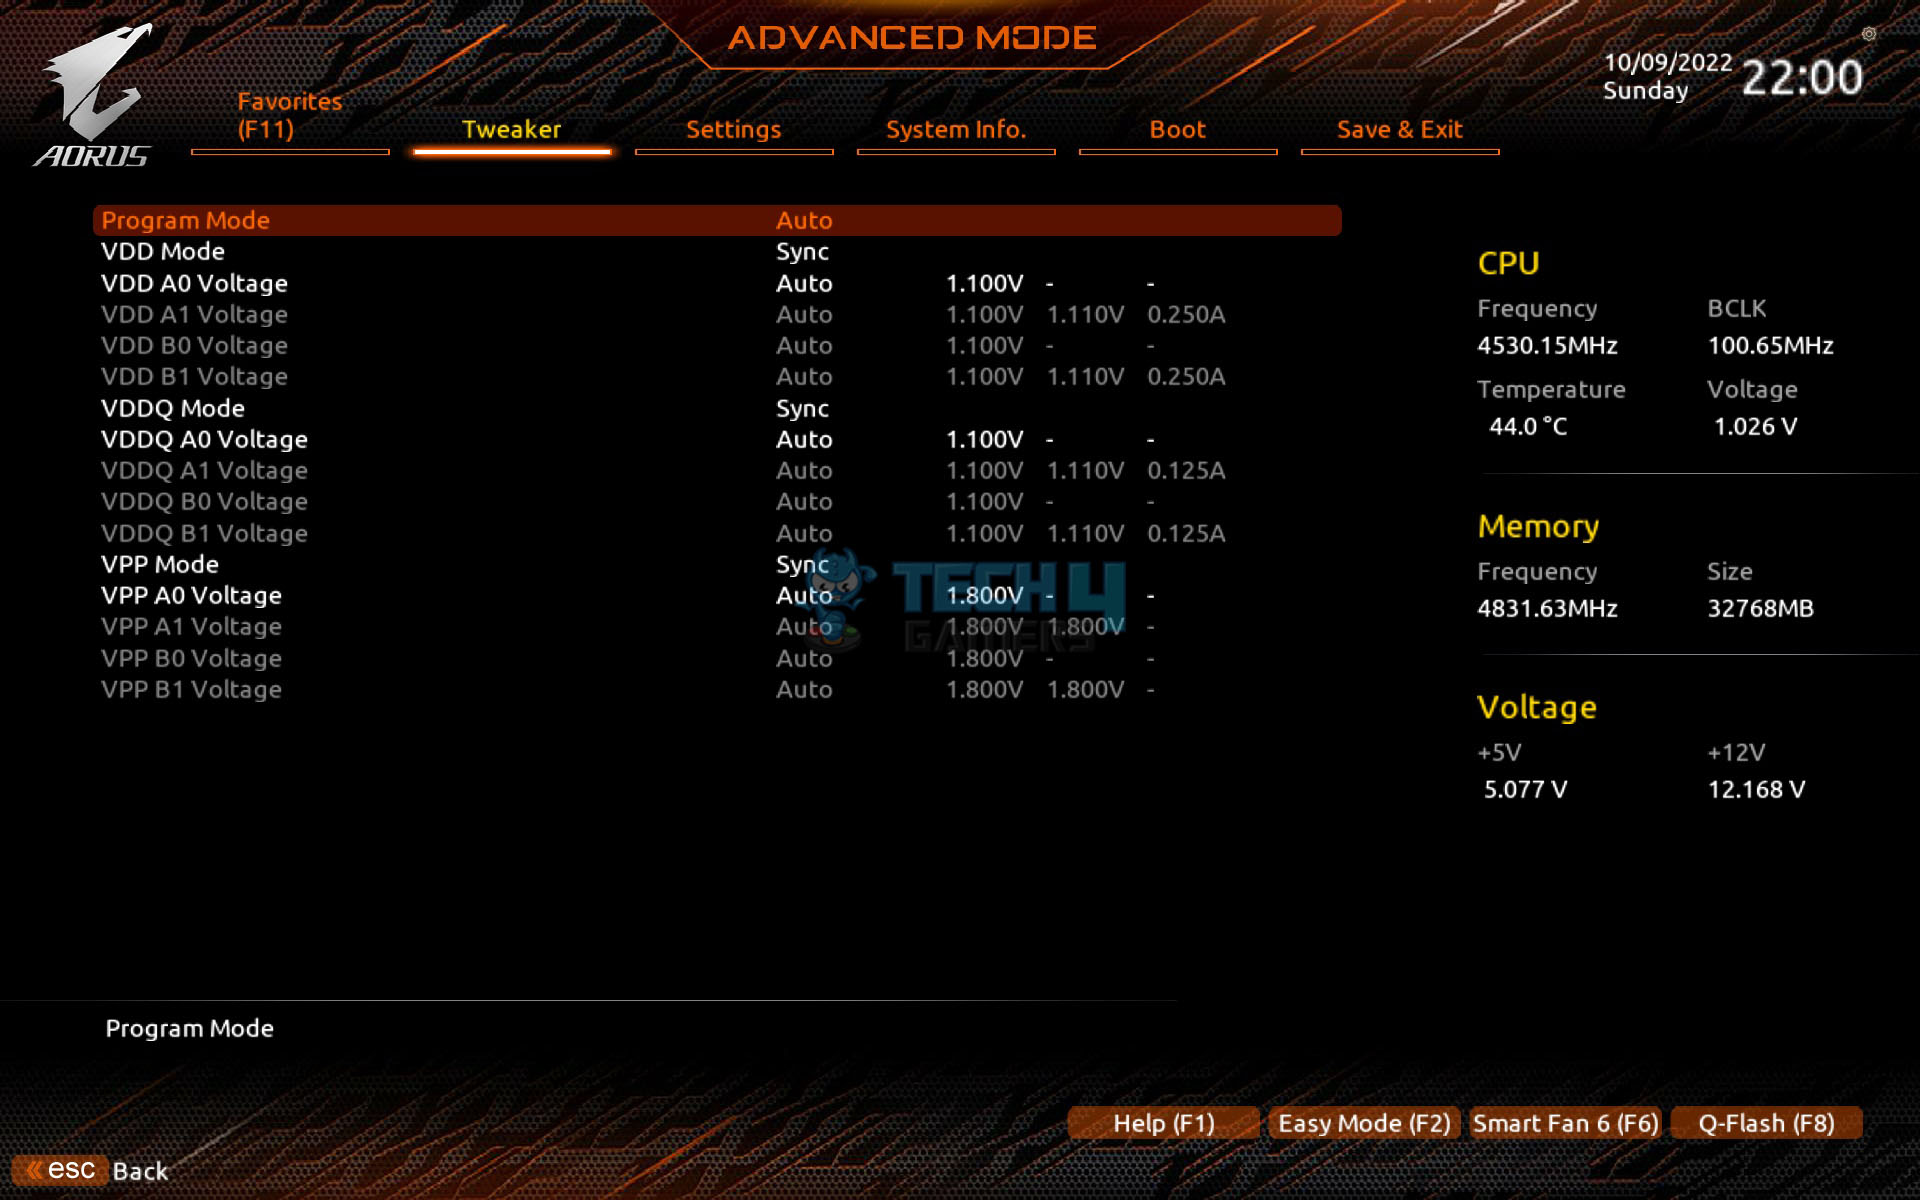
BIOS and Software
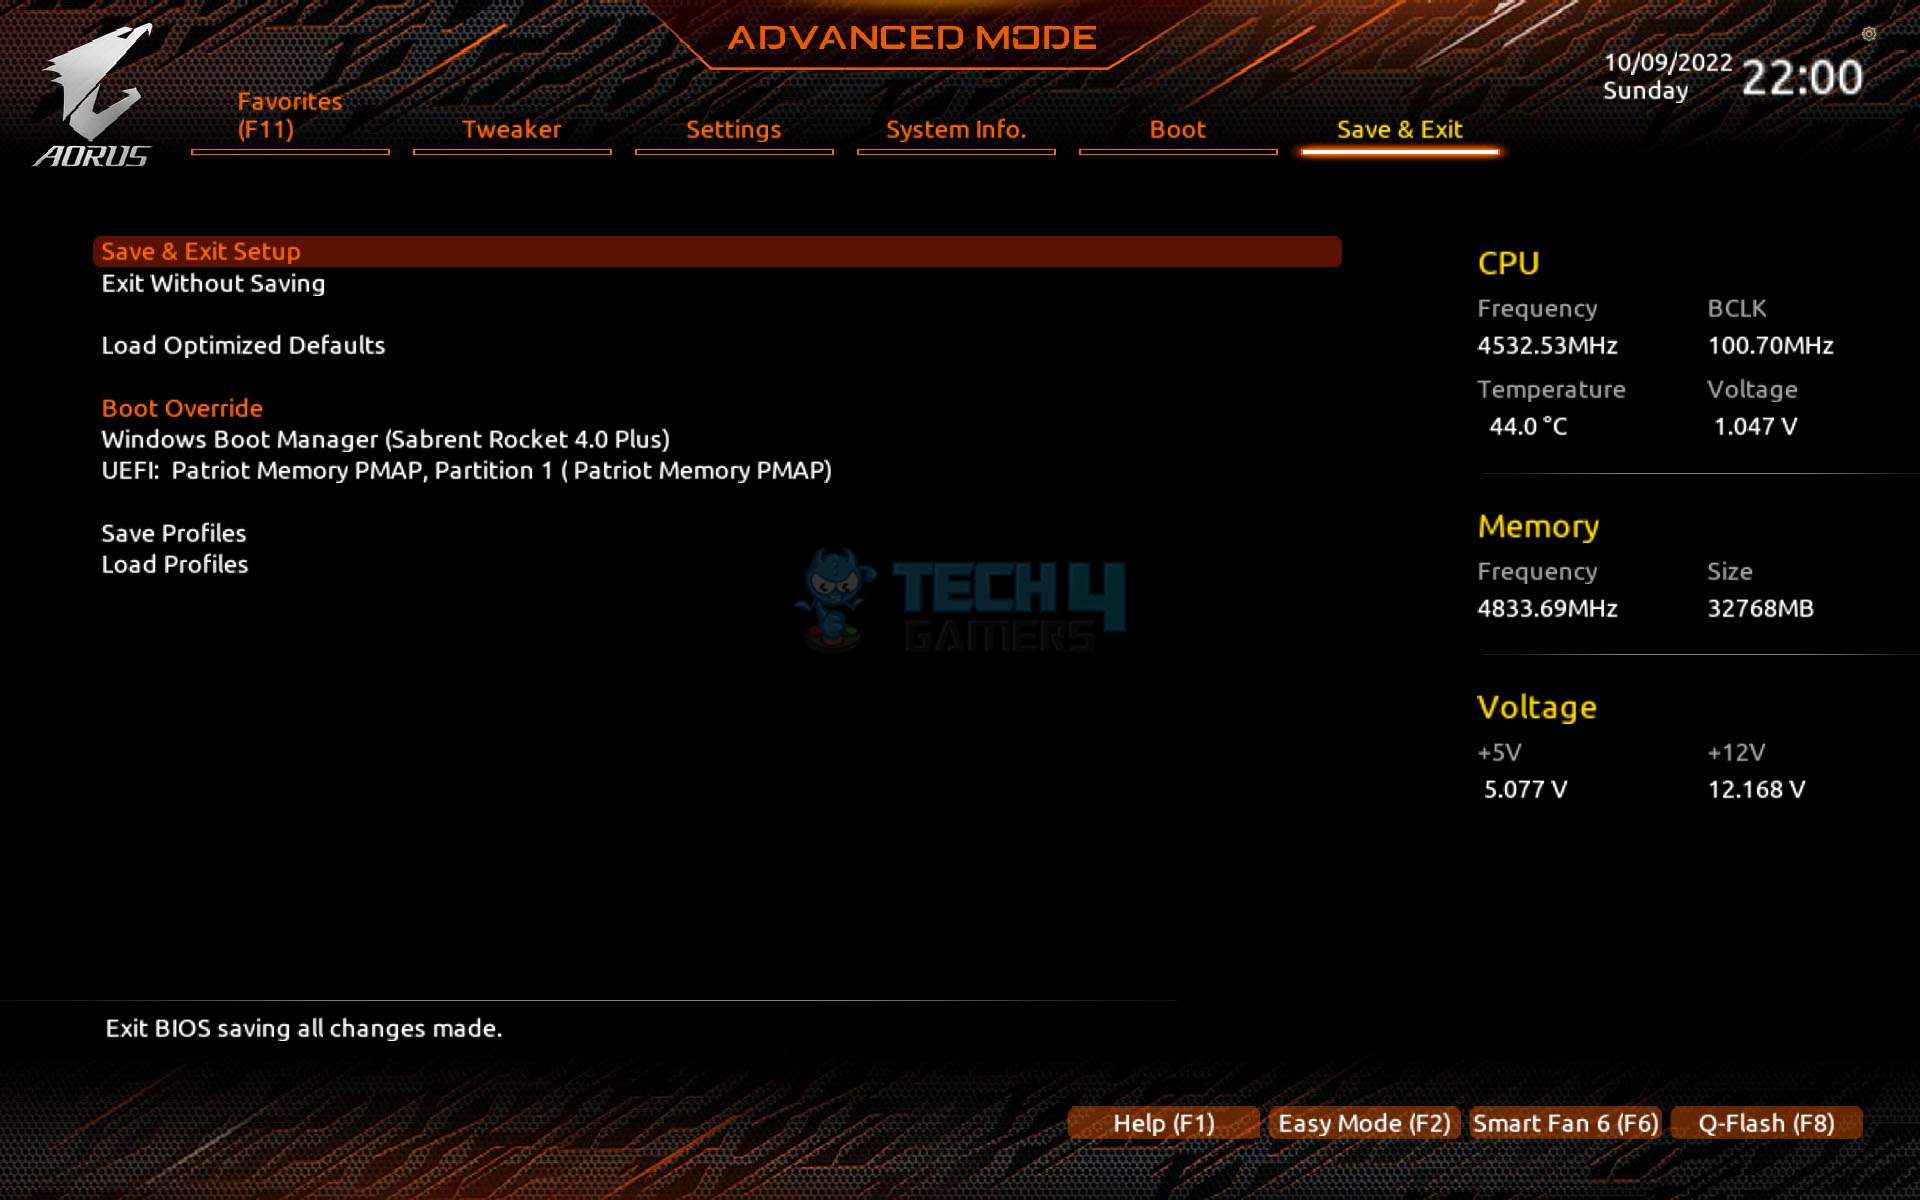


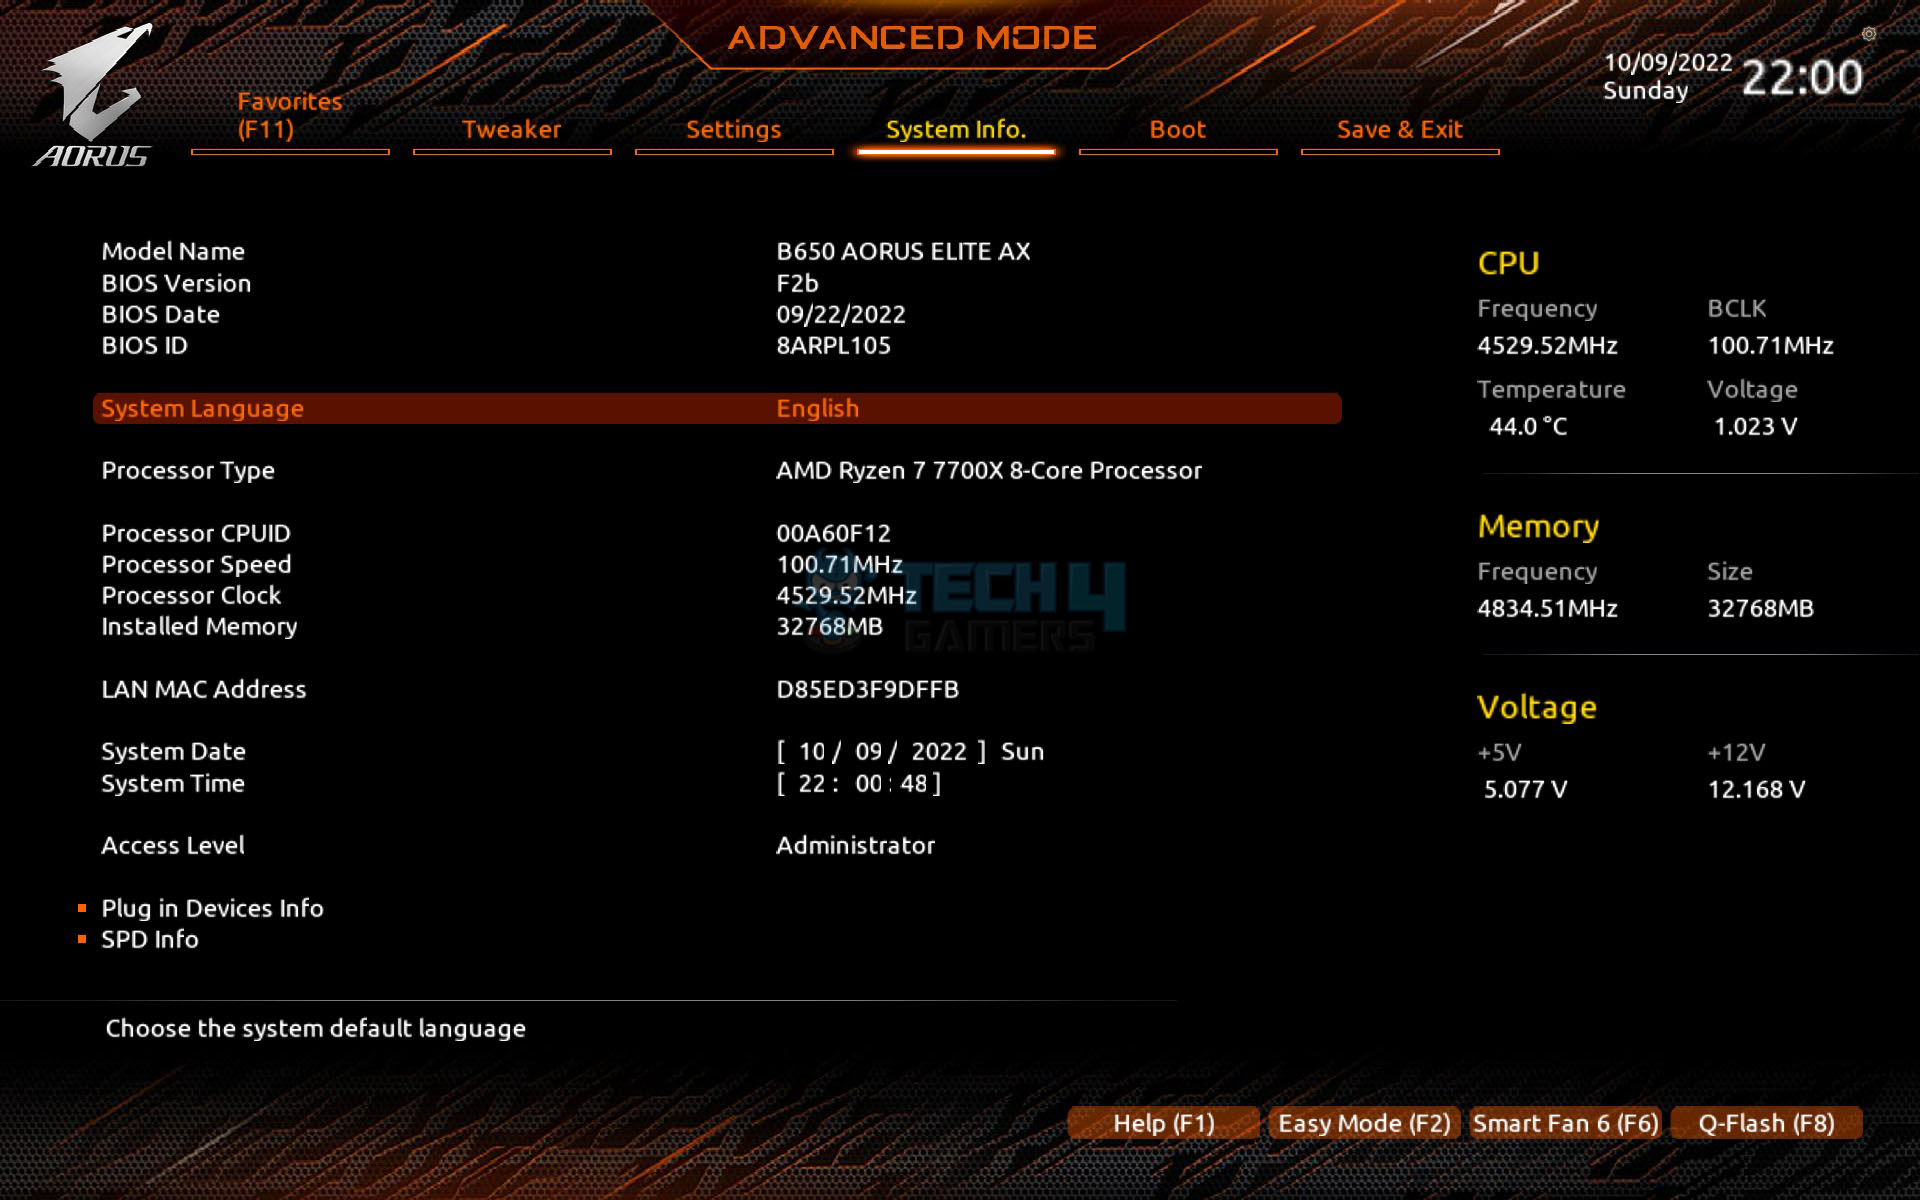


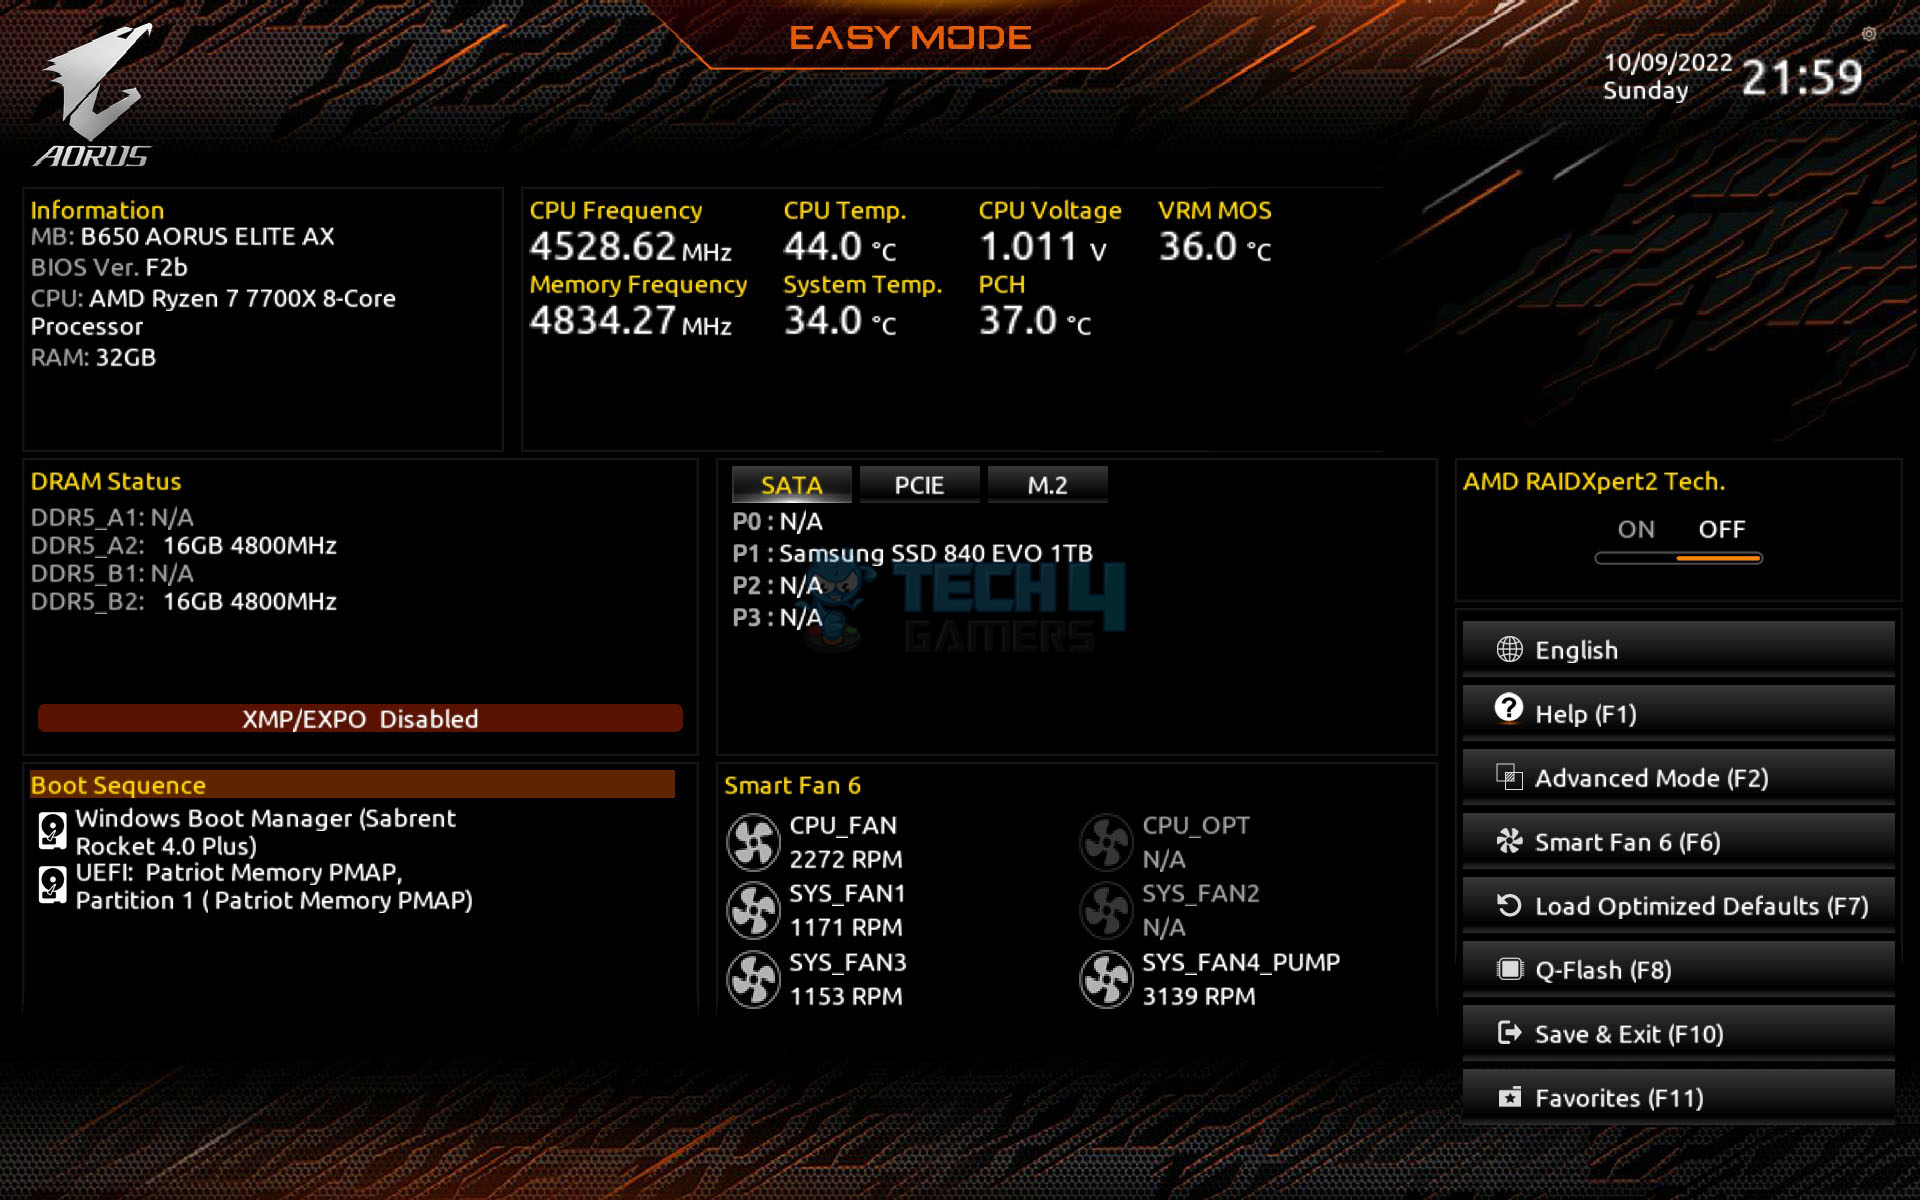
The last page is the Save and Exit options. The user can define the profiles and load them later on. The optimized Defaults can also be loaded from here.
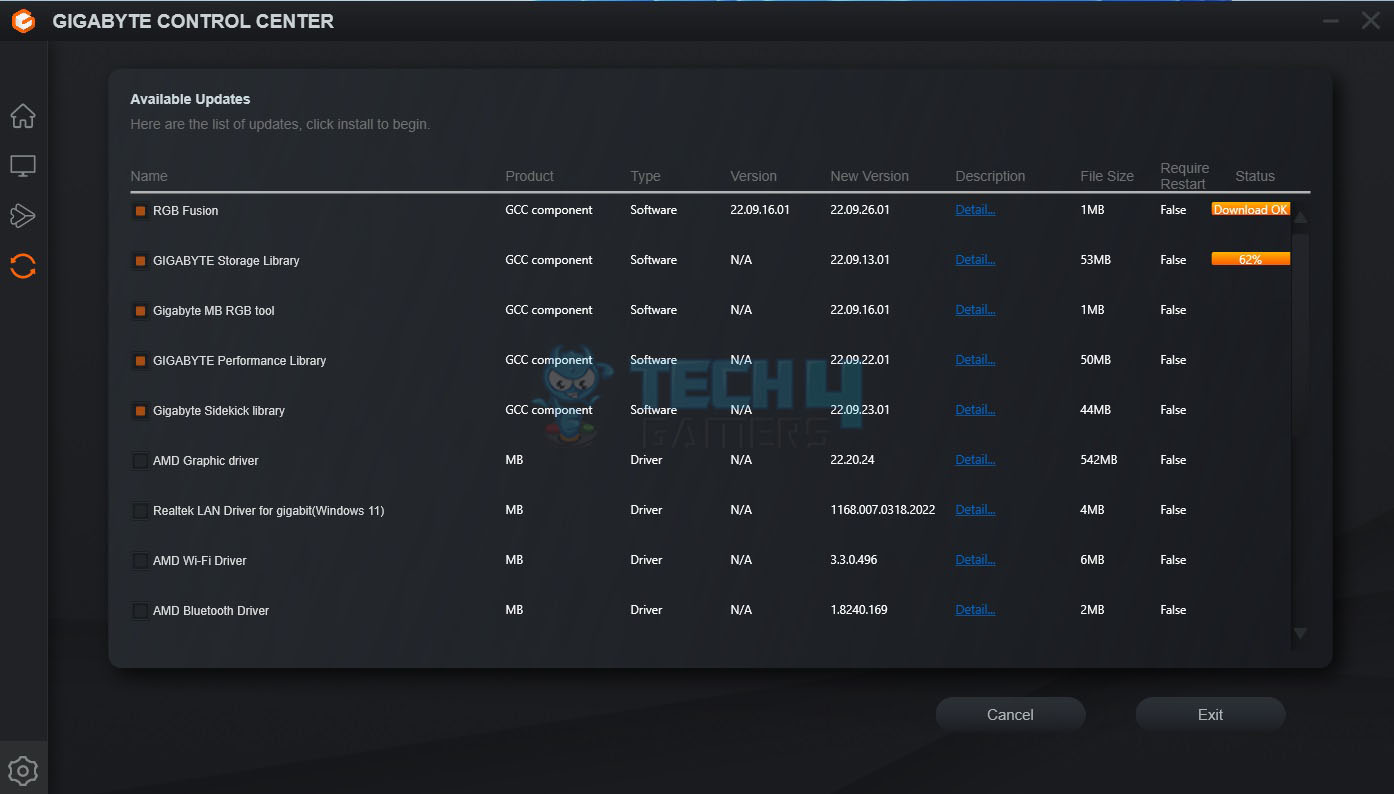
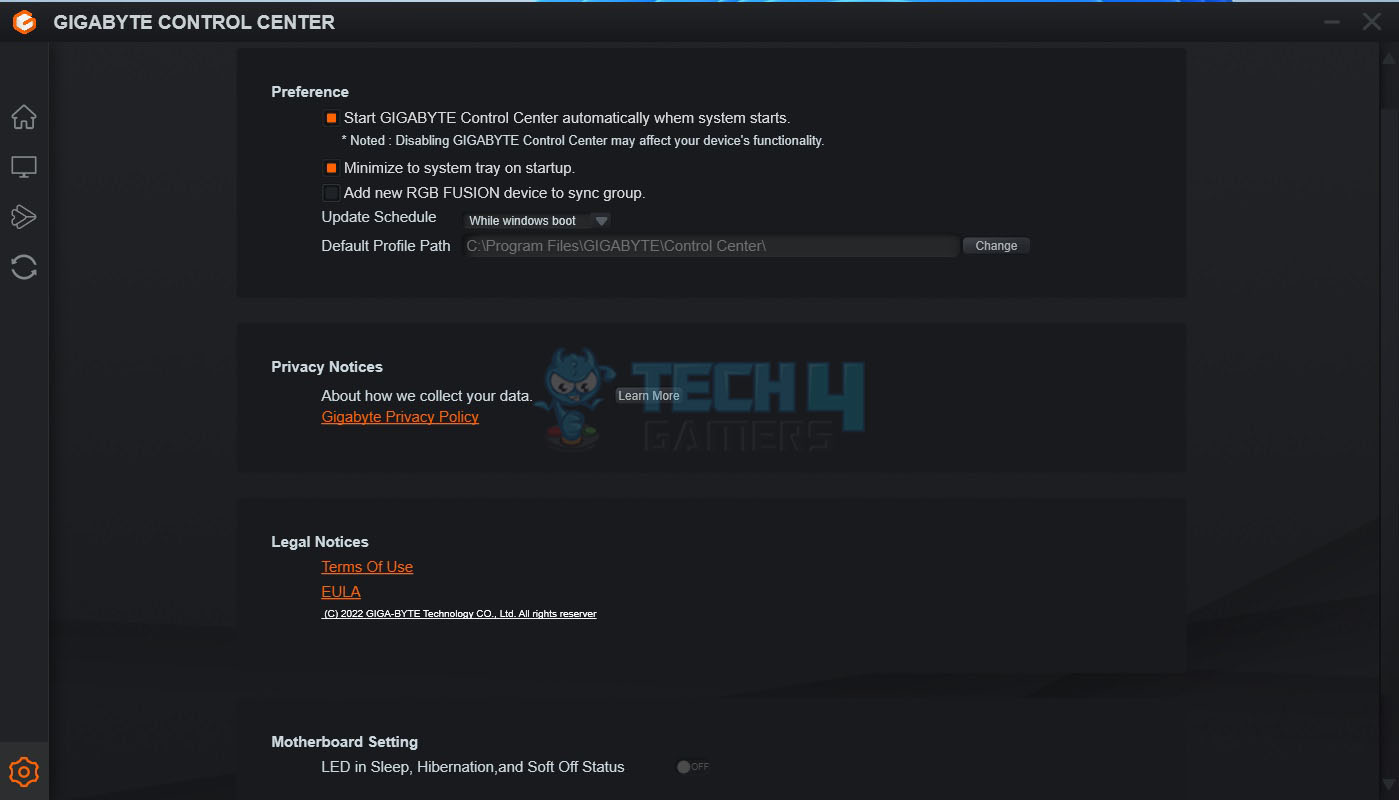
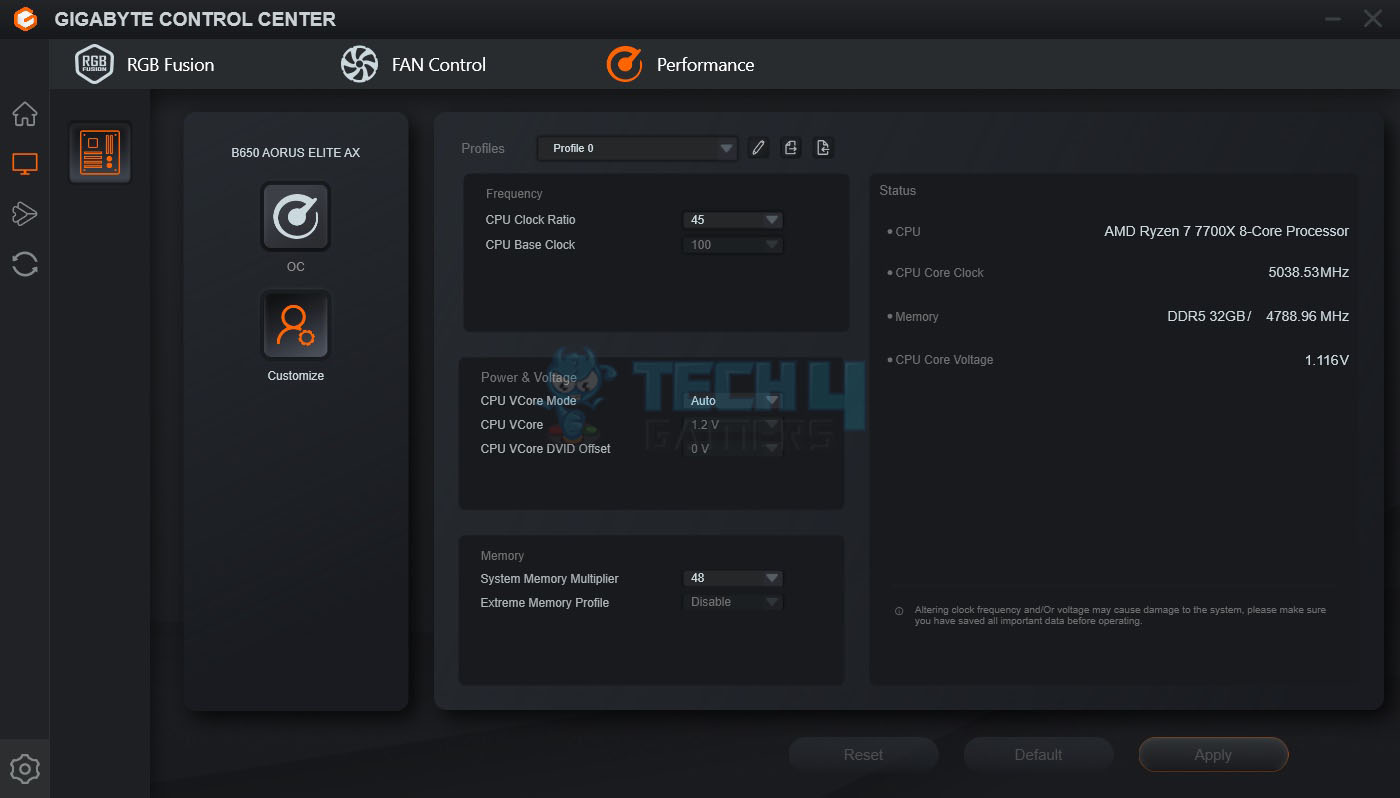
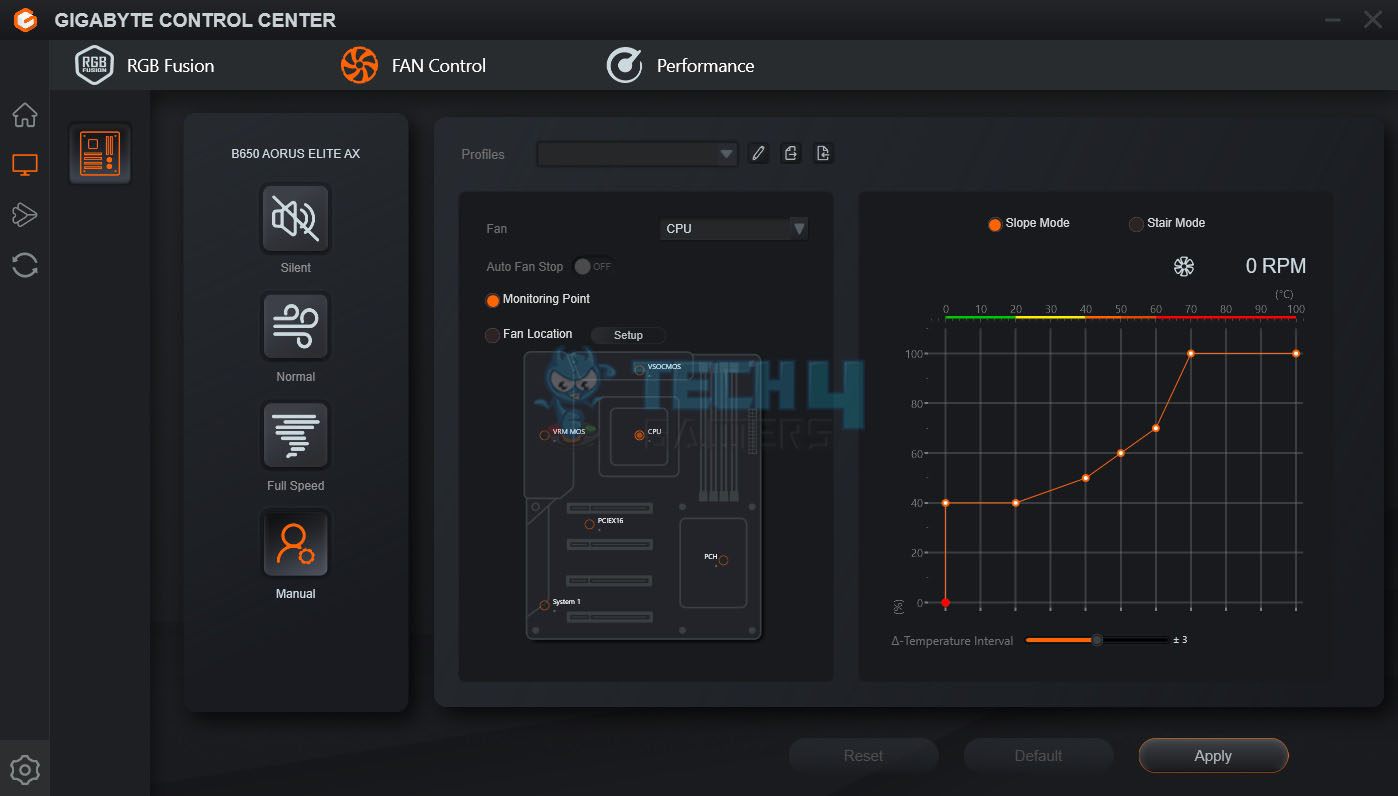
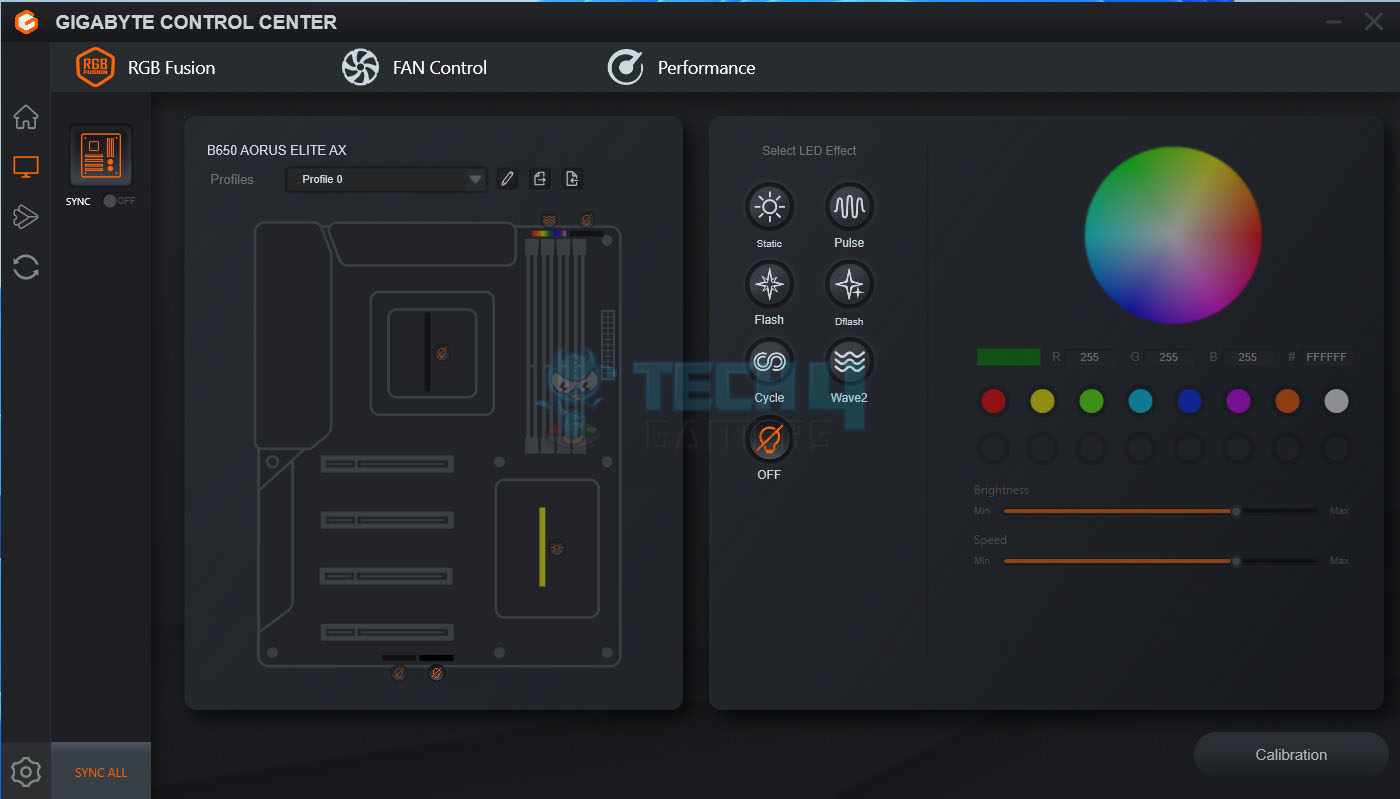
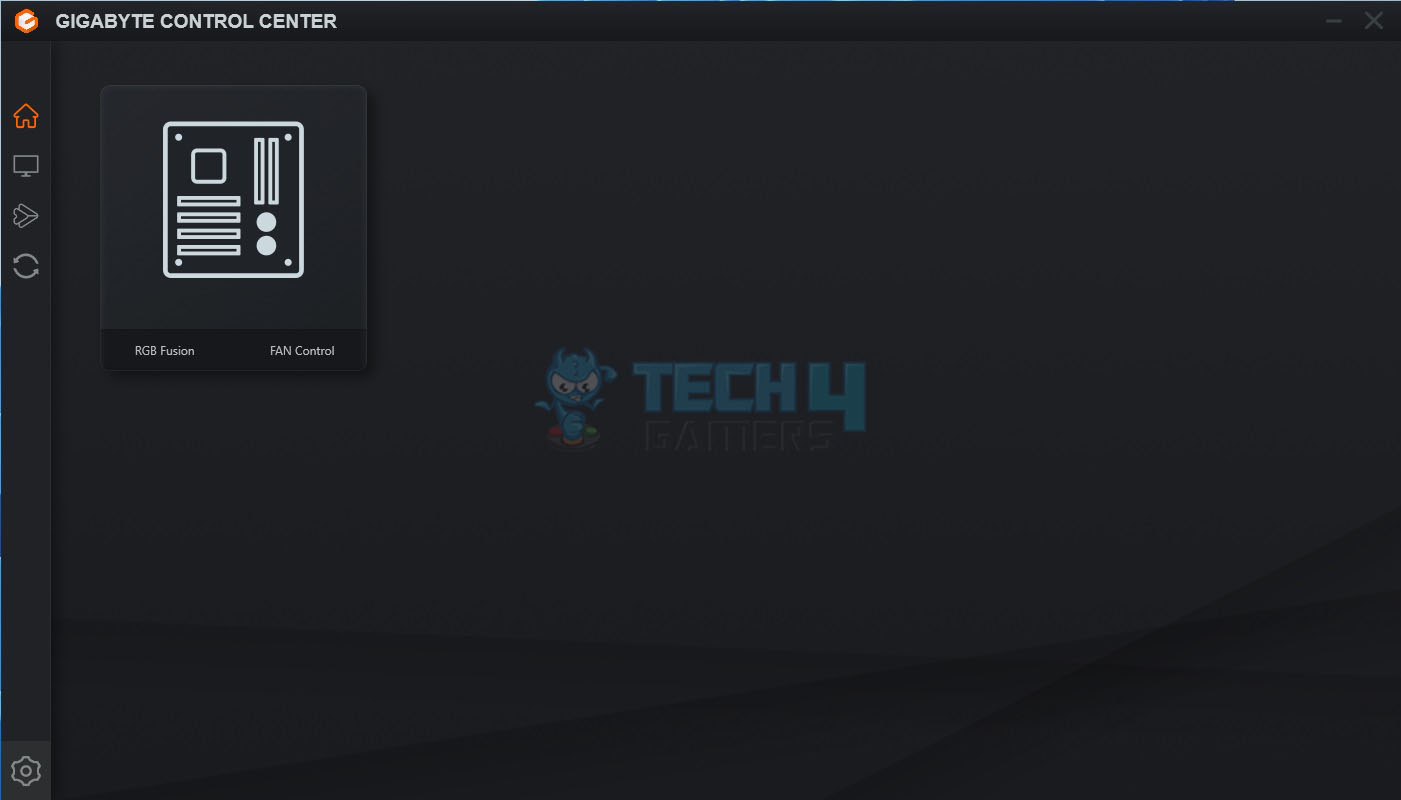
Now that we have covered the UEFI/BIOS and GIGABYTE Control Center, let us turn to the testing of the motherboard.
Performance Tests
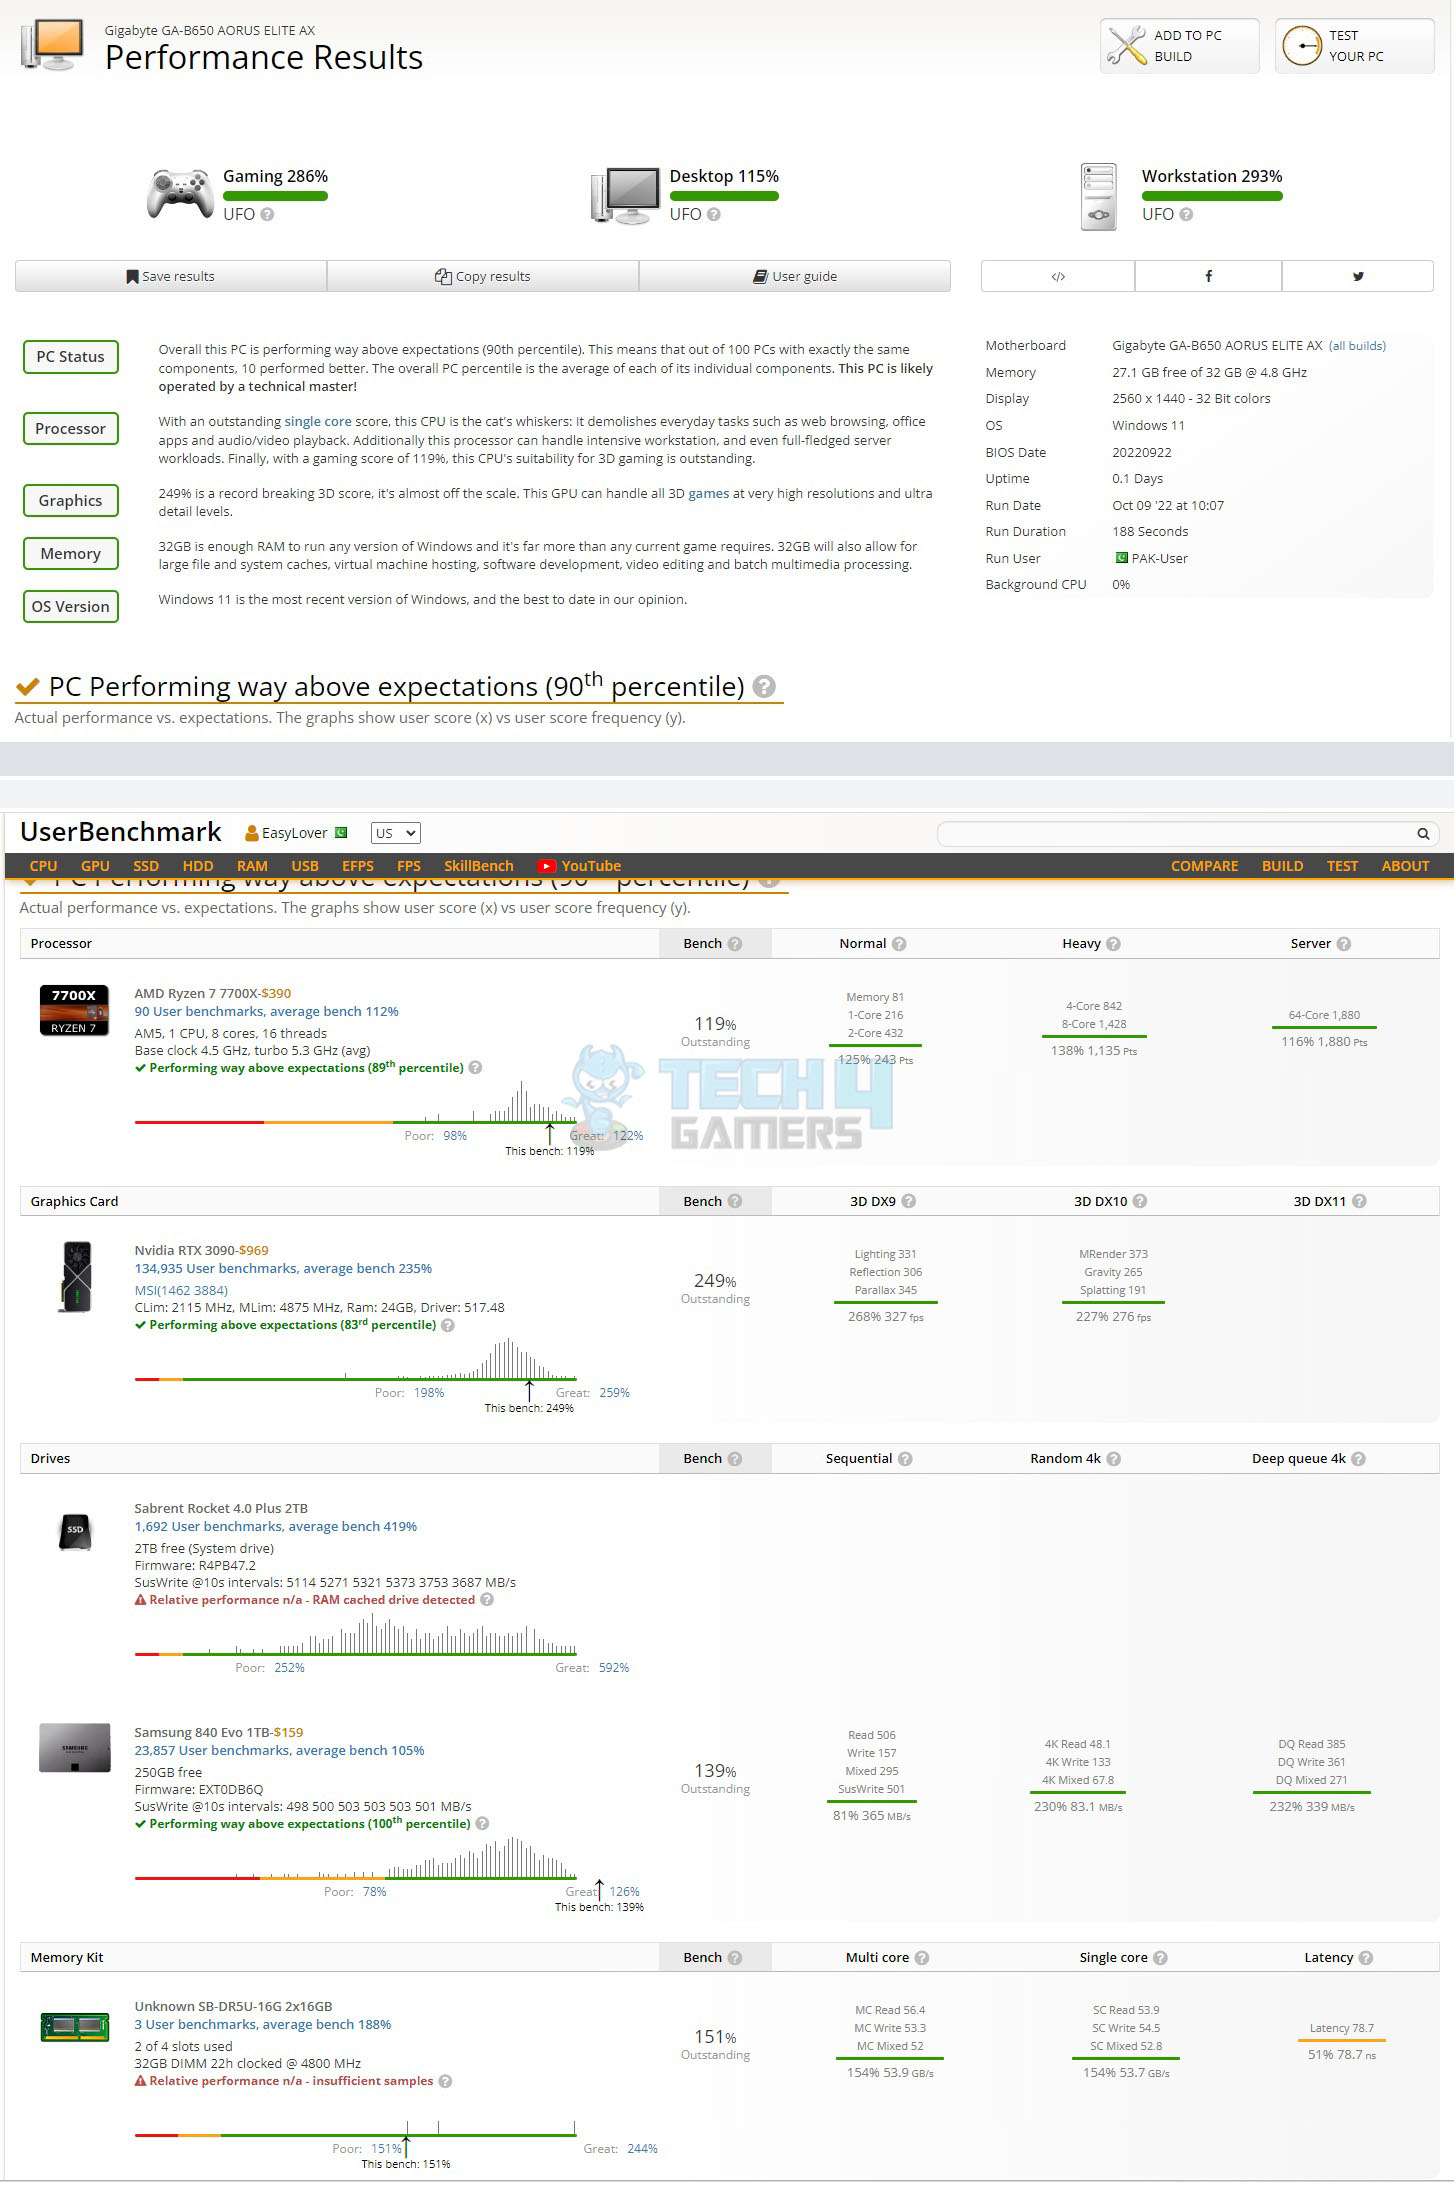
The following test bench setup is used to test the performance of the motherboard:
- AMD Ryzen 7 7700X [Auto, Stock]
- DeepCool LS720 [Fans and Pump at full speed]
- Sabrent Rocket 32GB DDR5 @ 4800MHz
- MSI GeForce RTX 3090 Gaming X Trio
- be quiet! Straight Power 11 1000W Platinum
- Sabrent Rocket 4 Plus 2TB PCIe 4 NVMe SSD
- Samsung 840 EVO 1 TB SSD for the Games
- Praxis Wetbench
- 2x SilverStone Air Penetrator 120SK A-RGB fans
- Microsoft Windows 11 x64 Pro version 22H2
- Nvidia 517.48 drivers were used for graphics card testing.
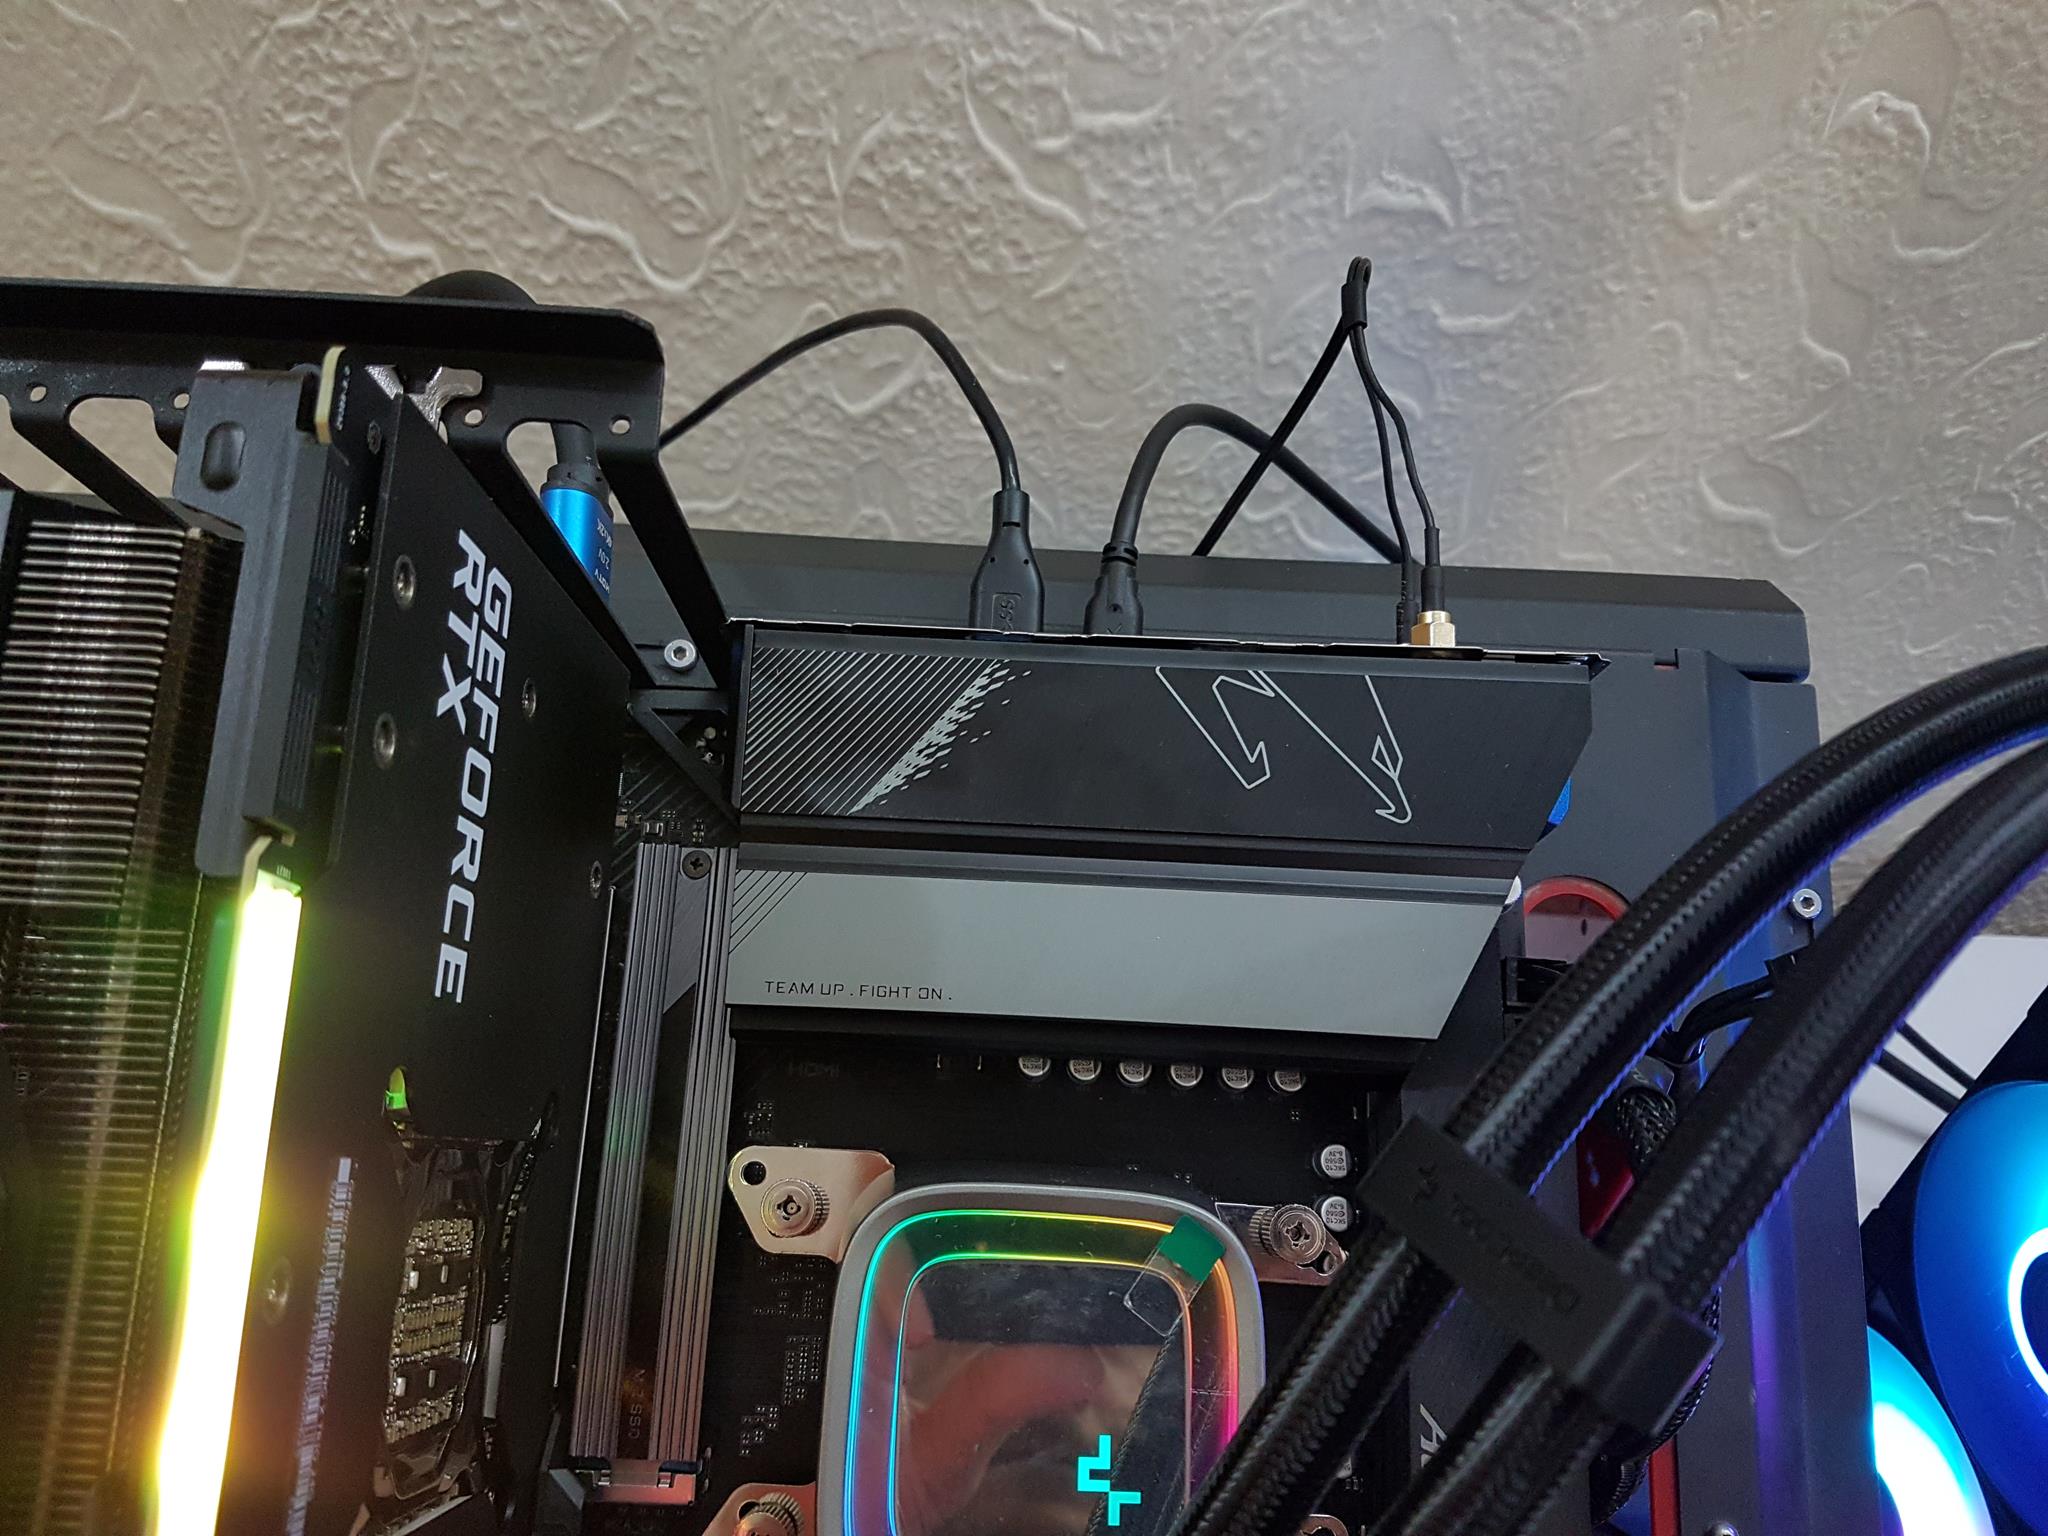


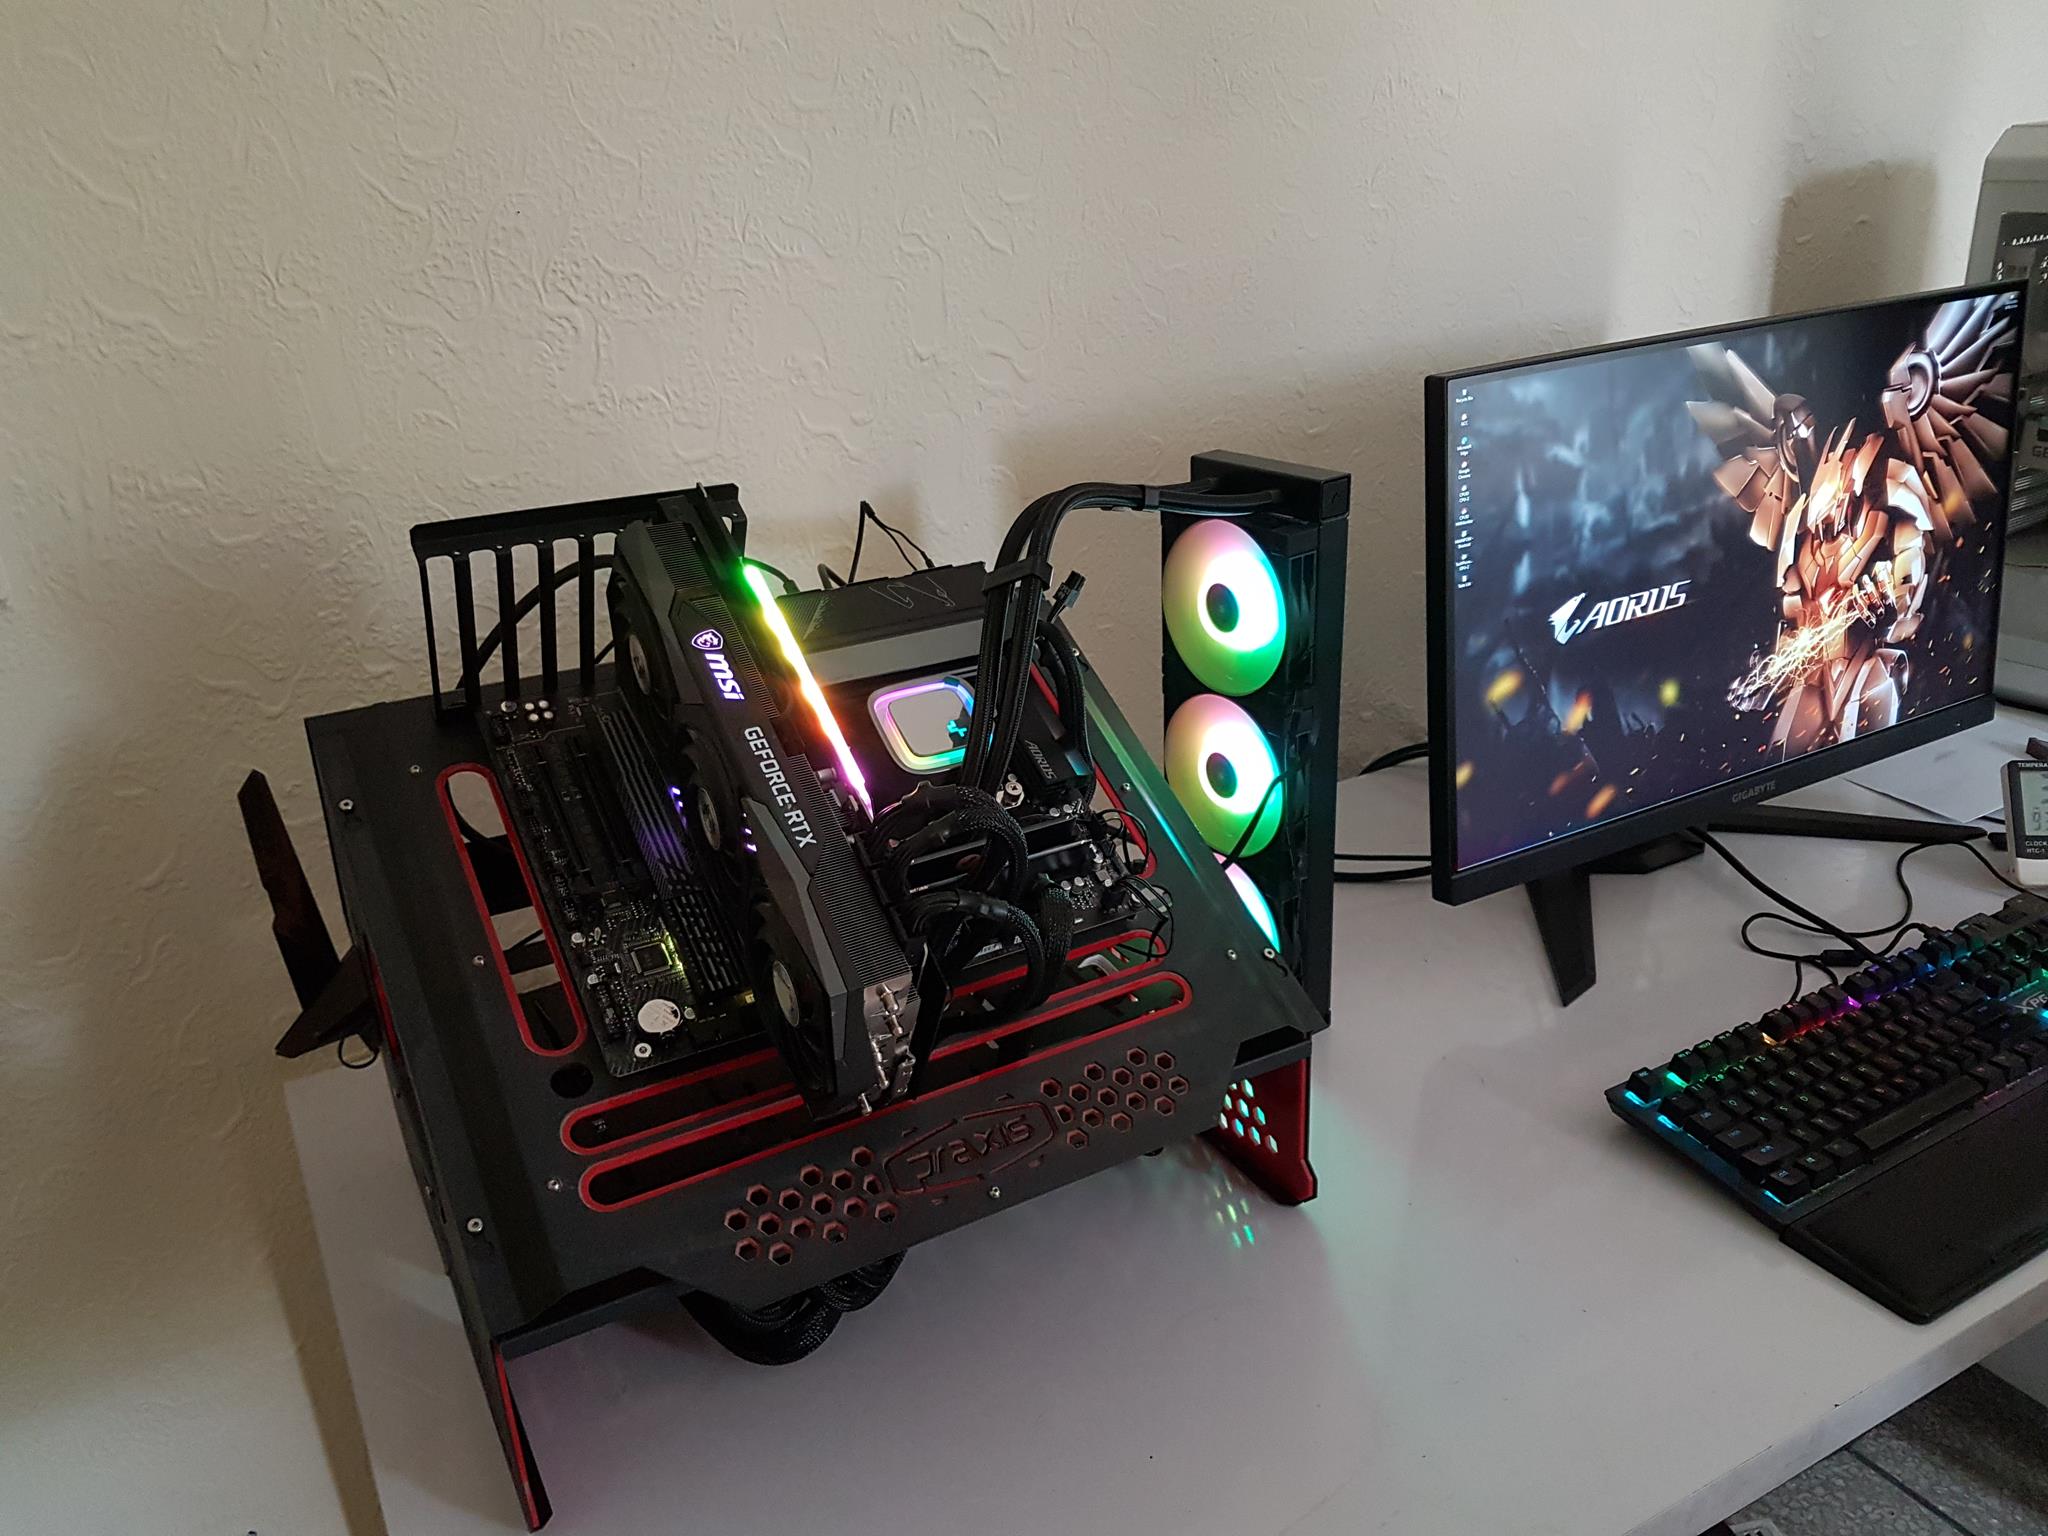
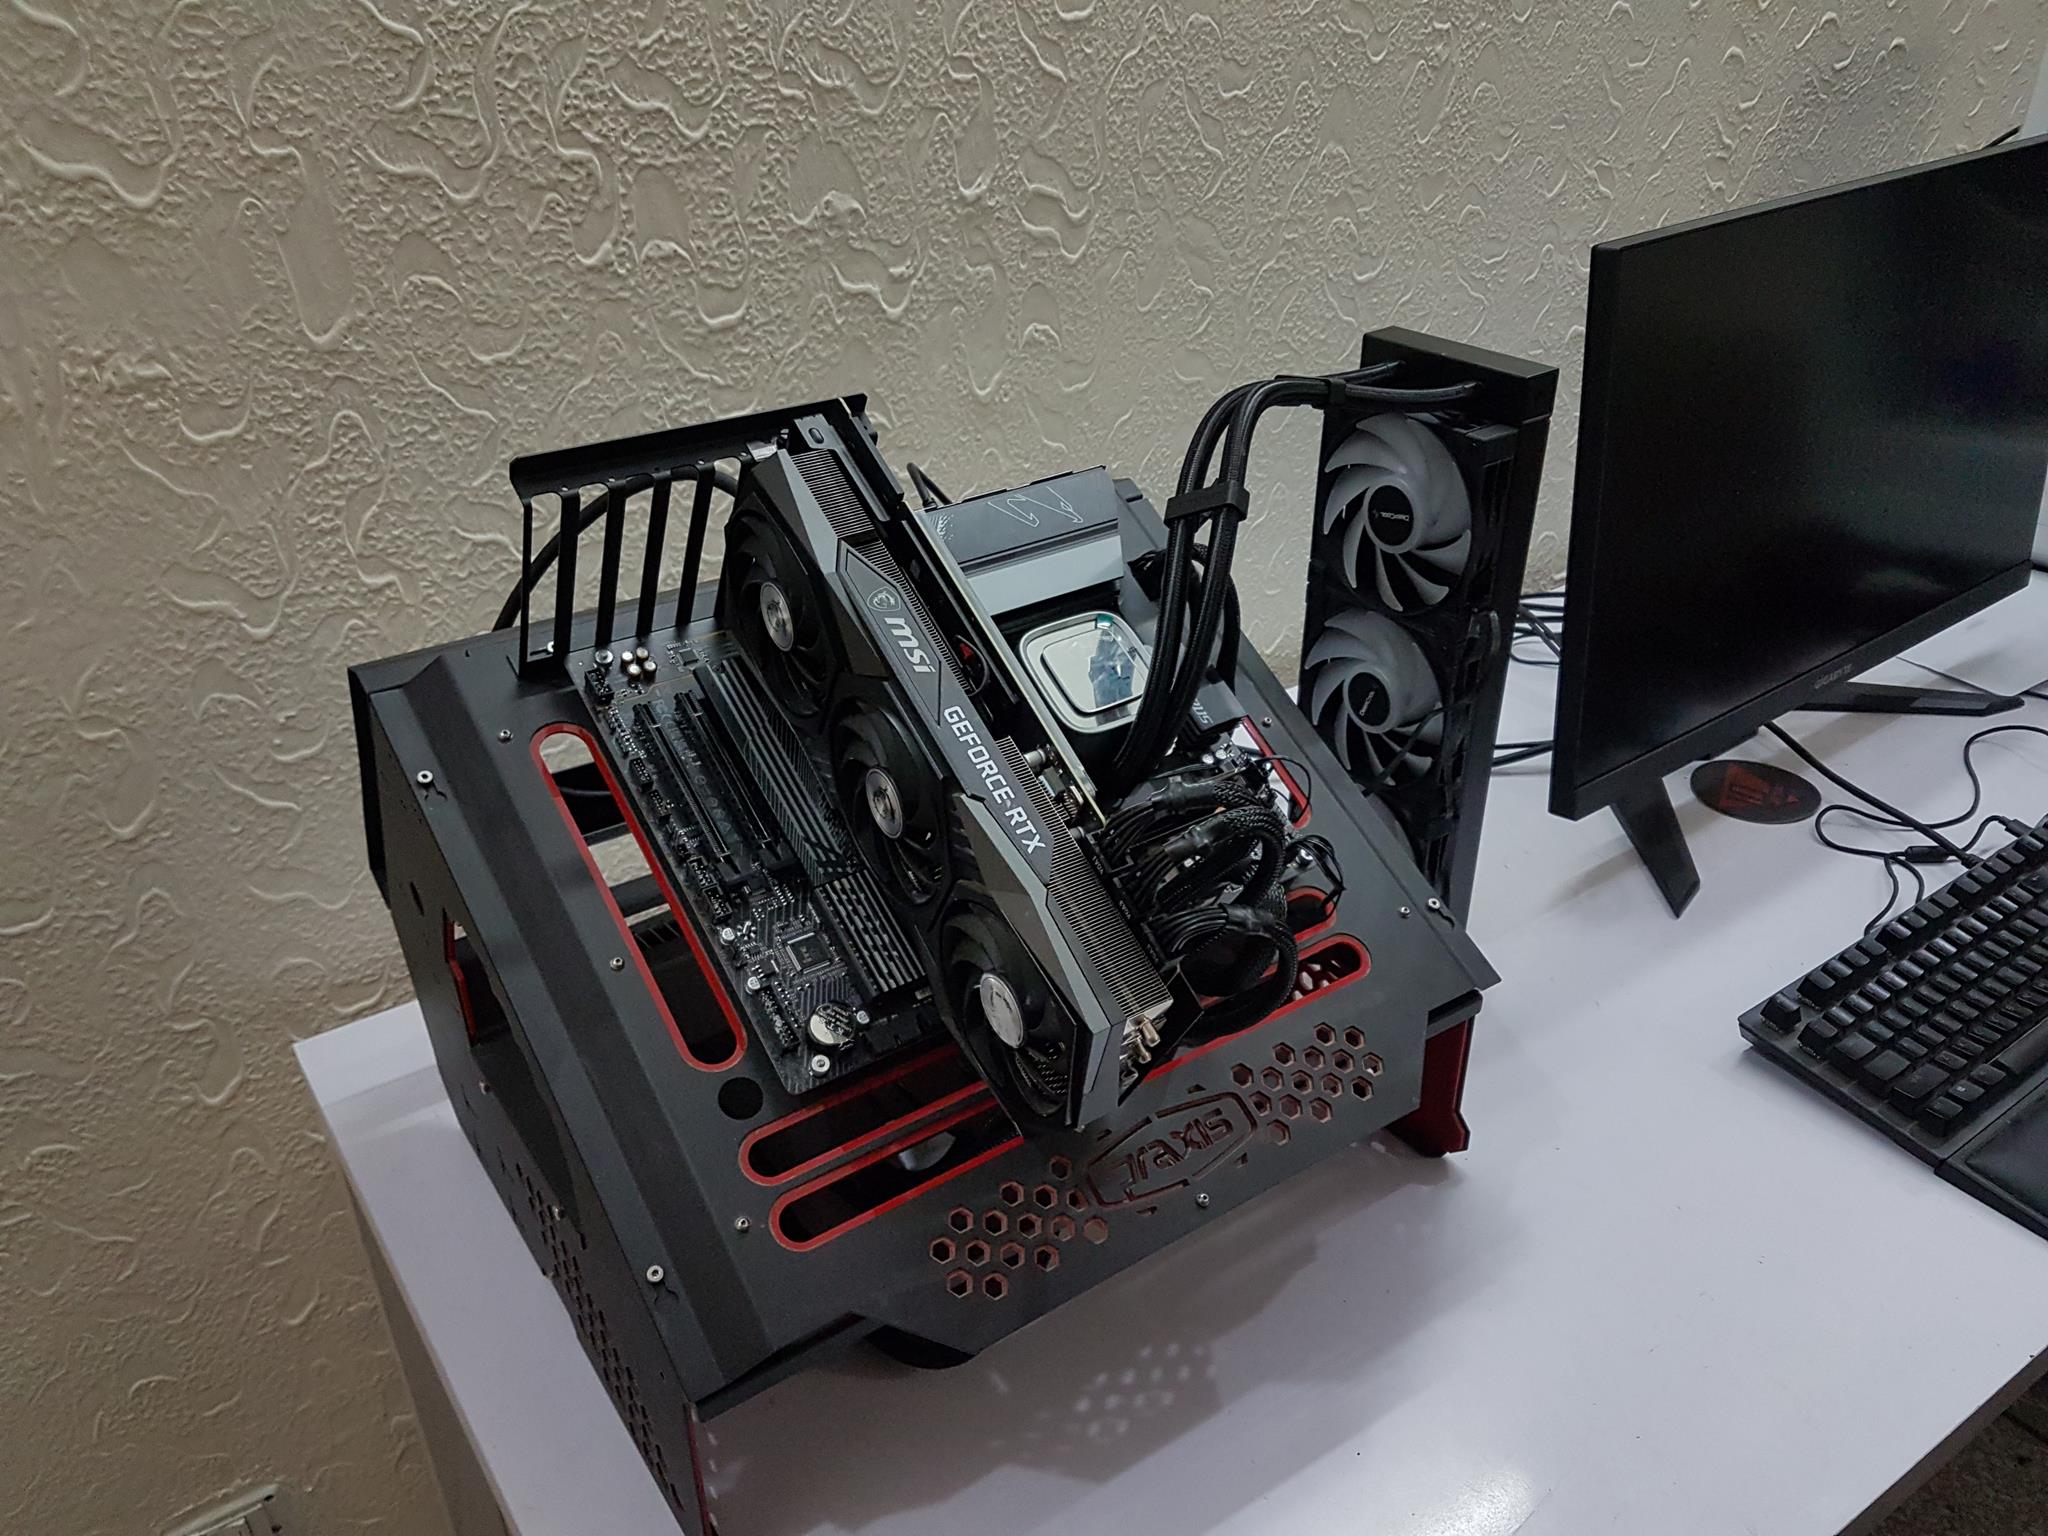
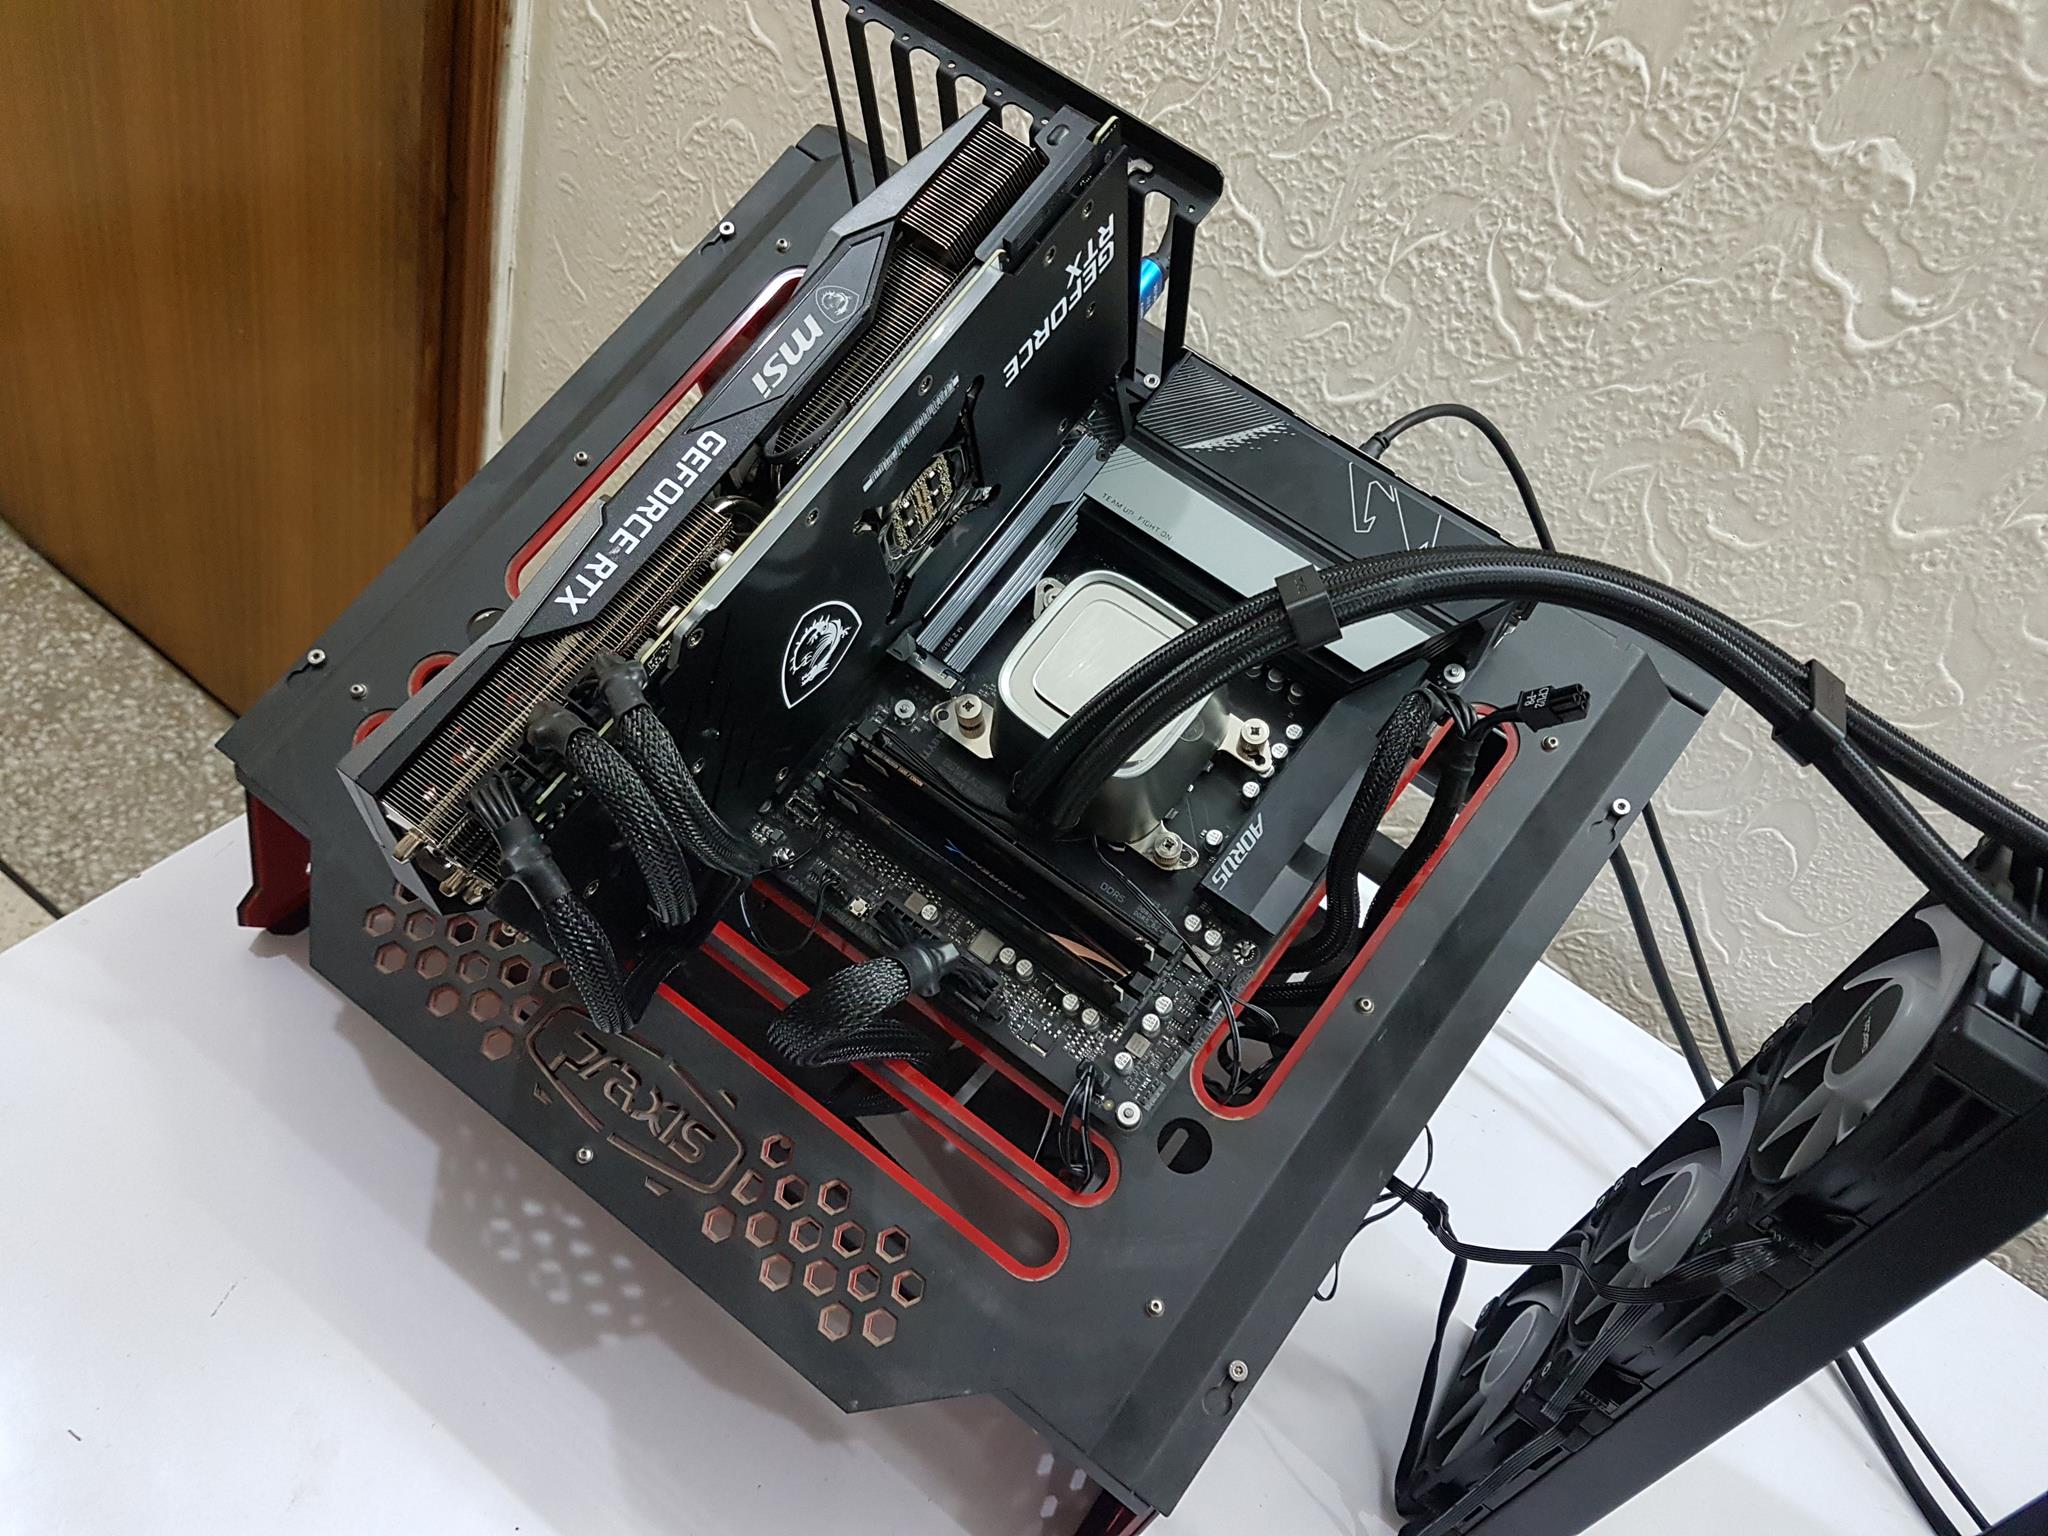
Pictured above are images of the test bench.
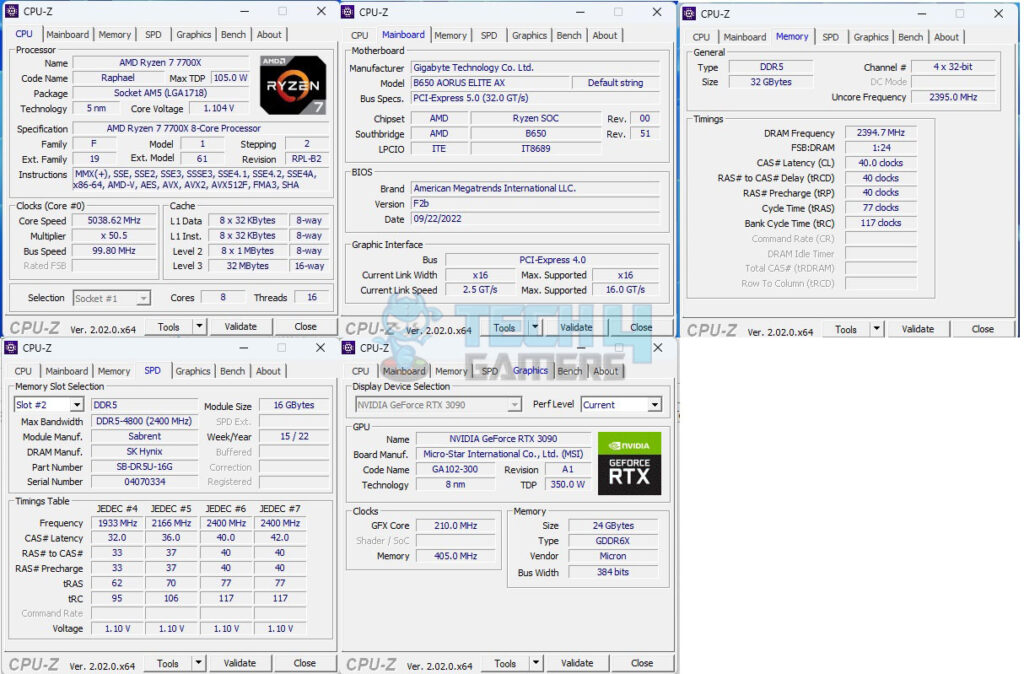
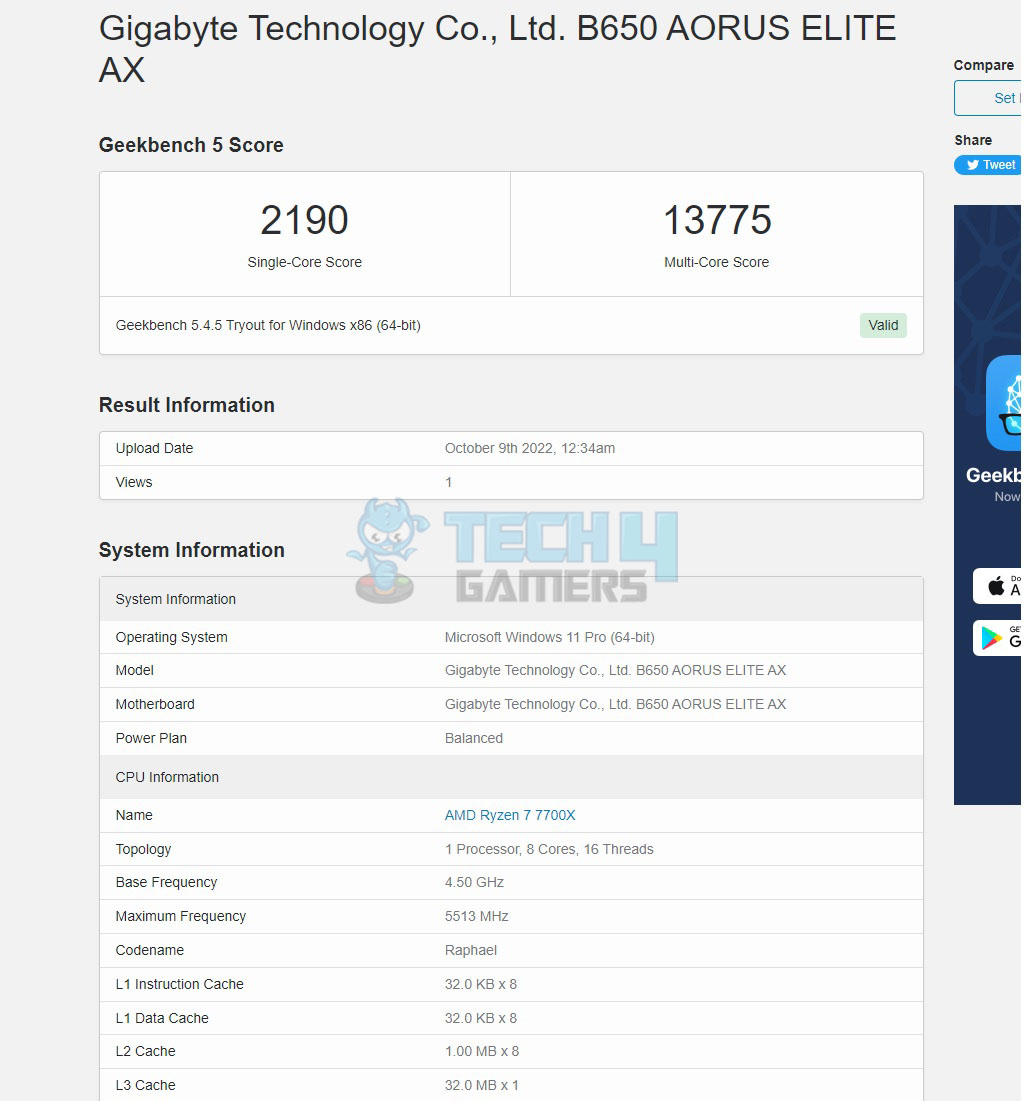
The above picture shows the CPU-Z values of the platform.
Overall System Performance
This section will show the results of the various test suites and gaming benchmarks that we have run on this motherboard.
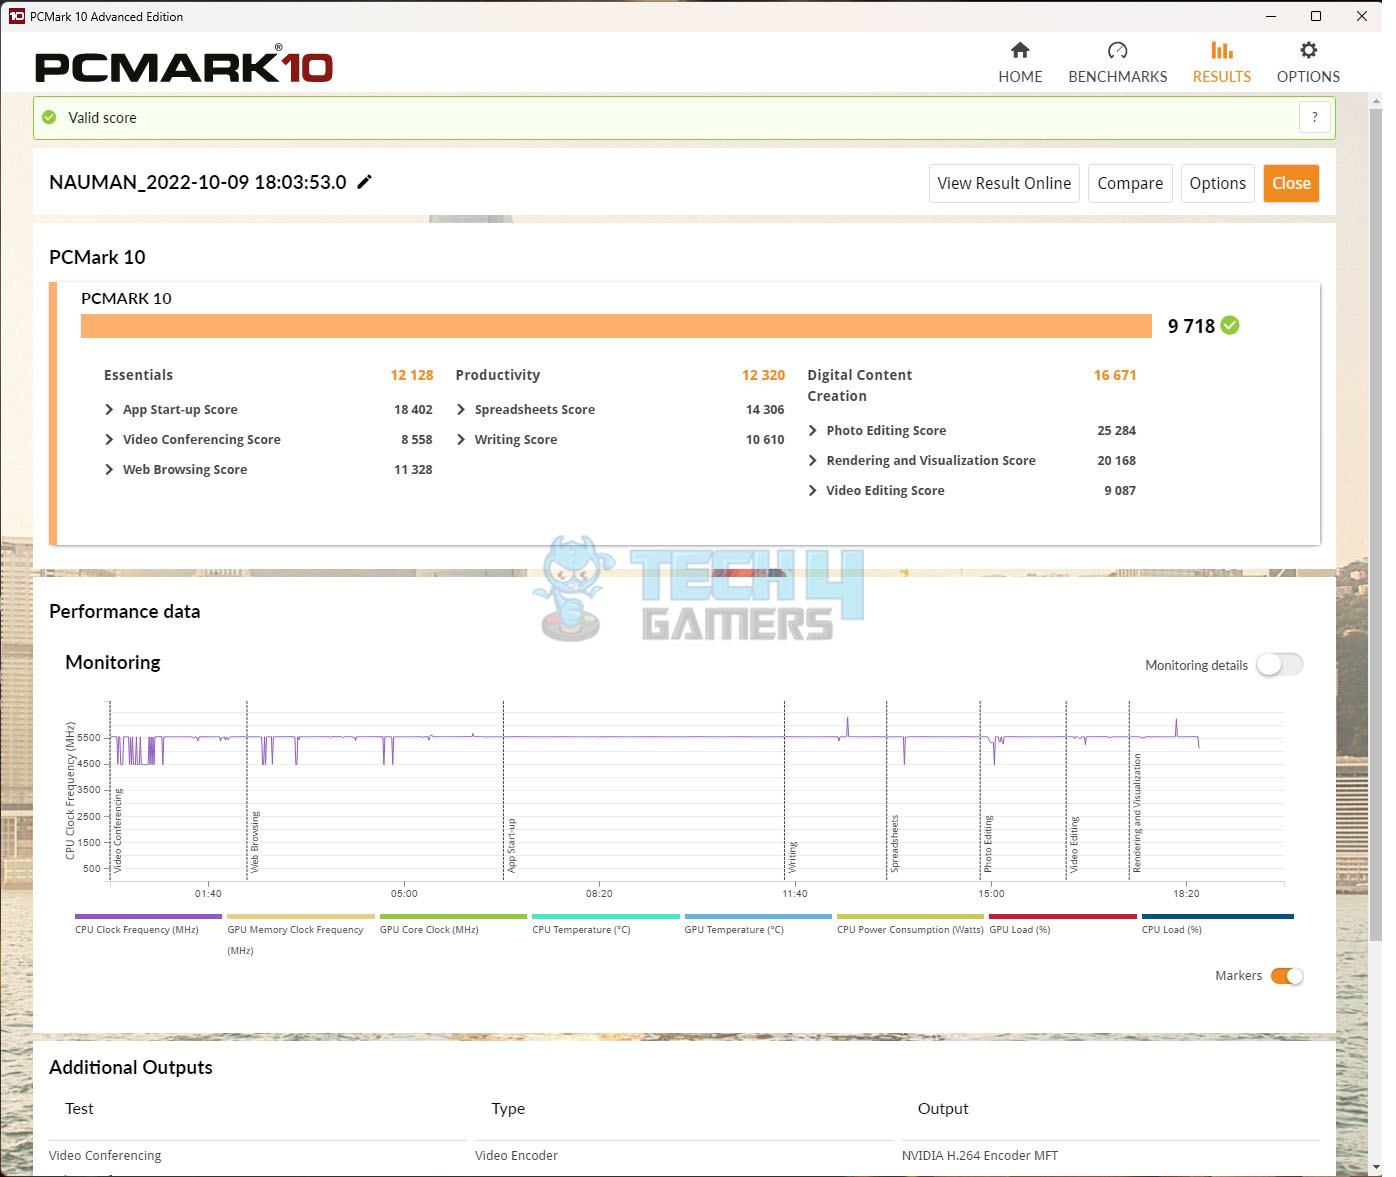
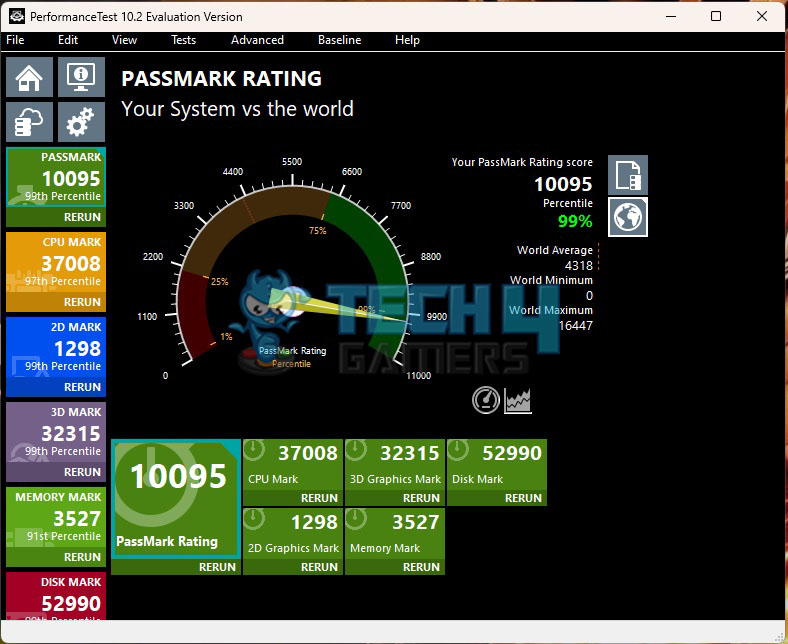
Overall, we have got ourselves a workstation-grade powerful PC that is adequate enough to handle any given task.
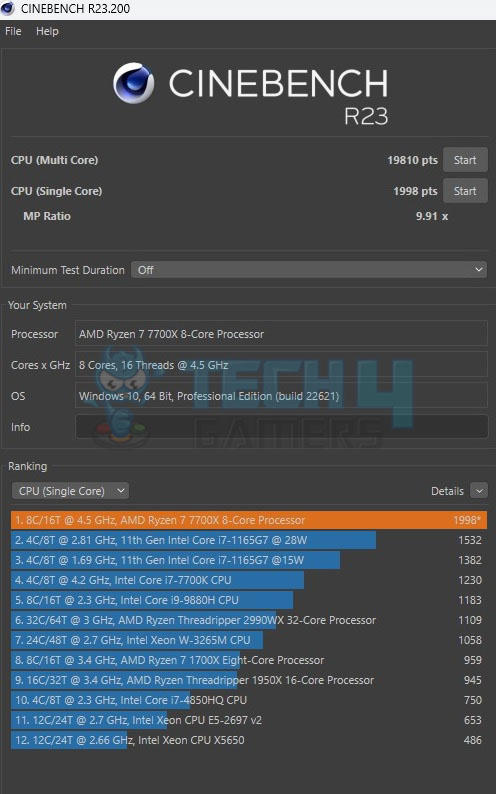
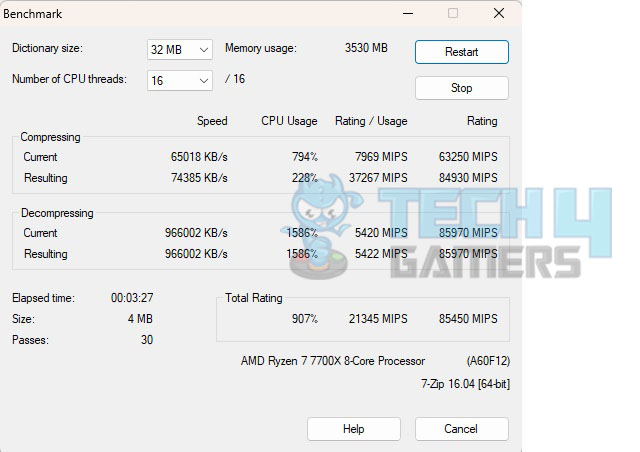
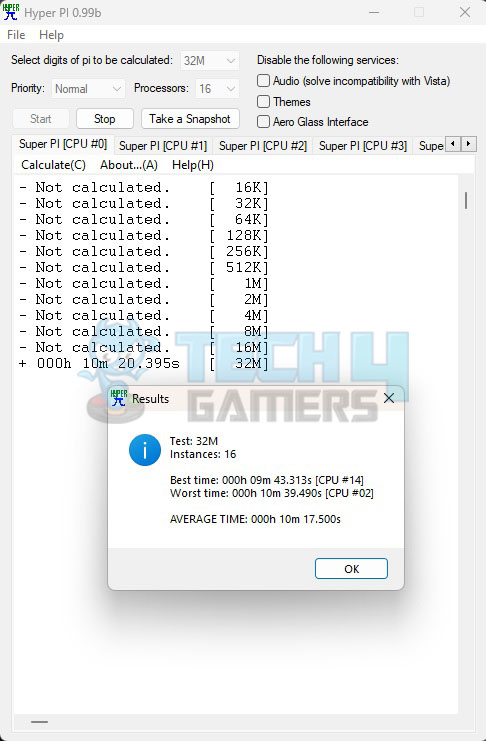
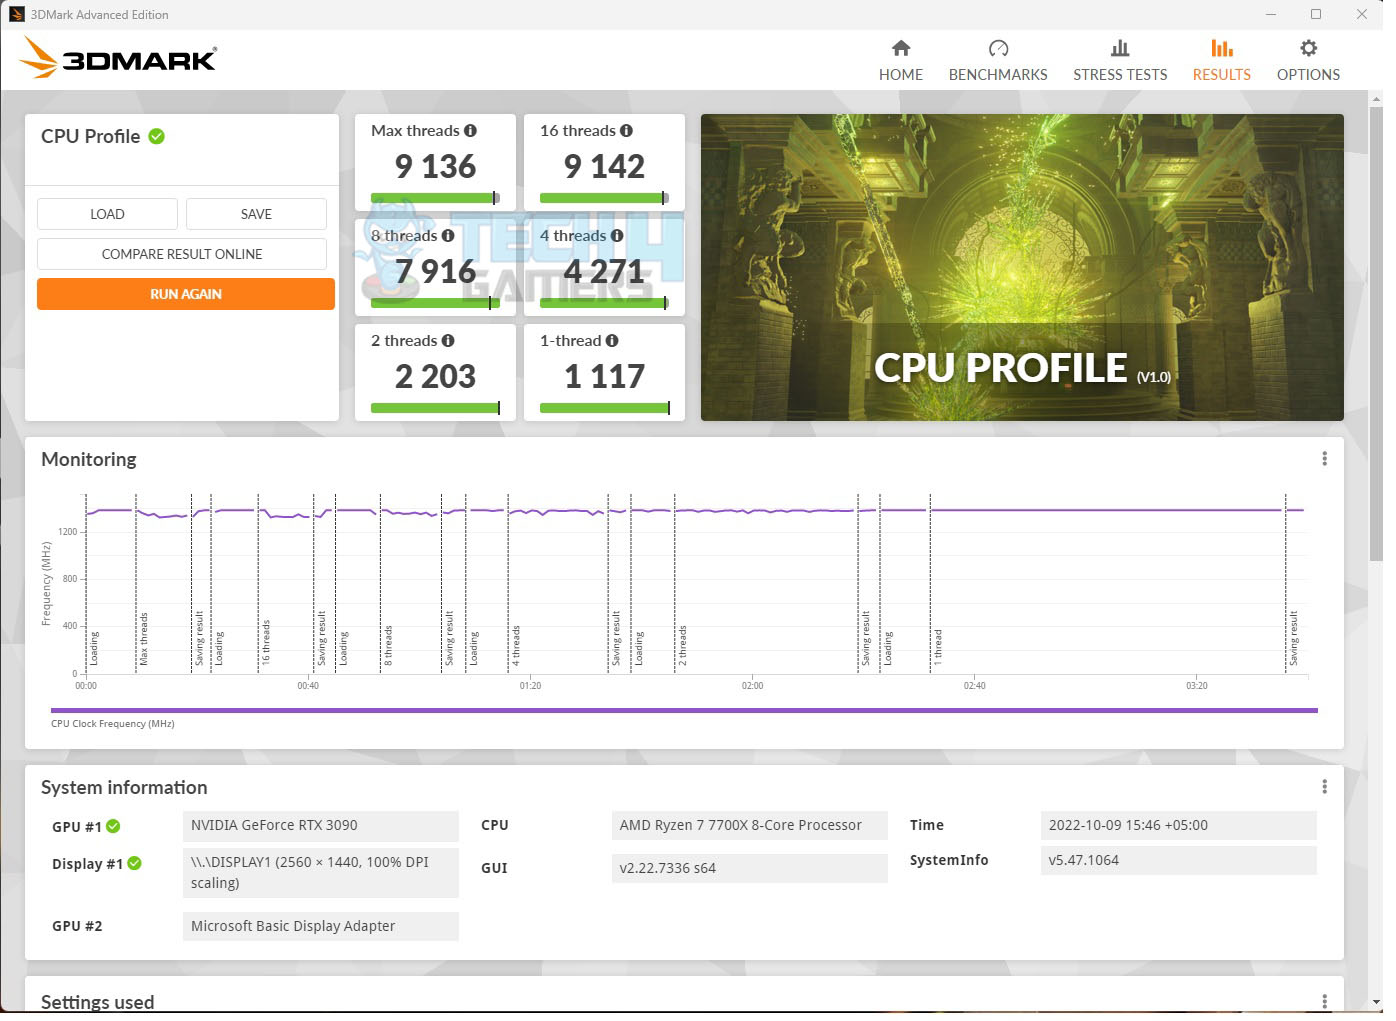
CPU Performance
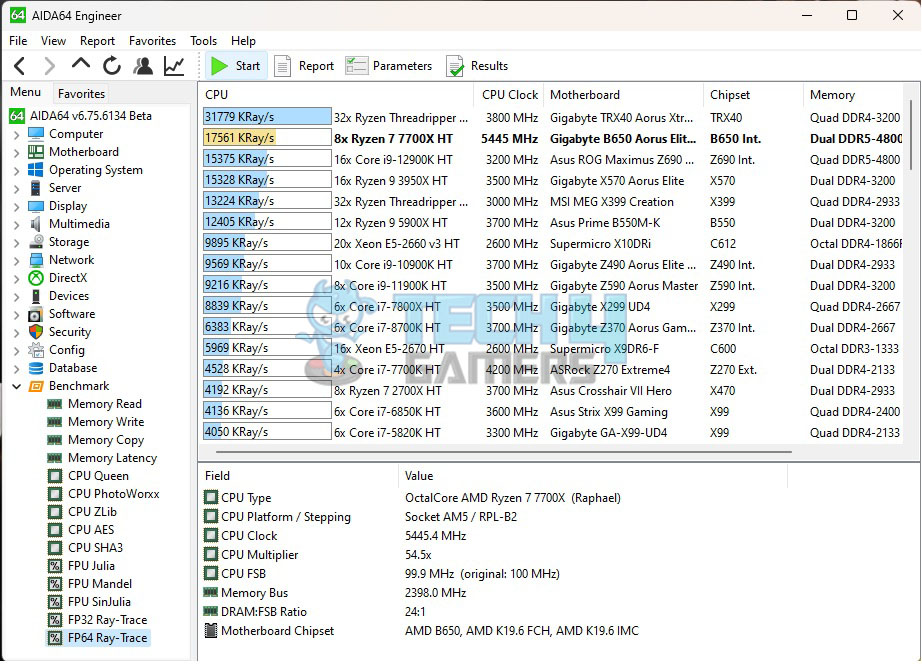
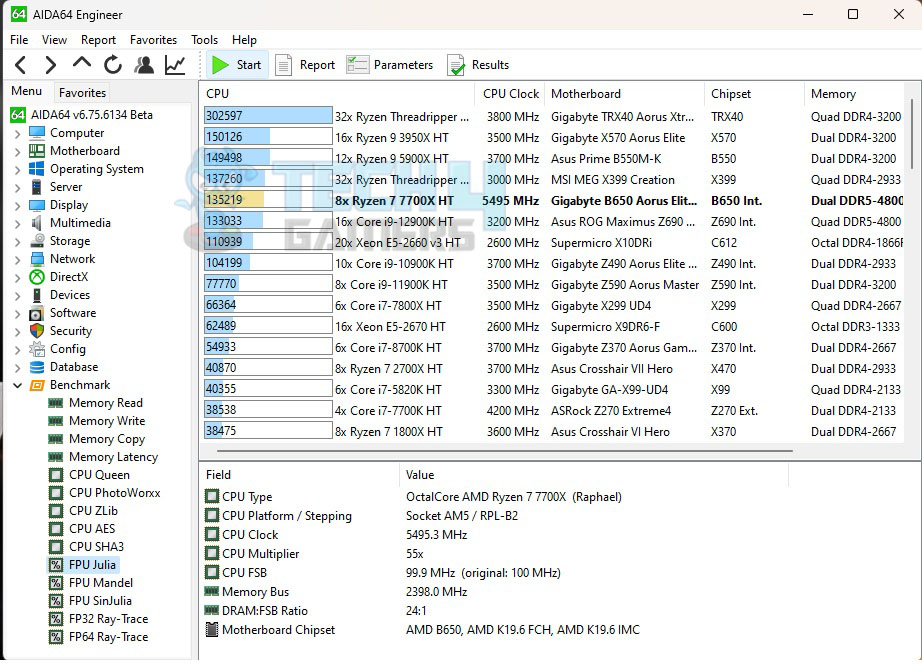
Memory Performance
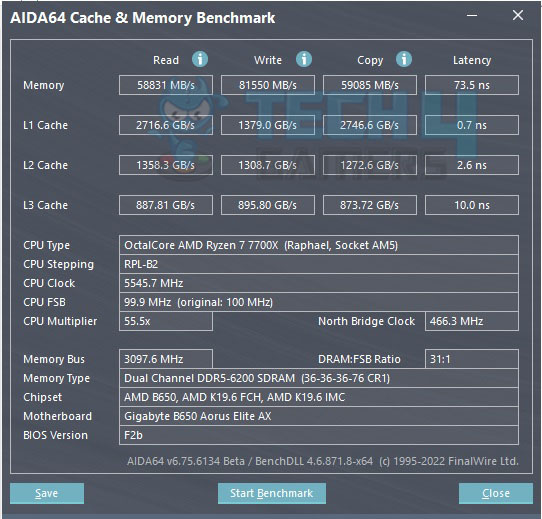
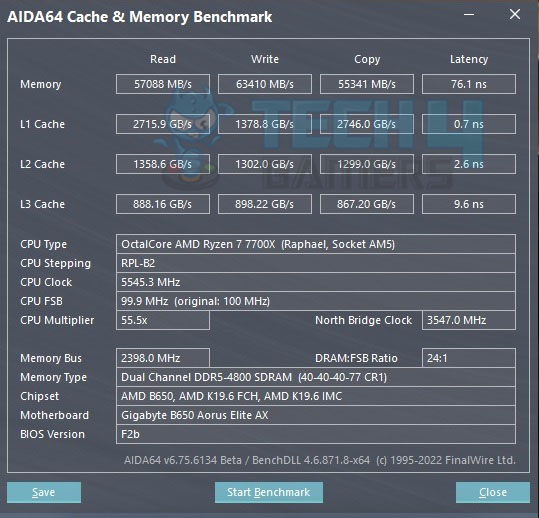
We have got some read and write speeds but they come at the cost of high latency. Afterwards, we pushed the Sabrent Rocket DDR5 kit from 4800MHz to 6200MHz, tightening timings from 40-40-40-77 to 36-36-36-76. Although we boosted Write and Copy operations, the gain in read speeds and Latency was marginal. Testing in games and synthetic benchmarks showed no significant performance enhancement.
Next, we installed the XPG Lancer RGB 32GB kit which is rated at 6000MHz using 40-40-40-76 timing. We ran the AIDA64 memory benchmark with Low Latency Support and XMP/EXPO High Bandwidth Support disabled and then rerun the test with both settings enabled. We saw good improvement in the transfer rate as well as the latencies.
Storage and USB Performance
We have included Sabrent Rocket Nano 2TB drive in the testing as it is a USB Type-C Gen 2 interface drive capable of 10Gbps transfer rate (theoretically). Since we have a USB Type-C Gen 2 port on the back panel, hence its testing is included.
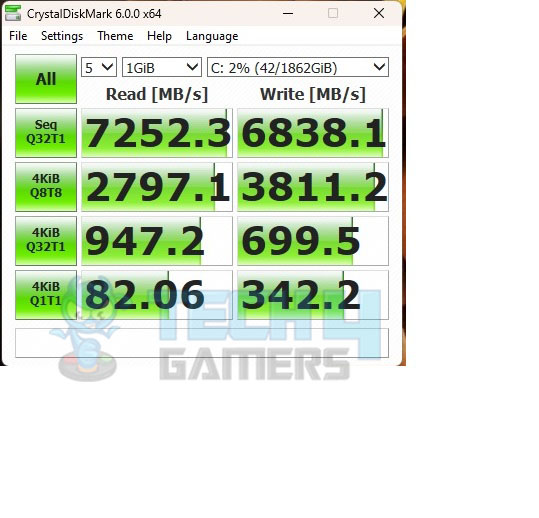
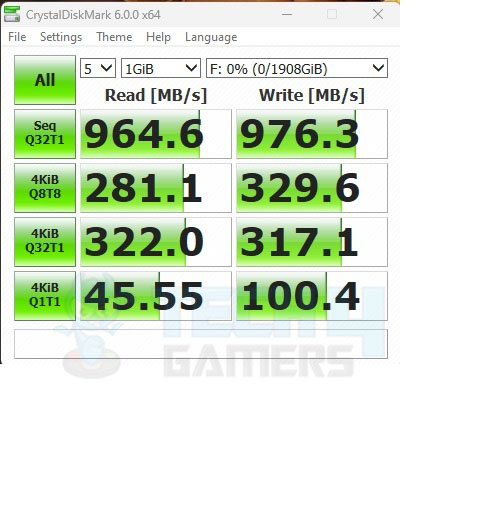
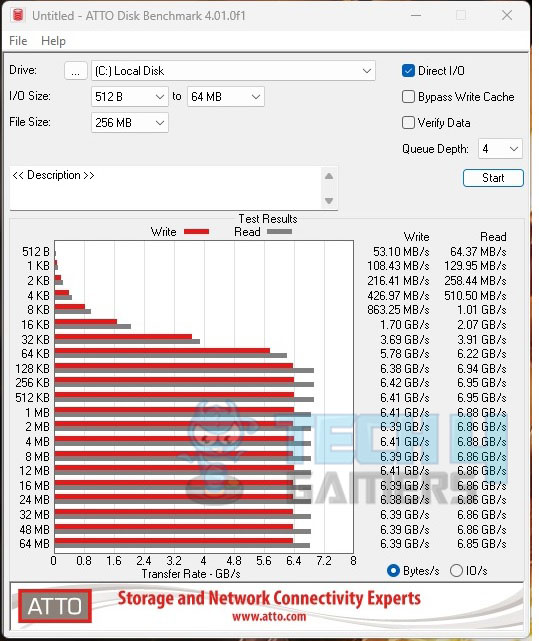
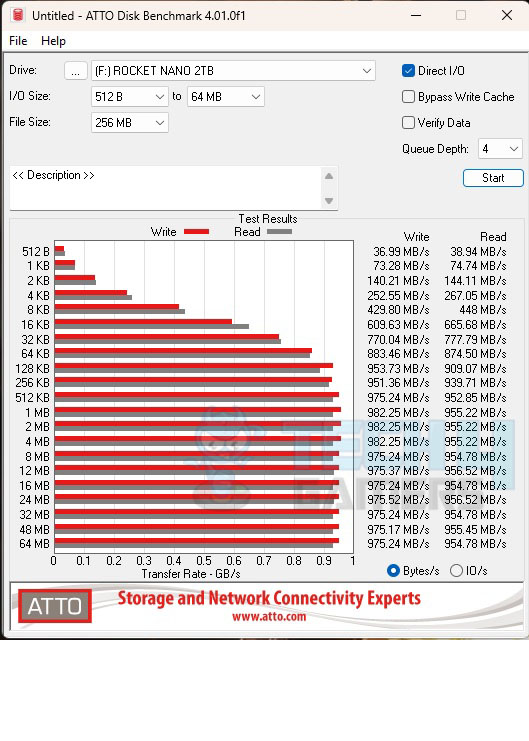
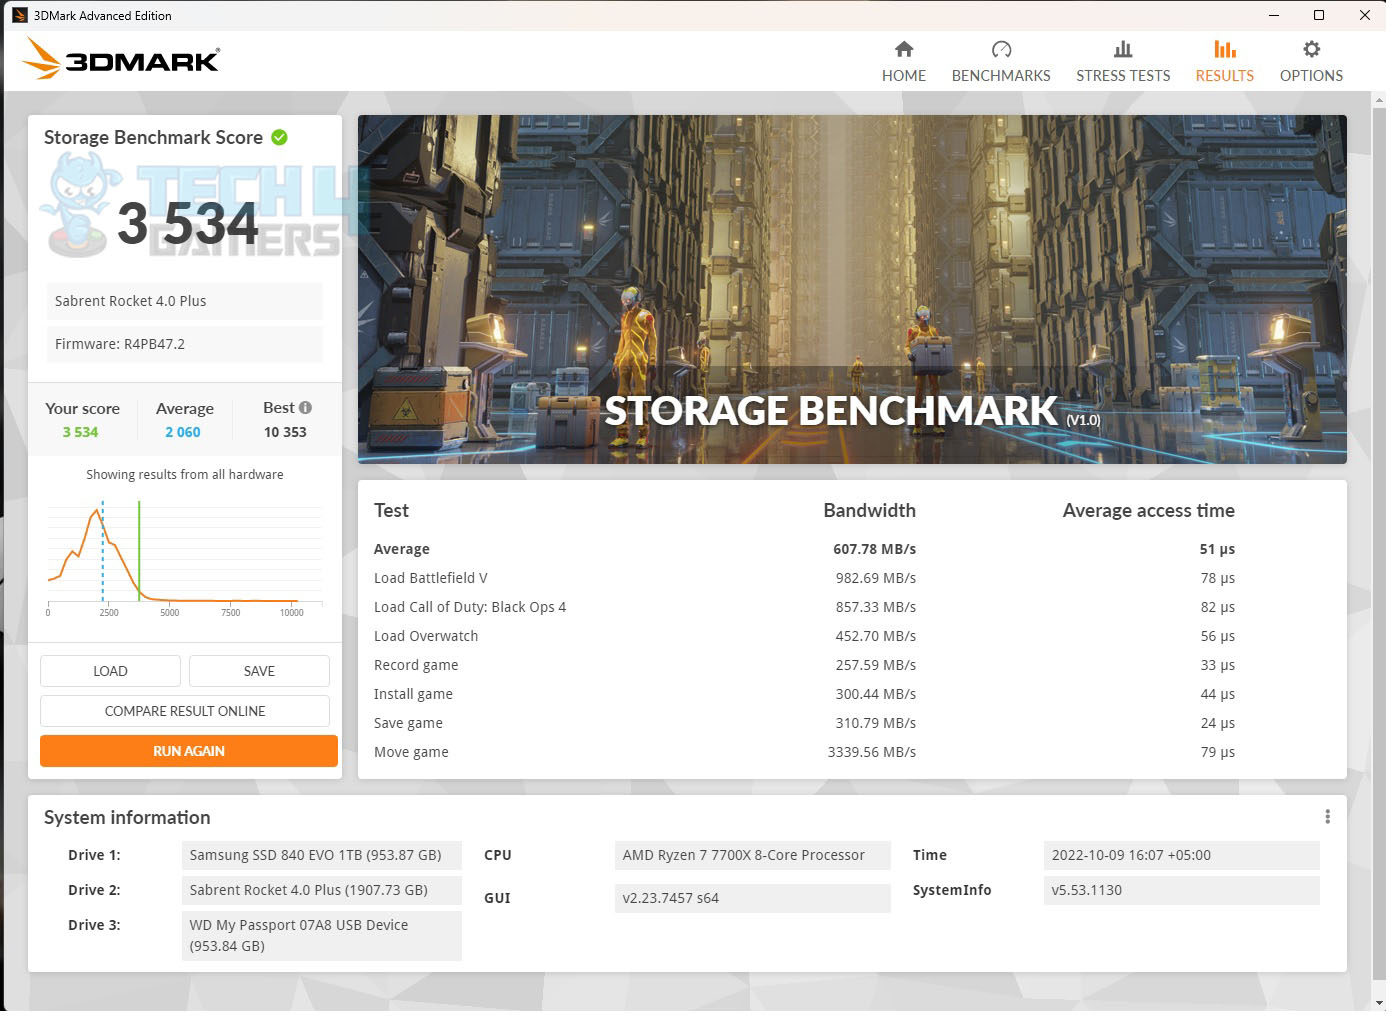
The storage performance is good as well. This motherboard is not holding anything back.
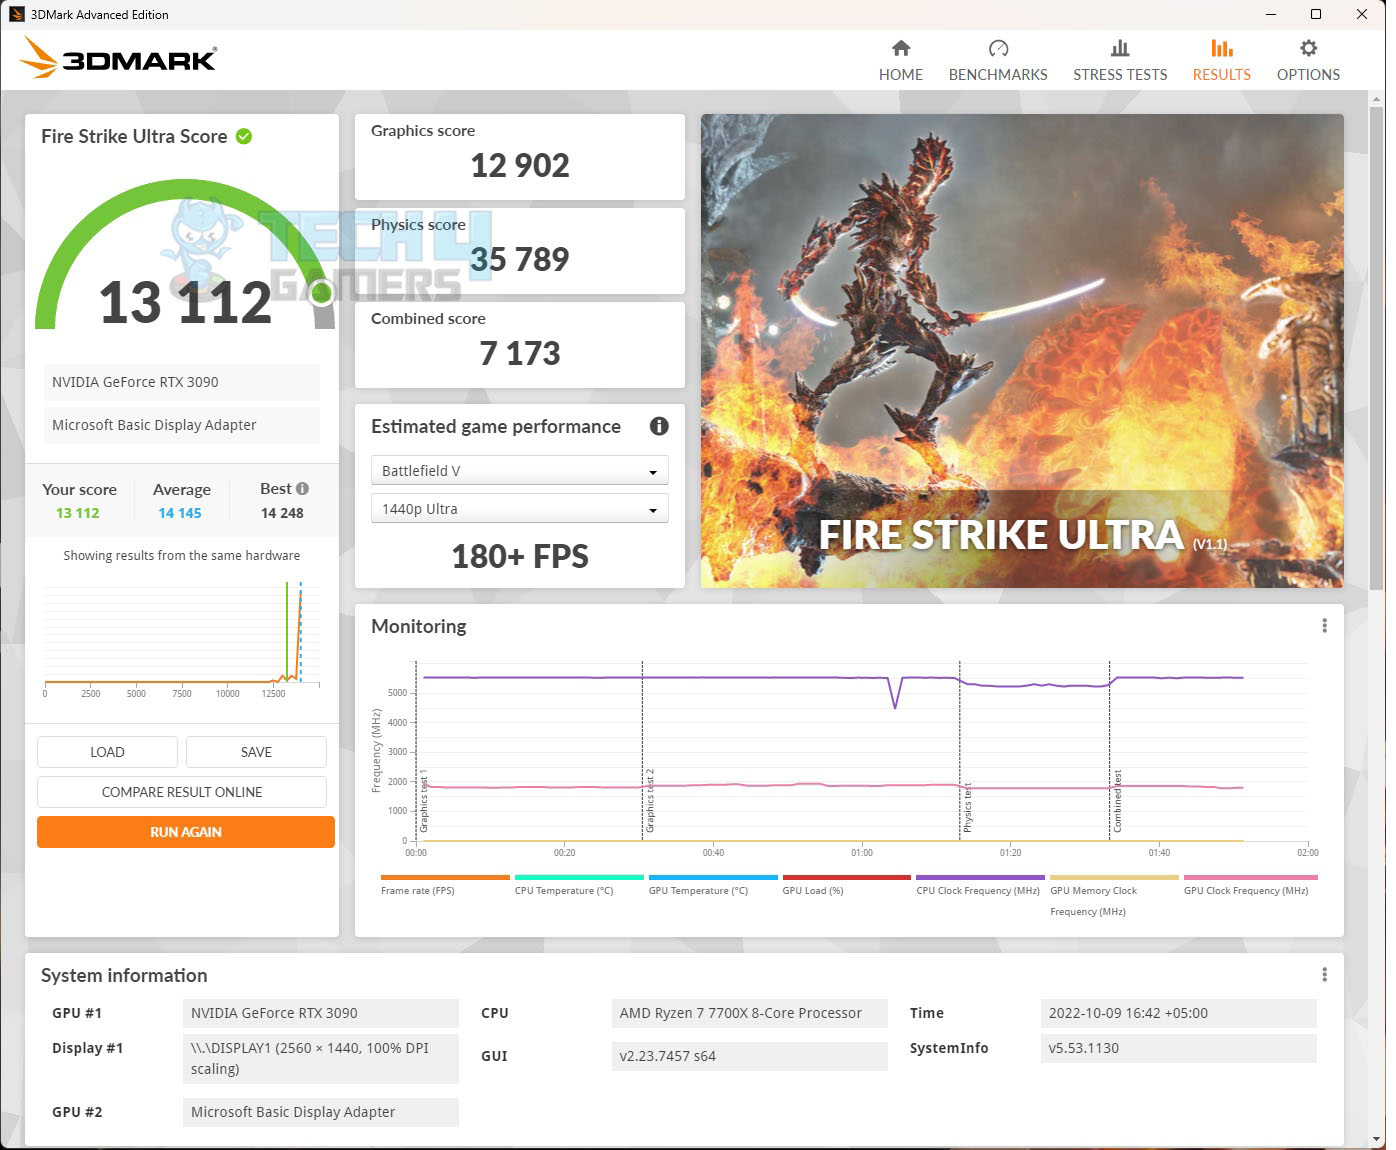
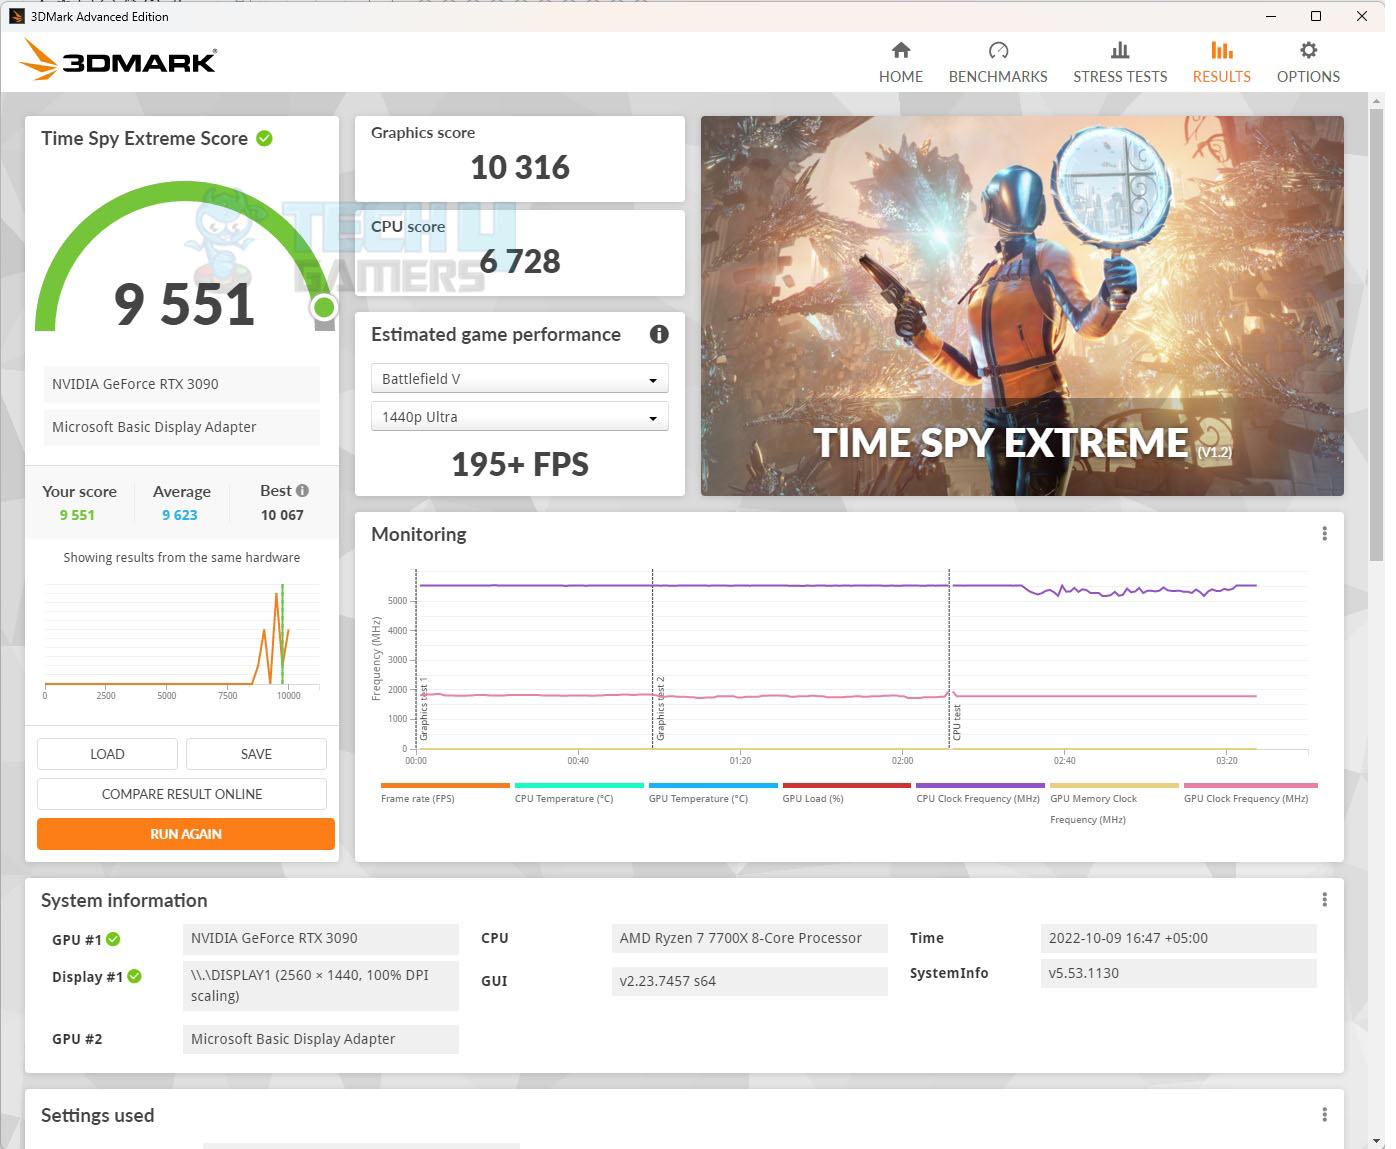
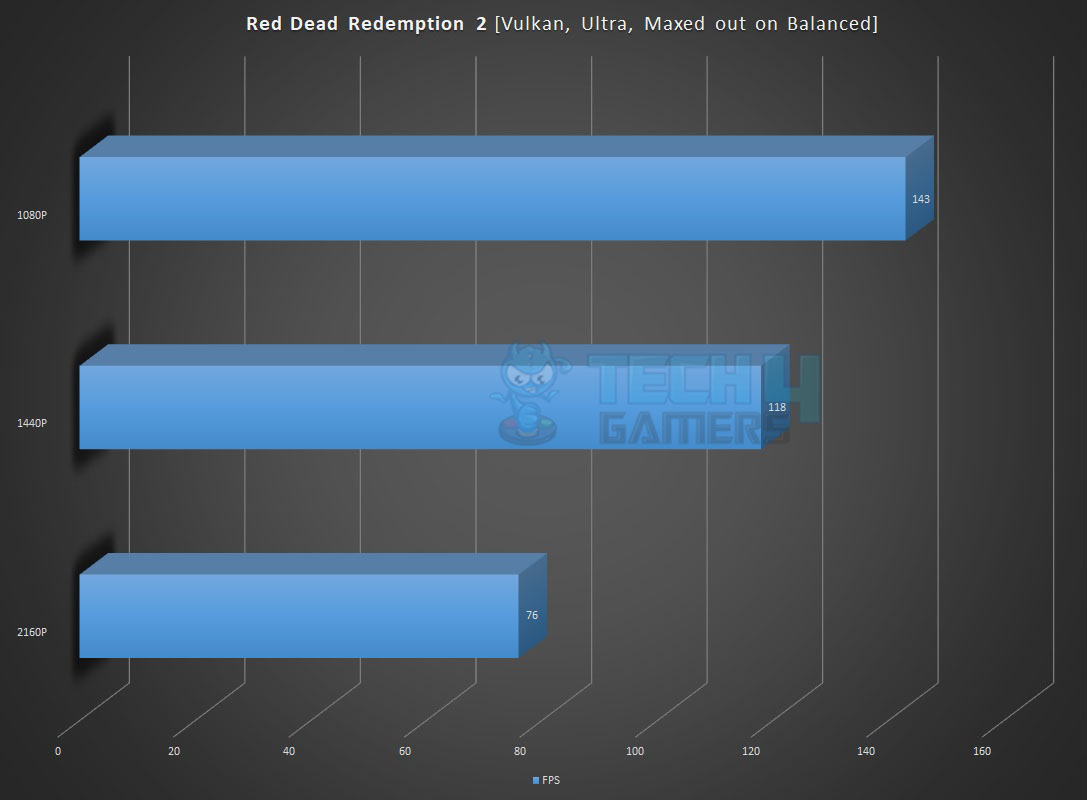
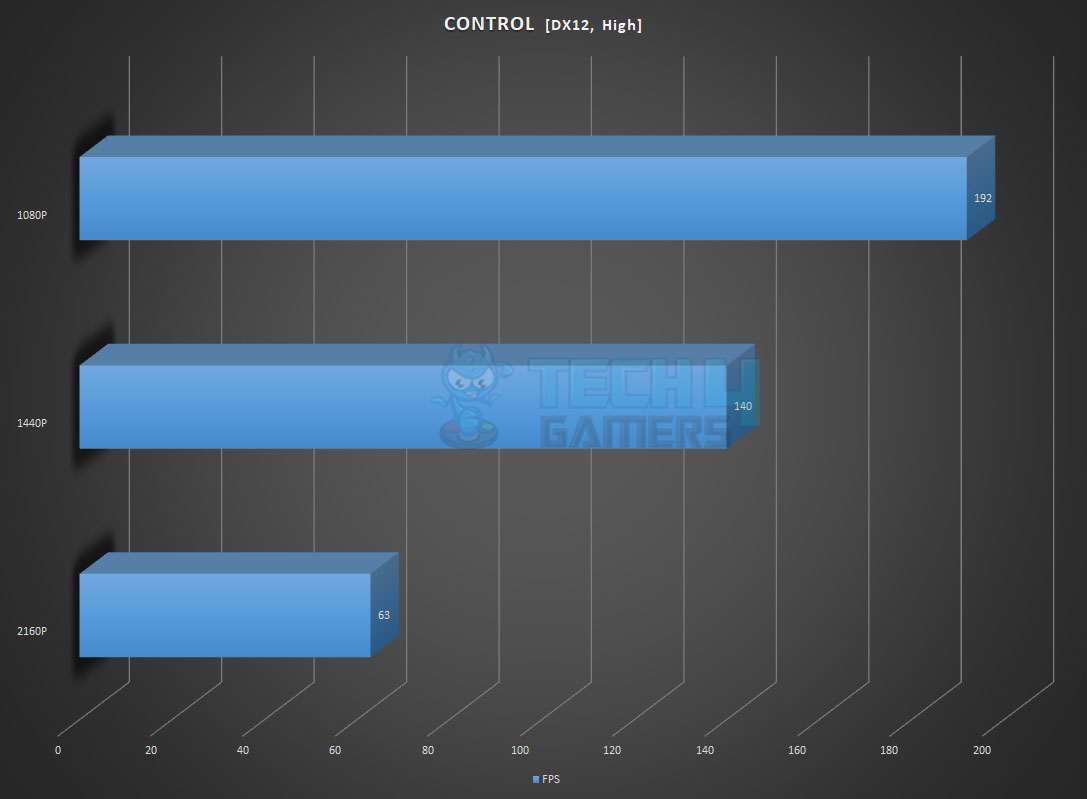
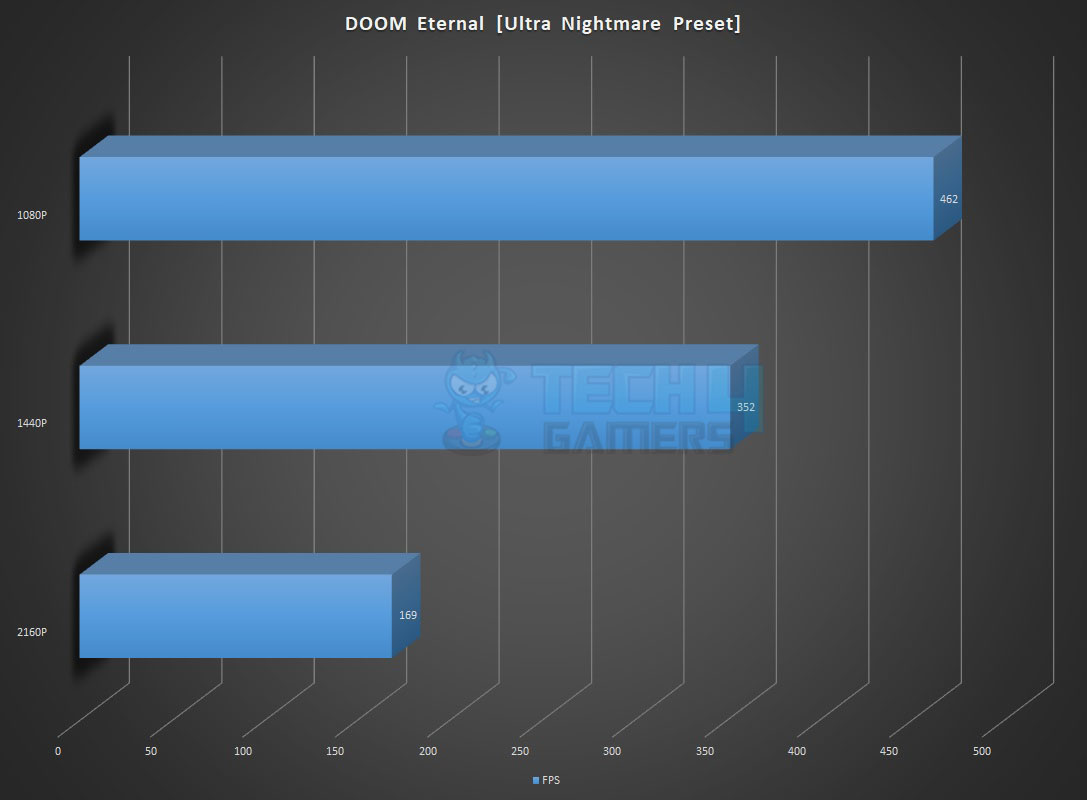
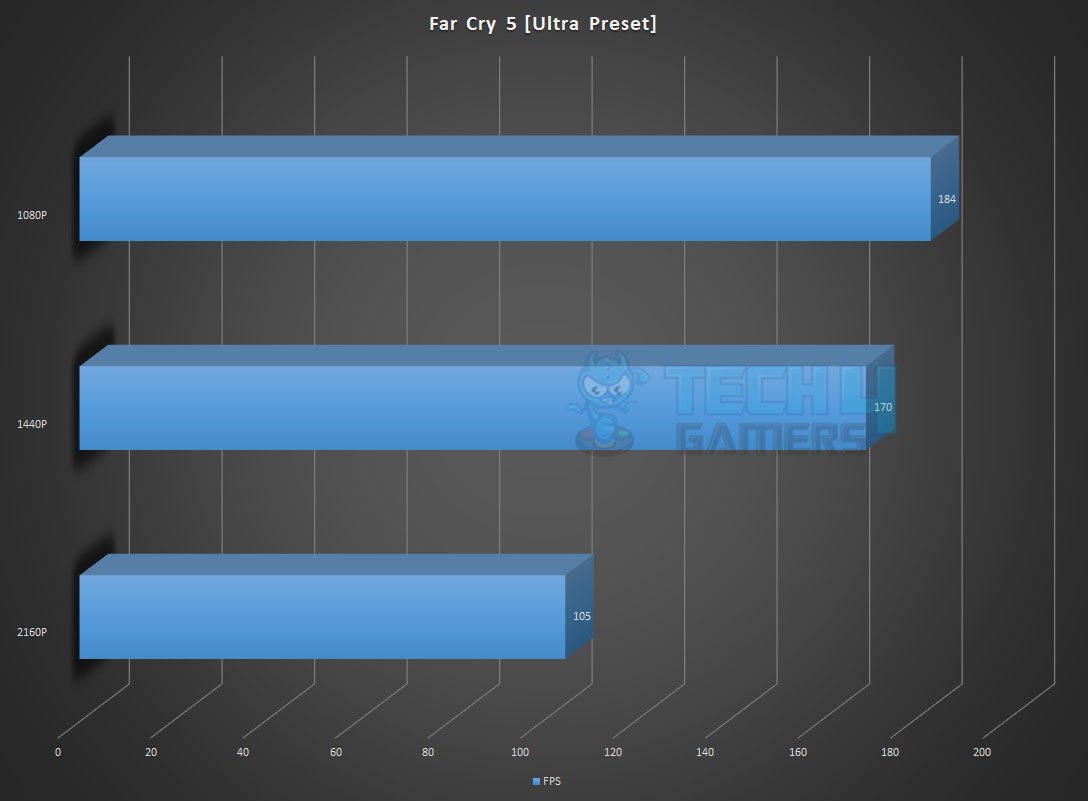
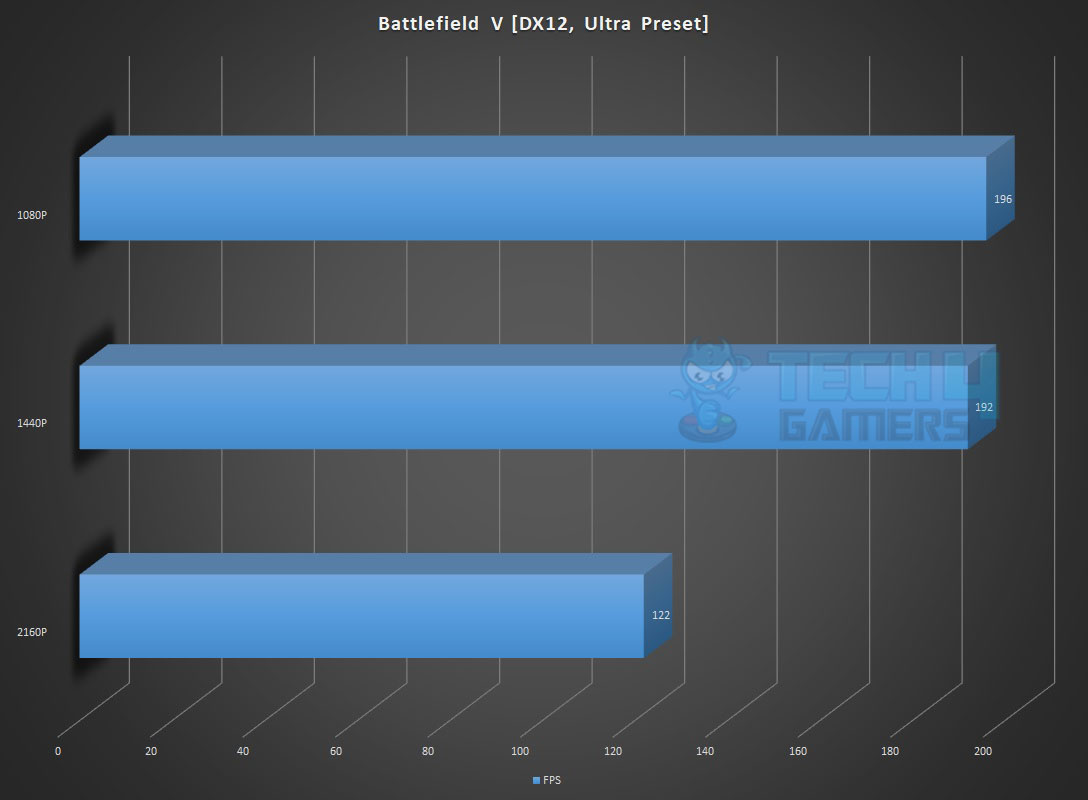
Gaming Performance
Power Consumption and Thermals
We’ve kept UEFI/BIOS settings on auto and stock, except for fixing Fans and pump speed at a constant 100%. The Sabrent Rocket DDR5 kits are running at JEDEC default, thanks to the motherboard’s accurate Memory timing and frequency selection. Windows power mode was Balanced. After 30 minutes of idle time, HWInfo64 recorded system values.
| CPU | RAM | NVMe SSD | Graphics Card | |
| Idle Temp | 45°C | 33.8°C | 33°C | 40.6°C |
| Idle Power Draw | 12.448W [Package] | 0.125W | N/A | 82.551 (Rail) |
The frequencies on the cores were in the range of 3000MHz+
Next, the Cinebench R23 System Stability test was run for 30 minutes to record the thermals, power, and frequency behavior.
- The temperature of the CPU was 95.4°C with a VCore value of 1.404V. The frequencies were in the range of 5000MHz. The package power draw was 123.187W.
- The graphics card under gaming load was drawing near 395W power with a maximum temperature of 75° We used a custom fan curve for the graphics card so the fans were running at high speed.
- The Sabrent Rocket 4 Plus NVMe SSD was doing 60°C under load.
The SilverStone Air Penetrator 120SK A-RGB was blowing focused air toward the graphics card and NVMe ports at its full speed.
Thermal Imaging
We have used the Hti HT18 Thermal camera to record the thermals of the VRM area of the motherboard under load using Cinebench R23.
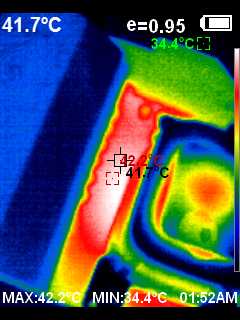
The MOSFETs ran at 42.2°C with a 31°C ambient temperature. The onboard sensor read 41°C, narrowing the error margin, suggesting accuracy. We didn’t utilize the external motherboard temperature sensor. The SilverStone Air Penetrator 120SK A-RGB blew focused air at maximum speed toward the CPU socket.
Should You Buy It?
Is this motherboard worthy of your money?
Buy It If
✅ You Prioritize Mid-Range Performance: If you’re seeking mid-range performance with a focus on durability and high performance, this motherboard delivers adequately in those aspects.
✅ You Need Multiple USB Ports and Hubs: For those requiring numerous USB ports and hubs, this motherboard offers a variety, including high-speed options like USB 3.2 Gen 2×2 Type-C and USB Type-C Gen ports.
✅ You’re Seeking Effective Heat Management: If effective cooling and heat management are priorities, the TMOS-based massive heatsinks and thermal pads for SSDs provide efficient temperature control.
Don’t Buy It If
❌ PCIe Slots are Too Limited For You: If you require high-speed PCIe slots across the board, note that this motherboard has limitations with two slots rated at X1 speed, which might not meet certain high-bandwidth demands.
❌ You Require More Robust Audio Solutions: For users seeking a more robust audio solution, the RealTek ALC897 might fall short of expectations, particularly for audiophiles or those with higher audio quality needs.
❌ You Have Advanced Overclocking Requirements: If you’re a power user seeking extensive overclocking options or features beyond basic settings, this motherboard might not fully meet those advanced needs.
Final Thoughts
The GIGABYTE B650 AORUS ELITE AX, ranking third in the B650 lineup, doesn’t come with a budget-friendly price despite falling into the mid-range category. Its design shows both strong features and some drawbacks.
The motherboard offers decent specs. However, its PCIe setup could be better. It houses a Gen 5-based M.2 NVMe SSD port directly linked to the CPU, while other PCIe slots operate at Gen 3 X1 speed, a limitation I found disappointing. On the connectivity front, it’s packed with USB ports, Wi-Fi 6E, Bluetooth 5.3, and a 2.5GbE LAN port.
The board offers effective cooling through TMOS-based heatsinks for VRM/MOSFETs. The audio solution with RealTek ALC897 and other components like the SuperIO chip and fan headers are fairly standard. The CPU power delivery is robust, utilizing twin digital 14 phases and MOSFET setups for VCore, SOC, and PCIe lanes.
Despite some minor issues, its overall performance stands out, offering good storage, gaming, and network performance, with reliable MOSFET cooling. The motherboard’s audio suffices for most needs, and GIGABYTE provides a 1+2 warranty for this model.
We are thankful to GIGABYTE for giving us the opportunity to review their B650 Aorus Elite AX Motherboard.
Awards Received By The Gigabyte B650 Aorus Elite AX
- Best Overall B650 Motherboard
- Best Value Motherboard For Ryzen 9 7900X3D
- Best Value Motherboard For Ryzen 9 7800X3D
- Best Value Motherboard For Ryzen 9 7950X3D
Recent Updates
- January 10, 2024: Few text changes to improve readability. Also added image galleries.
Thank you! Please share your positive feedback. 🔋
How could we improve this post? Please Help us. 😔
Feedback By:
[Hardware Reviewer & Editor]
Meet Nauman Siddique, a highly experienced computer science graduate with more than 15 years of knowledge in technology. Nauman is an expert in the field known for his deep understanding of computer hardware.
As a tech tester, insightful reviewer, and skilled hardware editor, Nauman carefully breaks down important parts like motherboards, graphics cards, processors, PC cases, CPU coolers, and more.
- 15+ years of PC Building Experience
- 10+ years of first-hand knowledge of technology
- 7+ years of doing in-depth testing of PC Hardware
- A motivated individual with a keen interest in tech testing from multiple angles.
- I majored in Computer Science with a Masters in Marketing
- Previously worked at eXputer, EnosTech, and Appuals.
- Completed Course in Computer Systems Specialization From Illinois Tech
Get In Touch: nauman@tech4gamers.com


