 Threads
Performance Meets Style!
Review Summary
The GIGABYTE Z690 AERO G is a mid-range motherboard aimed at content creators with almost a balanced set of features to deliver a satisfactory high performance to the users. Gamers can also enjoy this motherboard, though you would not find those extras when it comes to serious gaming.
Hours Tested: 15

Overall
-
Design - 8.5/10
8.5/10
-
Features - 8/10
8/10
-
Performance - 9/10
9/10
-
Value - 8/10
8/10
Pros
- VISION Link Support
- High-Speed Graphics (PCIe 5.0 x16 slot)
- Ample NVMe Storage (4x M.2 NVMe PCIe 4 slots)
- Fast Networking (2.5GbE LAN port)
- Customizable Cooling (8x Fan Headers, 9x thermal sensors)
- High-Quality Audio (ALC4080 Codec)
- Wireless Connectivity (WiFi 6)
Cons
- Lack of 10GbE LAN
- No WiFi 6E
- No Thunderbolt Ports
- Limited Audio Ports
- PCIe 3.0 Limitations (shared bus with M.2 WiFi and LAN port)


Introducing GIGABYTE’s AERO series—specifically, the Z690 AERO G motherboard designed for Content Creators. This sleek Silver and Black combo boasts a standout feature called Vision Link, a powerhouse port handling Fast Charging, Display, High-Speed Storage transfer, and more. Dive into a seamless experience with salient features like support for 12th Gen Intel® Core™ Series Processors, dual-channel DDR5, and a PCIe 5.0 x16 slot ready for GPU or NVMe storage. Enjoy hassle-free connections, speed networks, and advanced thermal design. Let’s begin testing!
- Why you can trust Tech4Gamers: Our reviews are based on dedicated hands-on testing by our team of experienced hardware experts. Find out more about how we test.
Key Takeaways
- GIGABYTE’s Z690 AERO G motherboard is a feature-rich, mid-range motherboard designed specifically for content creators, offering optimized features for heavy design workloads.
- It is ideal for content creators seeking a balance of performance and affordability, with features like VISION Link, DDR5 support, PCIe 5.0, and advanced thermal design.
- It is not suitable for users prioritizing integrated RGB lighting, as the AERO series lacks this feature; overclockers may find challenges with voltage optimization during overclocking.
Here are the specifications.
| Specifications | Details |
|---|---|
| CPU Support | 12th Gen Intel® Core™ Processors |
| CPU Socket | LGA 1700 |
| Chipset | Intel® Z690 Chipset |
| Graphics Interface | 1*PCIe 5.0 x16 |
| Display Interface | HDMI 1.4 + USB-C + DisplayPort_In |
| Memory Type | Dual-Channel DDR5 |
| Memory DIMM | 4*DIMMs |
| Expansion Slots | 2*PCIe 3.0 x4 |
| SATA/M.2 | 6SATA3 / 4M.2 for SSD |
| SATA RAID | RAID 0,1,5,10 |
| LAN | Intel® 2.5 GbE |
| Wireless | WIFI6 802.11 ax |
| USB | 2USB 3.2 Gen 2×2 Type-C + 1USB 3.2 Gen 1 Type-C + 2USB 3.2 Gen 2 Type-A + 6USB 3.2 Gen 1 + 6*USB 2.0 |
| Audio | ALC4080 |
| Form Factor (mm) | ATX (305×244) |
Packaging and Unboxing
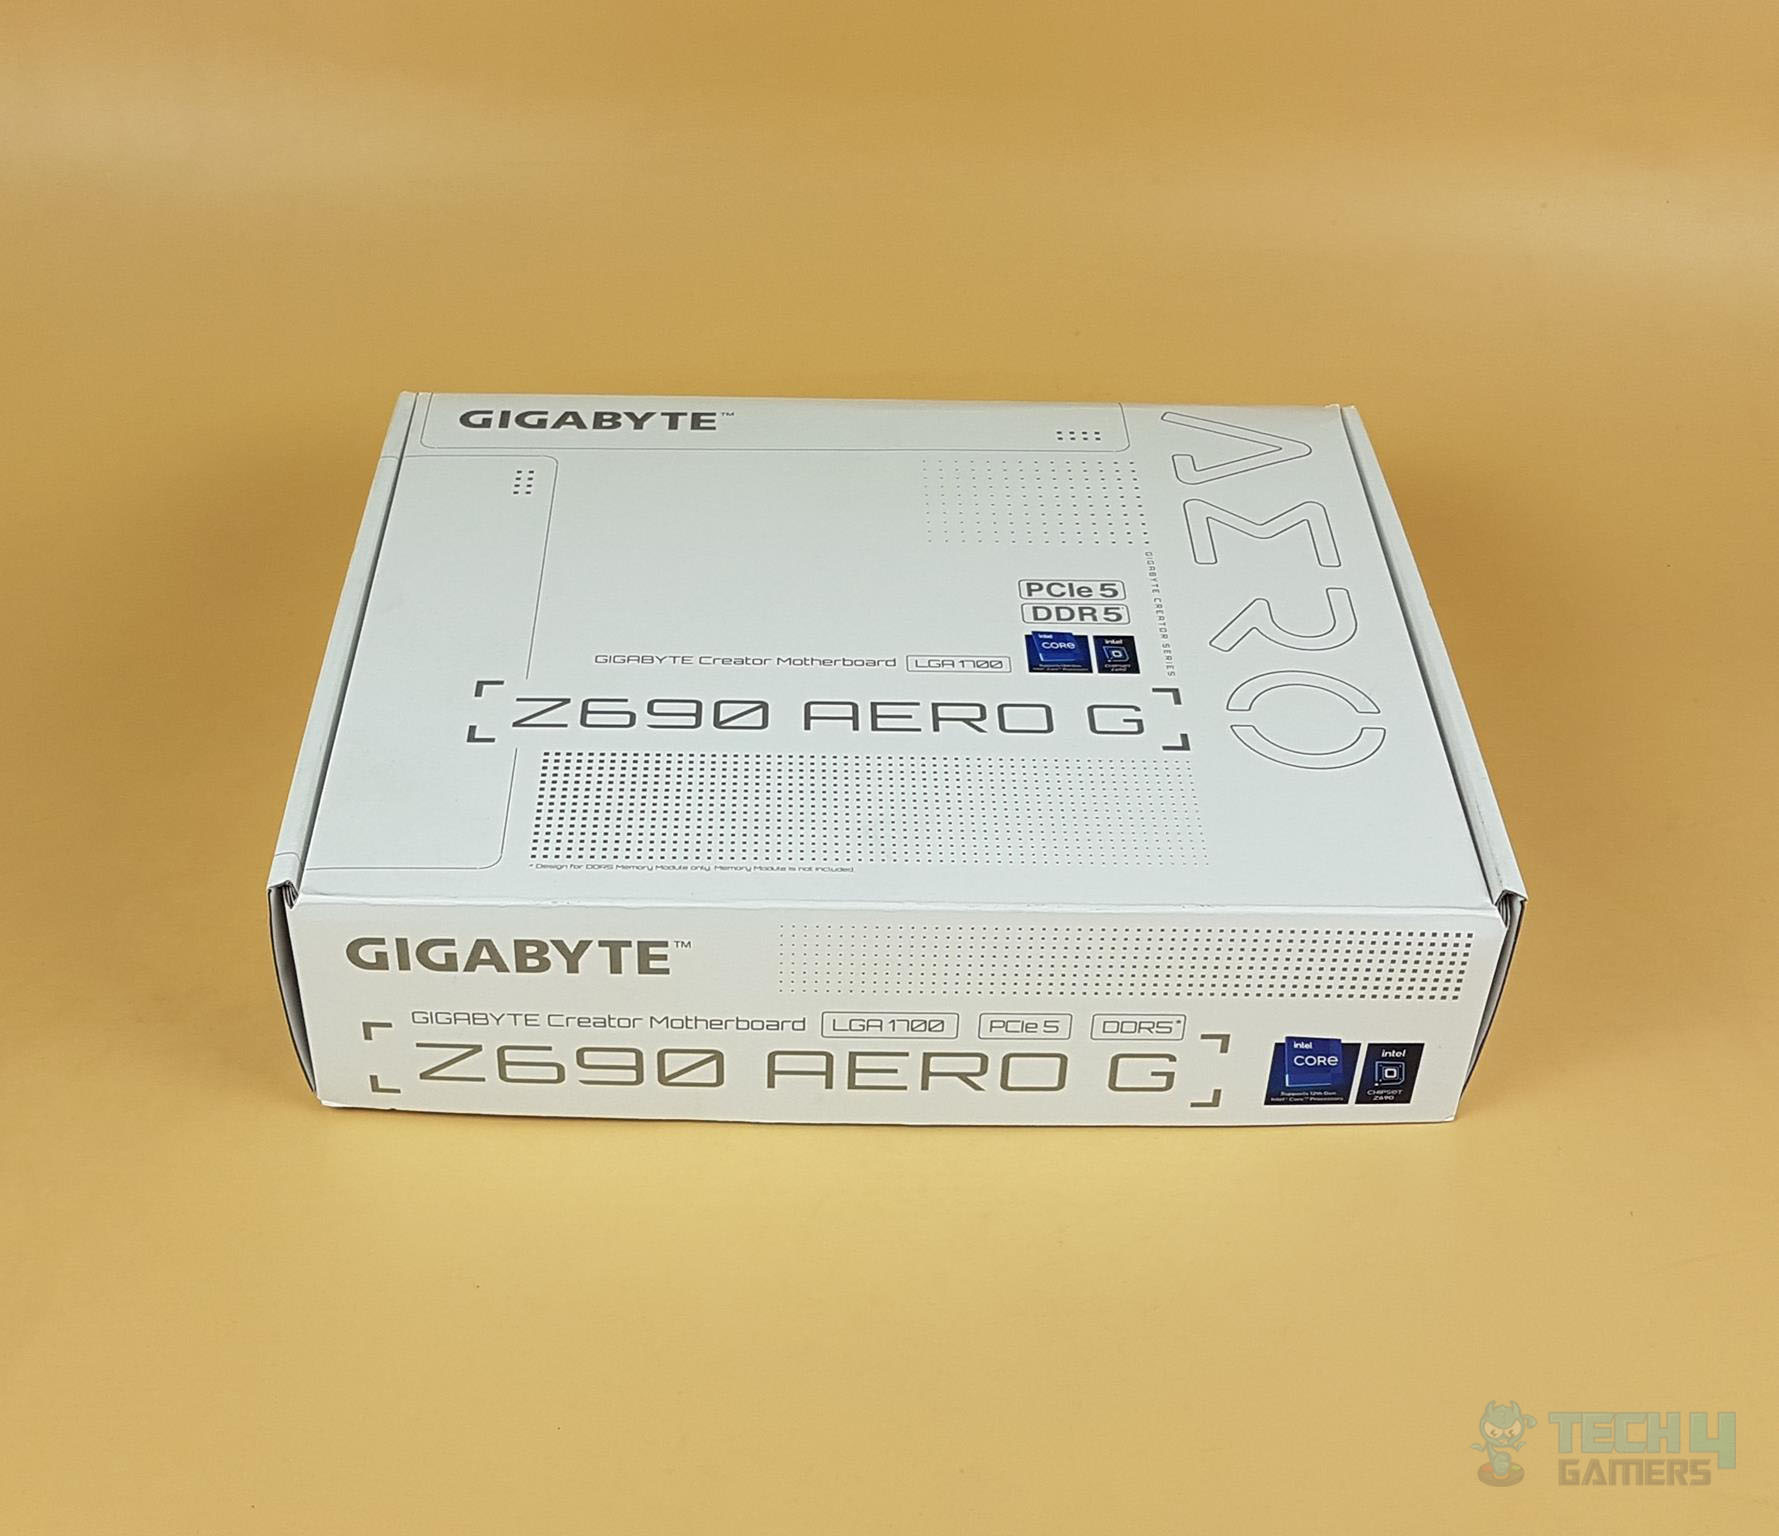
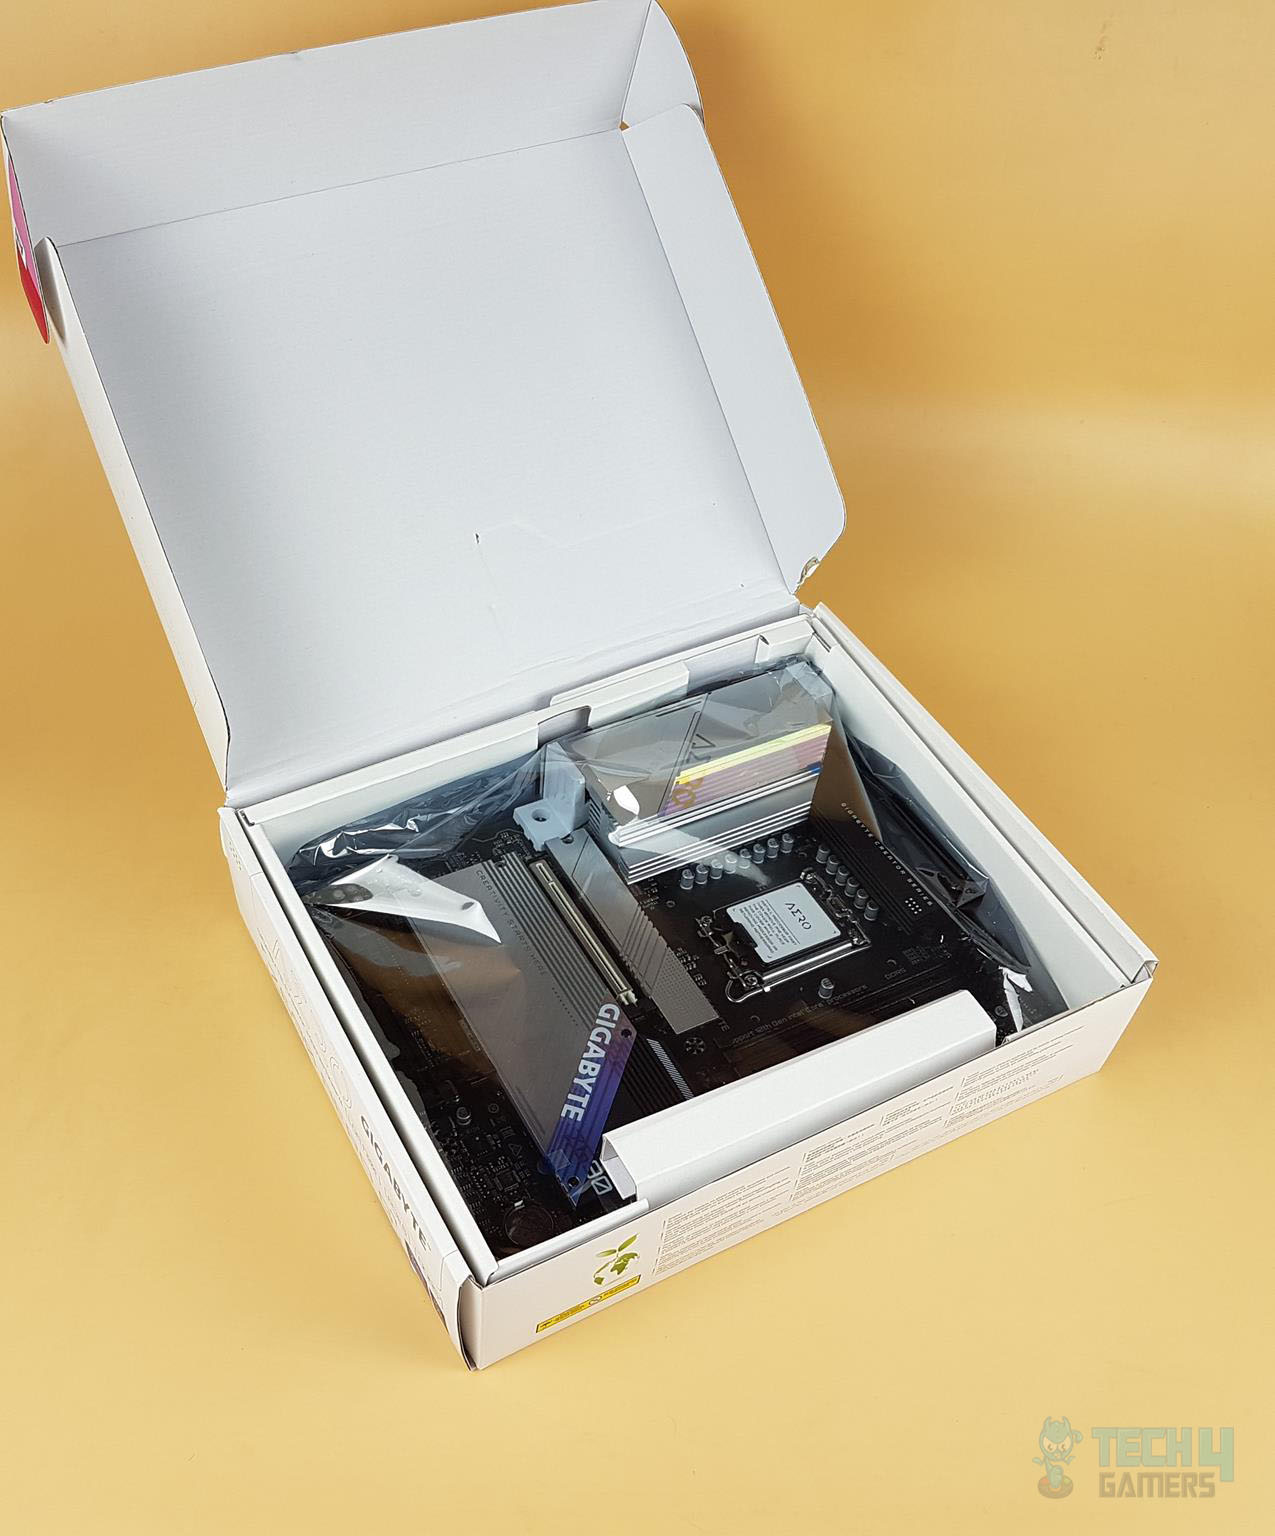
The motherboard is shipped inside the same themed packing box as we have seen on the Z490 VISION G motherboard.

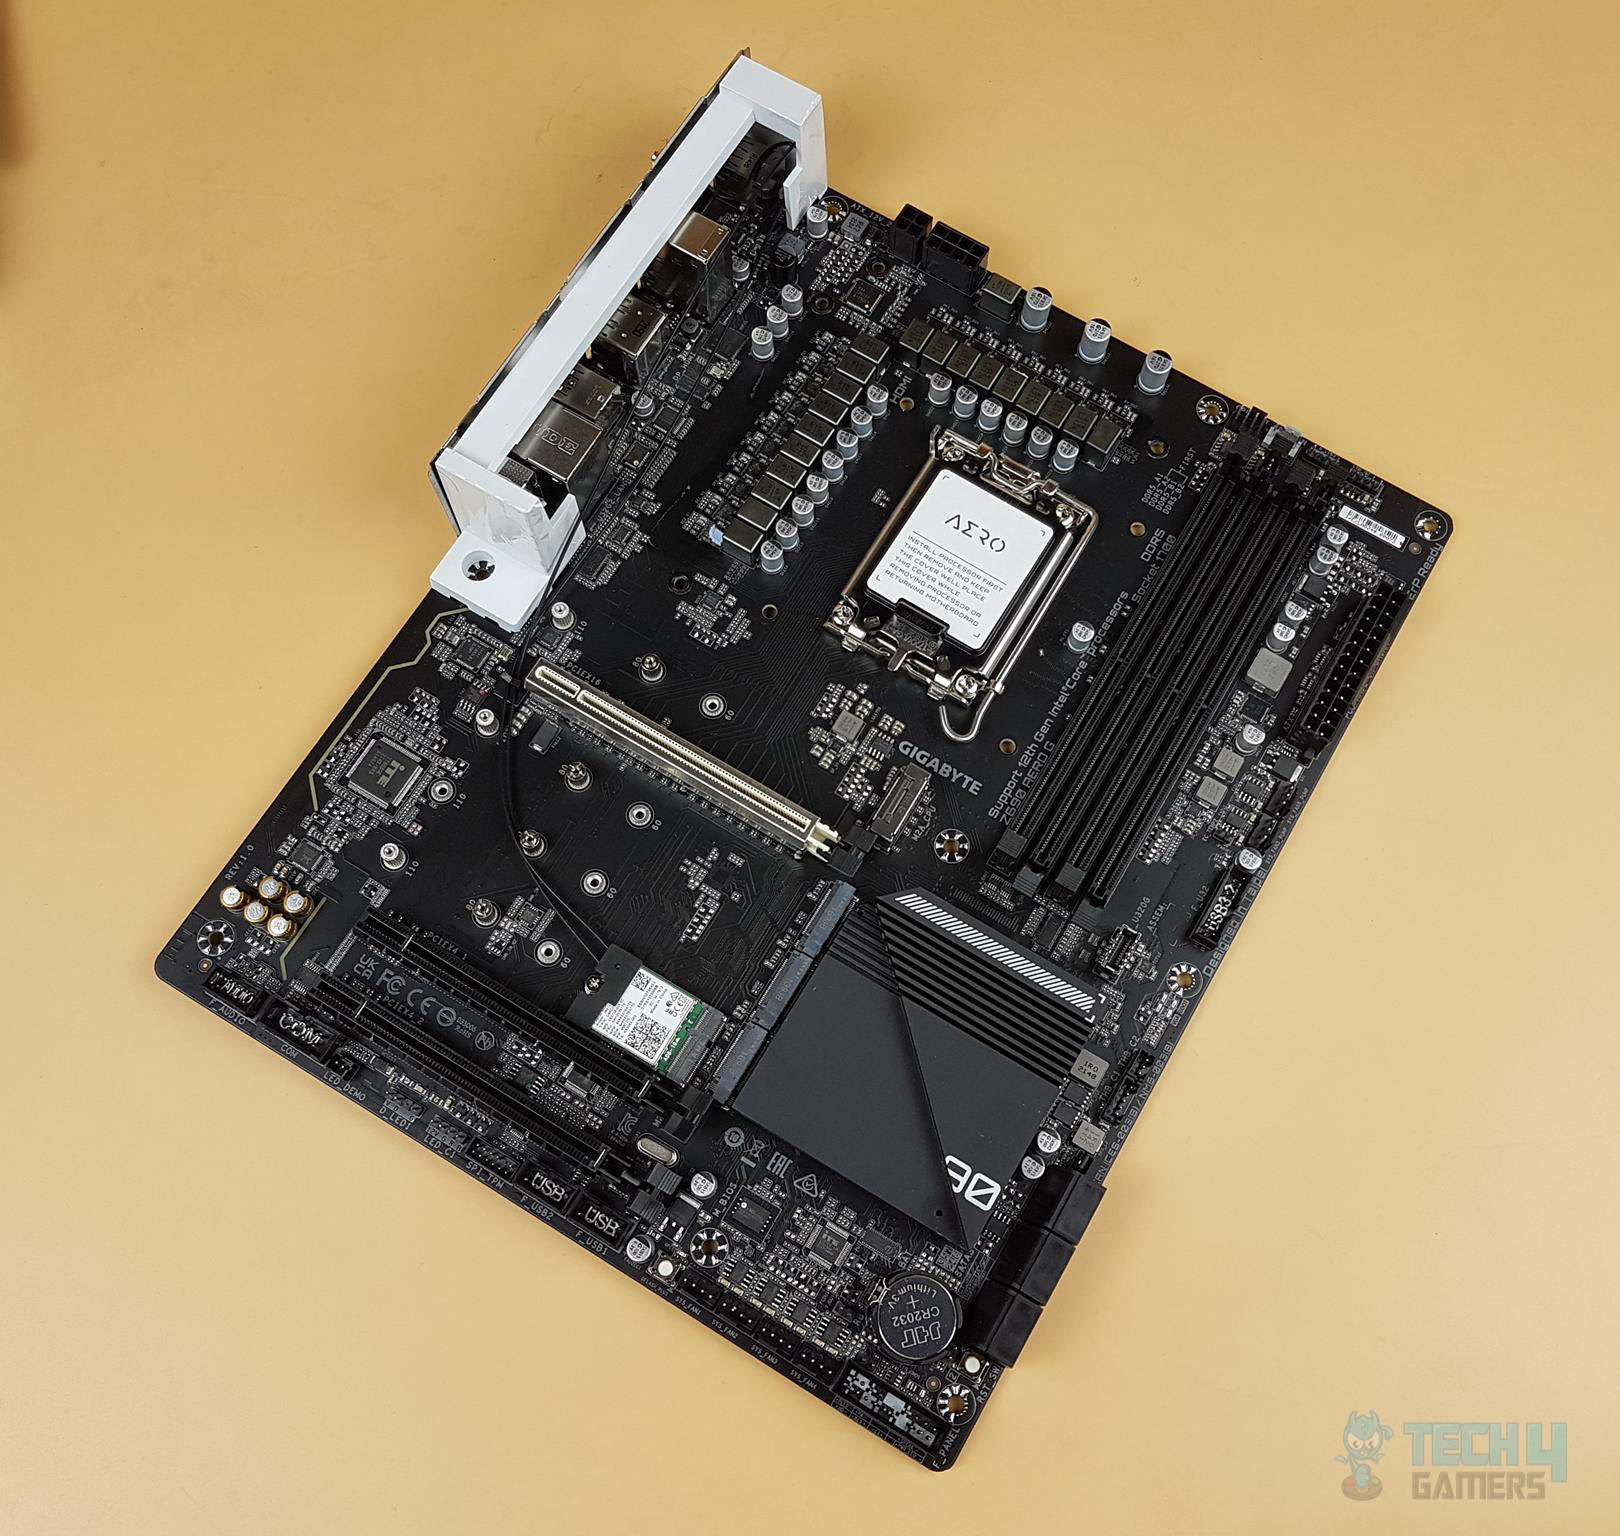
Design
The GIGABYTE Z690 AERO G motherboard is designed for content creators who need high-performance components. It features an Intel LGA1700 socket, Z690 chipset, 19 power phases, 4 NVMe SSD slots, PCIe x16 5.0 slot, and 4 DDR5 DIMM slots. With onboard WiFi 6, 2.5GbE LAN, and an integrated I/O shield, it’s ideal for silver and black accent builds. The motherboard supports DDR5 RAM, PCIe 3.0/5.0 slots, SATA ports, Thunderbolt, USB ports, Realtek ALC4080 audio, and has an ATX form factor compatible with Windows 10 and 11.
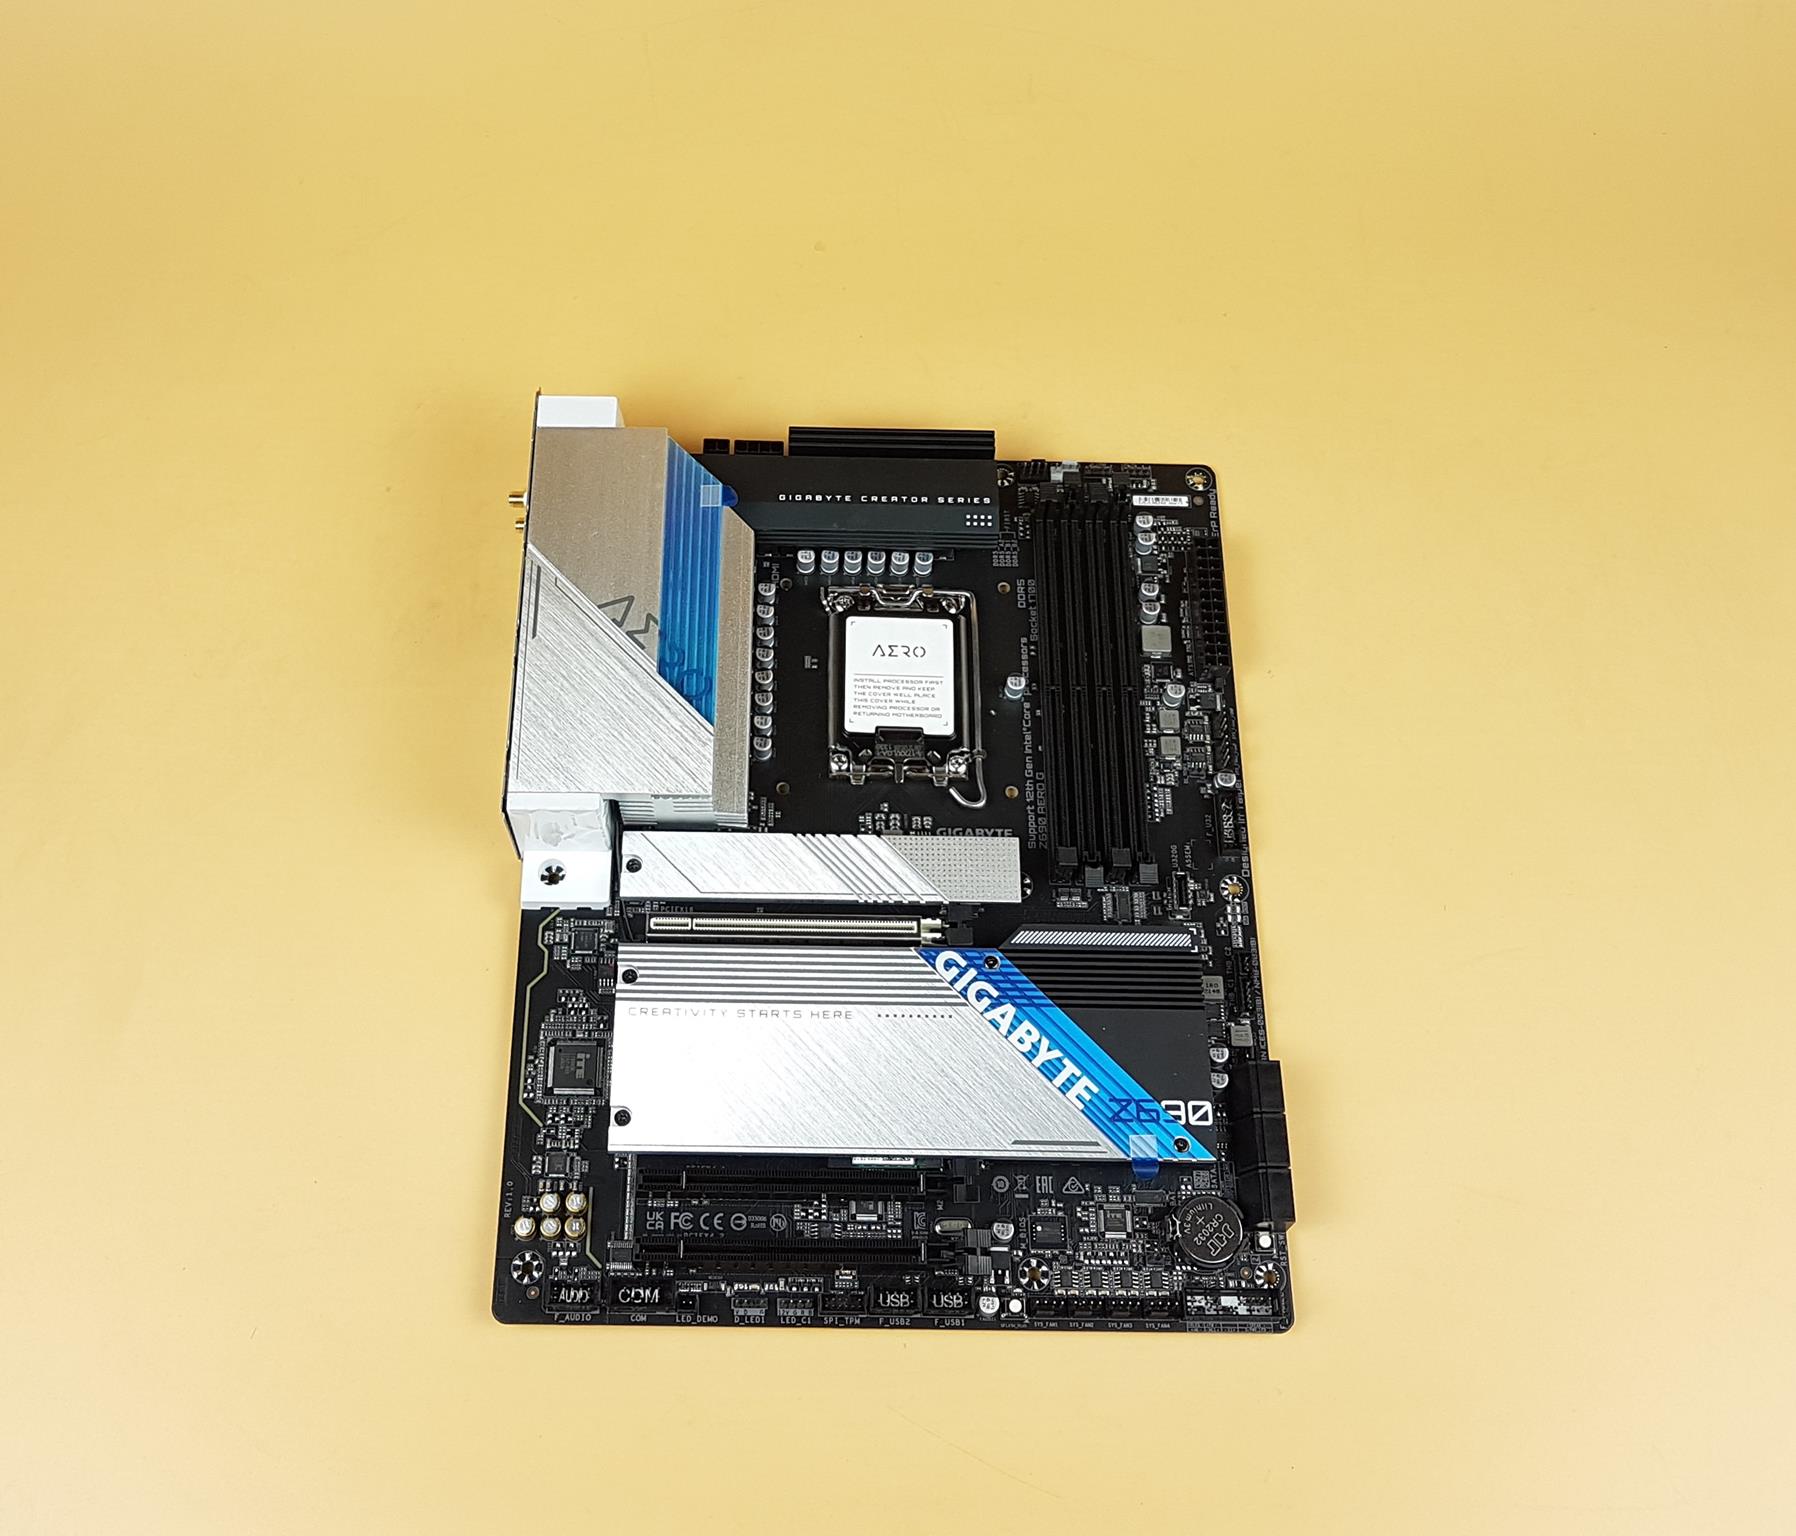
The motherboard features a thick aluminum-based heatsink cover on the Rear IO of the motherboard. The AERO text crosses over the shroud side to the heatsinks. There are no integrated RGB strips under the cover. The inclined portion of the cover has a colorful texture. One thing we are noticing is the lesser use of plastic around the socket area on the covers and heatsinks. We have a black color aluminum heatsink on the top. GIGABYTE Creator Series is printed over it. These black and silver accents on the IO cover give a unique look to the motherboard outlook.
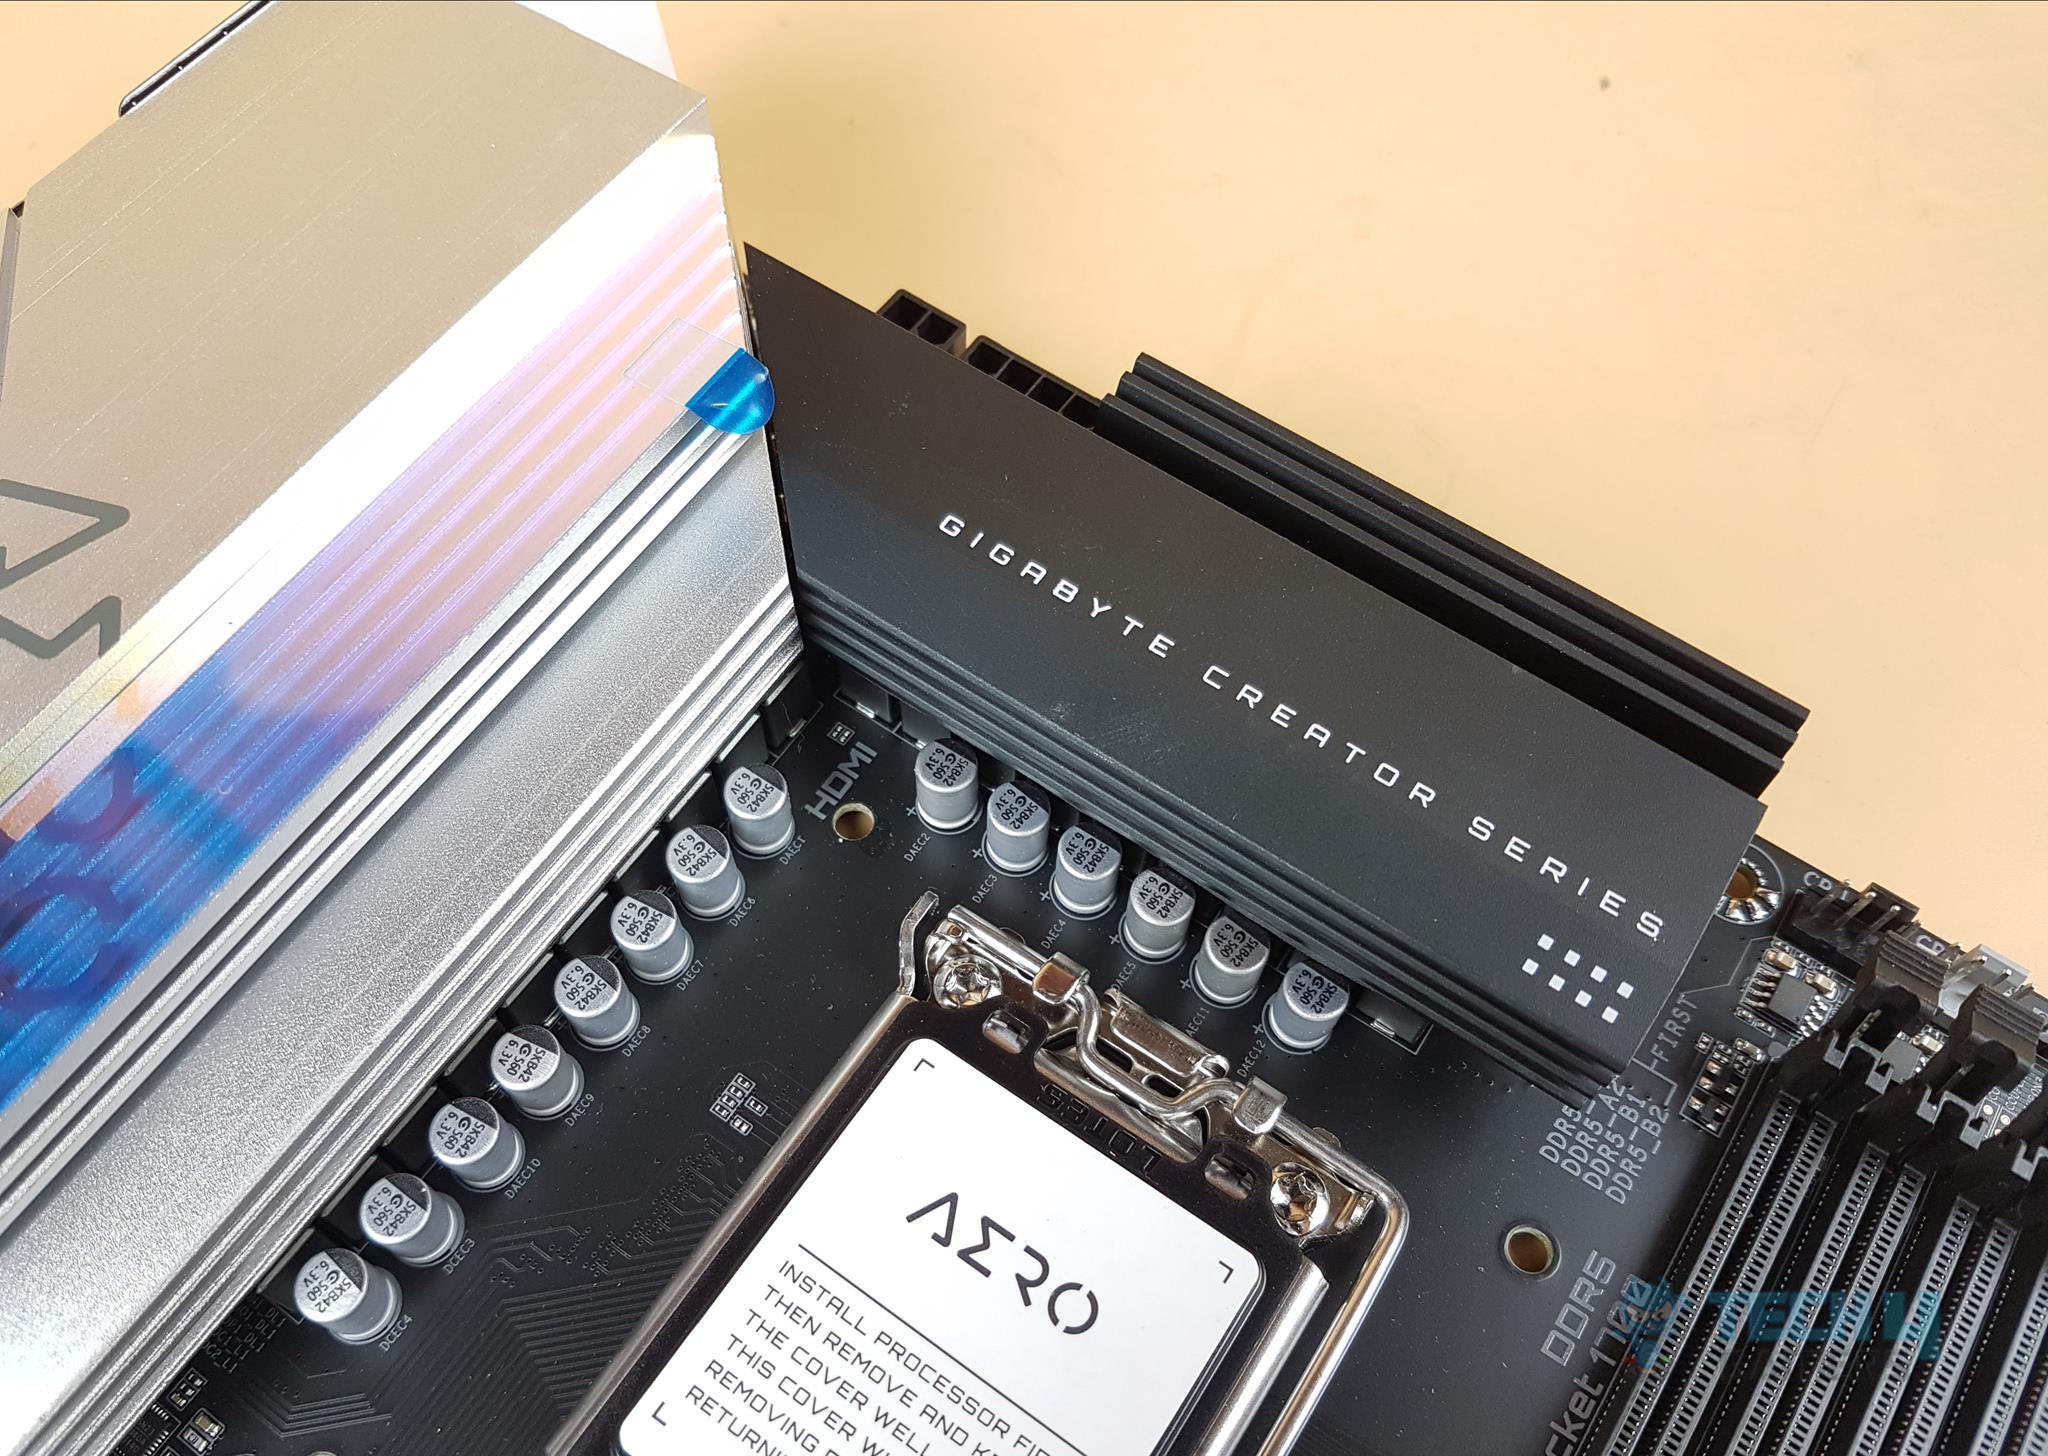
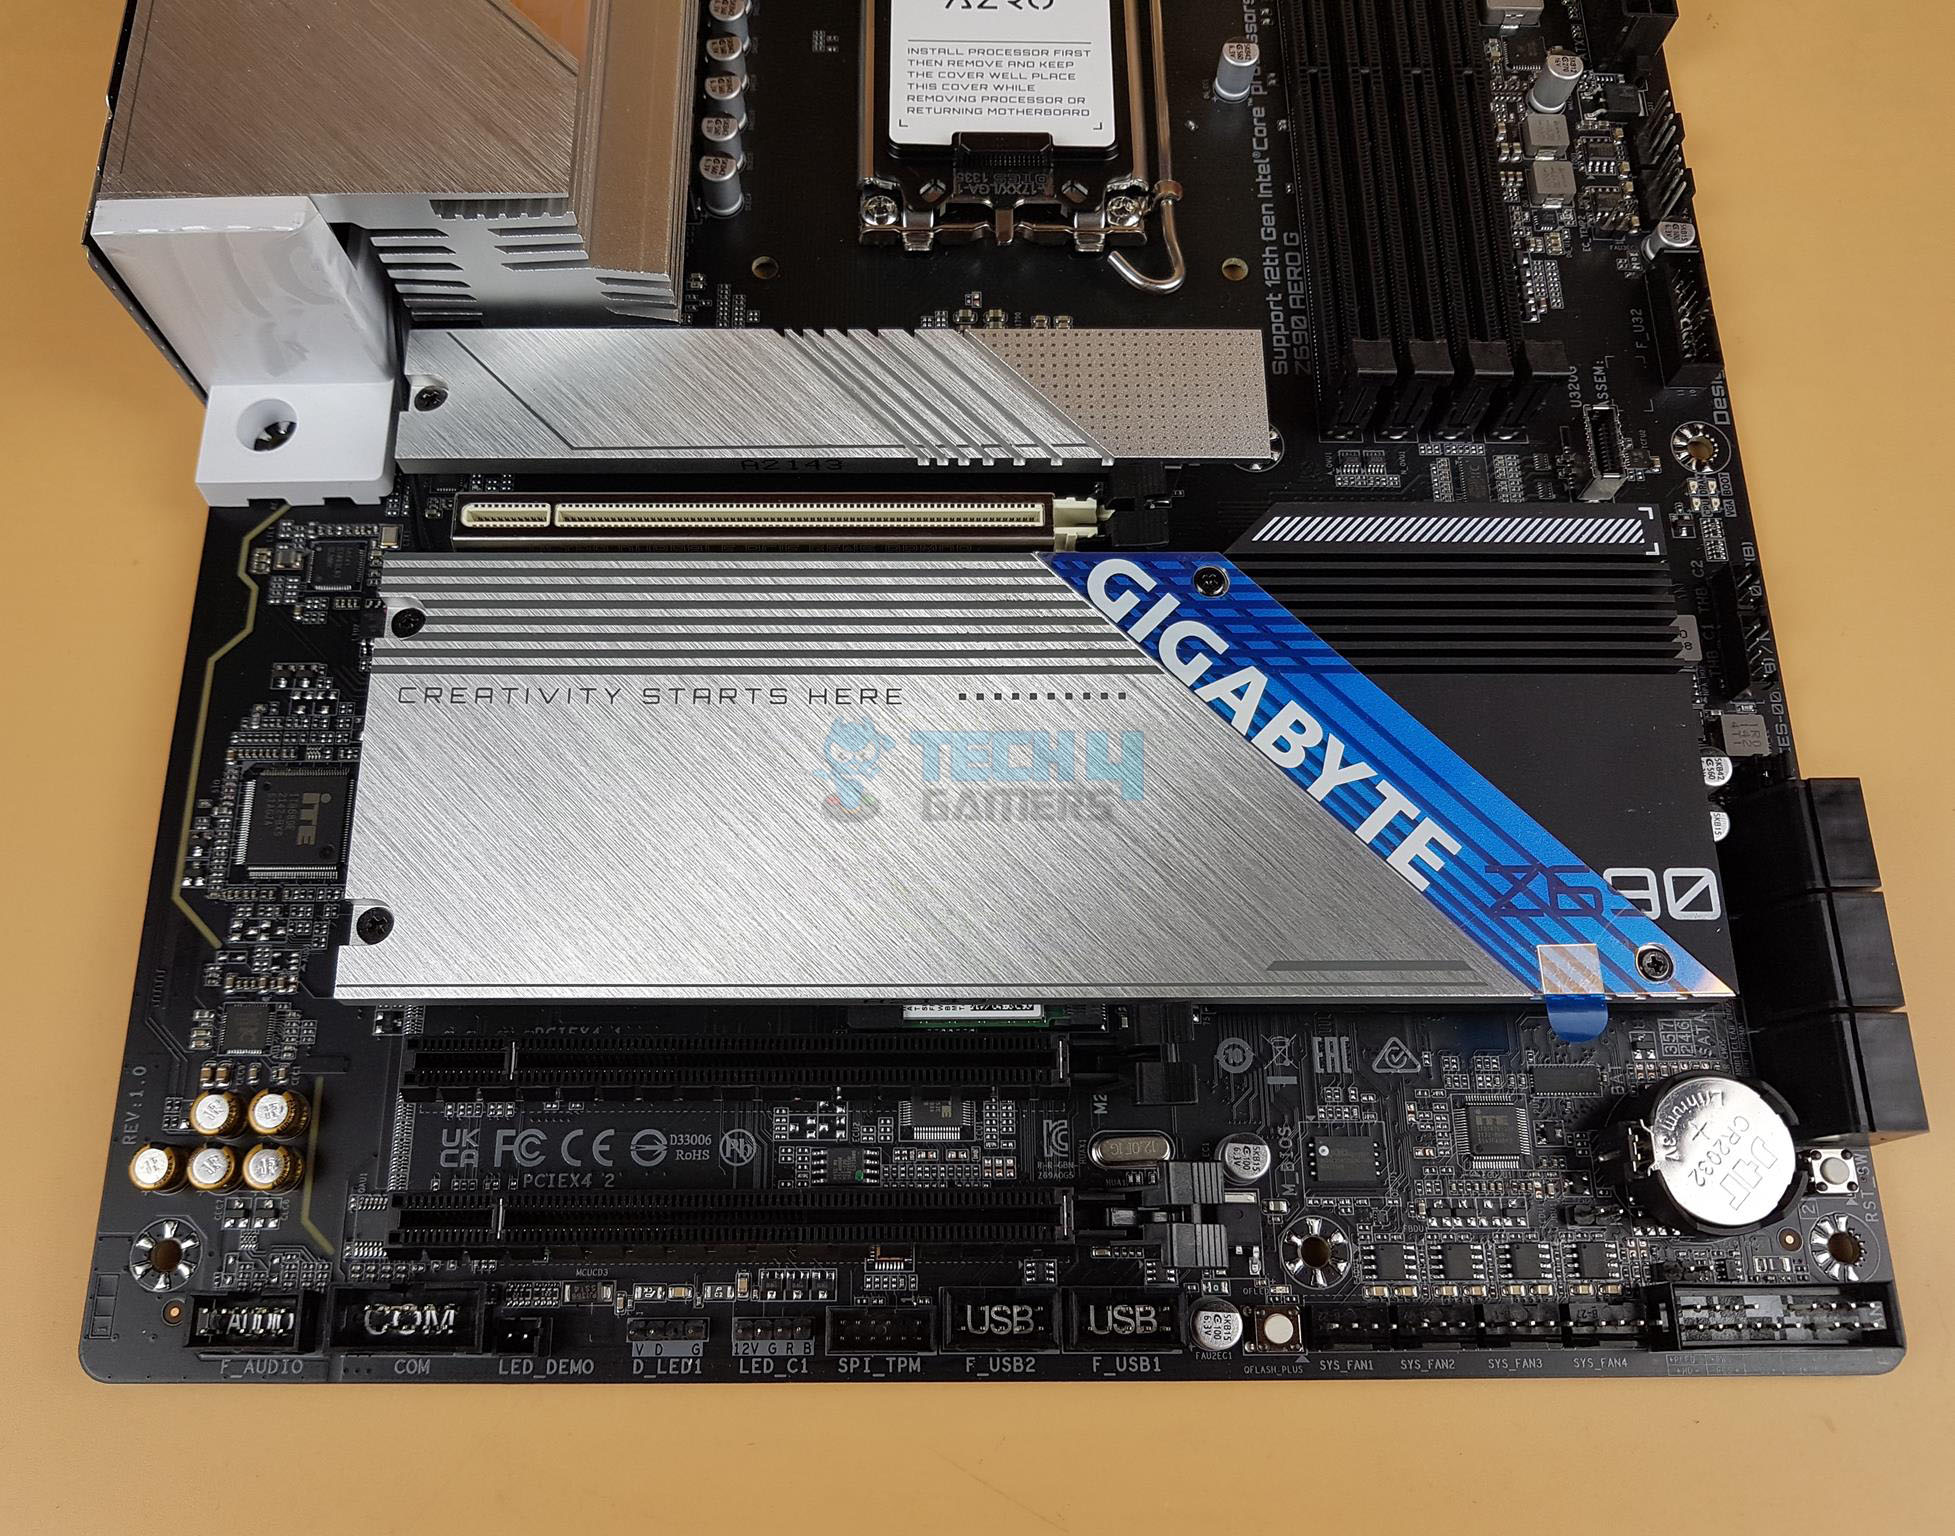
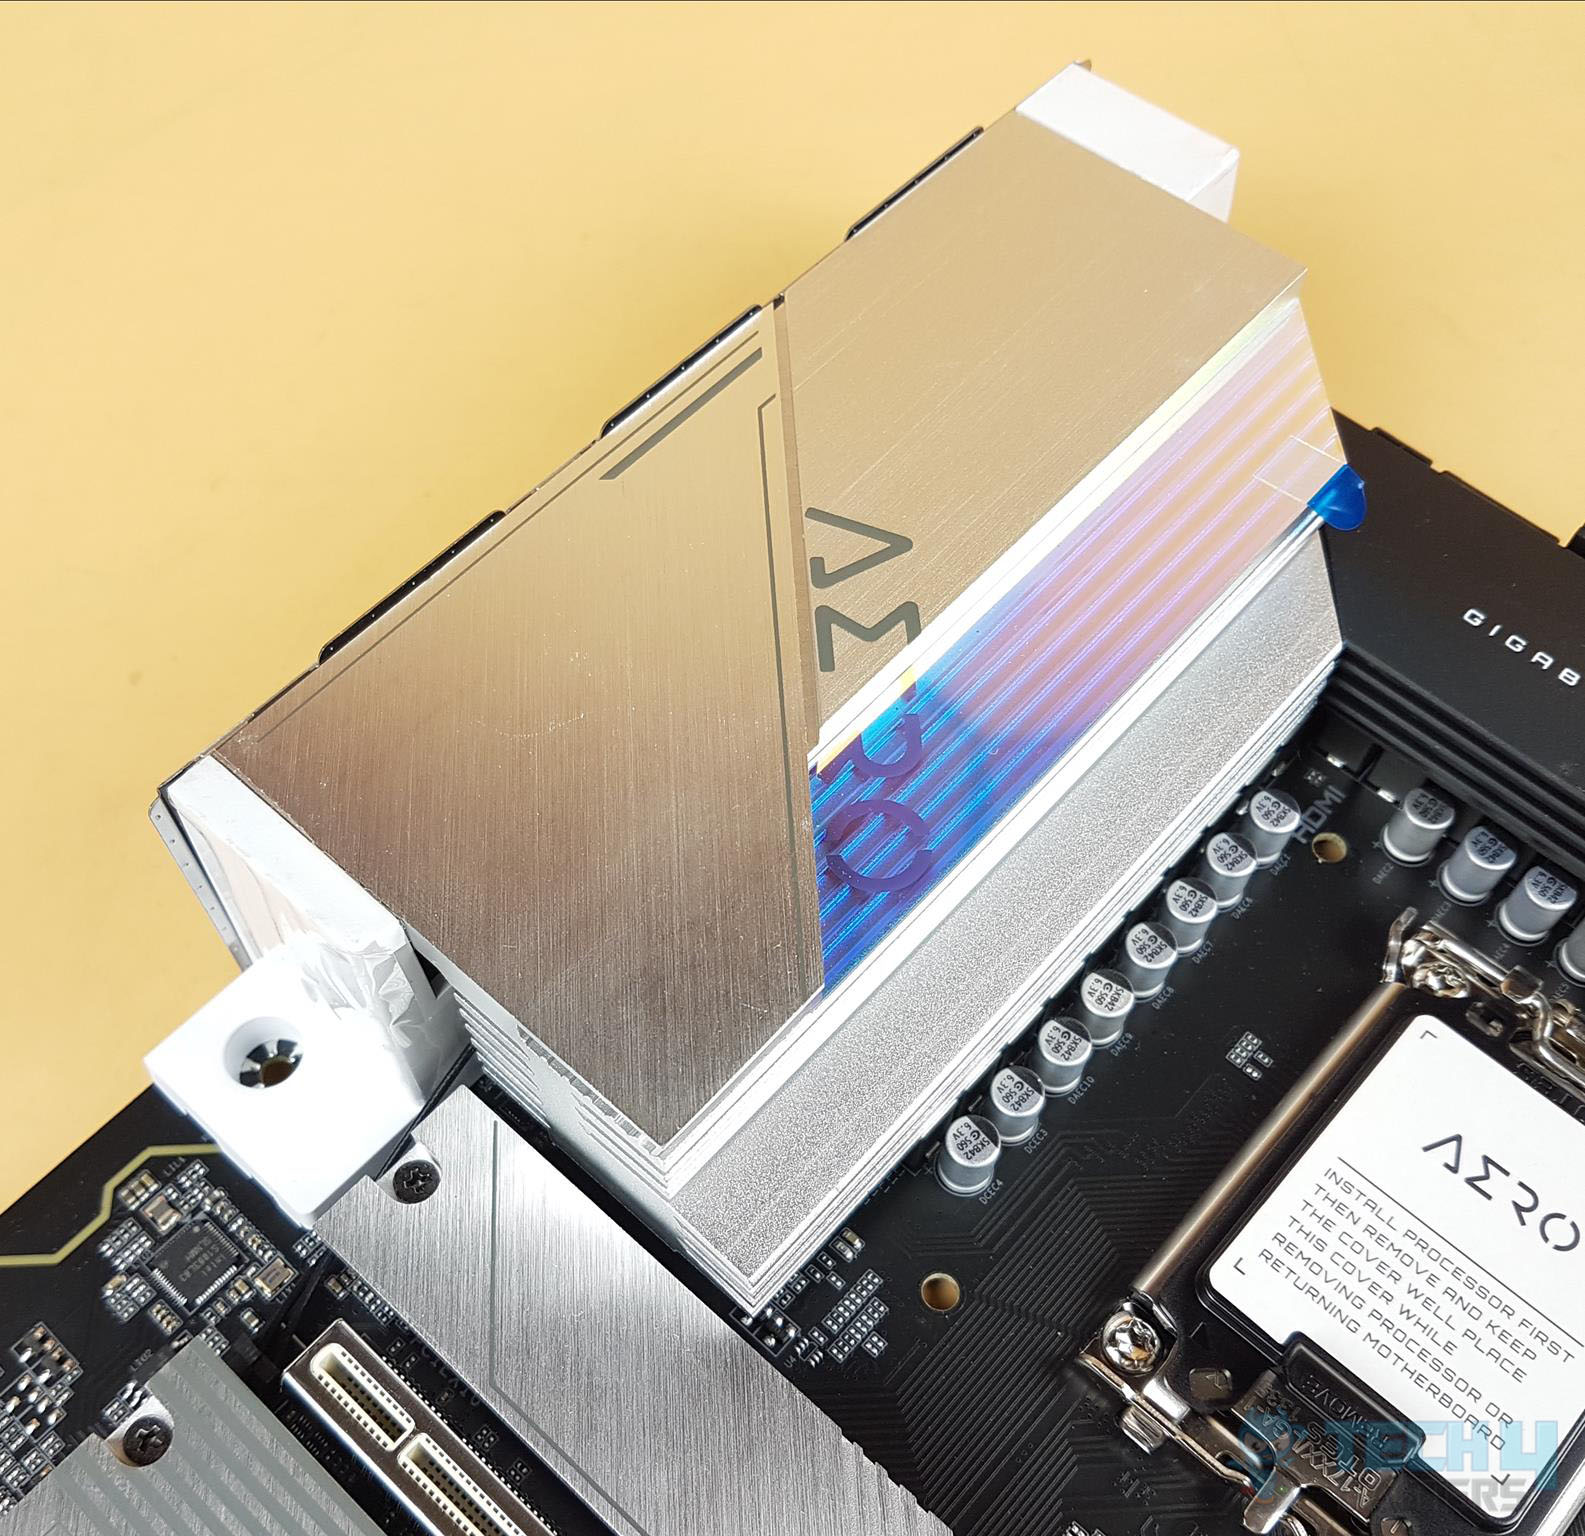
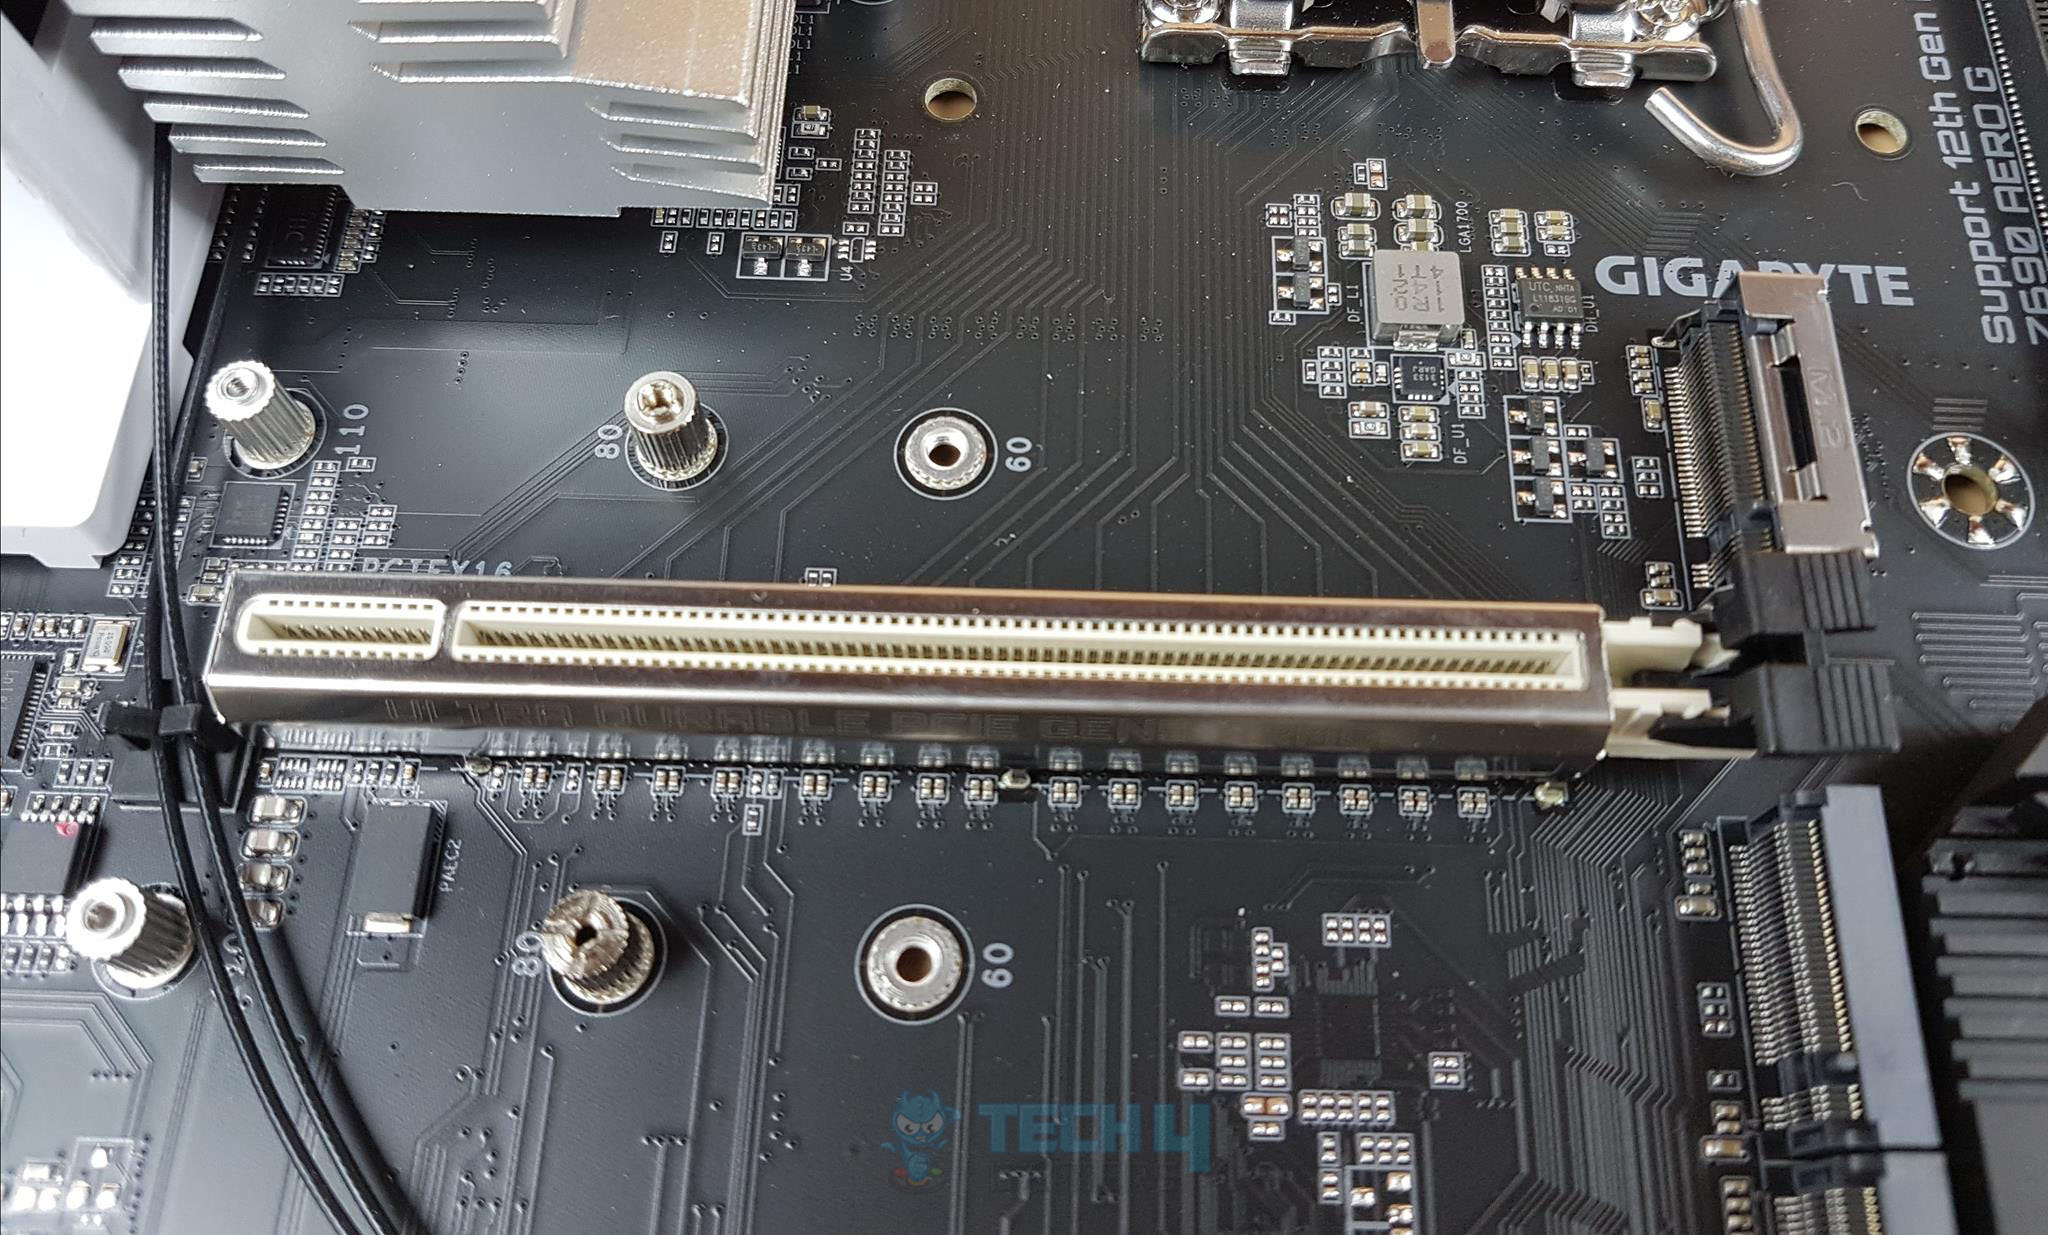
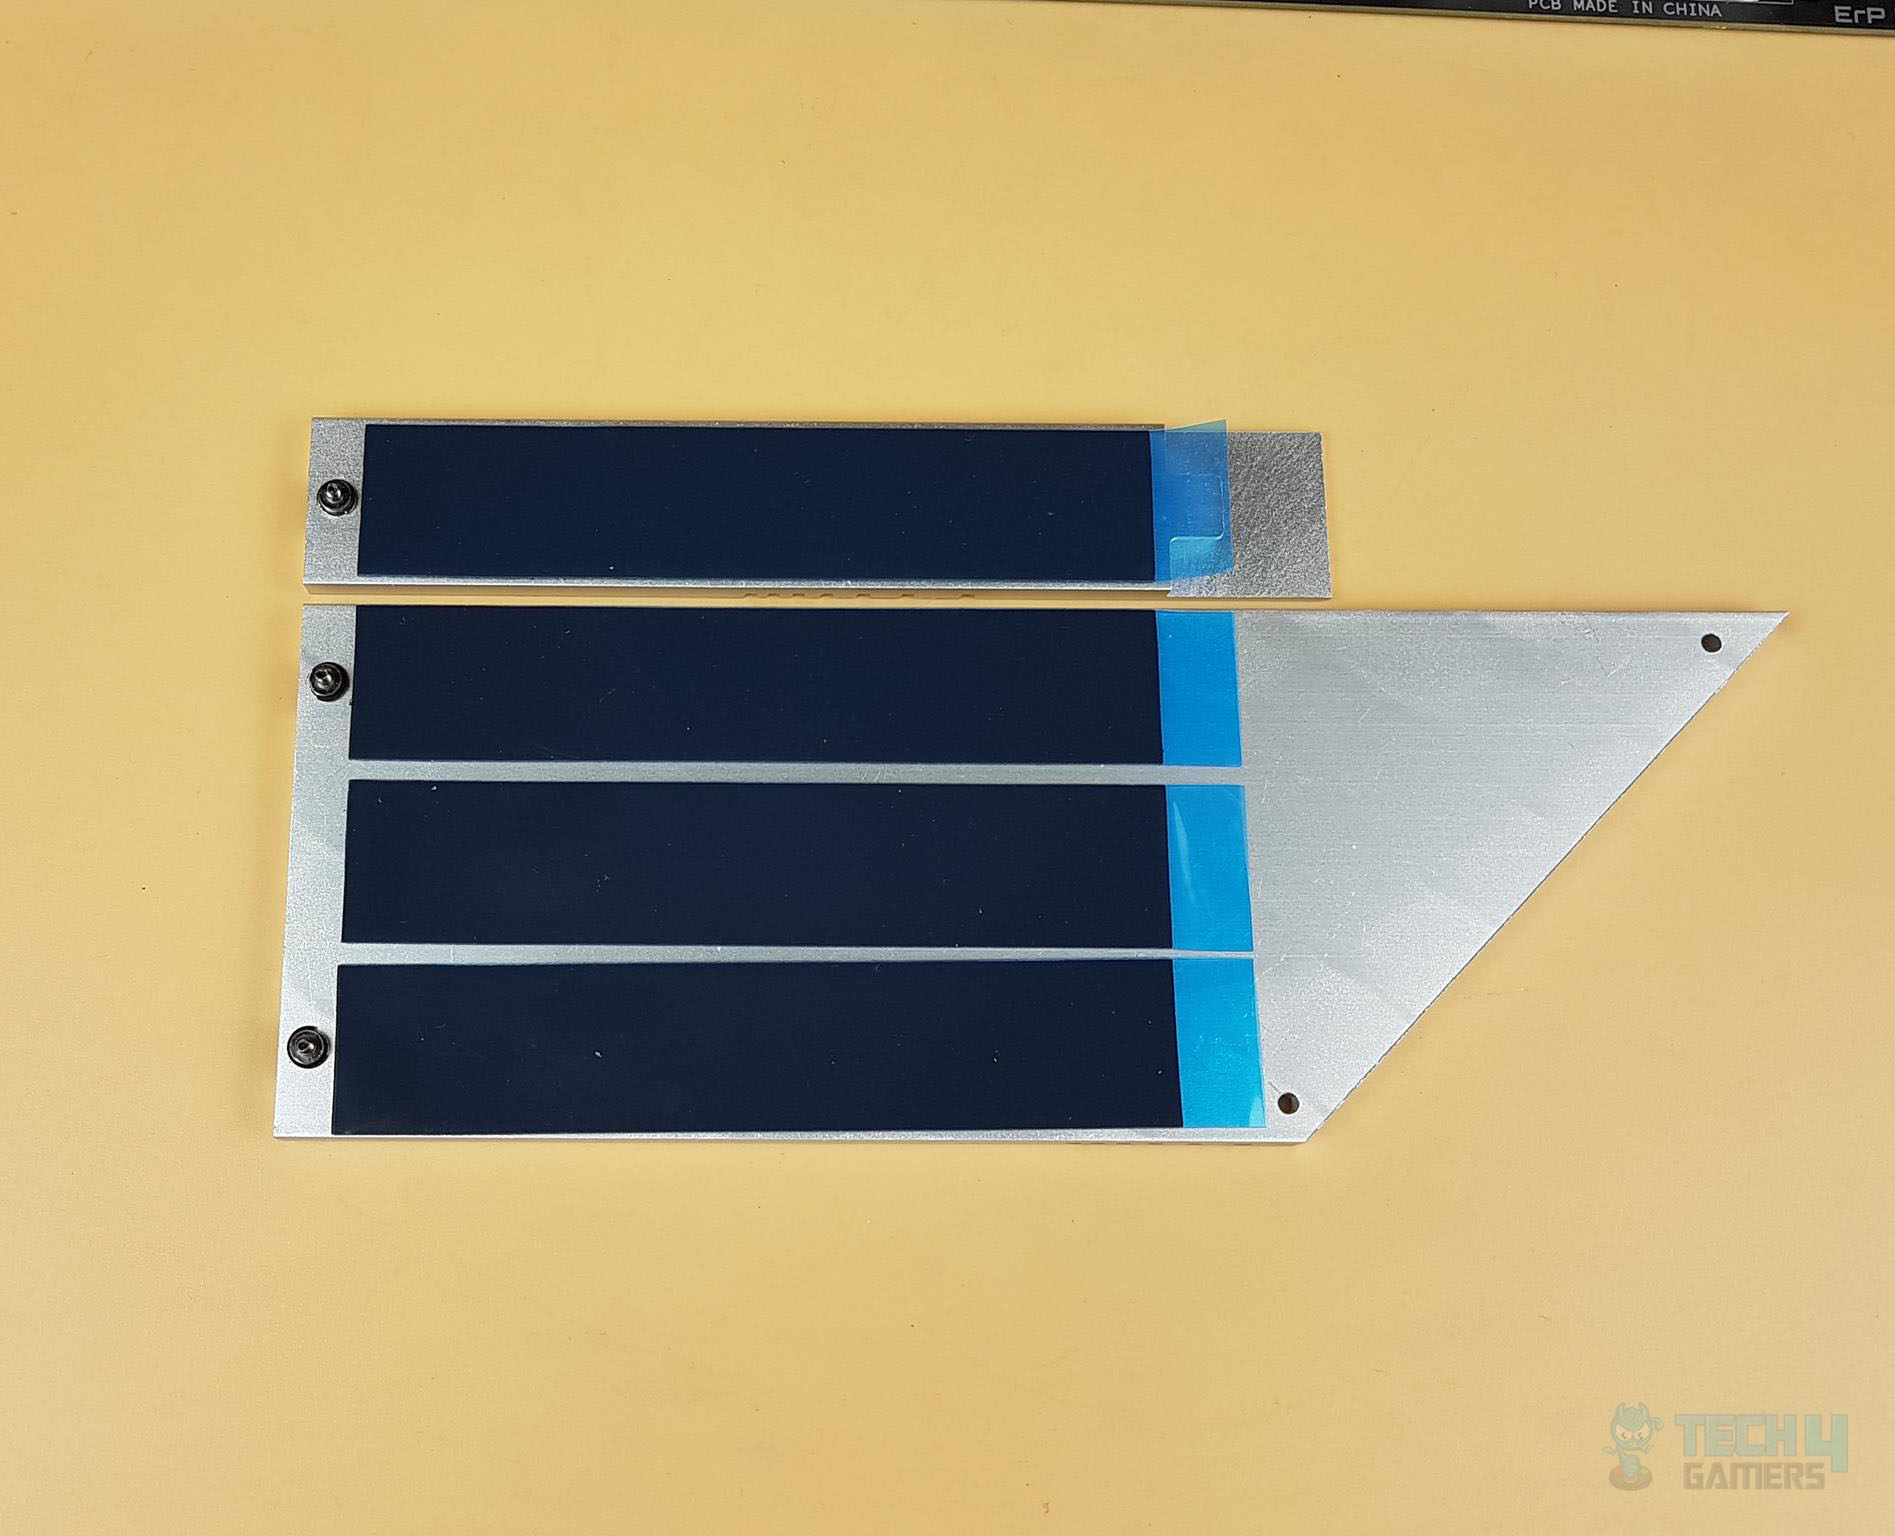
The top NVMe slot has a silver heatsink with a latch and screw lock. The first PCIe slot is metal-reinforced and supports PCIe 5.0 with backward compatibility. The large silver heatsink cover matches the top cover and has 3 NVMe slots. The Z690 chip has a black heatsink. The CPU socket has a white protective cover and uses a new design with 1700 pins, similar to the Intel X99/X299.
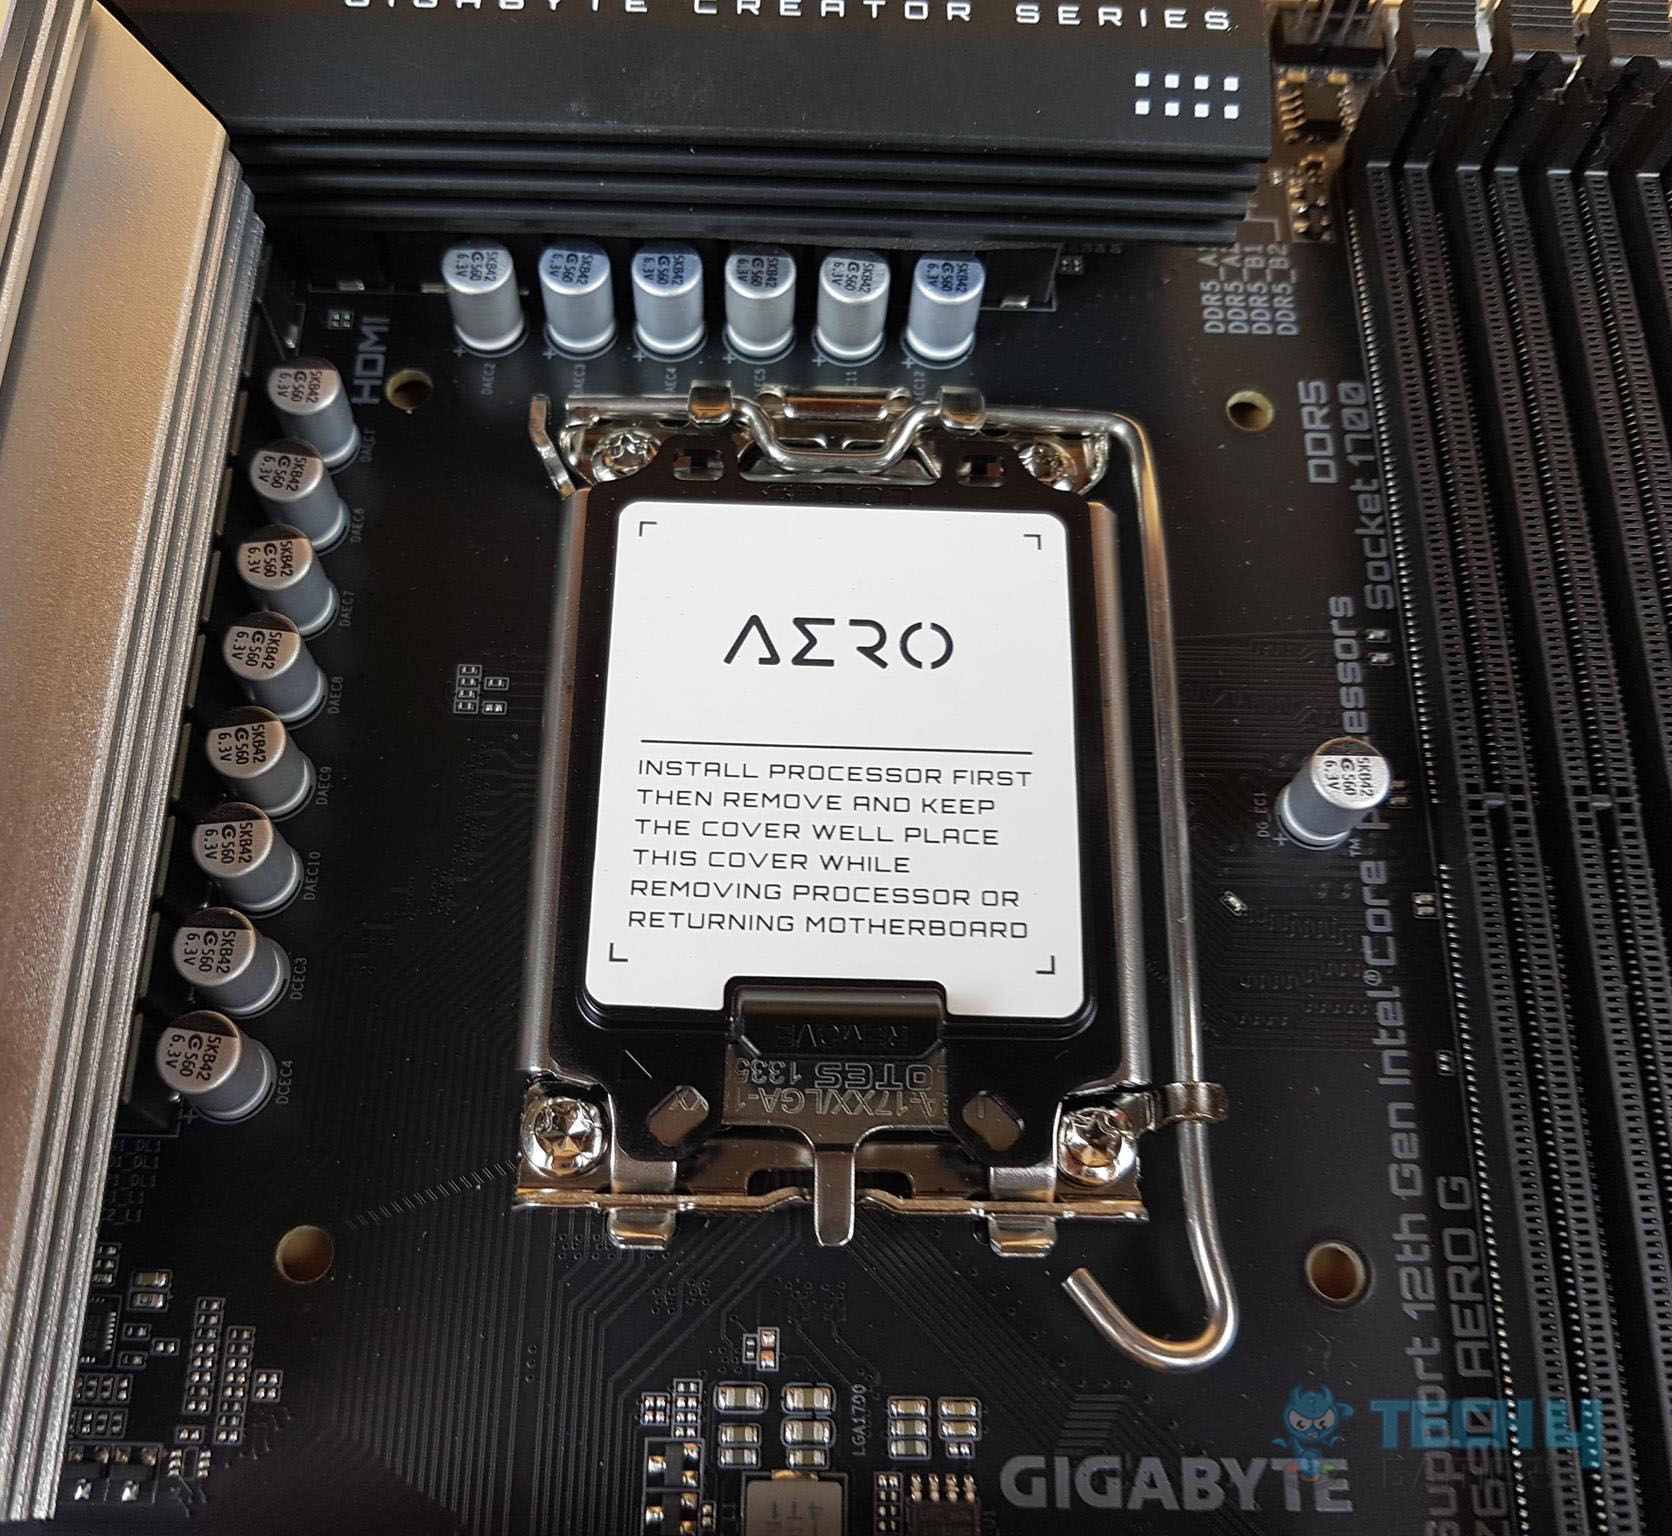
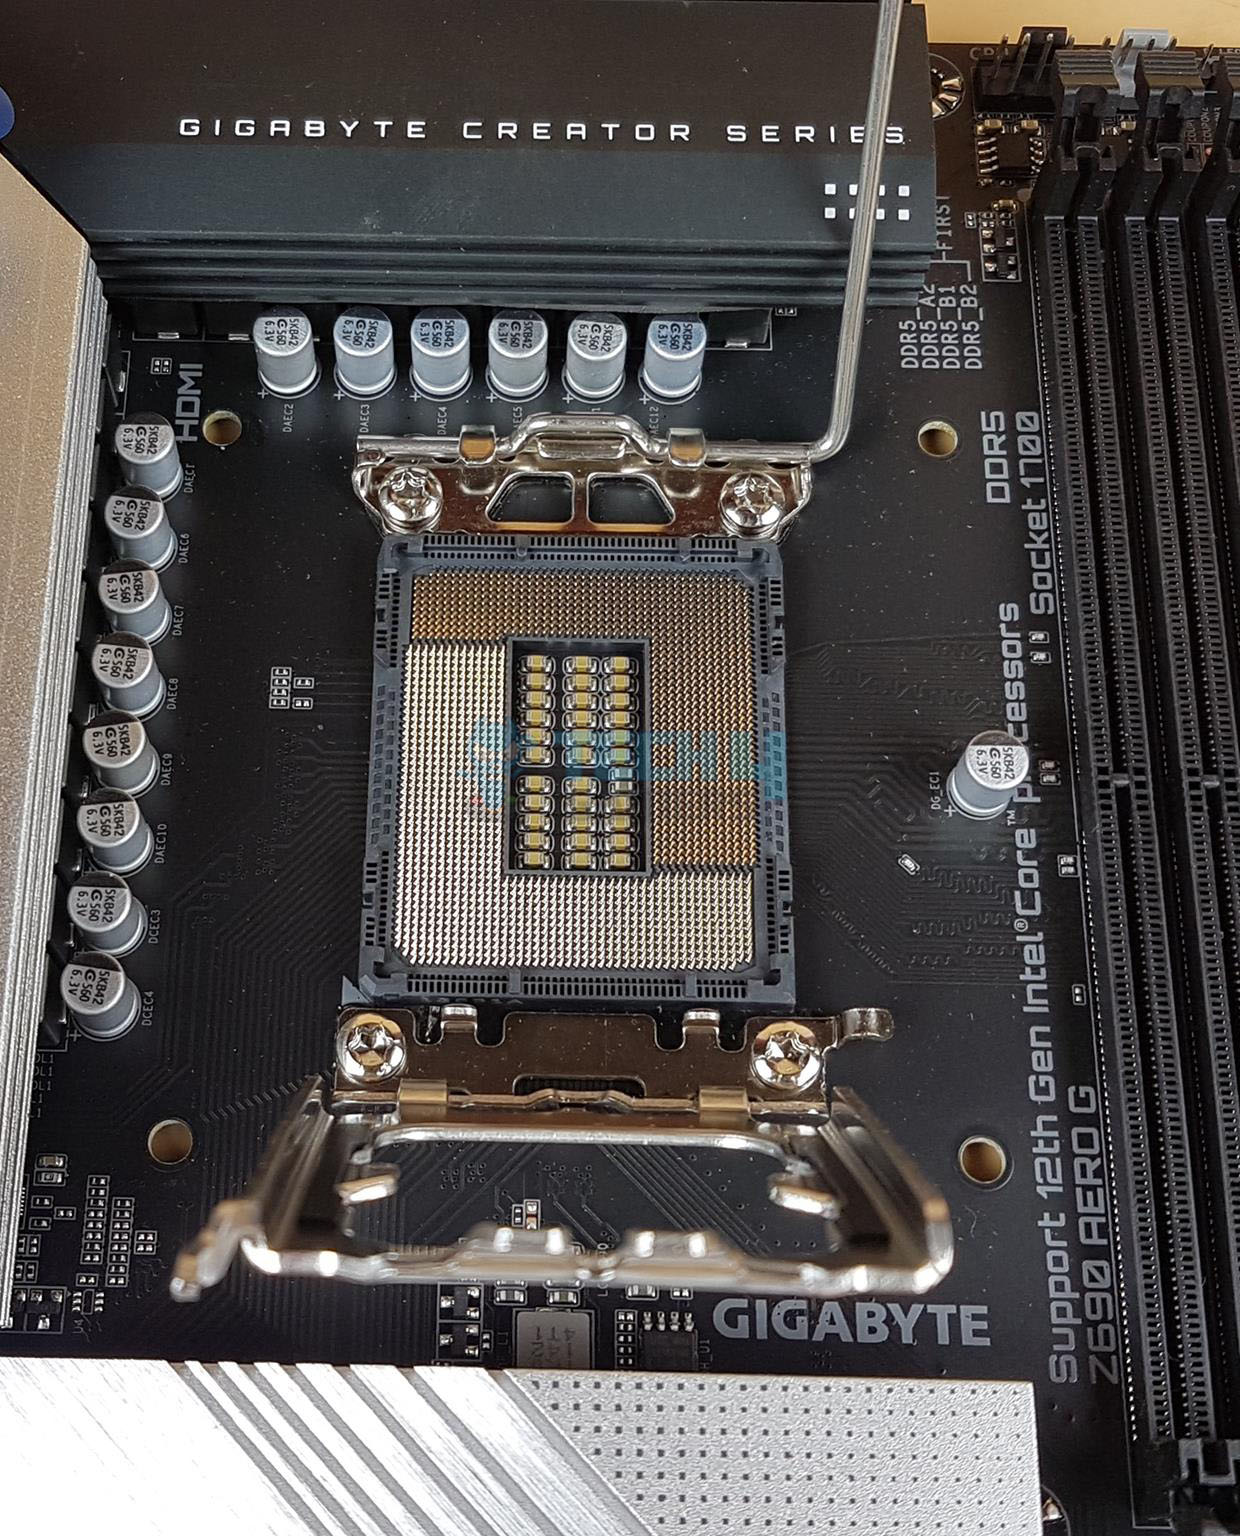
GIGABYTE Z690 AERO G motherboard uses efficient Tantalum capacitors. Align the CPU’s arrow-marked side with the indicated corner. It supports Intel 12th gen Core i CPUs. The HDMI port has a max resolution of 4096×2160@30 Hz, and USB Type C supports DisplayPort with 4096×2304@60 Hz. The motherboard has a 16+1+2 power phase design, each phase can endure 70A.
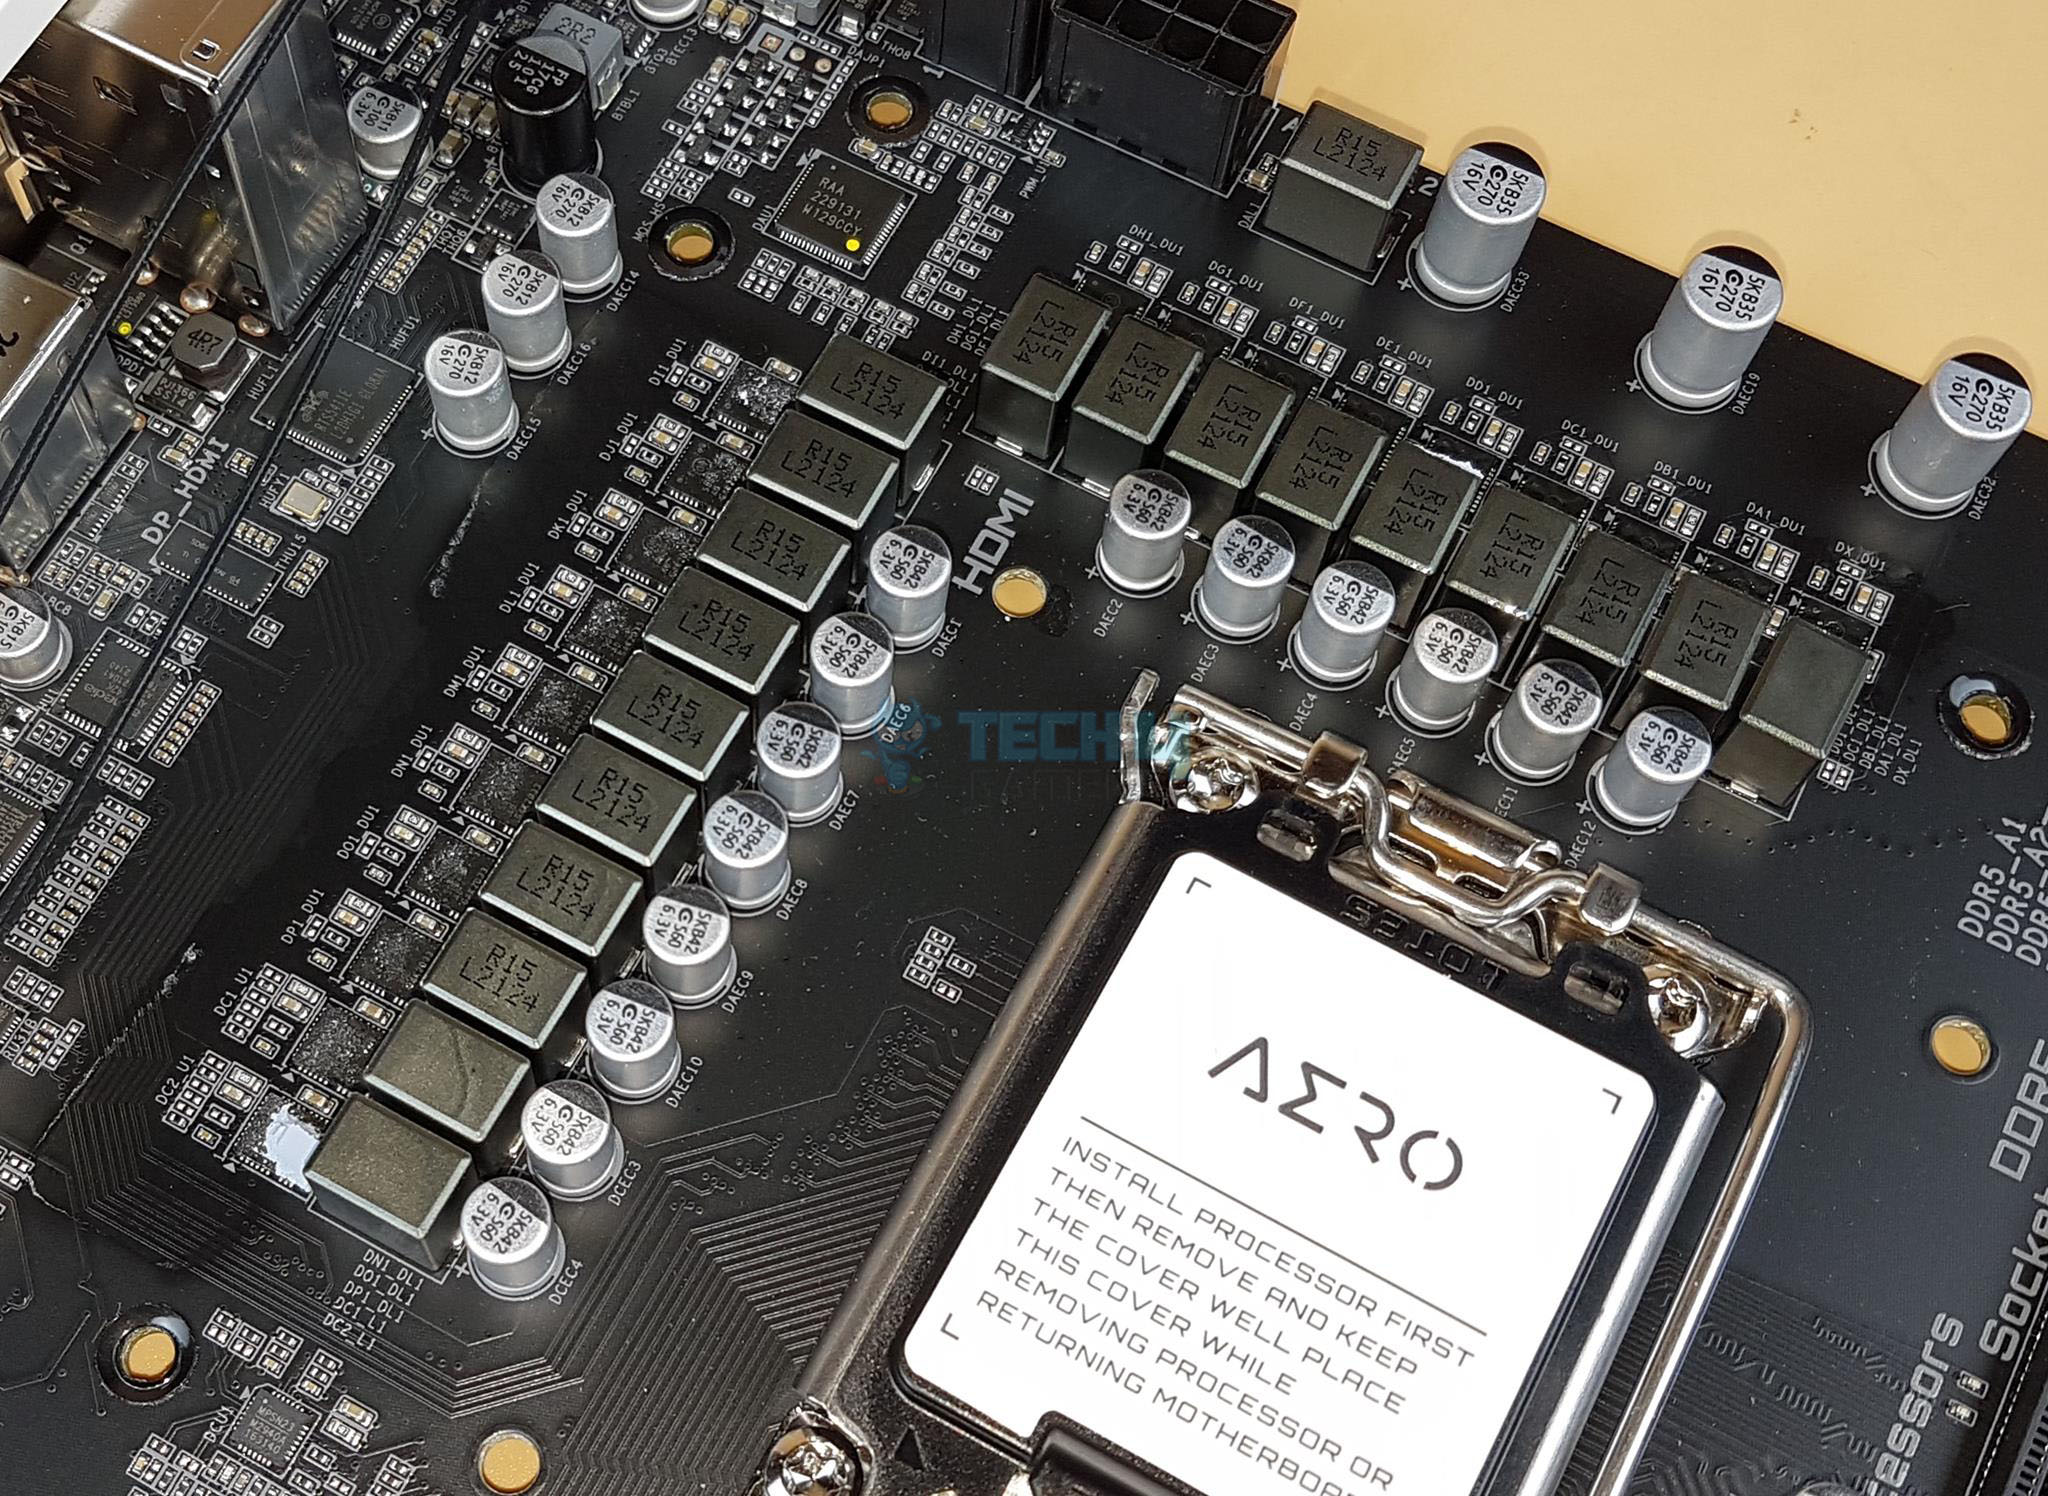
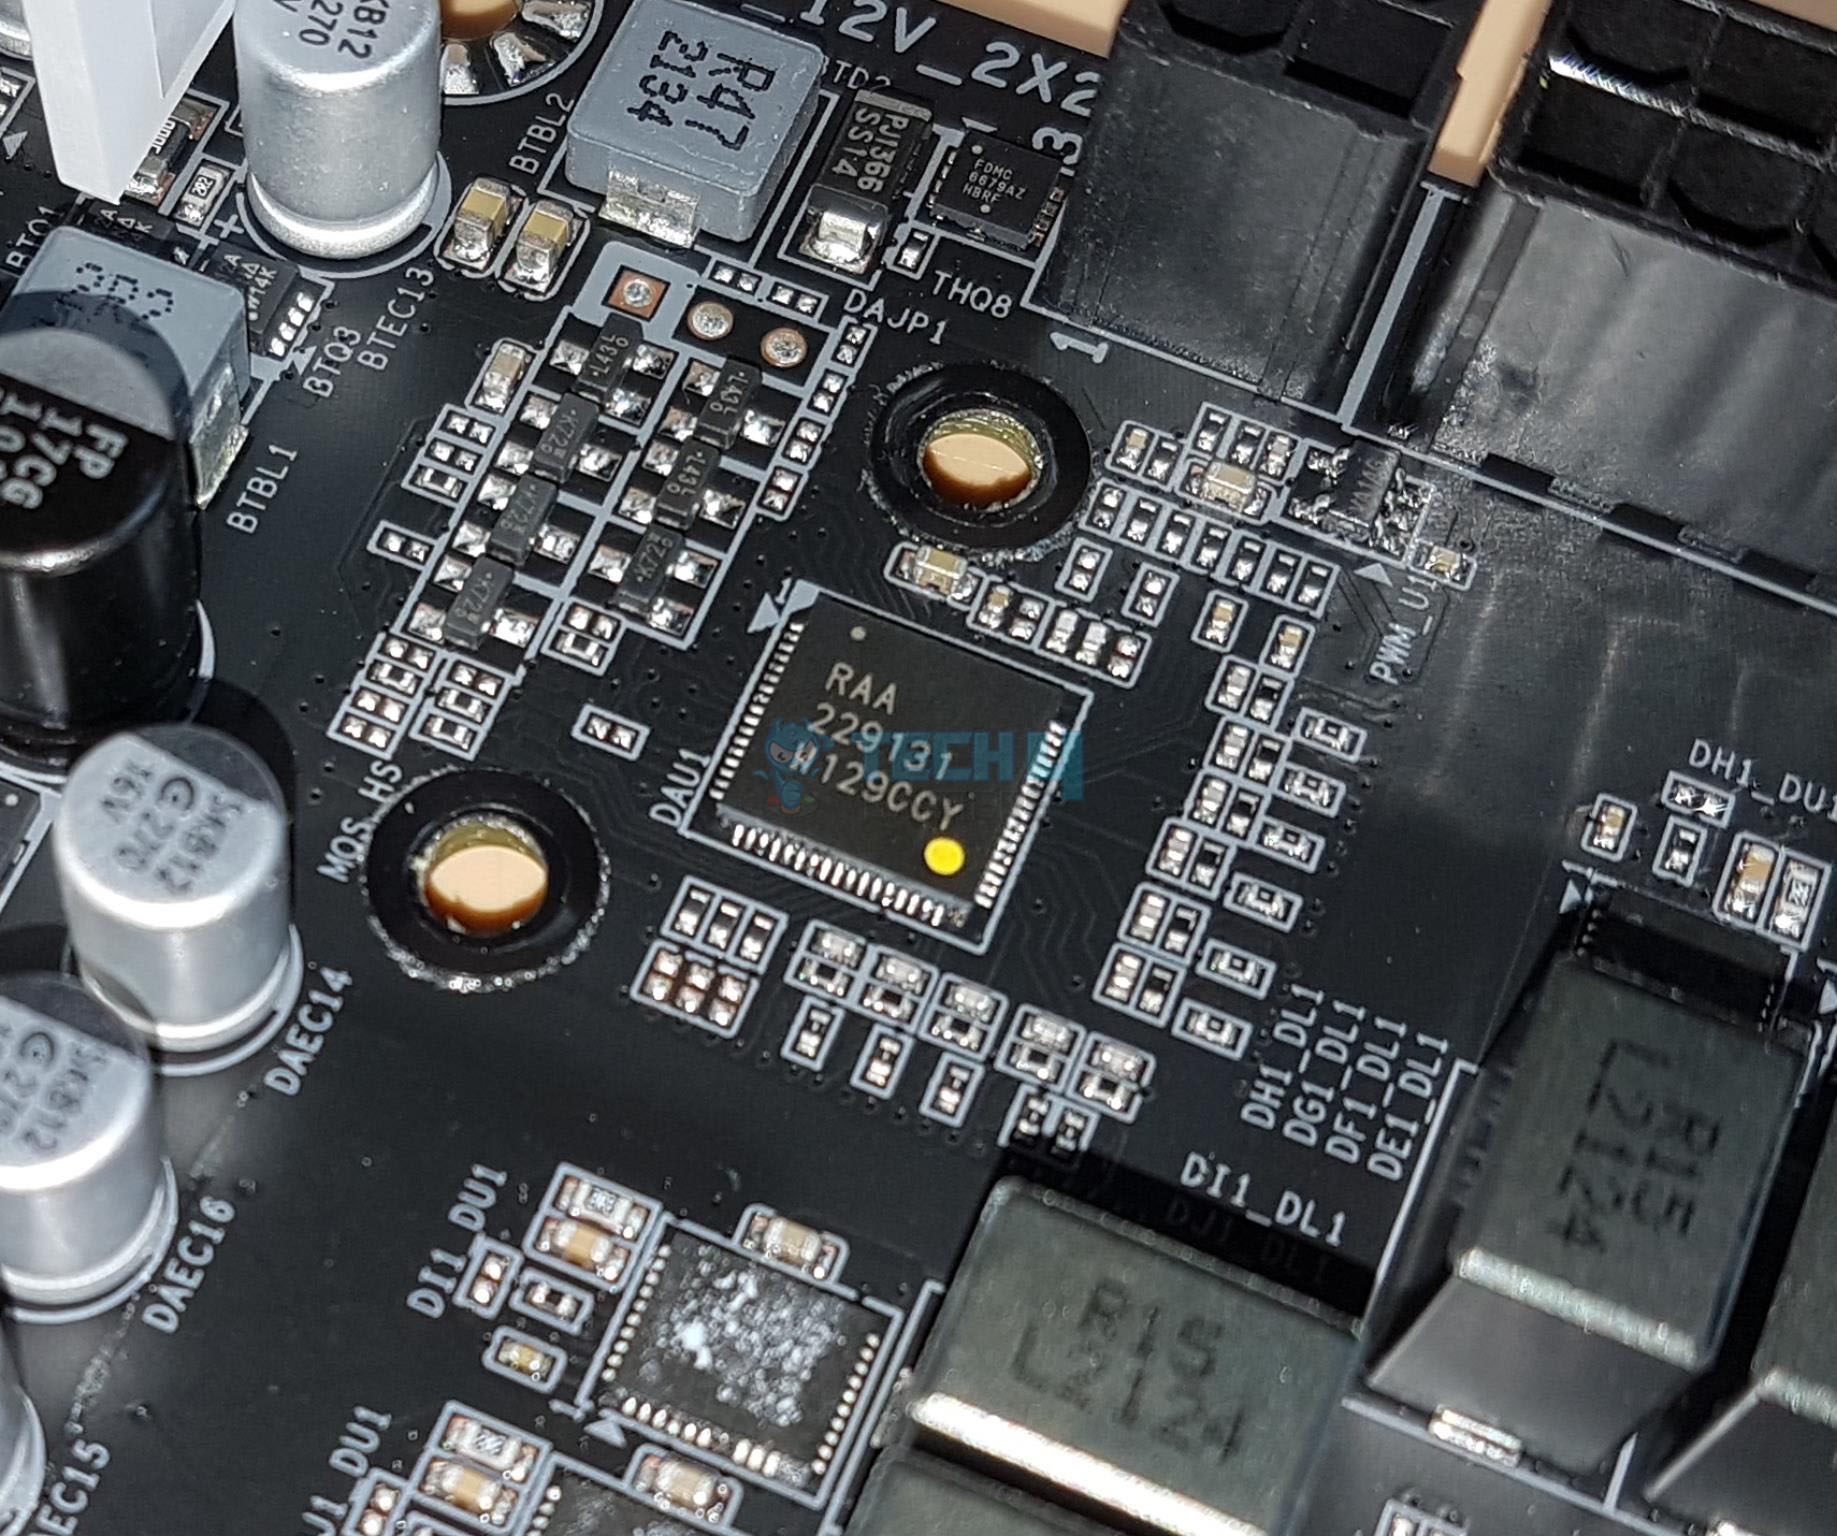
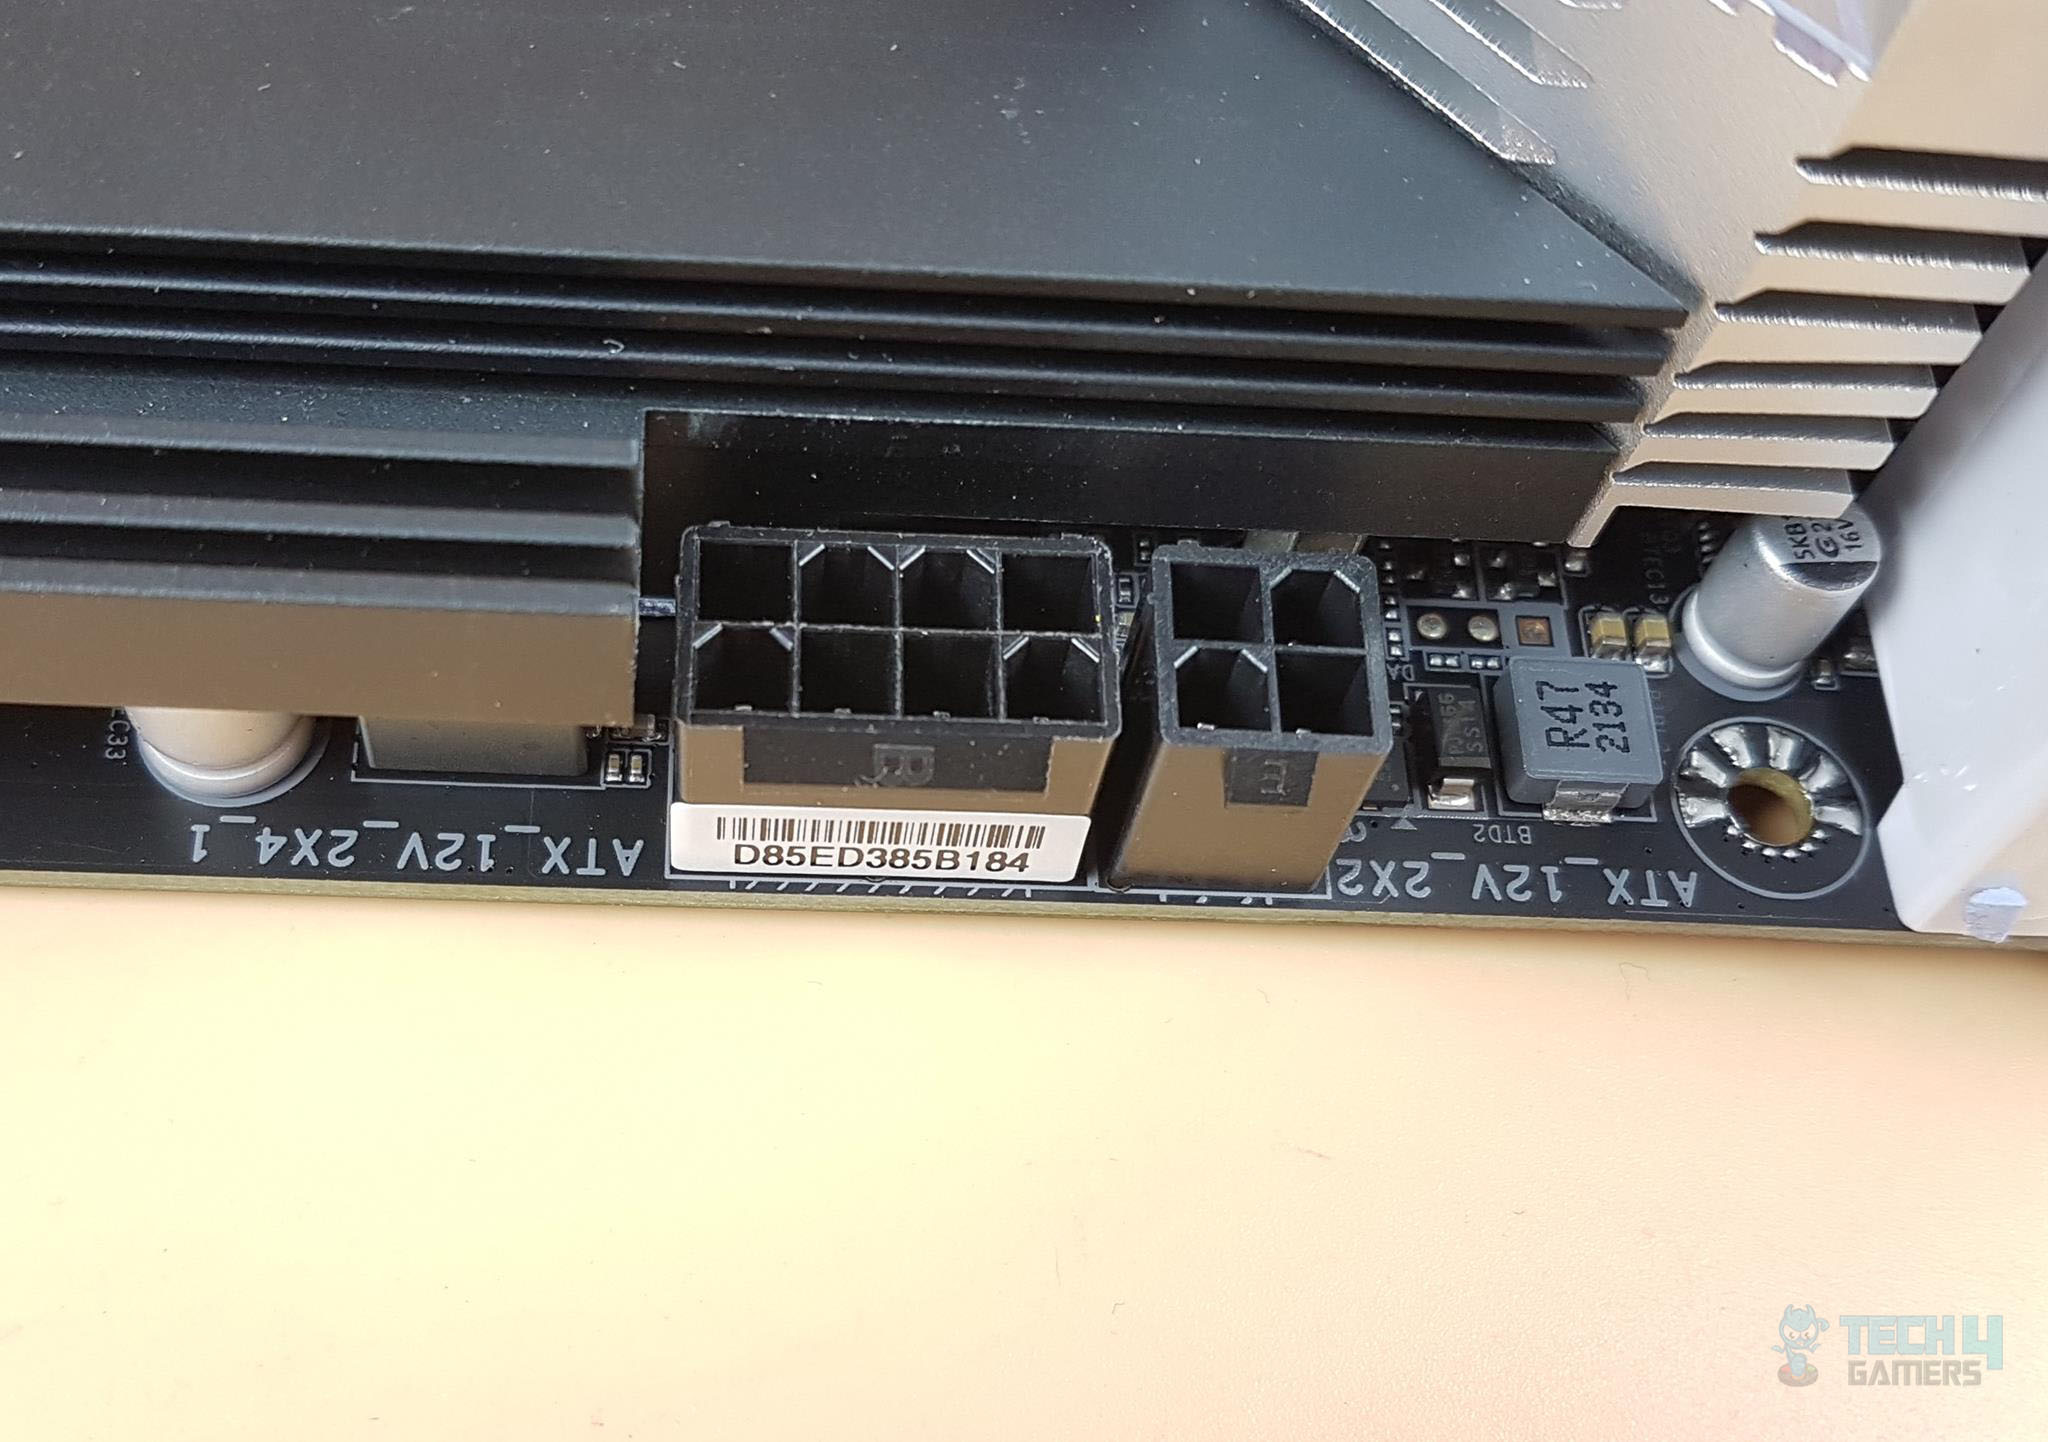
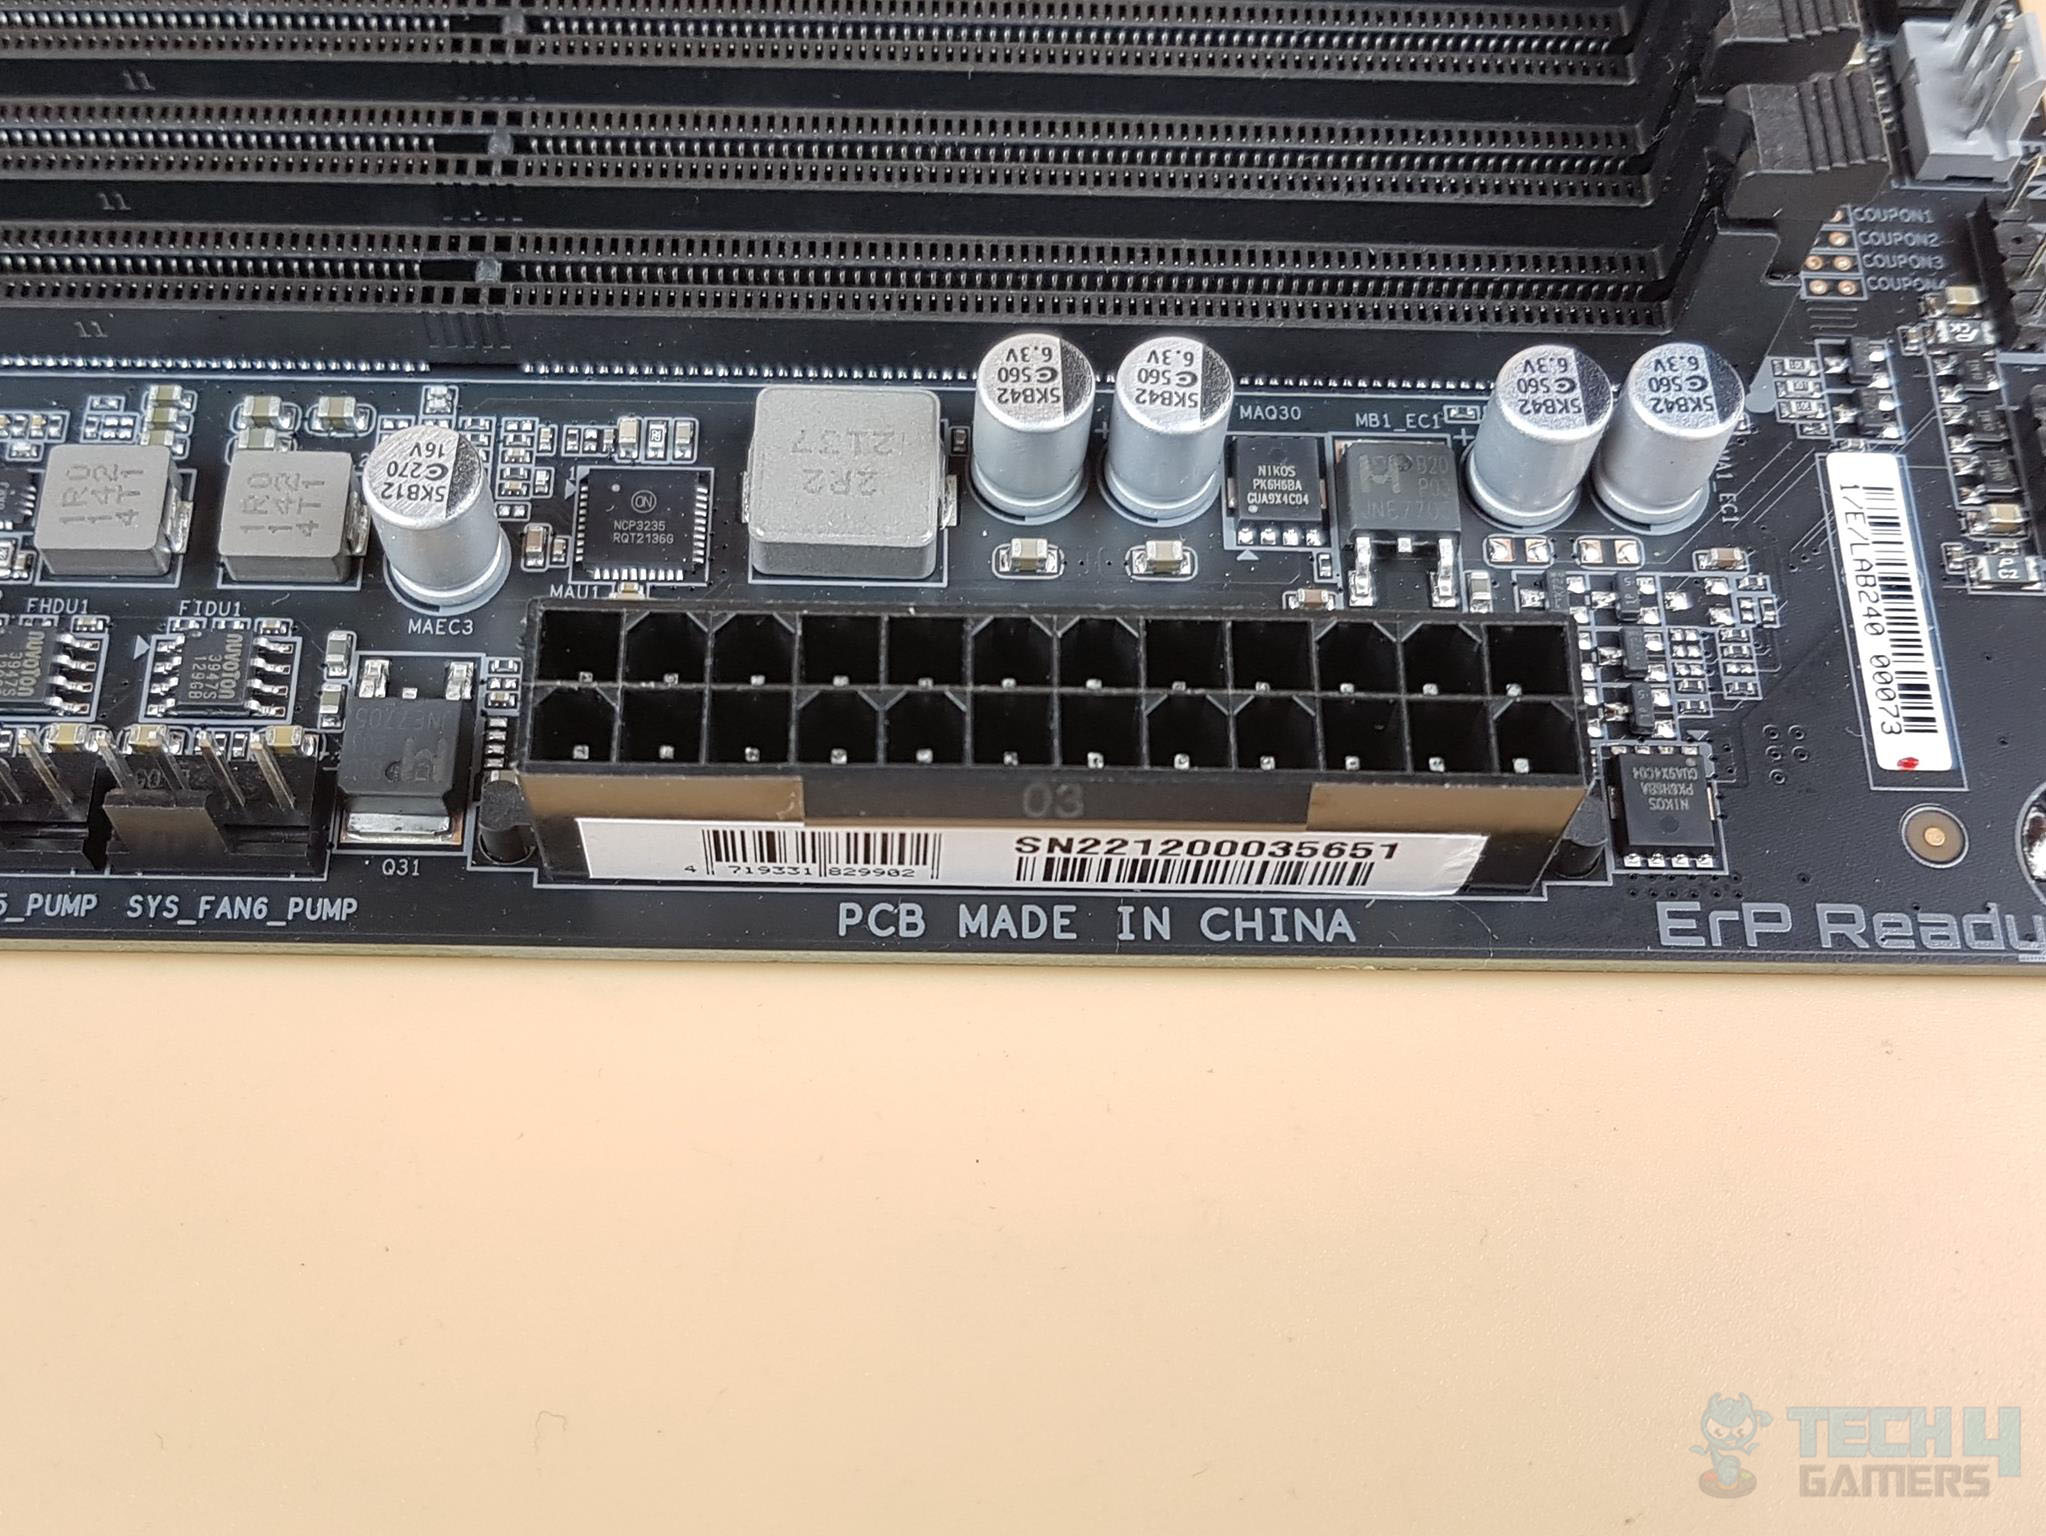
The RAA229131 controller manages MOSFETs in the motherboard. We use ON FMDMF5062/TI95480 for 16 power phases, providing a total of 1120A for the VCore. It’s not a high-performance design, but it handles Core i9 well. VccGT has 1 phase using SPS 60A, and VccAUX has 2 phases using DrMOS 70A. GIGABYTE uses a Direct-Touch HeatPipe-II and 5W/MK Thermal pads for efficient heat transfer. The 8+4 12V ATX power connectors are at the top left, without fan headers nearby.
On the motherboard’s far right, there are 4 headers:
- CPU Fan [4-pin PWM, Hybrid, 2A]
- CPU OPT Fan [4-pin PWM, Hybrid, 2A]
- 3-pin Digital RGB
- 4-pin RGB
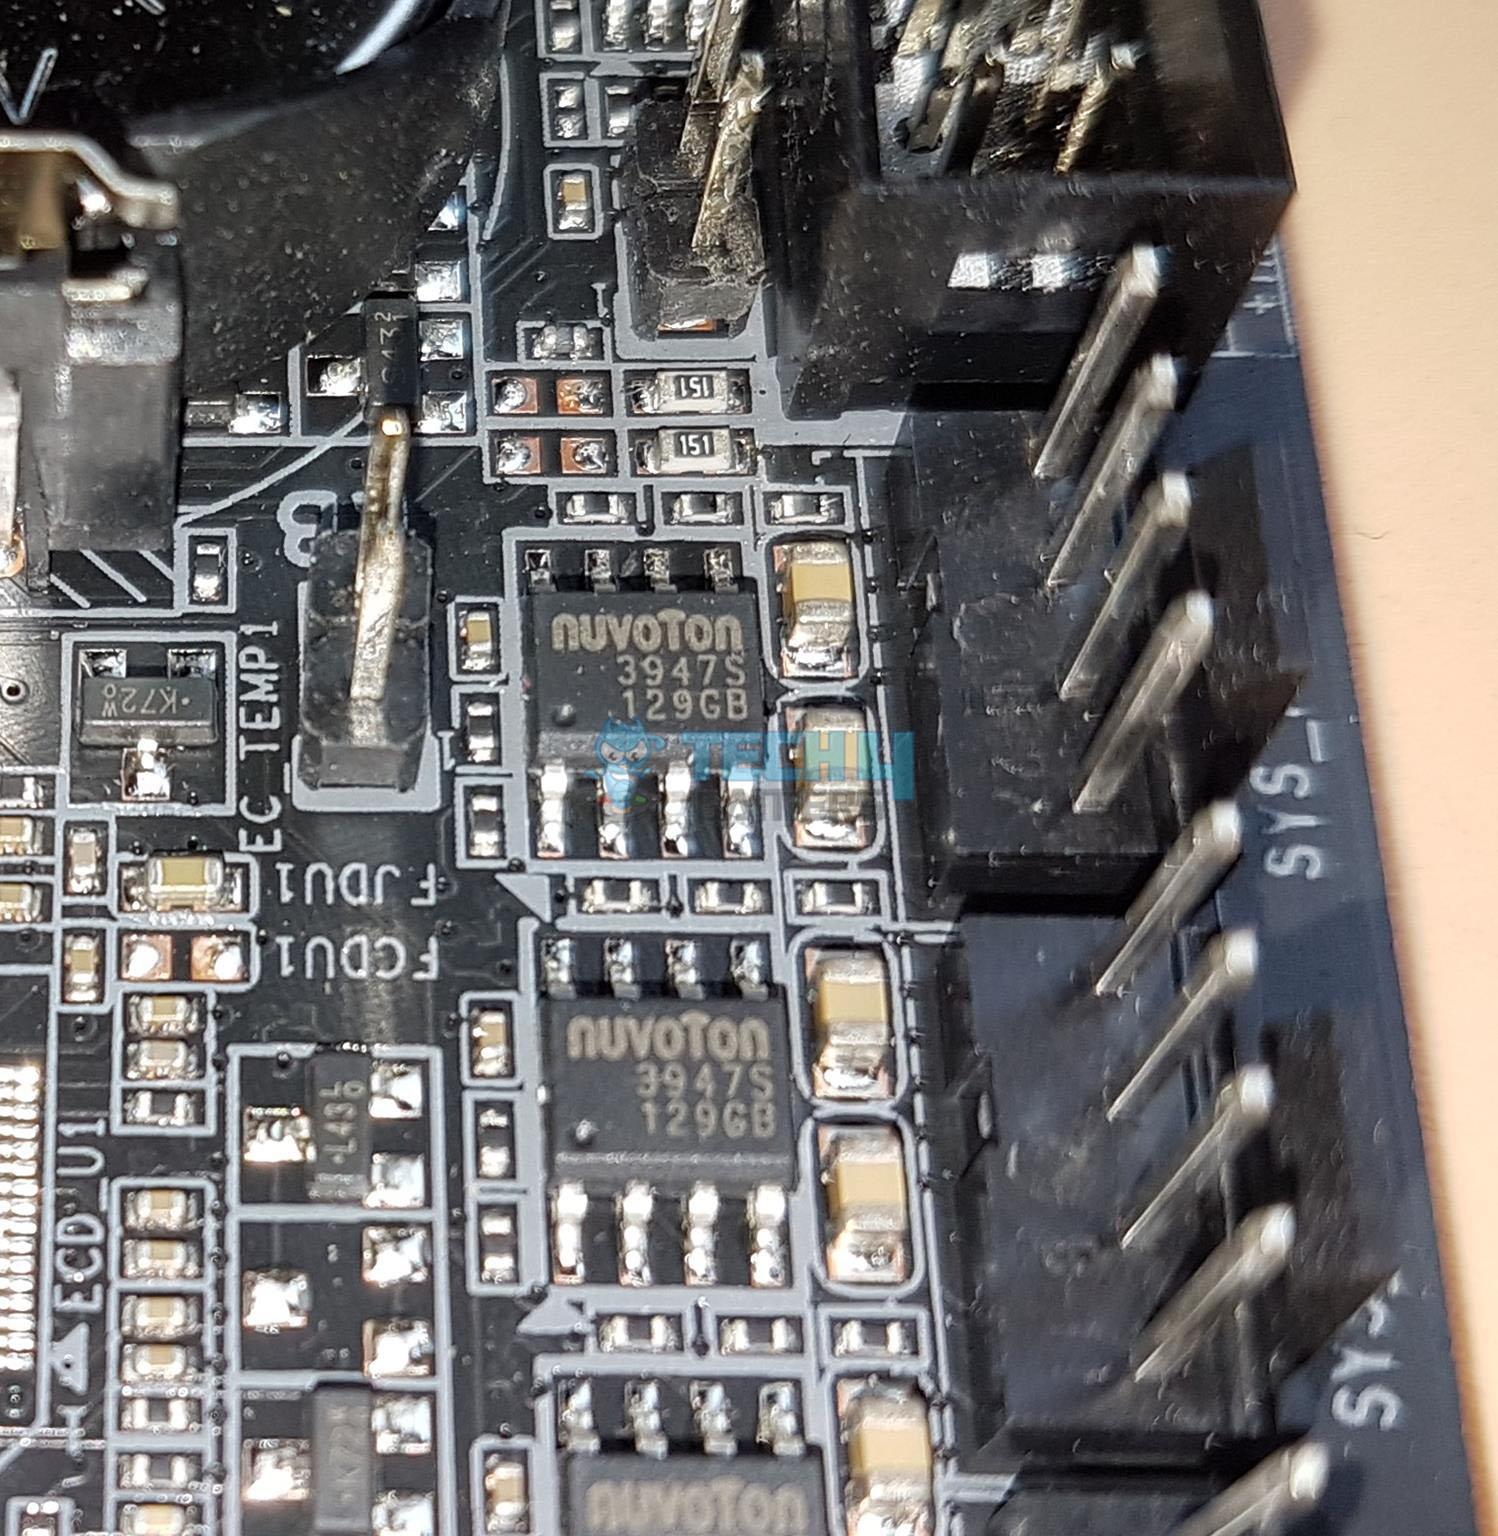
The fan headers are regulated by nuvoTon 3947S PWM fan controller chips.
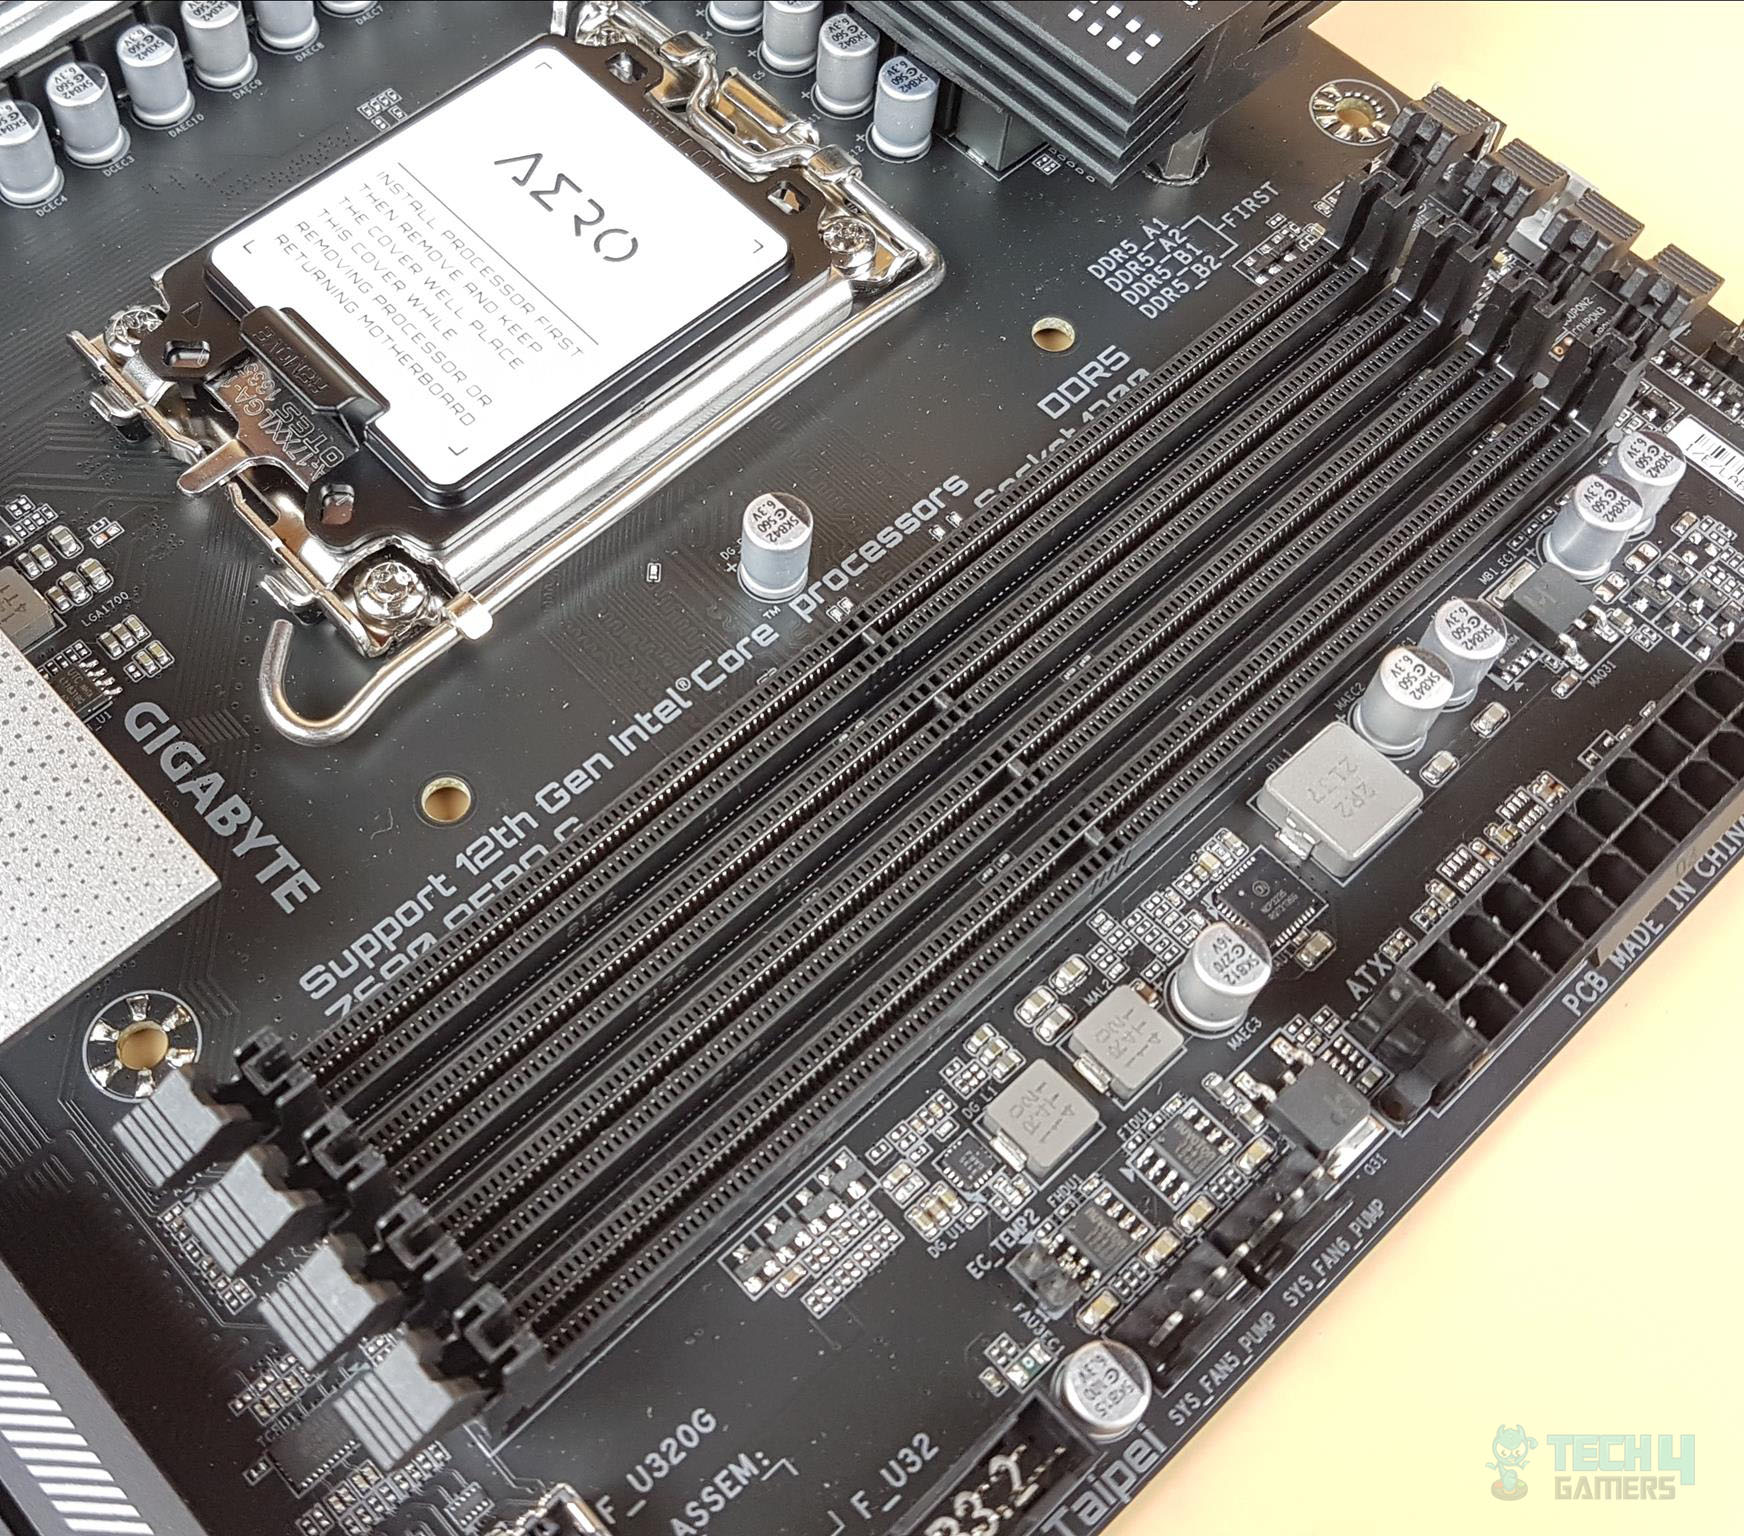
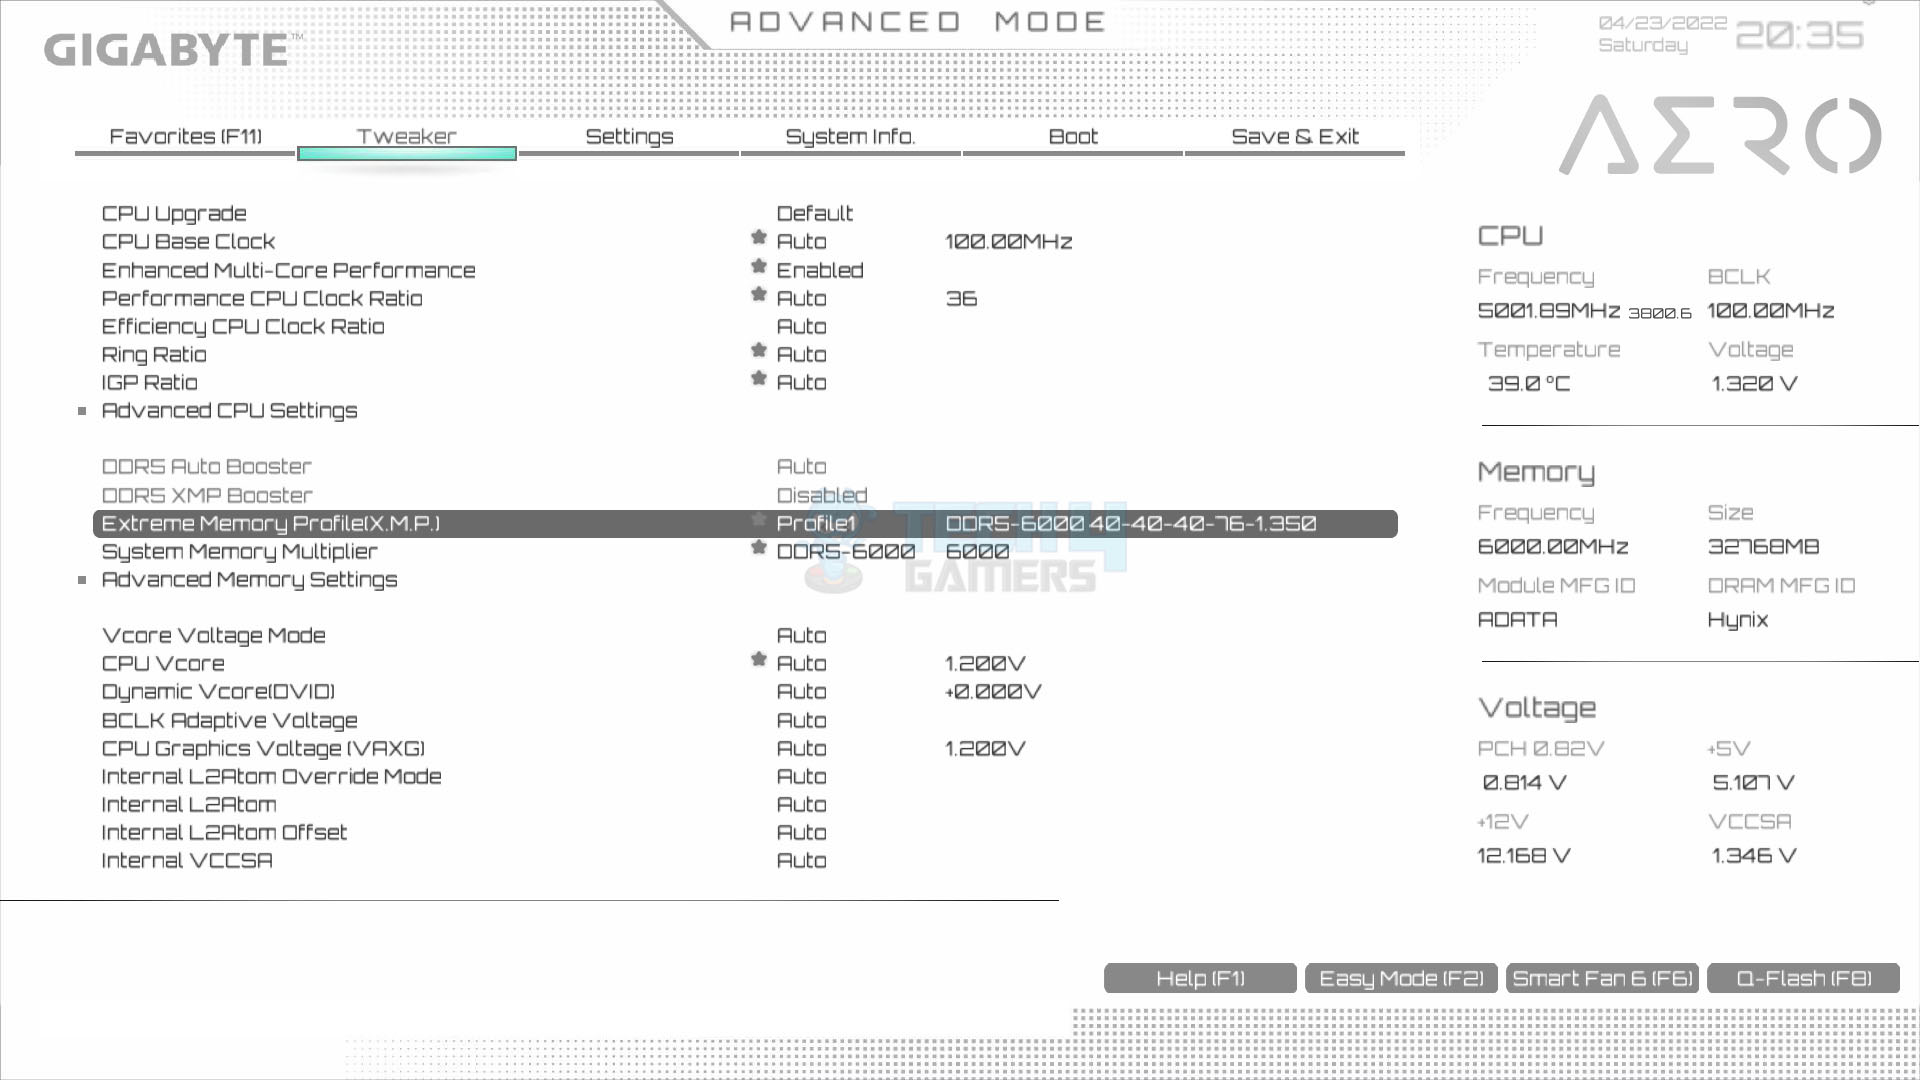
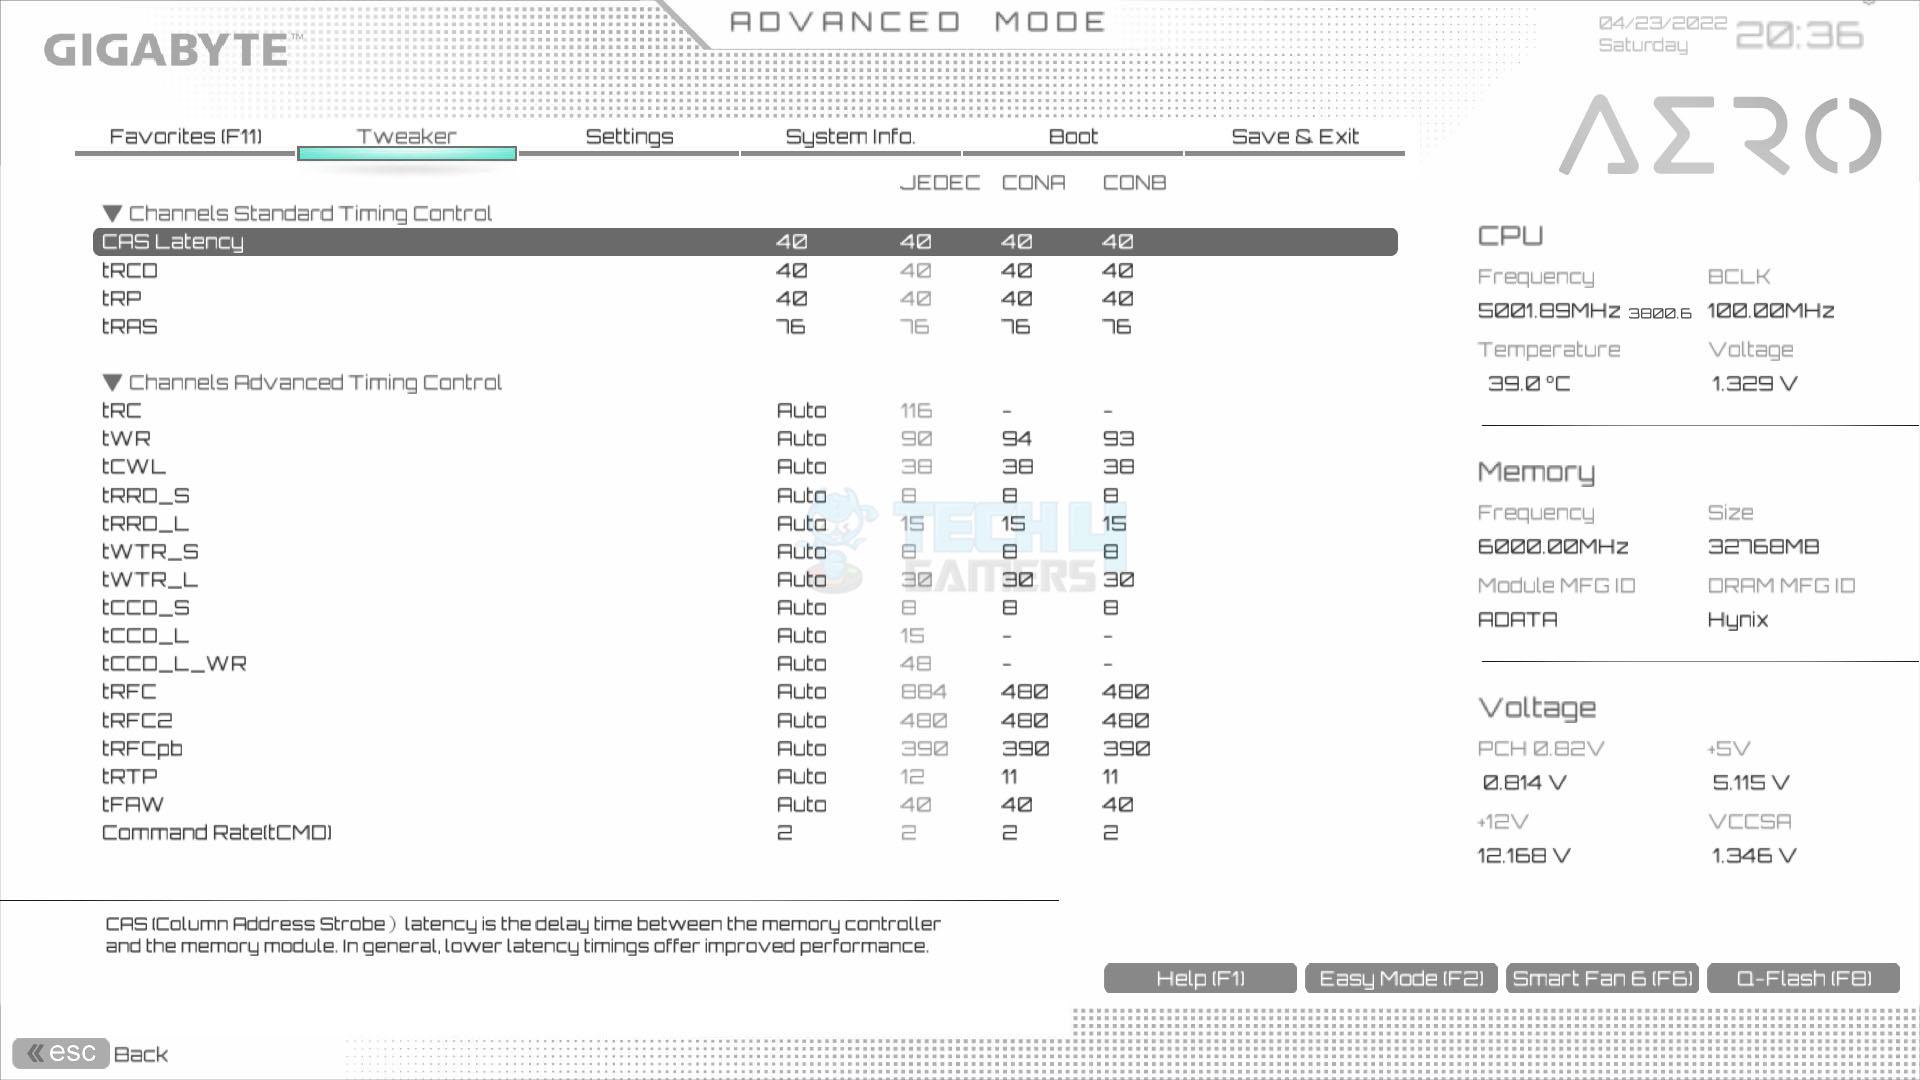
There are 4x DDR5 DIMM slots on the GIGABYTE Z690 AERO G motherboard. These are in the dual-channel configuration. The maximum capacity is 128GB with 32GB per DIMM slot and the maximum supported frequency is 6000 MT/s (OC) with BIOS update F6b. This motherboard supports ECC Un-buffered DIMM 1Rx8/2Rx8 memory modules (operate in non-ECC mode) as well as non-ECC Un-buffered DIMM 1Rx8/2Rx8/1Rx16 memory modules. These slots are not reinforced. The latches on both sides of a DIMM slot open. We have a solid pin 24-pin ATX connector here.

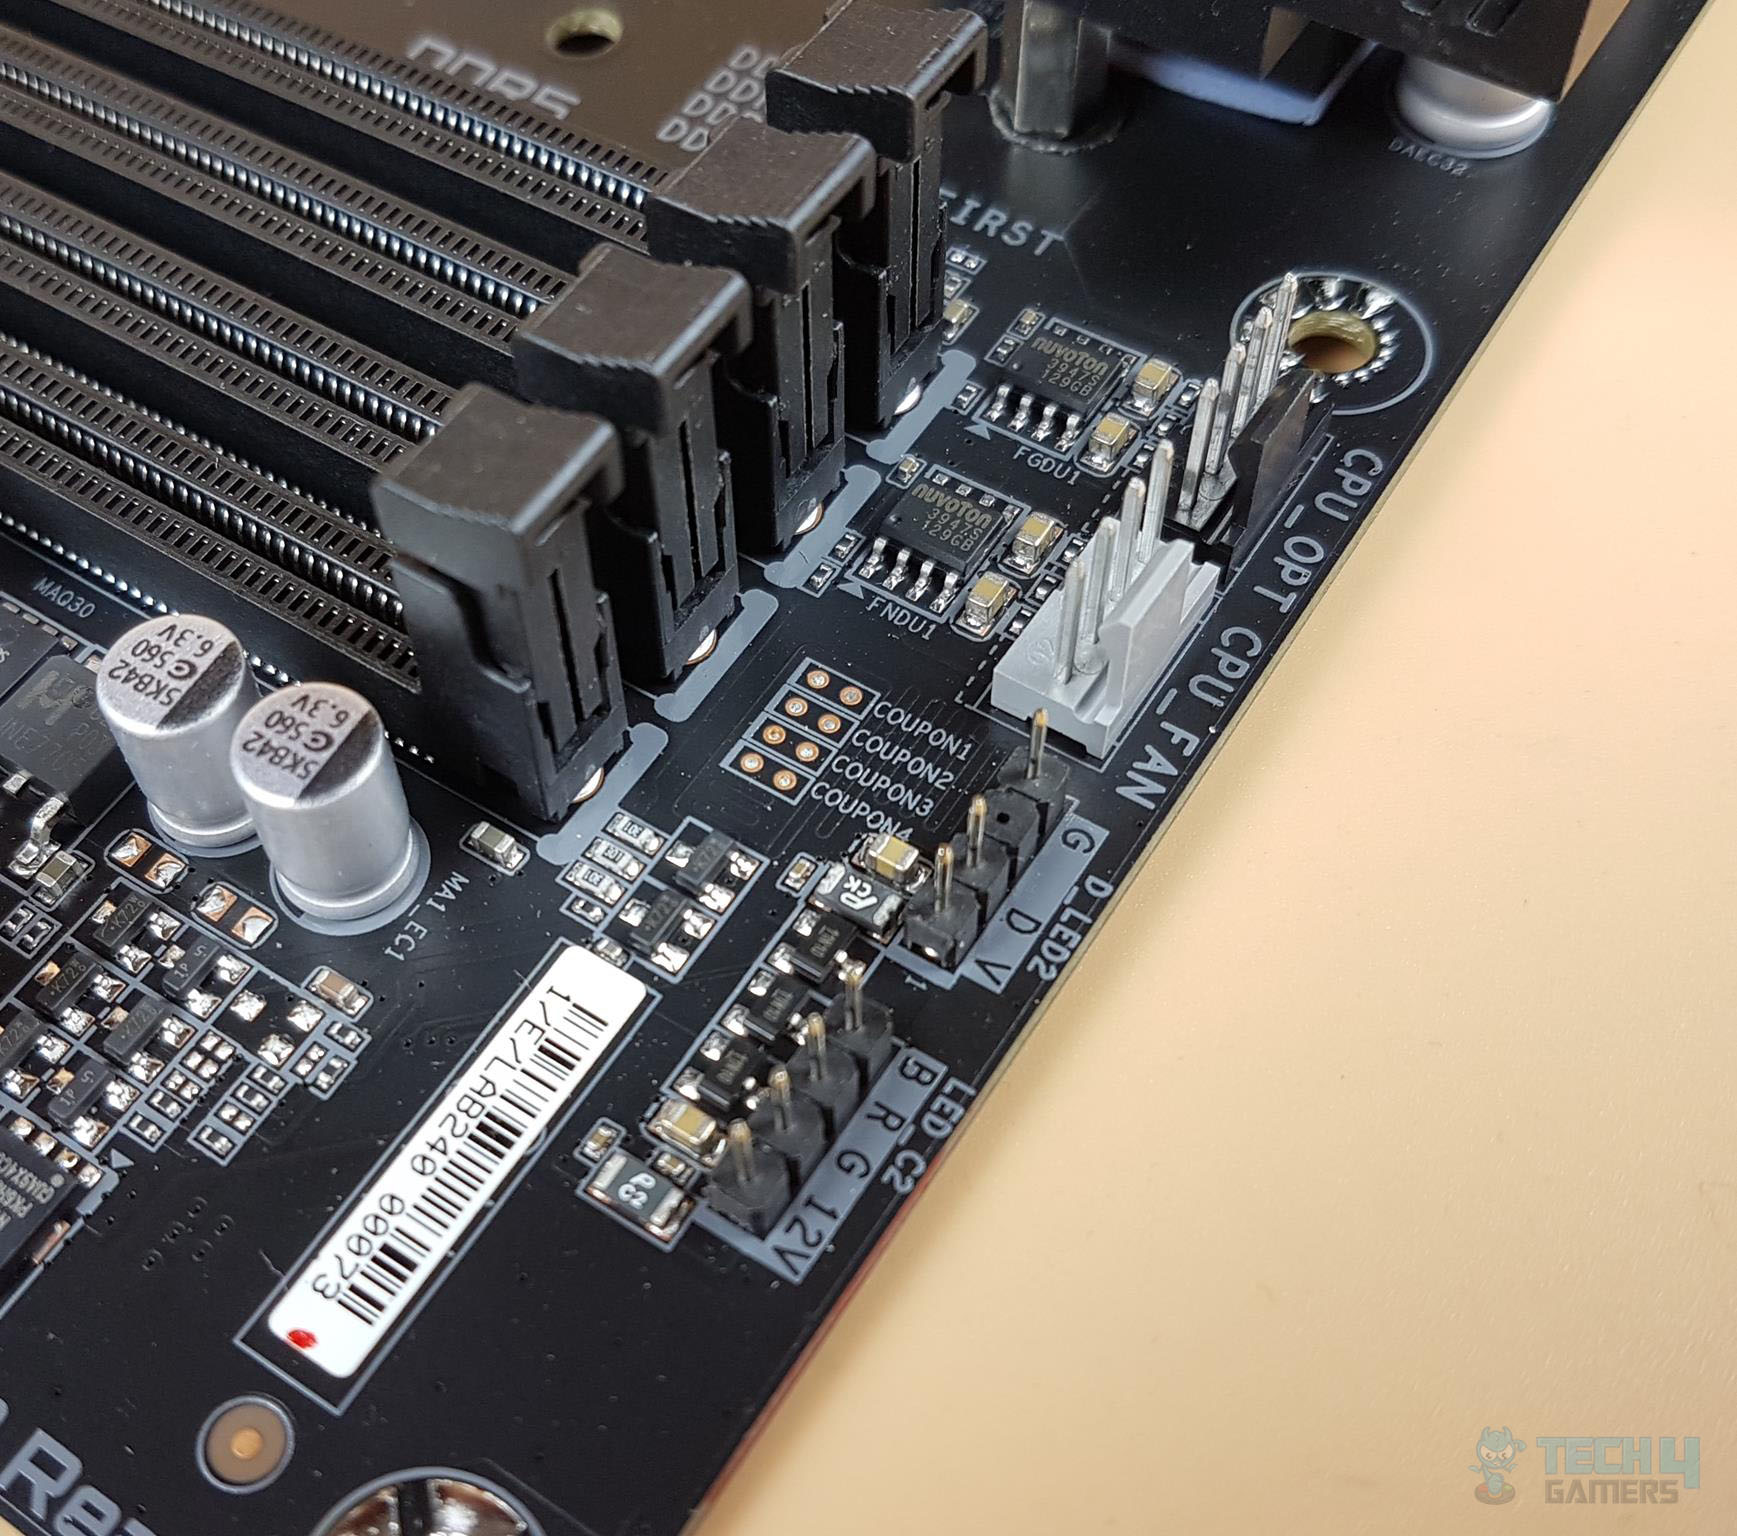
We have more headers here:
- 2x 4-pin PWM PUMP Headers
- 1x USB 3.2 Gen 1 Header.
- 2-pin Temp Sensor header.
We have a front-panel USB 3.2 Gen 2×2 header.
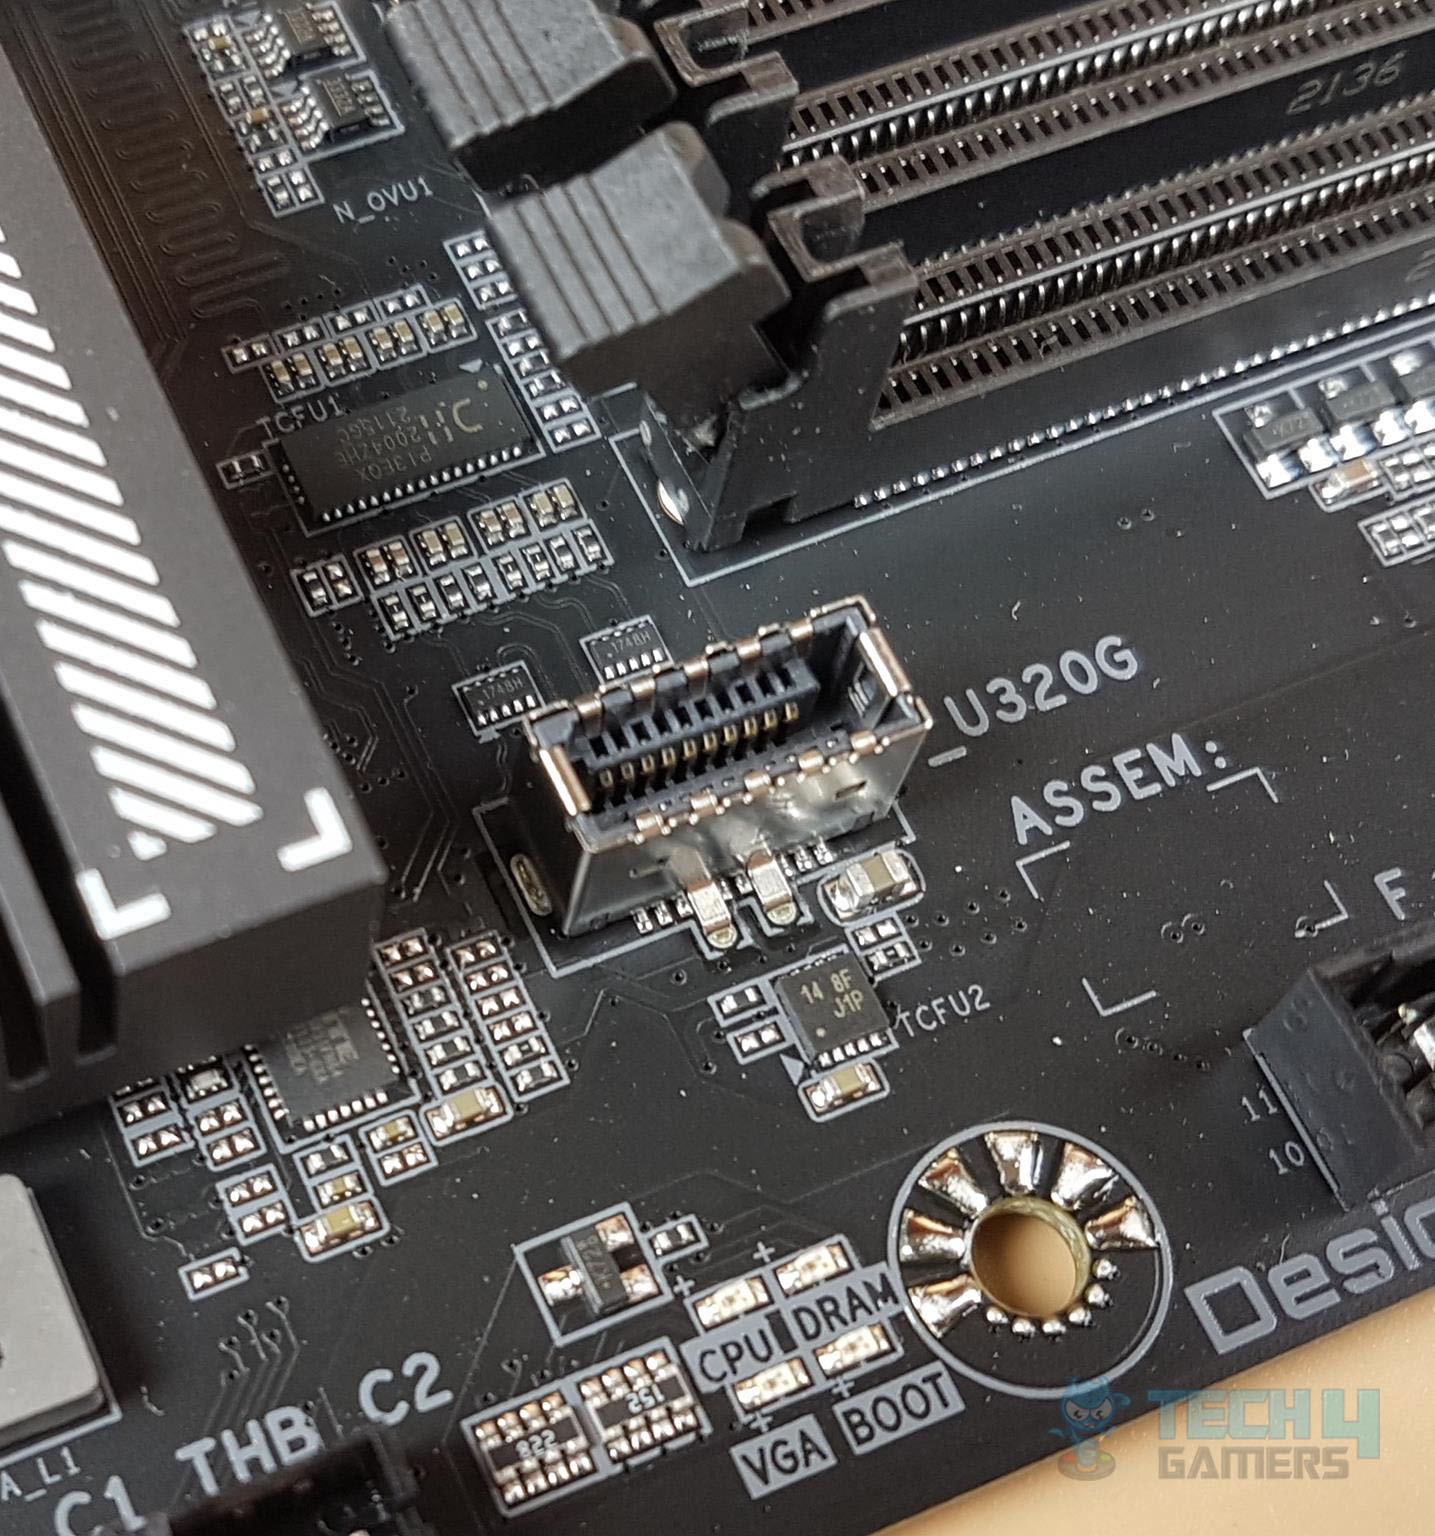
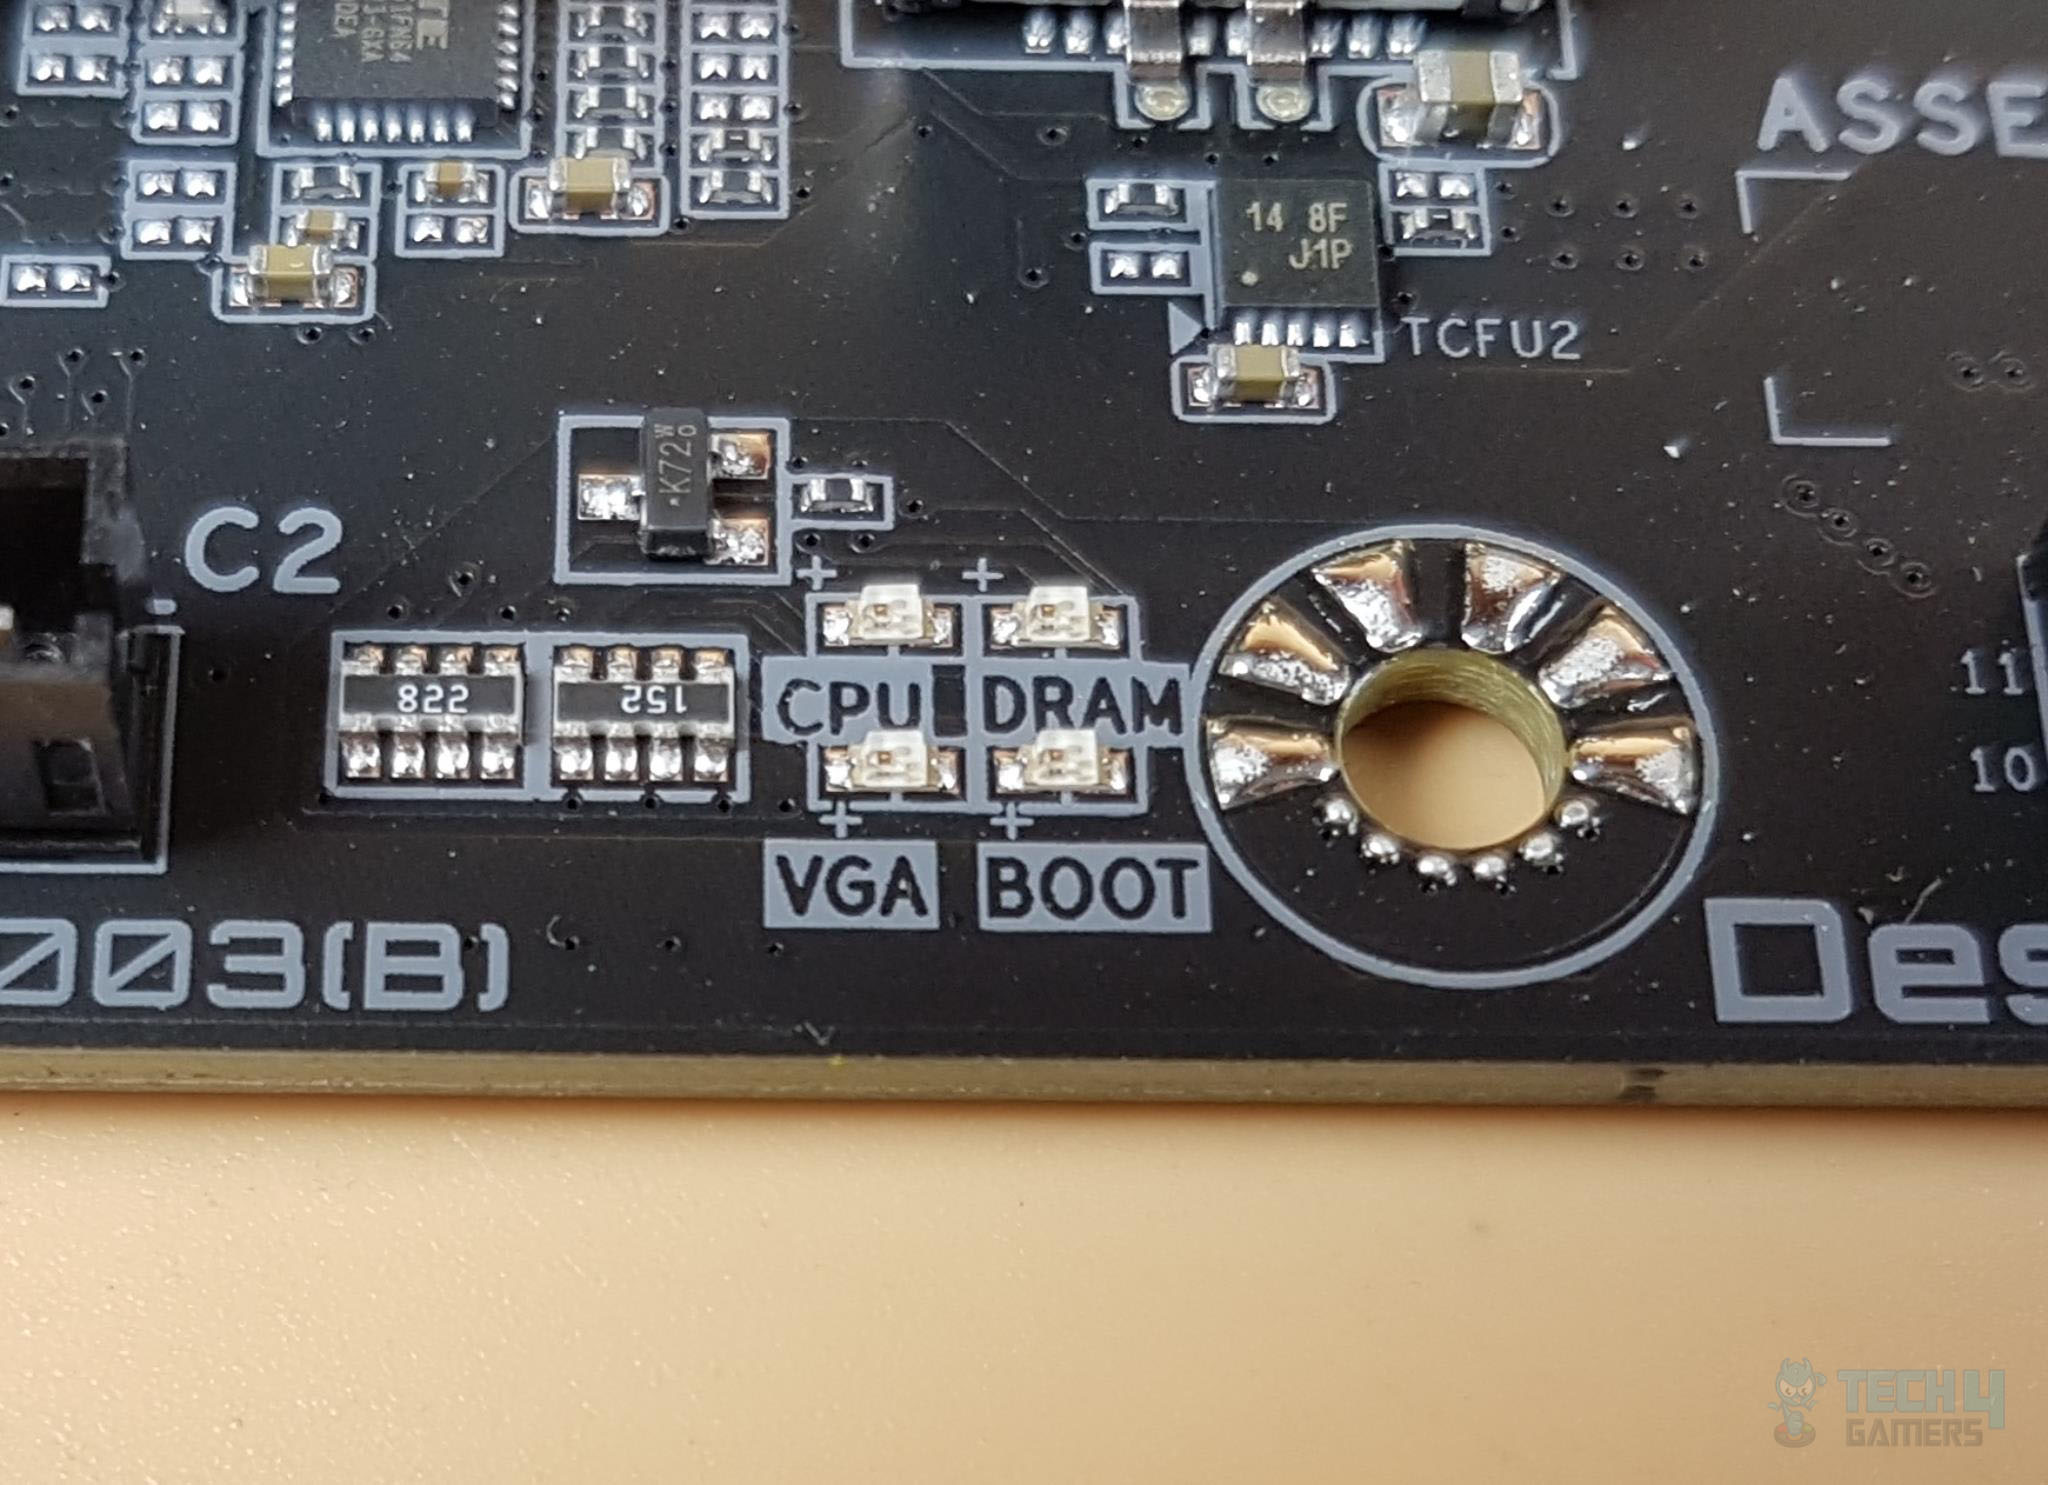
We have 4 LED indicators for VGA, CPU, BOOT, and DRAM marking printed at the bottom. This is the troubleshooting mechanism provided on this motherboard. Each of these 4 LEDs is dedicated to the VGA, CPU, BOOT, and DRAM. In case of any issue or error, the corresponding LED will light up continuously until the problem is resolved.
I was expecting a debug LED on this motherboard but it is not there. We have 5+3-pin connectors for the Thunderbolt Add-In Card. Please keep in mind that every motherboard manufacturer is using its pin-count headers. Asus has a 14-pin single header making it incompatible with the non-Asus add-in cards. You would need a GIGABYTE Thunderbolt Add-In Card for better compatibility.
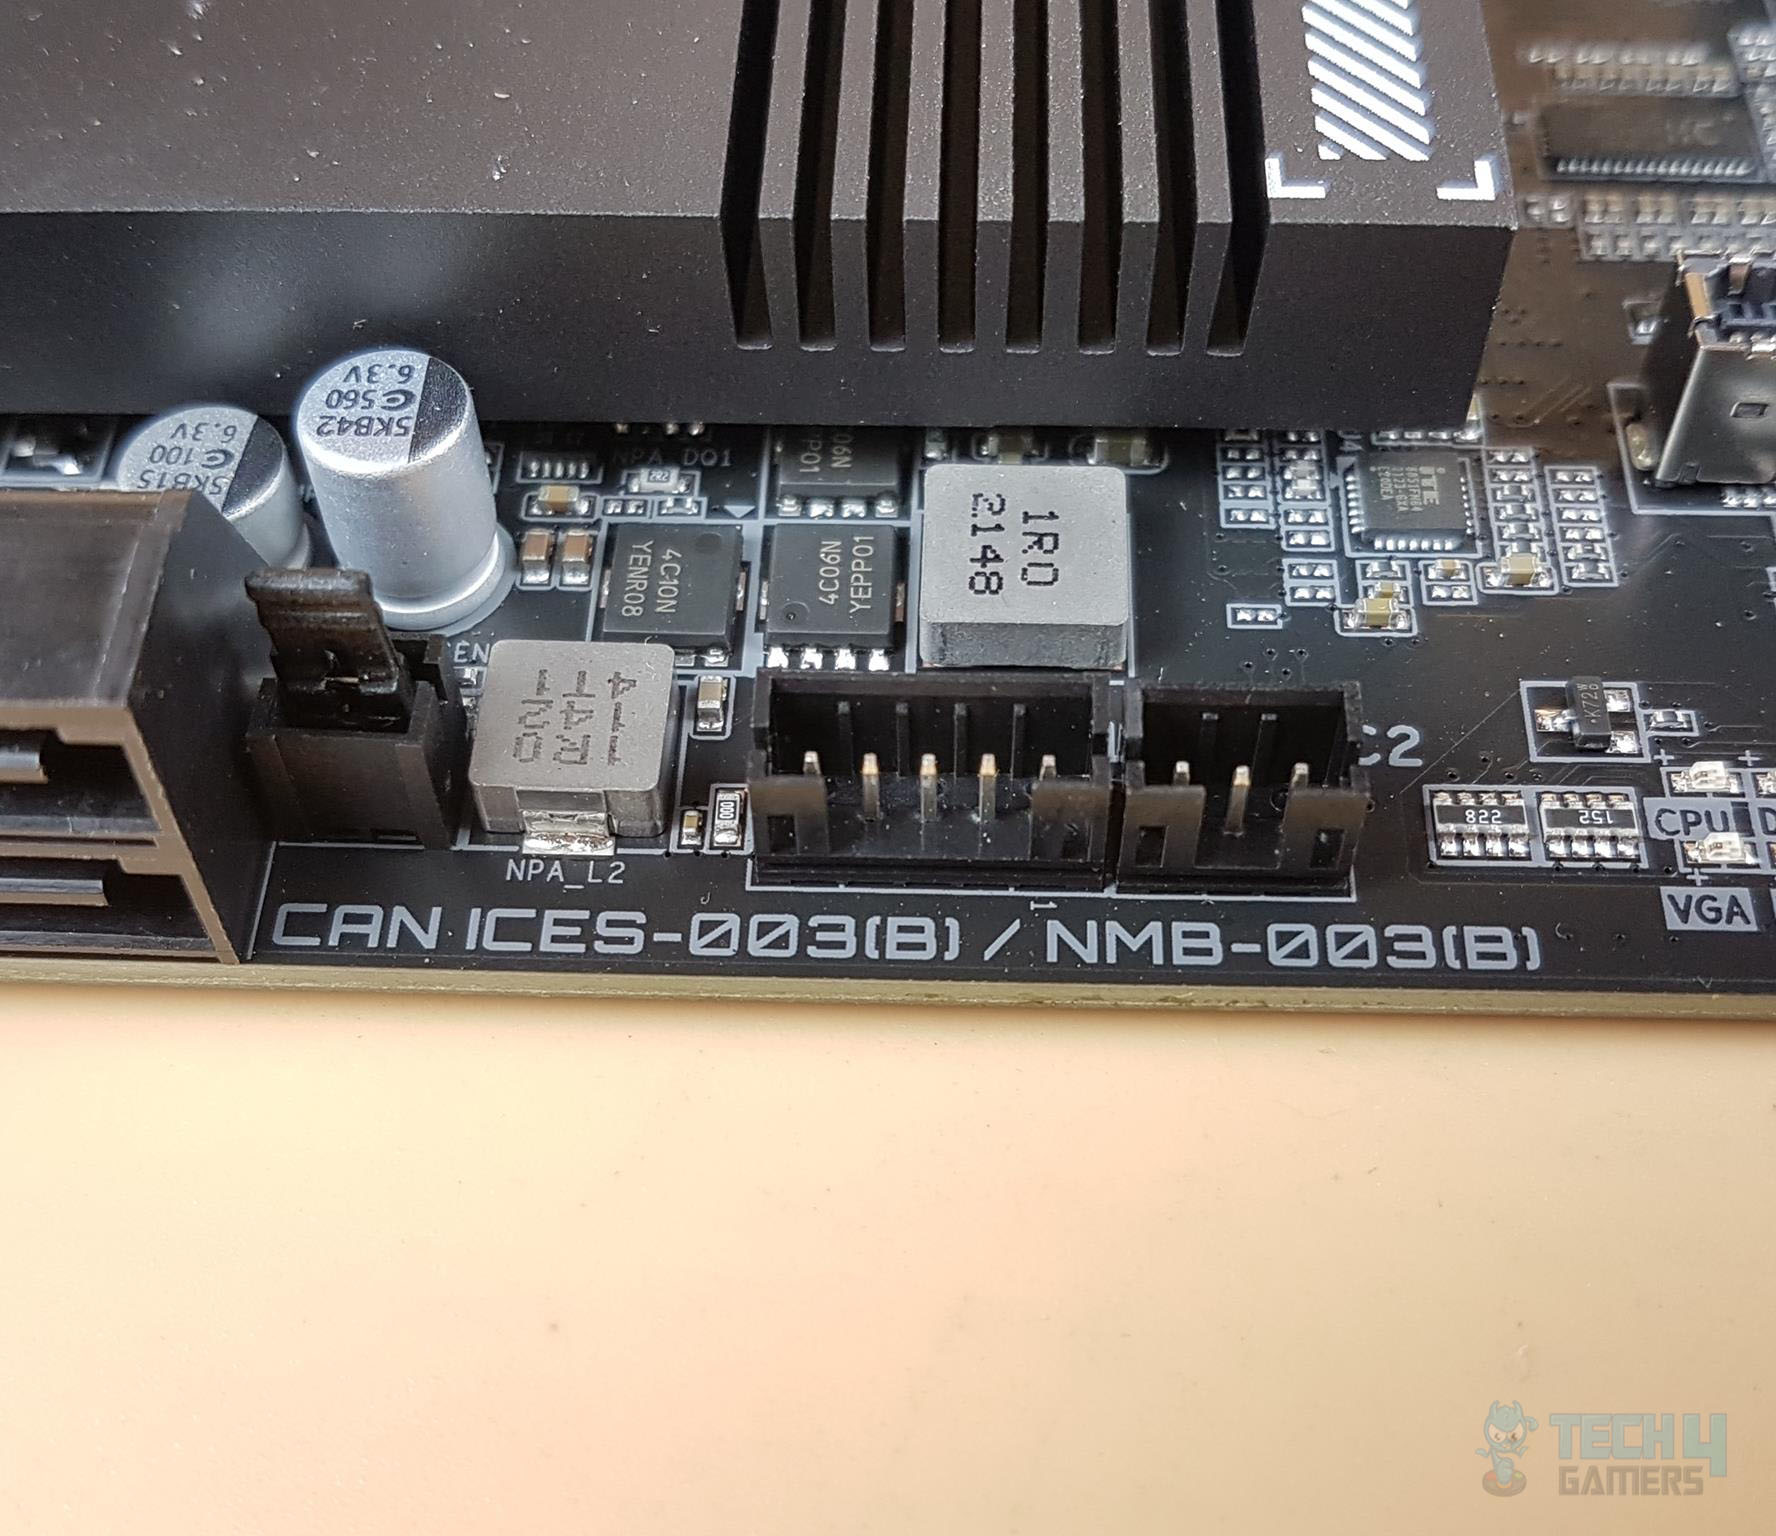
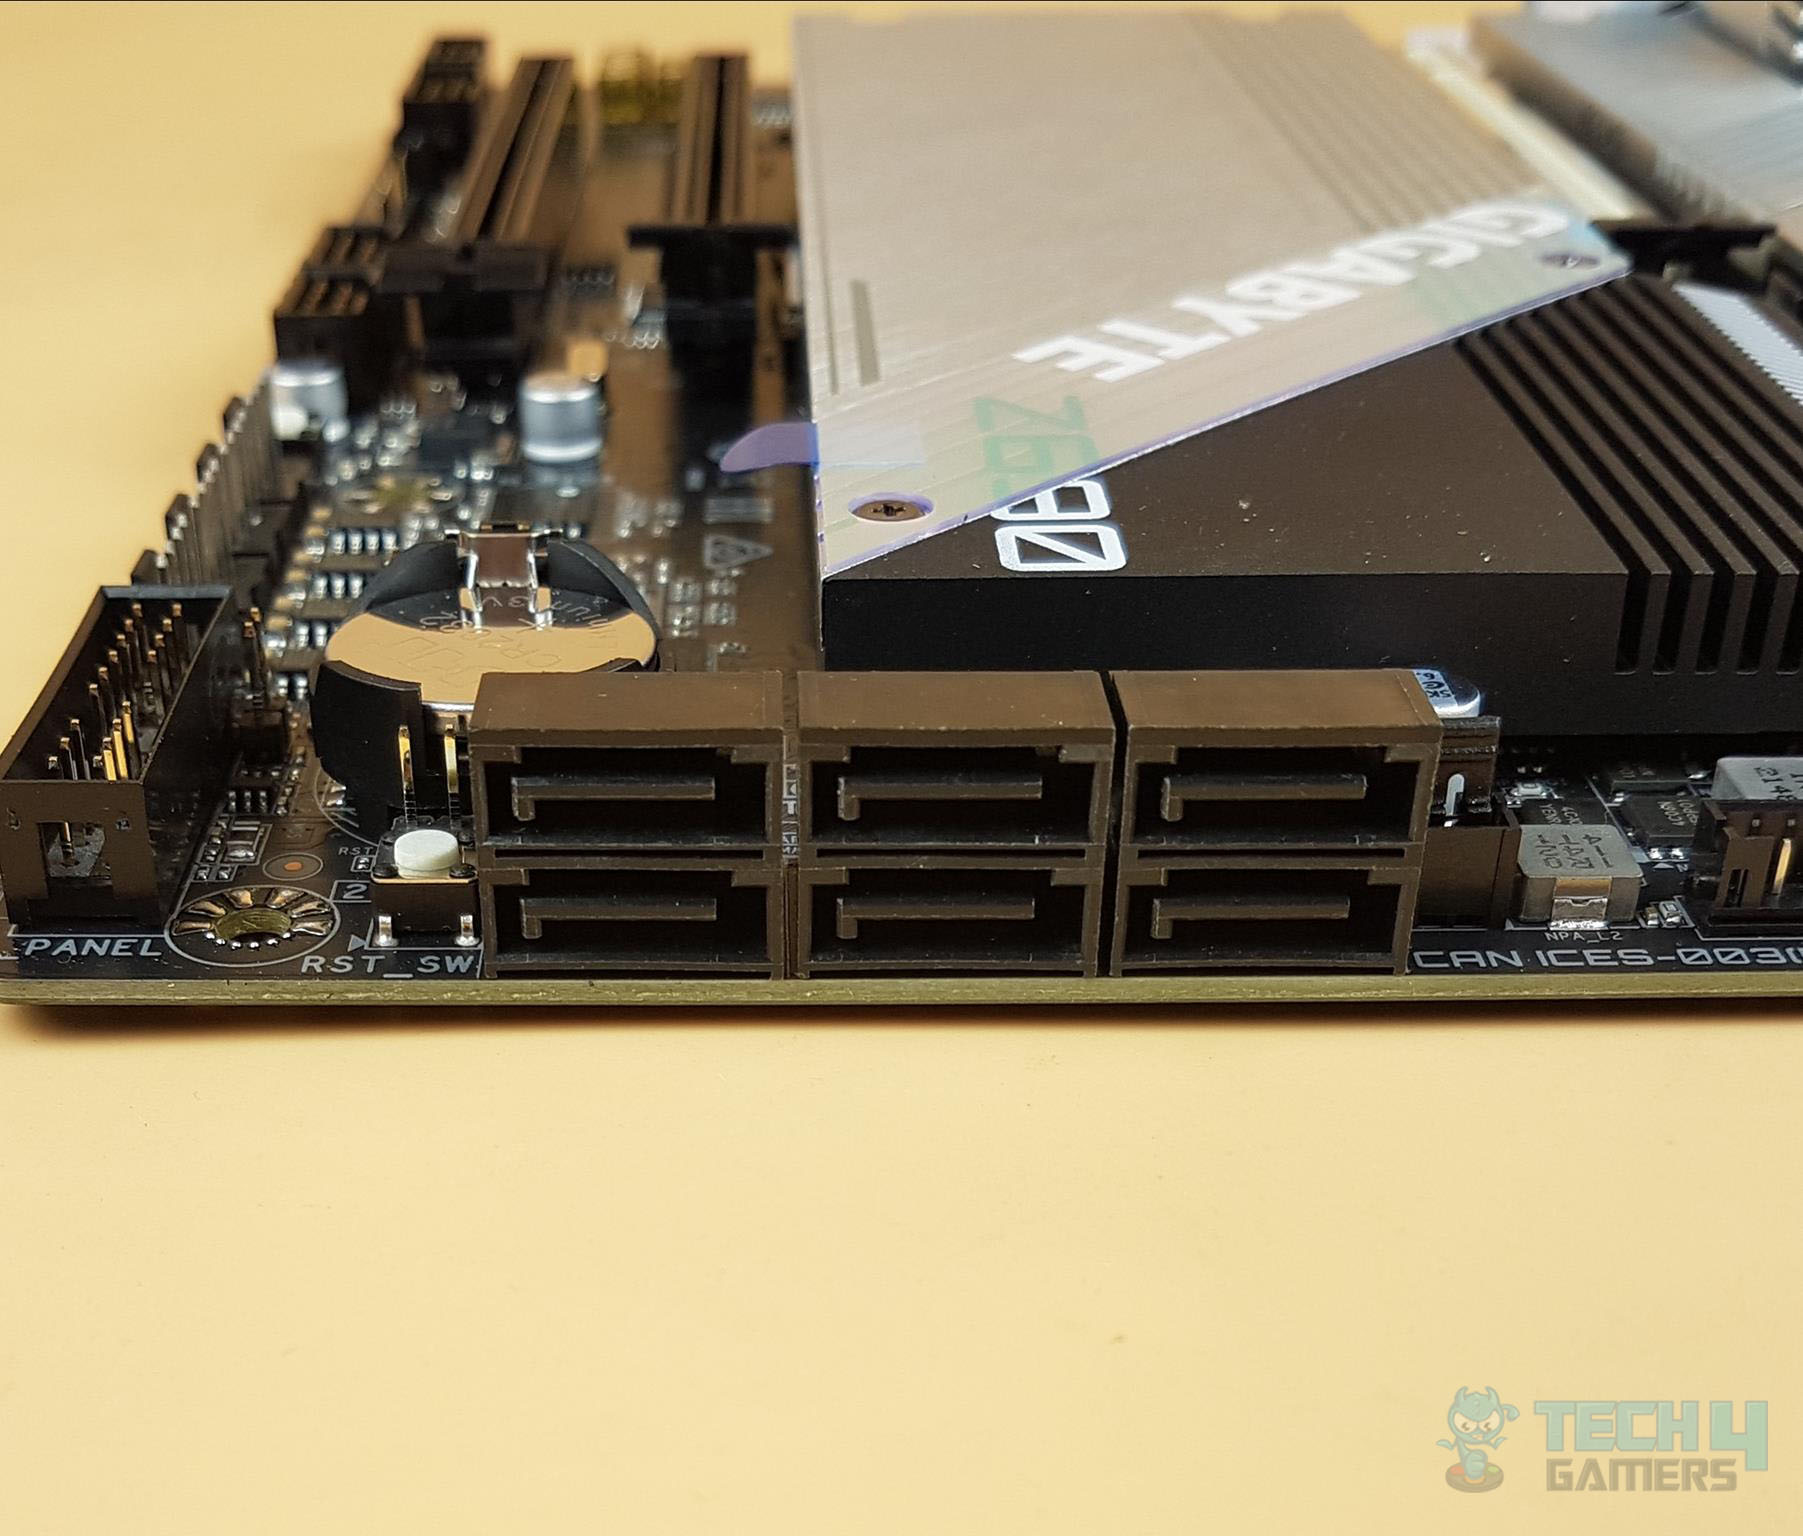
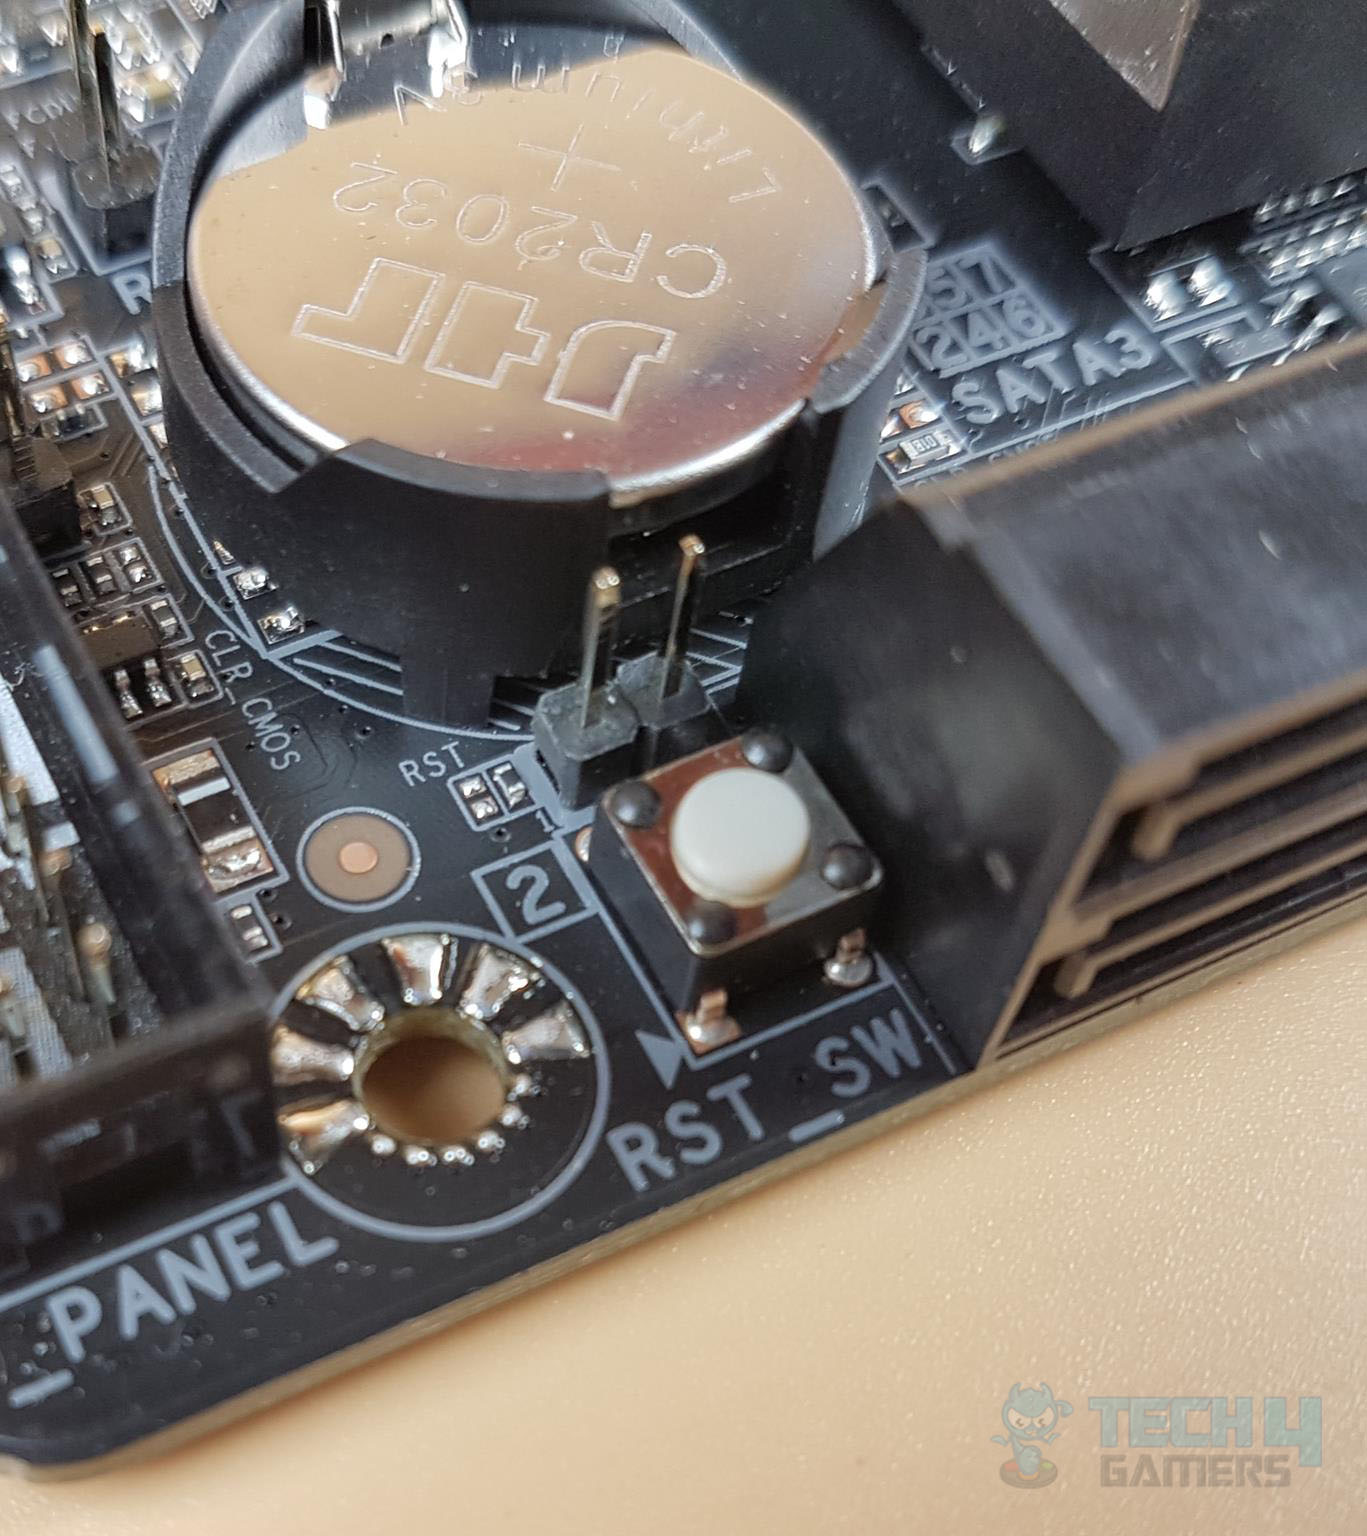
There are 6x SATA ports rated at 6 Gbps located on the lower right side of the motherboard. This motherboard supports RAID 0, RAID 1, RAID 5, and RAID 10. There is a Reset Jumper and a Reset button. This allows the user to quickly turn on/off the PC in an open-air environment meaning when the motherboard is installed on a test bench, not inside a PC case.
Connectivity
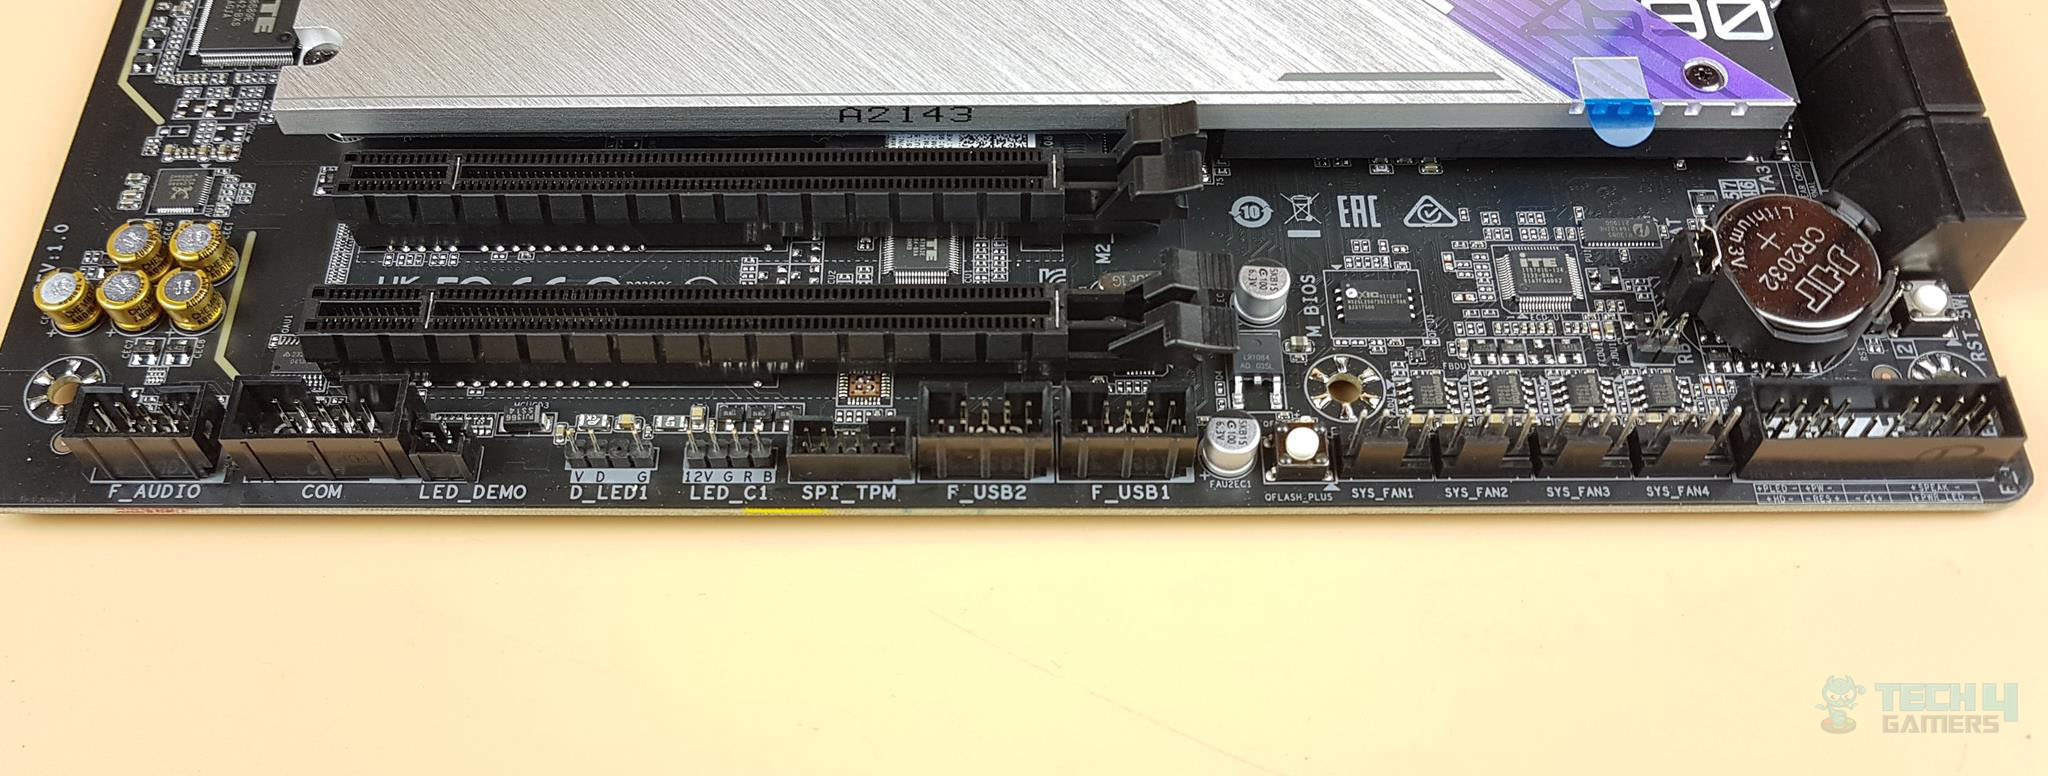
Use Q-Flash Plus to update the motherboard BIOS without CPU/RAM. Download the BIOS file from GIGABYTE, rename it to GIGABYTE.BIN, and copy it to FAT 32 USB. Plug into the dedicated port, connect the PSU to the motherboard, turn on the PSU, and press the Q-Flash Plus button. LED blinks fast, indicating a search for BIOS file. When done, the LED turns off, and PSU restarts. BIOS updated.
Starting from the right side, we have:
- System Panel Connector
- Reset Jumper
- 4x 4-pin PWM Fan Headers
- Q-Flash Plus button
- 2x USB 2.0 headers
- TPM Header
- 4-pin 12V RGB Header
- 3-pin 5V RGB Header
- COM Port
- Front Panel Audio Header
This pic shows a motherboard with heatsinks and covers, minus the chipset cover. The top PCIe slot works with the CPU, supporting PCIe 5.0. Two bottom slots connect to the chipset and are PCIe 3.0 x4. The top slot is reinforced. The motherboard supports AMD 2-way and Quad-GPU crossfire. There are 4 NVMe SSD slots: the top one works with the CPU and supports PCIe 4.0 x4/x2. The other three connect to the chipset, supporting PCIe 4.0 x4/x2 and SATA.
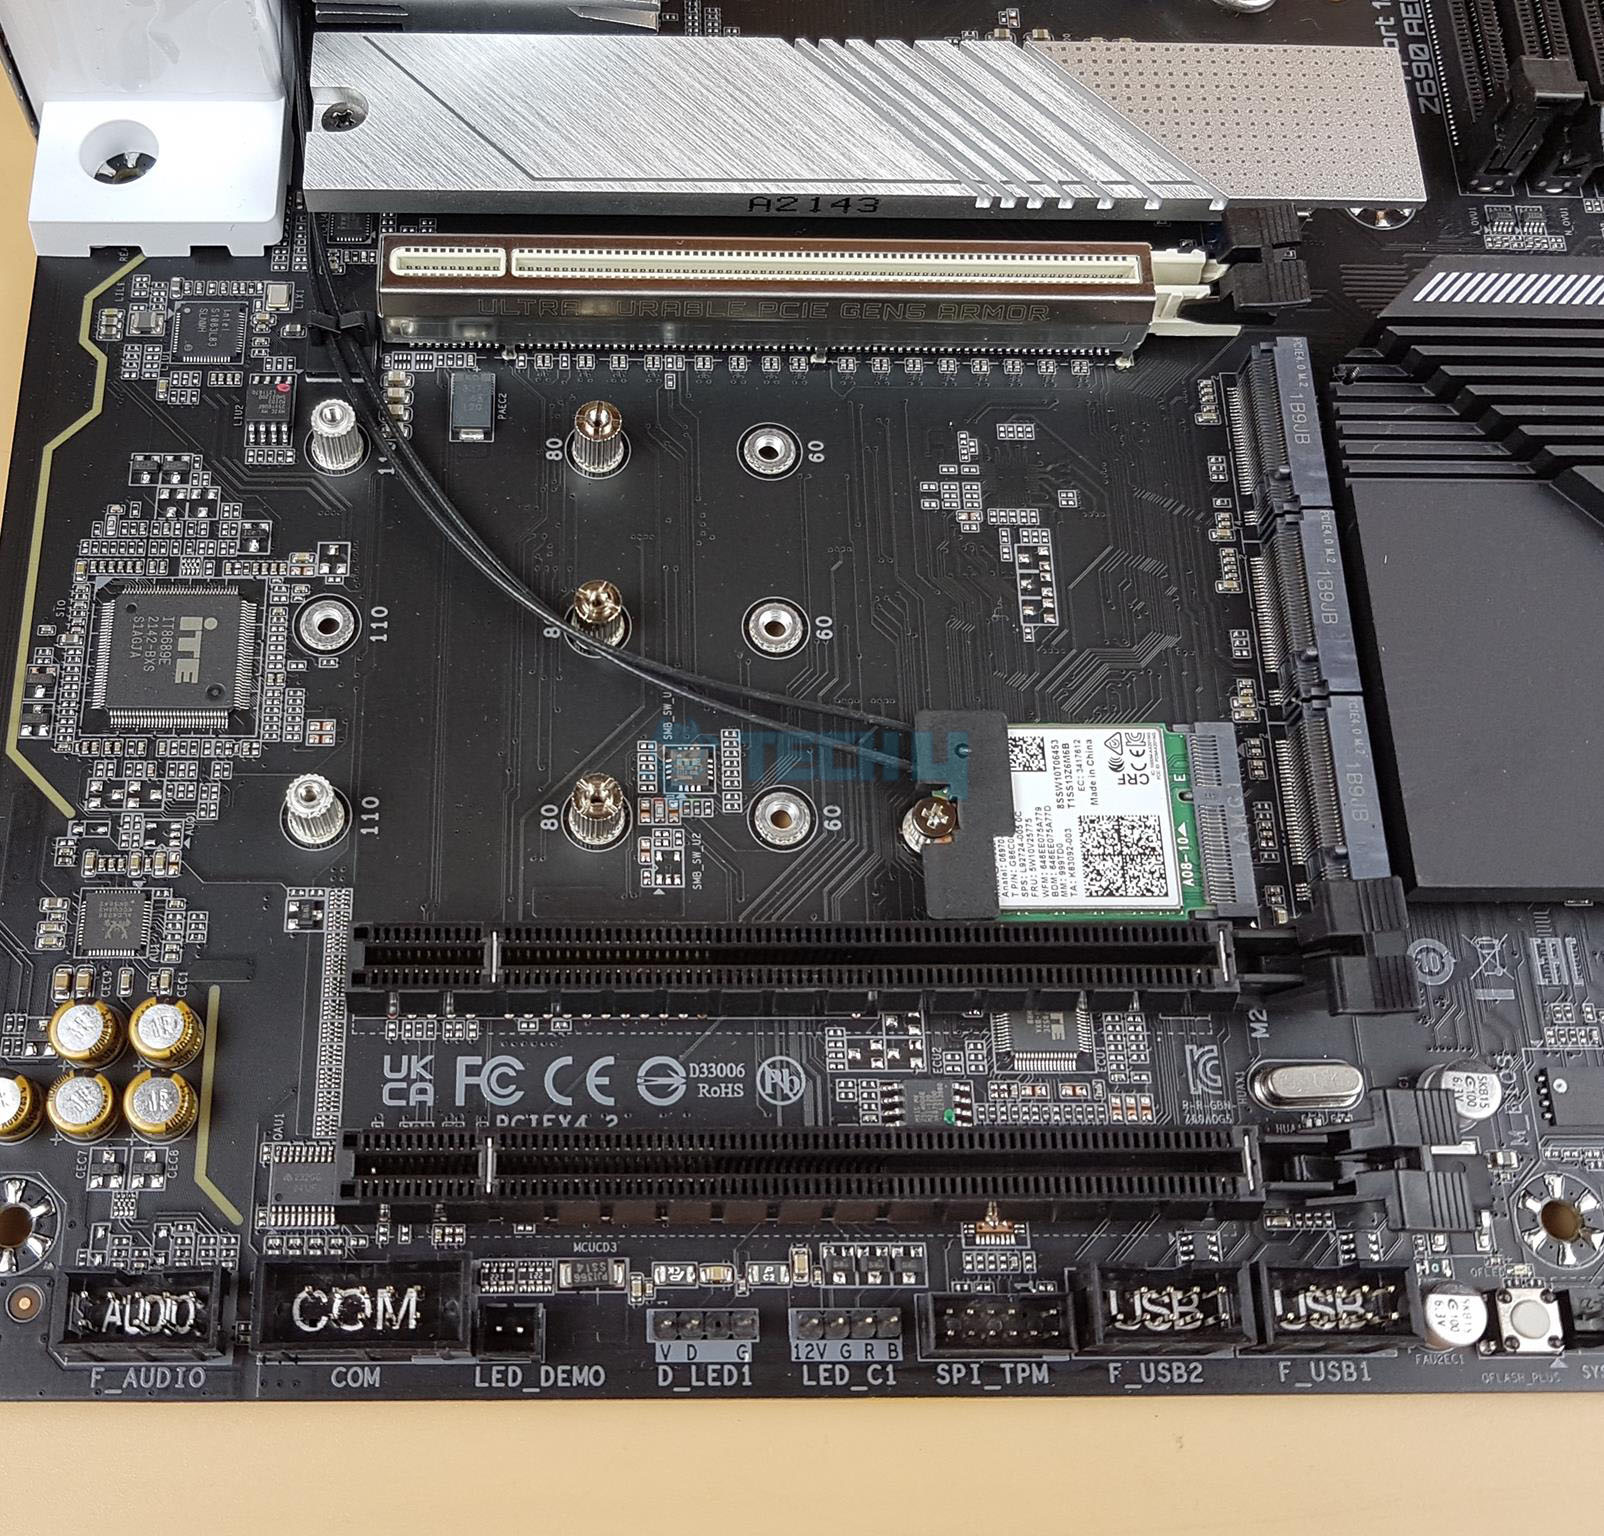
The picture shows the M2A_CPU M.2 connector after removing the thermal cover. The picture shows the underside of the thermal covers of the M.2 connectors.
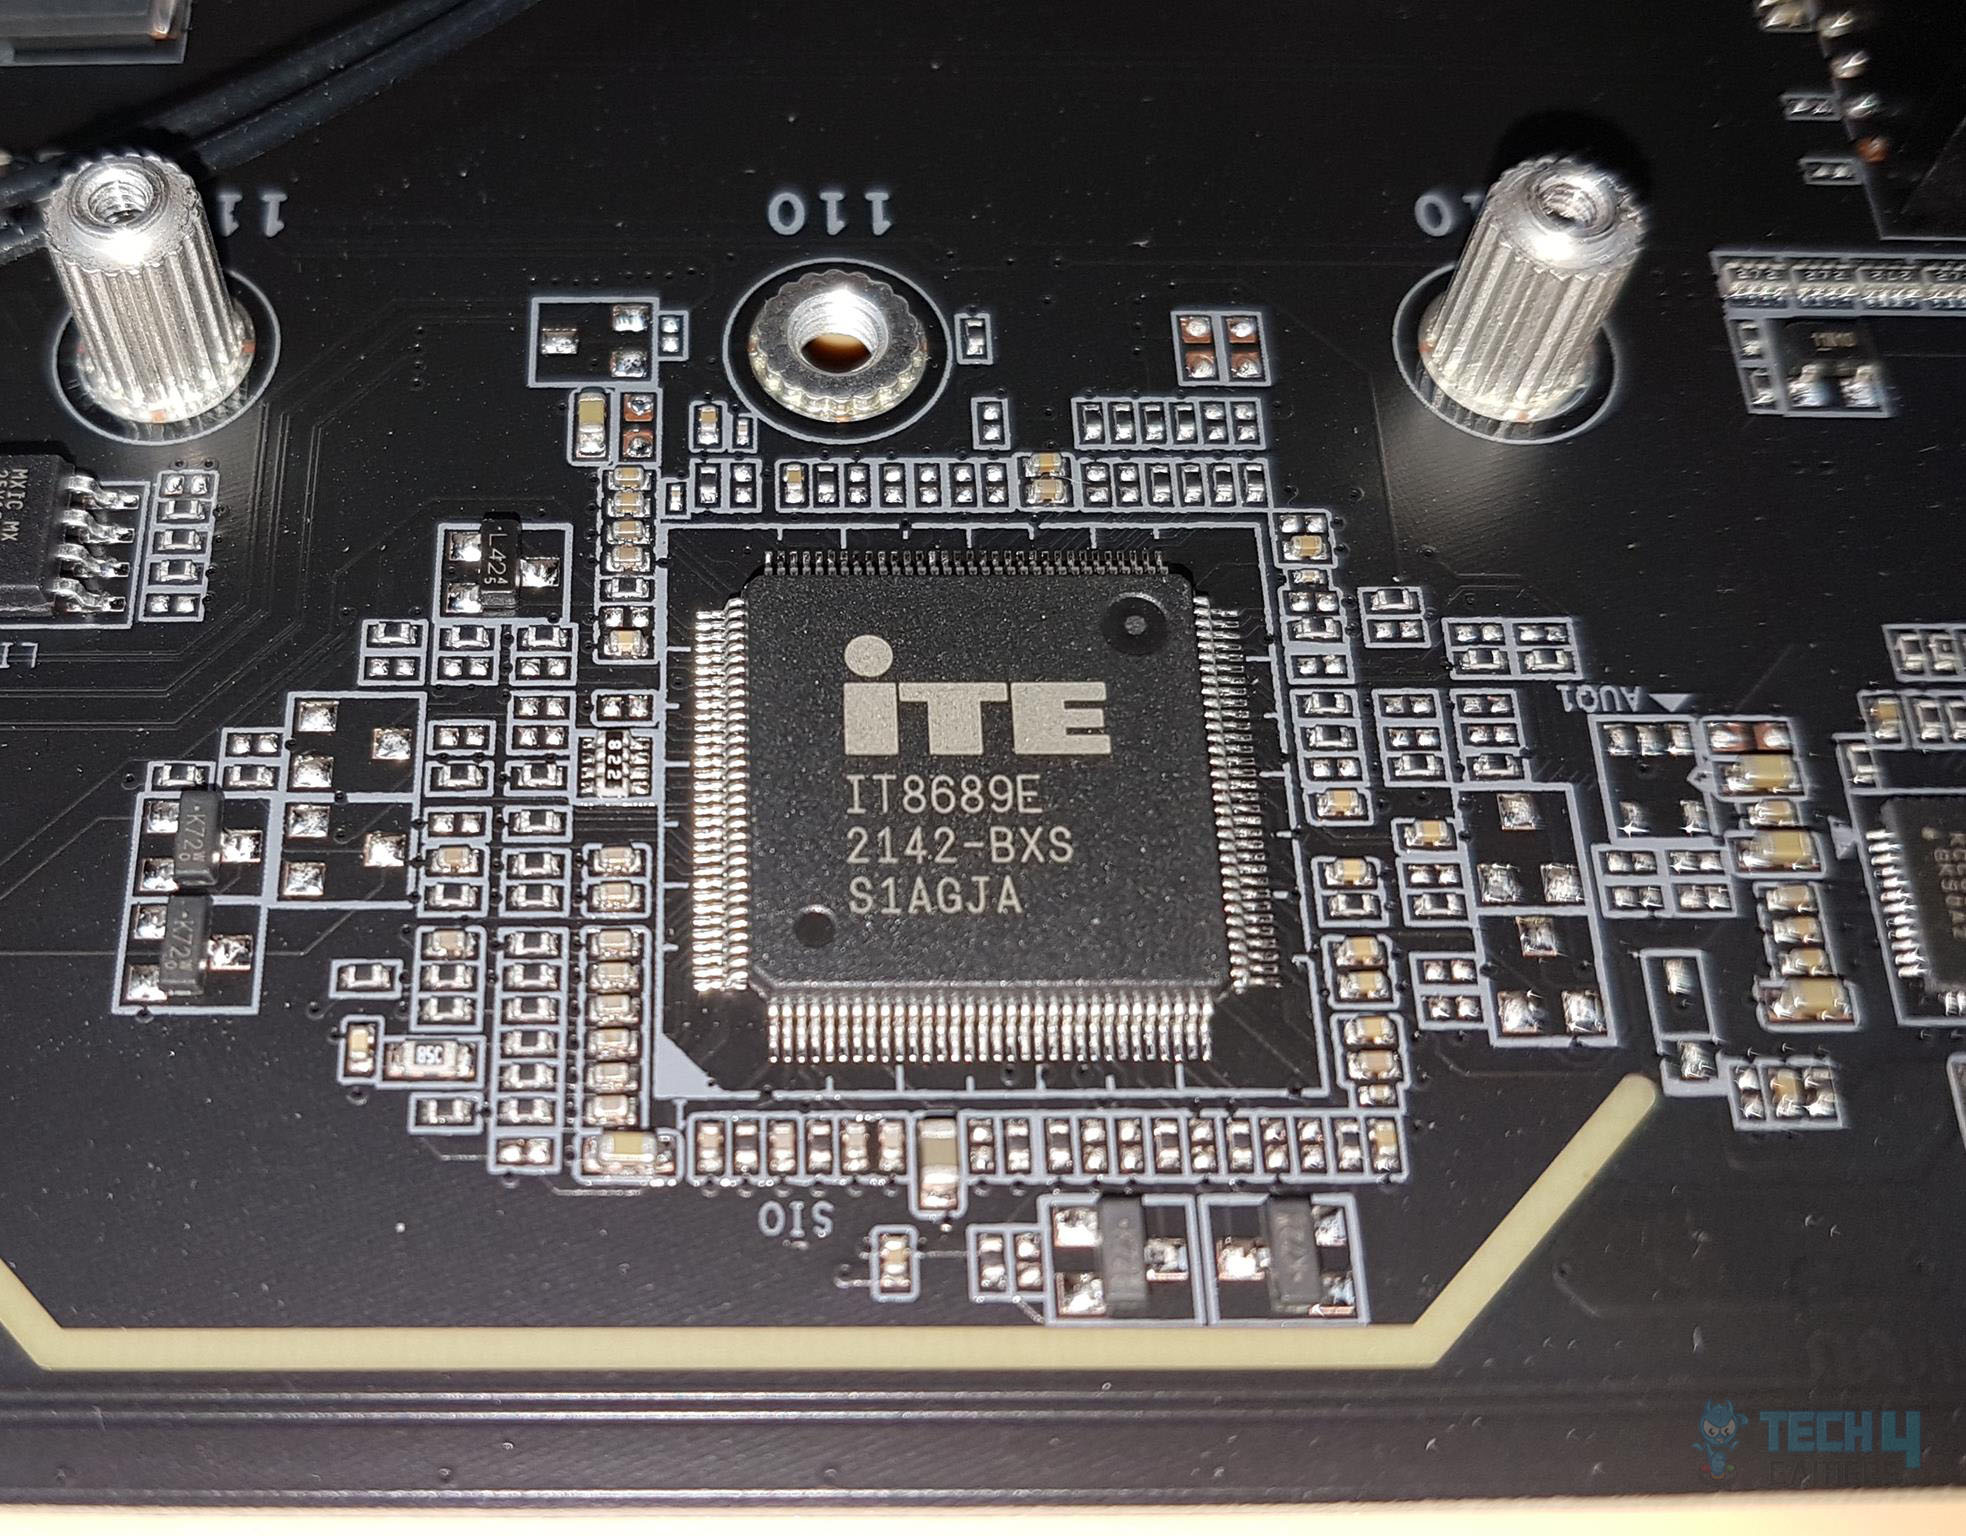
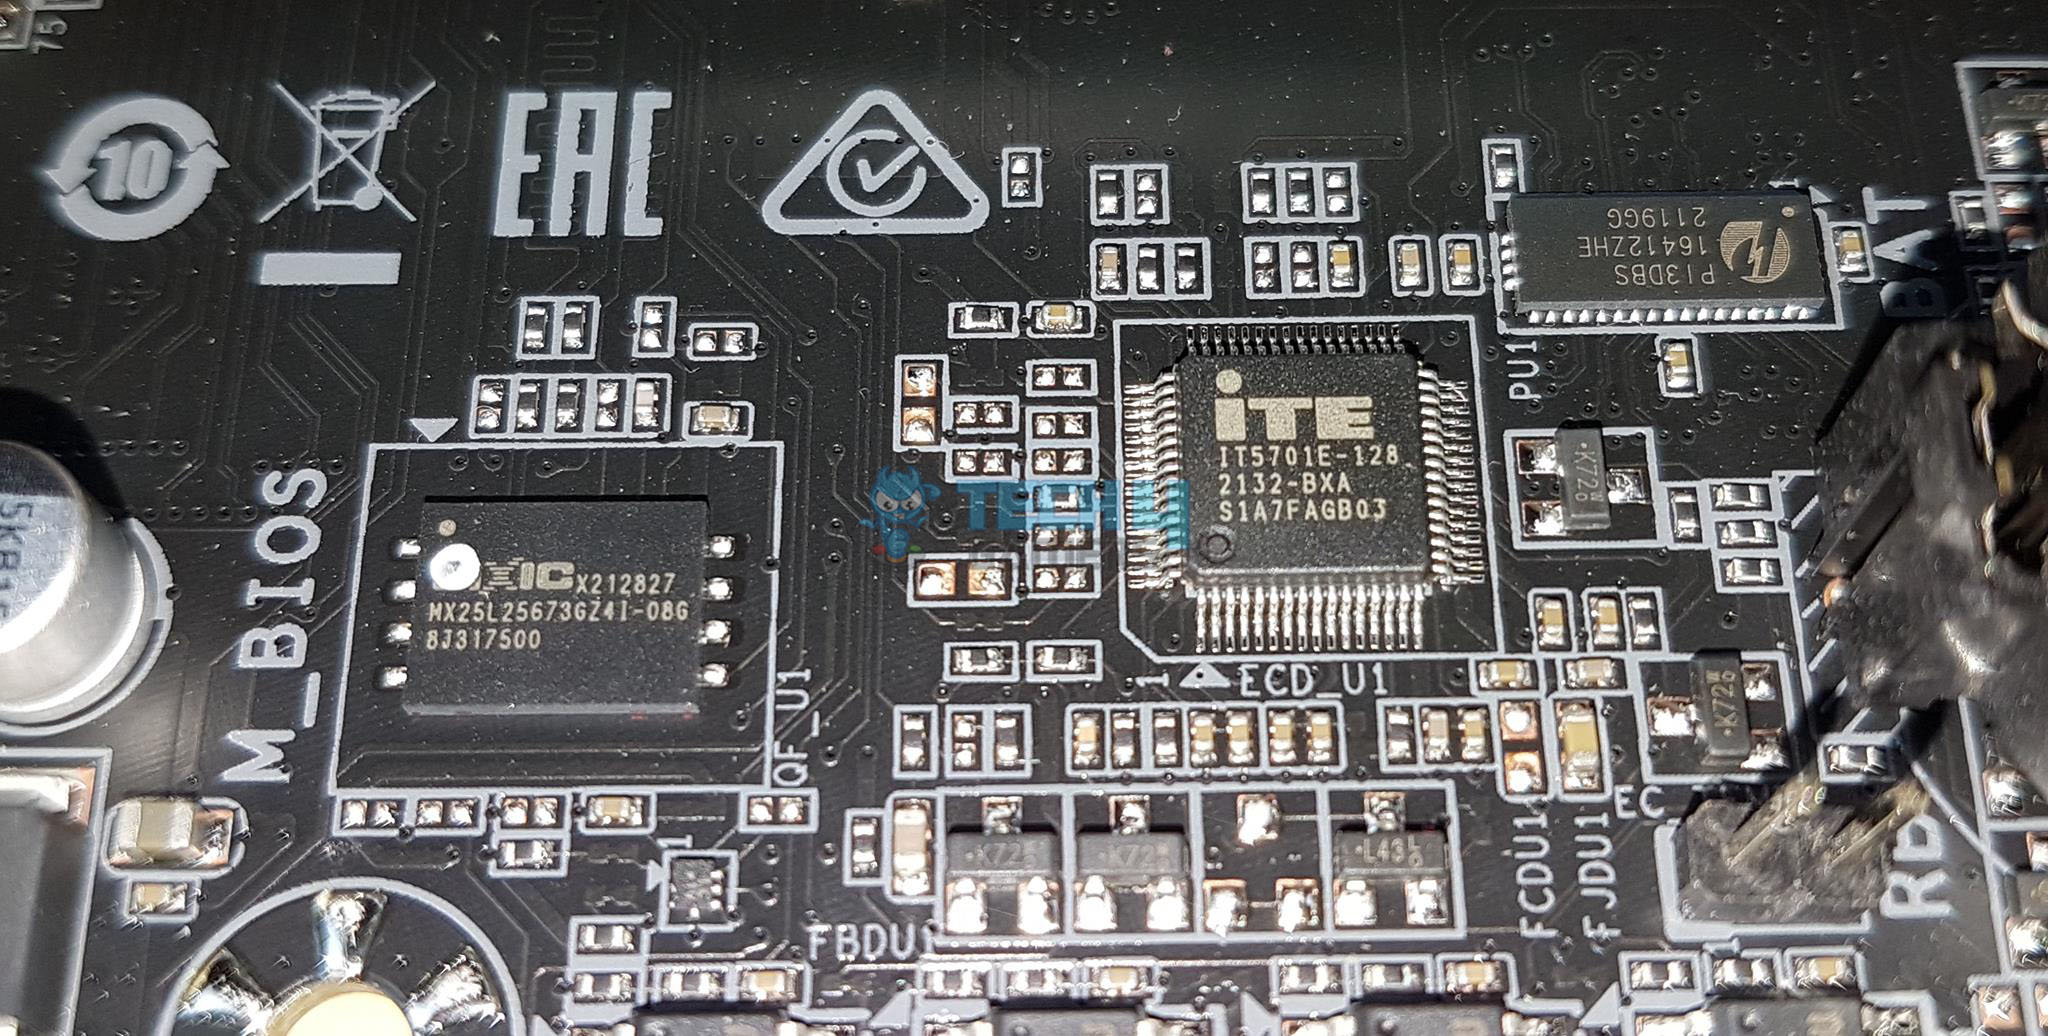
We have an iTE8689E chip for I/O control. The motherboard has a single 256Mbit Flash chip. We have other iTE chips as well which are IT5708FN and IT5701E which are used as Q FLASH PLUS and RGB controllers.

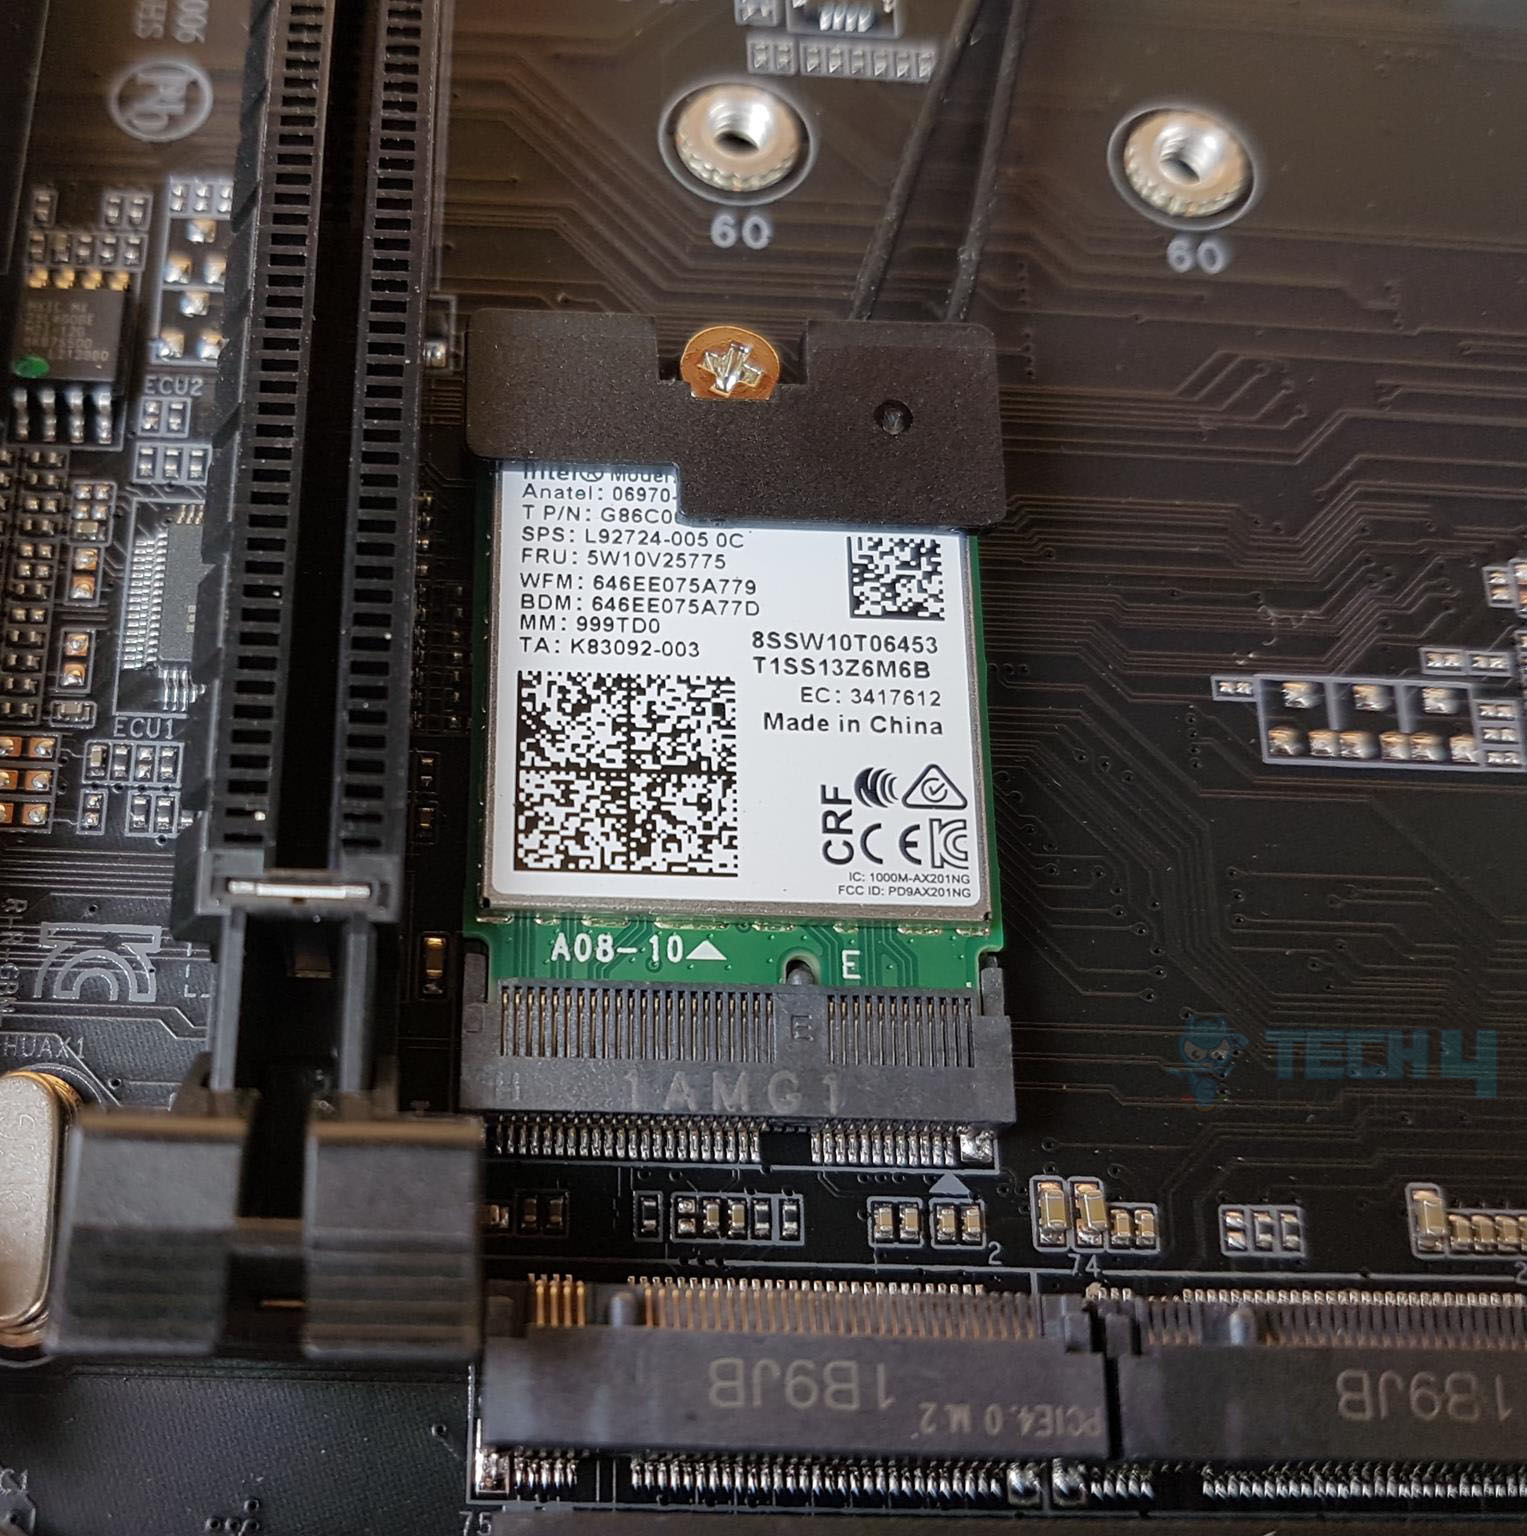
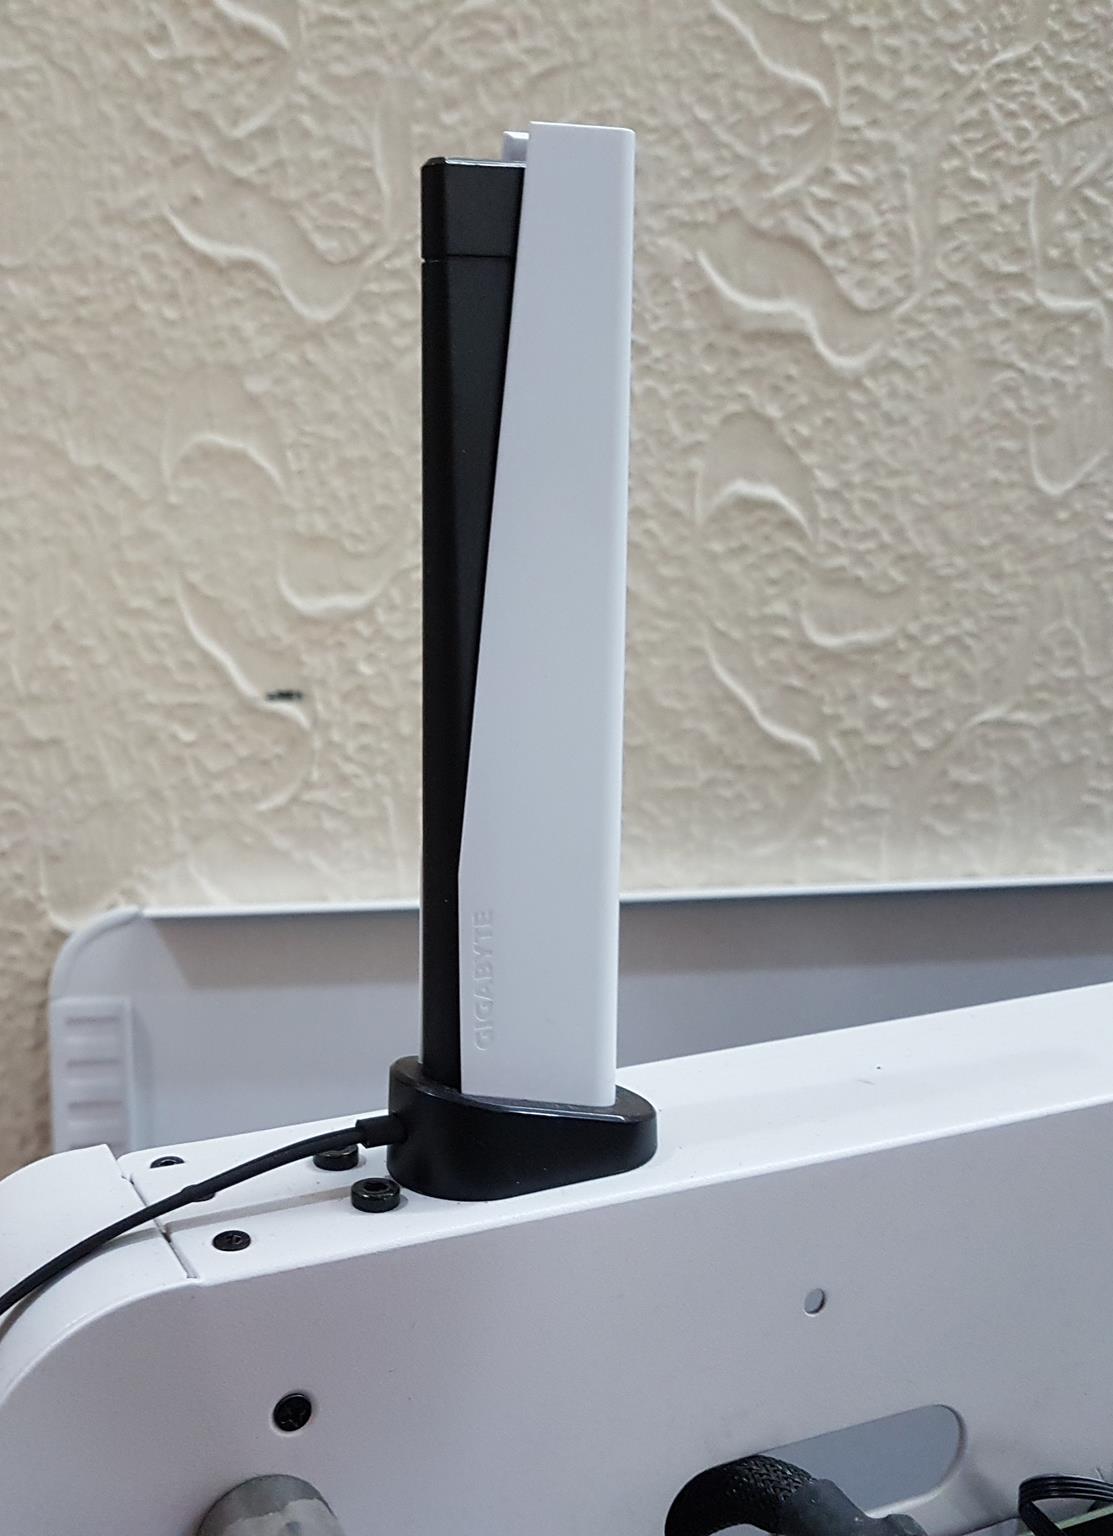
The GIGABYTE Z690 AERO G motherboard uses a high-quality audio system for realistic sound in games, featuring Chemicon capacitors. It supports 2-channel analog and S/PDIF Out. The motherboard includes an Intel Wi-Fi 6 module with antennas for a fast and reliable wireless connection. It doesn’t have WiFi 6E but supports WiFi 6 (802.11ax) and Bluetooth 5.2 for improved range and speed.
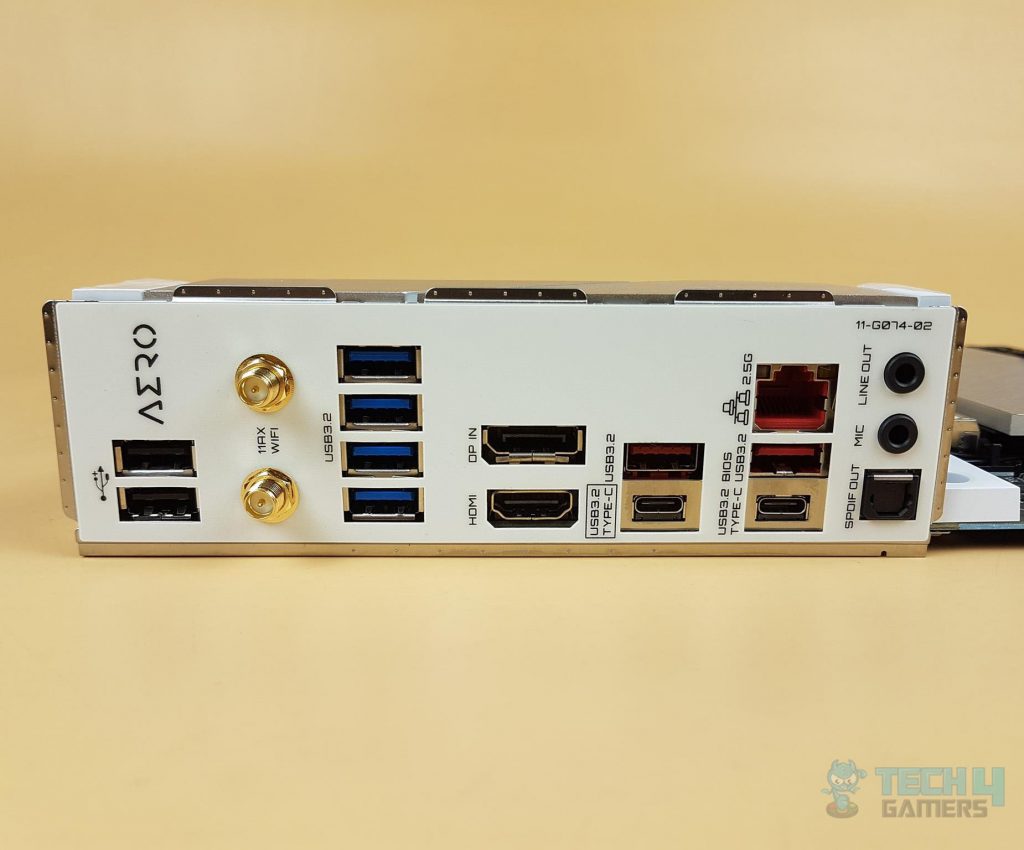
Ports
The GIGABYTE Z690 AERO G is using Intel 2.5 GbE NIC. The adoption of 2.5G LAN provides up to 2.5 GbE network connectivity, with at least two times faster transfer speeds compared to general 1GbE networking. It is also backward compatible with Multi-Gig(10/100/1000/2500Mbps) RJ-45 Ethernet. Since this is a Creator’s segment board, I was expecting a 10GbE port but GIGABYTE has only implemented that port on the VISION D motherboard.
The following options are provided:
- 2 x USB 2.0/1.1 ports
- 2 x SMA antenna connectors (2T2R)
- 4 x USB 3.2 Gen 1 ports
- 1 x DisplayPort In port
- 1 x HDMI port
- 2 x USB 3.2 Gen 2 Type-A ports (red)
- 1 x USB Type-C® port, with USB 3.2 Gen 2×2 support
- 1 x USB Type-C® port, with USB 3.2 Gen 1 support
- 1 x RJ-45 port
- 1 x optical S/PDIF Out connector
- 2 x audio jacks
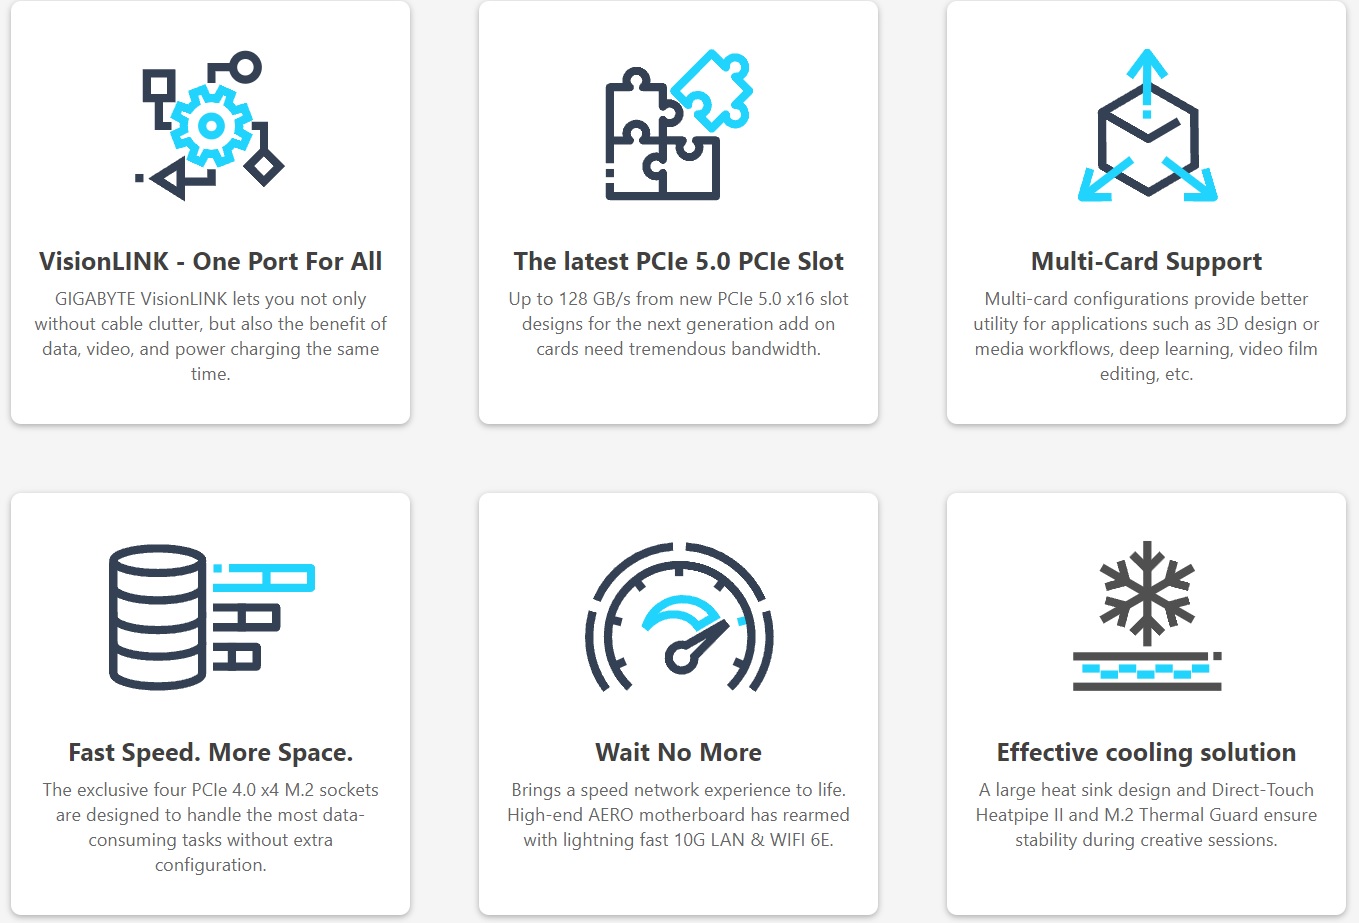
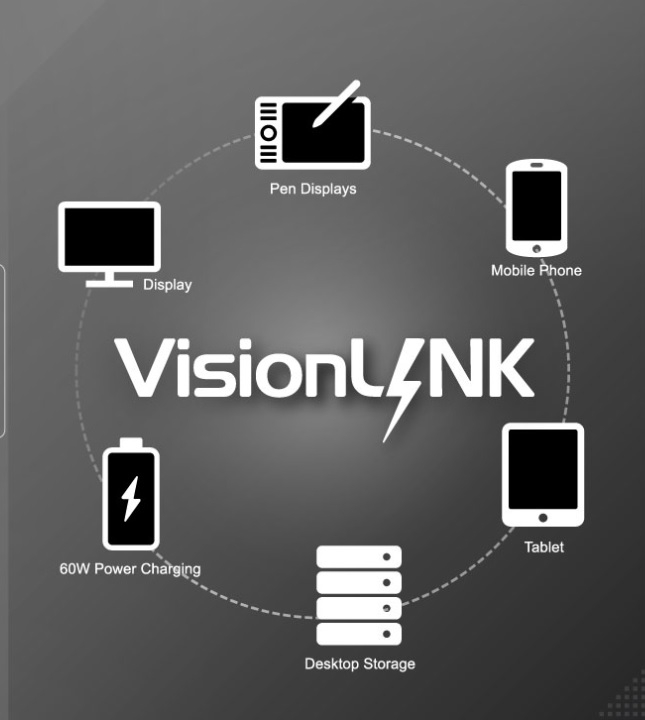
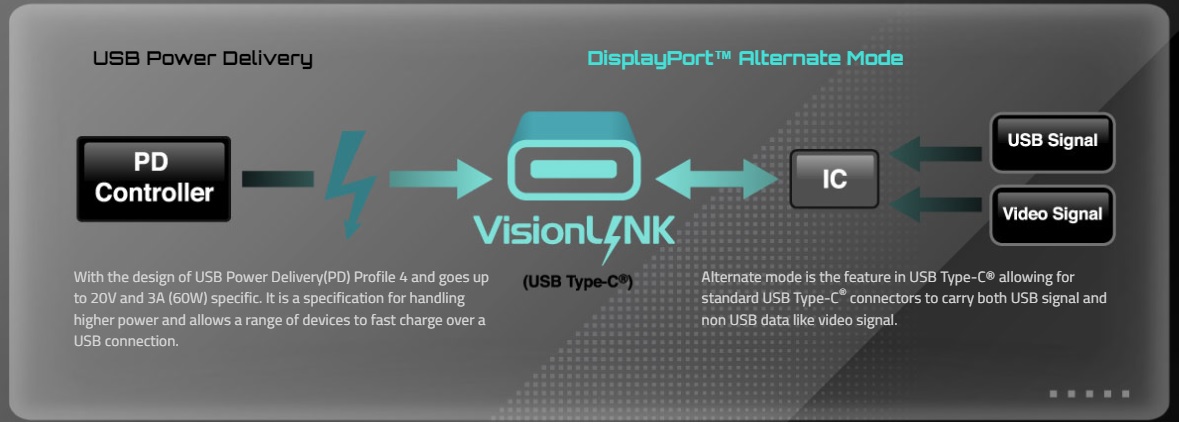
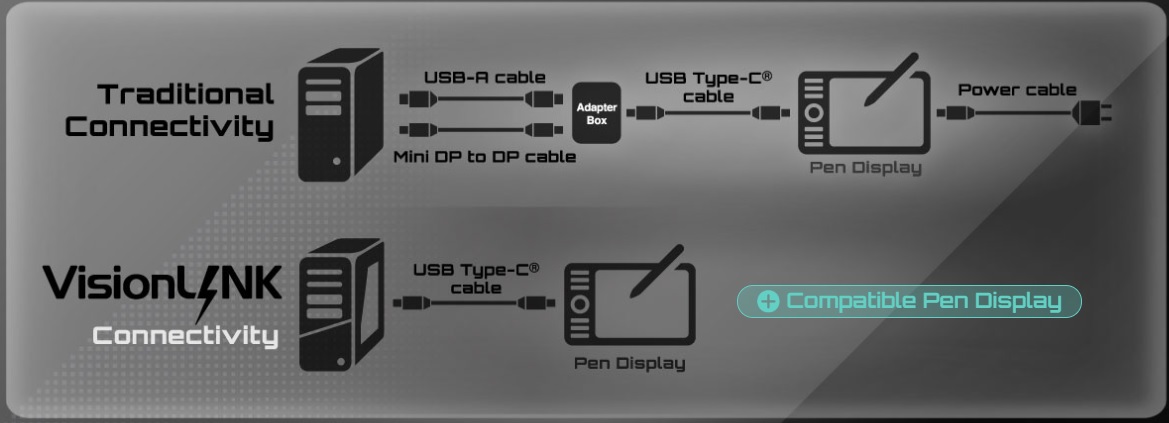
Vision Link
AERO series motherboards have 6 unique features for gaming. Vision Link in the picture shows a USB Type-C port for fast charging (up to 60W) and single-cable connectivity with DisplayPort. You can also output to compatible displays using Alternate Mode. Use a USB Type-C cable to connect and output to a pen display.
BIOS
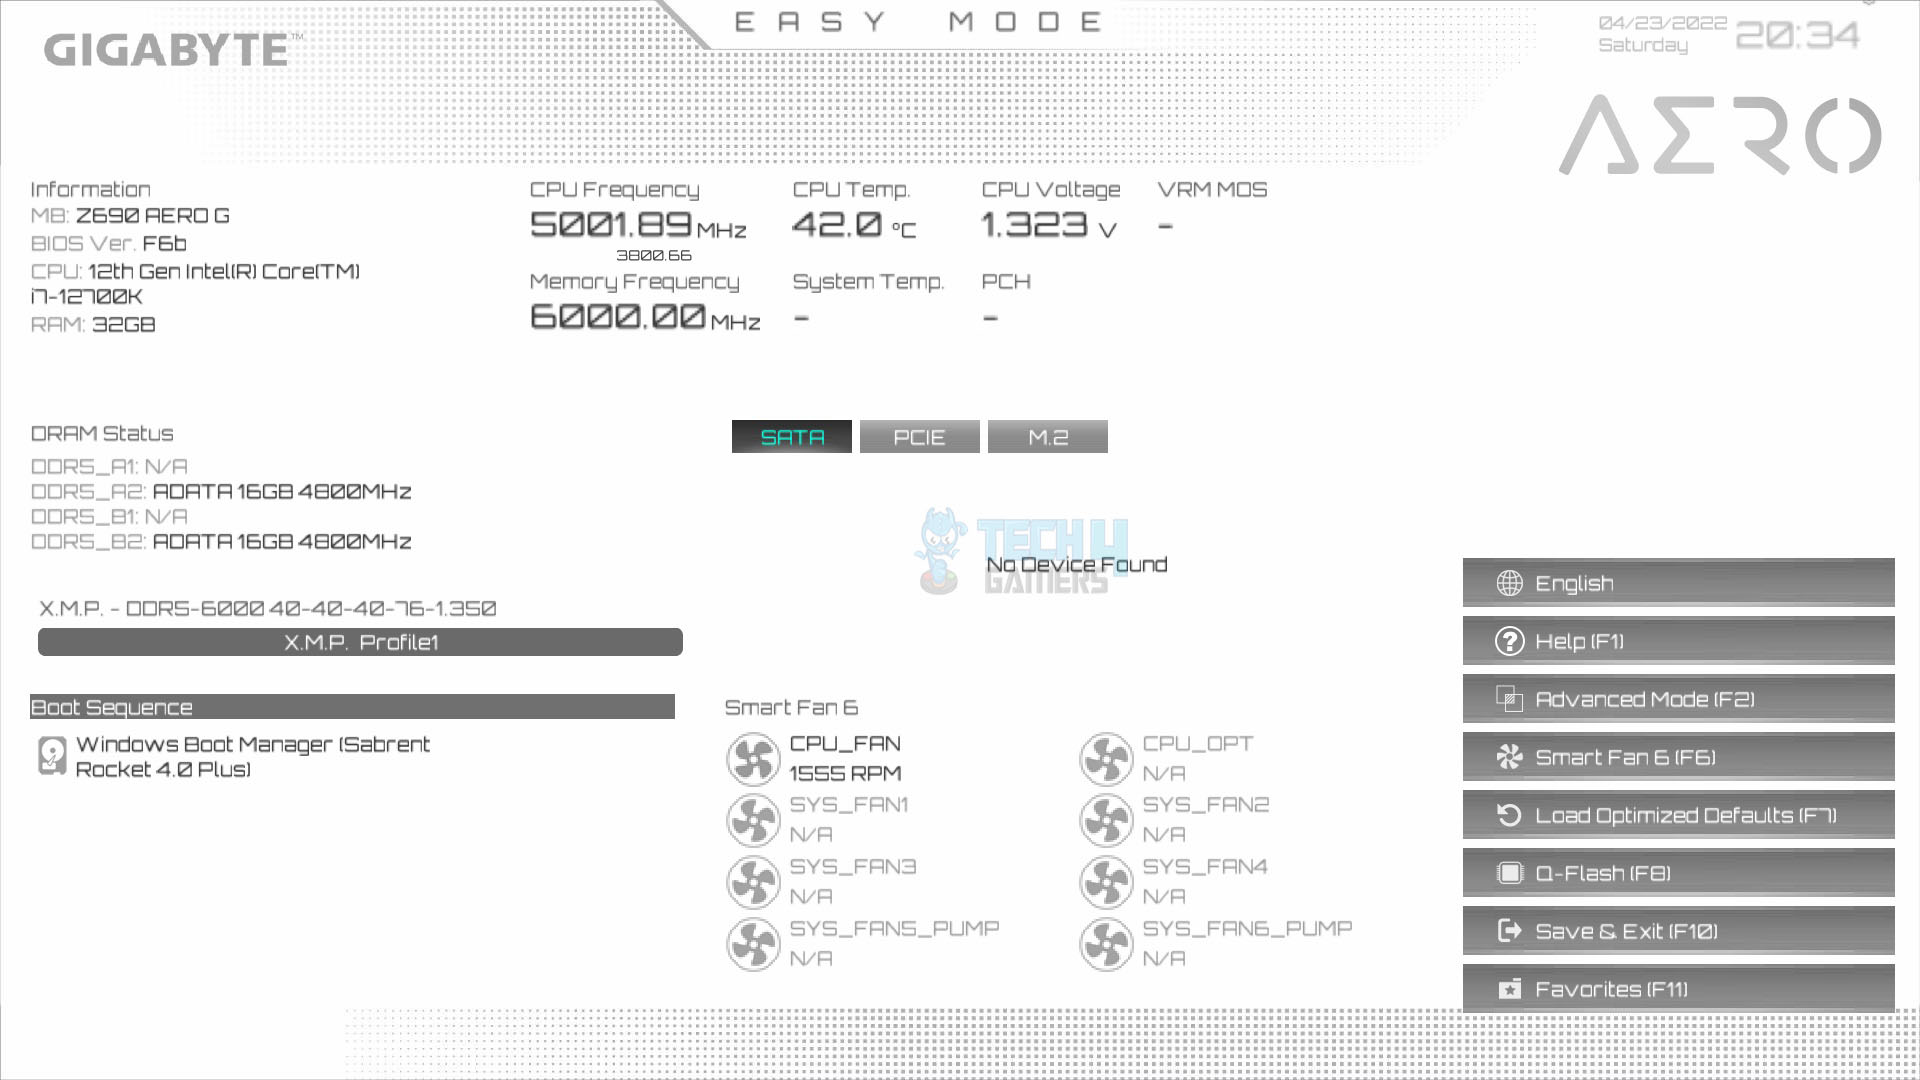
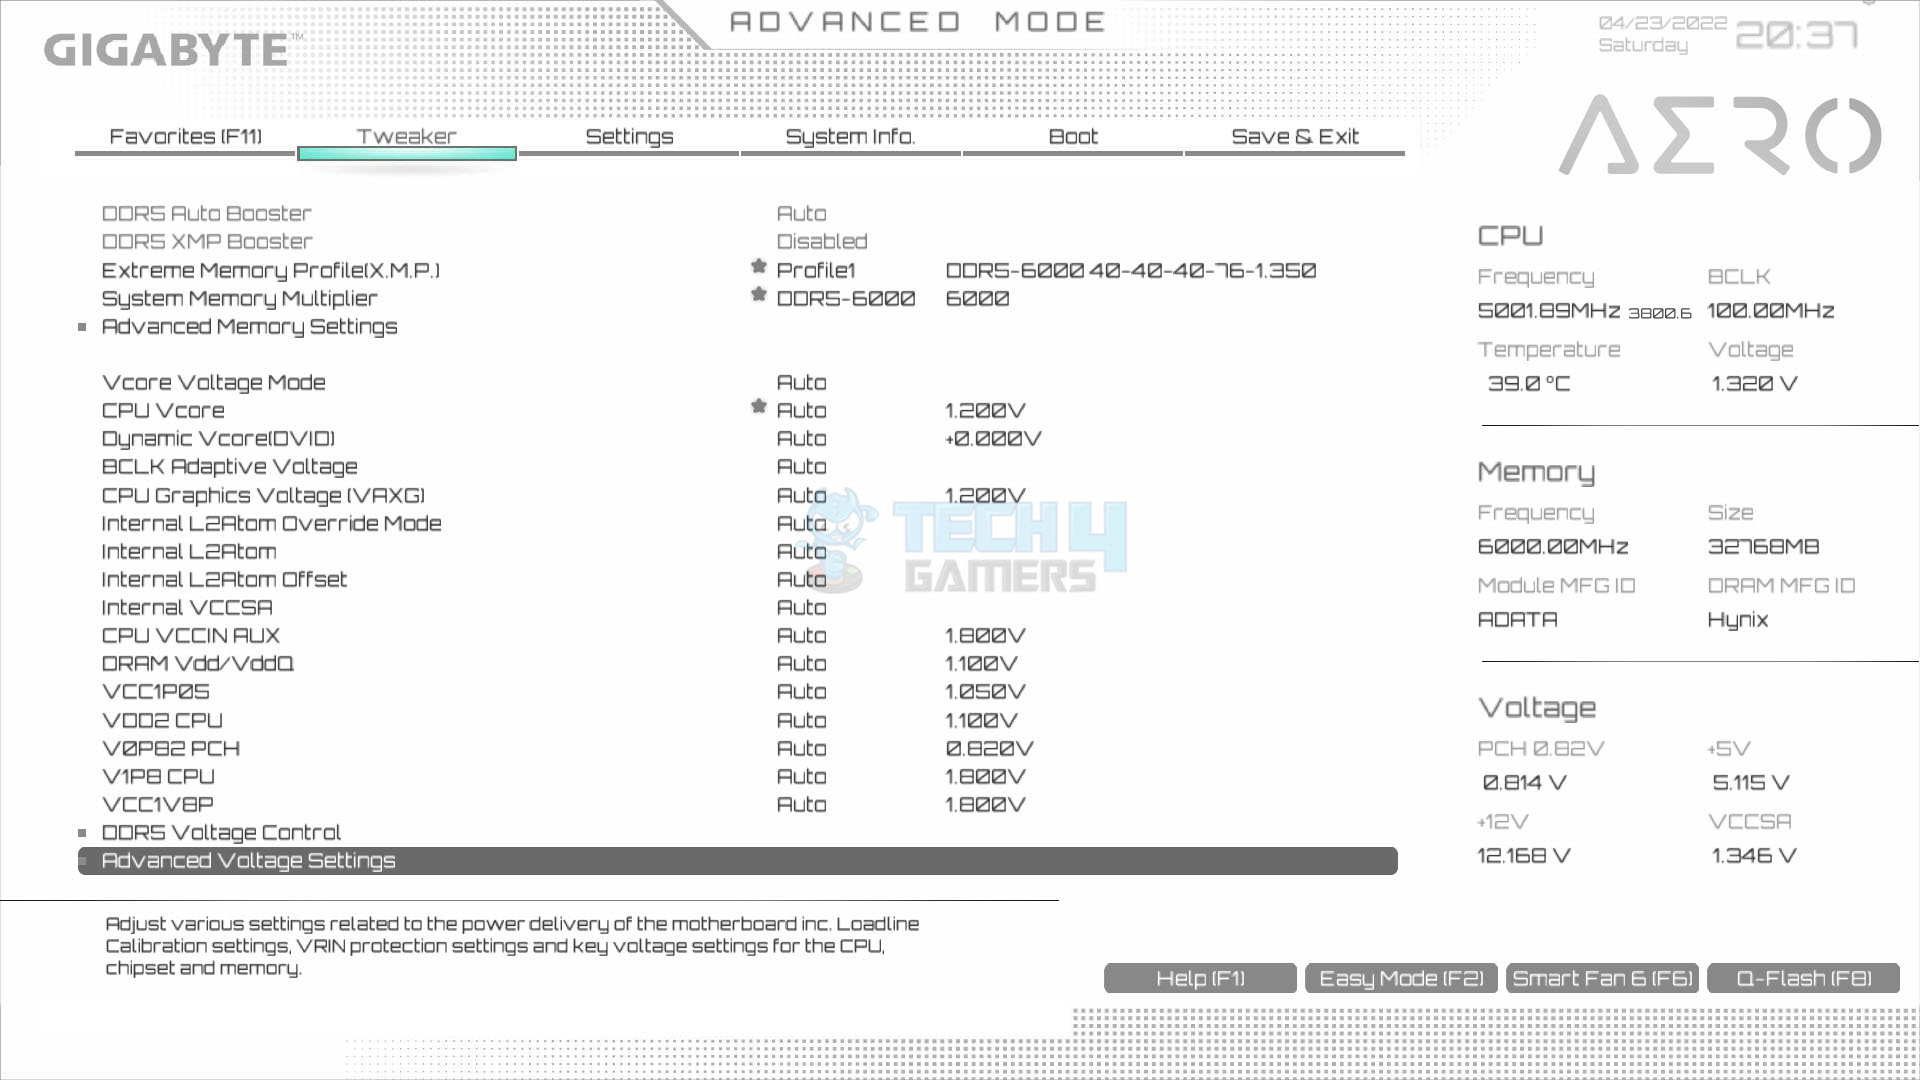
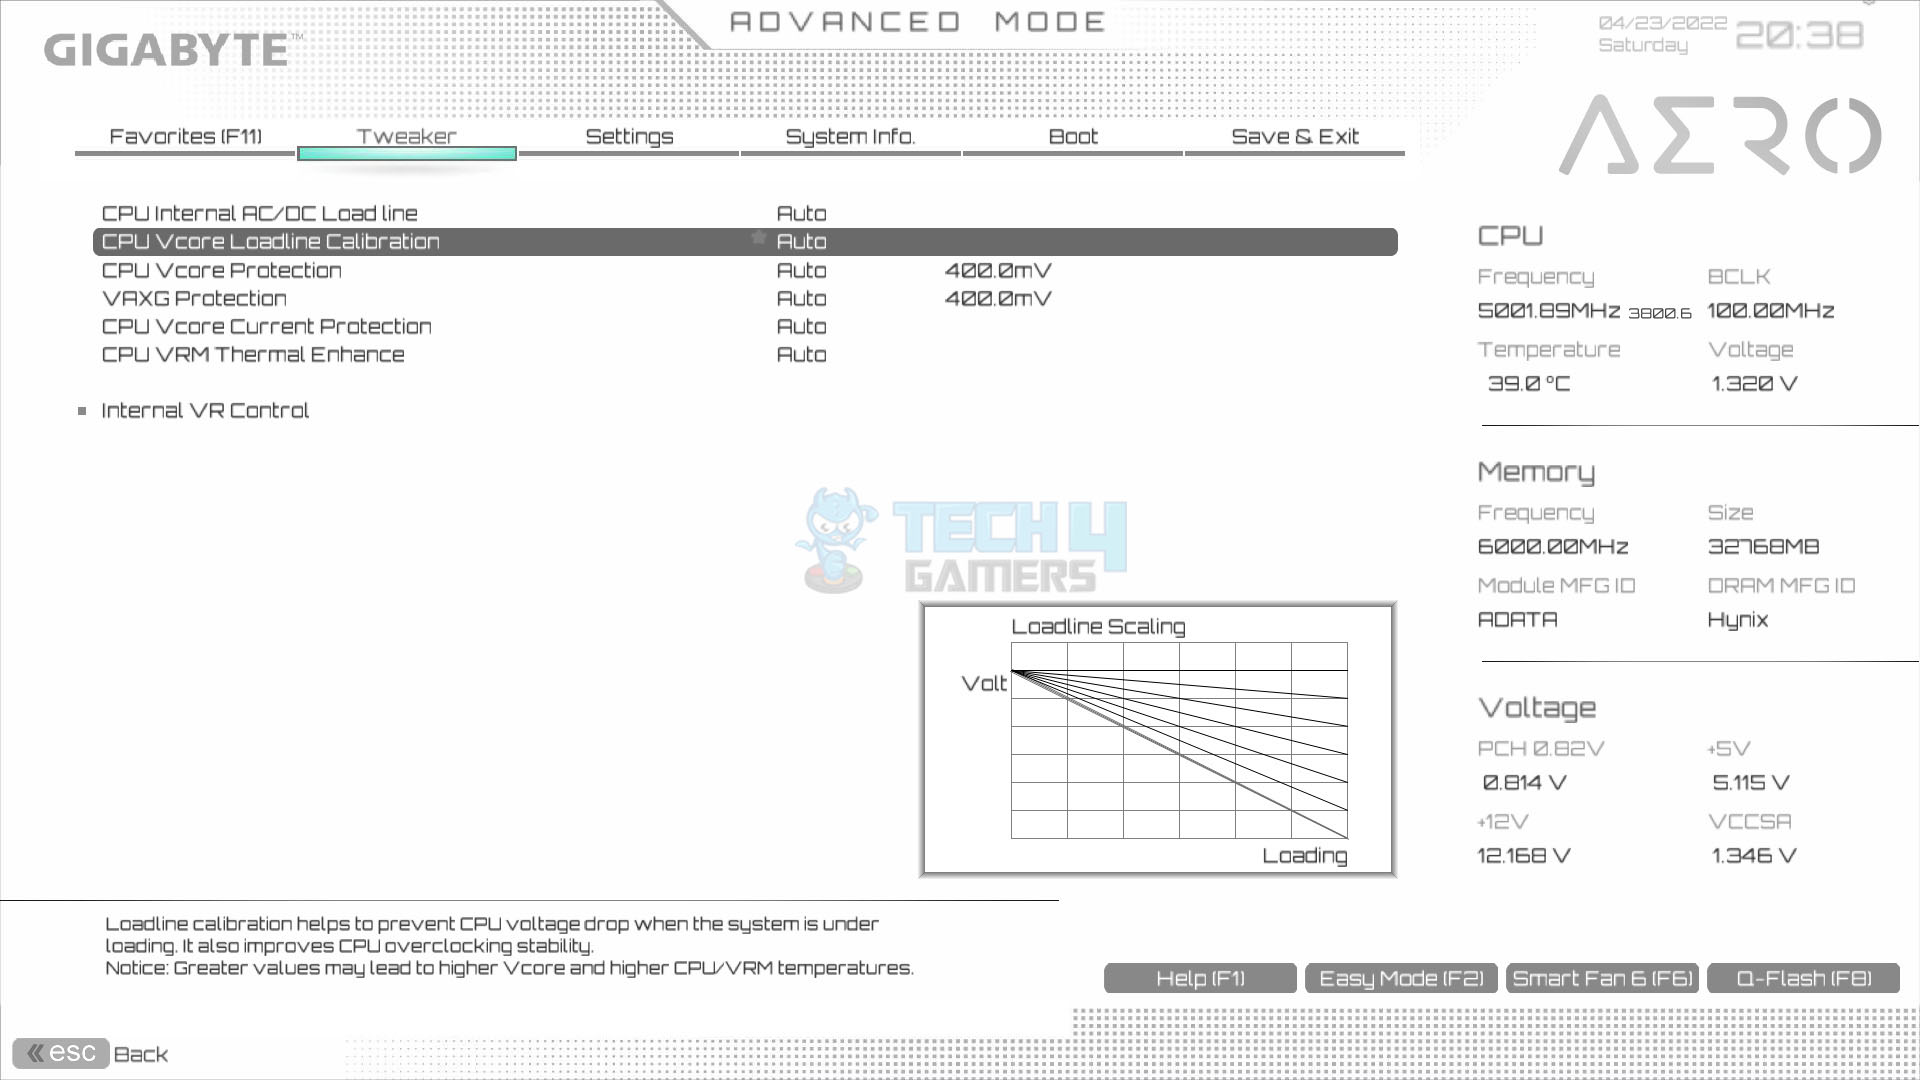
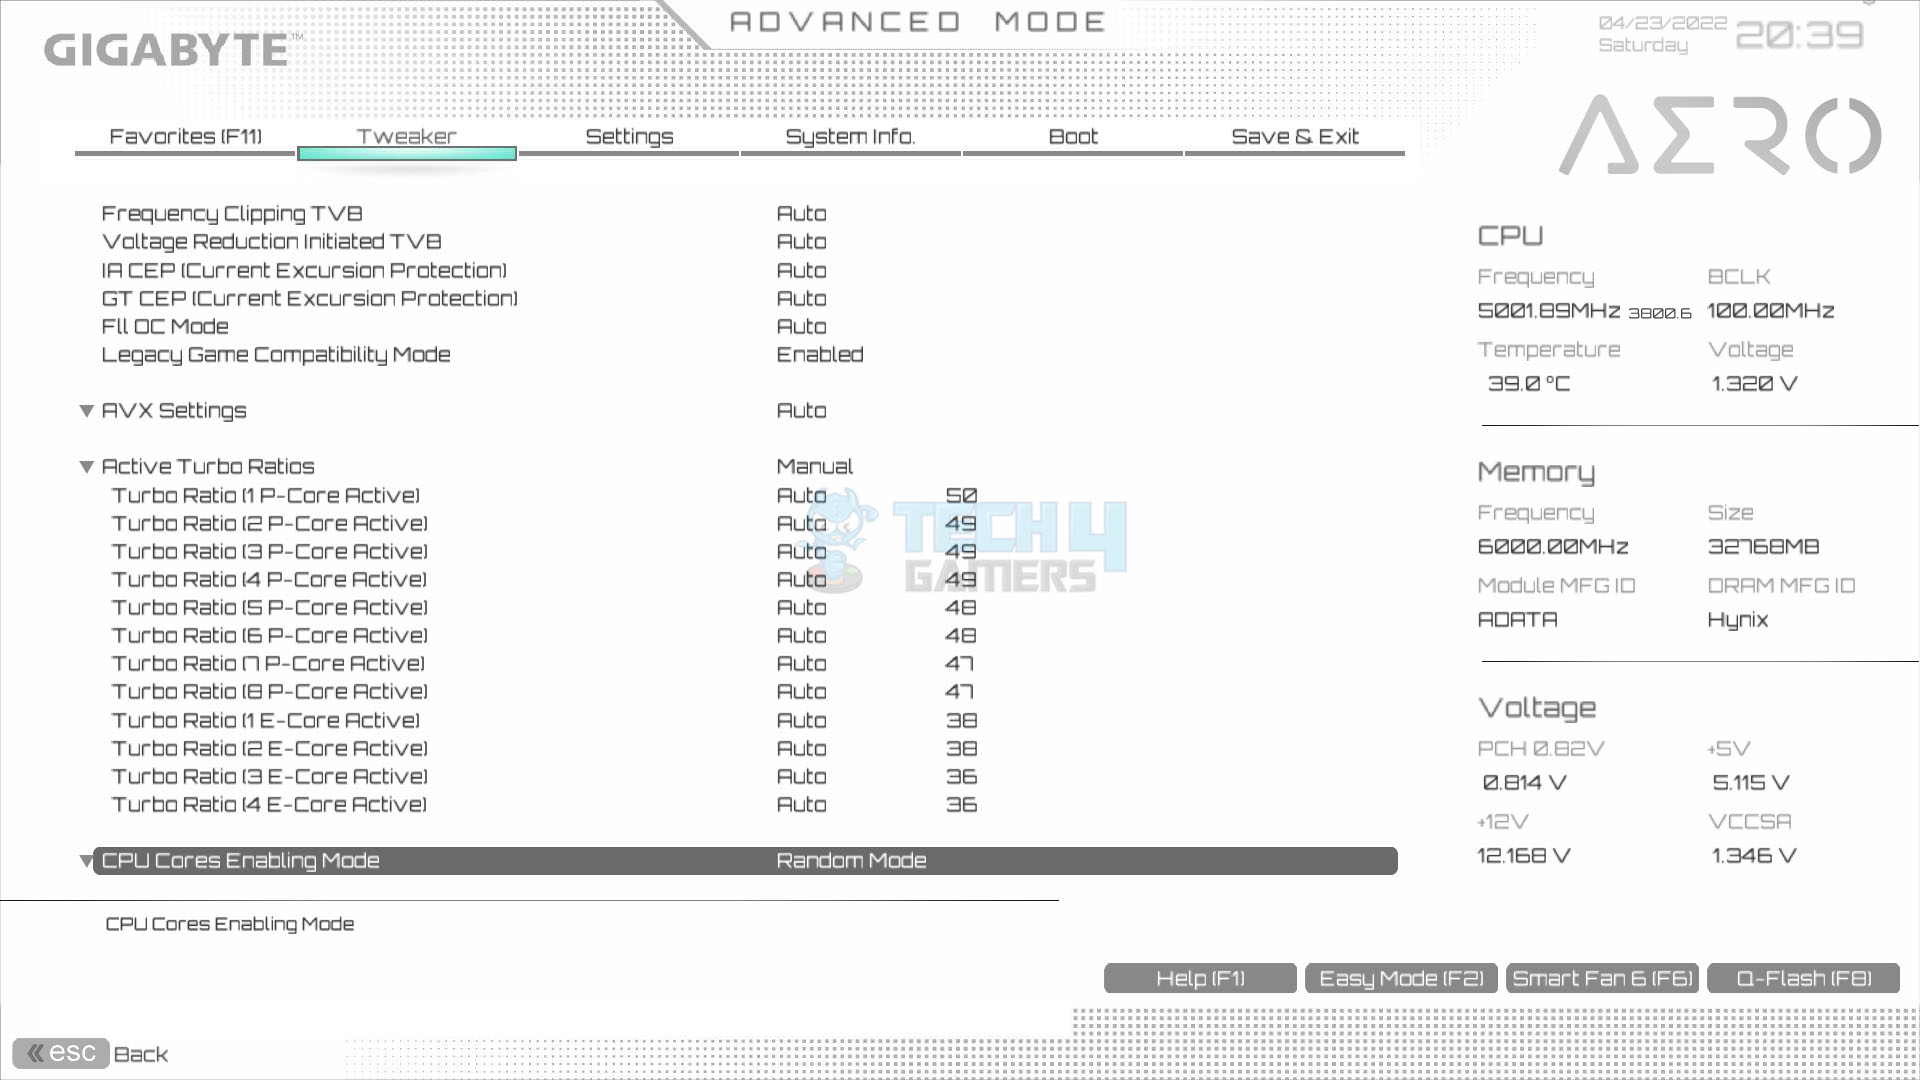
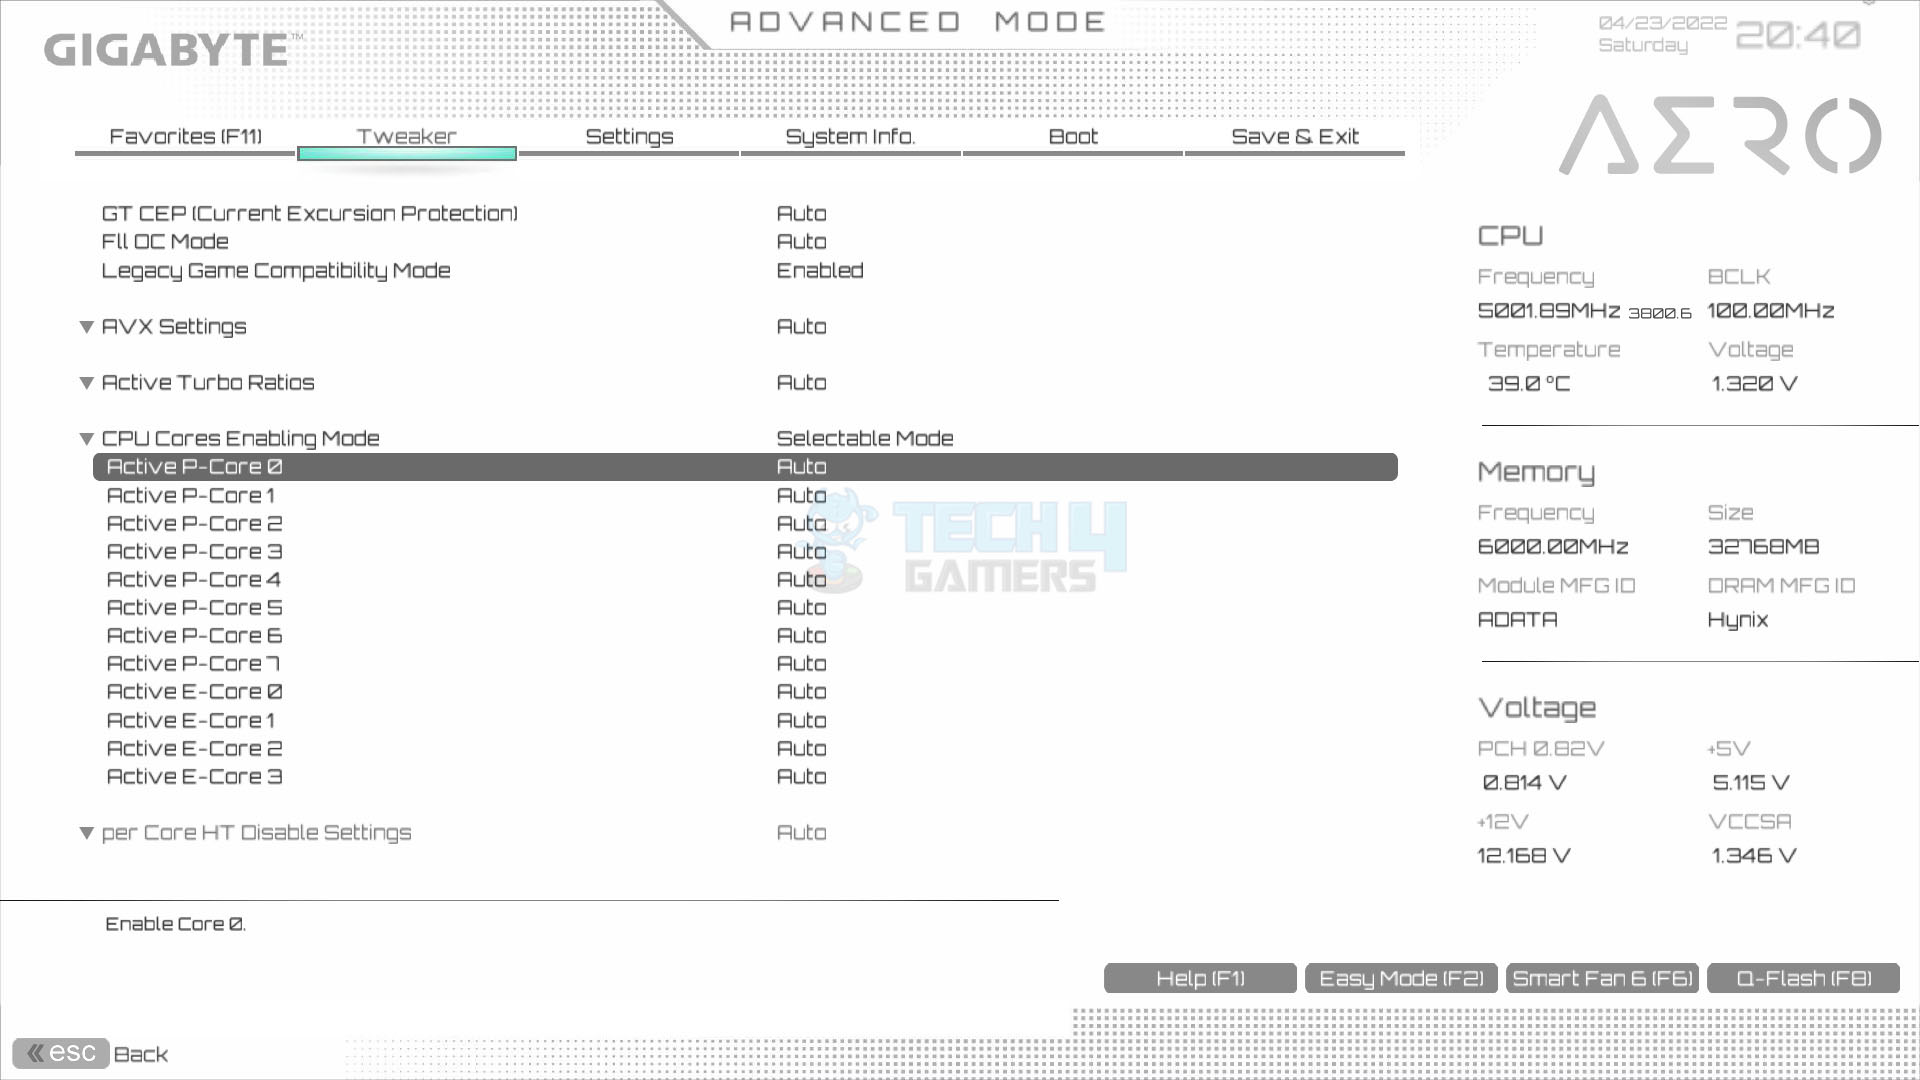
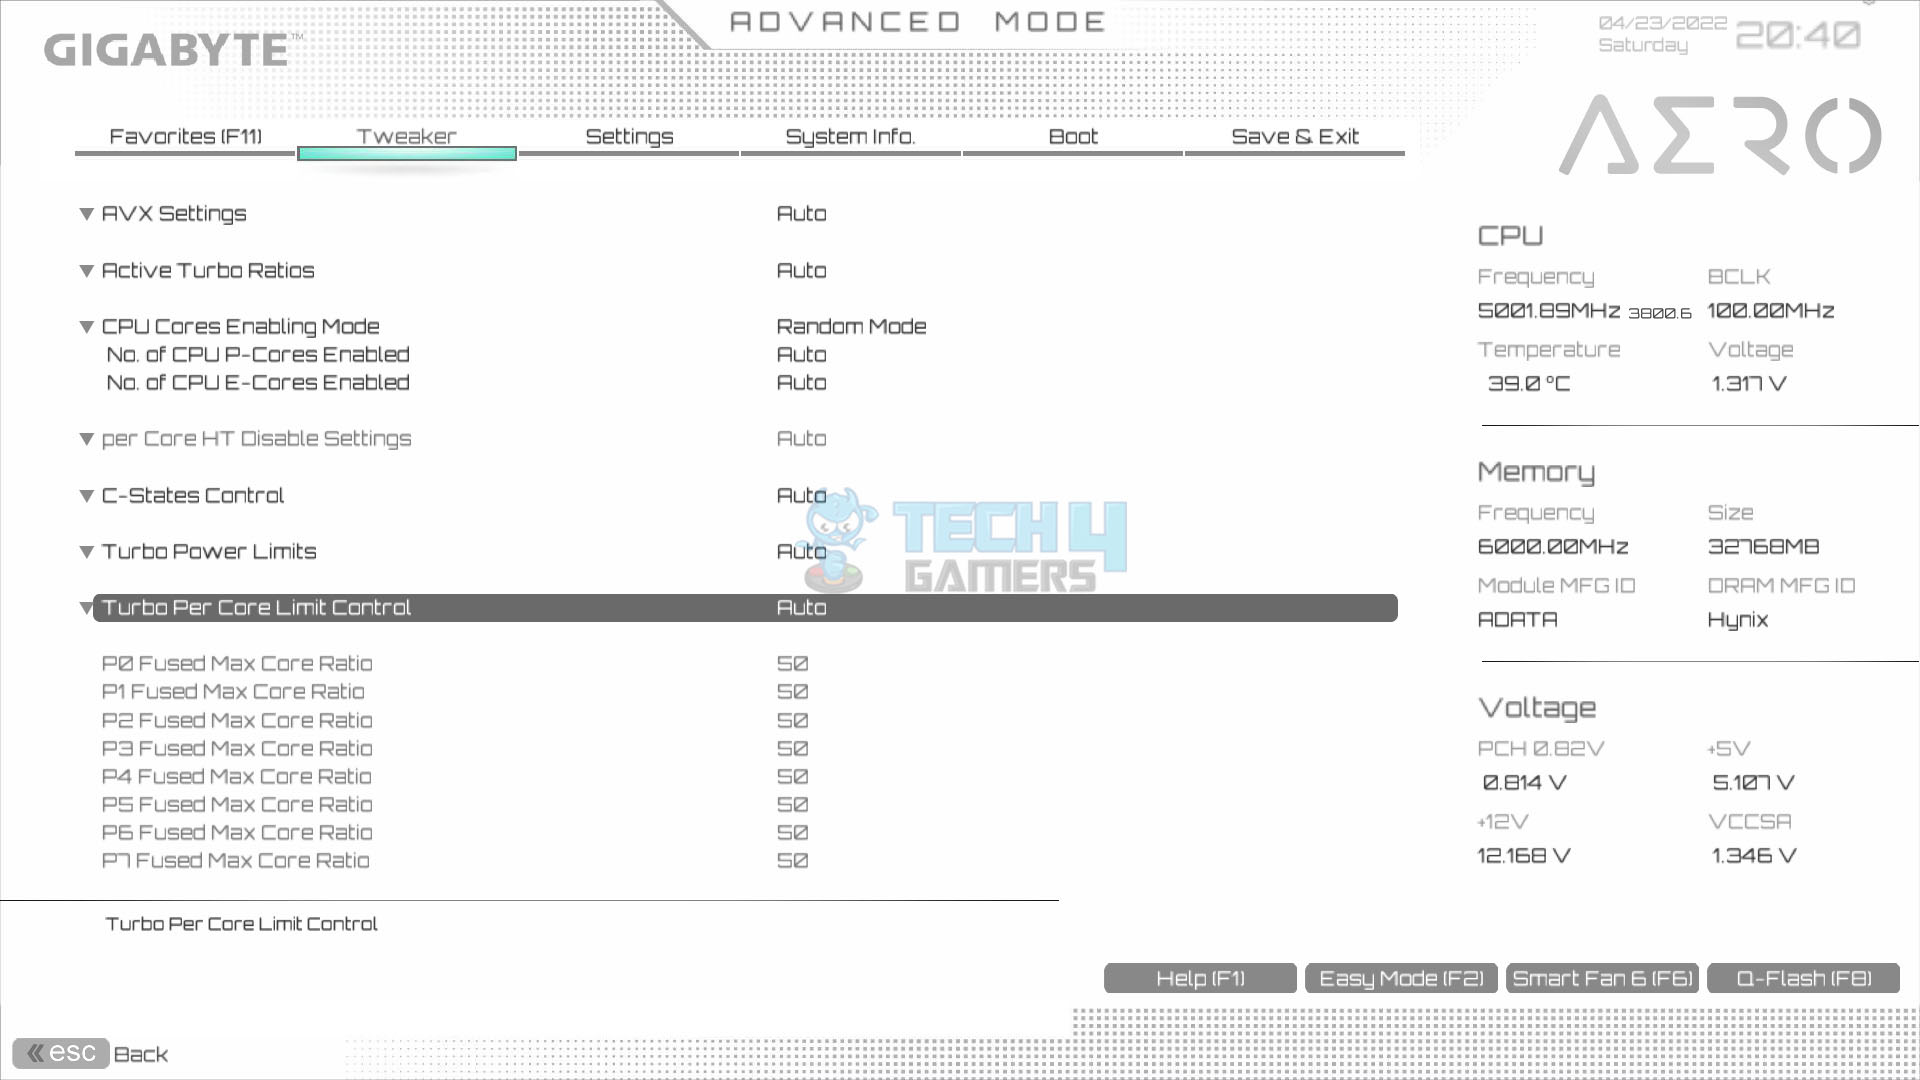
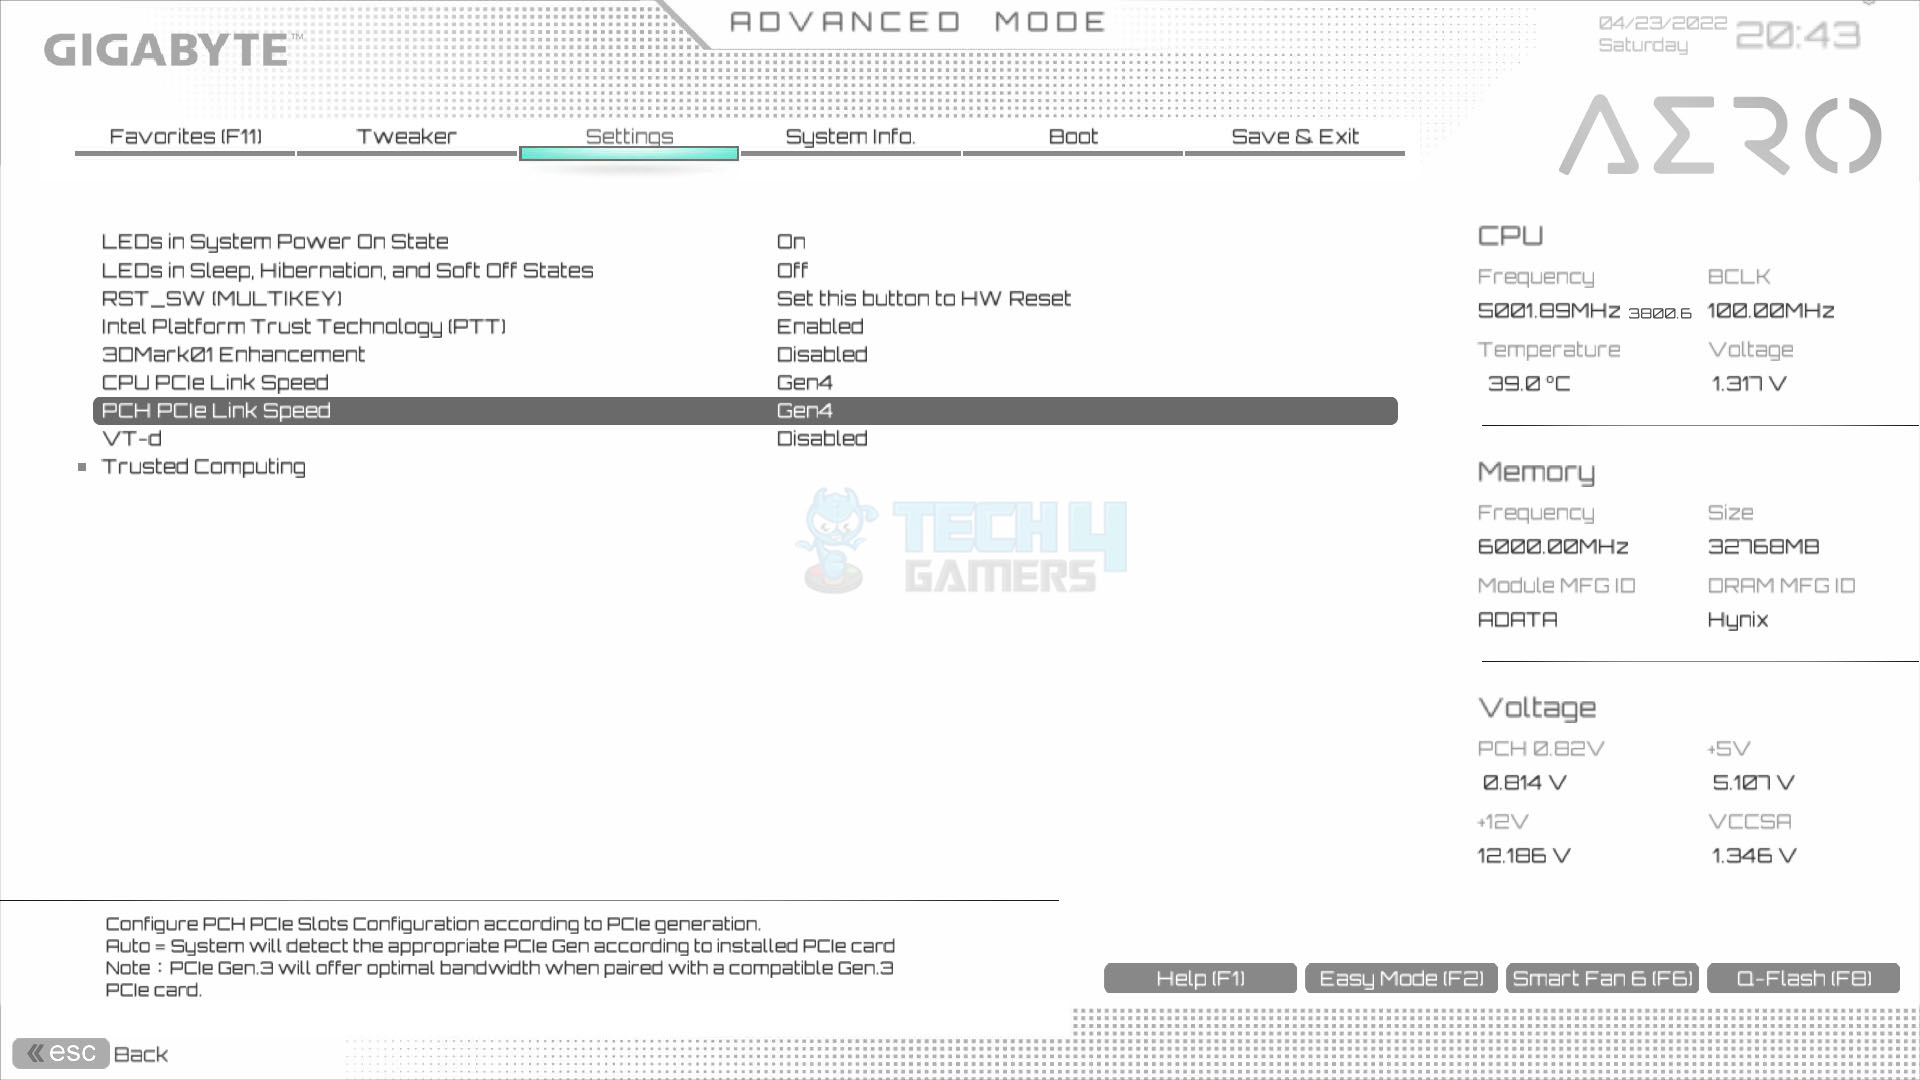
The BIOS setup on GIGABYTE Z690 AERO G is similar to Z490 VISION G. It has Easy and Advanced Modes. Smart Fan 6 allows control over fans. You can set fan type, curve, and alarms based on temperature. In Advanced Mode, Tweaker covers CPU and DRAM settings like frequency, voltage, and memory. You can manually set timings and advanced DDR5 kit settings. Advanced CPU Core Settings provide options for Speed Shift, Turbo Boost, and more. Menu options include channel link speed and TPM connector settings.


Software
GIGABYTE has provided tons of applications that the user can download from their website to be used for this motherboard. Their App Center is the basic application which is a must installed for all other applications to work except for the RGB Fusion 2. Here is a list of some of the applications:
- @BIOS
- cFosSpeed
- System Information Viewer (SIV)
- Easy Tune
- Fast Boot
Testing
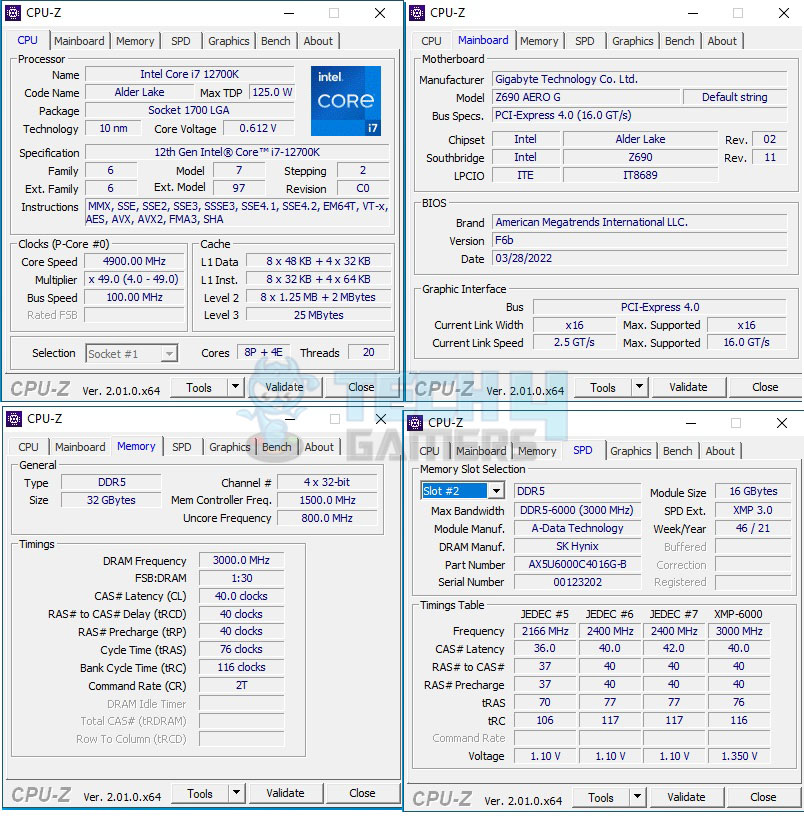
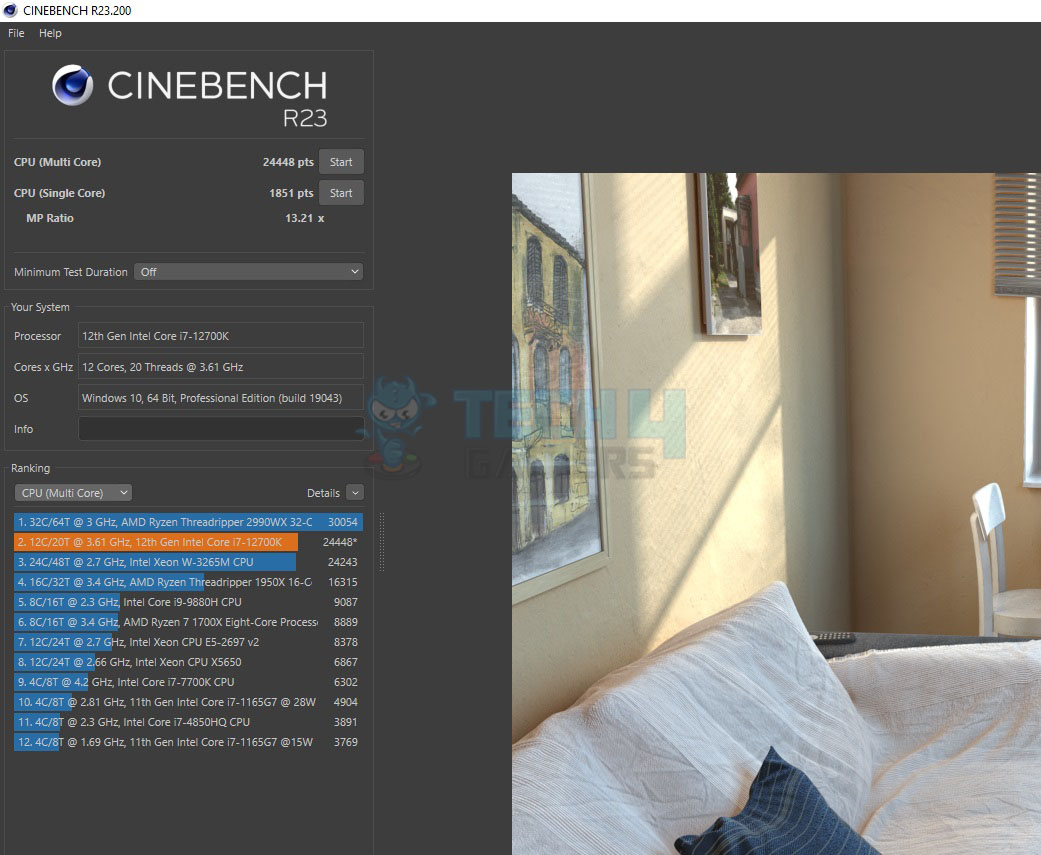
The following test bench setup is used to test the performance of the motherboard:
- Intel i7-12700k
- ARCTIC Liquid Freezer – II 420
- XPG Lancer RGB 6000 32GB DDR5
- GIGABYTE GeForce RTX 3070 VISION OC 8G
- be quiet! Straight Power 11 850W Platinum
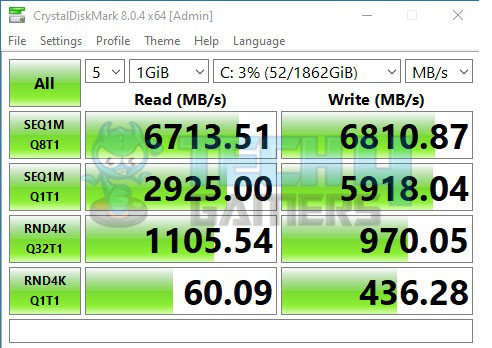
- Sabrent Rocket 4 Plus 2TB PCIe 4 NVMe SSD
- Samsung 840 EVO 1 TB SSD for the Games
- Thermaltake Core P6 TG Snow Edition in an open-frame layout
Microsoft Windows 10 x64 Pro was used for all the testing. Nvidia 512.15 drivers were used for graphics card testing.
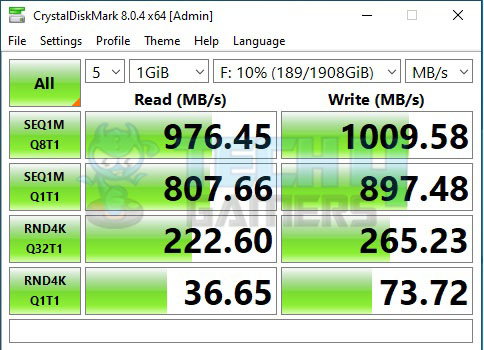
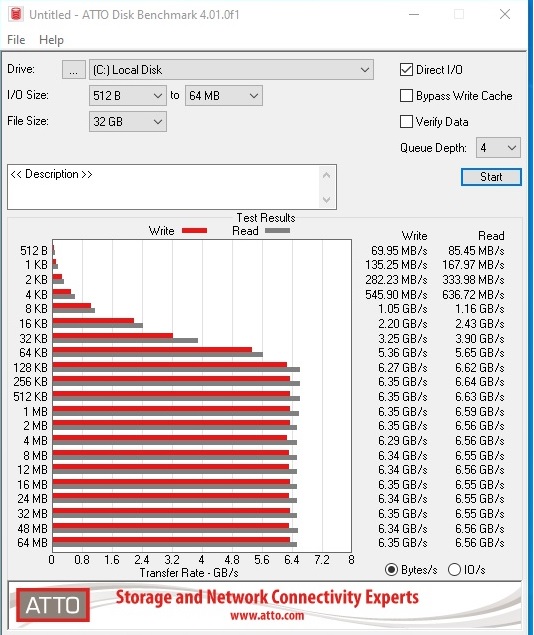
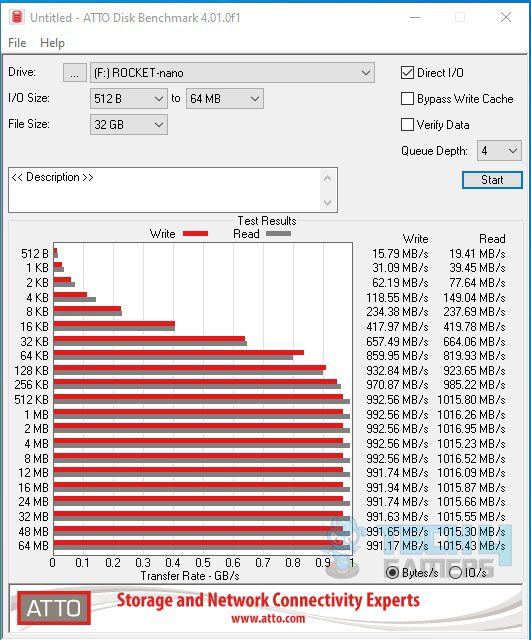
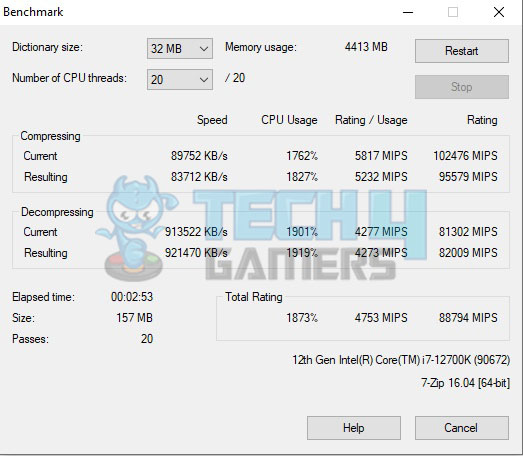
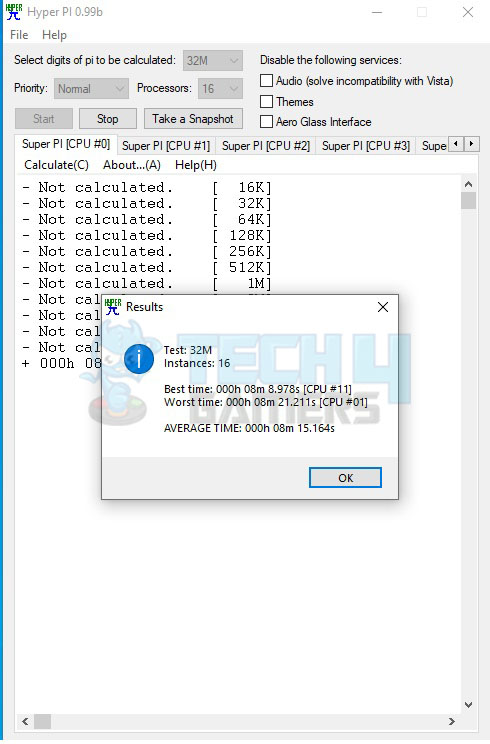
Storage Drive Tests
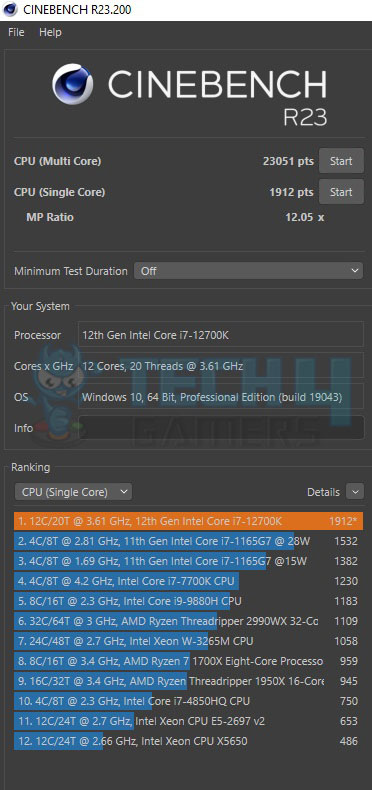
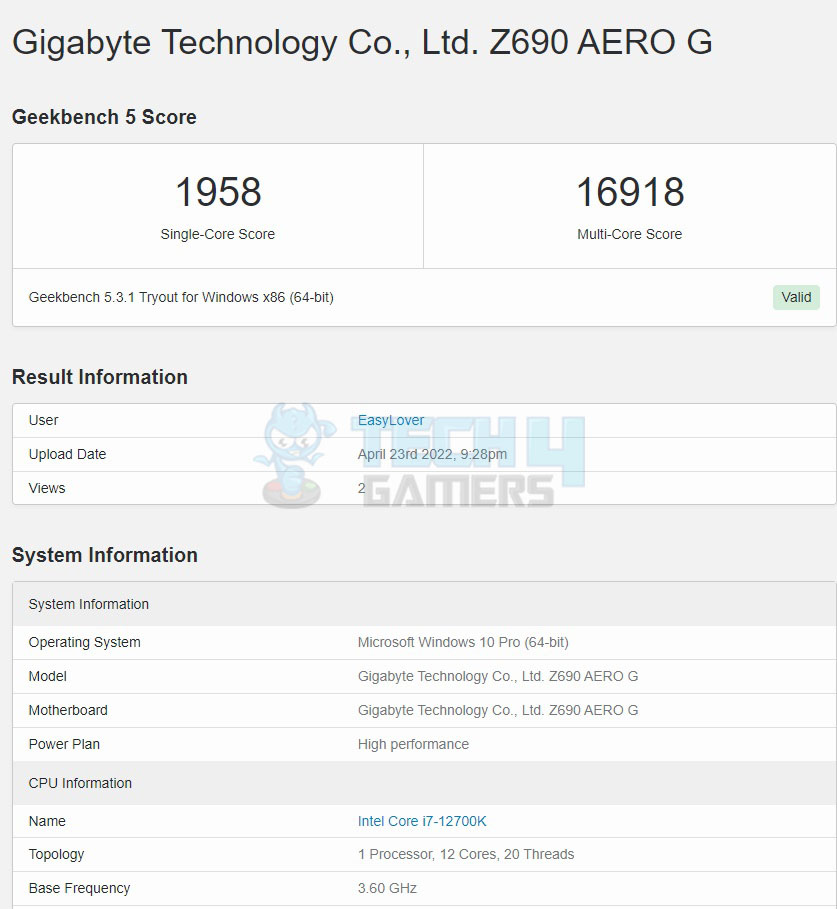
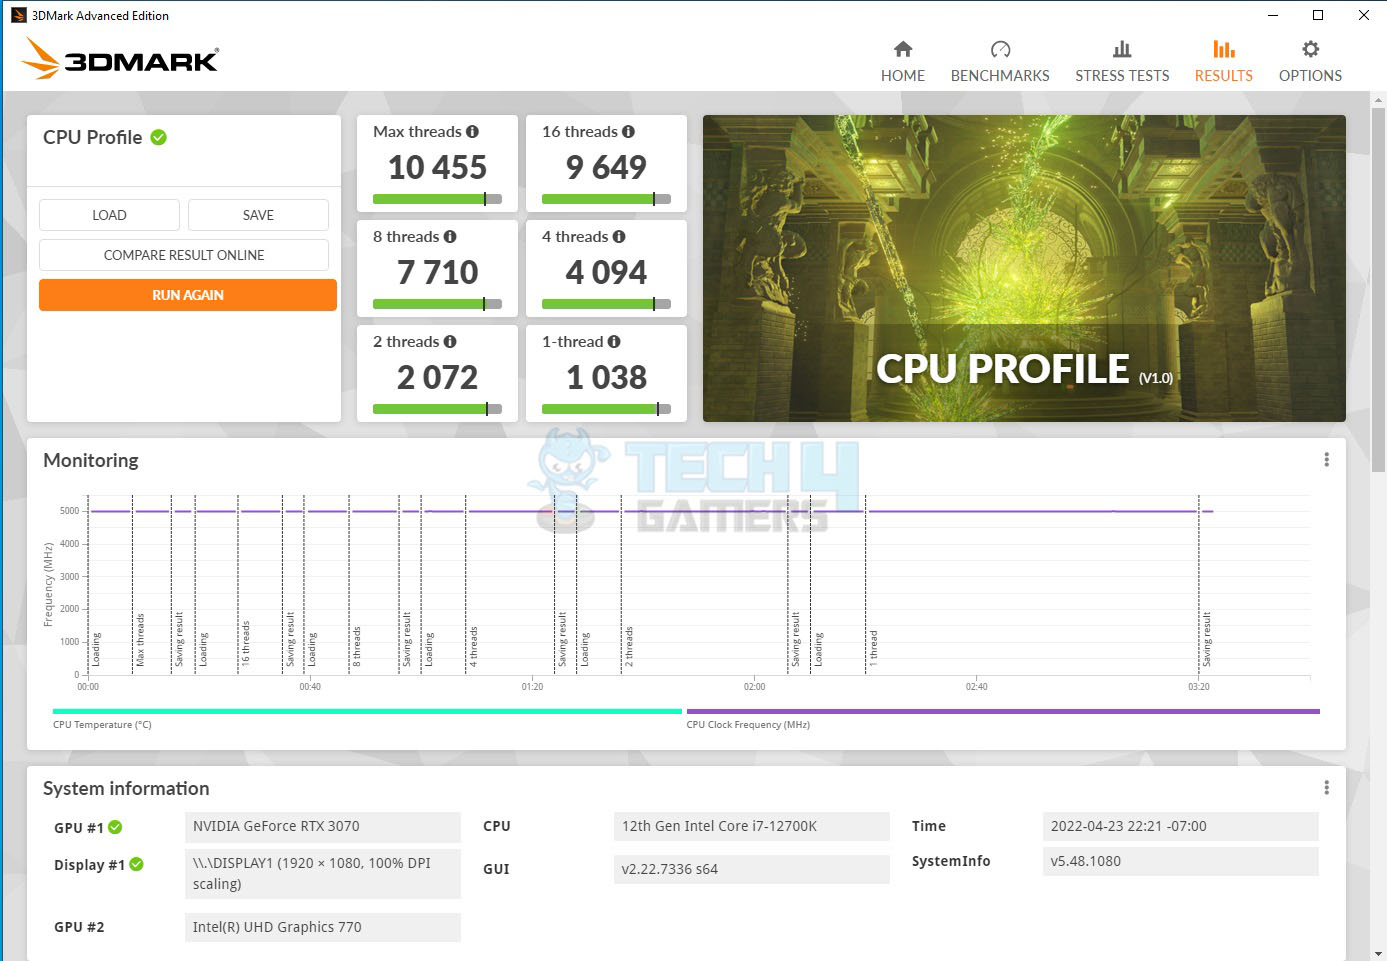
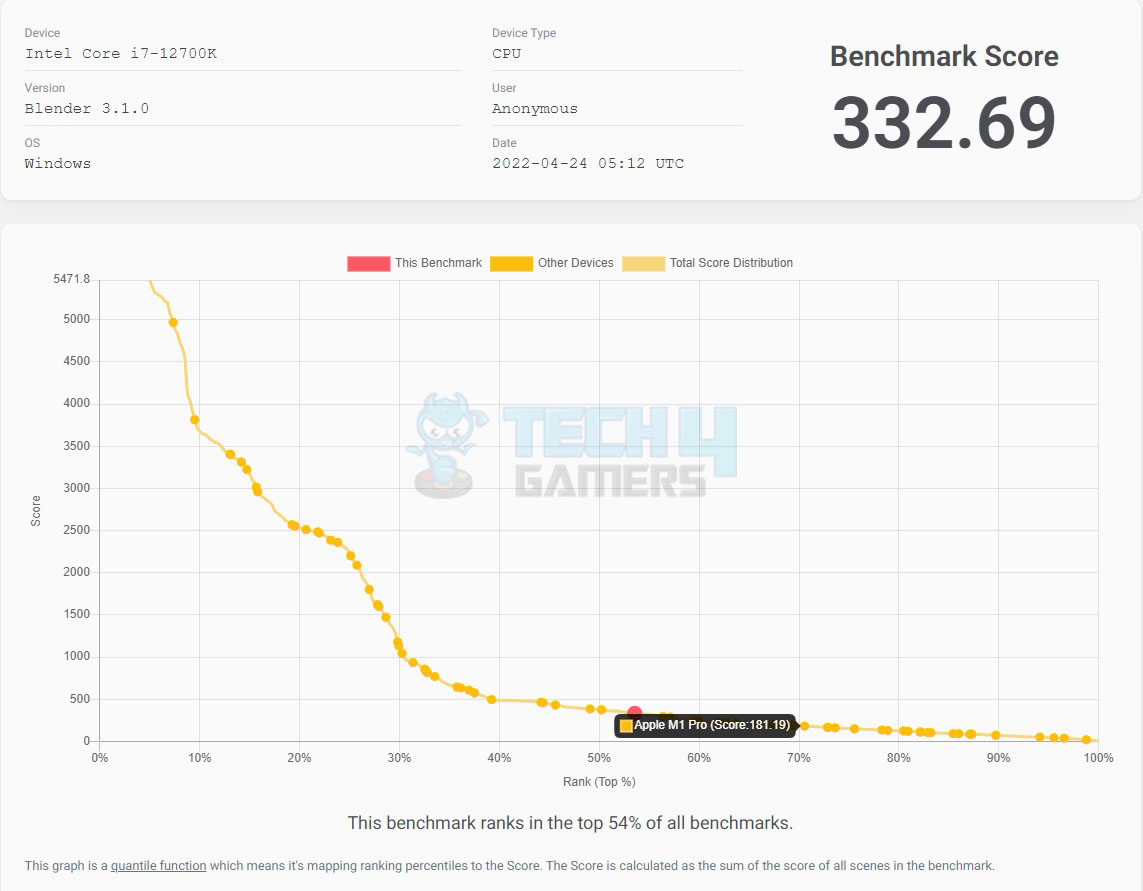
CPU Tests
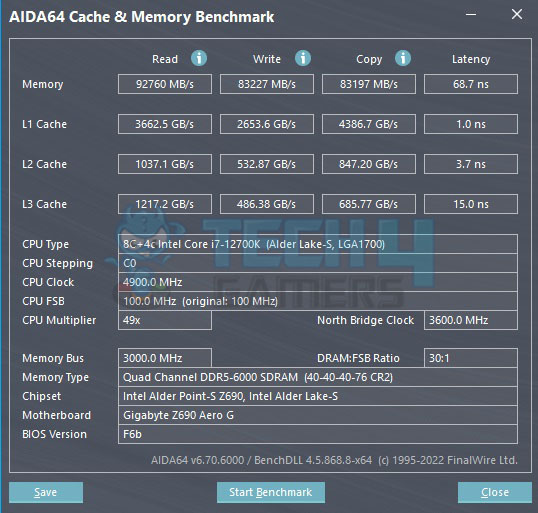
Memory Tests
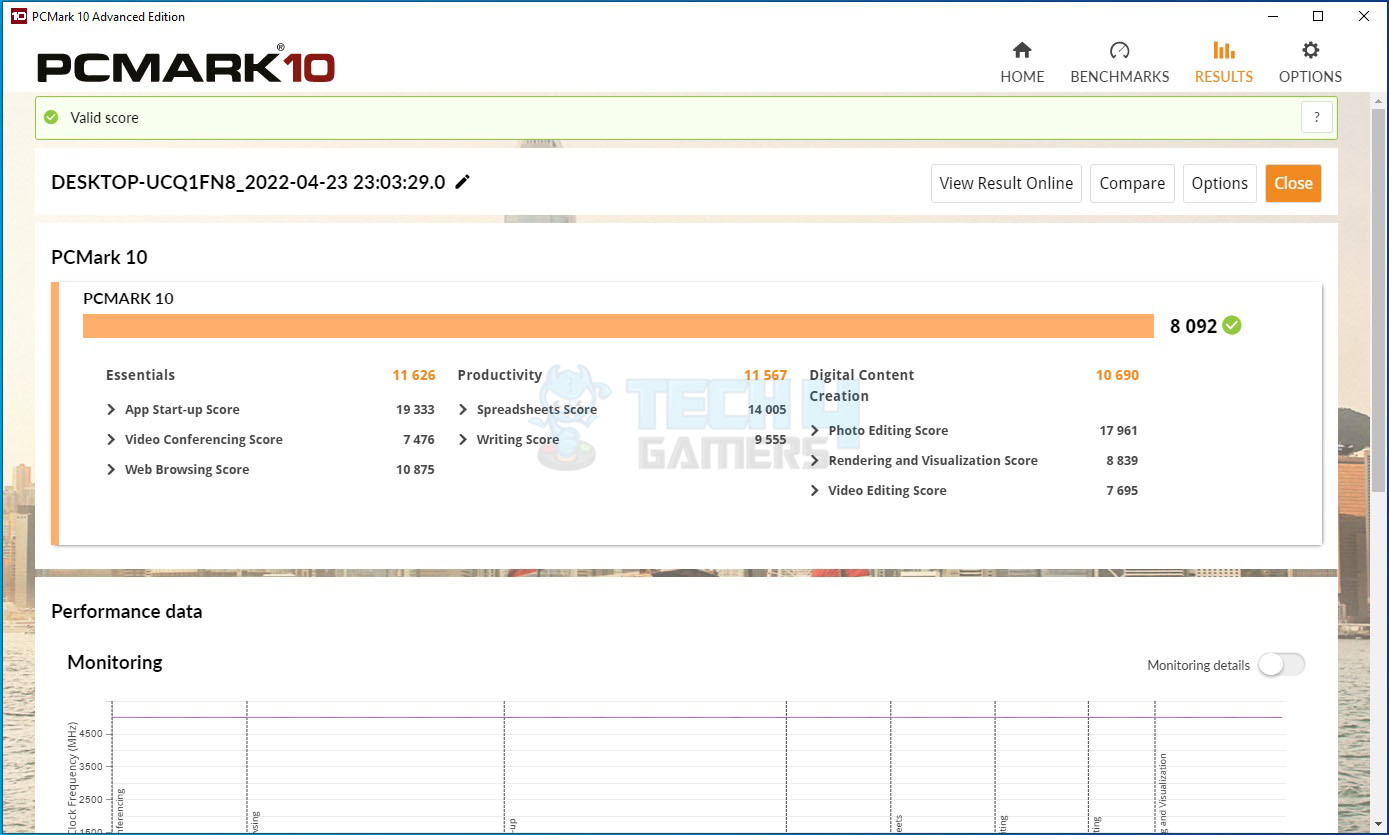
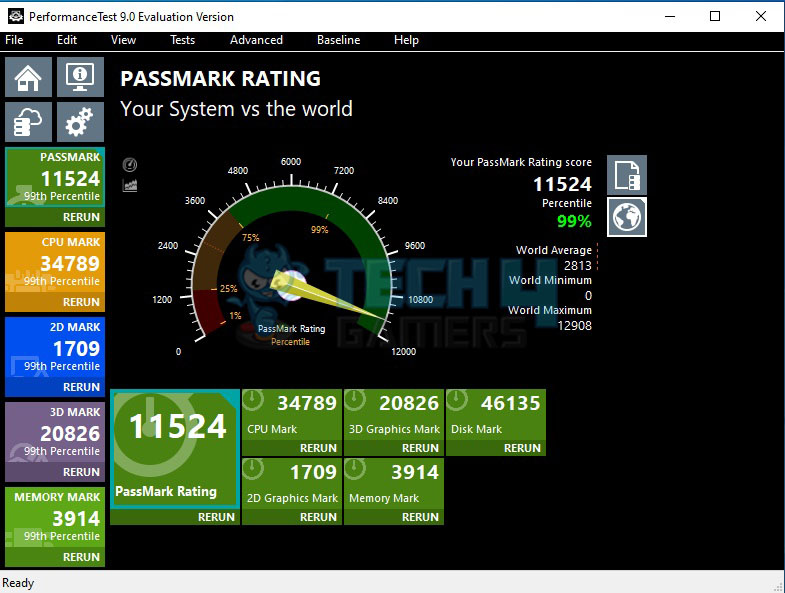
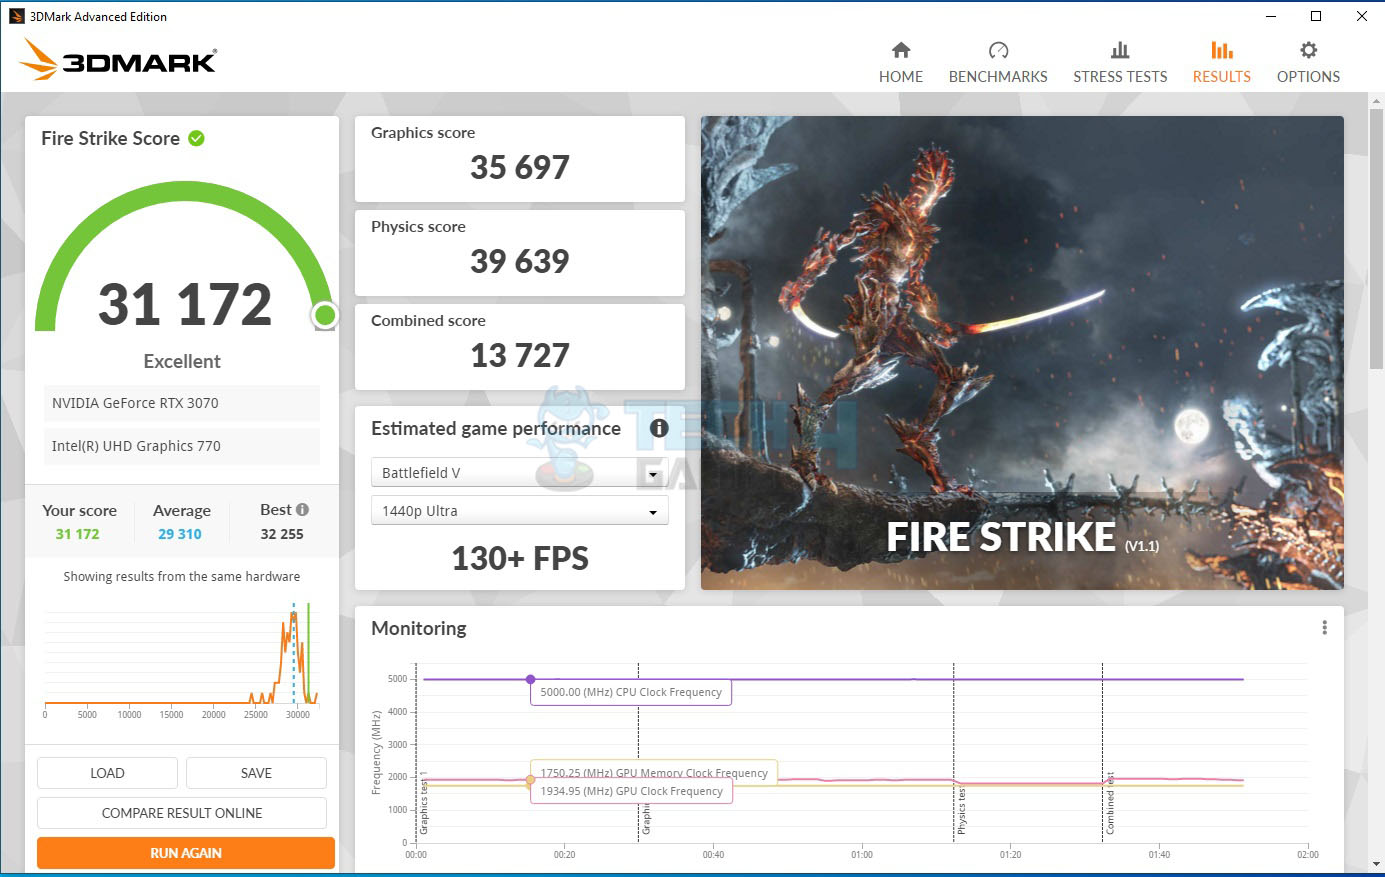
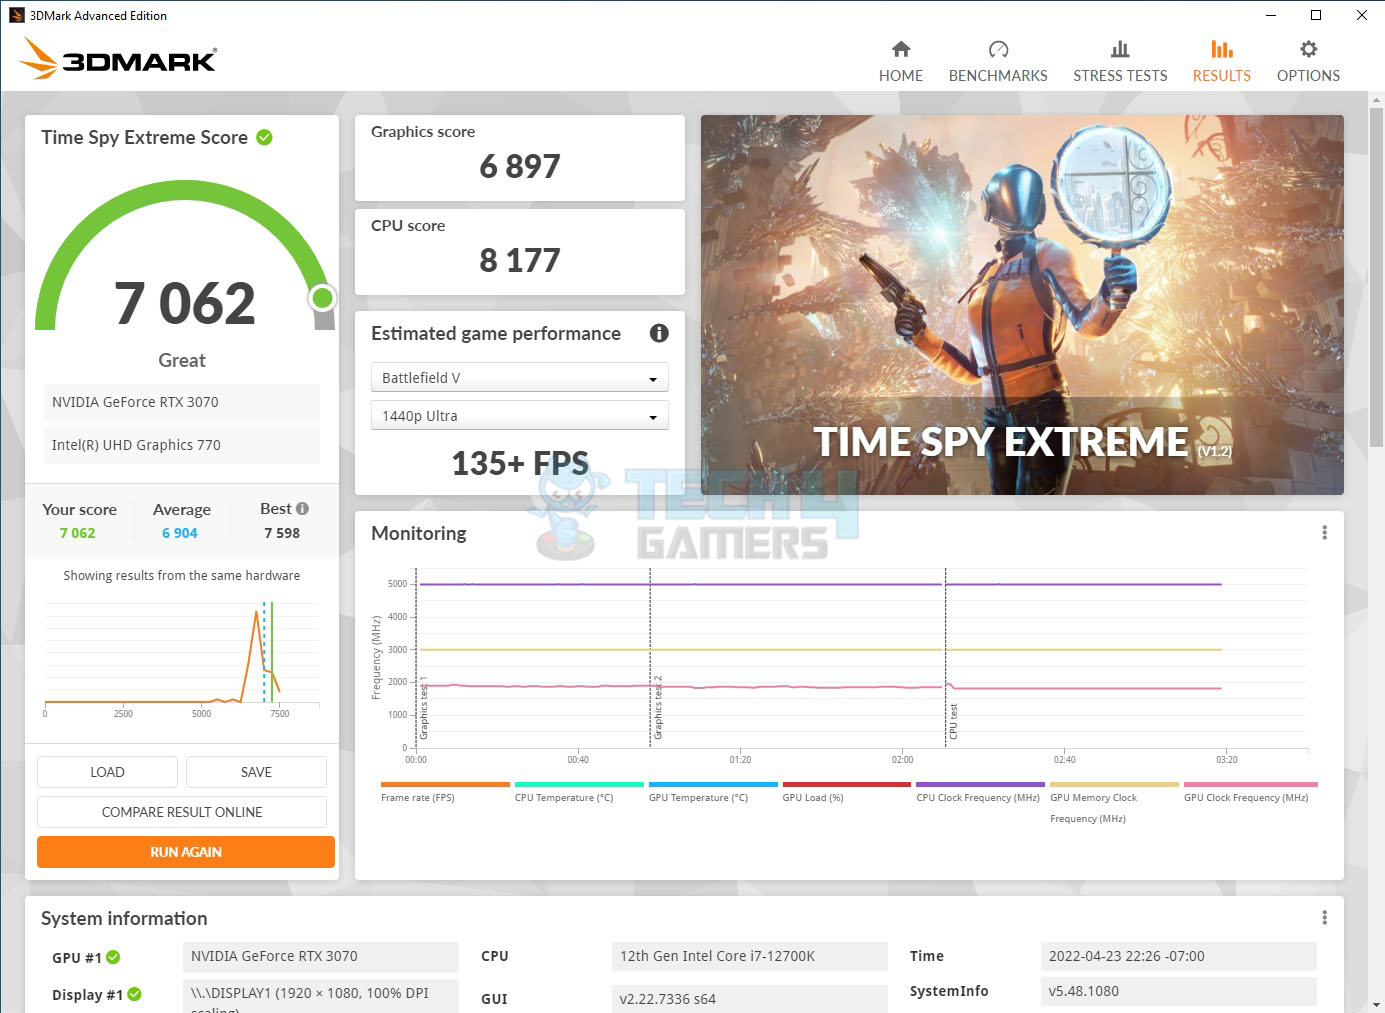
Overall System Tests
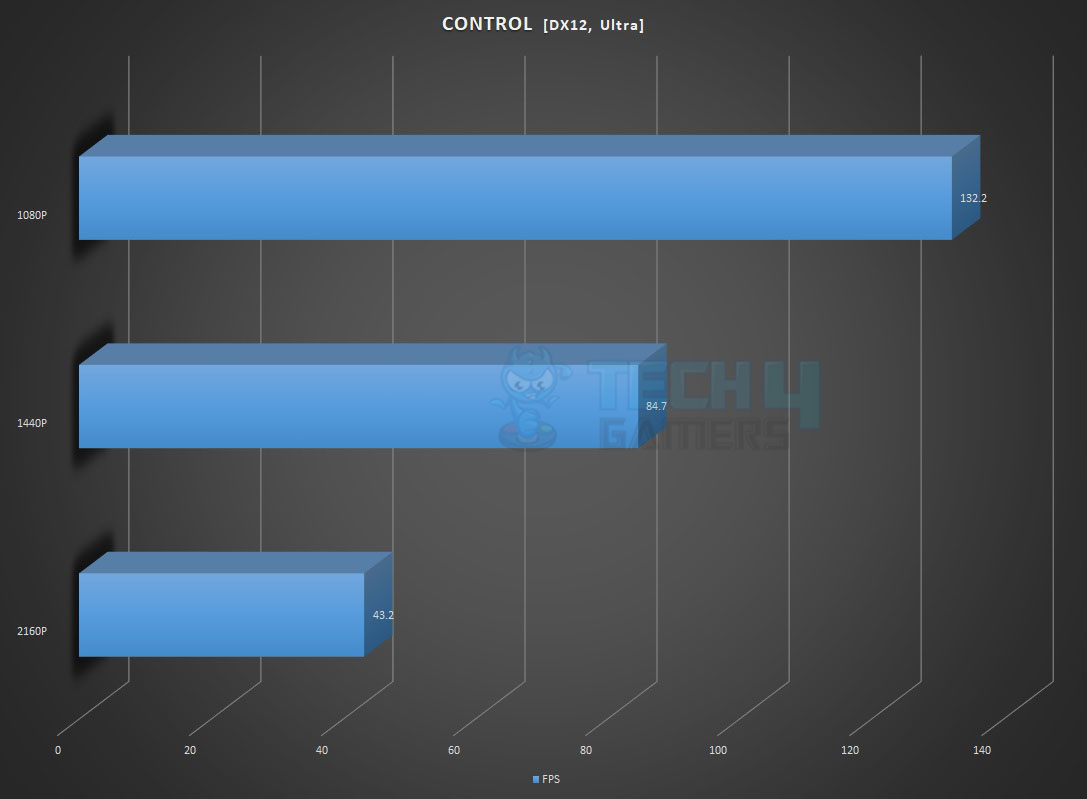
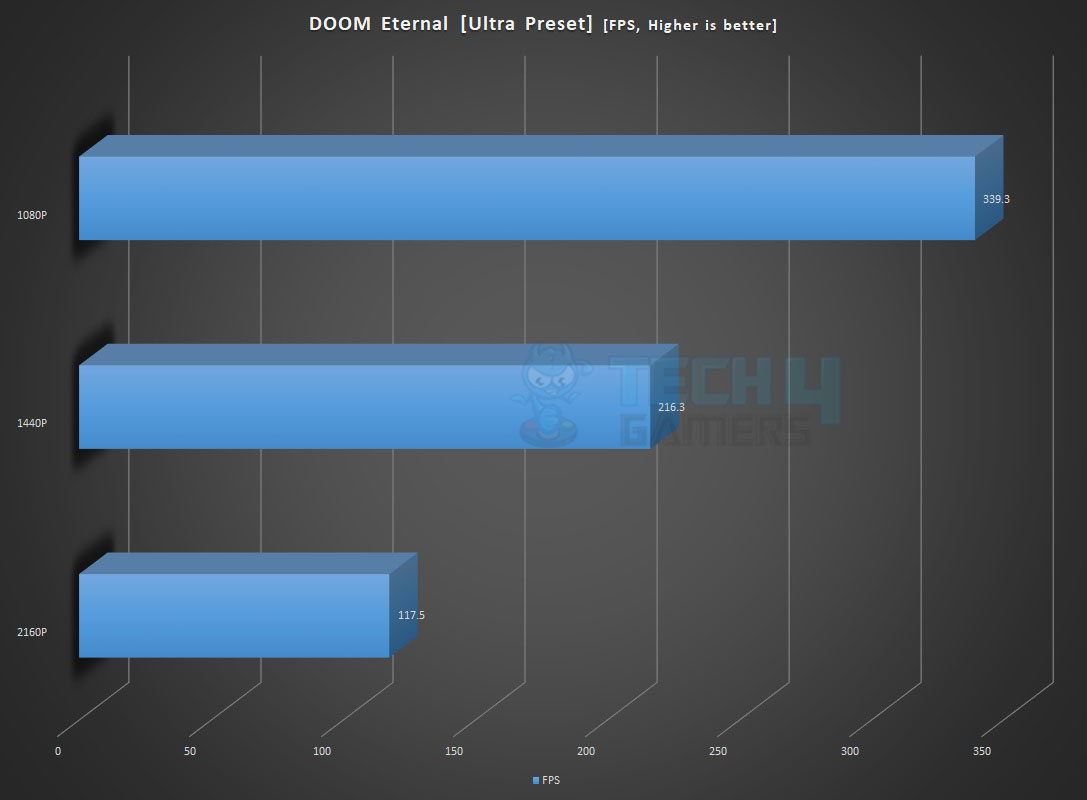
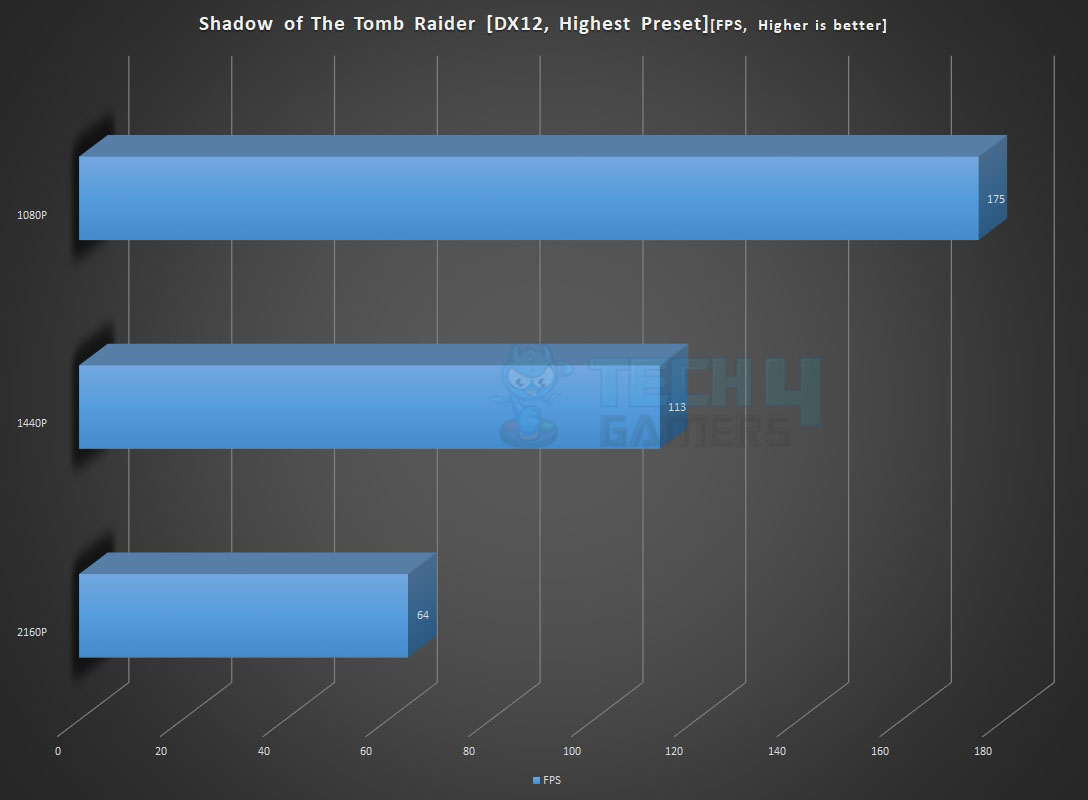
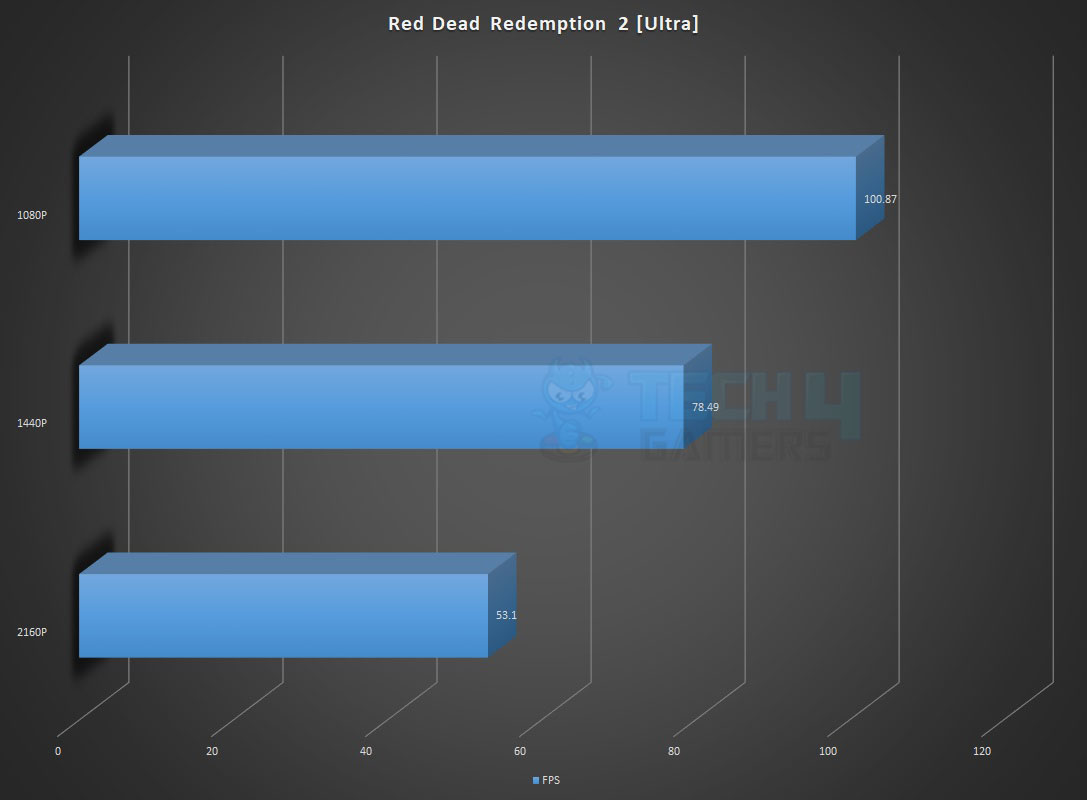
Gaming Benchmarks
The following games have been tested using their maximum graphics quality presets/settings.

Power Consumption and Thermals
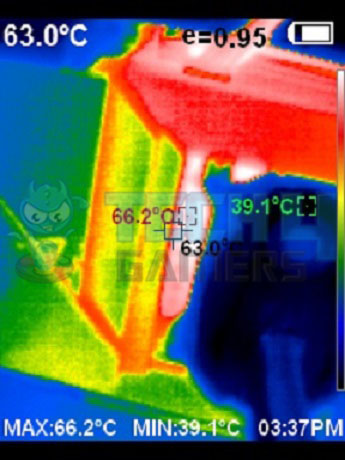
We tested the computer by changing some settings and running a CPU test for 20 minutes. On default settings, the temperature was 70°C, power draw was 178W. Without limits, the temperature reached 100°C, power draw was 252.3W. We used a thermal camera to check the VRM area temperature. The MOSFETs were operating at around 66.2°C at an ambient of 30°C. The VRM cooling is on the point of the GIGABYTE Z690 AERO G motherboard.
Should You Buy It?
Upon careful review and analysis of the GIGABYTE Z690 AERO G Motherboard, my assessment says that:
Buy It If
✅ You’re a Content Creator: If you’re a content creator engaged in heavy design workloads, the GIGABYTE Z690 AERO G motherboard offers a feature-rich and mid-range solution tailored to meet the demands of your creative endeavours.
✅ You Want Good Value: It comes equipped with features such as VISION Link, DDR5 support, PCIe 5.0, and an advanced thermal design, providing excellent value for your investment.
✅ You Appreciate Sleek Aesthetics: The motherboard’s sleek Silver and Black design, complemented by stylish accents, make it an appealing choice for those who prioritize aesthetics in their high-performance builds.
Don’t Buy It If
❌ You Prioritize Integrated RGB Lighting: If integrated RGB lighting is a priority for you, the AERO series might not be the best fit, as this motherboard does not include this feature.
❌ You Want Overclocking: Overclockers may face potential challenges with voltage optimization during overclocking. If overclocking is a primary focus, other motherboards may offer more suitable options.
❌ You Require Diverse Network Connectivity Options: If you specifically require a 10GbE port for high-speed network connectivity, the GIGABYTE Z690 AERO G motherboard may not meet your needs, as it only implements a 2.5GbE port. Consider other options with the desired network capabilities.
Final Words
GIGABYTE has rebranded the VISION series products as AERO under the Alder Lake platform, presenting a fresh approach for creators with optimized features for content creation. The Z690 AERO G is a feature-rich mid-range motherboard designed for professionals, utilizing an Intel LGA1700 socket with a Z690 chipset and featuring a 16+1+2 digital power phase design. While the power delivery is considered mediocre, the motherboard impressively handles heavy workloads such as 3D rendering and video production.
The motherboard supports up to 128GB DDR4 memory in a dual-channel configuration with a maximum transfer rate of 6000MHz (OC). It also provides 4 NVMe ports with thermal covers for effective heat transfer. Despite lacking integrated RGB/A-RGB LEDs, the motherboard offers 2x 5V lighting headers and 2x 12V lighting headers.
Connectivity features include 17 USB ports, Intel 2.5 GbE NIC, and a 2×2 WiFi 6 201AX solution with an antenna. The audio section utilizes Chemicon capacitors to drive the Realtek ALC4080, though there are only two audio ports on the rear IO. The motherboard’s thermal performance is commendable, with effective VRM cooling and a maximum MOSFET temperature of 66.2°C under an AVX load.
During testing with an Intel i7 12700k, DDR5 RAM, GIGABYTE GeForce RTX 3070 VISION OC, and Sabrent Rocket 4 Plus 2TB PCIe 4.0 NVMe SSD, the platform performed well. However, a caveat was noted during overclocking using Override mode, where the motherboard pushed excessive voltage, leading to instability and thermal throttling. This aspect requires optimization for better overclocking experiences.
In summary, the GIGABYTE Z690 AERO G provides satisfactory overall performance for content creators, offering a balanced set of features at a mid-range level.
Awards Won By The GIGABYTE Z690 AERO G Motherboard
Here are some of the Tech4Gamers Awards the Gigabyte Z690 Aero G has received.
Recent Updates
- March 5, 2024: A few text changes to improve readability. Also added image galleries.
Thank you! Please share your positive feedback. 🔋
How could we improve this post? Please Help us. 😔
Feedback By:
[Hardware Reviewer & Editor]
Meet Nauman Siddique, a highly experienced computer science graduate with more than 15 years of knowledge in technology. Nauman is an expert in the field known for his deep understanding of computer hardware.
As a tech tester, insightful reviewer, and skilled hardware editor, Nauman carefully breaks down important parts like motherboards, graphics cards, processors, PC cases, CPU coolers, and more.
- 15+ years of PC Building Experience
- 10+ years of first-hand knowledge of technology
- 7+ years of doing in-depth testing of PC Hardware
- A motivated individual with a keen interest in tech testing from multiple angles.
- I majored in Computer Science with a Masters in Marketing
- Previously worked at eXputer, EnosTech, and Appuals.
- Completed Course in Computer Systems Specialization From Illinois Tech
Get In Touch: nauman@tech4gamers.com


