 Threads

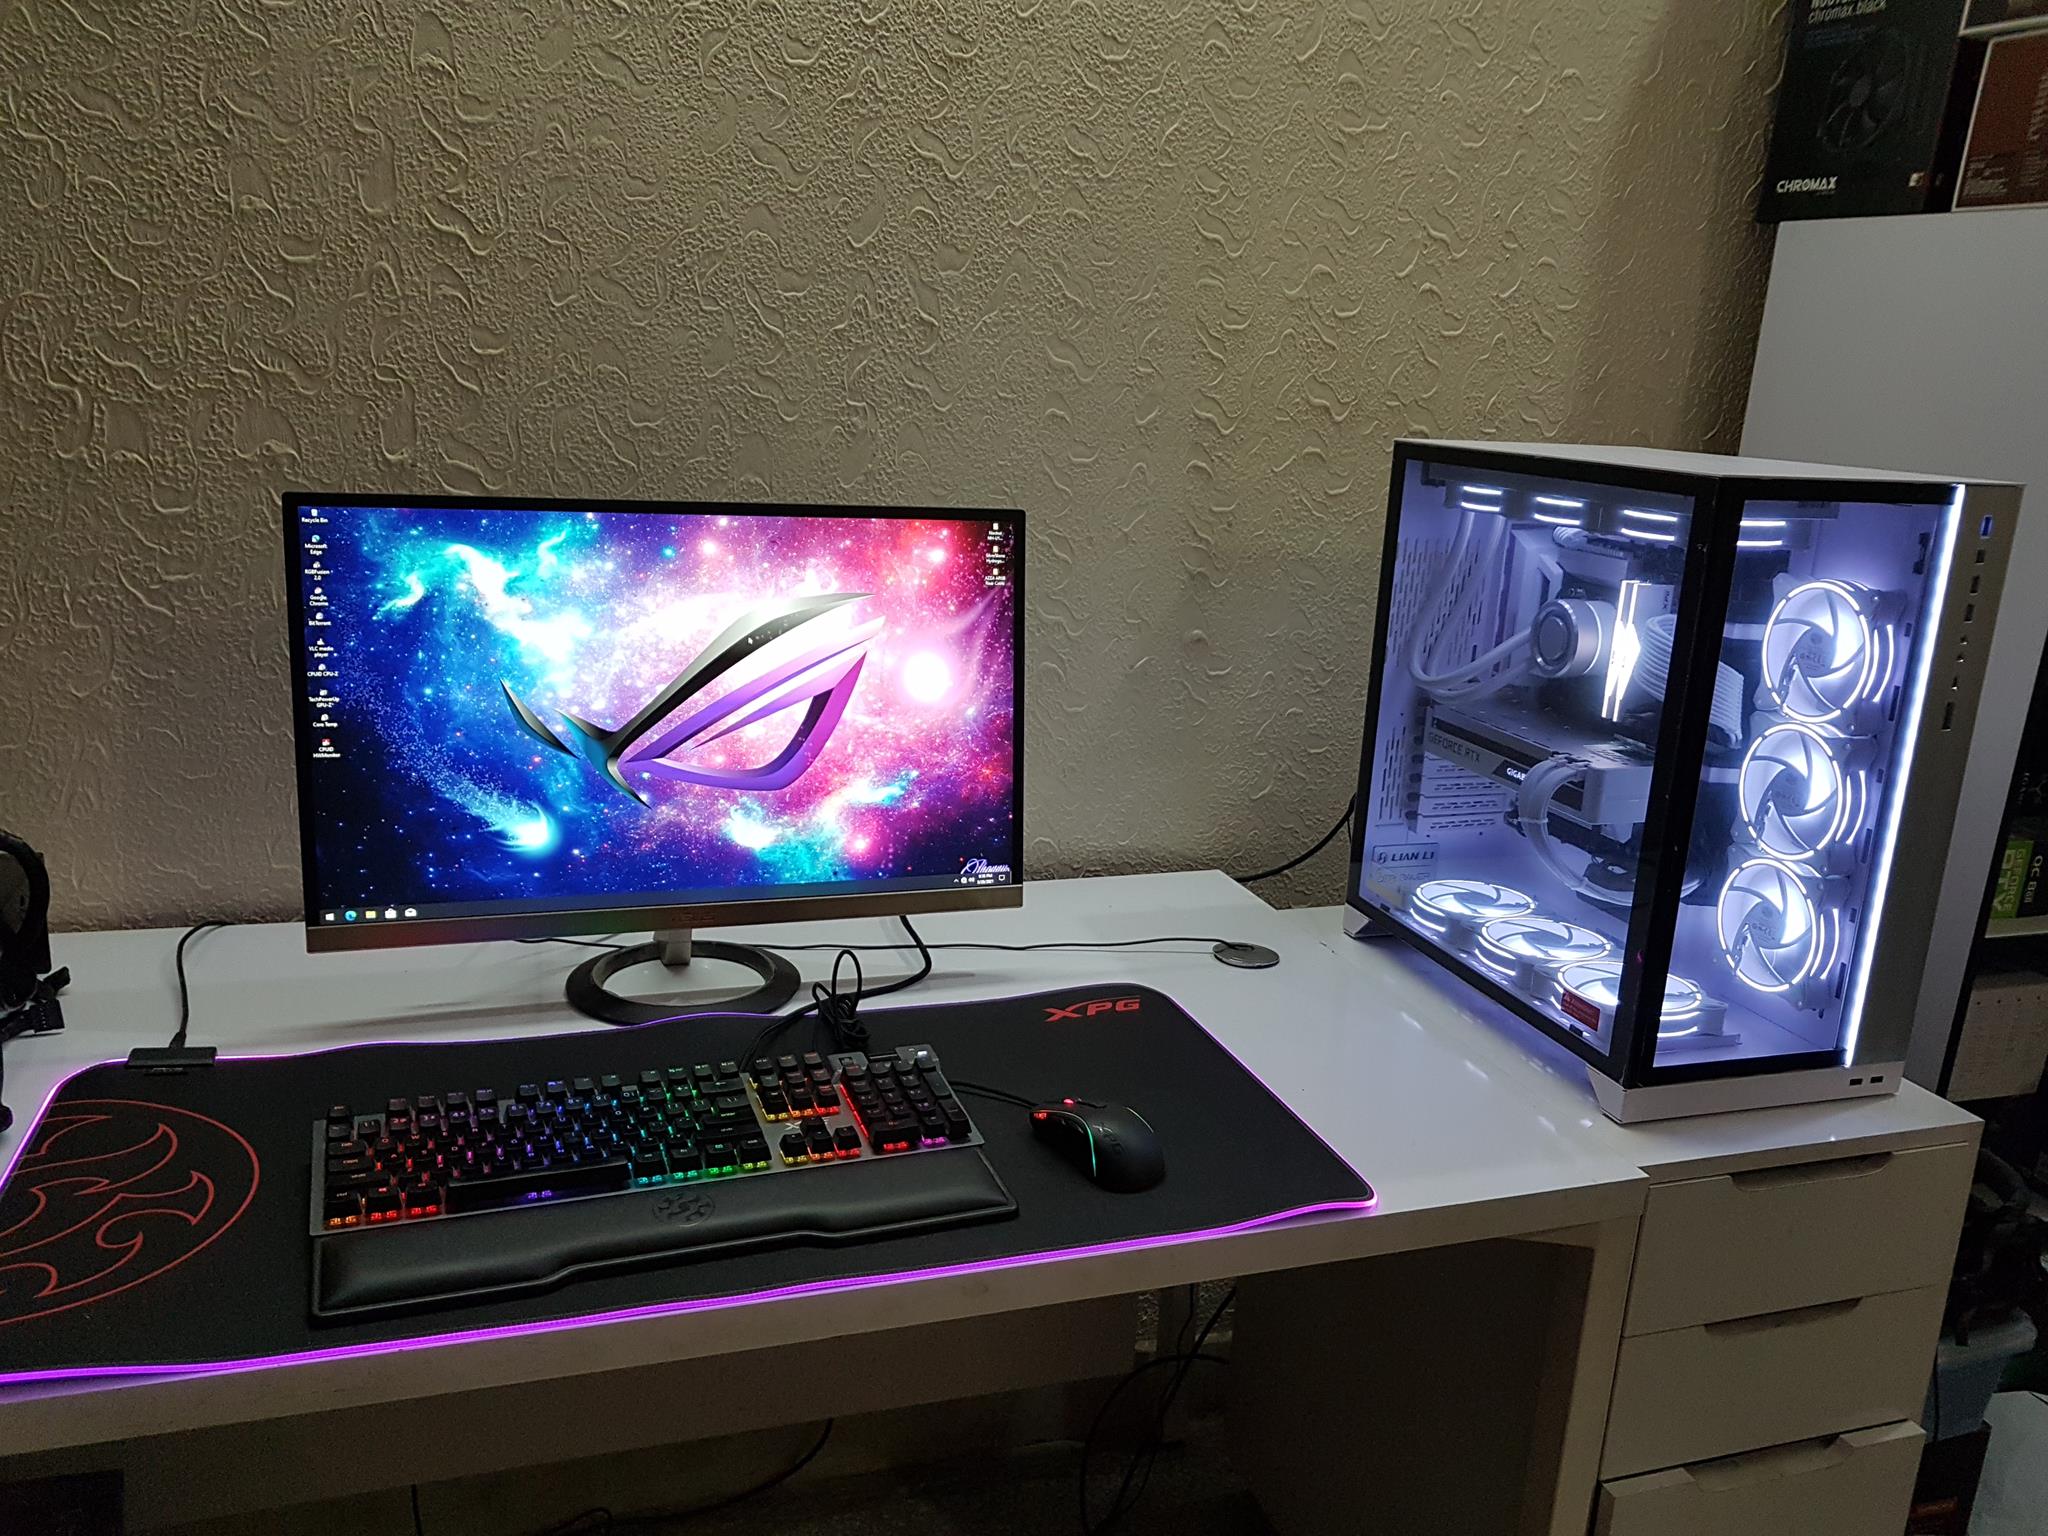
If you are planning to build a white-themed gaming PC for yourself, then you are in luck because today, we are sharing our experience of building a white gaming PC.
For any themed build, the most important factor is obviously color coordination and matching the components fitting the colored theme at its best. The white build is not an easy undertaking, given there are a few white-themed motherboards from reputable manufacturers, and those that are available don’t have white PCB. Only Colorful is making full white PCB motherboards.
Nevertheless, here is the complete list of the components we chose:

How To Build A White Gaming PC
First, let’s go over the components we have selected to build our white gaming PC.
Also Read: How to Build a Gaming PC
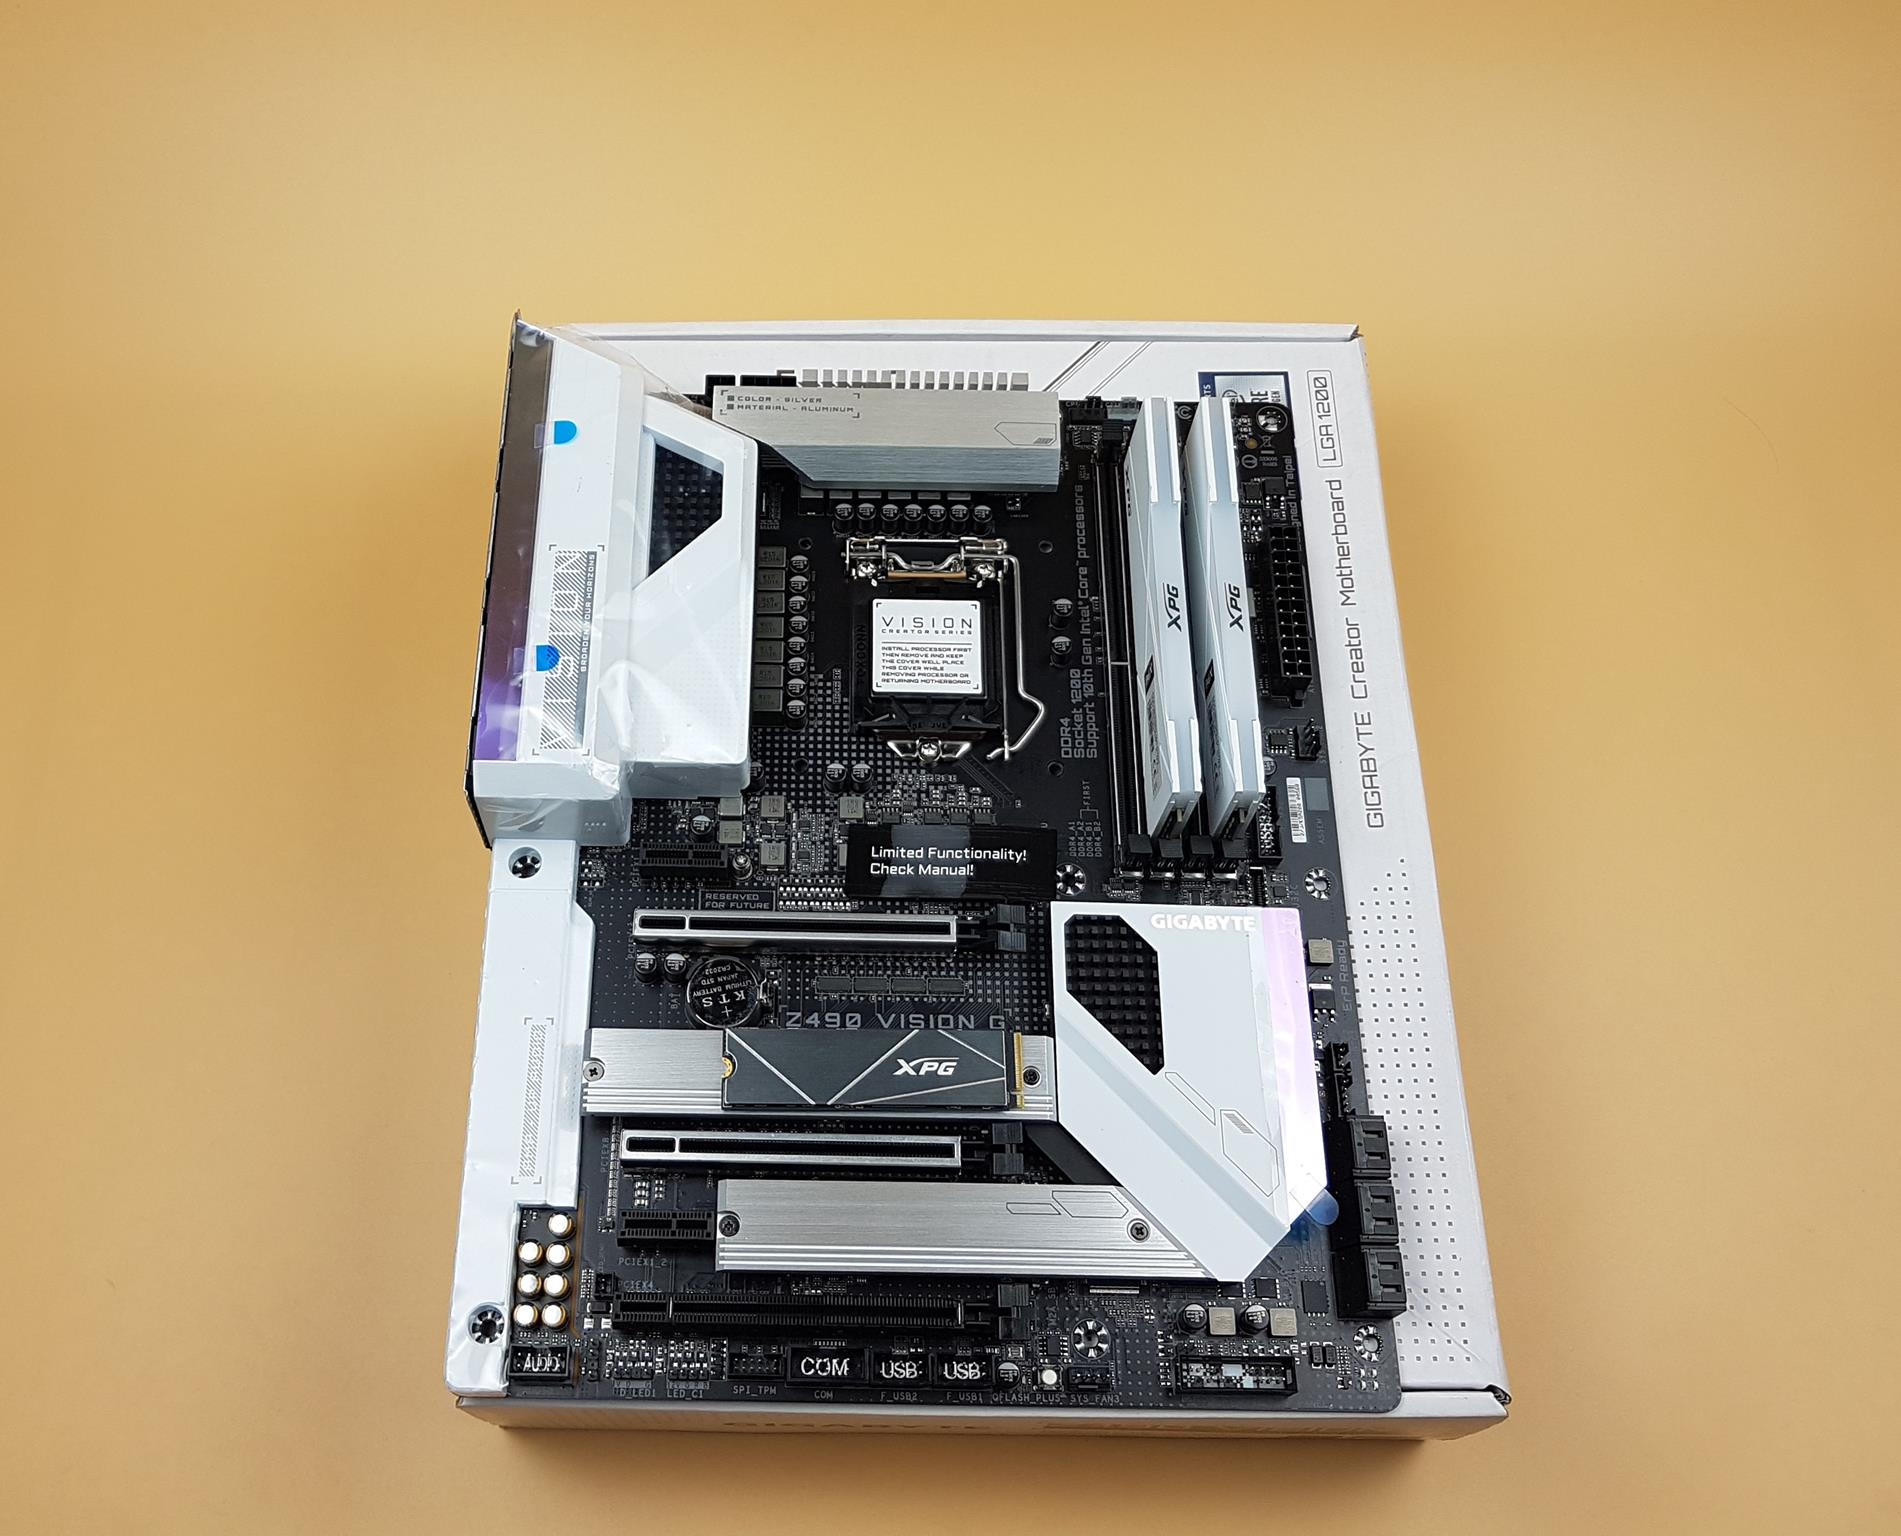
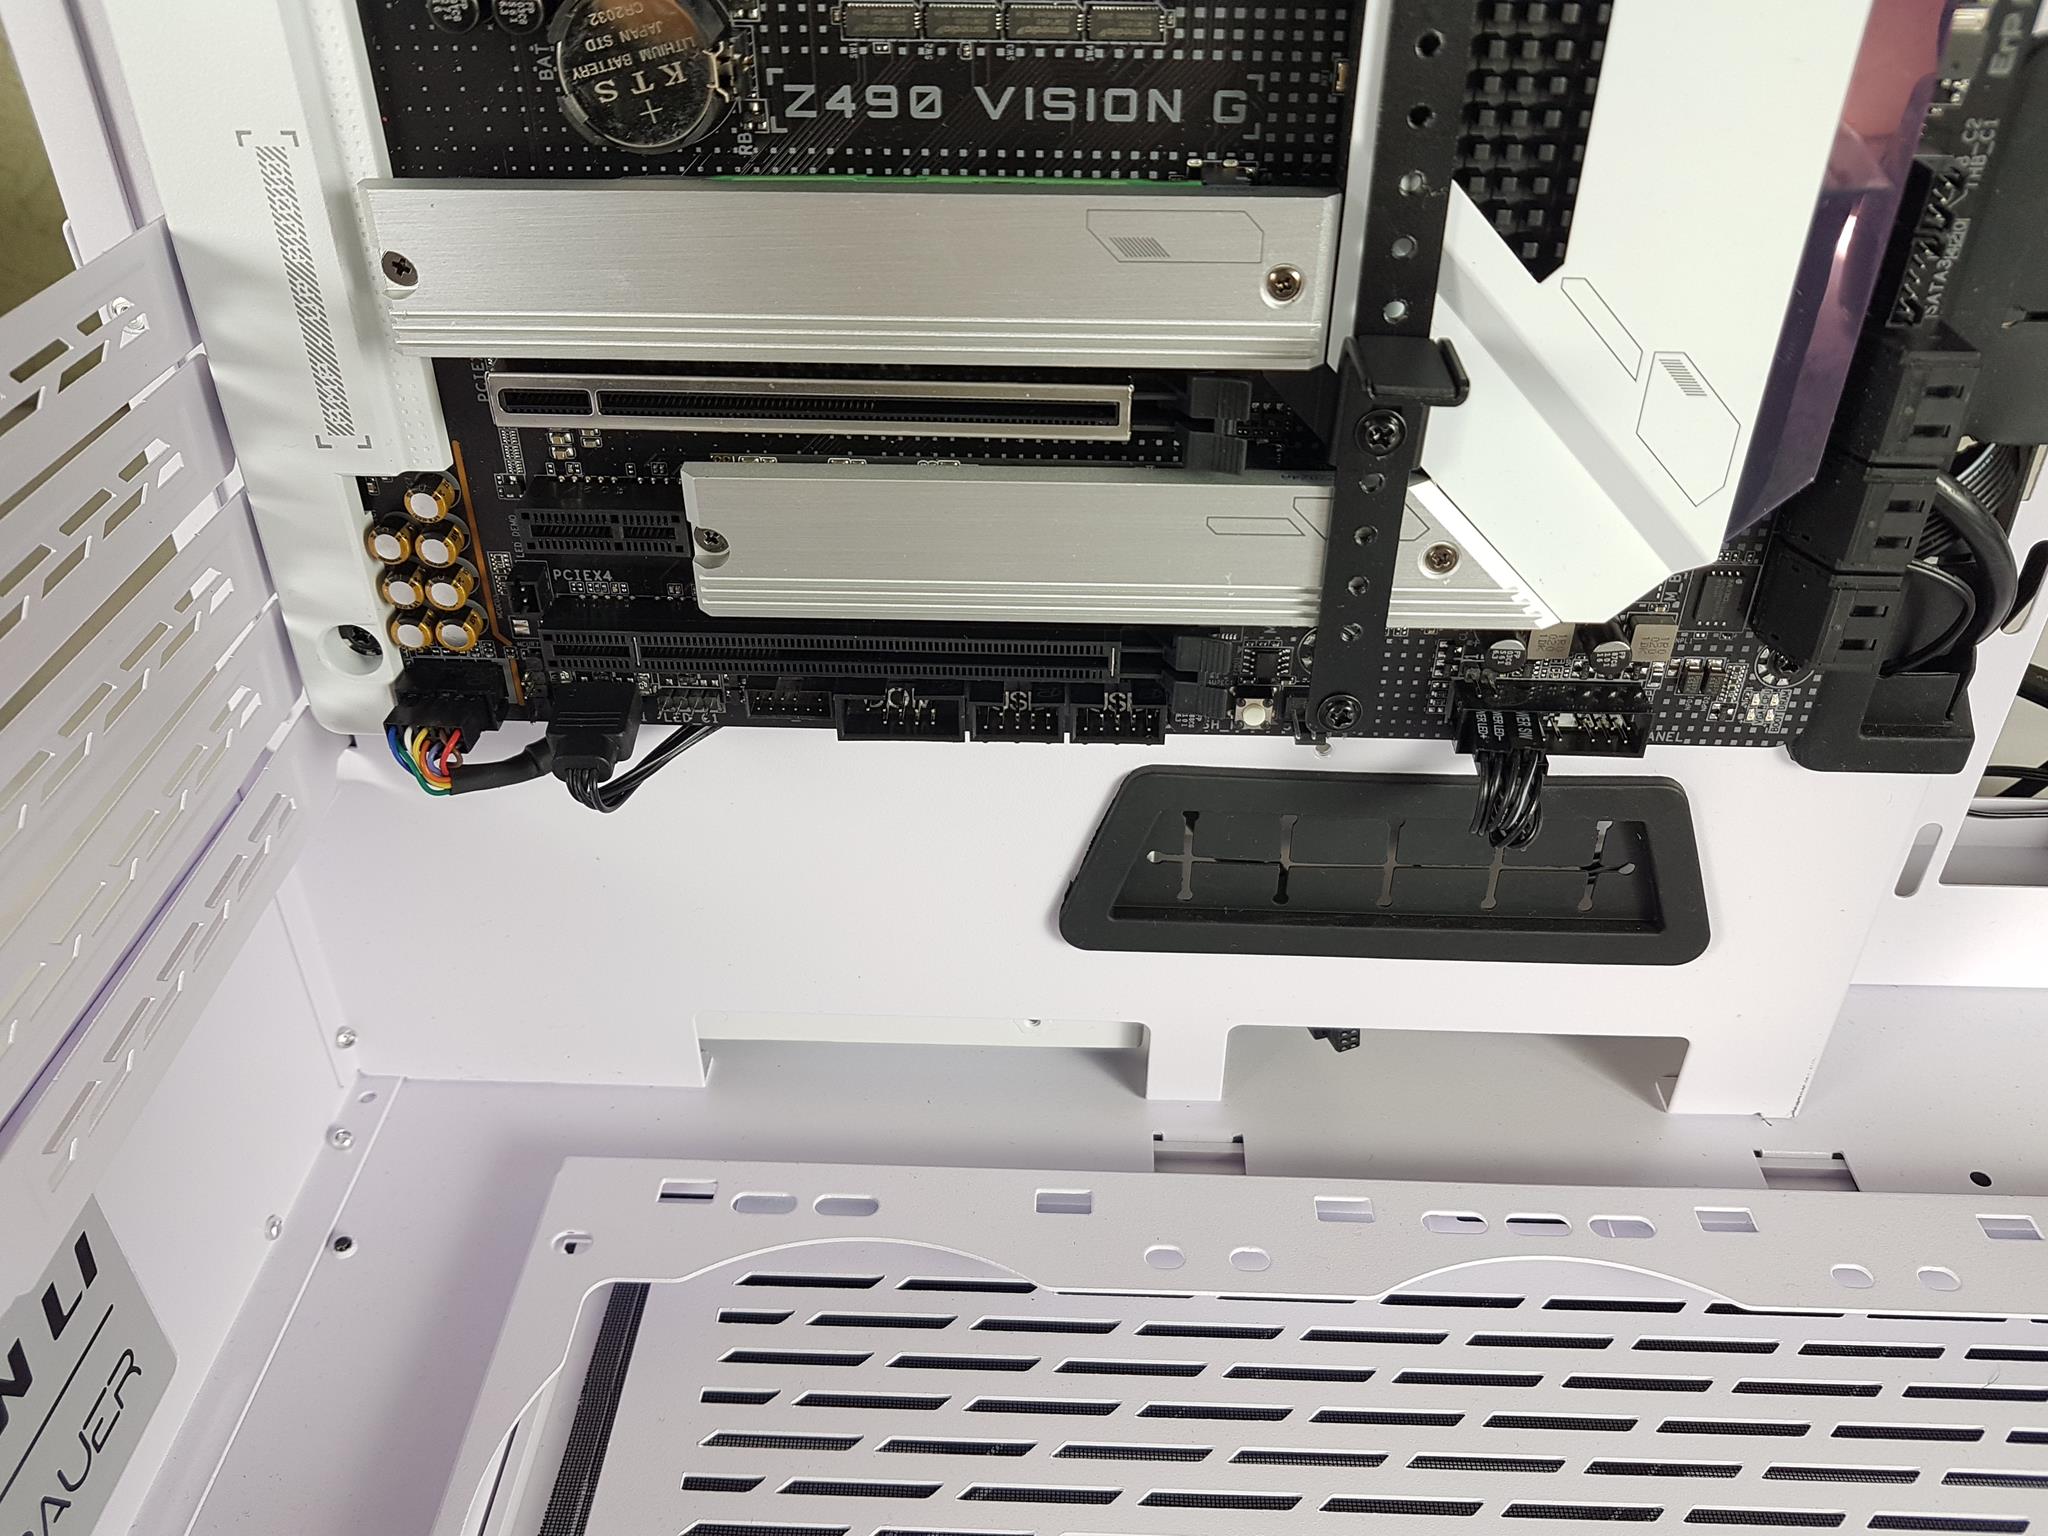
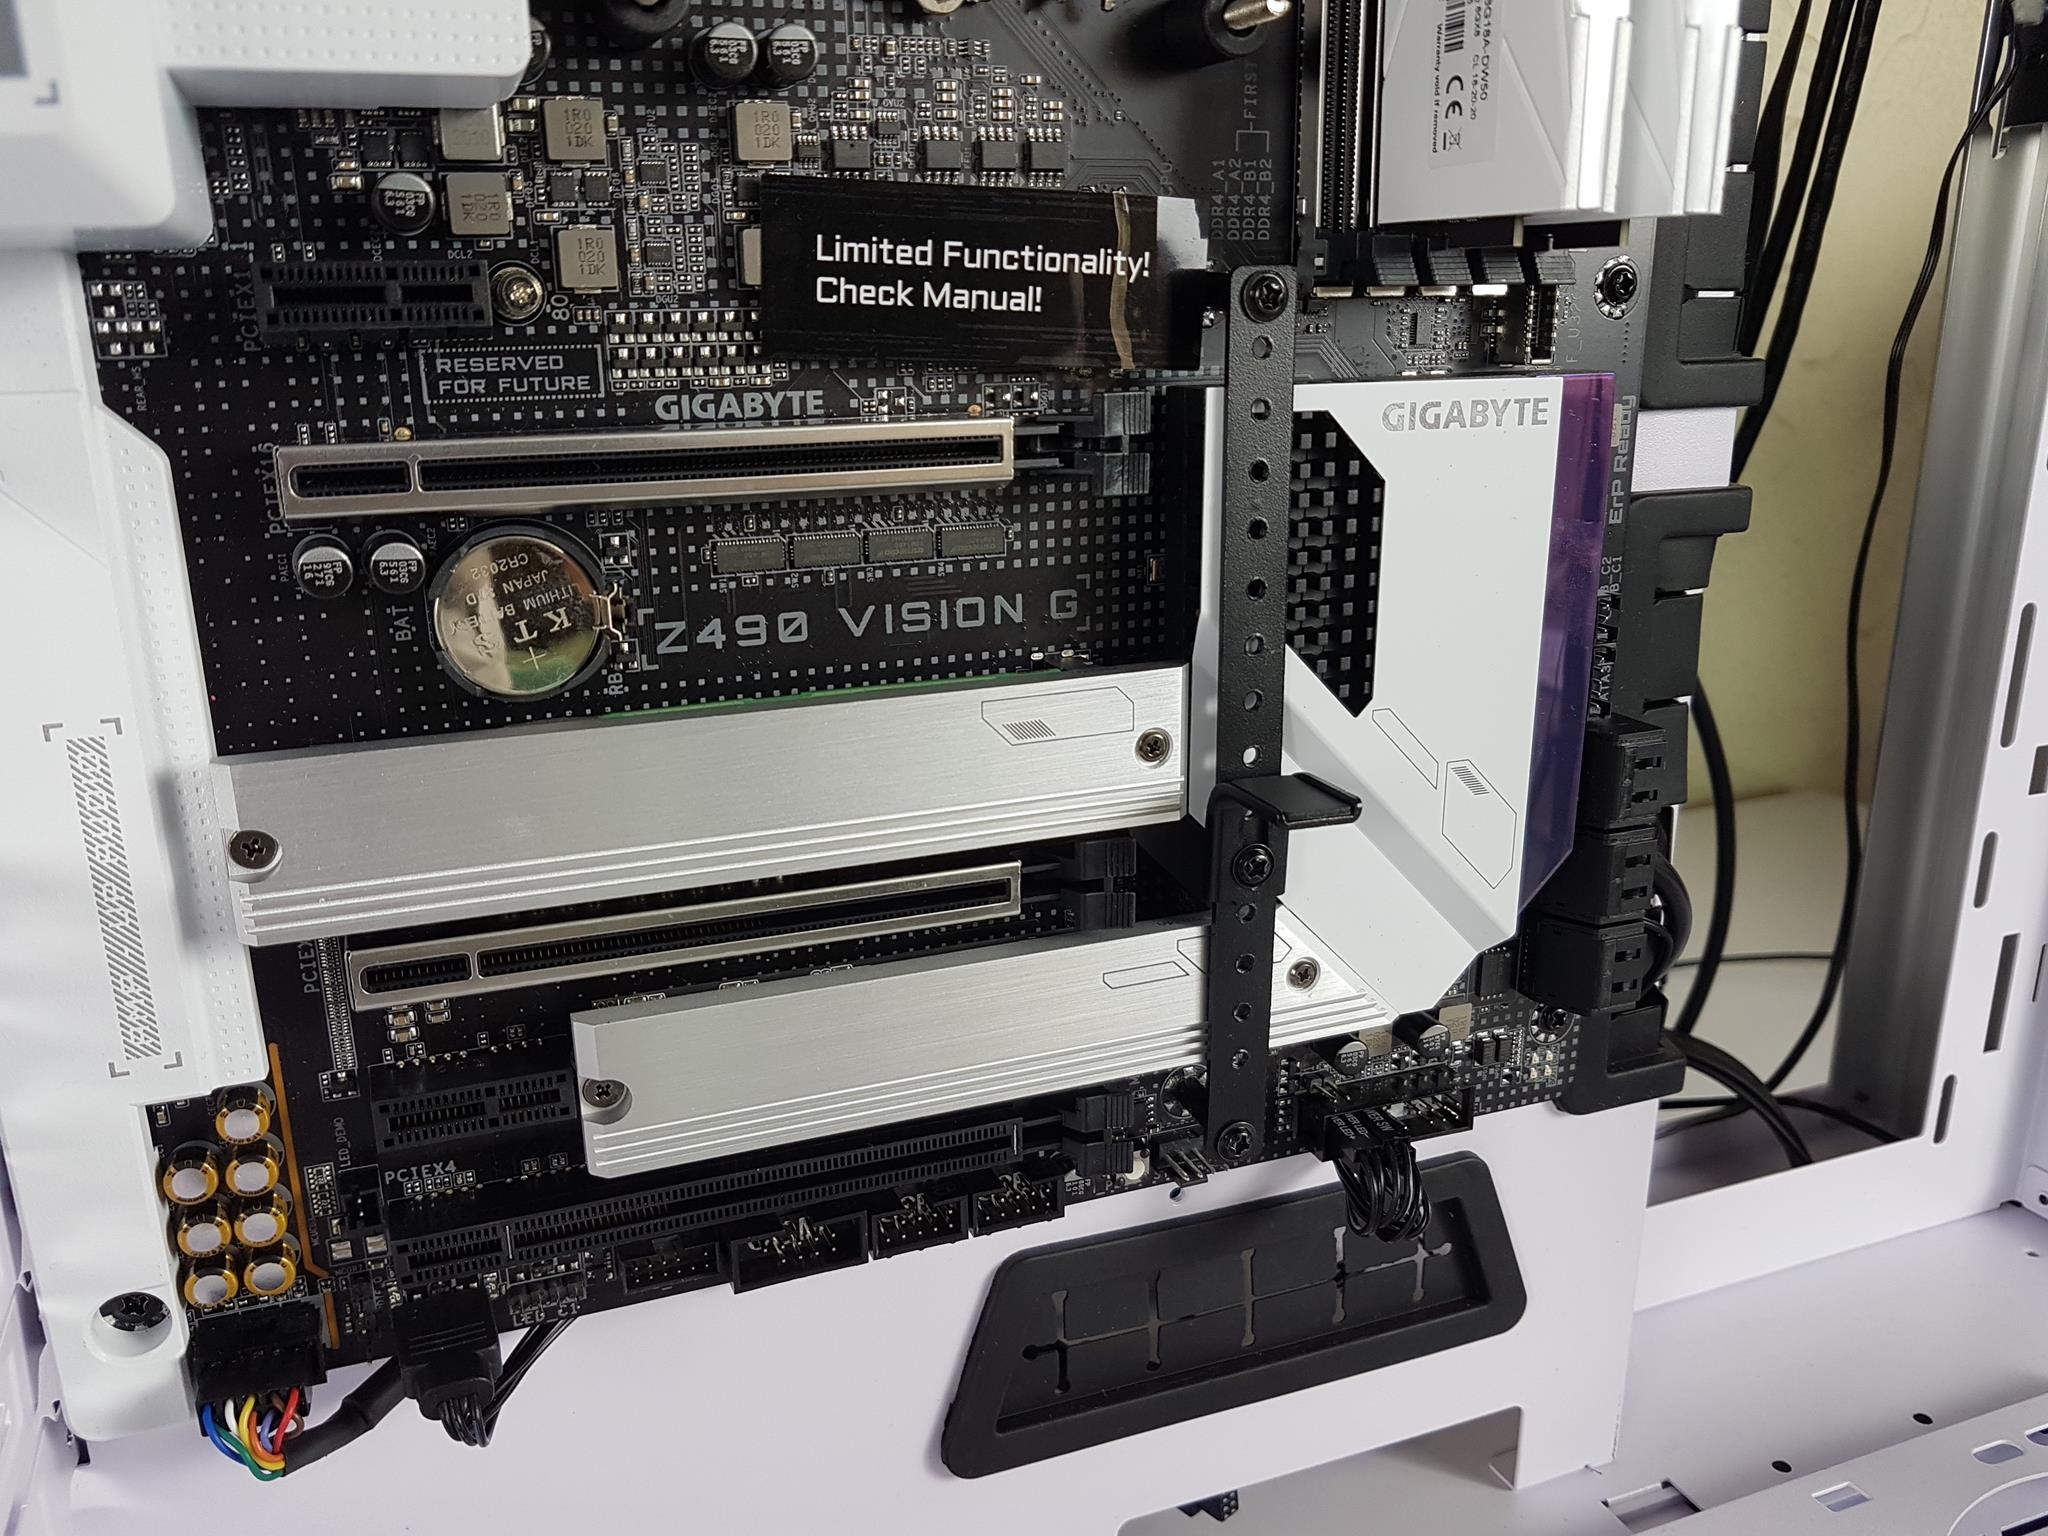
GIGABYTE Z490 VISION G
Our first priority was to decide the platform for this build. It was going to be AMD or Intel. We decided to go for GIGABYTE Z490 VERSION G as we decided to base this build on the VISION series from GIGABYTE. GIGABYTE offered their GeForce RTX 3070 VISION OC for this build and review completing our VISION powered PC.
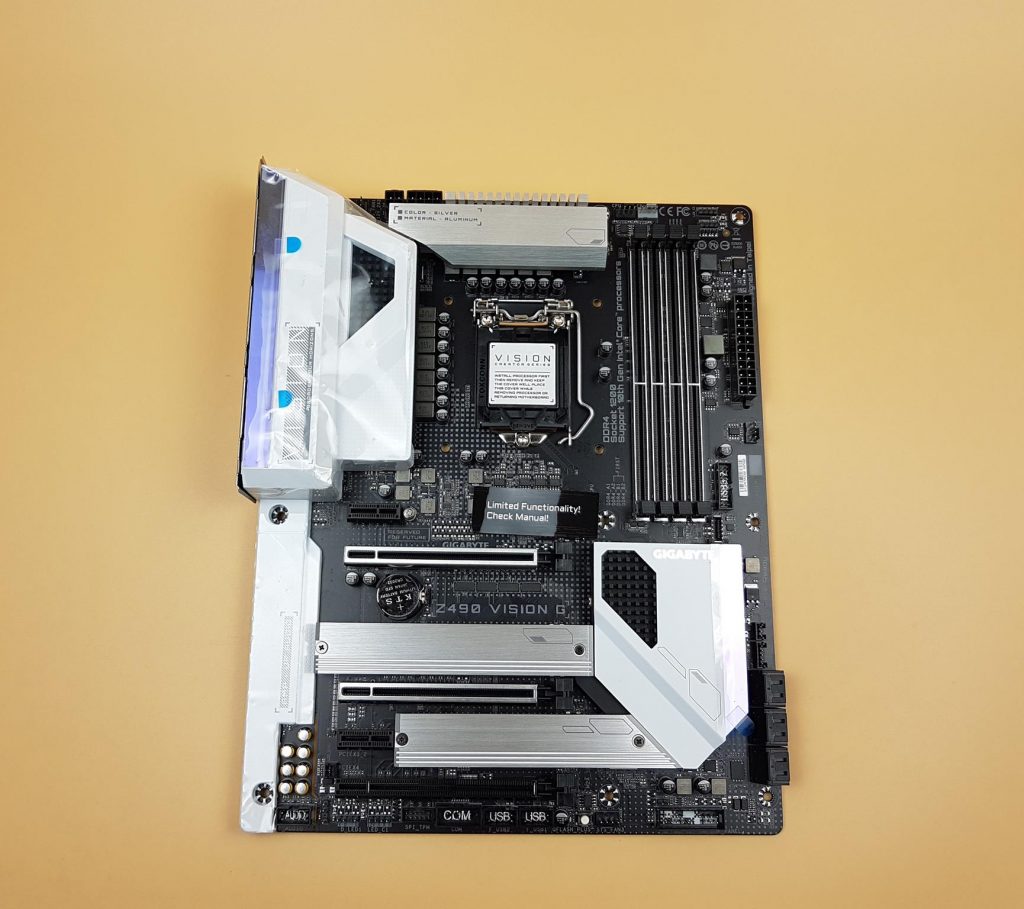
The GIGABYTE Z490 VISION G is a well-balanced White/silver-themed motherboard aimed at content creators who would not want to spend more and are still able to utilize most of the functions and features of the Intel Z490 chipset. The motherboard has PCIe 4.0-ready hardware for which a supported BIOS update would be needed, along with an Intel 11th generation CPU.
The motherboard features a Monoblock heat sink design to provide better airflow from Omni-Direction. GIGABYTE has used LAIRD 1.5mm thick thermal pads under the aluminum heatsinks on the power delivery circuitry. These thermal pads have a 5W/mK conductivity rating.
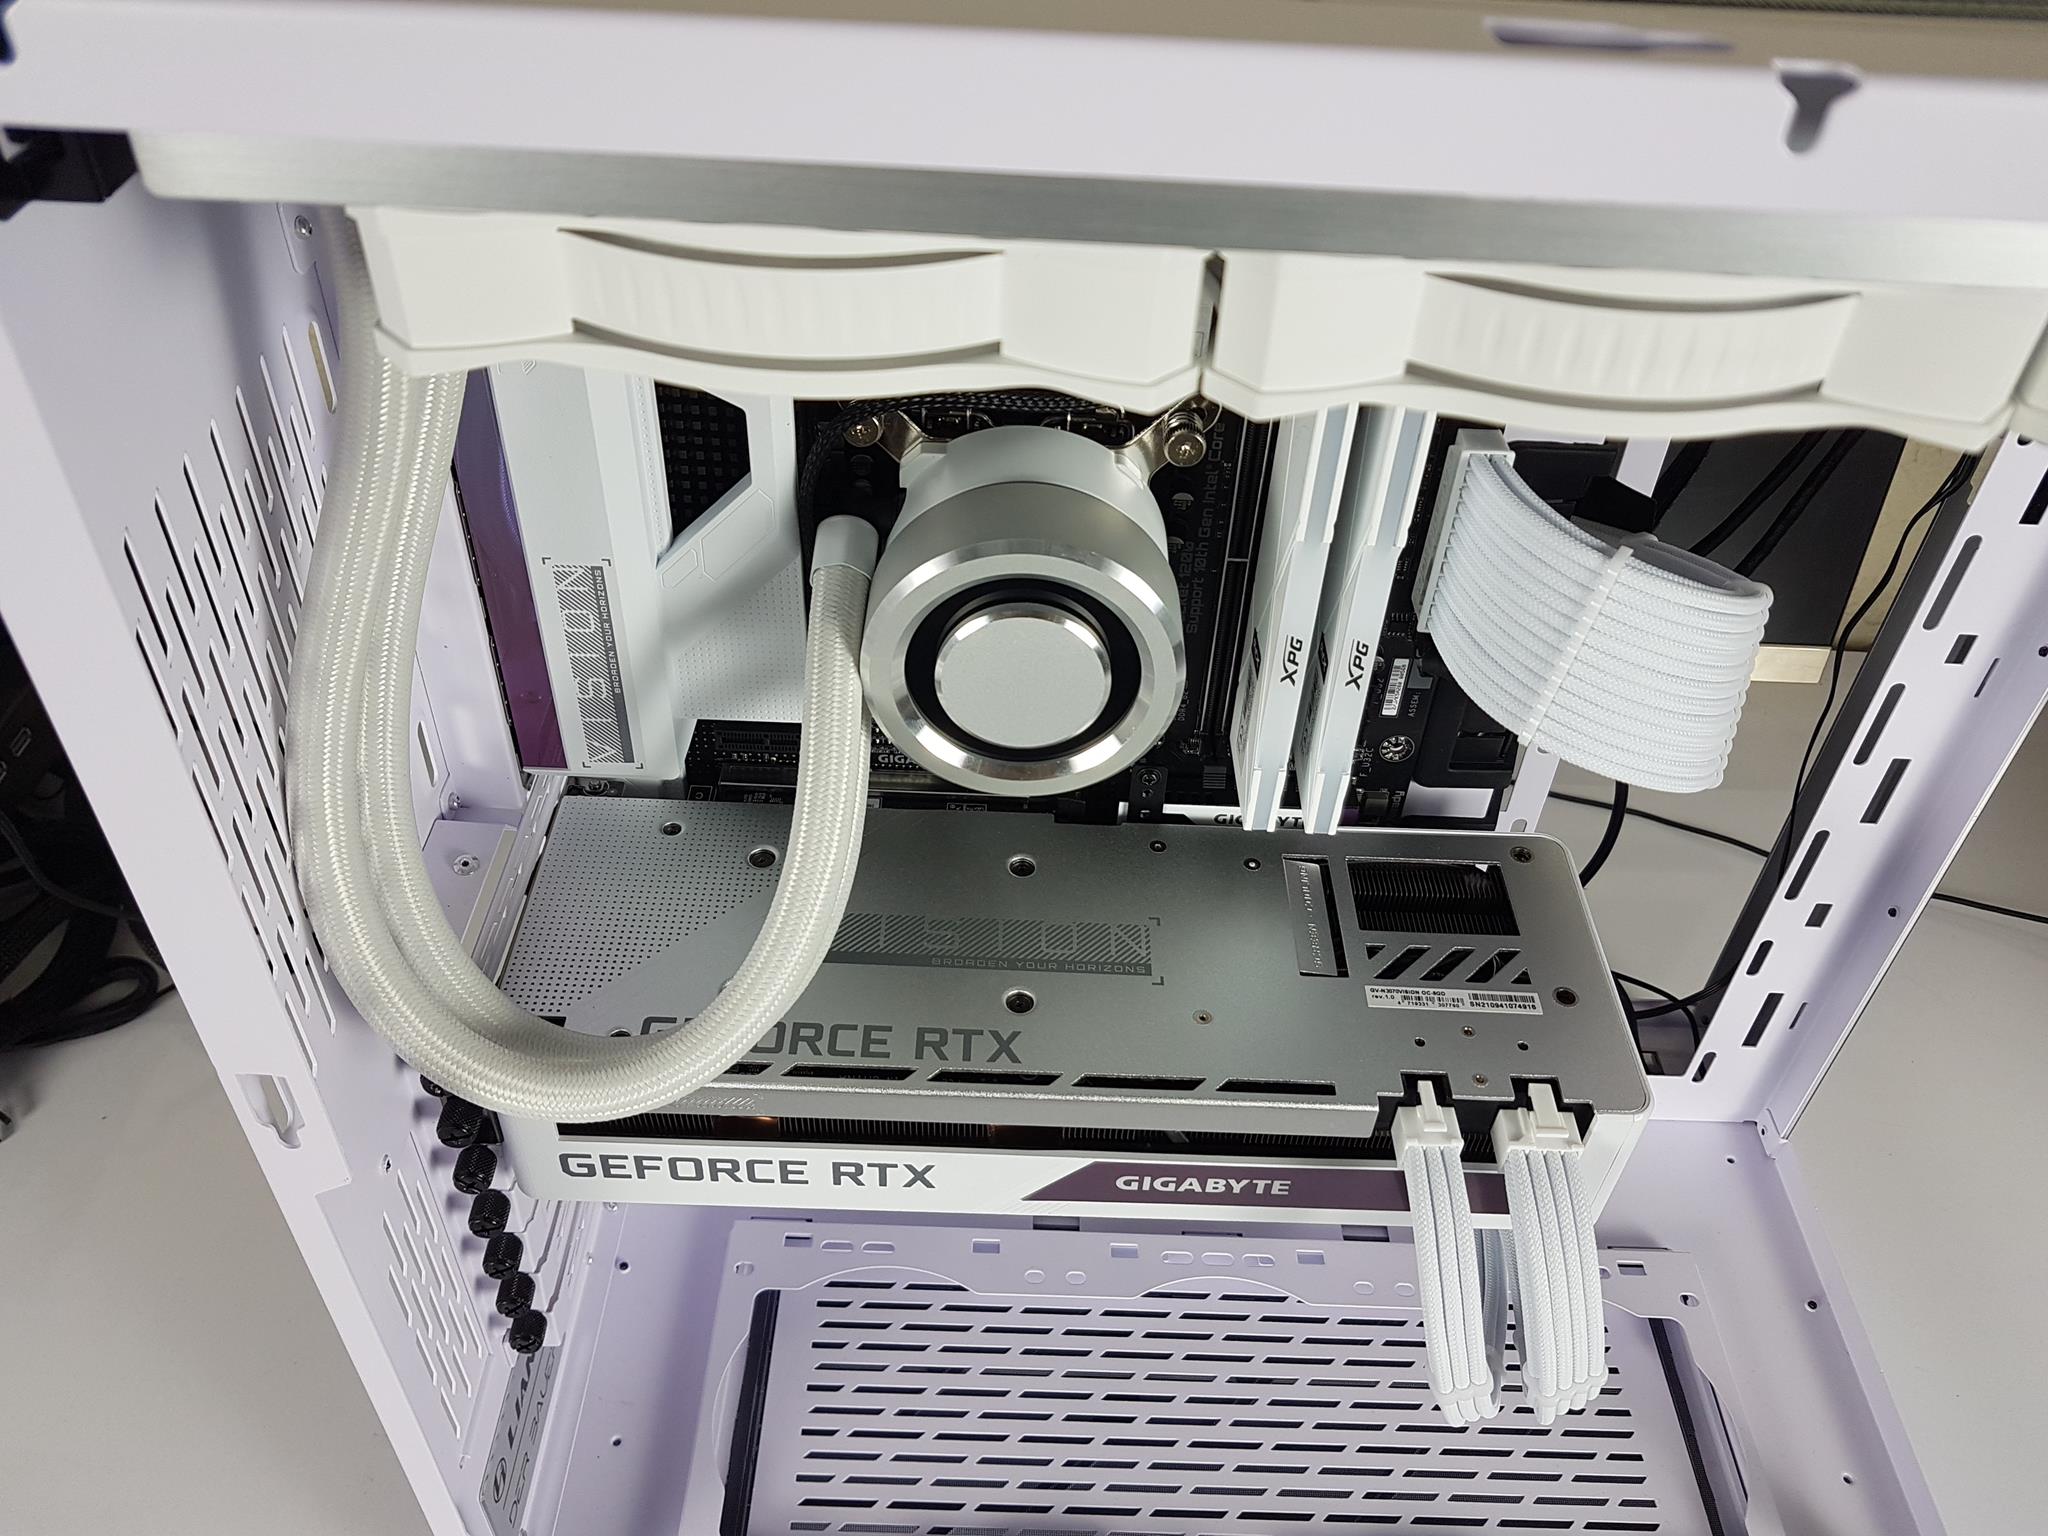
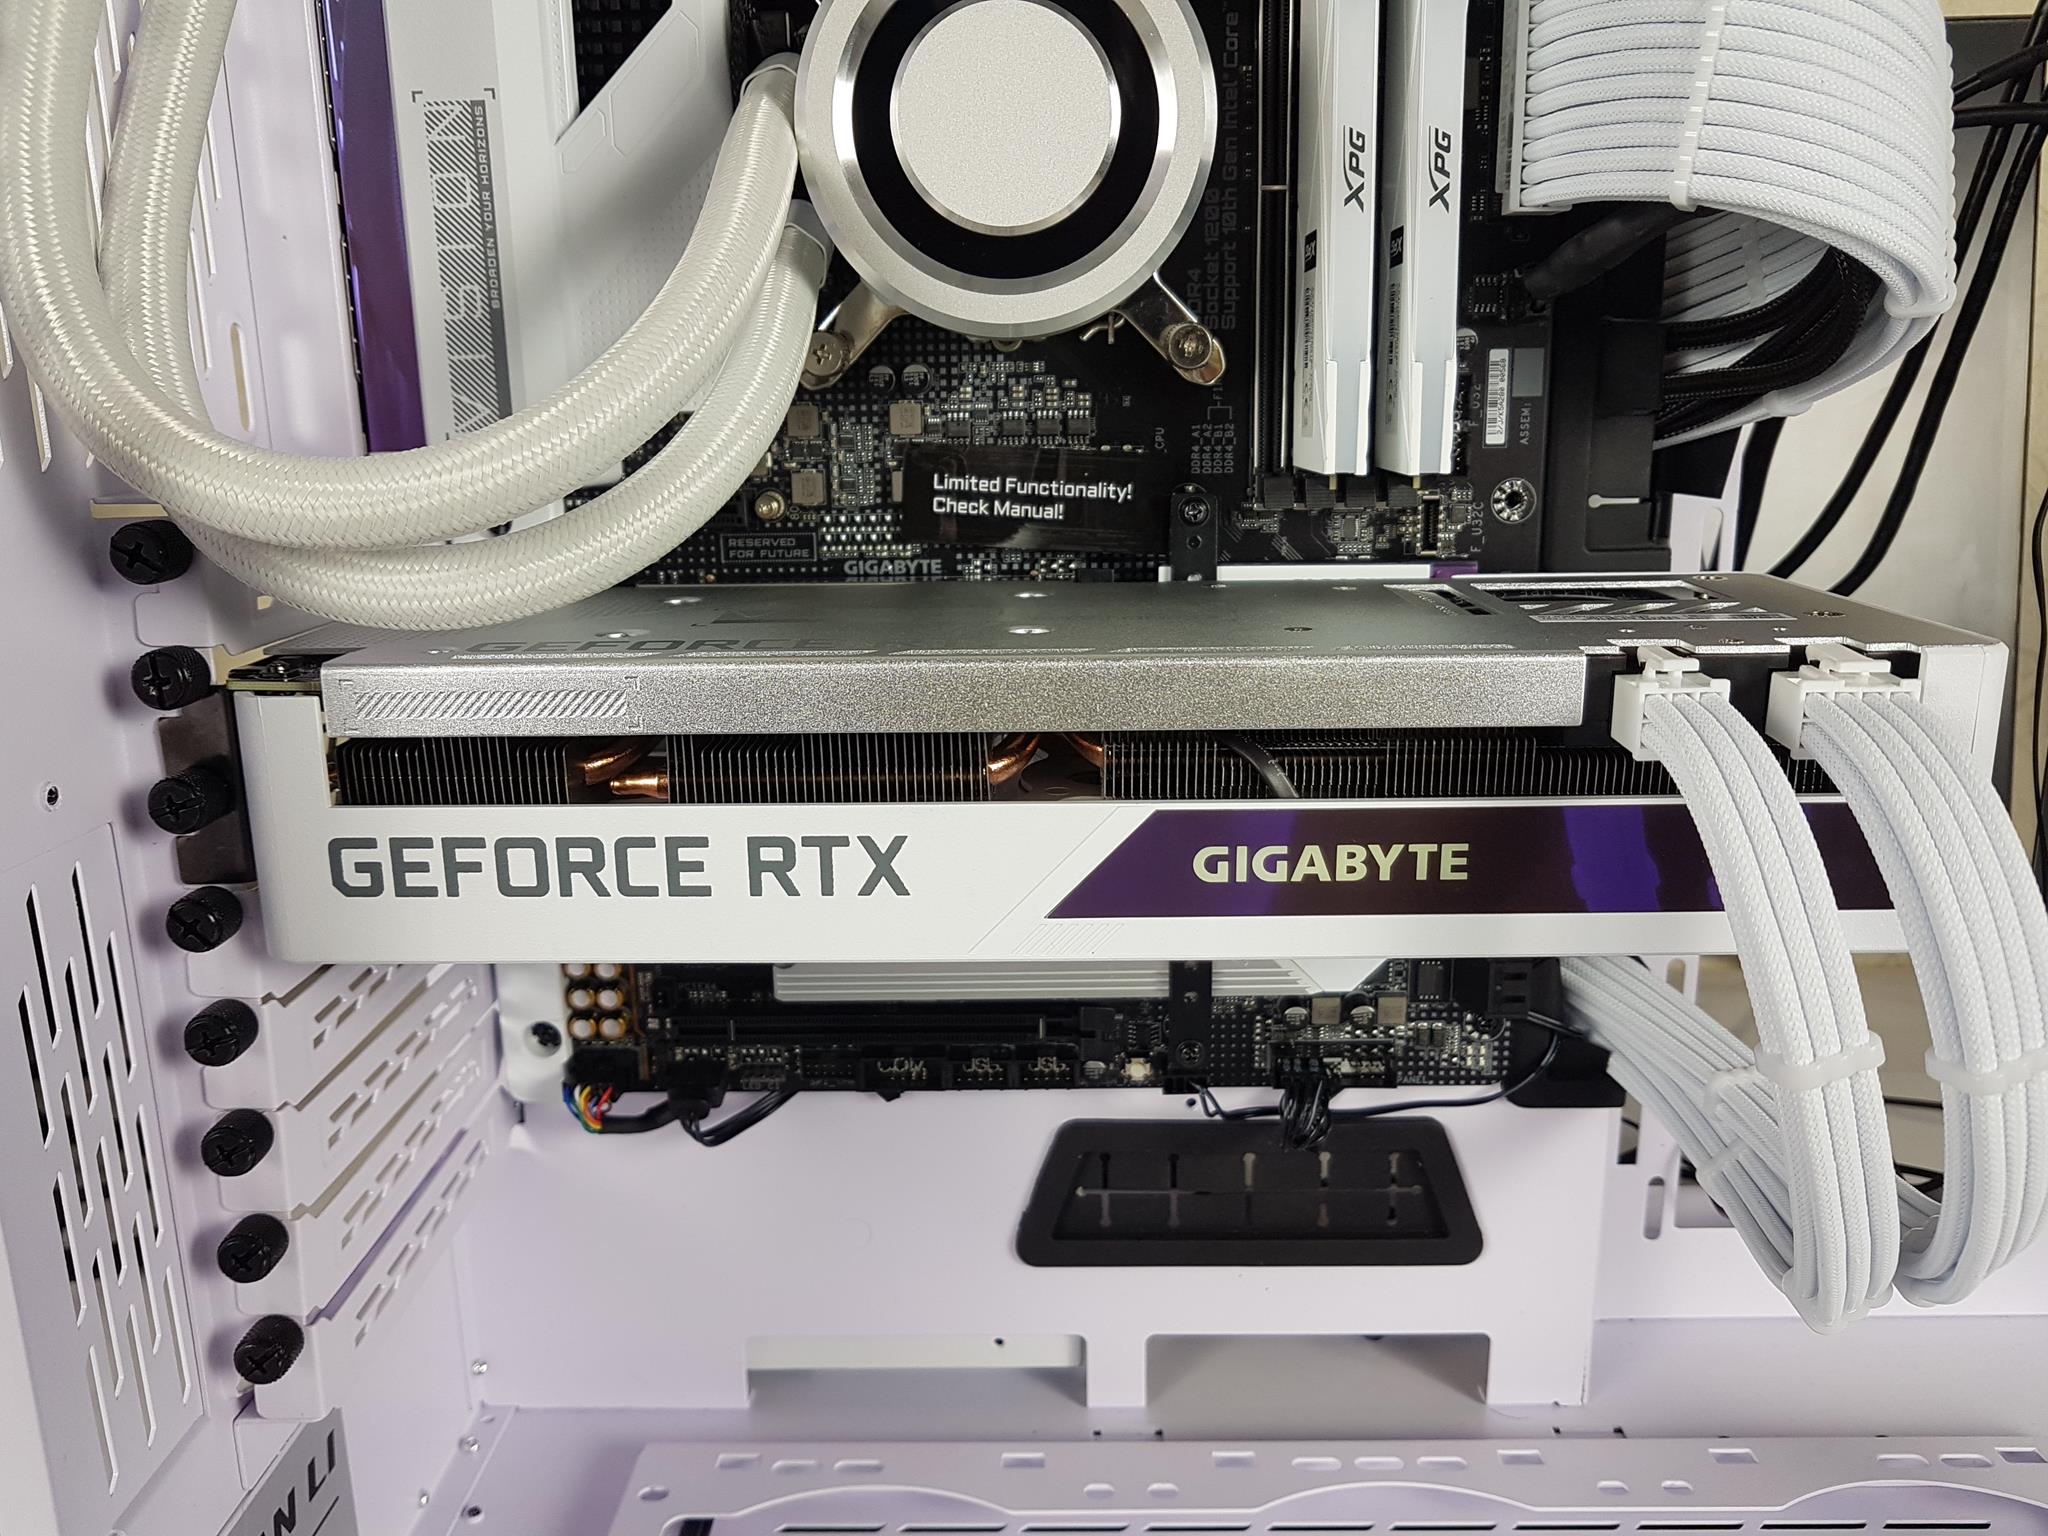
GIGABYTE GeForce RTX 3070 VISION OC
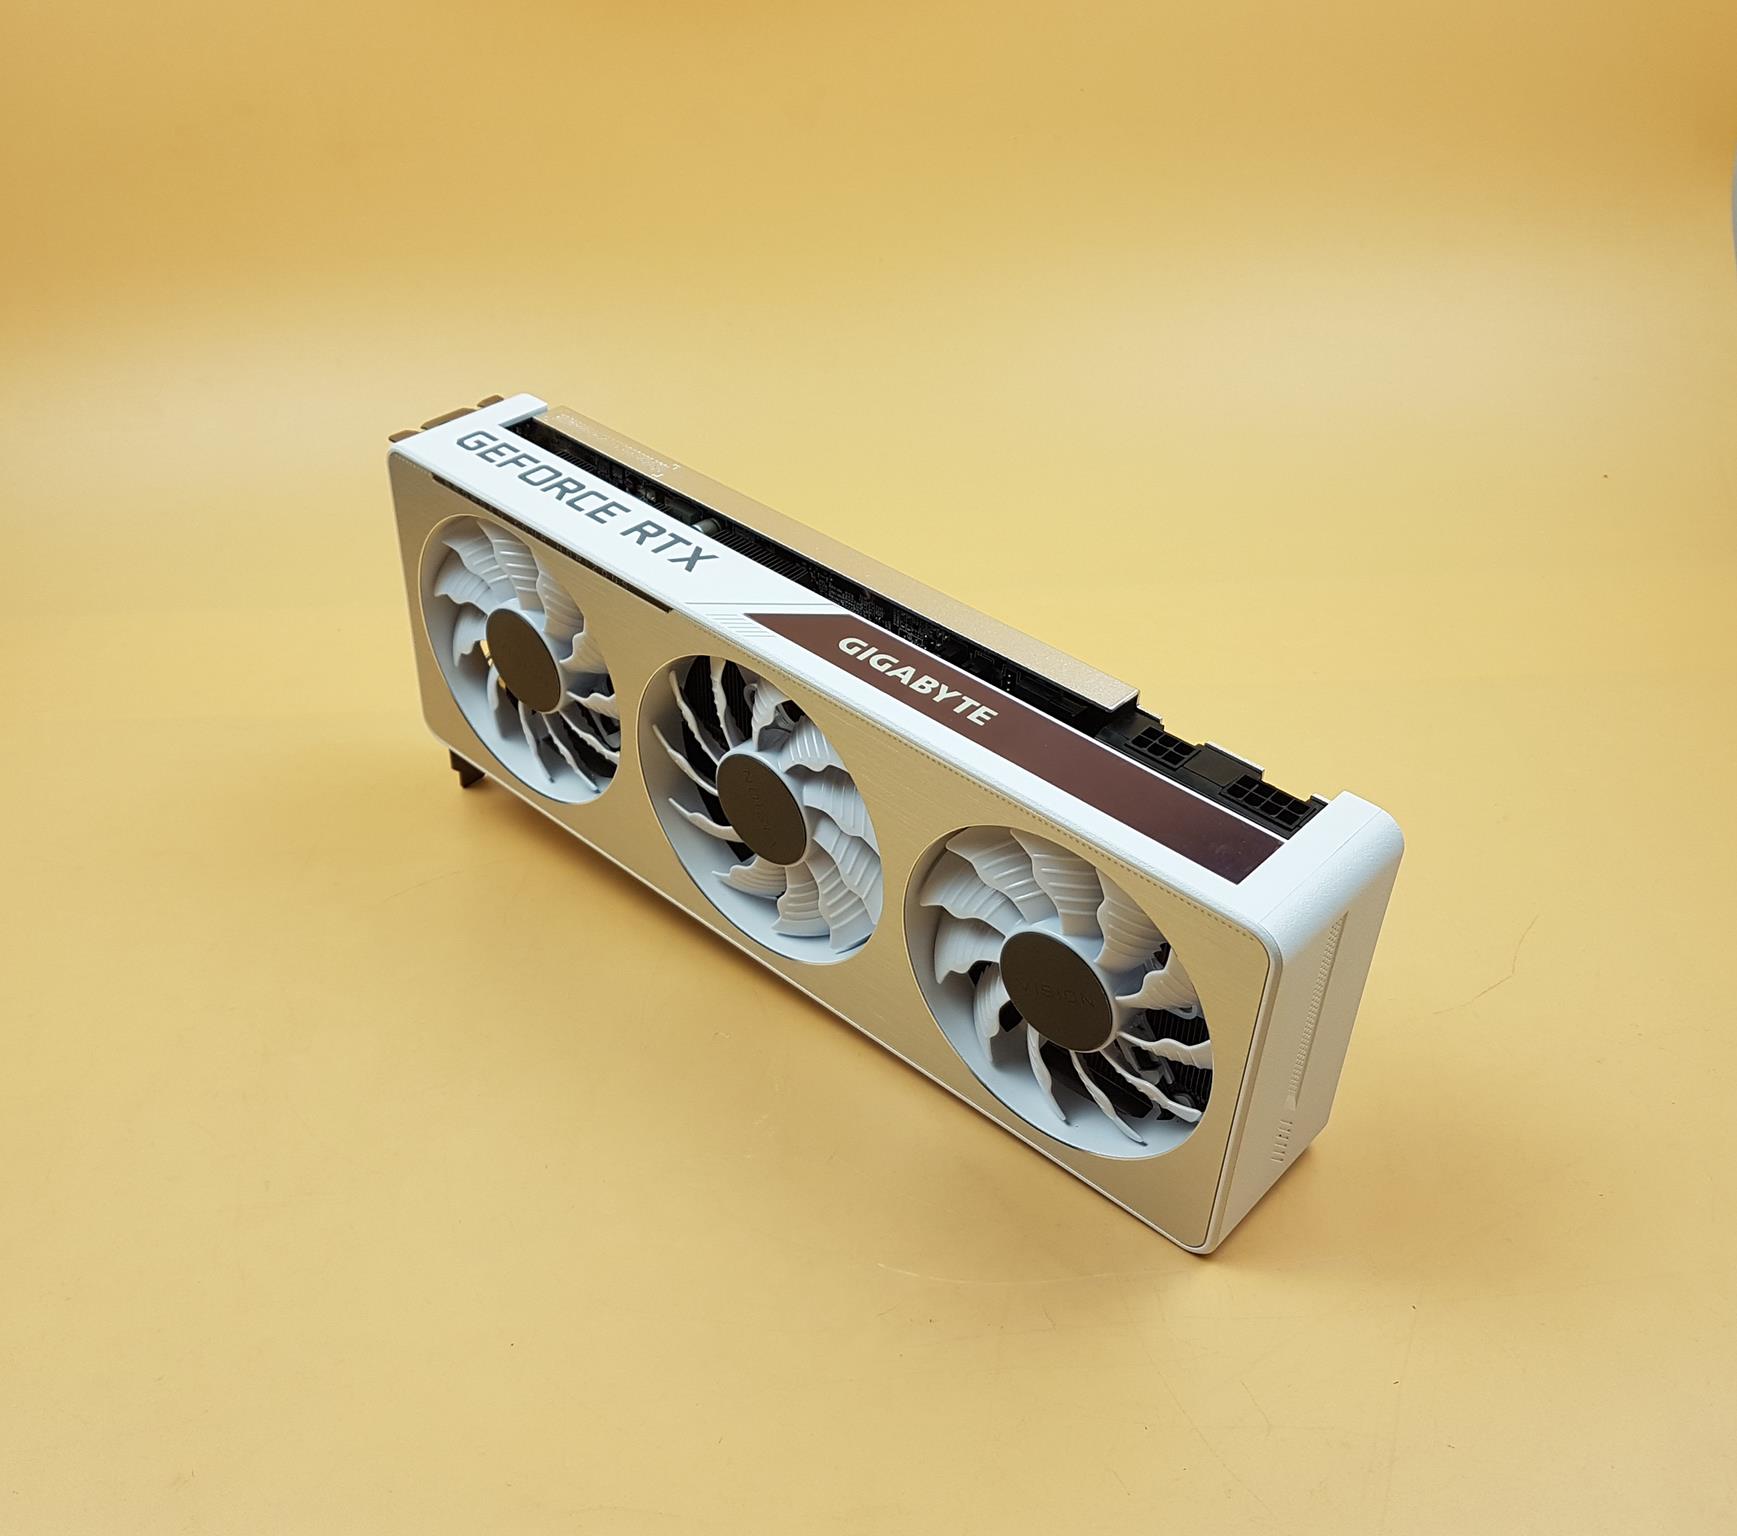
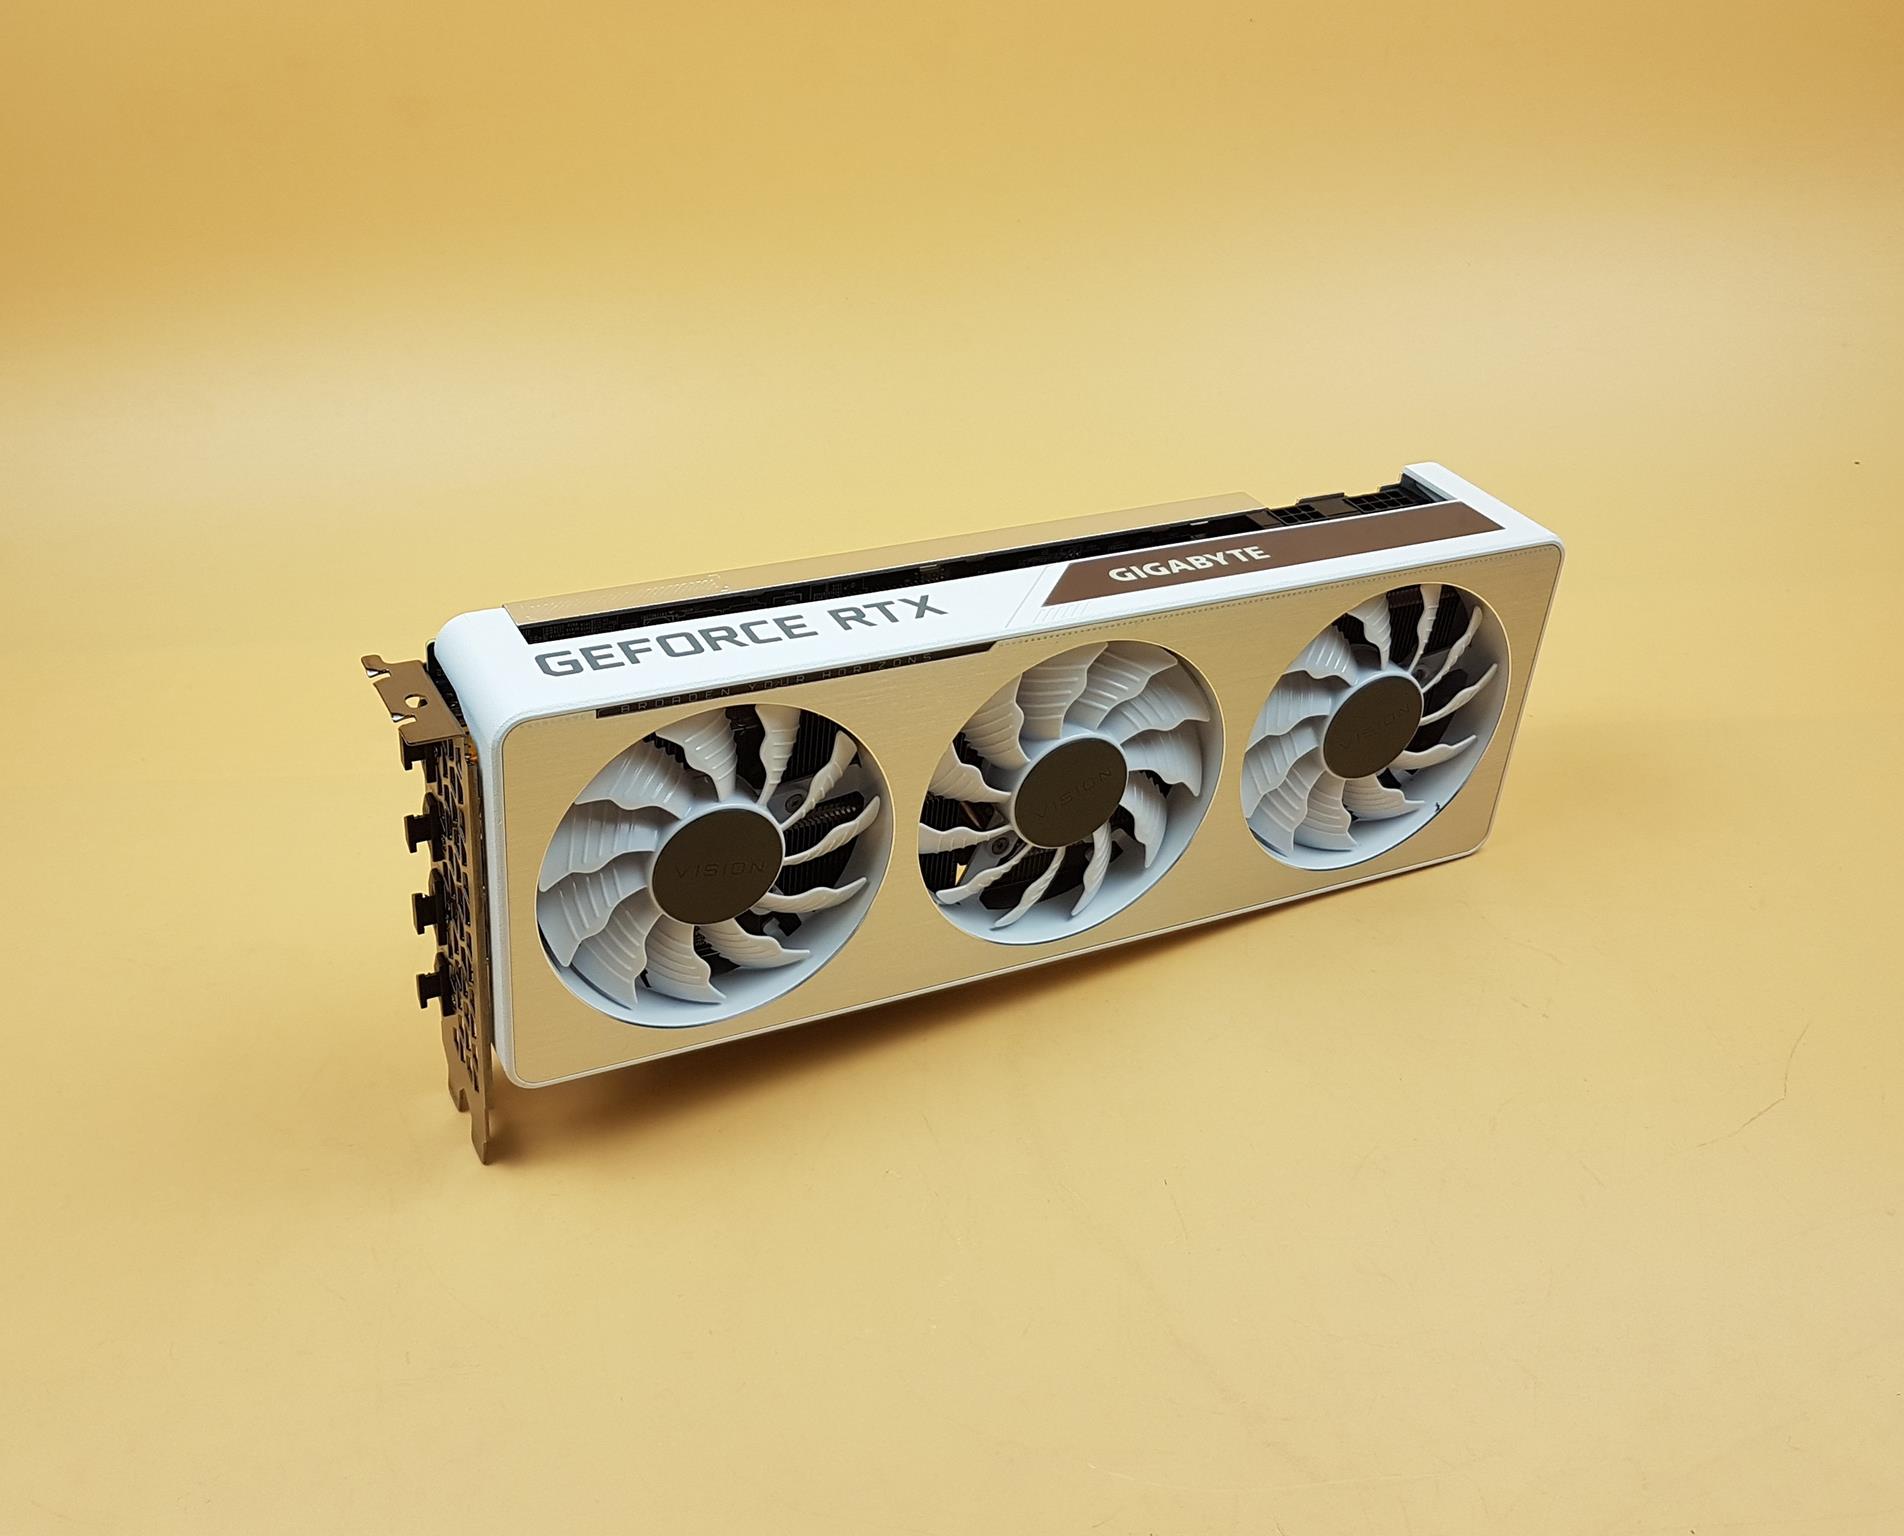
The GIGABYTE GeForce RTX 3070 VISION OC has a factory overclock boost clock of 1815 MHz as compared to the reference card’s boost clock of 1725MHz. The memory clock is 14000MHz. The dimension of the graphics card is 286x115x51mm making it a 2.5 slot design. Despite this dimension, the graphics card is lightweight.
This graphics card features GIGABYTE’s renowned WINDFORCE 3X cooling system, with three 80mm fans spinning alternately to reduce turbulence. The triangular fan edges and 3D stripe curves on the fan surface enhance airflow. The 3D Active Fan technology provides semi-passive cooling, keeping the fans off during low-load or low-power activities. The cooling system includes an aluminum heatsink with three segments connected by five 8mm composite heat pipes, and a direct-touch nickel-plated copper plate for effective VRAM and GPU cooling.
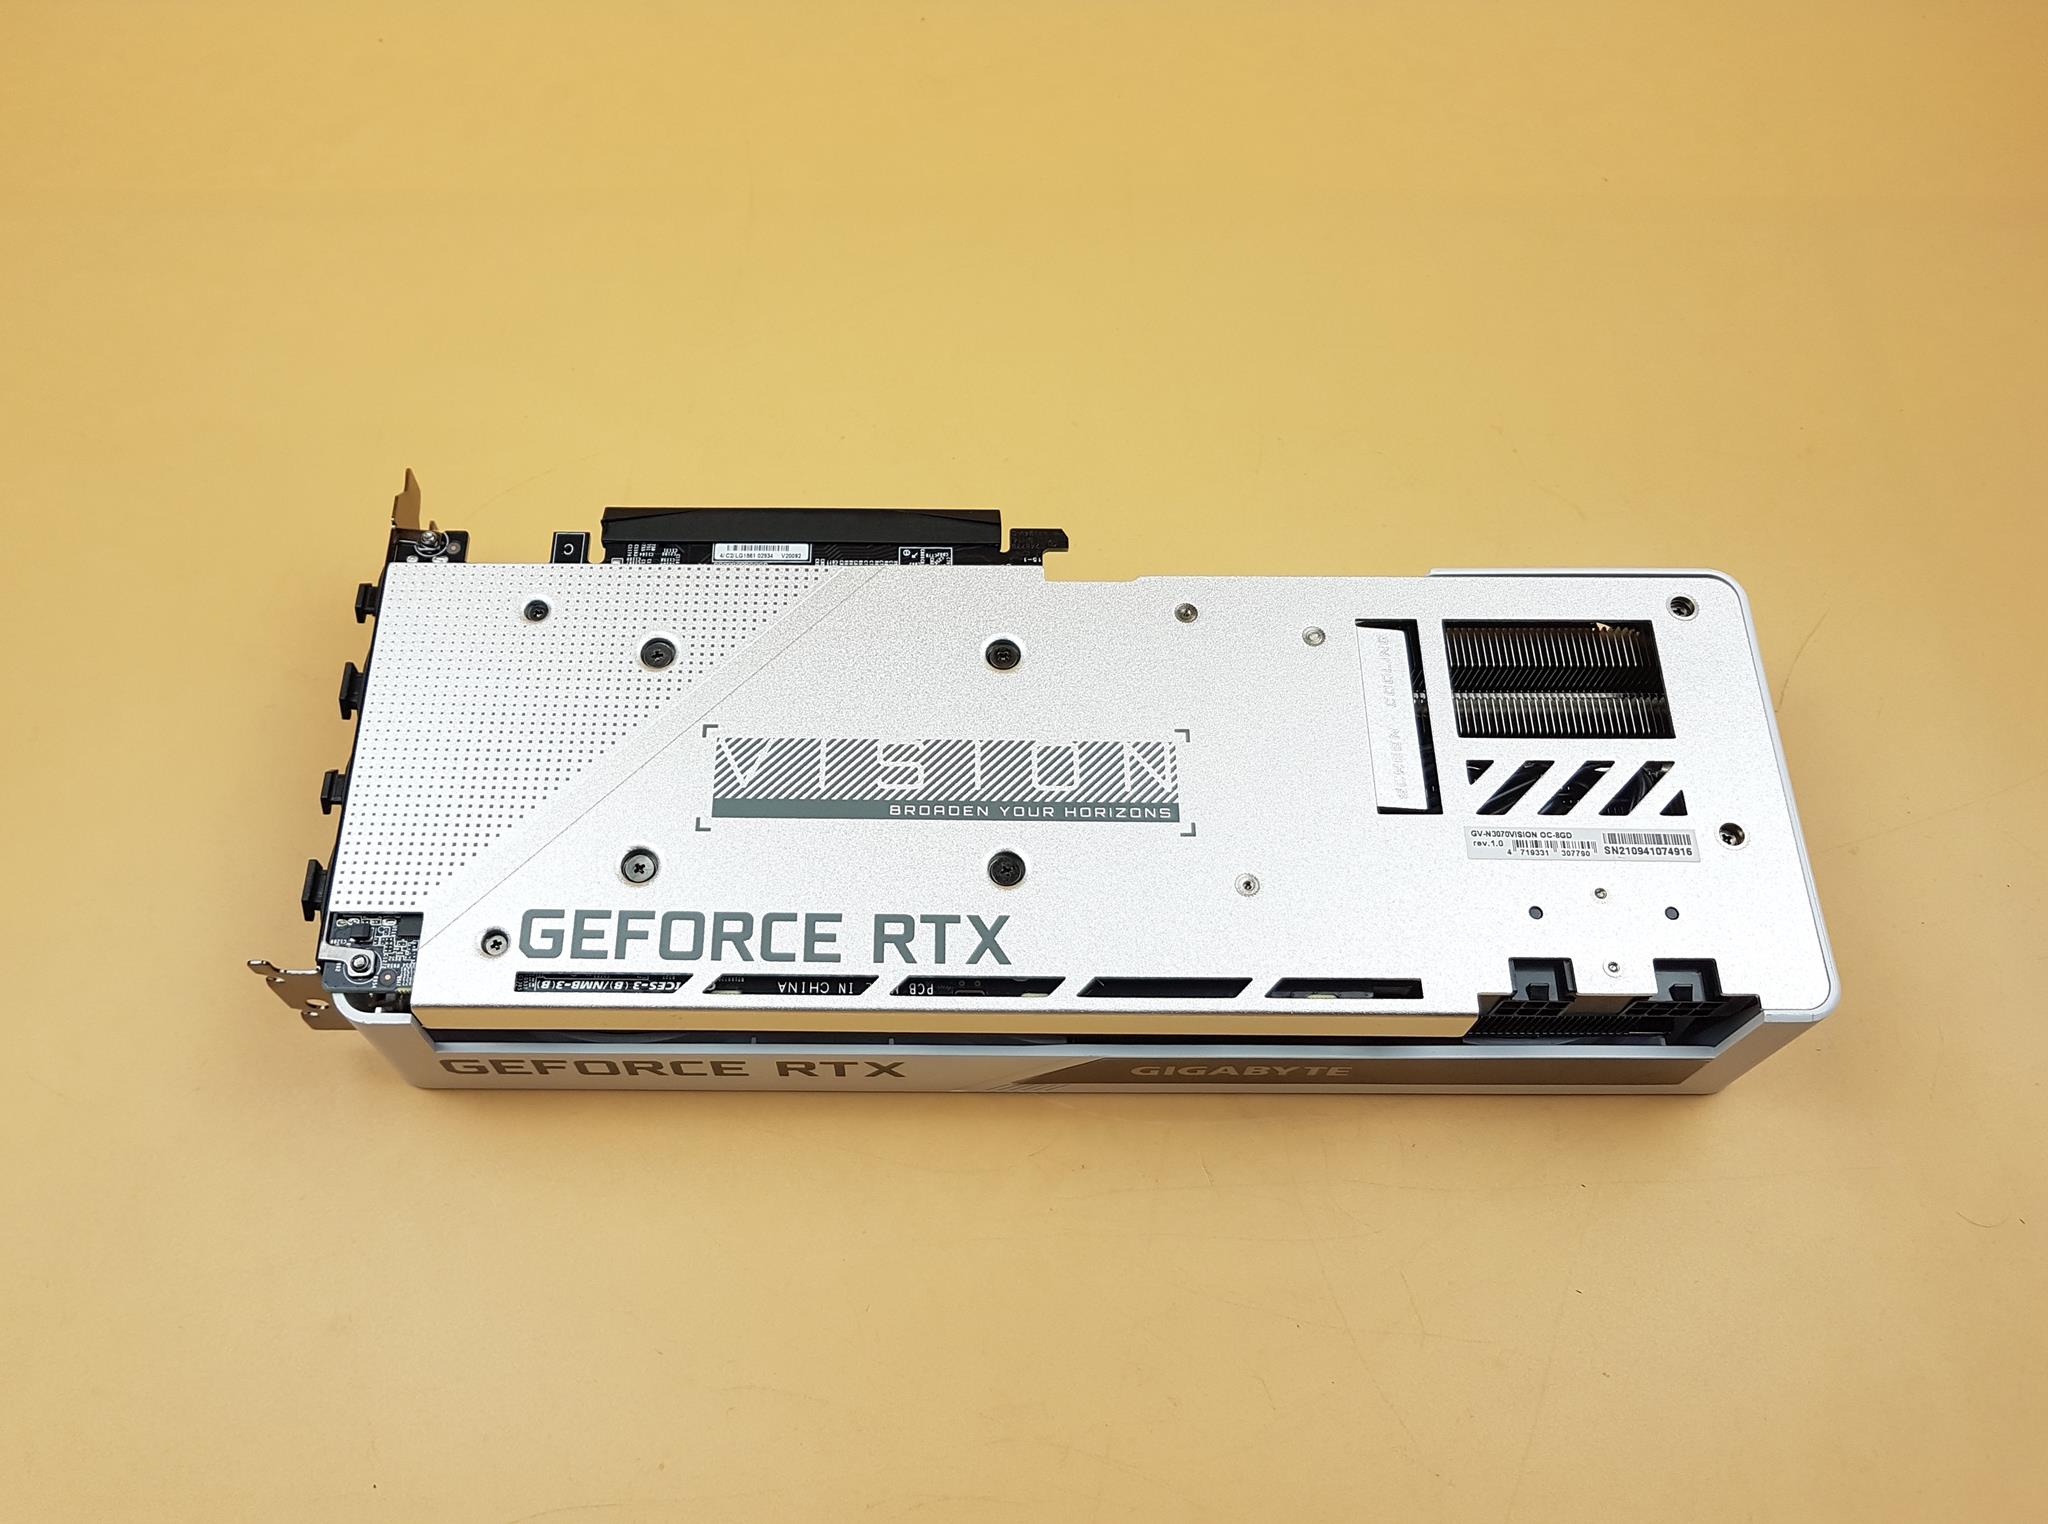
The distinctive feature is the VISION-themed shroud and white color of the graphics card, giving one heck of a spectacular look. This is further augmented by the silver metallic backplate with screen cooling. There is a large vented area on the metal backplate for proper ventilation. The card takes power using 8-pin and 6-pin PCIe power connectors. These connectors are housed inside a black color plastic-made housing.
Intel Core i9-10850K
The reason we went with i9 10850k, not 10900k, was the better price deal, which saved us some bucks to spend on other components. Intel launched their i9 10850k in the third quarter of 2020. It has 10 Cores and 20 Threads with a base clock of 3.60GHz. The Intel turbo boost 2 frequency is 5.0GHz, and the Turbo boost 3 frequency is 5.1GHz. The thermal velocity boost frequency is 5.2GHz, which is dependent on the cooling solution, workload, and capability of the processor.
The CPU features an Intel 20MB Smart Cache with a bus speed of 8 GT/s. The TDP rating of the CPU is 125W. The CPU supports a maximum of 128GB RAM with a memory type of DDR4-2933 with a maximum memory bandwidth of 45.8 GB/s.
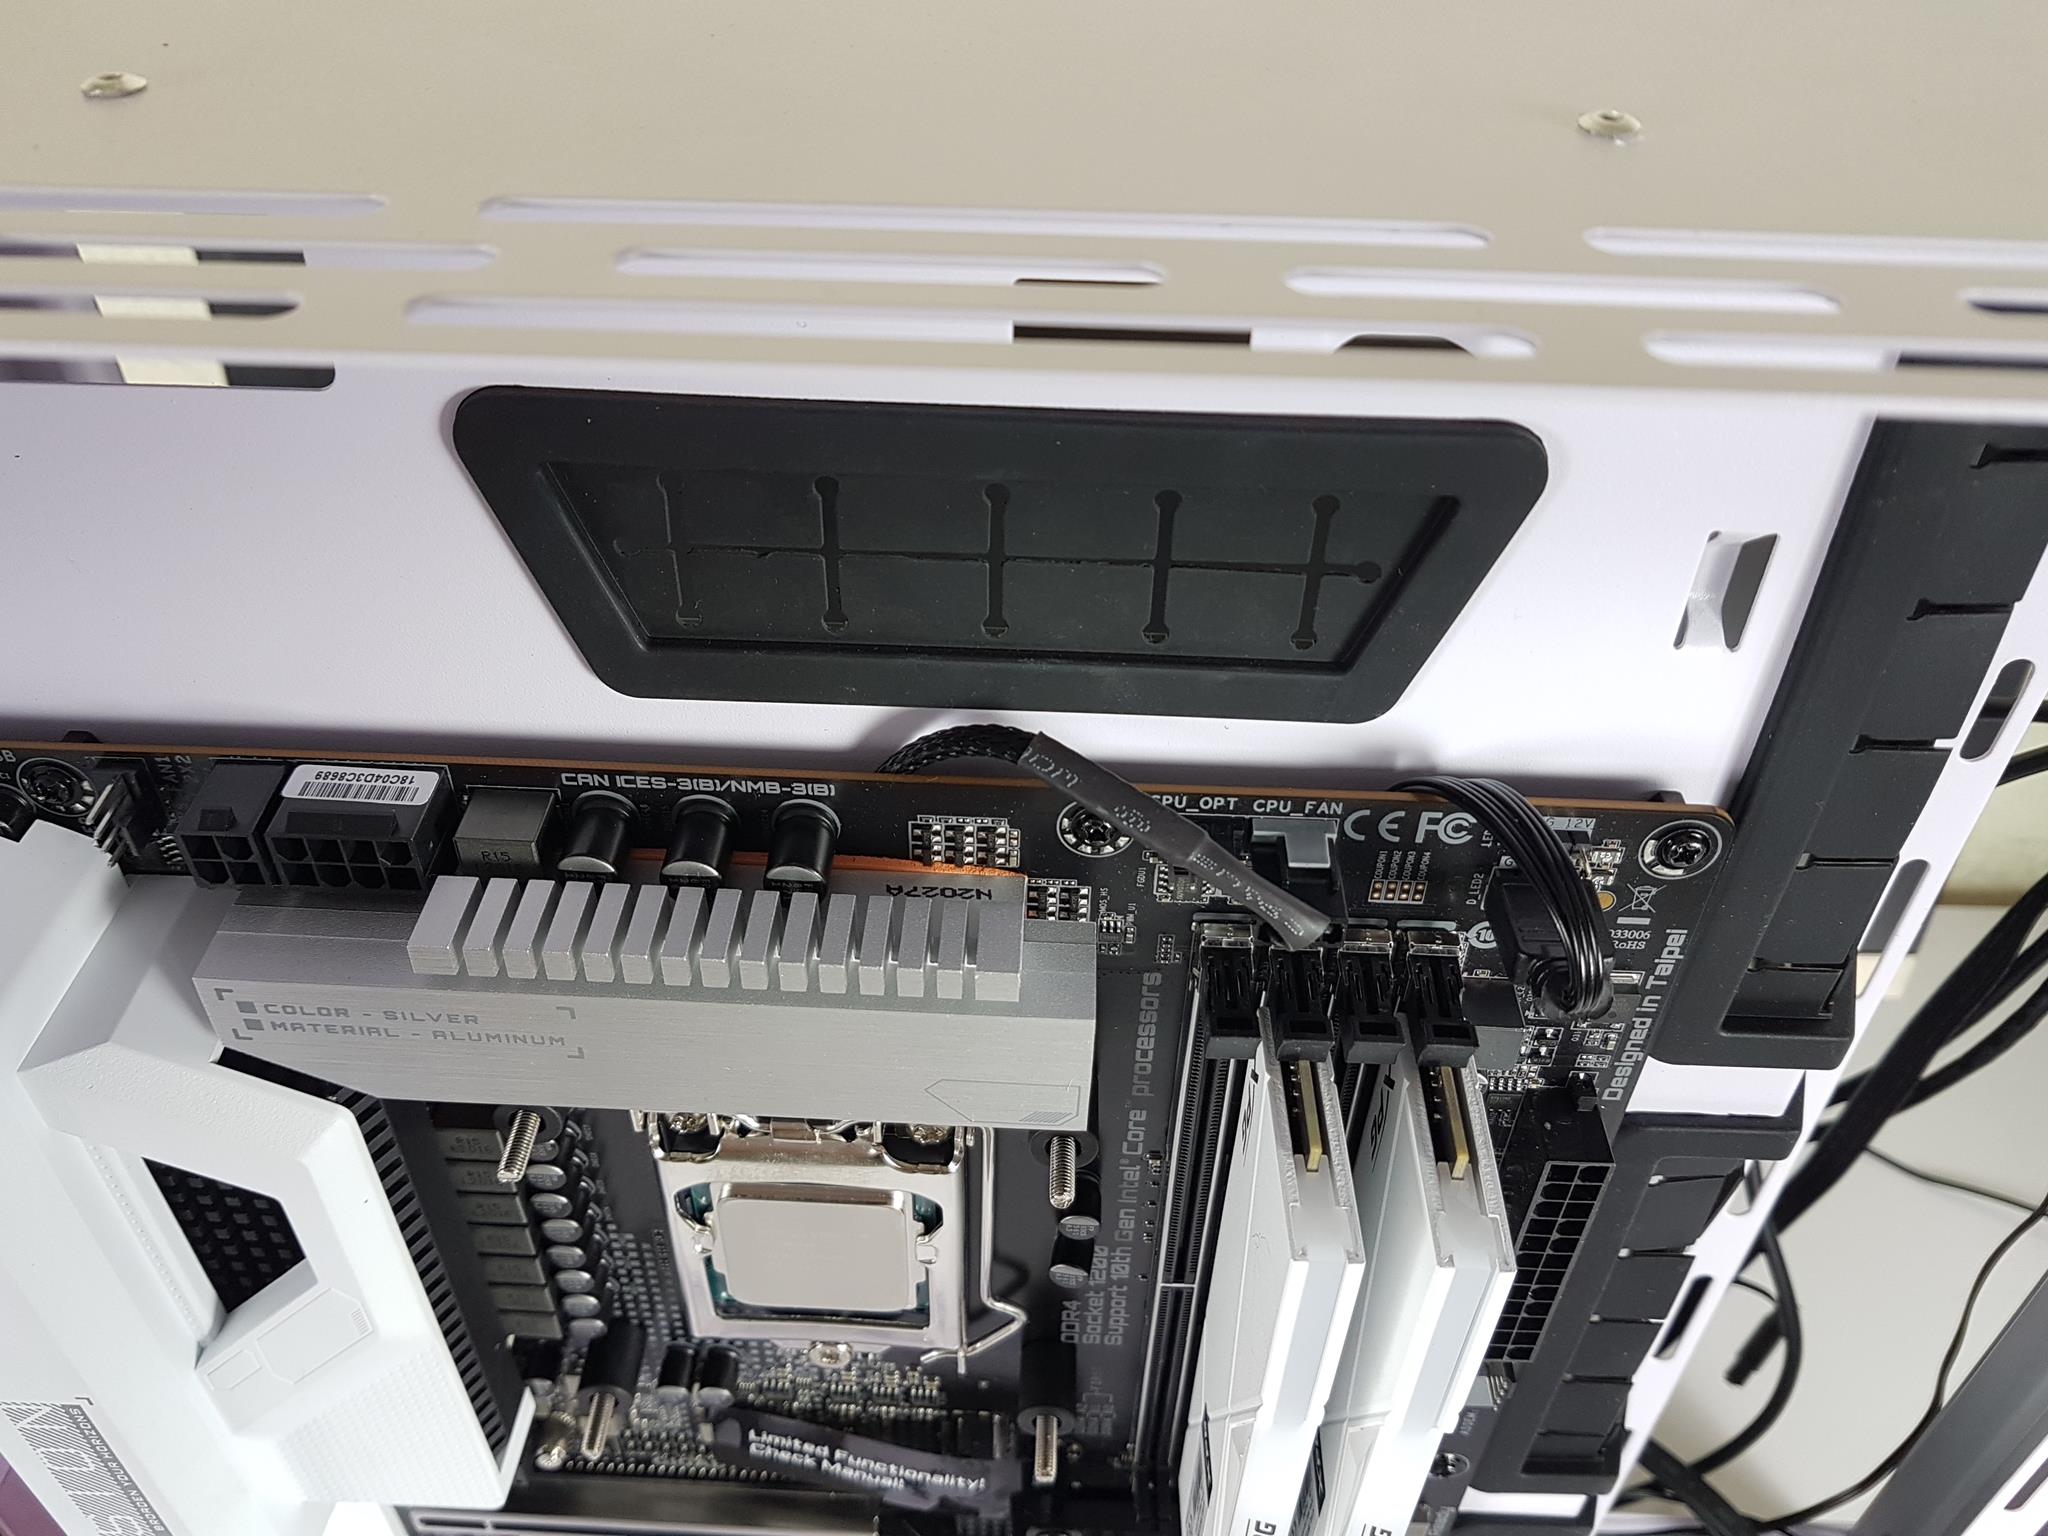
XPG SPECTRIX D50
XPG SPECTRIX D50 aims to provide high-speed DDR4 kits at reasonable prices. These kits come in tungsten gray and white colors with a minimum frequency of 3000MHz and a maximum frequency of 4800MHz. Our kit uses Hynix D-Die on the standard package of monolithic 78-ball FBGA. Die Density is 8 Gb D-Die (17 nm) with the composition of 1024M x8 (64MB x8 x16 banks). Each module has a dimension of 133.35 x 40 x 8mm (LxWxH).
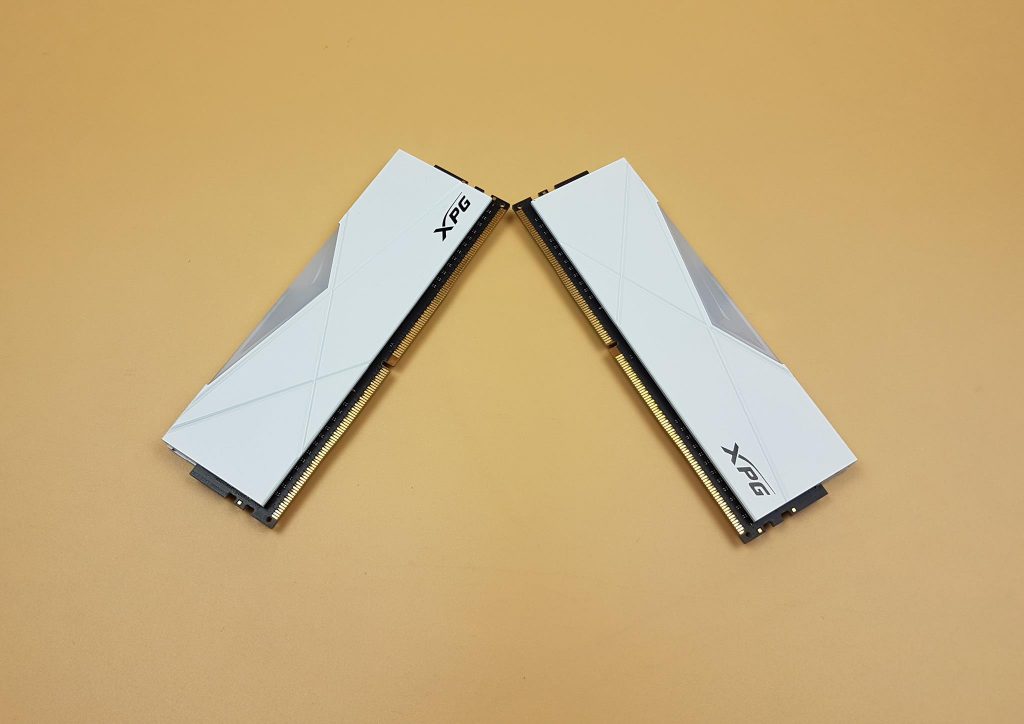
The heat spreader has a criss-cross pattern with geometric lining and finishing in an elegant manner making these kits stand out with their simple yet beautiful design footprint. There is a triangular designed cutout on the heat spreader in the center through which the RGB lighting peeks out. The white color on the heat spreader looks really cool in person. There is minimalistic branding on the modules.
Read our dedicated review of the XPG SPECTRIX D50.
XPG S50 Lite 1TB
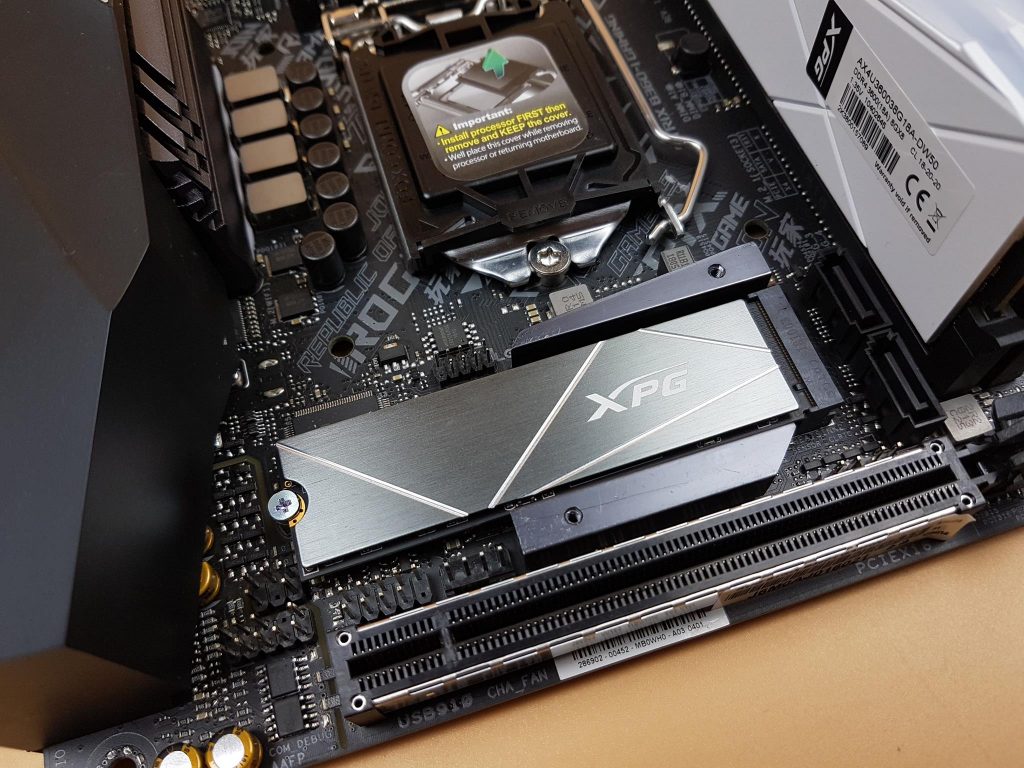
The XPG GAMMIX S50 Lite is available in two capacities; 1TB and 2TB. The XPG GAMMIX S50 Lite 1TB M.2 NVMe PCIe4x4 SSD has an M.2 form factor of 2280. It is an M Key type SSD compatible with the majority of the M.2 slots on modern motherboards. The XPG S50 Lite is utilizing 3D TLC NAND. The SSD’s dimension is 80x22x4.3mm (LxWxH) with a weight of 10g.
Click here to read our detailed take on this SSD.
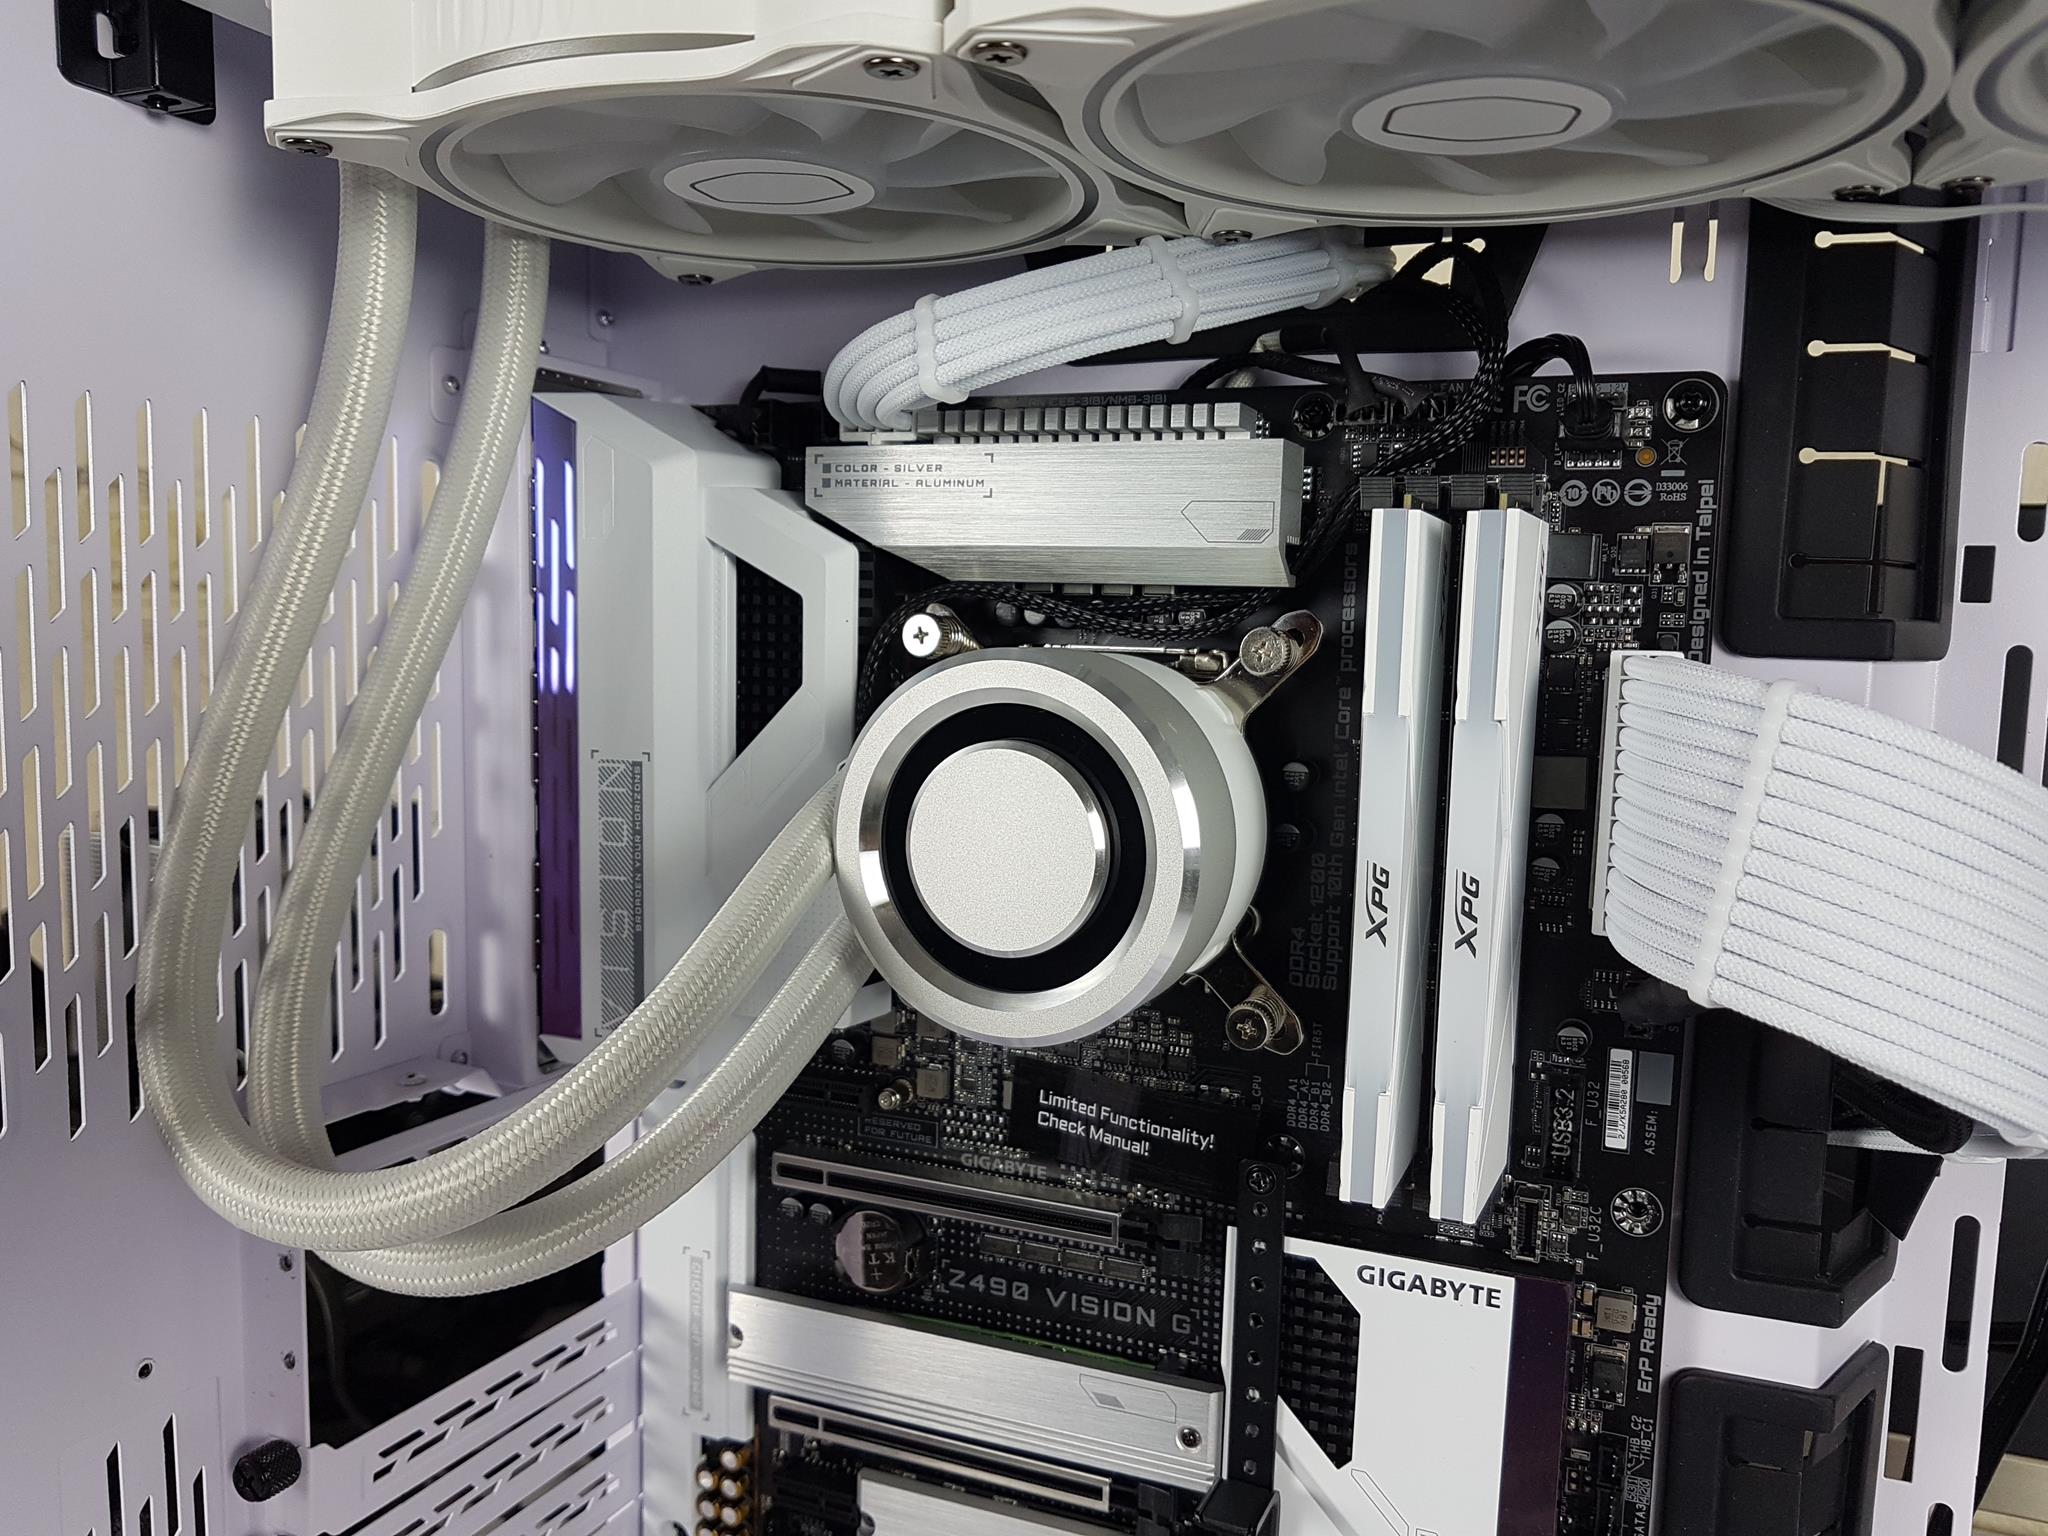
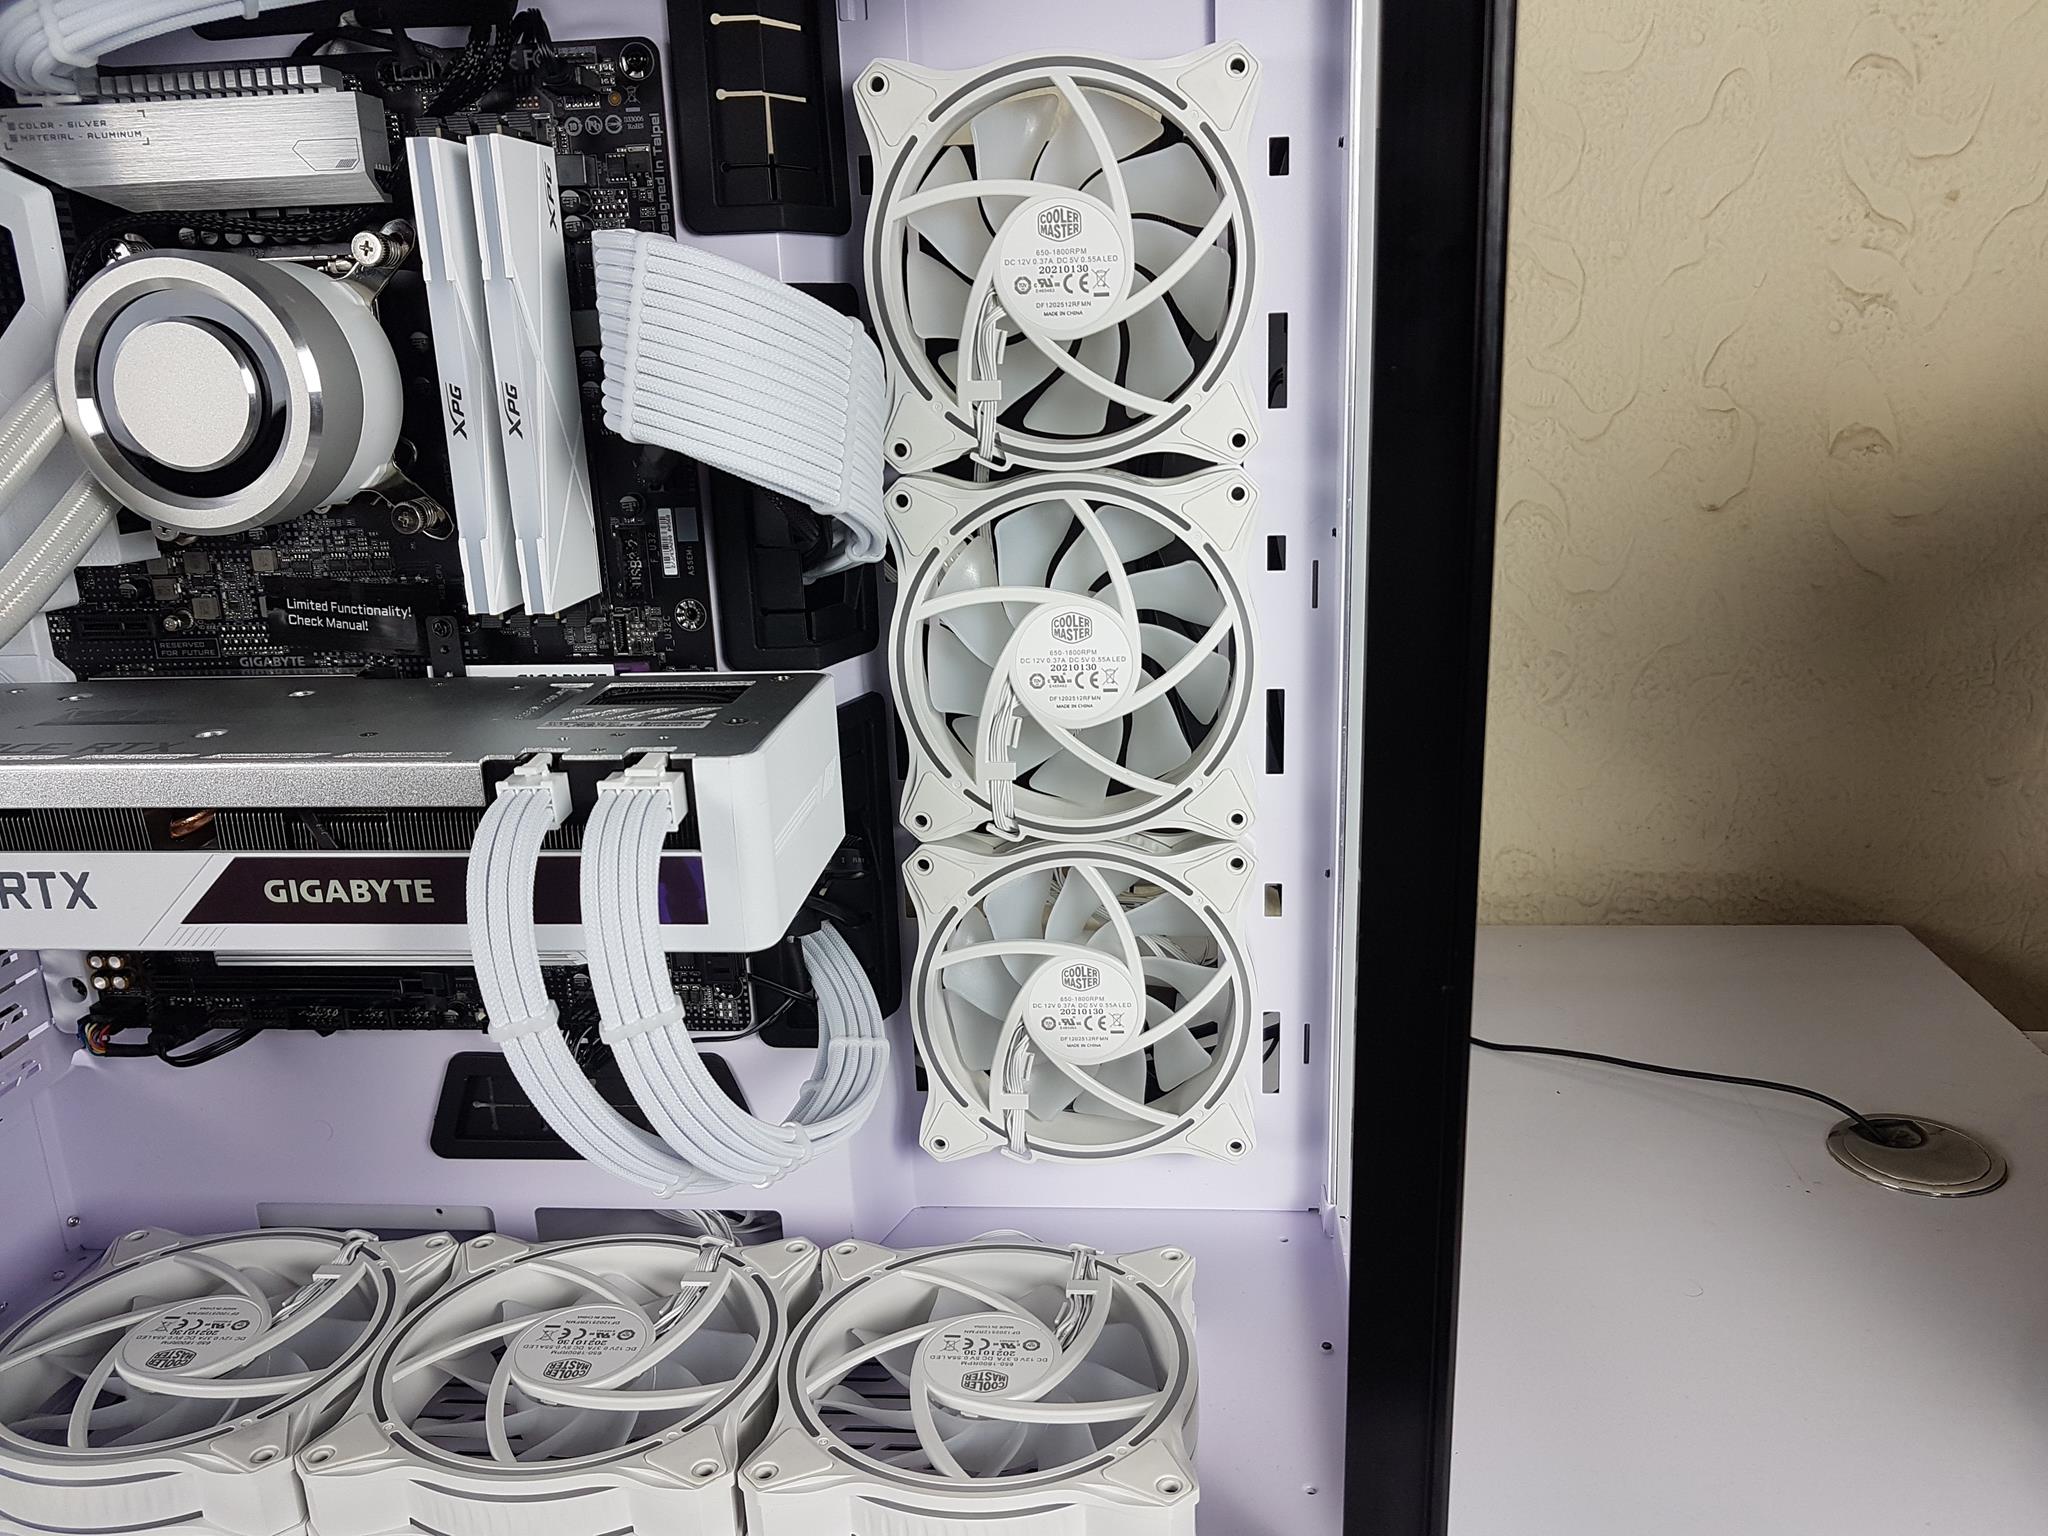
Lian Li GALAHAD 360 White
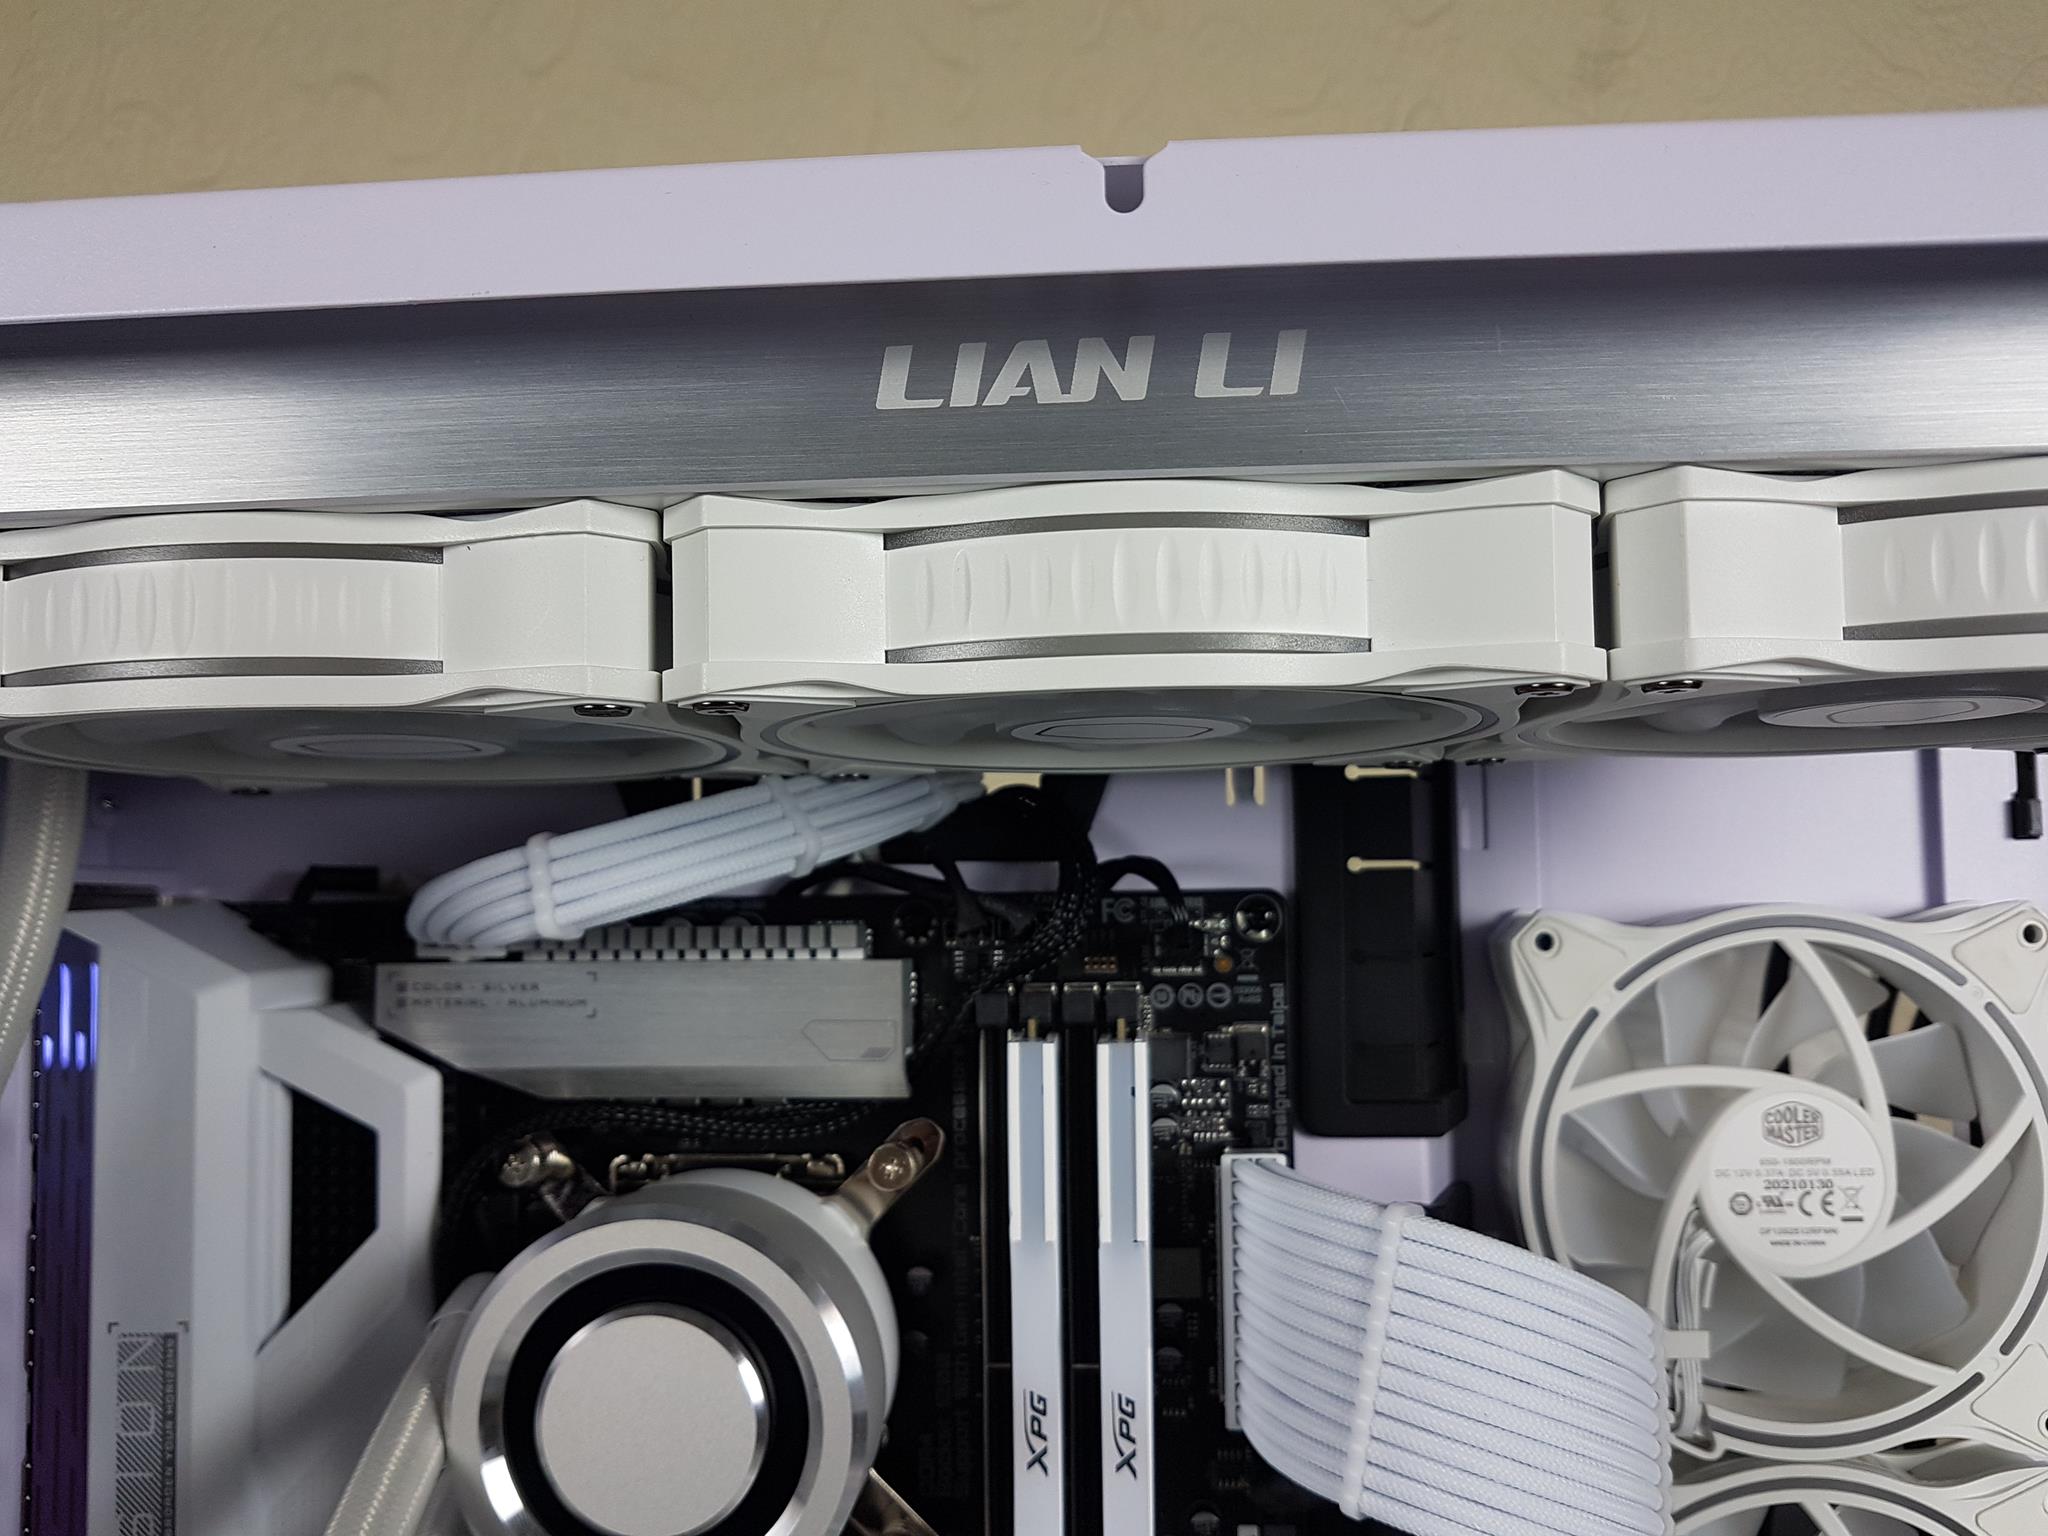
The GIGABYTE Z490 VISION G and GeForce RTX 3070 VISION OC presented us with a unique color combination of White and Silver. GIGABYTE could not have done it better than this and I admire their execution. In order to have almost a perfect match, we were on the lookout for the white and silver color cooler and Lian Li did not disappoint. We selected the Lian Li GALAHAD 360 White cooler for this purpose.
I love how Lian Li has implemented the faceplate with A-RGB backlit in quite a distinctive manner, and we can rotate the aluminum portion to have the Lian Li text face upright. This eases out the installation of the block regardless of the text orientation. The build quality is also top-notch, and the performance is good.
Click here to read our full review of this CPU Cooler.
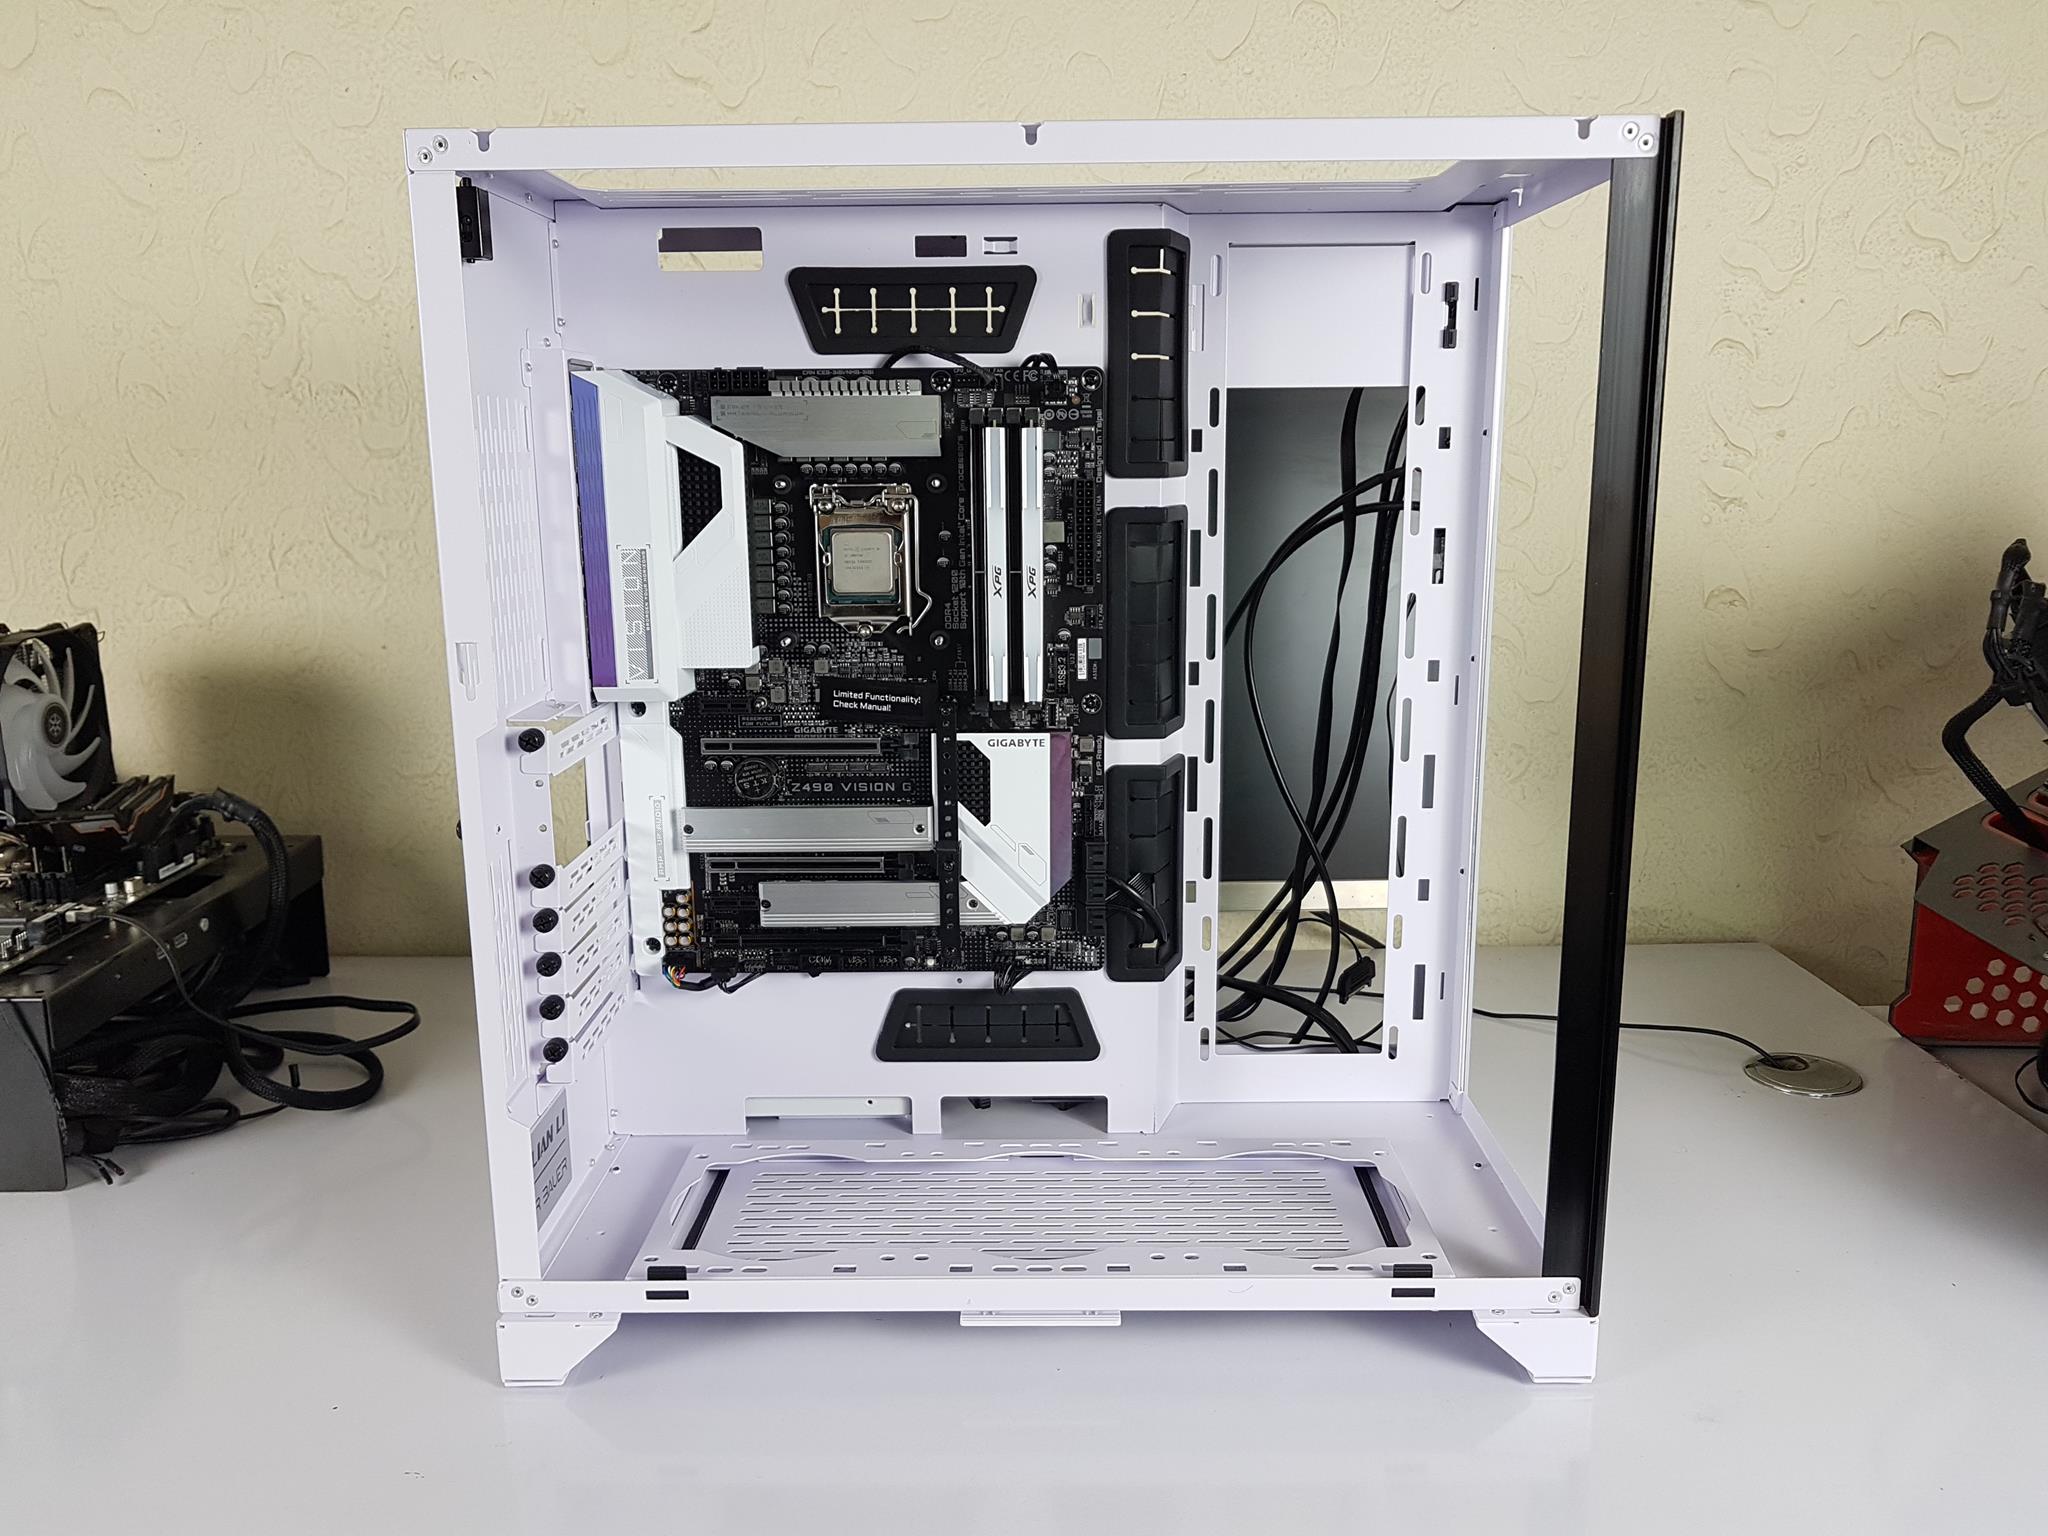
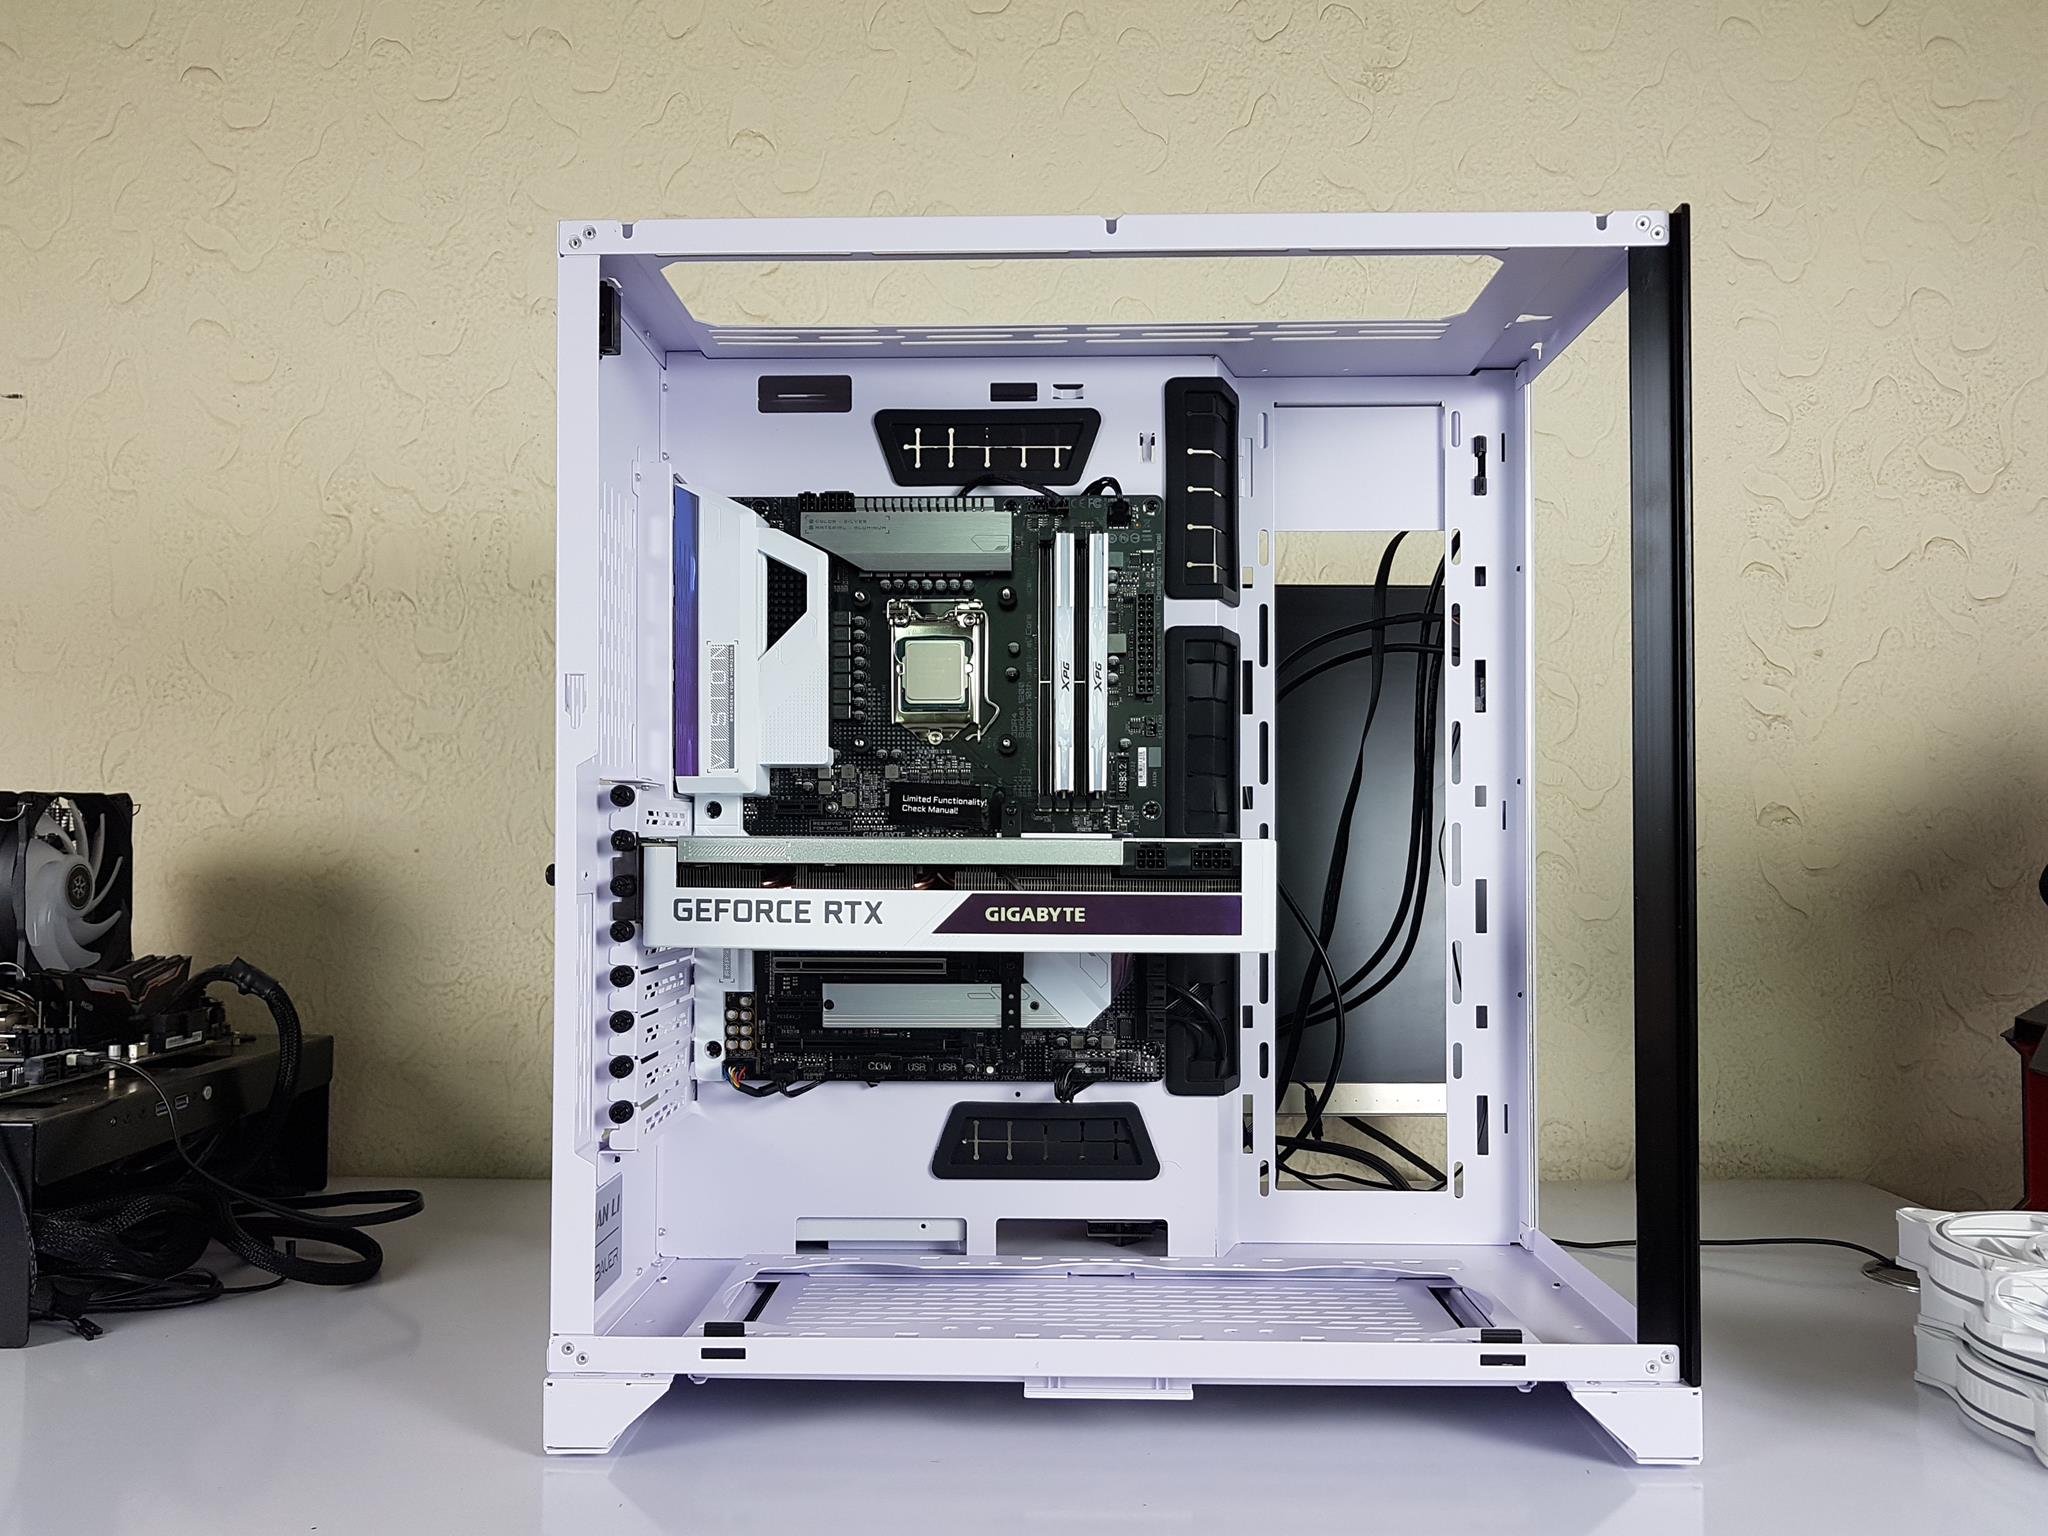
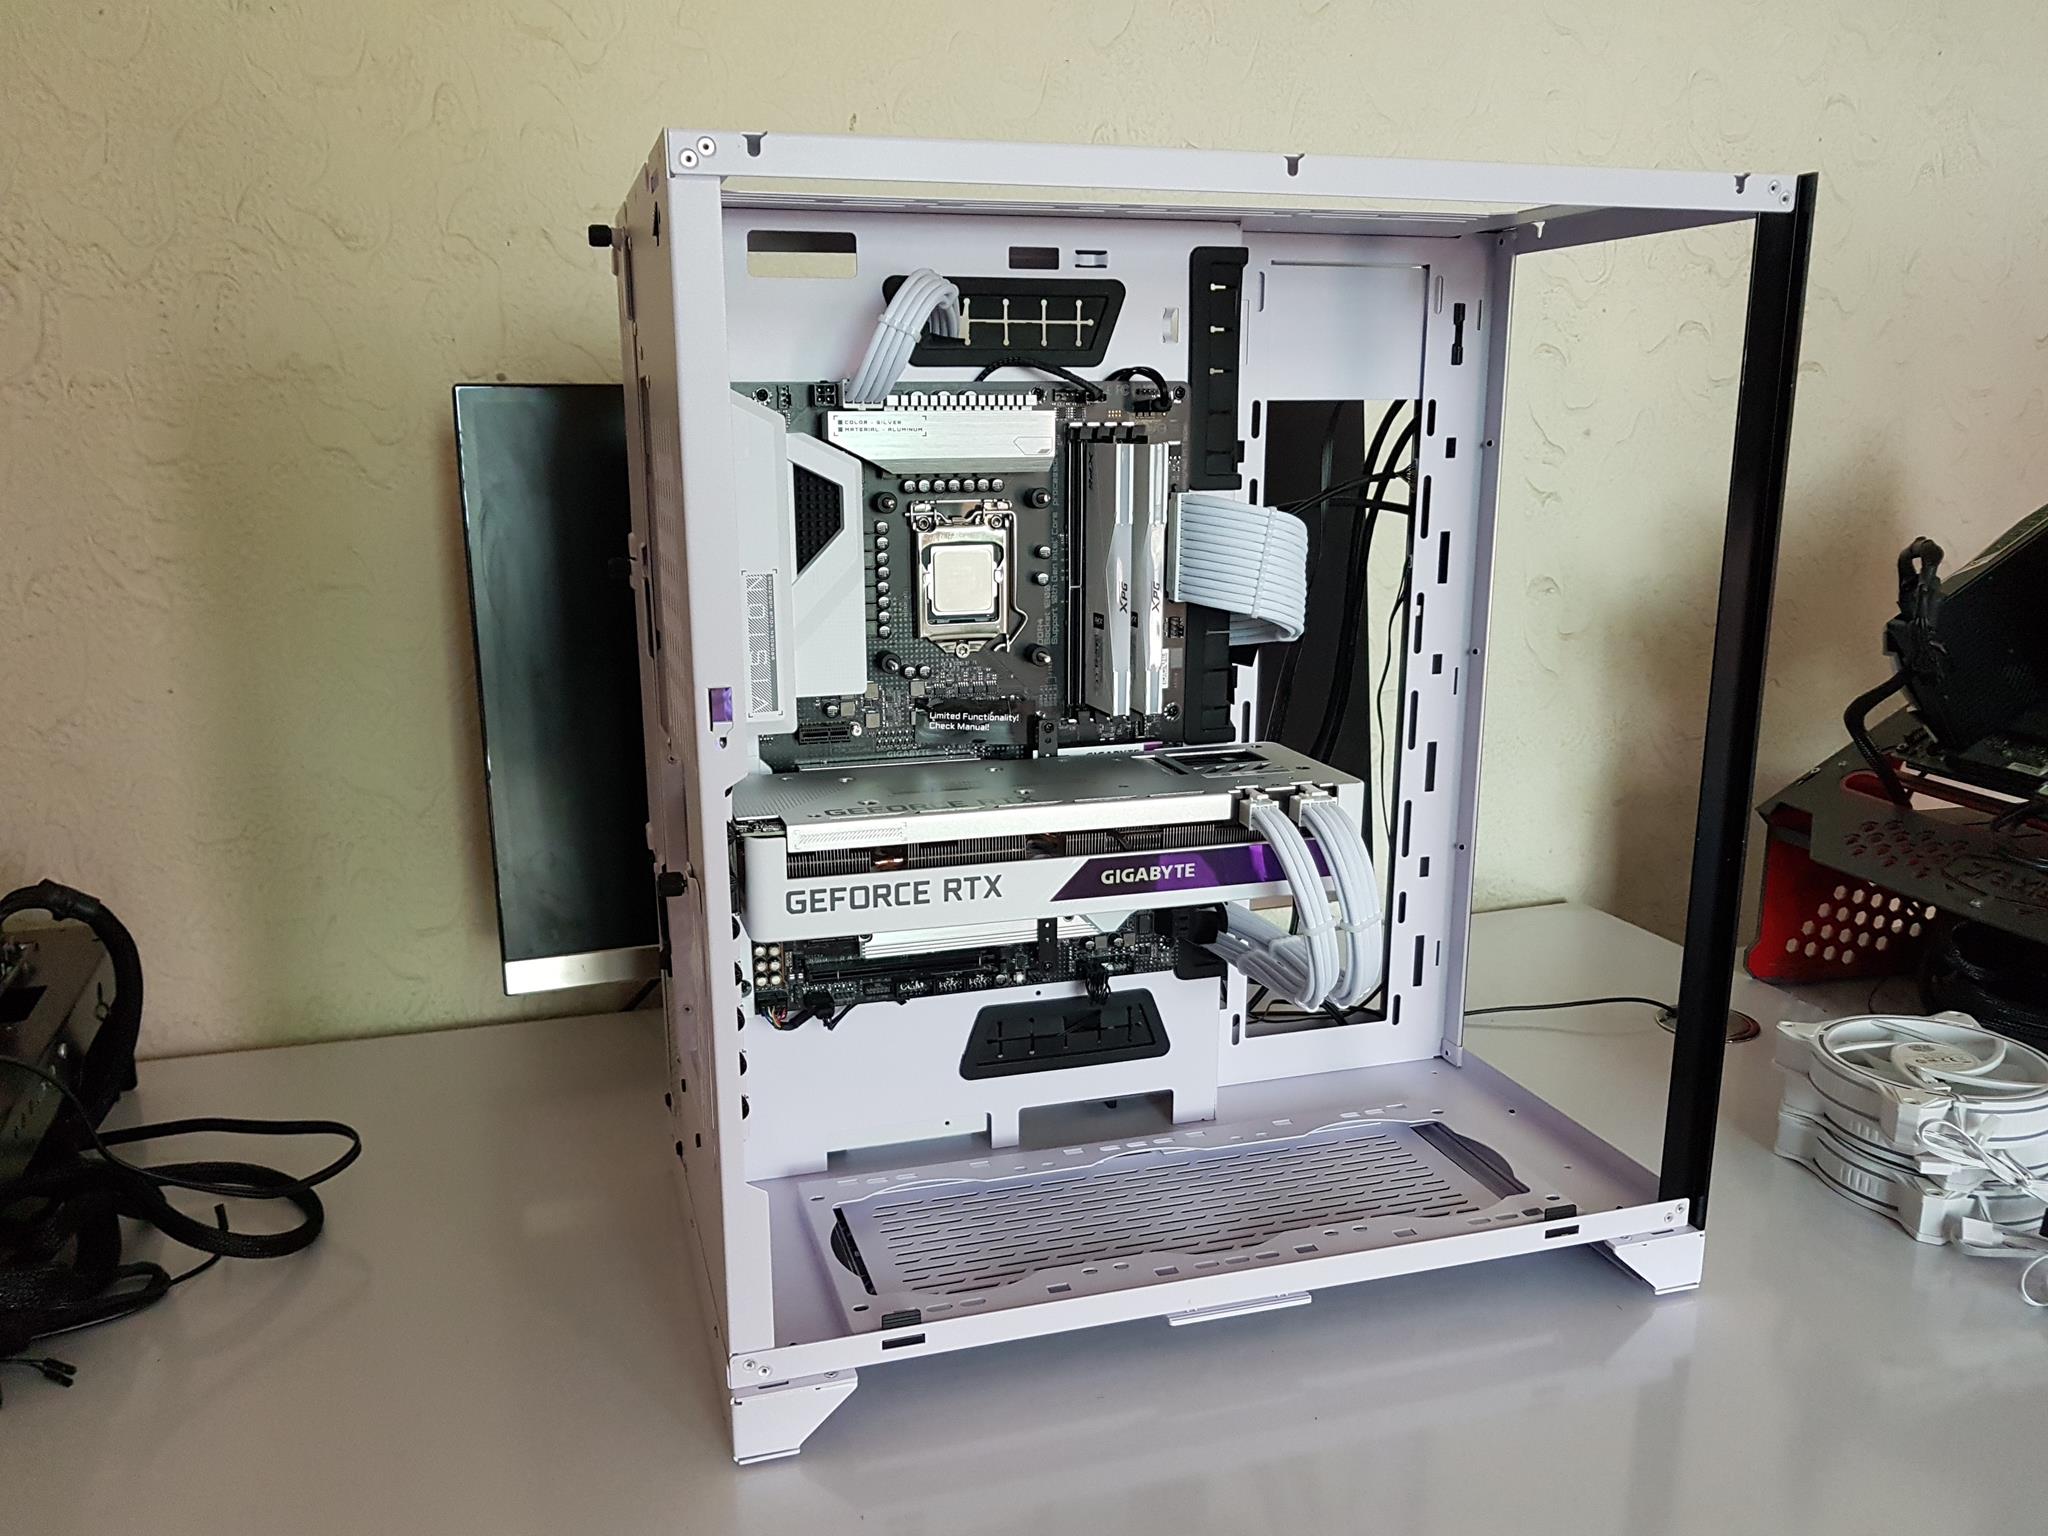
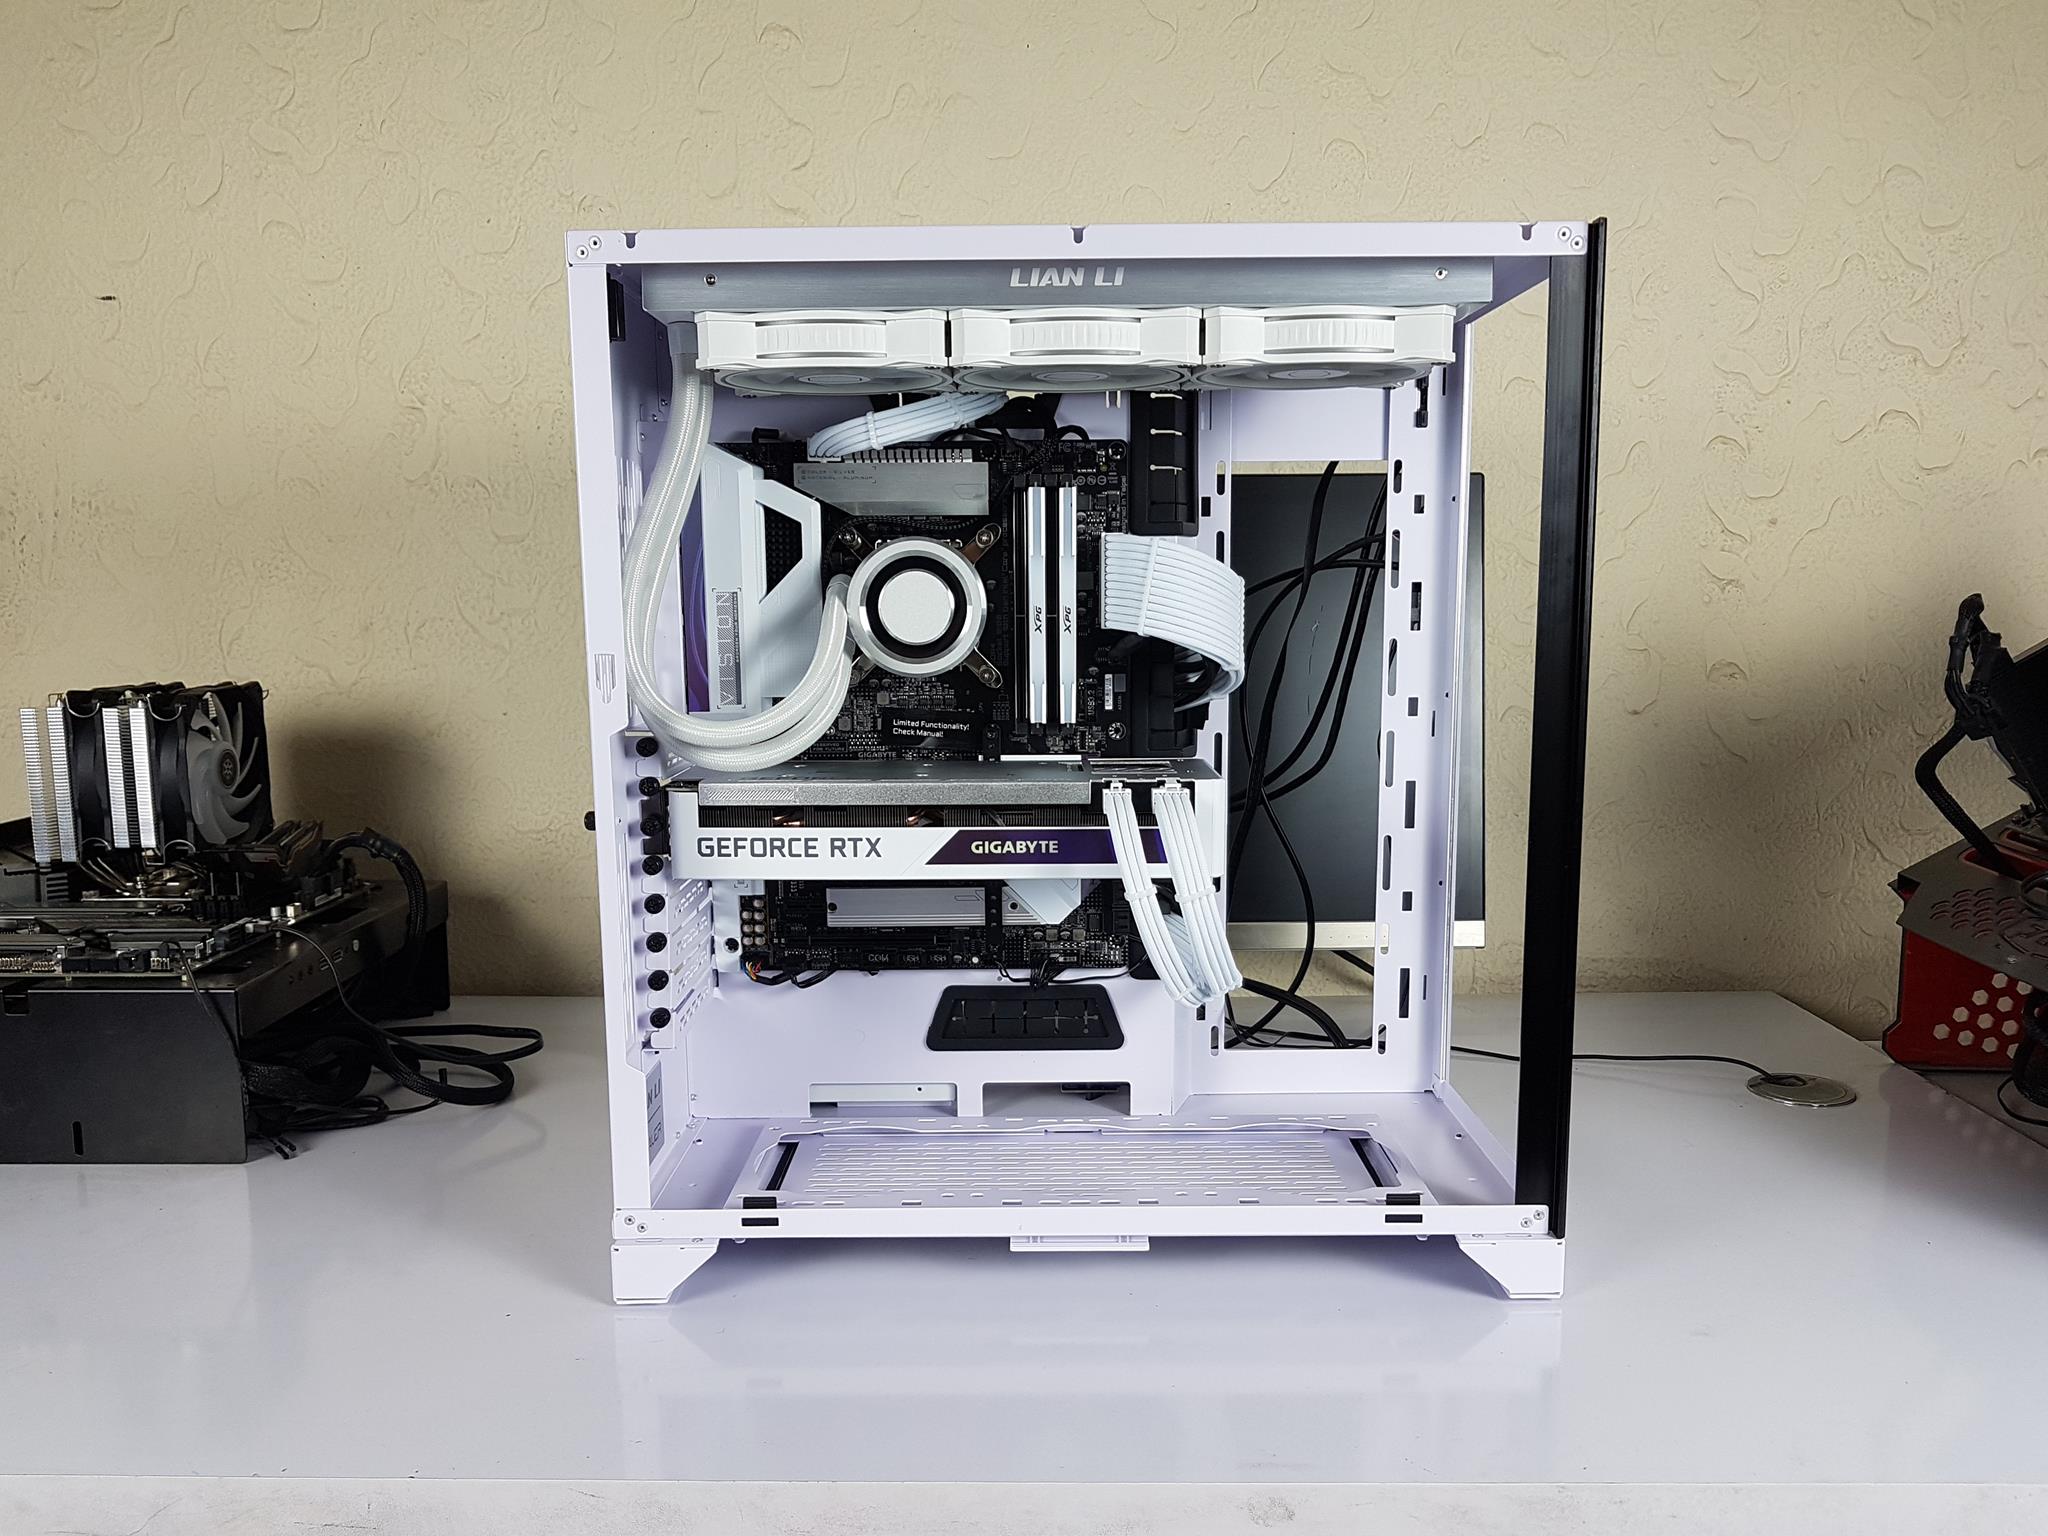
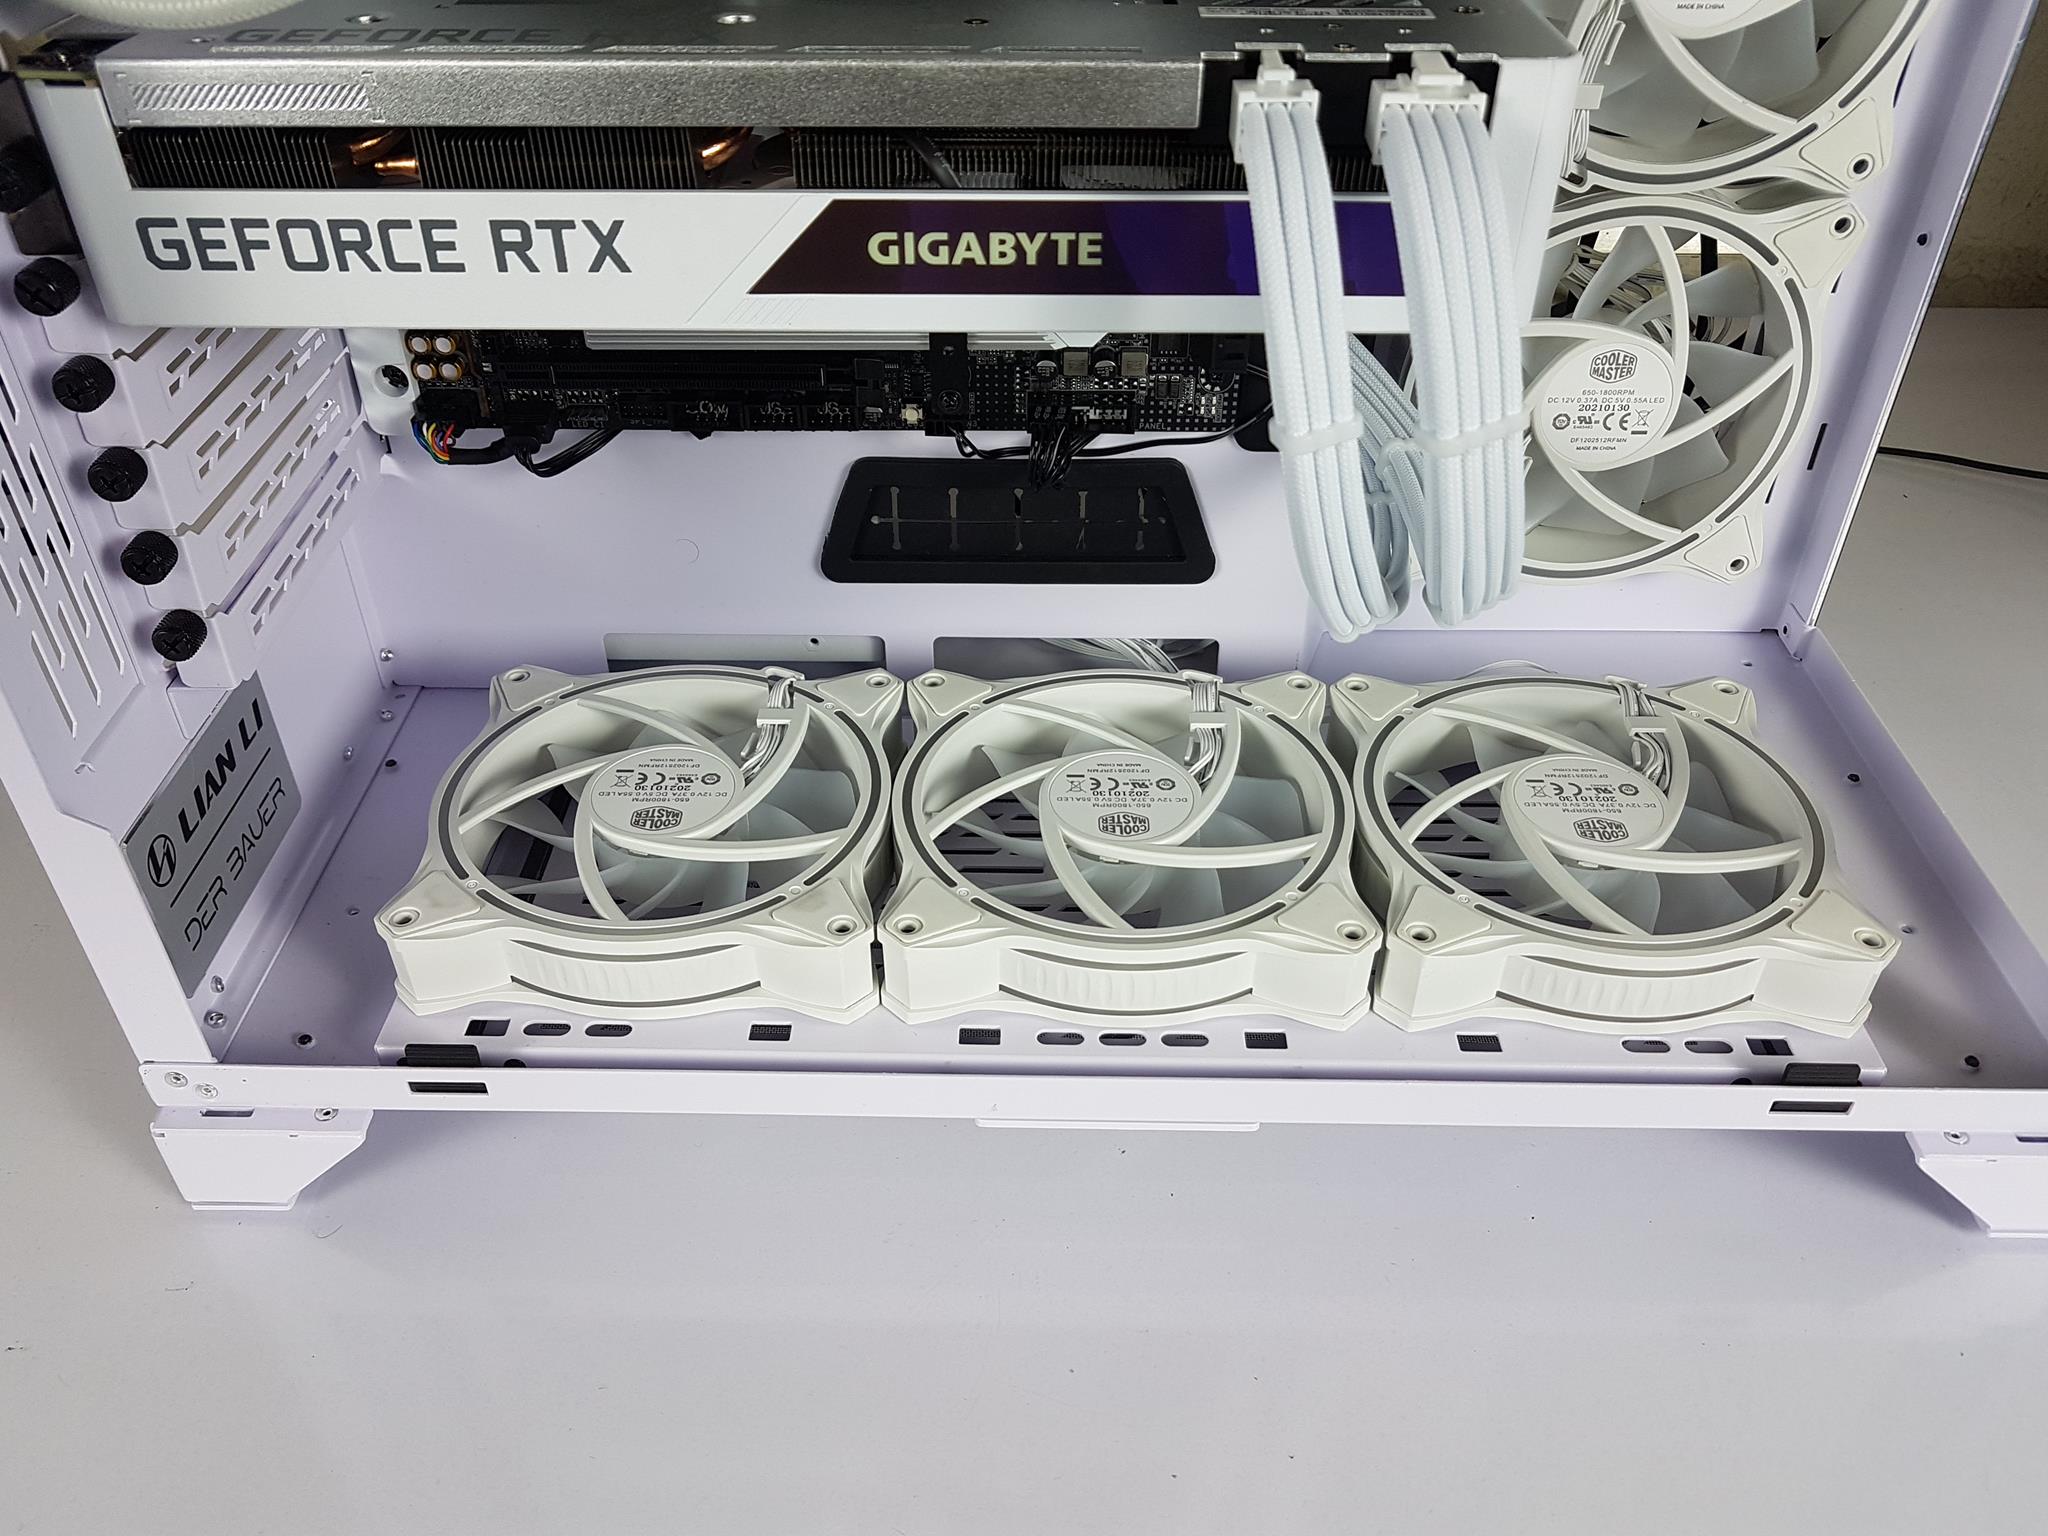
Lian Li O11 Dynamic XL ROG Edition White
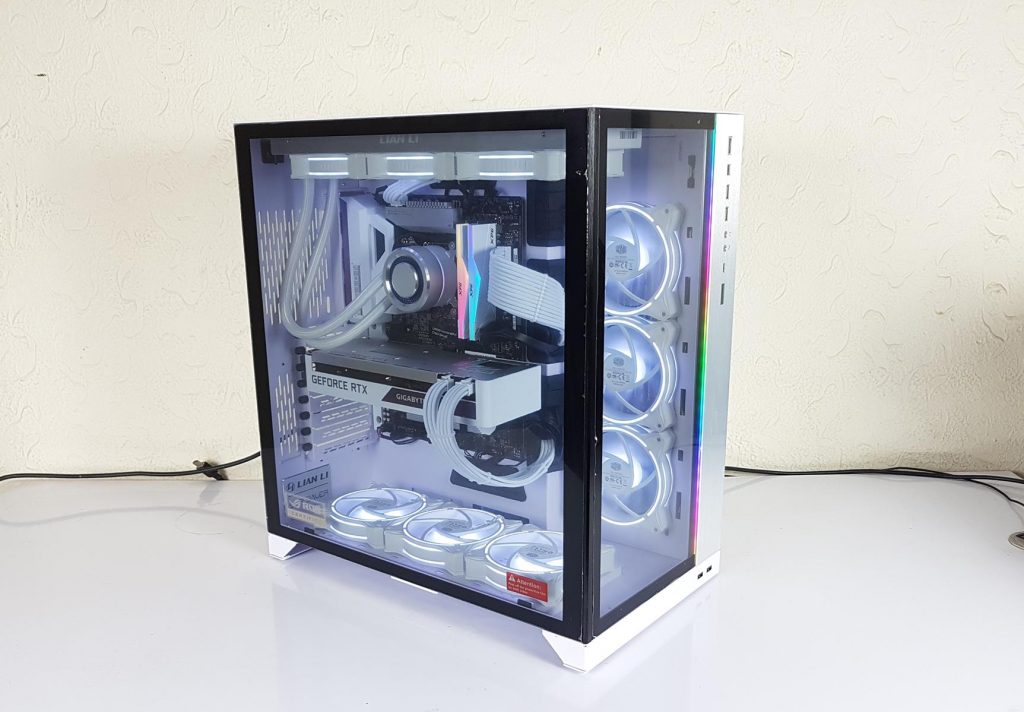
We chose the Lian Li O11 Dynamic XL chassis for its spacious design and future-proofing potential. This case features a unique layout ideal for liquid cooling but not for air cooling, with a separate variant available for the latter. It supports up to E-ATX motherboards, though an extension panel is needed for EEB boards.
The design includes a GPU support bracket, accommodates PSUs up to 280mm, and has four removable hot-swappable drive bays. Cable management is made easy with a rear bracket, and there are multiple fan installation points: up to 3x 120mm or 2x 140mm fans on the top and bottom, 1x 120mm on the rear, and up to 3x 120mm on the side.
The chassis features a front aluminum panel with I/O ports, and two 4mm tempered glass panels on the front and side. The interior is made of SPCC material. Additionally, there is an A-RGB LED strip on the front with a dedicated controller that syncs with the motherboard.
Cooler Master MF120 HALO White Fans
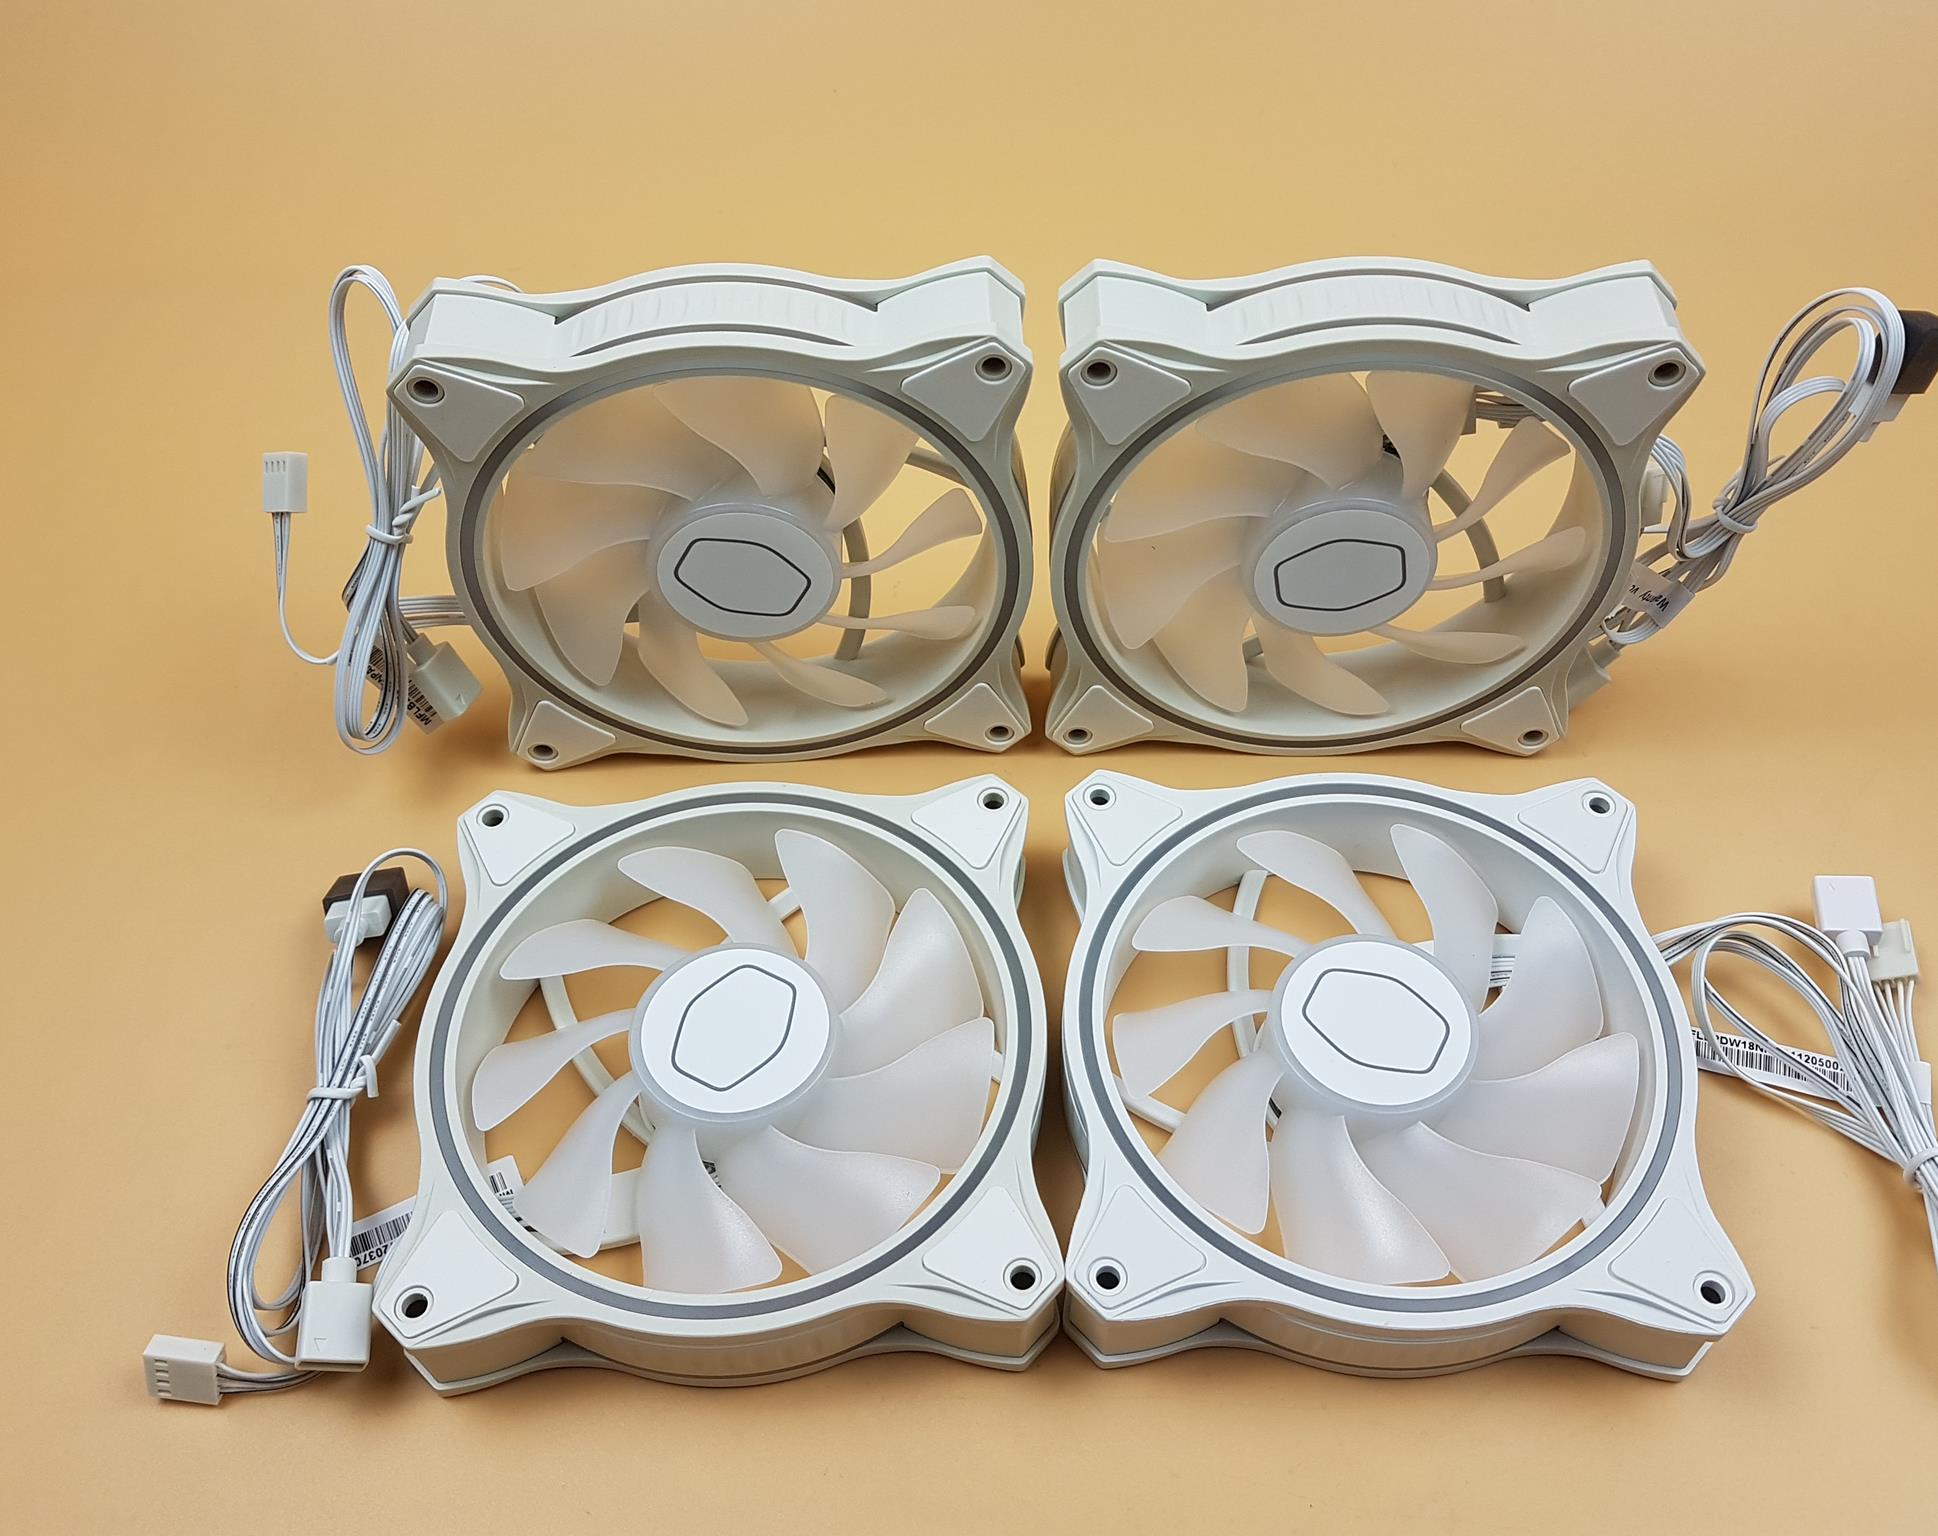
When I reviewed the standard version of Cooler Master MF120 HALO fans on Enos Tech, I knew that the white version of these fans would look dope and would make up for any white fan with dual-loop A-RGB lighting. I was not wrong at all. These fans have added that touch that was needed to lift the total outlook of this build.
The Cooler Master MF120 Halo White fans are using Rifle bearings and are rated for 160,000 hours MTTF. The airflow rating is 47.2 CFM ±10% and the air pressure rating is 1.6 mm H2O ±10%. Their sound rating is 6-30 dBA.
DeepCool DQ750-M-V2L-WH PSU
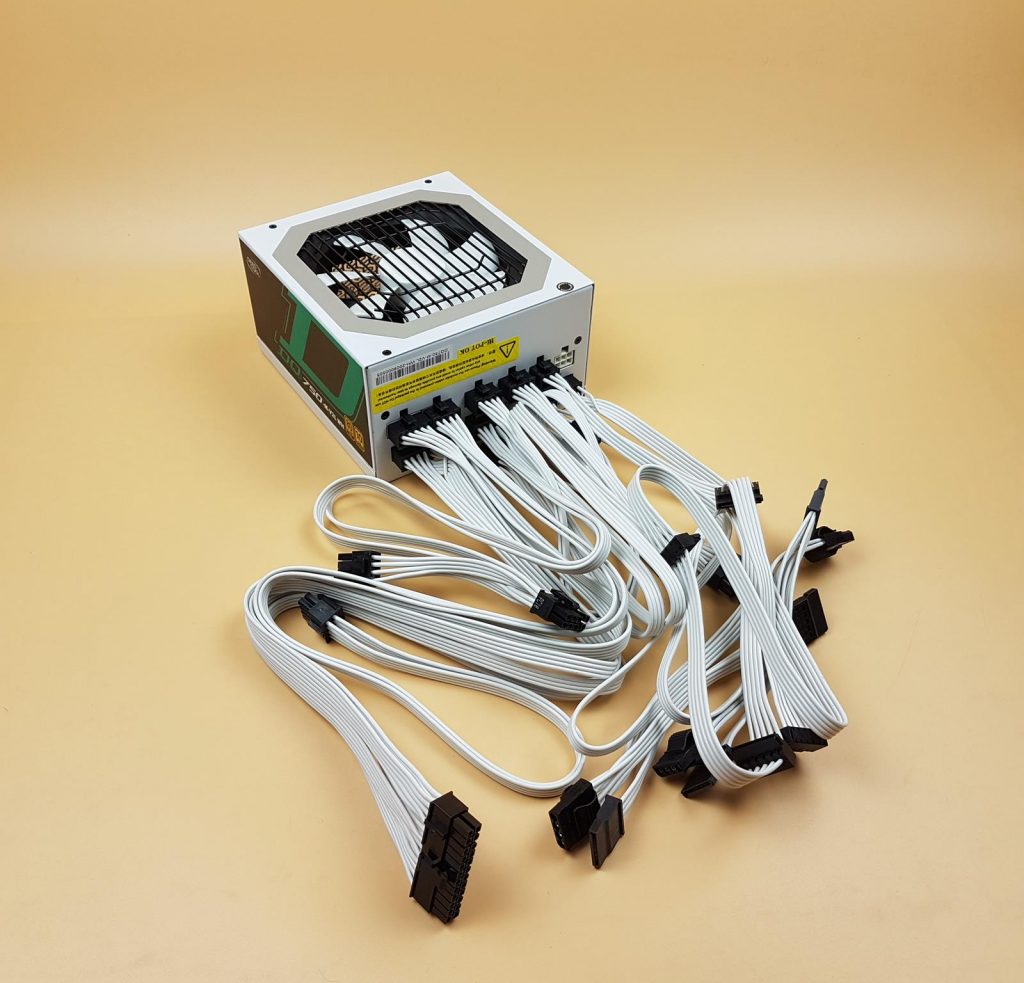
We are regularly getting white cases for review. DeepCool was kind enough to support us with white fans and a cooler for those reviews and feature builds. We reached out to them to support us with a white PSU as well. Next, we knew, FedEx dropped a parcel with the PSU in it.
The salient features of the PSU include:
- 80 PLUS® GOLD certified – Up to 91.2% efficiency
- 100% High quality Japanese capacitors
- Full bridge PFC + LLC Resonant converter
- Fully modular with flat cable design
- CircuitShield™ — OVP / UVP / SCP / OPP / OTP
Featuring active Power Factor Correction (PFC), a full bridge LLC resonant converter, and synchronous rectification DC-DC design, the DQ750-M-V2L WH delivers improved performance with lower power dissipation, increased quality, and better thermals to meet your needs.
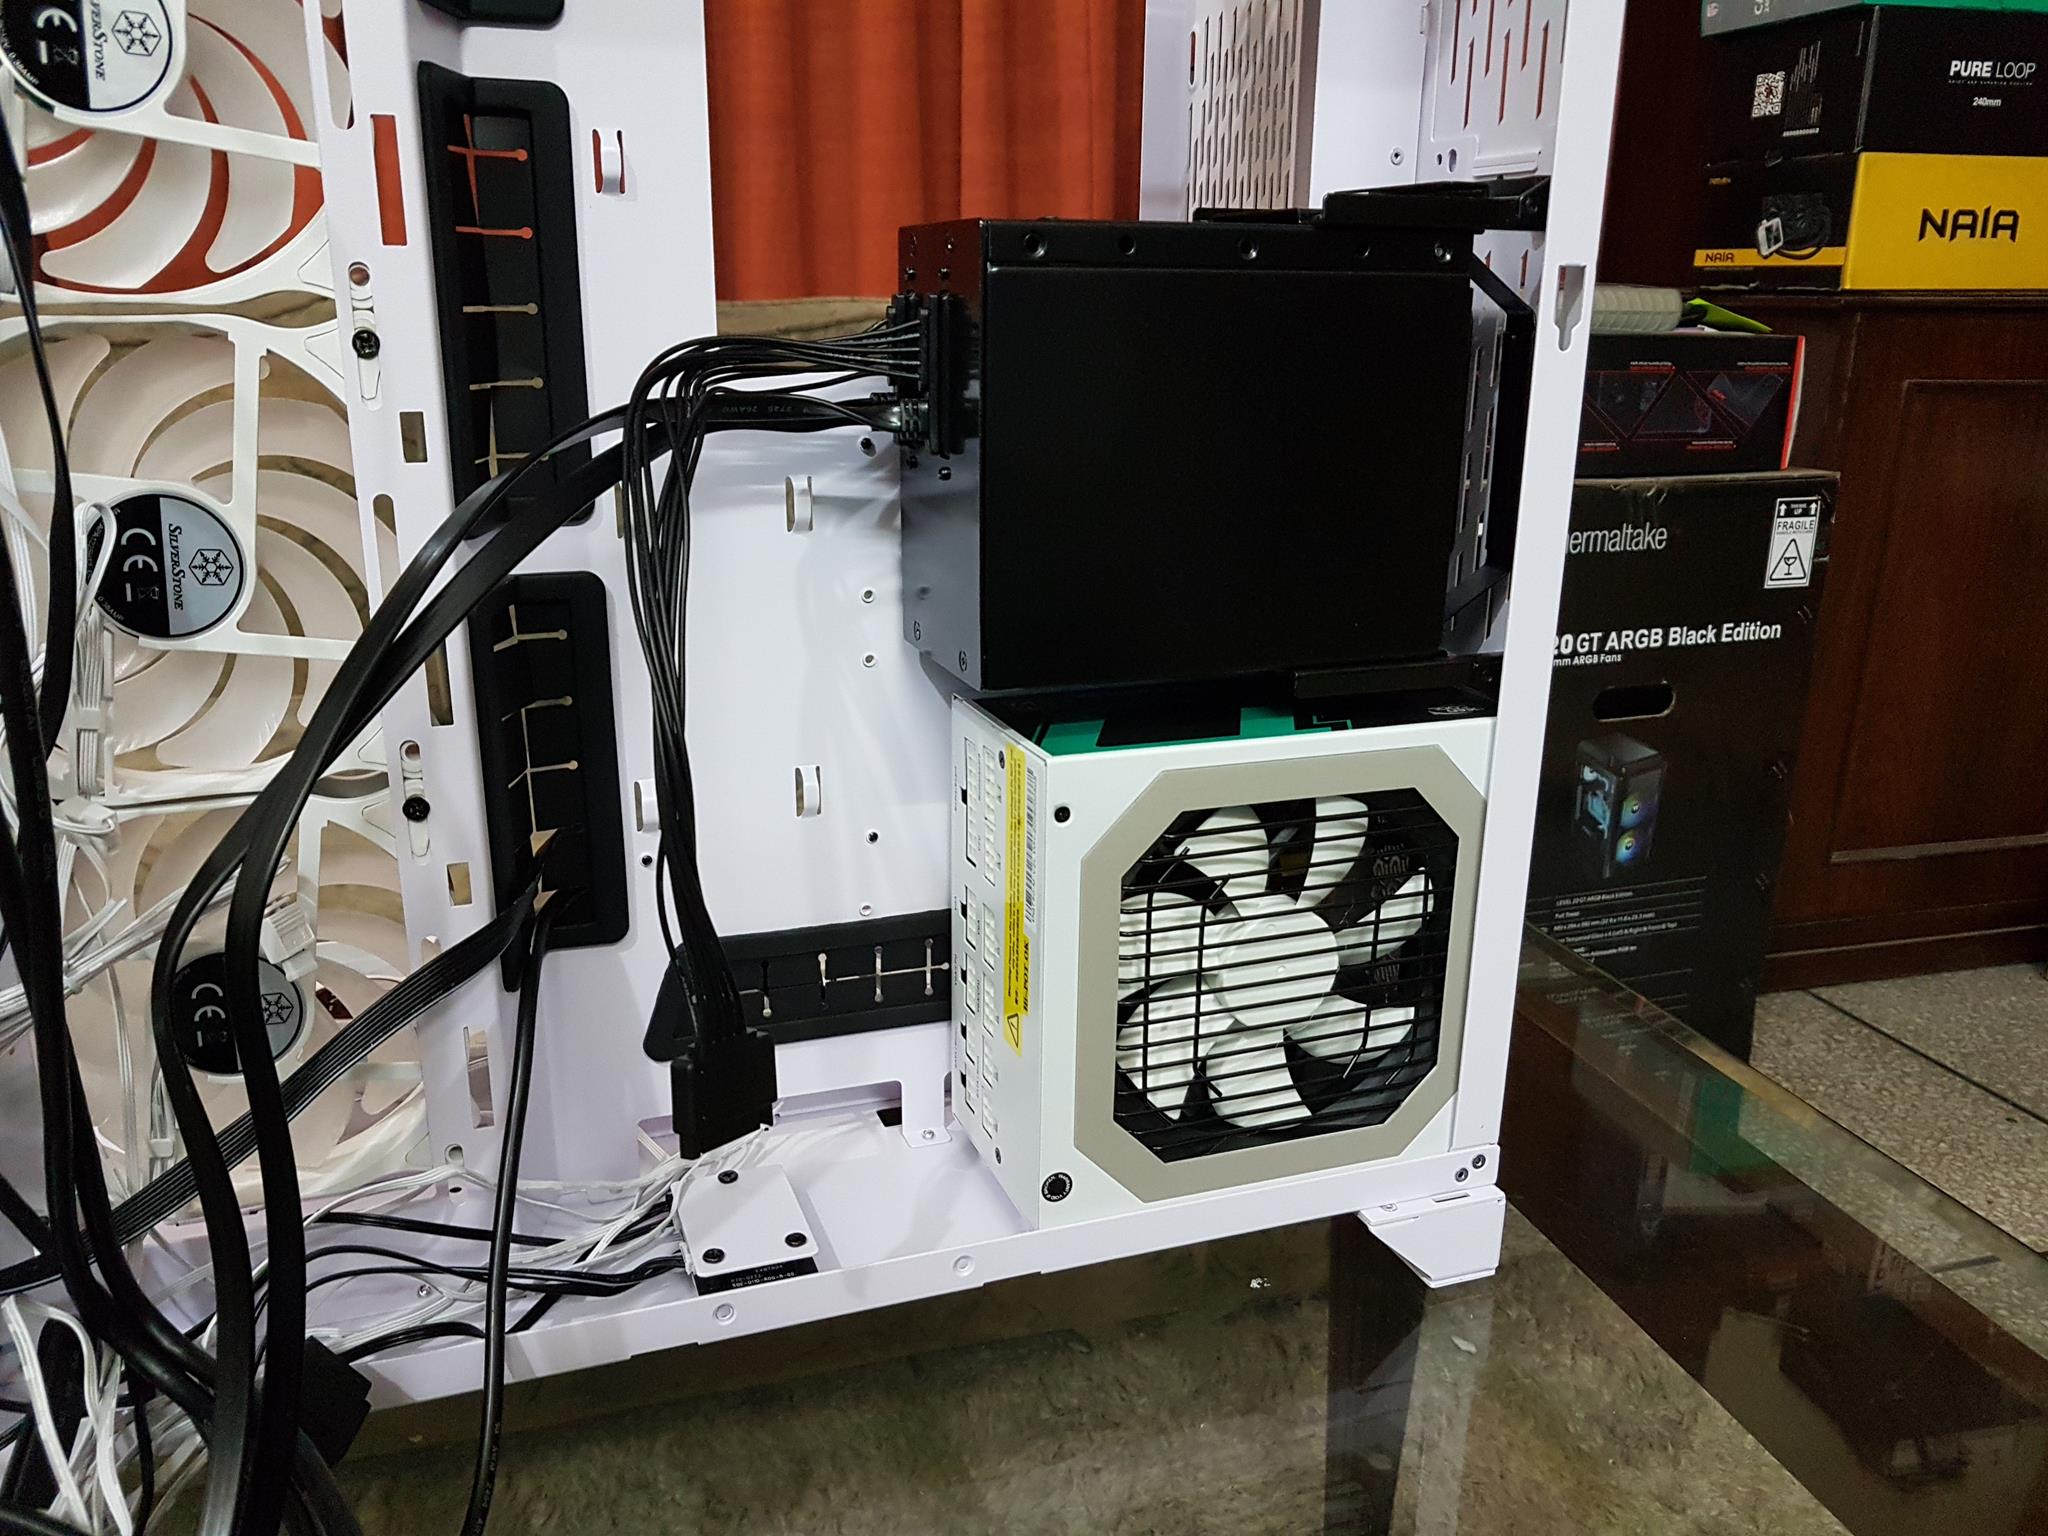
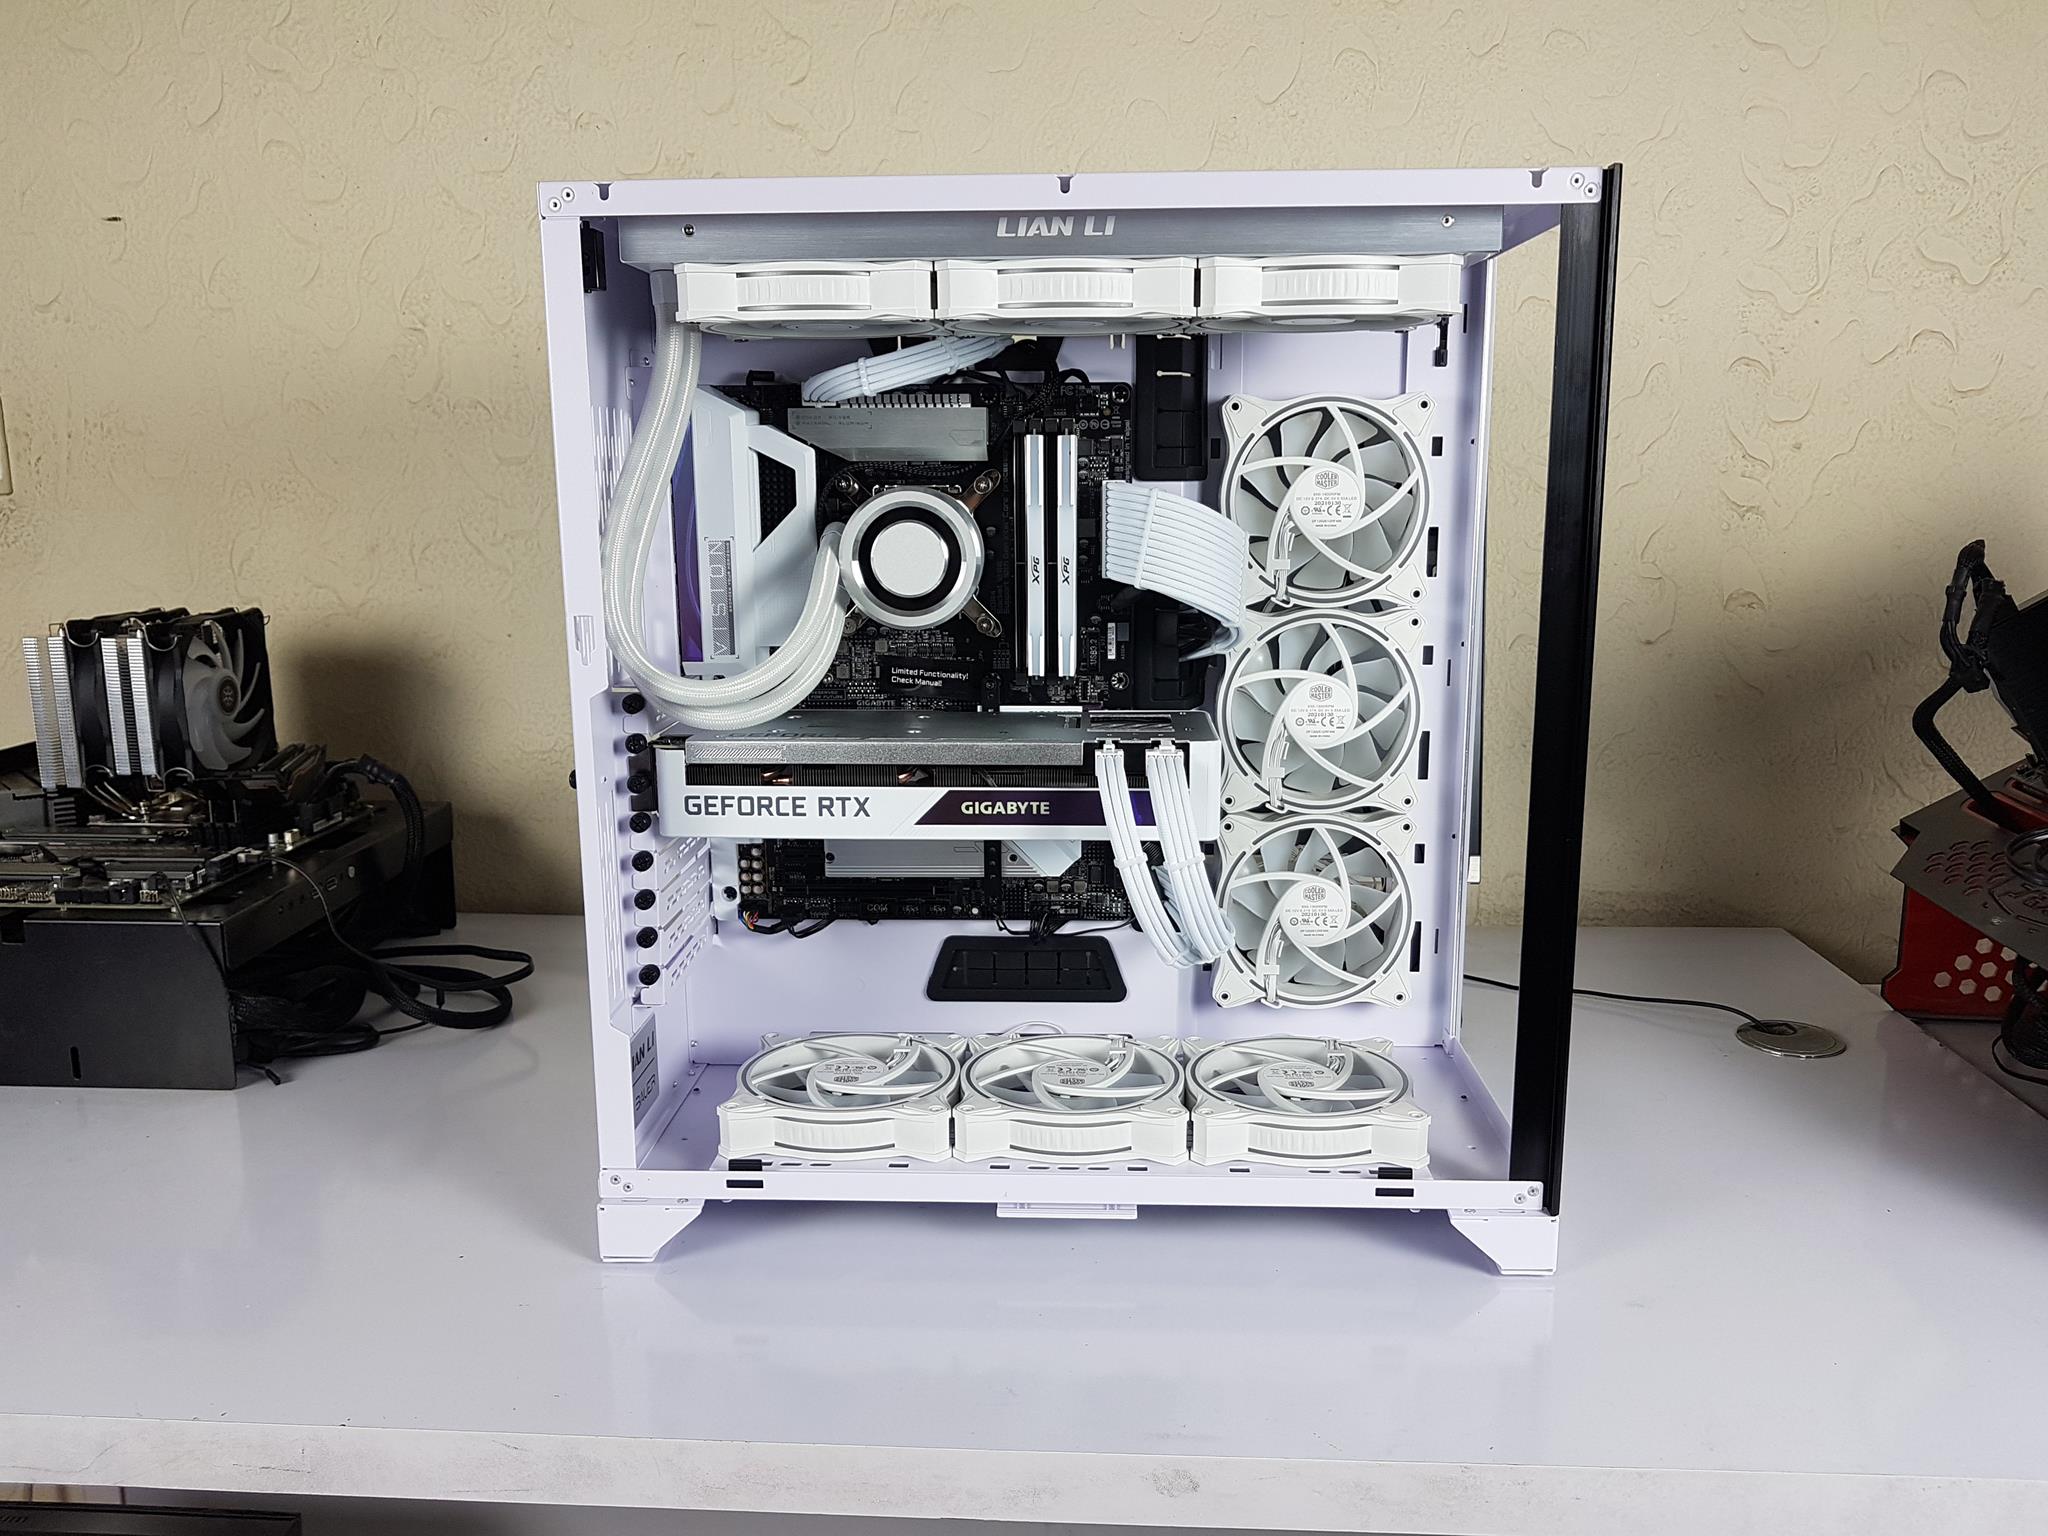
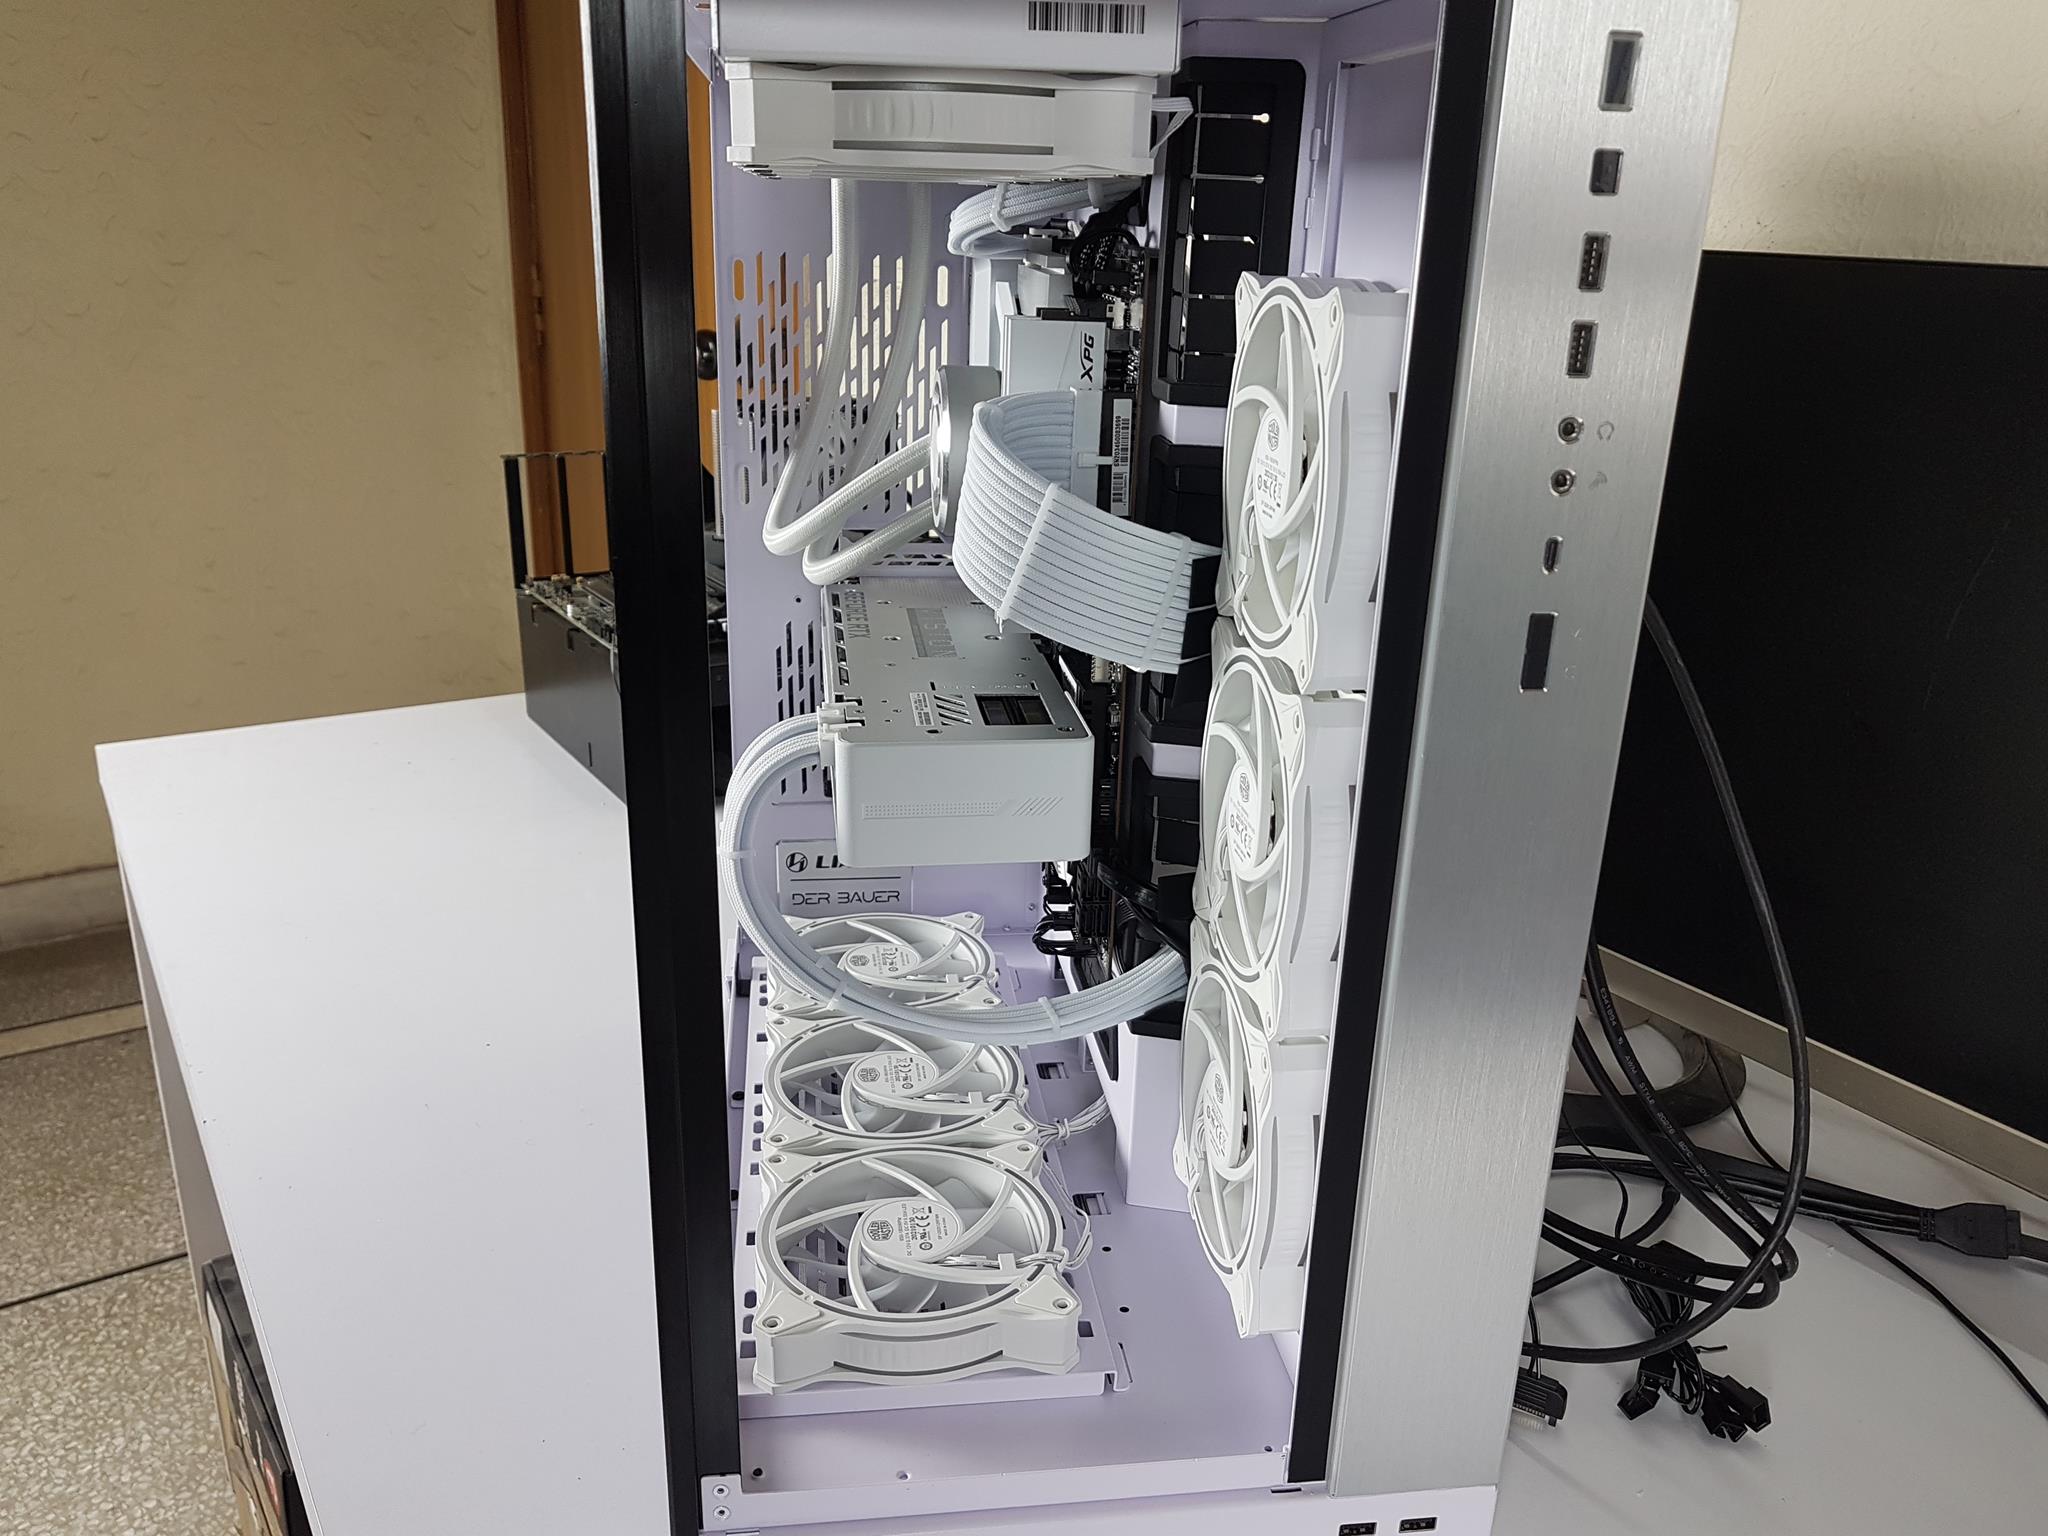
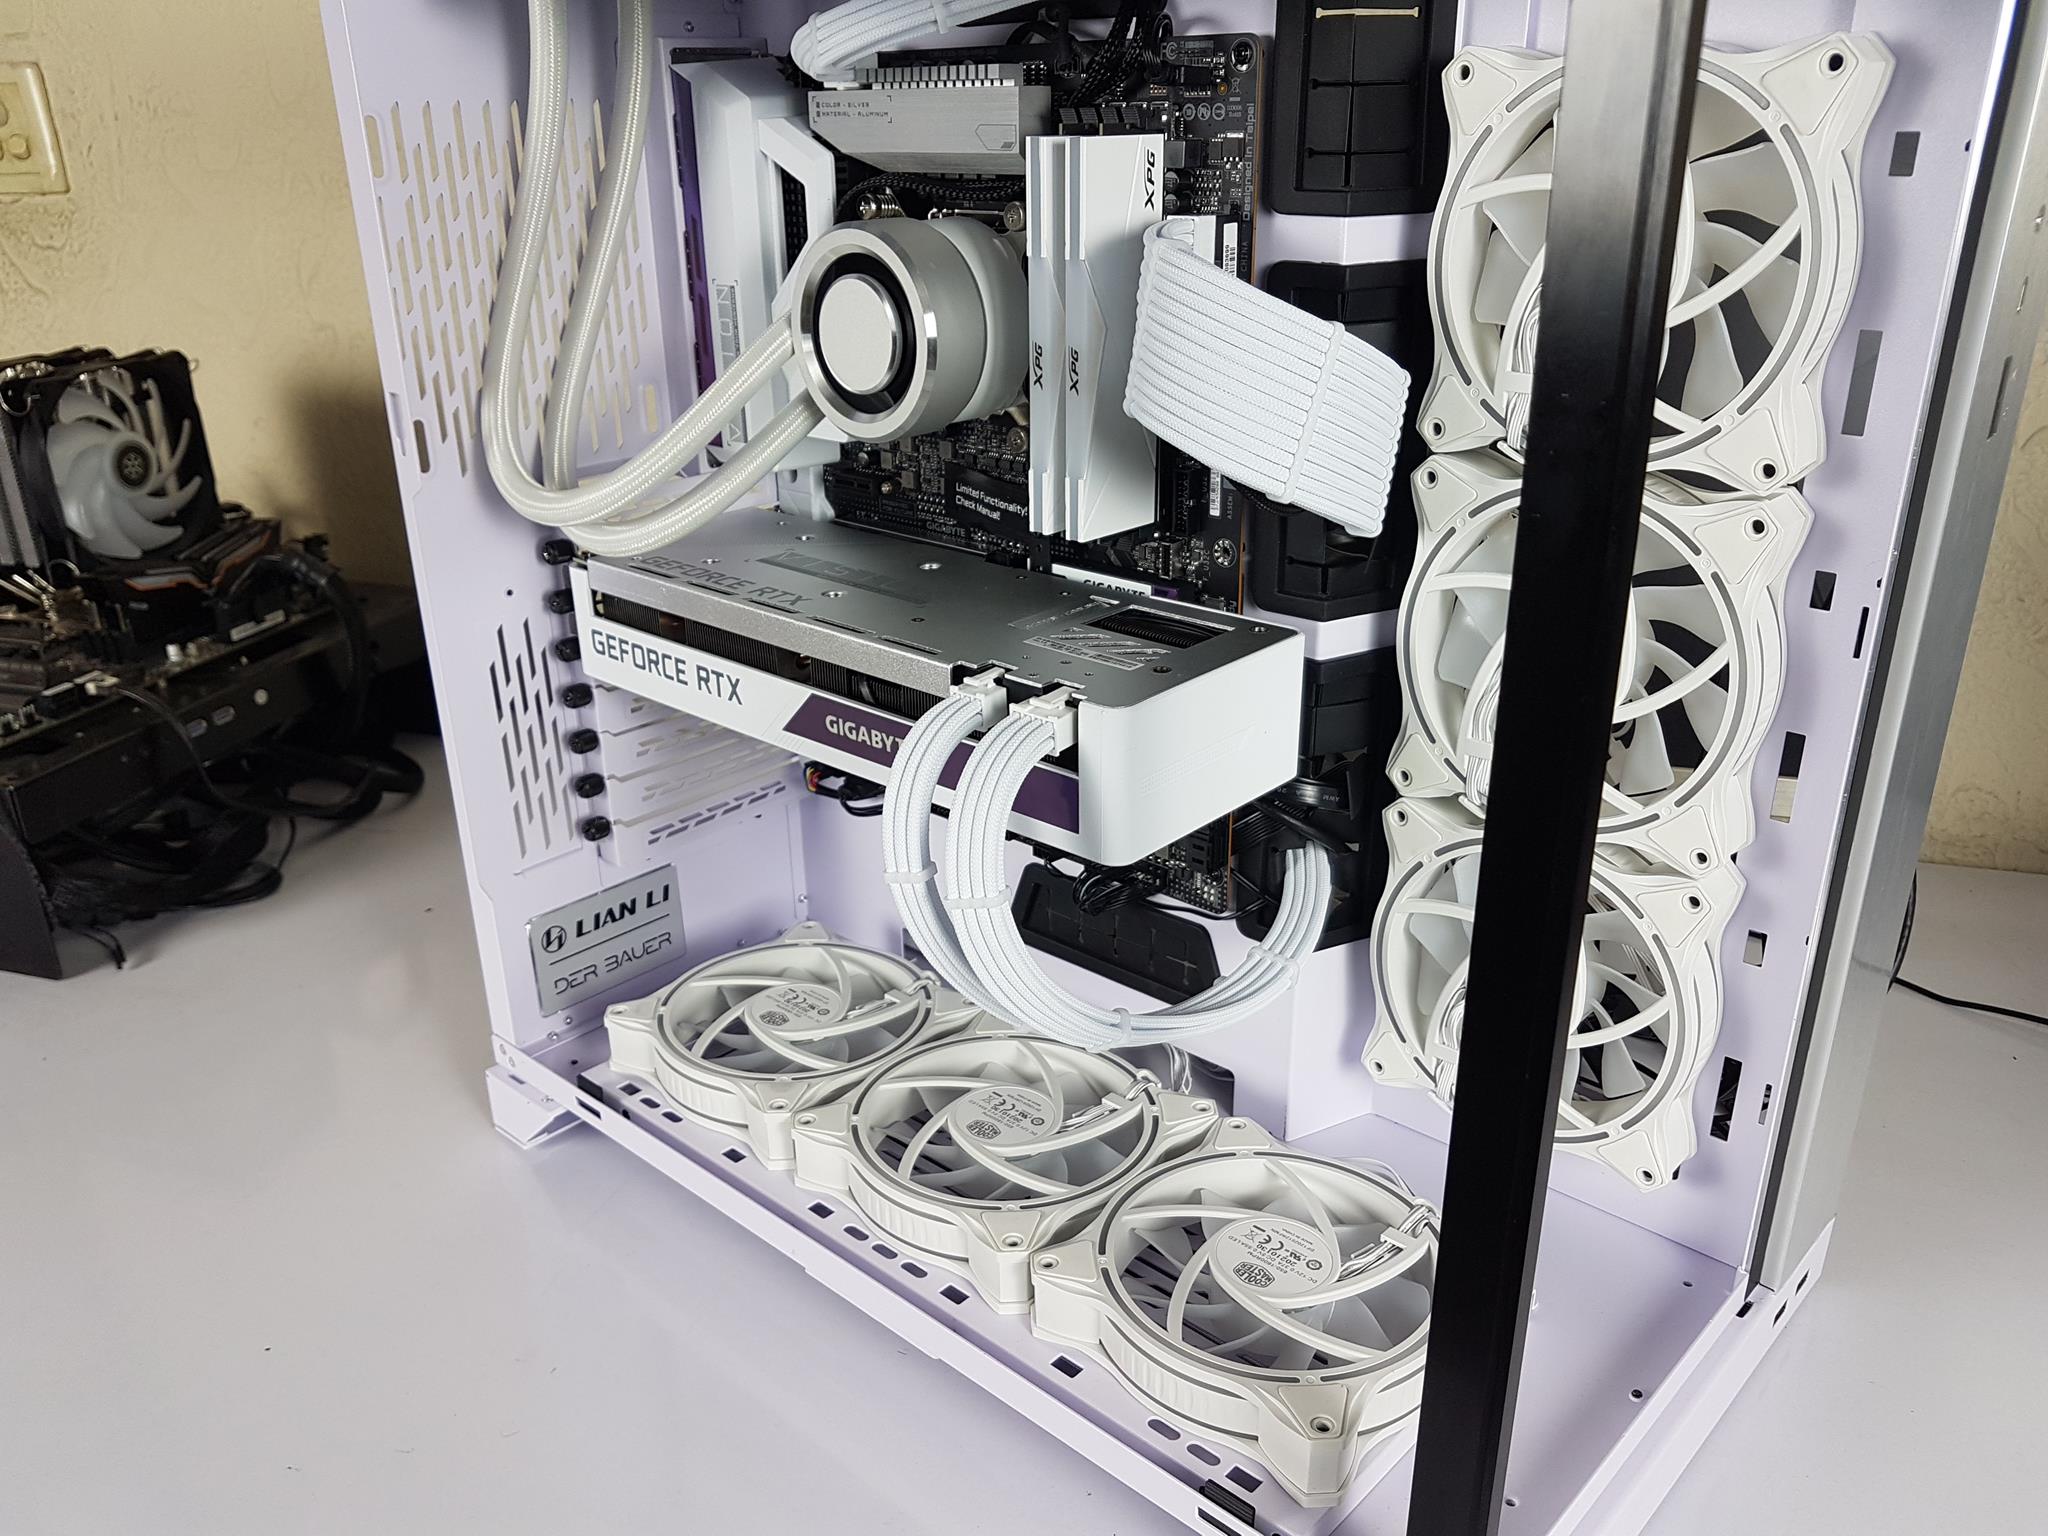
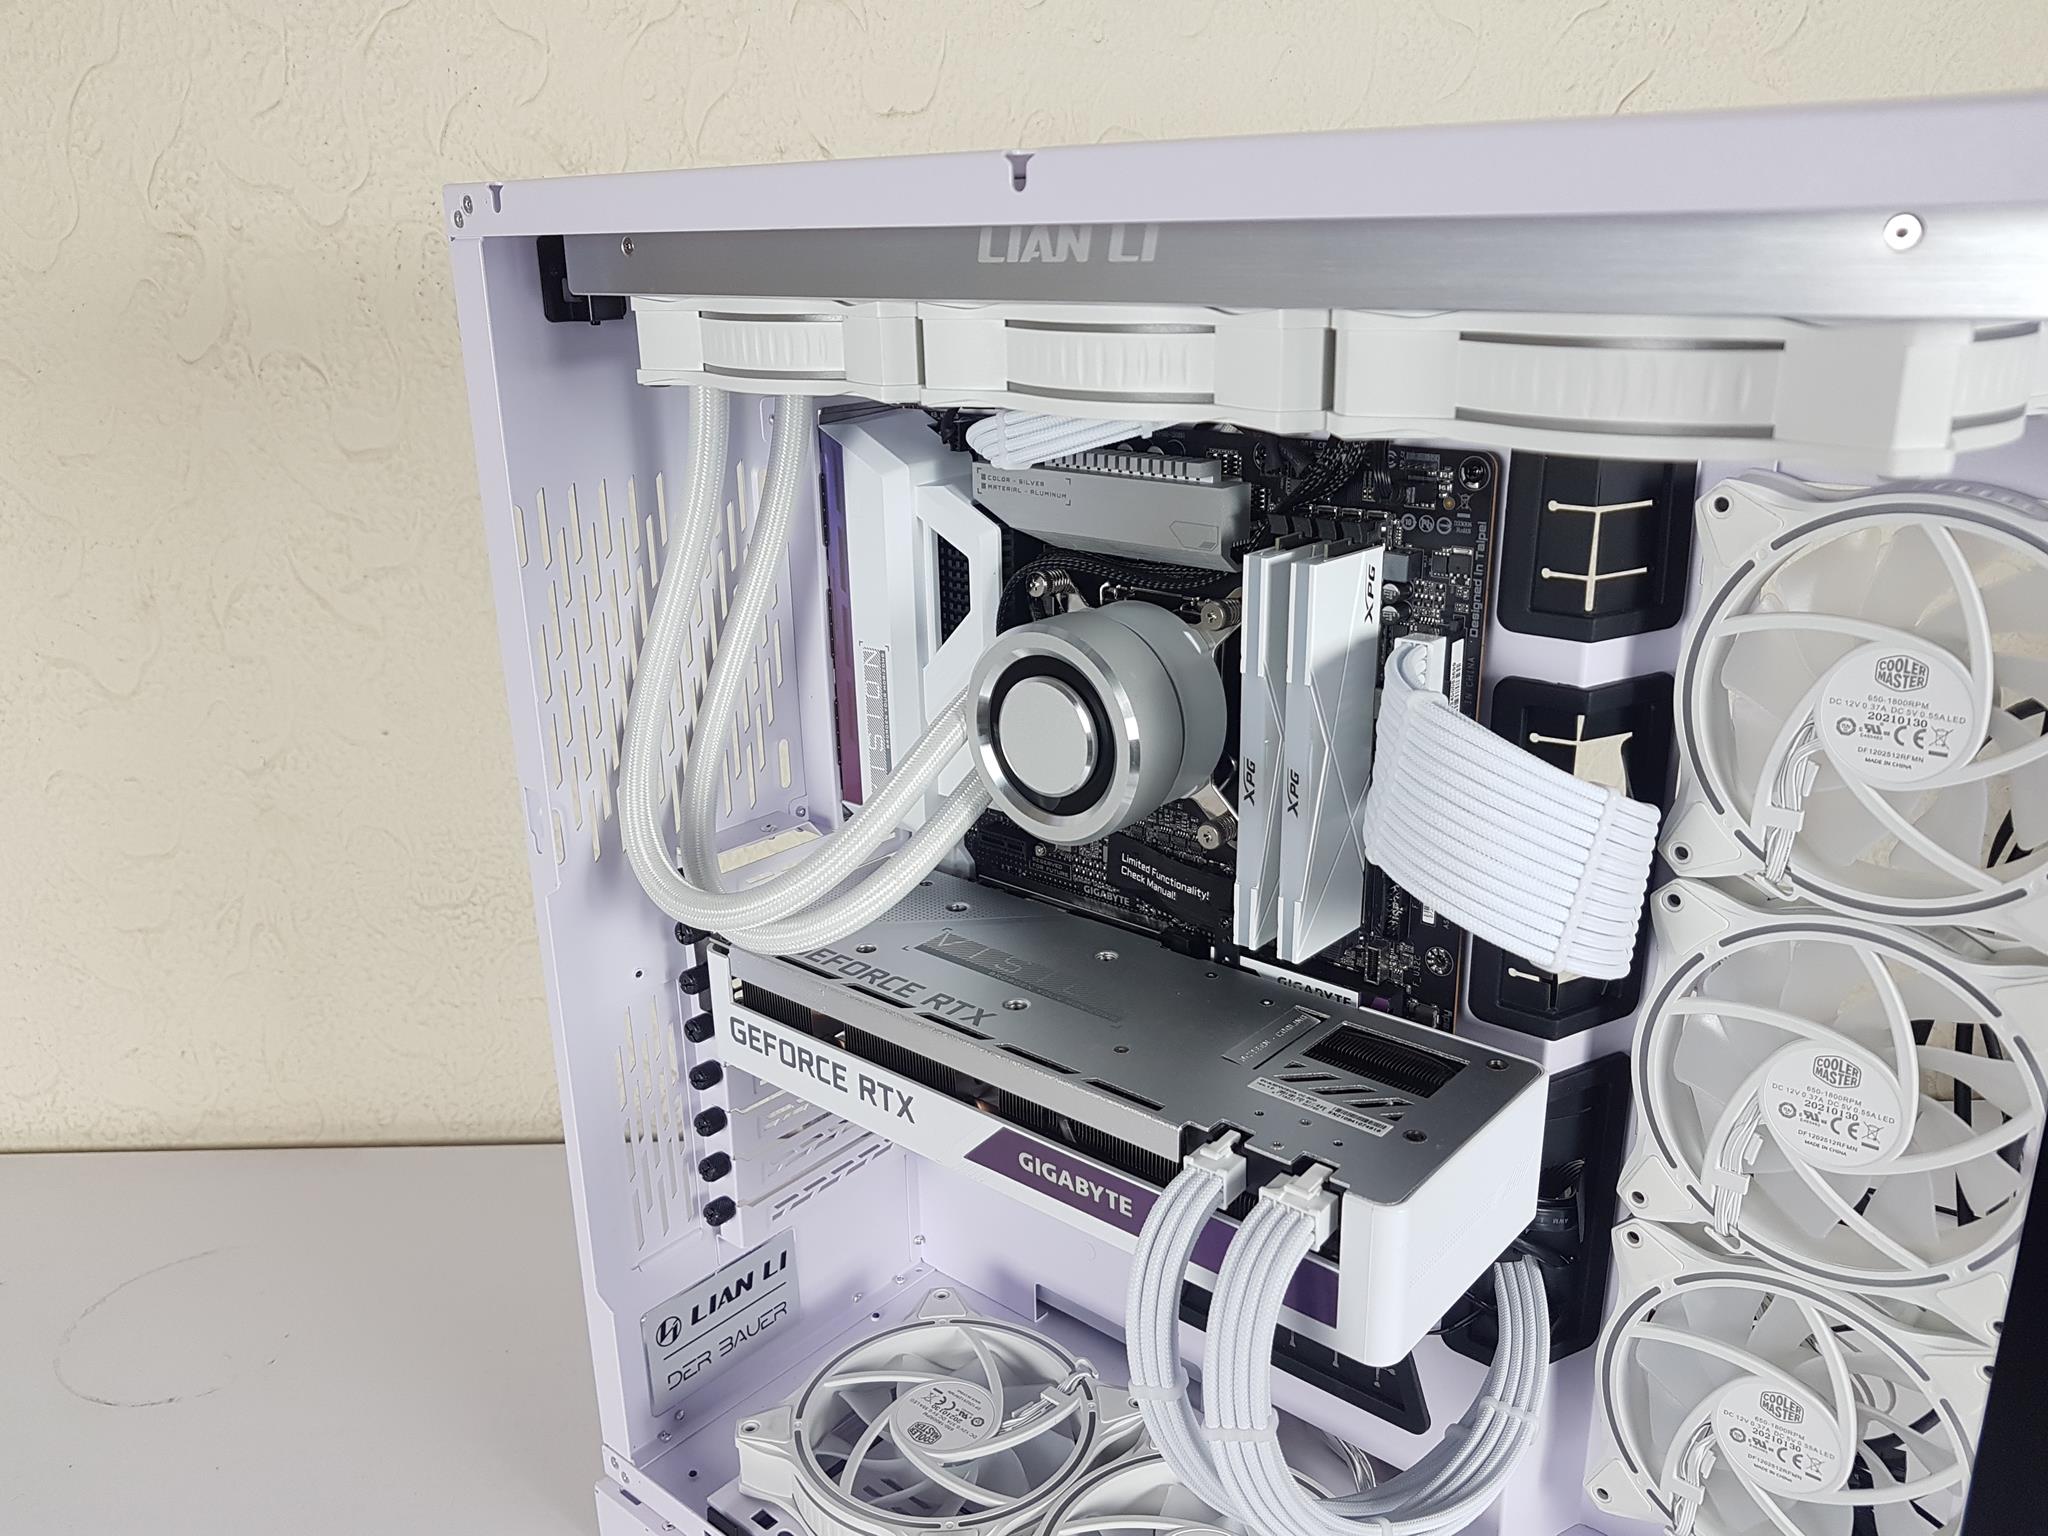
Build Experience
Now that we have given a brief of the components used in the white build, let’s dig into the building experience.
This is a gallery of our step-by-step building process, along with my thoughts as image captions. You can swipe through the gallery to go through all the steps.

POST
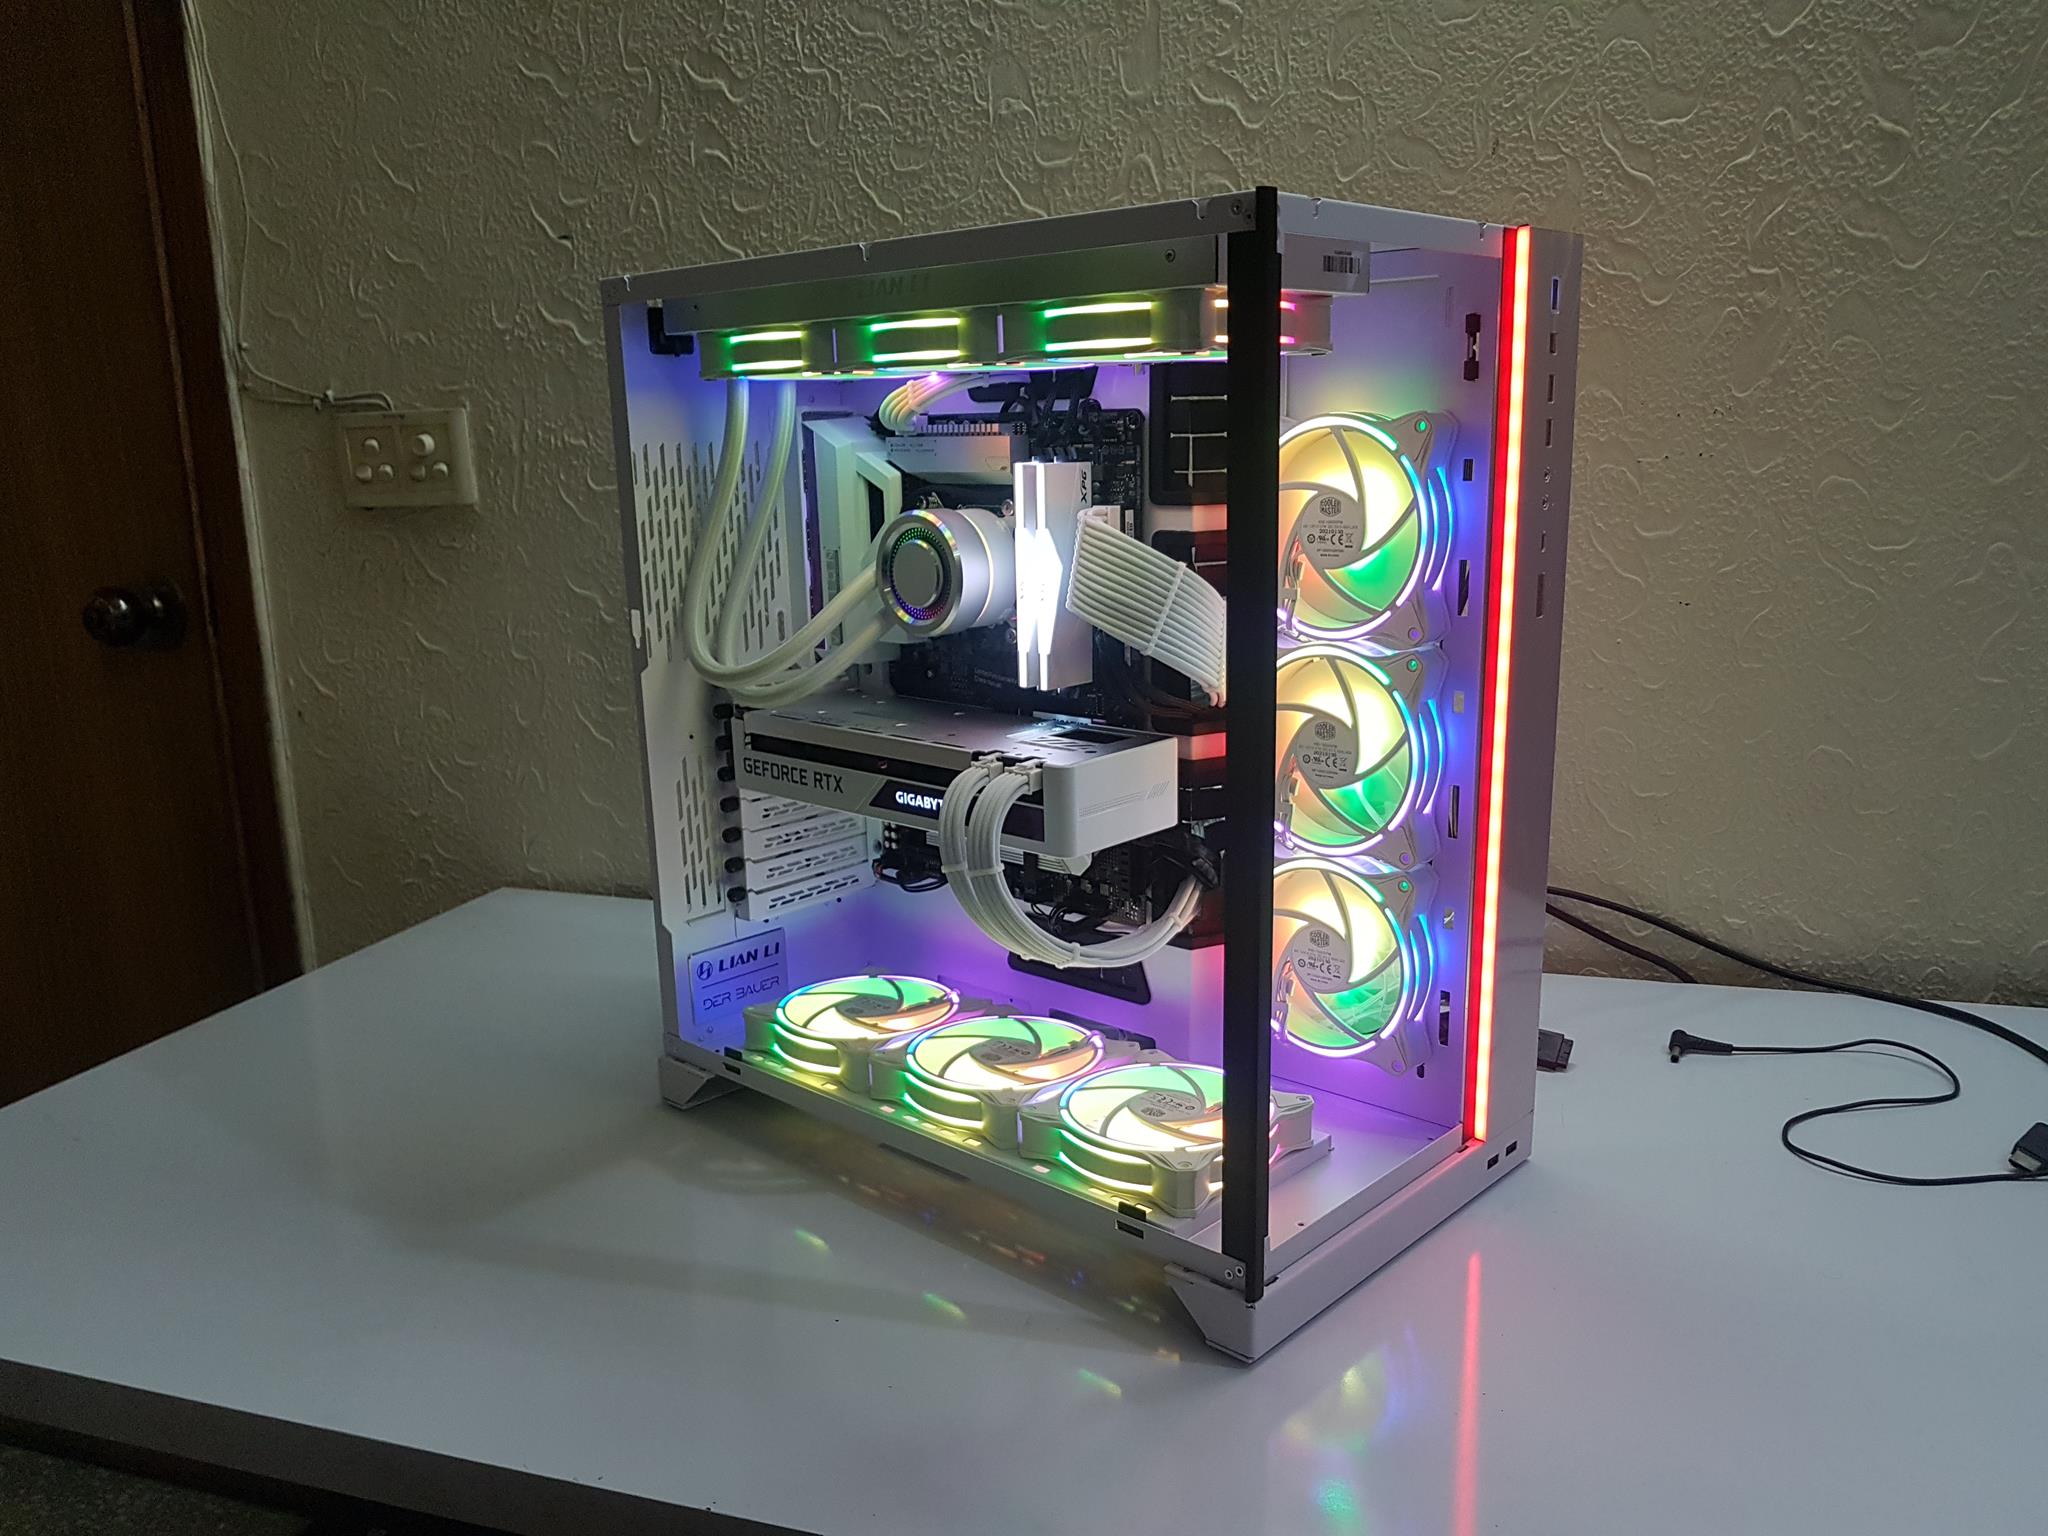
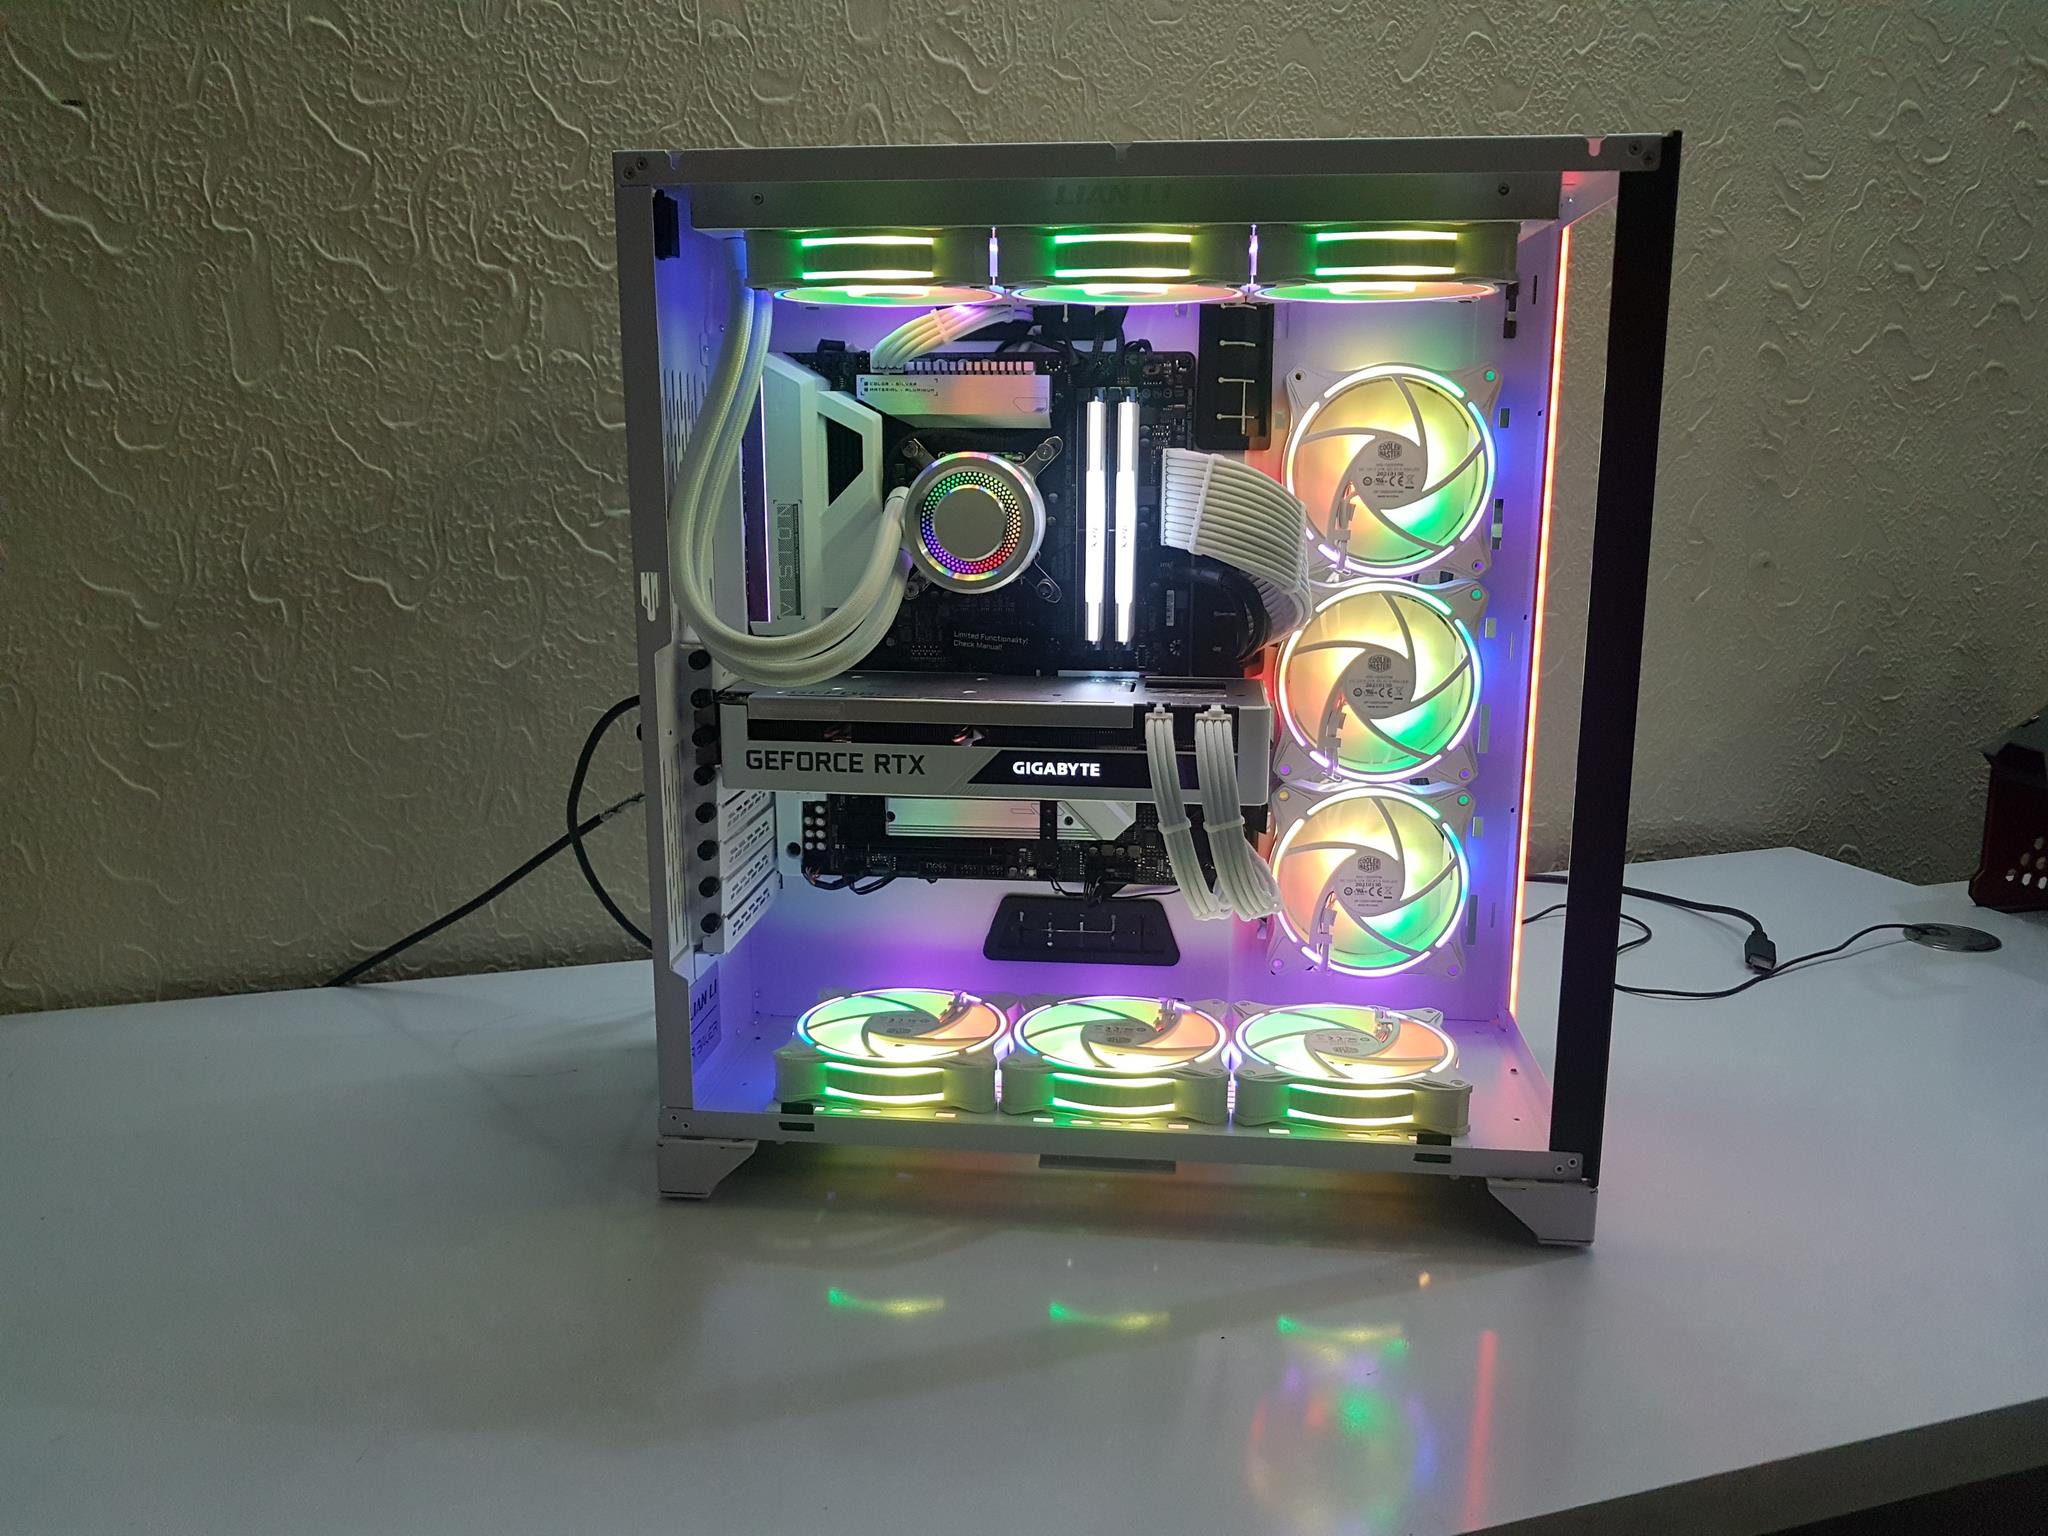
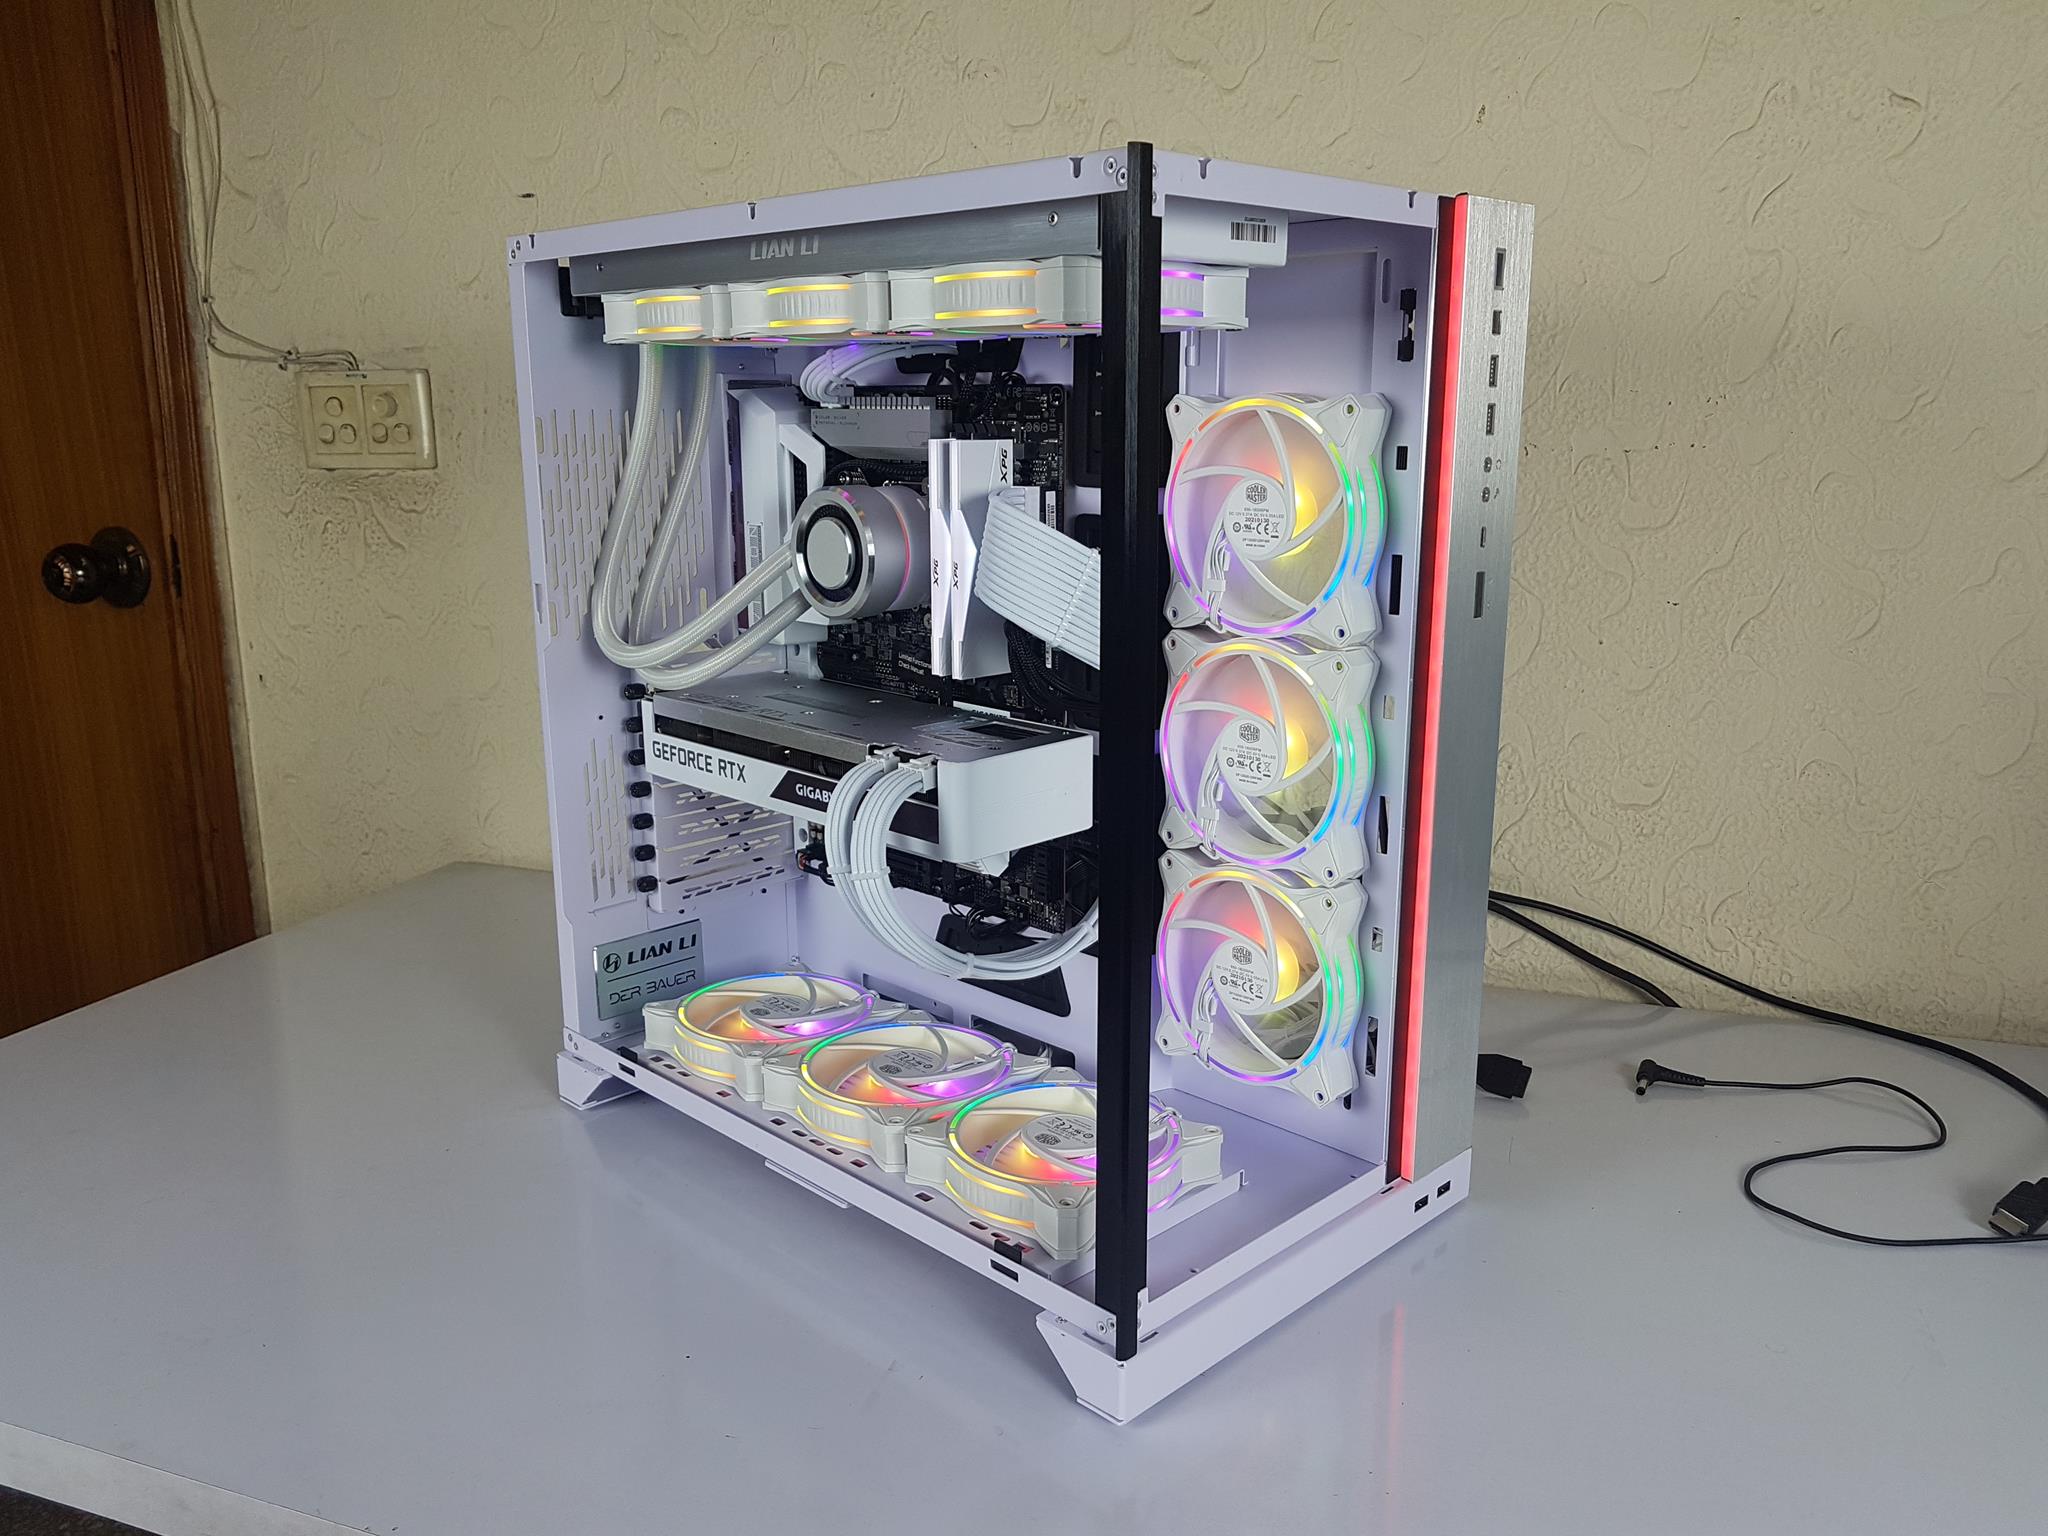
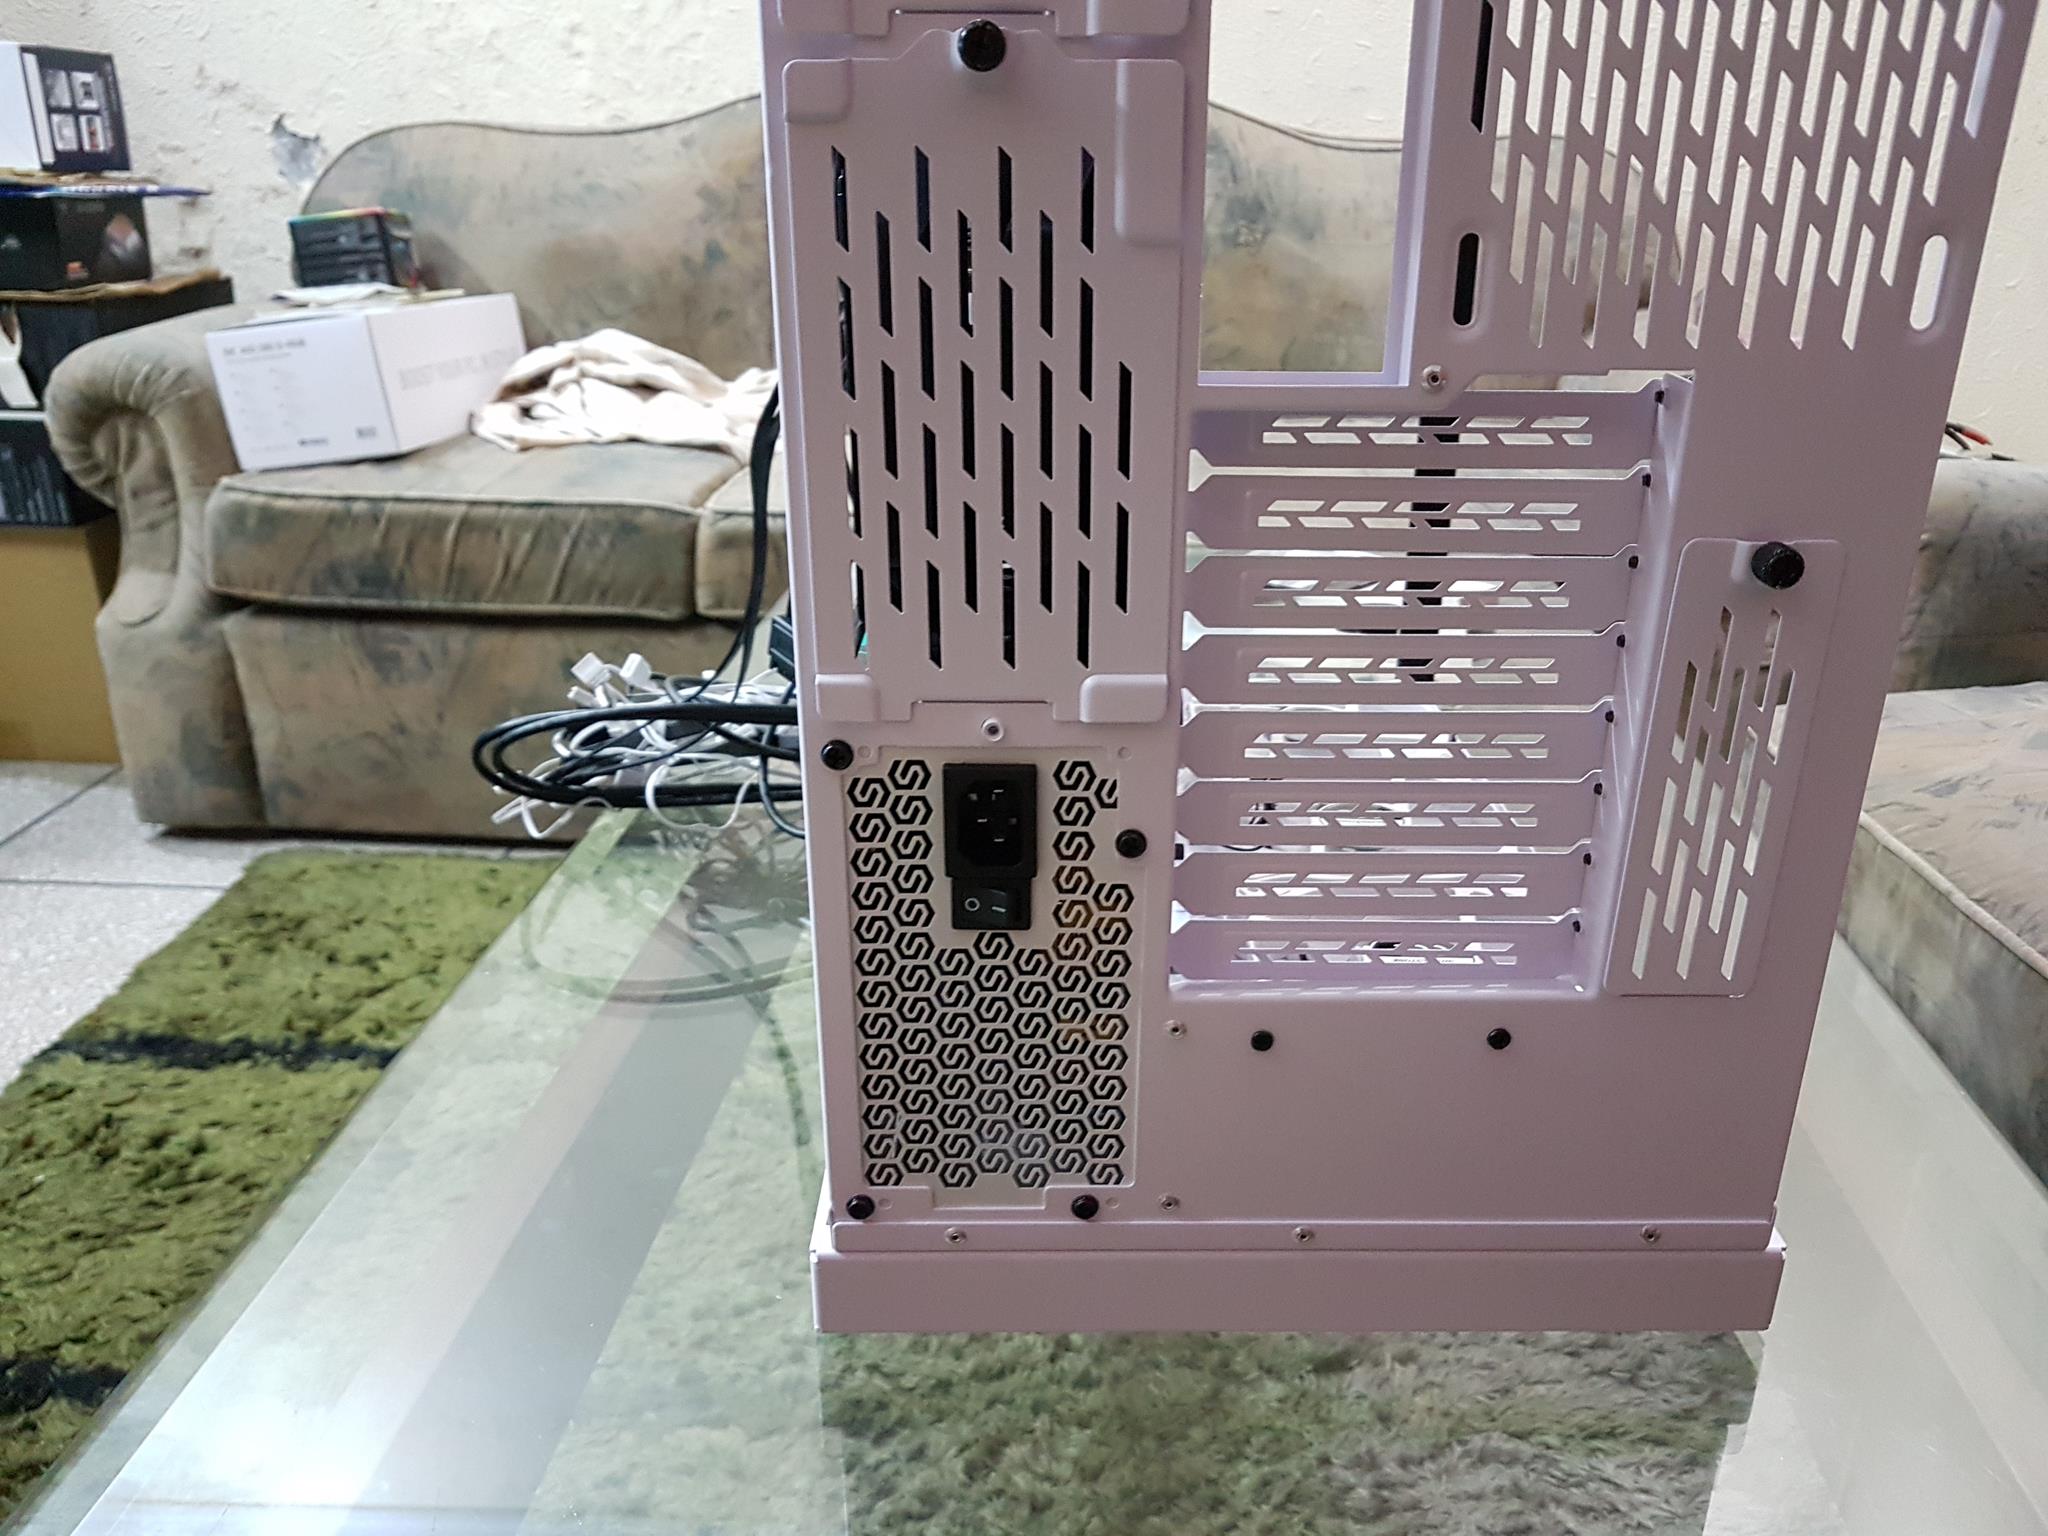
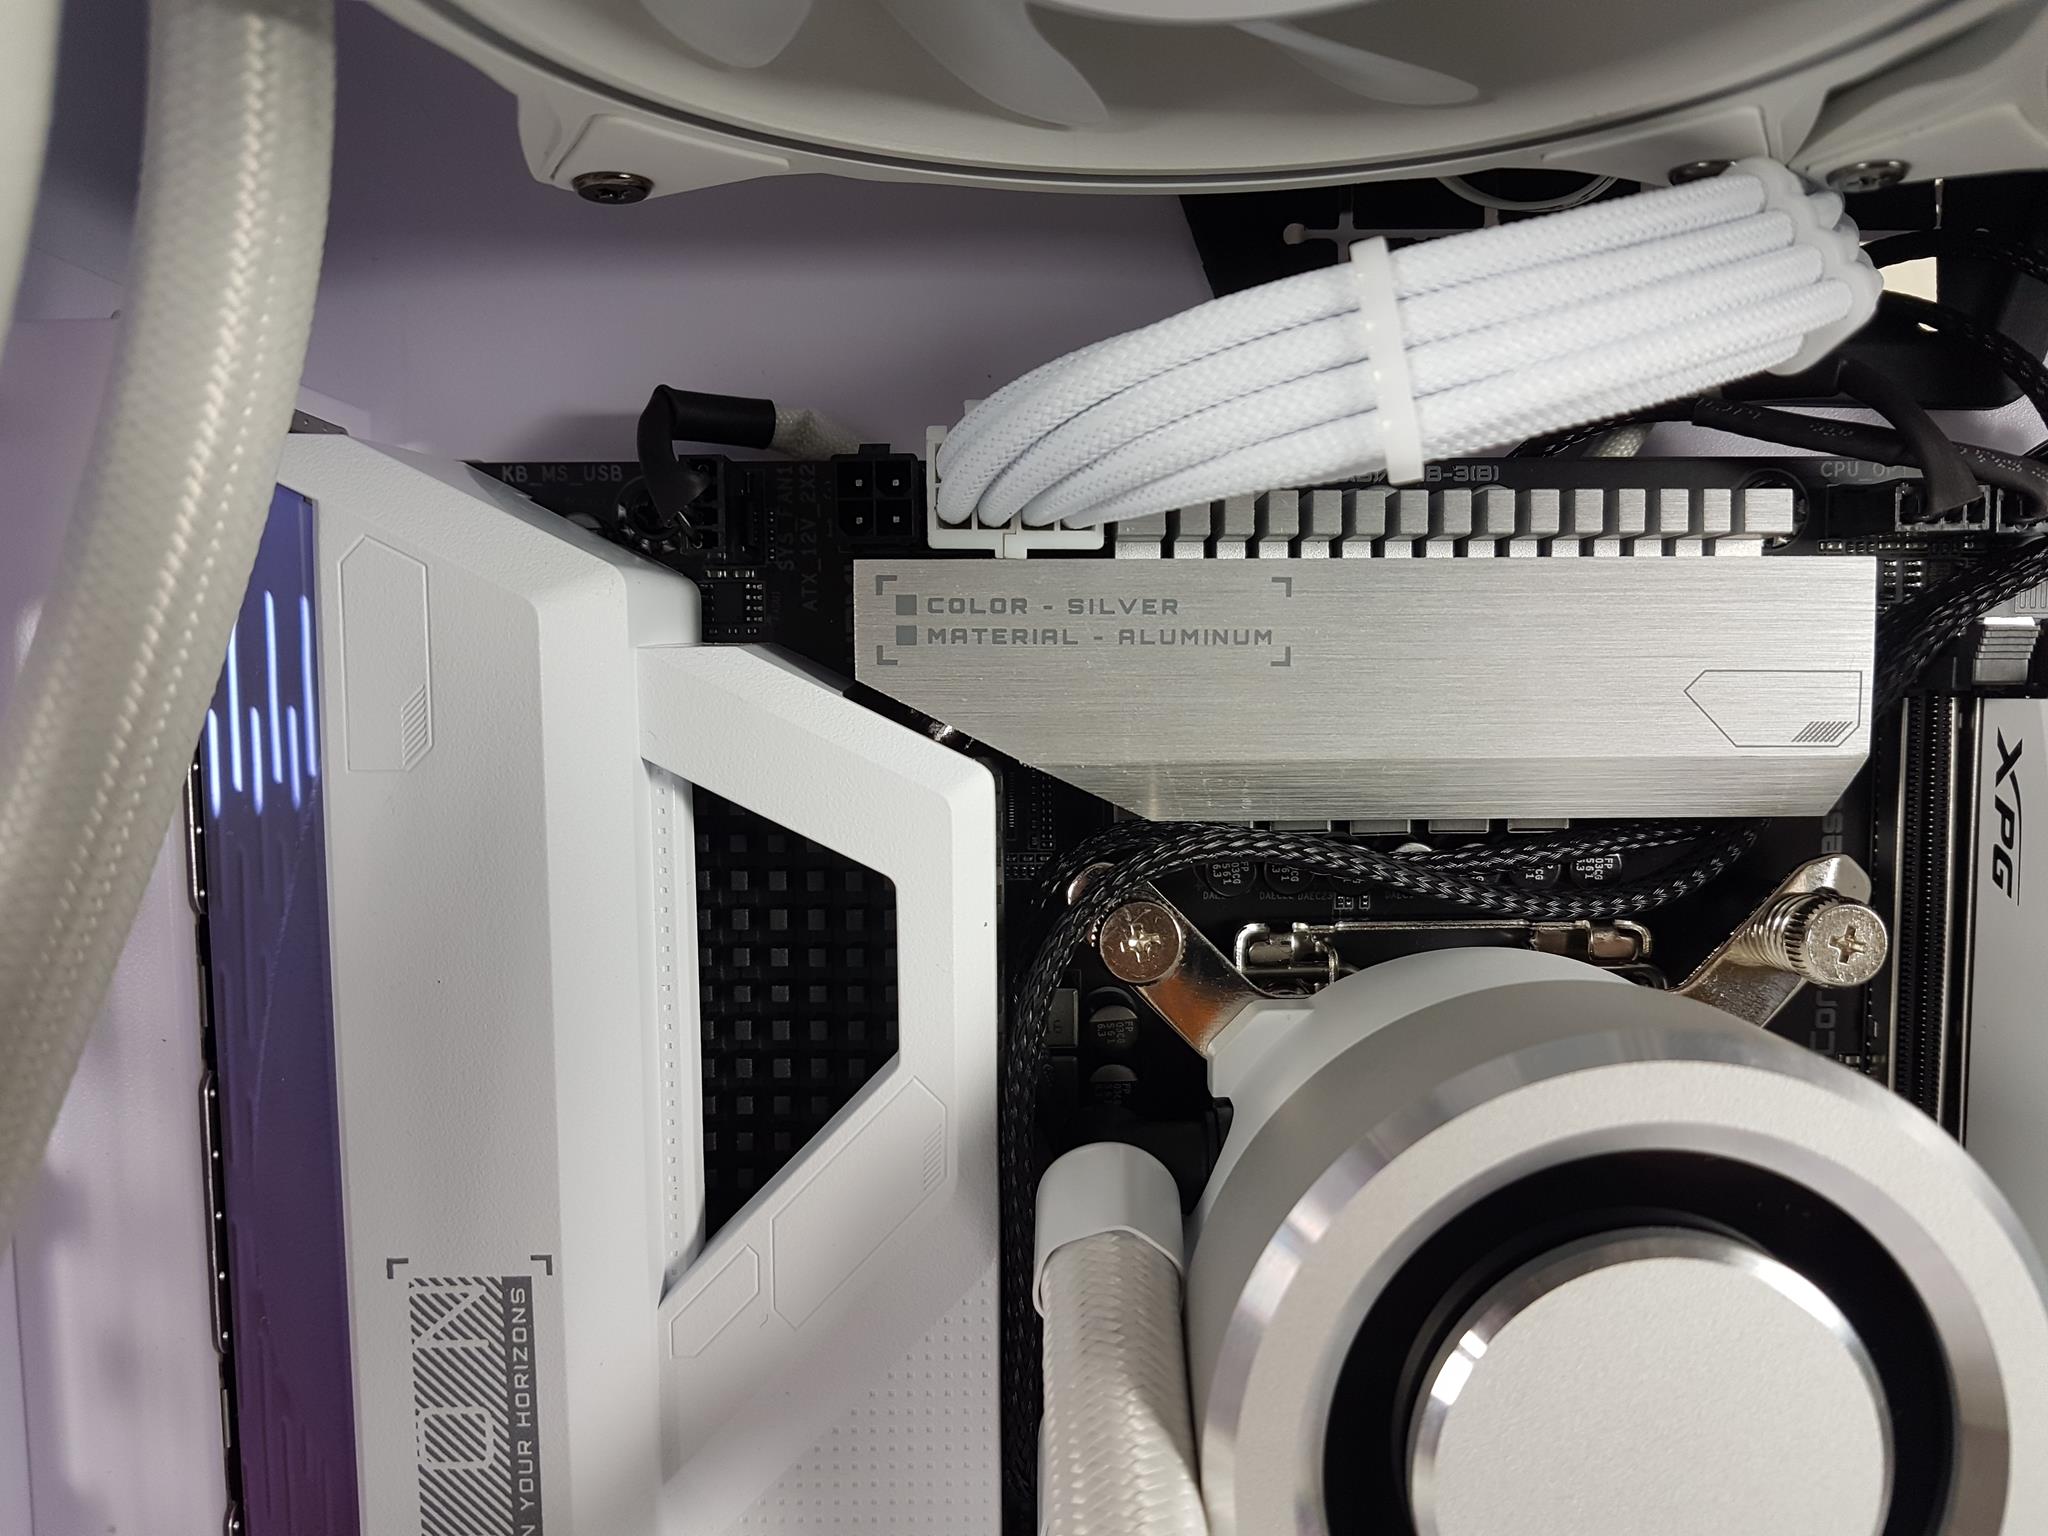
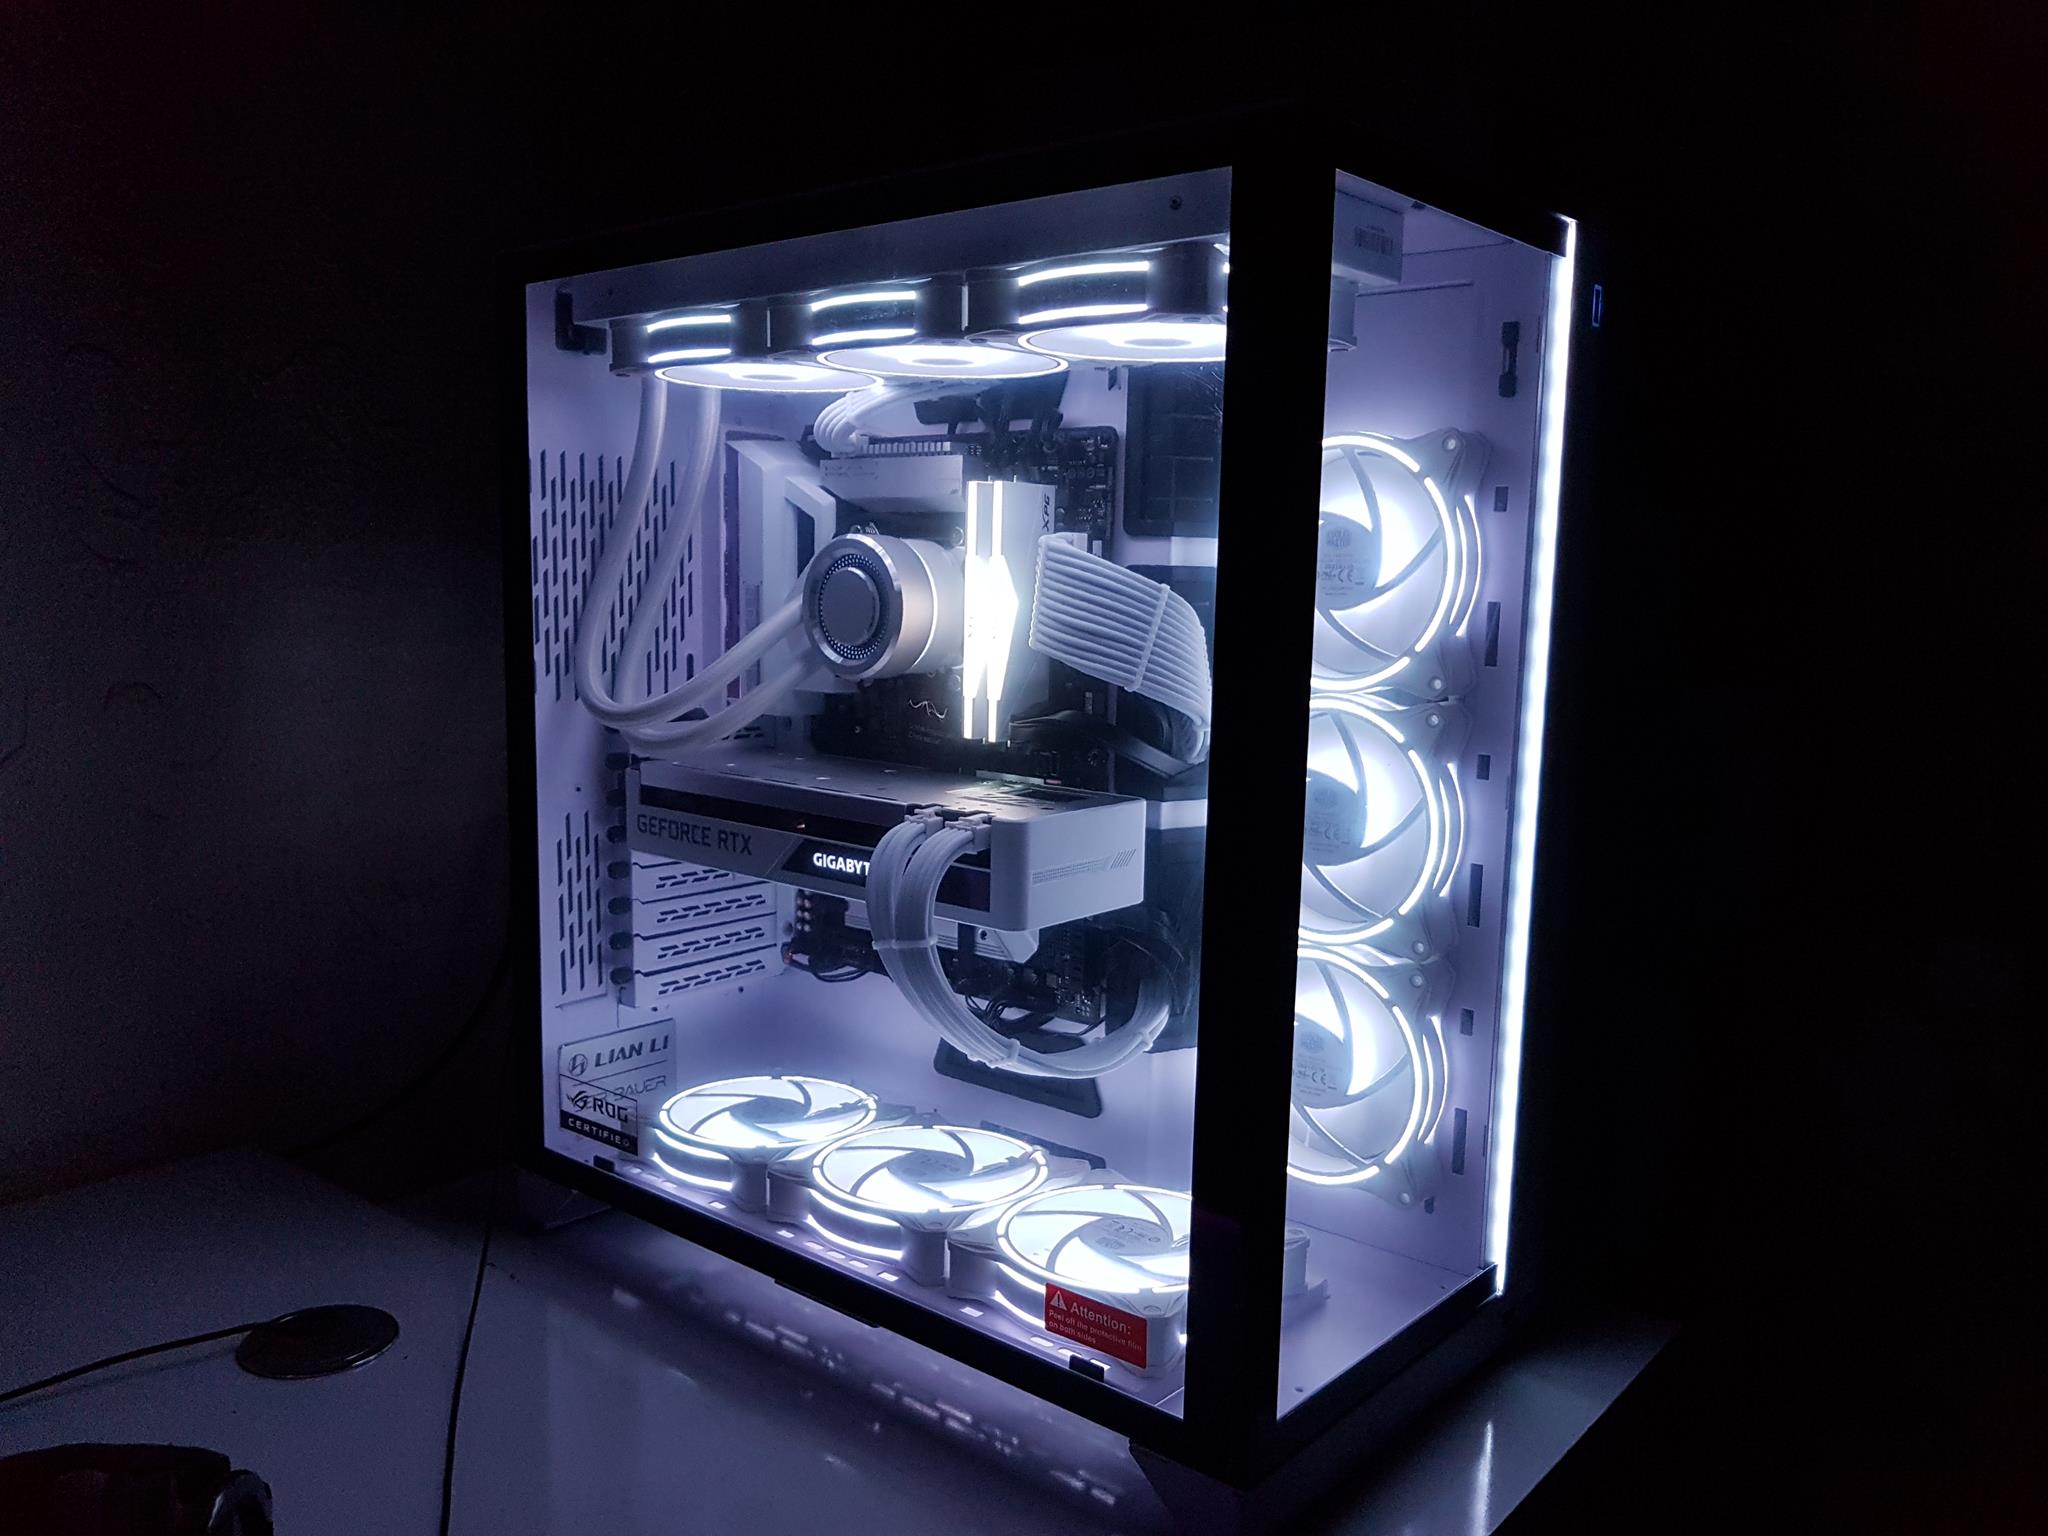
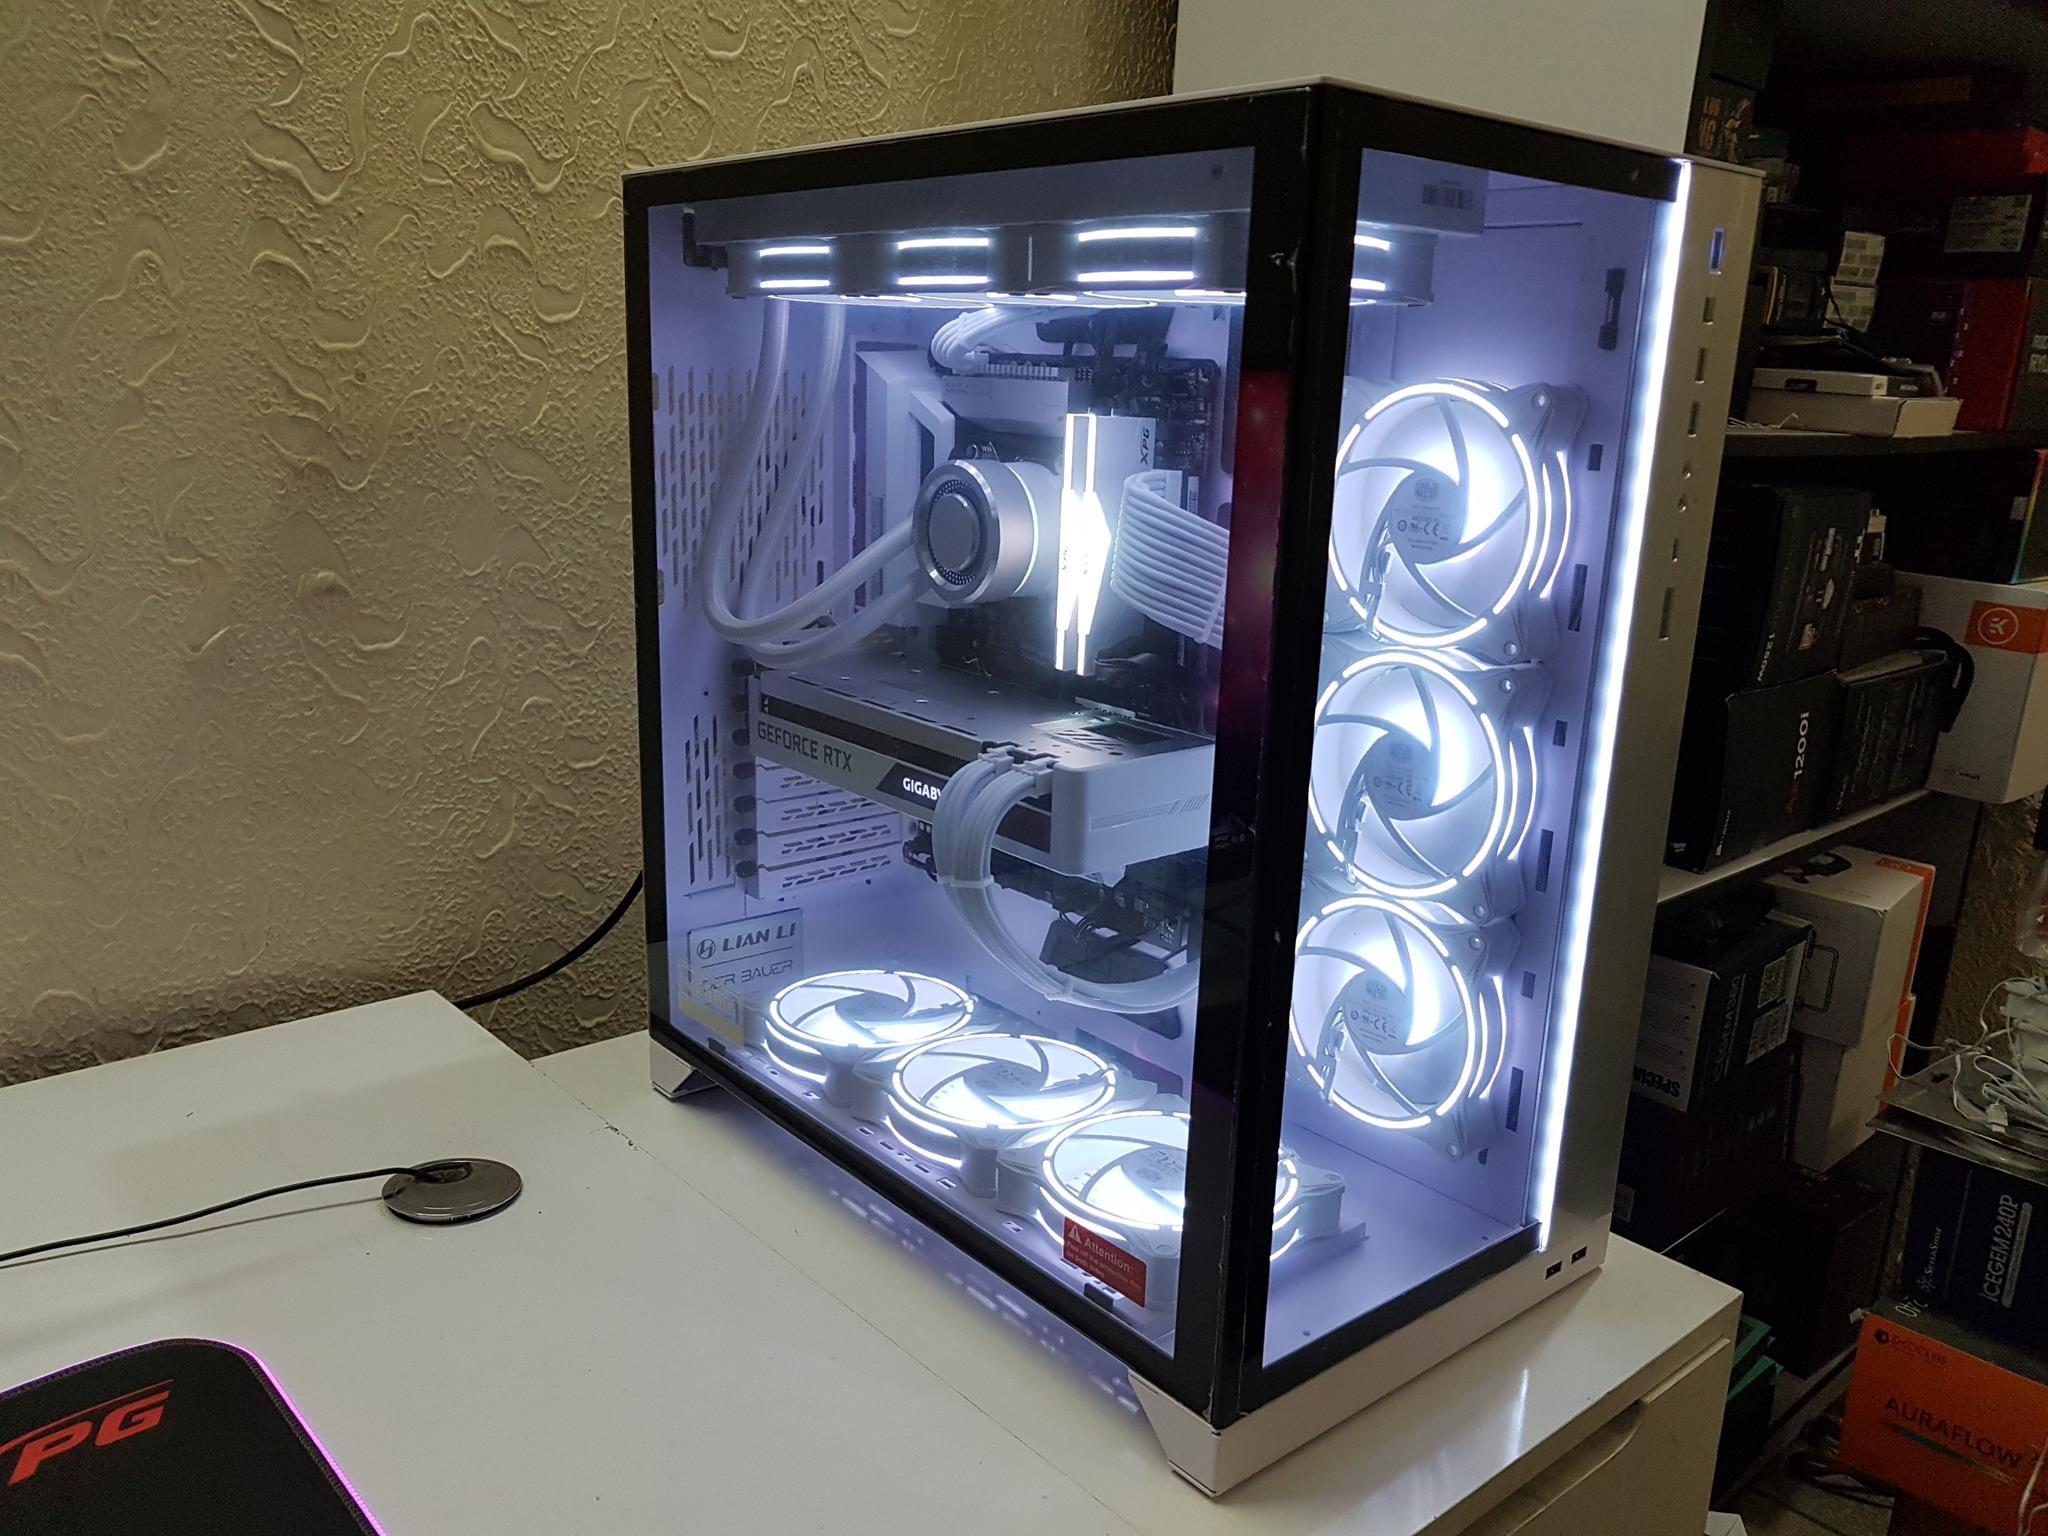
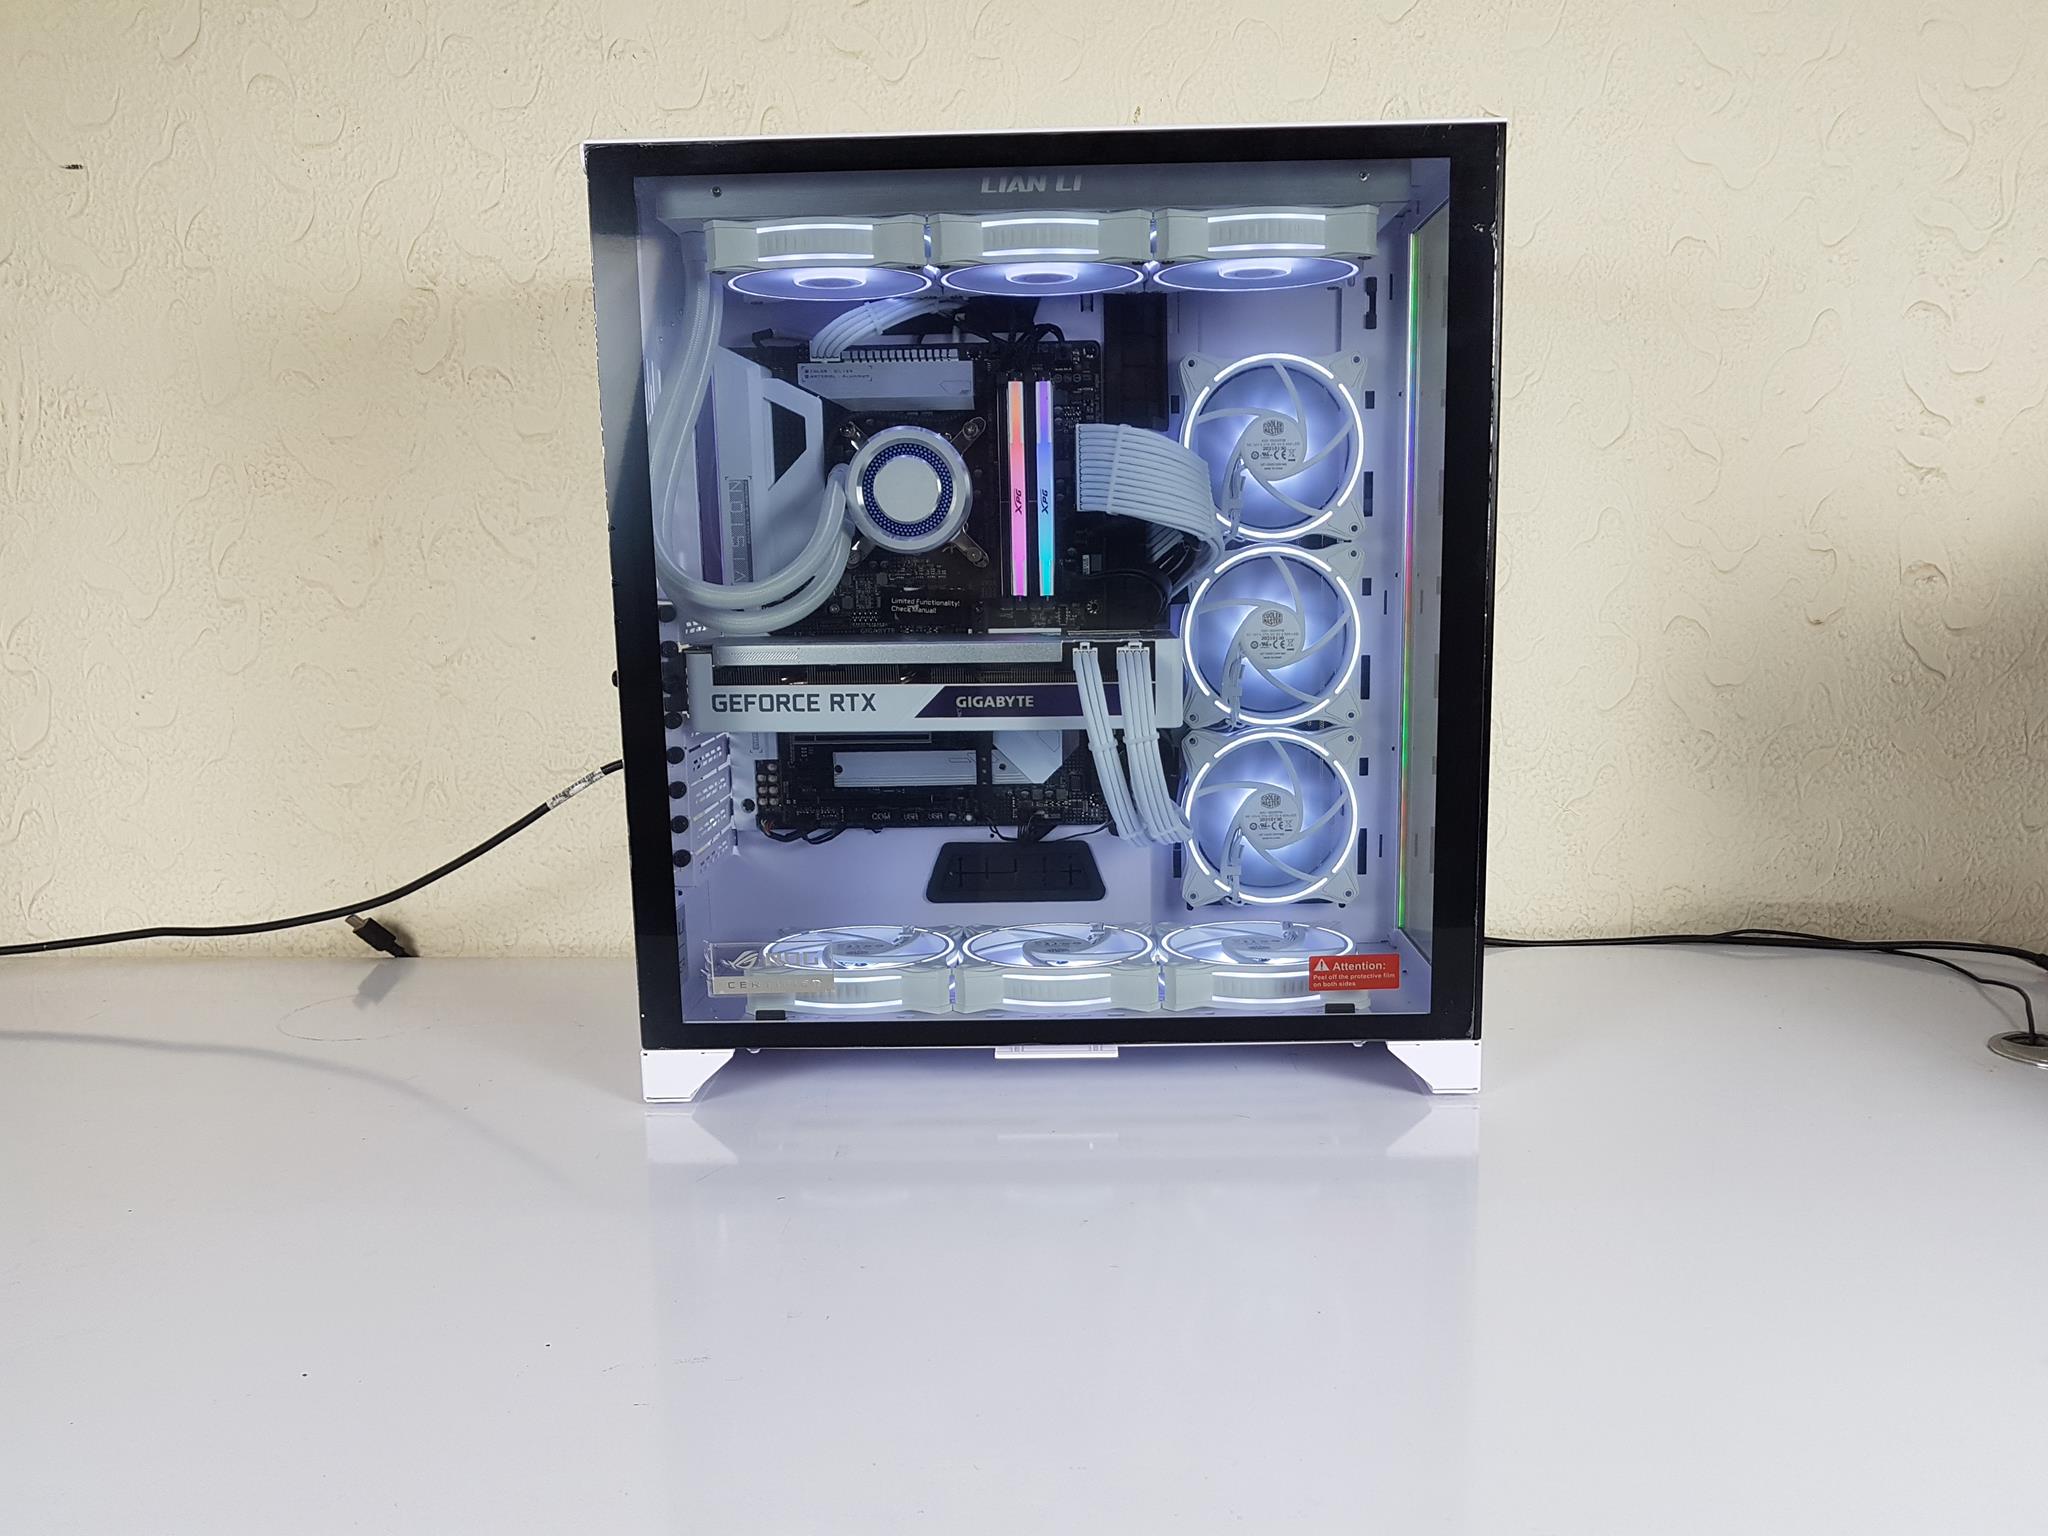
Here are more pictures of the build.

RGB Fusion
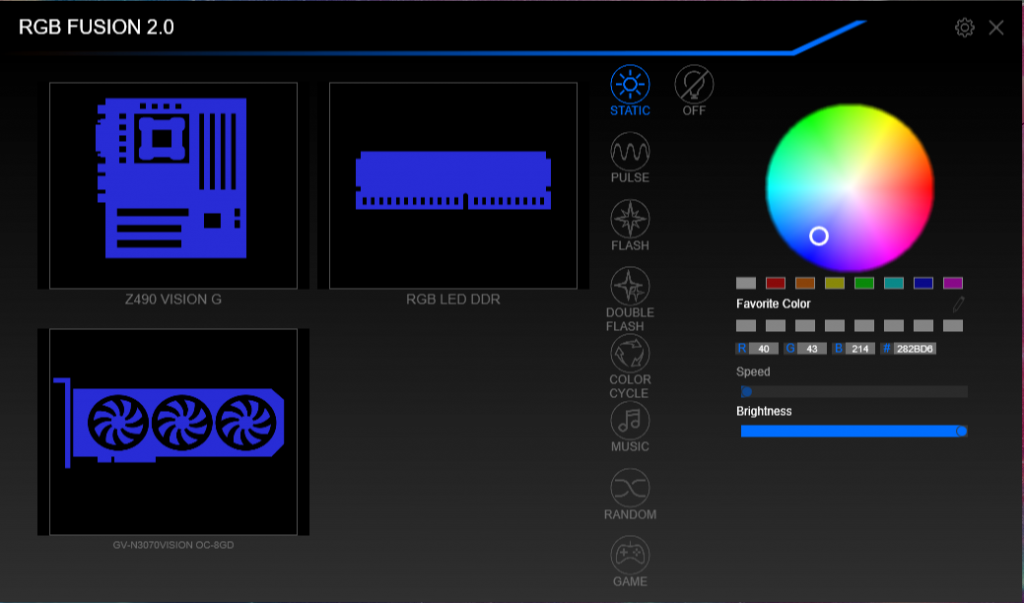
RGB Fusion is working flawlessly. It picked up the XPG SPECTRIX D50 as well and all three main components namely GIGABYTE Z490 VISION OC, GIGABYTE GeForce RTX 3070 VISION OC, and XPG SPECTRIX D50. I did not install the RGB Fusion directly rather have the APP CENTER download and installed it.
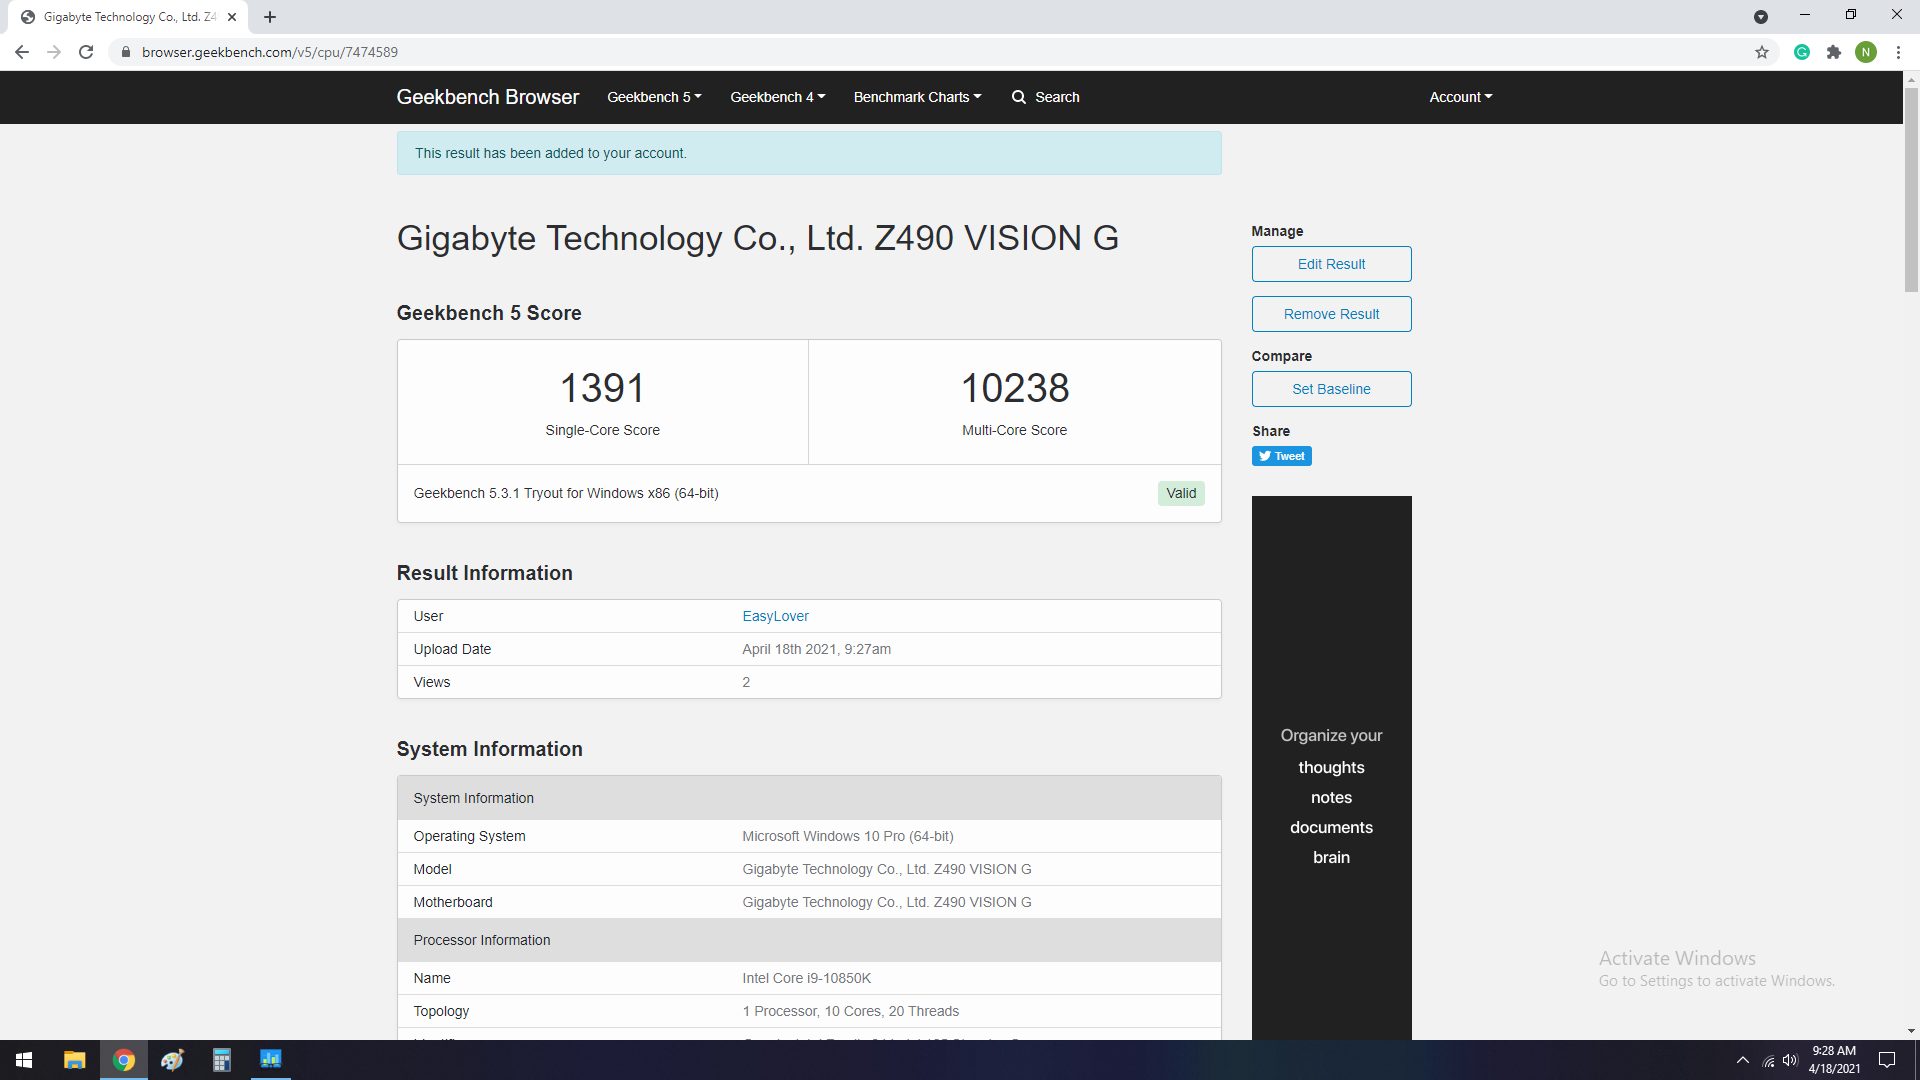
Testing
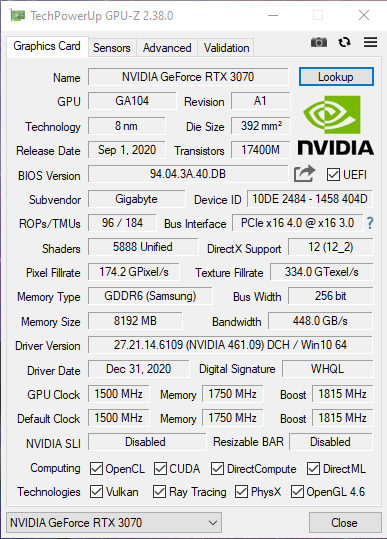
Finally, it was time for some testing checking the storage, rendering, gaming, synthetic loads along with the thermals and power consumption. Testing was done on the stock auto settings except that the VCore was set at -0.2V Offset as on Auto, the board was pushing over 1.40V, and temperatures were in the upper 80s. The Microsoft Windows 10 x64 version 20H2 was used. The MSI After Burner was used to measure the FPS in the gaming load. Where the games have built-in benchmarks, the results were obtained from those benchmarks.

The above picture shows the CPU-Z run on the stock Auto settings.
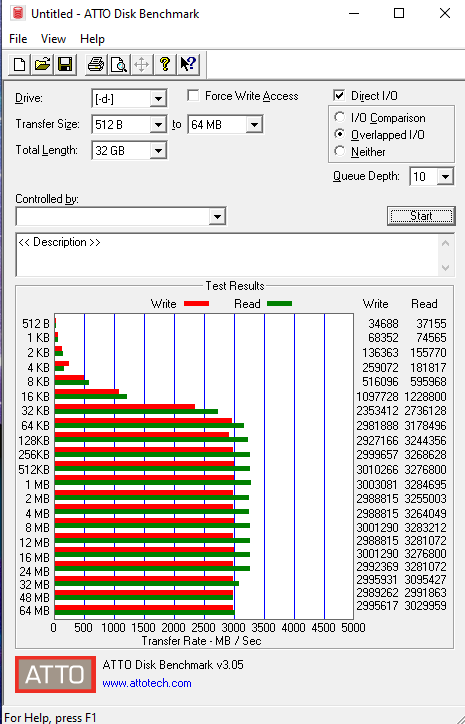
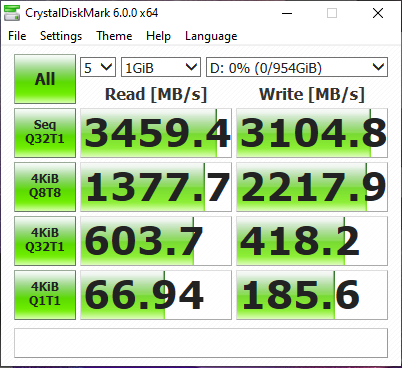
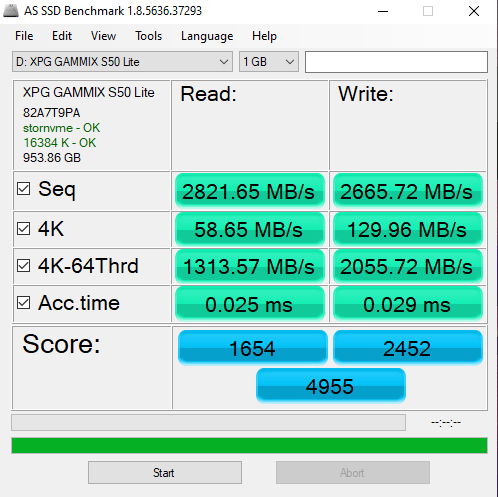
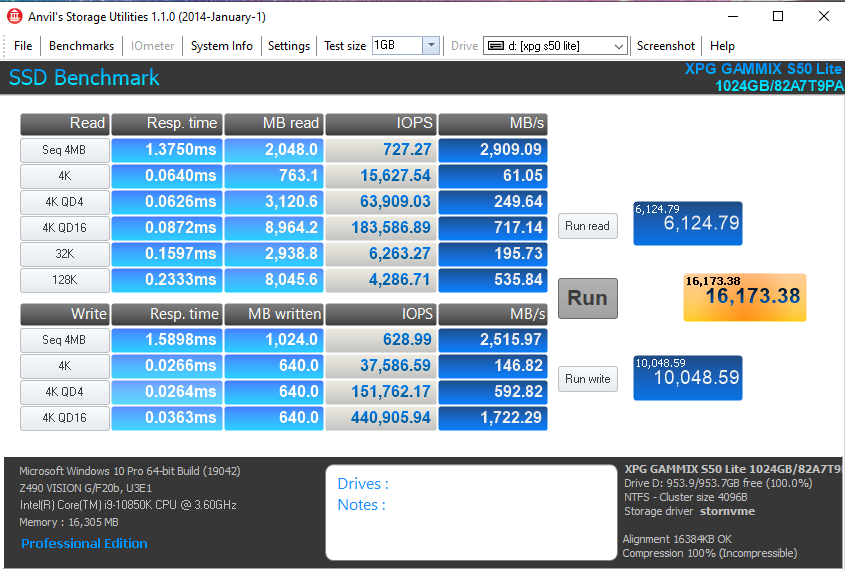
Storage
Let’s take a look at some storage benchmarks we ran on the XPG S50 Lite 1TB.
Memory Benchmark
We ran AIDA64 Extreme version 6.35 for memory benchmarks. Here is the result.
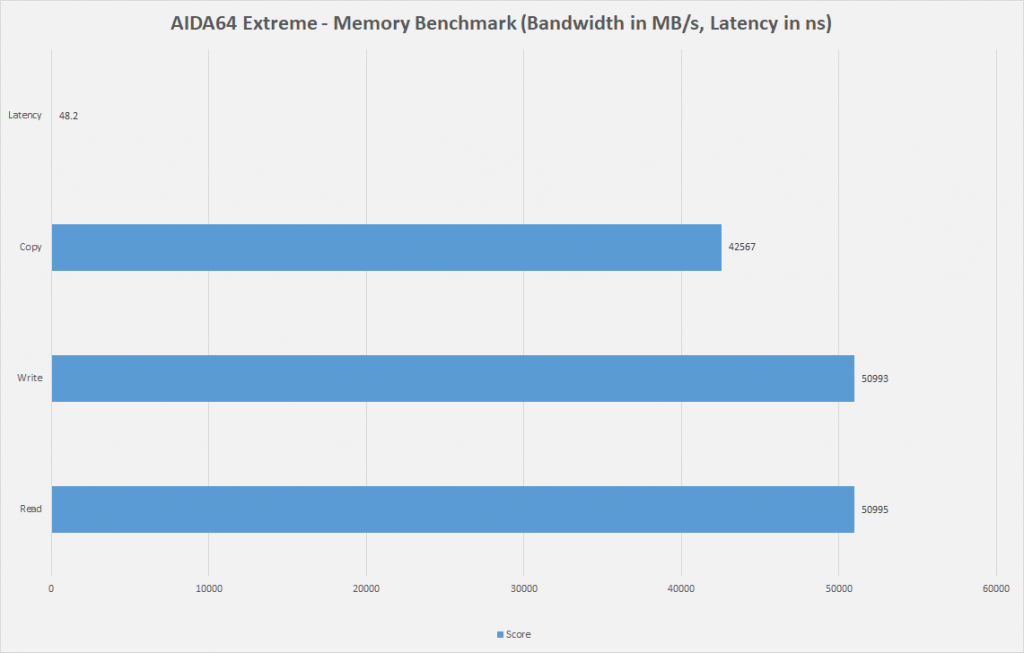
This score is better than what we have on our test bench with Intel i7 10700k on MSI MAG Z490 TOMAHAWK.
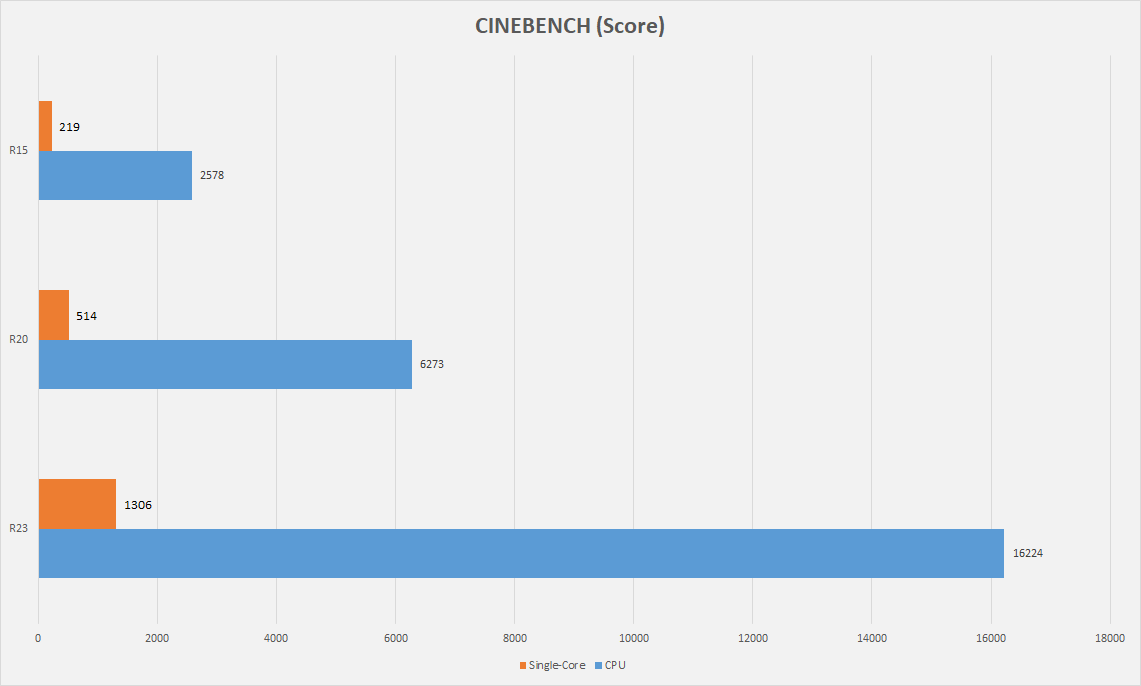
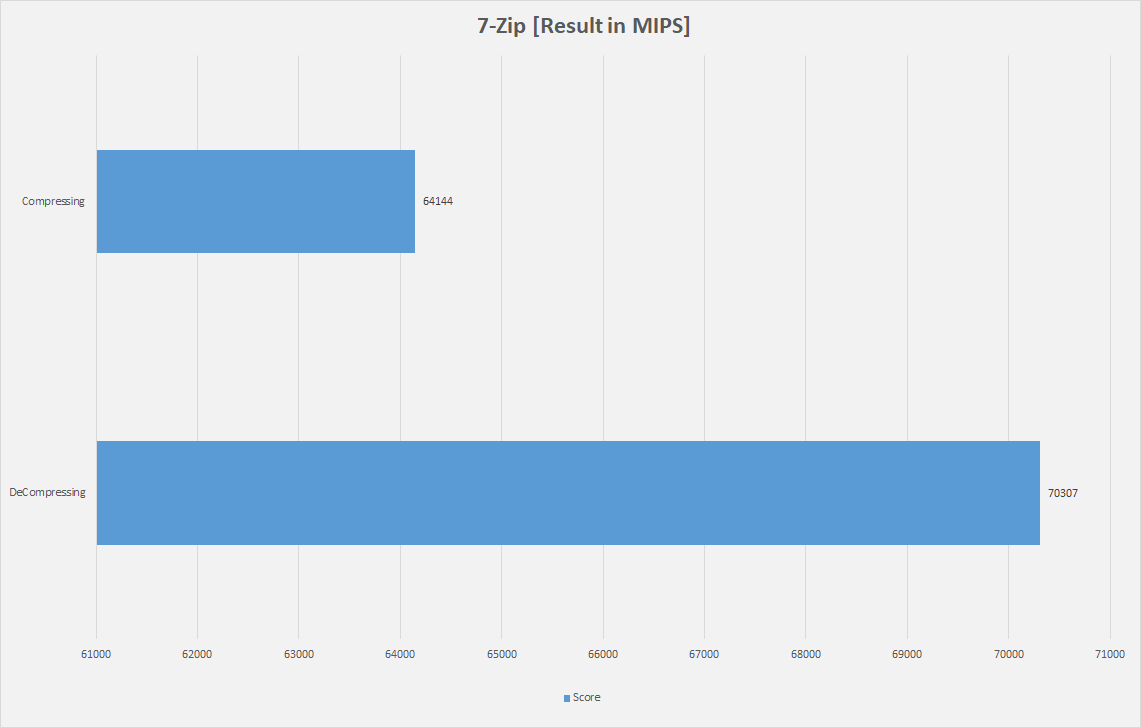
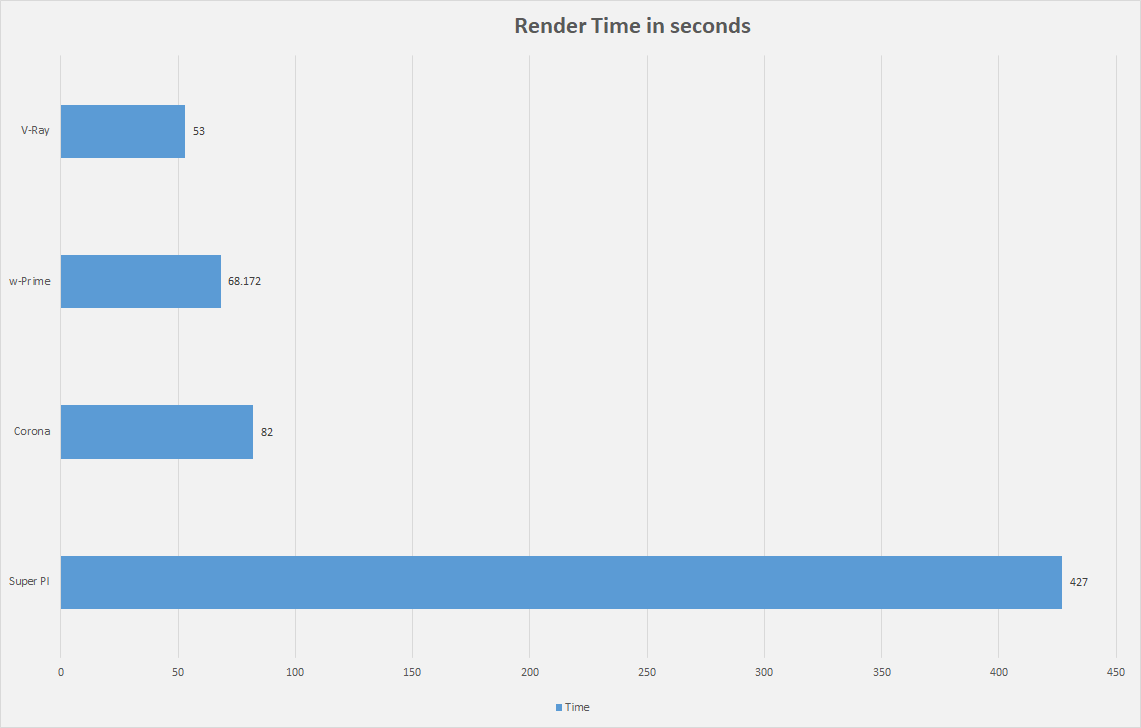
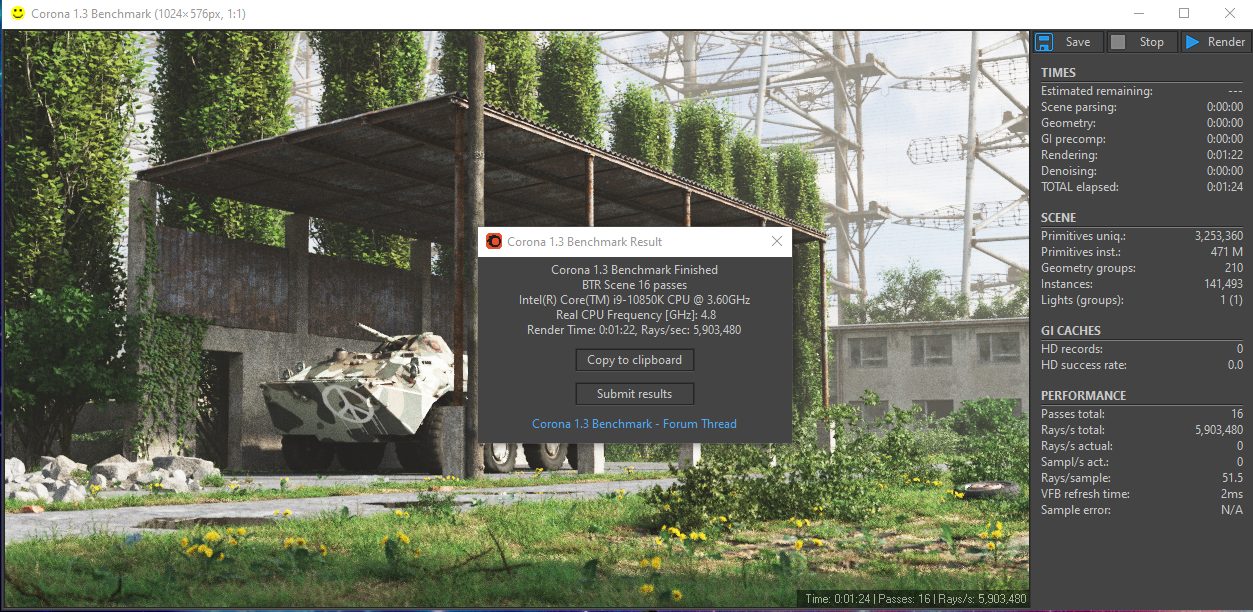
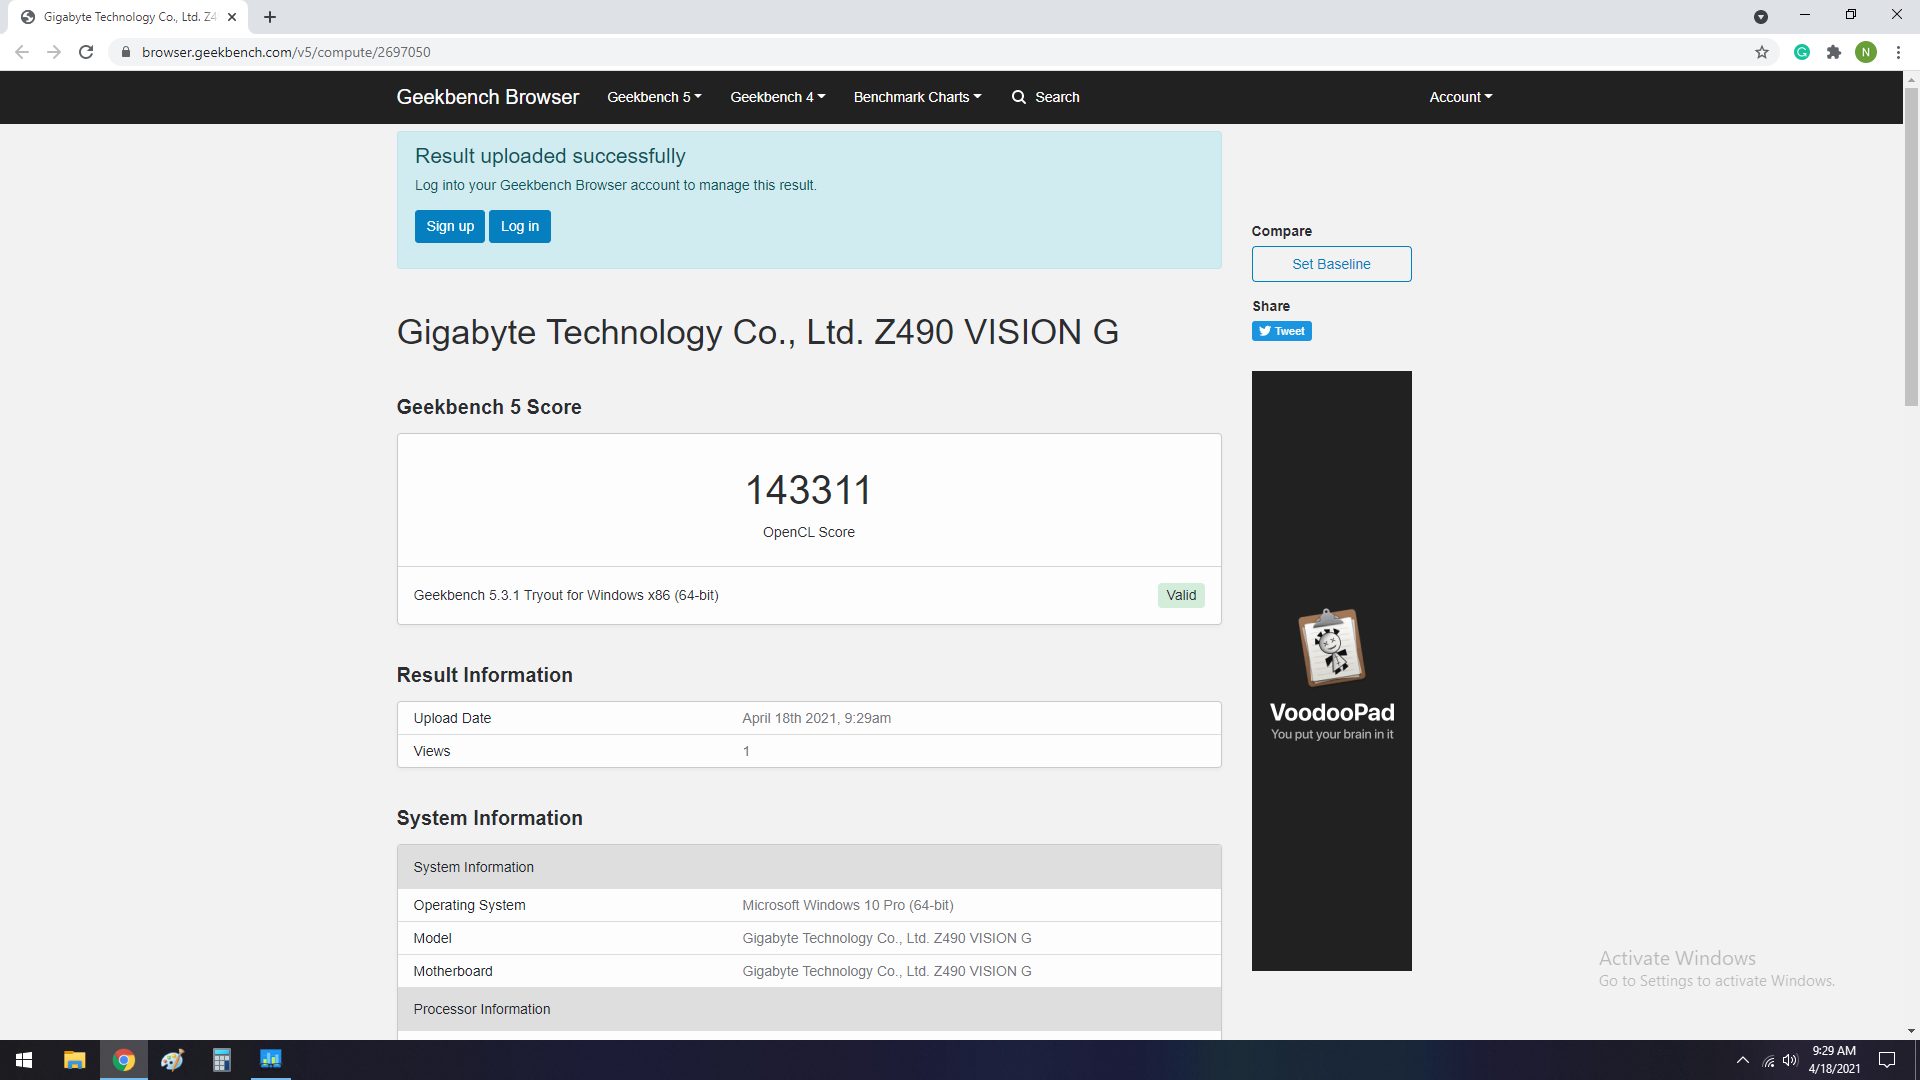
CPU Benchmark
Let’s go over a few CPU Benchmarks.


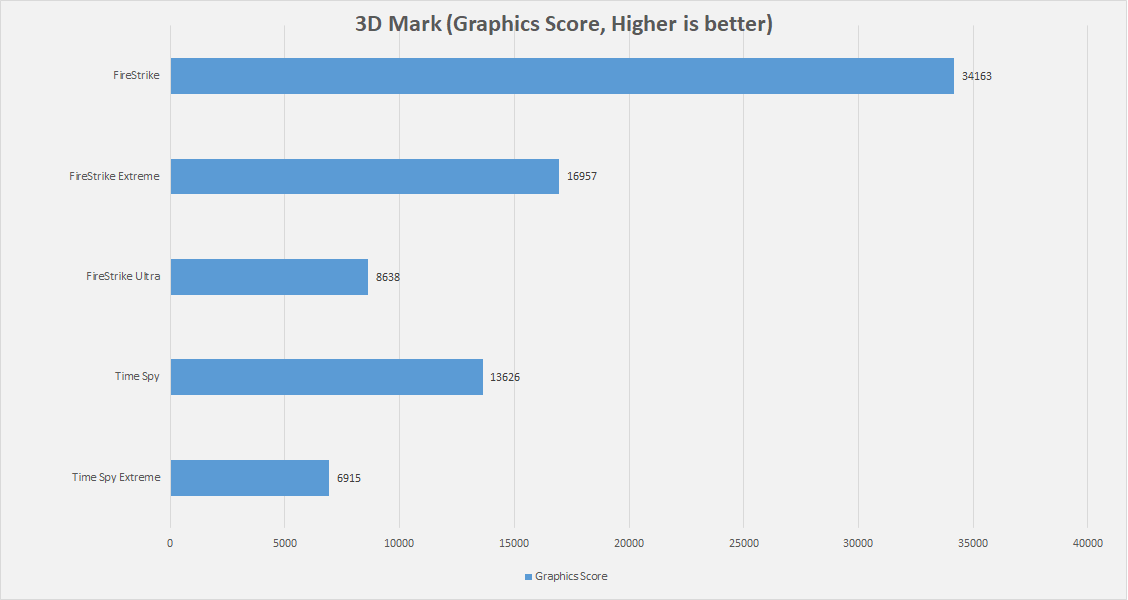
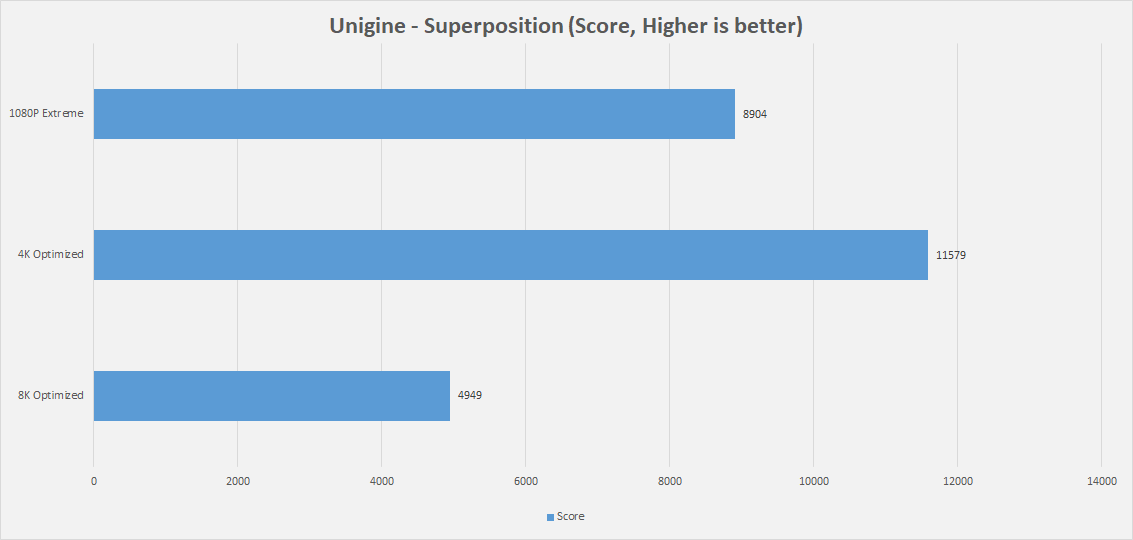
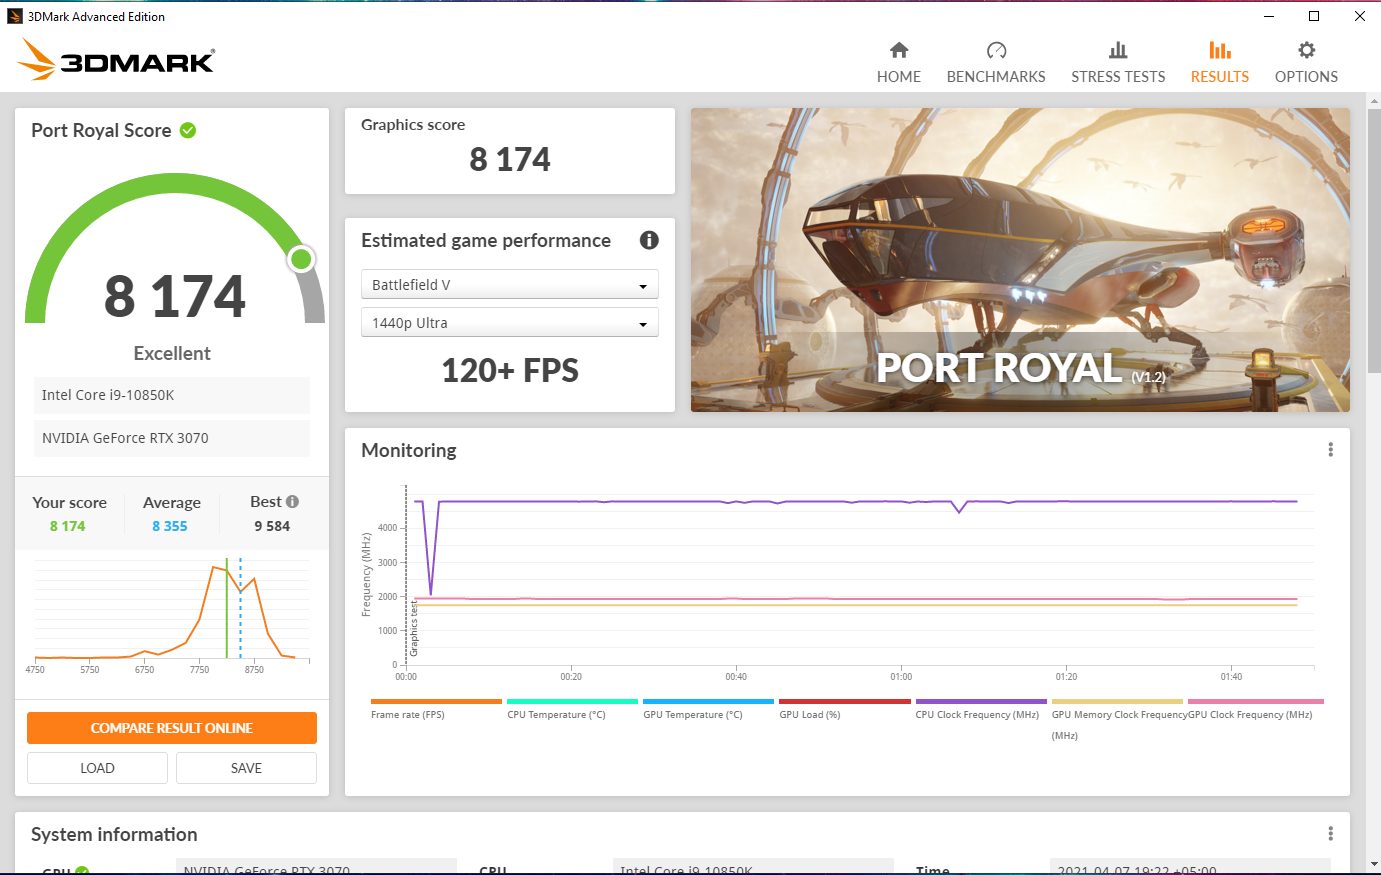
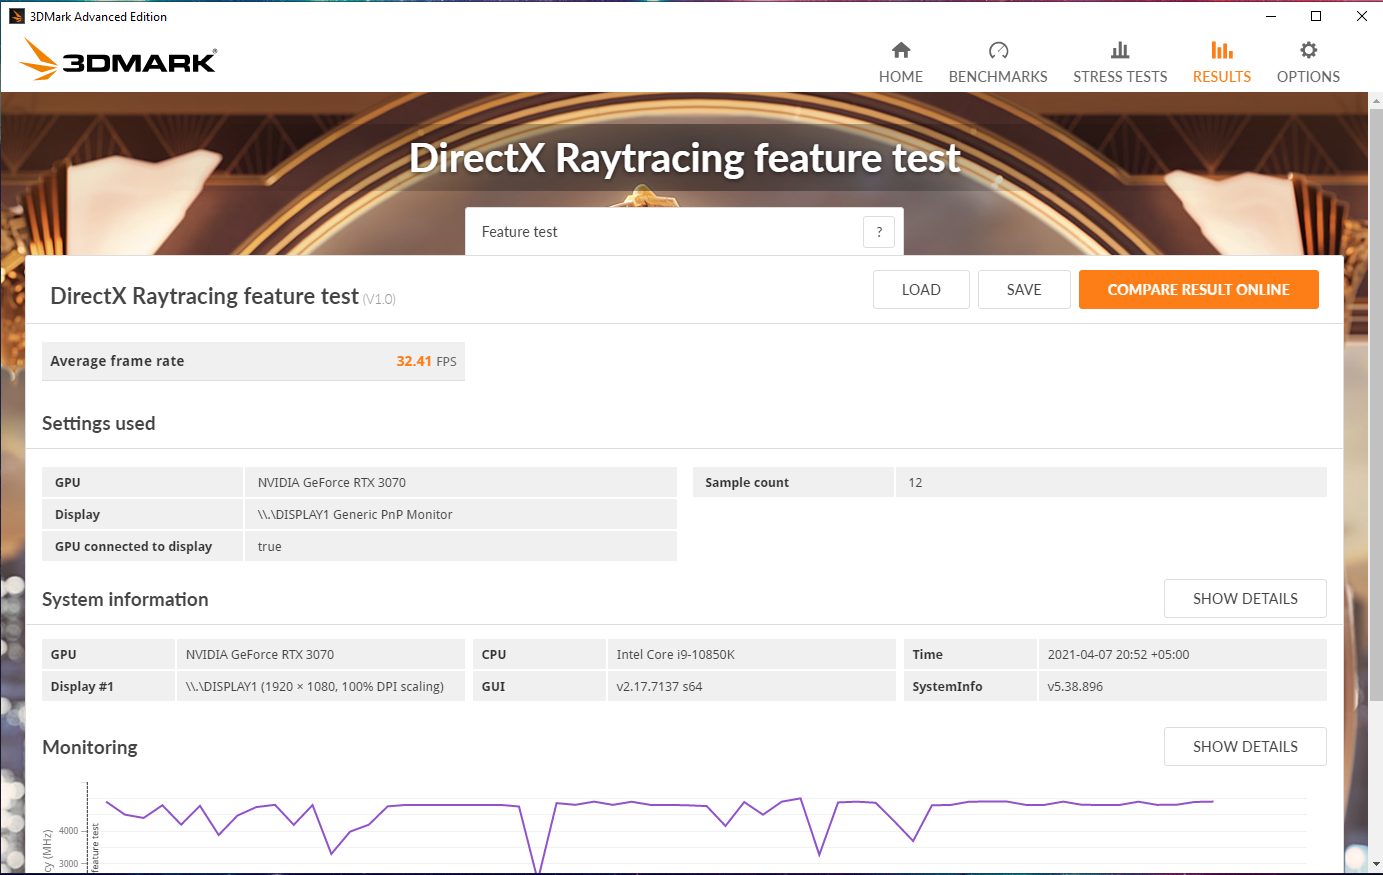
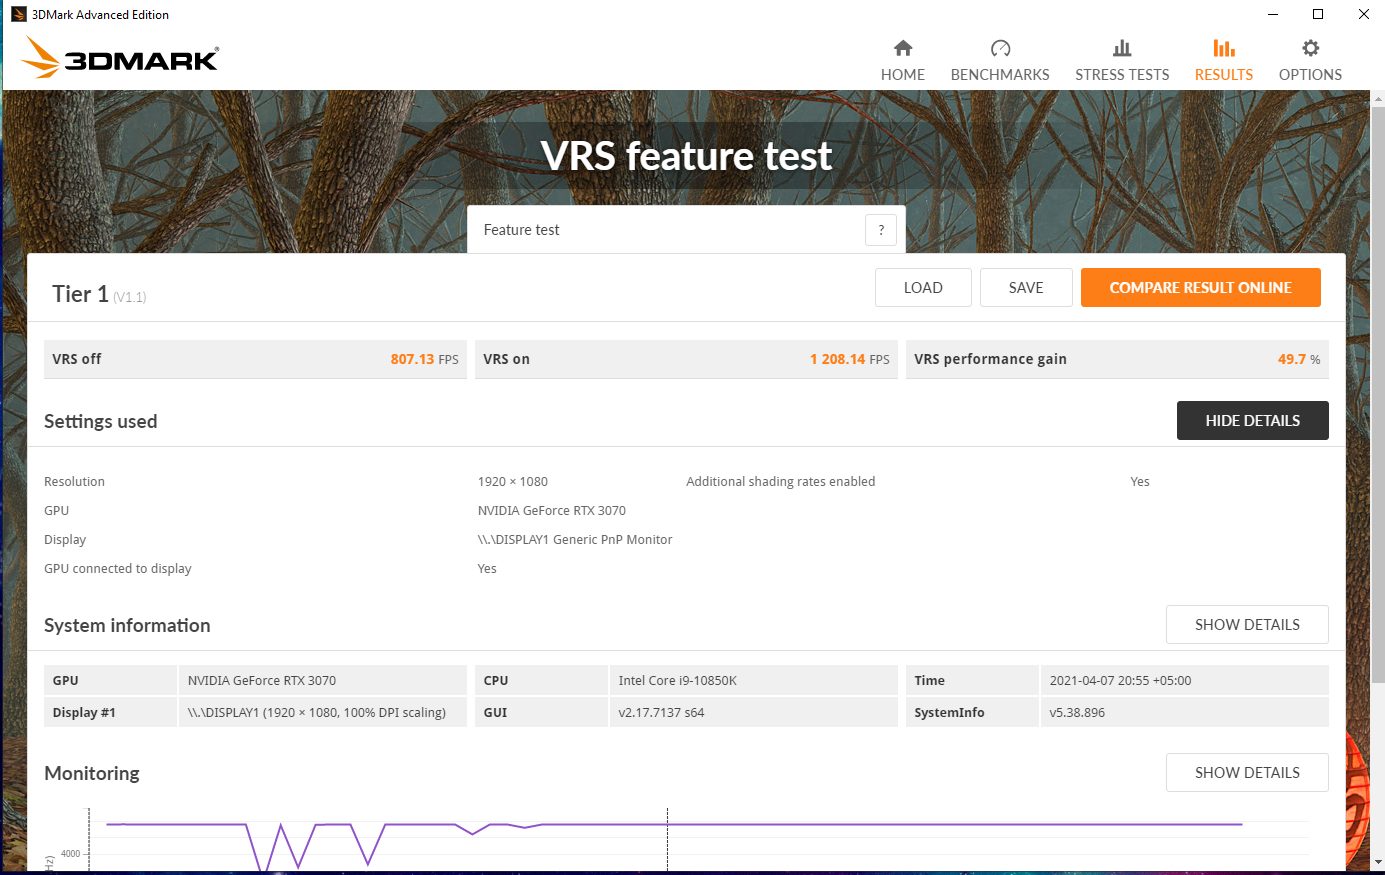
Graphics Card Testing
Let’s start with the synthetic benchmarks.
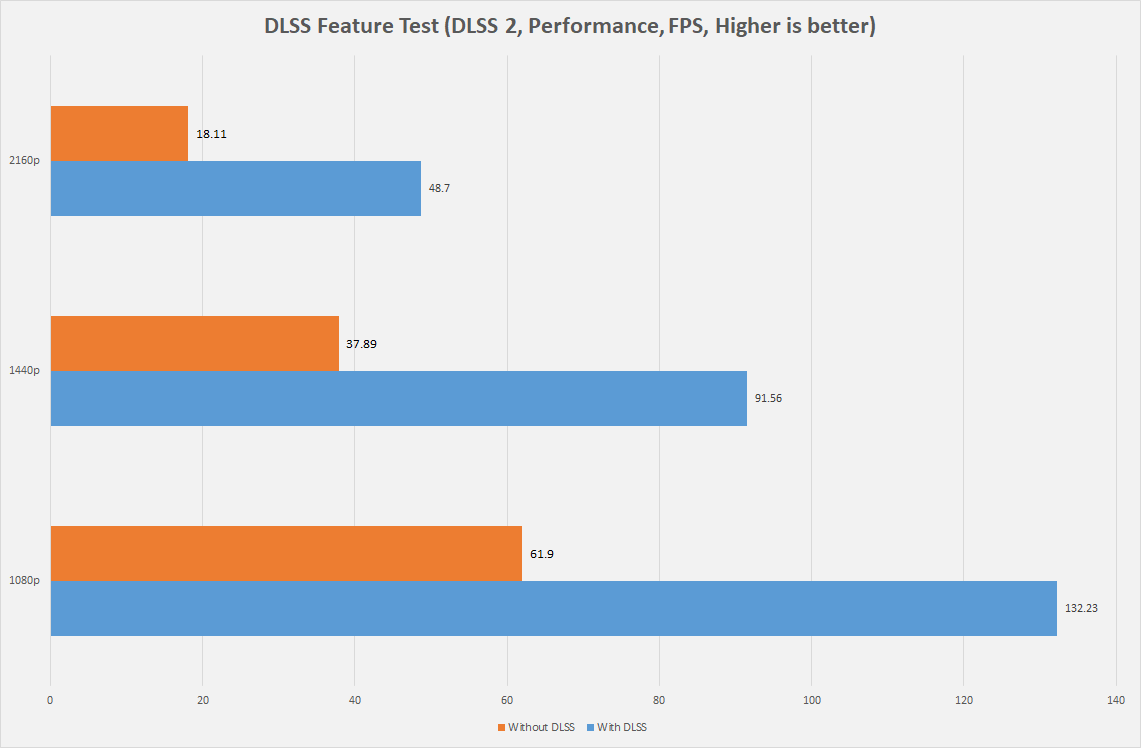
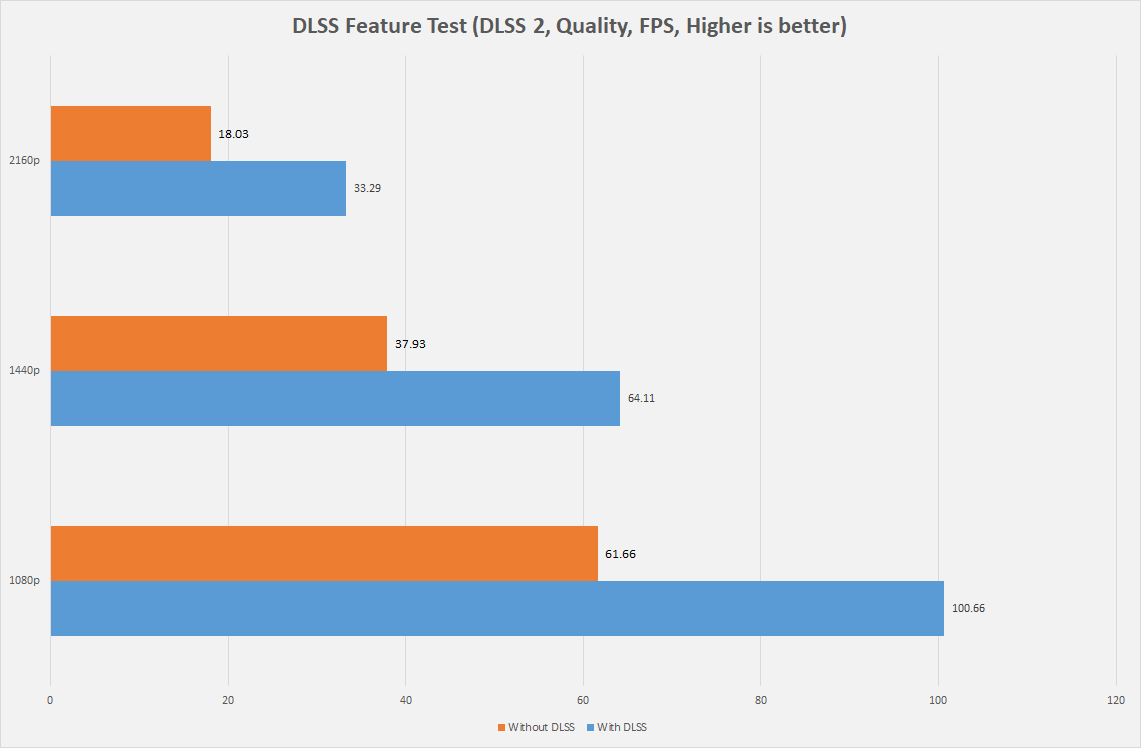

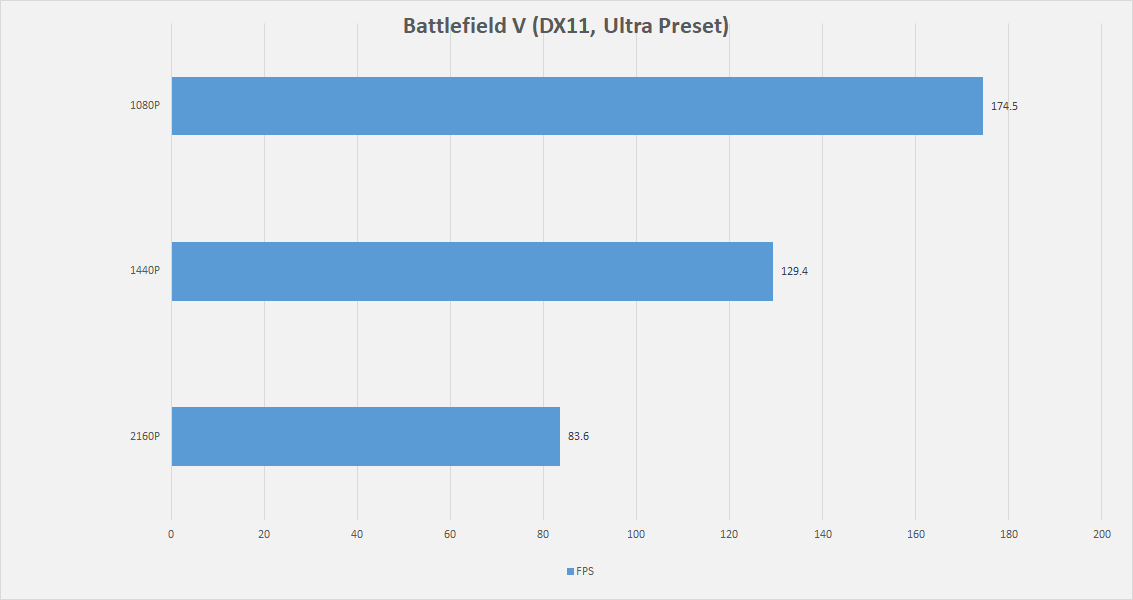
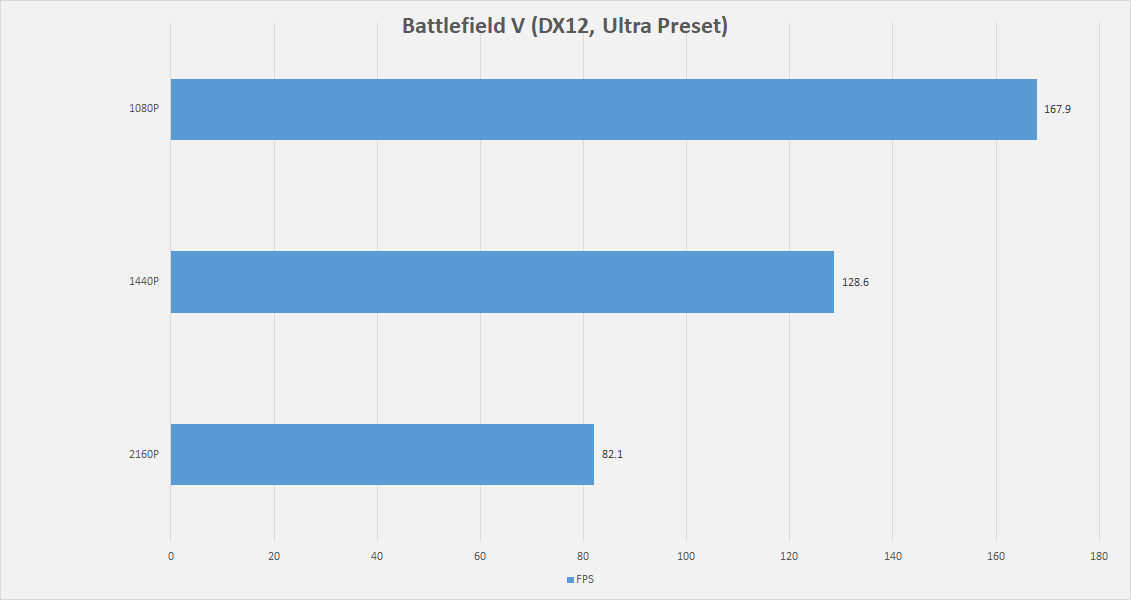
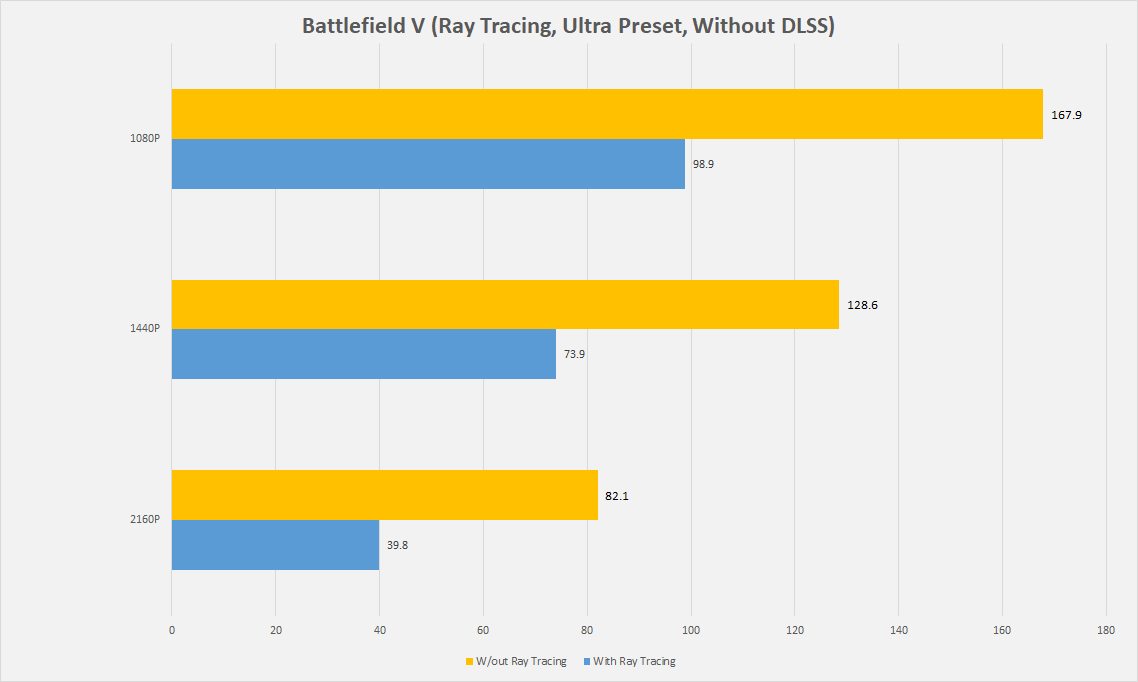
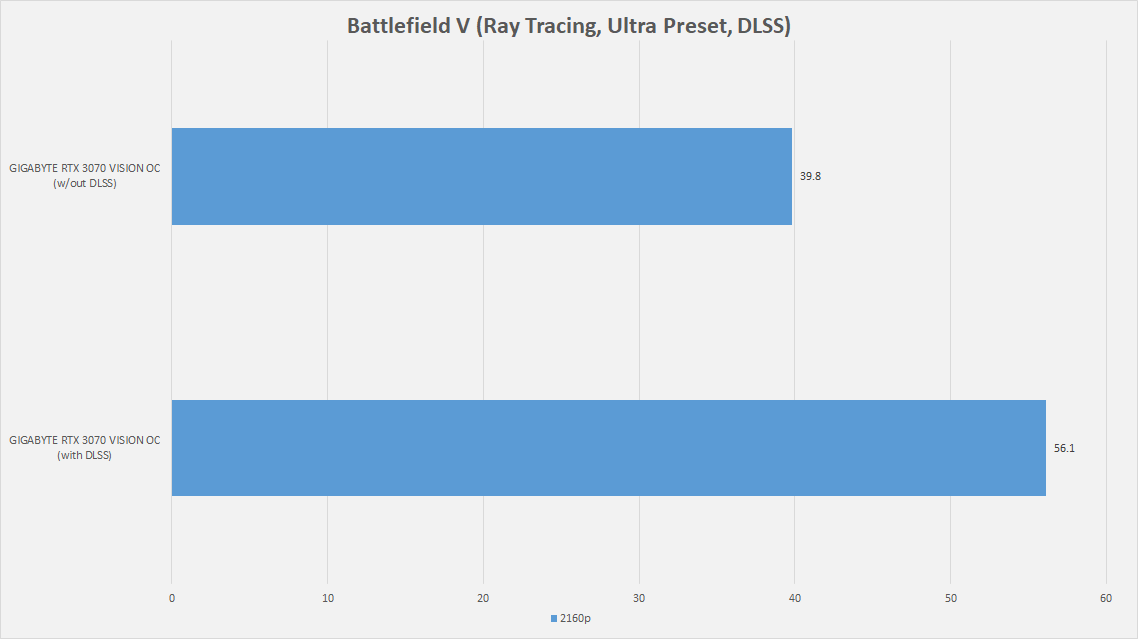
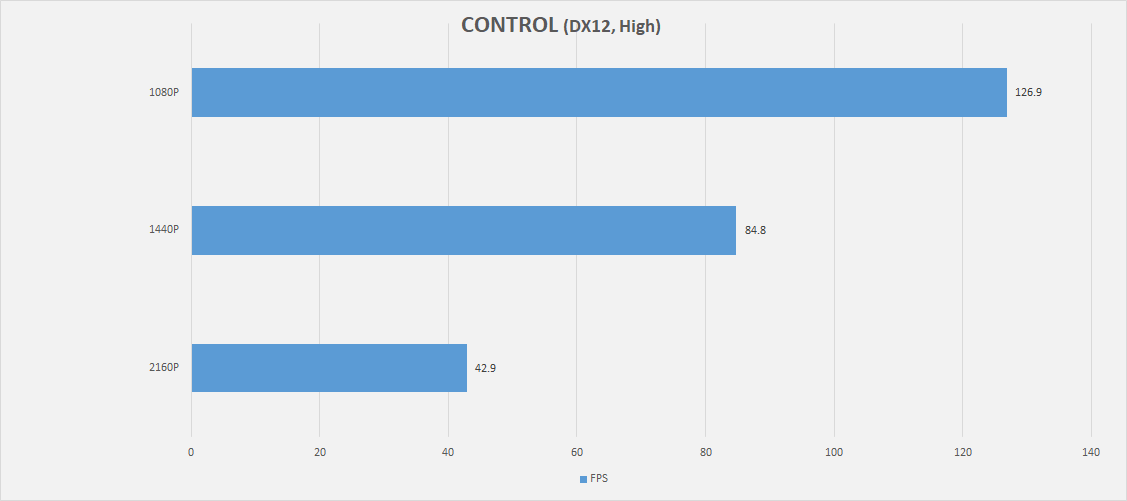
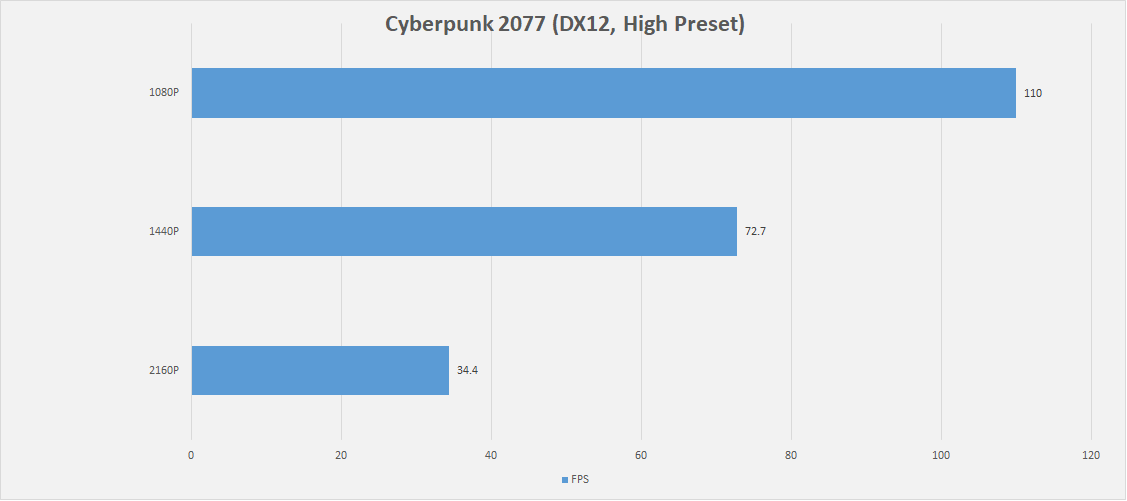
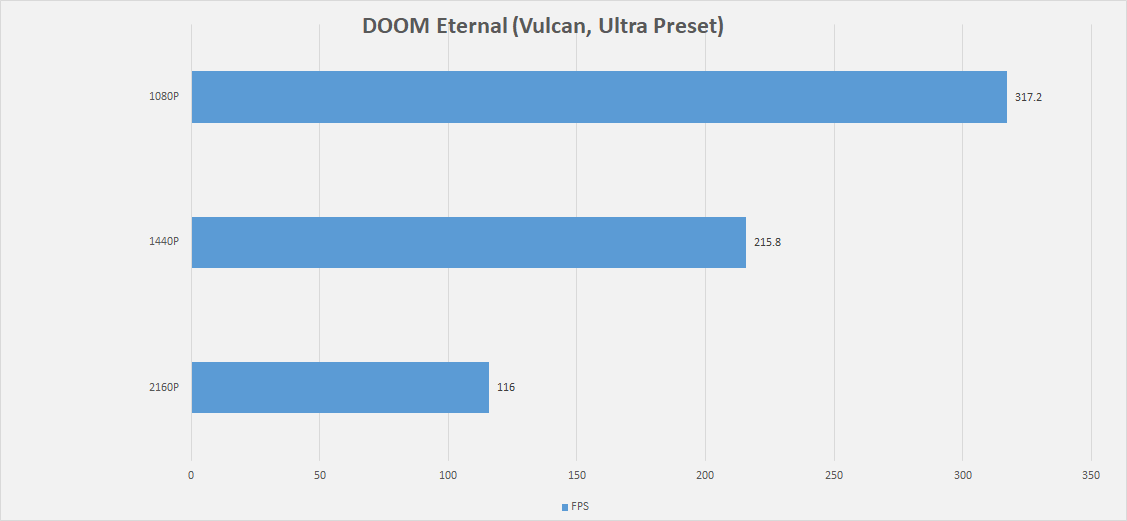
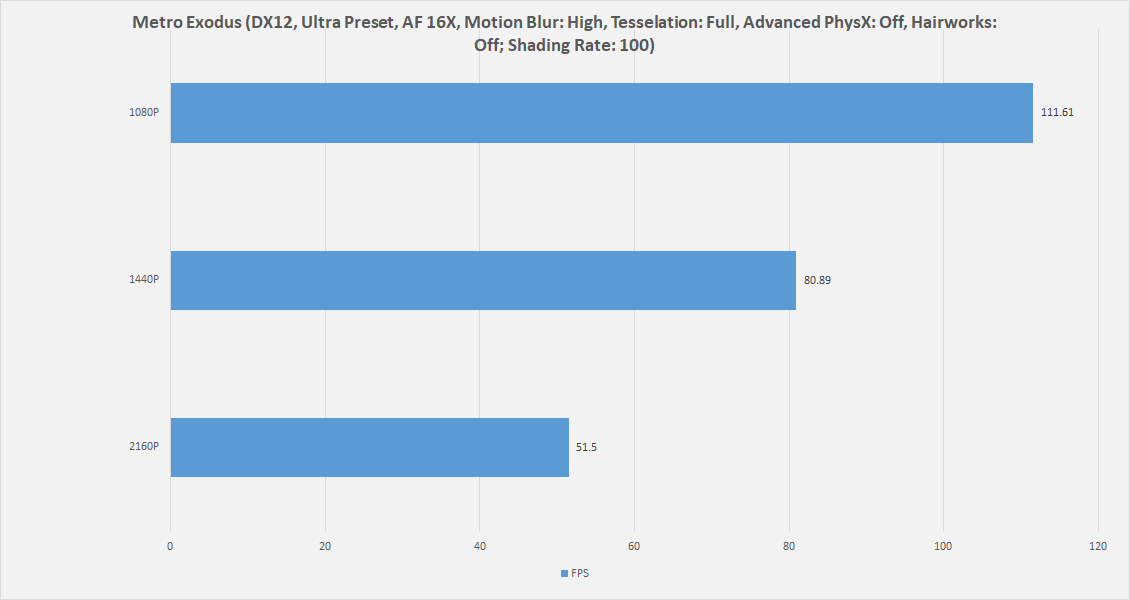
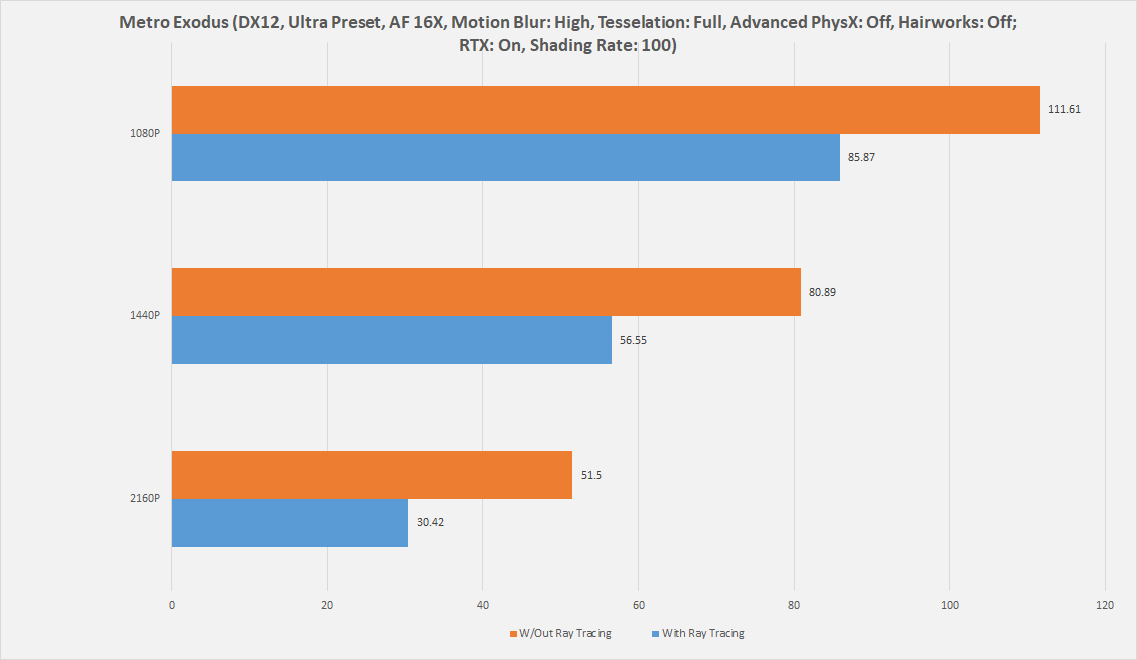
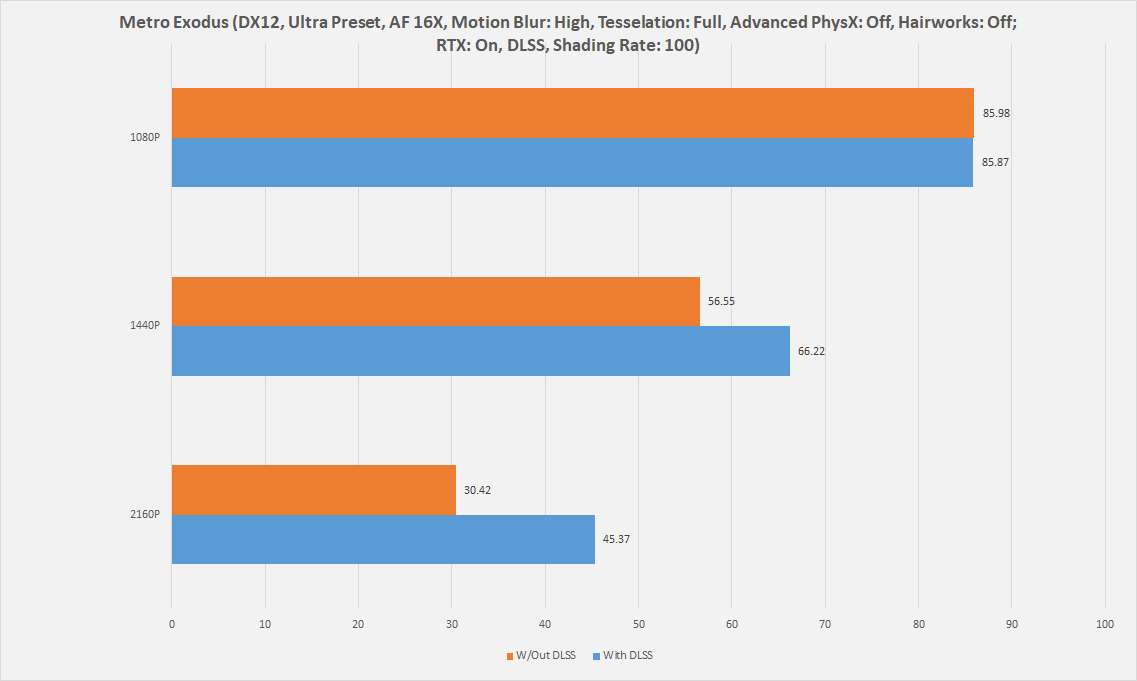
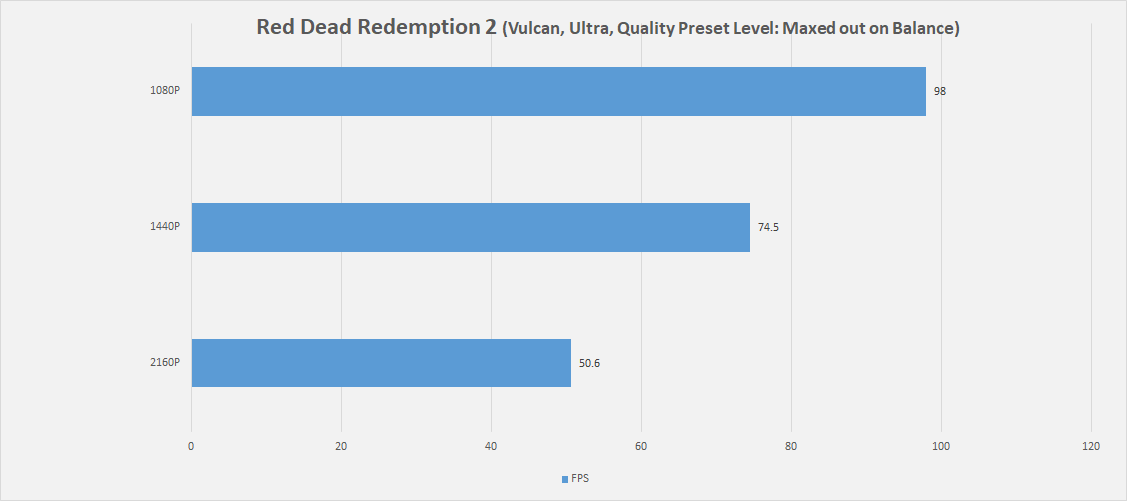
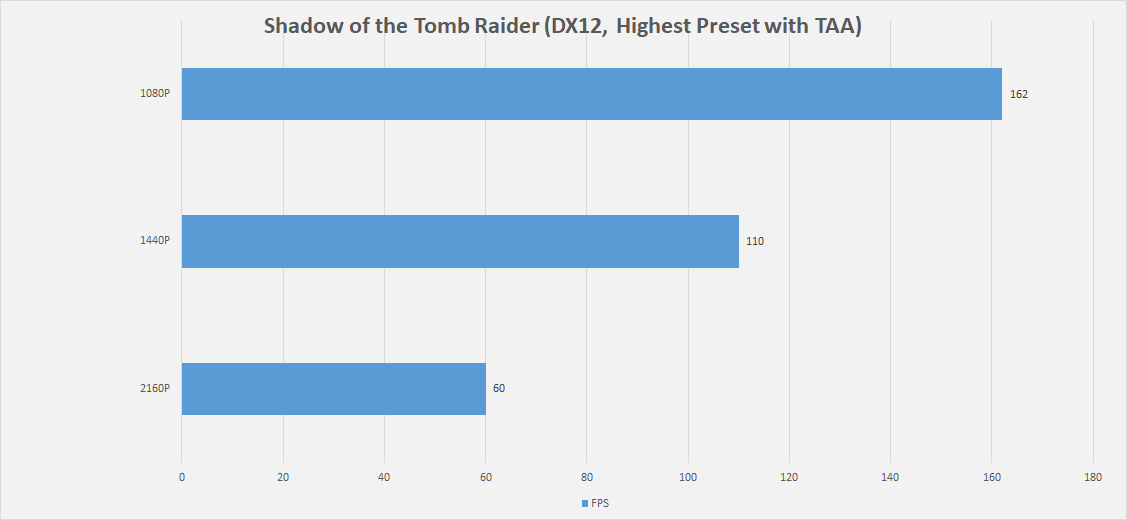
Gaming Benchmarks
It is time to take a look at the Gaming results.
Thermals and Power
Finally, here are the temperatures and the power consumption:
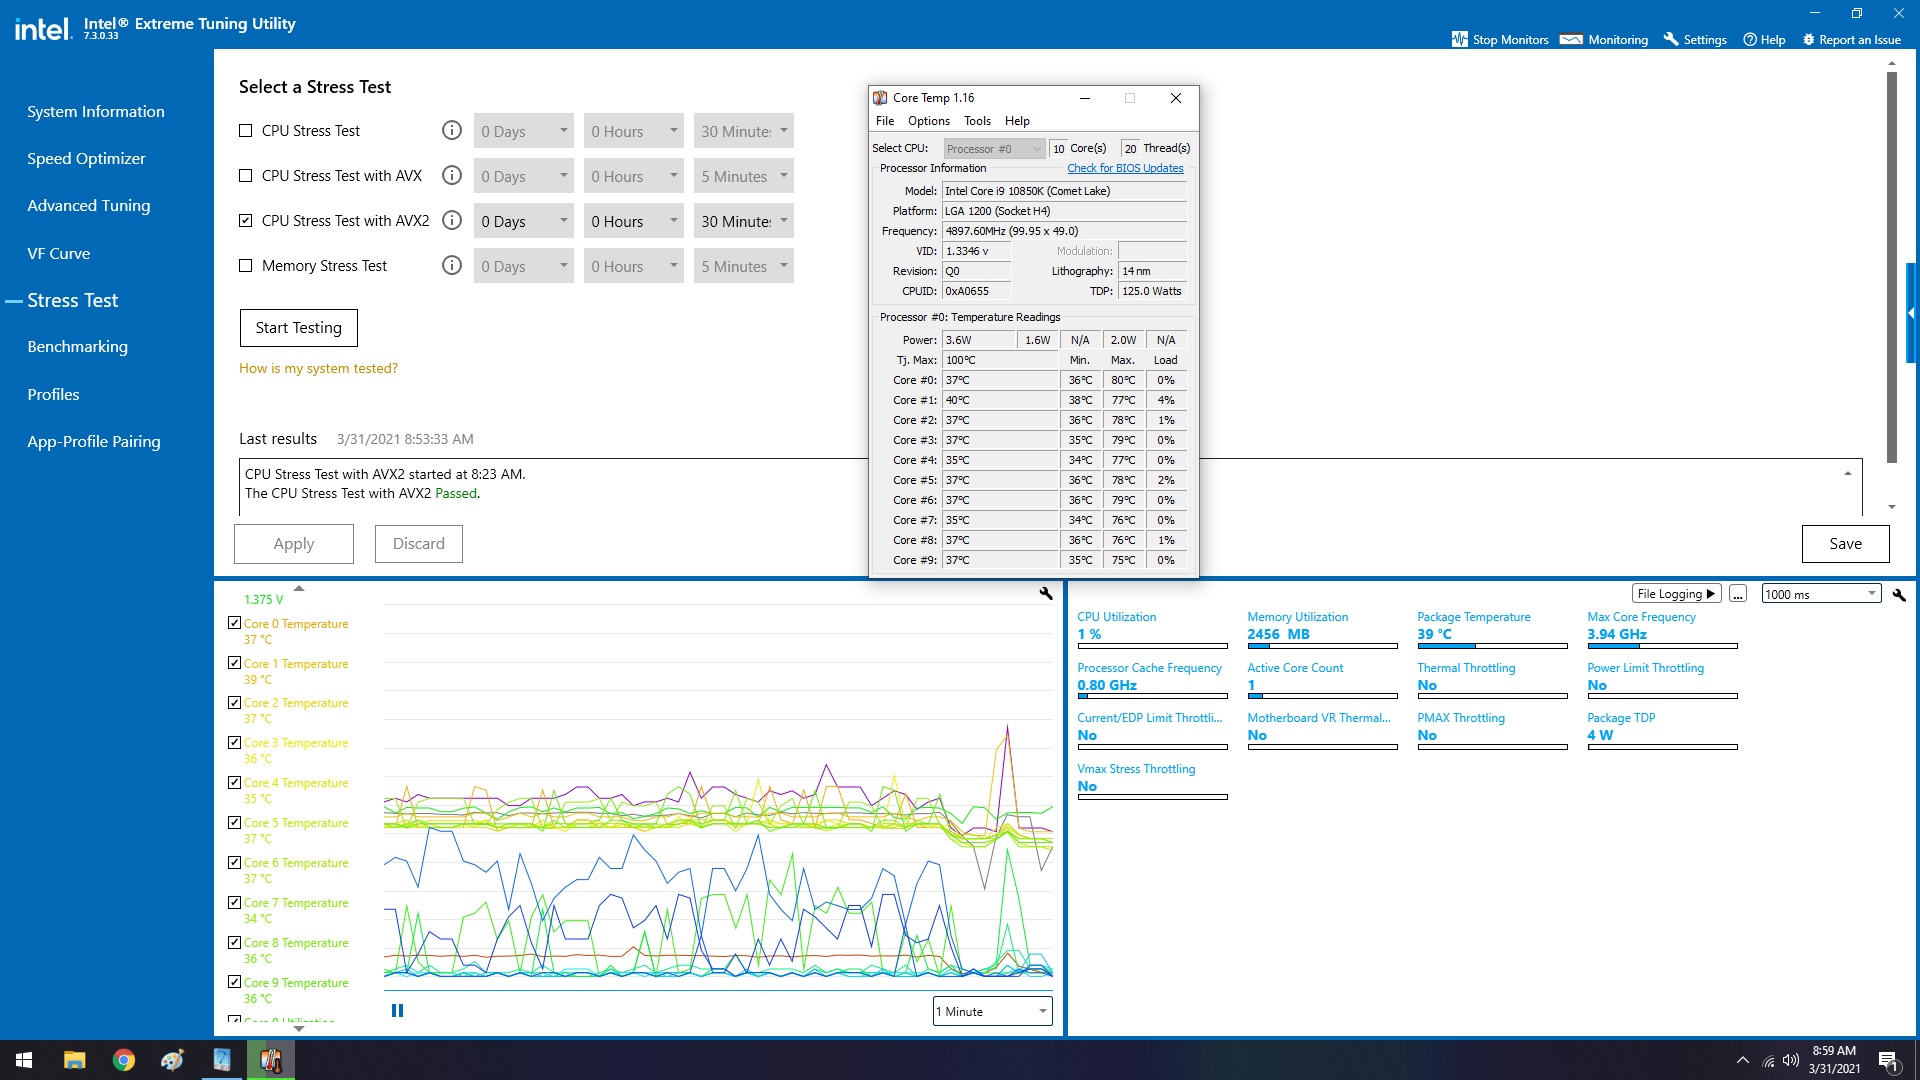
We did not overclock the CPU and graphics card and are reporting the results on stock auto settings. The Auto Enhancement mode was disabled. We ran the Intel XTU benchmark of AES2 for 30 minutes.
The maximum temperature on any core was 80°C. The ambient temperature was 28°C. The package power was 164W. All cores were boosting to 4.8GHz on multi-core load, whereas we saw two cores jumping to 5.2GHz for a very short span of time, and the majority of them sticking at 5.0GHz under single-core load.
The maximum temperature on the graphics card was 69°C under a 4K gaming load at an ambient of 28°C. The card was drawing near 220W power.
End Remarks
So, we are done, and the build is serving us very well. It is time to further fine-tune it, particularly by tightening the timings of the RAM to have it run at 3600MHz with CL16. The motherboard was pushing way too much voltage on the stock, so I ended up disabling the Auto Enhancement and setting the VCore to an Offset -0.20V, and it is holding quite well. Other than that, we have got ourselves quite hot silicon.
The graphics card is charming to us. It is running silently with maximum temperature on stock fan settings at 69°C. The VISION COMBO or VISION POWER – should I call it, is one heck of a combination in terms of aesthetics and obviously in terms of performance as well. The XPG SPECTRIX D50 is doing well, and we are now looking forward to upgrading it to have 32GB of DDR4 RAM.
The XPG S50 Lite 1TB on PCIe 3.0 is rocking, and our Windows boot time is 6.6 seconds. All in all, we have got ourselves a powerful machine to last us for some time to come.
We are highly grateful to GIGABYTE, XPG, DeepCool, and Cooler Master for their kind support on this project.
Recent Updates
- May 18, 2024: We have changed the formatting and added galleries to improve readability.
Thank you! Please share your positive feedback. 🔋
How could we improve this post? Please Help us. 😔
[How To’s & Guides Editor]
Haddi has been in the Gaming and tech Space for over 10 Years Now; he has worked on notable websites like eXputer, Gamepur, Gear Siege, Gearnuke, and plenty more. He is an expert at Games & PC Hardware; you can expect him to solve any problem. People often joke, that if there is any problem anyone can solve, Haddi can solve it faster. Currently, Haddi writes and manages a Team of Experts at Tech4Gamers.
Contact: Haddi@tech4gamers.com


![How To Keep A Monitor On When The Laptop Is Closed[Windows 11]](https://tech4gamers.com/wp-content/uploads/2023/10/Error-Fixes1-218x150.jpg "Windows 11: Keep A Monitor On When The Laptop Is Closed")
