 Threads

The DNS (Domain Name System) plays a crucial role in the Internet’s framework, facilitating user access to websites. DNS servers translate domain names to IP addresses, making visiting websites more straightforward for a browser. However, you can modify DNS settings to improve internet security and speed.
Key Takeaways
- DNS is the internet’s phonebook, which translates a domain name and converts it to an IP address.
- Modifying DNS settings is sometimes necessary for improved security and speed of the connection.
- You can modify DNS in any device by the Network, change DNS1 as the primary and DNS2 as the secondary addresses, and Save the settings.
Which Third-Party DNS Server Should You Use?
Google Public DNS, Cisco OpenDNS, and Cloudflare are three of the finest choices if you are looking for a third-party DNS server.
Google’s Public DNS
Google’s Public DNS keeps a log of the IP addresses for up to 2 days for diagnostic purposes. Sometimes, the logs stay long; however, Google’s database contains no personal information.
- Primary Address: 8.8.8.8
- Secondary Address: 8.8.4.4
Cloudflare
The privacy and internet speed that Cloudflare provides make it another well-liked option. It assures that the company will not log your data or your IP address unless you do it, and data keeps deleting every 24 hours.
- Primary Address: 1.1.1.1
- Secondary Address: 1.0.0.1
Cisco OpenDNS
OpenDNS‘ default feature is that it keeps filtering phishing websites, and you can also set up parental controls at no cost through its website. Additionally, OpenDNS provides paid services with various benefits, such as one-year activity history access.
- Primary Address: 208.67.222.123
- Secondary Address: 208.67.220.123
Modifying DNS Settings On Various Devices
The exact techniques to change the DNS may differ depending on the Operating System of your device; therefore, we have simplified the different ways for you.
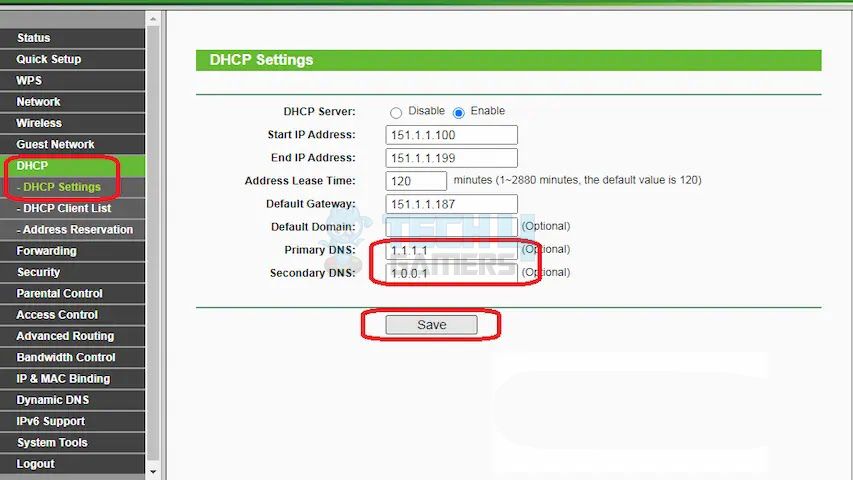
Through Router
This is our go-to method for experimenting with DNS addresses.
- Login to your router’s firmware.
- Go to Network/Internet Settings > Search for the DNS addresses section > Manually Assign the Address.
- Open DNS settings > Type the primary and secondary addresses for the server you wish to use > OK > Apply.

Router Firmware (Image By Tech4Gamers)
On Windows 10
These are the methods you can apply on your Windows 10 PC;
- Via Settings.
- Via Command Prompt.
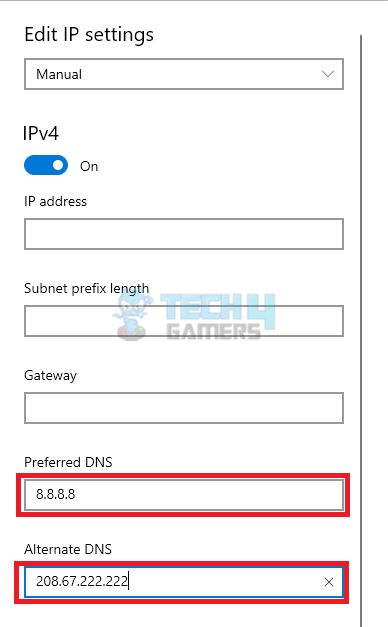
Via Settings
Here’s how you can do it:
- Launch Settings > Network & Internet.
- Move to Wi-Fi/Ethernet > Choose the current network.
- Click on Edit > Manual.
- Activate the toggle switch for IPv4.
- Verify the primary address in the Preferred DNS Server tab.

Google Public DNS (Image By Tech4Gamers) - Open Alternate DNS Server > Enter the secondary DNS address.
- Choose Save > Restart the system.
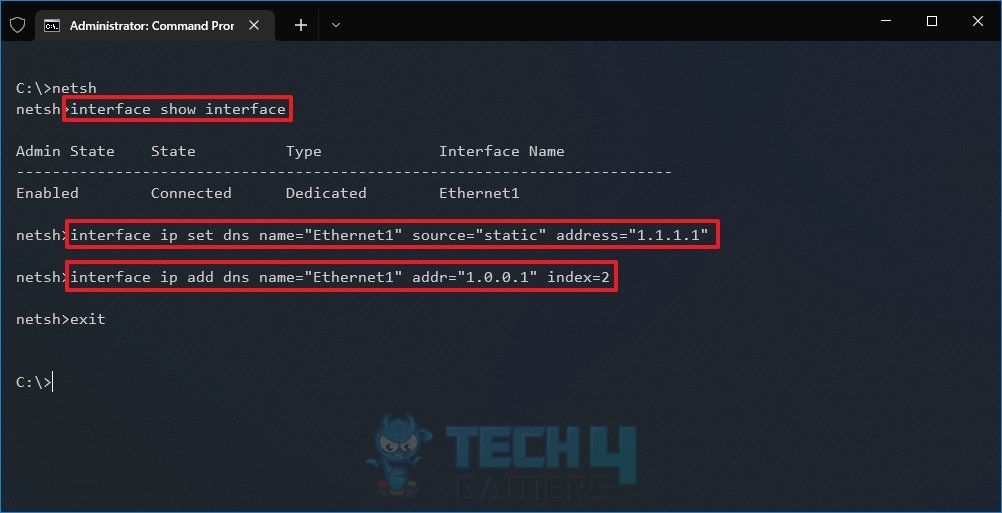
Via Command Prompt
We ran these codes in the Command Prompt and successfully altered the DNS on our Windows computer.
Carefully proceed with each step:
- Search for Command Prompt > Right-click the first result > Run As Administrator.
- To launch the utility for changing network settings, execute netsh
- To identify network adapters, type: interface show interface and hit Enter.
- For modifying the primary address, type:
interface ip set dns name= "DNS-Server-Name" source= "static" address= "X.X.X.X."
- Fill in the details in this command as per your requirement, such as DNS-Server-Name to Google Public DNS or Cloudflare DNS or any other, whichever you want to keep, and the same goes for X.X.X.X, keep the IP address of the same server.
- If you are willing to keep the settings for Google DNS, set the parameters as follows:
interface ip set dns name="Ethernet1" source="static" address="1.1.1.1".
- For secondary or alternate IP address, type:
interface ip add dns name= "DNS-Server-Name" addr= "X.X.X.X" index=2.
- Fill this command with the same DNS you entered above, then put the secondary address of the same server and keep the index 2.

DNS Setting In CMD (Image By Tech4Gamers)
On Windows 11 Via Control Panel
We confirmed this method by applying the steps below:
- Access the Control Panel > Network and Internet > View Network Connection > Change Adapter Settings.
- Right-click the connected network > Properties > Mark Internet Protocol Version 4 (TCP/IPv4).
- Choose Properties > Use Following DNS Server Addresses.
- Type the primary DNS address in the Preferred DNS Server tab.

Enter DNS (Image By Tech4Gamers) - Put the secondary DNS address in case the primary DNS is unreachable; the system will need an alternative address.
- Click on the Alternate DNS Server > Type the secondary address for the server you have used previously.
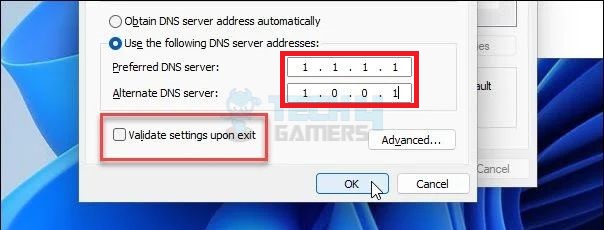
For more advanced settings, follow the instructions:
- Move to Advanced > DNS > Add.
- Type the additional DNS server addresses > OK.
On A Mac
To modify DNS settings on a Mac, make use of this quick guide, as also explained on Apple Support:
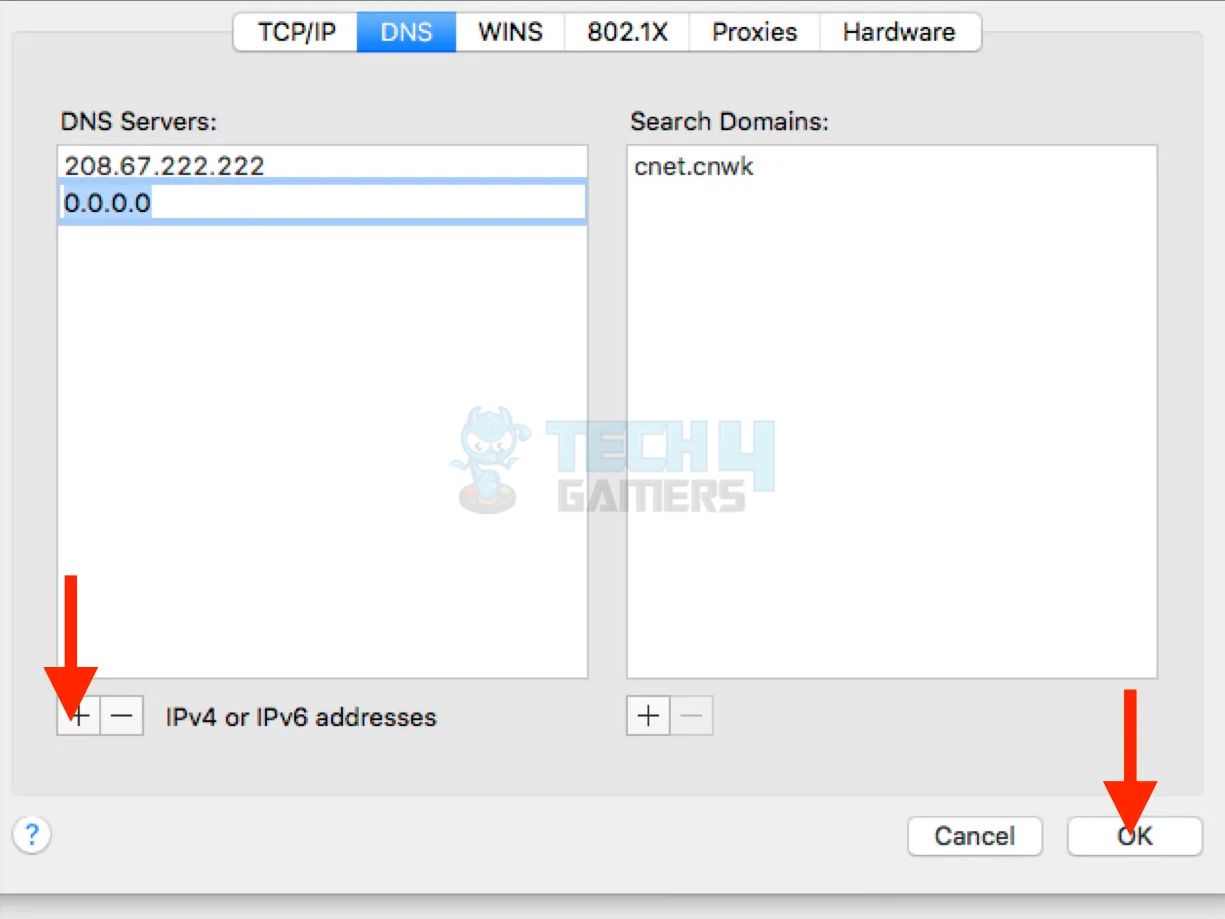
- Click the Apple Icon > System Preferences > Network.
- Pick the relevant connection.
- Go to Advanced > DNS Server > Click the + icon.
- Type the primary and secondary addresses > OK > Apply.

Add DNS Mac (Image By Tech4Gamers)
On An Android Phone Or Tablet
Changing DNS became crucial when downloading new games and apps took too long on our Android devices. Once we reconnected to the network after the DNS change, we noticed a visible difference in downloading time.
Here is what you need to do:
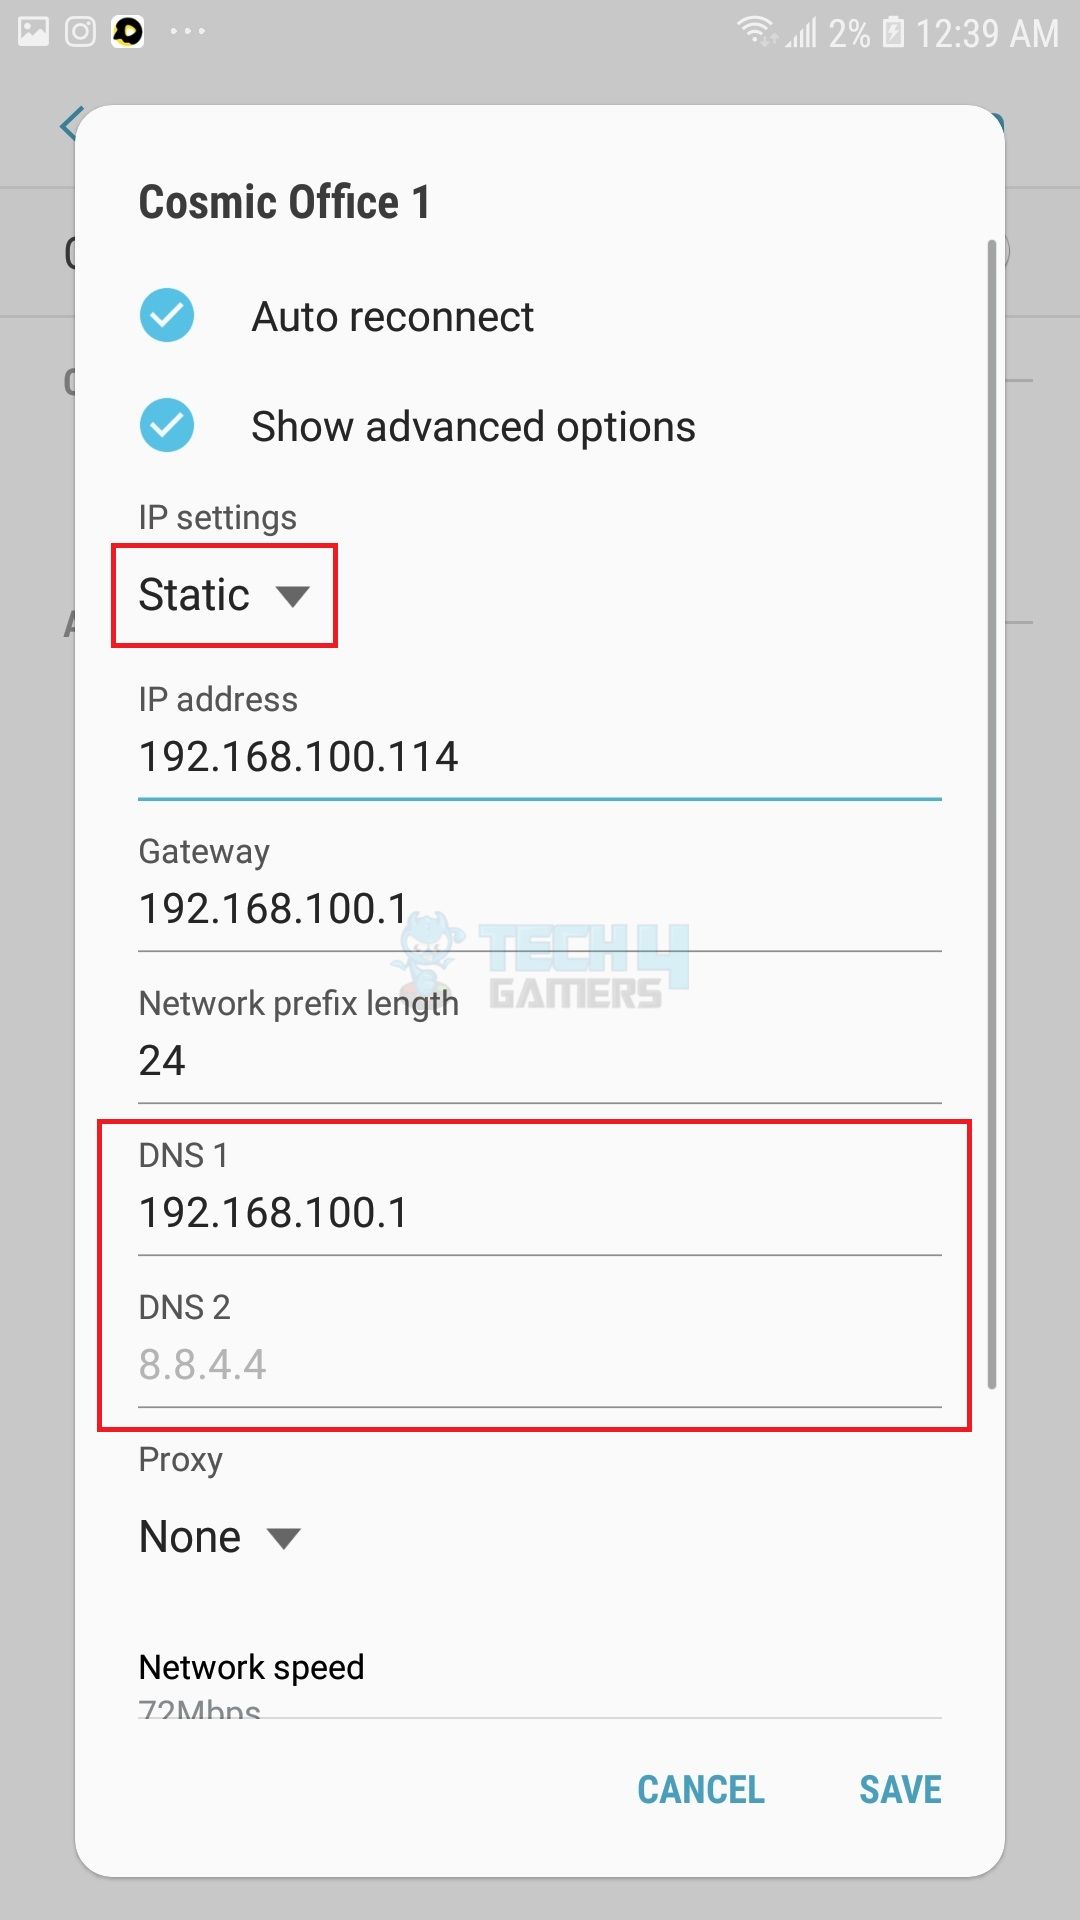
- Open your phone’s Settings > Wi-Fi.
- Select the connected network > Manage Network Settings.
- Change the IP Settings from DHCP to Static.

DNS IP Settings (Image By Tech4Gamers) - The DNS1 and DNS2 fields should be filled with the primary and backup DNS server addresses > Tap Save.
On An iPhone Or iPad
We were facing network speed issues on our iPhone, so we switched the DNS address to another server, restarted the phone, and restored the usual network performance.
The following method helped us complete the process:
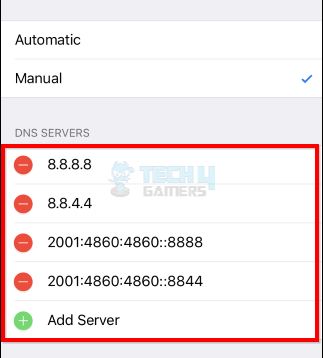
- Open iOS Settings > Wi-Fi > Tap the i icon.
- Pick DNS > Configure DNS > Manual.
- Tap the red – sign next to any DNS server addresses you want to delete and the green + symbol to add new DNS server addresses.

DNS Server Addresses (Image By Tech4Gamers) - Enter the DNS server details > Save.
On A Chromebook
Chromebook lets you connect to a variety of servers. As per our testing, this is among the quickest ways to switch DNS on a Chromebook.
These are the complete steps you can use on a Chromebook:
- Open Chromebook Settings > Wi-Fi.
- Select the current network > Name Server.

Chromebook Name Server (Image By Tech4Gamers) - For Google Public DNS servers, choose Google Name Servers; otherwise, Custom Name Servers > Enter DNS address.

Chromebook DNS Servers (Image By Tech4Gamers)


What Are DNS And IP Addresses?
Domain names are converted into IP addresses through DNS (Domain Name System), the internet’s phonebook.
Every device and network has a unique identifier for communication to the internet, known as an IP address, a unique set of digits. It is always a four-set number combination separated by dots, such as 192.168.1.1.
Related Articles
Thank you! Please share your positive feedback. 🔋
How could we improve this post? Please Help us. 😔
[How To’s & Guides Editor]
Haddi has been in the Gaming and tech Space for over 10 Years Now; he has worked on notable websites like eXputer, Gamepur, Gear Siege, Gearnuke, and plenty more. He is an expert at Games & PC Hardware; you can expect him to solve any problem. People often joke, that if there is any problem anyone can solve, Haddi can solve it faster. Currently, Haddi writes and manages a Team of Experts at Tech4Gamers.
Contact: Haddi@tech4gamers.com


