


Every device connected to the internet has a unique Internet Protocol (IP) address. I tested several ways to change my IP address, such as using a VPN or modifying the proxy settings. It can bring various benefits for the user, like enhancing privacy and keeping your data secure from threats.
- An IP address sets your device apart from other devices on the network or your local internet for hassle-free communication and data transfer.
- Alter the IP address for your device computer through TCP/IP configurations, enabling a proxy, turning on VPN, or simply restarting your internet router.
- It has many advantages, such as providing access to geographically blocked or restricted content, masking your virtual location, and fixing network errors or connectivity problems.
Methods Difficulty Rating
Rated: 5/10
Rated: 1/10
Rated: 4/10
Rated: 6/10
Rated: 7/10
Rated: 4/10
Use A VPN
Turning on a Virtual Private Network (VPN) lets you modify your IP address and change your virtual location to another available region. Secure VPNs like NordVPN, SurfShark, ExpressVPN, and Private Internet Access intercept the internet traffic, encrypt it, and send it through a remote server that can be traced to different countries. Consequently, by enabling a VPN, I could view websites and content blocked in my country while protecting my identity and data.
While using a VPN lets you switch the IP address, you might face slower internet speeds, especially if you’re using a free VPN. As such, I recommend checking out this how to disable a VPN guide if you don’t want to use a VPN anymore.
Switch Networks
Connecting to another WiFi or internet network also changed my IP address on the device. Simply, disconnect from the current network and switch to a different one.
Use Command Prompt/Terminal
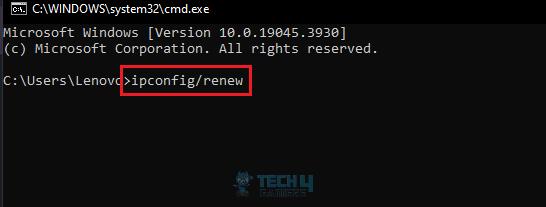
Executing a specific command on Windows and Mac computers removed the device’s current IP address, making it available for other devices on the network. Then, I requested a new IP address from Dynamic Host Configuration Protocol (DHCP) using the second code.
Windows
This method will help you enter a new IP on a Windows computer:
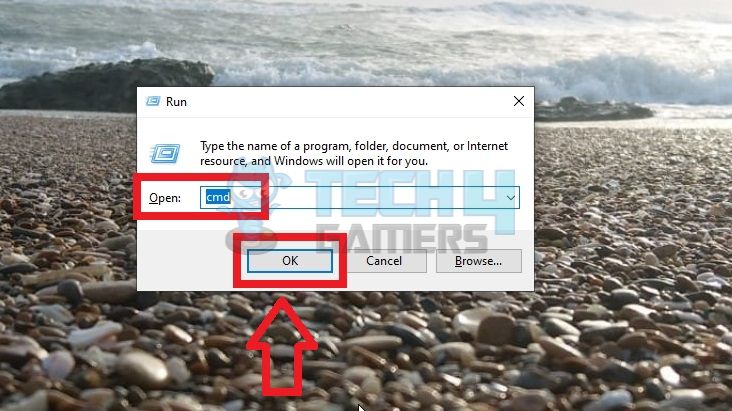
- Type Run Code: Hold the Windows+R keys to launch the Run box > Type cmd > OK.

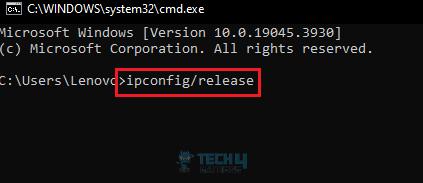
Type Code In Run Box (Image By Tech4Gamers) - Release IP: Execute the command ipconfig/release and let the content load. It will release the current IP address.

Release IP Address (Image By Tech4Gamers) - Revise IP: Type the command ipconfig/renew > Hit Enter to request a different IP address from the server.

Renew IP Address (Image By Tech4Gamers)
macOS
Use this simple pathway for changing IP on a Mac:
- Run Terminal Code: Open Terminal > Execute sudo ipconfig set en1 DHCP for DHCP to issue you a new IP address.
Resort To A Proxy
Proxy servers are a bridge between your device and the internet. Enabling proxies route the internet traffic through its servers rather than directly to its destination. Hence, it enables better privacy and access to a broader range of content.
Windows
Take note of the following steps to perform the process efficiently:
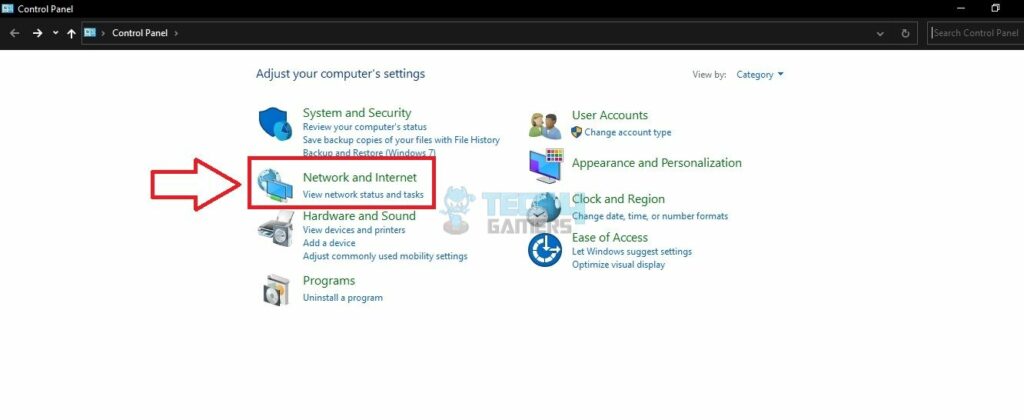
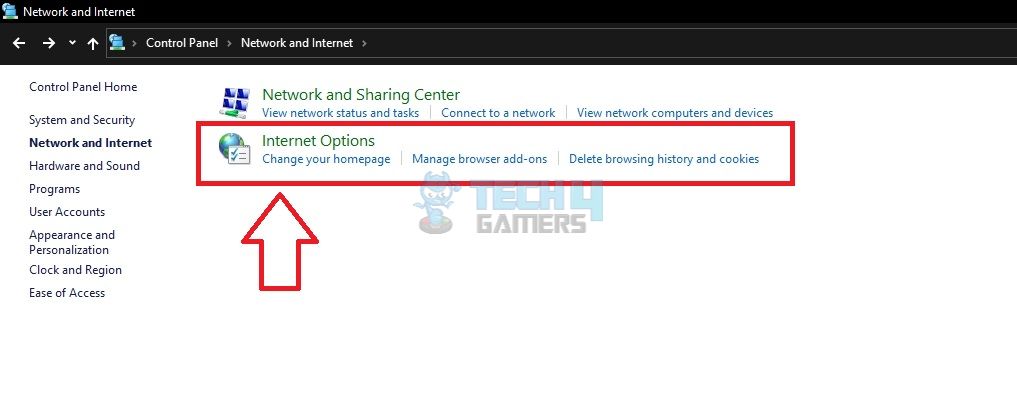
- Go To Network And Internet: Open the Control Panel > Network And Internet.

Pick Network And Internet (Image By Tech4Gamers) - Click Internet Options: Choose the second option, Internet Options.

Select Internet Options (Image By Tech4Gamers) - Bring Up LAN Settings: Head to the Connections tab > Select LAN Settings.

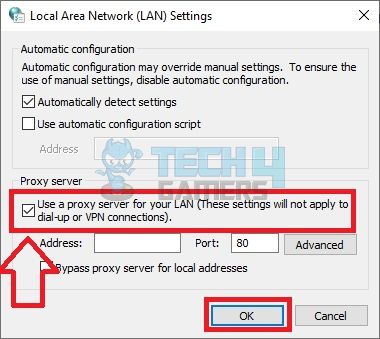
Press LAN Settings (Image By Tech4Gamers) - Enable Proxy: Mark the box beside Use A Proxy Server For Your LAN > OK.

Mark Use Proxy Box (Image By Tech4Gamers)

macOS
Here are the complete instructions to help you modify the IP:
- Enter Network Settings: Press the Apple symbol on the top menu > System Preferences > Network.
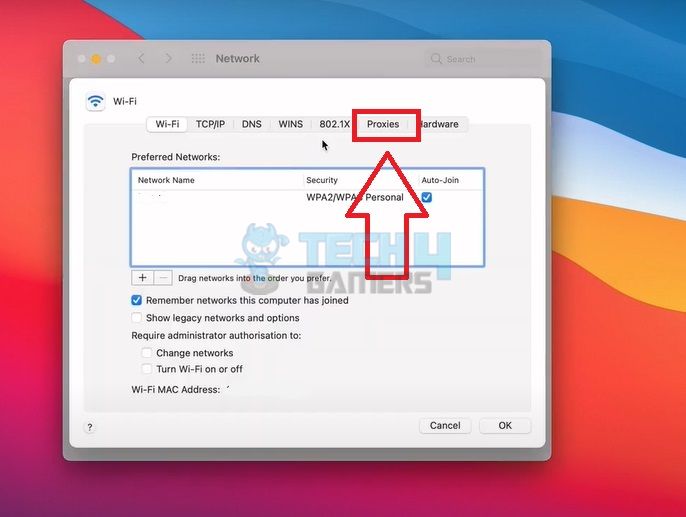
- Head To Proxies: Stay on the Ethernet section > Advanced > Move to the Proxies tab.

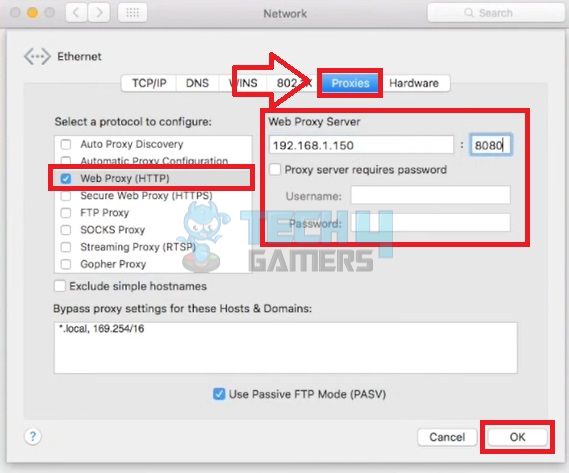
Highlight Proxies (Image By Tech4Gamers) - Alter IP Address: Select a protocol to configure, for example, HTTP, HTTPS, SOCKS or another > Type the IP address and port number in the Web Proxy Server box.
- Save Settings: Put a tick on the option Proxy Server Requires Password, and enter the credentials in the boxes below > OK.

Change Proxy Settings (Image By Tech4Gamers)
Android
I proceed with the method below to successfully alter my phone’s IP:
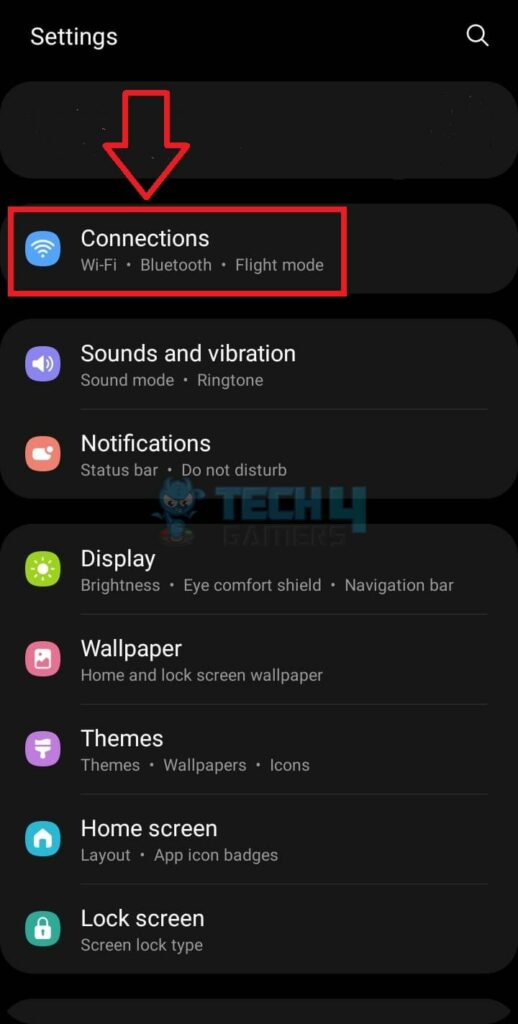
- View Connections: Open the Settings > Connections.

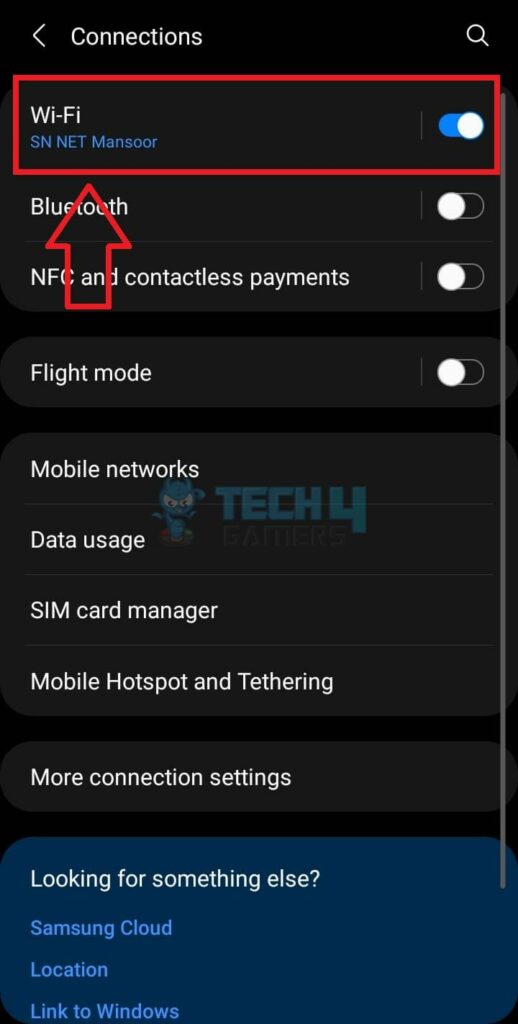
Scroll To Connections (Image By Tech4Gamers) - Choose WiFi: Go to WiFi to view more details and options.

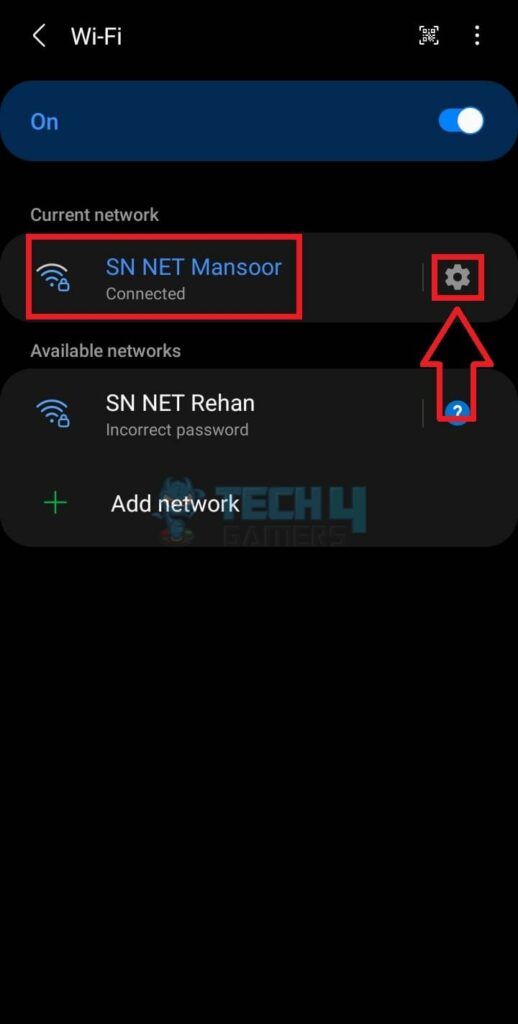
Tap WiFi (Image By Tech4Gamers) - Go To Network Settings: Tap the Settings icon beside the connected WiFi.
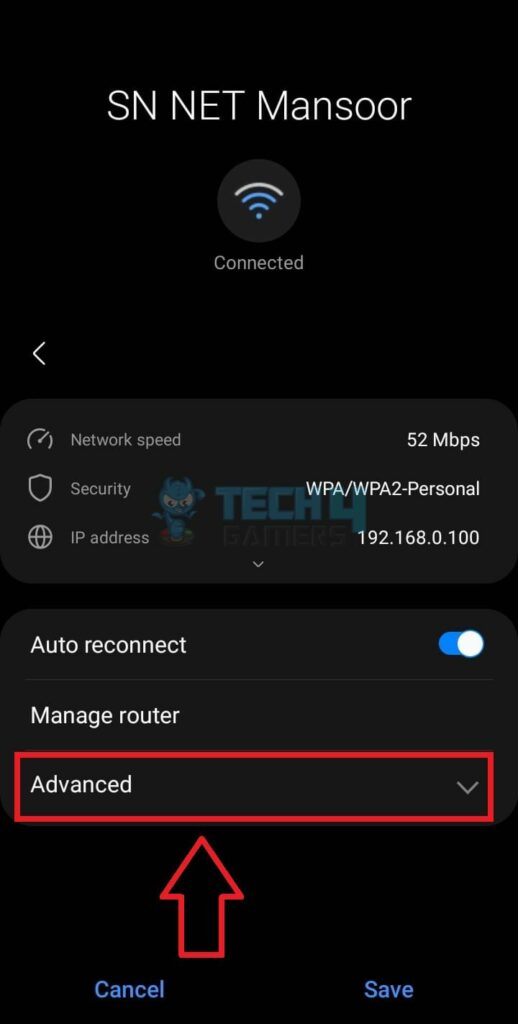
Click On Settings Gear (Image By Tech4Gamers) - Expand Advanced Tab: Select Advanced to expand the menu.

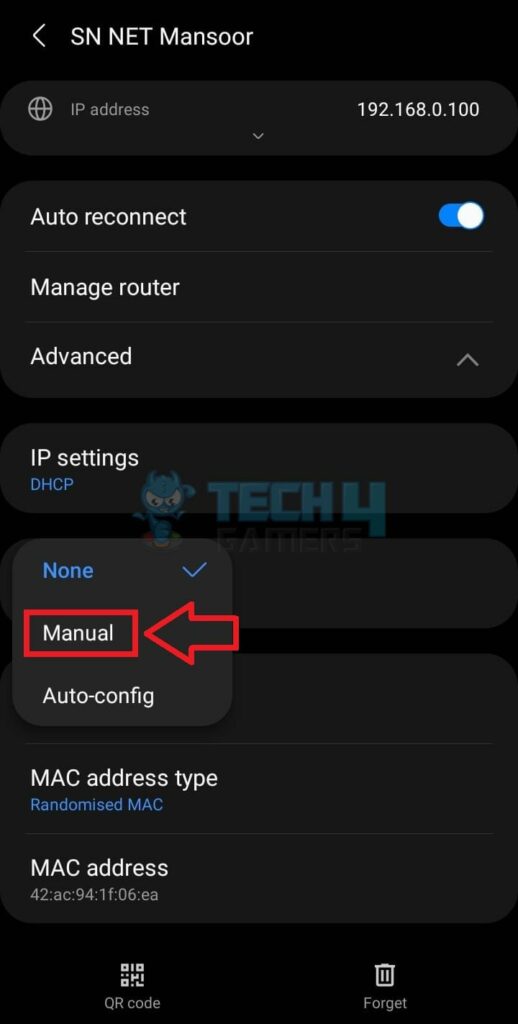
Expand Advanced (Image By Tech4Gamers) - Pick Manual Proxy: The Proxy settings will be set to None by default > Tap on it and pick Manual from the sub-menu.
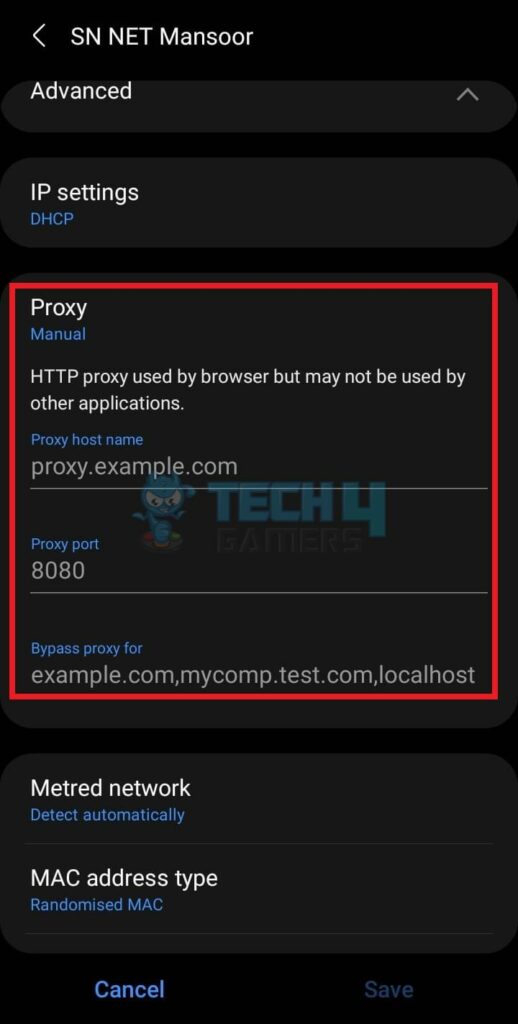
Select Manual Proxy (Image By Tech4Gamers) - Configure Proxy: Now, enter the proxy details provided by your host.

Enter Proxy Details (Image By Tech4Gamers)
iOS
For an iPhone, here is how you can resort to another IP:
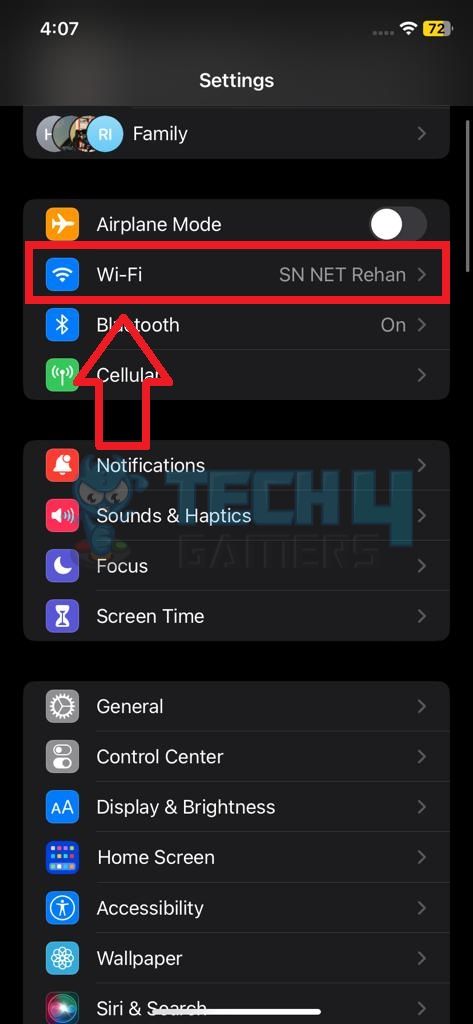
- Navigate To WiFi: Move to Settings > WiFi.

Choose WiFi (Image By Tech4Gamers) - Access More Options: Press the i symbol. It should be located in front of the connected WiFi.
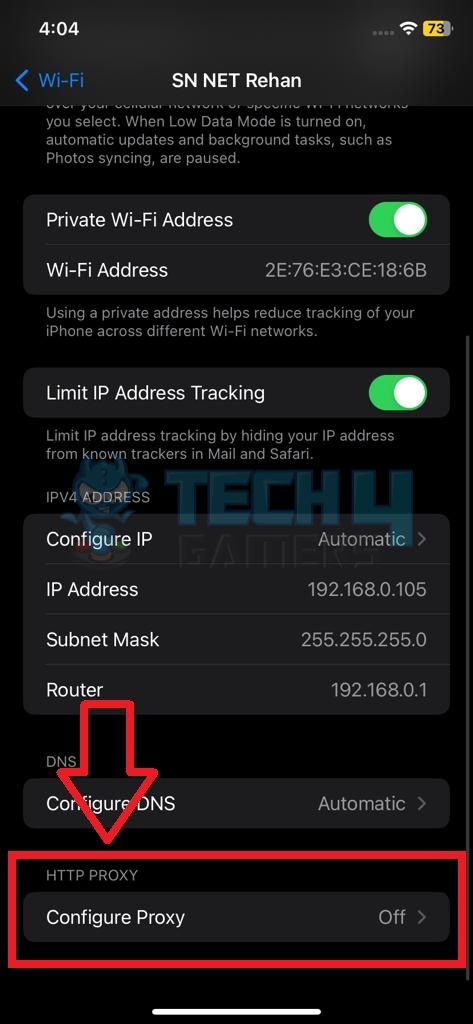
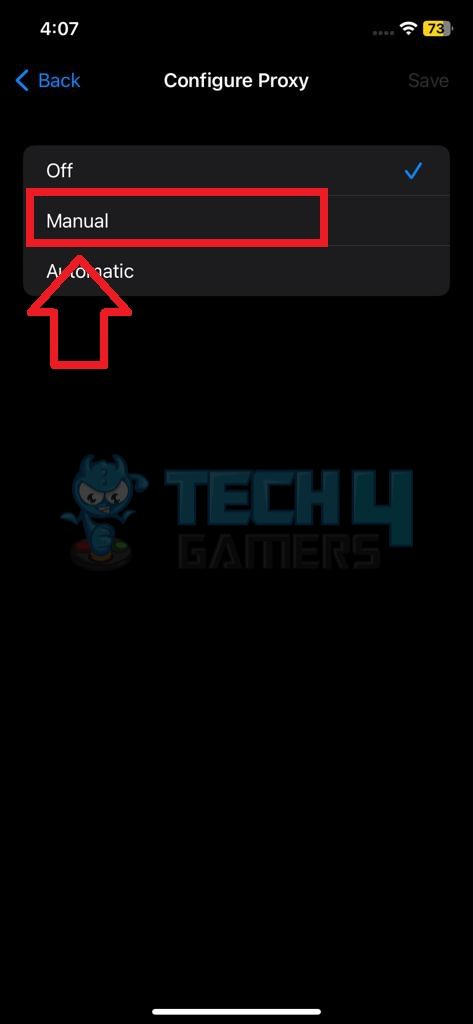
Tap “i” symbol (Image By Tech4Gamers) - Select Configure Proxy: Find the Configure Proxy option and click on it.
Configure Proxy (Image By Tech4Gamers) - Change IP: Set it as Manual > Type the proxy details and save the settings.
Pick Manual (Image By Tech4Gamers)
Configure TCP/IP
Transmission Control Protocol/Internet Protocol (TCP/IP) is a system of networking protocols that overlooks how data travels on the network. The TCP/IP settings determine how the connected devices communicate among themselves and with the internet.
Modifying these settings can resolve connectivity errors and enhance the network’s performance on your device.
Windows
Use the method below to configure TCP/IP on Windows:
- Pick Network And Internet: Select Network And Internet on the Control Panel menu.
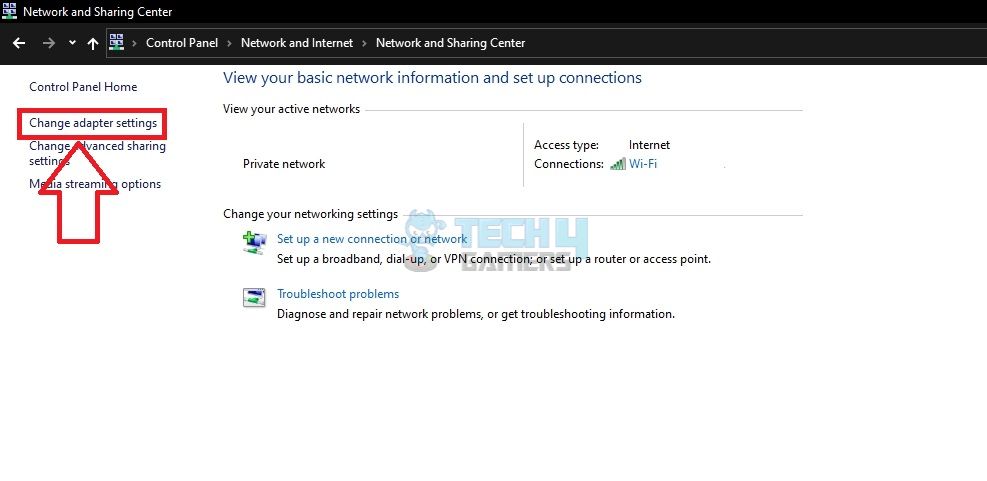
- Open Network Settings: Go to Network And Sharing Center > Locate the option Change Adapter Settings on the left bar > Click on it.

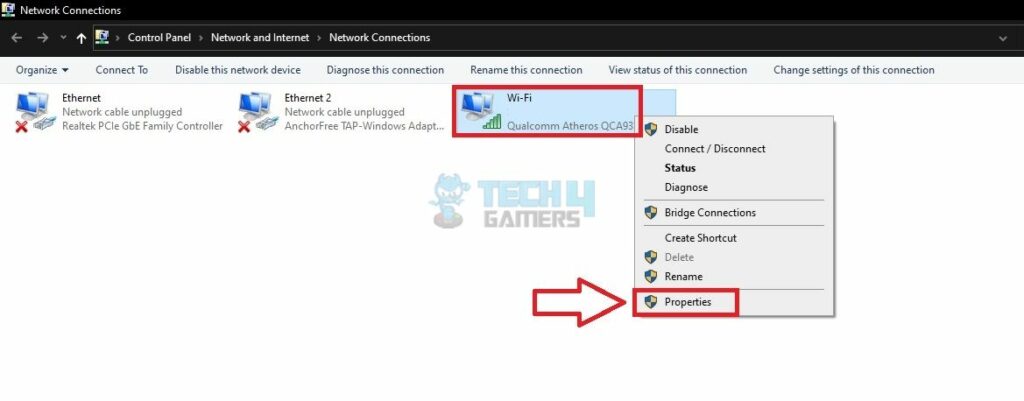
Go To Change Adapter Settings (Image By Tech4Gamers) - Choose WiFi Properties: Right-click on your connected WiFi network > Properties.

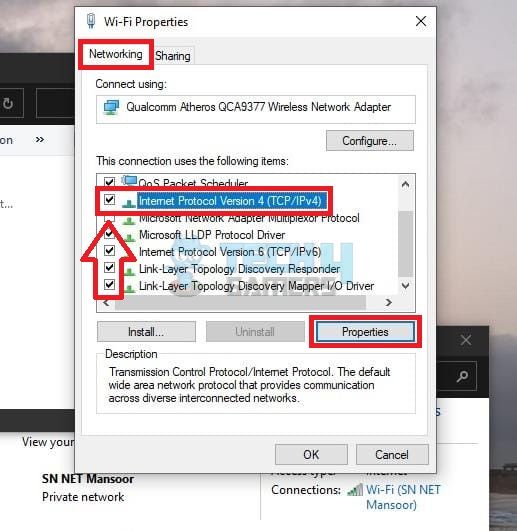
Pick WiFi Properties (Image By Tech4Gamers) - Mark TCP/IPV4: In the next dialog box, highlight Internet Protocol Version 4 (TCP/IPv4) > Press the Properties button.

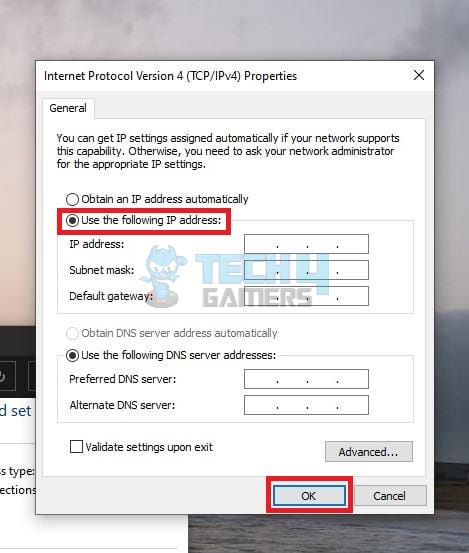
Choose Internet Protocol Version (Image By Tech4Gamers) - Alter IP Address: In the General tab, select Use The Following IP Address > Enter the desired IP address, subnet mask, and default gateway > OK.

Change IP Address (Image By Tech4Gamers)
macOS
By using these instructions, I accessed the required settings on my Mac:
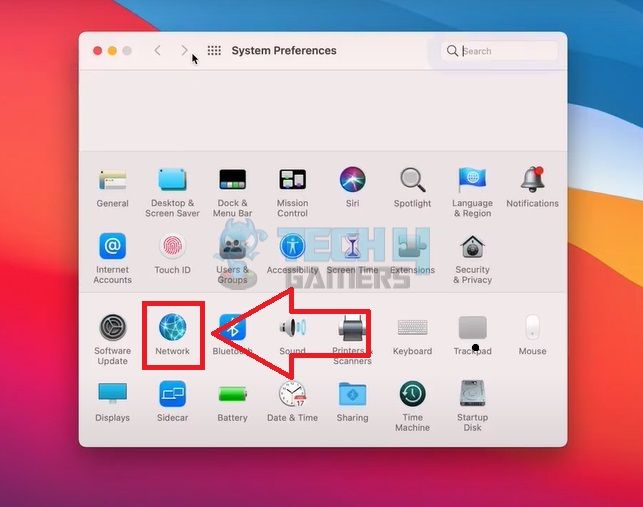
- Open Network: Launch Network settings from the System Preferences menu.

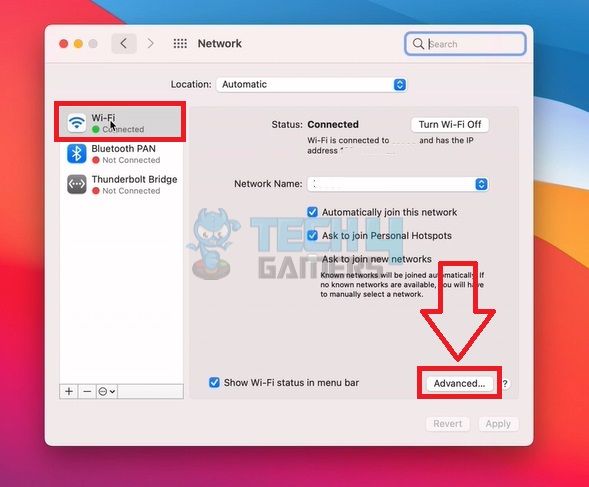
Head To Network (Image By Tech4Gamers) - Launch Advanced Settings: Click on WiFi > Advanced.

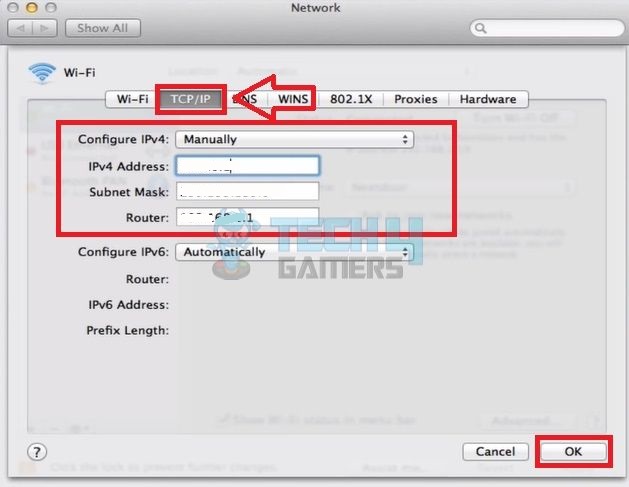
Open WiFi Details (Image By Tech4Gamers) - Alter To Manual: Select the TCP/IP tab > Set Manually in the box next to Configure IPv4.
- Type New Address: Next, type the new IP address next to IPv4 Address > OK.

Configure TCP Settings (Image By Tech4Gamers)
Through Smartphone Settings
Besides the few methods mentioned above (enabling VPN, switching networks, restarting the internet router), I revised the IP address from the phone’s settings. The whole process took me less than 8 minutes and was pretty simple.
Android
Follow the steps carefully to shuffle the IP address quickly:
- Open Advanced Network Settings: Navigate to Settings > Connections > WiFi > Tap the Settings gear beside your connected WiFi network > Expand the Advanced section.
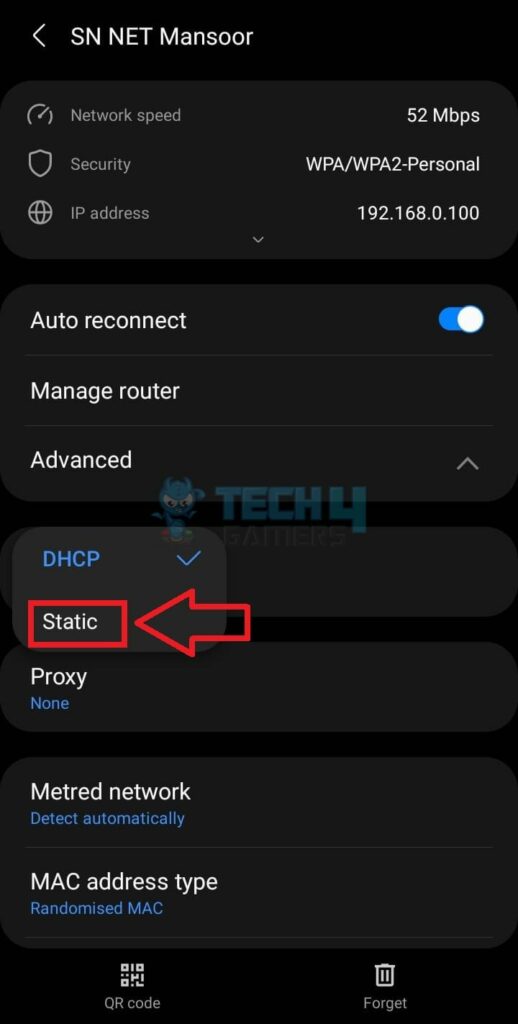
Expand Advanced (Image By Tech4Gamers) - Select Static: The IP Settings are set to DHCP by default > Tap on it > Pick Static from the drop-down.
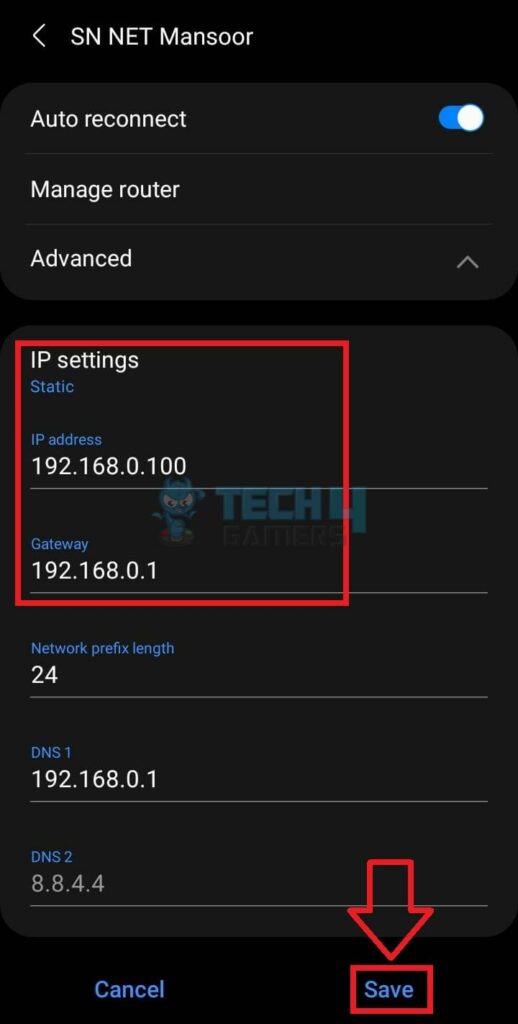
Select Static (Image By Tech4Gamers) - Enter New IP: Type the preferred IP and Gateway > Save the settings.
Save New IP Address (Image By Tech4Gamers)
iOS
Move ahead with this technique on an iOS phone:
- Access Connected Network: Head to iPhone settings > WiFi > Tap the i symbol next to the connected WiFi network.
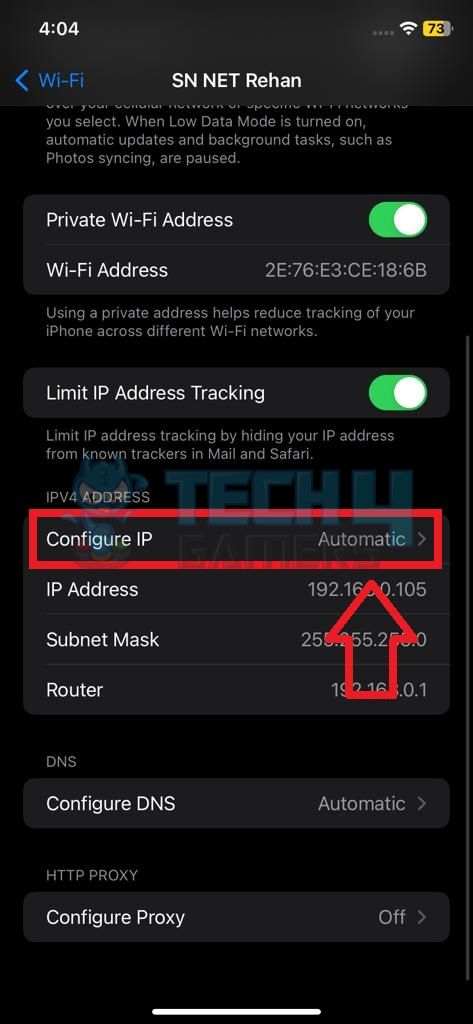
Tap “i” Symbol (Image By Tech4Gamers) - Select Configure IP: Now, scroll down and select Configure IP.
Configure IP (Image By Tech4Gamers) - Change IP Address: Pick Manual to modify the IP address, subnet mask, and router > Apply the settings.
Pick Manual (Image By Tech4Gamers)
Pros And Cons Of Changing IP Address
| Pros | Cons |
|---|---|
| ✅ Lets you bypass firewall restrictions | ❌ May restrict streaming websites |
| ✅ Allows to trespass regional bans | ❌ Some apps may require reauthentication |
| ✅ Protects data from hackers | ❌ Frequent IP change can disrupt network performance |
Final Words
Apart from the methods mentioned above, you can also alter the IP address by requesting your Internet Service Provider (ISP). Consult your ISP or a network security expert if your device malfunctions after changing IP addresses.
Frequently Asked Questions
You should change your IP address when you detect security risks, network errors, and poor internet performance.
Restart your internet router, enable VPN, use proxy servers, or request a new IP from DHCP.
There are no real risks you should worry about while changing your IP. However, frequent changes may disrupt your internet connection or halt access to certain websites.
Similar PC Processes:
- How To Clear DNS Cache? [Detailed Guide]
- How To Disable Firewall [All Methods Guide]
- How To Remove Malware And Viruses From PC? [5 Methods]
- How To Remove McAfee From Windows 11?
- How To Perform Disk Check? [Mac, Windows & Linux]
Thank you! Please share your positive feedback. 🔋
How could we improve this post? Please Help us. 😔
[How To’s & Guides Editor]
Haddi has been in the Gaming and tech Space for over 10 Years Now; he has worked on notable websites like eXputer, Gamepur, Gear Siege, Gearnuke, and plenty more. He is an expert at Games & PC Hardware; you can expect him to solve any problem. People often joke, that if there is any problem anyone can solve, Haddi can solve it faster. Currently, Haddi writes and manages a Team of Experts at Tech4Gamers.
Contact: Haddi@tech4gamers.com


