 Threads

Your computer may go into the power-saving mode due to insufficient power supply or faulty settings. However, you can change the Power and Sleep settings or switch GPU slots to get the computer out of power-saving mode.
Key Takeaways
- The computer may shift to the power-saving mode if you have left the screen idle for some minutes, as specified in the Settings.
- Use the Taskbar menu, PC Settings, or the Command Prompt to turn off power mode on a Windows computer and adjust the battery settings for a Mac computer.
- Safely pull out the RAM disk and graphics card and clean them if the issue persists.
Why Is Your Computer Switching To Power-Saving Mode?
While testing methods for the situation, we found several reasons why a computer may enter the power-saving mode.
Here are the causes:
- Improper connection between the monitor and the CPU.
- Using a faulty power source.
- Overheating of CPU, GPU, motherboard, or other critical components.
- The computer was left idle for too long.
Also Read: Computer Turns On, But No Signal To Monitor
How To Get A Computer Out Of Power-Saving Mode?
We tested all the methods to provide the exact steps for each. However, try these simple methods first for both Windows and macOS.
- Reconnect the monitor.
- Blow off dust from the cables.
- Power cycle the computer.
- Use a different power source.
Windows
There are plenty of techniques we tested to disable the power-saving mode on our Windows computer, such as the ones listed below:
- From Taskbar.
- Using Control Panel.
- Using PC Settings.
- Clean RAM And Other Components.
- Change GPU To Secondary Slot.
From Taskbar
This is the quickest and the most convenient method to disable the power-saving mode on your PC, and we regularly use it to save the system’s battery.
Follow the below-mentioned steps:
- Move your cursor to the right edge of the “Taskbar” and click on the arrowhead pointing upwards.
- Double-click on the “Battery” symbol in the mini-menu.
- Drag the pointer to the extreme right to disable power-saving mode.
Also Read: FIXED: Windows 11 Freezes But Mouse Still Moves
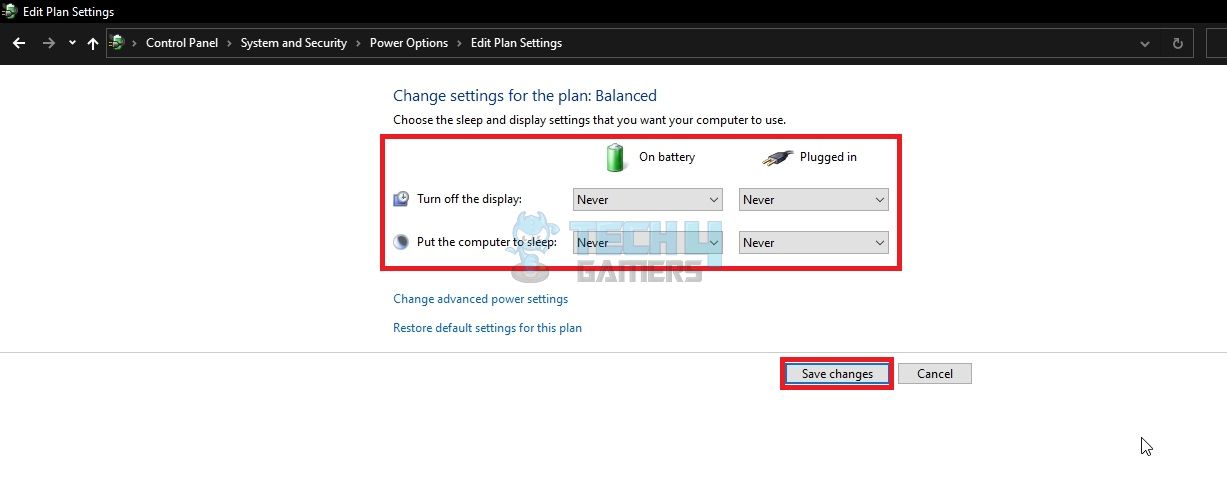
Using Control Panel
We modified the duration of putting our computer to sleep from a few minutes to Never. Doing so ensured that our computer does not go into the sleep mode.
Follow the instructions below to undo power mode via Control Panel:
- Come to the “Desktop” and click the “Control Panel” icon.
- Pick “System And Security.”
- Head to “Power Options.”
- Click on the blue button, “Change Plan Settings.”
- Select “Never” in both the boxes, “On Battery” and “Plugged In,” in front of “Put The Computer To Sleep.”
- Hit the “Save Changes” button at the bottom.

Modify Settings (Image By Tech4Gamers)
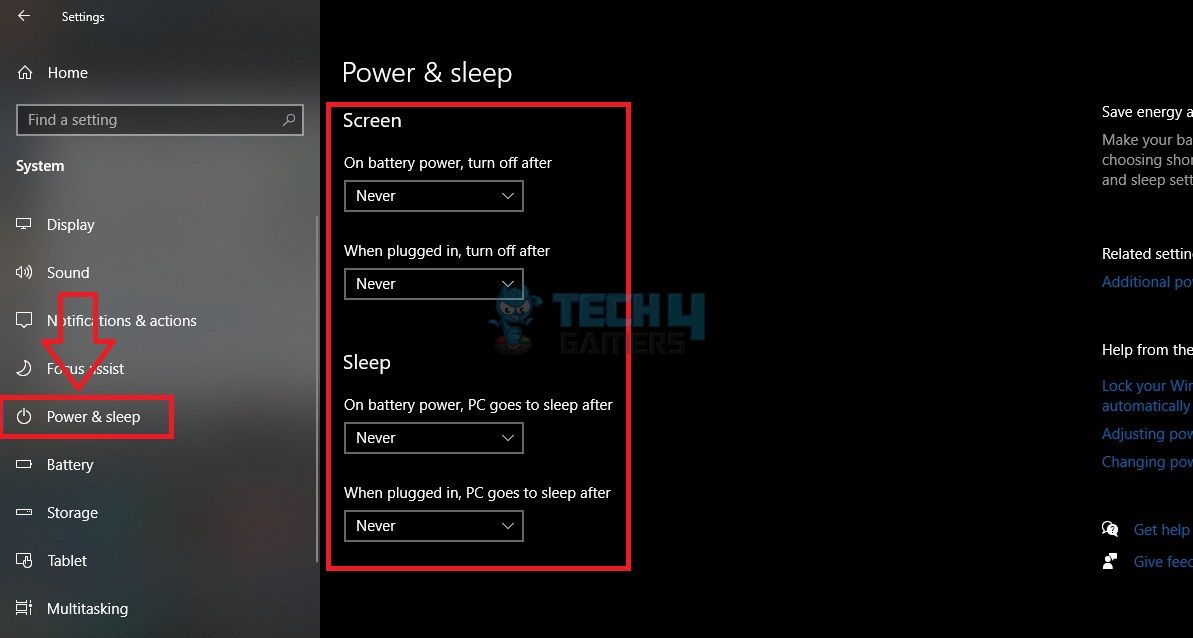
Using PC Settings
The option to switch out of power-saving mode also lies in the PC Settings. We tested it on our computer, and it worked.
Use this method to get your computer out of power-saving mode:
- Launch the “Start” menu and click the “Settings” gear.
- Select “System” on the “Settings” page.
- Scroll down to “Power And Sleep” on the left pane.
- Set “Never” in all the drop-boxes on this screen.

Power And Sleep (Image By Tech4Gamers)
Also Read: How To Fix Your Computer Has A Virus Error
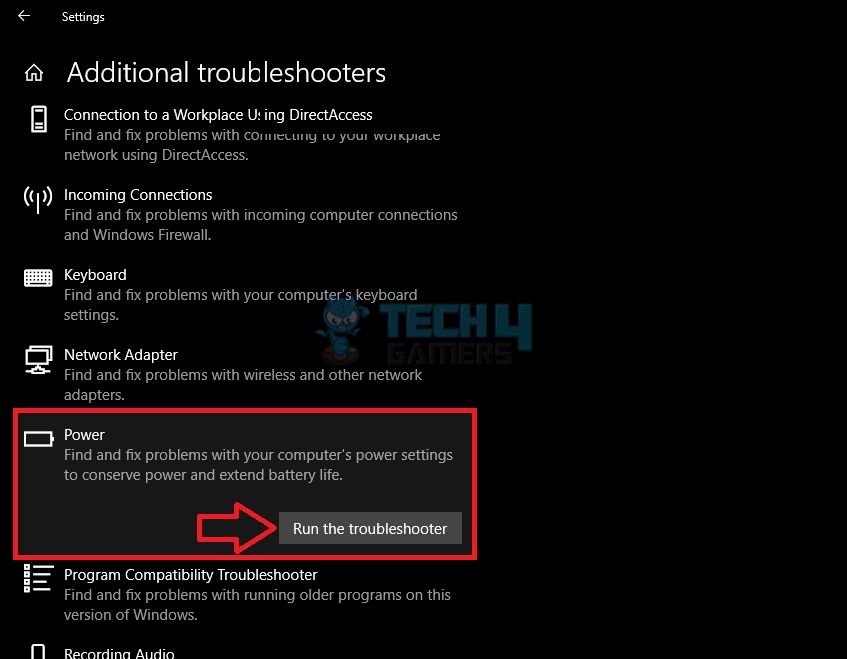
Use Power Troubleshooter
We often use built-in Windows troubleshooters to fix temporary issues with our Windows computer. In this case, we ran the Power troubleshooter to check why our computer was not switching out of the Power-saving mode.
You can navigate to the troubleshooter with these steps:
- Open the “Update And Security” section in “Settings.”
- Click on “Troubleshoot” from the left menu bar.
- Hit “Additional Troubleshooters.”
- Find “Power” in the list and “Run The Troubleshooter.”

Run Troubleshooter (Image By Tech4Gamers) - Wait for the process to complete. It will diagnose and fix any detected issues or prompt you to solve them.
Clean RAM And Other Components
If modifying the settings does not work, the computer may have a technical issue. We shut down the computer and removed all the power cables. Next, we opened the case and pulled out the RAM from its slot on the motherboard. We cleaned the edges of the RAM with a soft cloth or an eraser to remove the dust and rust.
Lastly, placing the RAM back into its slot and turning on the computer got our computer out of the situation. Repeat the step for the graphics card if the issue persists. In addition, several users commented under a YouTube video by Technical NVN99 Shiva that cleaning the components fixed the issue.
Also Read: How To Clean Your PC Without Compressed Air?
Change GPU To Secondary Slot
A Reddit user, Sunderk89, found that placing the GPU into a secondary slot worked in getting the computer out of the power-saving mode. It may be because of a faulty primary slot. Therefore, we tested this fix and immediately resolved the issue after a simple restart.
Also Check: Nvidia Display Driver Failed To Start
Mac OS
Apart from a Windows computer, we also tried disabling the power-saving screen on a macOS computer. Unlike Windows, the methods are limited for macOS.
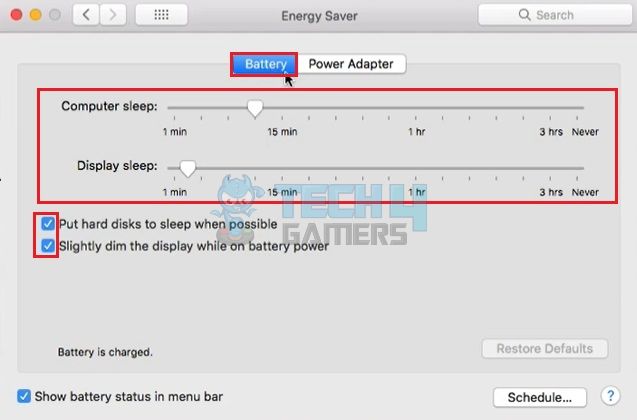
System Preferences
As per our testing, modifying the battery saver settings for the macOS computer prevented it from going into power-saving.
Use the system preferences menu to turn off the power-saving mode:
- Click on the “Apple” symbol on the top bar.
- Go to “System Preferences.”
- Select the “Energy Saver” option on this menu.
- Switch to the “Battery” tab.
- Choose “Never” in the “Computer Sleep” and “Display Sleep” toggle lines.
- Furthermore, remove the ticks beside the boxes “Put Hard Disk To Sleep When Possible” and the one below that.

Change Battery Saver Settings (Image By Tech4Gamers)
More From Mac: Your Computer Is Low On Memory
Thank you! Please share your positive feedback. 🔋
How could we improve this post? Please Help us. 😔
[How To’s & Guides Editor]
Haddi has been in the Gaming and tech Space for over 10 Years Now; he has worked on notable websites like eXputer, Gamepur, Gear Siege, Gearnuke, and plenty more. He is an expert at Games & PC Hardware; you can expect him to solve any problem. People often joke, that if there is any problem anyone can solve, Haddi can solve it faster. Currently, Haddi writes and manages a Team of Experts at Tech4Gamers.
Contact: Haddi@tech4gamers.com


