 Threads
Azza Apollo 430 Review
Review Summary
The Azza Apollo 430 is a beautifully crafted mid-tower PC chassis with a striking white design and vibrant orange accents. Supporting ATX and micro ATX motherboards, it offers versatility with compatibility for lengthy video cards up to 370mm and water cooling support up to 240mm on both the front and top. The high-quality tempered glass side panel showcases internal components, complemented by a stylish RGB strip on the front panel. However, budget-conscious consumers may find it slightly pricey, and the blocked front design may deter those prioritizing optimal airflow. Cable management options are limited, with only four tie points on the back. Despite these considerations, the Apollo 430 stands out for its visual appeal and solid construction.
Hours Tested: 13

Overall
-
Build Quality - 8/10
8/10
-
Performance - 8.5/10
8.5/10
-
Design - 9/10
9/10
-
Value - 7/10
7/10
-
Features - 7/10
7/10
Pros
- Striking
- Versatile
- Aesthetic
- Sturdy
- RGB
Cons
- Pricey
- Airflow
- Limited Cable Management


When we received an offer for Azza Apollo 430 Review, I quickly told them to send a white version and boi-o-boi. Was I wrong about it? Not at all! It is, for sure, a beautifully crafted mid-tower PC Chassis. It is a compact mid-tower still quite spacious and offers many build opportunities. The chassis is available in 4 models. Also, if you want White PC Cases, read our article.
- CSAZ-430B-DF1 [Black with a Hurricane II ARGB Fan]
- CSAZ-430B-DF2 [Black with a standard ARGB Fan]
- CSAZ-430W-DF1 [White with a Hurricane II ARGB Fan]
- CSAZ-430W-DF2 [White with a standard ARGB Fan]
Key Takeaways
- The AZZA Apollo 430 is a visually stunning mid-tower chassis with premium features, including ARGB lighting and a high-quality tempered glass side panel.
- The AZZA Apollo 430 case is ideal for enthusiasts who want a visually striking case with customizable ARGB lighting, ATX/micro ATX support, compatibility for lengthy video cards (up to 370mm), and versatile water cooling support.
- It is not advised for budget-conscious consumers or those prioritizing optimal airflow with fully vented front designs, as the AZZA Apollo 430 has premium features and a blocked front.
- Why you can trust Tech4Gamers: Our reviews are based on dedicated hands-on testing by our team of experienced hardware experts. Find out more about how we test.
AZZA Apollo 430 Overview
The model I am taking a look at is CSAZ-430W-DF2. I wish I could look at Hurricane II fan as it looks quite stunning in design. The chassis has a tempered glass side panel, while the back panel is a standard metallic cover. The chassis has cooling support for up to 3x 120mm / 2x 140mm fans on the front. 2x 120/140mm fans on the top and a 120mm fan on the rear.
The chassis supports 240mm AIO/radiator on the top and up to 360mm AIO/radiator on the front. The maximum CPU cooler height is 155mm. Up to 370mm long graphics cards are supported. The motherboard support ranges from mini-ITX to standard ATX.
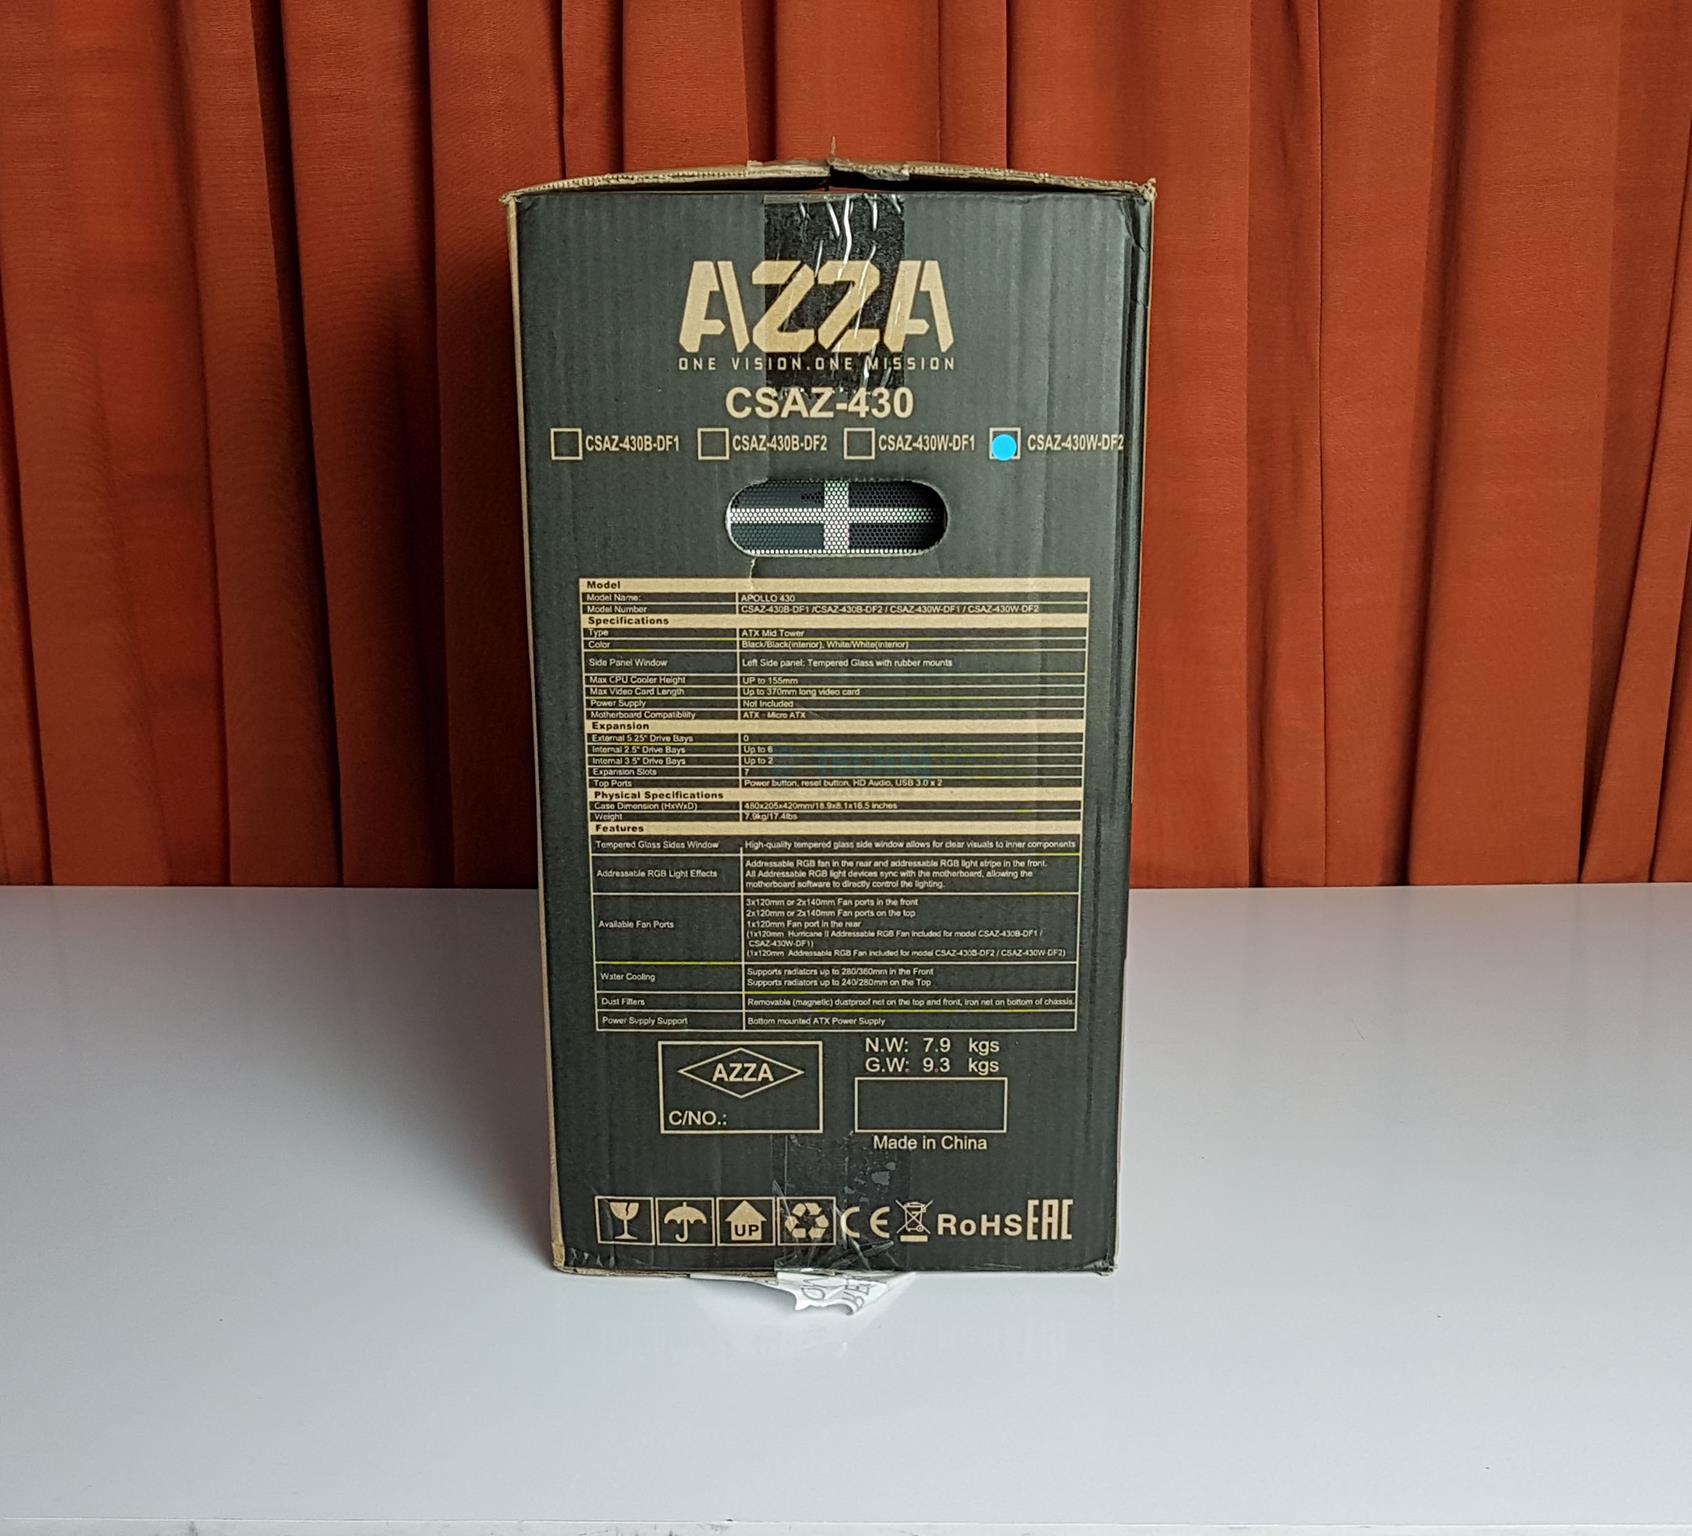
Let’s take a look at the specifications of the case:
| Model Name | APOLLO 430 |
|---|---|
| Model Number | CSAZ-430W-DF2 |
| Type | ATX Mid Tower |
| Color | White |
| Side Panel Window | Left Side panel: Tempered Glass with rubber mounts |
| Max CPU Cooler Height | Up to 155mm |
| Weight | Up to 370mm long video card |
| Case Dimension (HxWxD) | 480x205x420mm/18.9×8.1×16.5 inches |
| Motherboard Compatibility | ATX、Micro ATX |
| Power Supply Support | Bottom-mounted ATX Power Supply |
Packaging and Unboxing
The AZZA Apollo 430 white is shipped inside a standard brown cardboard box.


Closer Look
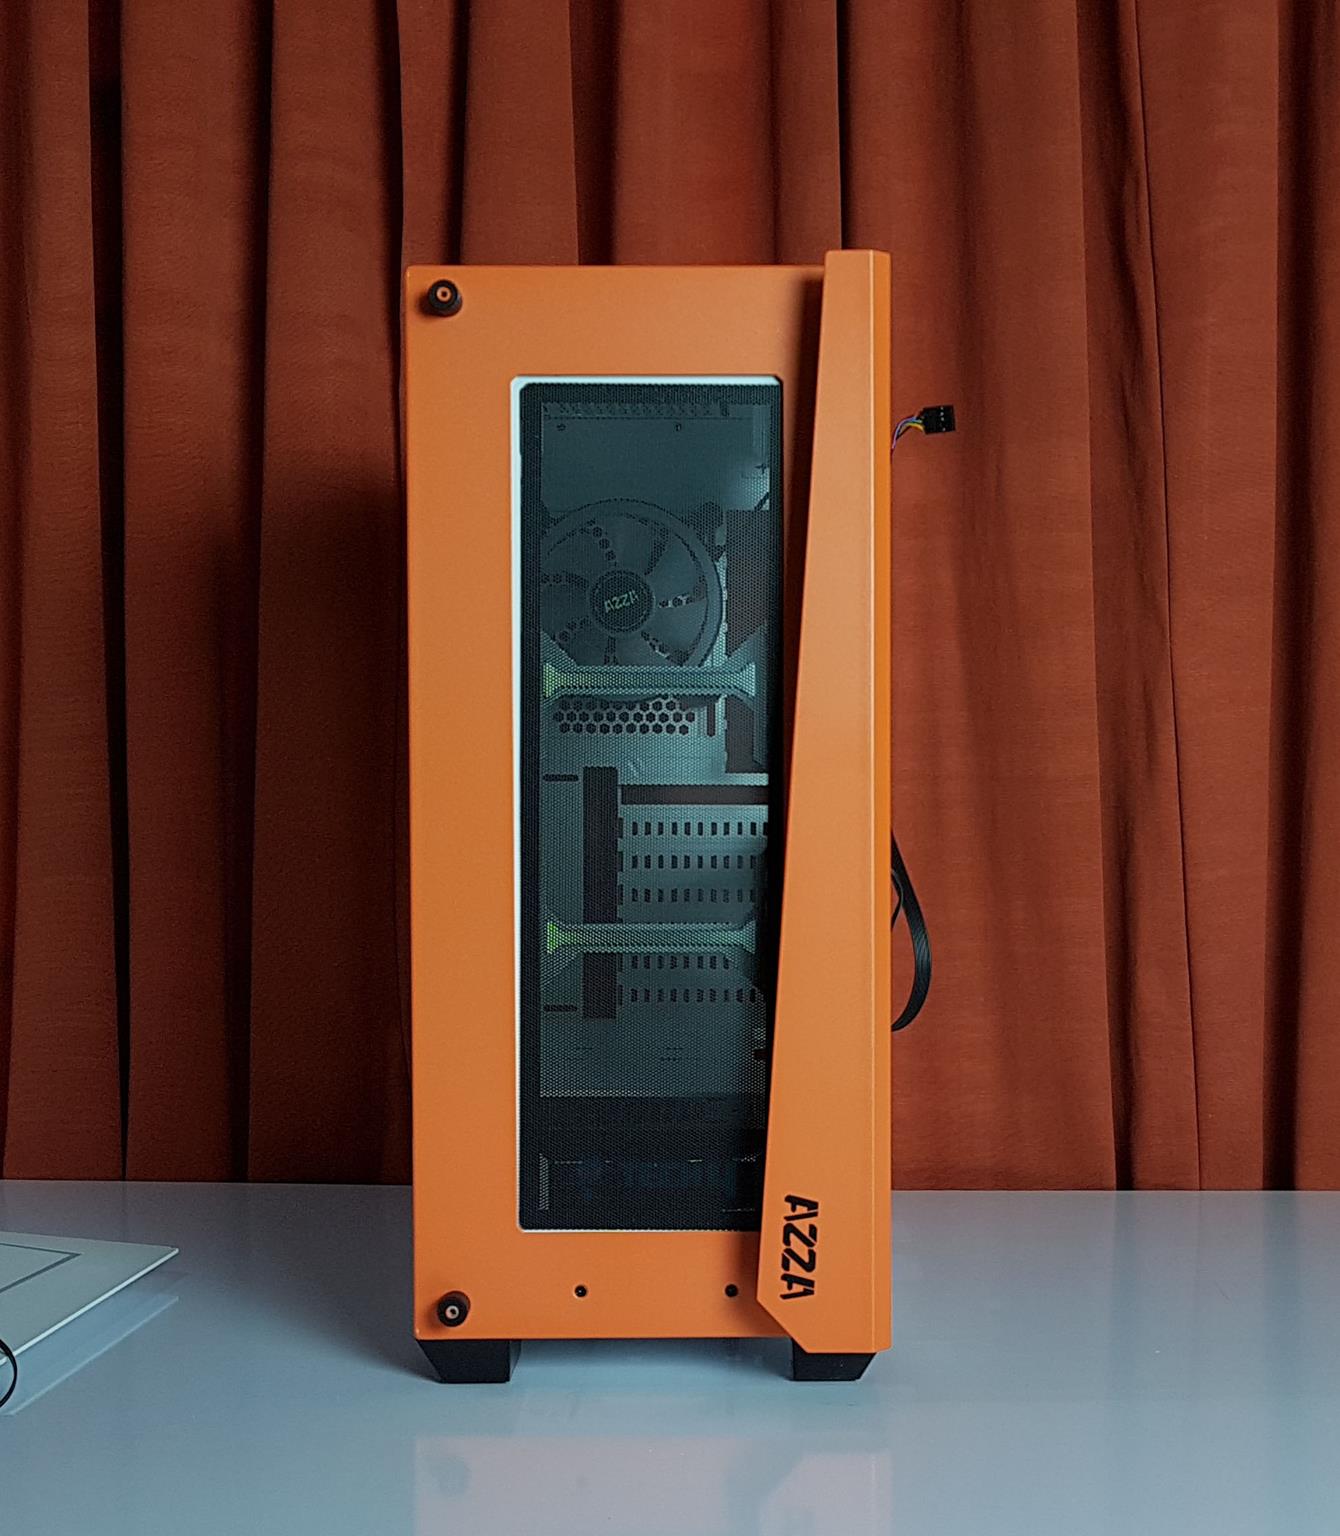
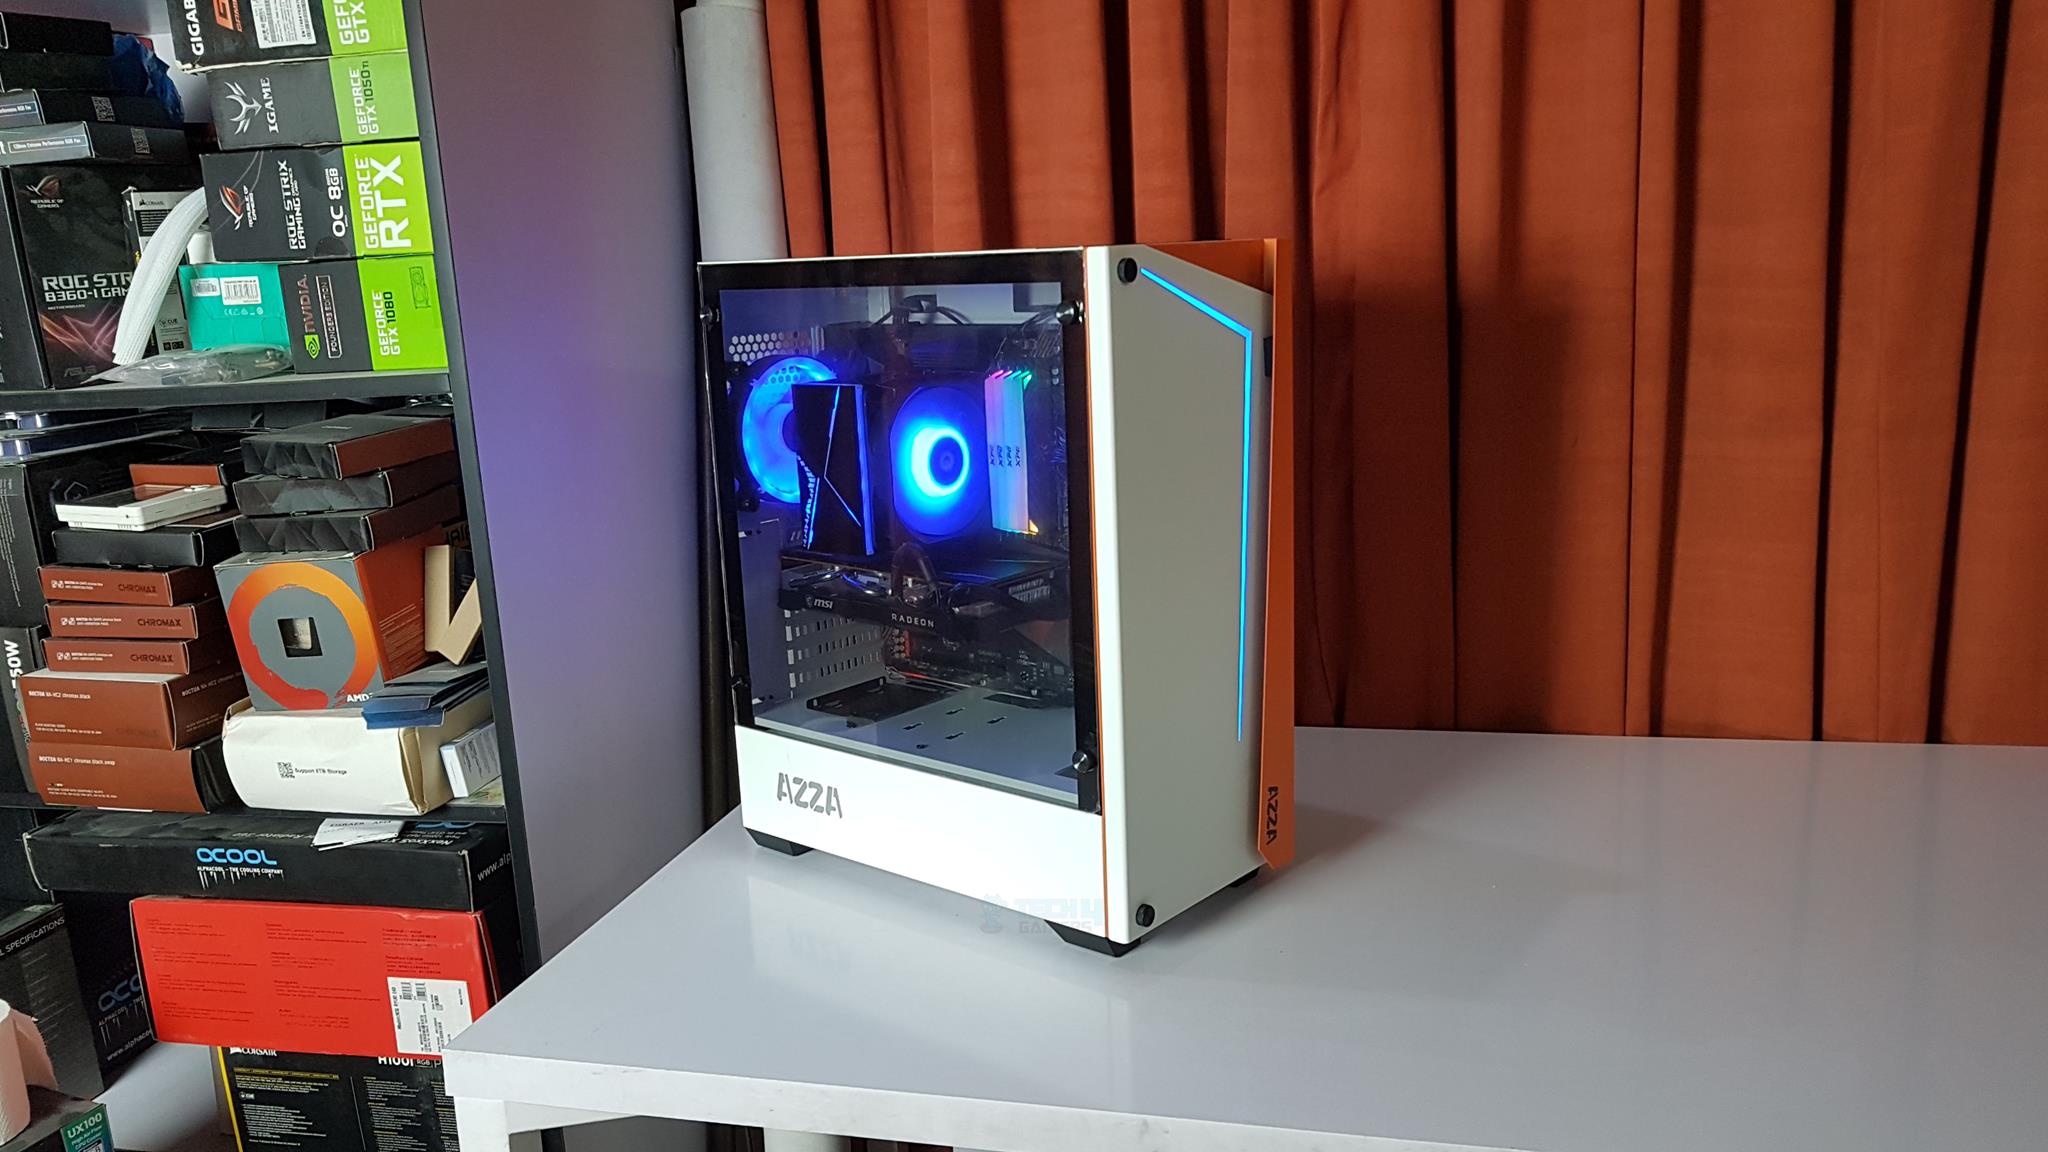
The AZZA Apollo 430 Review is a beautifully crafted mid-tower chassis with stunning styling. Particularly, the orange accent befitting the front speaks for itself, and it is further augmented with an ARGB lighting strip provided under the front white color frame with a diffuser lining running from the front towards the bottom.
This is a mid-tower category chassis supporting motherboards up to ATX size. It has a dimension of 480x205x420mm. It weighs 7.9 kg. The chassis is made up of steel and tempered glass. The White edition has outer and inner sides finished in white. The chassis supports bottom-mounted ATX standard PSU. It is time to take a look at the chassis. Let’s start with the front side.
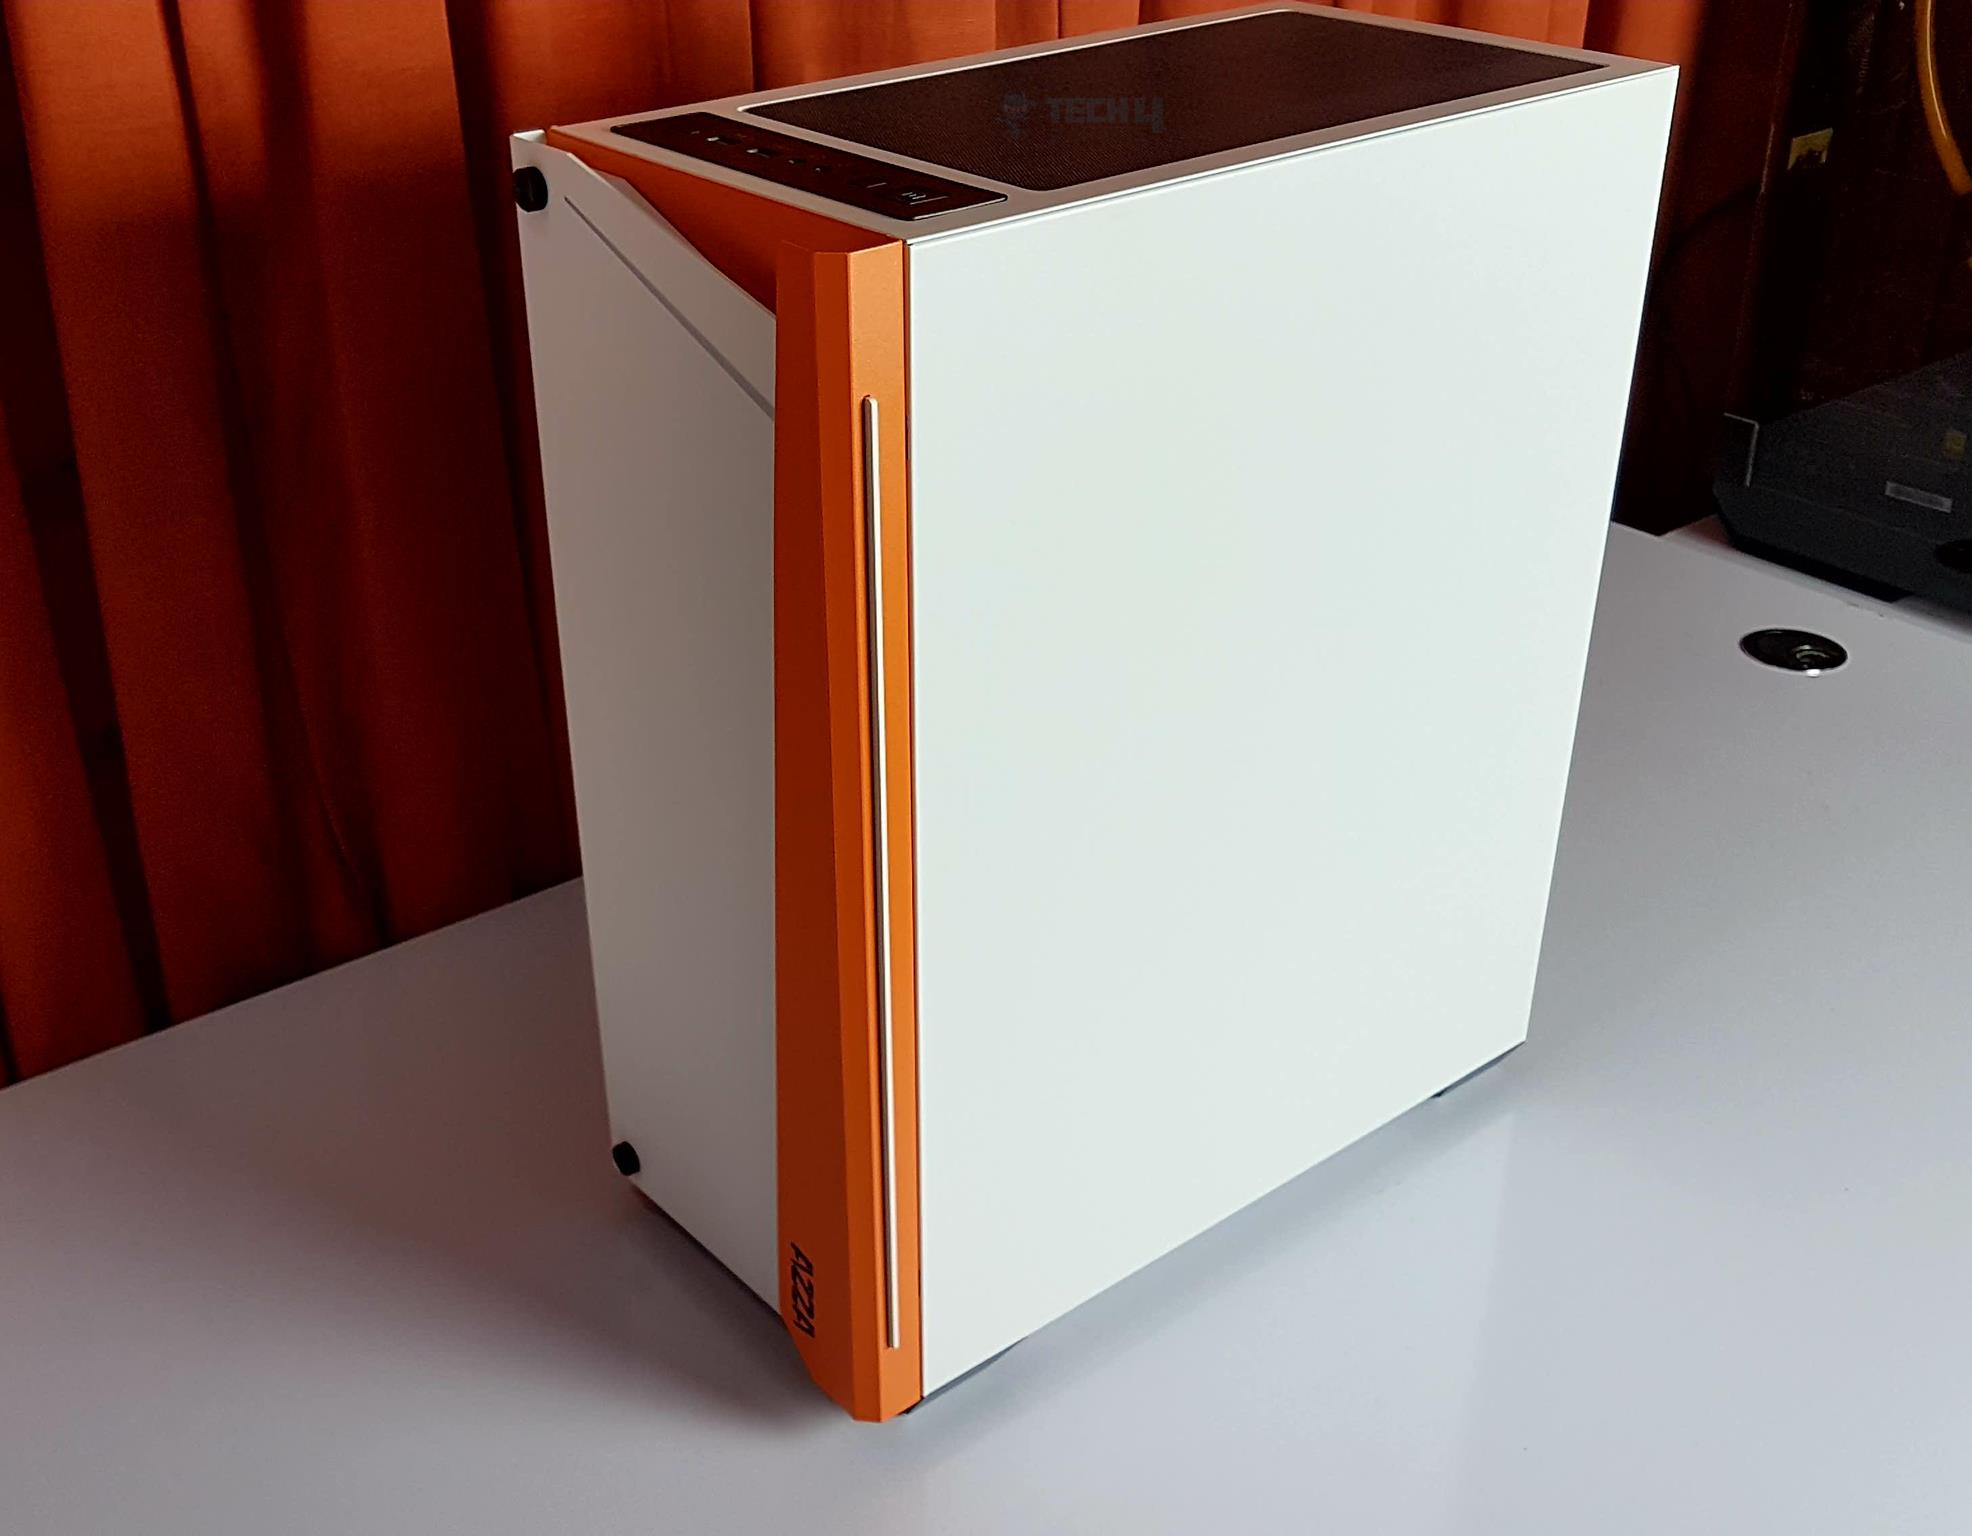
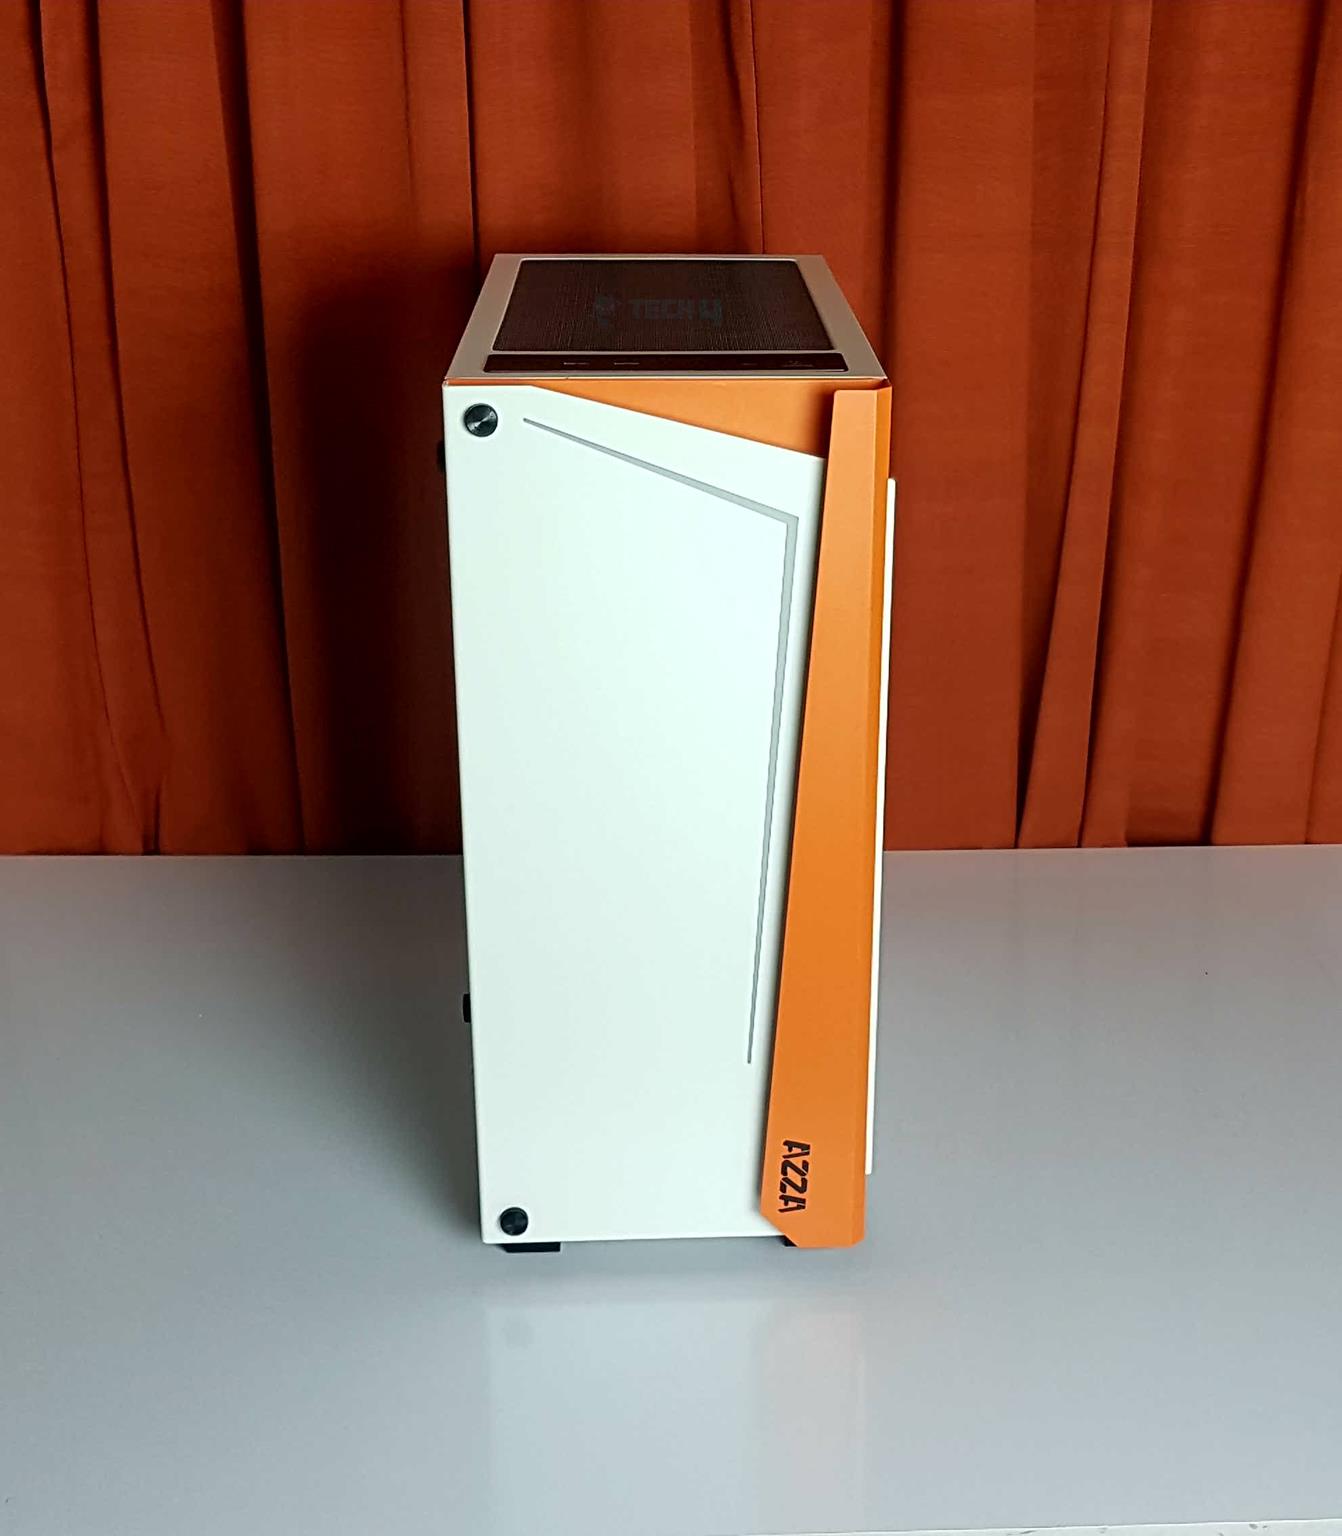
The front side of the AZZA Apollo 430 Review is one heck of a show. The front side packs two panels or metallic covers. The main front panel is finished in white and secured to the second orange panel using two thumbscrews. The front panel has a diffuser that starts from the upper top and runs across the panel’s length on the top and the orange panel’s protruded portion’s length.
A certain portion of the white panel extends through the orange panel on the right side, giving the overall design and layout a balanced look and feel. One thing by now would have been cleared. This chassis has the front side completely blocked as there is no potential air intake side on the sides or the top except on the bottom, which would not help.
Remove the two black color thumb screws on the left side of the white color panel. You must lift the white panel from the left side upwards. Two black rubber pads are inserted between the white panel and the inner side of the orange panel’s shroud. They are not fixed and will come off as well.
Please note that the ARGB cable is connected to the lighting hub on the backside of the chassis. Unplug it from the hub before taking off the front panel. We are left with a completely orange front panel. It has a deep cut in the middle, which runs at 360mm in height. We can see a magnetic dust filter placed on the fan mount grill.
The black color spacers are on the two mounts. This panel is installed on the chassis frame using two black color screws on the bottom. Remove those two if you want to take the orange panel off. This panel has studs on the backside that slide and lock in the chassis cut-to-size holes.
The above picture shows the inner side of the front white color panel. There is a plastic cover hiding the ARGB lighting strip. The strip can be accessed by removing the three screws of the cover.
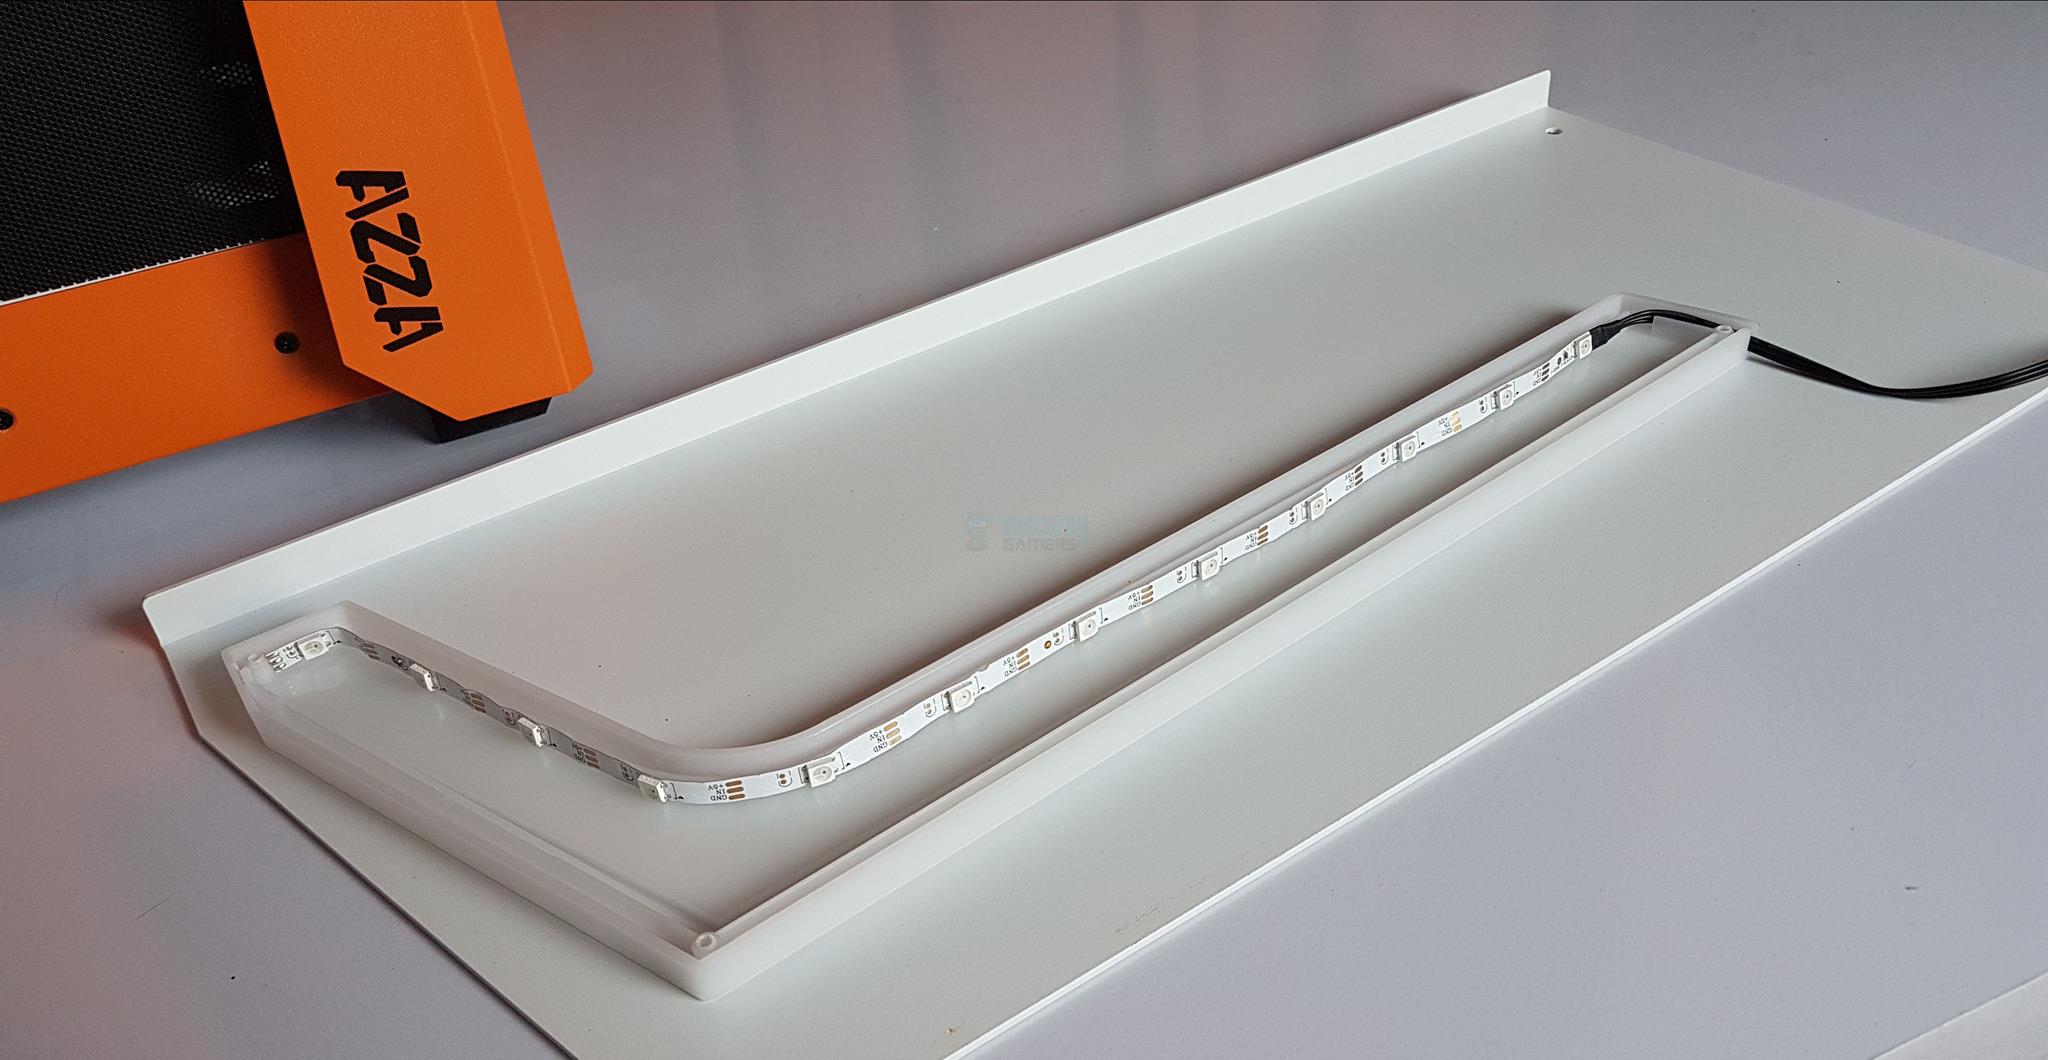
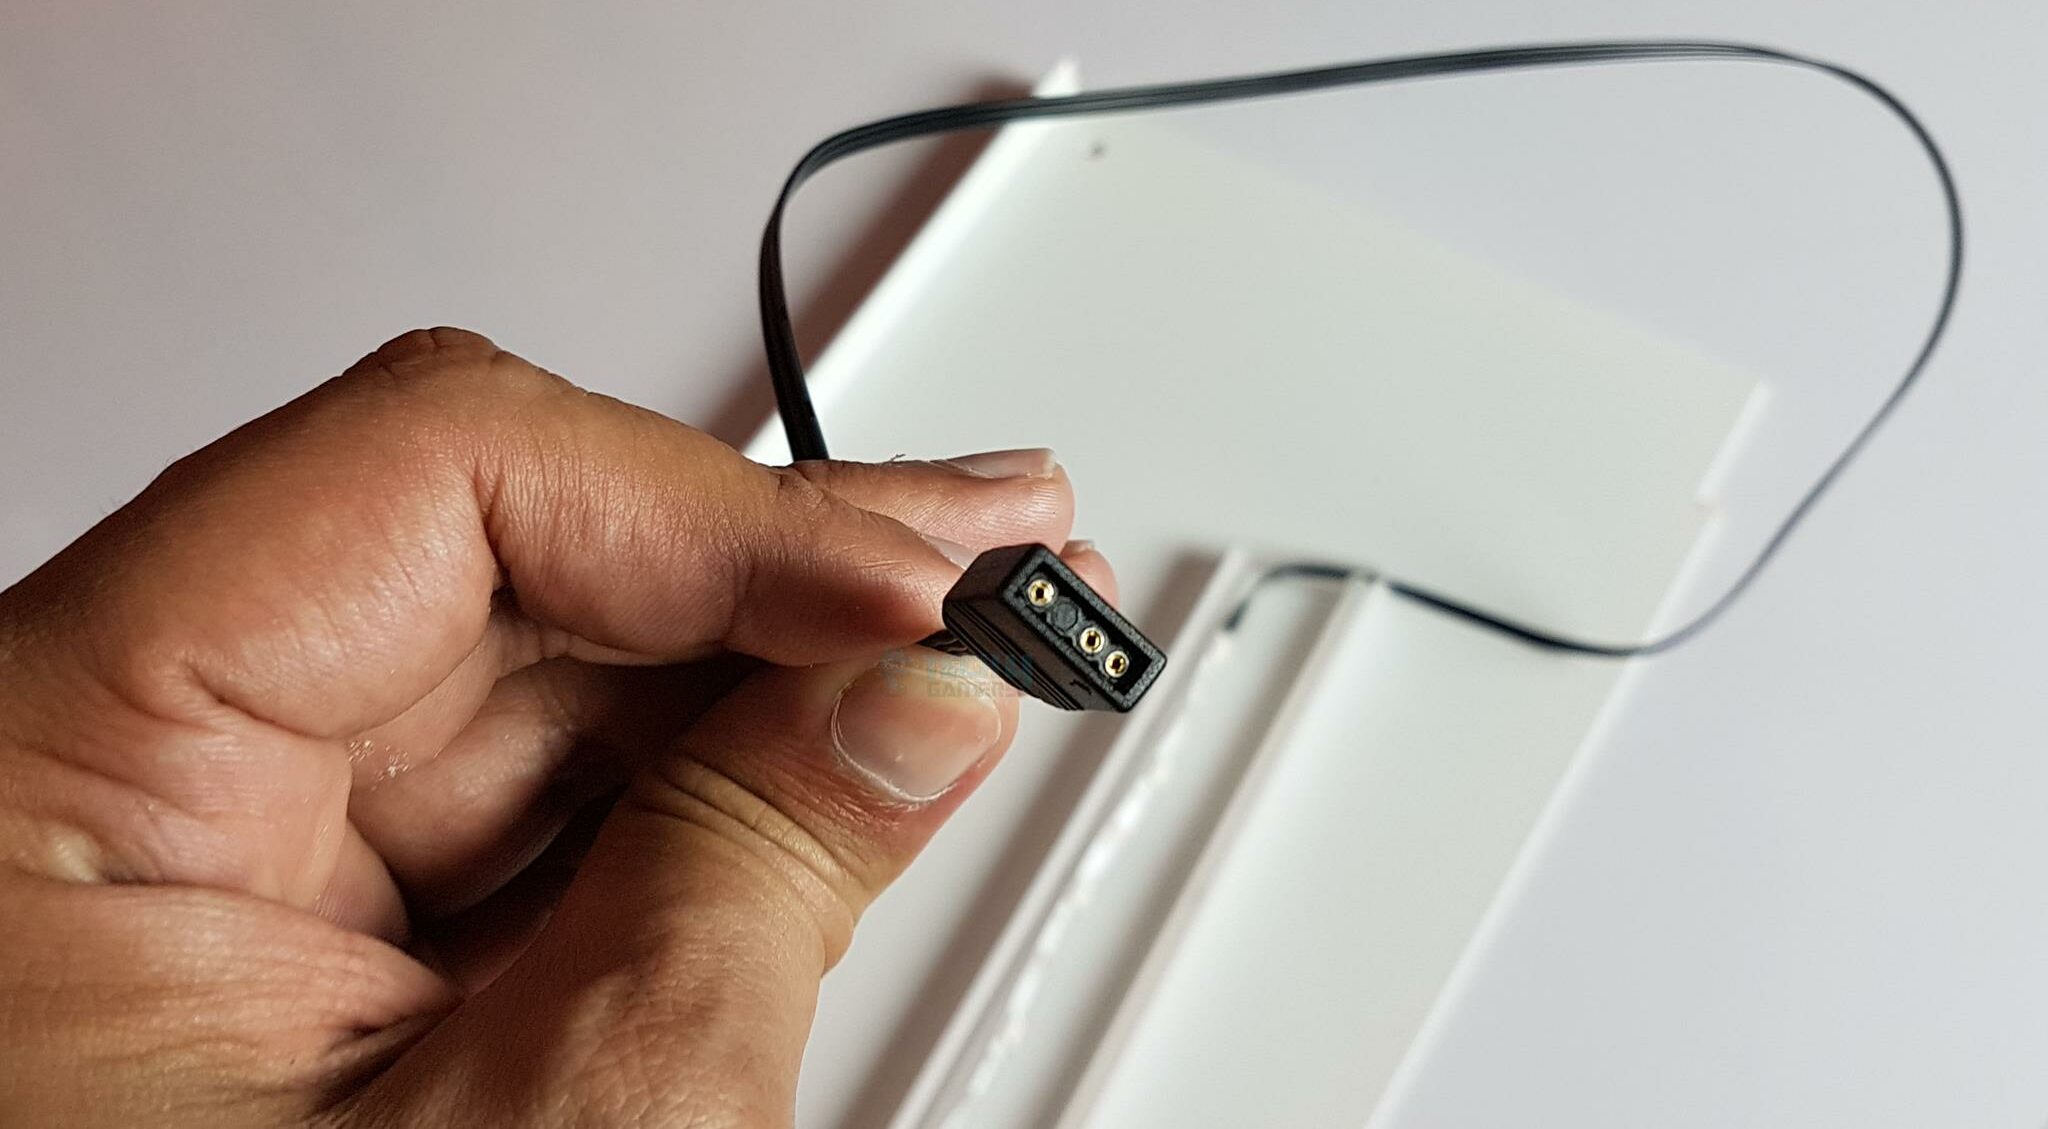
The AZZA Apollo 430 White has 12 ARGB LEDs on the front panel tucked inside a cut-to-size diffuser holder. The ARGB strip uses a 5V 3-pin connector for the connectivity.
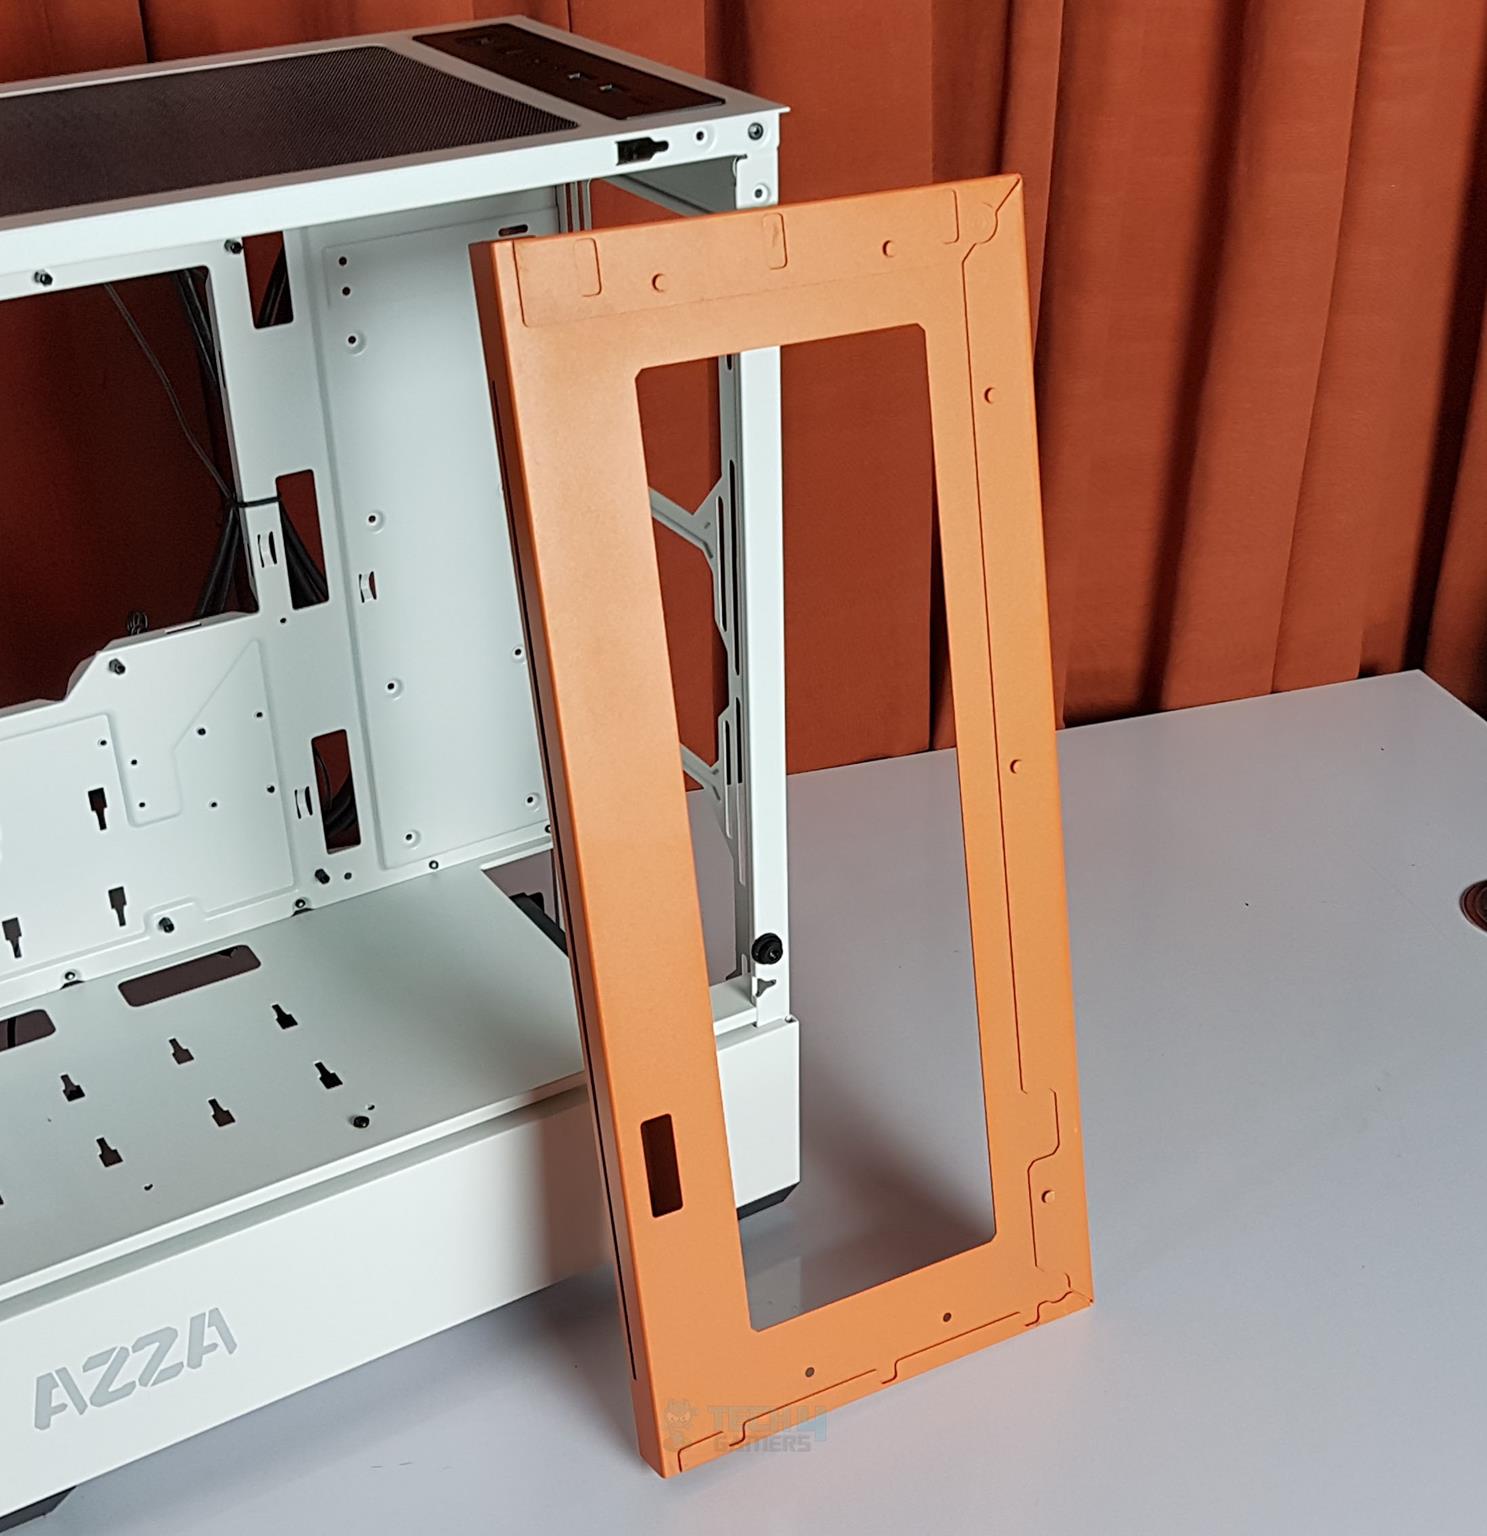
The above picture shows the backside of the orange colour panel. This panel seems to be spray painted. 5 studs hook up on the chassis. The picture above shows the chassis’s front side with both panels completely removed. Only the magnetic dust filter remains intact.
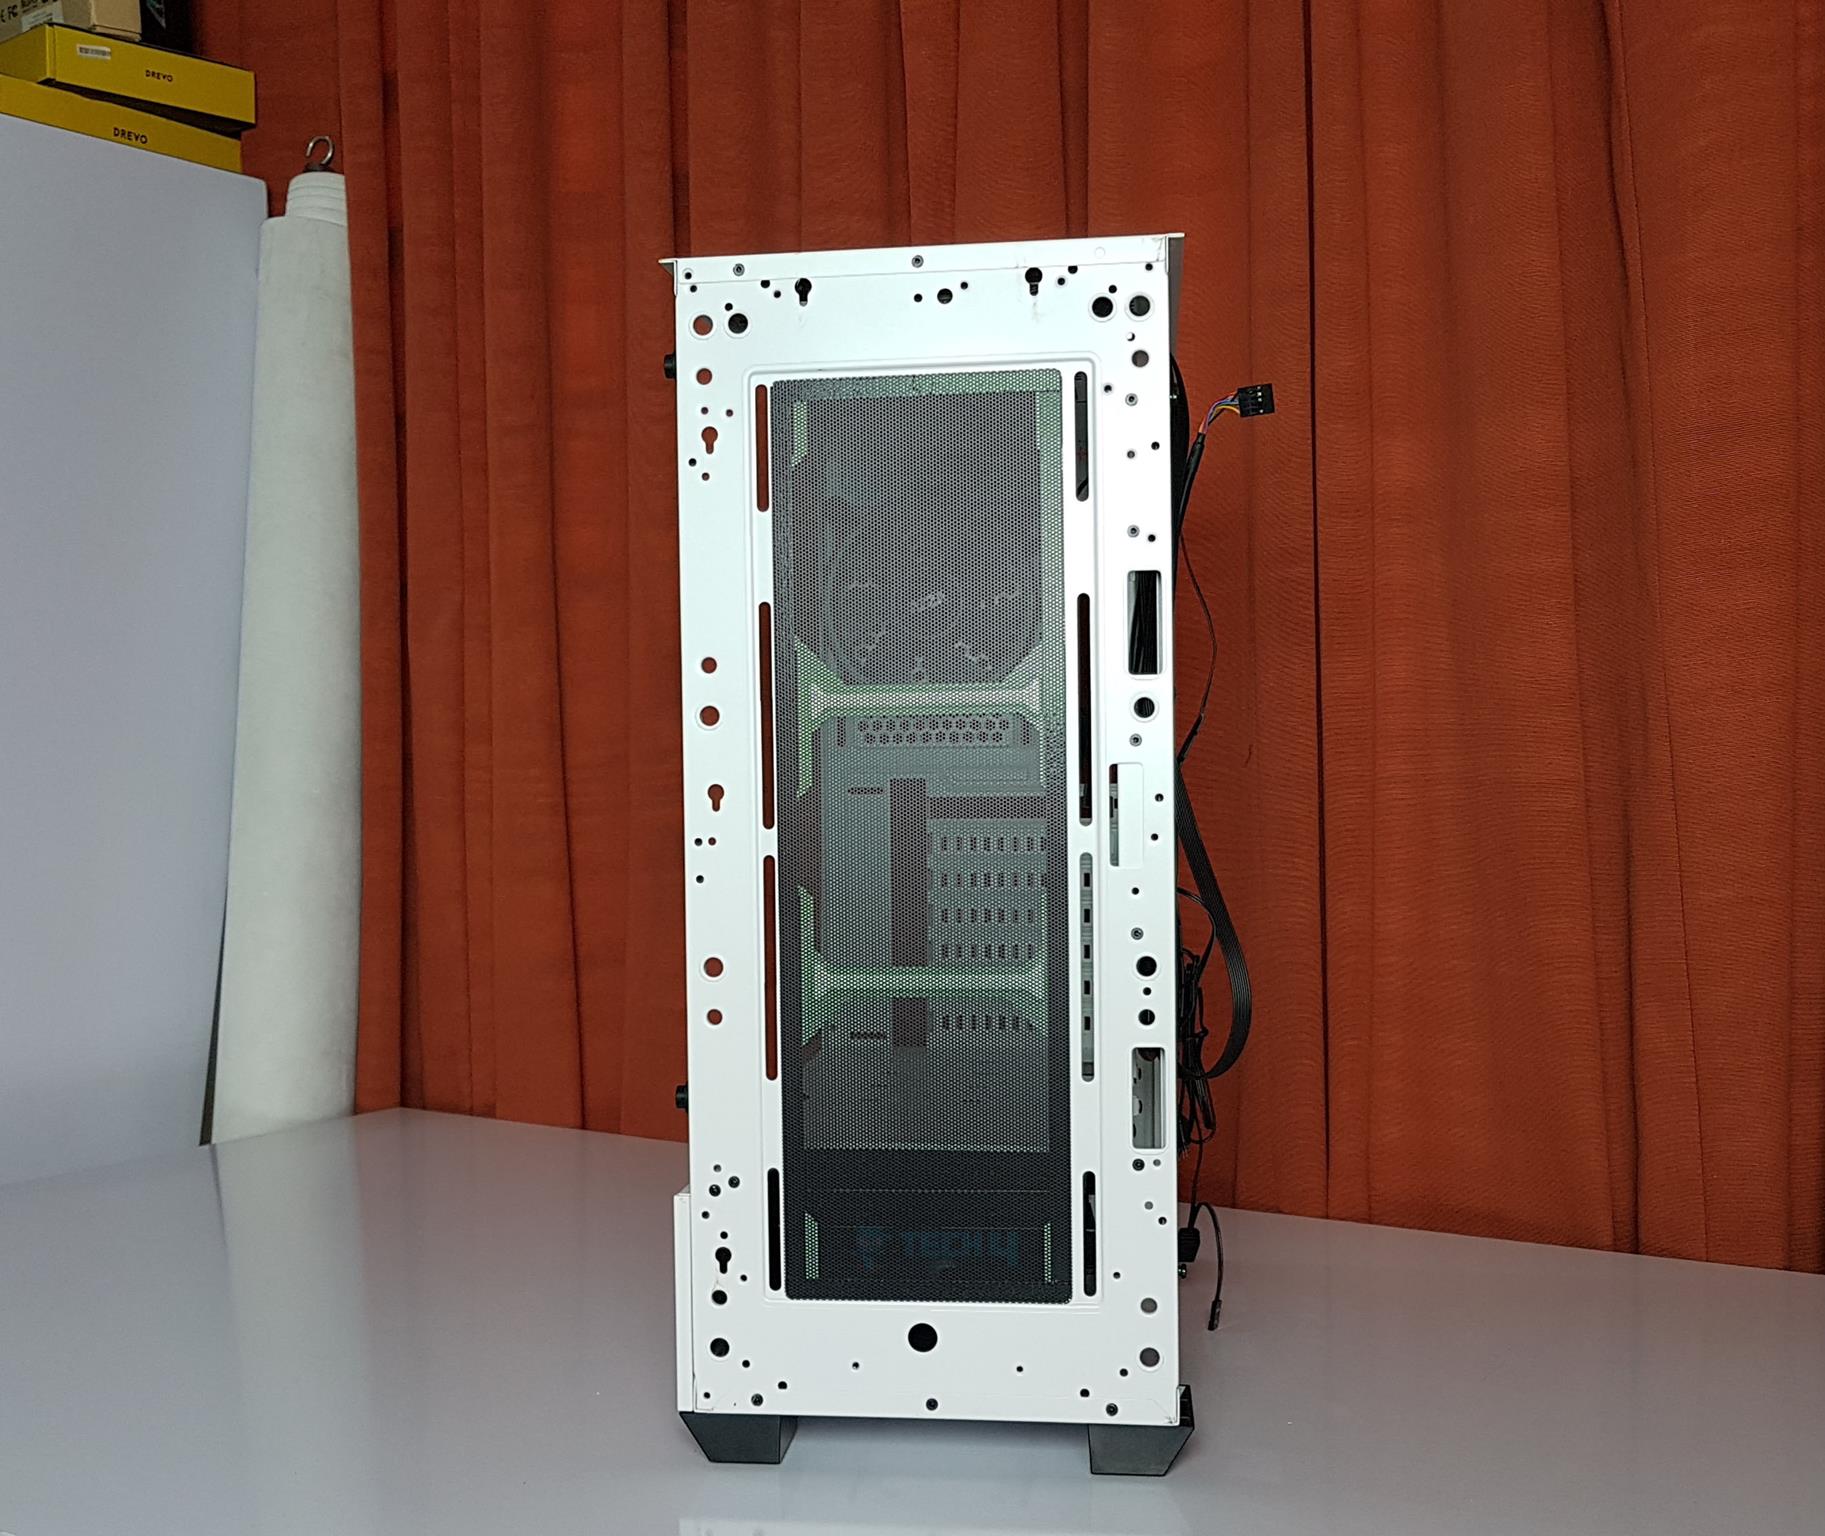
Let’s dive into the front-side details. The fixed rail made installing my choice of fans (3x 120mm or 2x 140mm) a breeze, and it accommodated a 360mm radiator, contrary to AZZA’s 240mm specification. Two cutouts on the right side neatly managed the ARGB cable from the front panel.
The top section, with its 52mm solid cover and a removable 10x24mm cutout, left me wondering about its water-cooling utility. The large cutout for the motherboard’s rear I/O shield was practical, featuring a vented area for the pre-installed 120mm fan, which I could adjust in height using the rail mechanism.
Yet, only the first PCIe slot cover was removable, a drawback in flexibility, as the non-reusable covers for the other slots limited options. Notably, the area beside the PCIe slot covers lacked ventilation.
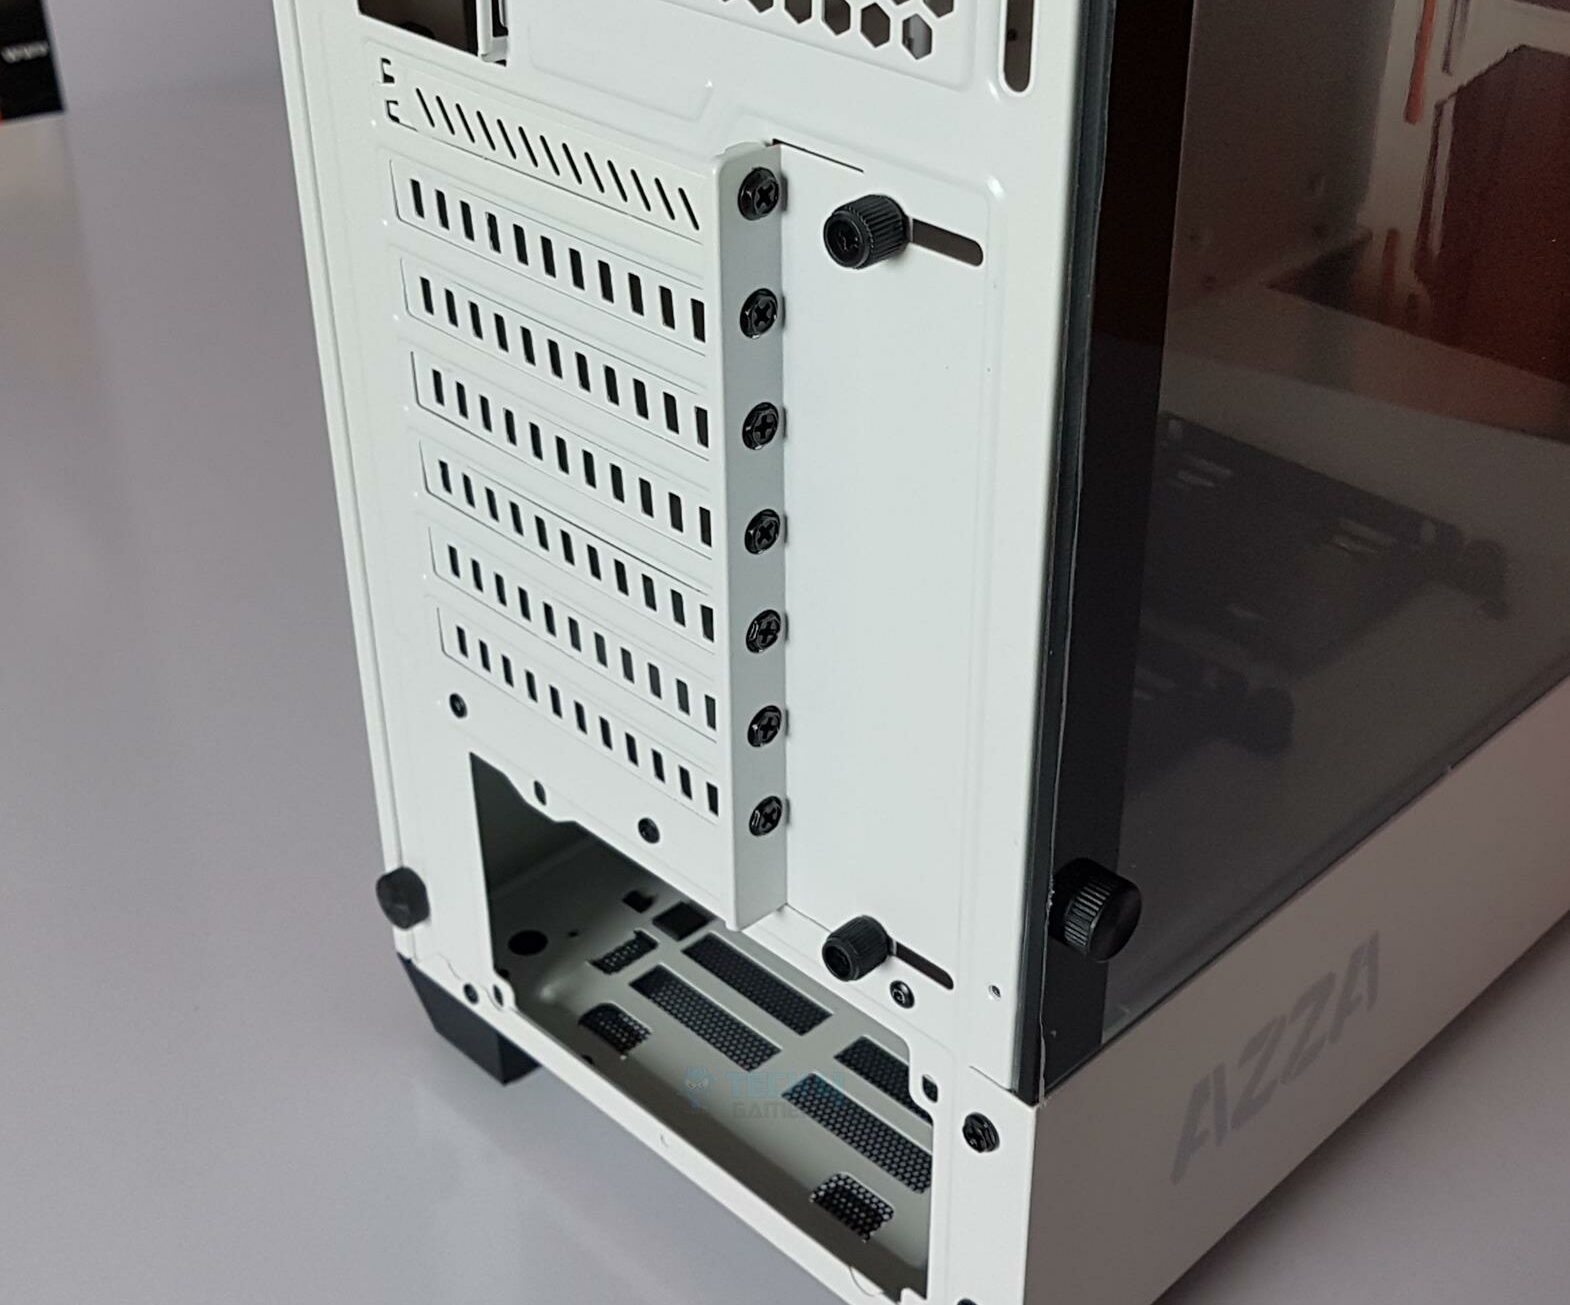
There is a protective cover on the right side of the PCIe slot covers. It is held with the chassis using two thumbscrews. It needs to be removed before installing the PCIe device.
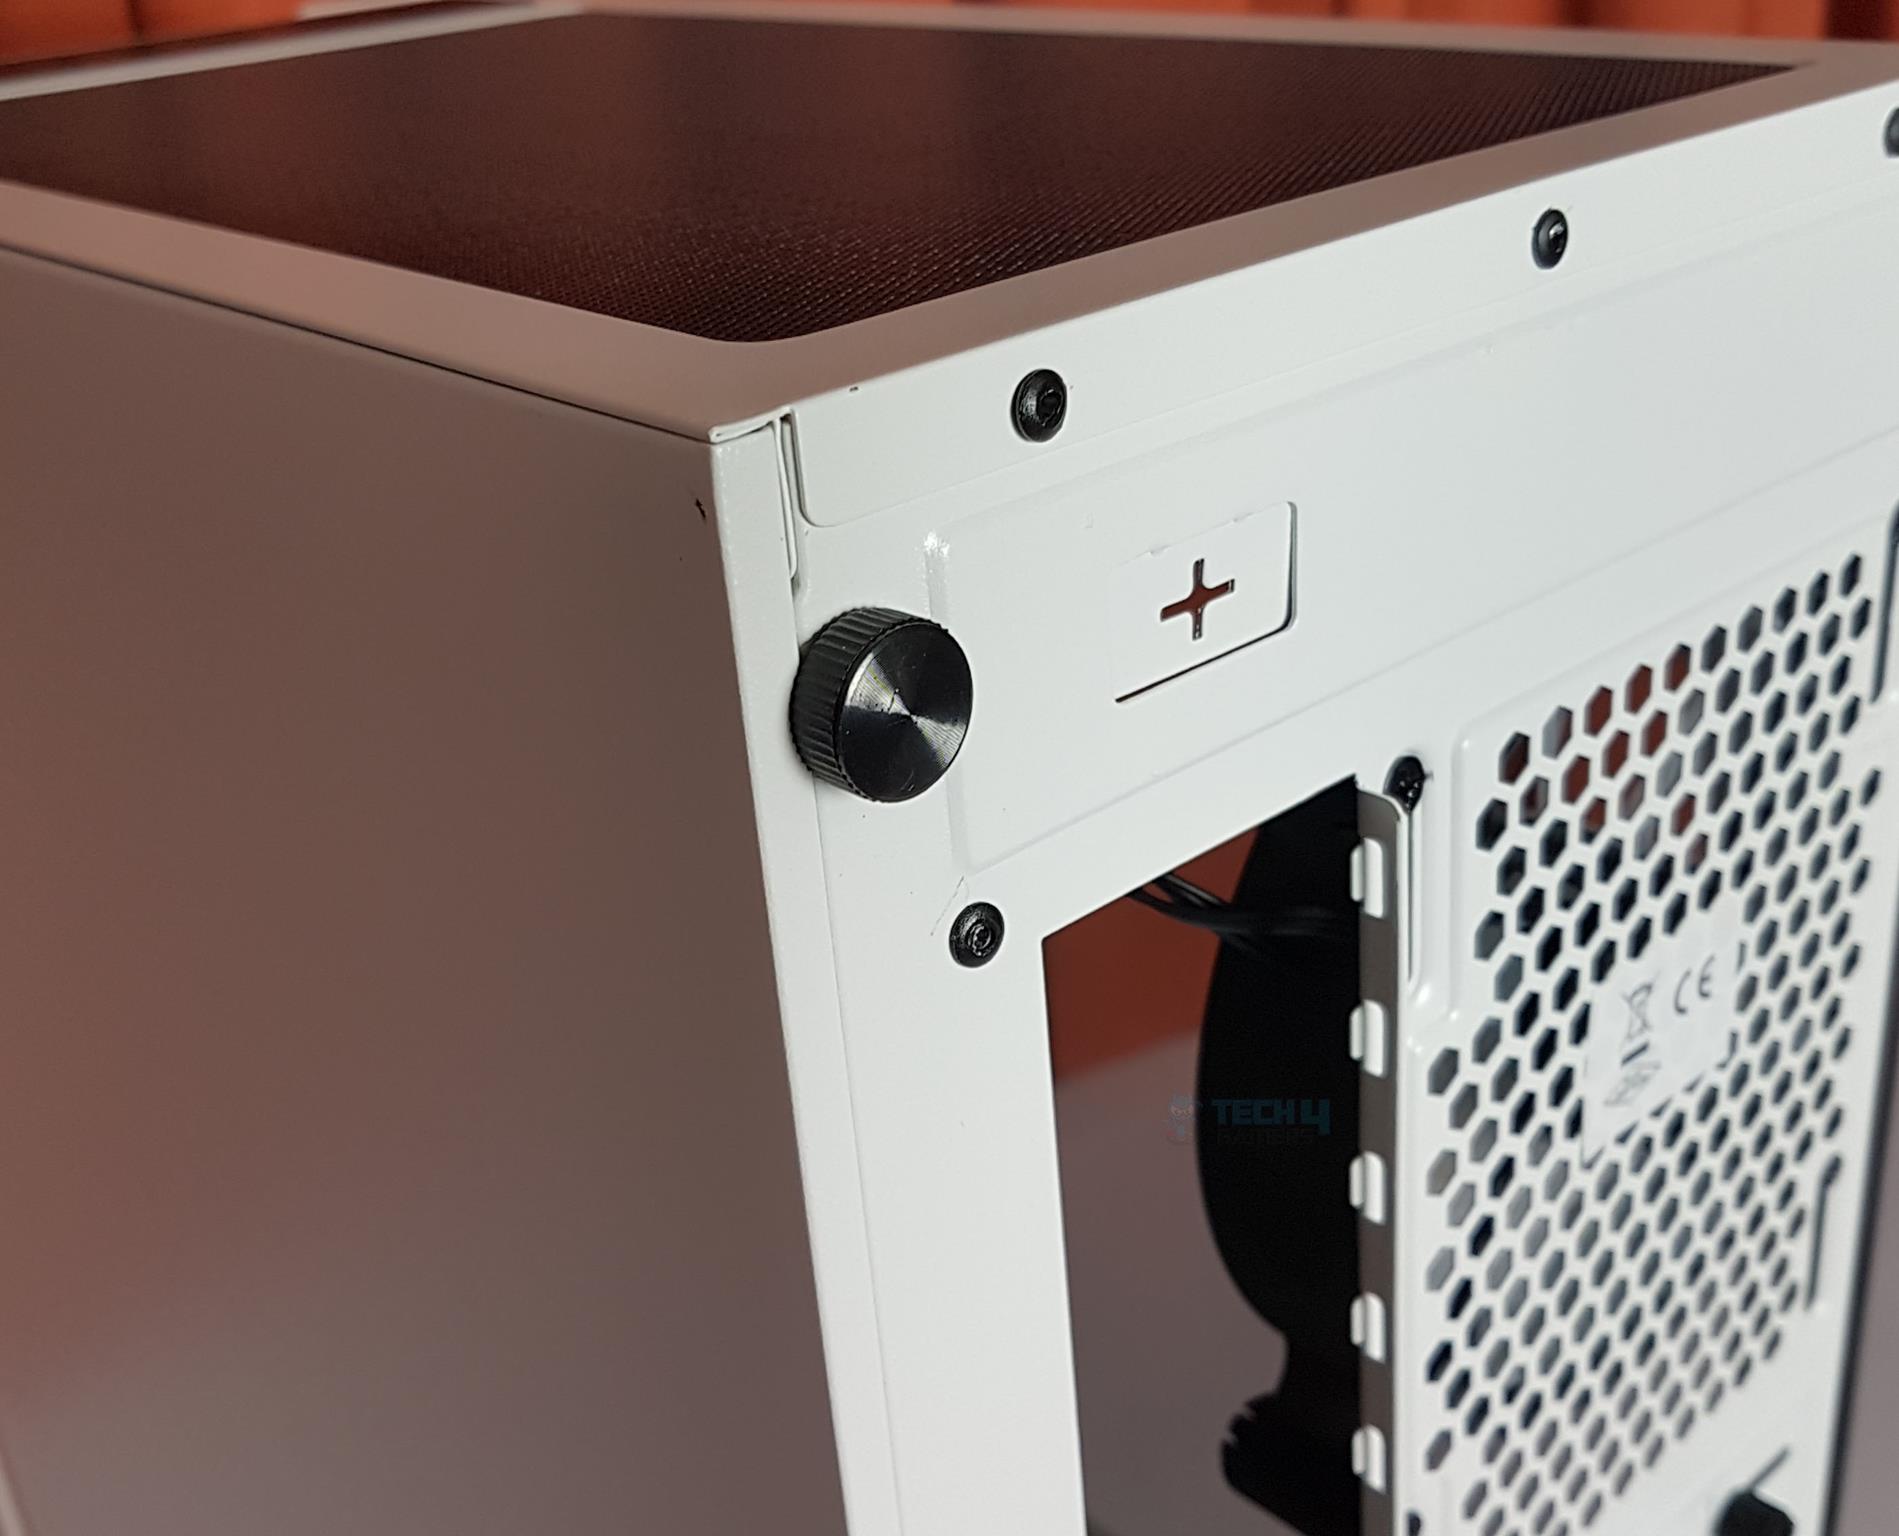
The right side panel has a strange locking mechanism. There is no hole on the side of this panel, which we usually see in most of the Chassis. The locking screws are passed through the holes on the side of the panel and inserted into the chassis frame to lock the panel. Quite an unconventional design! The bulkhead thumb screws are to be screwed into the chassis frame, and their bulkhead side is supposed to hold and lock the side panel.
At the bottom, we have a standard ATX PSU mount. Another complaint is that the PSU can only be installed with the fan side facing downward. I can understand that there is no vented portion on the shroud facing the PSU but still, they should not have forced the user to make it happen in one way only.
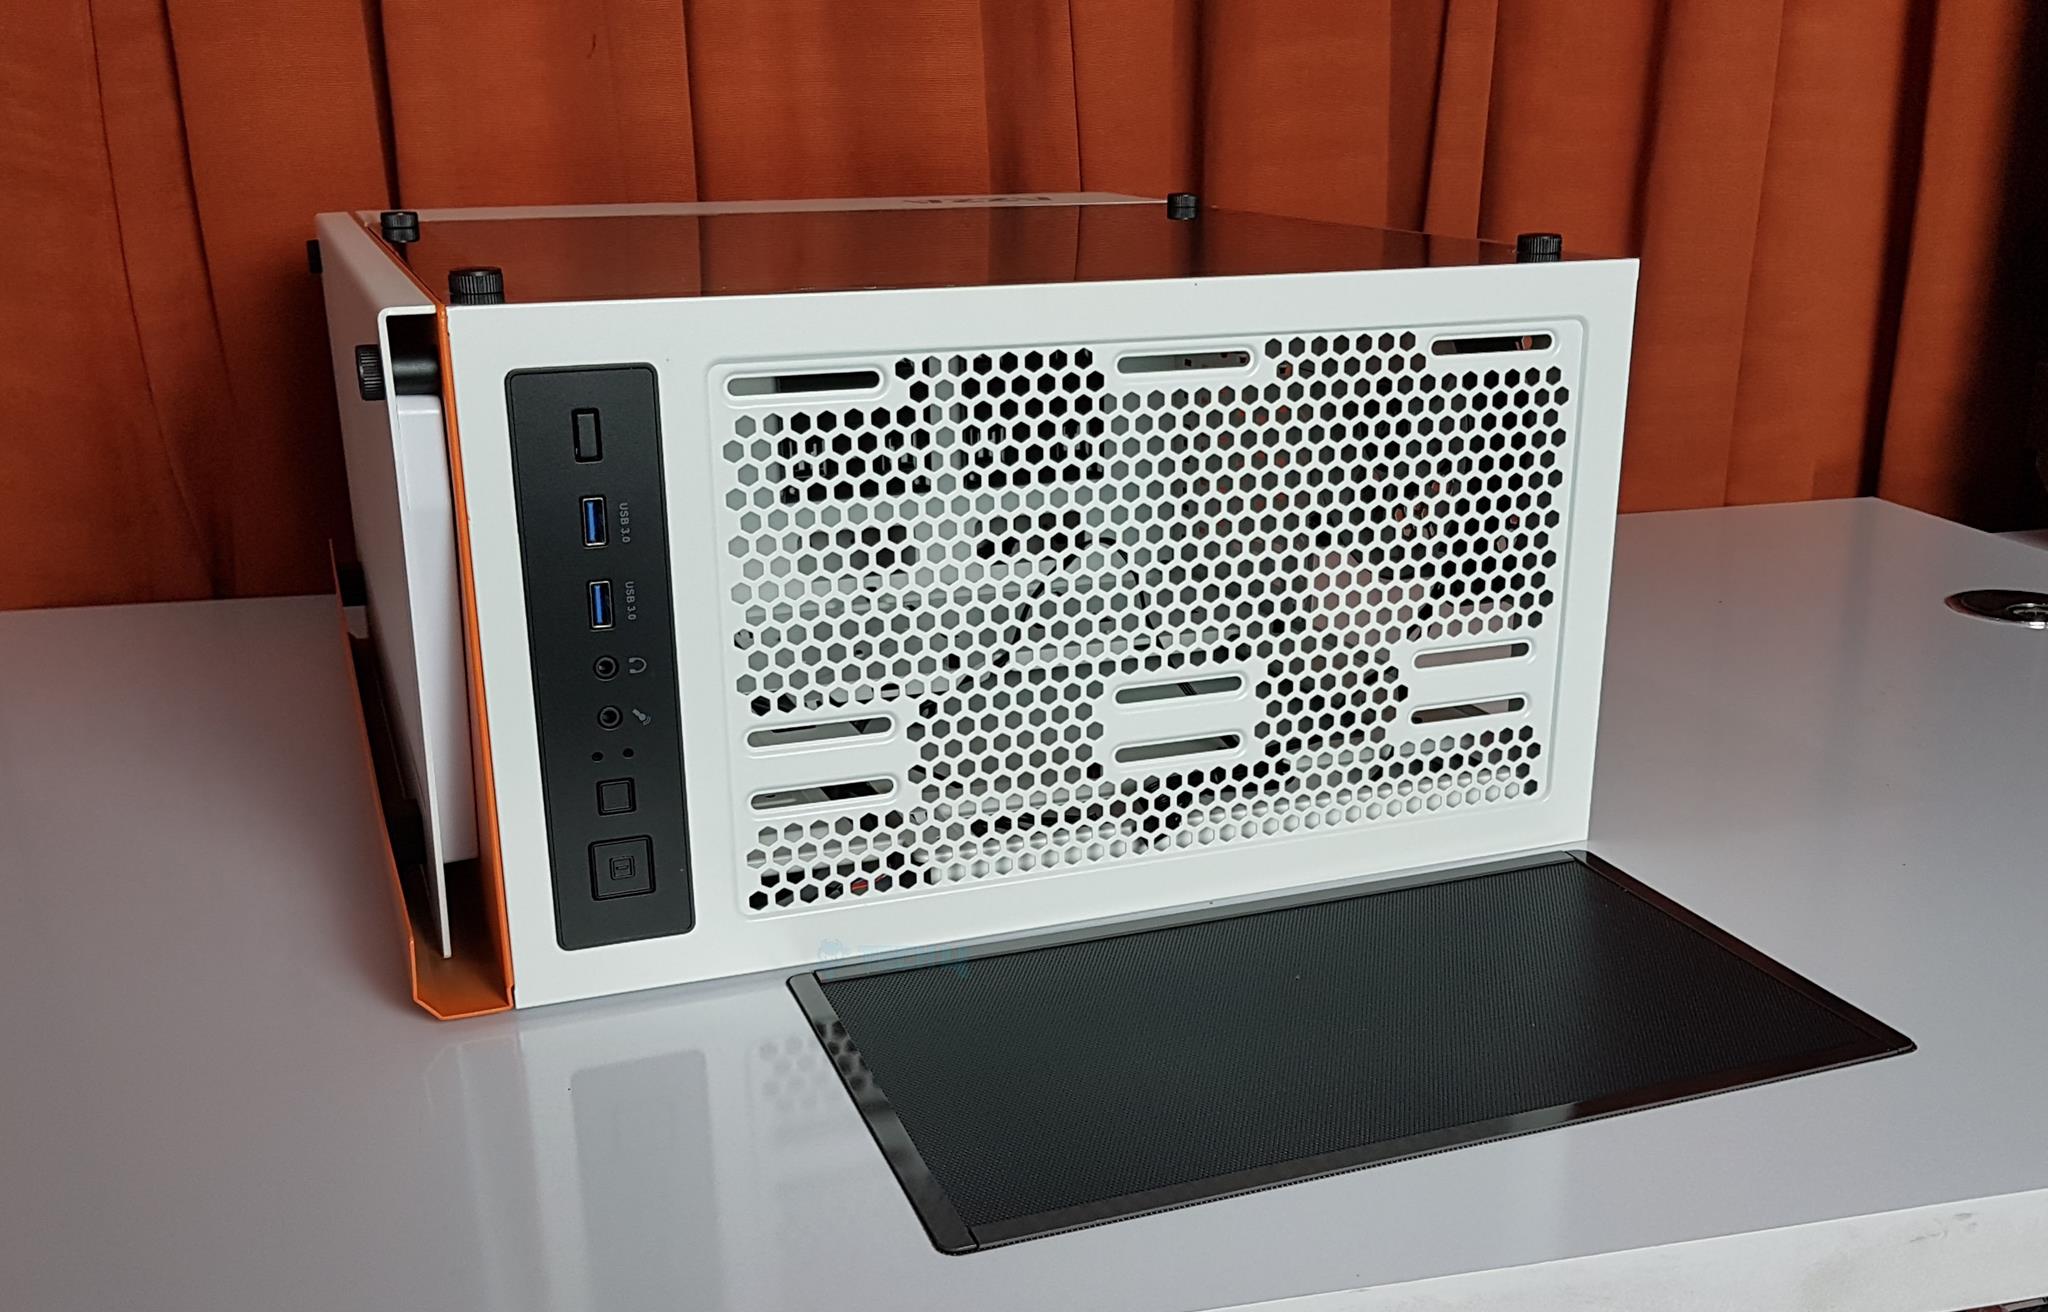
We have a sleek design on the top of this chassis. A large magnetic dust filter covers the entire vented area. The vented area provides 2x 120/140mm fans or a 240mm radiator. Again, we are seeing a rail mechanism that would allow the user to adjust the position of the fans/radiator a bit. On the left side, we have an IO panel. Let’s look at the bottom side of the AZZA Apollo 430 White.
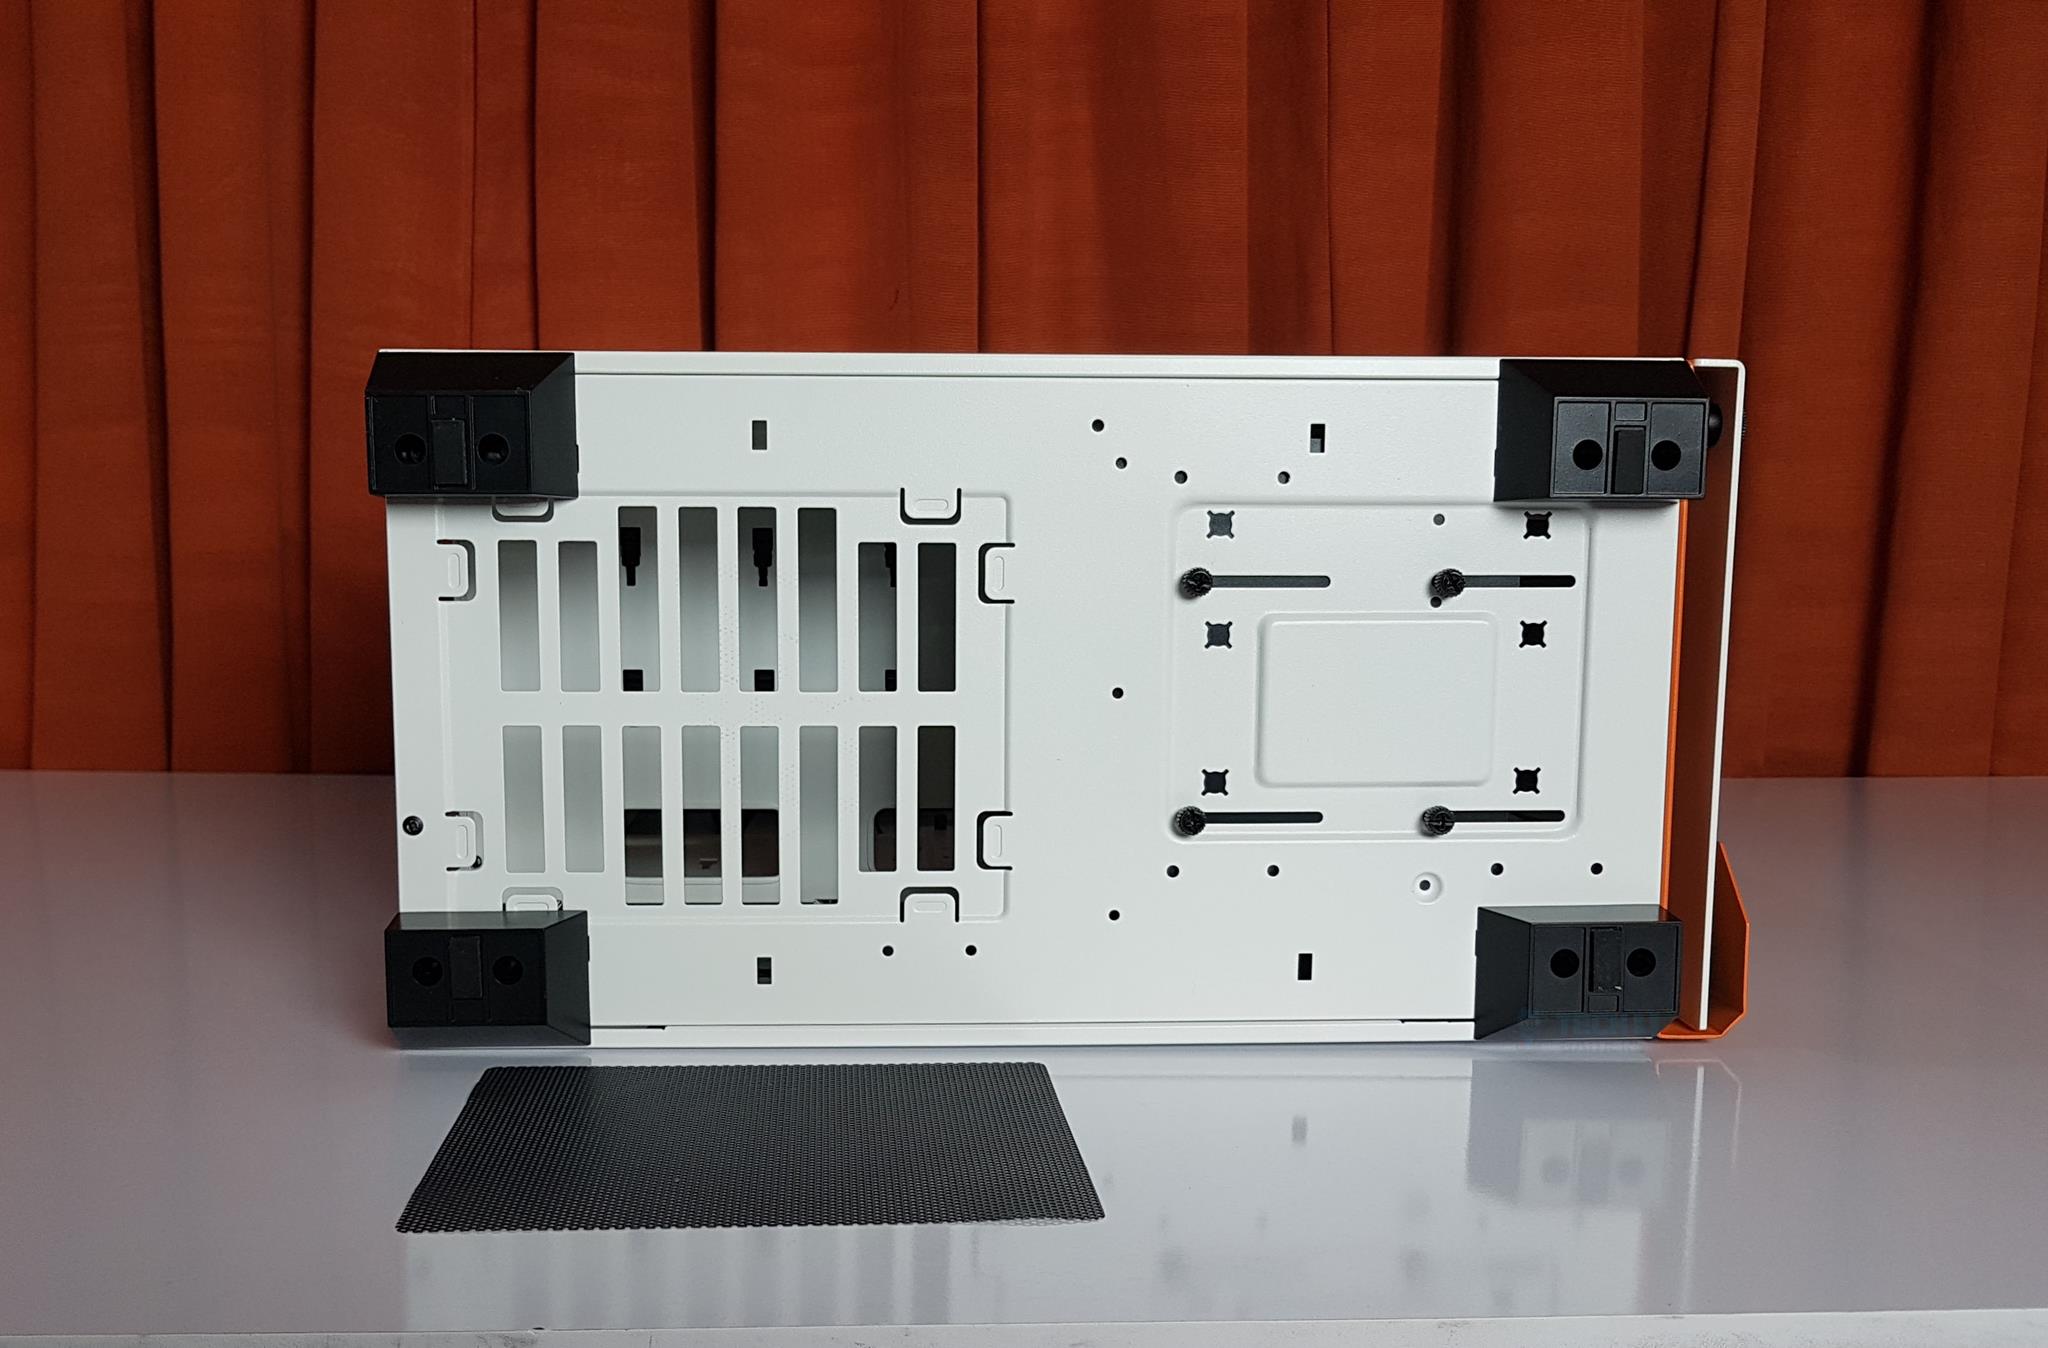
There are 4 feet of black on the corners of the chassis. These give the chassis a lift of approximately 22mm from the ground. They have rubber mounts at their base to avoid scratching the surface on which the chassis will be placed. The PSU area is vented and has an iron net, which is removable and washable.
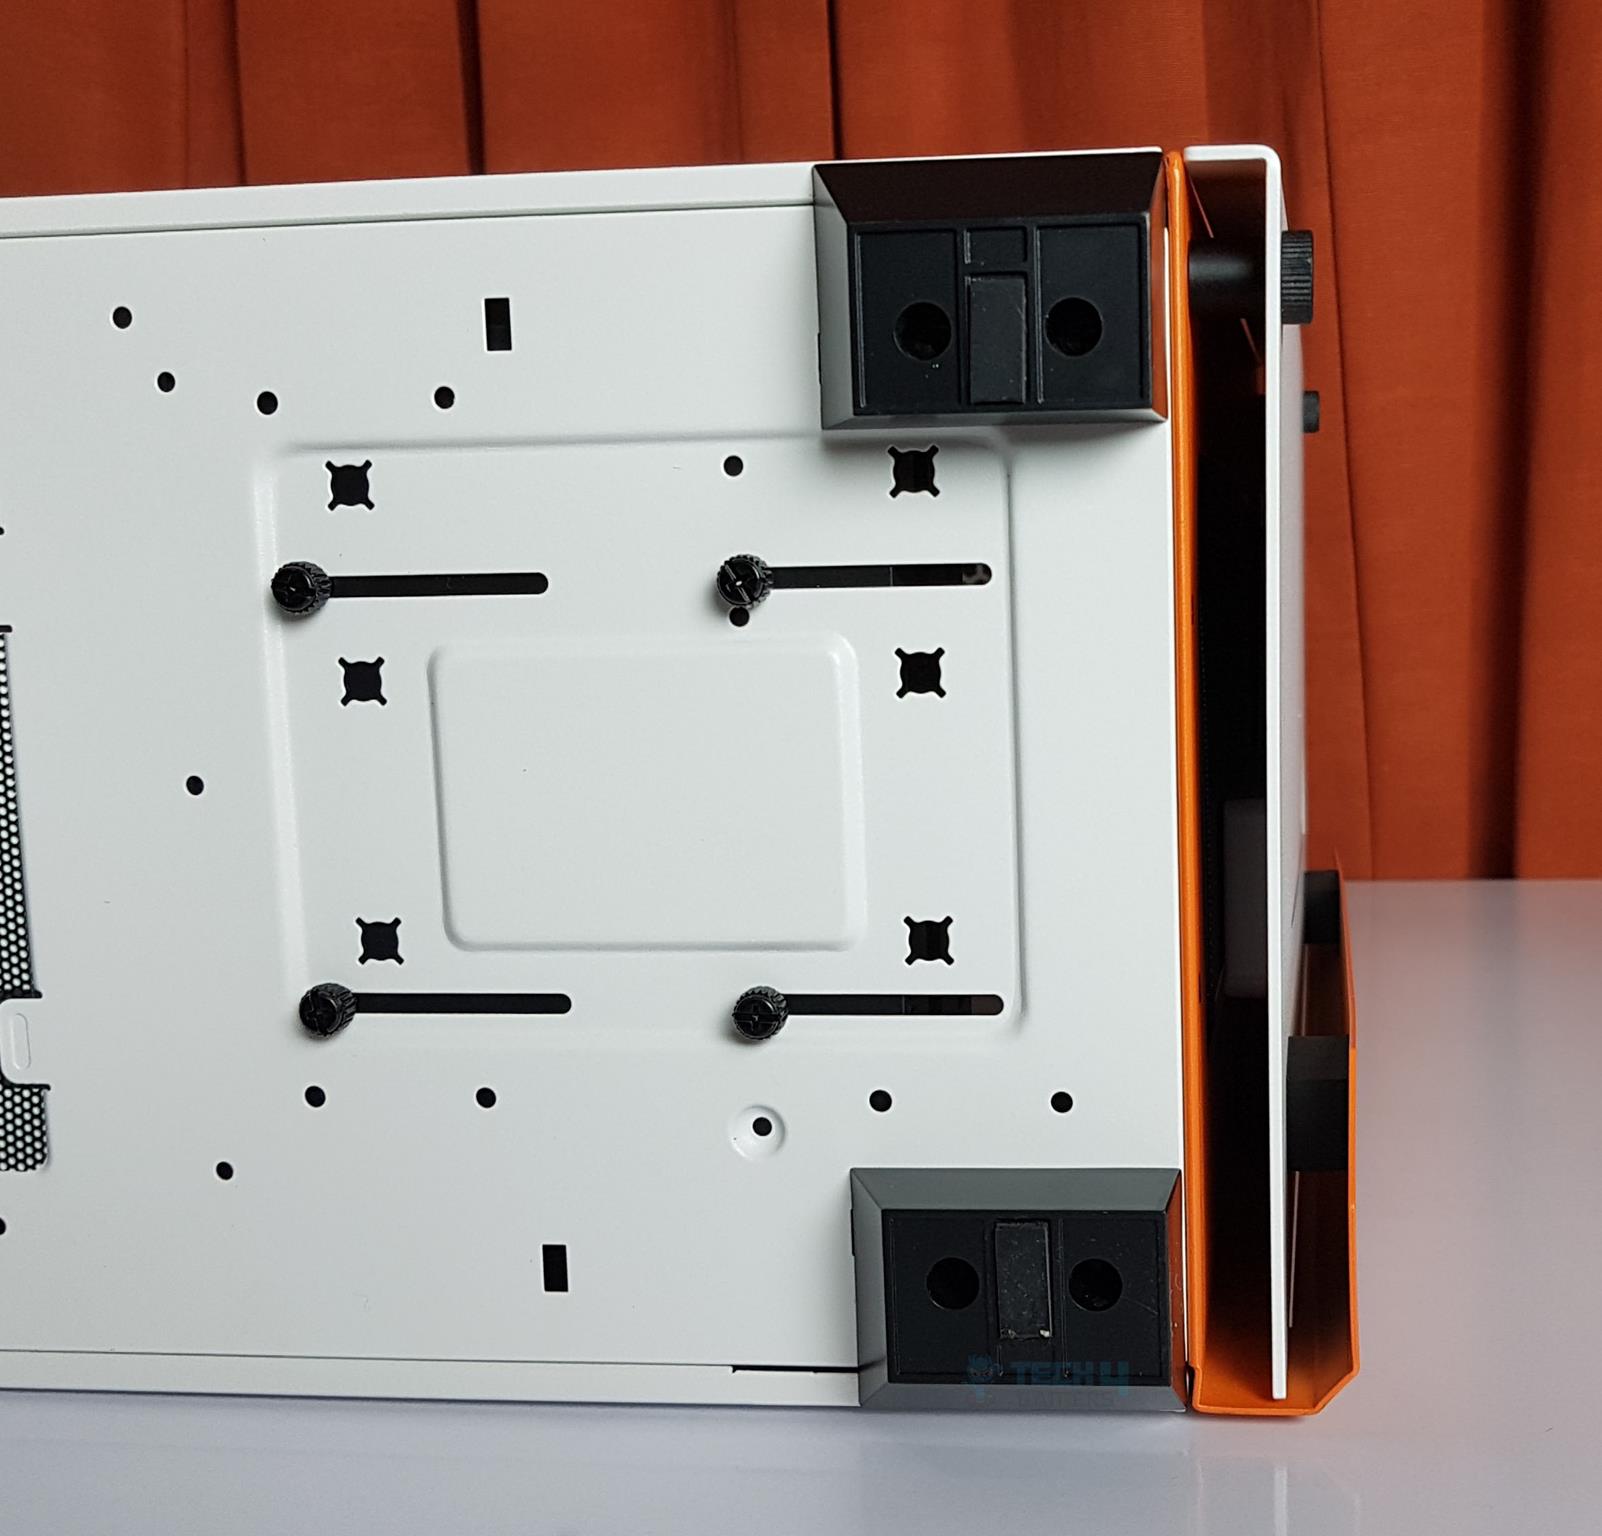
The right side area shows 4x screws. These are holding the HDD cage. As can be seen, the position of the HDD cage can be changed inside the chassis thanks to the rail mount mechanism here as well. The far-right side area shows some room for possible air intake, but it isn’t much.
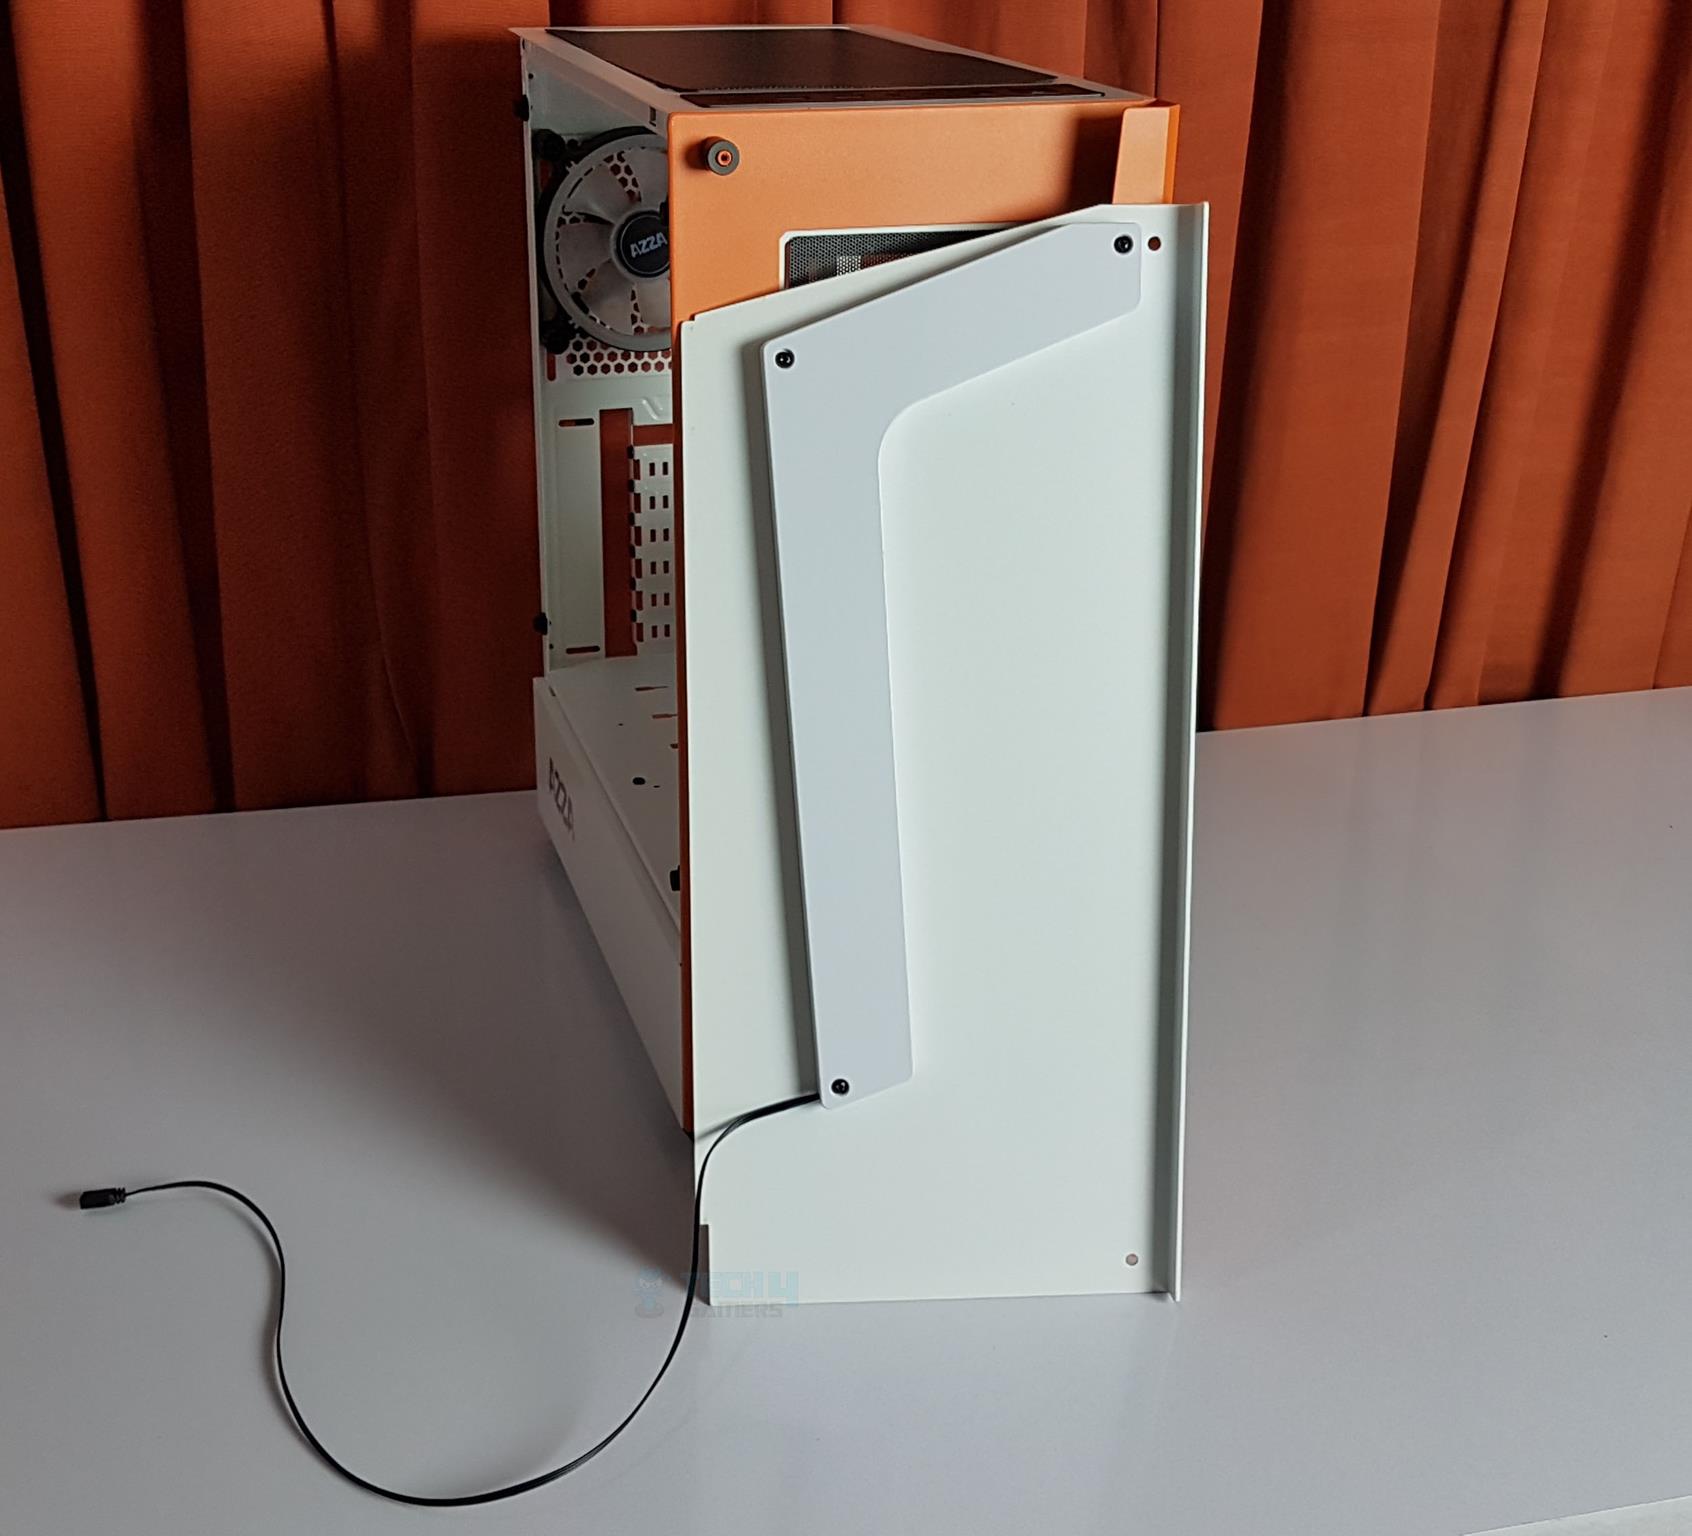
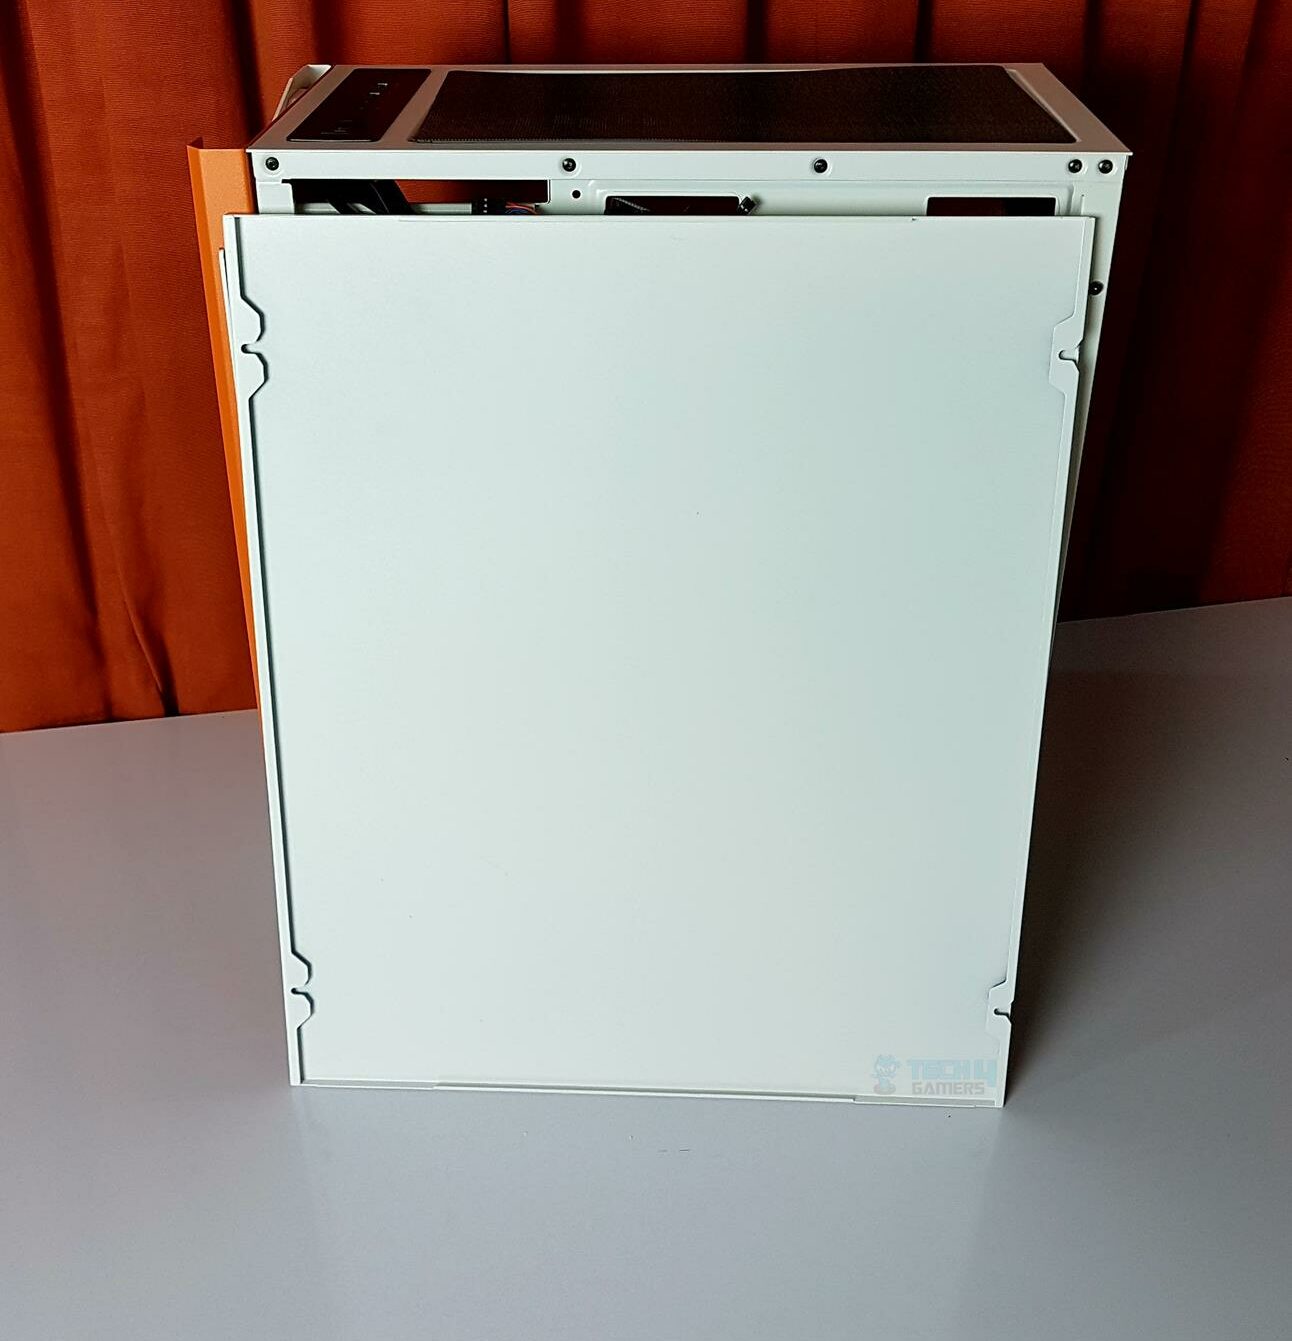
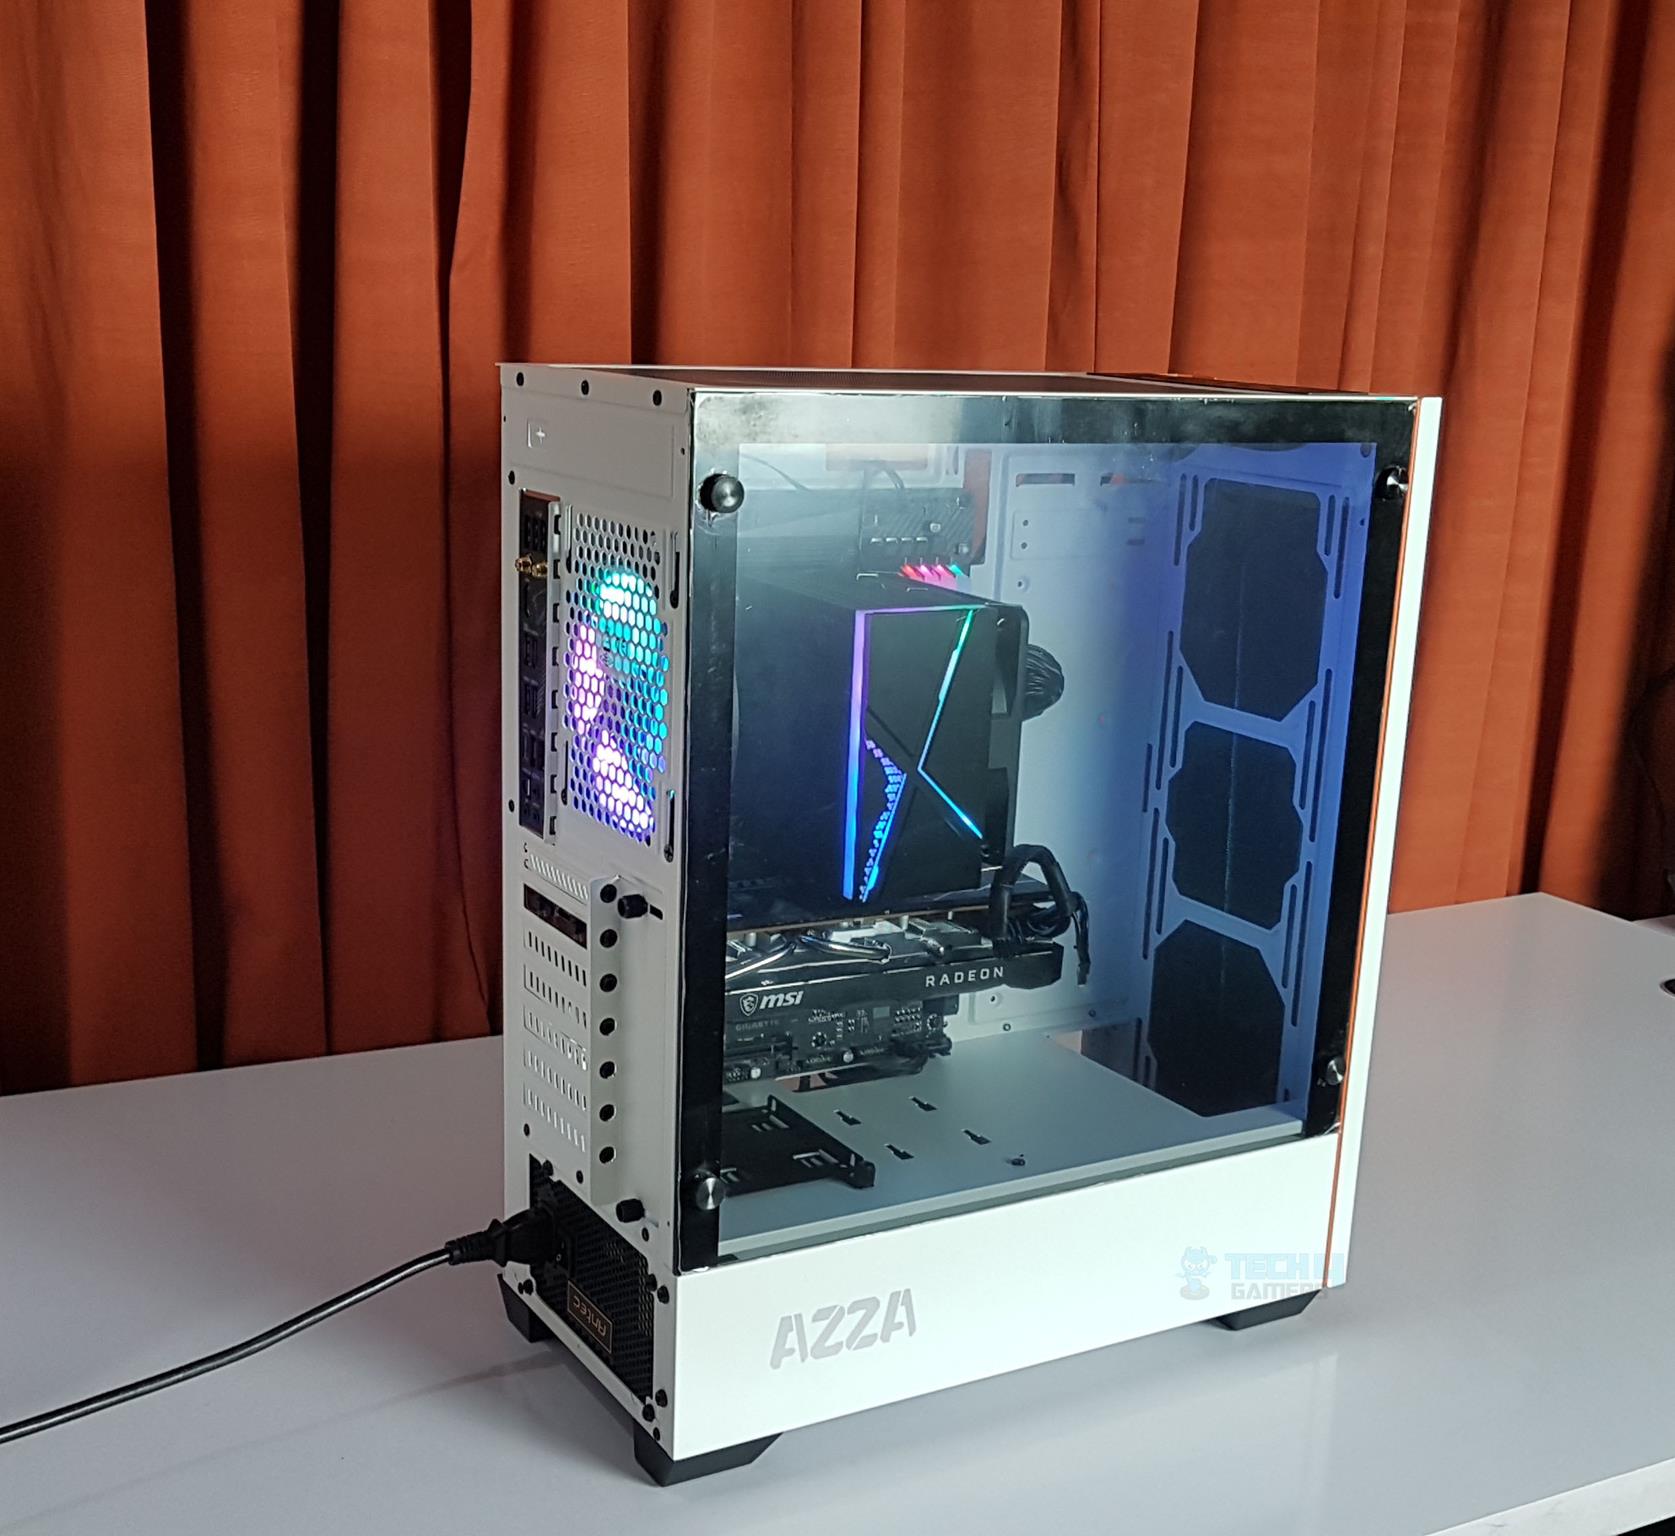
The side panel features tempered glass. It is installed using 4x bulkhead screws on each of its corners. The panel sits on the rubber mounts to avoid scratching. The panel does not fall as soon as screws are removed, but one can’t be too careful while handling the TG panels! The glass does not have a dark tint. The borders of the three-sided glass panel have a black border, adding some look to the overall design.
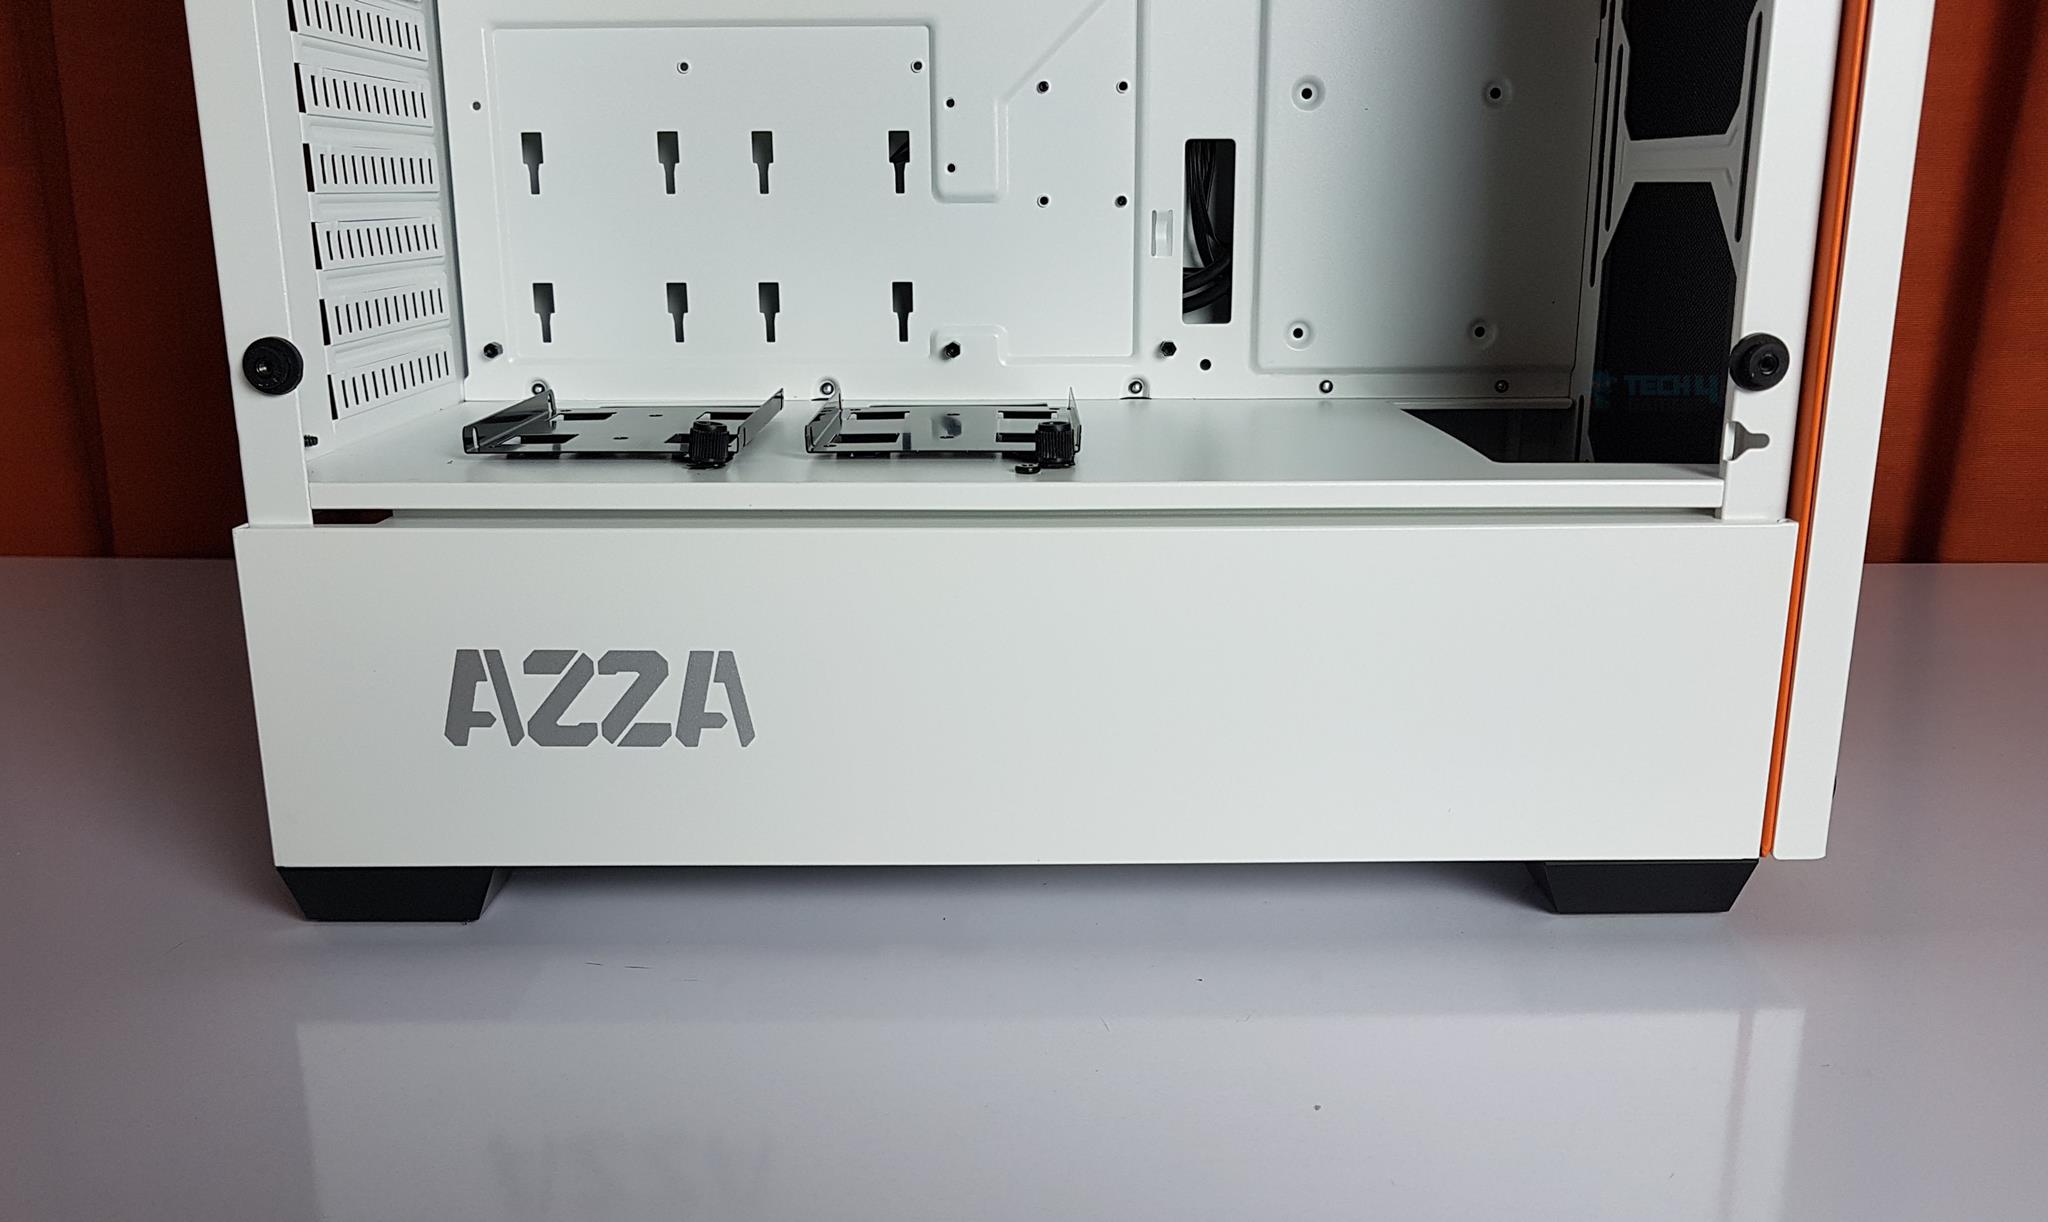
The bottom of the chassis is in a white frame with an AZZA textured print, which, in my opinion, looks cool. This makes the chassis a dual-chamber design. However, it is modular as the bottom side panel is removable.
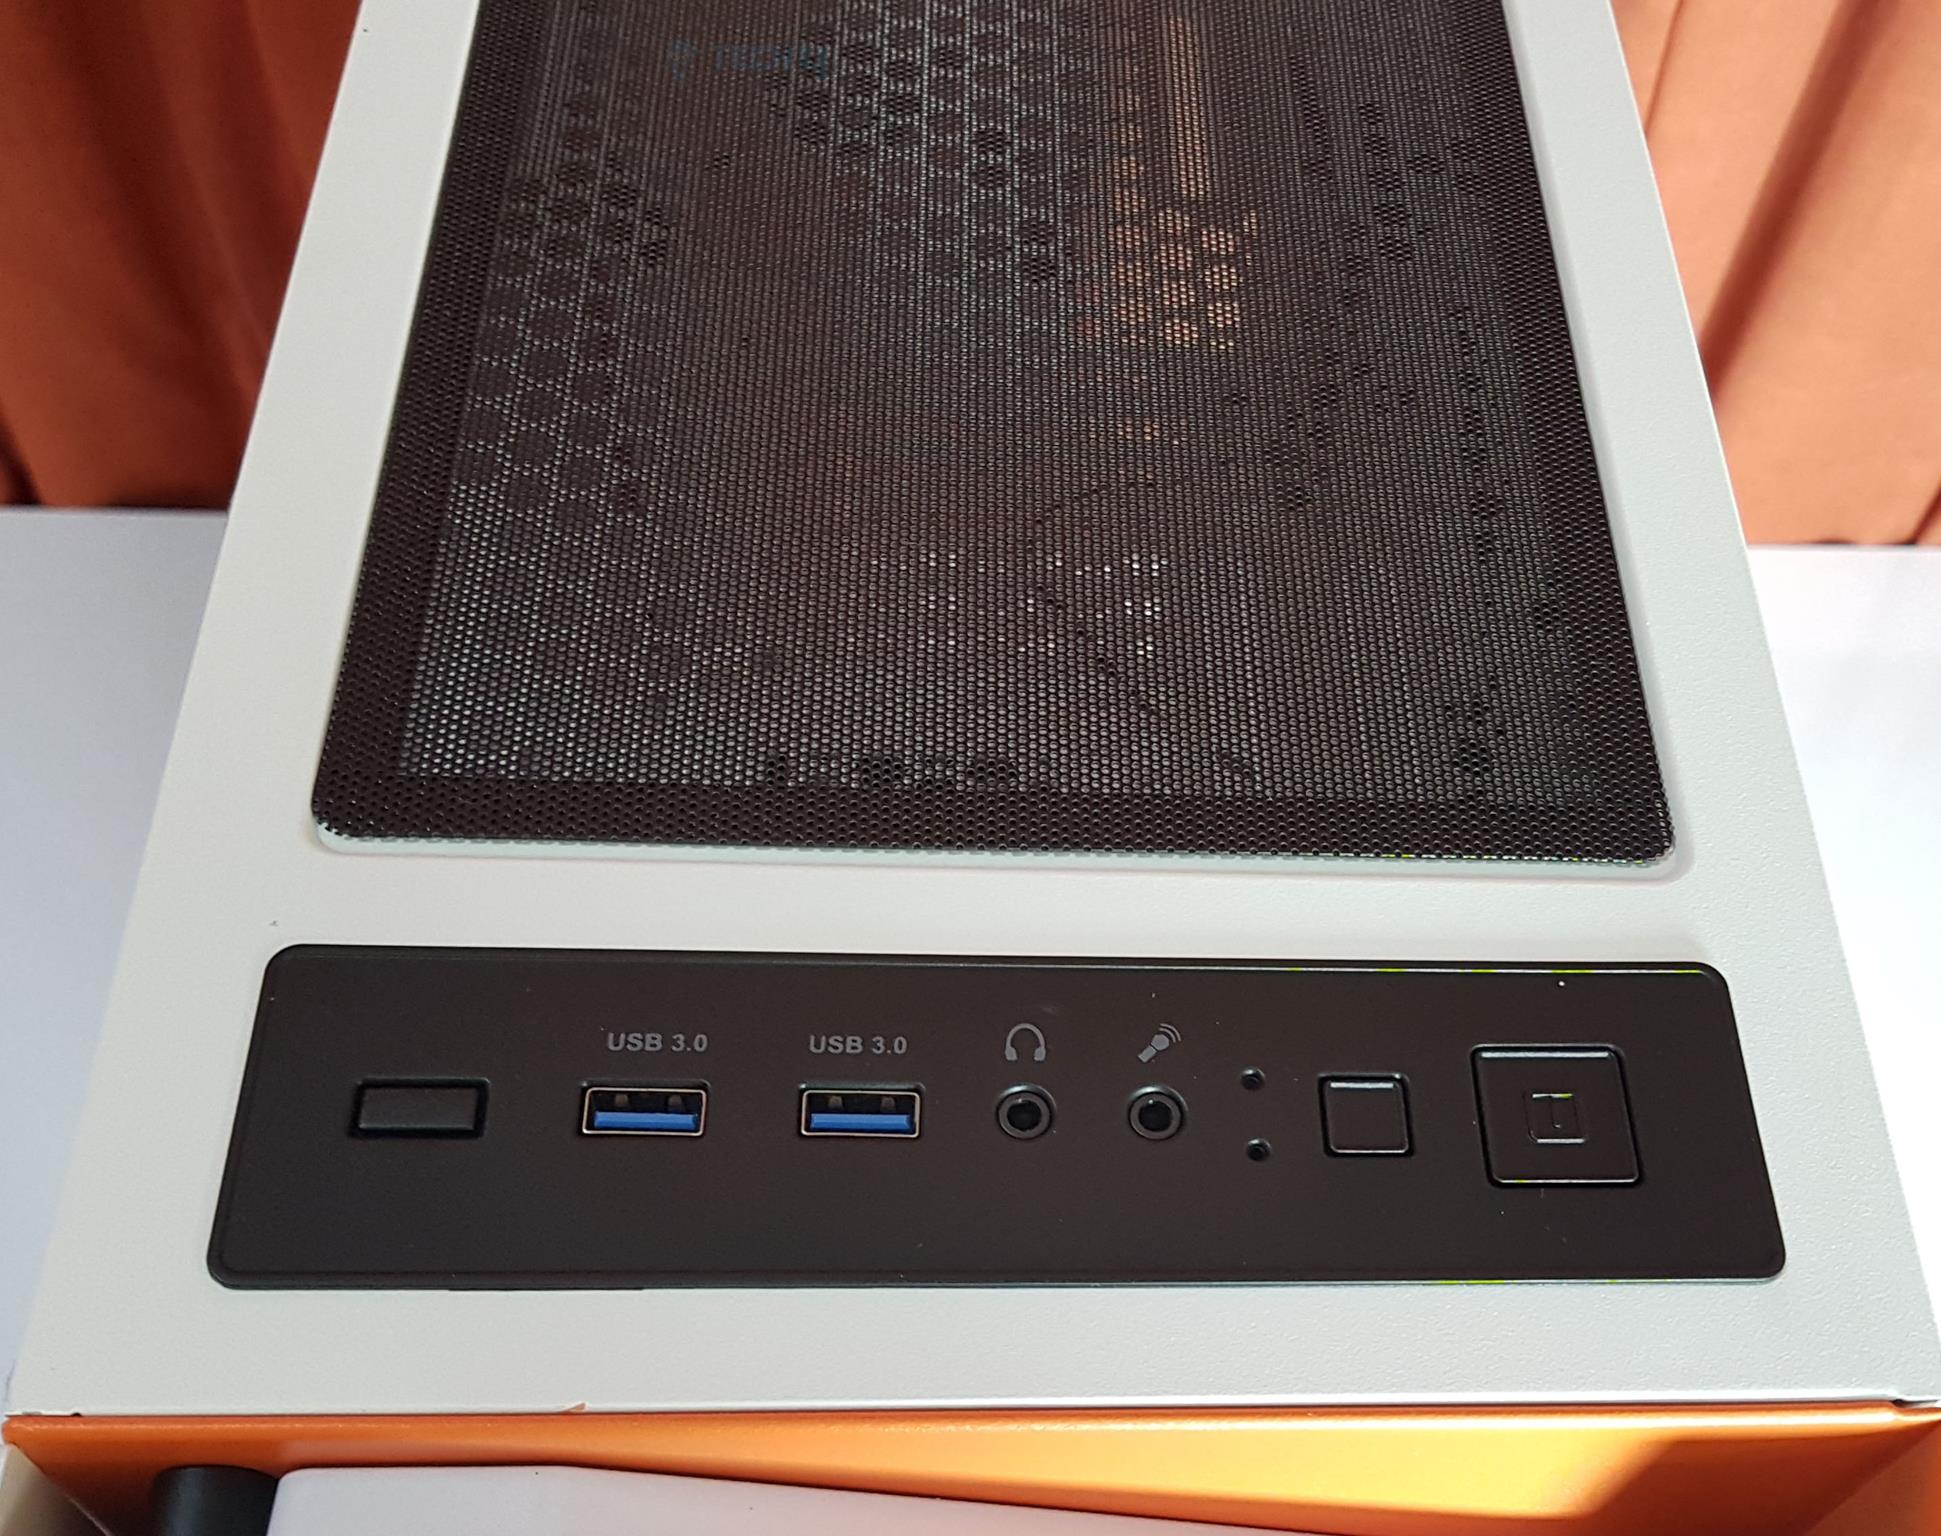

The top I/O panel includes:
- Power Button
- Reset/RGB Button [Default is RGB]
- Headphone jack
- Microphone jack
- 2x USB 3.0 port
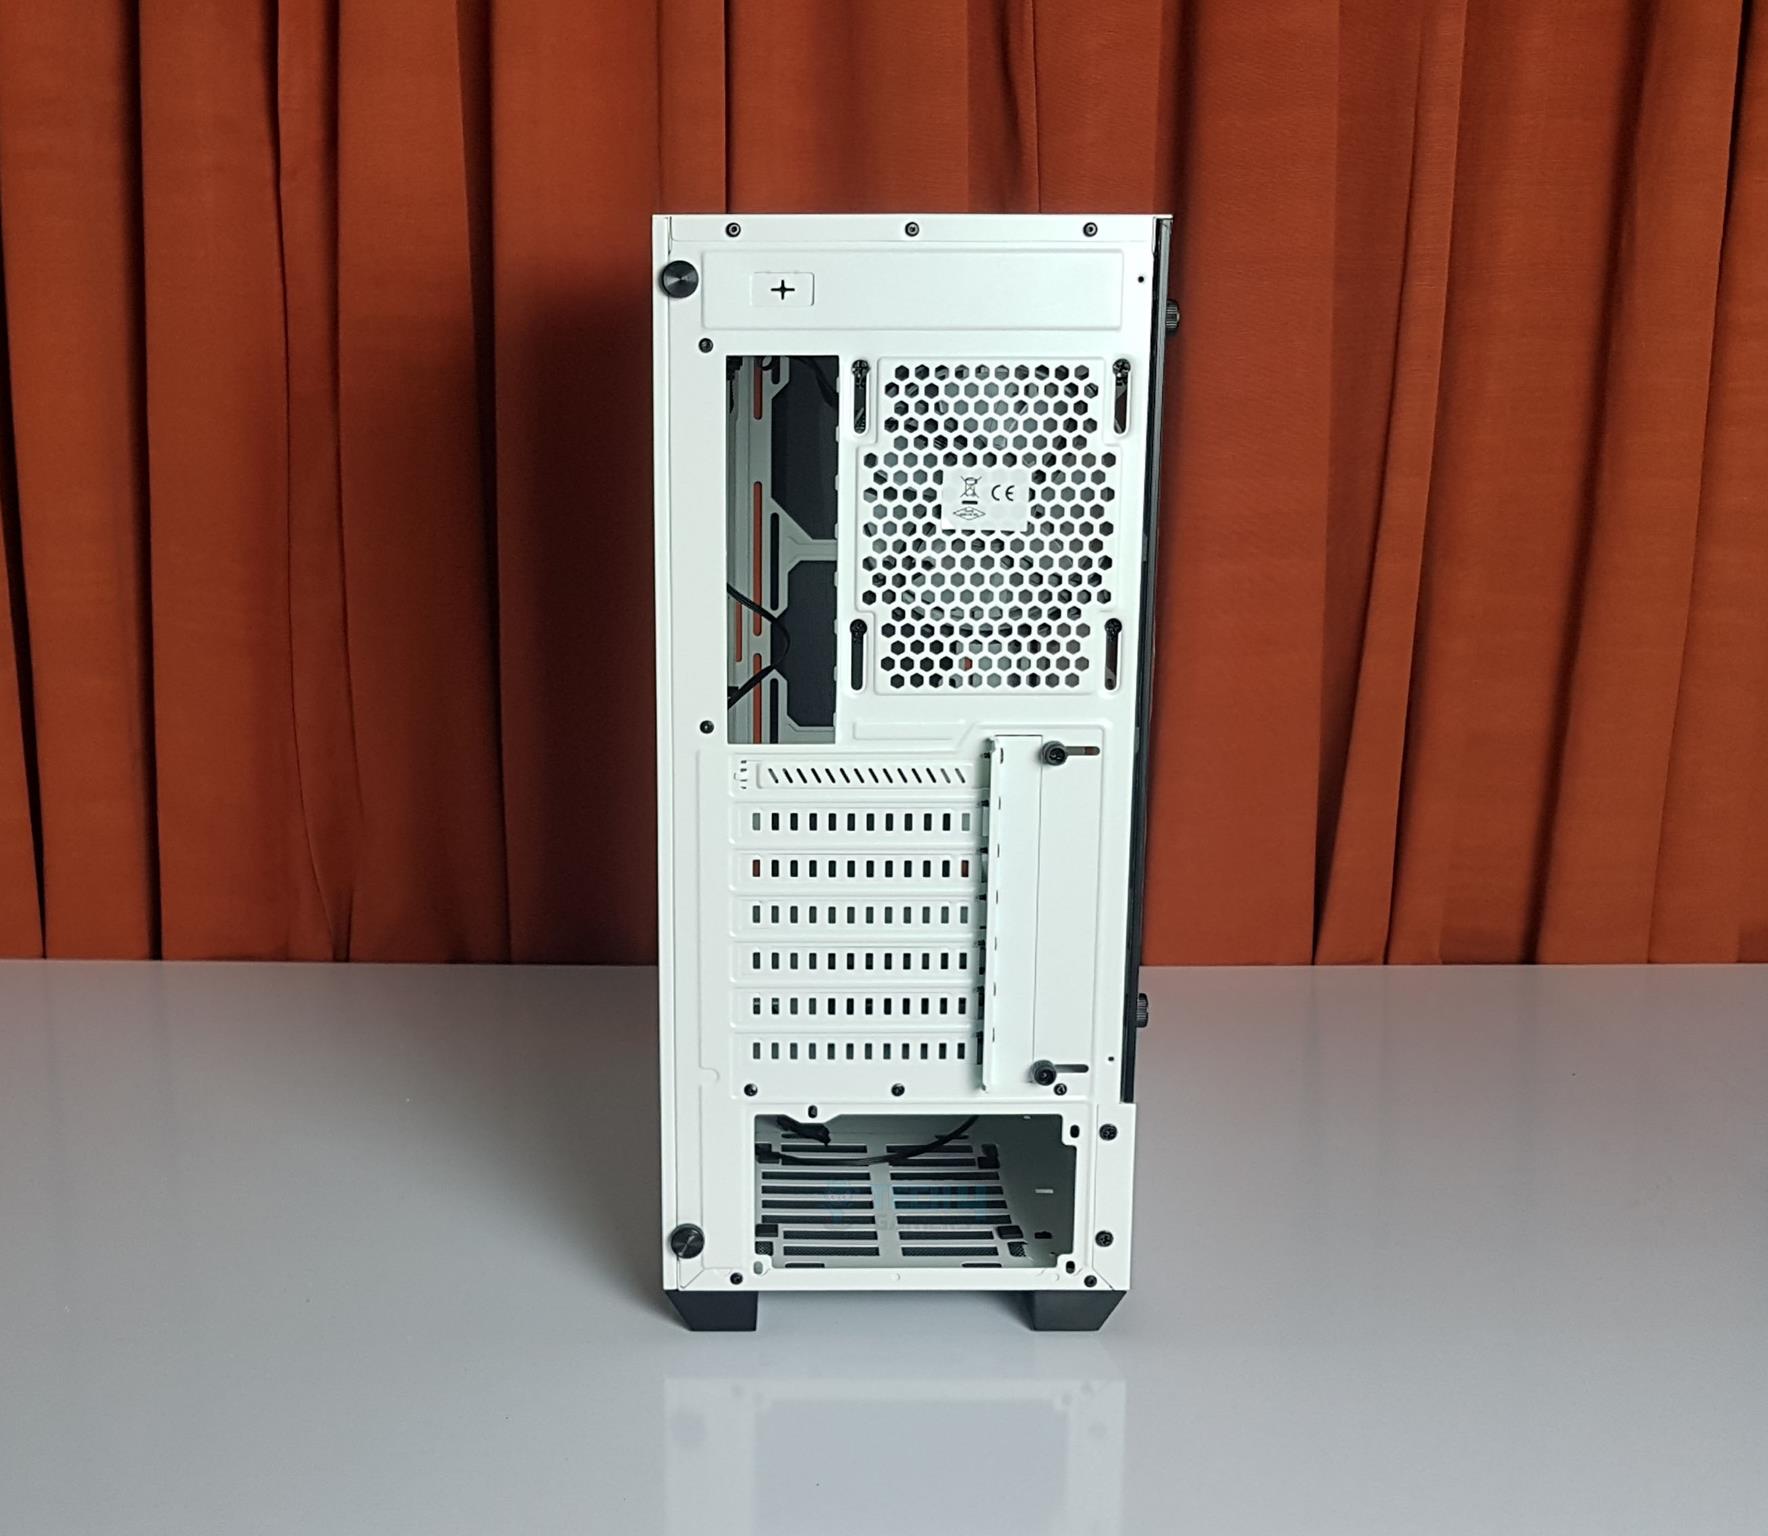
The right side panel is a solid body design. There are locking positions on each of the mounting portions. There are screws on the mainframe on which these locking positions are placed. This seems to be a tongue-and-mortise method of locking.
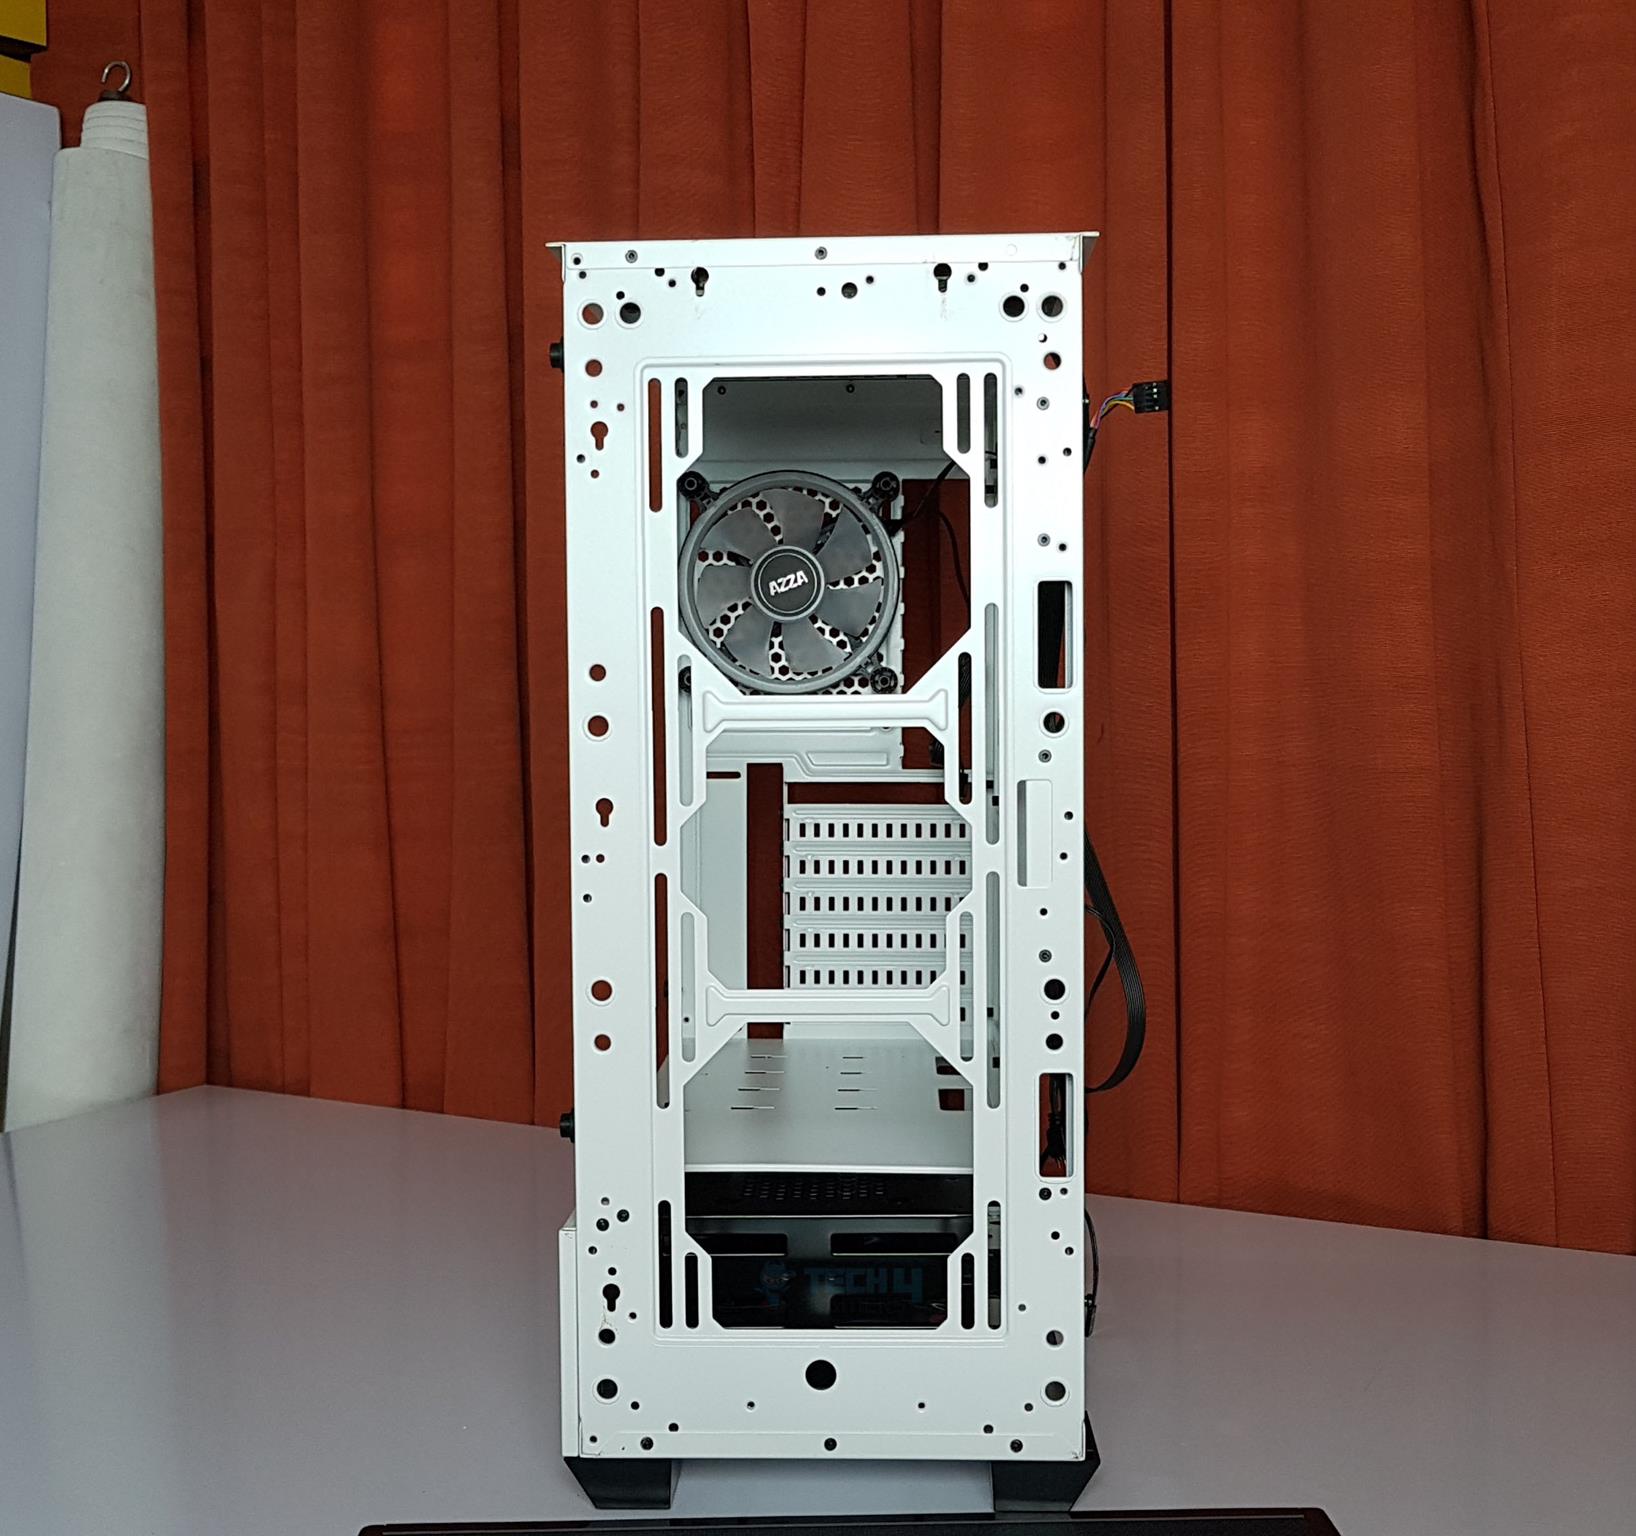
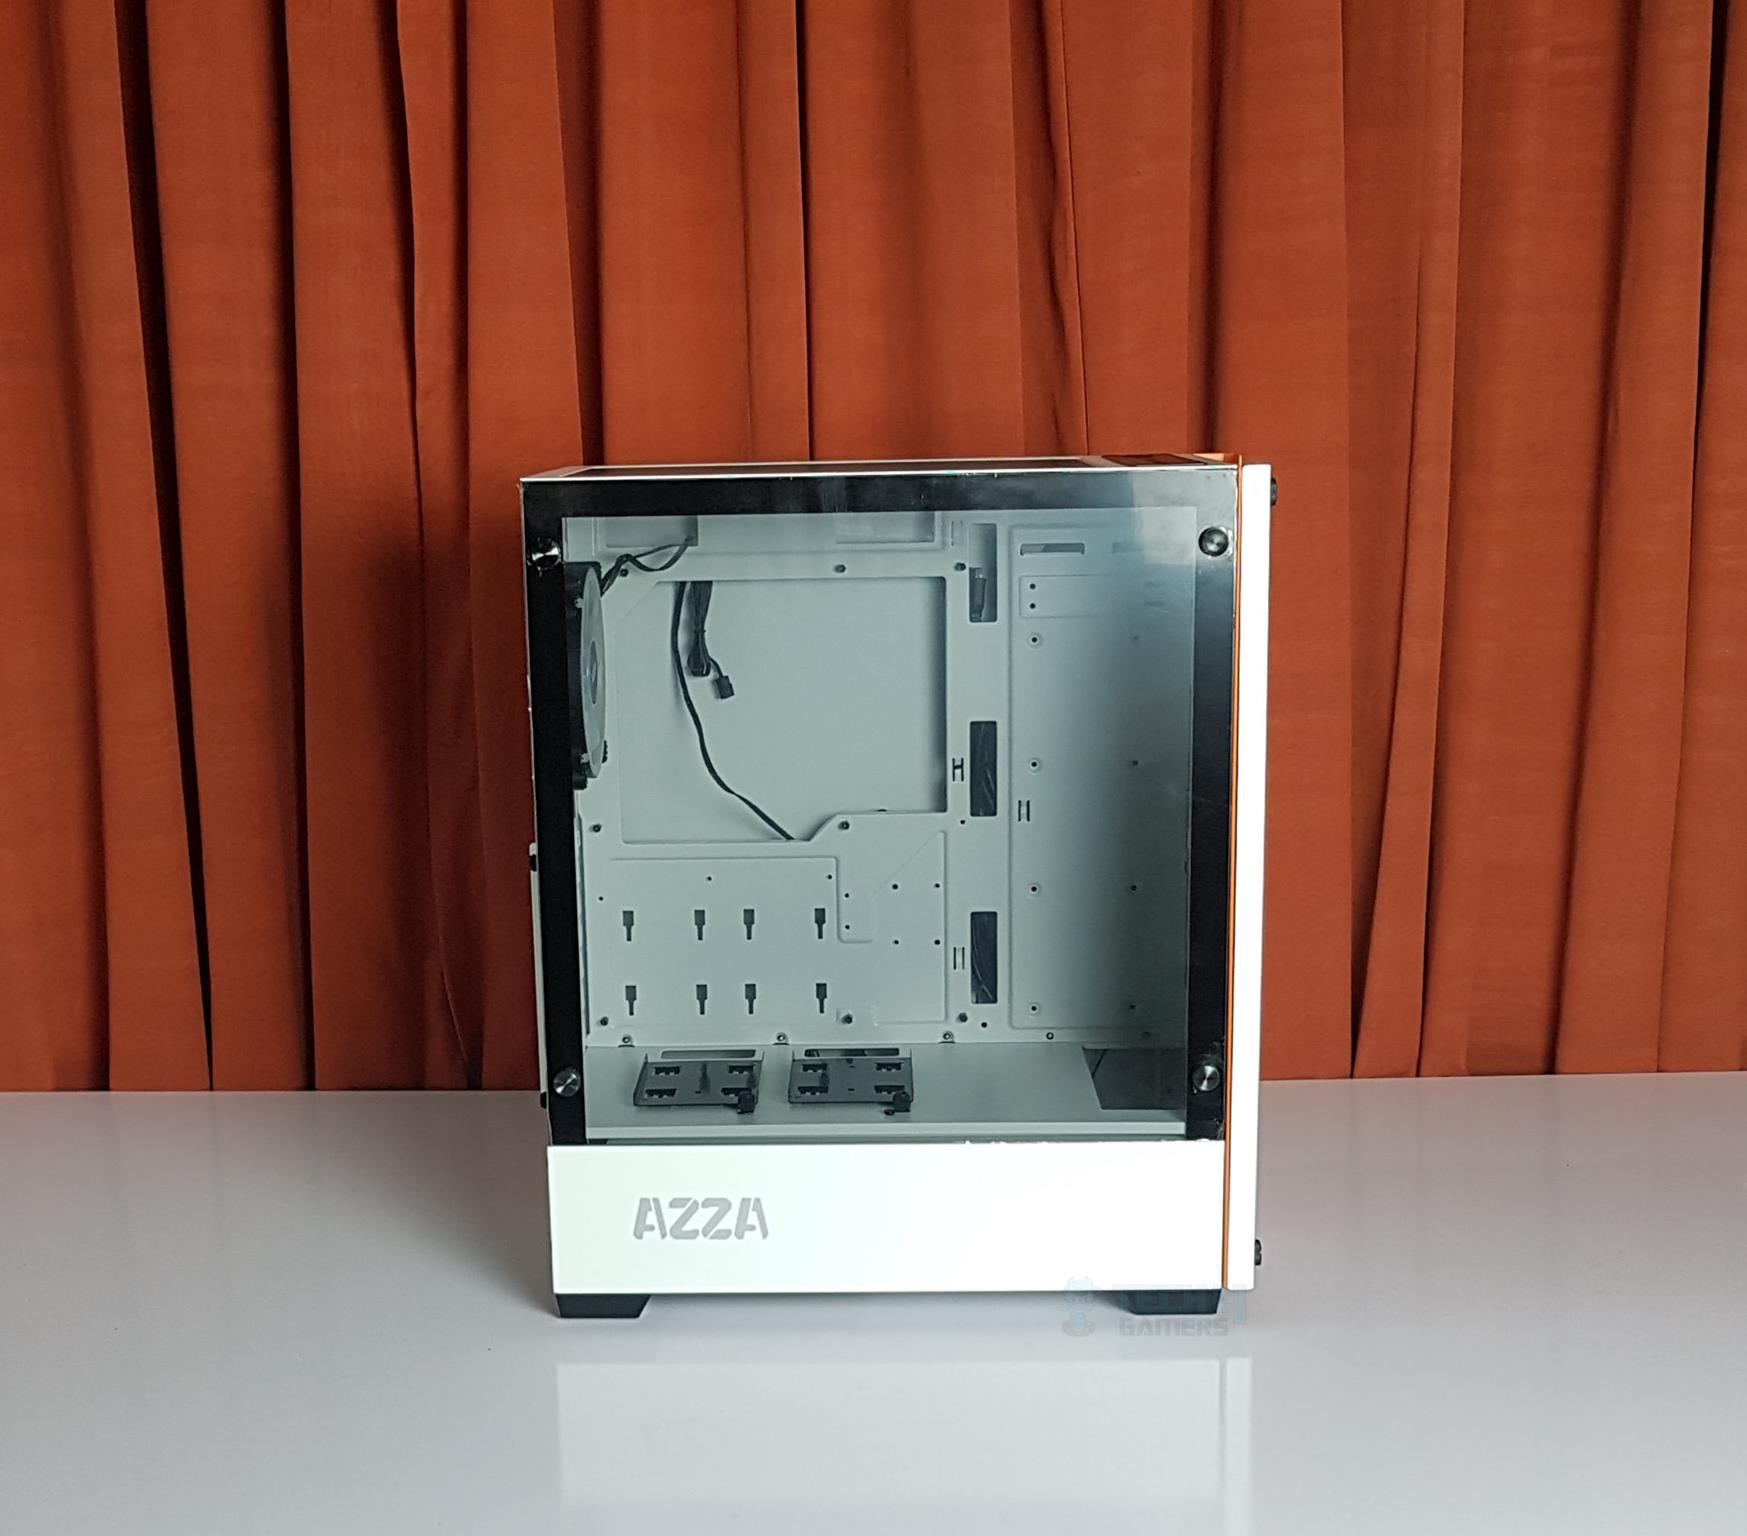
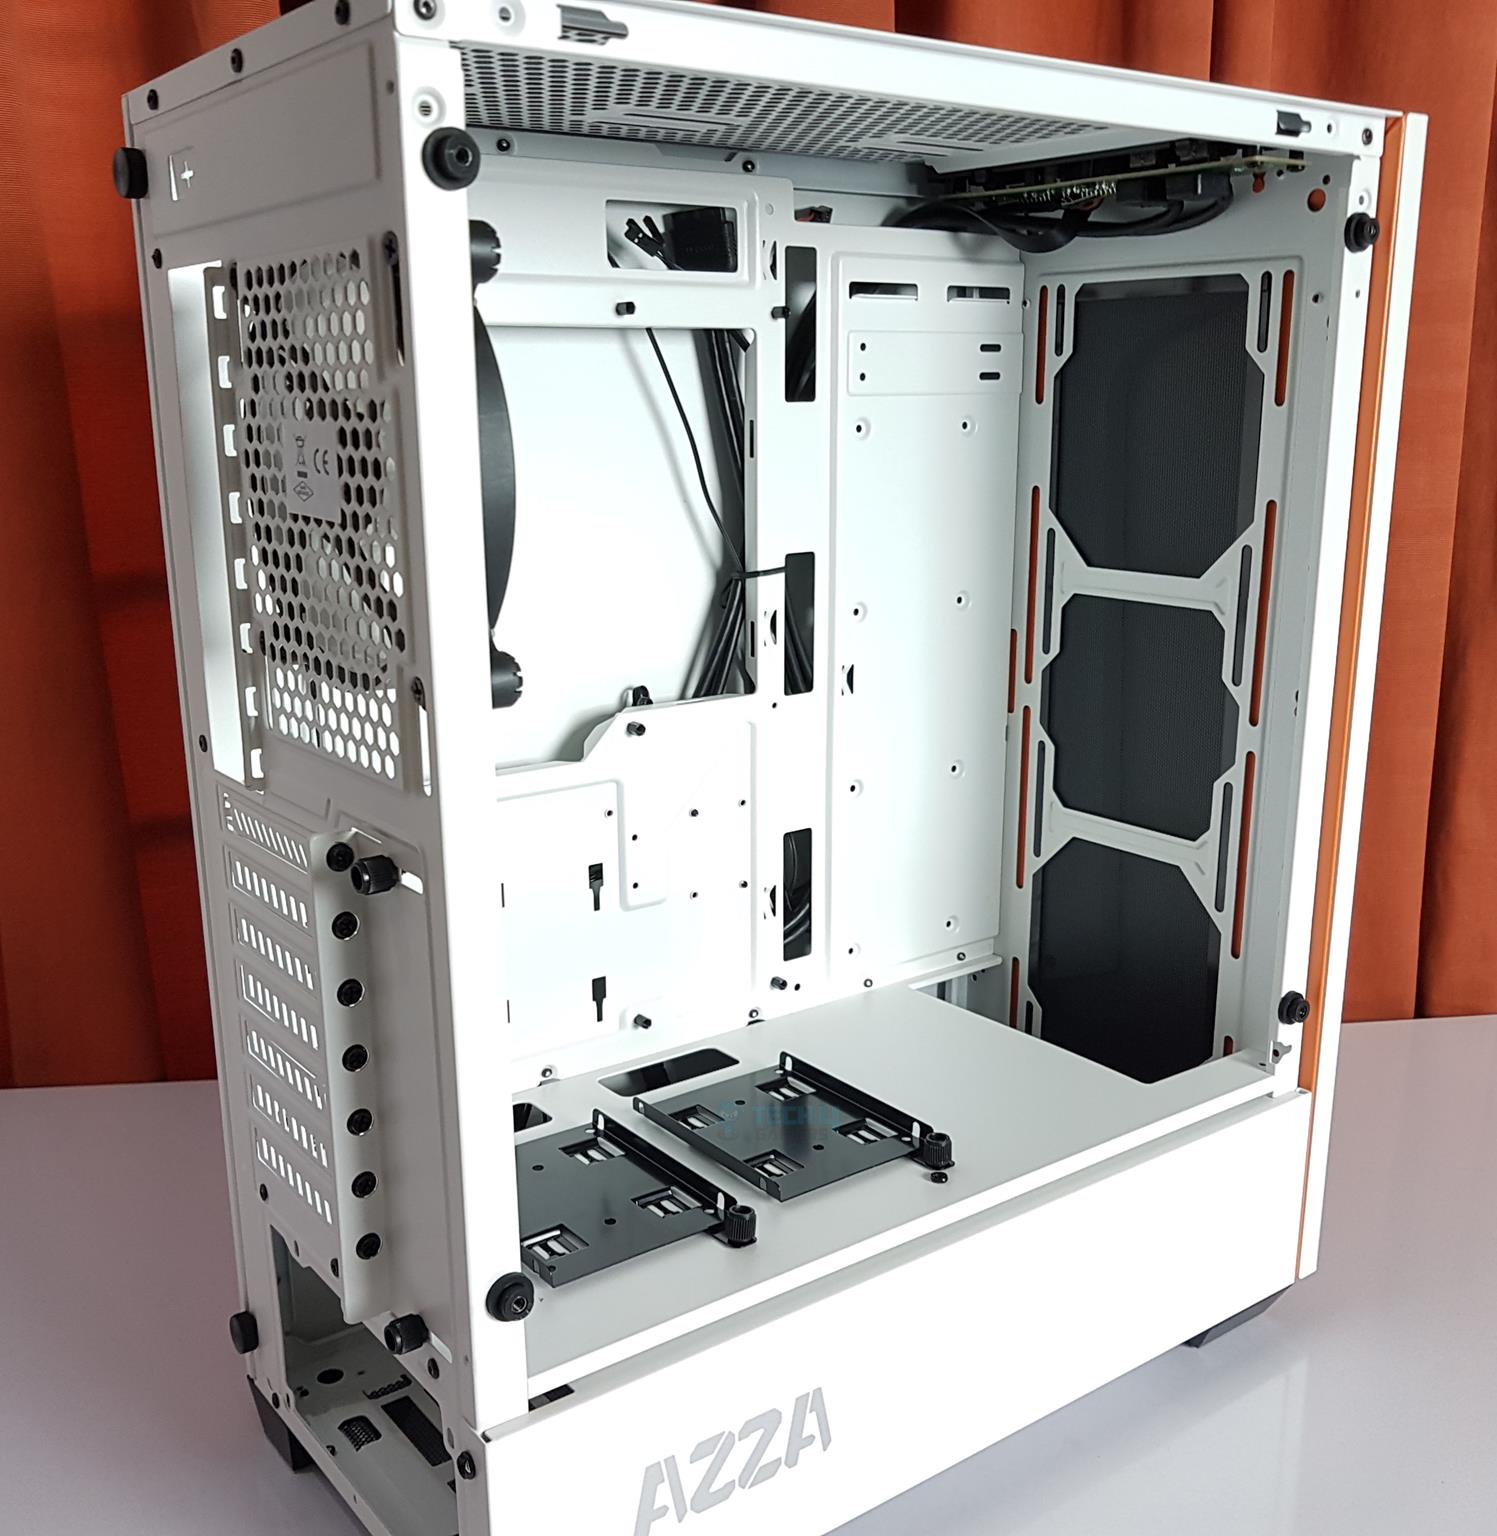
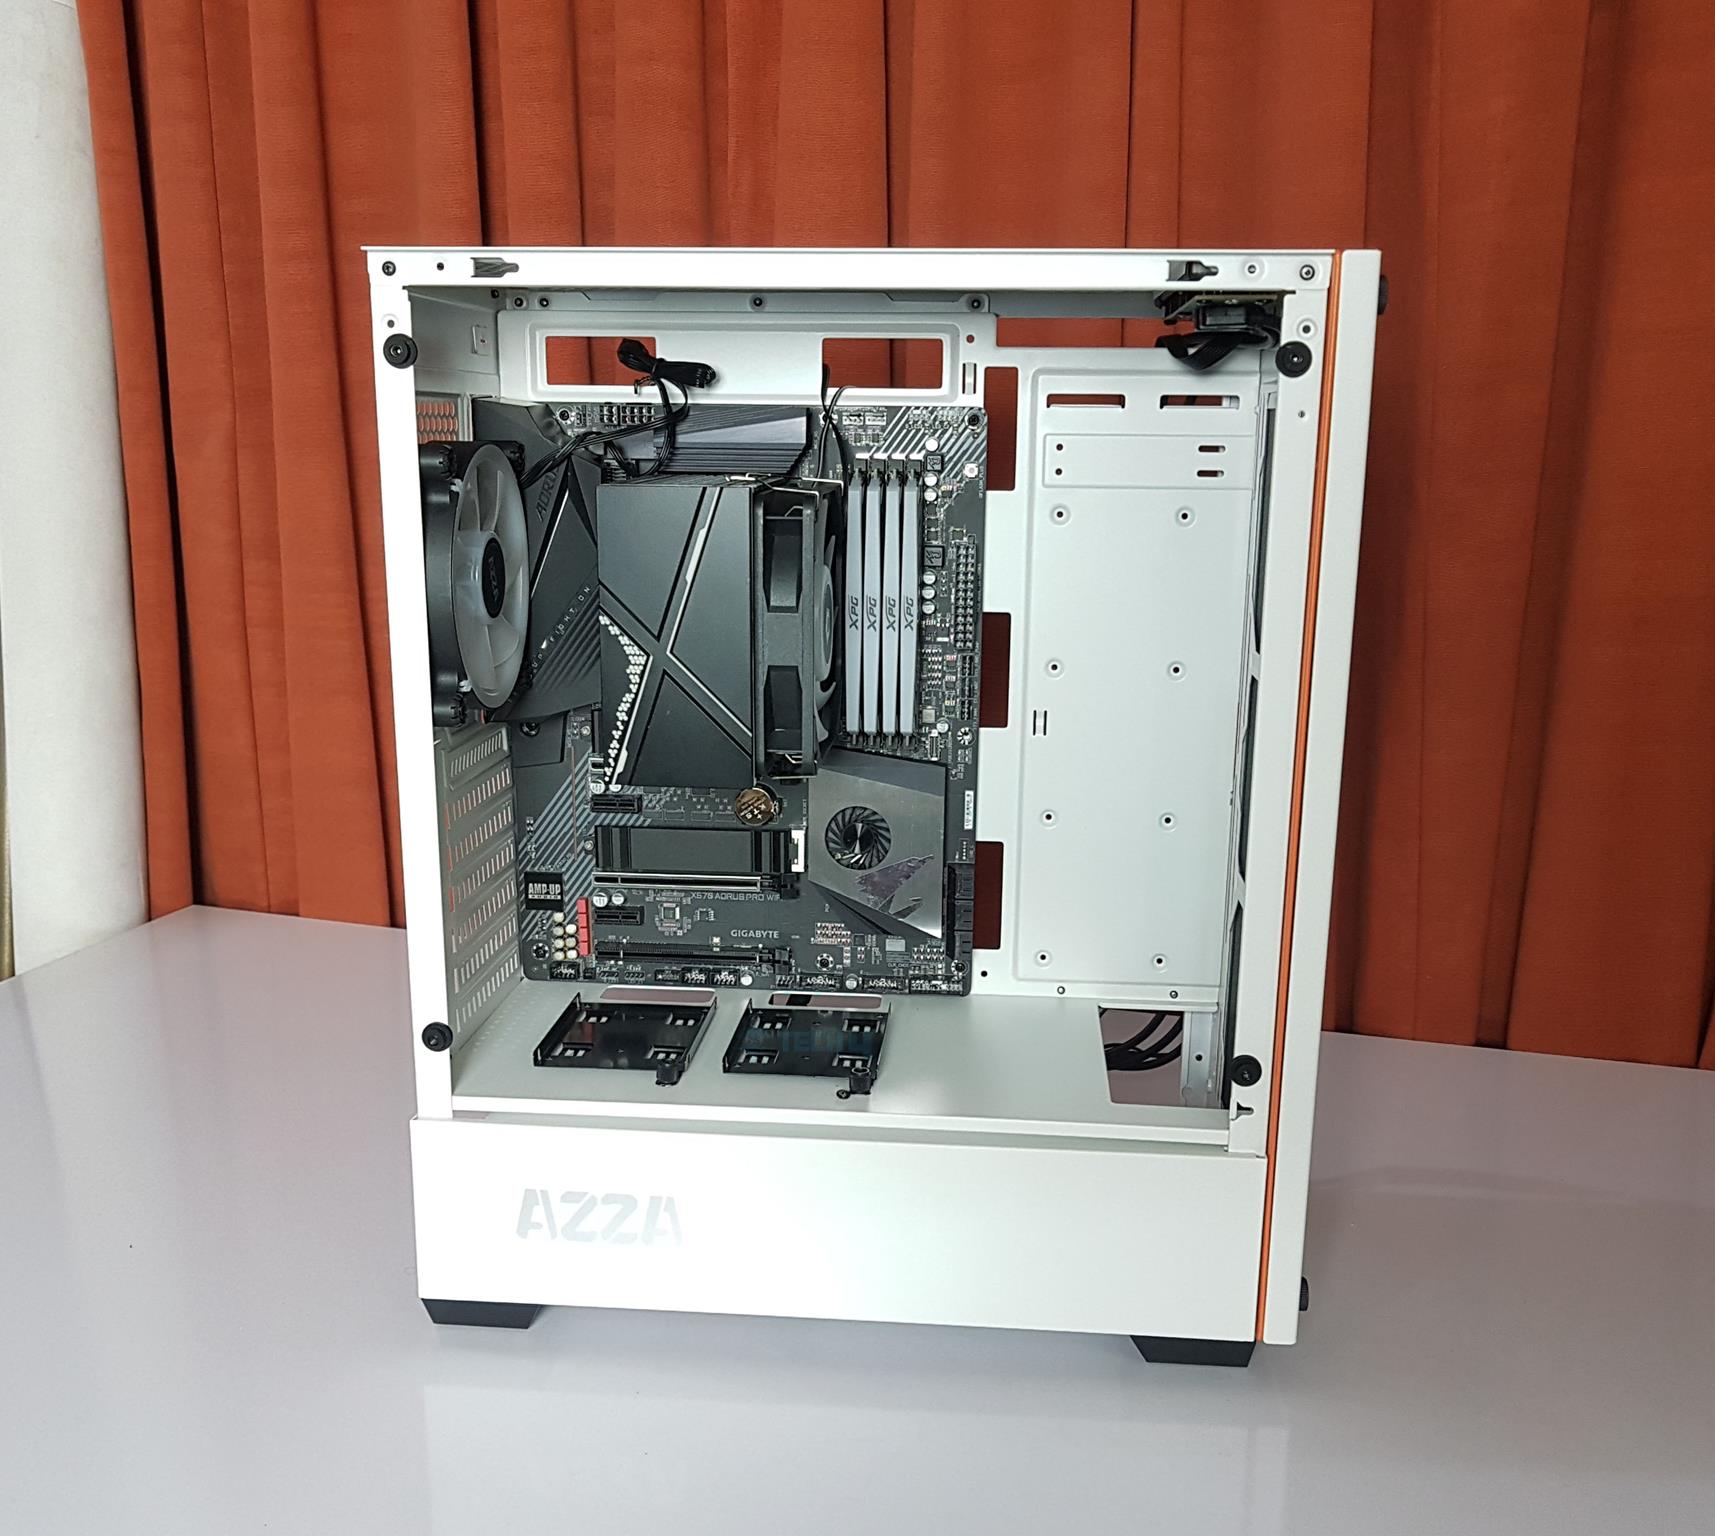
The chassis is well-planned from this side. We have a solid motherboard tray with no flex. There is a large cutout on the motherboard tray for ease of CPU cooler installation. There is a total of 7 cutouts on the tray for cable management. None of these have rubber grommets. 8x standoffs are pre-installed in standard ATX configuration. The chassis has a PSU shroud which runs to the entire length of the chassis.
There is a cutout on the left side of this shroud to show the PSU side. There is roughly a provision of 58mm from the top of the chassis to the top of the motherboard. Installing a 240mm AIO should face no issue. Regarding displacement from the AIO to the side of the chassis, we have roughly 28mm of space, leaving us with almost no incompatibility with any RAM height.
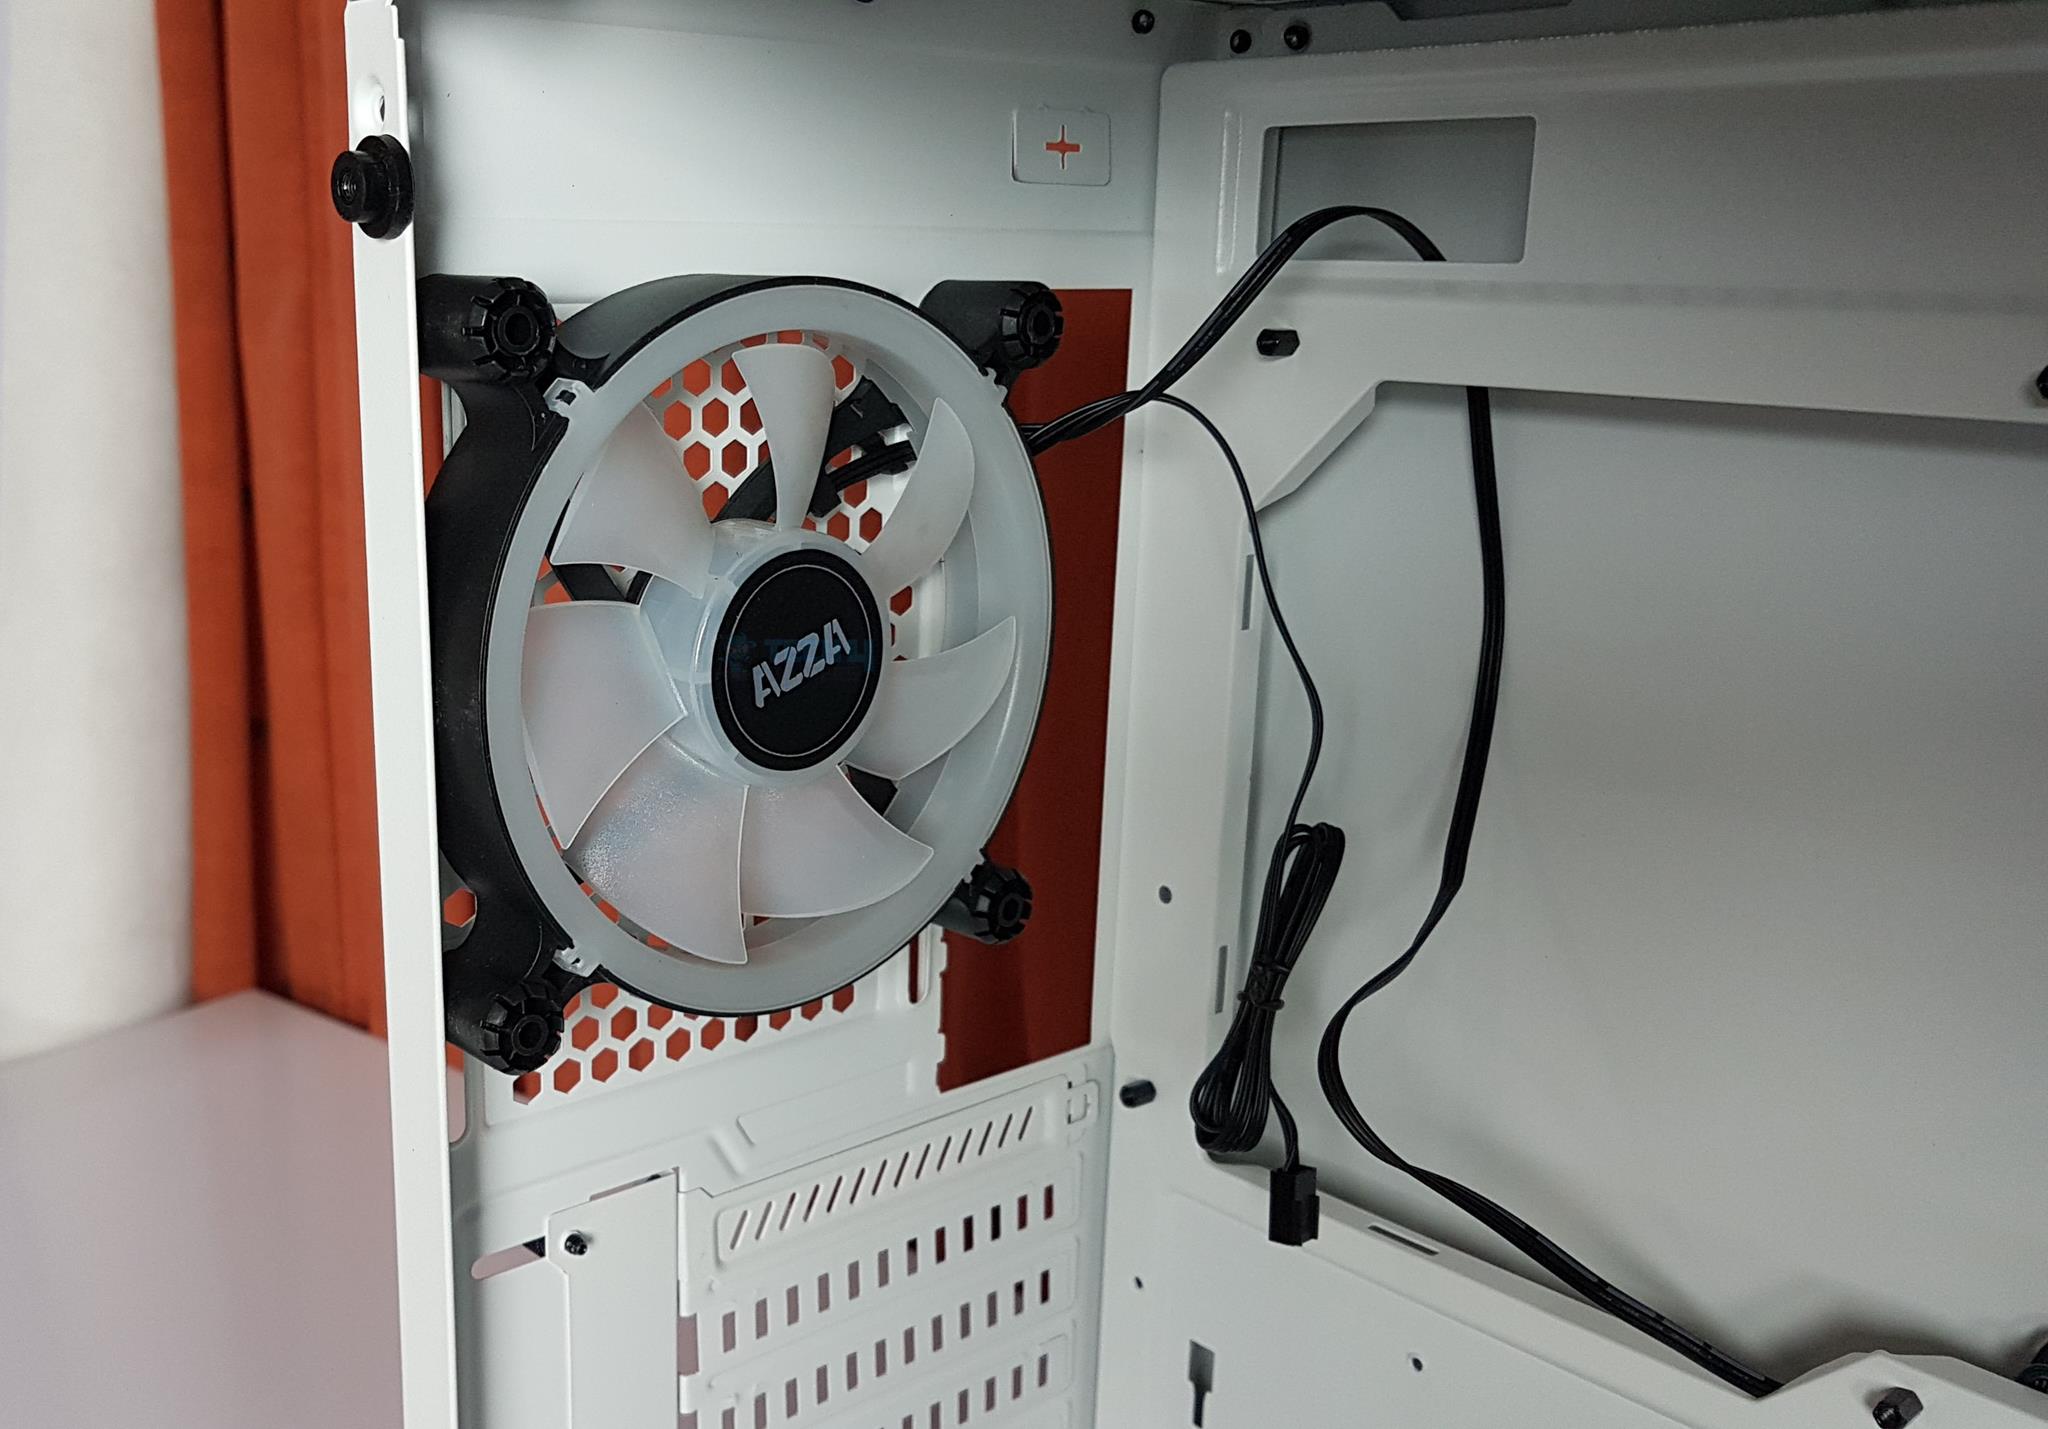
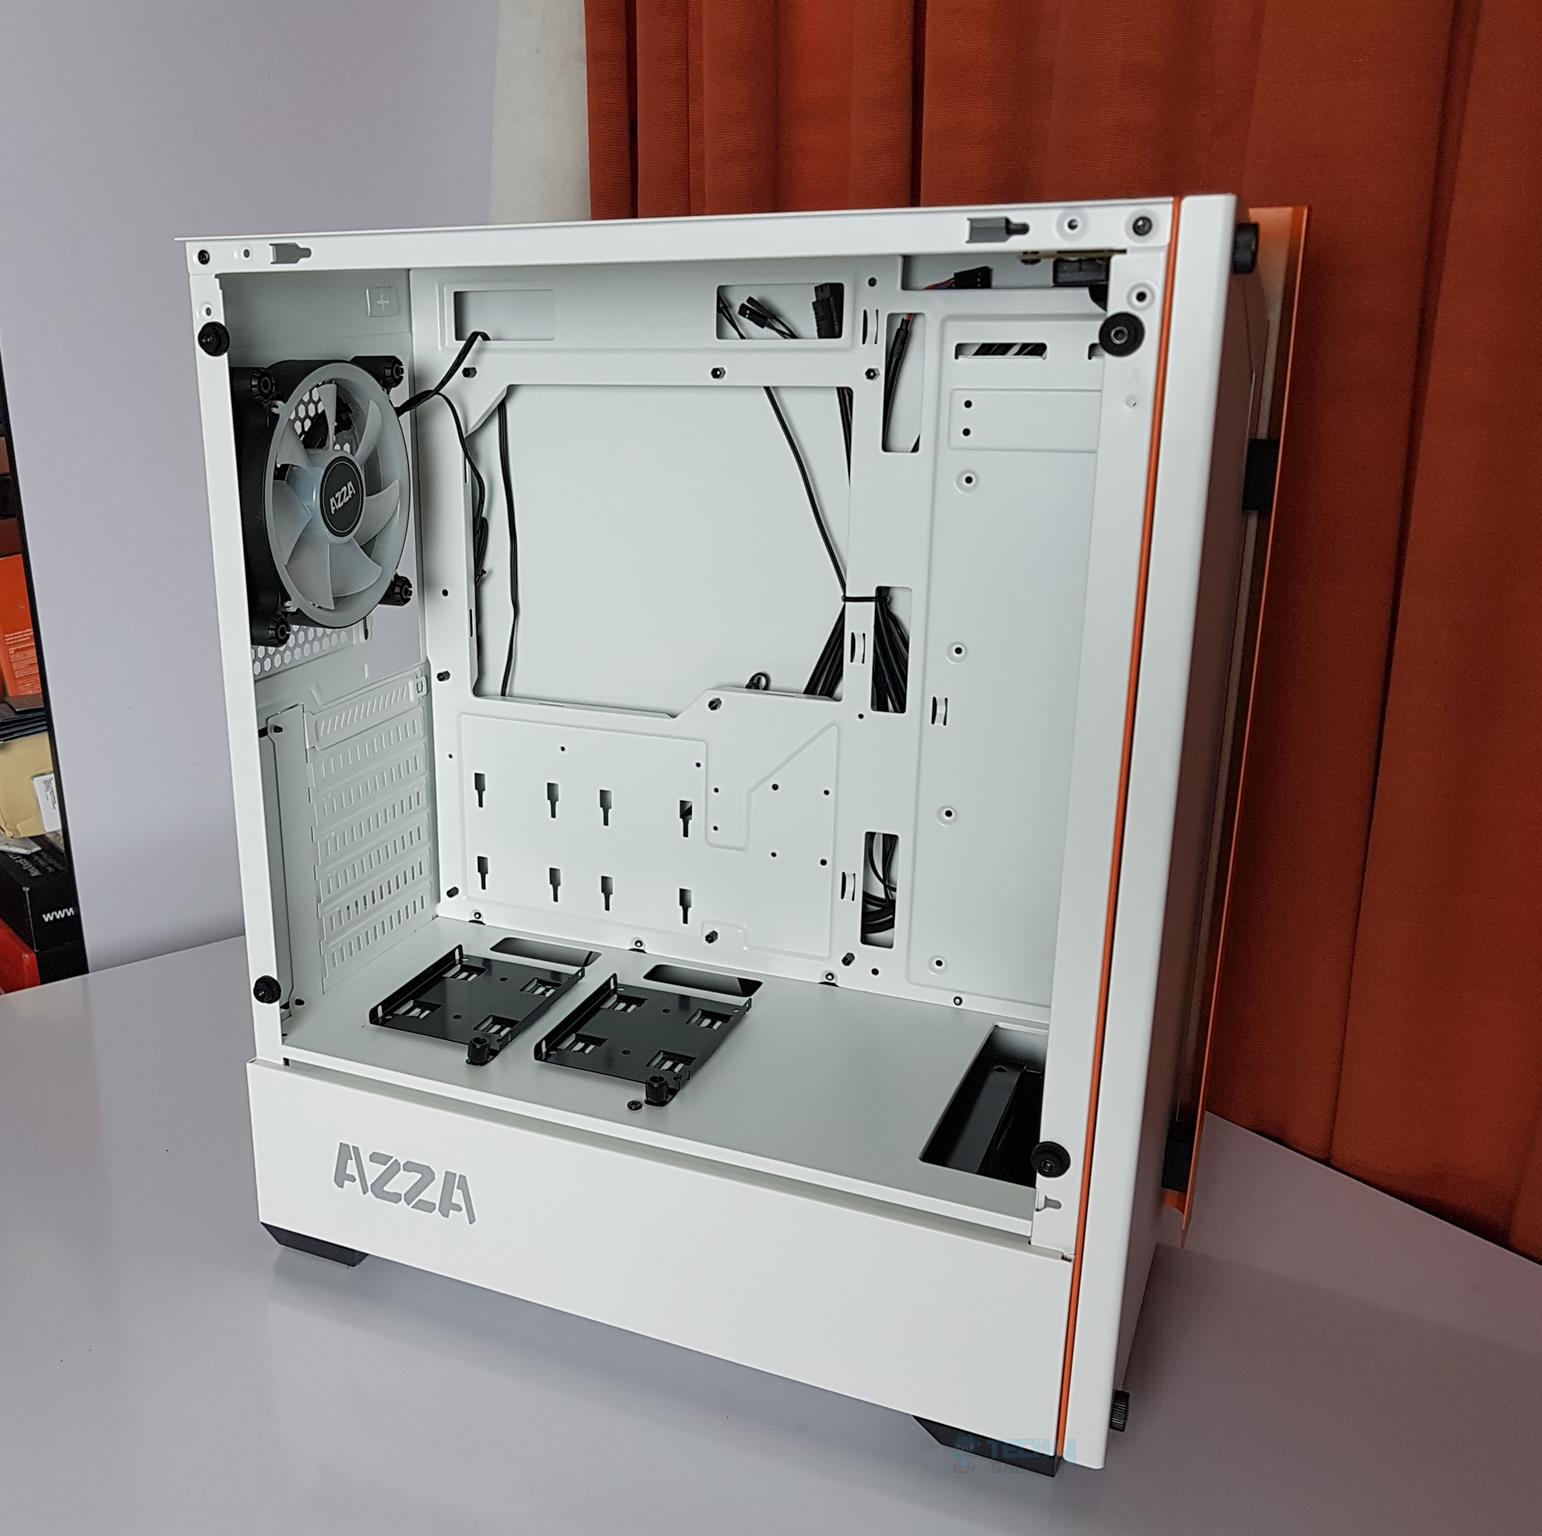
The chassis comes with a 1x pre-installed fan on the rear. This fan has digital RGB lighting. It has 7 translucent blades and a circular ring on the border for killer lights. The fan was reaching up to 1400 RPM when set at full speed. There are a total of two cables coming out of this fan.
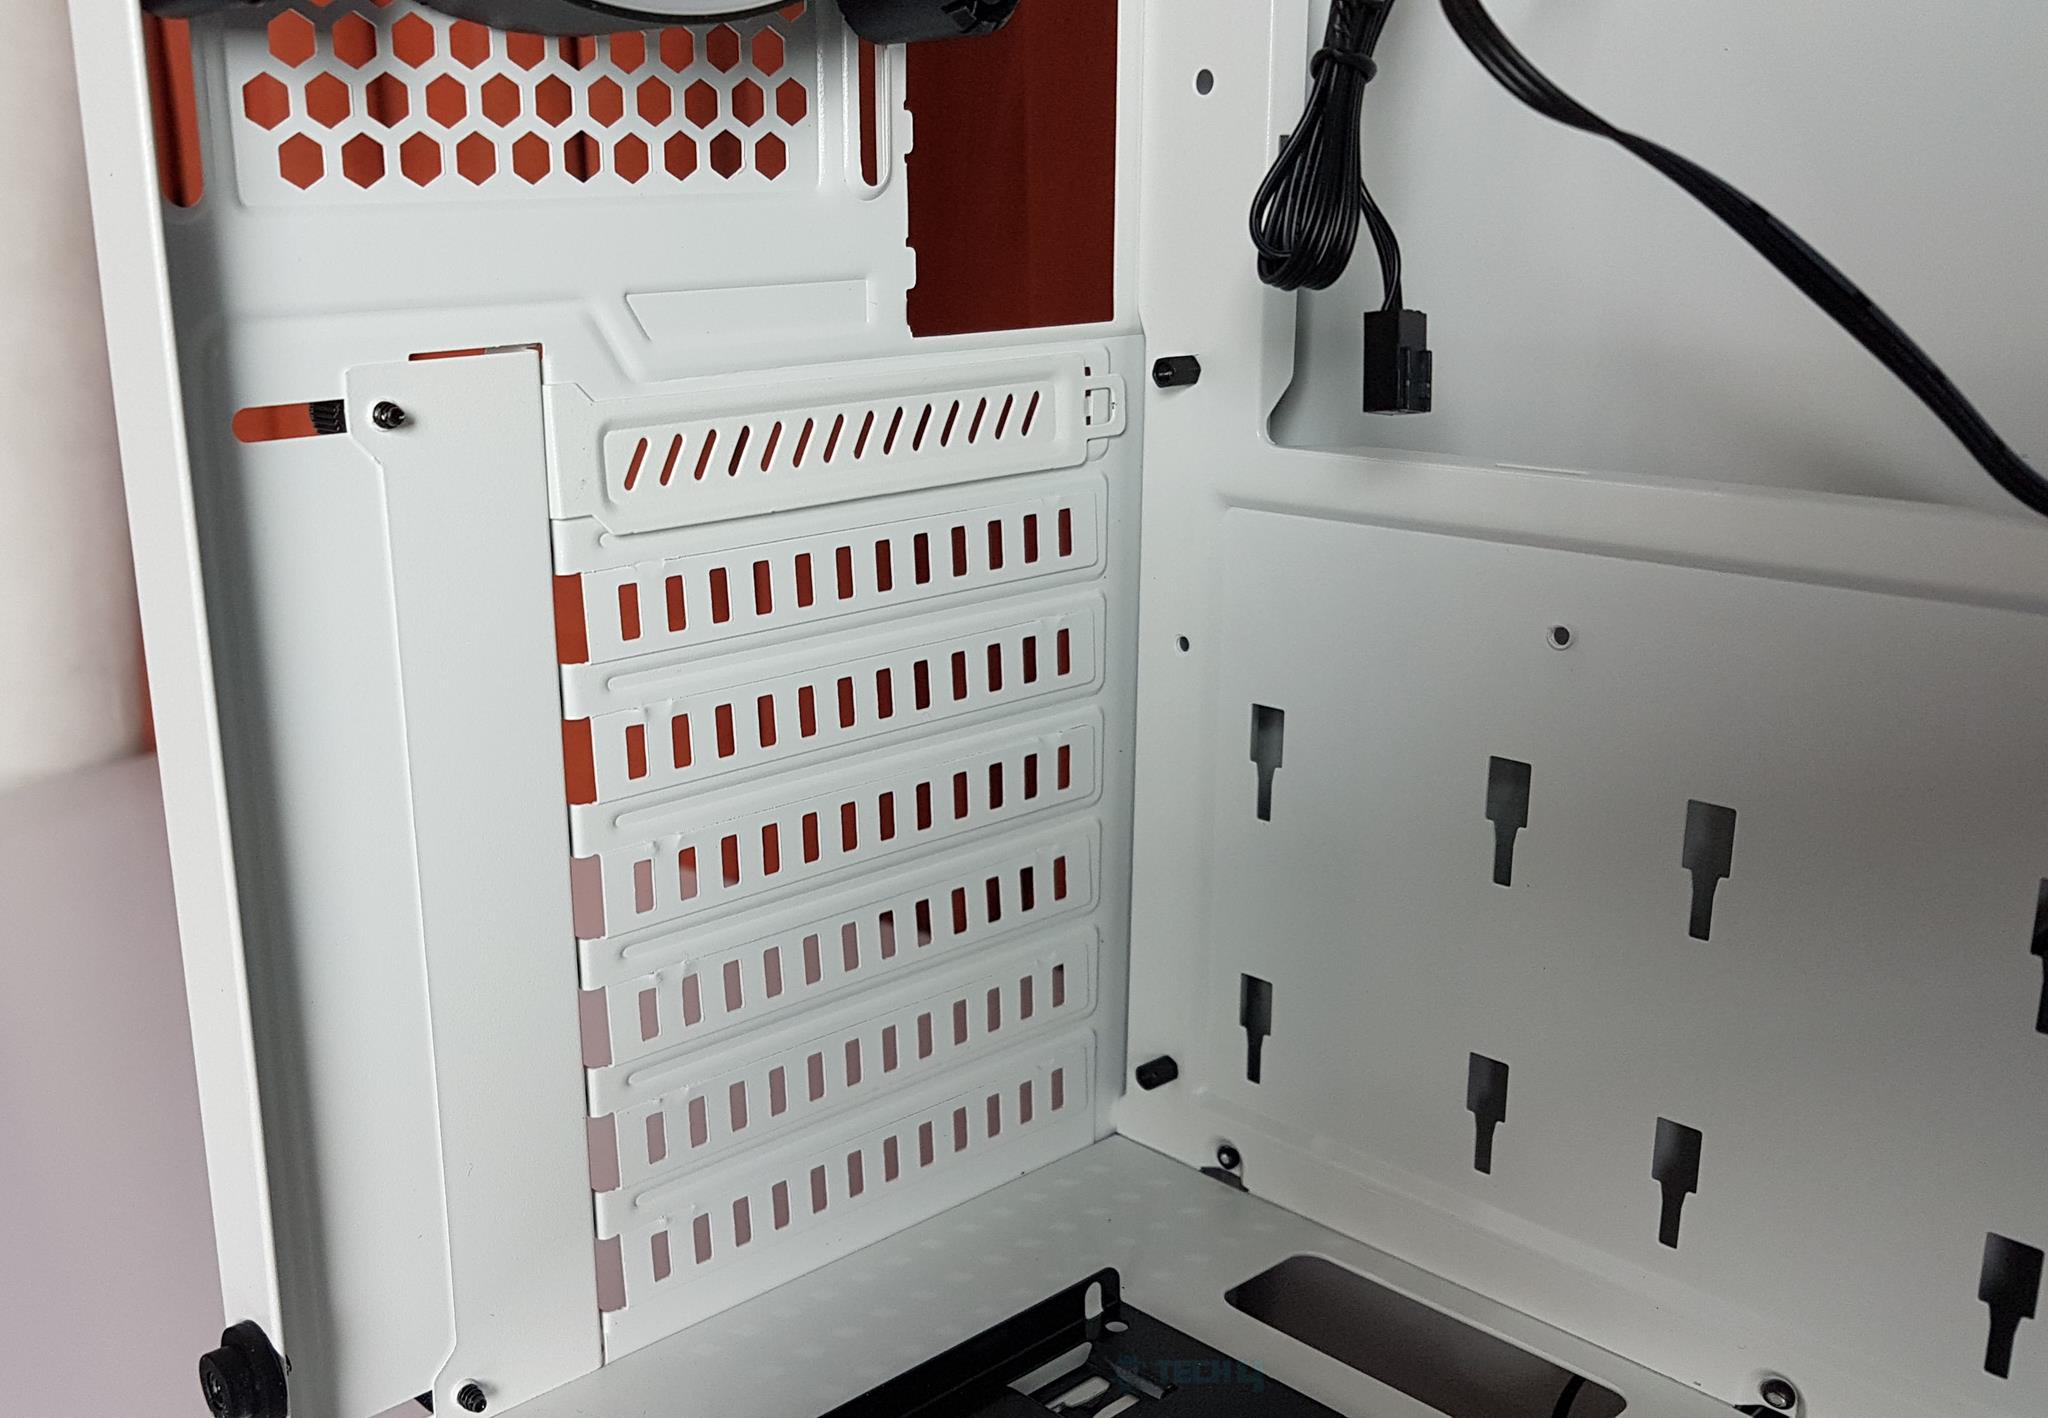
One is a 3-pin power cable, whereas the other is for the ARGB lighting and is already connected to the RGB hub. The cables are flat. Only the first PCIe slot cover is reusable. All others, once removed, can’t be reused. I expected more from AZZA, as all should have been made reusable.

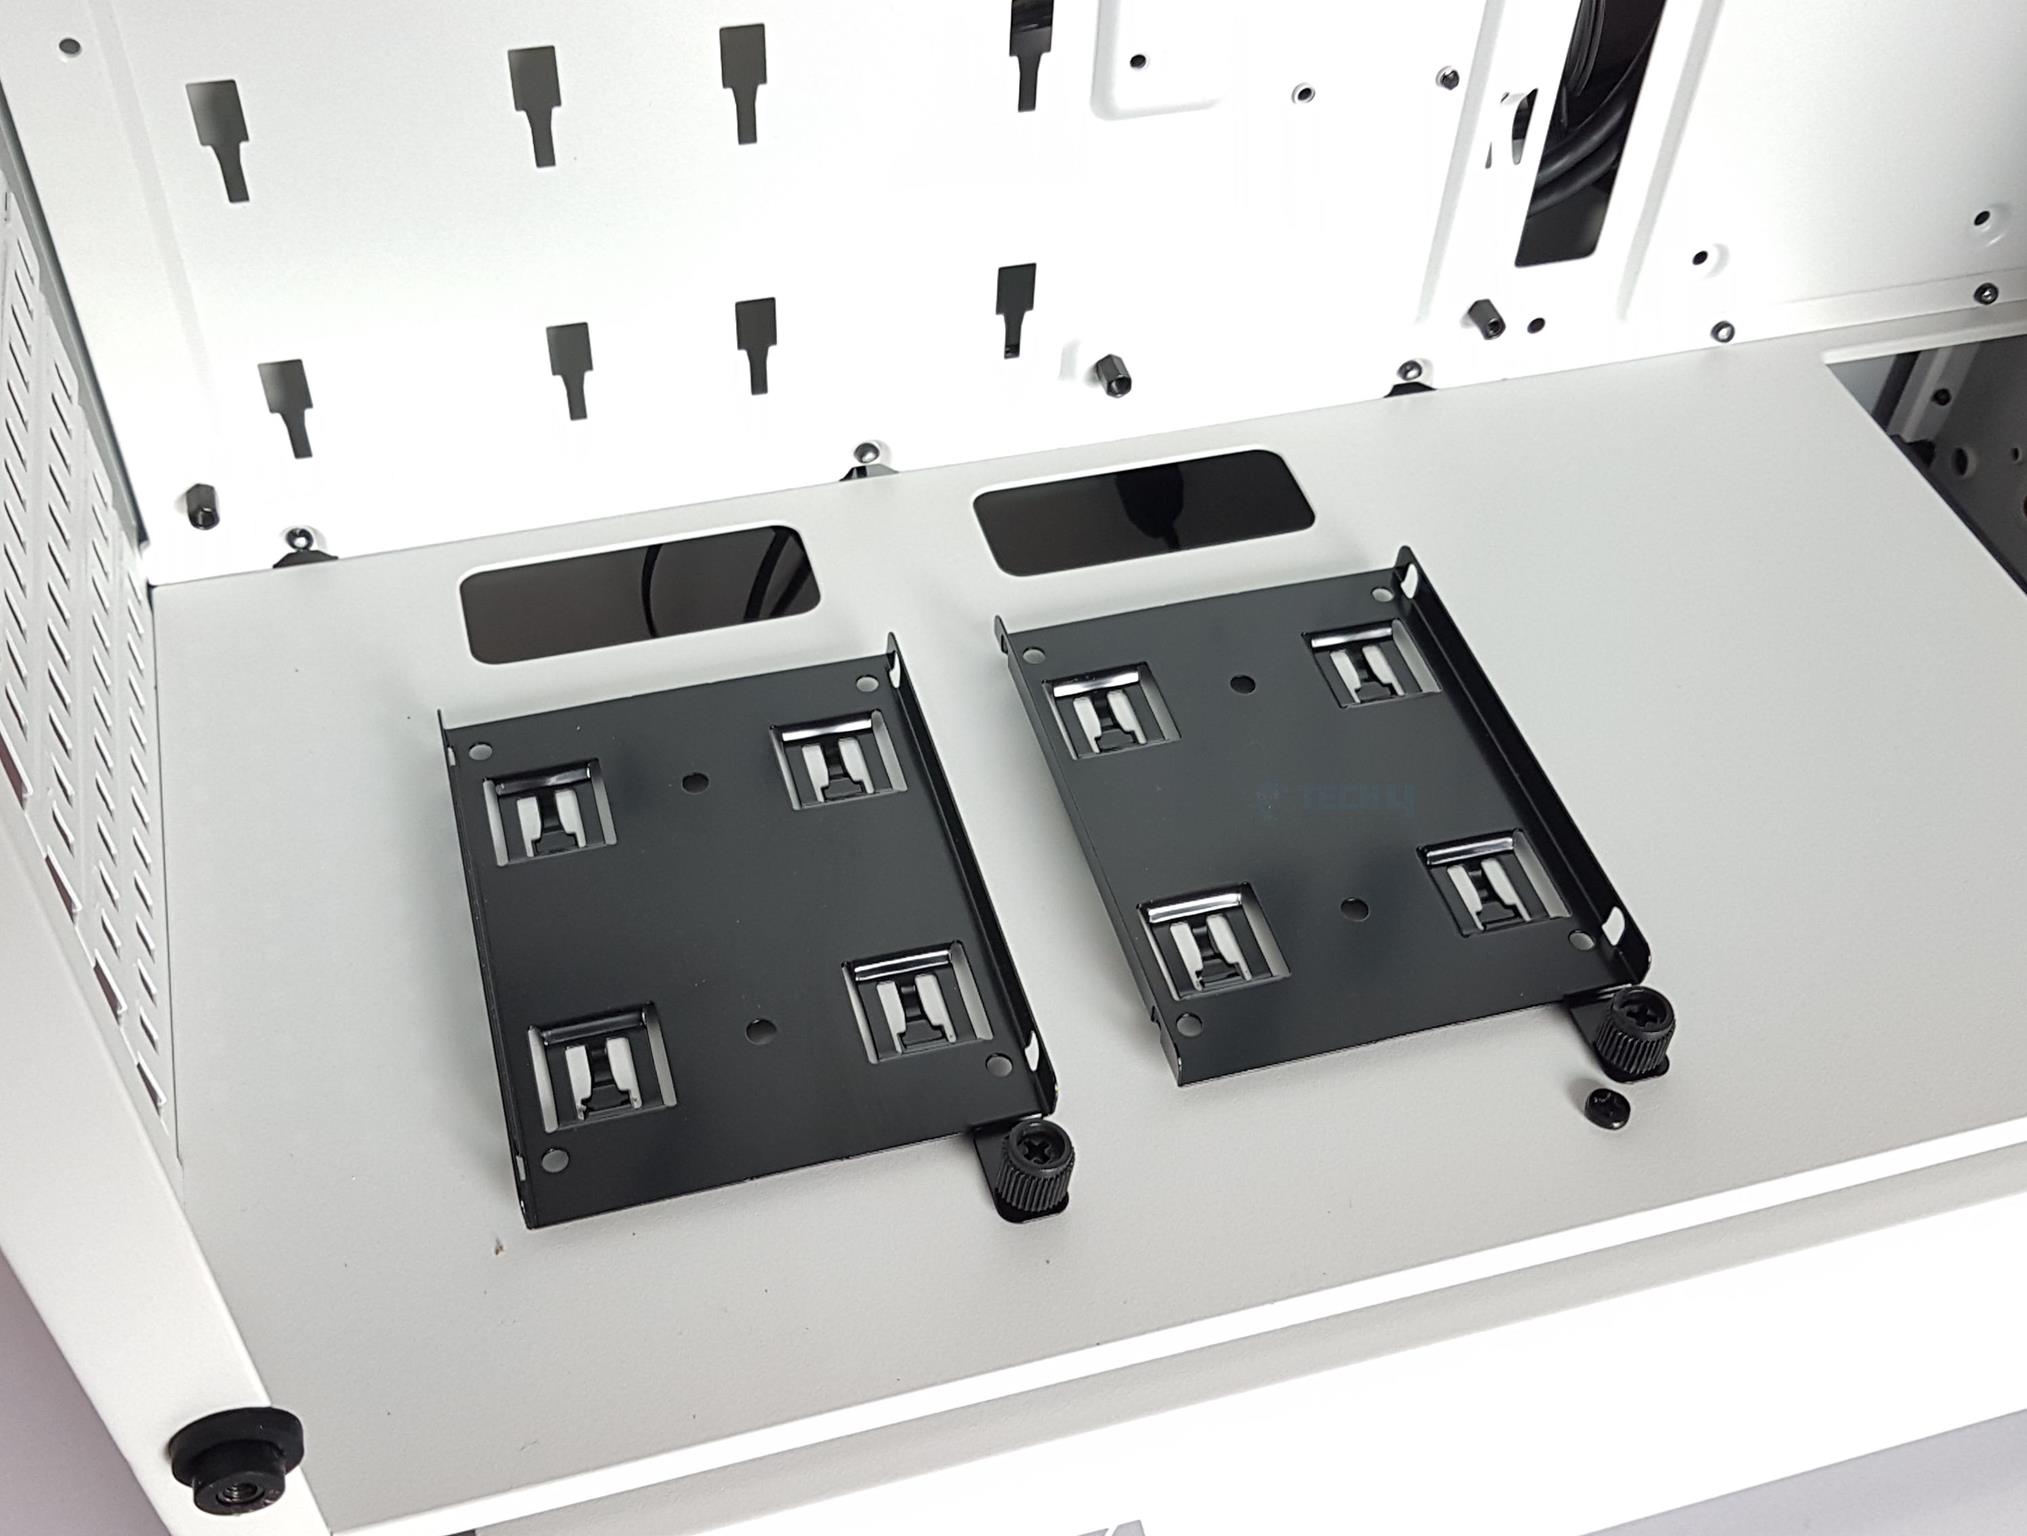
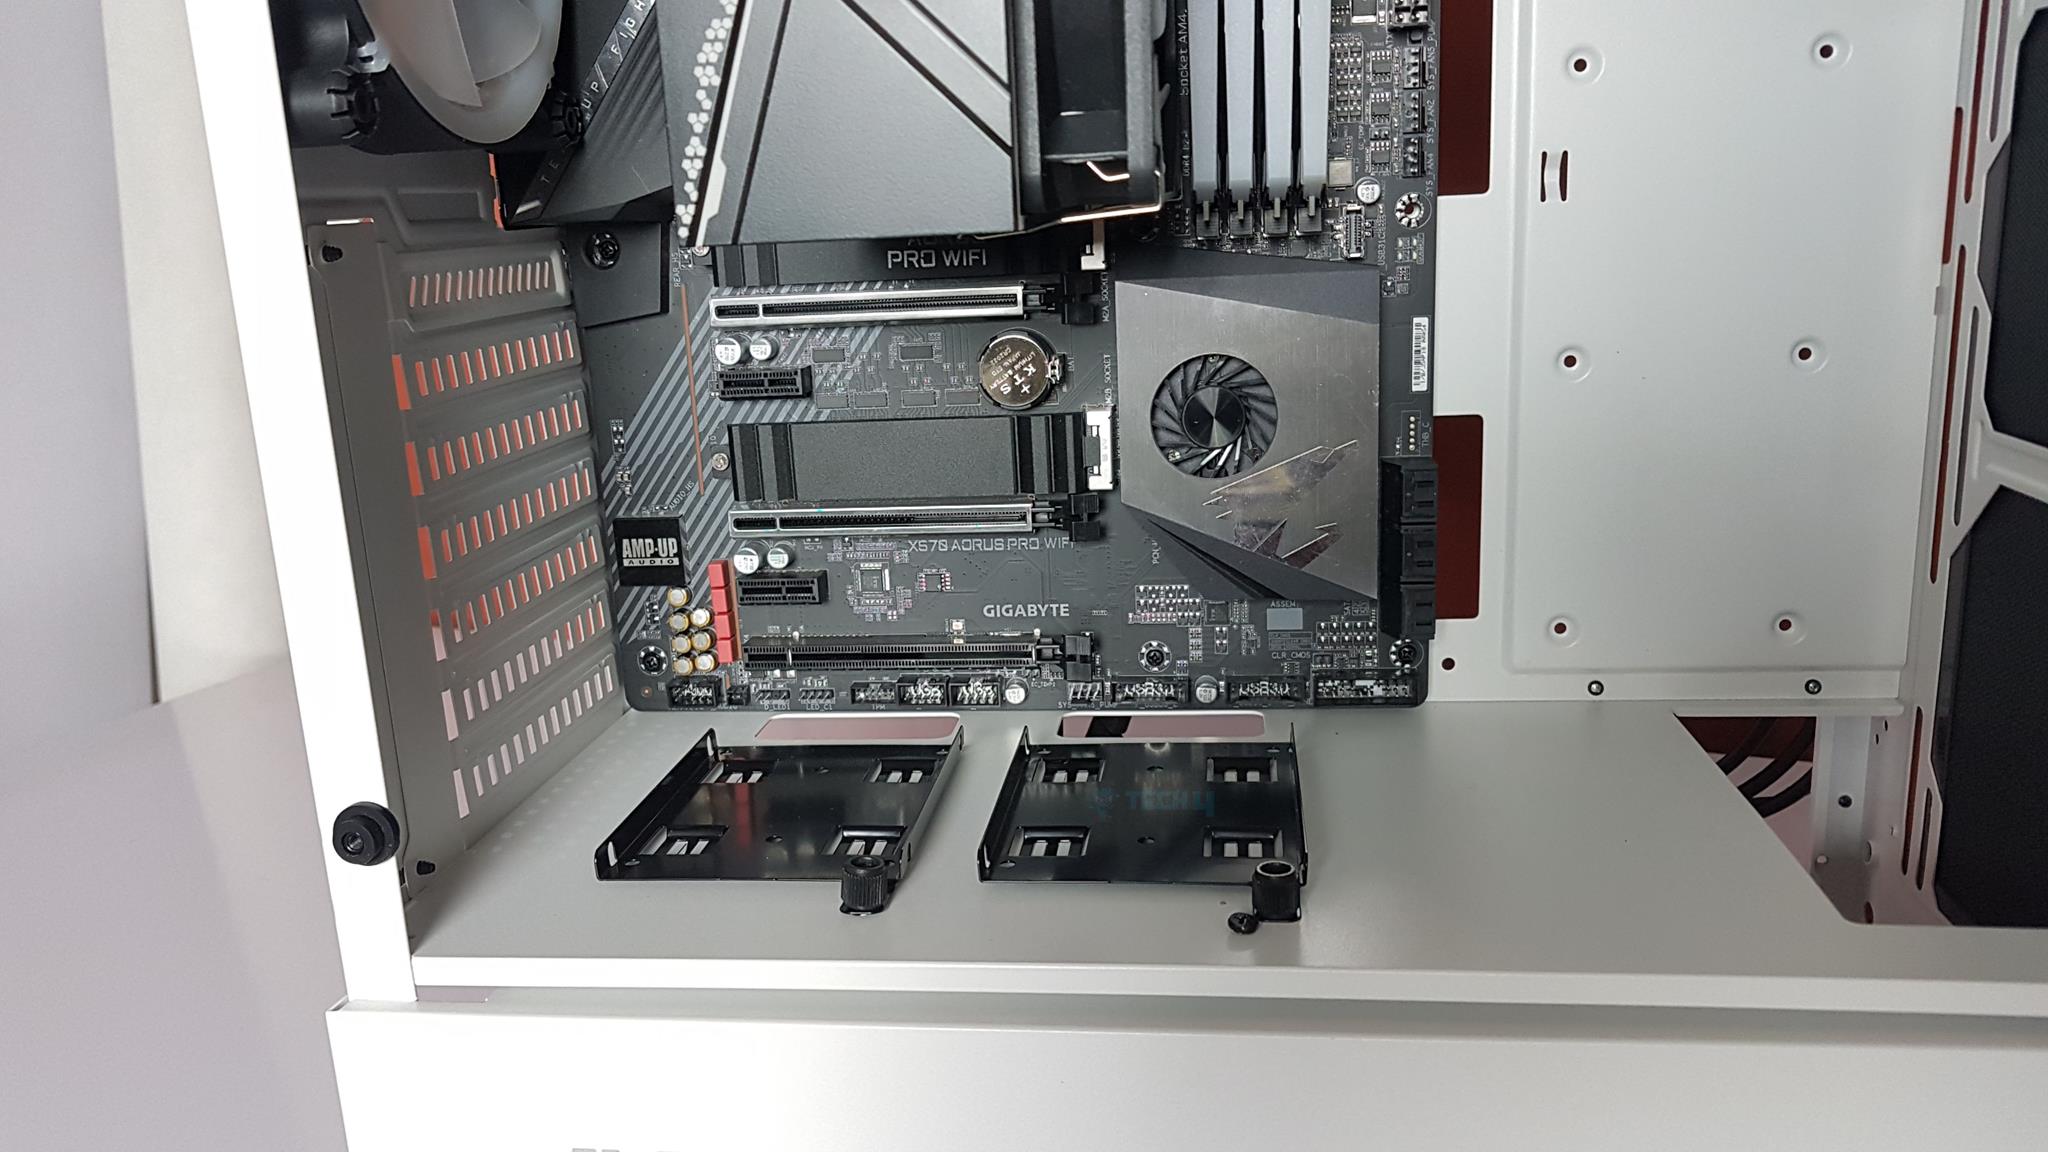
The above picture shows the side cover and the first PCIe slot cover removed. There is no vented portion on the PSU shroud. There are 2x 2.5” SSD brackets preinstalled there. These are removable and can be used on 4 other possible 2.5” mounts. There are 6x 2.5” storage mounts, but only two brackets are provided. The brackets are on the black cover.
A maximum 21mm thickness radiator can be installed given that 25mm thick fans are installed on it. More room can be made by removing the HDD cage. The bottom chamber of the chassis has a cover on the front side. This cover is removable as it is secured using two screws on the rear side of the chassis.
Two 2.5” brackets can be installed on the motherboard tray’s backside. We can spot a black color RGB lighting hub. Cable management space ranges from 20mm to 28mm, depending on the area.
There are two cutouts on the shroud opposite the brackets. They route the cables for the connectivity on the motherboard’s bottom area and the SSDs on the brackets.
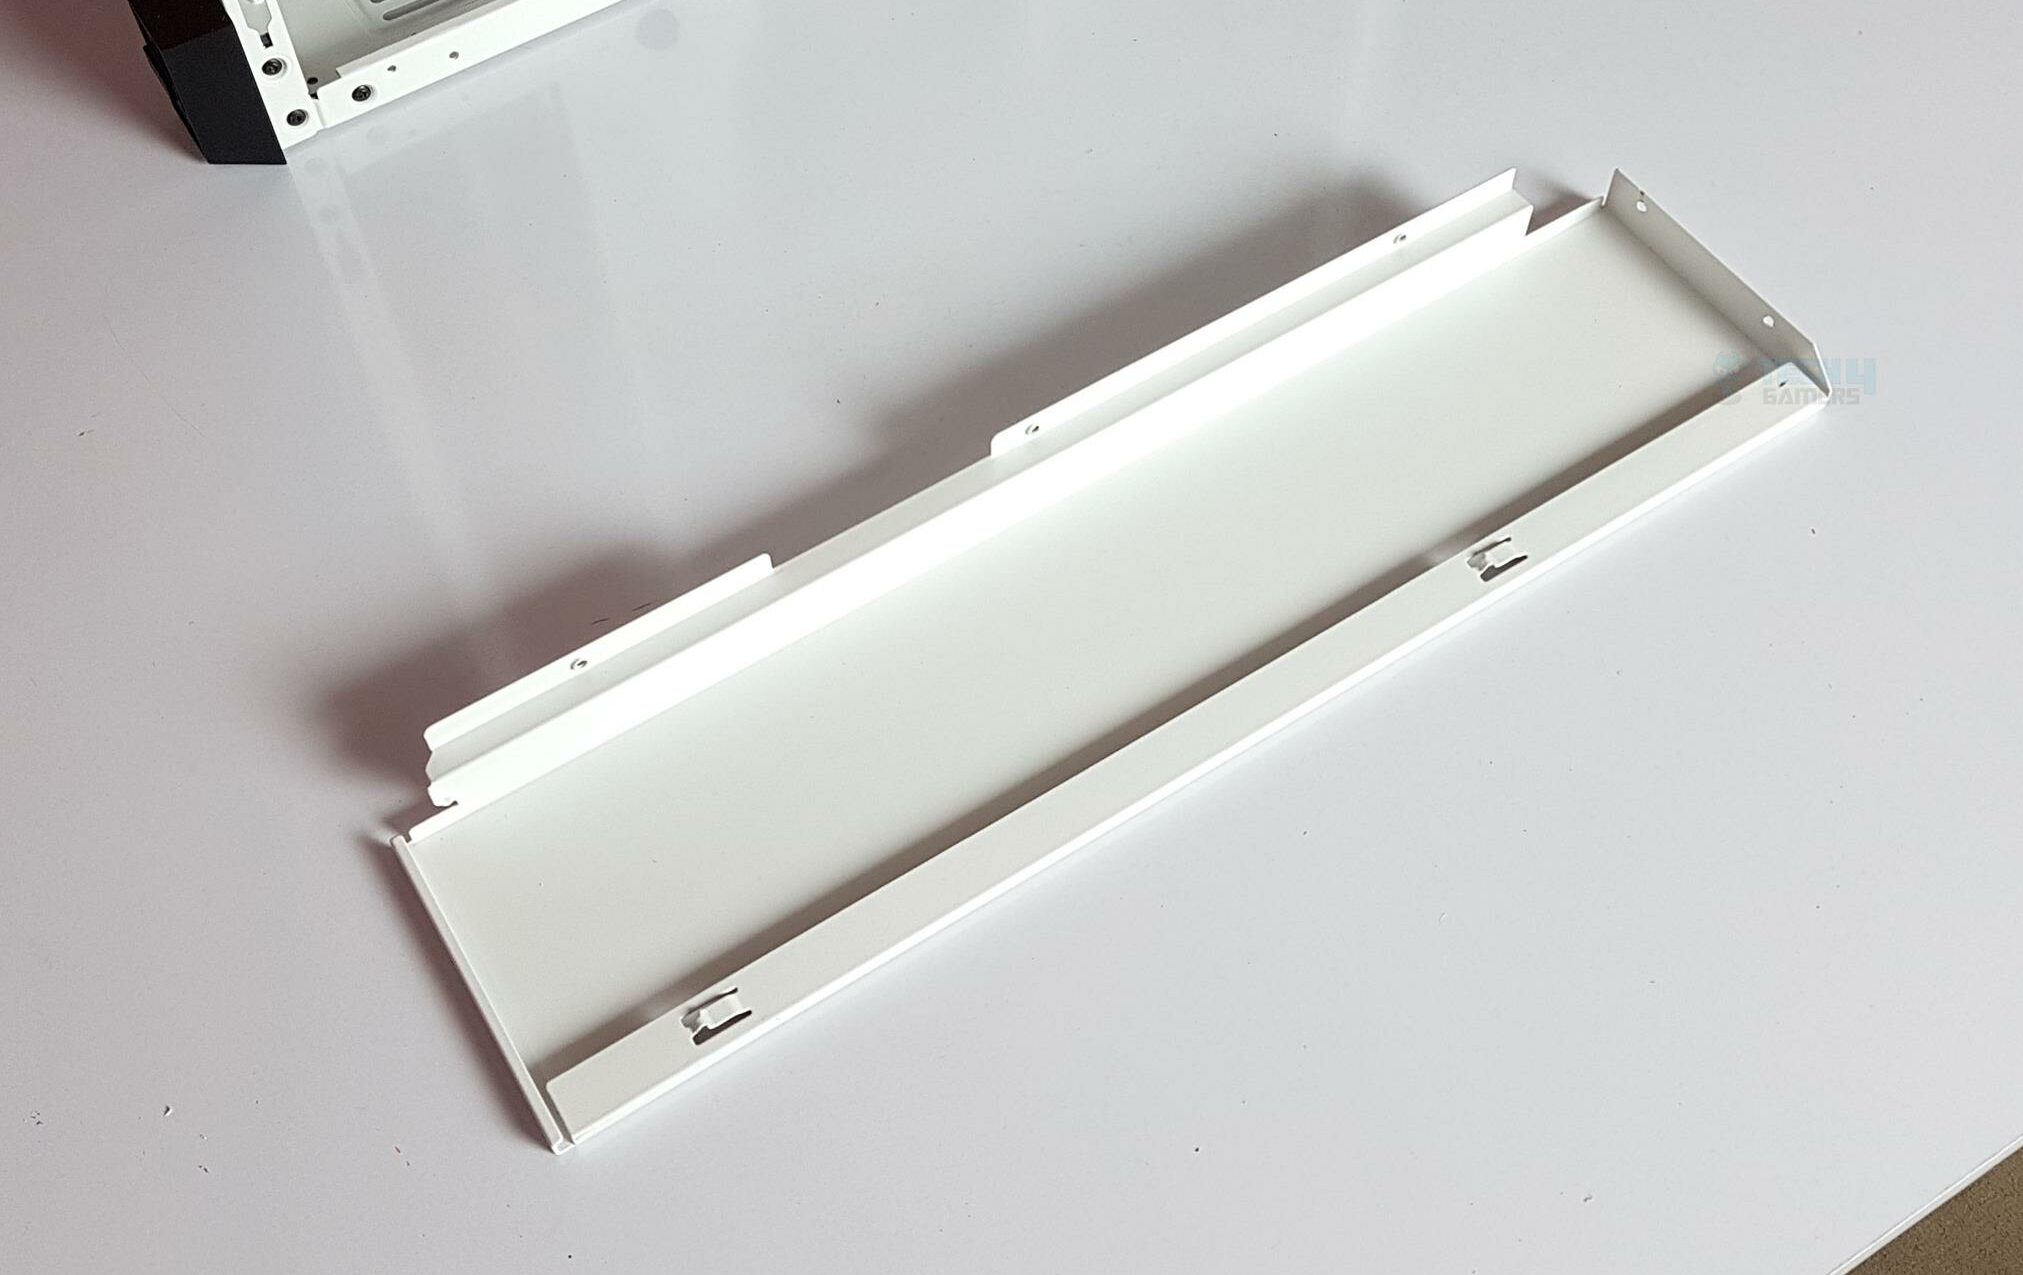
In the above picture, we can see the inner side of the front-mounted rail. The fans or the radiator can only be installed on the chassis’s inner side (on the rail’s backside). The area next to the rail has a solid cover without cutouts or other provisions. The SSD brackets can be installed on the backside of this cover.
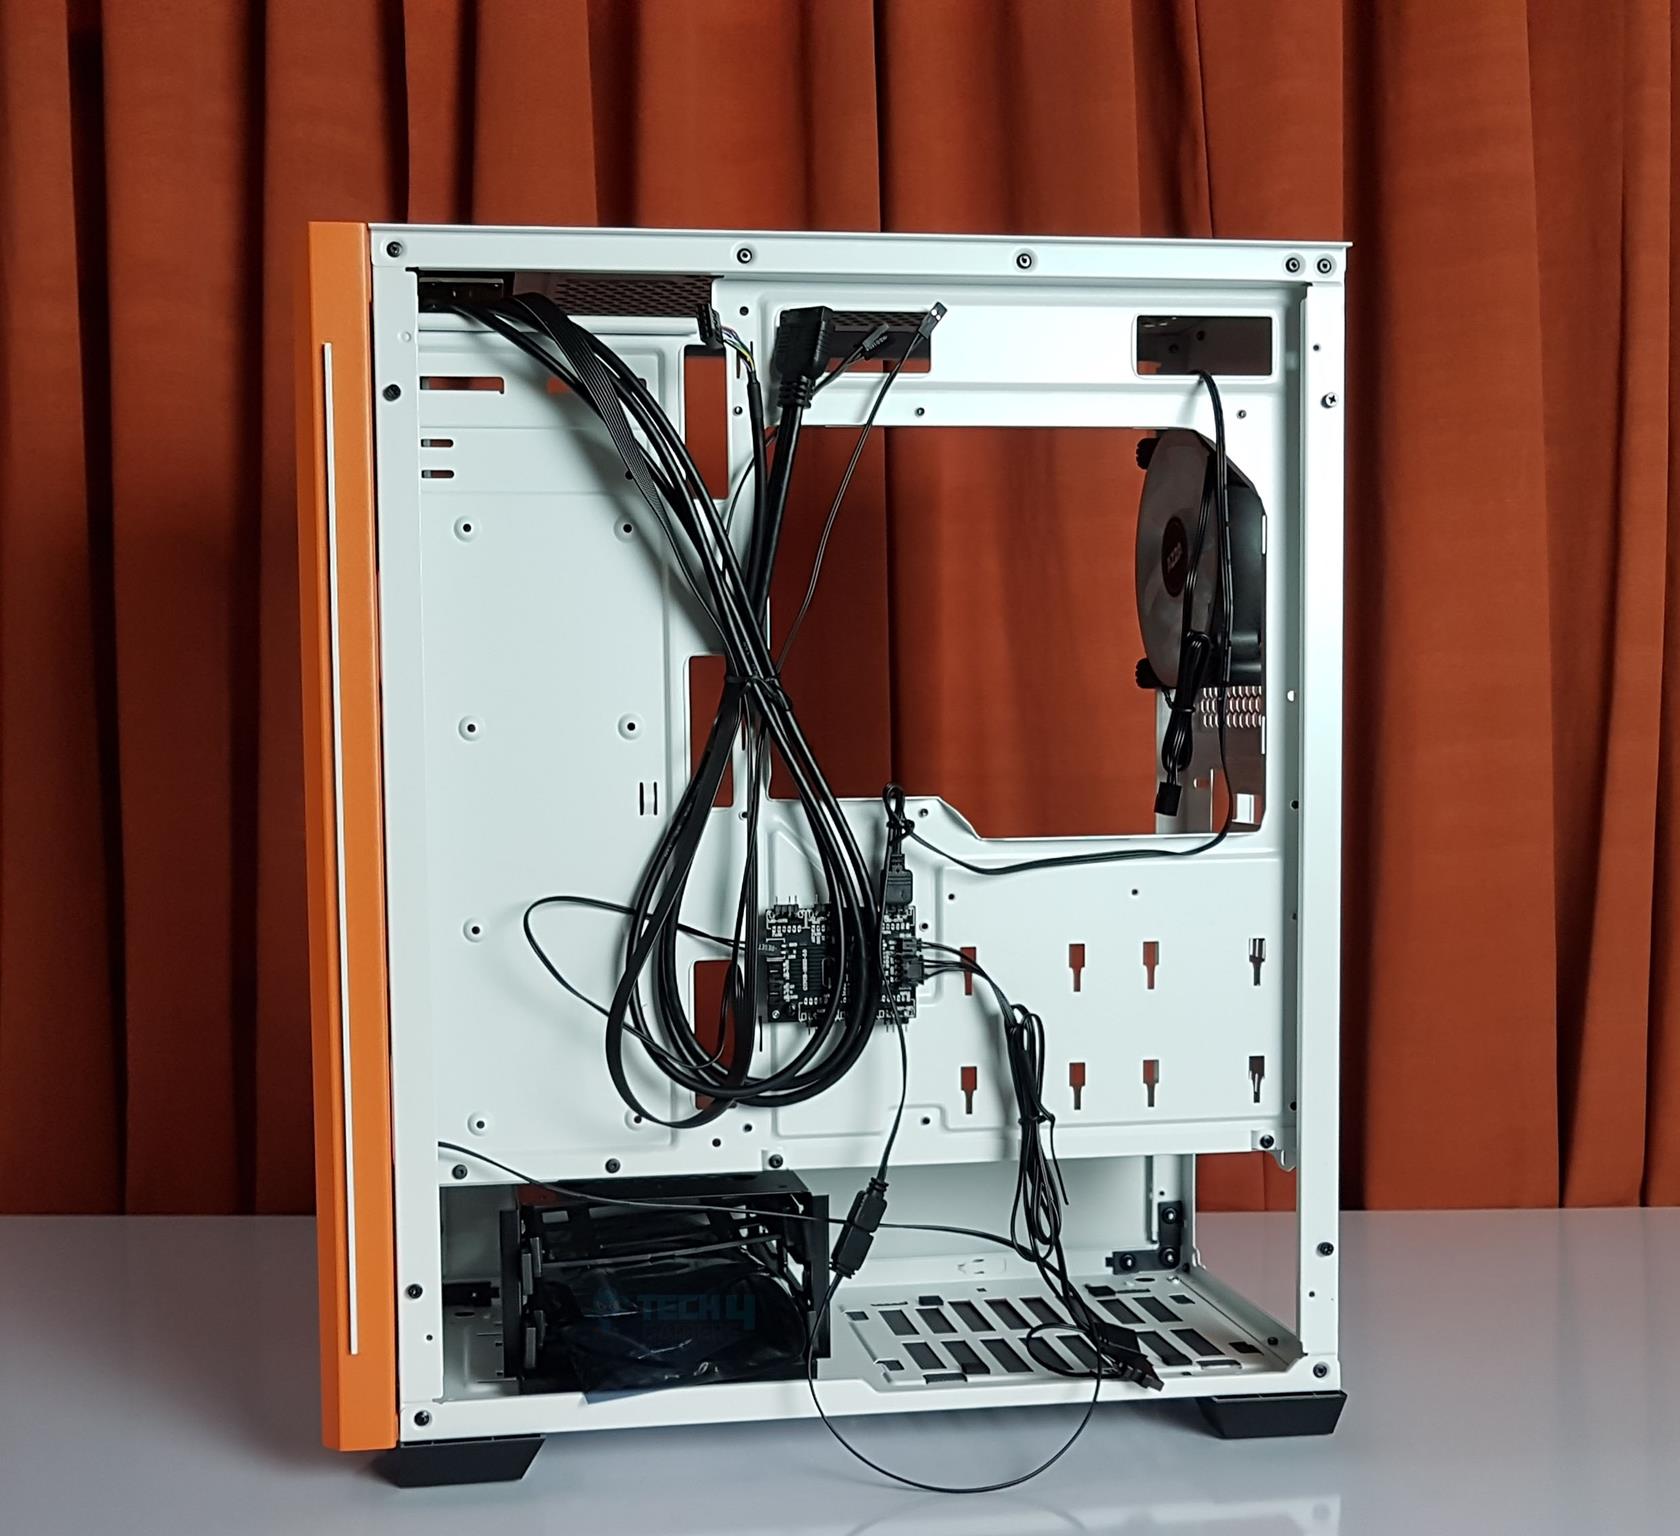
The above picture shows this cover removed with the inner side shown. Let’s look at the chassis from the backside with the panel removed. Cables everywhere! Pun intended. This is a dual-chamber design. There are only 4x cable tie points, which is strange! I was expecting more, particularly on the right side of the tray’s backside.
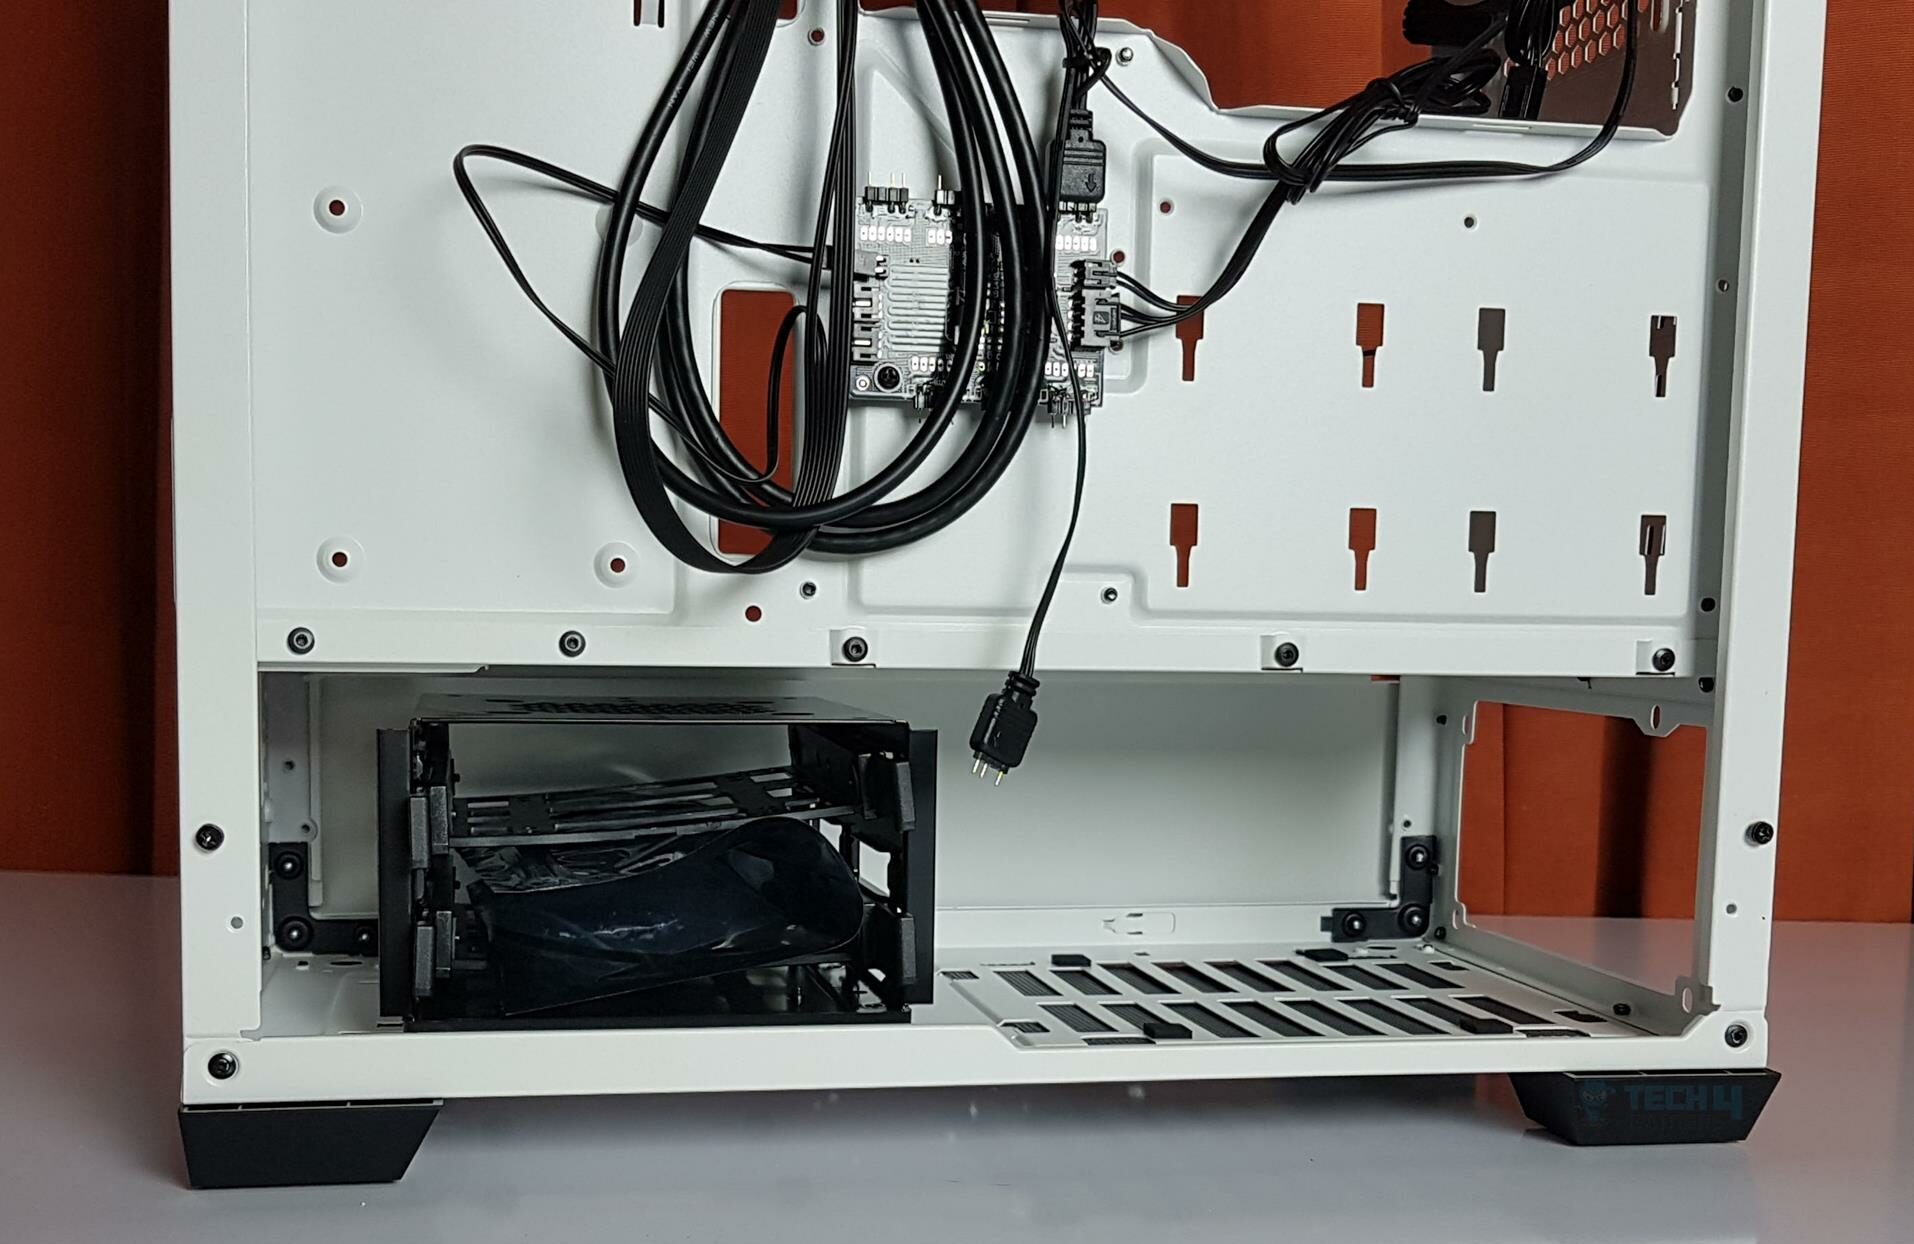
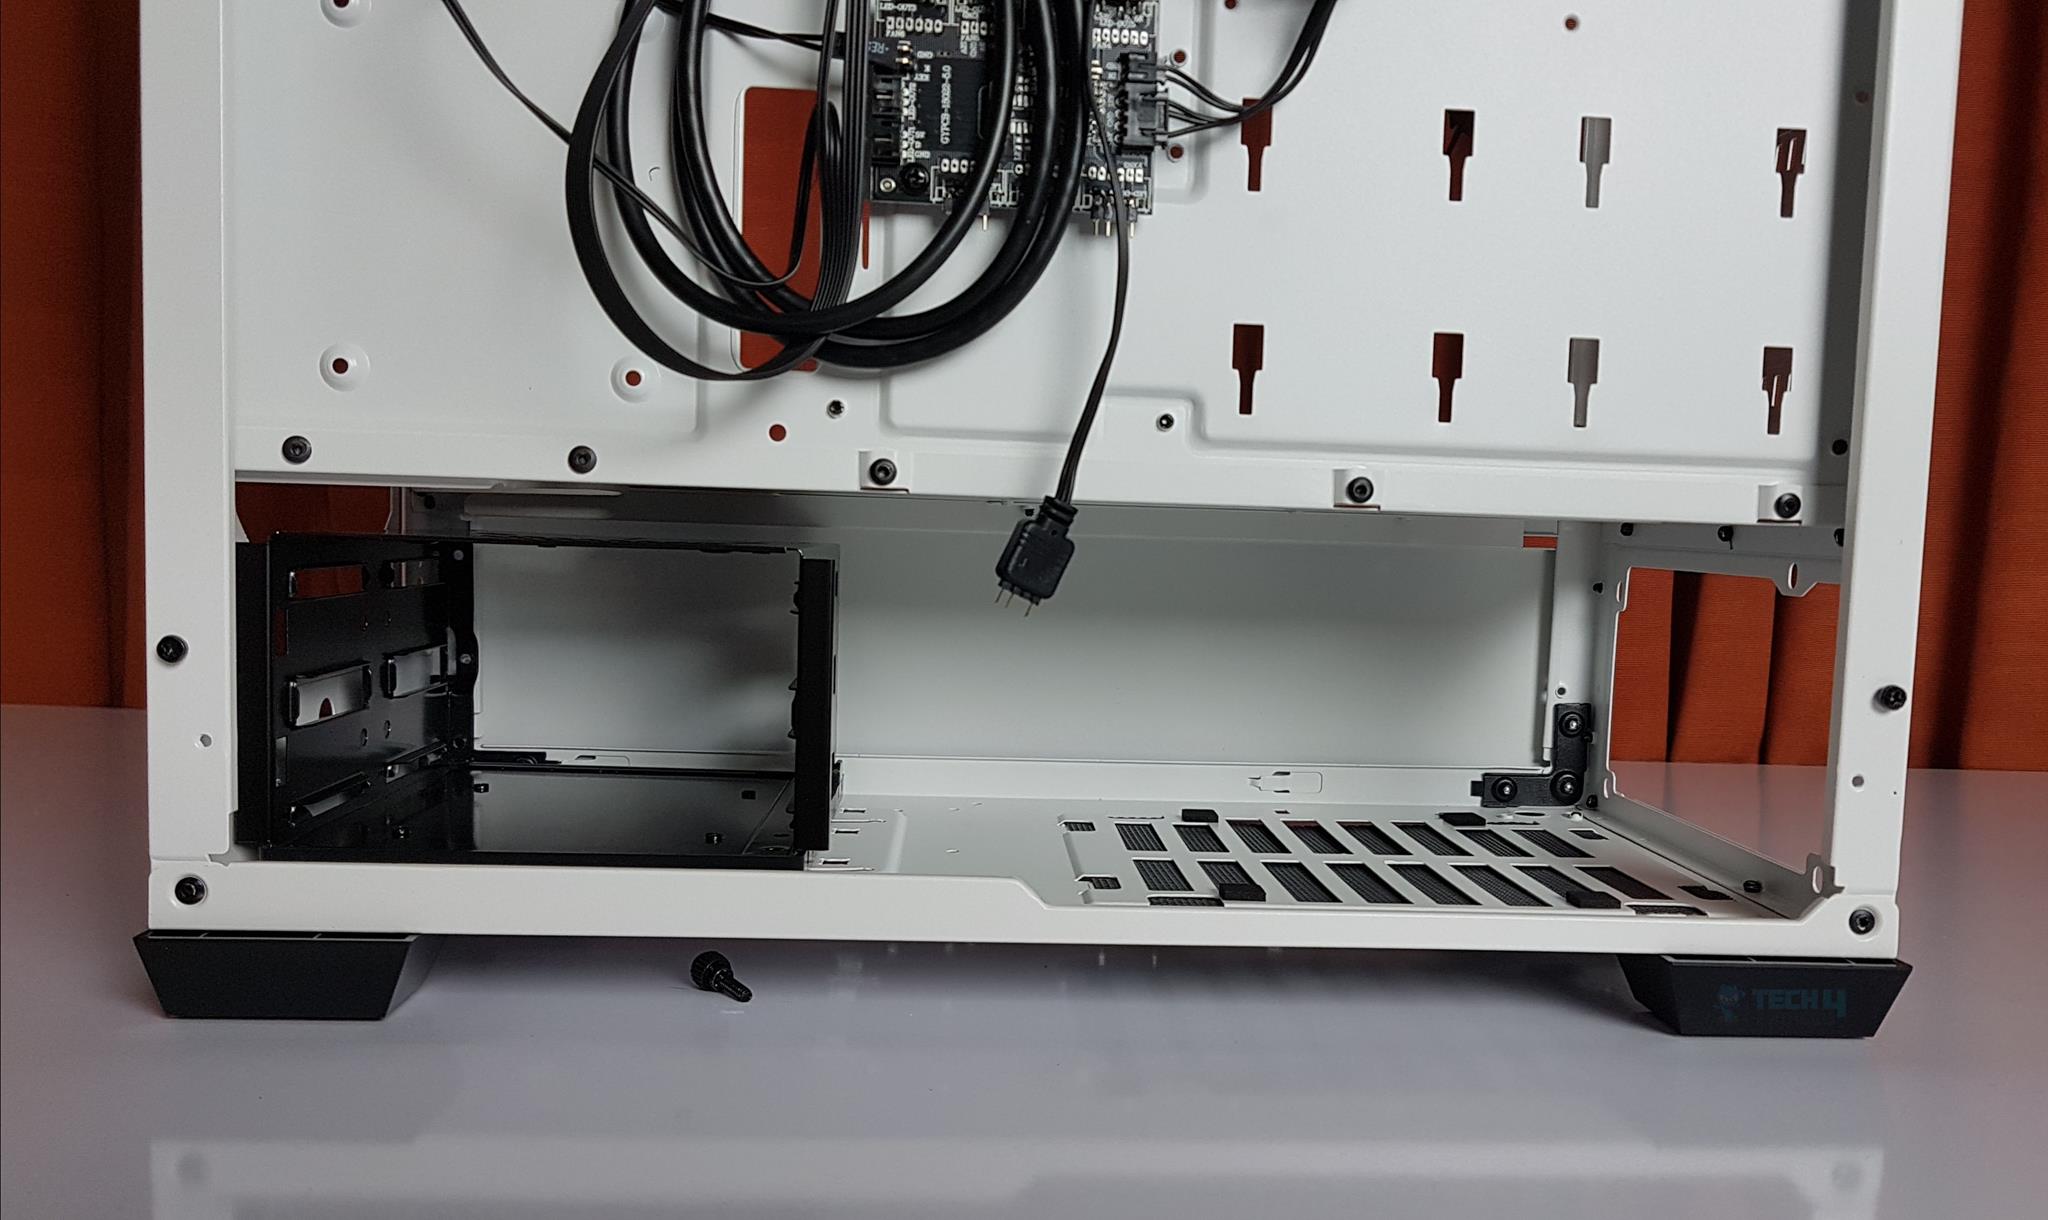
The bottom chamber houses an HDD cage on the left side, whereas there is a provision for the PSU housing on the right side. The drive cage is tool-less and is secured using 4x thumb screws which are on the bottom of the chassis. A PSU of approximately 206mm in length with cables is there.
If you move the HDD cage to the leftmost corner, more space for PSU and cables can be made, roughly 250mm.
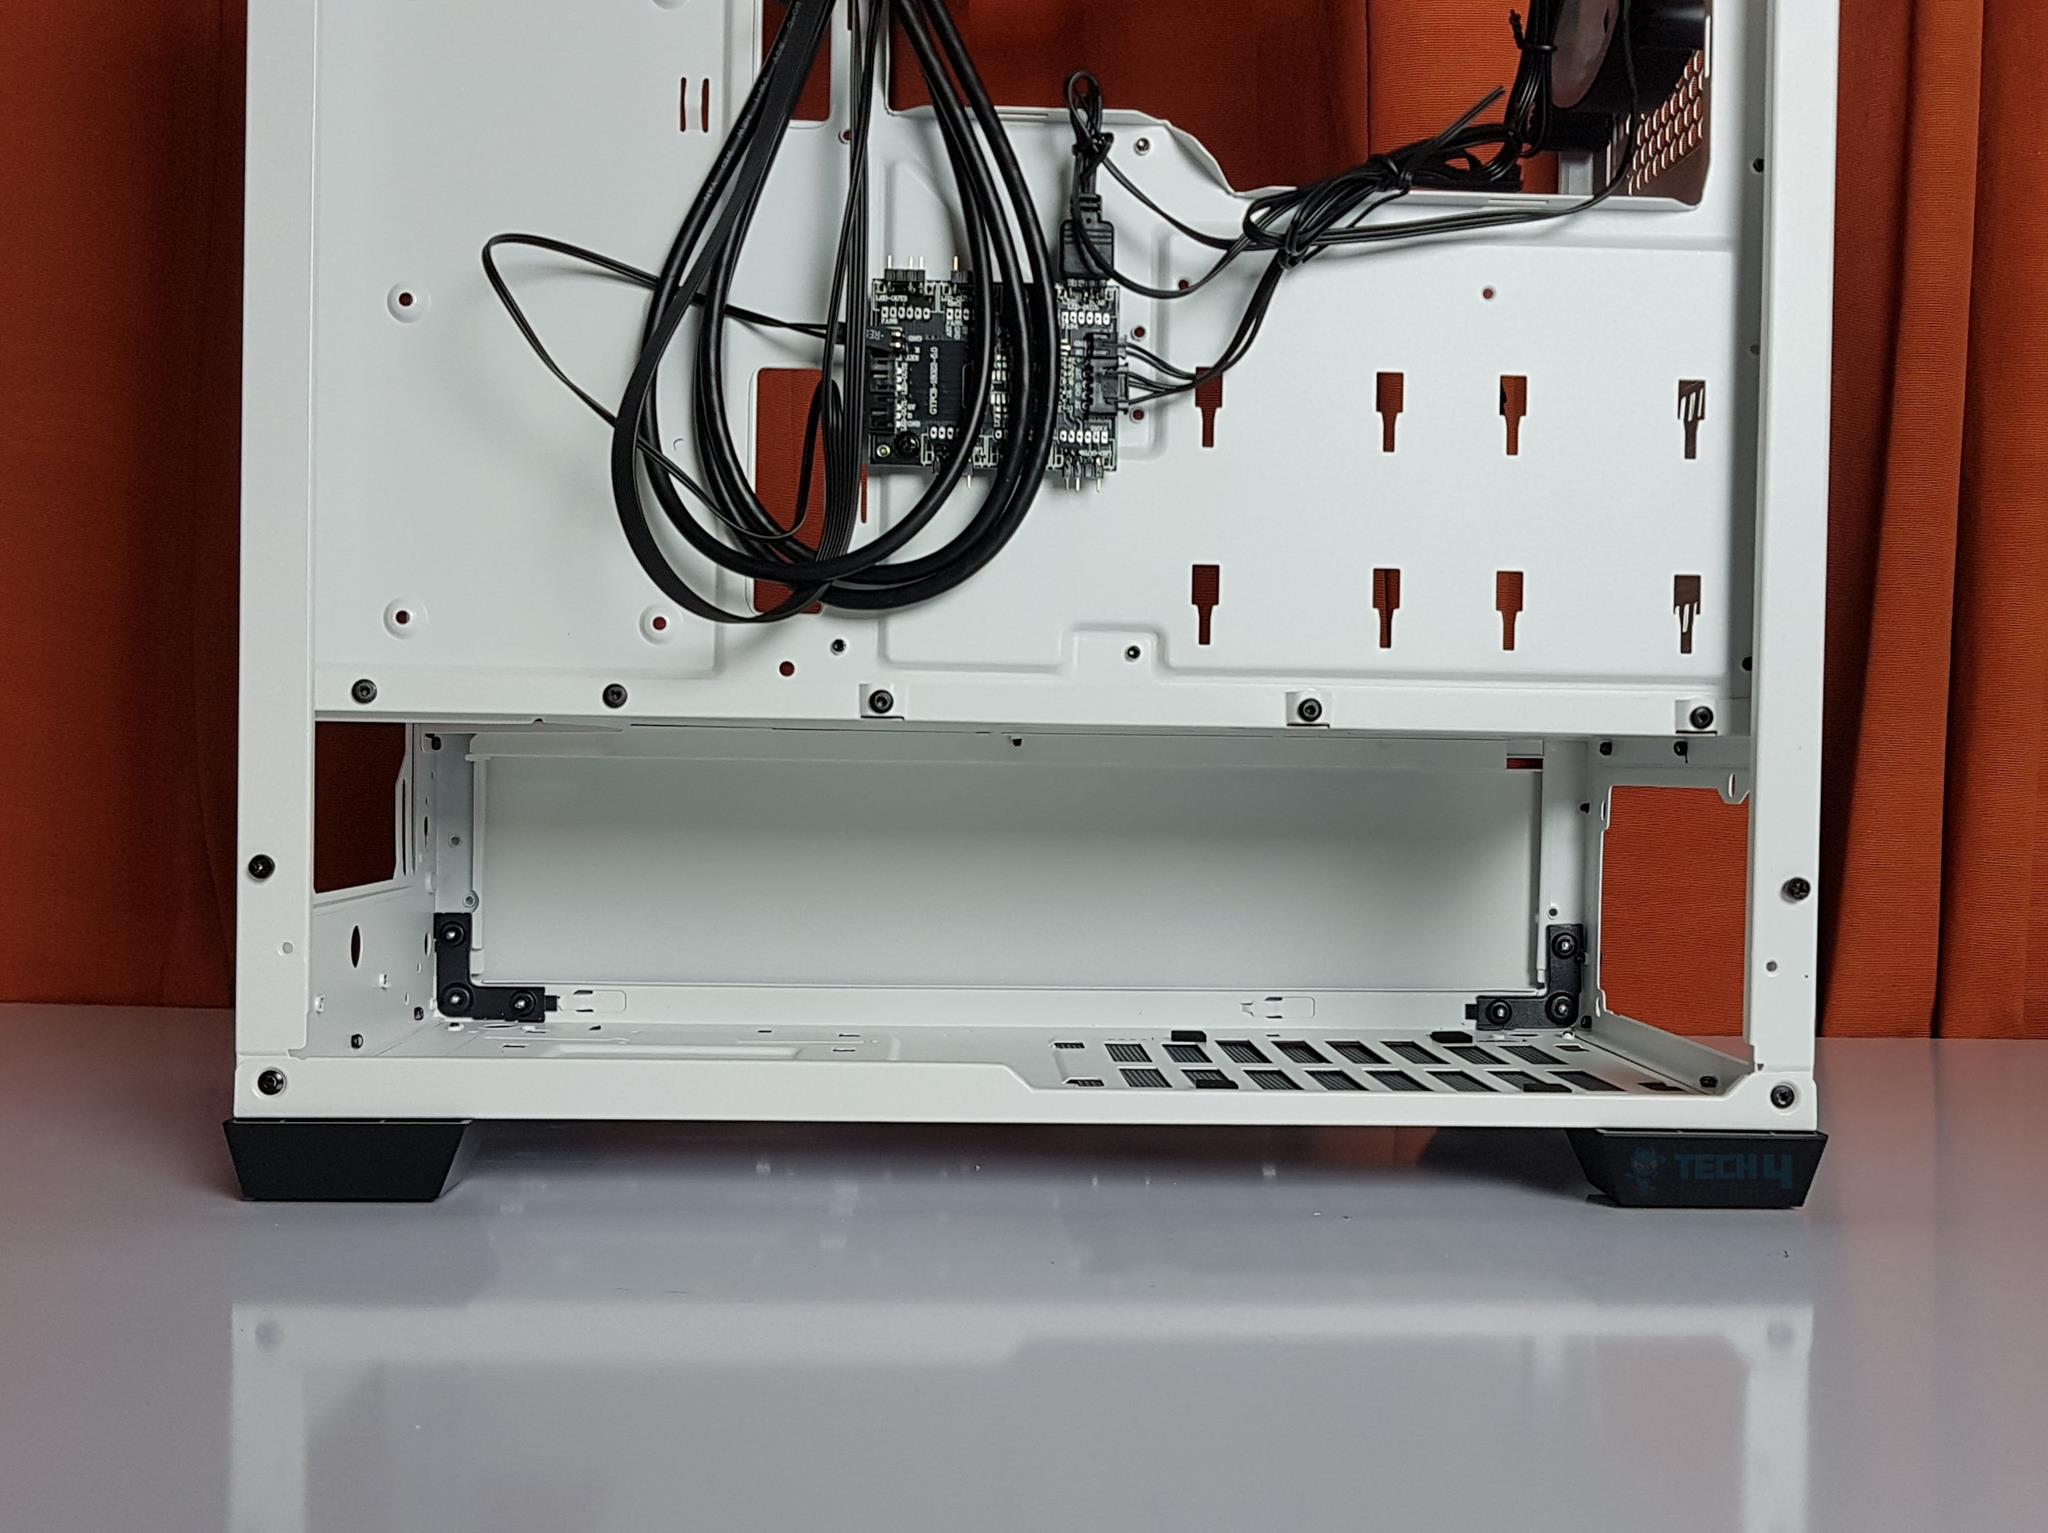

The above picture shows the bottom chamber with the HDD cage removed. The HDD cage is made of steel and is quite rigid. It can house two caddies. Each caddy can either hold a 2.5” or a 3.5” drive.
Let’s take a look at the RGB lighting control box or hub. This hub is SATA powered. It has 6x 3-pin ARGB male headers. The rear fan is already connected to the top first header. There are 2x 3-pin female headers. The I/O panel’s Reset connector is connected to this header. Doing this has removed the reset capability of the chassis, as the user can change the lighting modes by pressing the Reset button on the I/O panel.
The hub’s right side gives a hint of cables going out. That is true. The user can connect up to 8x ARGB devices to this hub (2x are already connected, leaving room for 6x).
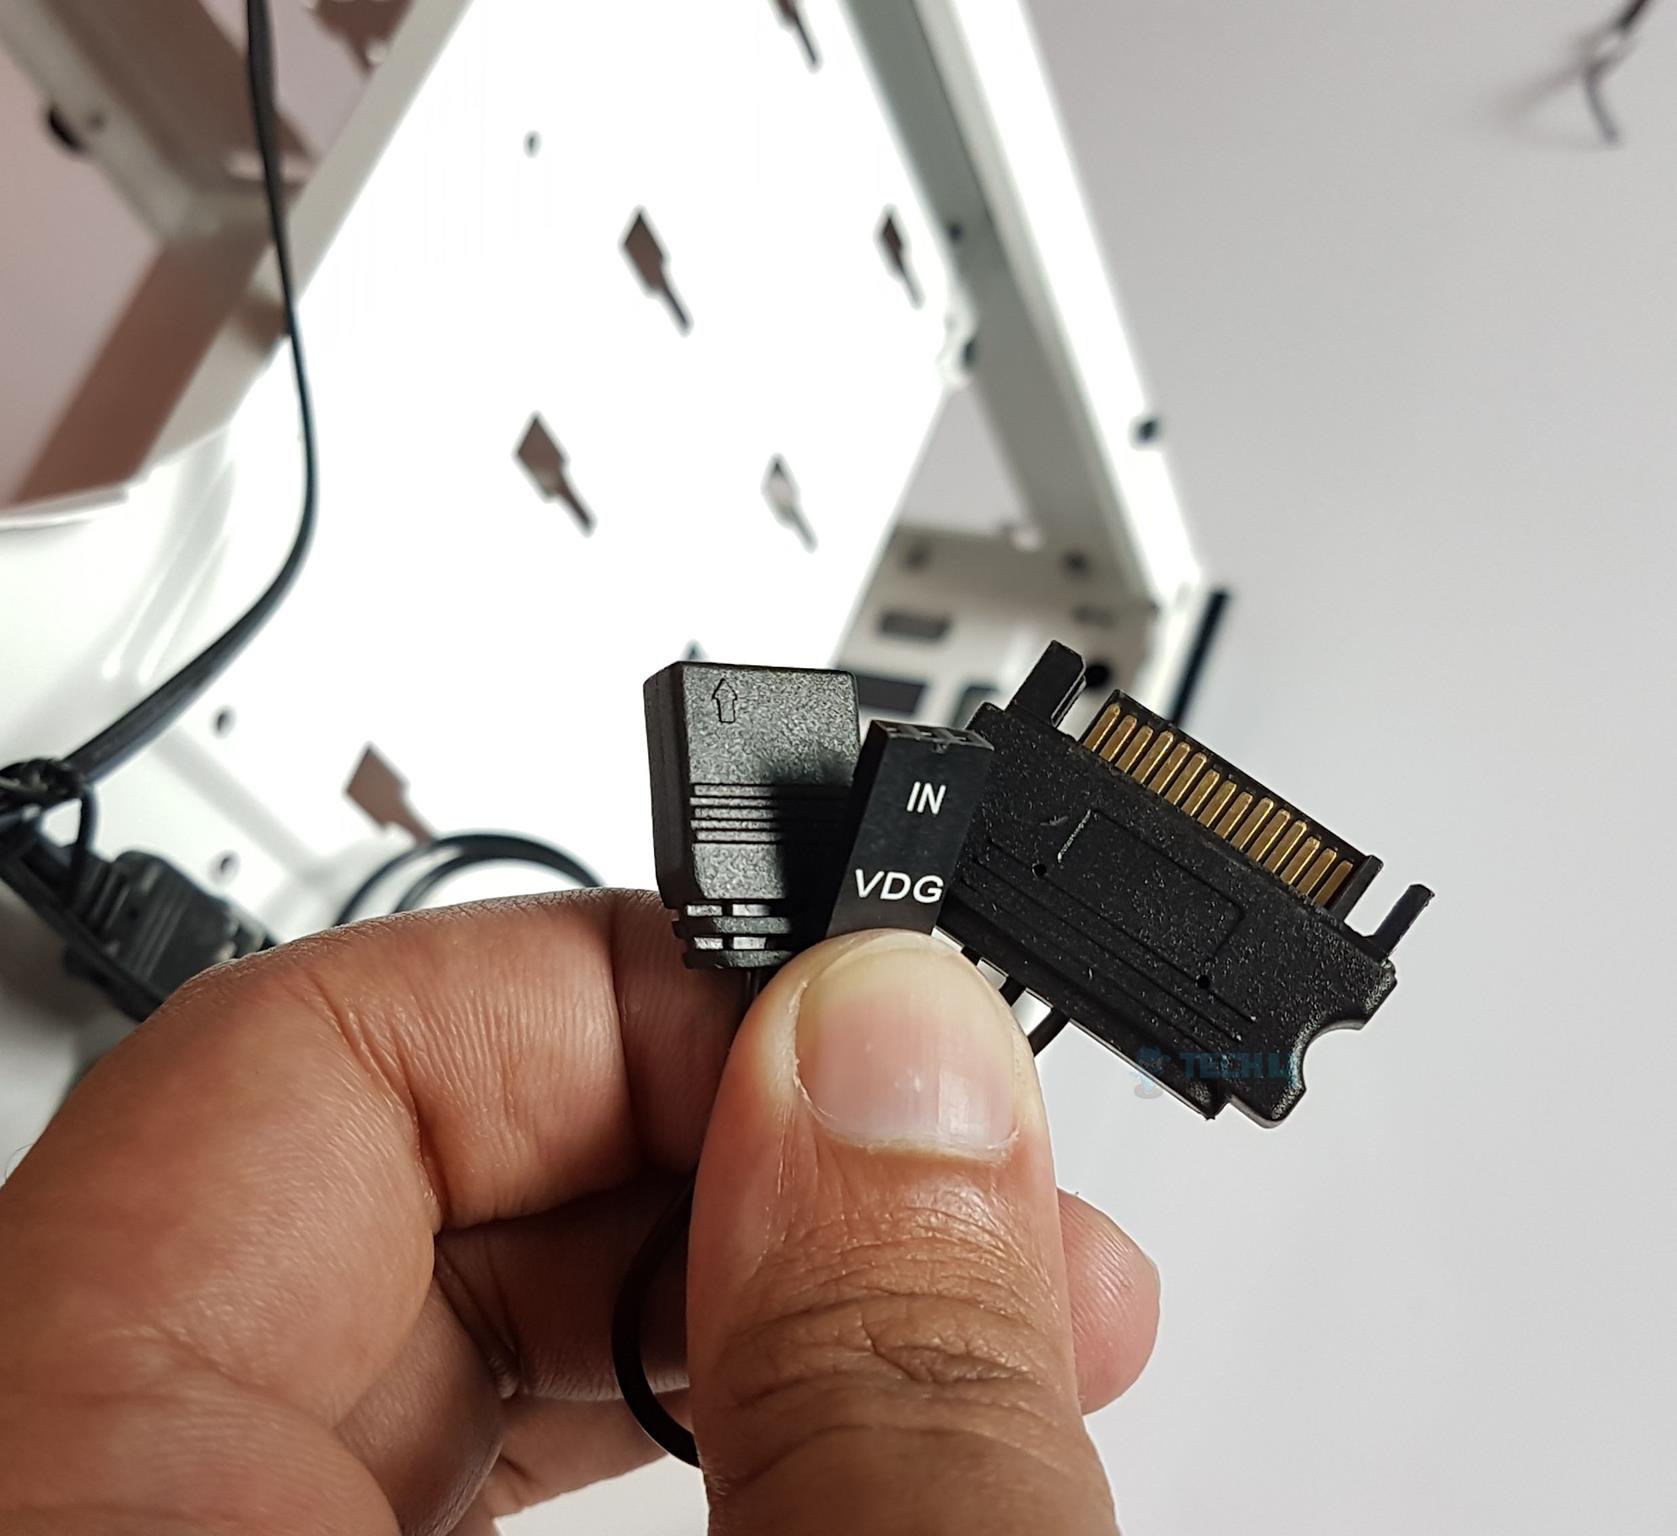
One of the cables is the SATA connector, which needs to be connected to the PSU to power the hub. The other two connectors allow the user to connect this hub with the motherboard’s digital lighting (5V) headers. This way, the user can control and sync the lighting effect of the build.
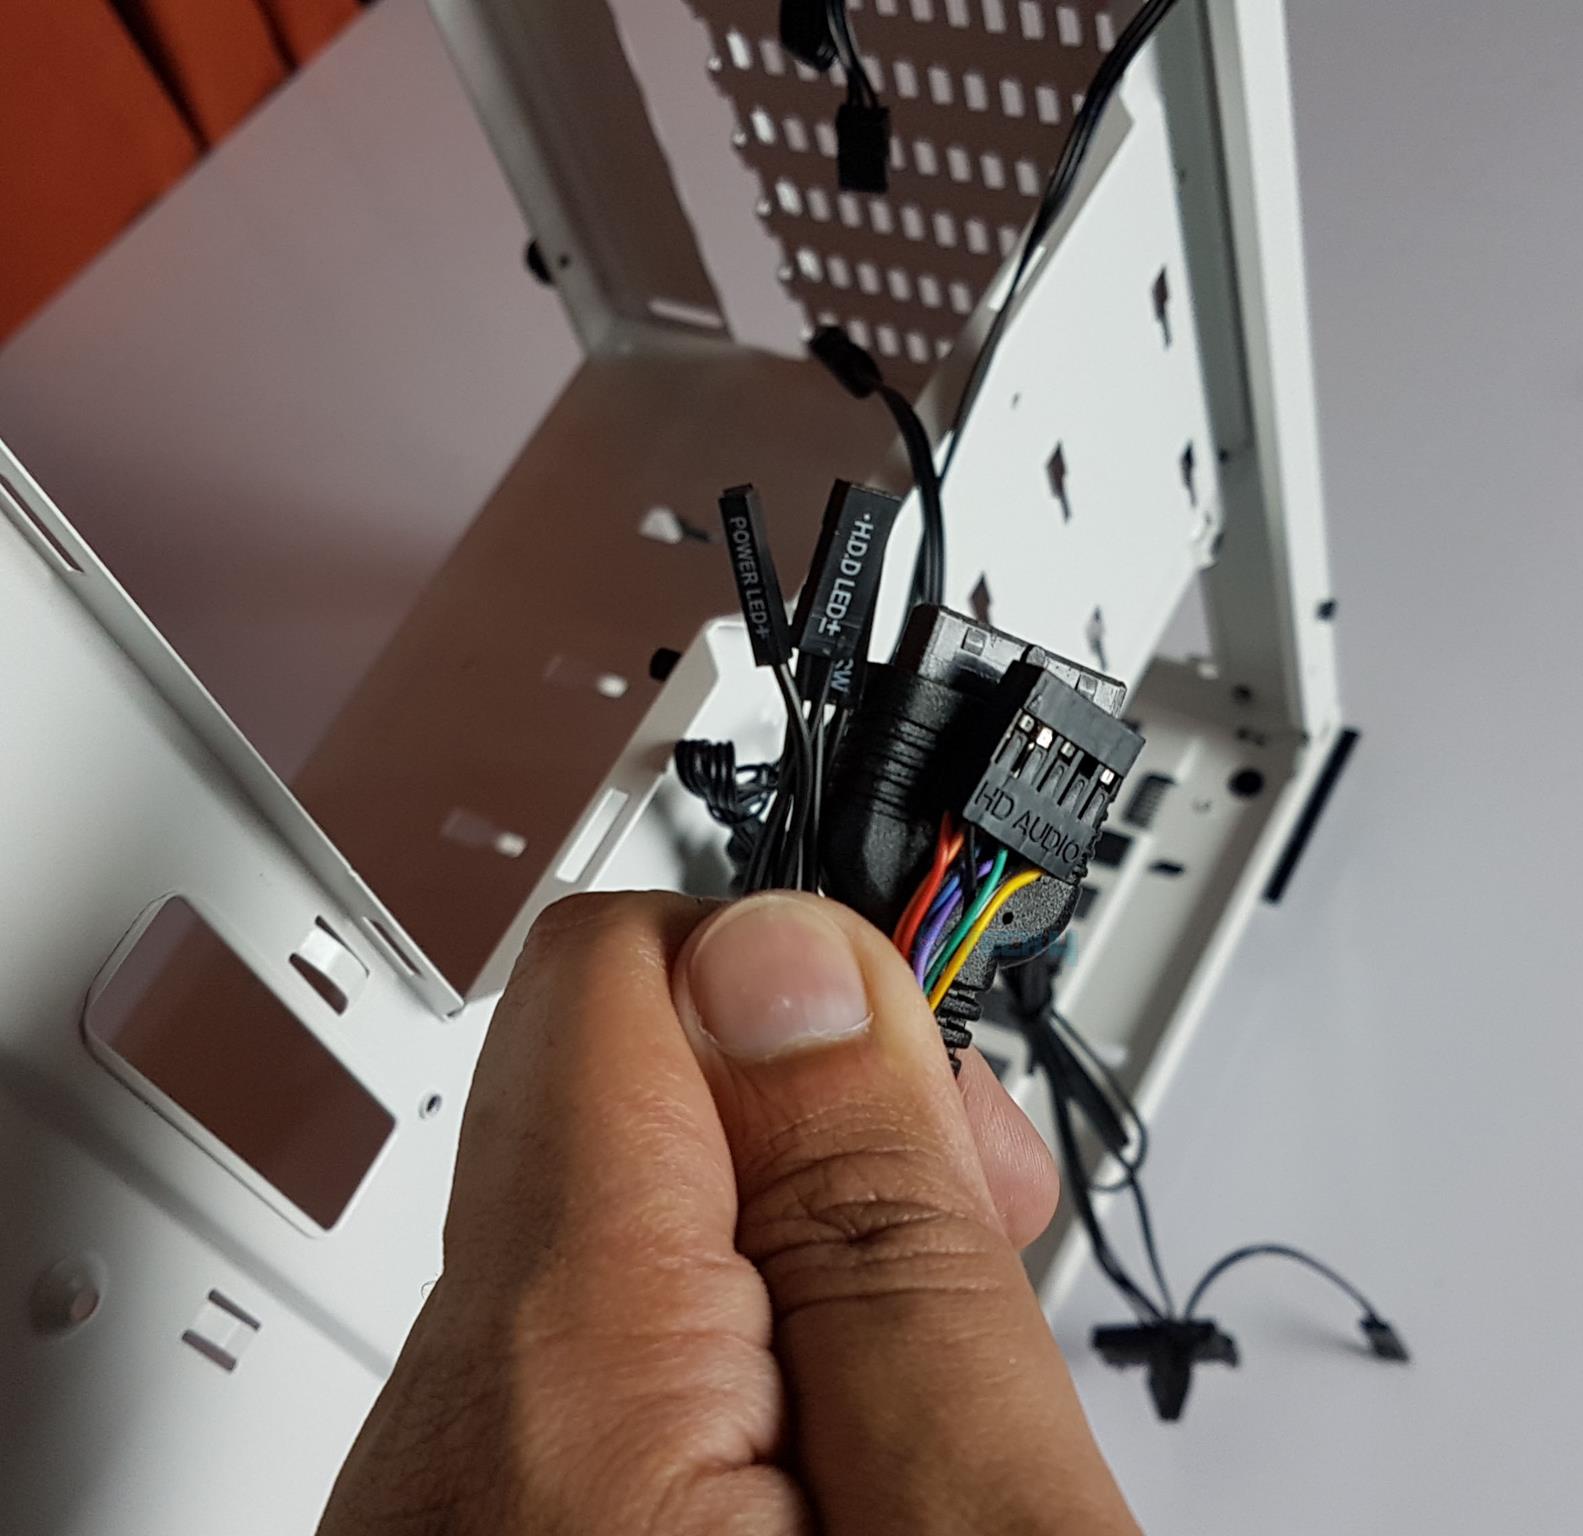
The front panel’s cables include:
- 1x USB 3.0 Cable
- 1x Front Panel HD Audio Cable
- System Panel Cables
Storage Capacity
- Up to 2x 3.5” Drives
- Up to 6x 2.5” Drives (Only two brackets are provided)
CPU Cooler Height
- 155mm
Graphics Card Length
- Up to 370mm
Fans Provision
- Up to 3x 120mm or 2x 140mm fans on the front
- Up to 2x 120mm or 2x 140mm fans on the top
- 1x 120mm fan on the rear (pre-installed)
Radiator Provision
- 120mm/240mm/360mm radiator on the front*
- 120mm/240mm on the top
*The installation of a 360mm radiator is possible without an HDD cage.
Test Build and Experience
The following configuration has been used for the test build:
- AMD Ryzen 7 3700X
- AORUS X570 Pro WIFI
- CORSAIR VENGEANCE PRO RGB 16GB @ 3200MHz CL16
- ID-COOLING SE-234-ARGB and CORSAIR H!00i RGB Platinum
- MSI RX 5700 XT MECH OC
- HyperX 120GB 2.5” SSD
- Antec HCP1300

I started with the motherboard installation and removed the pre-installed 120mm fan, as the I/O cover could not slip past the fan. Besides that, I did not face any issues regarding the motherboard installation. The RAM was installed outside the chassis, whereas both coolers were installed inside the chassis, and I had no difficulty installing the cooler.
Since the chassis supports only 155mm height coolers, you are kinda restricted on what you can install in this chassis for cooling purposes. I could not install the Noctua NH-U14S, which is very obvious why, but I also could not install the Noctua NH-U12S since that cooler has a height of 158mm and was obstructing the tempered glass panel.
I ended up using the ID-COOLING SE-234-ARGB CPU Air Cooler. I will cover why I have used two coolers for the testing in the Testing section.
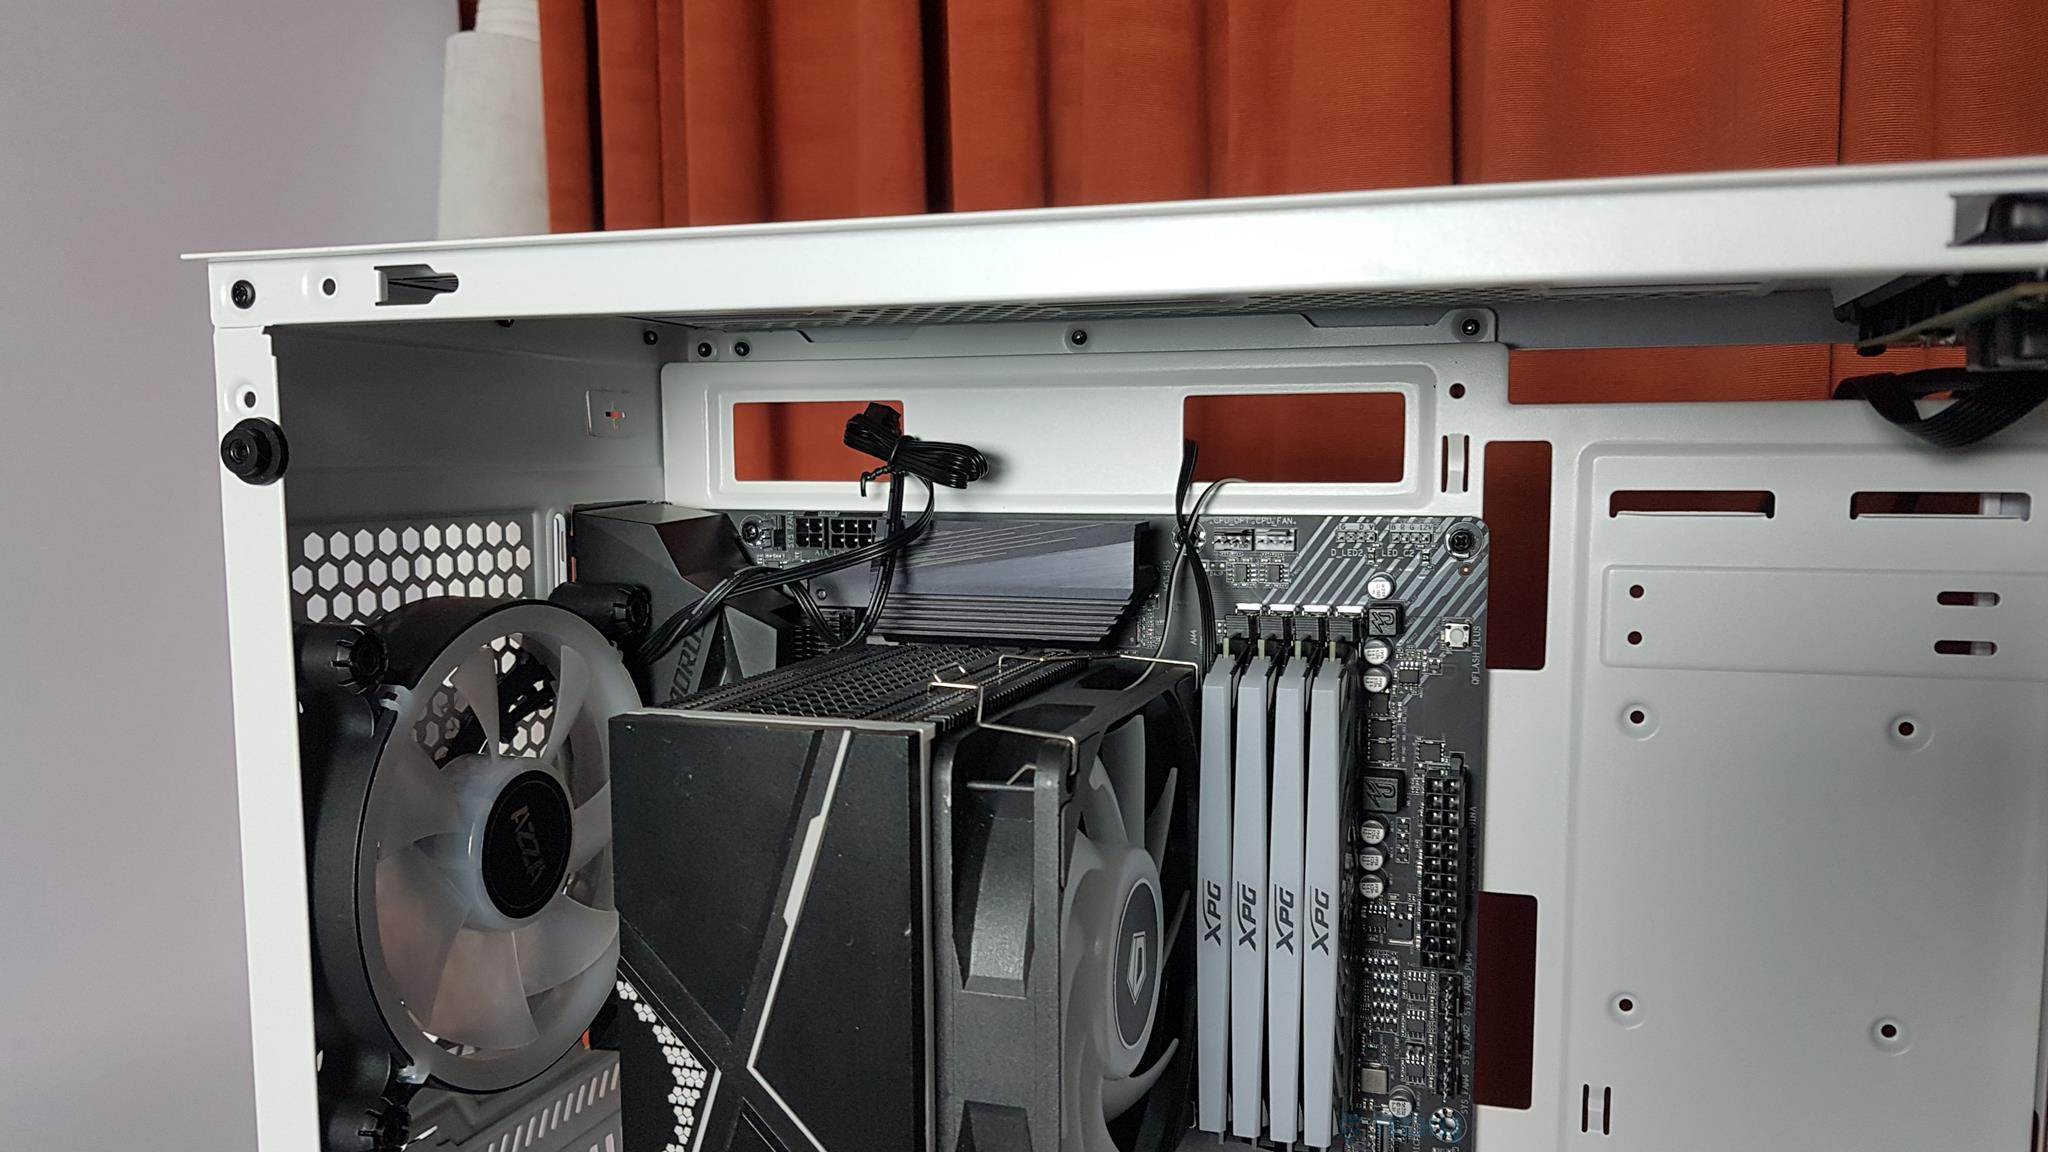
Installing AZZA Apollo 430 White components is a breeze, thanks to ample space on the motherboard top and two convenient cutouts. The PSU shroud’s cutouts aid effective cable management, though I placed the 2.5″ SSD on the back of the motherboard tray for a cleaner look. Installing the fully modular PSU is straightforward.
Note that it must be installed with the fan side down due to the lack of vents on the shroud. Connecting the rear fan to the CPU-OPT header is simple, but the limited 4 cable tie points on the back make cable management challenging yet achievable with time and effort. Other than that, I faced no issues; it was a straightforward task.
Testing
Next up is the thermal testing using the same configuration as mentioned above. Here are some key points regarding the testing:
- The rear fan was set to run at 100% of the speed.
- The CPU Cooler’s fan was connected to the CPU fan header and was set to run at a 100% duty cycle.
- No other fan was used to ensure the testing of the chassis in stock configuration.
- I have used Far Cry 5 on 1080P using Ultra settings to measure the thermals. For each test, a minimum of 30 minutes of gameplay was made.
- A minimum of 15 minutes of idling time was ensured between the tests.
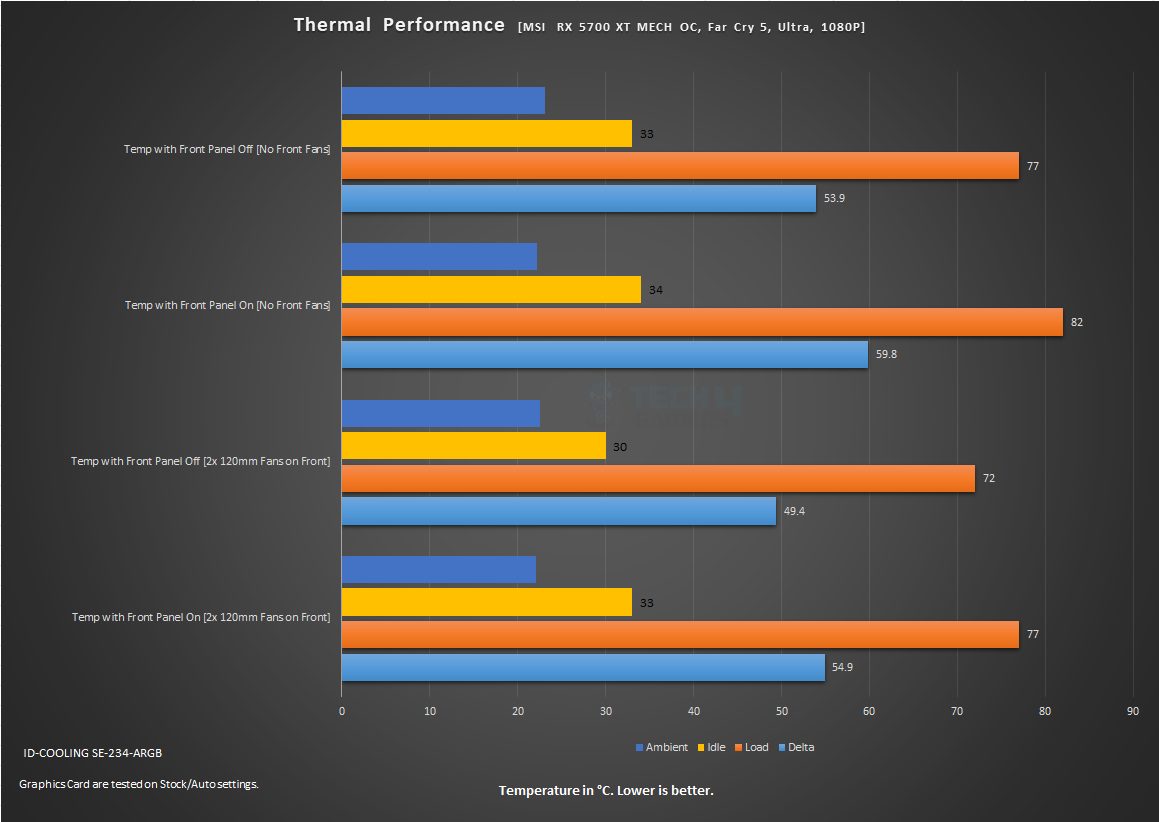
- Thermal testing is conducted with and without the front panel to see how much airflow is restricted by this design.
- Two Noiseblockers, NB-BlackSilentPro PL-PS fans, were installed on the front rail to make the case. These have a rated speed of 600~1500RPM with a maximum of 58.9 CFM airflow and a 1.42 mmH₂ air pressure rating.
- Testing was done on Stock/Auto settings on Ryzen 7 3700X and RX 5700 XT.
- MSIAfterBurner was used to record the temperatures.
Configuration Clarification
Here are some pointers before you take a look at the graphs:
- The AZZA Apollo 430 White has only one fan pre-installed on the rear.
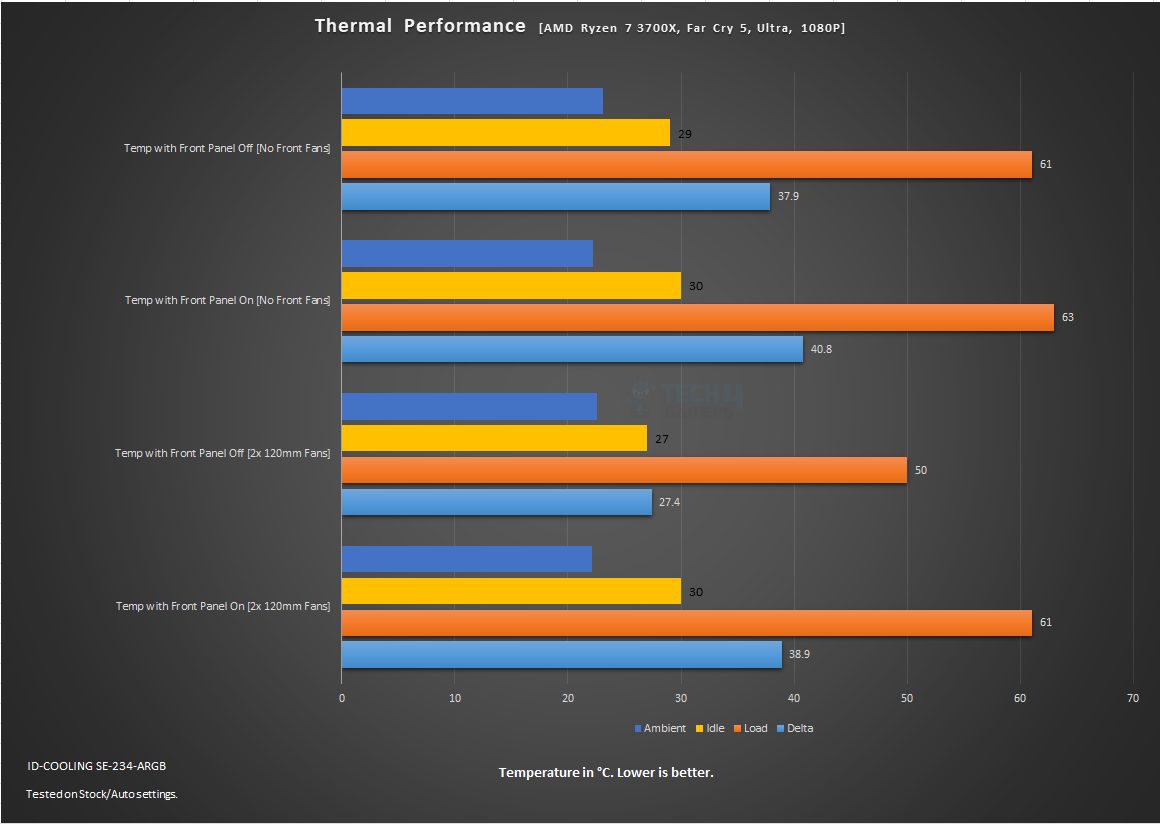
- I have tested the thermals of this chassis with the front panels removed and with the front panels on.
- I have tested the thermals of the chassis with 2x 120mm fans installed on the front with and without the front panels.
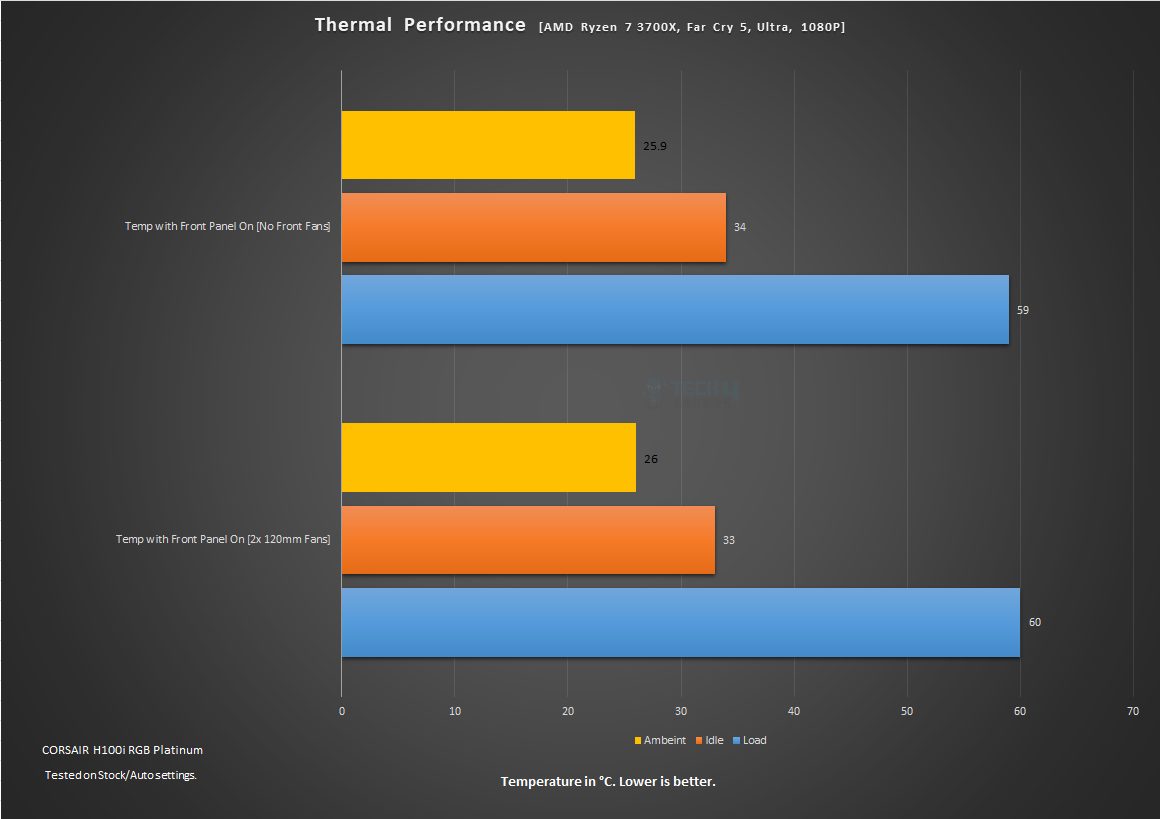
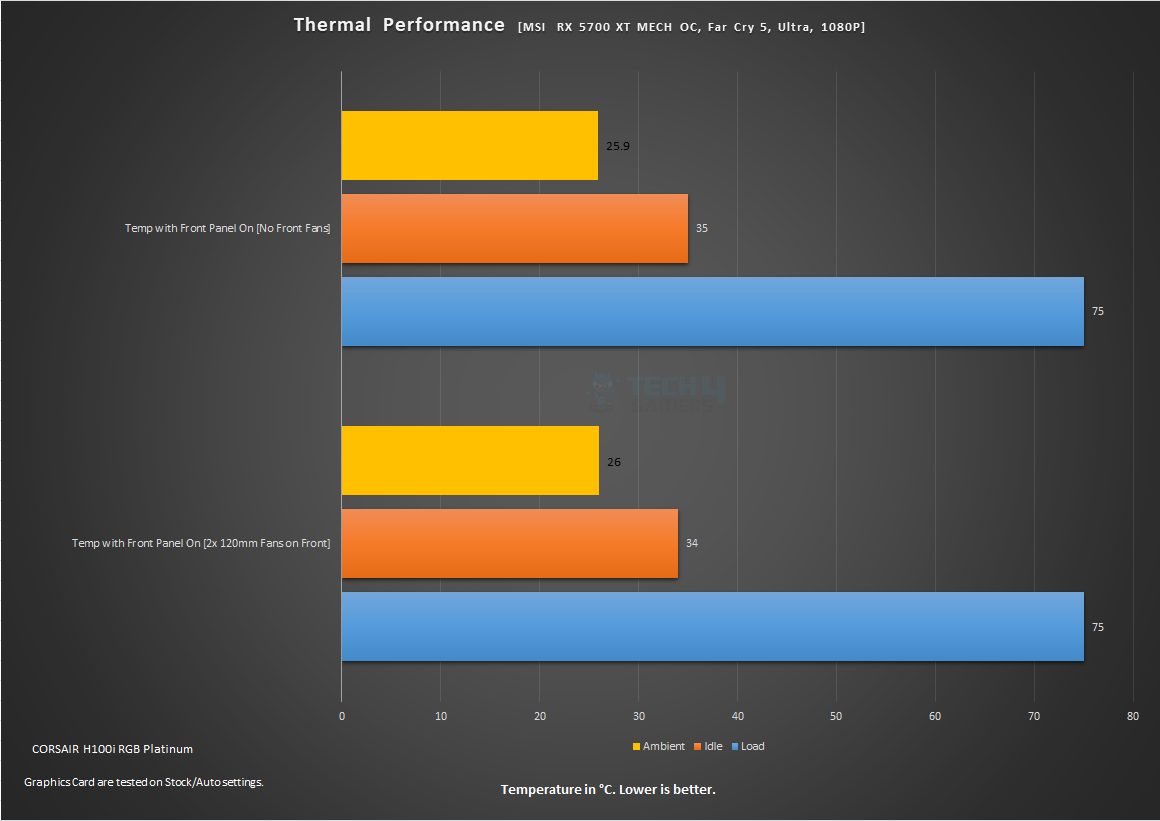
- Based on initial test data from the air cooler, I also used an AIO to test the thermal performance.
Here is the result:
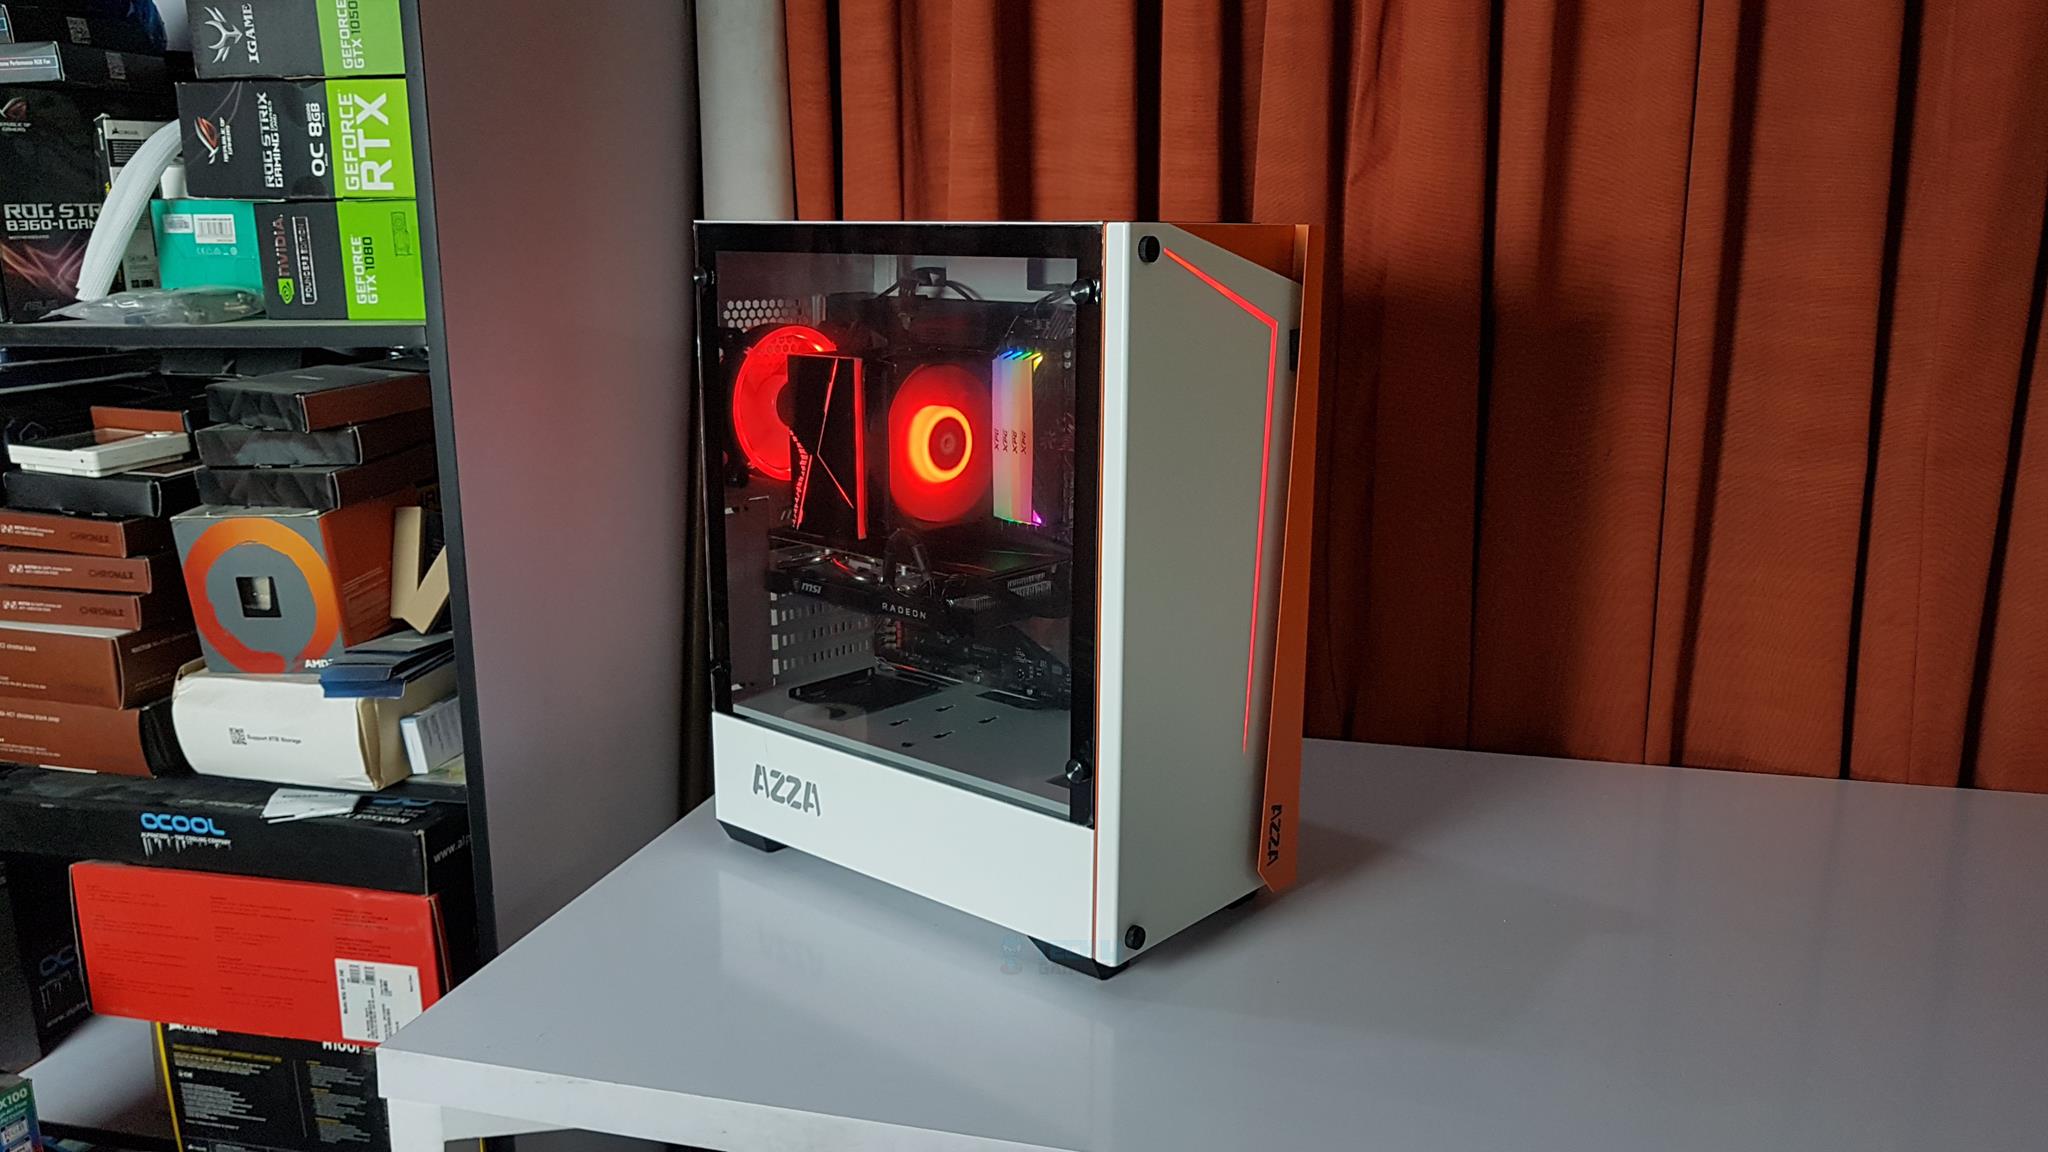
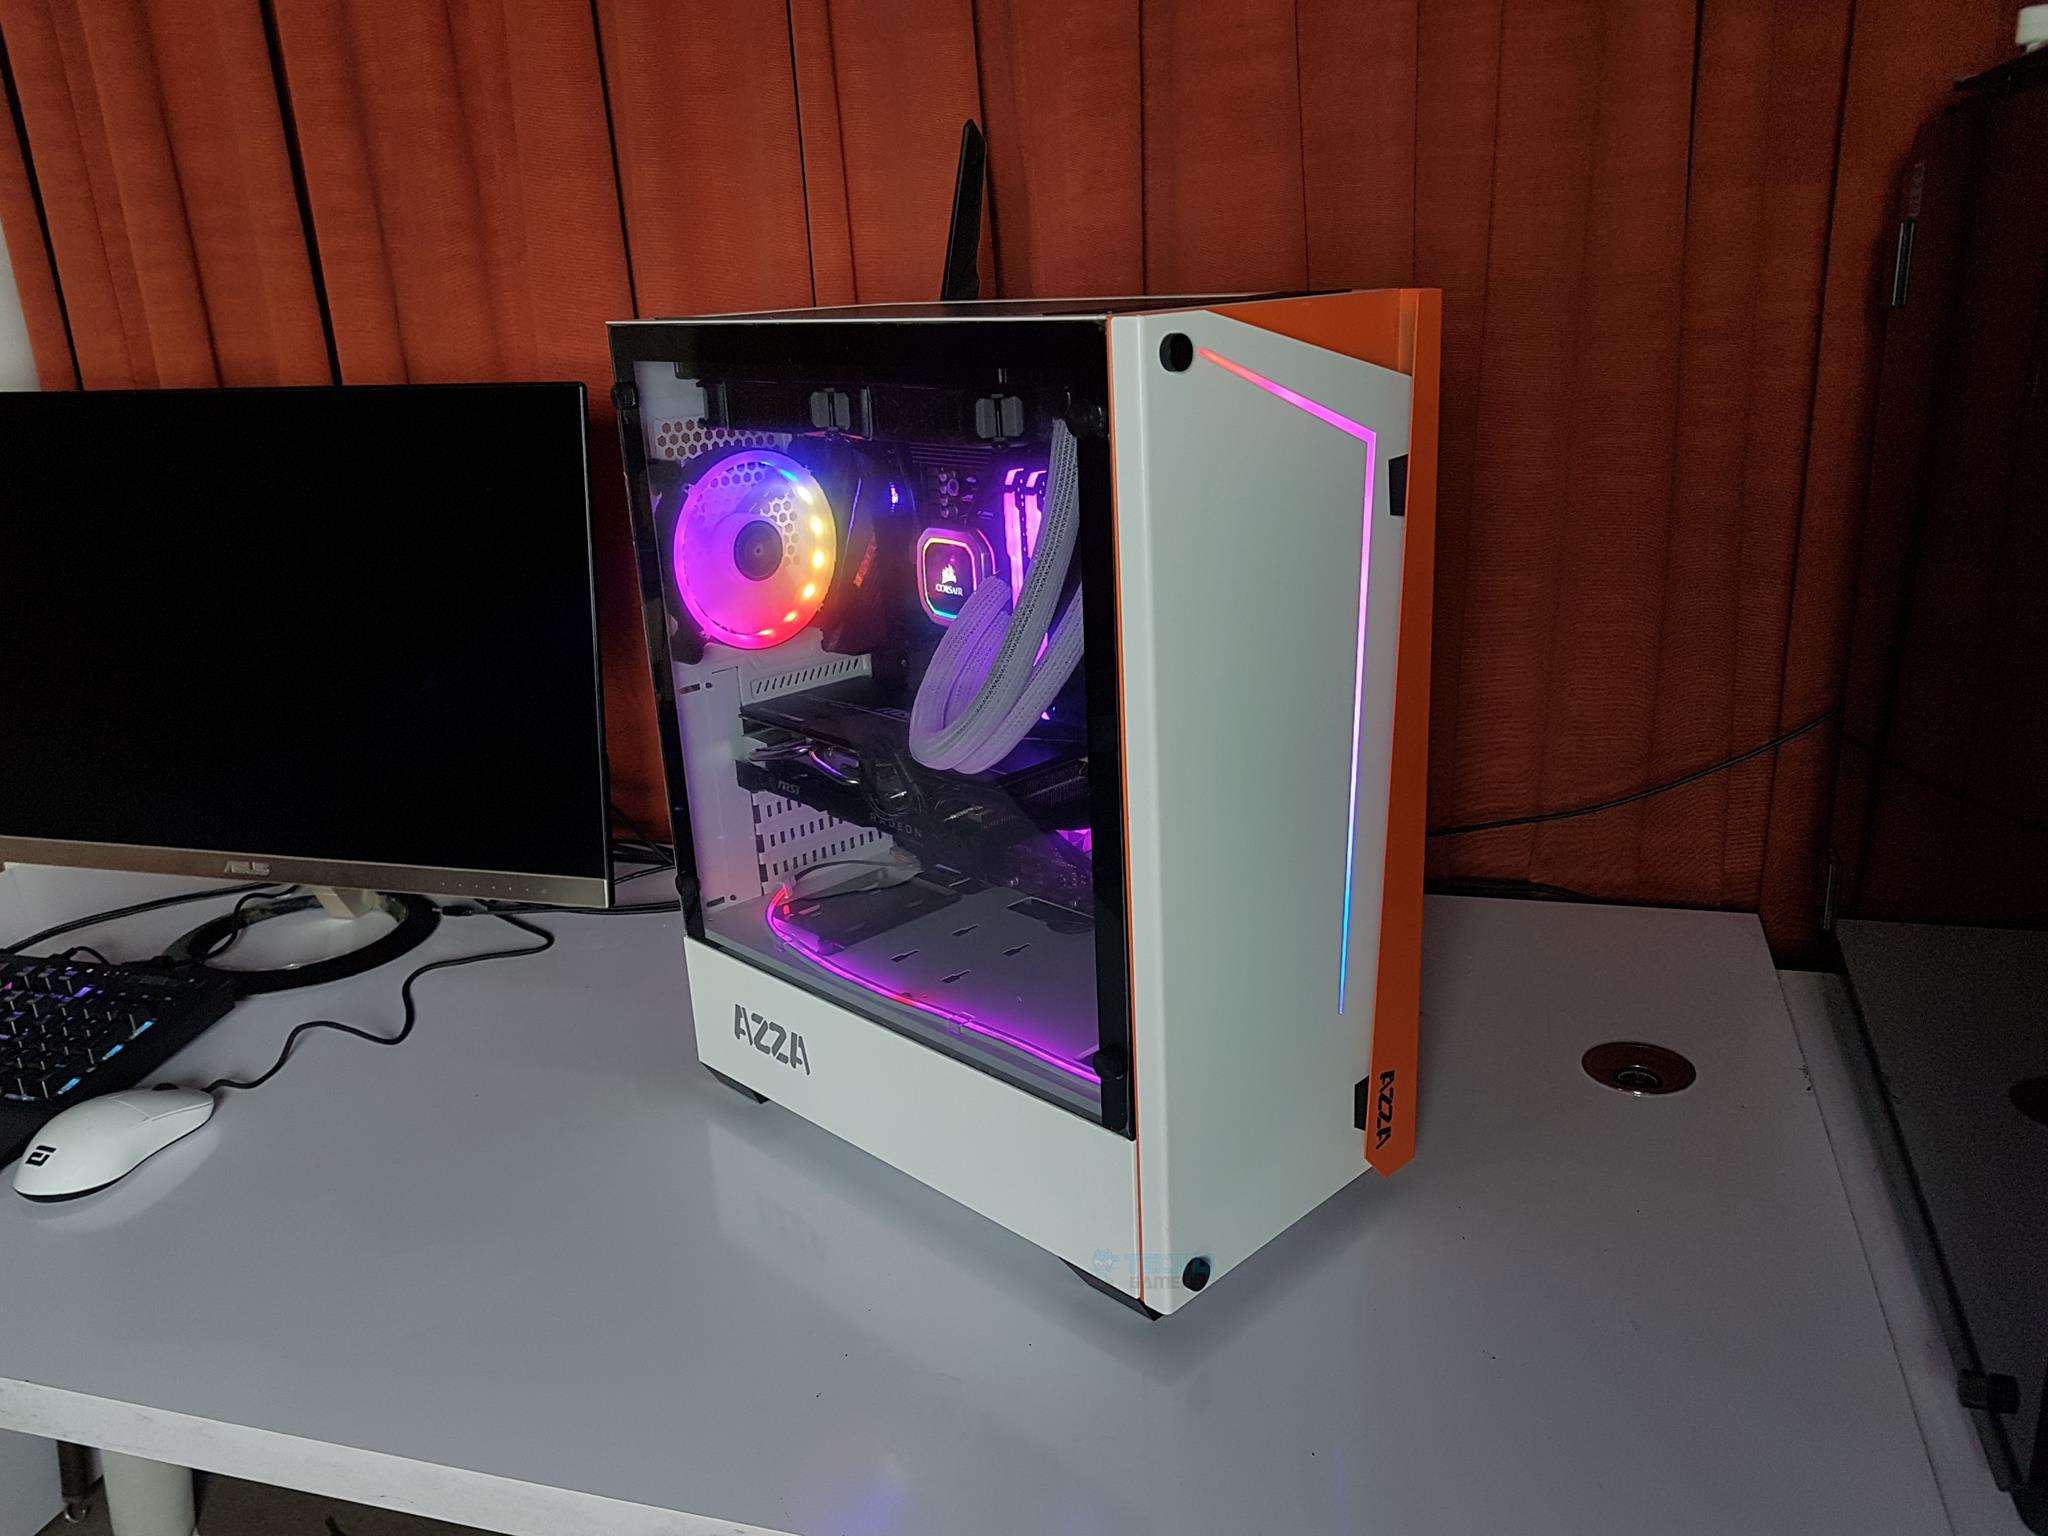
RGB Lighting
ARGB lighting is the strongest and monumental strength of The AZZA Apollo 430 White. We have a 120mm ARGB fan on the rear and an ARGB lighting strip on the front panel inside a white diffuser cover. To make the case more compelling, they have provided a lighting control hub that can be synced to the motherboard’s digital lighting header (5V). Users can press the Reset button on the top I/O panel to switch between the lighting modes.
Here are some pics for your eye pleasure.
Should You Buy It?
After having a detailed look at the AZZA Apollo 430, let’s answer the question about who should buy it and who shouldn’t.
Buy It If:
✅ You seek a modern PC case: Enthusiasts seeking a visually striking mid-tower chassis with a sleek white design and vibrant orange accents, complemented by customizable ARGB lighting, should consider the Apollo 430.
✅ You aim for versatility: The AZZA Apollo 430 case supports ATX and micro ATX motherboards, accommodates lengthy video cards up to 370mm, and offers water cooling support up to 240mm on both the front and top.
✅ You prioritize aesthetic appeal and component showcase: The high-quality tempered glass side panel of the AZZA Apollo 430 case provides a clear view of the internal components, and the stylish RGB strip on the front panel enhances the visual experience.
Don’t Buy It If
❌ You require an economical PC case: Individuals on a budget seeking affordable mid-tower options, as the AZZA Apollo 430, with its premium features, might surpass the budget constraints of some users.
❌ You prioritize maximum cooling performance: Users who prioritize maximum cooling performance prefer a fully vented front design for optimal airflow, as the AZZA Apollo 430’s blocked front may not meet their airflow expectations.
❌ You want your cables managed neatly: Builders need extensive cable management options, as the limited 4 cable tie points on the back might present challenges for users aiming for an exceptionally tidy cable arrangement.
Conclusion
After getting my hands on the Azza Apollo 430, I can’t help but rave about its sleek white design and eye-catching orange accents. The various models cater to different rear fan preferences, and its support for ATX motherboards, steel, and tempered glass construction adds to its appeal. I enjoyed the flexibility in storage with 2x 3.5” drives in the removable HDD cage and support for 2.5” drives.
The chassis easily accommodated my 155mm CPU cooler and a 370mm graphics card. Cooling options are impressive, allowing for 3x 120mm or 2x 140mm fans on the front, 1x 120mm fan on the rear, 2x 120mm/140mm fans on the top, and up to a 240mm radiator. The RGB lighting caught my attention, especially the digital RGB LED strip and rear 120mm fan.
However, my firsthand experience also highlighted a potential drawback—the blocked front design affecting airflow, as evident in testing. Despite some cable management challenges and non-reusable PCIe slot covers, the chassis’s rock-solid build quality makes it a notable contender.
Recent Updates
- January 8, 2024: A few text changes to improve readability. Also added image galleries.
Thank you! Please share your positive feedback. 🔋
How could we improve this post? Please Help us. 😔
[Hardware Reviewer]
Awais Khan is a Tech Geek, conscientious, reliable, and hardworking individual who pays attention to detail with excellent time management skills. Alongside that, he is an expert in PC Hardware; dealing with Benchmarks, Analysis, and testing before sharing information with readers. Whenever free, Awais occasionally shares Gaming Videos on his YouTube Channel.
Get In Touch: awais@tech4gamers.com


