


Understanding how the motherboard’s power switch pins work is essential, whether building your personal computer or fixing problems with an existing one. It would help if you learned about the specific functionality of each pin on the motherboard power switch to connect the accurate wires.
- The motherboard power switch pins connect to and control the computer’s power button. Your computer’s power button completes the circuit and tells the motherboard whether to turn on or off.
- Connecting correctly allows convenient power control of the computer. They may cause potential malfunction or damage if connected incorrectly
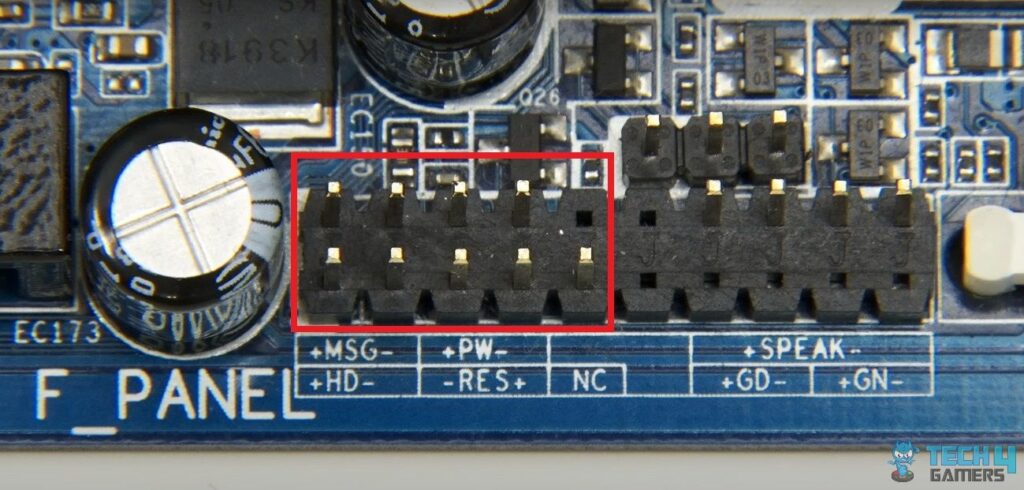
- The power switch pins are located on a section of the motherboard known as F_Panel, Front Header, or Front Panel Header. You can connect them manually.
- You can turn jump start your motherboard using a tiny conductive device, such as a screwdriver, to briefly short the motherboard’s two power switch pins.
Locate the Power Switch Pins on Your Motherboard
When referring to your motherboard manual to locate the power switch pins, begin by consulting the section that details the layout and components of your specific motherboard model. This section is typically found in the introductory pages or the manual’s appendix.
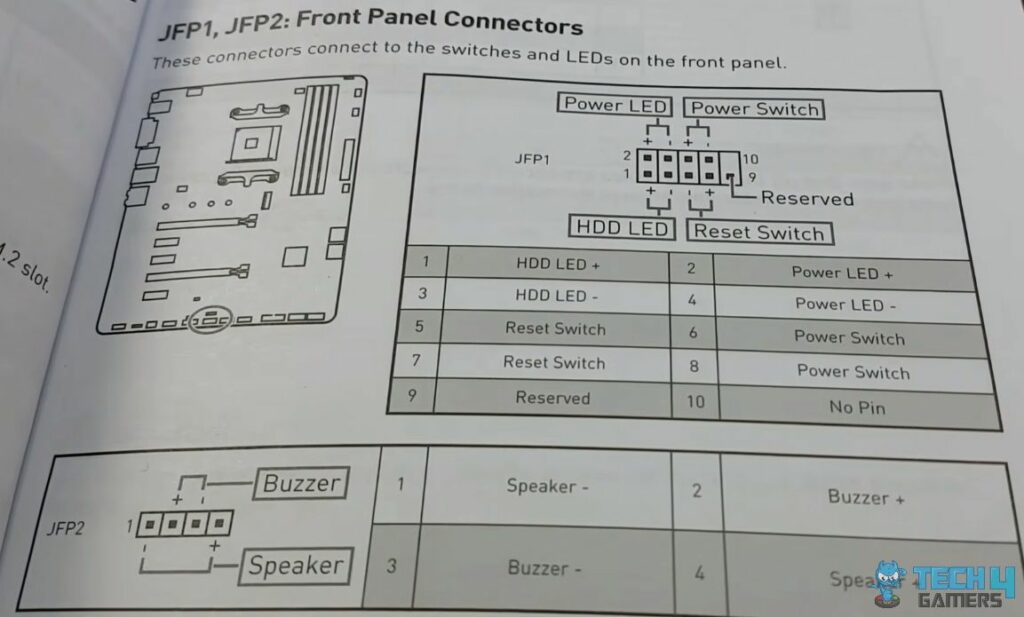
These pins are typically labeled with abbreviations such as “PWR_SW” or “PWR_BTN,” indicating their function as the power switch for the system. Additionally, you may find other labels or markings adjacent to these pins, providing further clarification or instructions.
Identify the Power Switch Cable from Your Case
The next step is to locate the corresponding power switch cable that originates from your computer case. This cable is an essential component as it connects the physical power button on your computer case to the motherboard, allowing you to power the system on and off.
The power switch cable is usually a two-pin connector with a specific label printed on it, such as “PWR_SW” or “POWER SW.” This label serves as an identifier, indicating the cable’s function and ensuring proper alignment during the connection process.
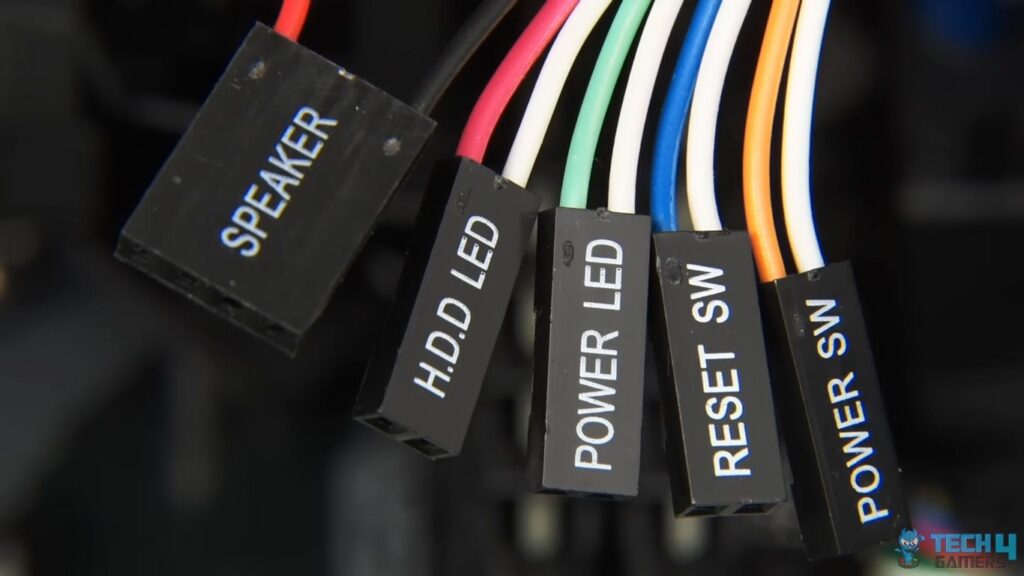
To confirm that you’ve located the correct cable, verify that the label matches one of the abbreviations found near the power switch pins on your motherboard. This ensures compatibility and alignment when connecting the cable to the motherboard.
Align the Pins And Connect
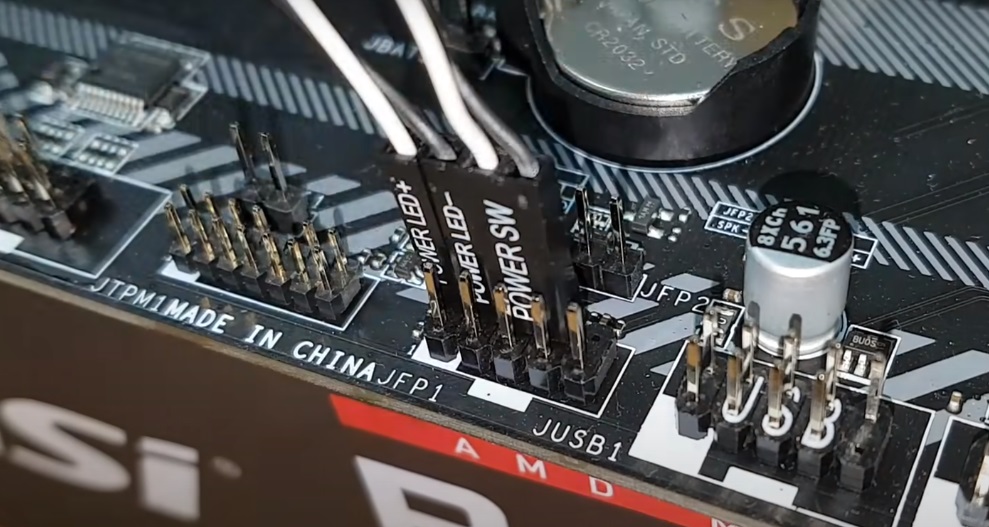
Take a close look at the power switch cable and identify which pin is the positive (+) and which is the negative (-). The positive pin is usually indicated by a small arrow or a “+” symbol. Align the pins on the power switch cable with the corresponding pins on the motherboard, making sure to match the positive and negative connectors correctly.
Carefully insert the power switch cable into the power switch pins on the motherboard. Apply gentle pressure until the connector is fully seated and the pins are securely connected.
Test the Connection You Made And Secure the Cable
Before closing up your computer case, it’s a good idea to test the power switch connection to ensure it’s working correctly. Plug in your computer’s power supply unit and press the power button on your case. If everything is connected properly, your computer should power on.
Once you’ve confirmed that the power switch is working, you can tidy up the cables inside your case and secure the power switch cable in place using cable ties or clips.
Final Words
The power switch pins are easy enough to connect. You just have to match the labels on the cables and headers. If you’re still running into issues a Reddit user mentioned some good tips to help with the installation of the pins.
Comment
byu/Just_Importance1829 from discussion
inpchelp
You’ll realize it’s not as difficult once you have learned to identify and connect them correctly. This skill is essential for troubleshooting, as improper connections can prevent your computer from turning on.
Frequently Asked Questions
The motherboard contains a set of pins for connecting to and controlling the computer’s power switch.
Yes. One typical technique is to use a screwdriver to short the motherboard’s two power switch pins briefly. This turns on the computer as it replicates the action of pressing the computer’s power button.
Consult your motherboard’s user manual if you have trouble identifying the proper pins or connectors. Alternatively, you can also search for manuals or tutorials online.
Also Read:
- Motherboard RGB Header
- How To Clean A Motherboard?
- How To Turn On PC Motherboard Without Power Button
- How To Connect Power Button To Motherboard
Thank you! Please share your positive feedback. 🔋
How could we improve this post? Please Help us. 😔
[How To’s & Guides Editor]
Haddi has been in the Gaming and tech Space for over 10 Years Now; he has worked on notable websites like eXputer, Gamepur, Gear Siege, Gearnuke, and plenty more. He is an expert at Games & PC Hardware; you can expect him to solve any problem. People often joke, that if there is any problem anyone can solve, Haddi can solve it faster. Currently, Haddi writes and manages a Team of Experts at Tech4Gamers.
Contact: Haddi@tech4gamers.com


