 Threads

The power button on your PC does the job of easily opening and closing your system. It also performs functions such as power indication and error indication, depending on your build.
Key Takeaways
- The power switch pins on the motherboard can be located using the motherboard’s user manual or by manually searching for them.
- To connect the power button cable to the motherboard, match the labels on the cables with the corresponding connectors, then carefully insert them into the correct pins.
- Testing the power button after connecting it to the motherboard is important to ensure the power button is functioning properly.
To connect a power button to a motherboard, you will need the following materials:
- Power Button Cable.
- Screwdriver.
- Multimeter.
Locating The Motherboard Power Switch Pins
It would be best to locate the power switch pins before connecting the power button to the motherboard. Also, you might be interested in learning how to connect RGB fans to the motherboard.
Remove The Case Panel
Before accessing the motherboard, you must remove the case panel covering it. Usually, this involves using a screwdriver to remove a few screws.
Locate The Front Panel Header
After locating the motherboard, the next task is to find the front panel on the motherboard. There are two ways to find the front panel. Let’s discuss both of them one by one.
Using The Motherboard Manual
Find the motherboard’s user manual in the materials that came with the motherboard. Look for the manual section that covers the motherboard’s layout and connections. This section should include a motherboard diagram with all the various connectors and components labeled.
Manually Searching For The Front Panel Header
To start, you can try to identify the front of the motherboard. This is usually the side of the motherboard that faces the inside of the computer case and is closest to the front panel connectors (e.g., power button, USB ports, audio jacks) on the case.
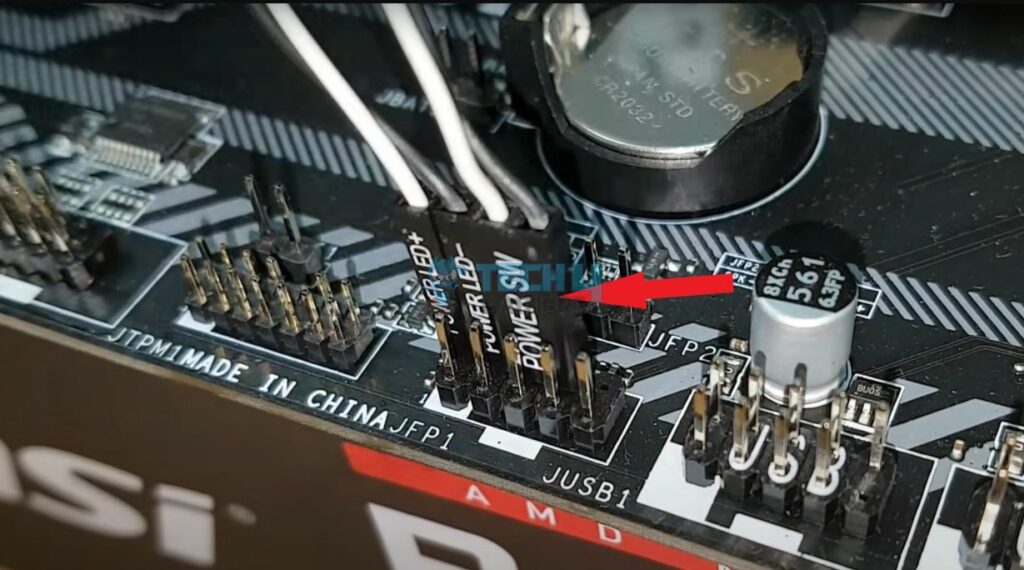
Look for a small group of connectors near the motherboard’s front. The front header will often be labeled with a series of abbreviations such as “PWR,” “RESET,” “HDD LED,” and so on. It may also be labeled as the “front panel header” or “front header.”
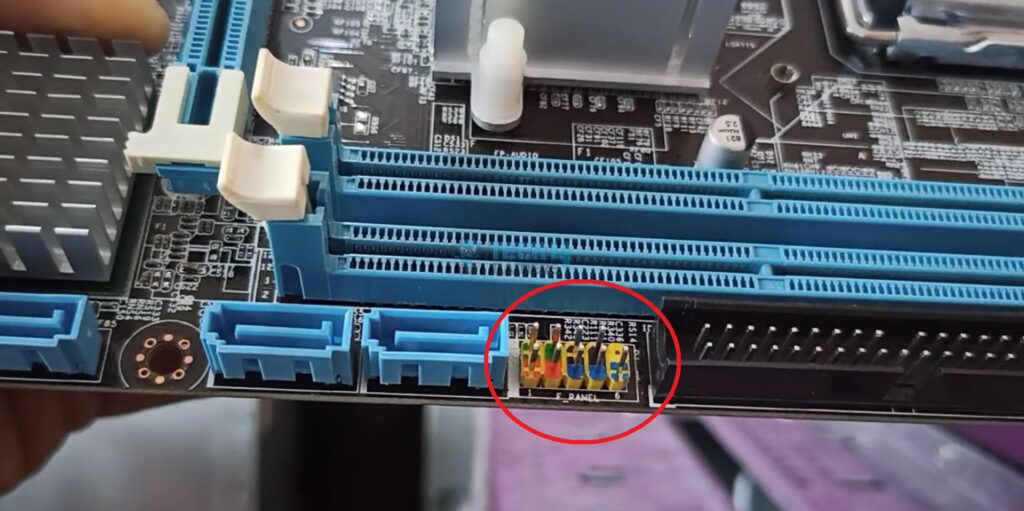
Once you have located the front header, you can use the labels on the front panel cables from your case to determine which connectors they should be connected to on the motherboard.
Identify The Power Switch Pins
Refer to the motherboard manual or the manufacturer’s website to determine the pinout of the front panel header. The manual or website should provide a diagram or table showing which pins correspond to functions, such as the power switch, the reset switch, and the power LED.
You can also check our guide on motherboard power switch sins for more detailed insight.
Testing And Troubleshooting the Connection
After you have connected the power button to the motherboard, it is essential to test the connection to ensure it is properly connected and functioning. Also, if you just got a new storage device, read our guide on connecting an SSD to the motherboard.
Follow the steps below for the testing and troubleshooting process:
- If you removed the case panel to access the motherboard, reattach it before testing the connection.
- Connect the power supply to the motherboard and plug it into a wall outlet.
- Watch the boot sequence as the computer starts up, ensuring it goes through the usual process, including displaying the BIOS screen and loading the operating system.
- If the power button has an LED, ensure it lights up when pressed.
- If the power button is not working, check the connection to ensure the power button cable is securely seated on the power switch pins.
- If the original power button and cable won’t work, test with a spare to identify whether the issue lies with the button, the cable, or both.
Things Not To Do When Connecting A Power Button To A Motherboard
After following the above instructions properly, you don’t necessarily need additional precautions for this process. But still, these tips can help you stay more cautious and avoid making mistakes.
Here’s a list of them:
- Don’t work on a powered-on system.
- Don’t make the wrong connections when connecting the cables.
- Don’t apply too much pressure when connecting cables or components.
As long as you follow proper safety precautions, connecting the power button to the motherboard should be safe. It can damage the motherboard or computer if the power button is not connected correctly. Follow the instructions carefully and securely attach the wires to the correct pins. Generally, you can connect the power button to any motherboard if the power switch is compatible. Common Questions Answered
More Articles On Motherboards:
Thank you! Please share your positive feedback. 🔋
How could we improve this post? Please Help us. 😔
[How To’s & Guides Editor]
Haddi has been in the Gaming and tech Space for over 10 Years Now; he has worked on notable websites like eXputer, Gamepur, Gear Siege, Gearnuke, and plenty more. He is an expert at Games & PC Hardware; you can expect him to solve any problem. People often joke, that if there is any problem anyone can solve, Haddi can solve it faster. Currently, Haddi writes and manages a Team of Experts at Tech4Gamers.
Contact: Haddi@tech4gamers.com


