


AIO, or an All-In-One cooling system, is a liquid-based thermal solution for your CPU. CPU fans often get jammed or clogged due to debris or dust accumulation. Users often face CPU fan errors that may be mainly attributed to issues with the fan or its controlling system. Therefore, you must learn how to fix the AIO CPU fan that is not working to keep your CPU’s temperature low.
- CPU fan not working is a common issue that can cause your PC to overheat and shut down, or it can also cause damage to the components.
- The CPU fan might stop working for several reasons, including dust clogging, connection to the wrong header, low CPU fan rpm limit, faulty PSU, outdated BIOS, broken CPU fan, or a defective motherboard.
- The issue can be resolved by cleaning and lubricating the fan, utilizing another header, updating the BIOS, setting a suitable CPU fan rpm limit, replacing the PSU or the fan itself, or getting a new motherboard.
- After trying the fixes, put some load on the CPU to verify whether the fans spin.
Method Difficulty Rating
Set A Suitable RPM
Rated: 5/10
Mount Fan Correctly
Rated: 6/10
Re-Connect The Pump
Rated: 6/10
Update BIOS
Rated: 4/10
Set A Suitable RPM For The CPU Fan
If the fan is spinning at a very low speed, the motherboard may fail to recognize it. To avoid that, reduce the CPU fan’s lower speed limit or ignore it entirely from the BIOS settings. These steps can assist you in doing that:
- Enter BIOS: Enter into the BIOS settings menu by pressing and holding the F2 button on the keyboard while pressing the power button (The BIOS key may differ depending on the machine you are using.)
- Find Advanced Mode: Locate the Advanced Mode inside the BIOS settings and go to the Monitor tab.
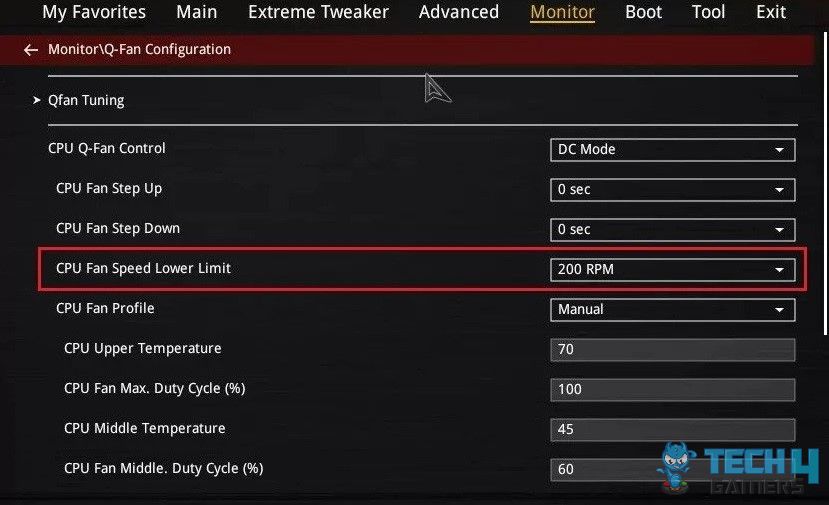
- Proceed To Fan Control Settings: Go to the Fan Control section > CPU Q-Fan Control or Q-Fan Configuration.

CPU Fan Speed Control (Image By Tech4Gamers) - Reduce The Lower Speed Limit: Now, set the “CPU Fan Speed Lower Limit” to 200 rpm or lower, or choose the Set to ignore option.
- Save Settings: Save the settings after you have made the required changes and reboot your computer.
Mount The CPU Fan Correctly
Usually, the CPU fan stops working when it isn’t correctly connected to the CPU_FAN header. Ensuring that the fan is correctly mounted in its place and connected to the proper header is of paramount importance. To mount the CPU fan correctly:
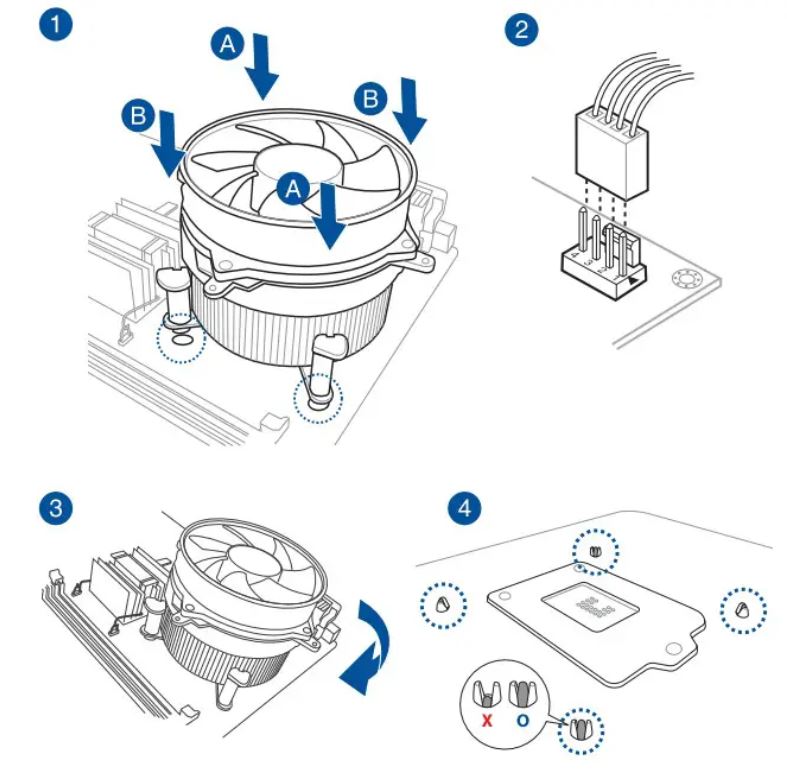
- Verify Connection: Ensure that the CPU fan is appropriately fixed in its place.

CPU Fan Configuration On The Motherboard (Image By Device.Report) - Verify Fan Header: Check whether it is connected to the correct header, i.e., CPU_FAN header.
- Check Orientation: Ensure the header is connected in the correct orientation corresponding to the specific pins.
Tip: Usually, the CPU_FAN header is towards the upper right corner of the motherboard; however, its position may vary depending on different models and brands.
Connect The AIO Pump Correctly
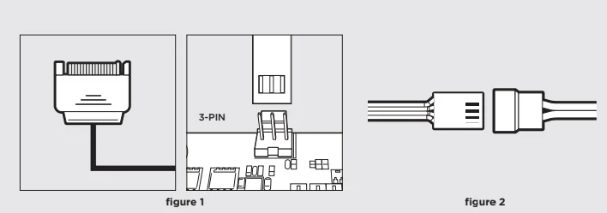
The first thing to make sure of when using a liquid-cooled CPU is to connect the AIO pump correctly. The complete AIO setup usually has 3 or 4 cables attached to it, including 3-pin and 4-pin connectors, SATA connectors, and a USB connector. The following steps will help you do that:
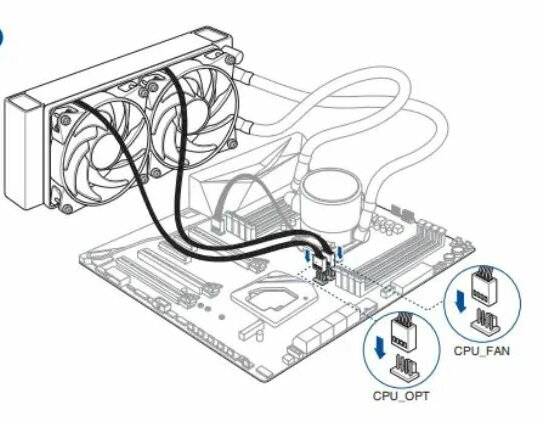
- Plug AIO Pump: Connect your AIO pump to the AIO_PUMP header.

Connect The AIO To The Header (Image By Device.Report)
Tip: If there is no AIO_PUMP header on your motherboard, you may connect the AIO pump to SYS_FAN or CHA_FAN instead (The header must be set at 100% speed in BIOS’s settings).
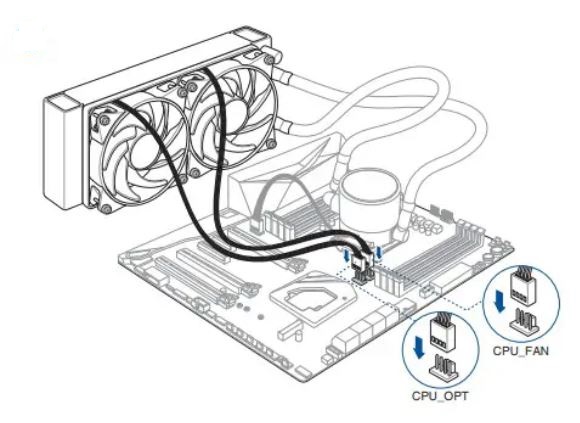
- Plug 3-pin Connector: Connect the 3-pin connector to the CPU_FAN header on your motherboard.
- Plug 4-pin Connectors: Connect the 4-pin splitter connectors to the radiator fans.

Plug The 3-pin And 4-pin Connectors Into the CPU Fan Header And Radiator Fans, Respectively (Image By Device.Report) - Connect SATA Connecter: Plug the SATA connector into any free SATA cable on your motherboard.

AIO Connectors (Image By Corsair) - Connect USB Connector: Plug the USB connector into any free USB header on your motherboard.
- Attach Fan To The Header: The system may generate a CPU Fan error even when the AIO Pump is connected to the AIO header. Plug the fan cable into the CPU_FAN header to remove that error.
Update The BIOS
An outdated BIOS can result in several issues related to your PC, including the PC fan not working AIO. Updating BIOS might be tricky, so be very careful while updating it. If you want to reset BIOS, we also have a guide.
- Enter Command: Launch the command prompt by typing cmd in Windows search > Enter the command “wmic bios get smbiosbiosversion” > note down the BIOS version.
- Turn Off Antivirus: Disable the antivirus by searching for Security and Maintenance and then clicking the security option to access antivirus settings.

Turn Off Antivirus In Security and Maintenance Settings (Image By Tech4Gamers) - Disable Bitlocker Driver Encryption: Also, temporarily suspend the BitLocker drive encryption by searching “Manage Bitlocker” and clicking the “Turn Off Bitlocker” (Make sure you have the Bitlocker recovery key before suspending Bitlocker).
- Download BIOS File: Go to your motherboard manufacturer’s official website > Choose your PC’s model and operating system > Download the BIOS file.
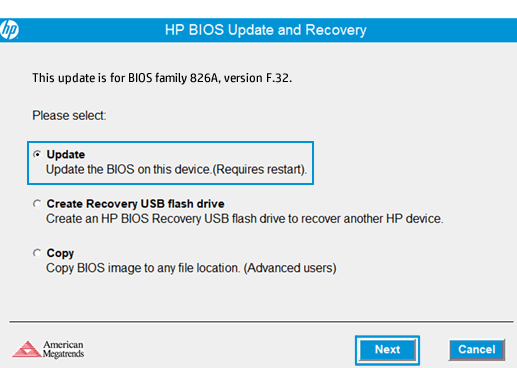
- Update BIOS: Open the BIOS file once downloaded, and follow the instructions for installation.

Select The Update Option (Image By HP) - Enable Antivirus And Bitocker: After the installation, reboot your PC and enable the antivirus and Bitlocker protection.

Replace The Power Supply Unit
If you hear beeping sounds or more than one component is not working, your PSU may be faulty. If your computer shuts down immediately after booting up, this is also an indication of a faulty PSU. You need to replace the PSU in this case, as your AIO CPU fan might not work.
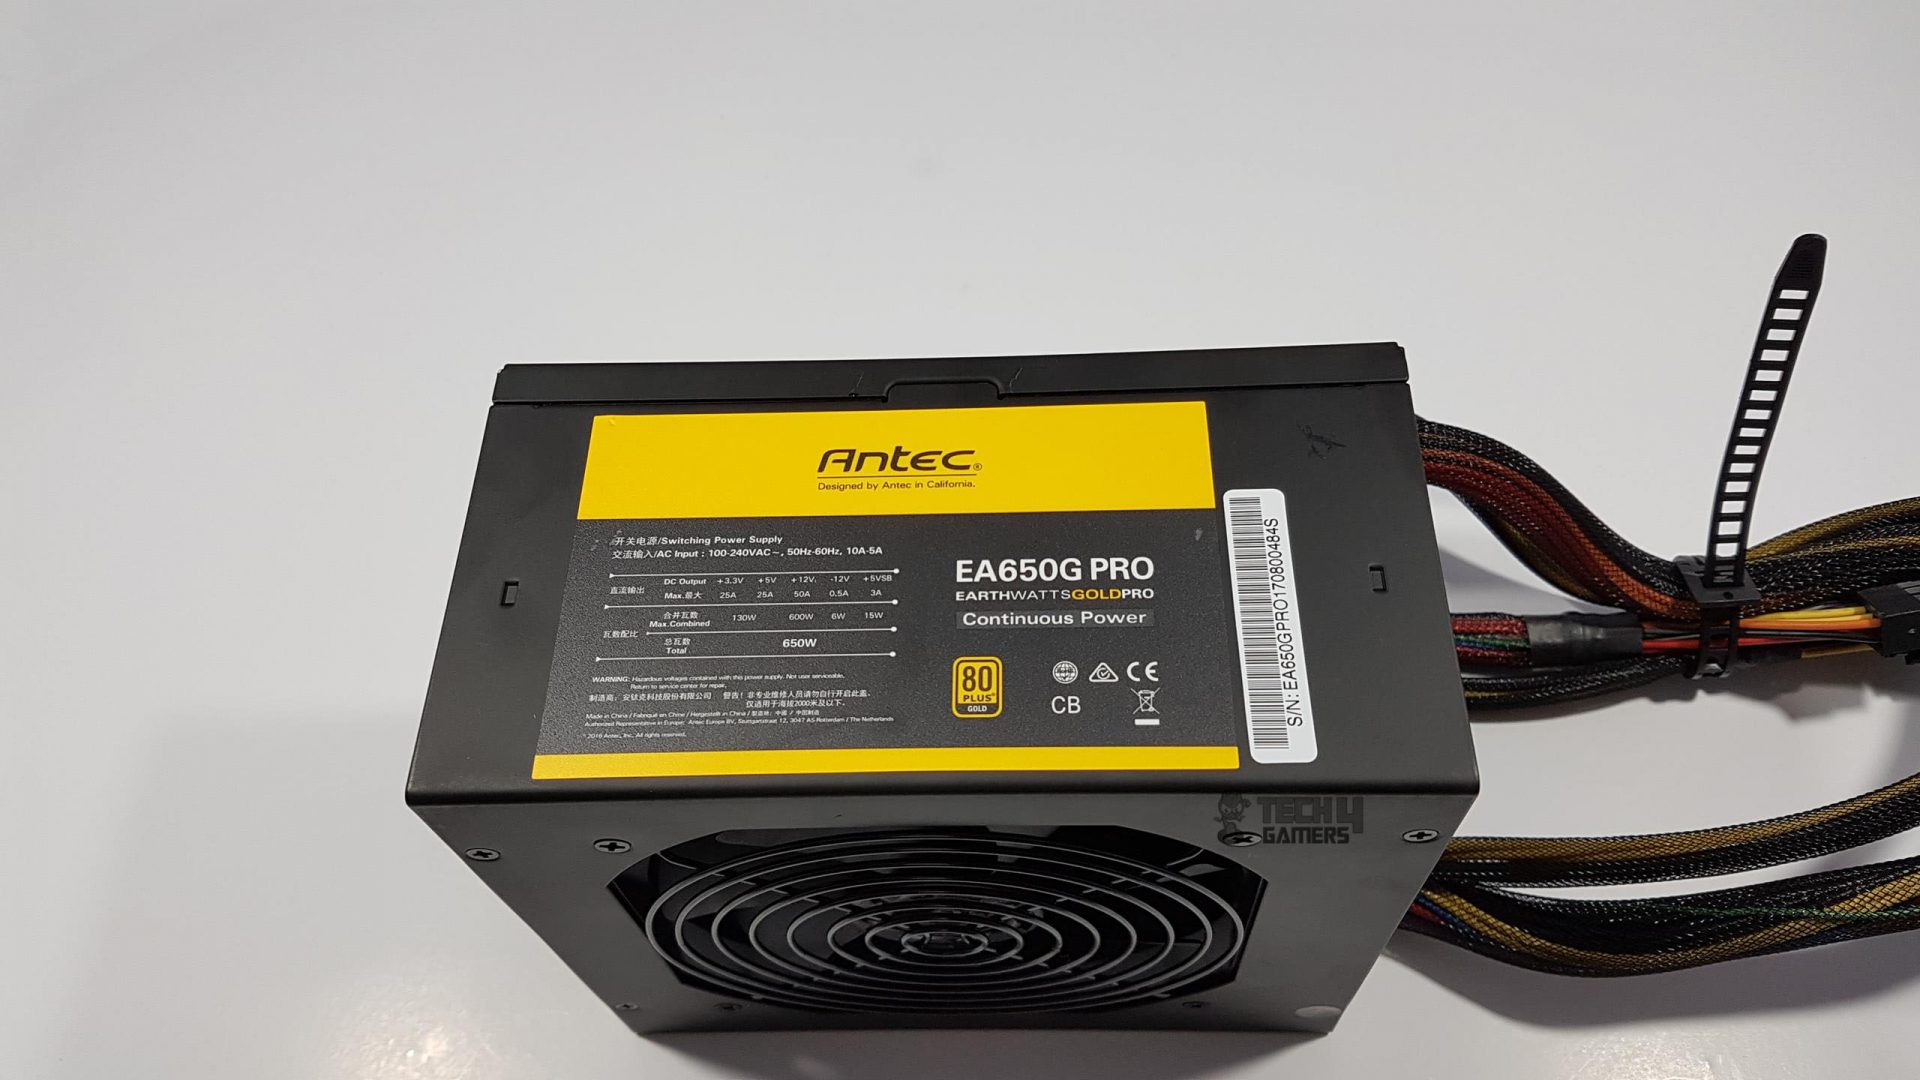
Laptops usually have the PSUs integrated into their motherboards, so you would need to change the motherboard for laptops. Also, ensure you get a compatible PSU for your computer with similar supply ports to the broken one.
Final Words
This was everything you needed to know about the AIO CPU fan not spinning. Before concluding this article, I suggest ensuring no wires entangled with the CPU fan prevent the fan from spinning. CPU fans generally produce less torque, so even the lightest wires can stop the fan from turning.
huh, my pc has restarted randomly a few times in the last week and i was wondering if my PSU has died but instead it's my CPU fan. it's just not spinning at all so my CPU is running hot
— memento hikikomori (@_zellyn) March 24, 2018
Your PC fan is also programmed to spin faster when the CPU runs games or resource-hungry applications. So, after trying all the above fixes, start a game and look inside the CPU to check whether the fan has started spinning faster. If you don’t observe any change in the spinning speed of the fan after some time, you may need to replace your CPU fan.
Frequently Asked Questions
Your CPU fan might be clogged due to dust and debris accumulation, which may prevent it from spinning. Other possible reasons include the fan connected to the wrong header, low CPU fan rpm, faulty PSU, outdated BIOS, broken CPU fan, or a faulty motherboard.
Cleaning and lubricating the fan mostly resolves the problem. Other fixes include connecting the CPU fan to another header, updating the BIOS, setting a lower CPU fan rpm limit, replacing the PSU or the fan, and replacing the motherboard.
No, your PC won’t work without the CPU fan and will throw a CPU fan error. In some cases, the PC might turn on, but it will soon shut down when the temperature of the CPU increases.
Related Articles:
- AIO Vs Custom Loop Liquid Cooling
- How To Remove Intel CPU Fan/Cooler? Step By Step
- How To Remove AMD CPU Fan
- How Long Do AIO Coolers Last
- How To Fix CPU Fan Not Spinning [Tested Methods]
Thank you! Please share your positive feedback. 🔋
How could we improve this post? Please Help us. 😔
[How To’s & Guides Editor]
Haddi has been in the Gaming and tech Space for over 10 Years Now; he has worked on notable websites like eXputer, Gamepur, Gear Siege, Gearnuke, and plenty more. He is an expert at Games & PC Hardware; you can expect him to solve any problem. People often joke, that if there is any problem anyone can solve, Haddi can solve it faster. Currently, Haddi writes and manages a Team of Experts at Tech4Gamers.
Contact: Haddi@tech4gamers.com


Feedback By: