 Threads
Solid Overclocking!
Review Summary
The GIGABYTE Z490 AORUS PRO AX Gaming Motherboard is a solid choice for PC enthusiasts. It supports Intel’s 10th and 11th-generation CPUs and excels in overclocking with a 12+1 power phase design. With dual M.2 ports, PCIe 4.0 readiness, and up to 128GB DDR4 support at 5000 MT/s, it’s ideal for high-performance setups. Overall, this motherboard is a great fit for users prioritizing performance and advanced features in an upper mid-range offering.

Overall
-
Performance - 9/10
9/10
-
Features - 9/10
9/10
-
Design - 8/10
8/10
-
Value - 8/10
8/10
Pros
- Supports Intel 10th and 11th gen CPUs
- 12+1 power phase design
- Dual M.2 ports
- PCIe 4.0 readiness
- Supports up to 128GB DDR4 at 5000 MT/s
- Robust overclocking capabilities
- Effective thermal management
- Intel 2.5 GbE LAN and Wi-Fi 6 connectivity
- High-quality audio with Realtek ALC1220
- Durable build quality
Cons
- Relatively higher price point
- Complexity in BIOS compared to competitors
- No included Thunderbolt support


The GIGABYTE Z490 AORUS PRO AX Gaming Motherboard stands out as an upper mid-range offering in the competitive landscape of high-end PC components. With a focus on catering to PC enthusiasts, GIGABYTE’s AORUS Gaming brand delivers powerful and stylish gaming products, expanding its reach into various categories, including server products and peripherals.
GIGABYTE has also ventured into the PC peripheral and doing so by achieving the AORUS ecosystem. It also has non-arous boards, such as the Z370 HD3, which we reviewed. In this review, we’ll get into the key features and performance aspects of the Z490 AORUS PRO AX motherboard.
- Why you can trust Tech4Gamers: Our reviews are based on dedicated hands-on testing by our team of experienced hardware experts. Find out more about how we test.
Key Takeaways
- GIGABYTE Z490 PRO Motherboard is an upper mid-range board with a 12+1 power phase design, dual M.2 ports, and PCIe 4.0 readiness.
- The GIGABYTE Z490 PRO excels with versatile CPU compatibility, high memory capacity, and robust overclocking performance, making it a top choice for enthusiasts.
- You should not get the GIGABYTE Z490 PRO if you prioritize basic functionality over advanced features, have specific aesthetic preferences misaligned with the motherboard’s design, or require more expansion options for future upgrades.
By the way, if you are looking for new 12th-generation processors, check out our Z690 Motherboards Review. Similarly, If you don’t like GIGABYTE, go for the MSI Z490 Motherboard.
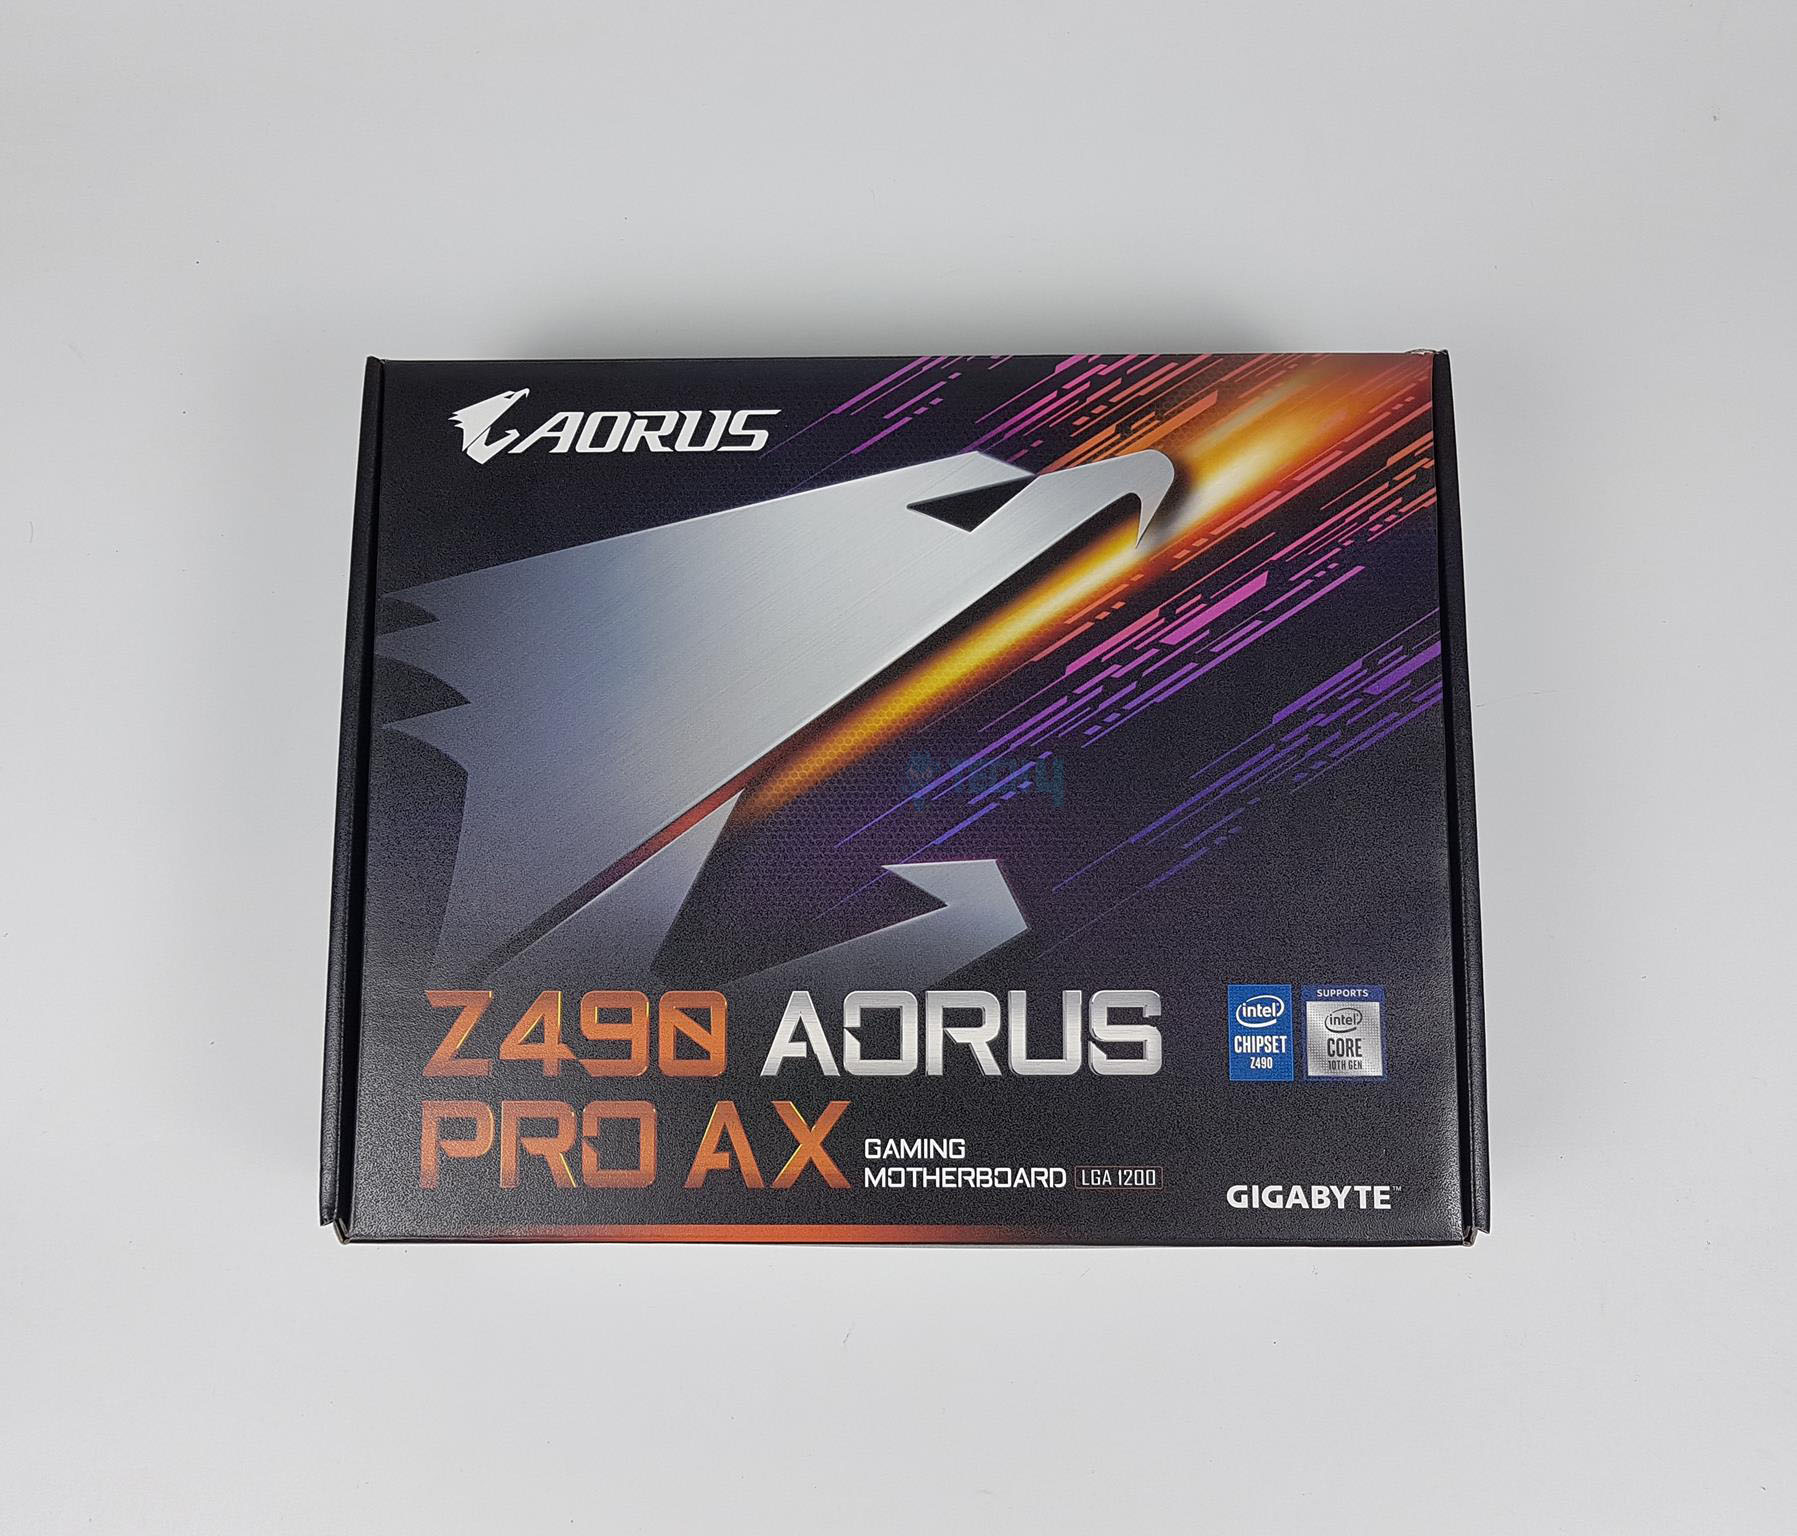
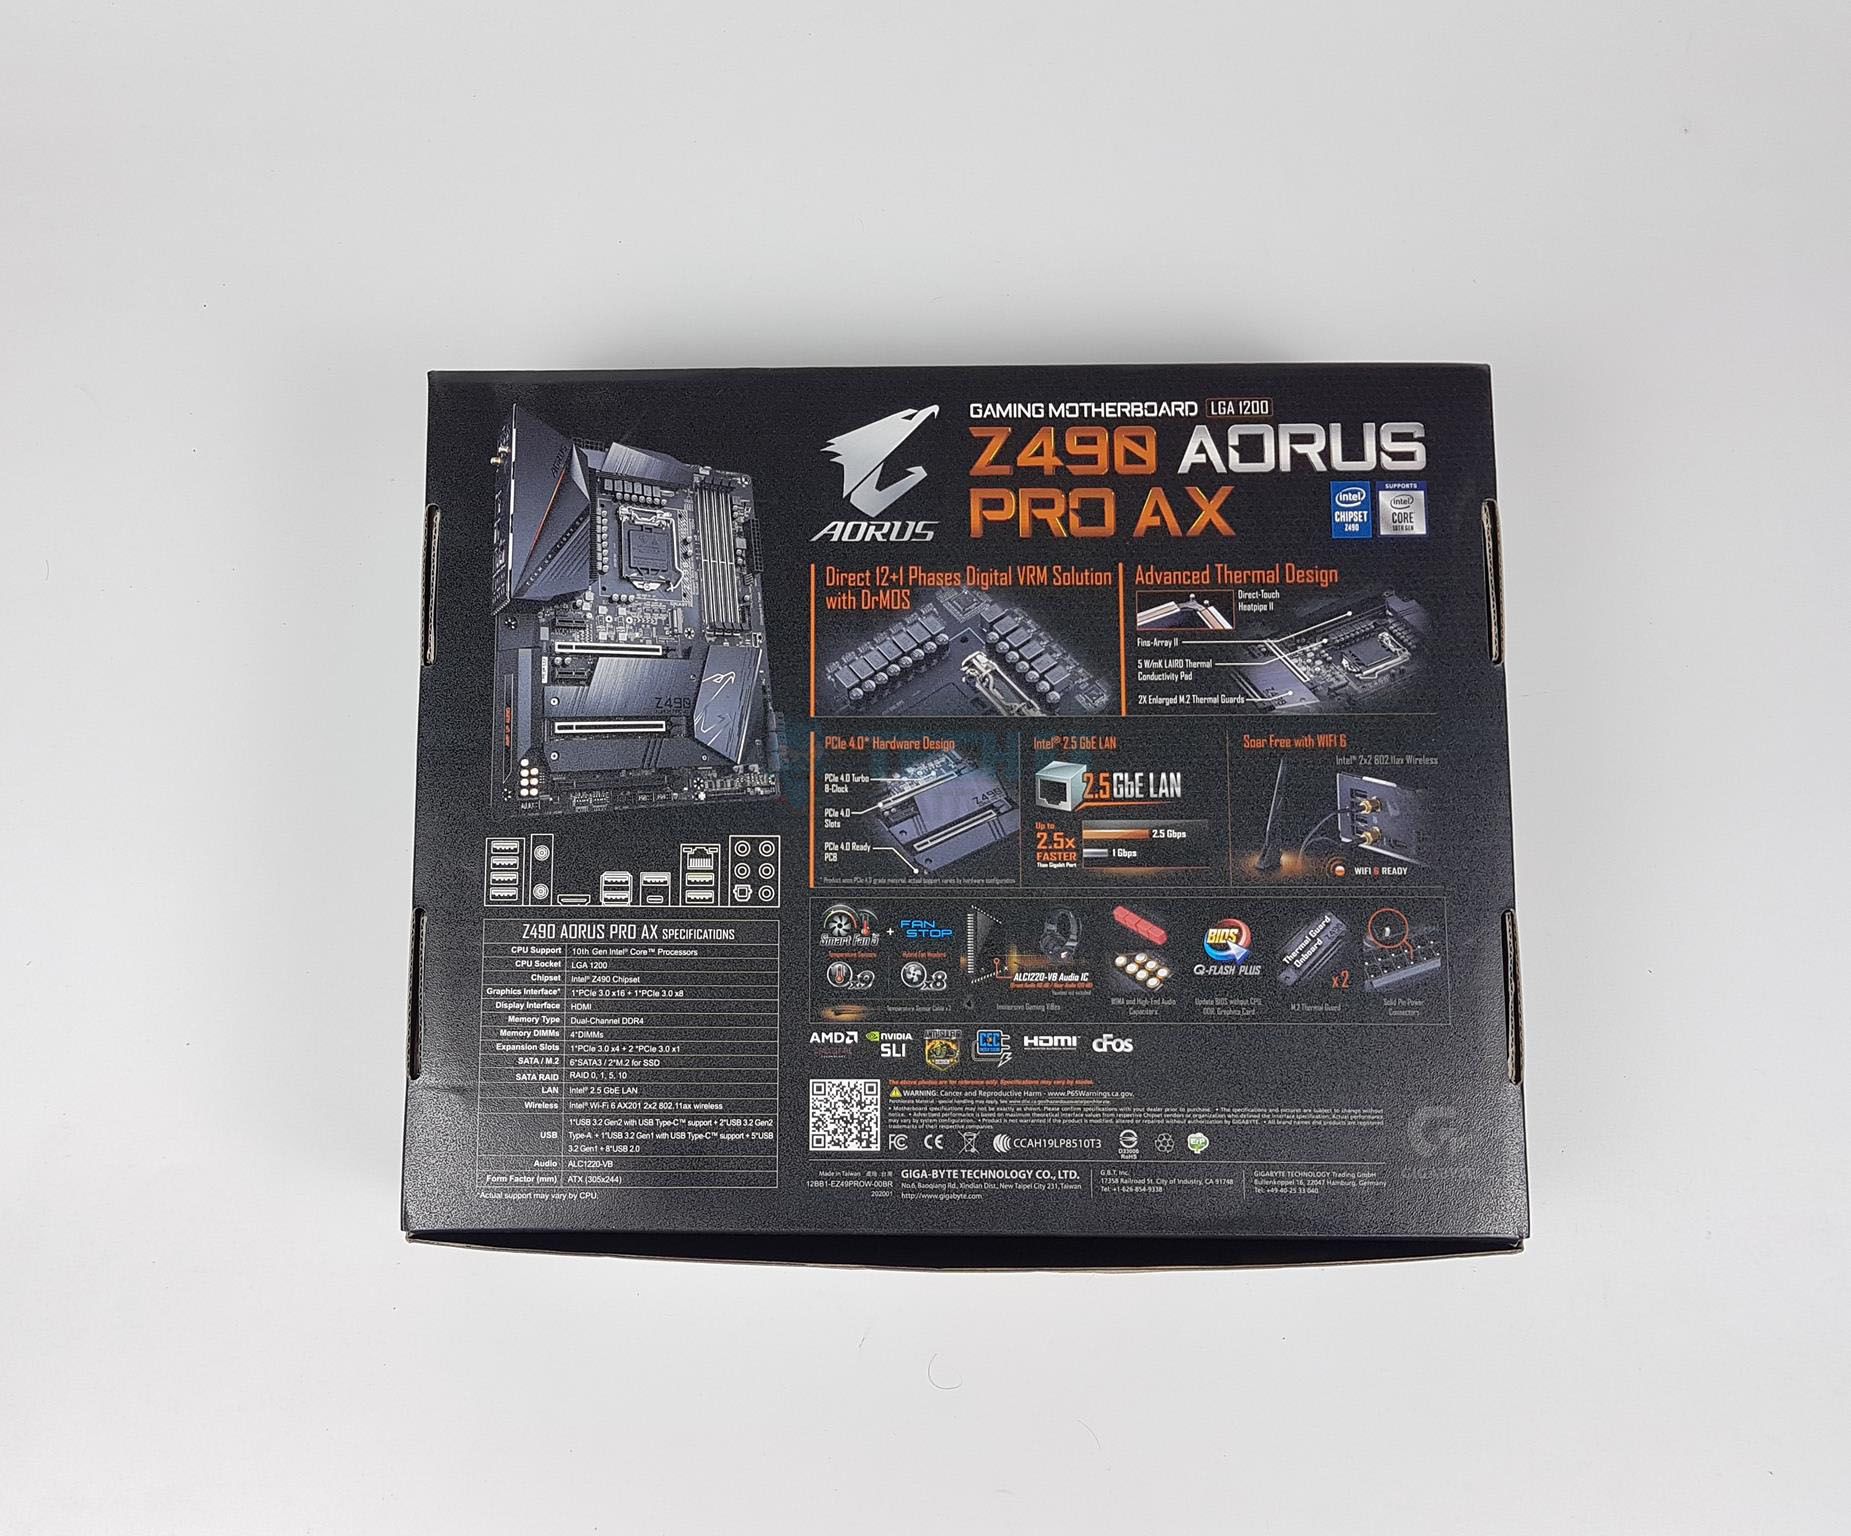
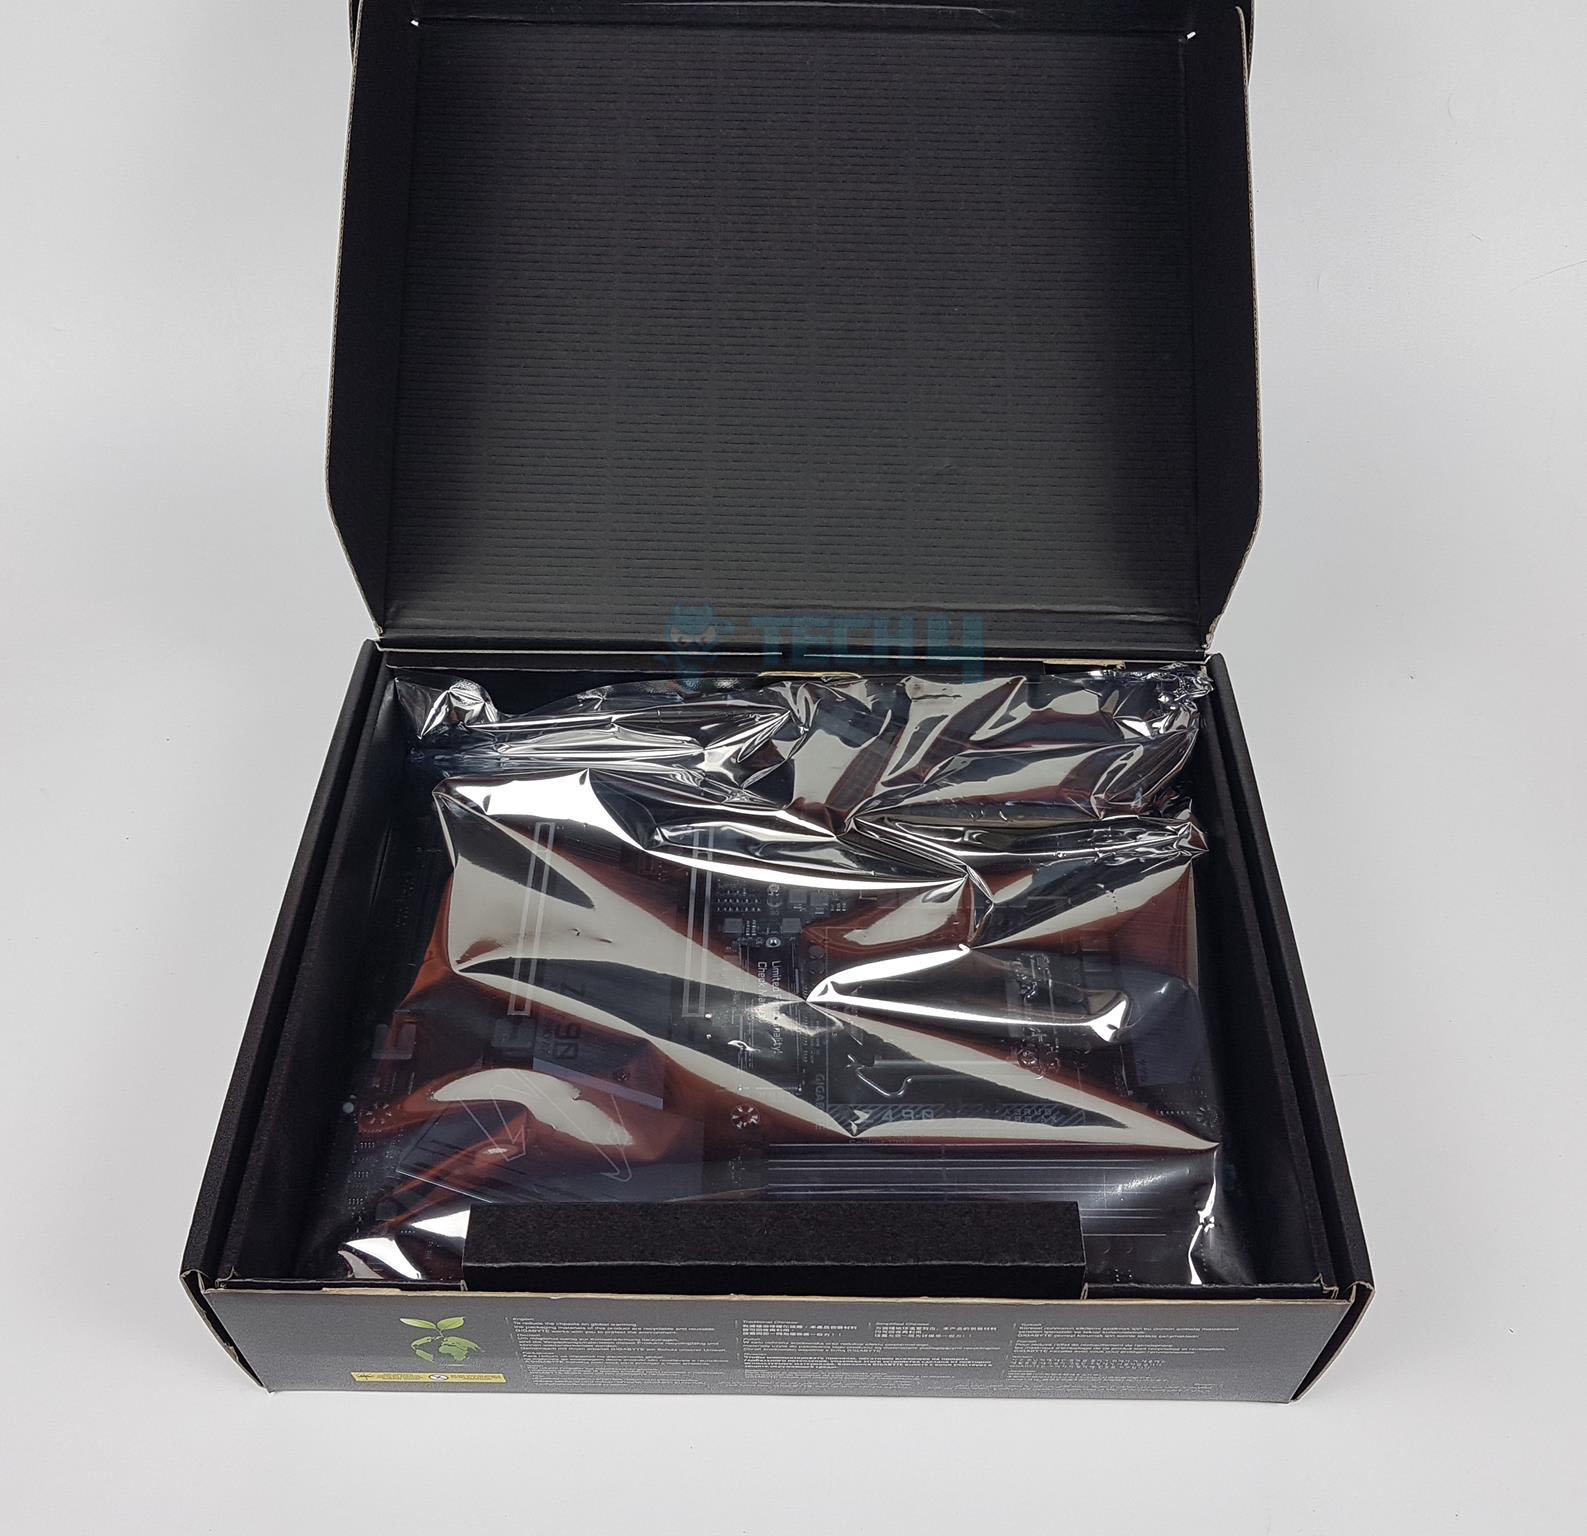
Packaging And Unboxing
The motherboard is shipped inside a cardboard-based packing box.
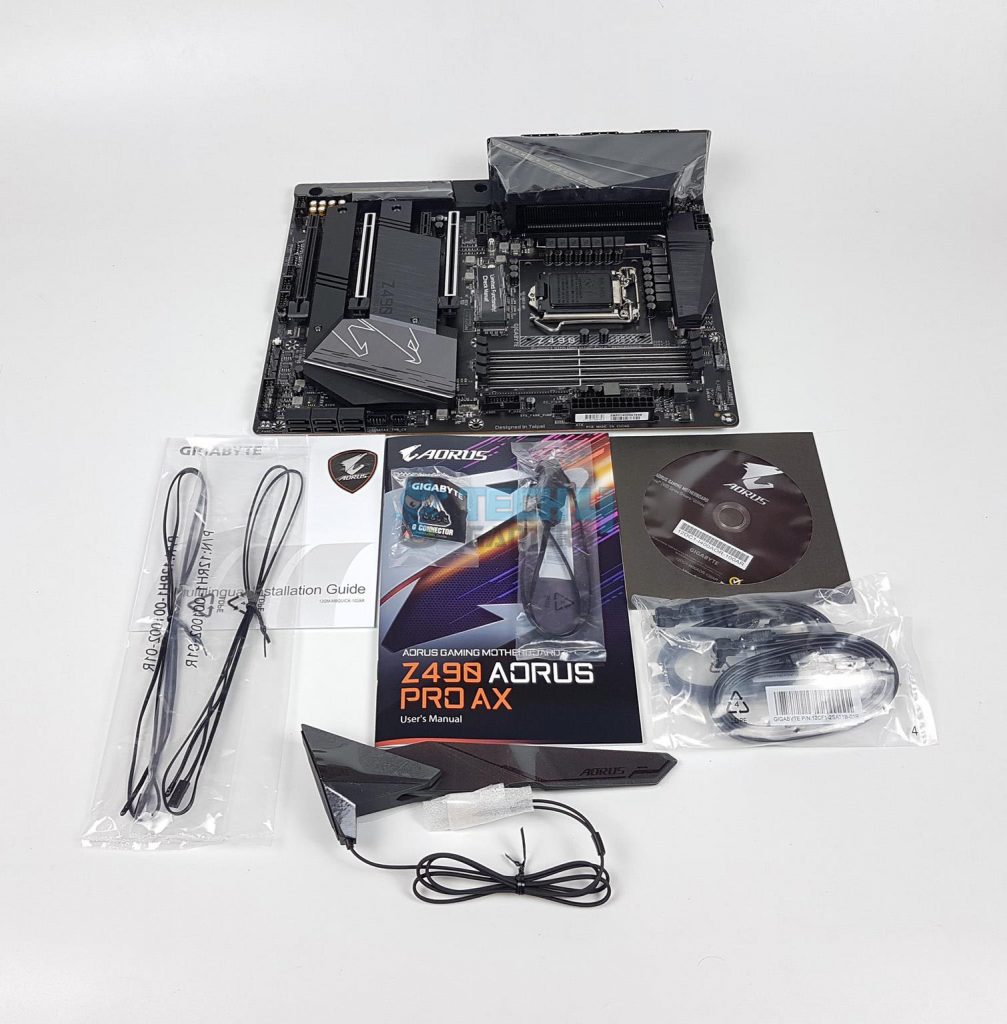
Accessories
These include:
- 1x Motherboard
- 1x WiFi Antenna
- 1x G Connector
- 1x Installation Disk
- 1x User Manual
- 1x Installation Guide
- 1x Metal Badge
- 4x SATA Cables
- 1x RGB Extension Cable
- 2x Thermal Probe cables
Closer Look
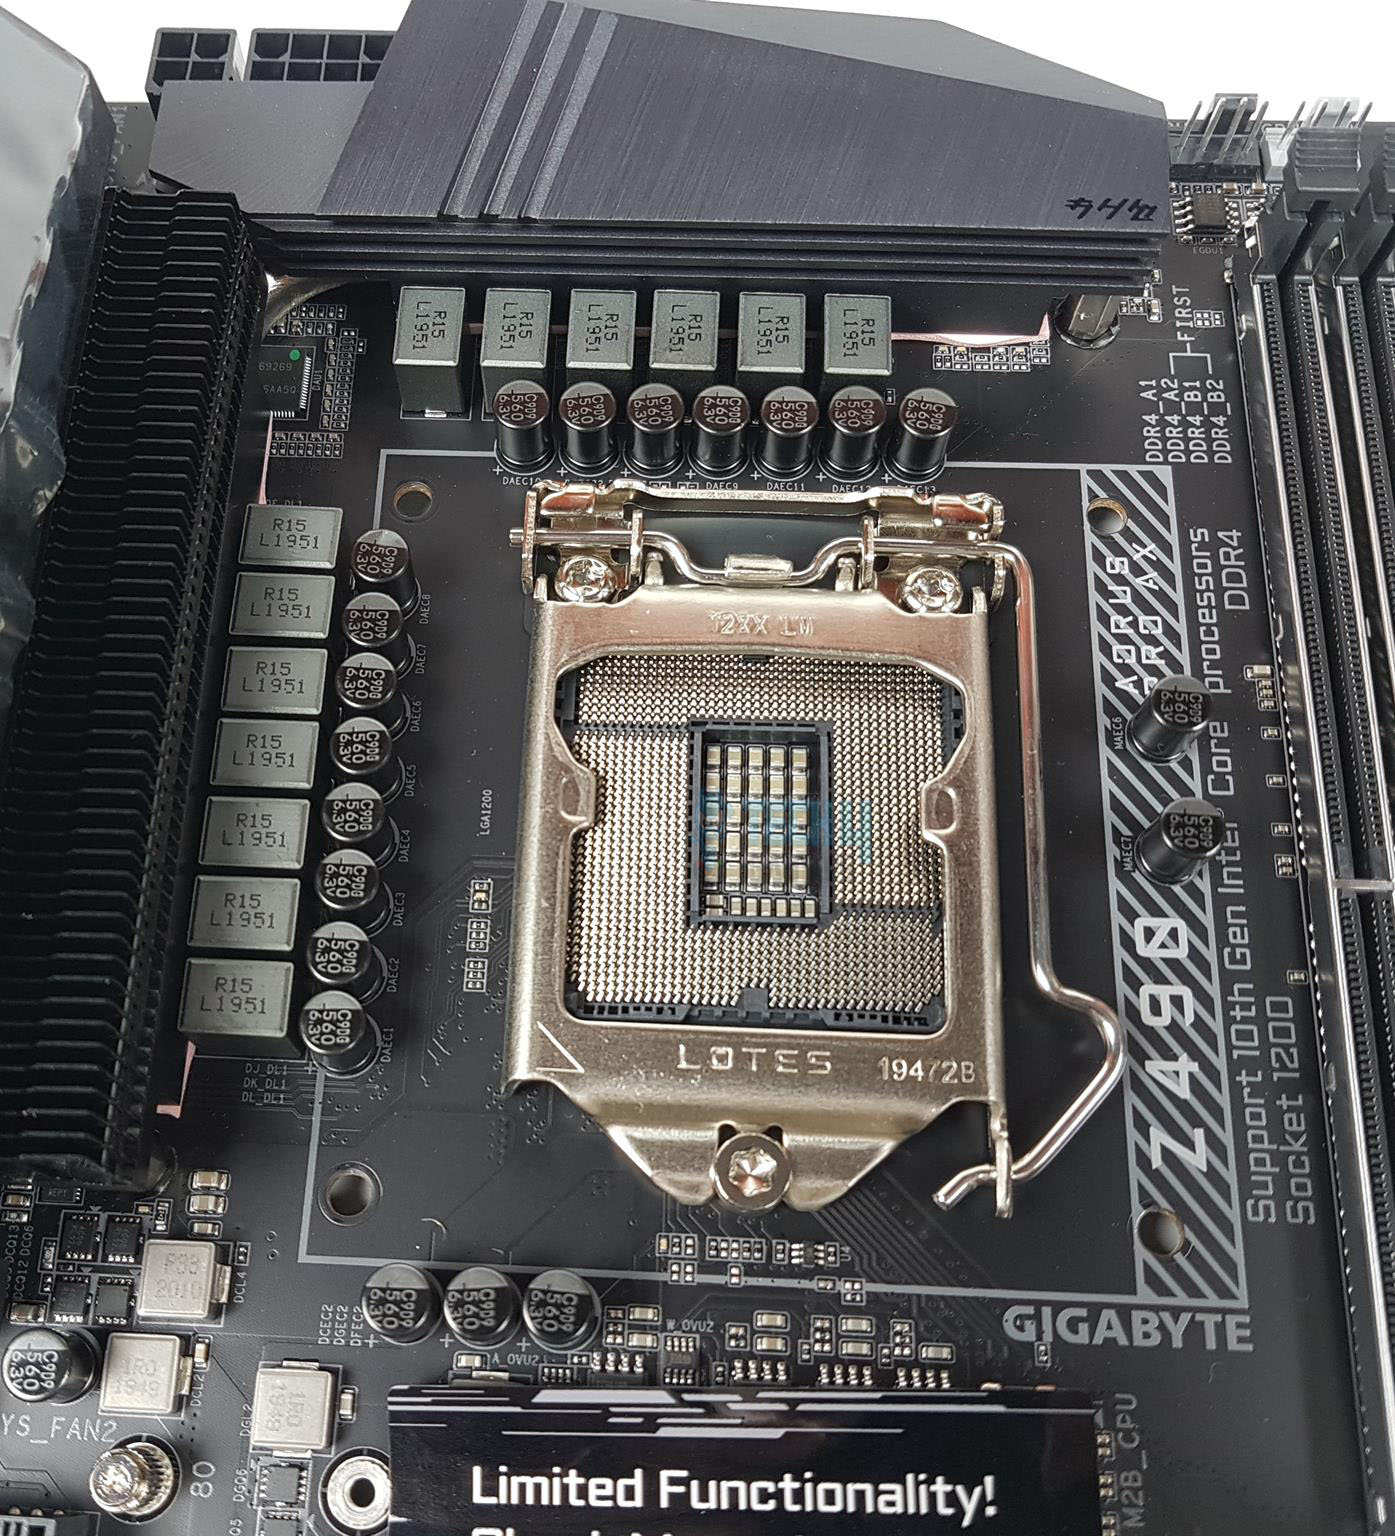
It is time to take a closer look at the PCB of the motherboard and its layout. Let’s take a look at the motherboard.
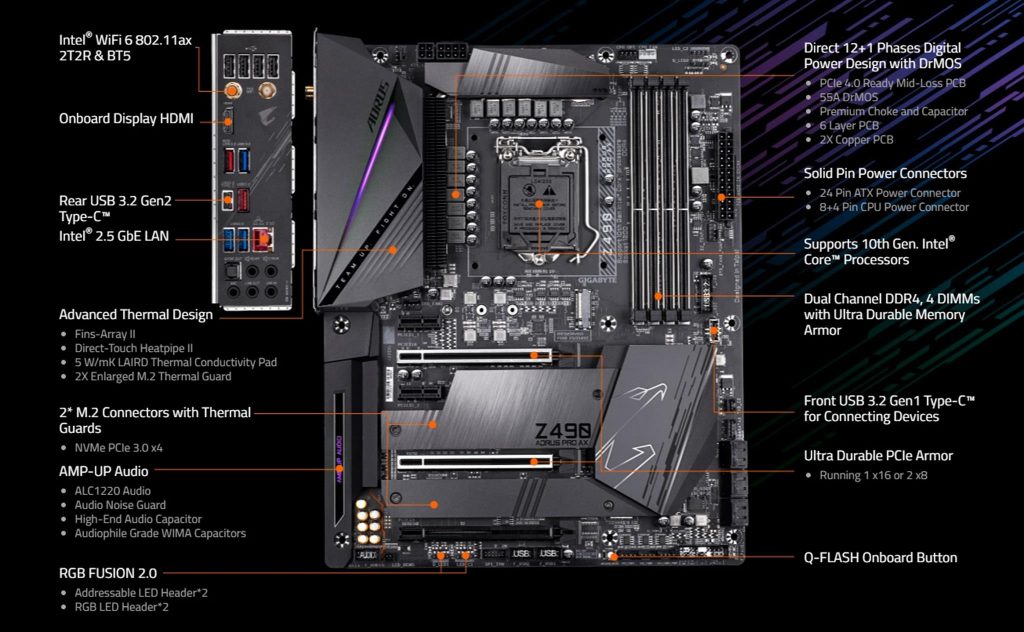
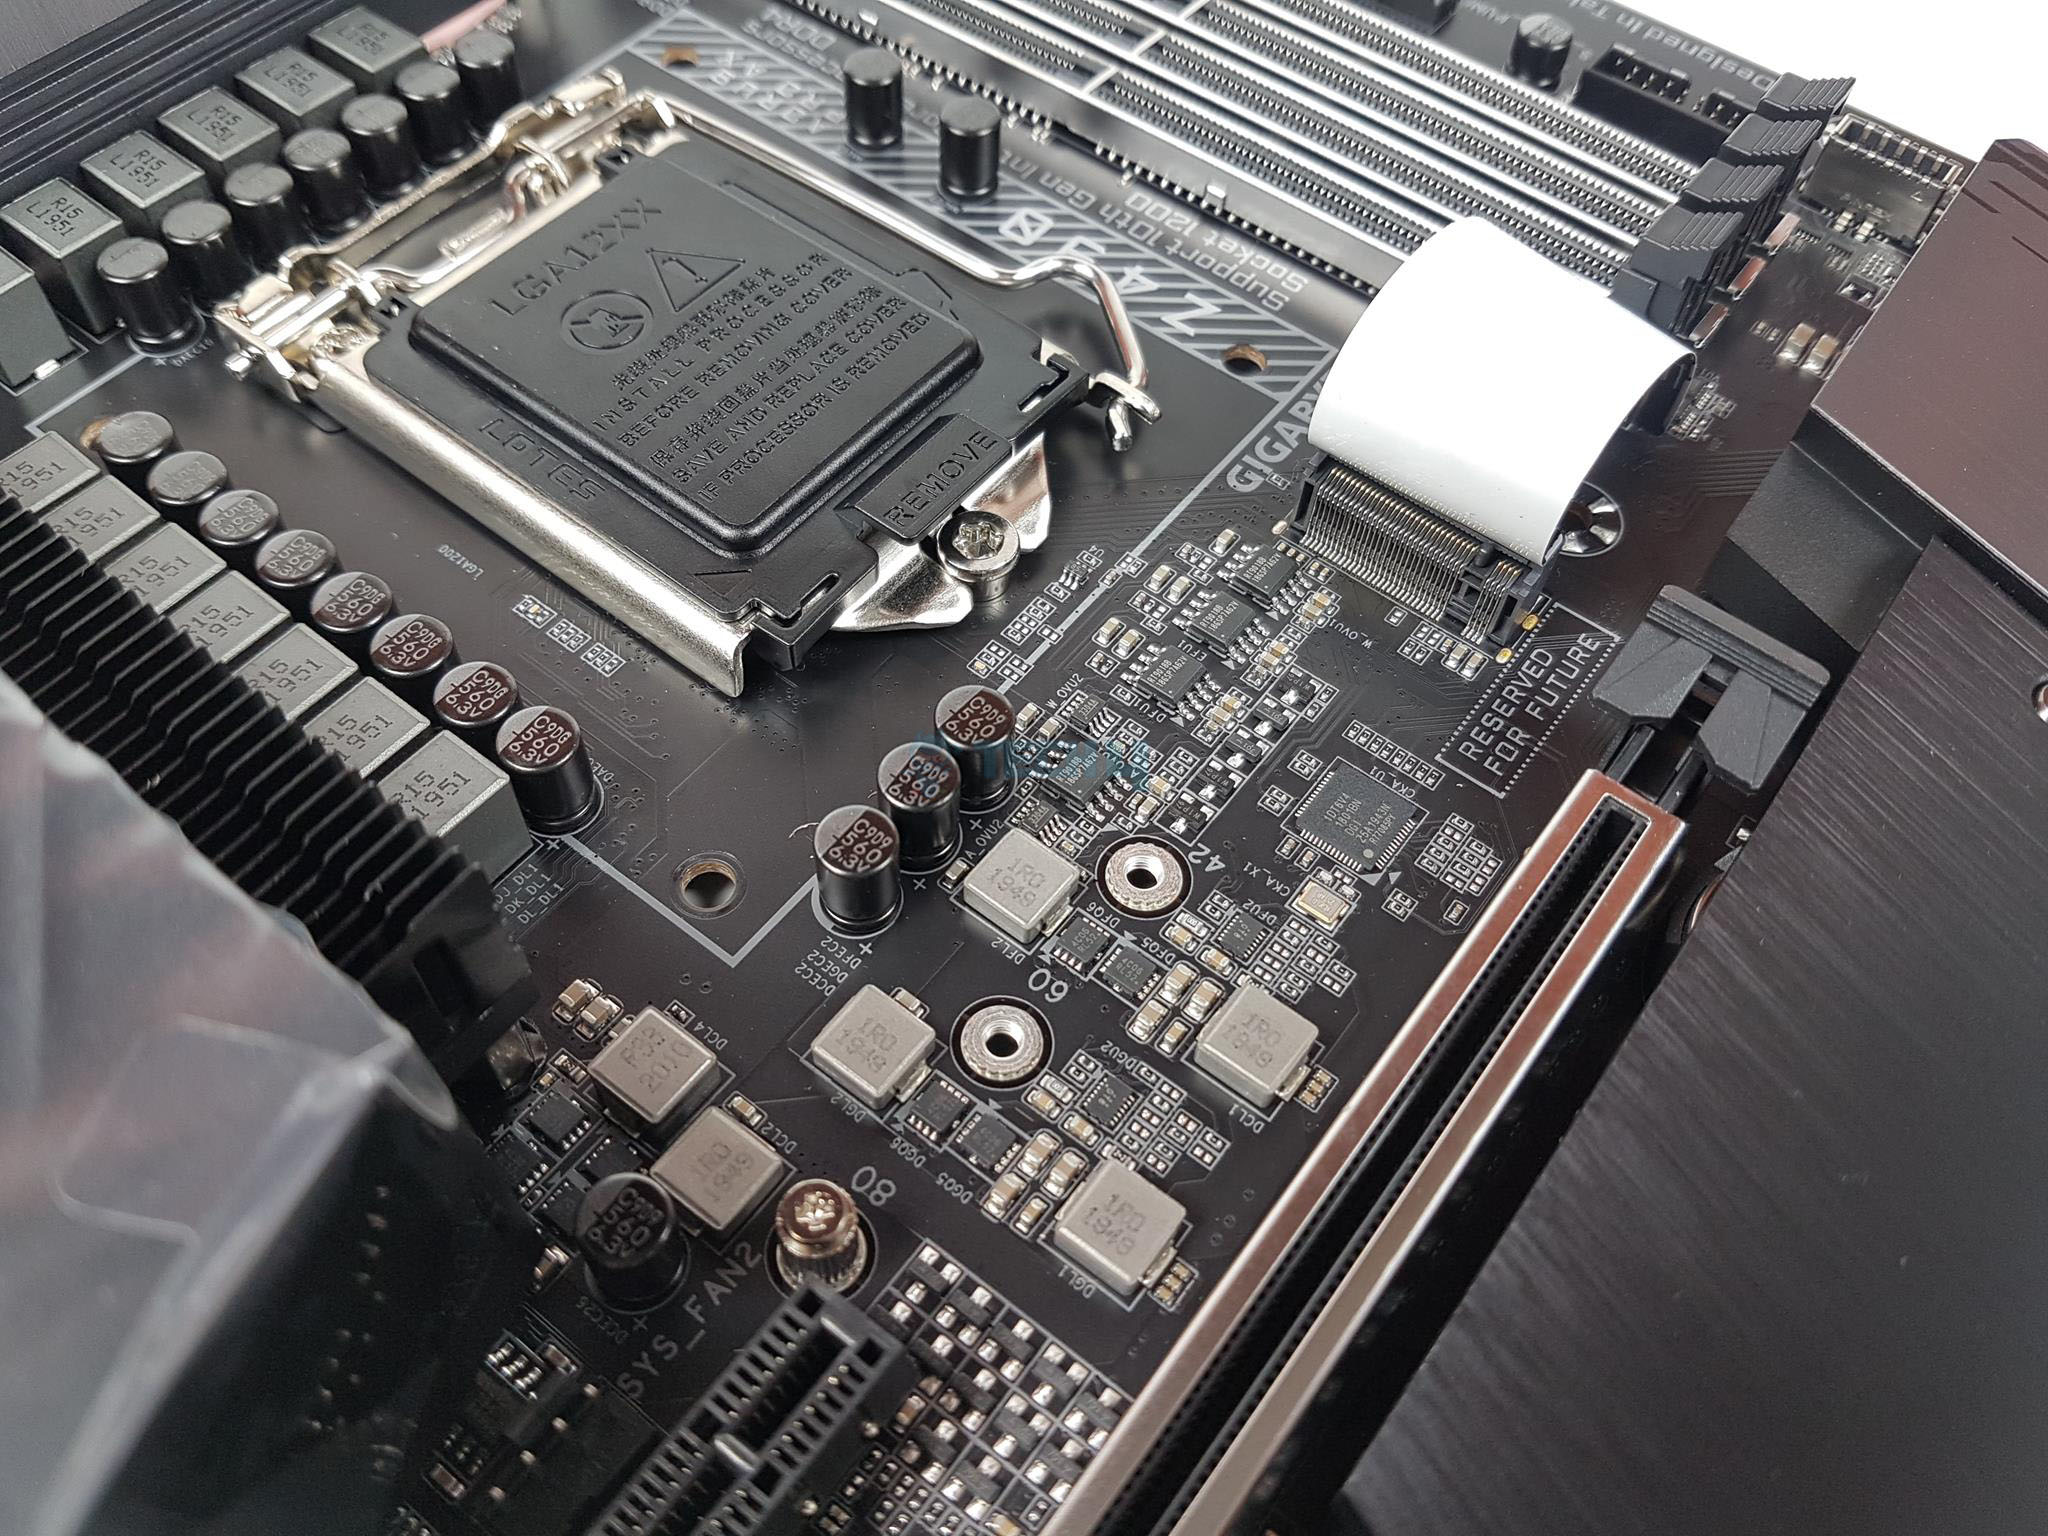
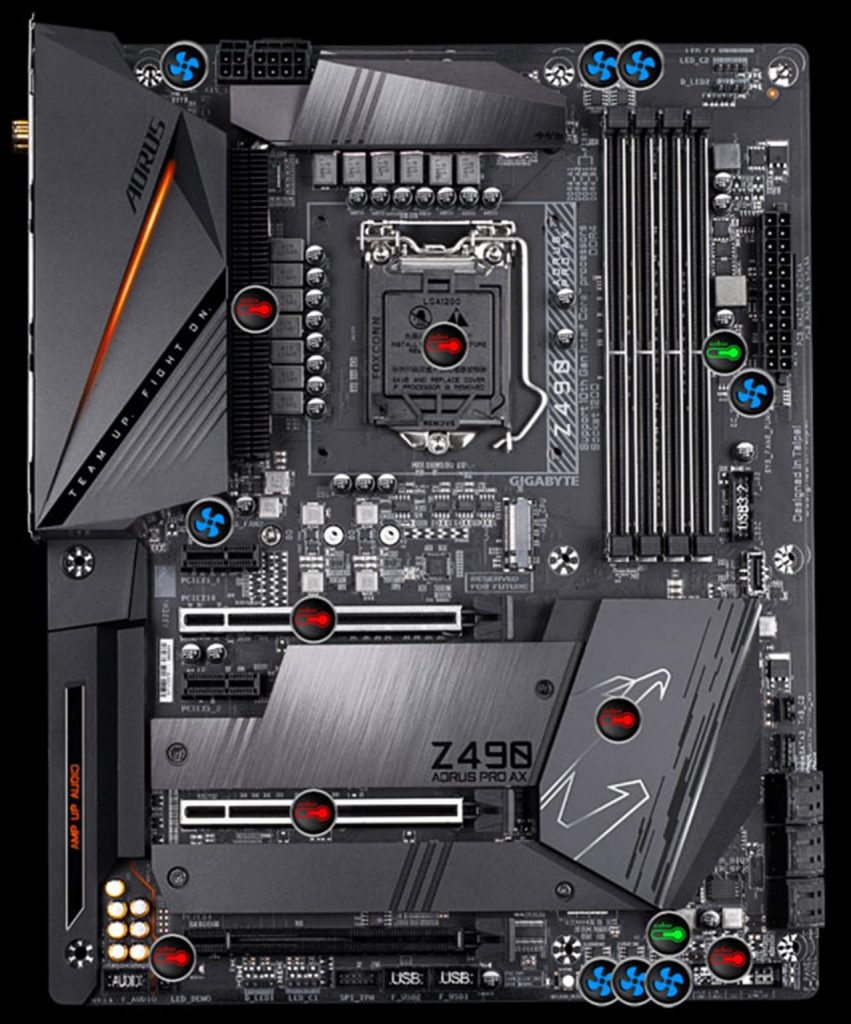
The GIGABYTE Z490 AORUS PRO packs decisive 12+1 Phases digital VRM with DrMOS, Fins-Array II, Dual PCIe M.2 with Thermal Guards, Intel® WiFi 6 AX201, Intel® 2.5 GbE LAN with USB Type-C, RGB Fusion 2.0, and a plethora of utilities and applications.
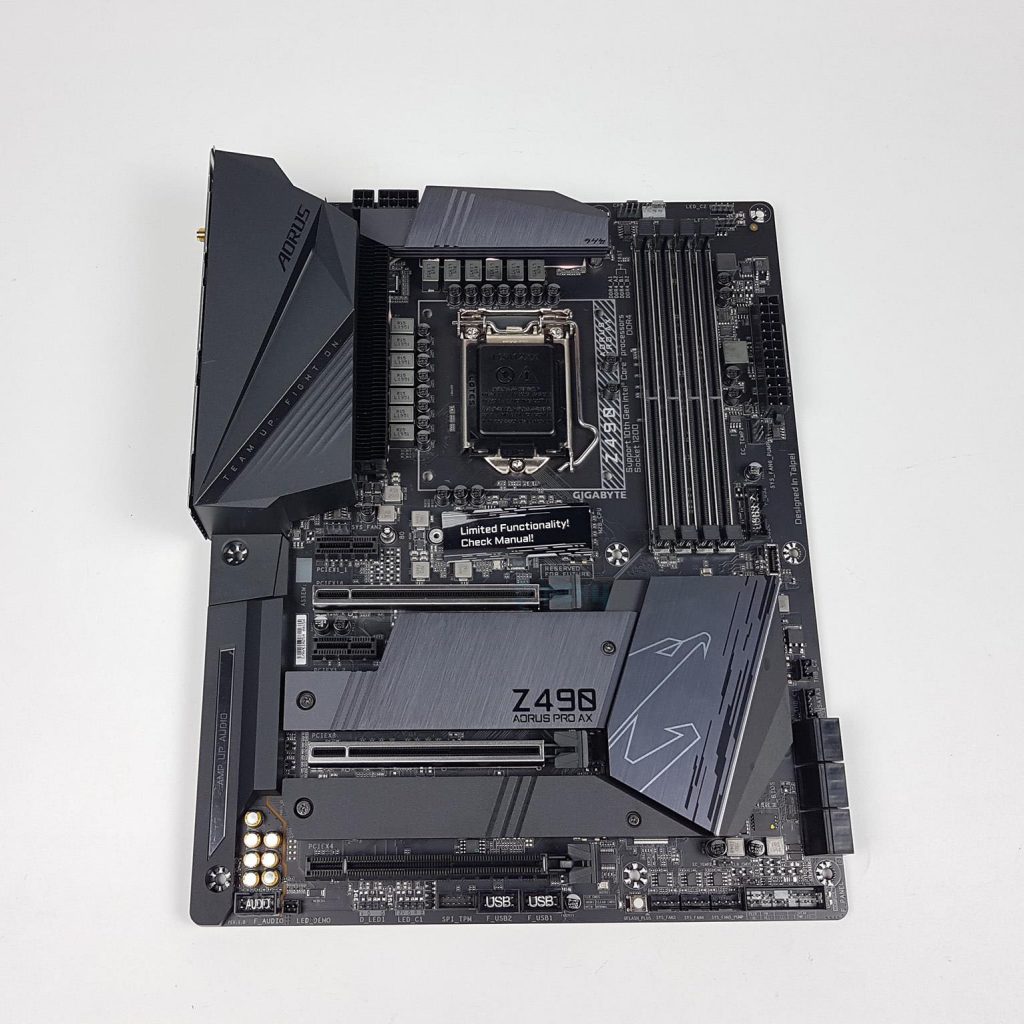
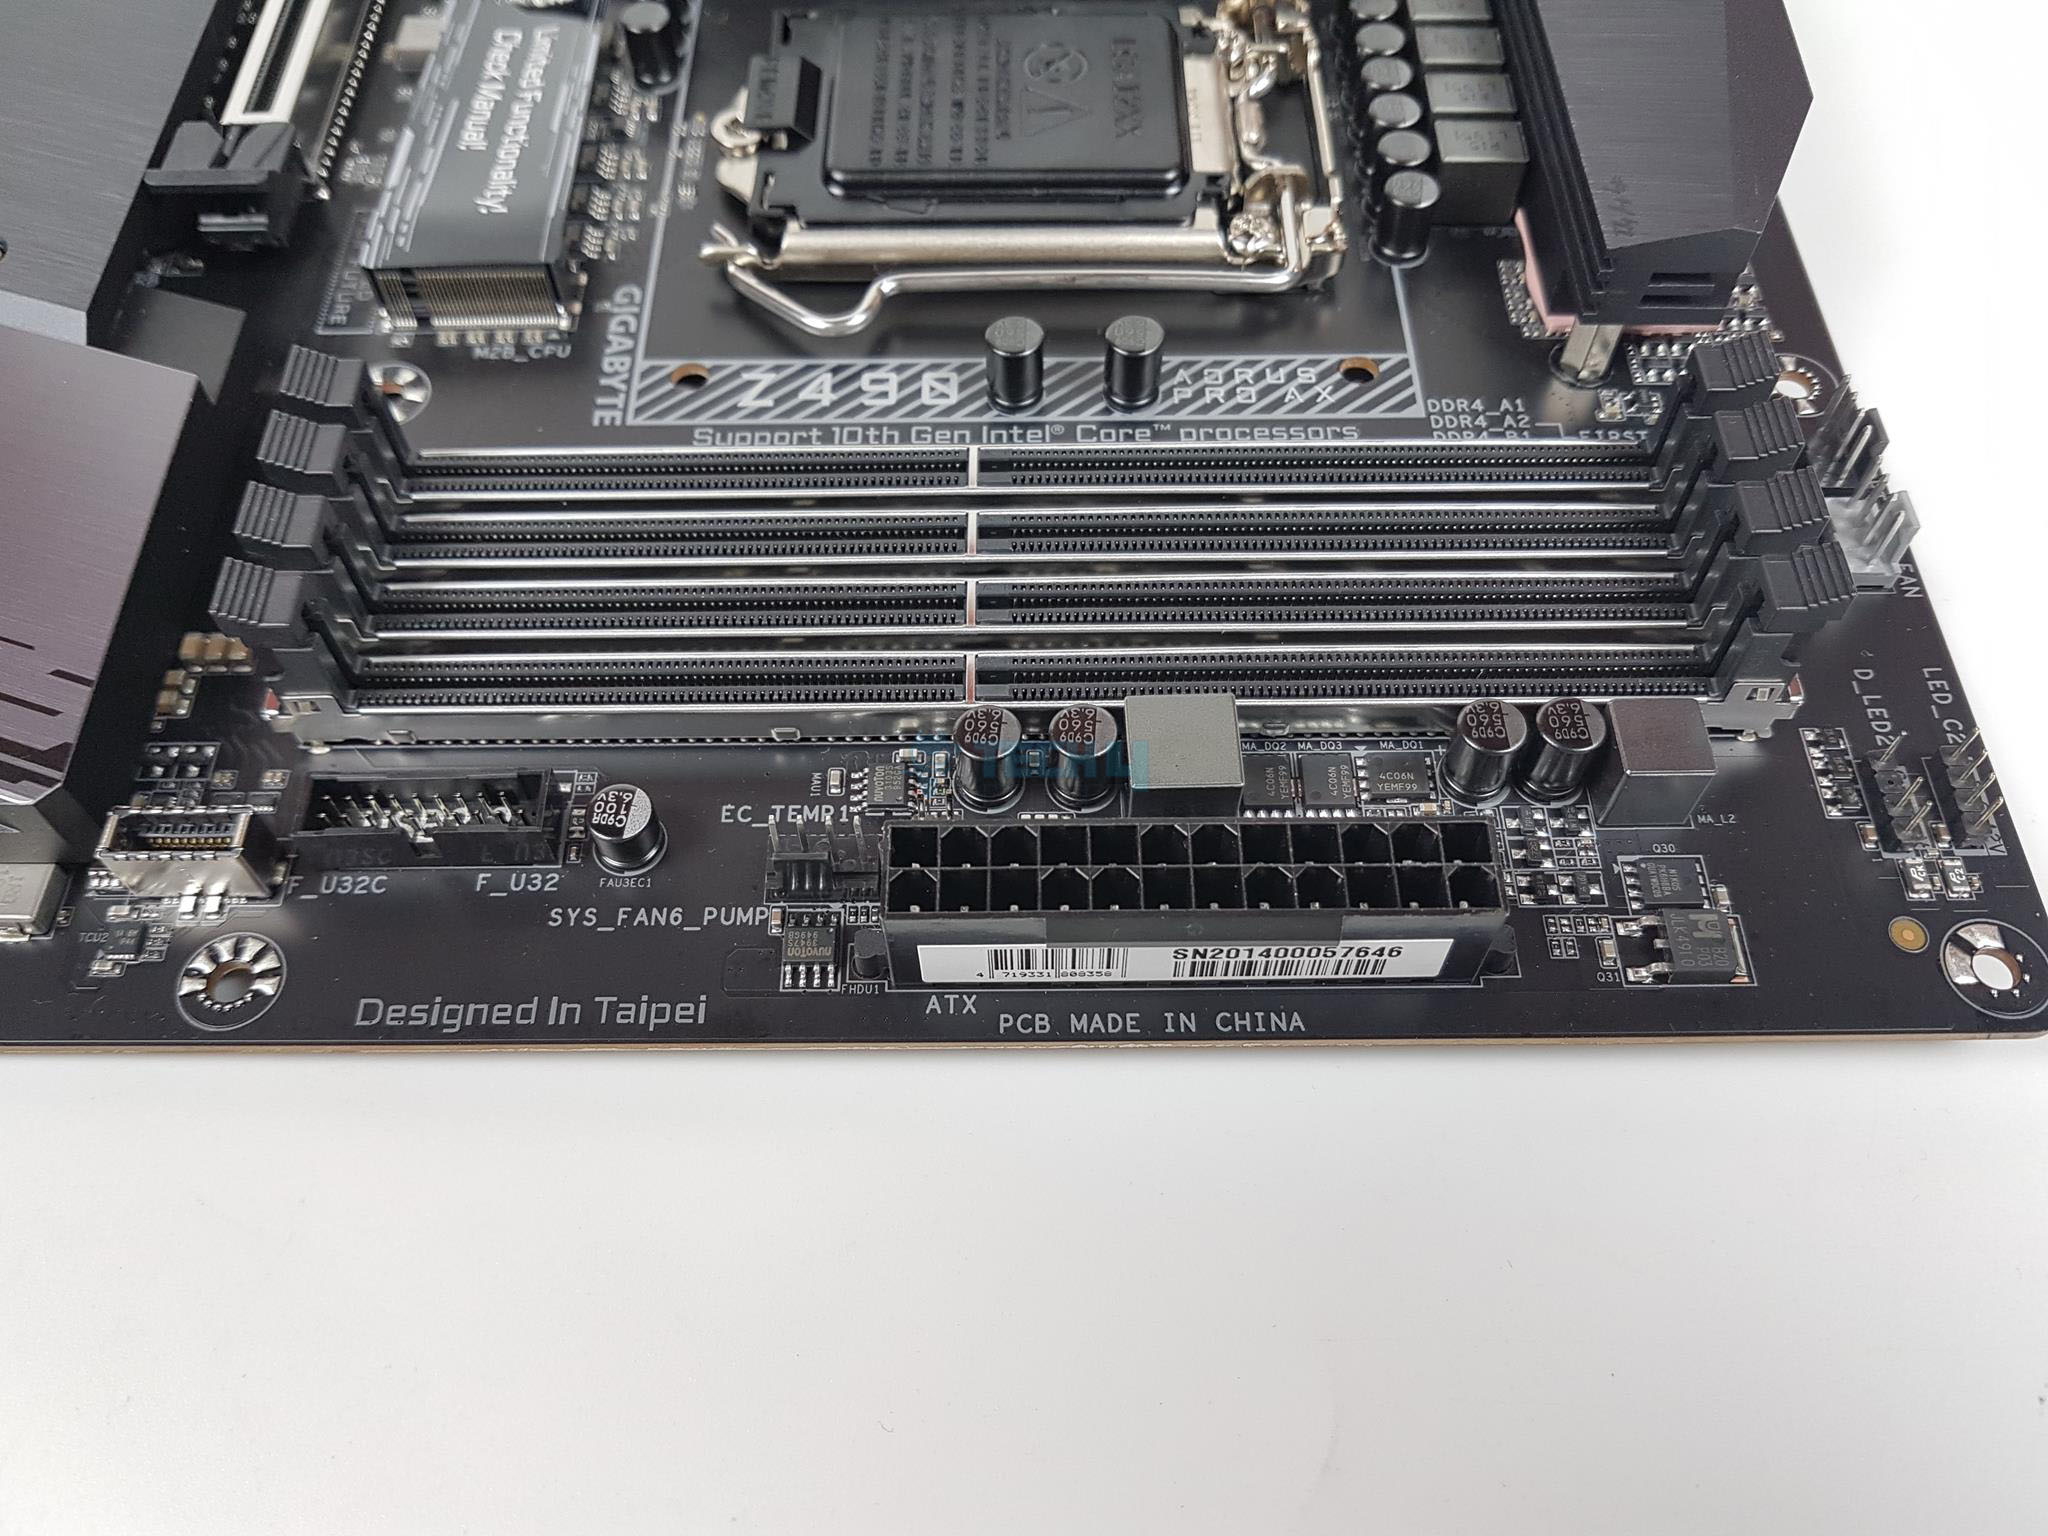
We have 4x DIMM slots for DDR4 RAM, 5x PCIe 3.0 slots at X16/X8/X4/X1, 6x SATA ports, Thunderbolt port, USB 2.0 ports, USB Type-C, USB 3.1 Gen 1, USB 3.2 ports, onboard audio solution driven by Realtek ALC1220-VB, Intel 2.5 GbE NIC, on-board WiFi 6 AX201 key and nice handy I/O connectivity options. The PCB has an ATX form factor measuring 30.5cmX24.4cm and has support for Microsoft Windows 10 x64.
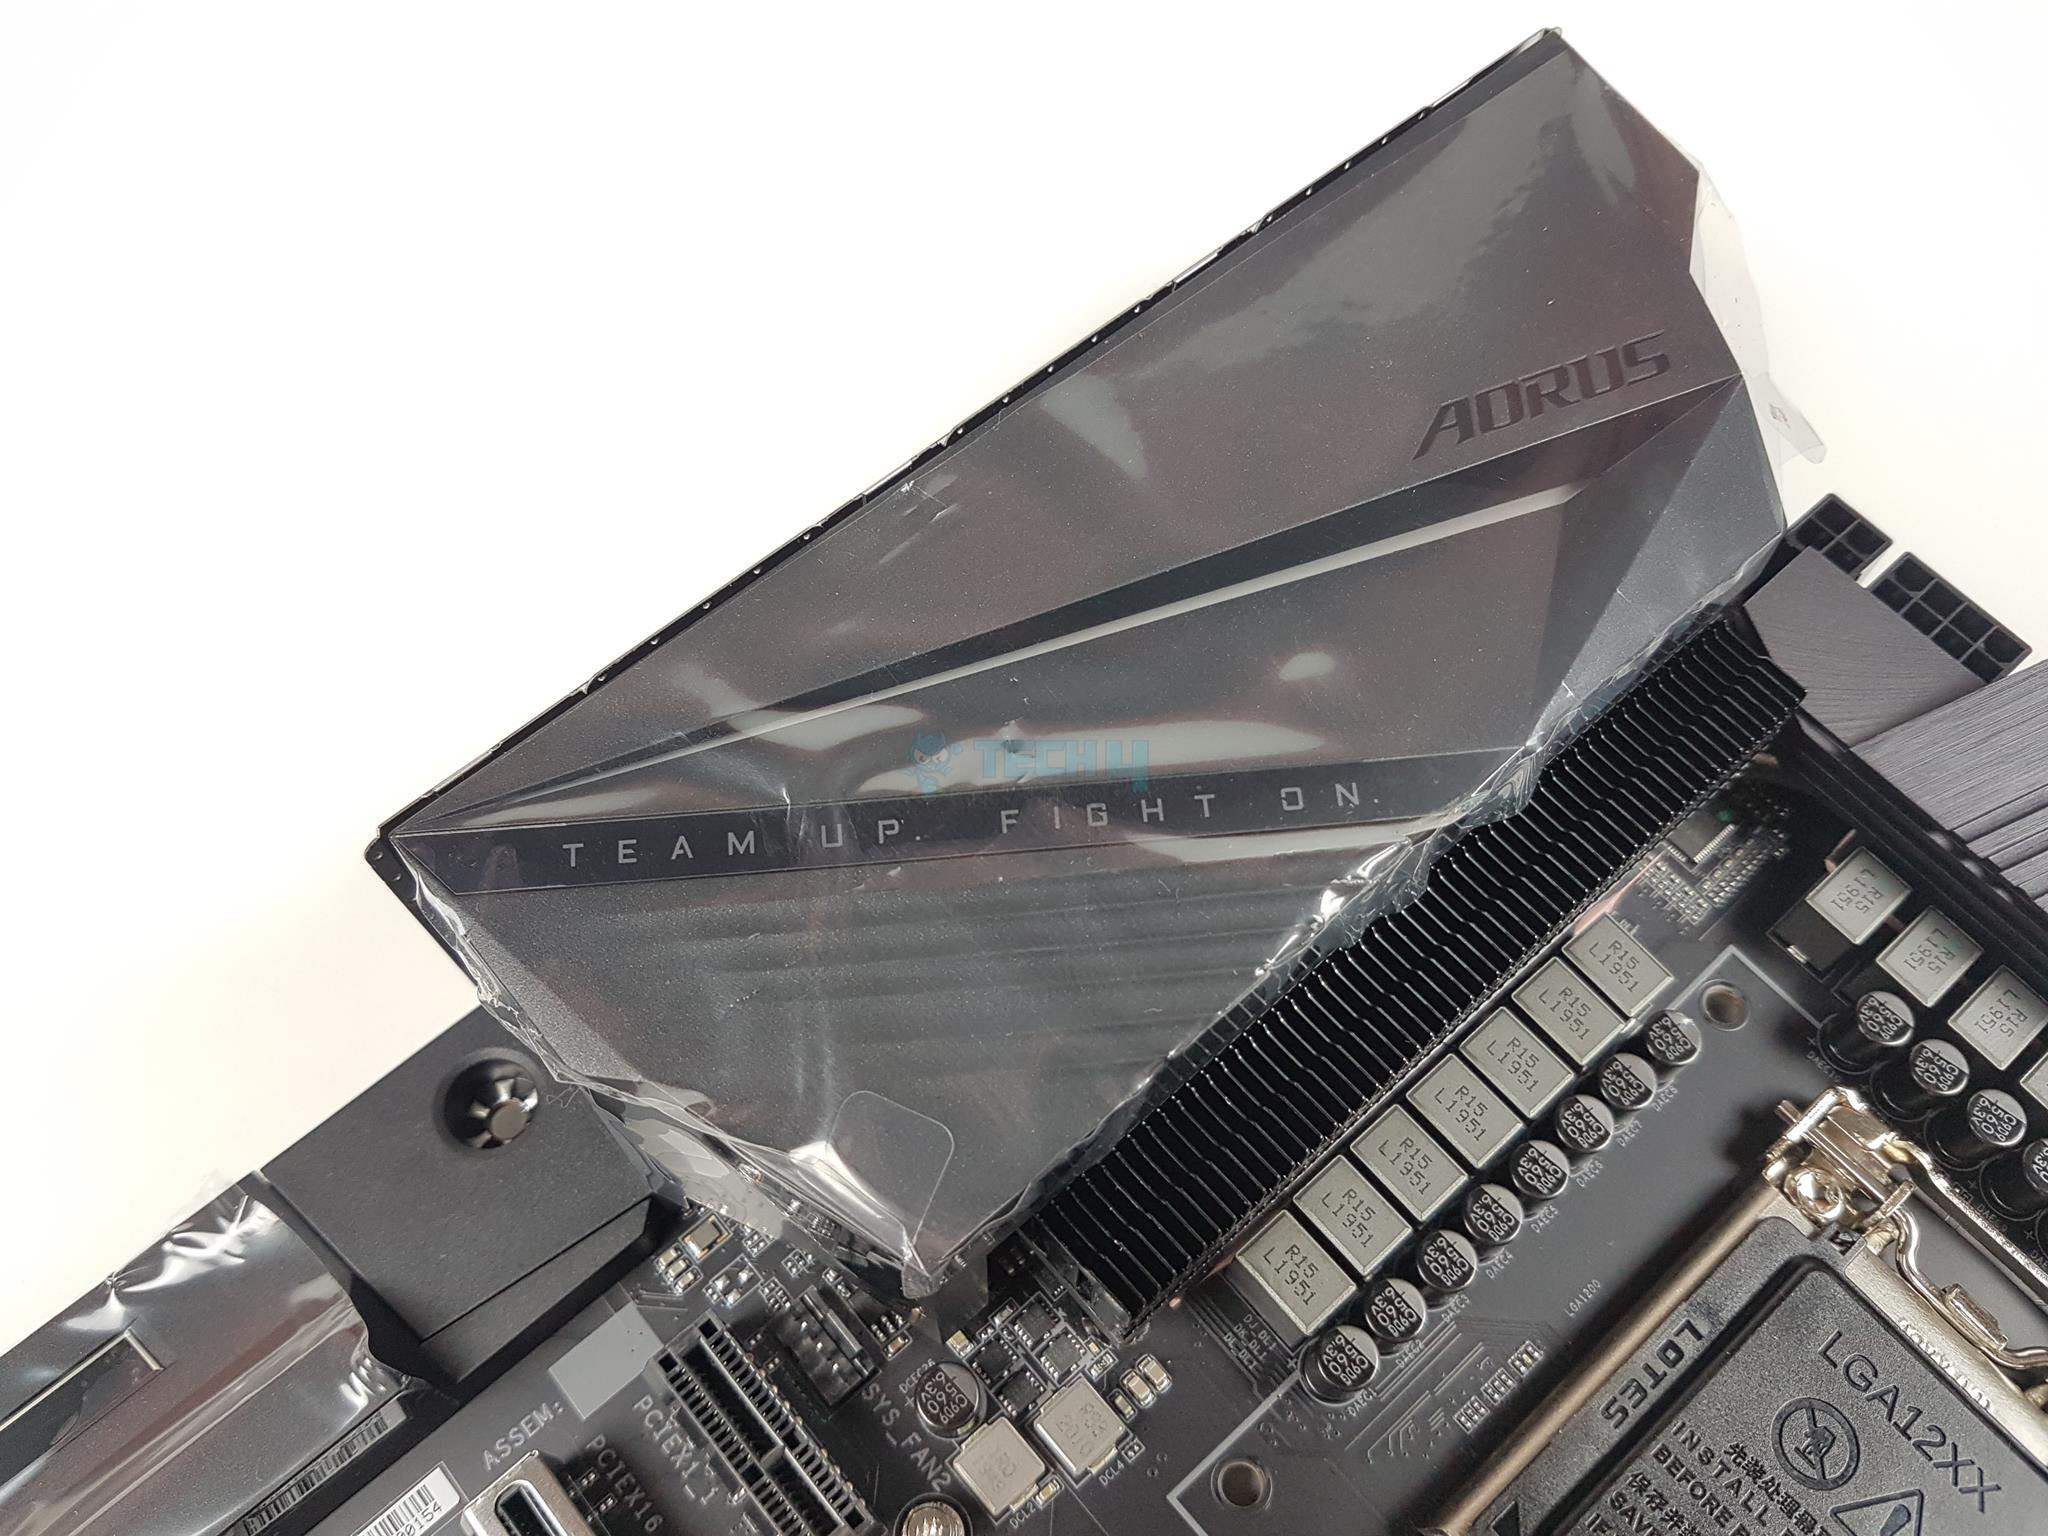
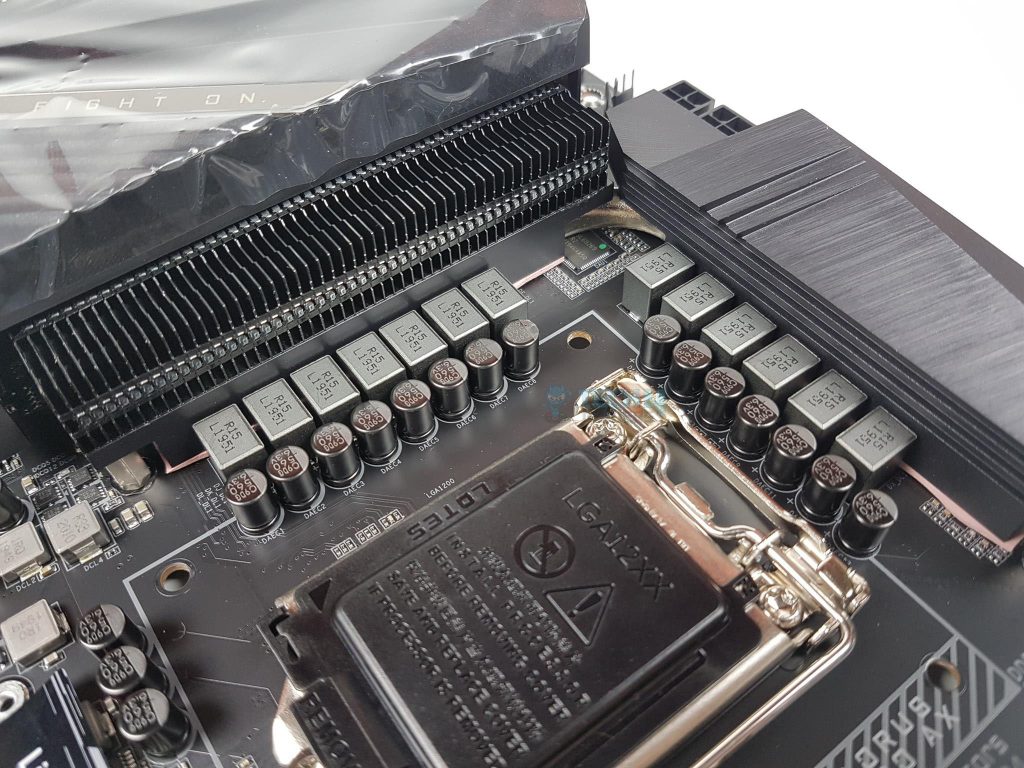
The above picture shows the heatsink covering the power delivery components on the motherboard.
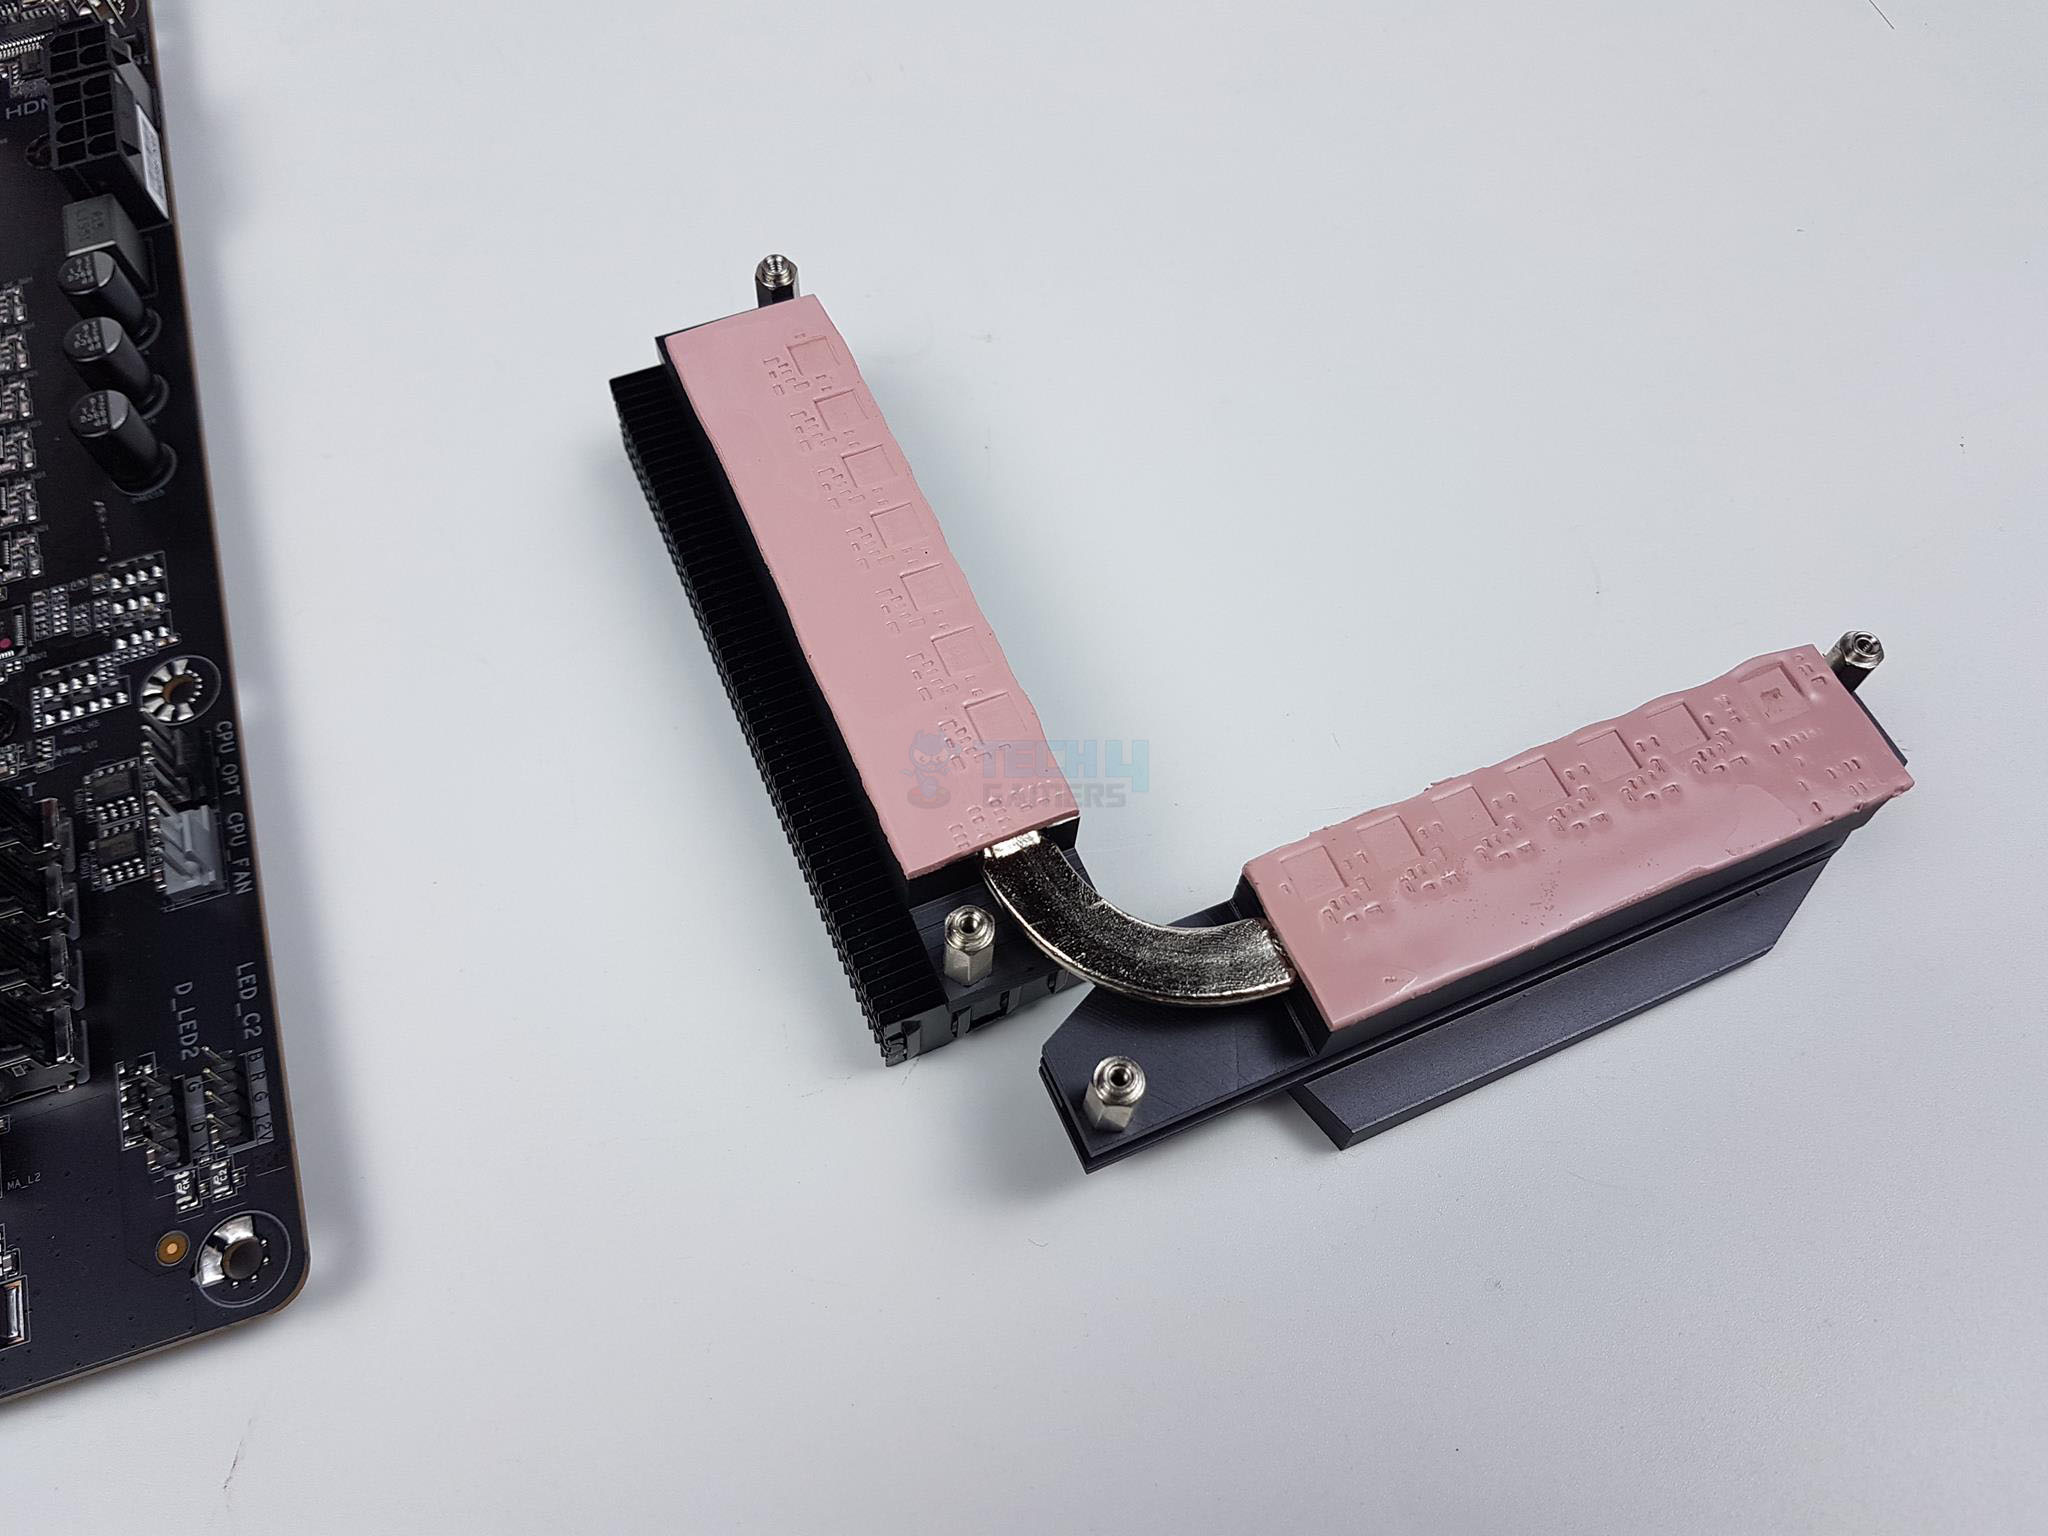
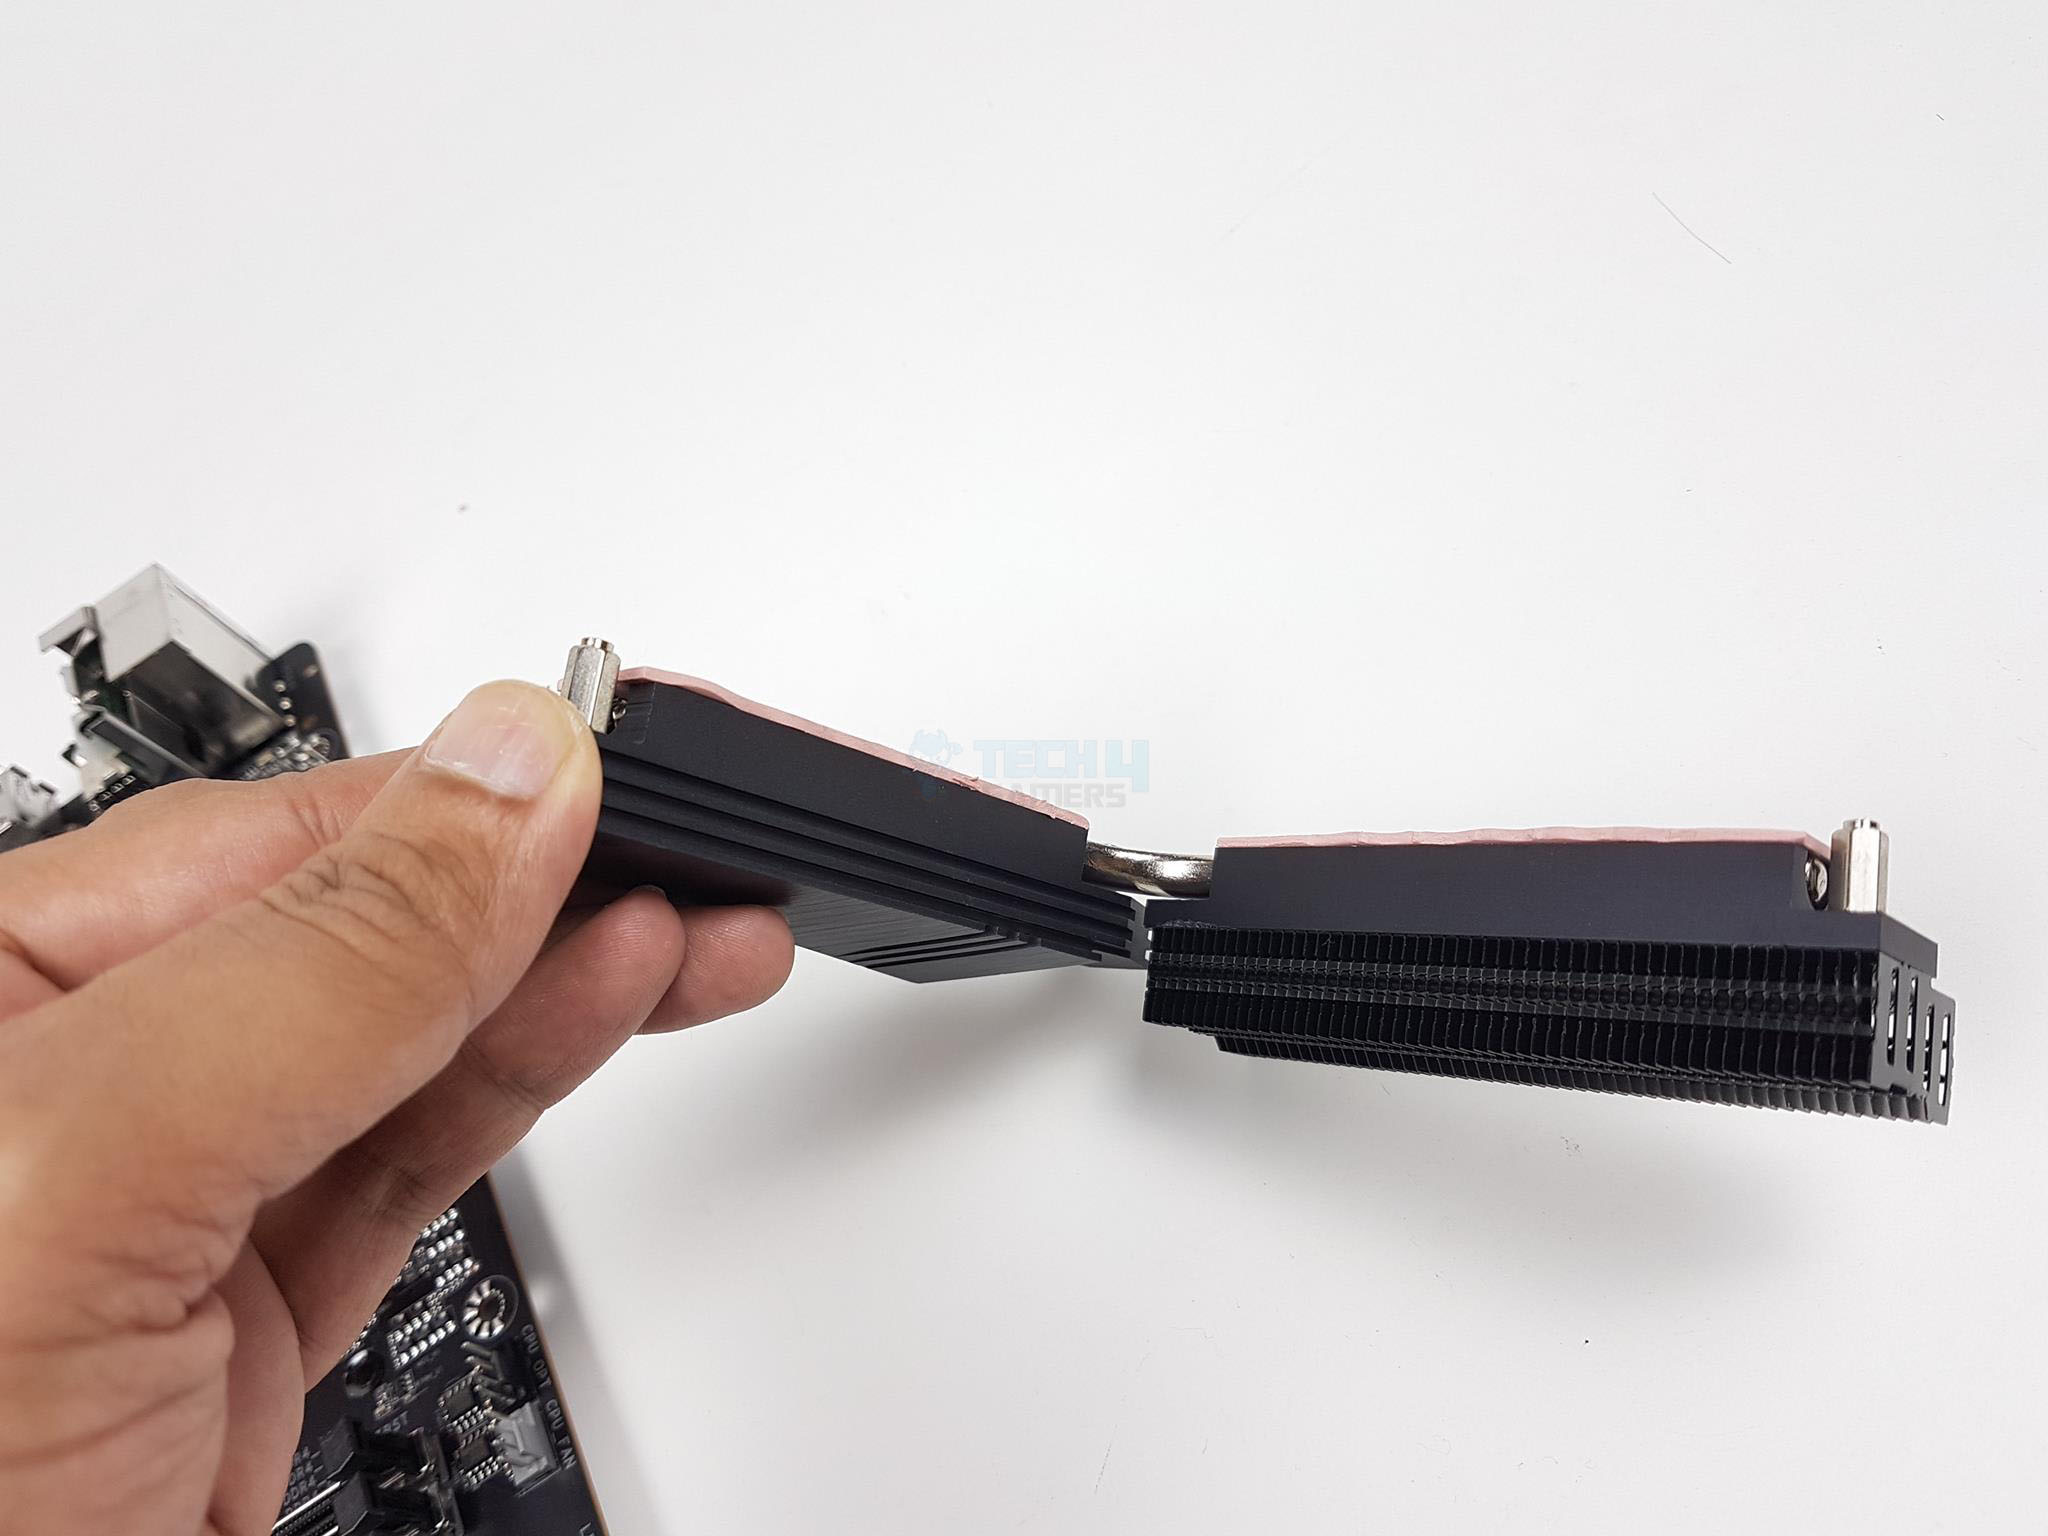
There are two black color-coated aluminum heatsinks with multiple cut-outs to increase the surface area for effective heat dissipation. Fins-Array II uses a new louvered stacked-fins design which not only increases surface area by 300% compared to traditional heatsinks but also improves thermal efficiency with better airflow and heat exchange.
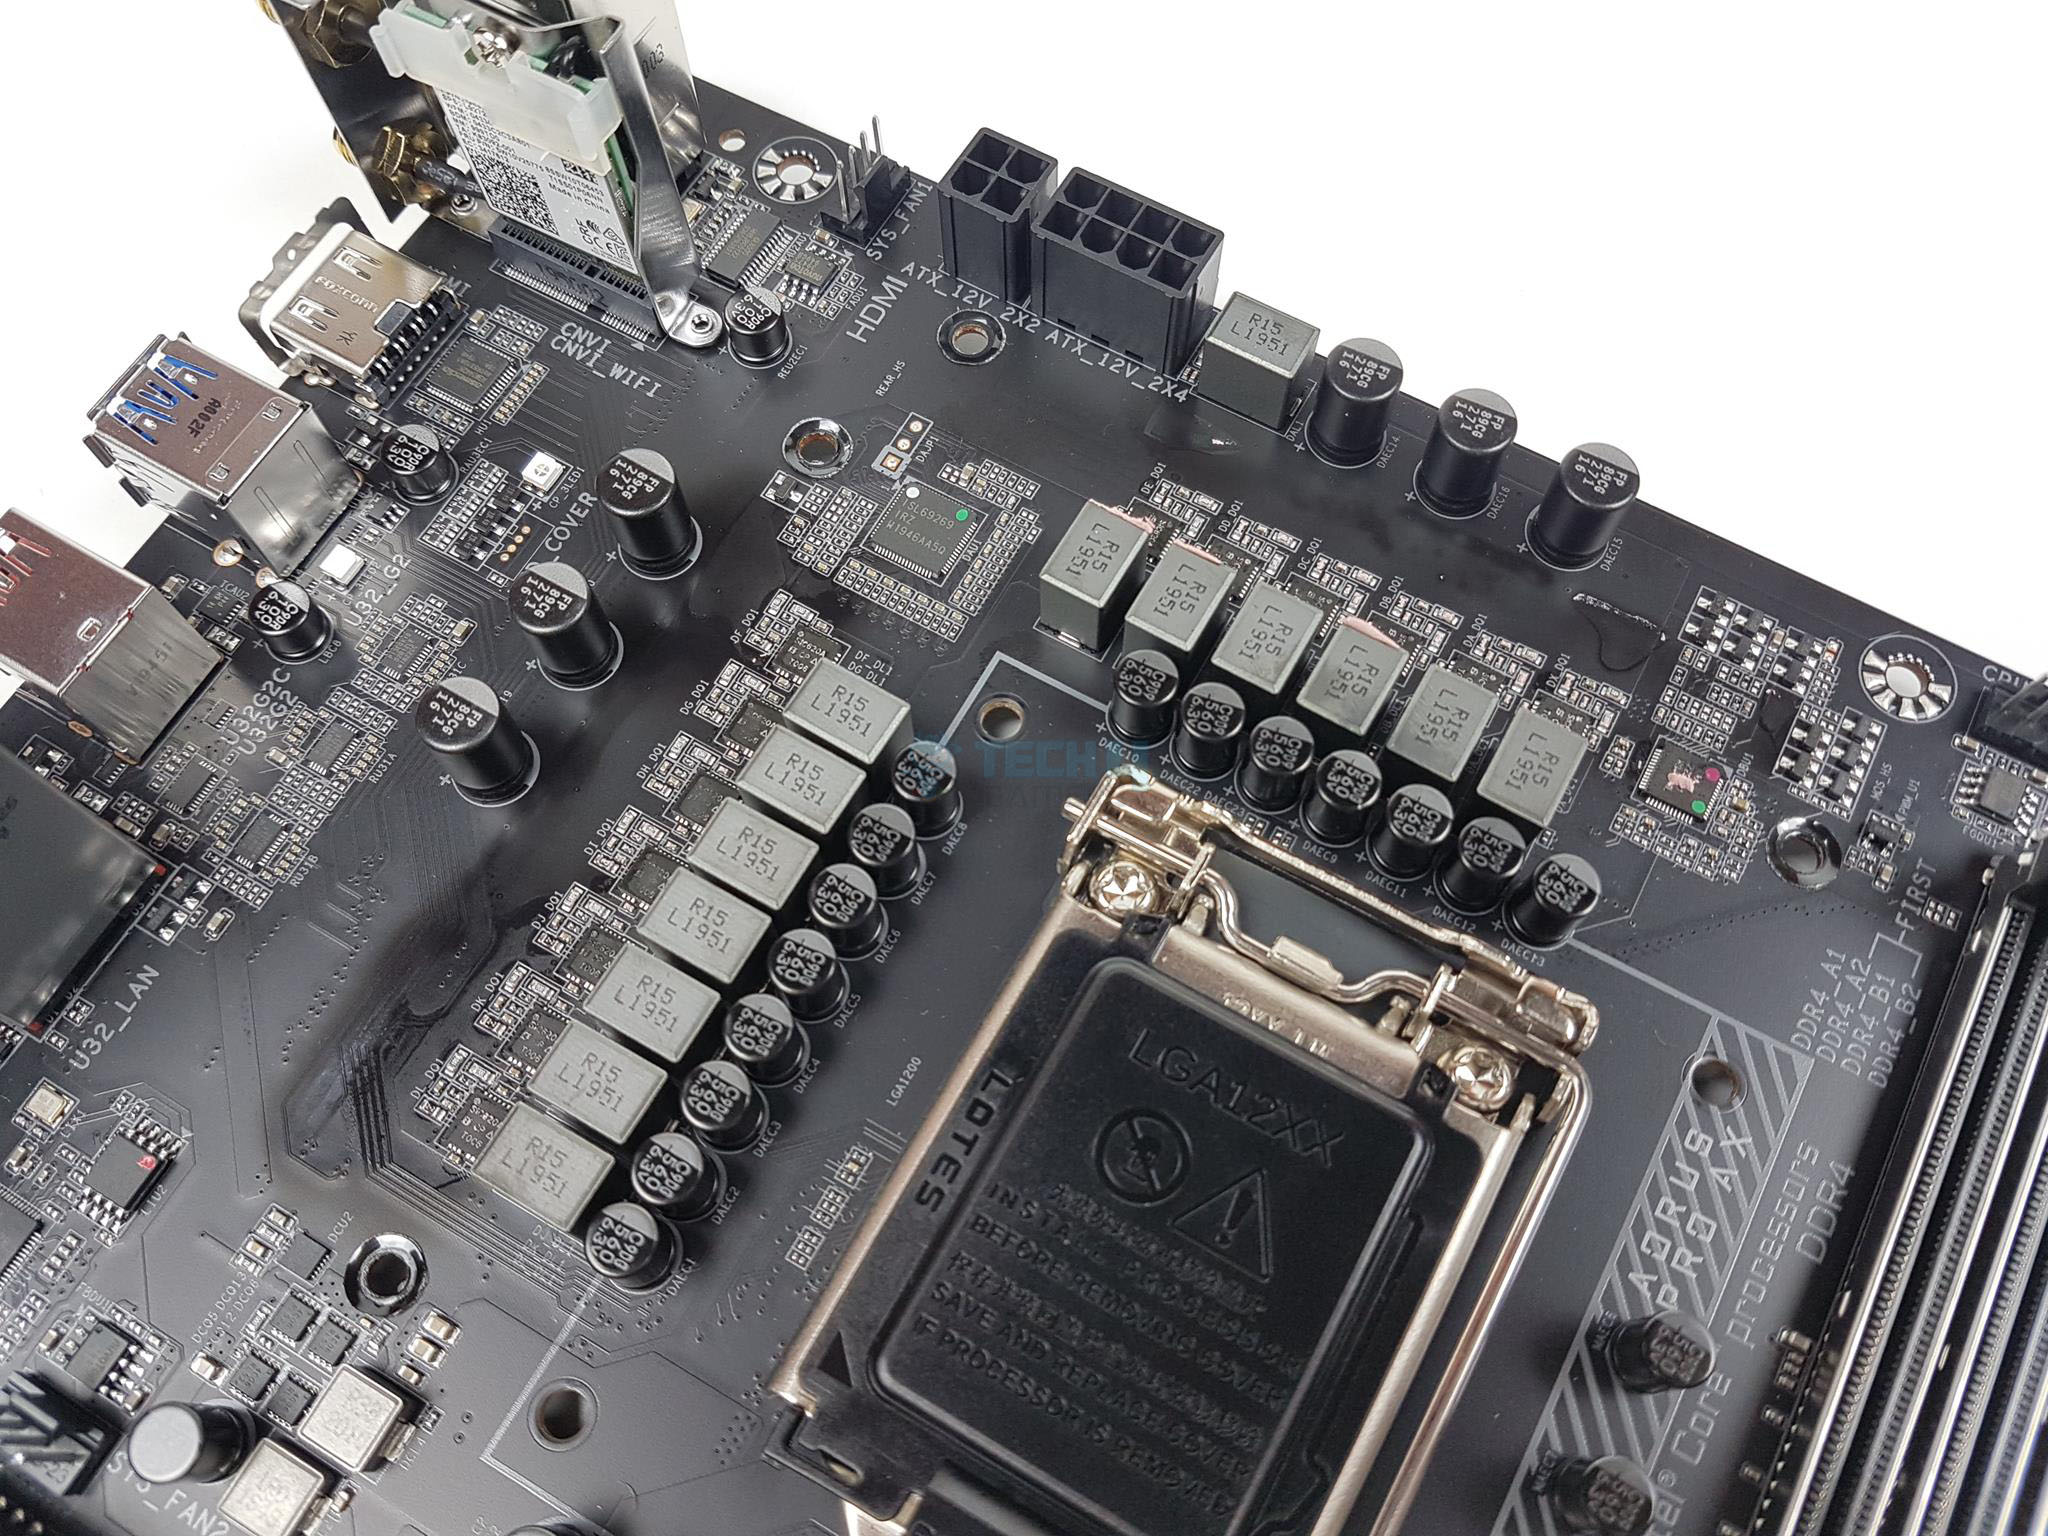
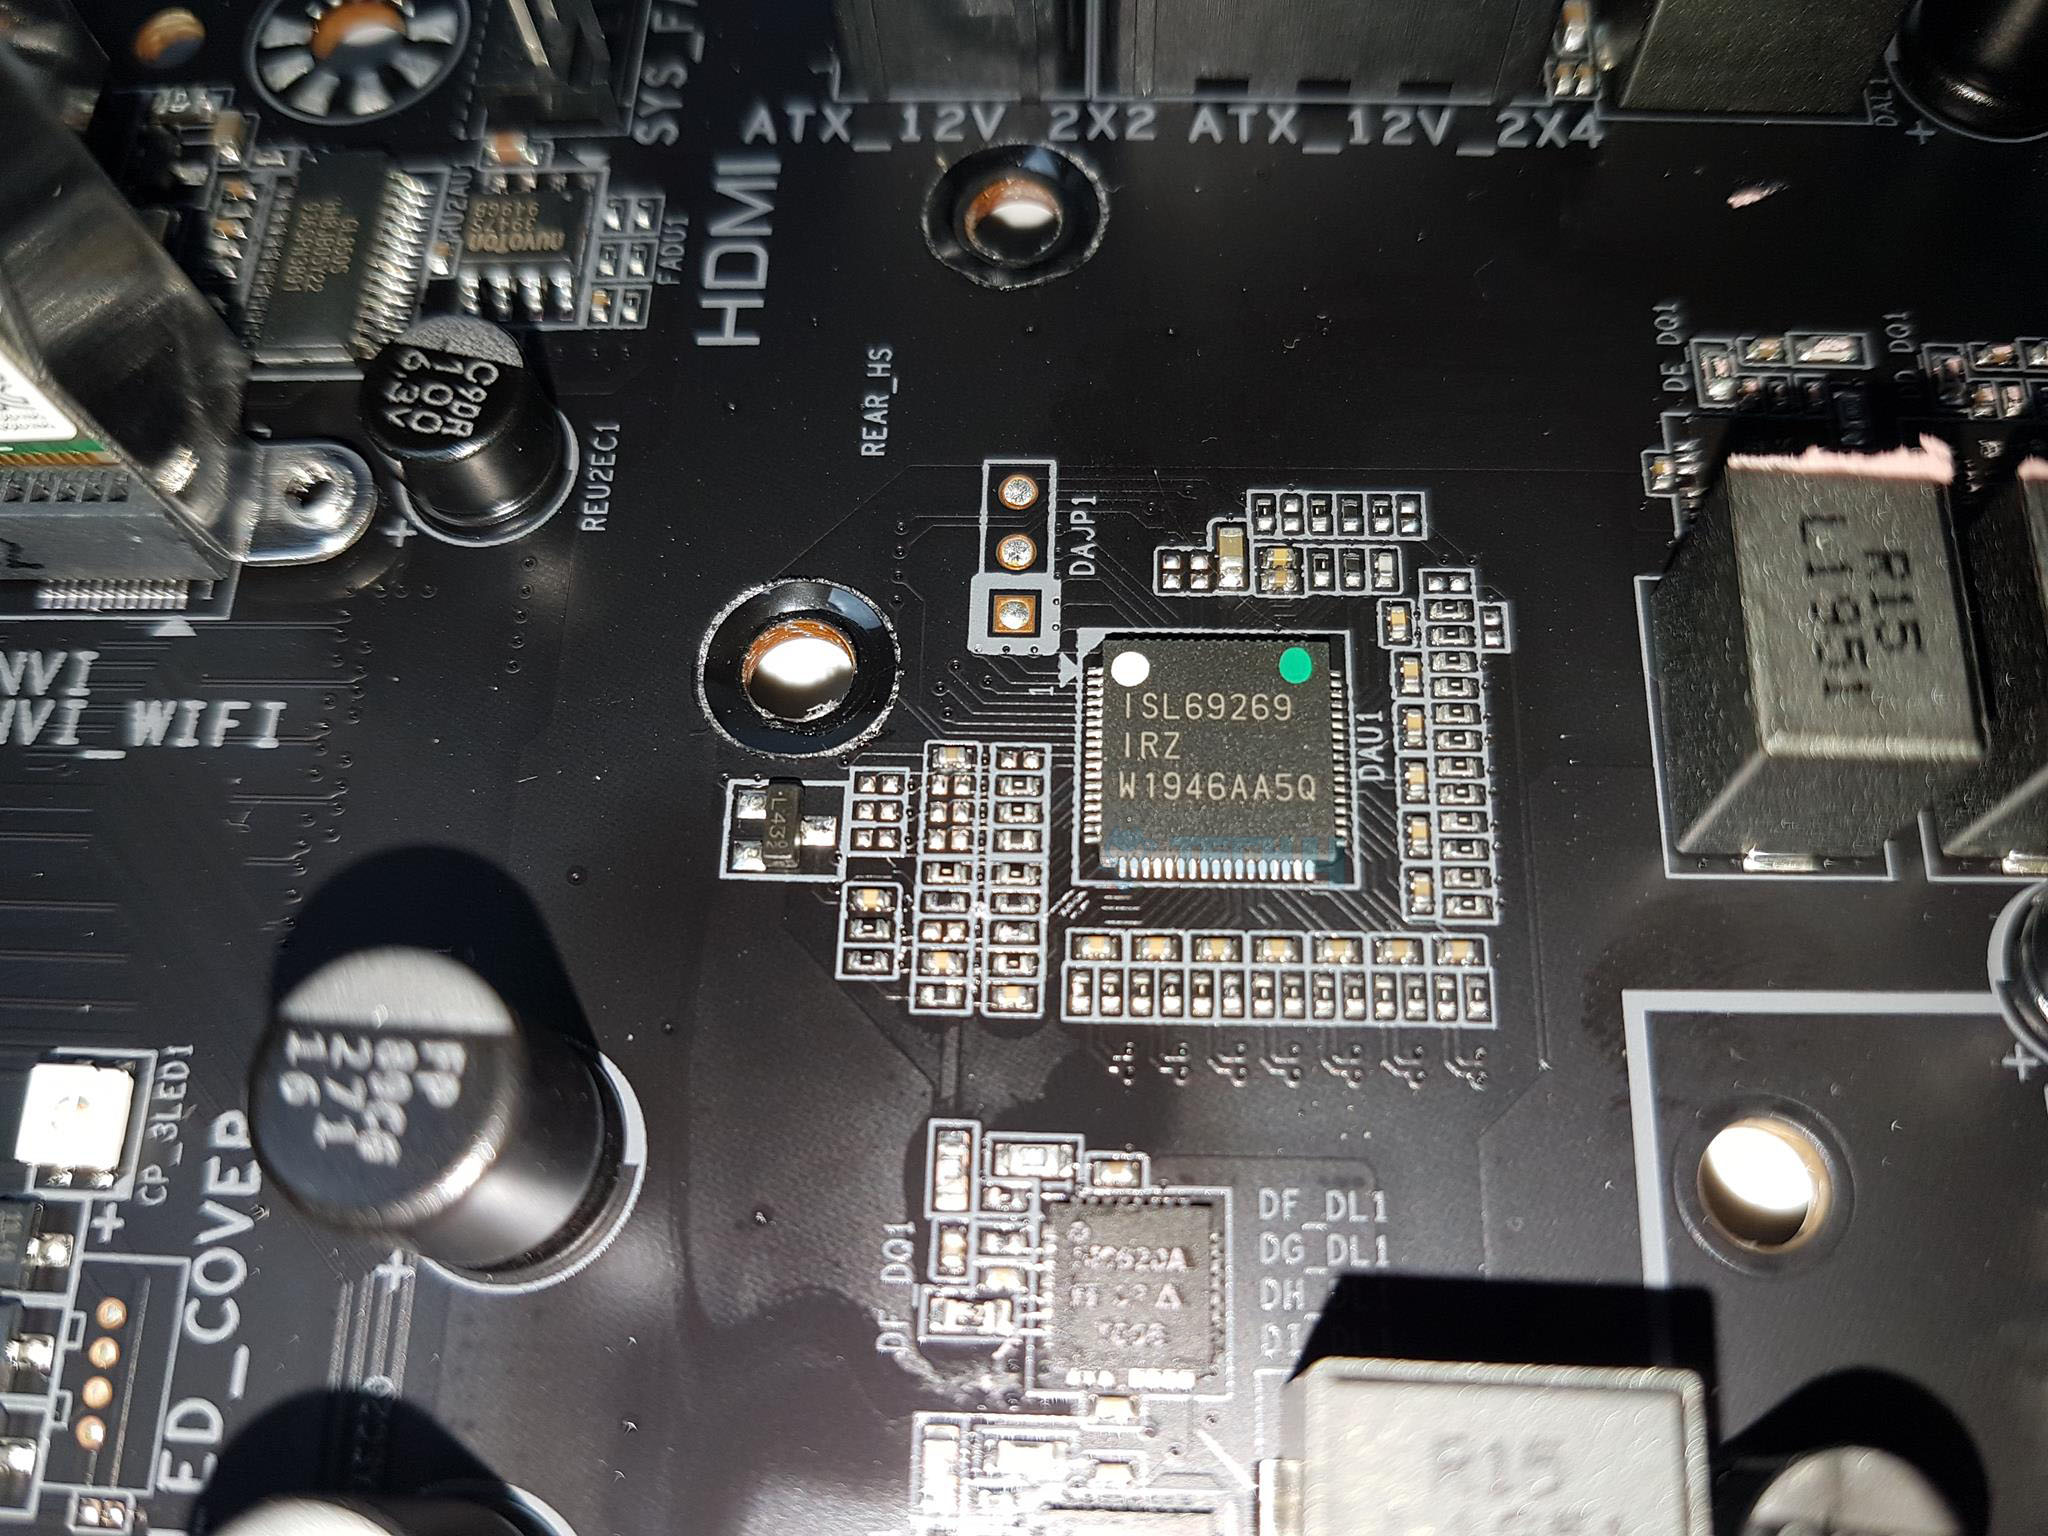
GIGABYTE Z490 AORUS PRO employs 12+1 Digital Power Phases with DrMOS, each capable of providing up to 55A of power from each phase.
The 12+1 power design is actually using doubles to achieve the power delivery target. One phase is for the SOC. GIGABYTE also employs an Intersil ISL69269 PWM controller.
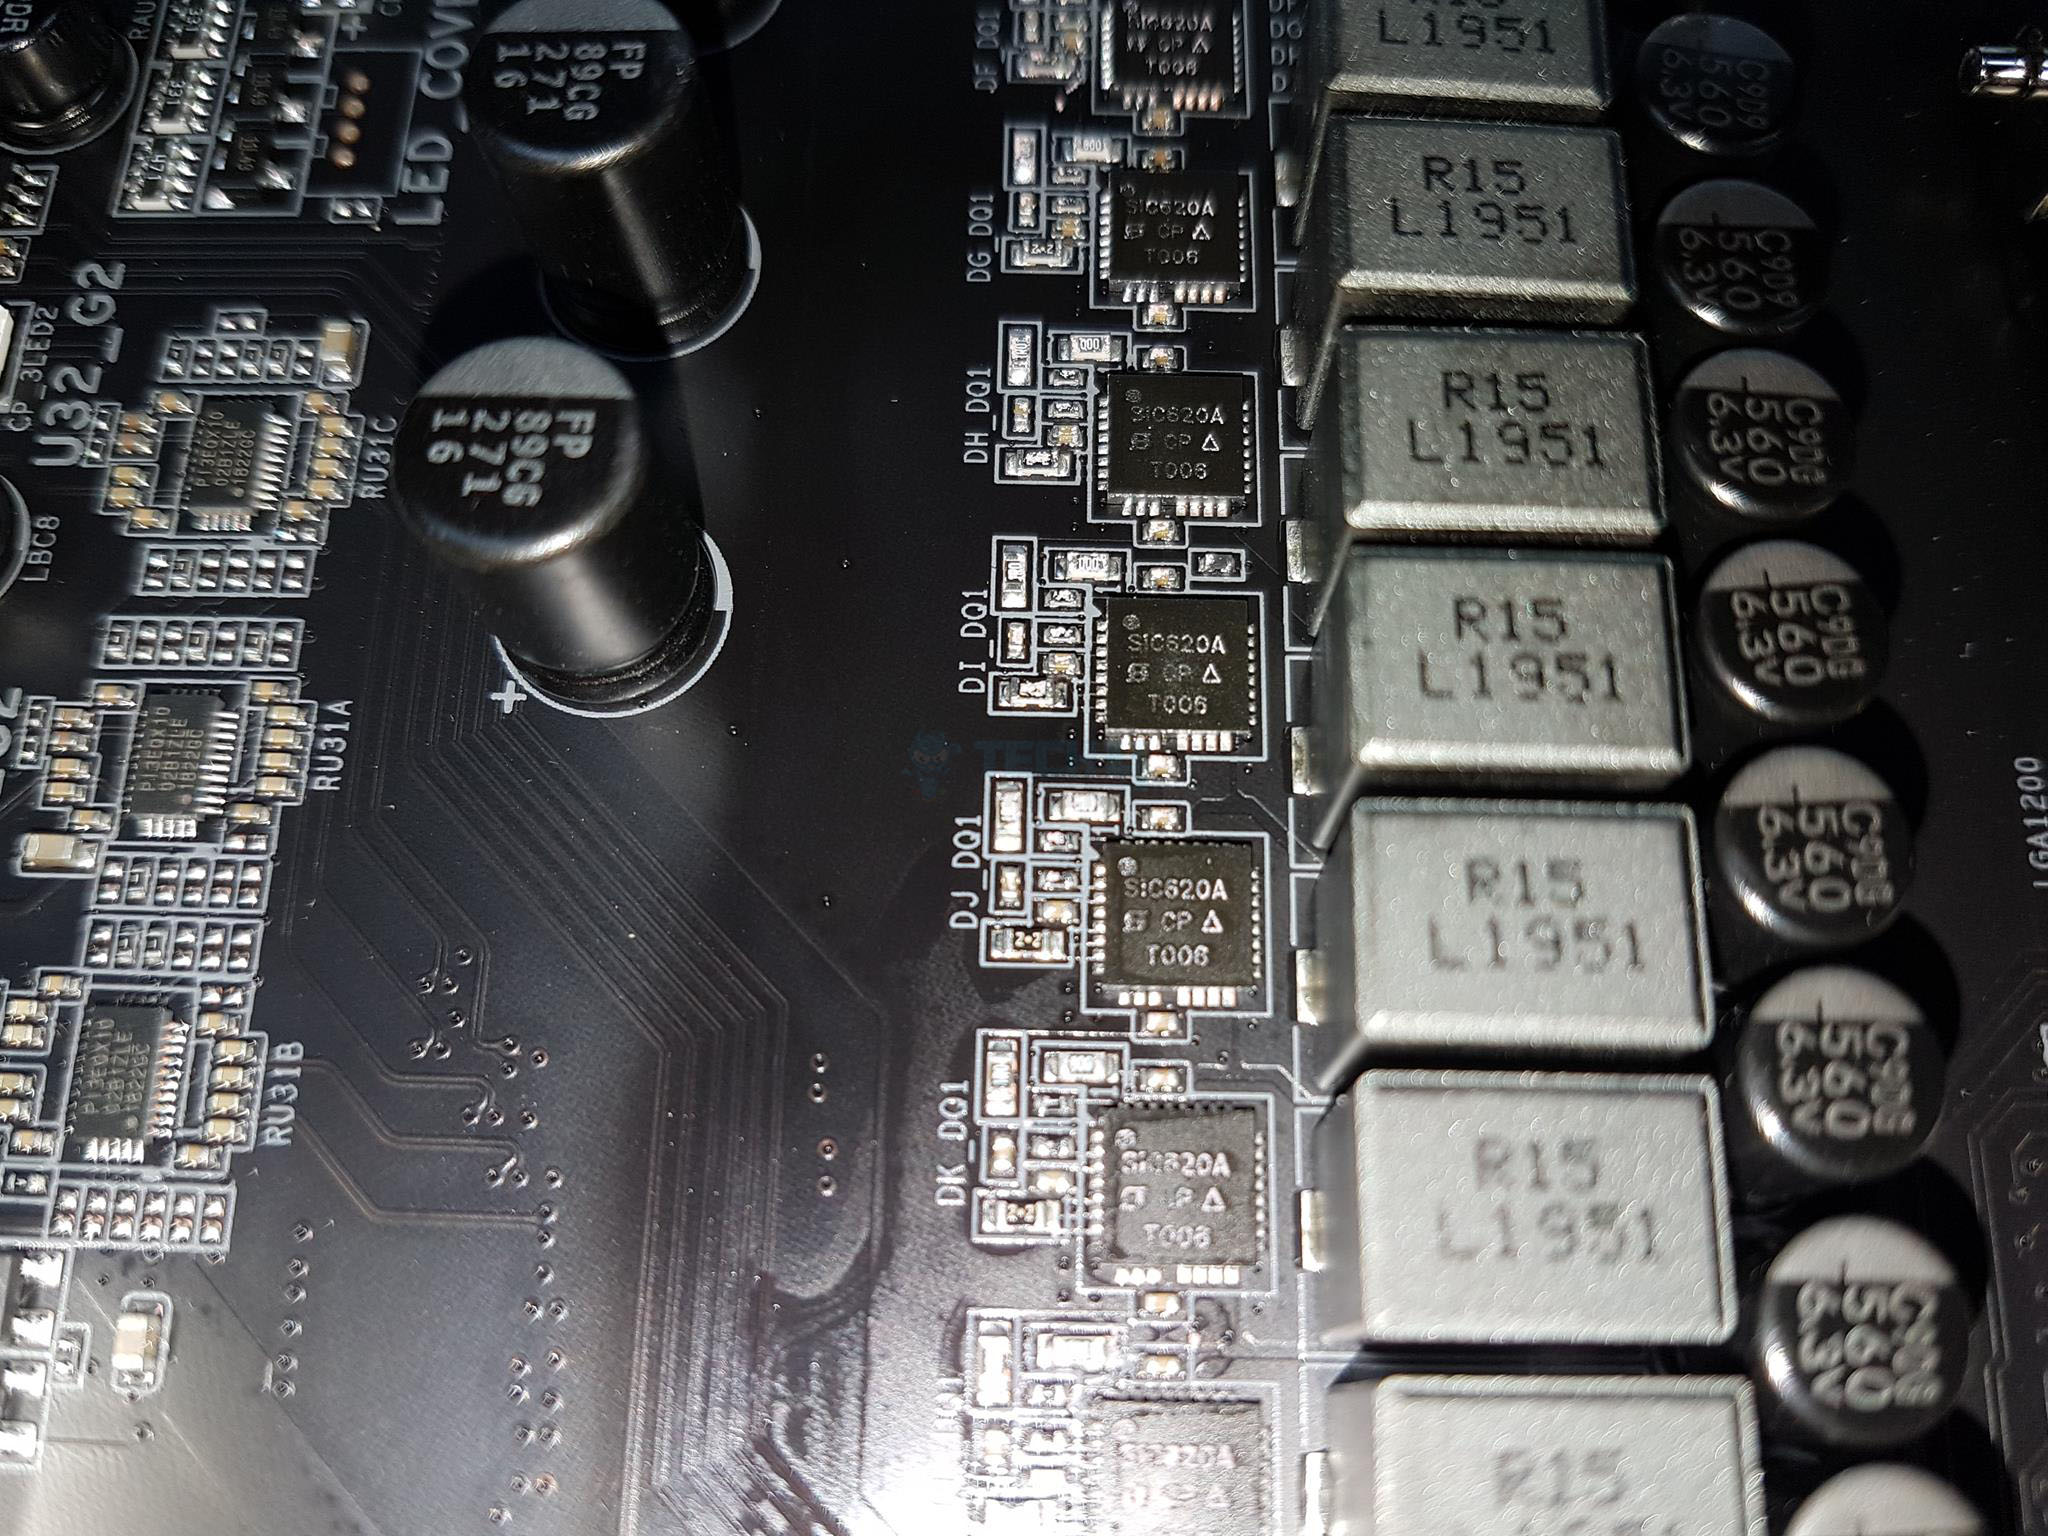
The GIGABYTE Z490 AORUS PRO AX employs SiC620A doublers for 12 power phases (55A each) and Tantalum capacitors for improved stability during overclocking. Its 2X Copper PCB design ensures effective power distribution and heat dissipation, which is crucial for overclocking.
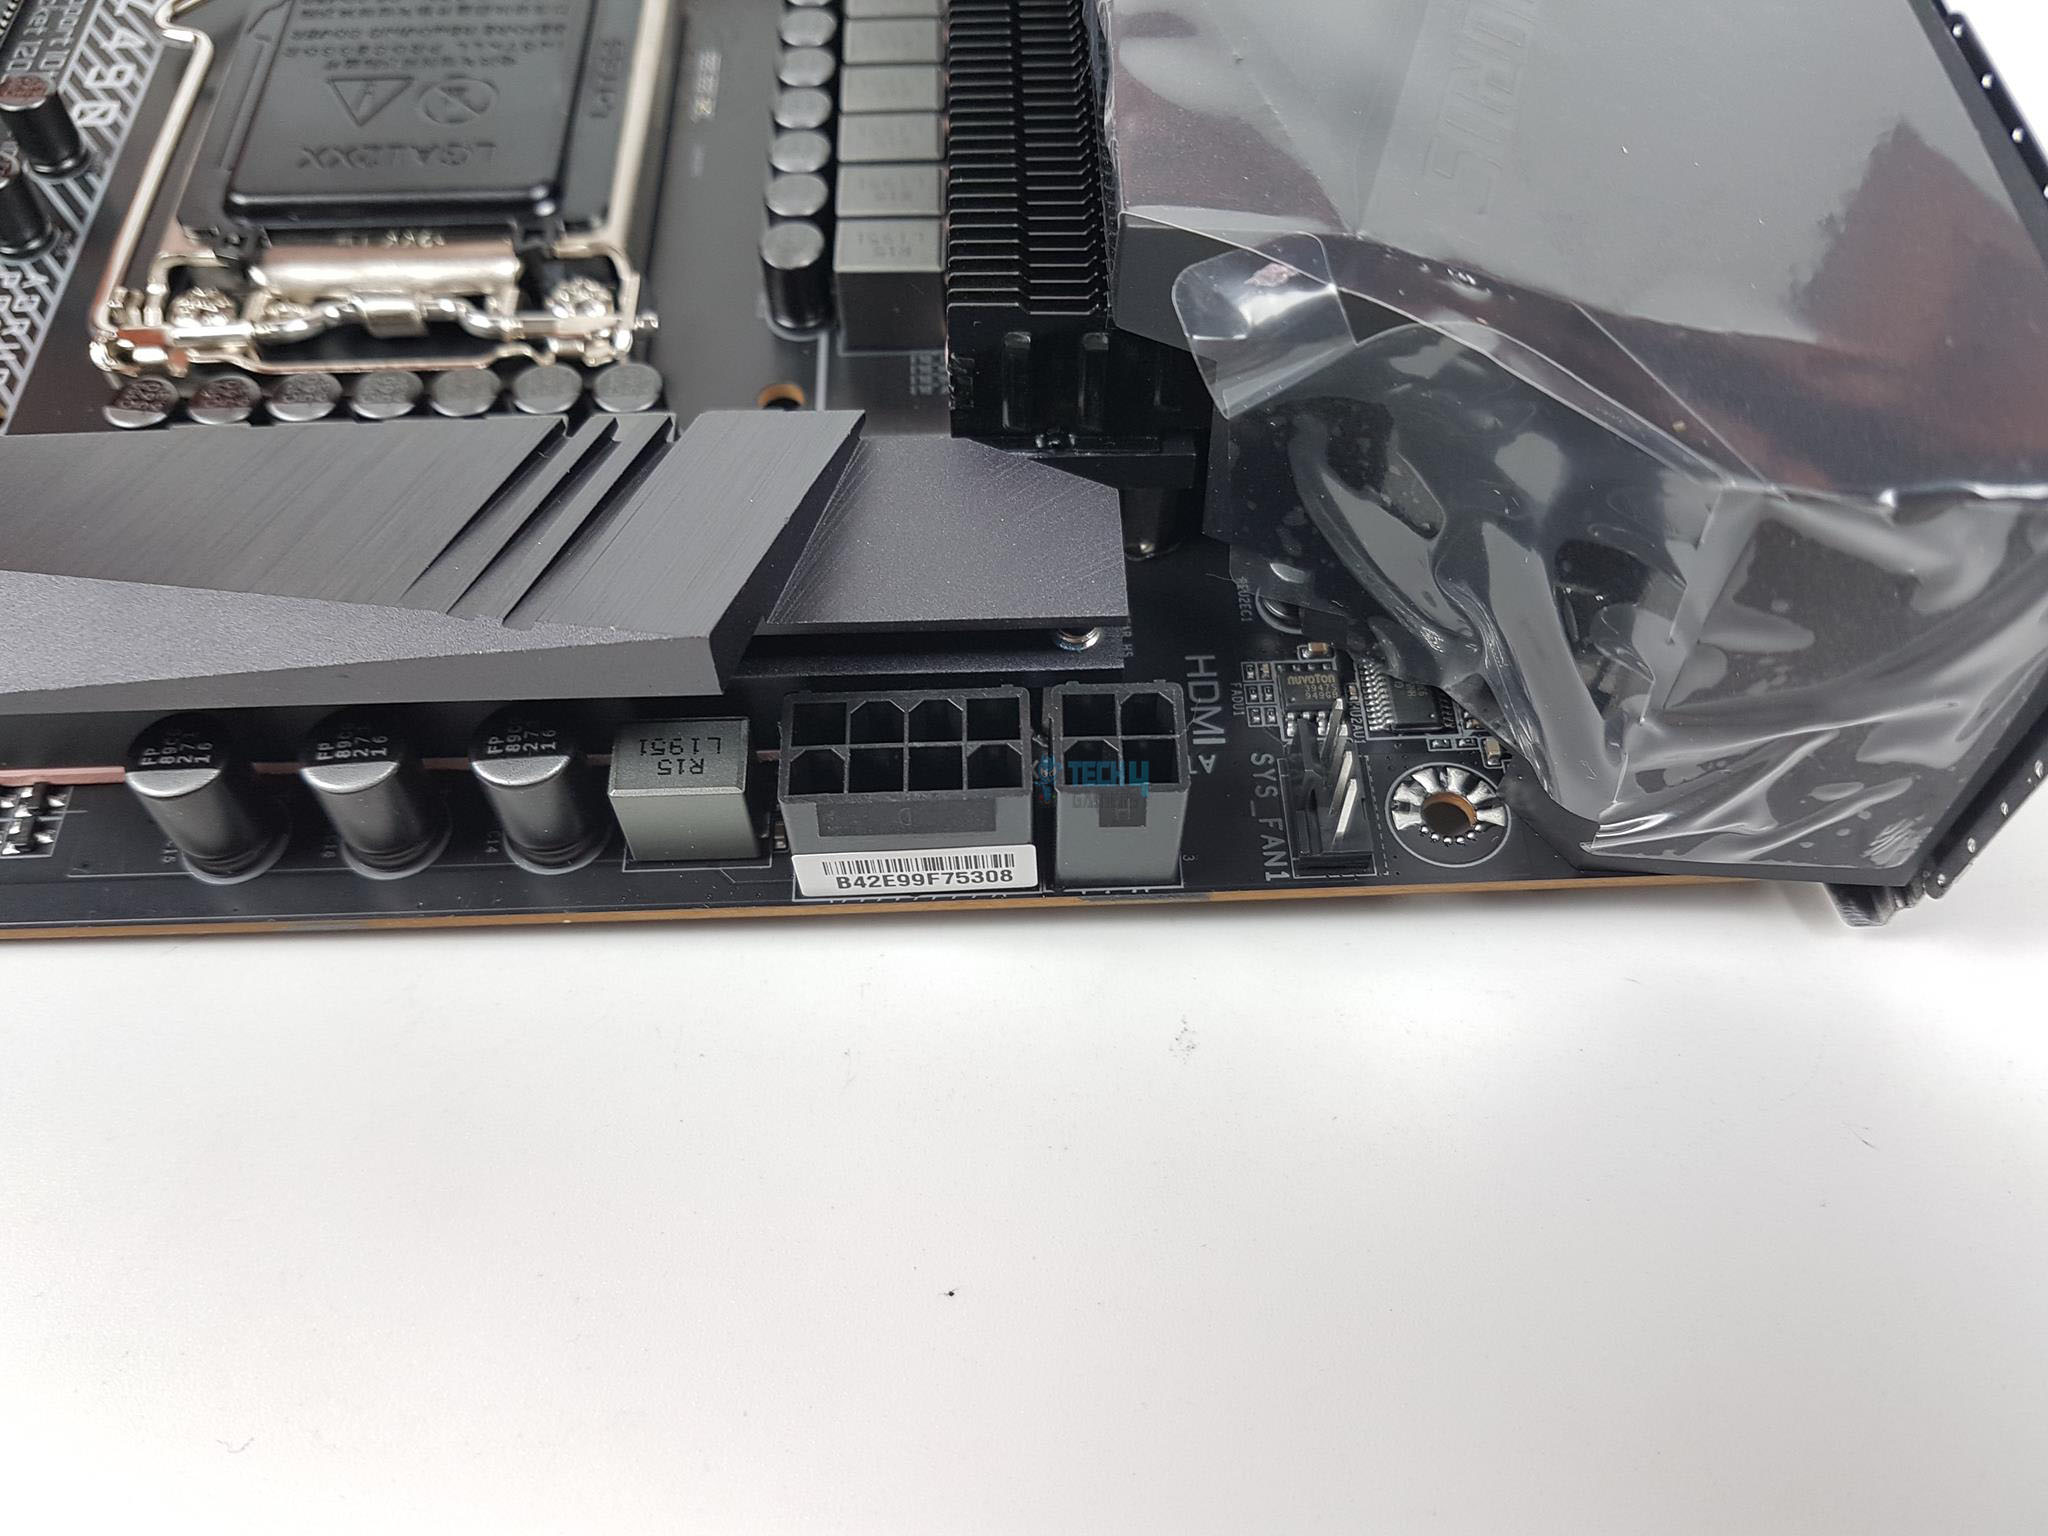
The 8+4 CPU power connectors, with an extra 4-pin for specific Intel Core i9 variants, and a 4-pin PWM hybrid Fan Header offer flexibility. The motherboard features solid-plated ATX 24-pin, ATX 12V 8-pin, and 4-pin power connectors for a stable power supply with enhanced conductivity and heat management.
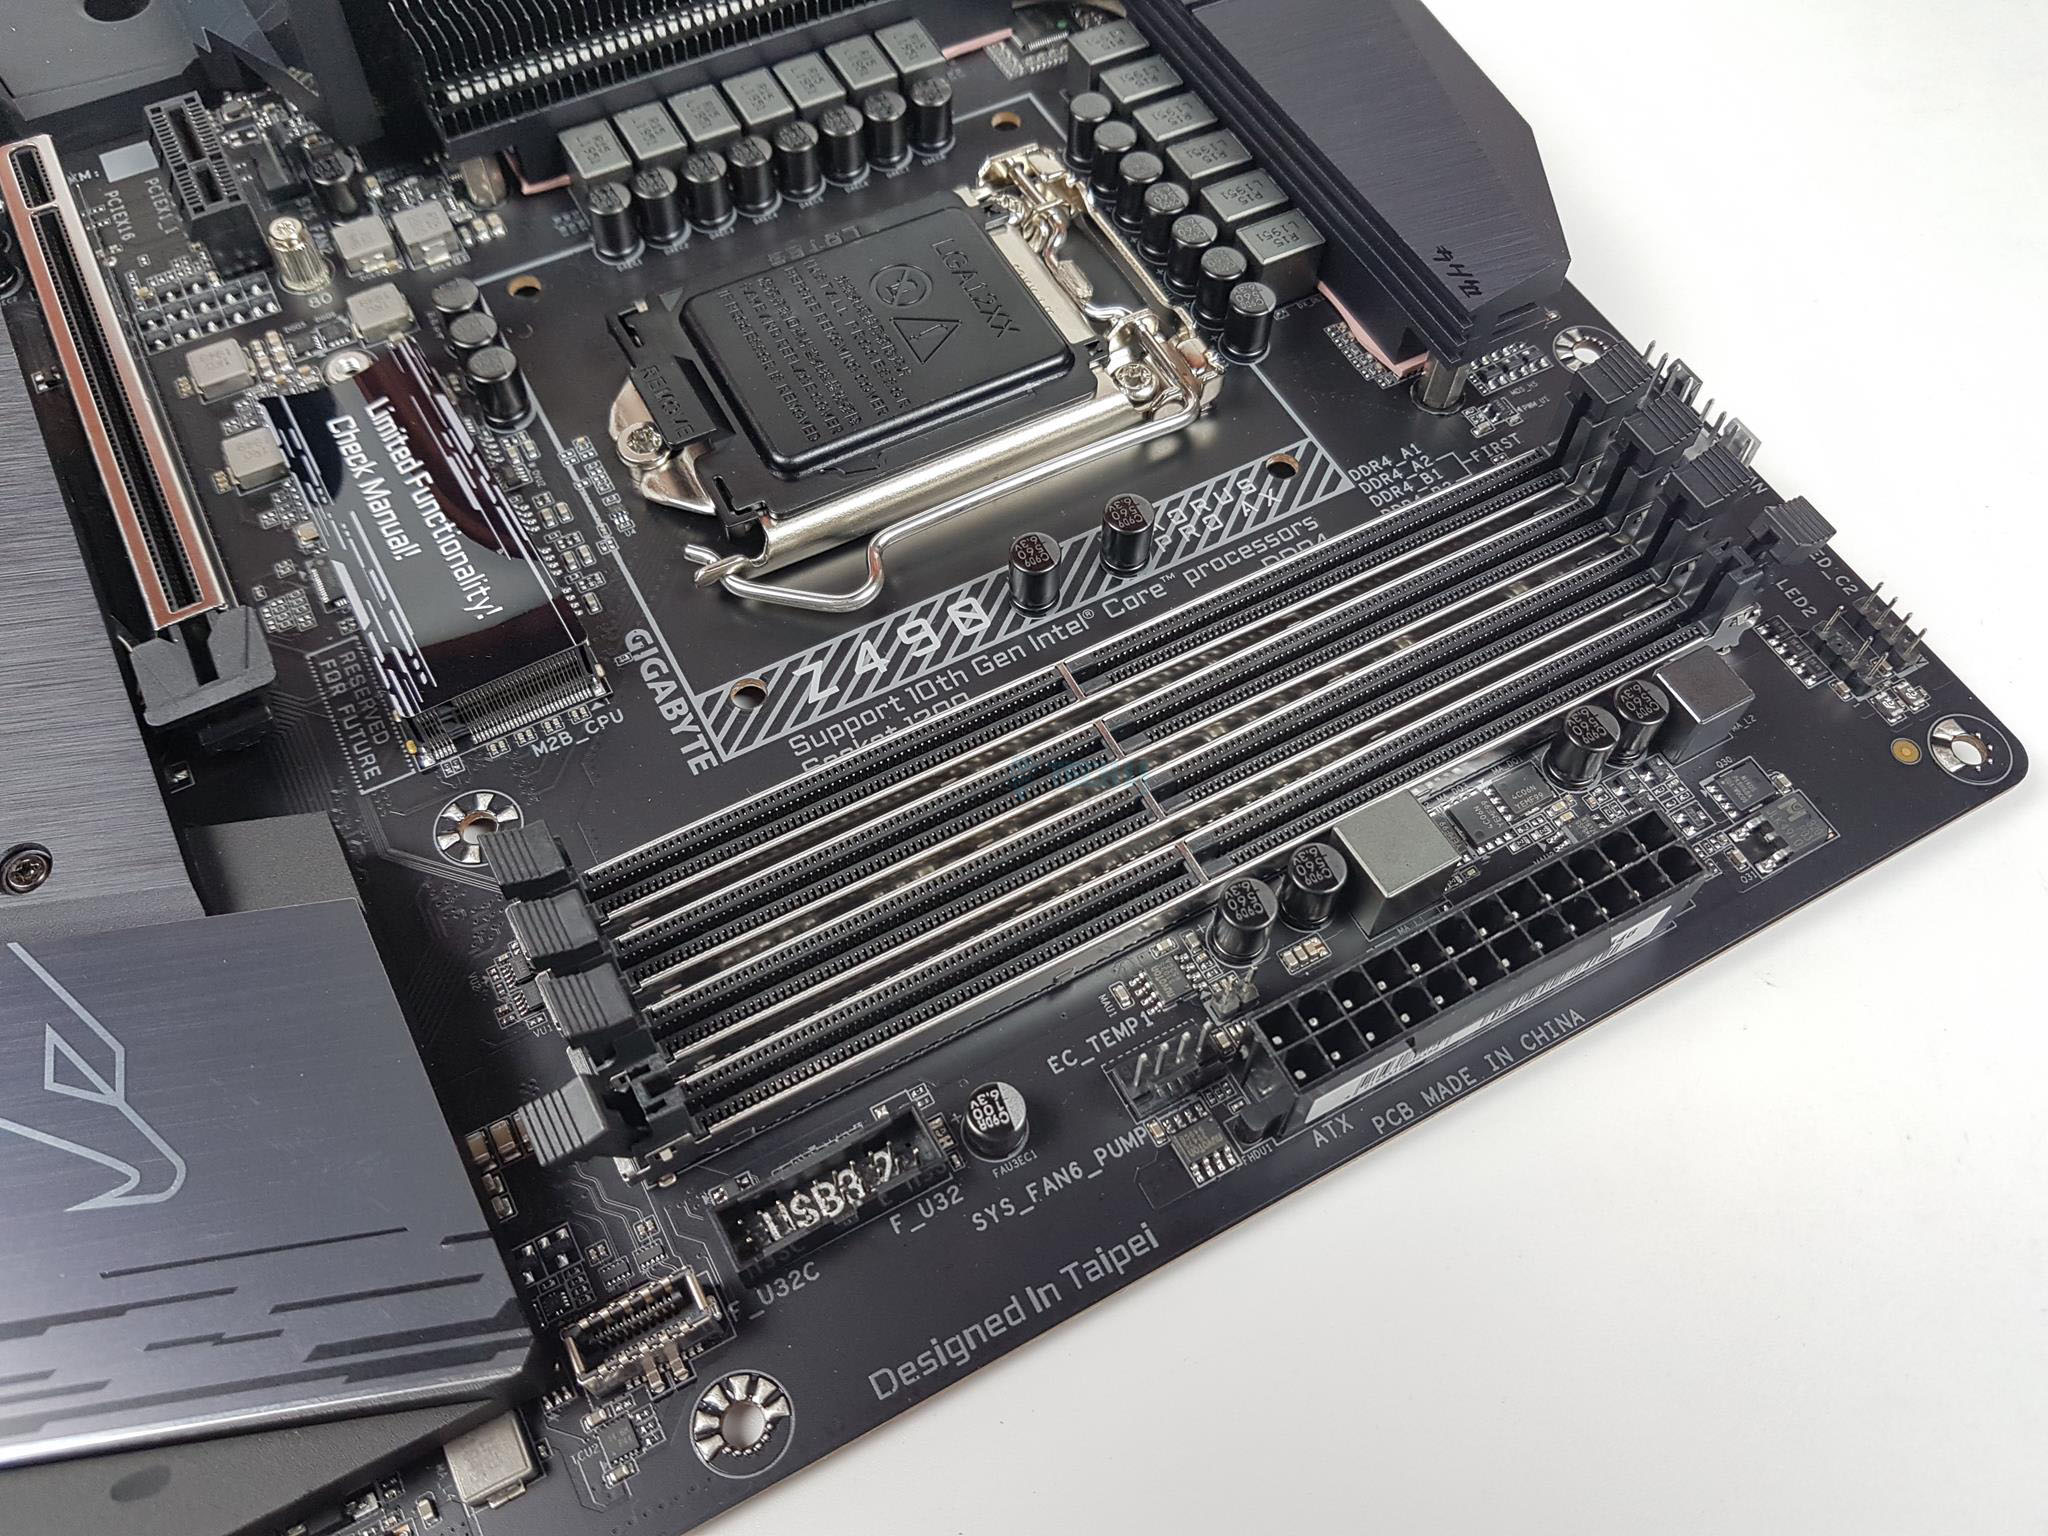
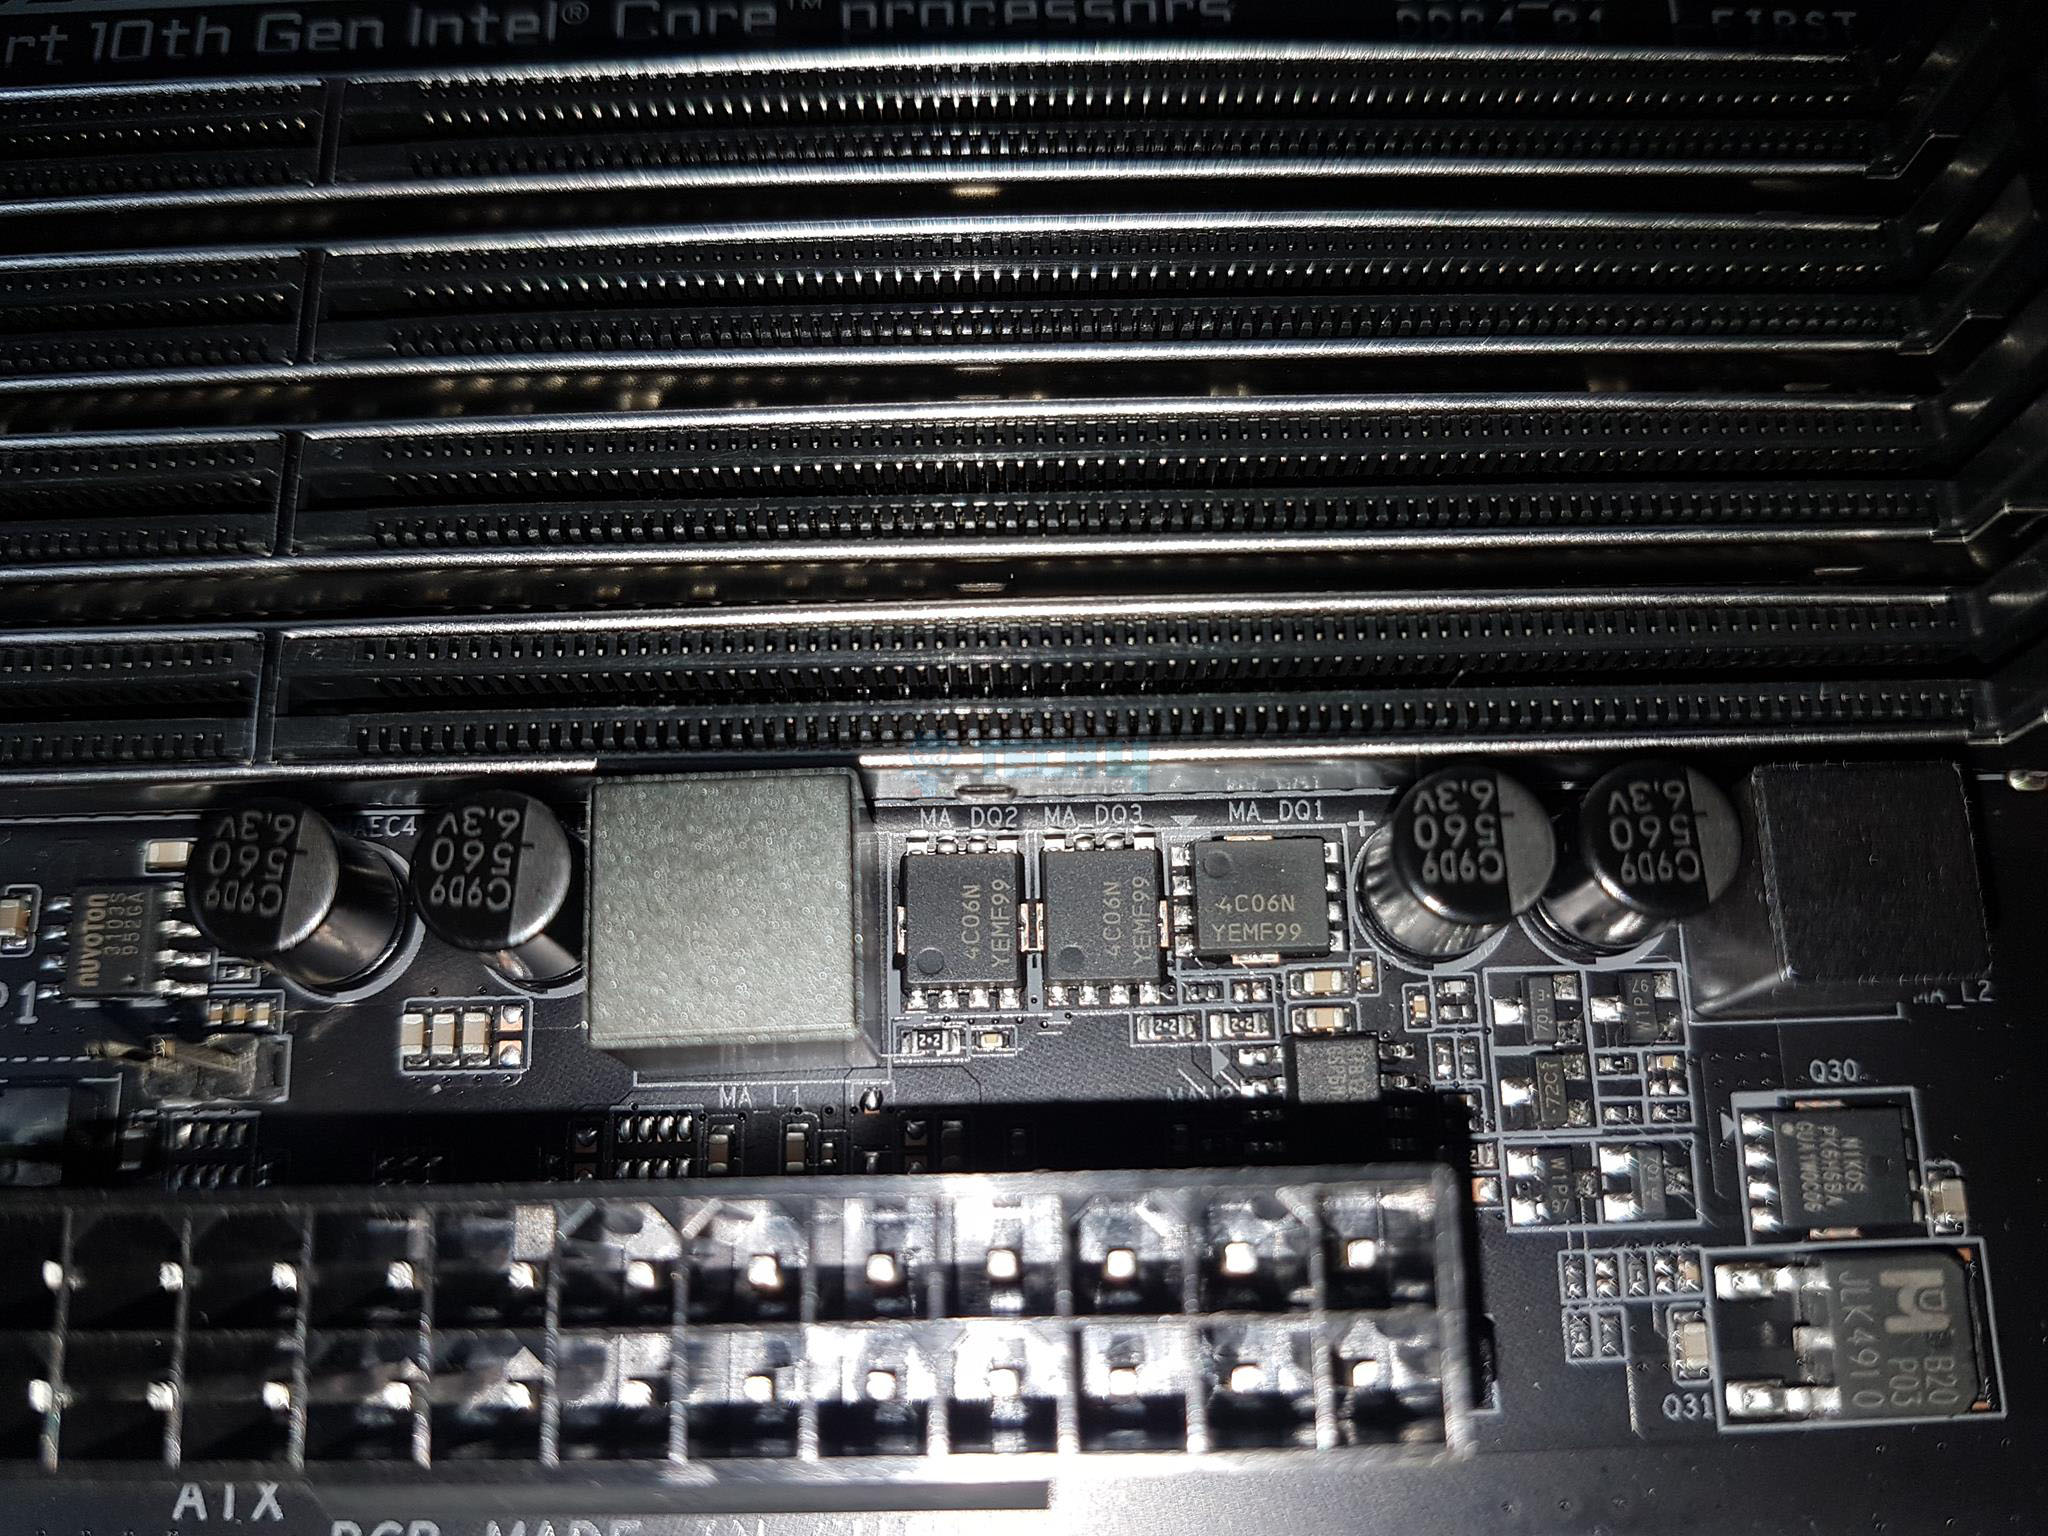
The GIGABYTE Z490 AORUS PRO AX motherboard has 4 stainless steel DIMM slots in Dual Channel, supporting up to 128GB (32GB per slot) at a max frequency of 5000 MT/s (OC). It accommodates ECC Un-buffered DIMM 1Rx8/2Rx8 and non-ECC Un-buffered DIMM 1Rx8/2Rx8/1Rx16 modules, with memory routing shielded under the PCB for interference protection.
It incorporates a Realtek RT8120D for a single-phase PWM with a driver. The MOSFET setup includes 3 On Semiconductor 4C06N arranged in two-low, one-high, resembling the Z390 AORUS PRO WIFI motherboard’s design.
Starting from the right side, there is a 12V RGB header below which we have a digital RGB header. Each header has a clear label identifying which header is for what type of lighting.
Next, we have CPU_OPT and CPU_FAN headers. Another striking feature on the AORUS line of the motherboards is that every header is a hybrid one and utilizes PWM control. A nuvoTon 3947S PWM controller controls each fan header.
We have a solid pin 24-pin ATX connector, a USB 3.2 Gen-1 header, and a USB 3.2 Gen-1 Type-C header.
We have 3-pin and 5-pin Thunderbolt Add-In headers. The Thunderbolt Add-In card is not included and needs to be purchased separately if required.
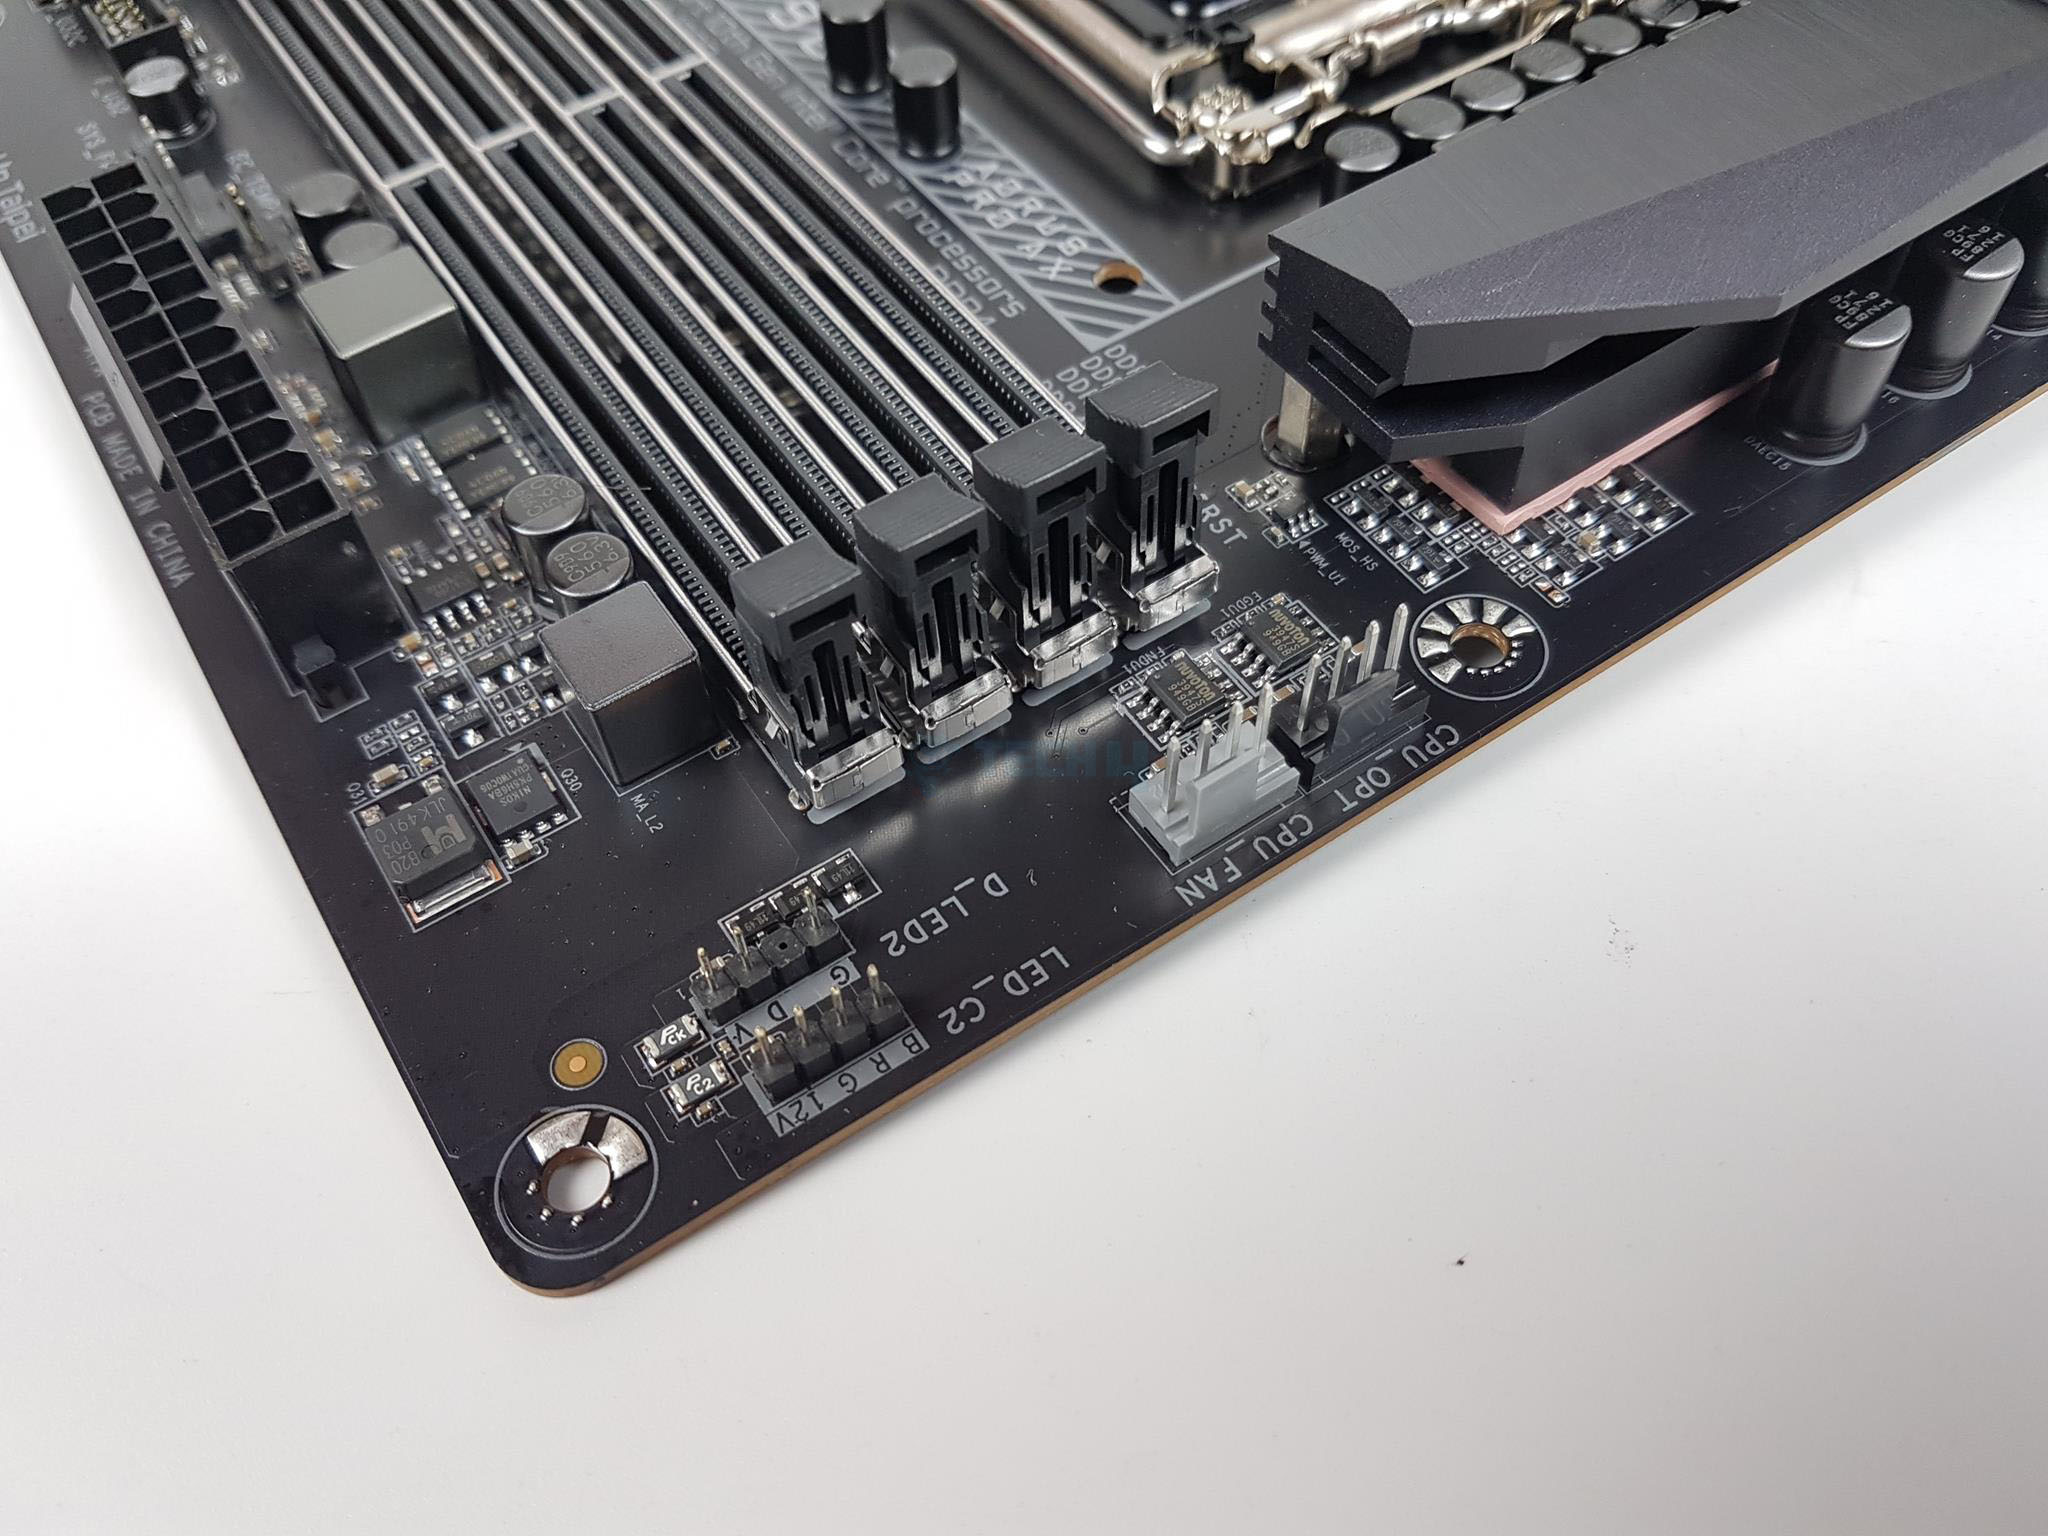
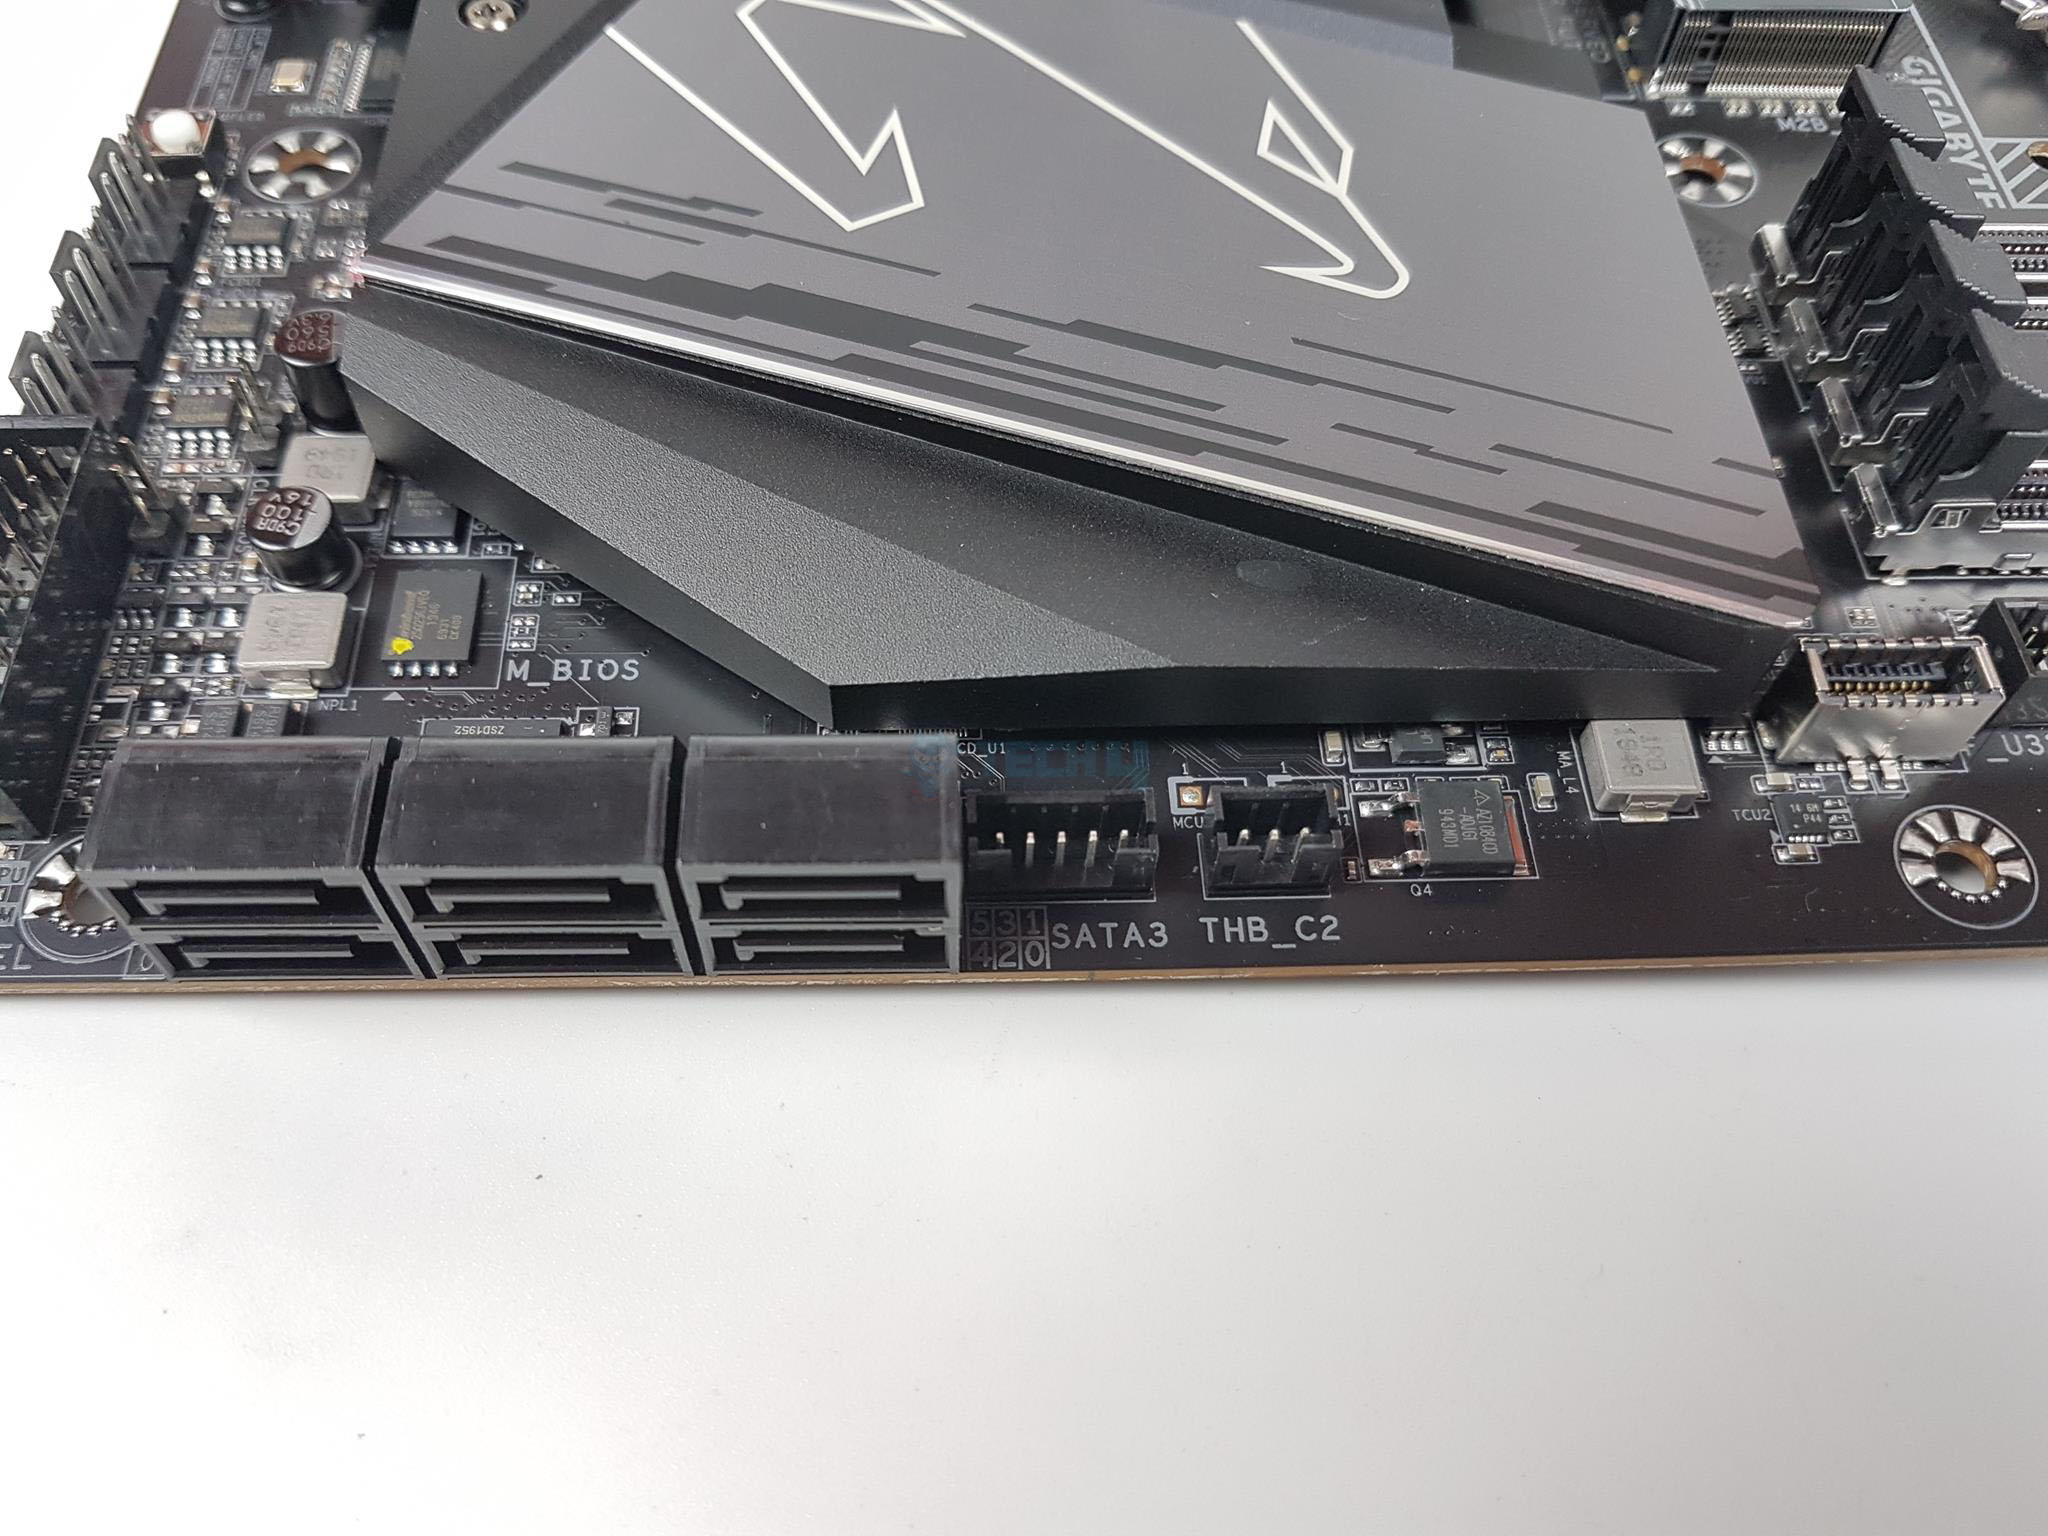
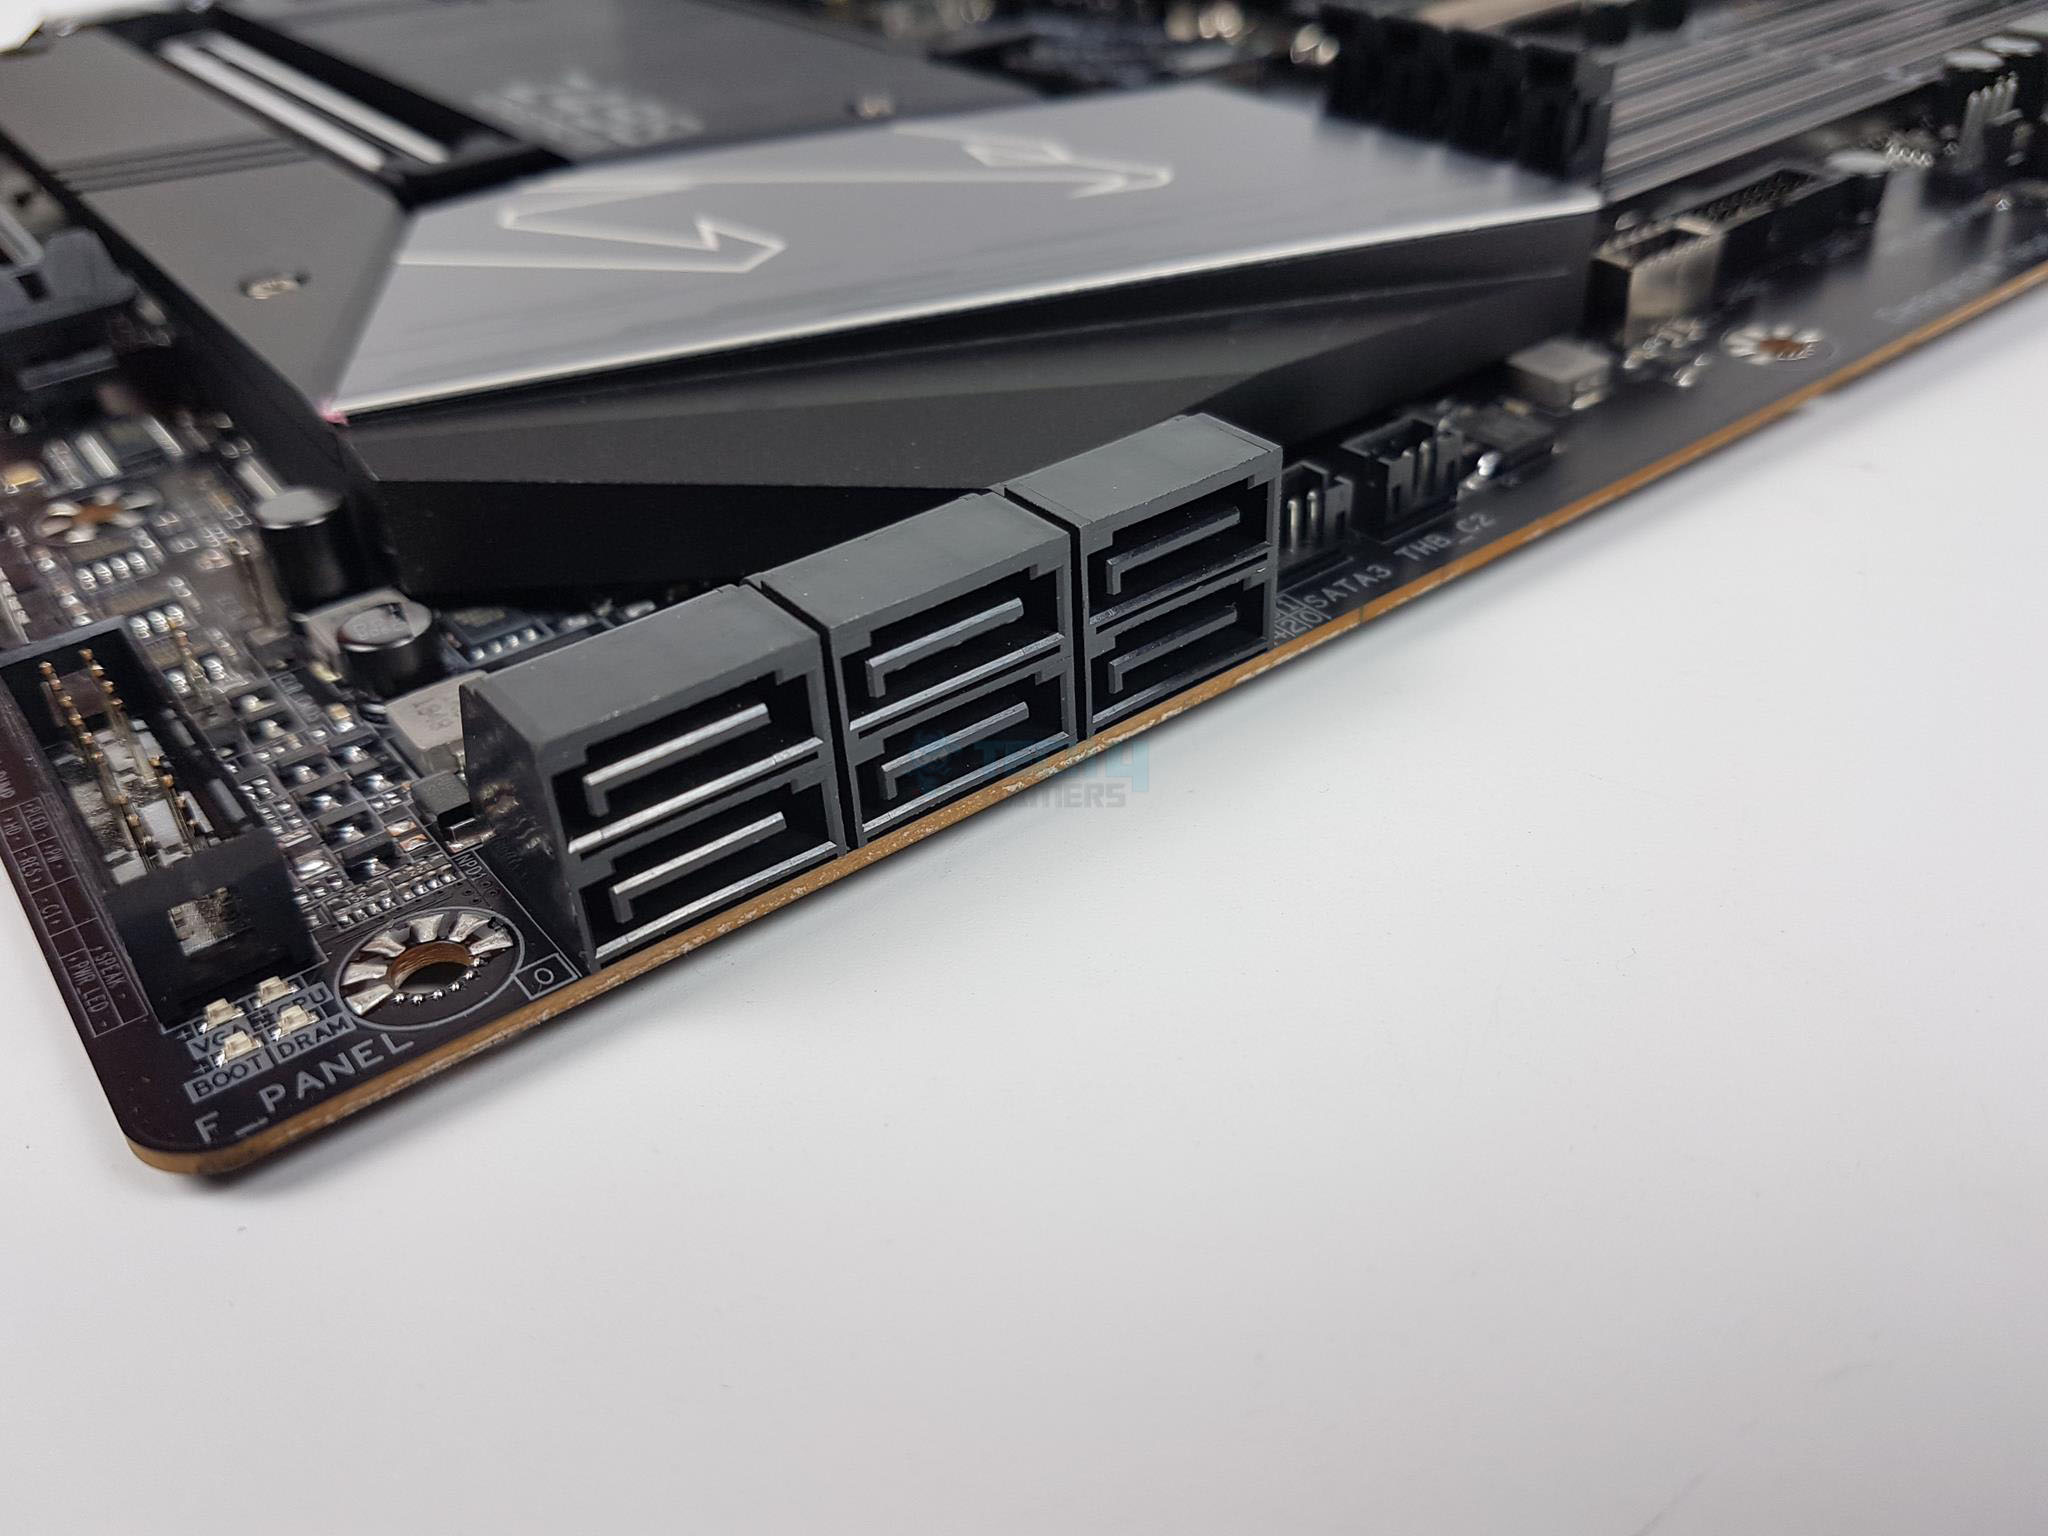
There are 6x SATA ports rated at 6 Gbps located on the lower right side of the motherboard. This Z490 AORUS PRO Review supports RAID 0, RAID 1, RAID 5, and RAID 10.
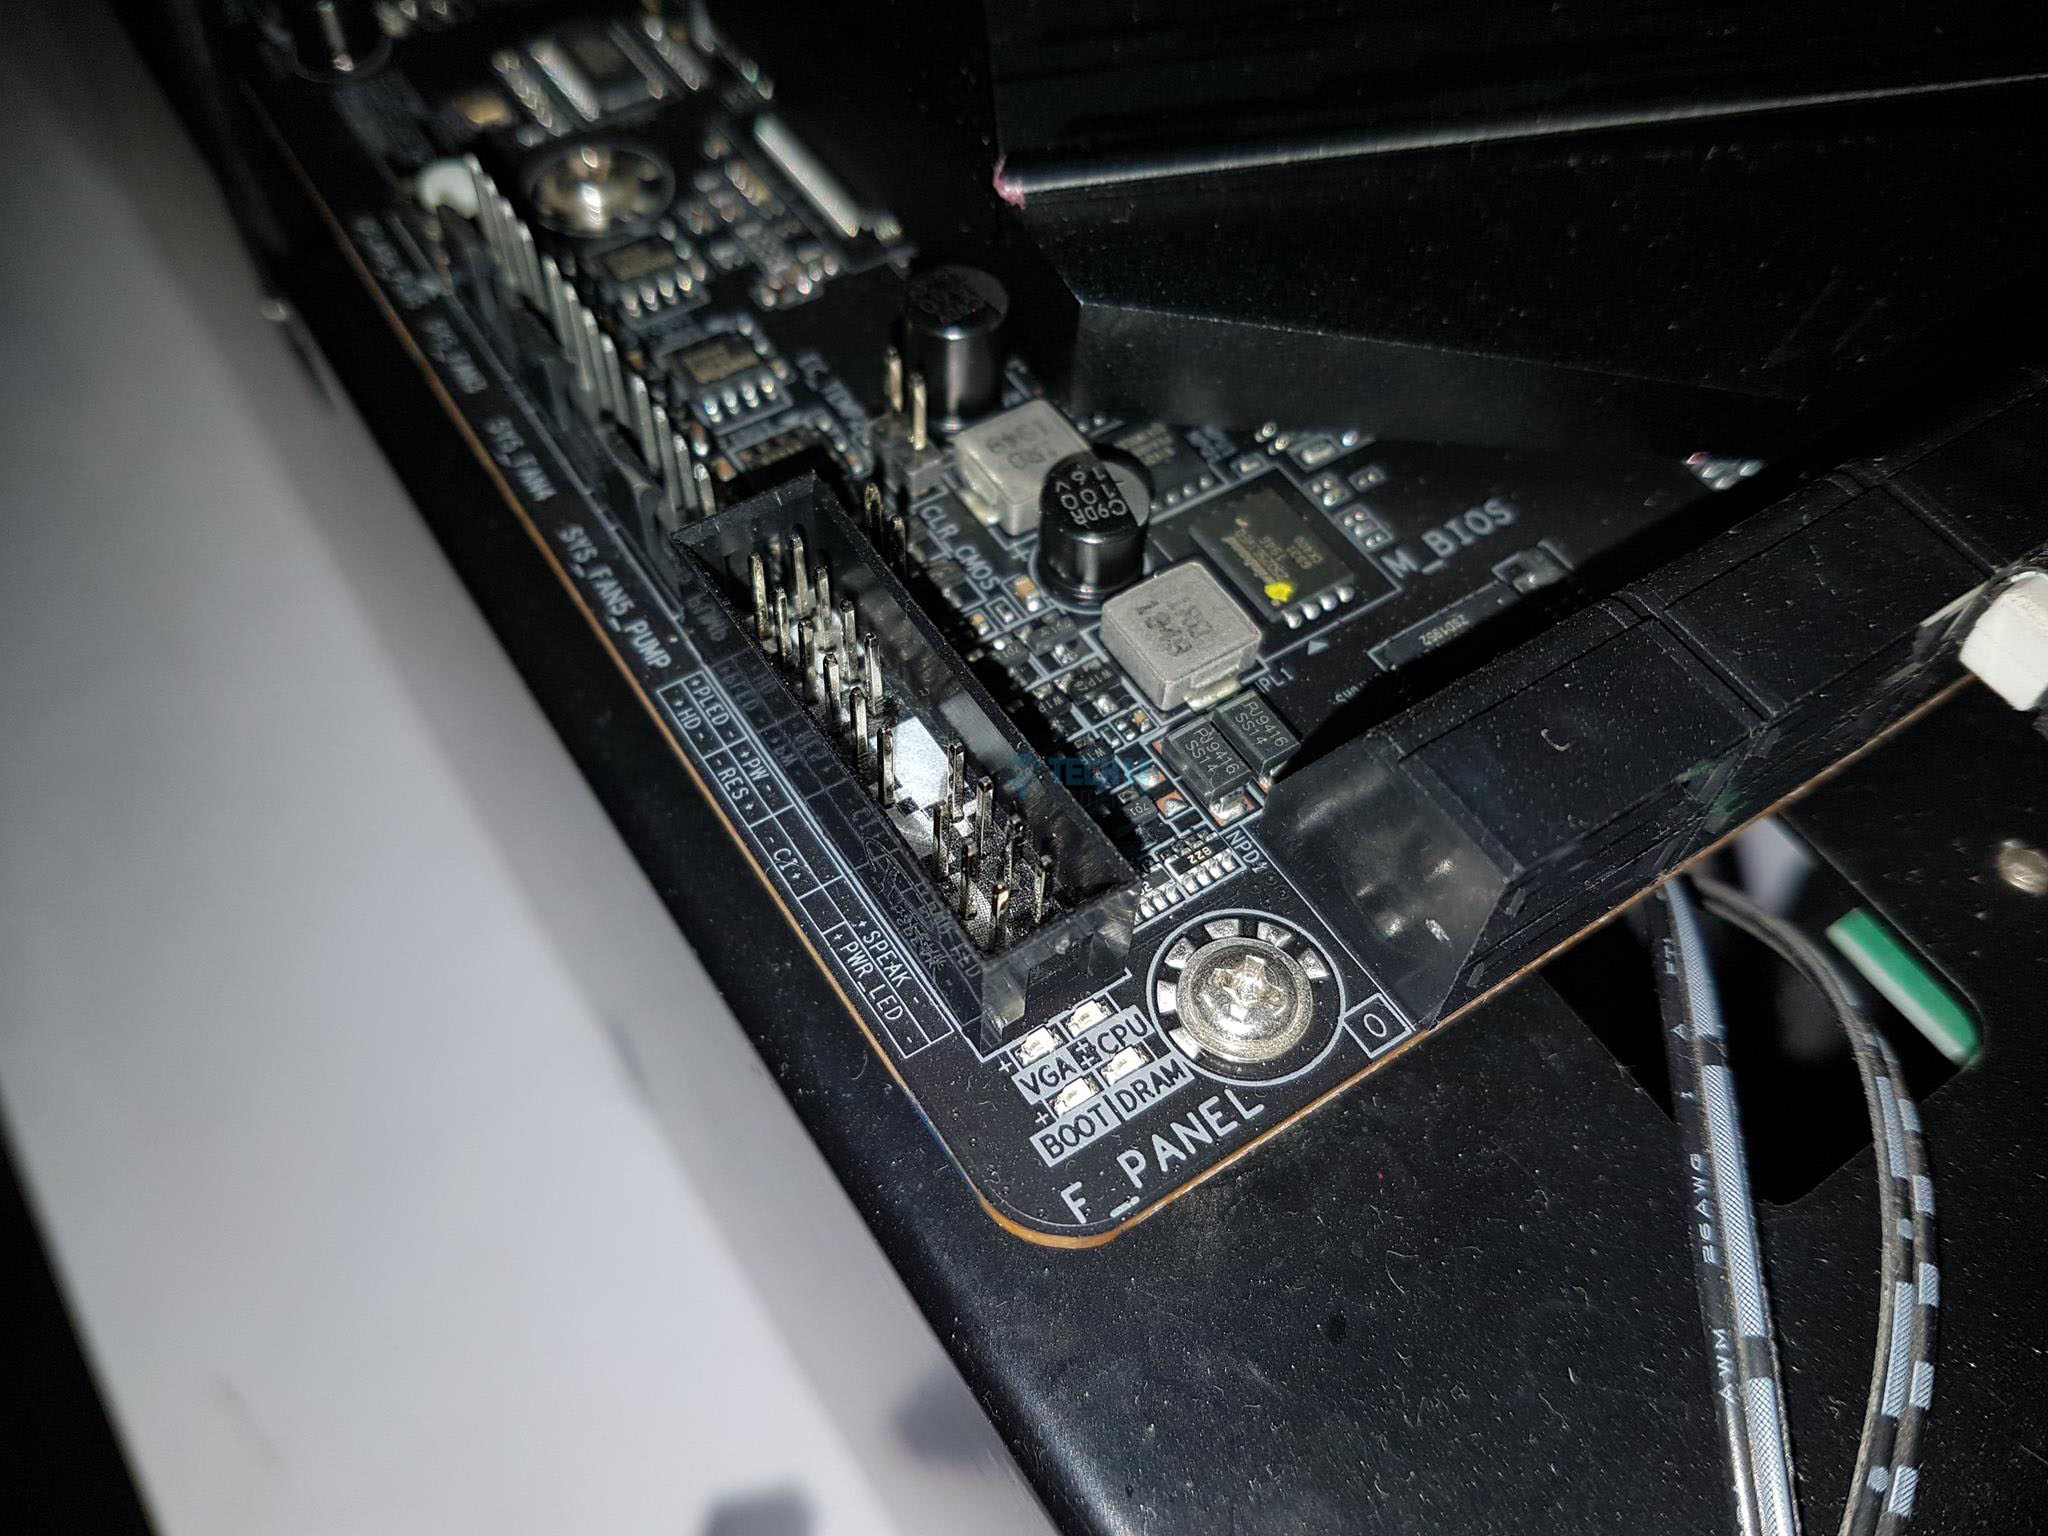

The Z490 AORUS PRO motherboard features dedicated LED indicators for VGA, CPU, BOOT, and DRAM troubleshooting. Each LED corresponds to a specific component, lighting up in case of issues until resolved. Notably, there’s a Thunderbolt header but no debug LED, raising concerns.
Connectivity options at the motherboard’s base include a color-coded system panel connector with a provided G Connector for easy front panel cable connection. A 2-pin Clear CMOS jumper facilitates BIOS reset by shorting the pins with a screwdriver after powering off. On the left of the front panel connector, there are 3x 4-pin hybrid fan headers, with the rightmost one designated for the pump.
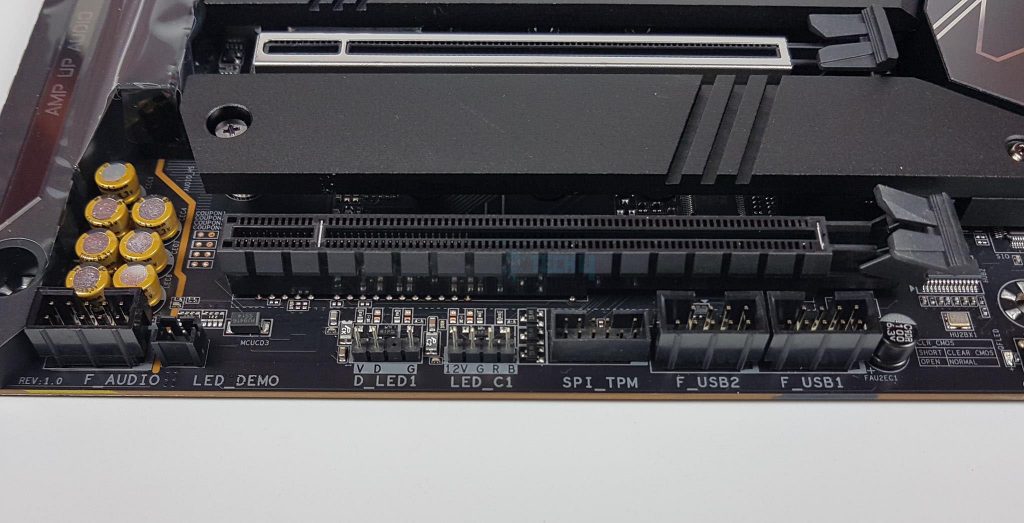
Next, we have two 9-pin USB 2.0 headers followed by a TPM header. Next, we have two lighting headers. The first one is +12V, and the next one is +5V, followed by the Demo LED, and in the last, there is an HD Audio header to which the chassis’ front panel audio cable is connected, which is optional, though.
The GIGABYTE Z490 AORUS PRO AX Gaming Motherboard features a full-length chipset cover finished elegantly with colorful stenciling using black, gray, and silver colors. There is a Falcon logo on the lower left side of the shroud. There are no RGB LEDs under the cover.
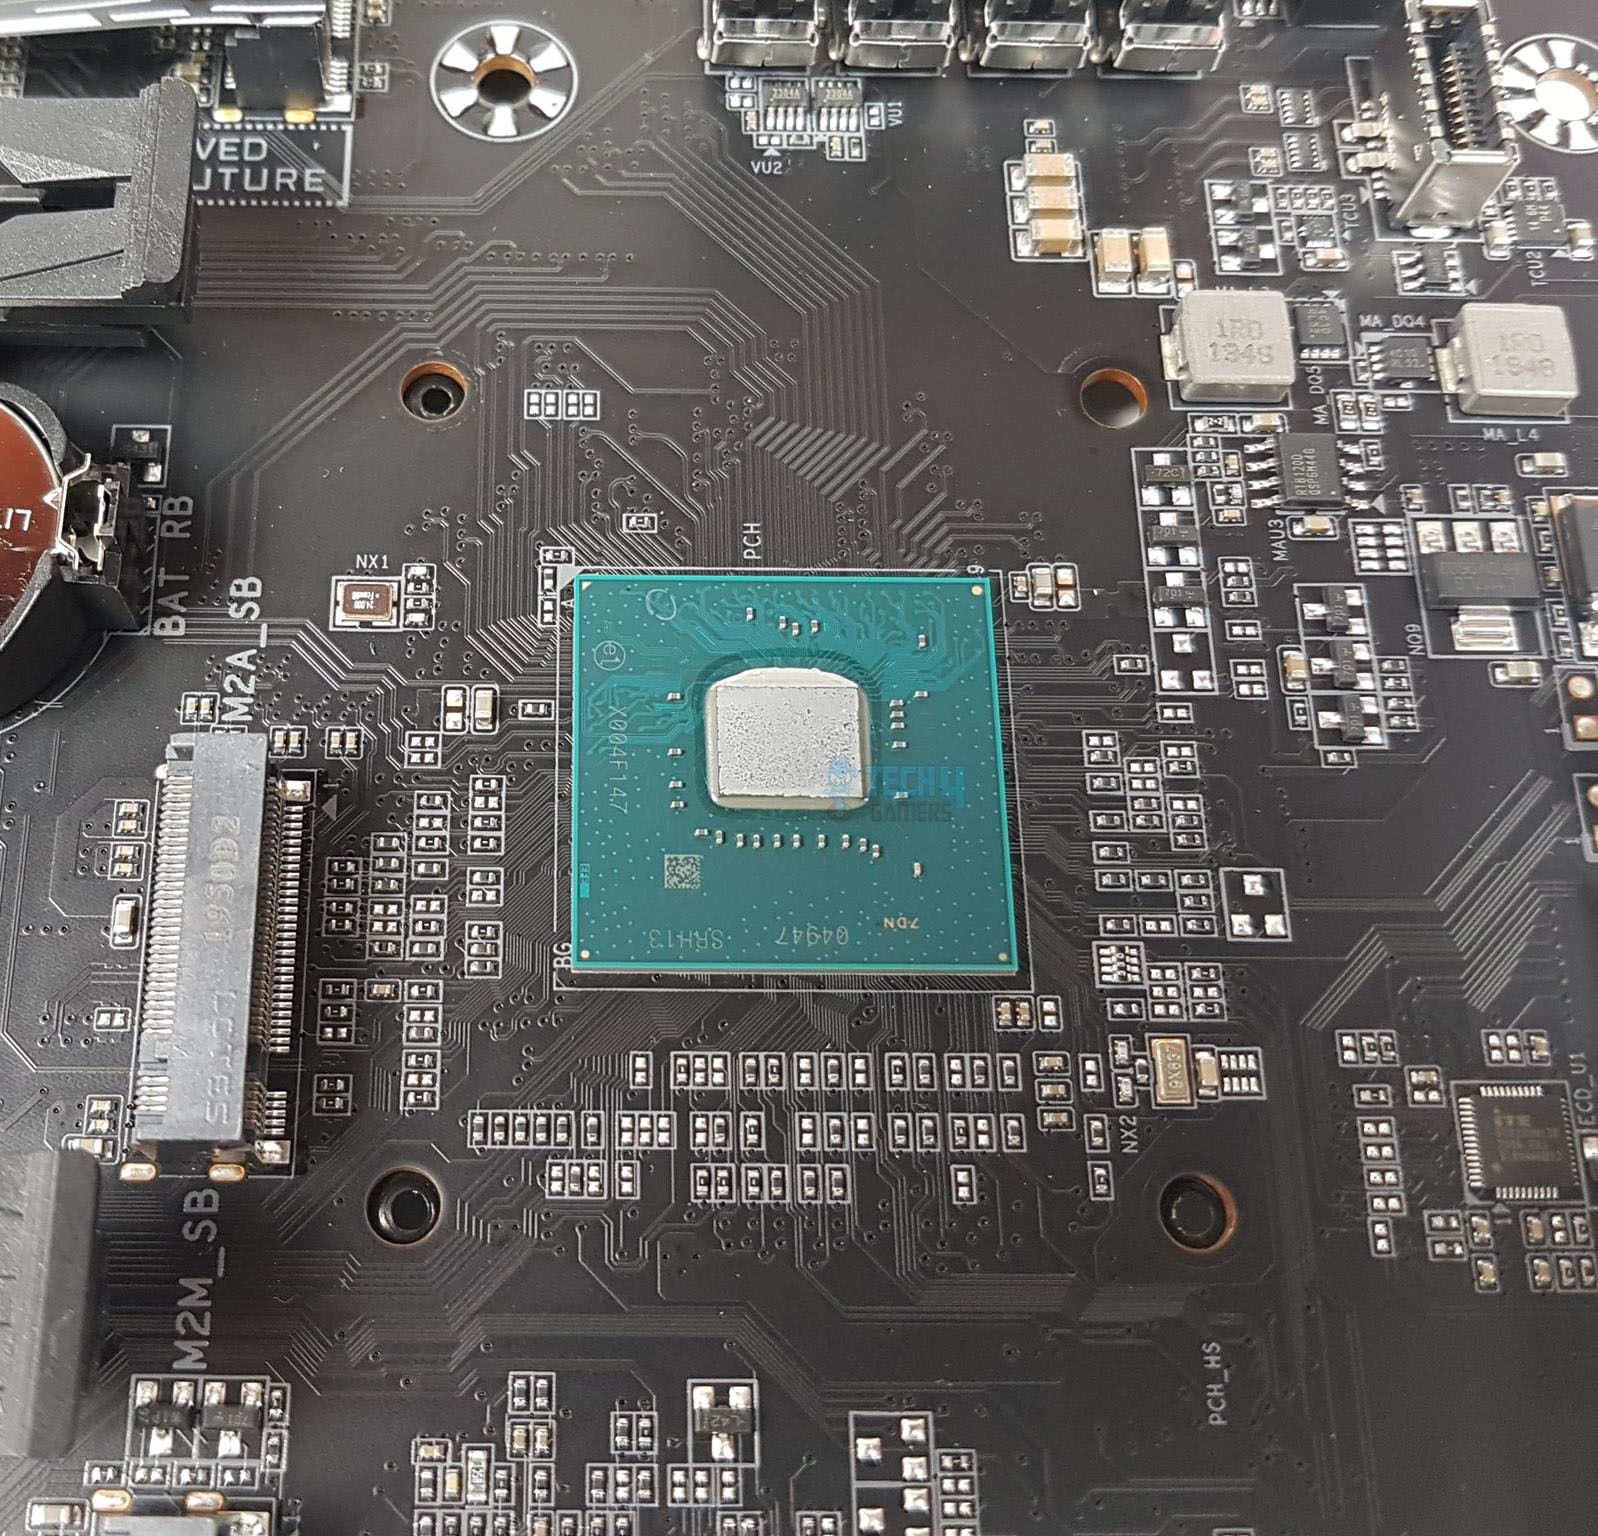
The right picture shows the Intel Z490 chipset after taking the cover off.
USB Ports
The following USB connectivity options are present on the GIGABYTE Z490 AORUS PRO AX Gaming Motherboard:
Coming from the Chipset:
- 1 x USB Type-C™ port on the back panel, with USB 3.2 Gen 2 support
- 1 x USB Type-C™ port with USB 3.2 Gen 1 support, available through the internal USB header
- 2 x USB 3.2 Gen 2 Type-A ports (red) on the back panel
- 5 x USB 3.2 Gen 1 ports (3 ports on the back panel, 2 ports available through the internal USB header)
Chipset+2 USB 2.0 Hubs:
8 x USB 2.0/1.1 ports (4 ports on the back panel, 4 ports available through the internal USB headers)
PCIe Slots
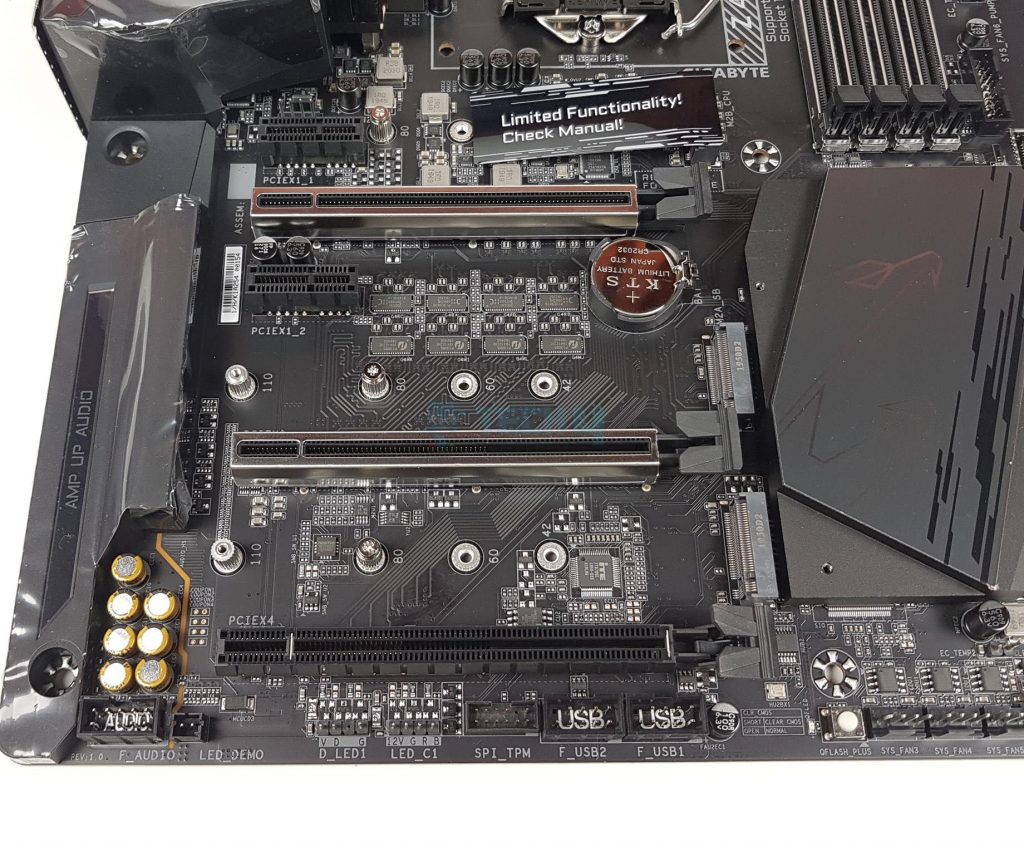
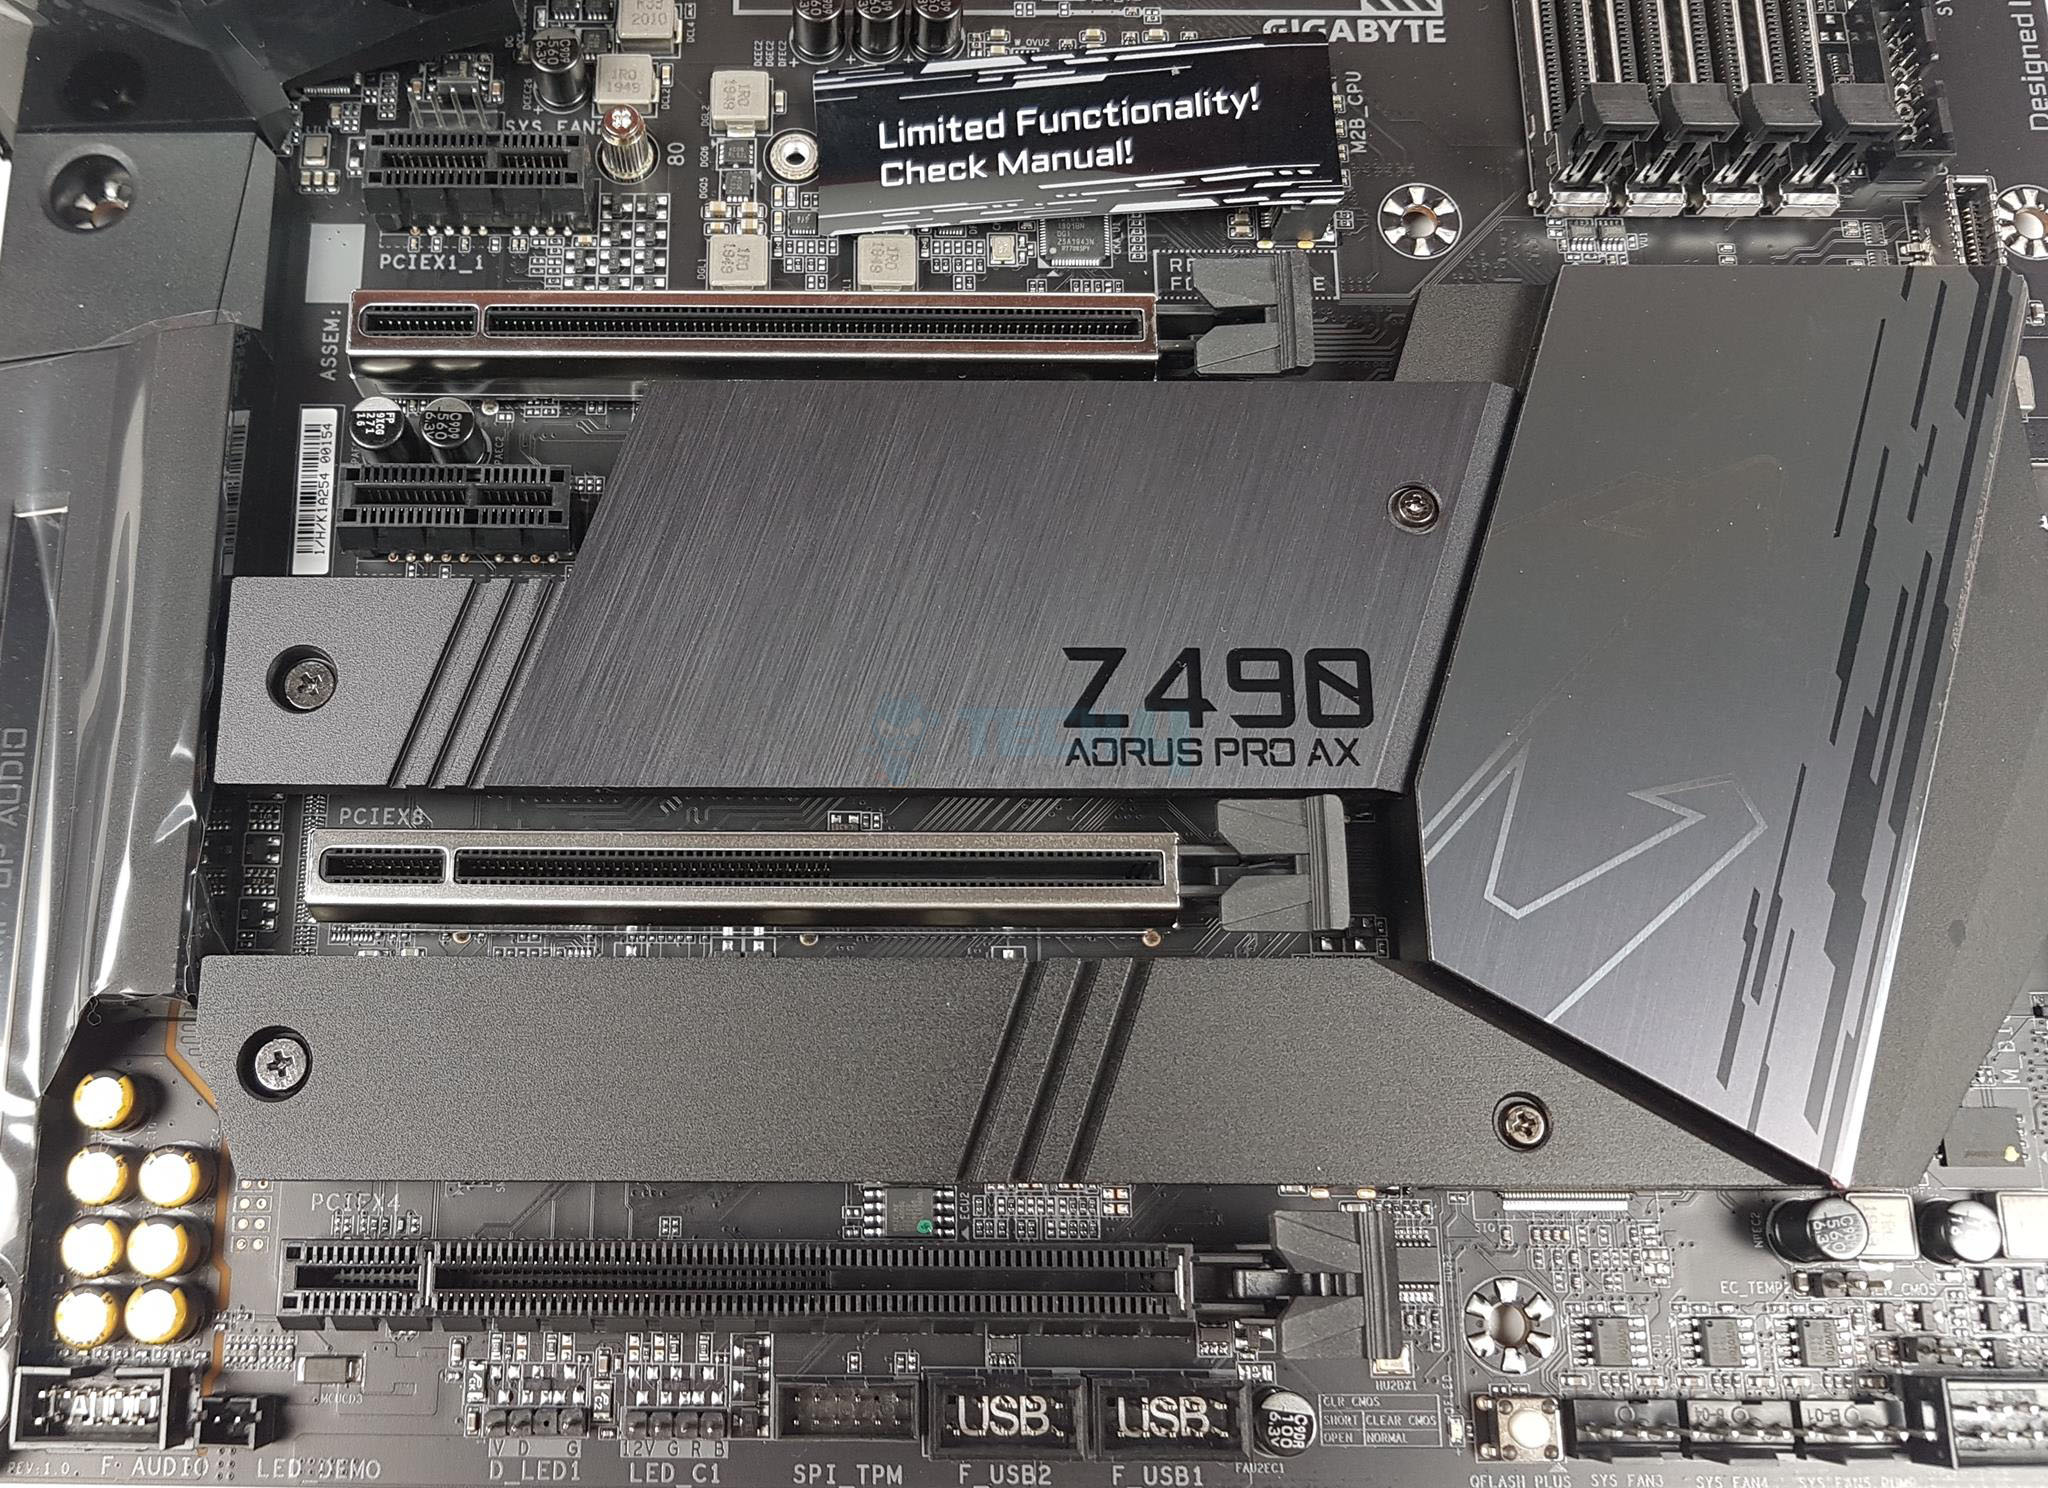
GIGABYTE highlights the Z490 AORUS PRO’s PCIe 4.0 ready PCB and circuitry, featuring a PCIe 4.0 turbo b-clocker above the PCIe slots. While Comet Lake isn’t inherently PCIe 4.0 ready, the motherboard anticipates 11th-generation chips with PCIe 4.0 support.
This hybrid design contrasts with the usual binary choice, offering room for vendors to implement PCIe 4.0 on the Comet Lake platform. The Z490 AORUS PRO boasts a total of 5 PCIe slots.
The top slot is electrically wired to the CPU socket. PCIe slots have higher slot signal stability and lower impedance, maximizing PCIe bandwidth.
Here is the configuration information for these slots:
- 1 x PCI Express x16 slot, running at x16 (PCIEX16) For optimum performance, if only one PCI Express graphics card is to be installed, be sure to install it in the PCIEX16 slot.
- 1 x PCI Express x16 slot, running at x8 (PCIEX8) The PCIEX8 slot shares bandwidth with the PCIEX16 slot. When the PCIEX8 slot is populated, the PCIEX16 slot operates at up to x8 mode.
- 1 x PCI Express x16 slot, running at x4 (PCIEX4)
- 2 x PCI Express x1 slots
SLI/CF Support
- Support for NVIDIA® Quad-GPU SLI™ and 2-Way NVIDIA® SLI™ technologies
- Support for AMD Quad-GPU CrossFire™ and 2-Way AMD CrossFire™ technologies
Top two slots are PCIe 4.0 ready with double-locking stainless steel armor. Below the first slot, 4 switches convert x16 to x8/x8. The bottom row features PCIe 4.0 Re-Drivers to strengthen signals for longer distances.
M.2 Port
The GIGABYTE Z490 AORUS PRO AX Gaming motherboard has two M.2 ports using a PCIe Gen 3 interface.
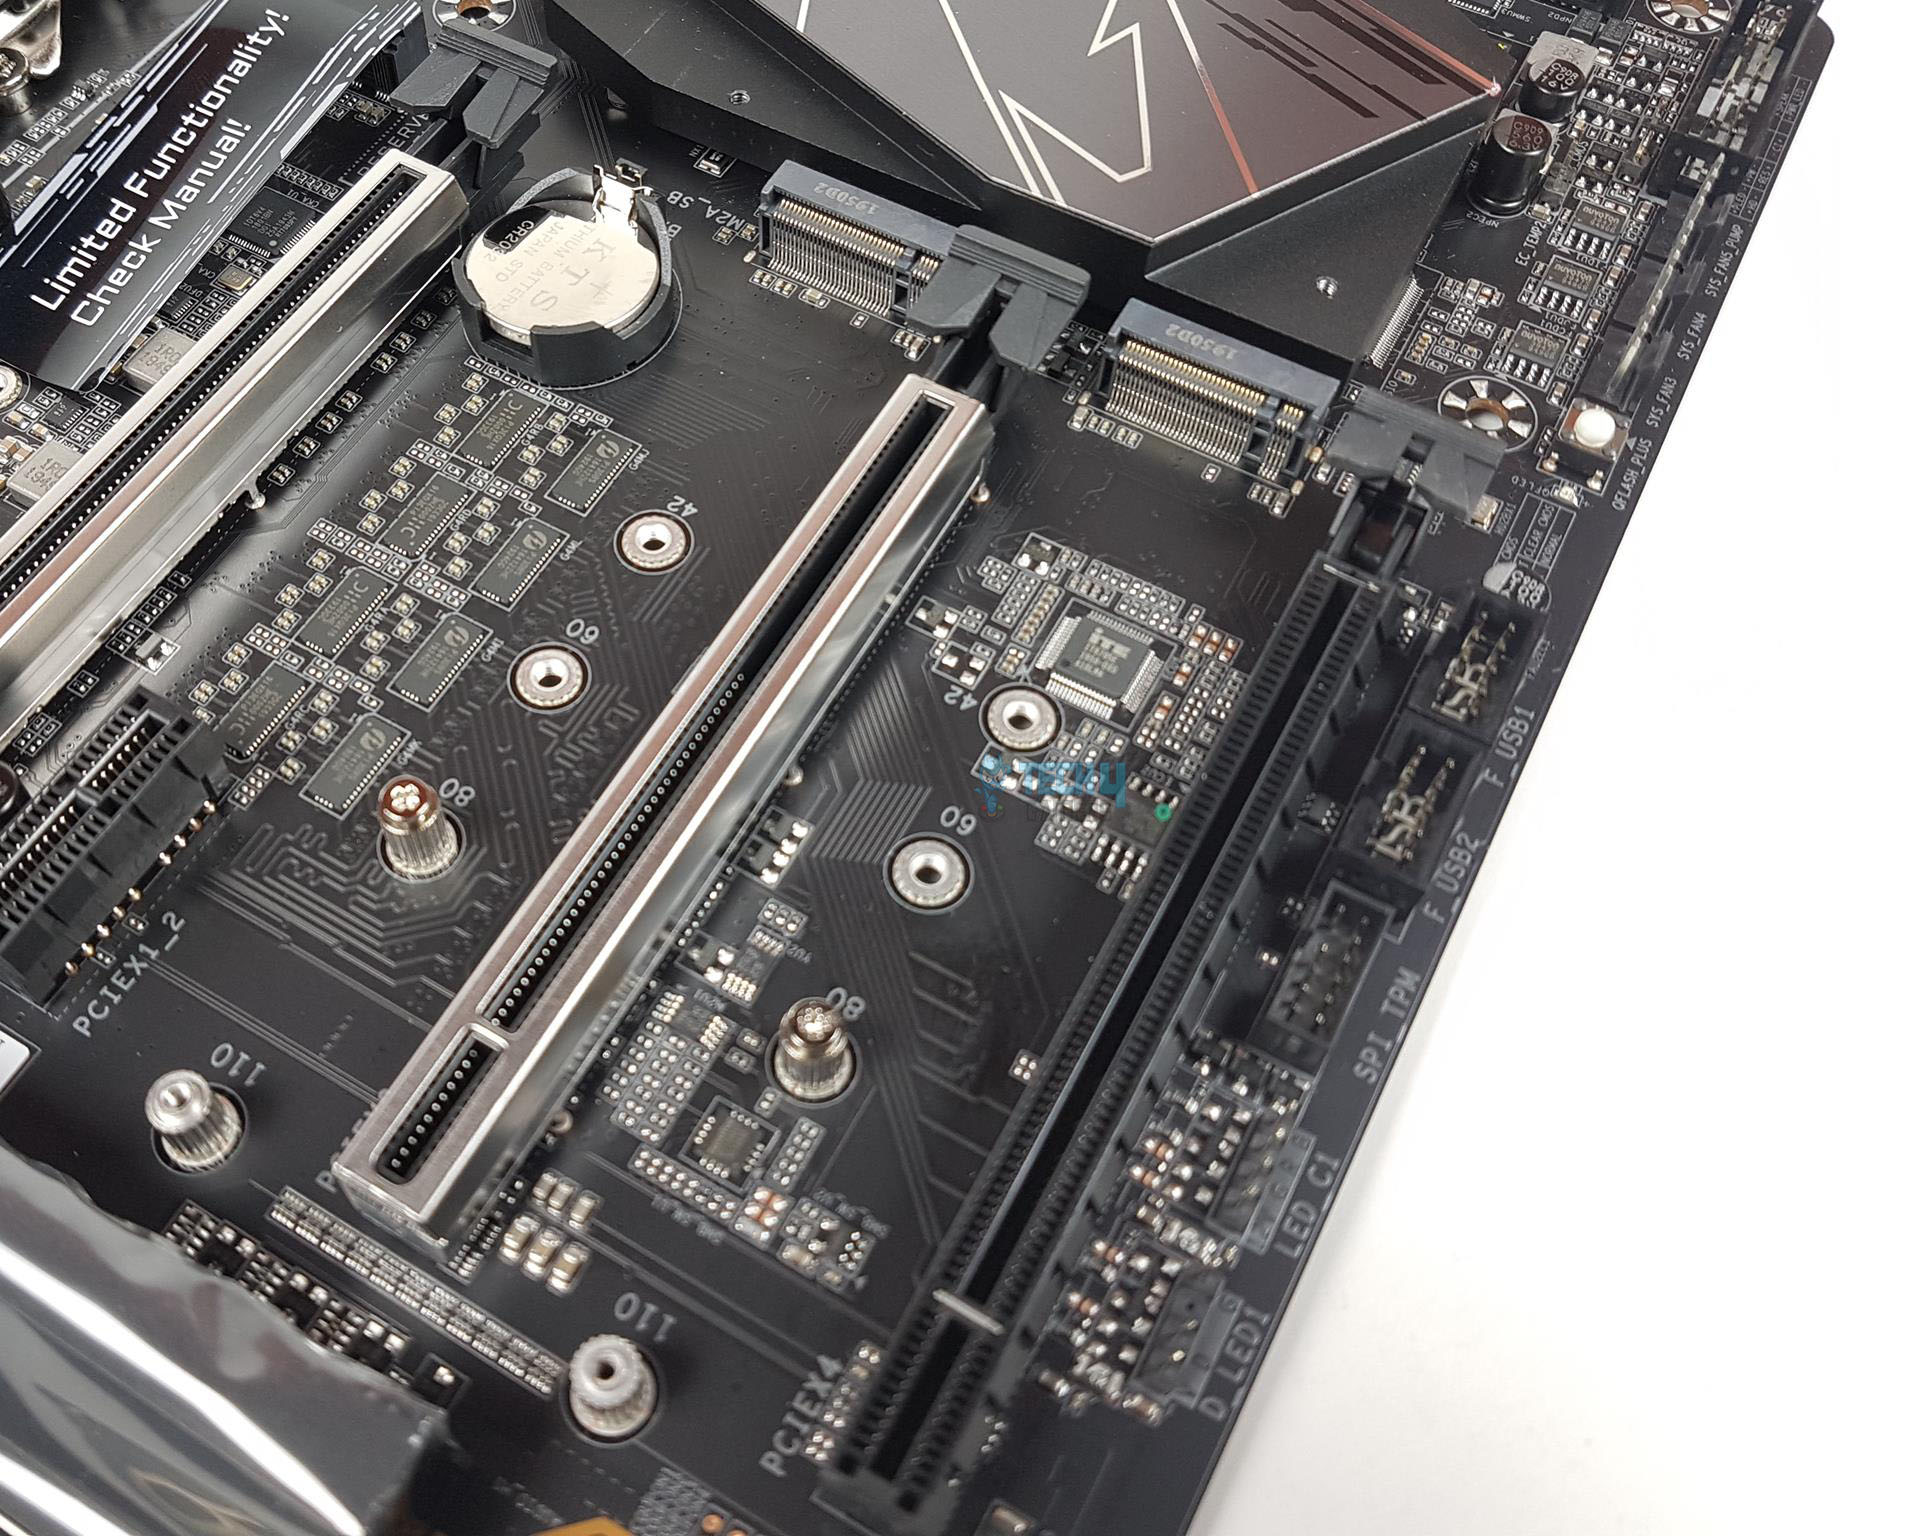
The top M.2 port is reserved for future use, cautioned by a warning sticker due to potential limitations with RAID settings shared with SATA ports. It is advisable to use the M.2 ports under the cover. Both M.2 ports come with thermal shields and pre-applied thermal pads.
The connectors, labeled M2A_SB and M2M_SB, support socket 3, M key, type 2242/2260/2280/22110 SATA, and PCIe x4/x2 SSDs.
Both M.2 ports have thermal covers on the top with pre-applied thermal pads to ensure the cool temperature on the drives.
Audio
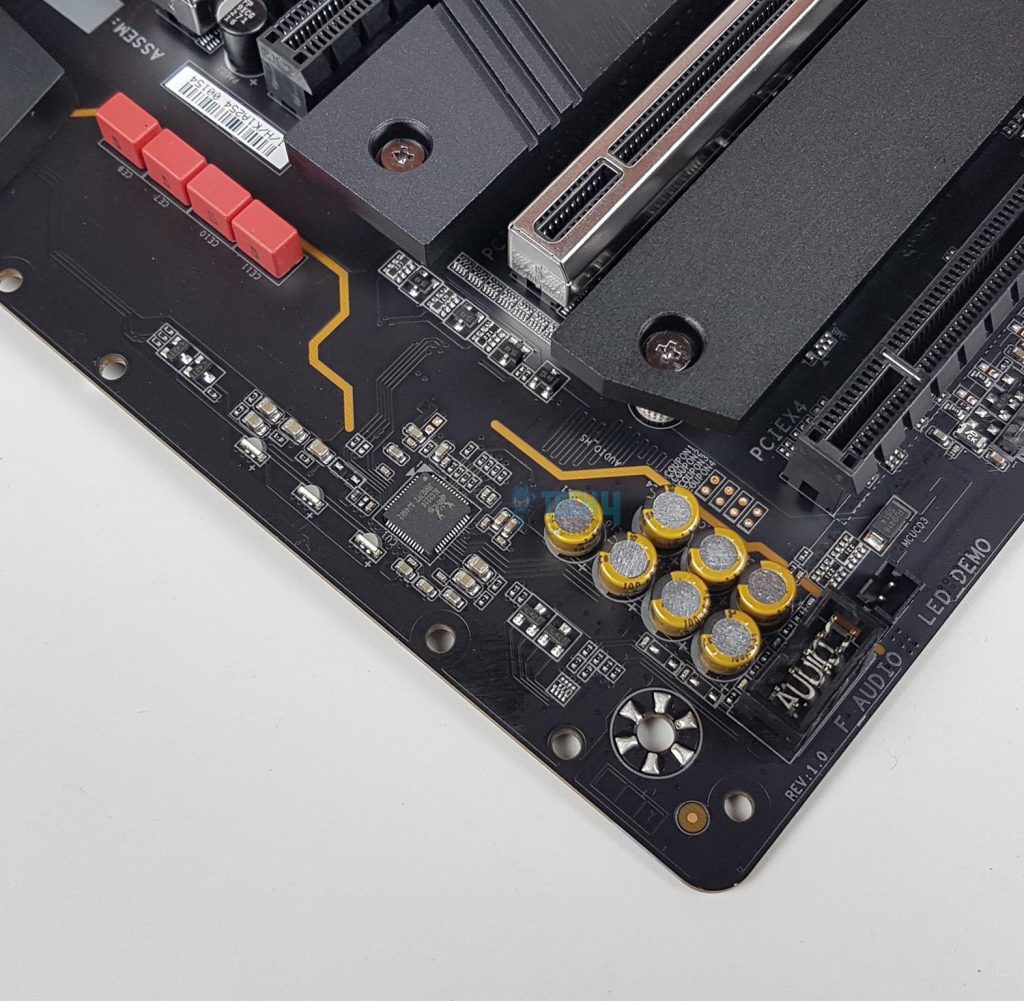
The GIGABYTE Z490 AORUS Pro WiFi Gaming motherboard features Realtek High-End HD Audio Codec ALC1220 with 120dB(A) SNR [110/114 dB(A)] HD Audio and VB Series audio controller. The Smart Headphone Amp automatically detects headphone impedance to prevent volume and distortion issues.
The audio section uses a combination of Hi-Fi grade WIMA FKP2 capacitors and high-end Chemicon audio capacitors. WIMA FKP2 capacitors, common in premium Hi-Fi systems, complement high-end audio capacitors for rich bass and clear high frequencies.
AOURS AMP-UP Audio technology, combined with a dedicated layered PCB and 4 Hi-Fi grade WIMA KFP2 Capacitors, delivers high-resolution and high-fidelity audio for demanding audiophiles. LED trace path lighting illustrates PCB layer separation. Channel support includes 2/4/5.1/7.1, with S/PDIF Out.
Networking
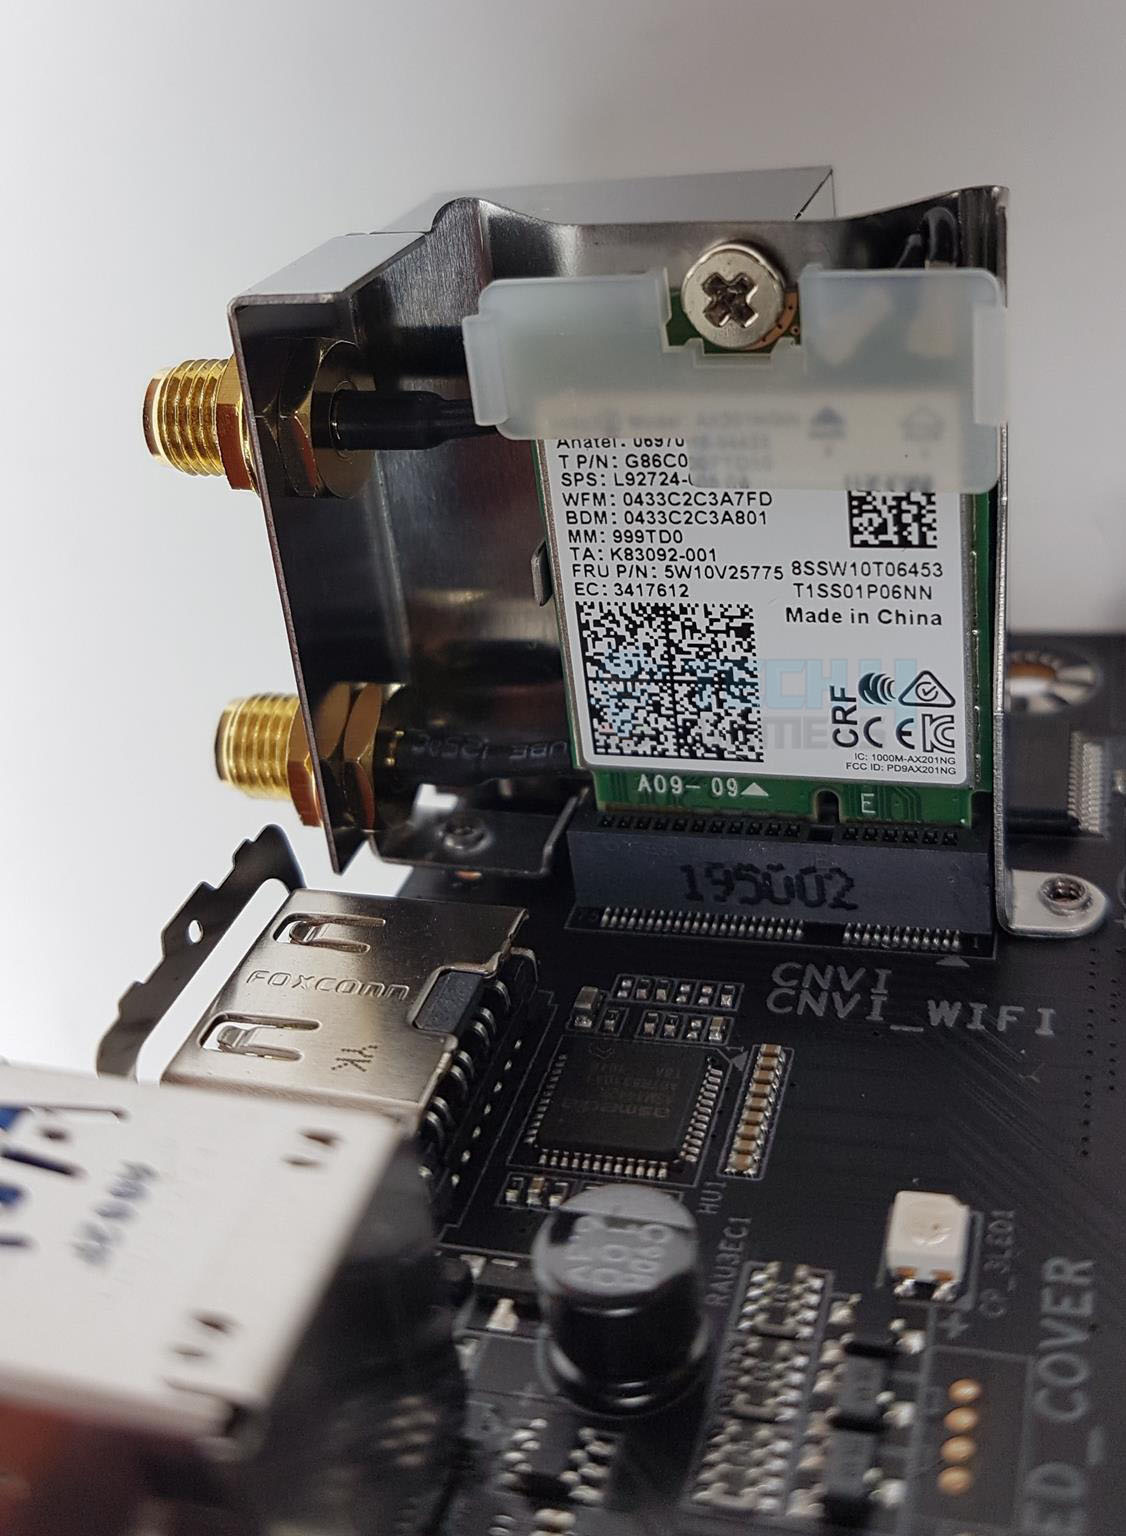
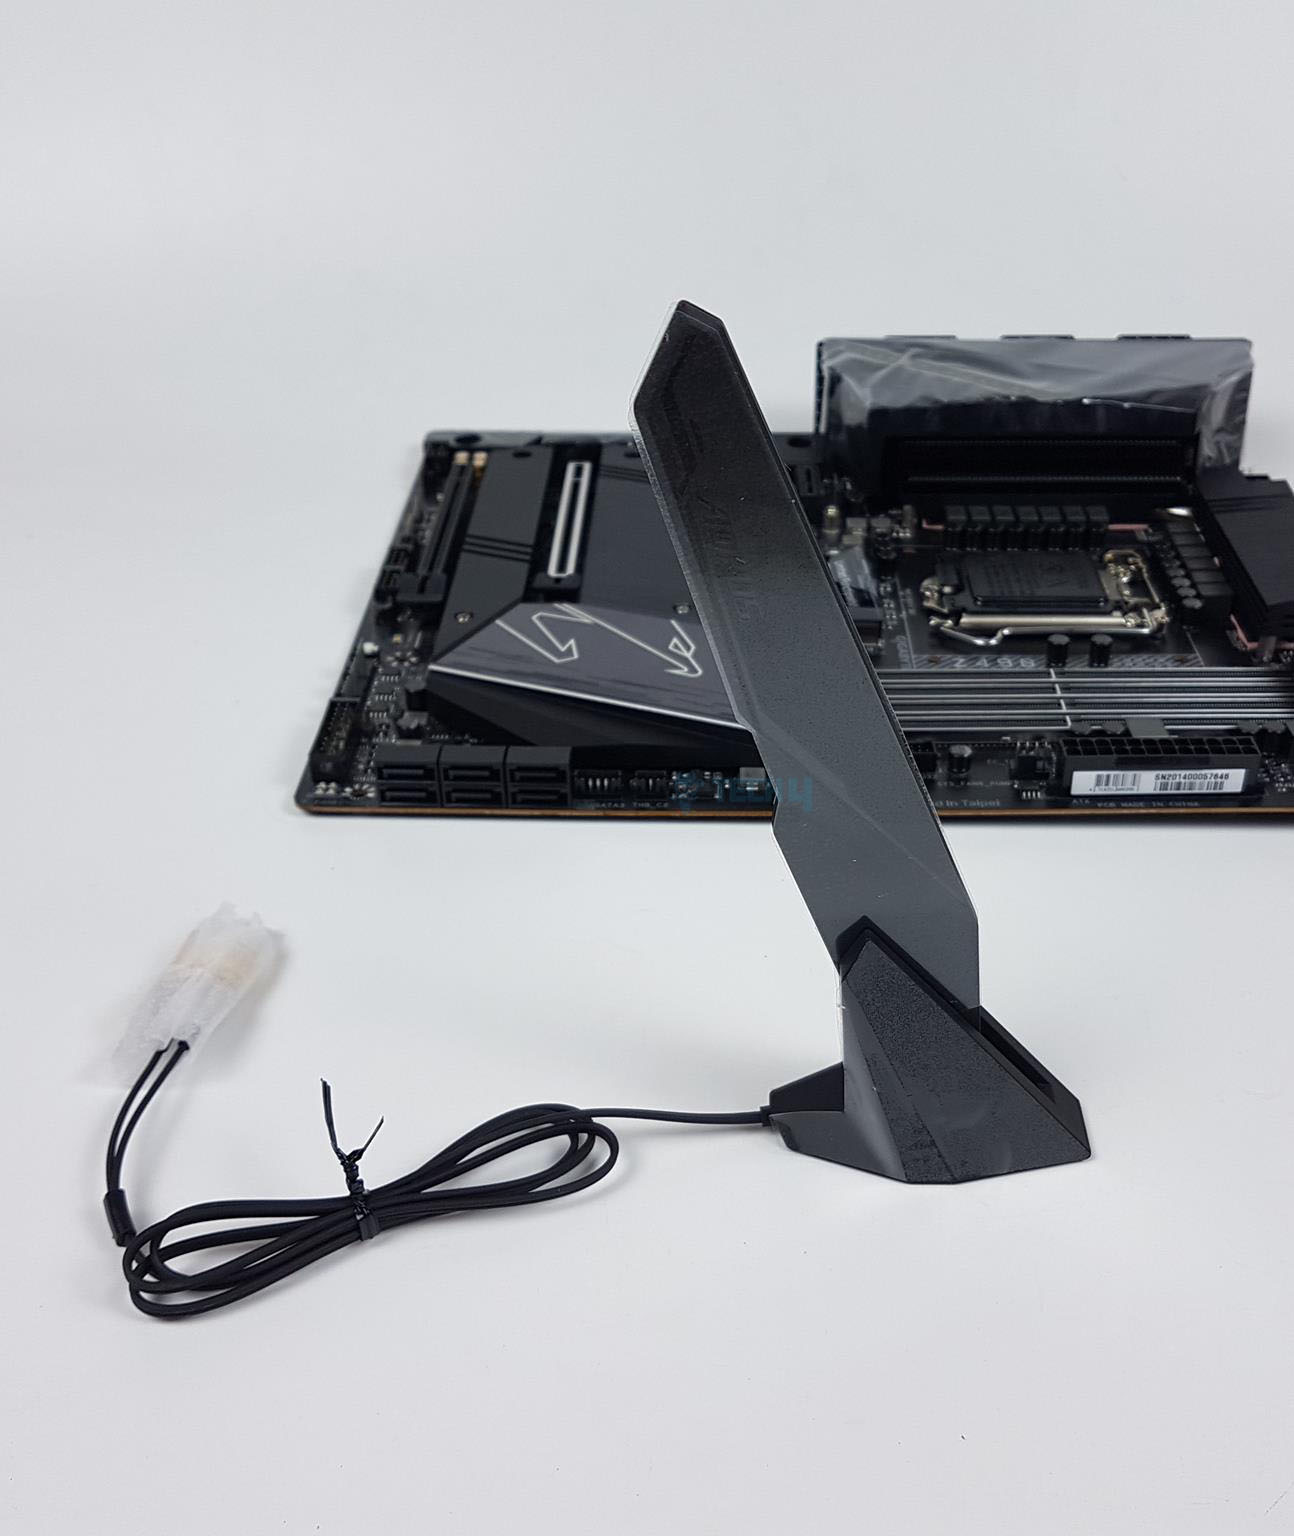
The CNVi controller module on the Rear IO panel enables WiFi 6 201AX connectivity, supported by antennas for a dual-band 2.4/5 GHz range. The antenna also supports Bluetooth 5.1 with an improved range and faster transmission.
The Z490 AORUS PRO AX motherboard utilizes an Intel 2.5 GbE NIC, providing up to 2.5 GbE network connectivity—twice as fast as general 1GbE networking. Ideal for gamers and streamers, it ensures a smooth online experience and is backward compatible with Multi-Gig (10/100/1000/2500Mbps) RJ-45 Ethernet.
CMOS Chip
This board has 1x 128 Mbit flash using licensed AMI UEFI BIOS. PnP 1.0a, DMI 2.7, WfM 2.0, SM BIOS 2.7, and ACPI 5.0 are supported.
Thermal Monitoring and Cooling Solution
Now, it is time to take a look at the cooling provision on the GIGABYTE Z490 AORUS PRO AX Gaming Motherboard.
The above picture shows the thermal sensors and fan headers provision on the GIGABYTE Z490 AORUS PRO AX Gaming motherboard. This Z490 AORUS PRO motherboard comes with:
- 8 Fan / Water Pump Connectors
- 7 Temperature Sensors
- 2 External Temperature Sensors
The Z490 AORUS PRO AX motherboard includes 7 sensors on the PCB, with two 2-pin sensor headers (shown in green) and two 4-pin Pump/AIO headers. All headers are hybrid and can be controlled via UEFI/BIOS using the Smart Fan 5 utility or through the SIV utility from Windows. Note: The SIV utility requires the installation of the APP Center application.
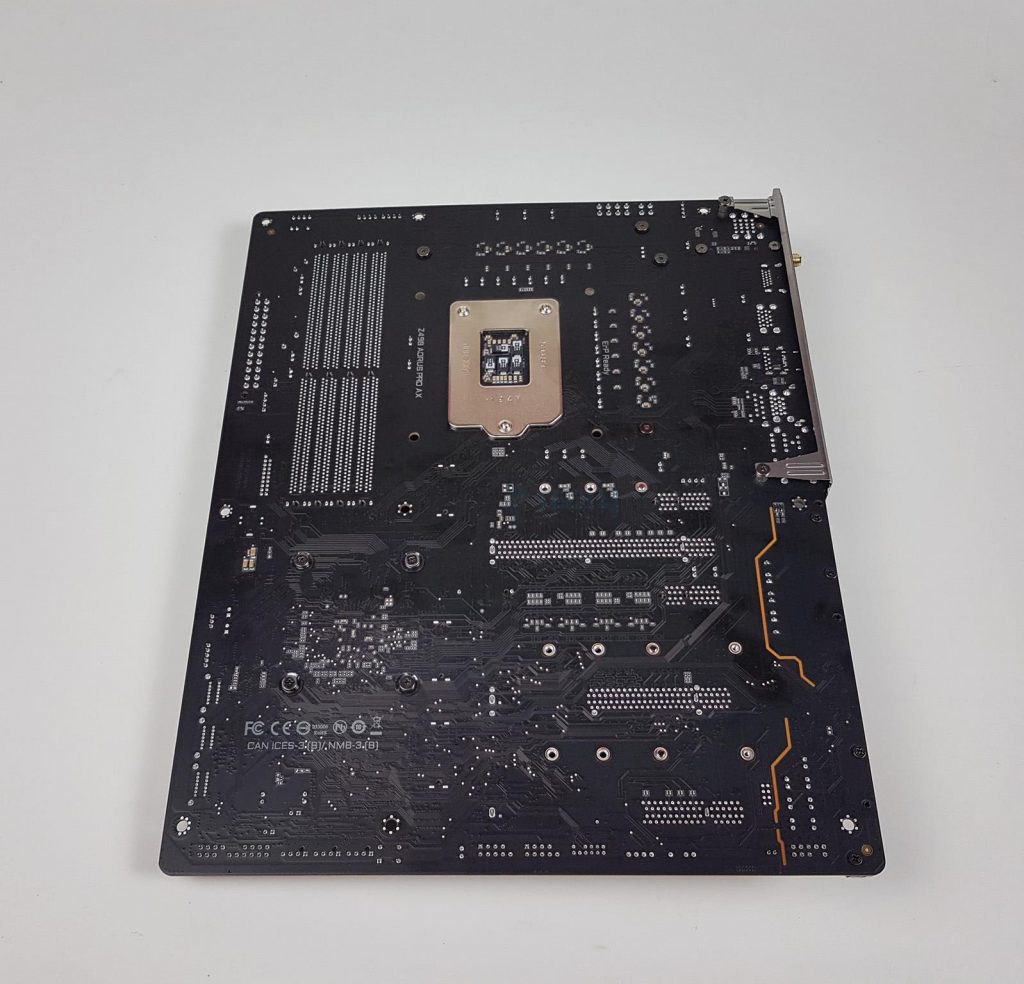
Back I/O Panel
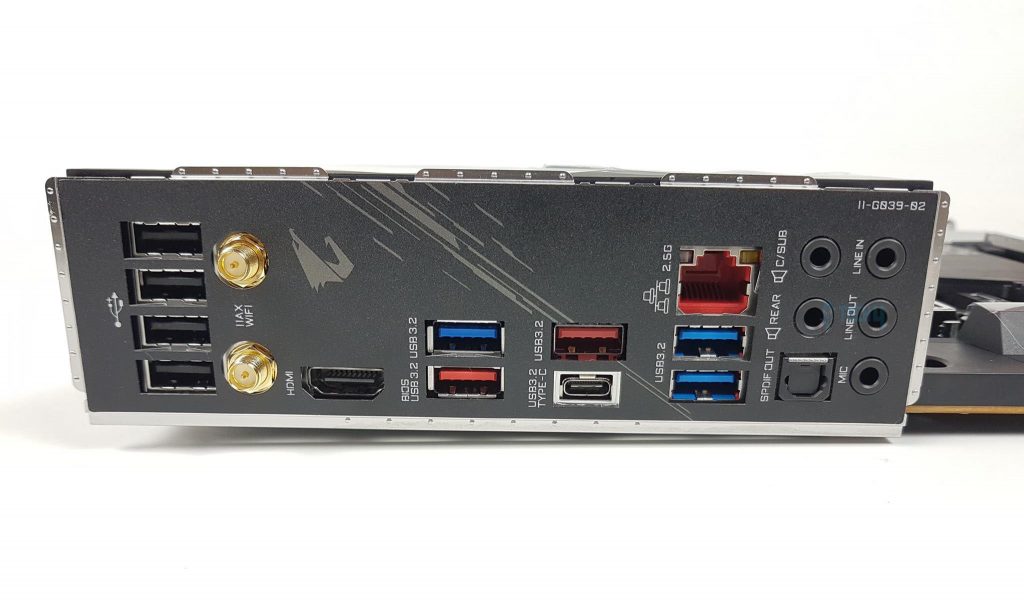
- 1 x USB Type-C™ port, with USB 3.2 Gen 2 support
- 2 x USB 3.2 Gen 2 Type-A ports (red)
- 3 x USB 3.2 Gen 1 ports
- 4 x USB 2.0/1.1 ports
- 2 x SMA antenna connectors (2T2R)
- 1 x HDMI port
- 1 x RJ-45 port
- 1 x optical S/PDIF Out connector
- 5 x audio jacks
Here is the picture of the motherboard’s backside.
BIOS
Though GIGABYTE has been improving the user interface on their UEFI/BIOS, it is still not as good as the one provided by ASUS or MSI but spending a bit of time alone will get you going.
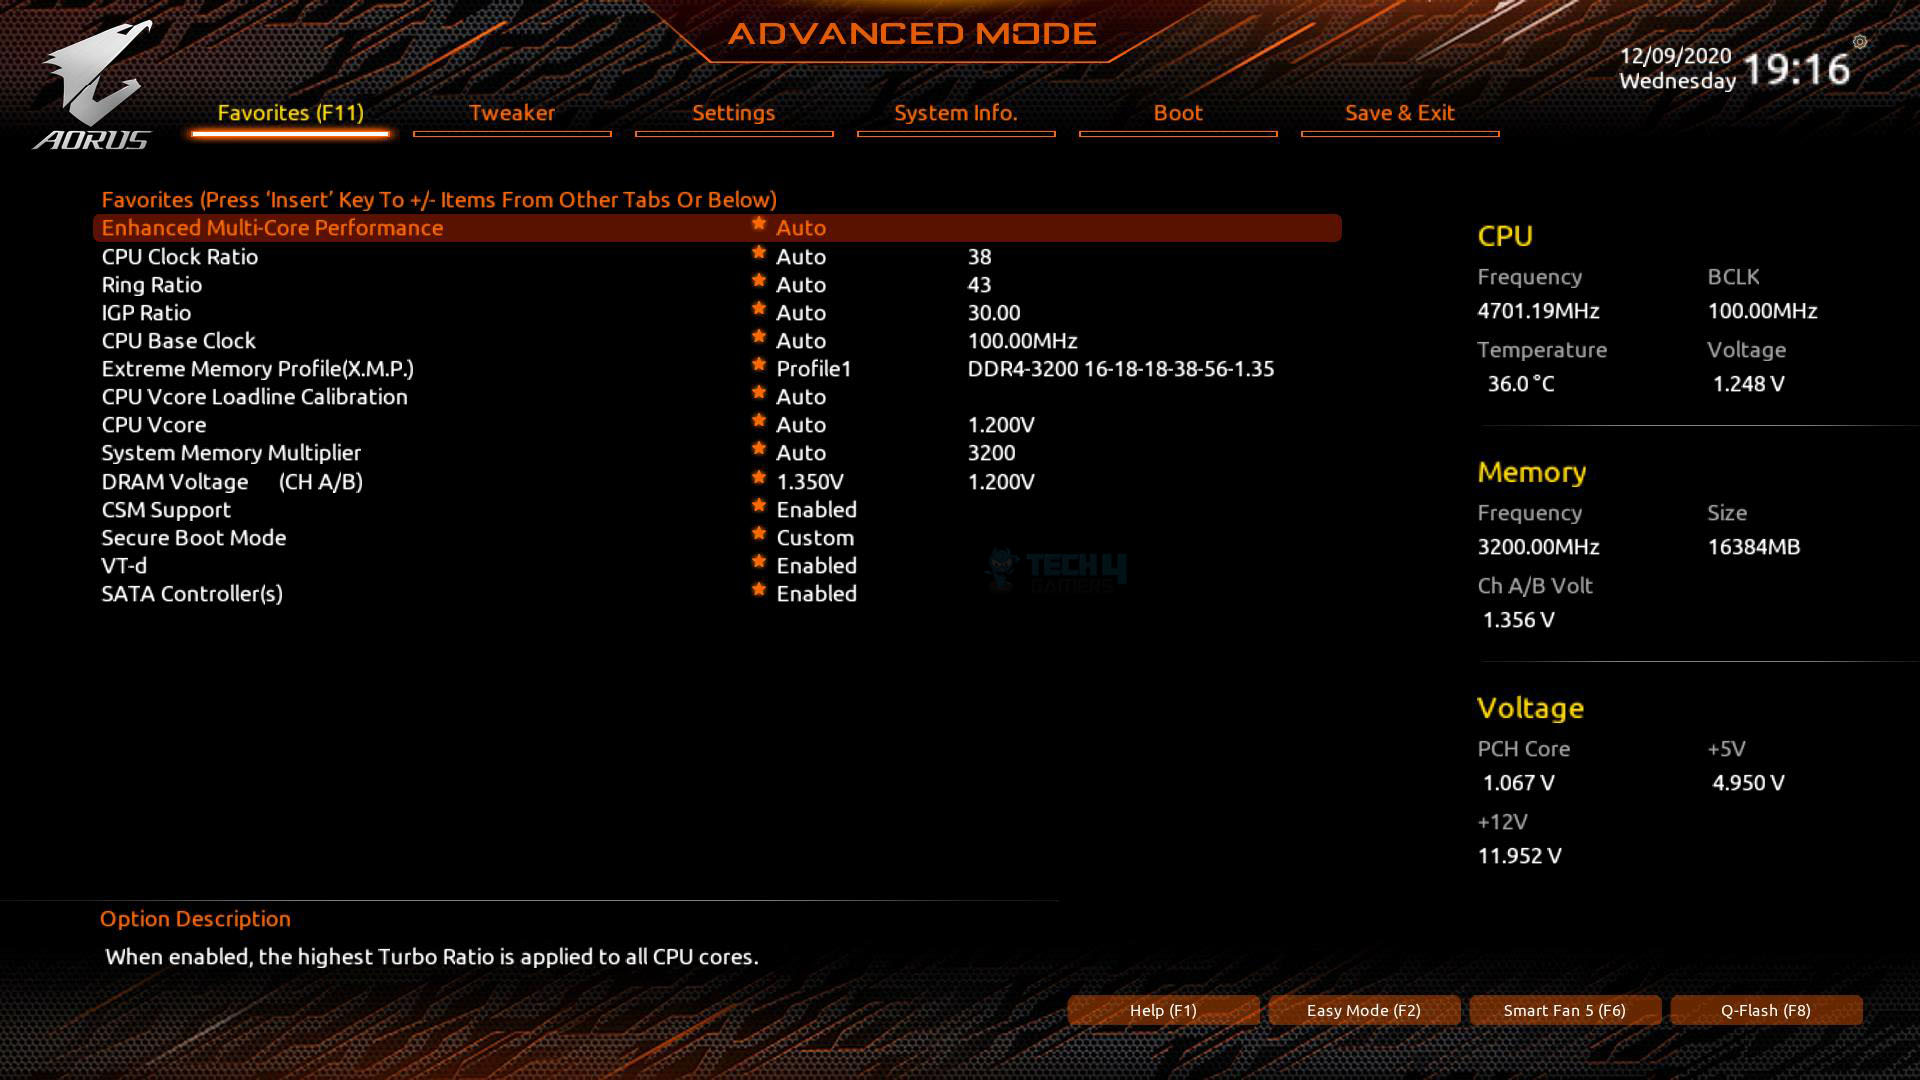
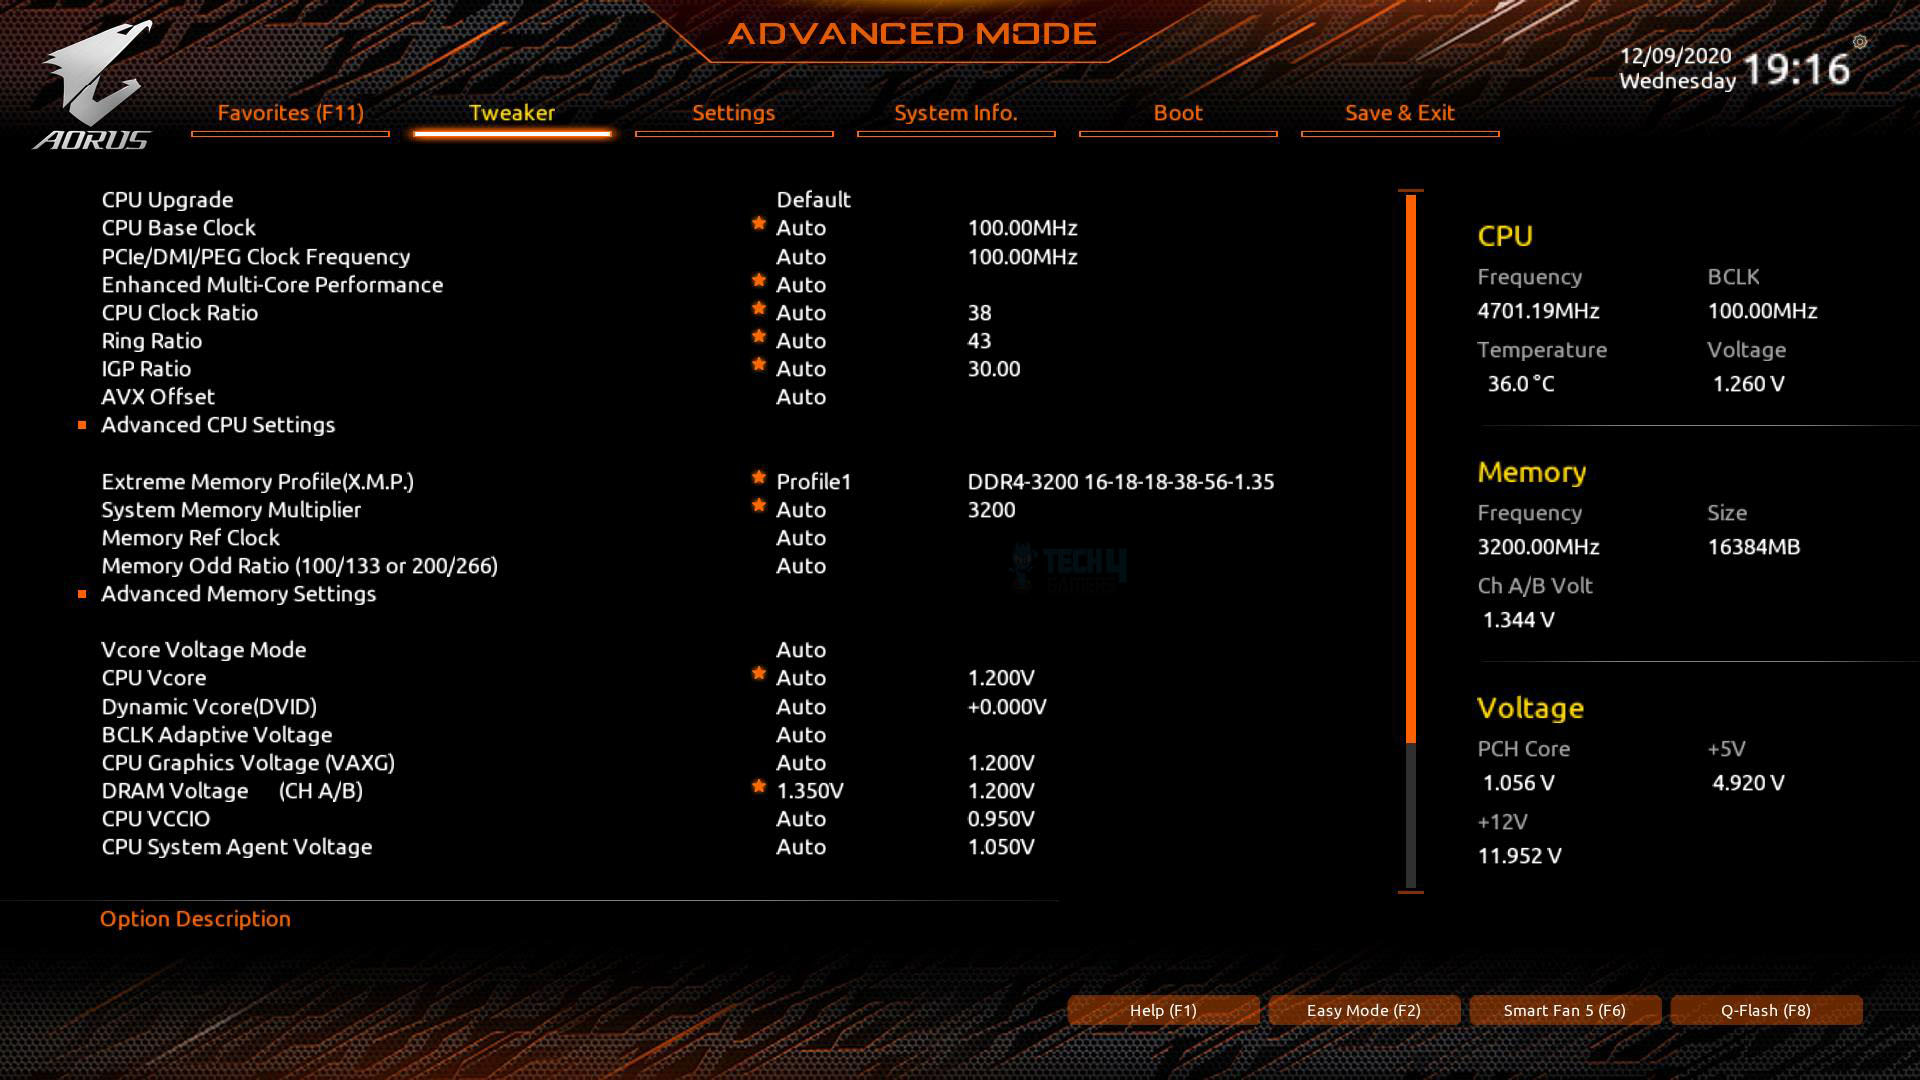
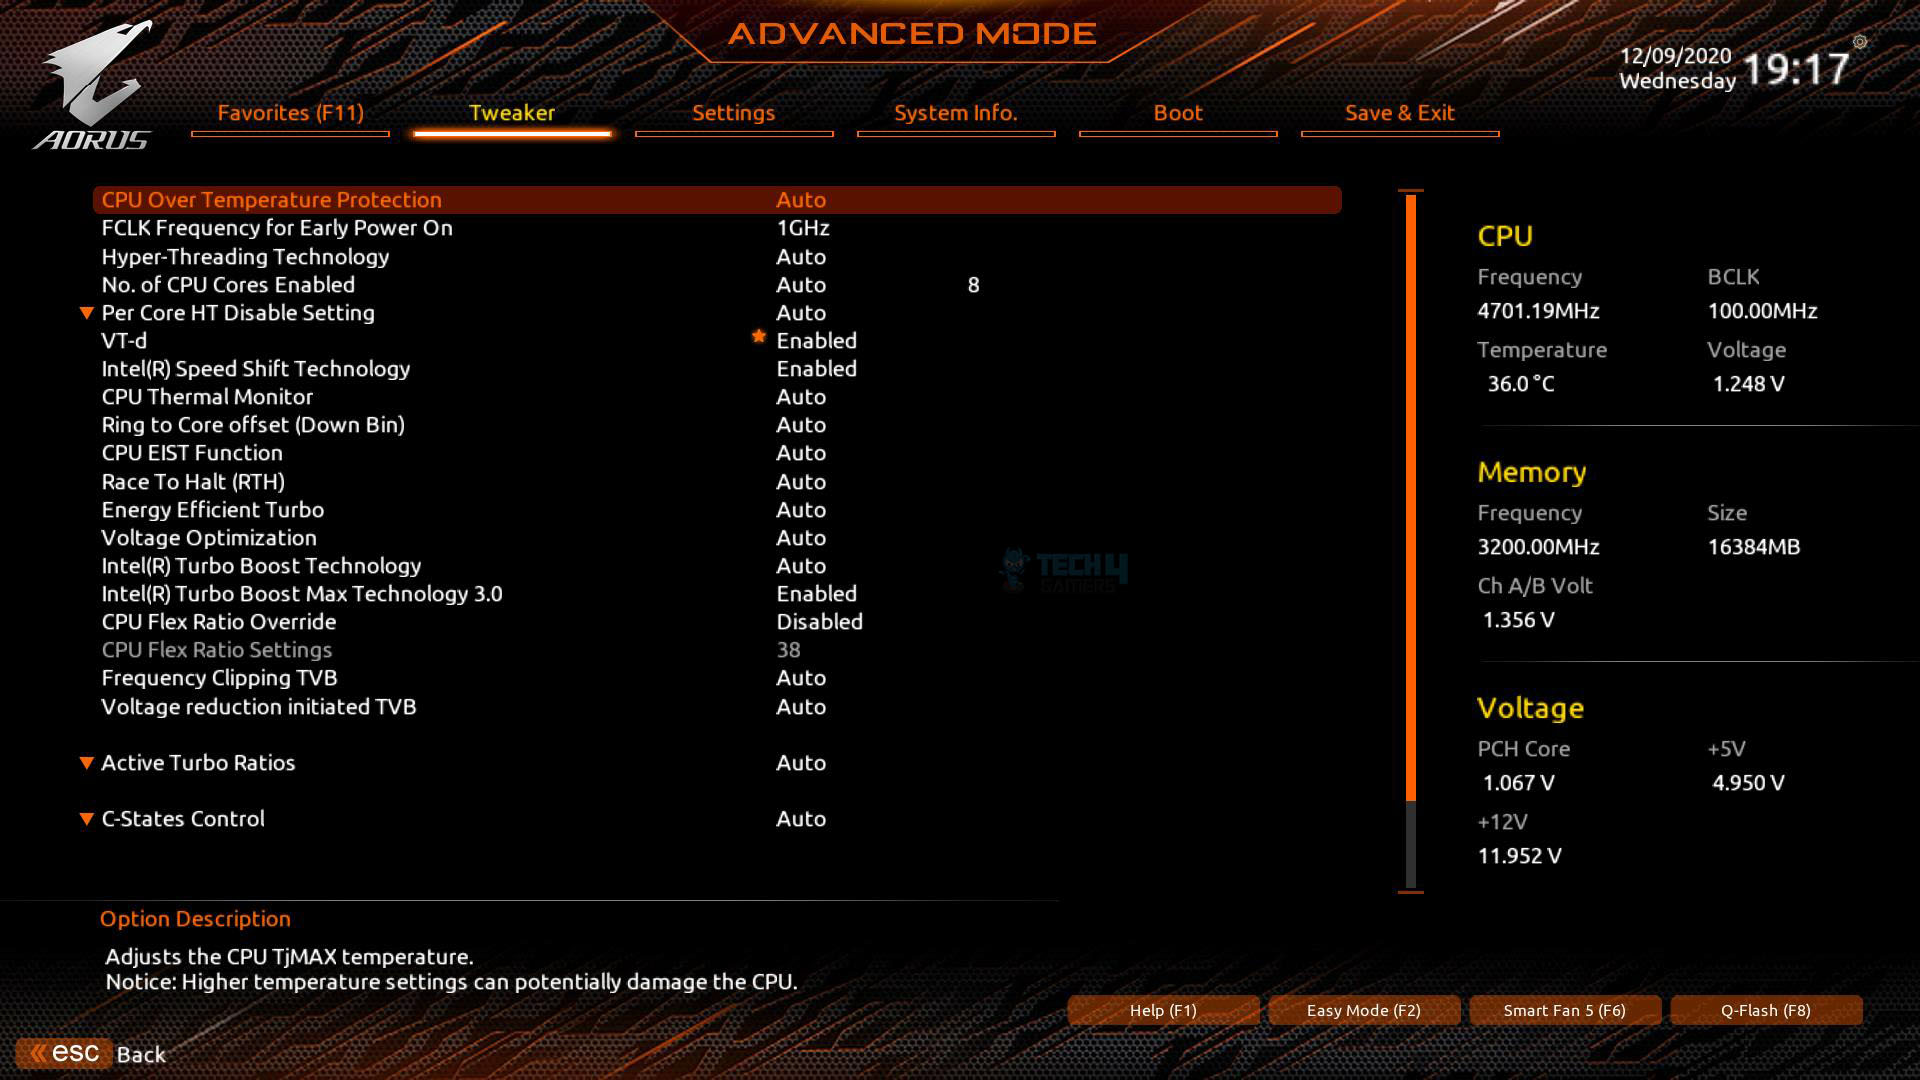
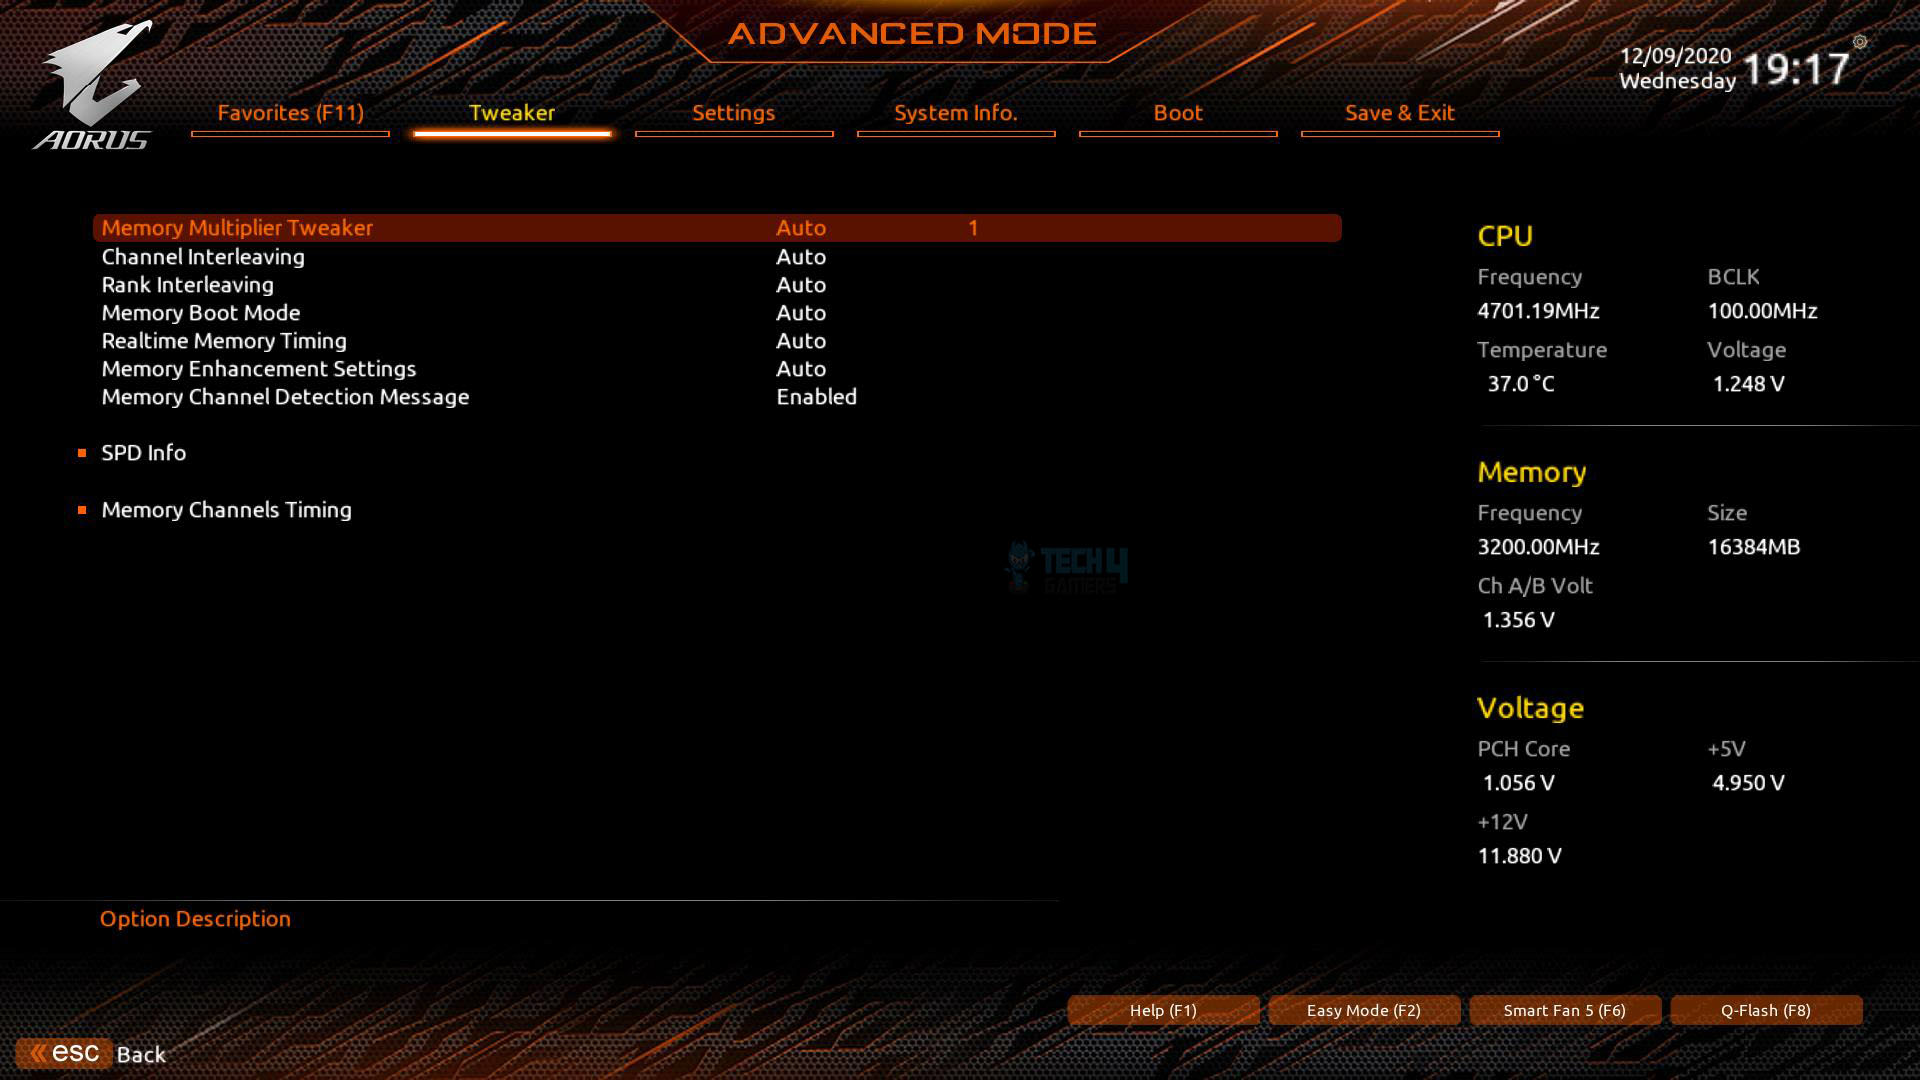

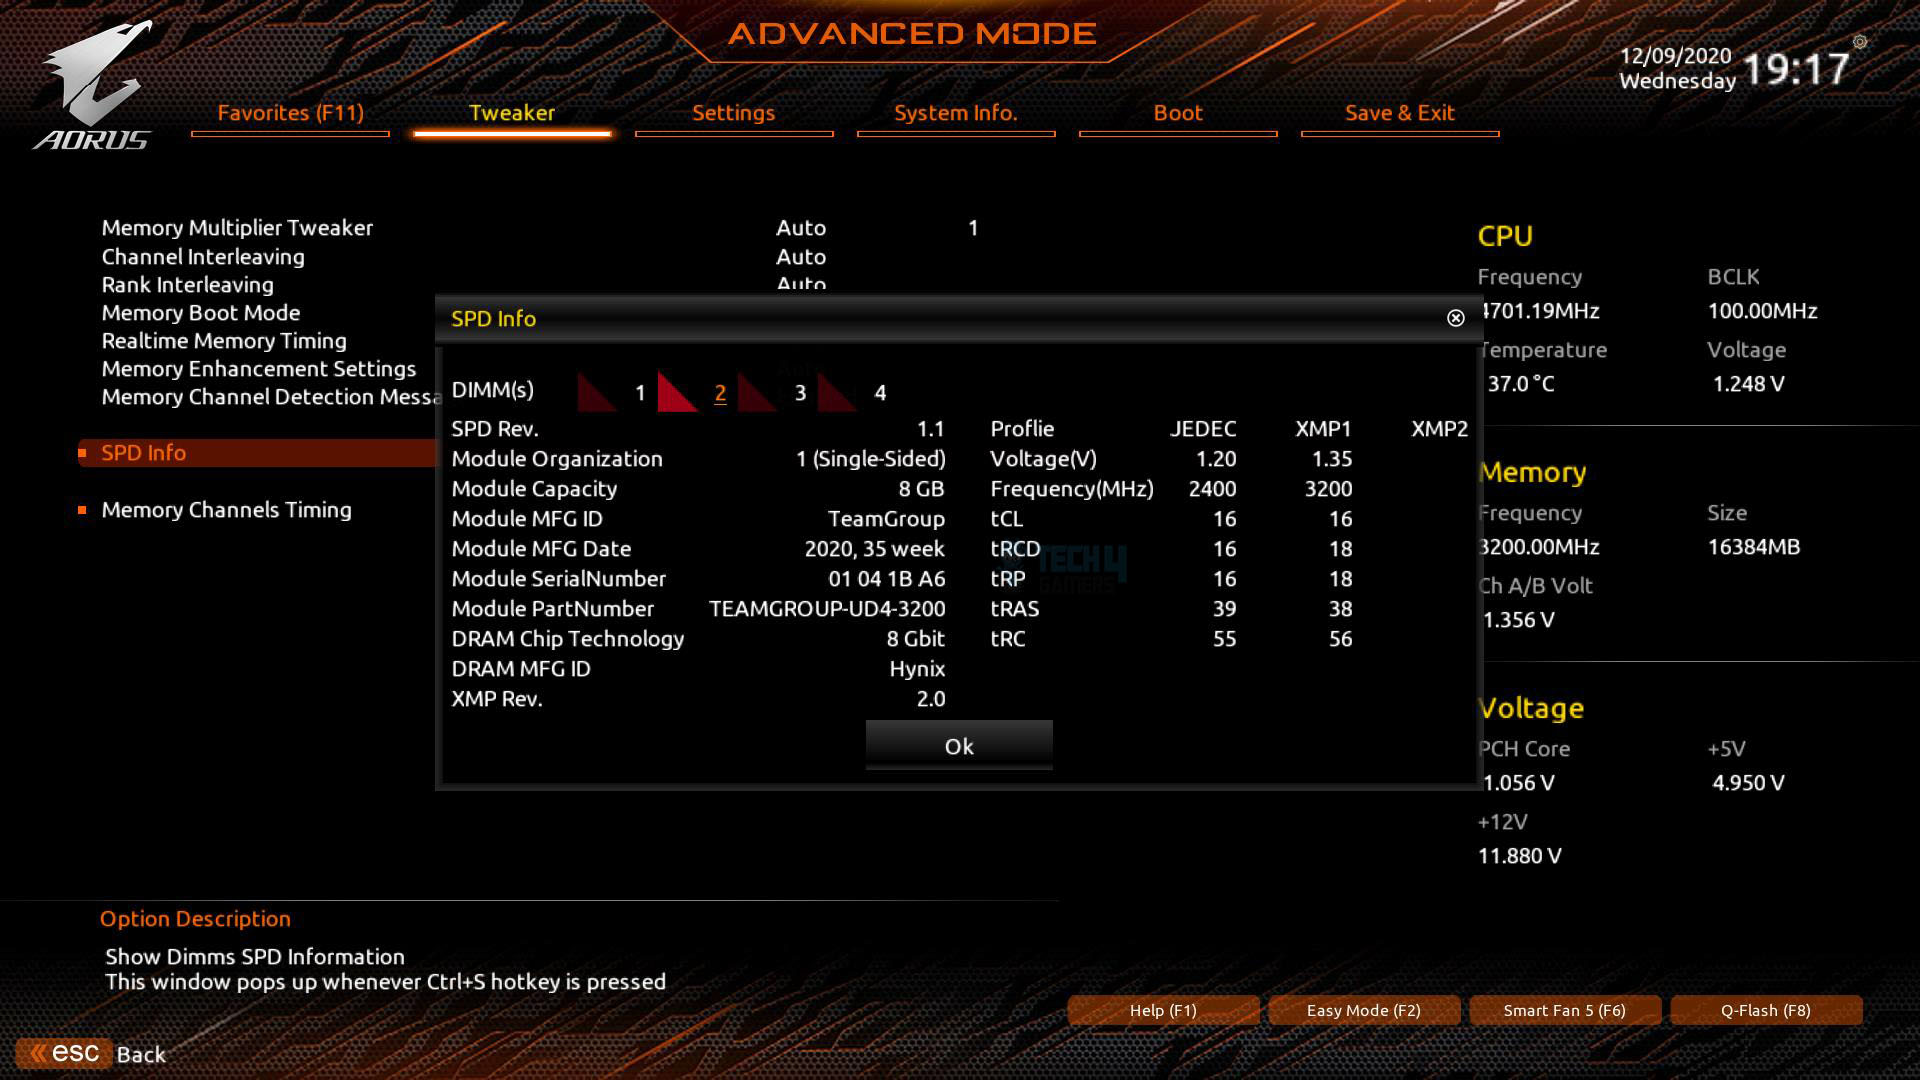

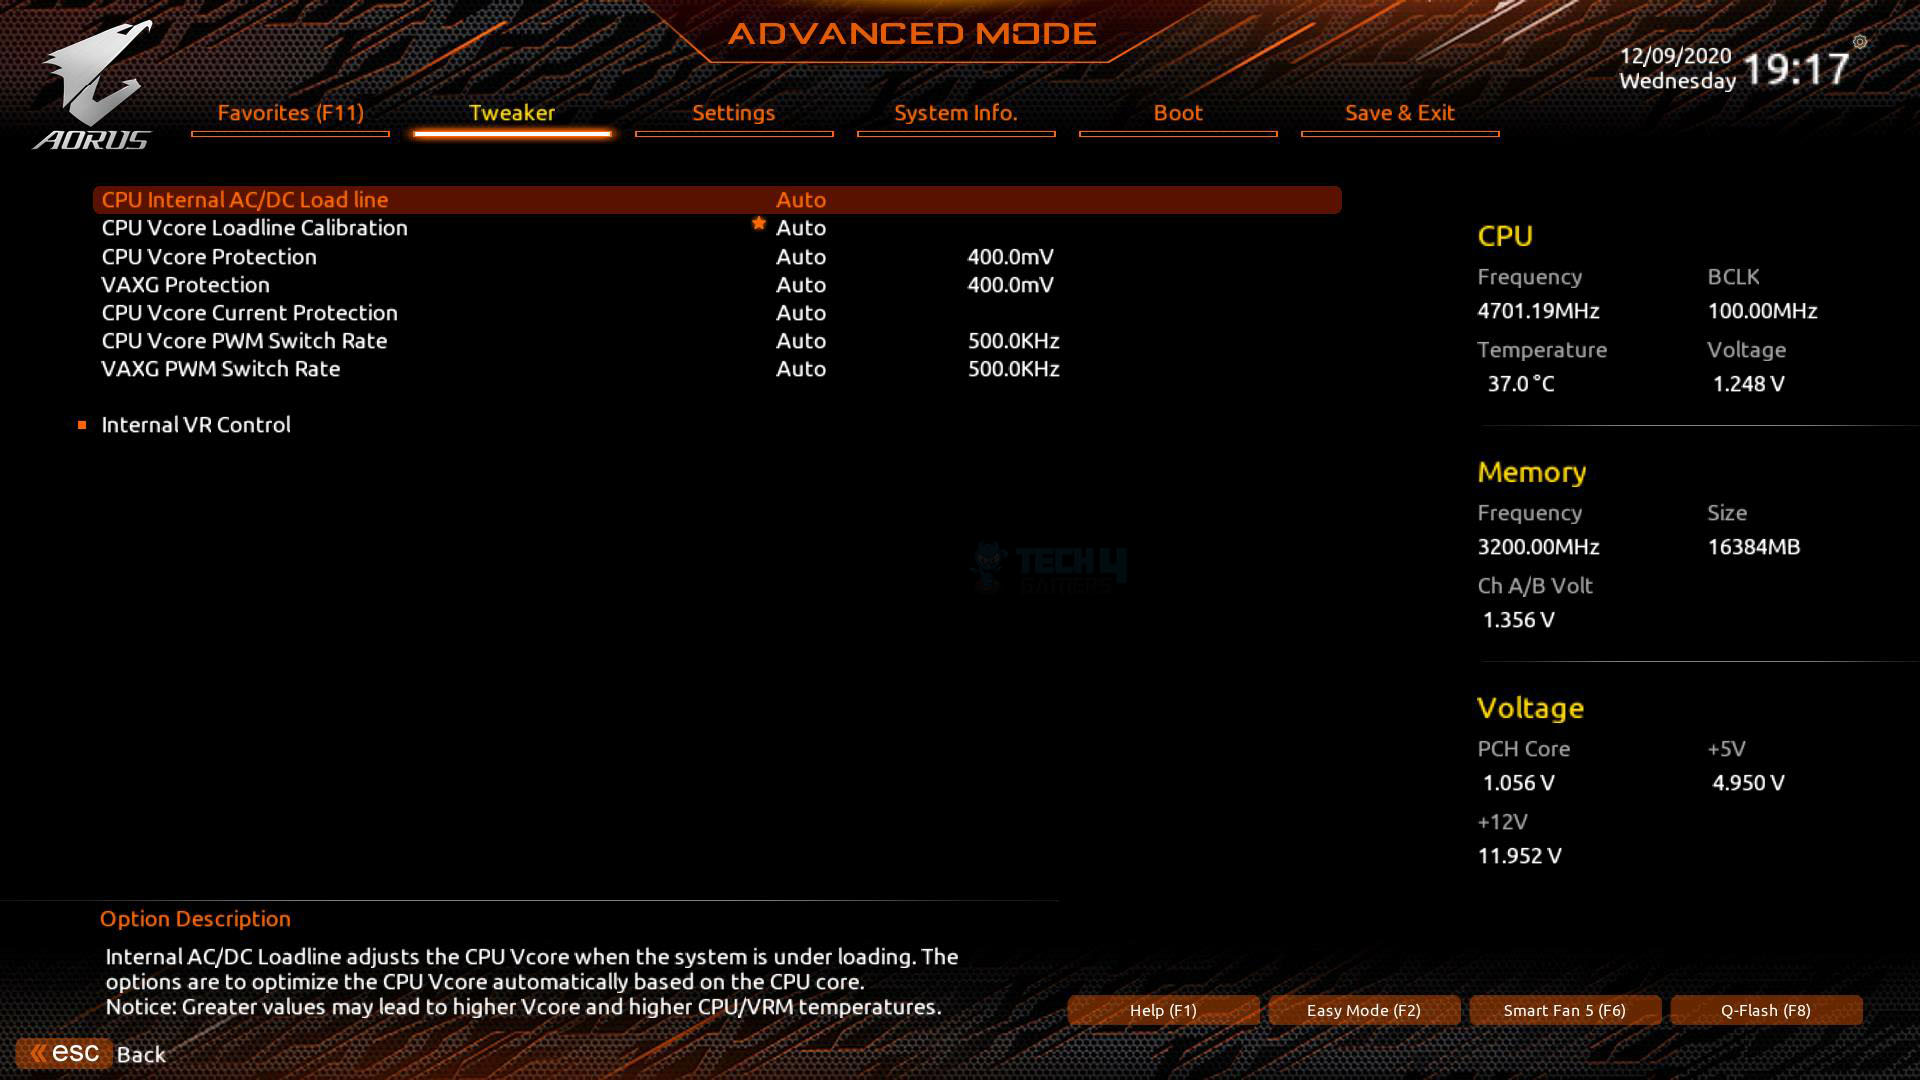
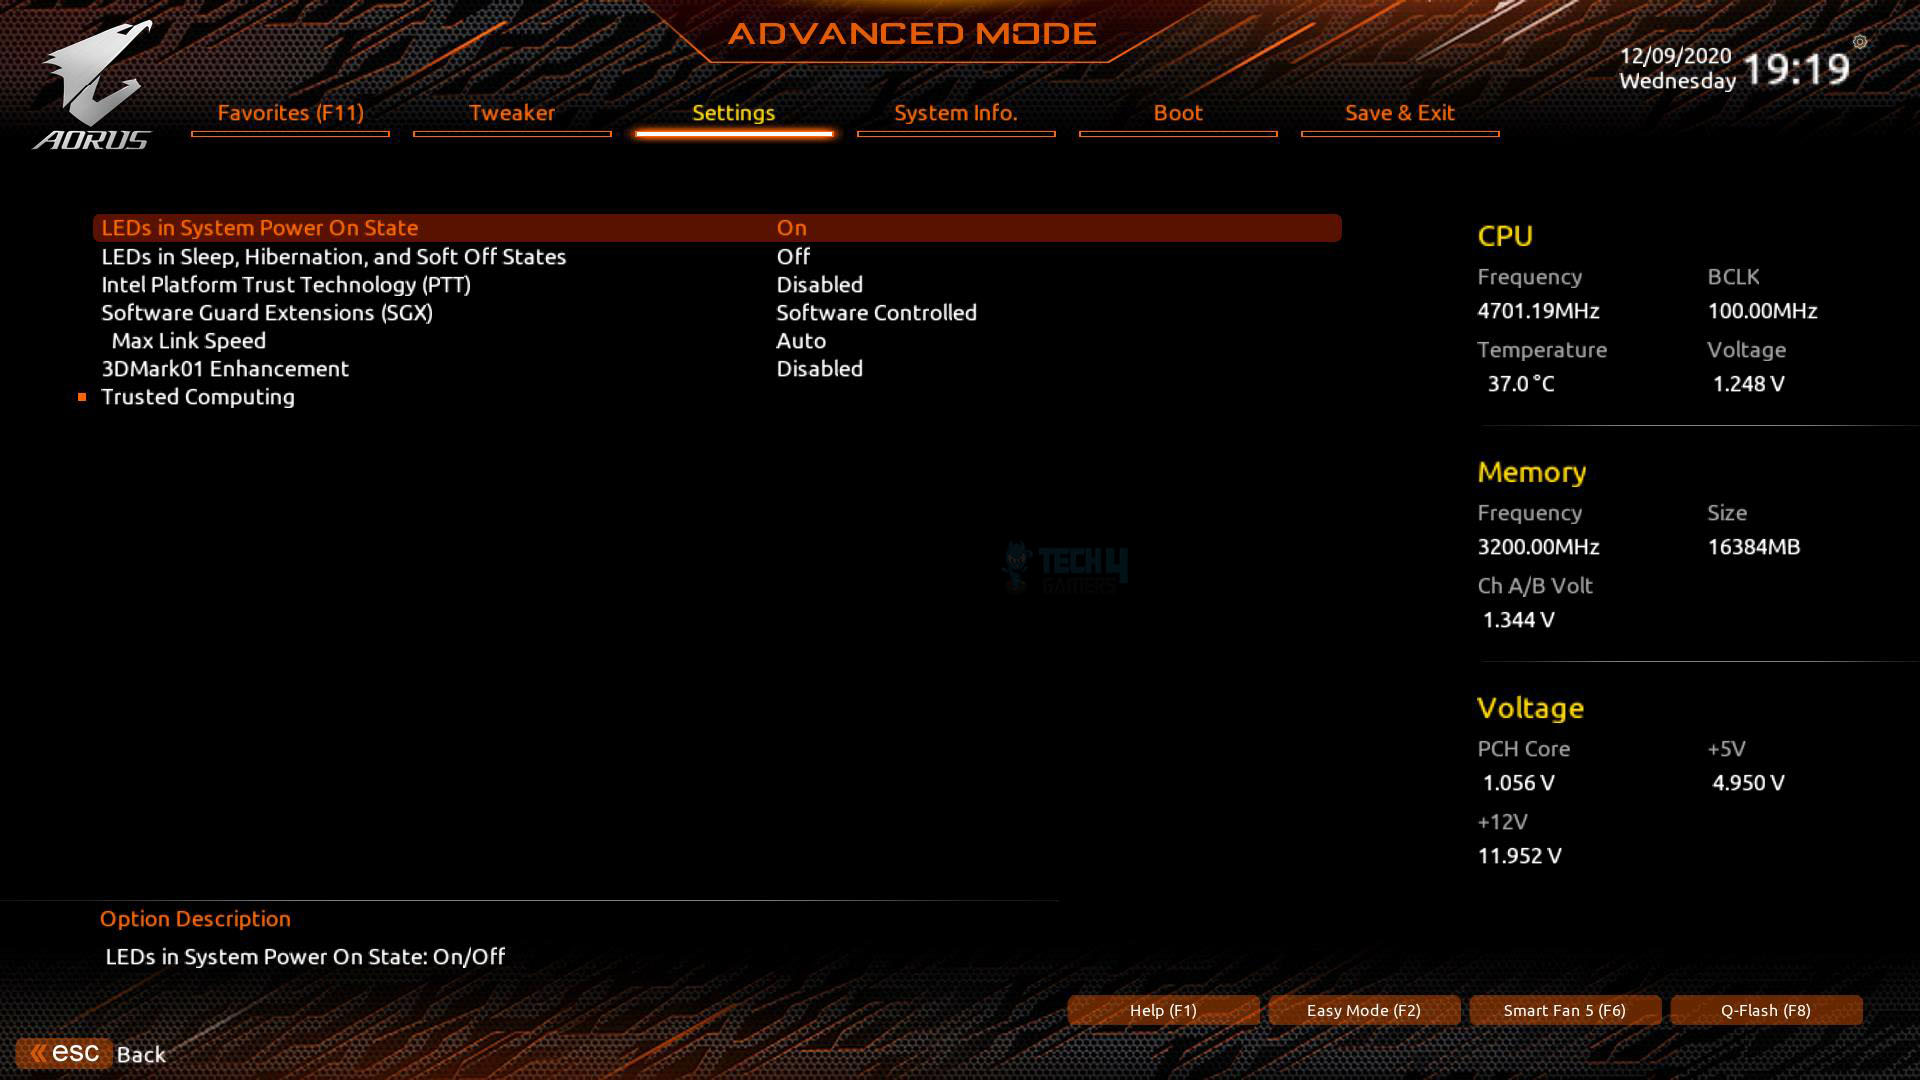
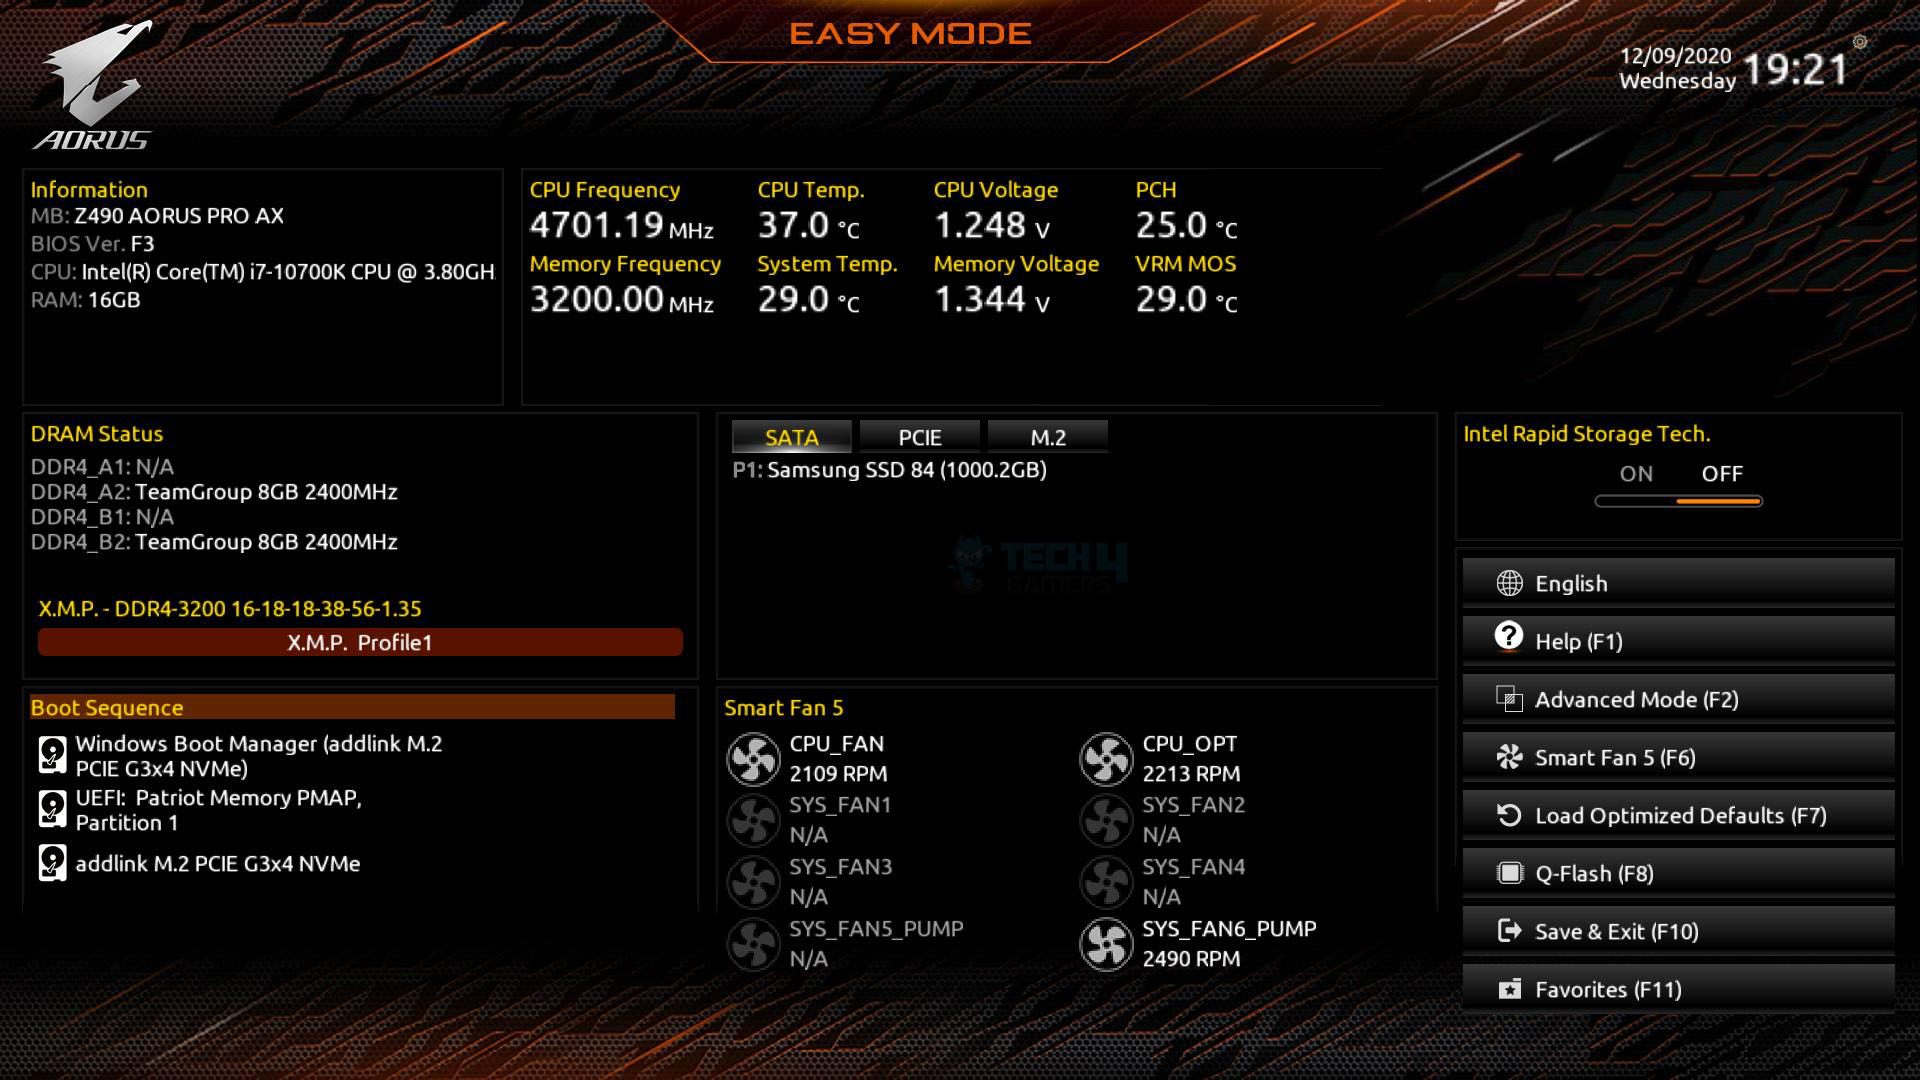
The Favorites section streamlines access to frequently used settings in a single window for user convenience. The Tweaker section provides comprehensive control over CPU and DRAM settings, categorized into Frequency, Voltage, and Memory Settings. Advanced CPU Core Settings offer fine-tuned controls for features like Speed Shift Technology and Turbo Boost. Memory-related configurations, including DRAM timings, are managed through the Advanced Memory Settings.
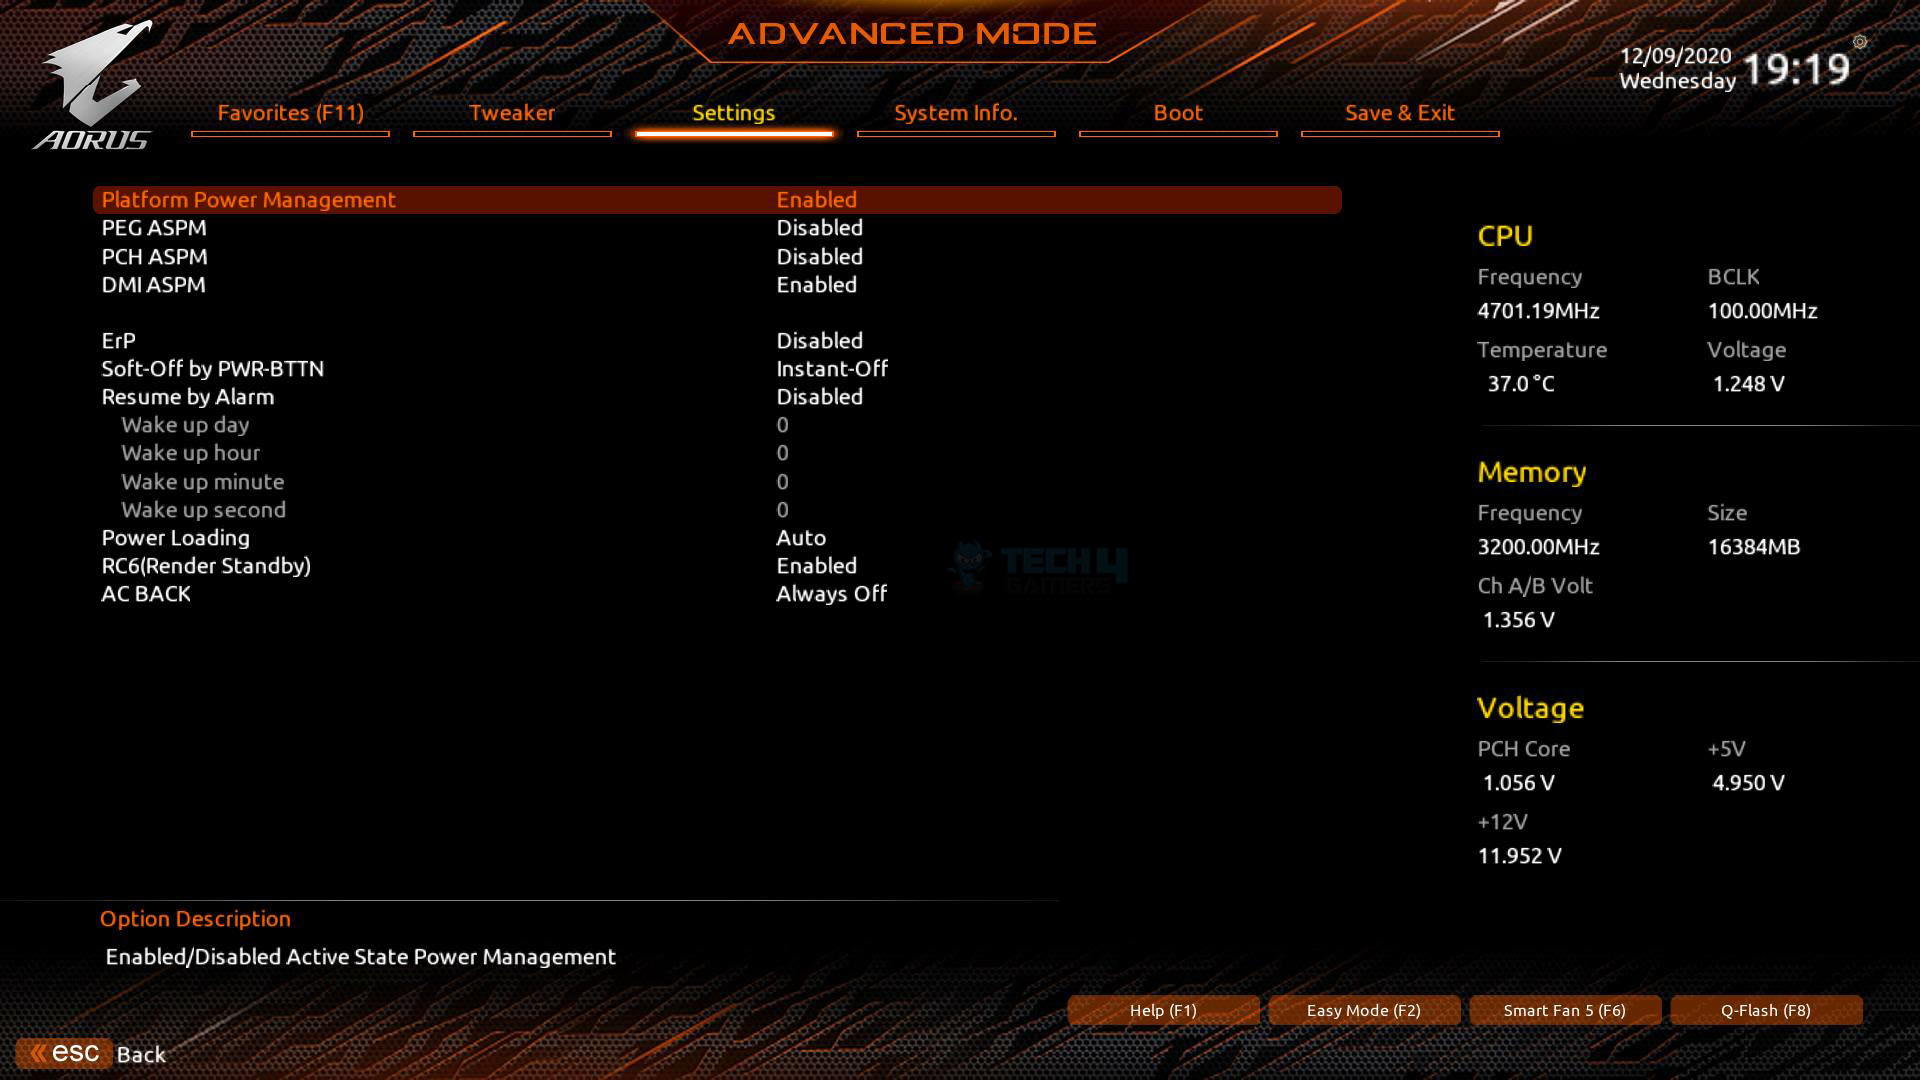
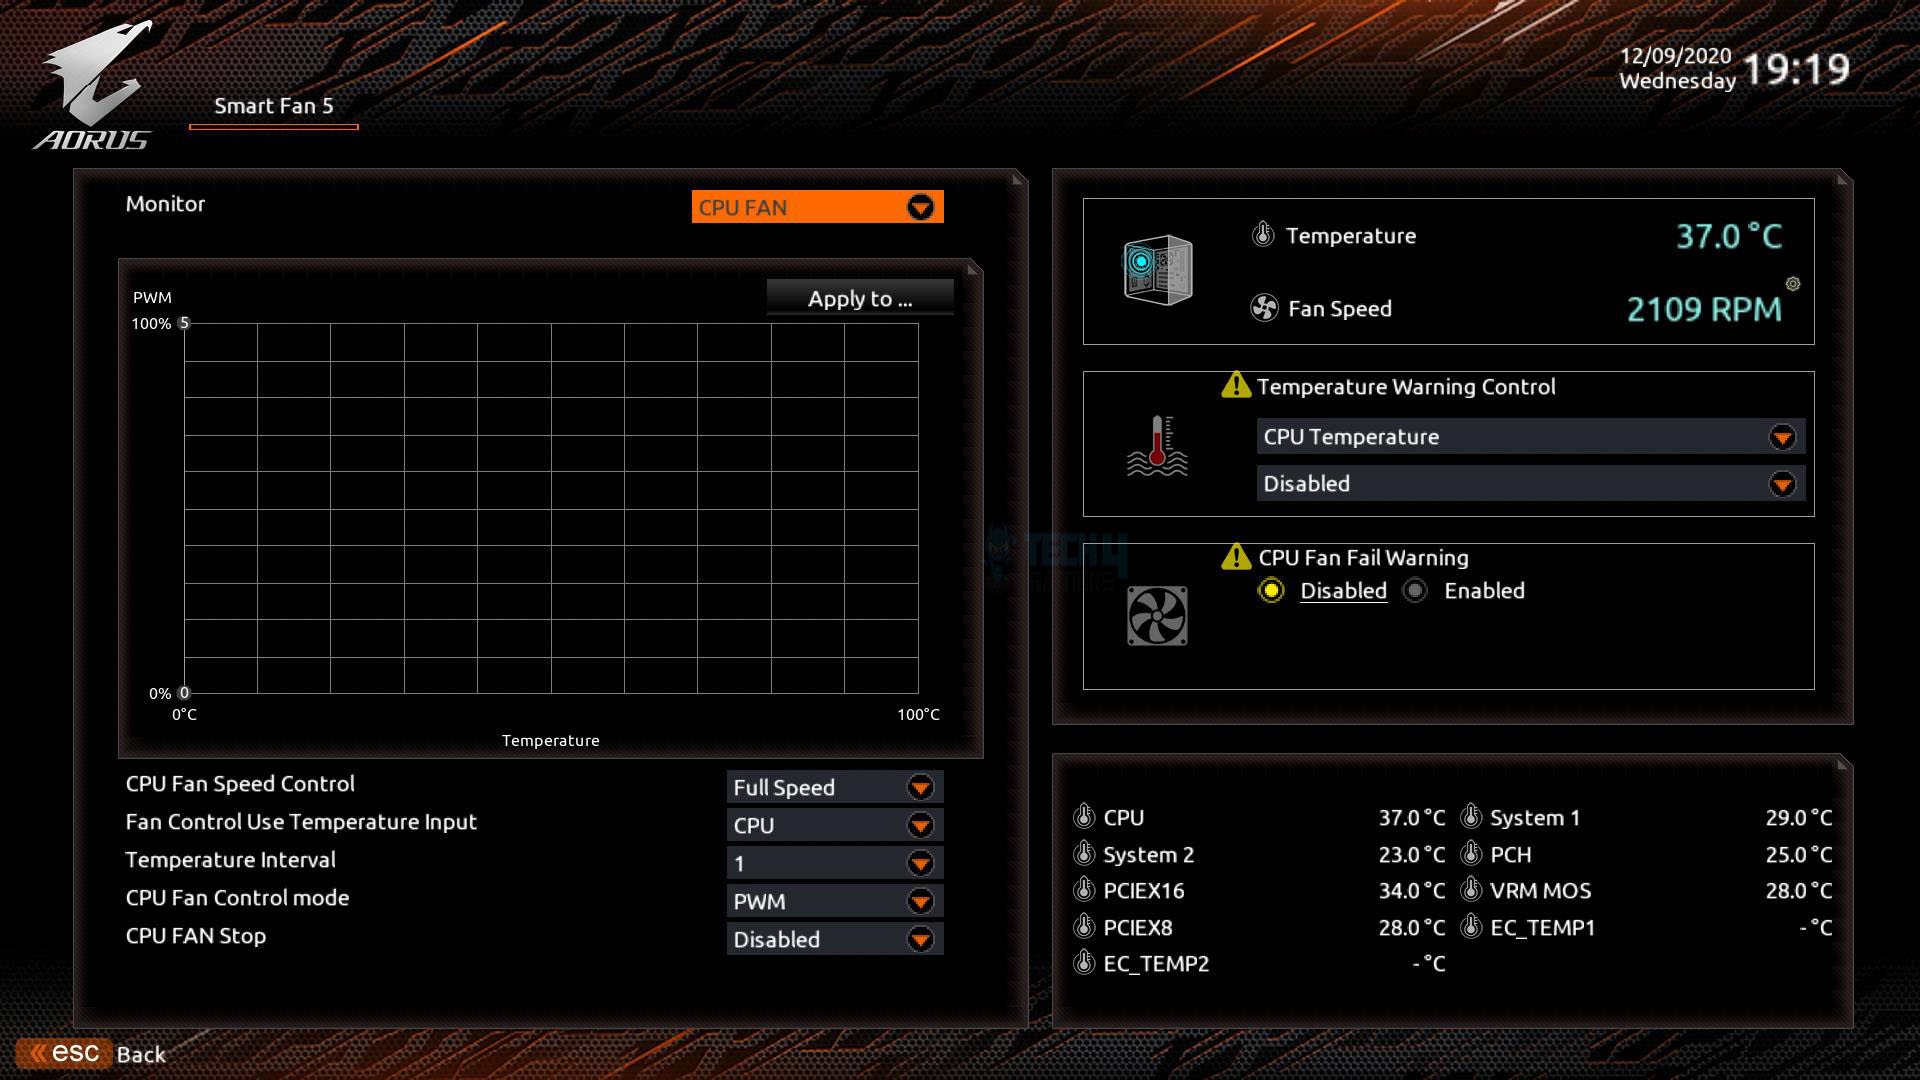
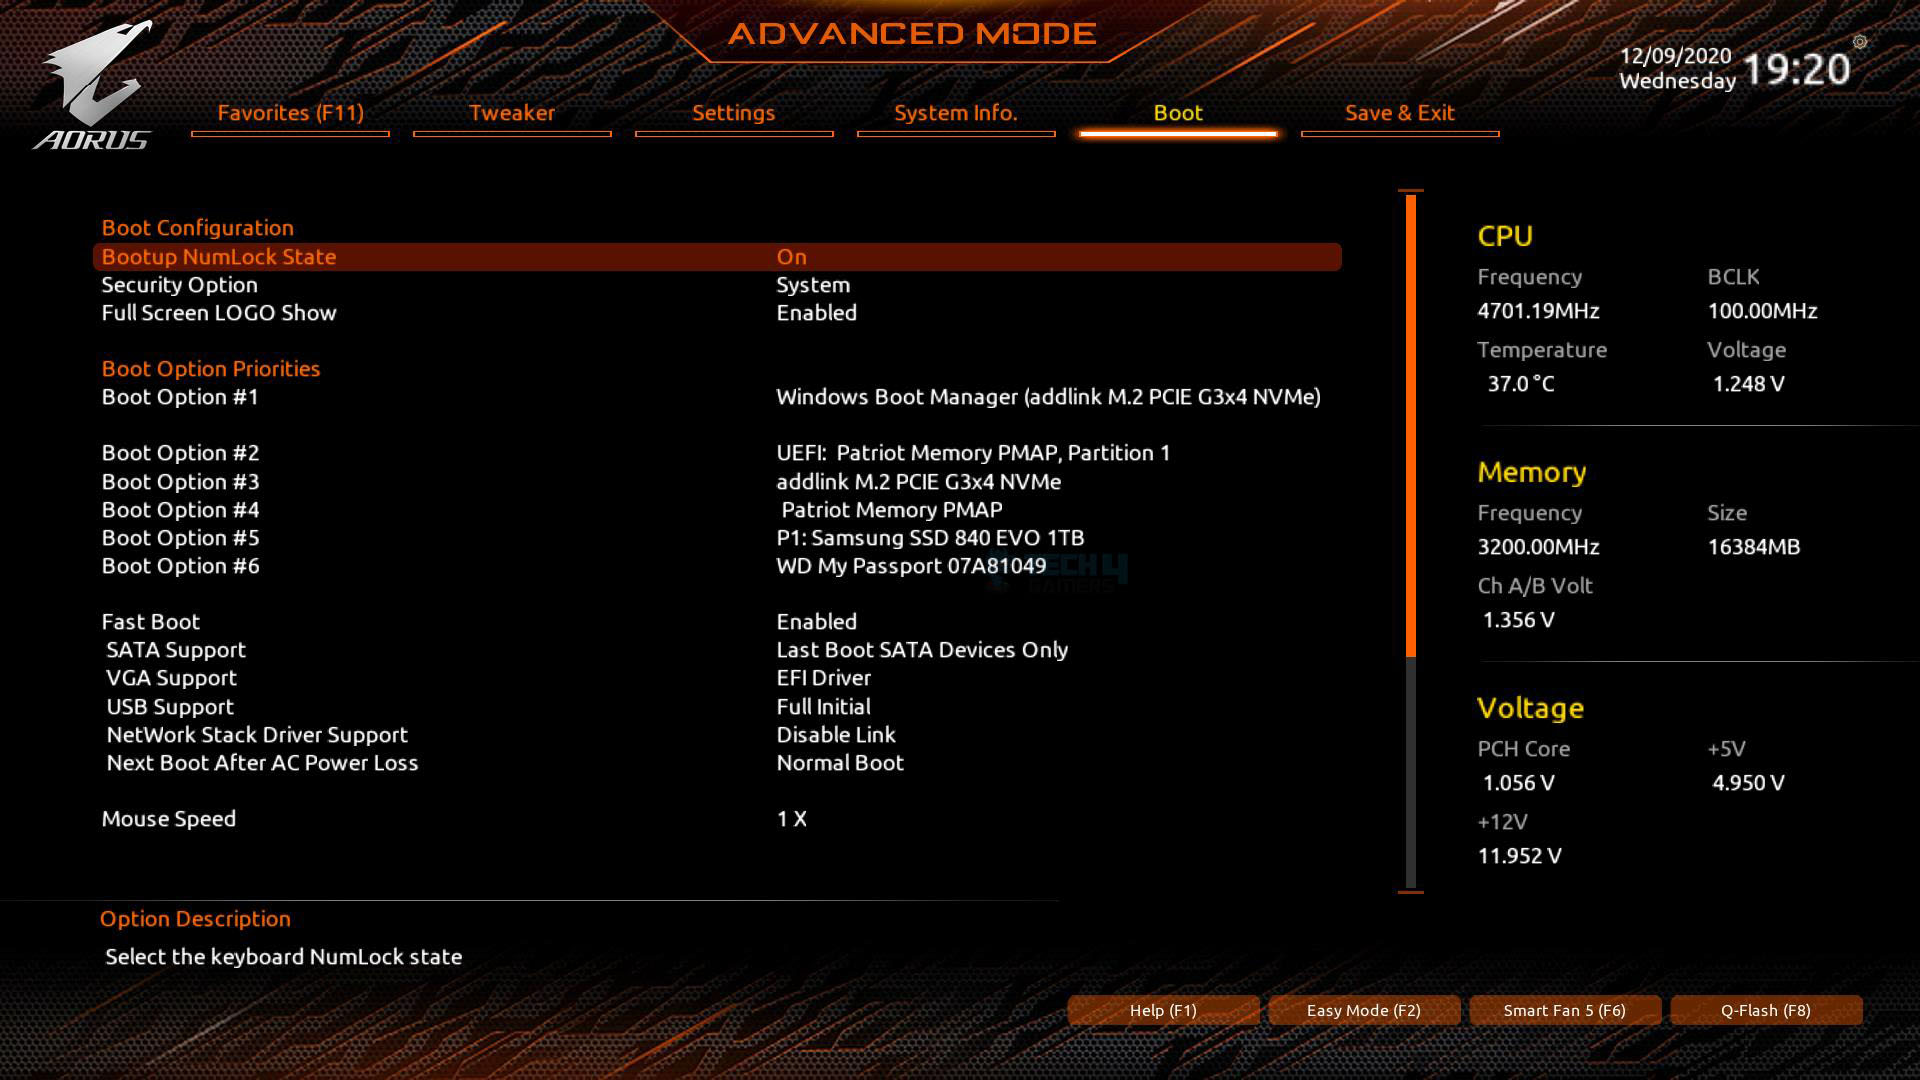
In the Settings section, Smart Fan 5 gives users complete control over connected fans and pumps, allowing for customization of control types, fan curves, and predefined speed modes. The System Menu provides essential details such as the motherboard model and BIOS version, along with control over boot time behavior, Fast Boot activation, and boot drive priorities.
GIGABYTE Software
GIGABYTE has provided tons of applications that the user can download from their website to be used for this motherboard. Their App Center is the basic application that must be installed in order for all other applications to work except for the RGB Fusion 2. Here is a list of some of the applications:
- cFosSpeed
- System Information Viewer (SIV)
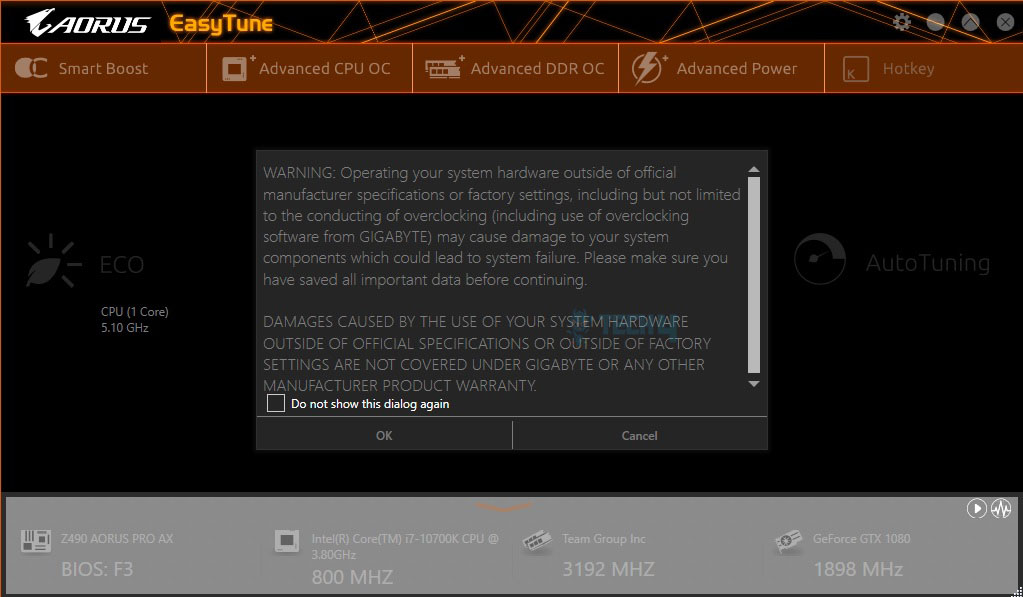
- Easy Tune
- Fast Boot
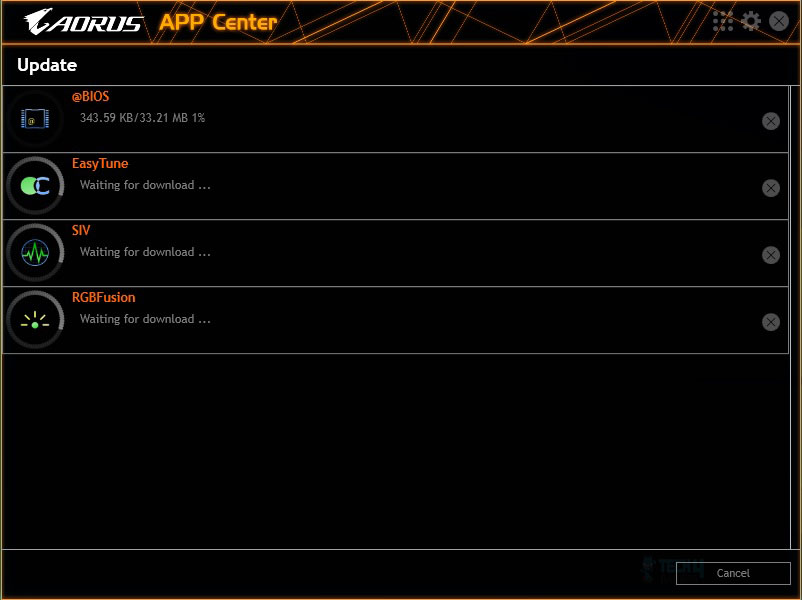
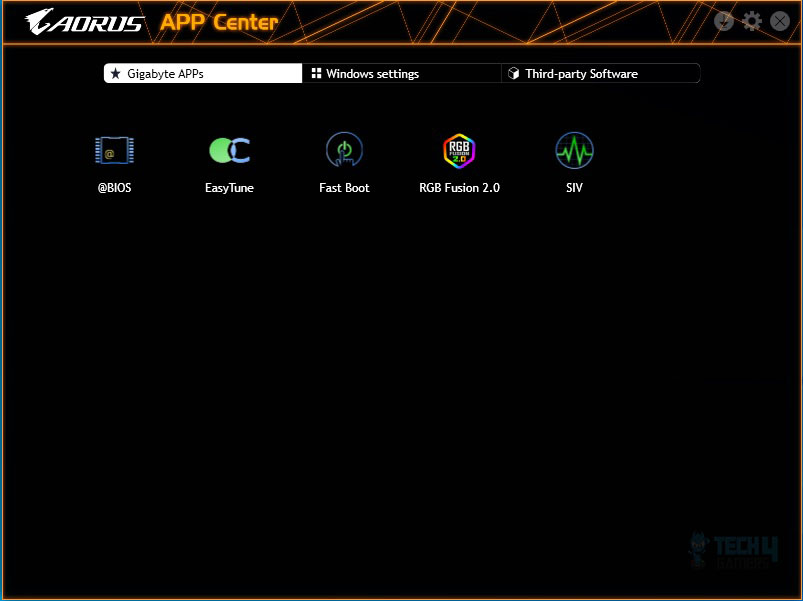

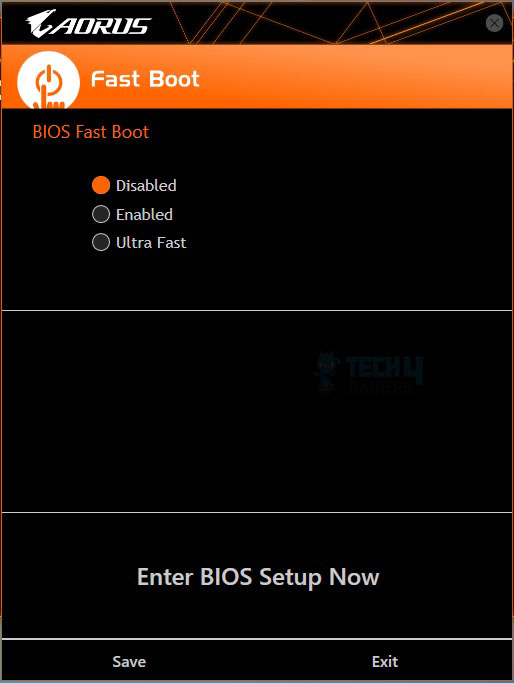
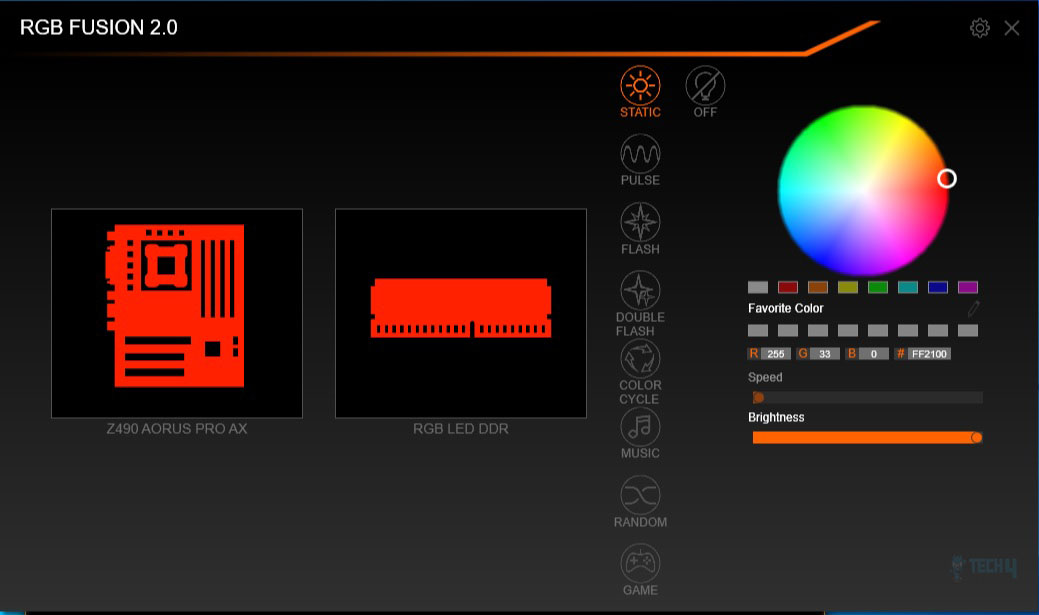
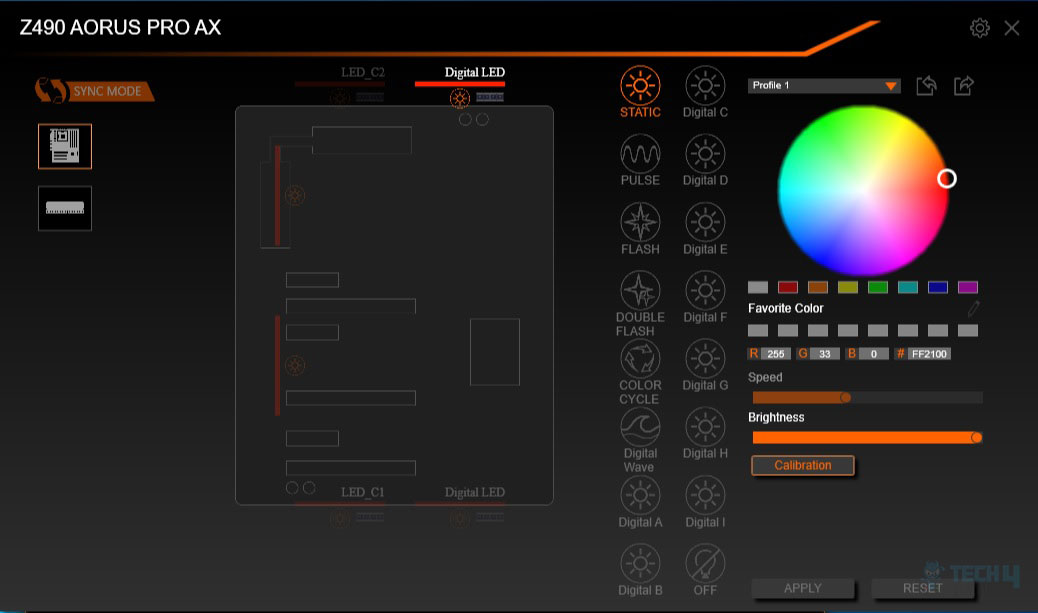
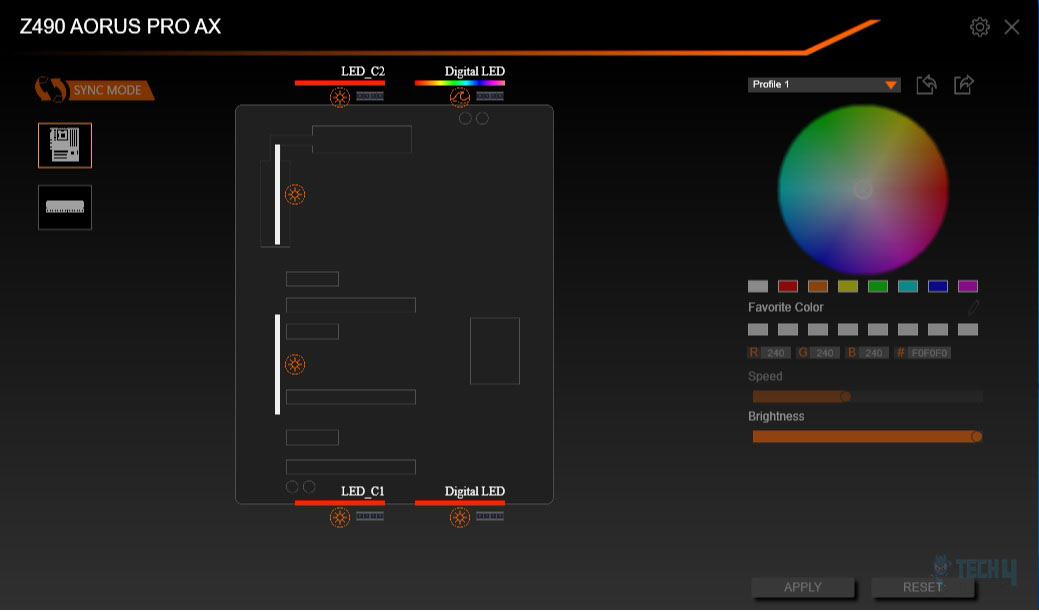

Install the App Center to download the required software or directly get it from the App Center. Clicking the motherboard picture sets lighting zones and modes for RGB/A-RGB devices.
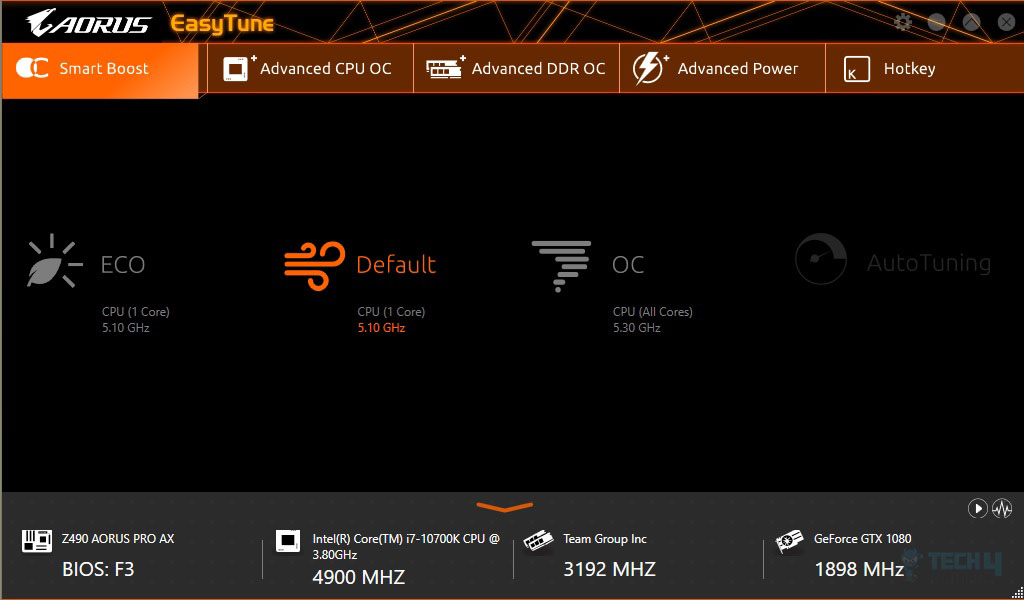
Easy Tune, a tuning utility like ASUS’s AiSuite, carries a disclaimer for overclocking risk. Smart Boost has options, including 5.1GHz in Eco and Default modes and 5.3GHz in all core OC modes.
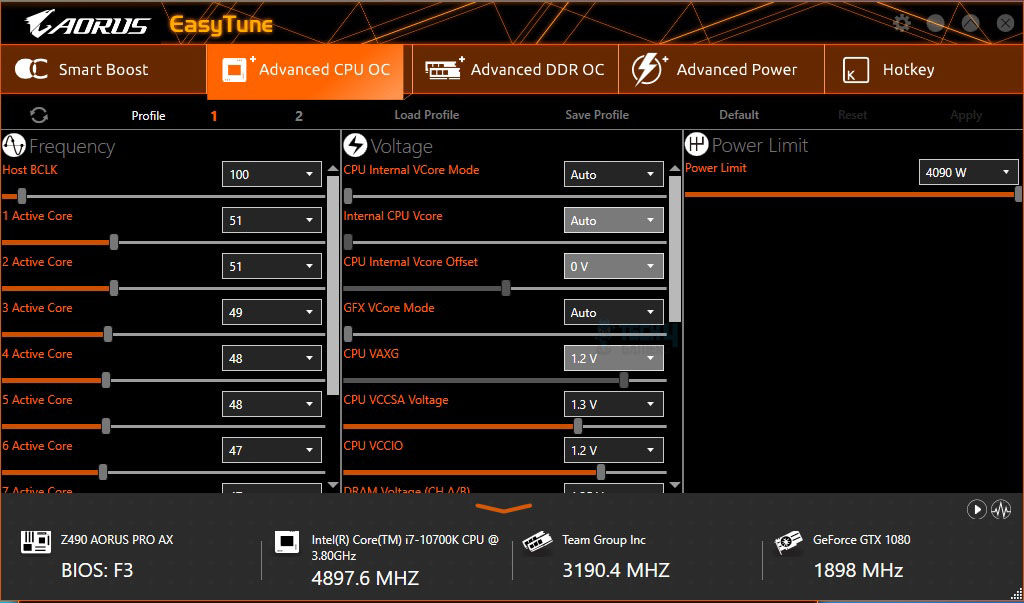
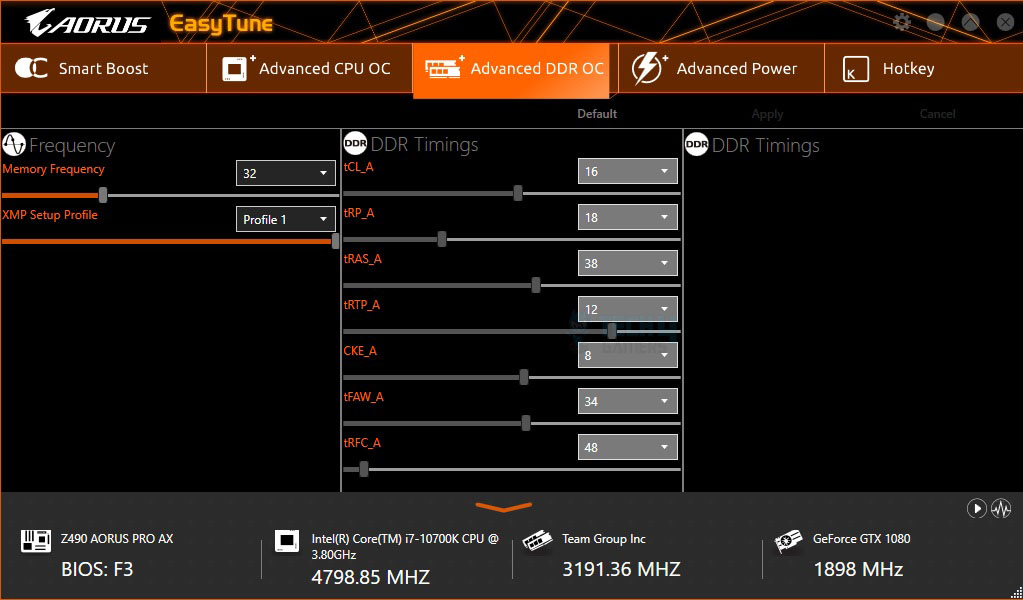
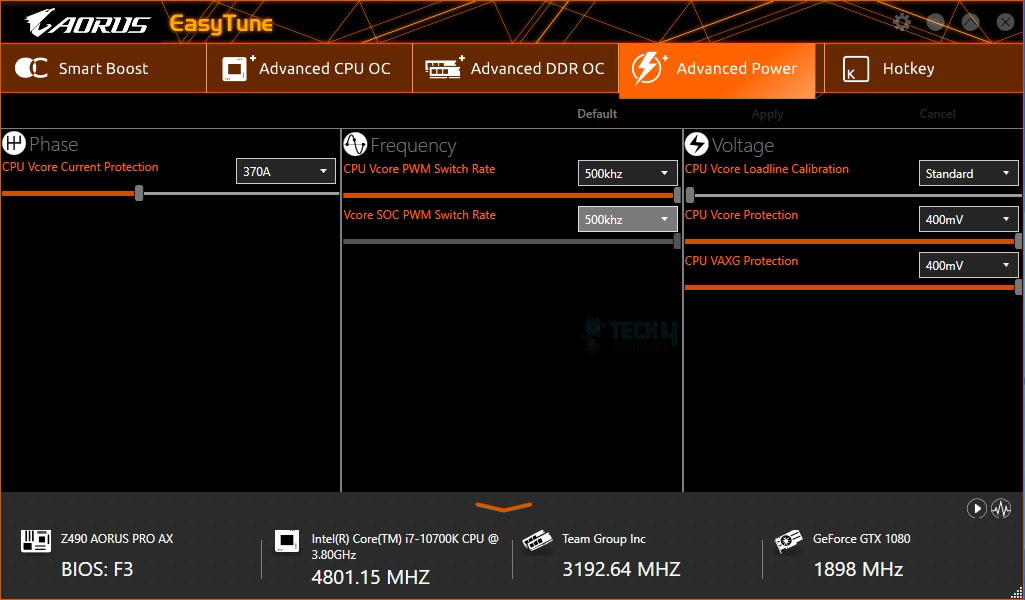
Advanced CPU OC and Advanced DDR OC allow overclocking of the CPU and DDR4 kit. Users can remove power restrictions for extreme overclocking.
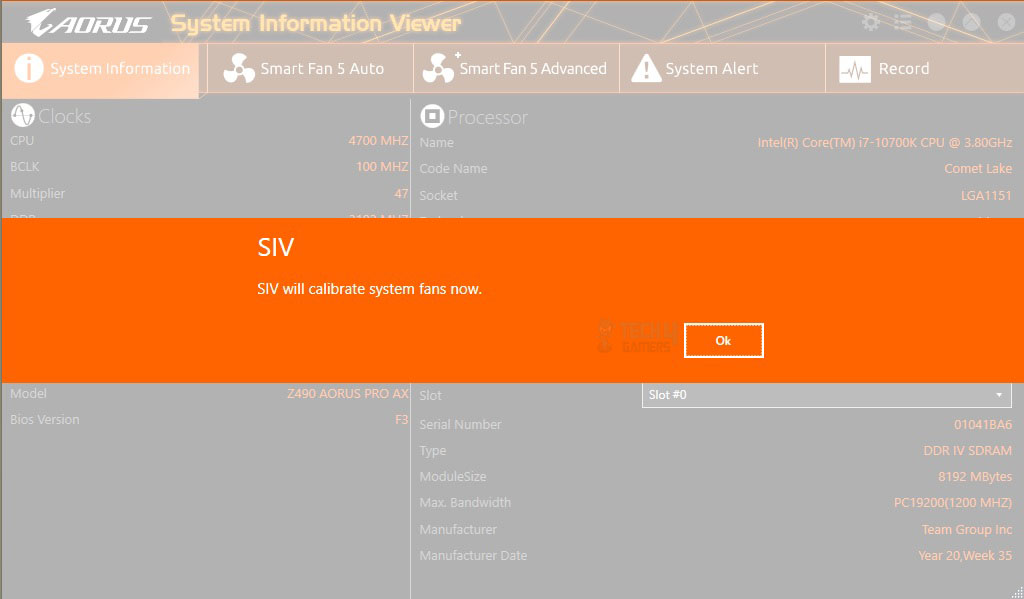
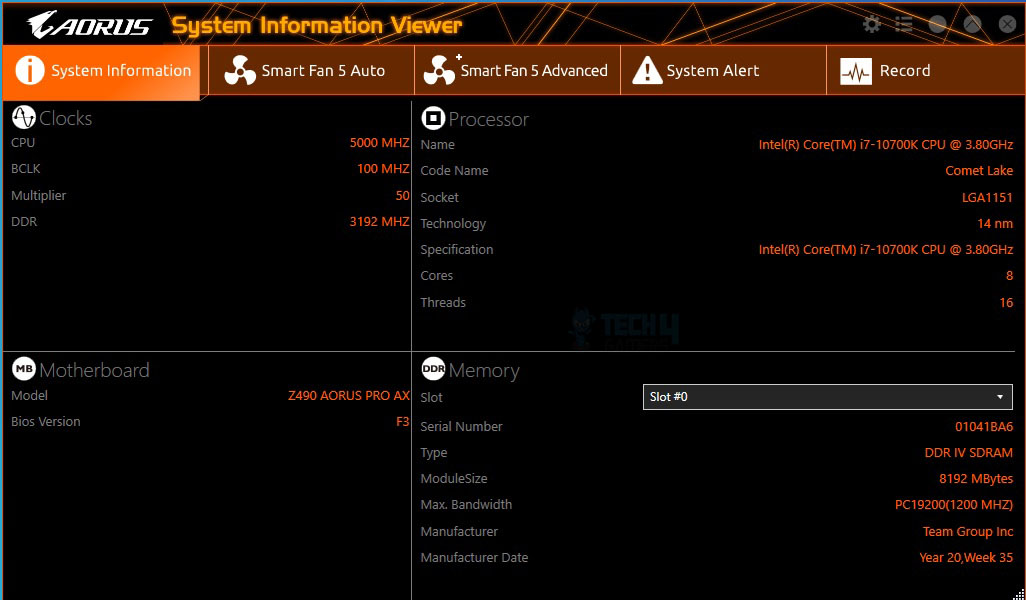
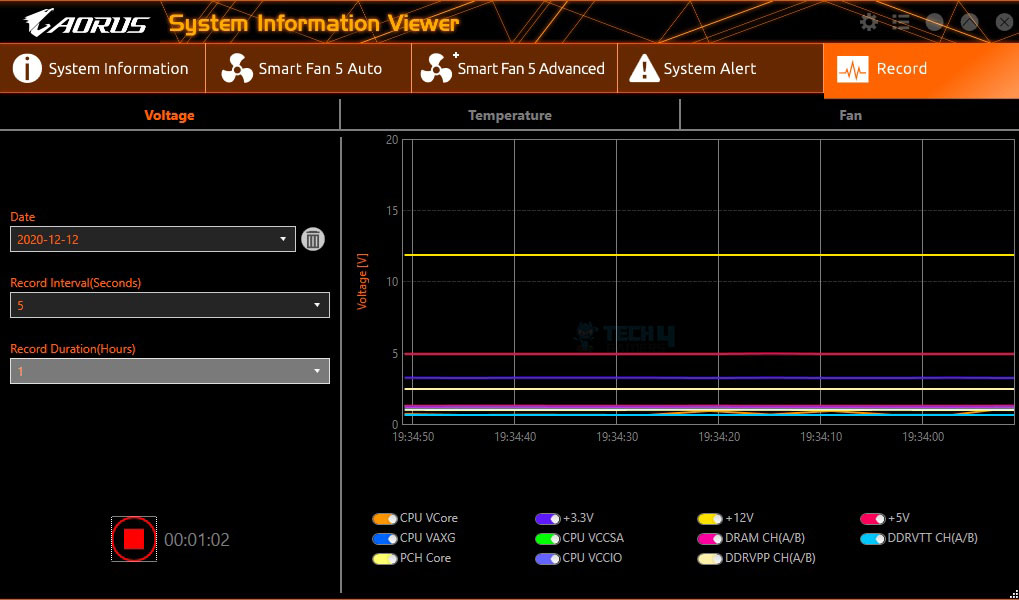
SIV (System Information Viewer) fine-tunes cooling, entering calibration mode at start, optional for advanced users. The system Information section displays CPU, Memory, and Motherboard status.
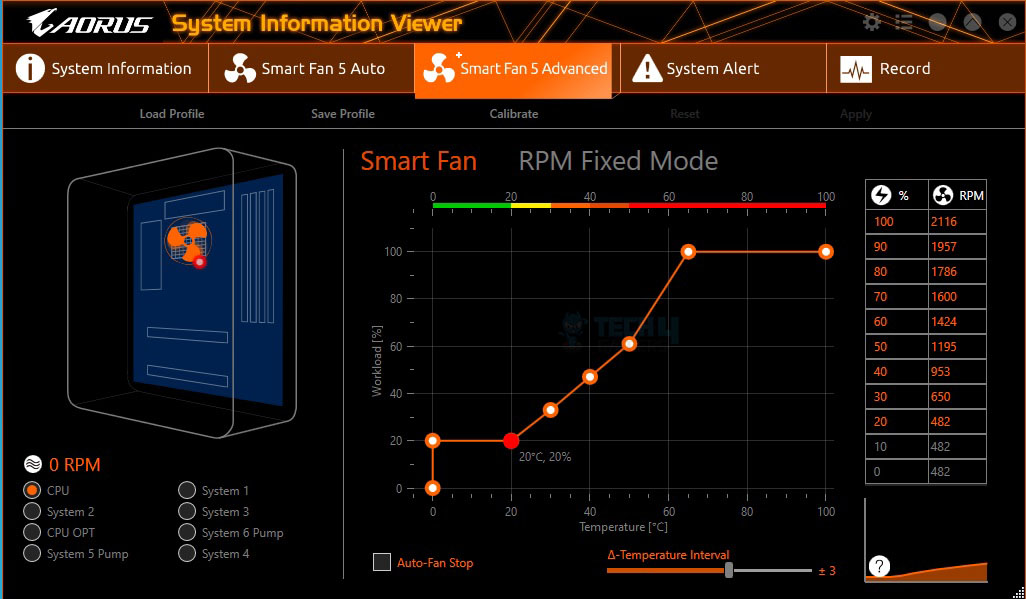
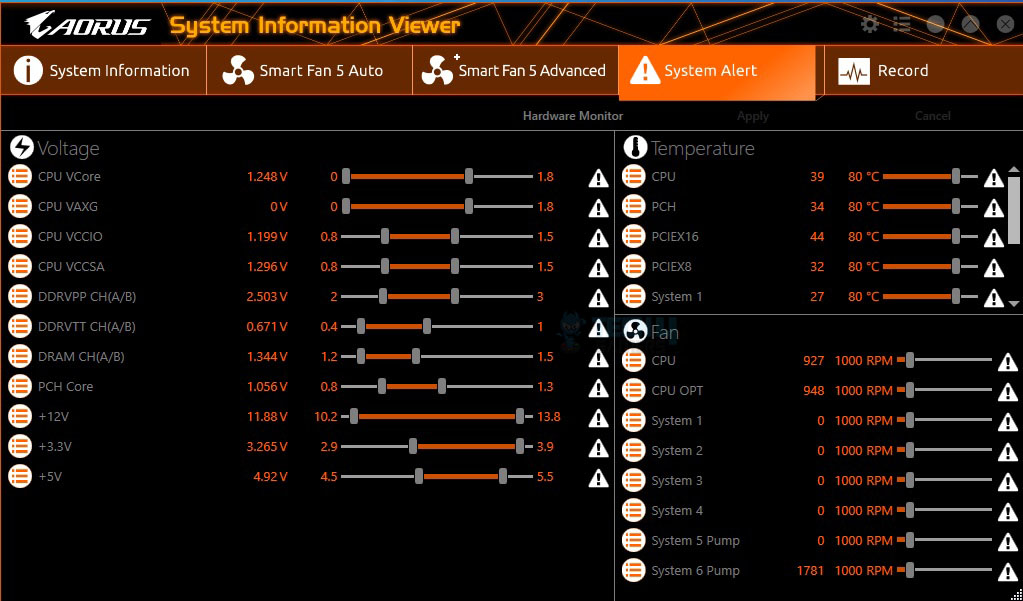
Pre-defined fan control modes are available, each displaying its effects. Smart Fan 5 Advanced offers comprehensive control, allowing users to set alarms for specific values.
The Record section graphs voltages, temperature, and fan speed for monitoring system performance.
Motherboard Test Setup
The following test bench setup is used to test the performance of the motherboard:
- Intel i7 10700k
- EK-AIO 240 D-RGB
- T-Force NightHawk RGB 16GB @ 3200 MT/s
- Nvidia GeForce GTX 1080 Founder’s Edition
- CORSAIR AX1200i
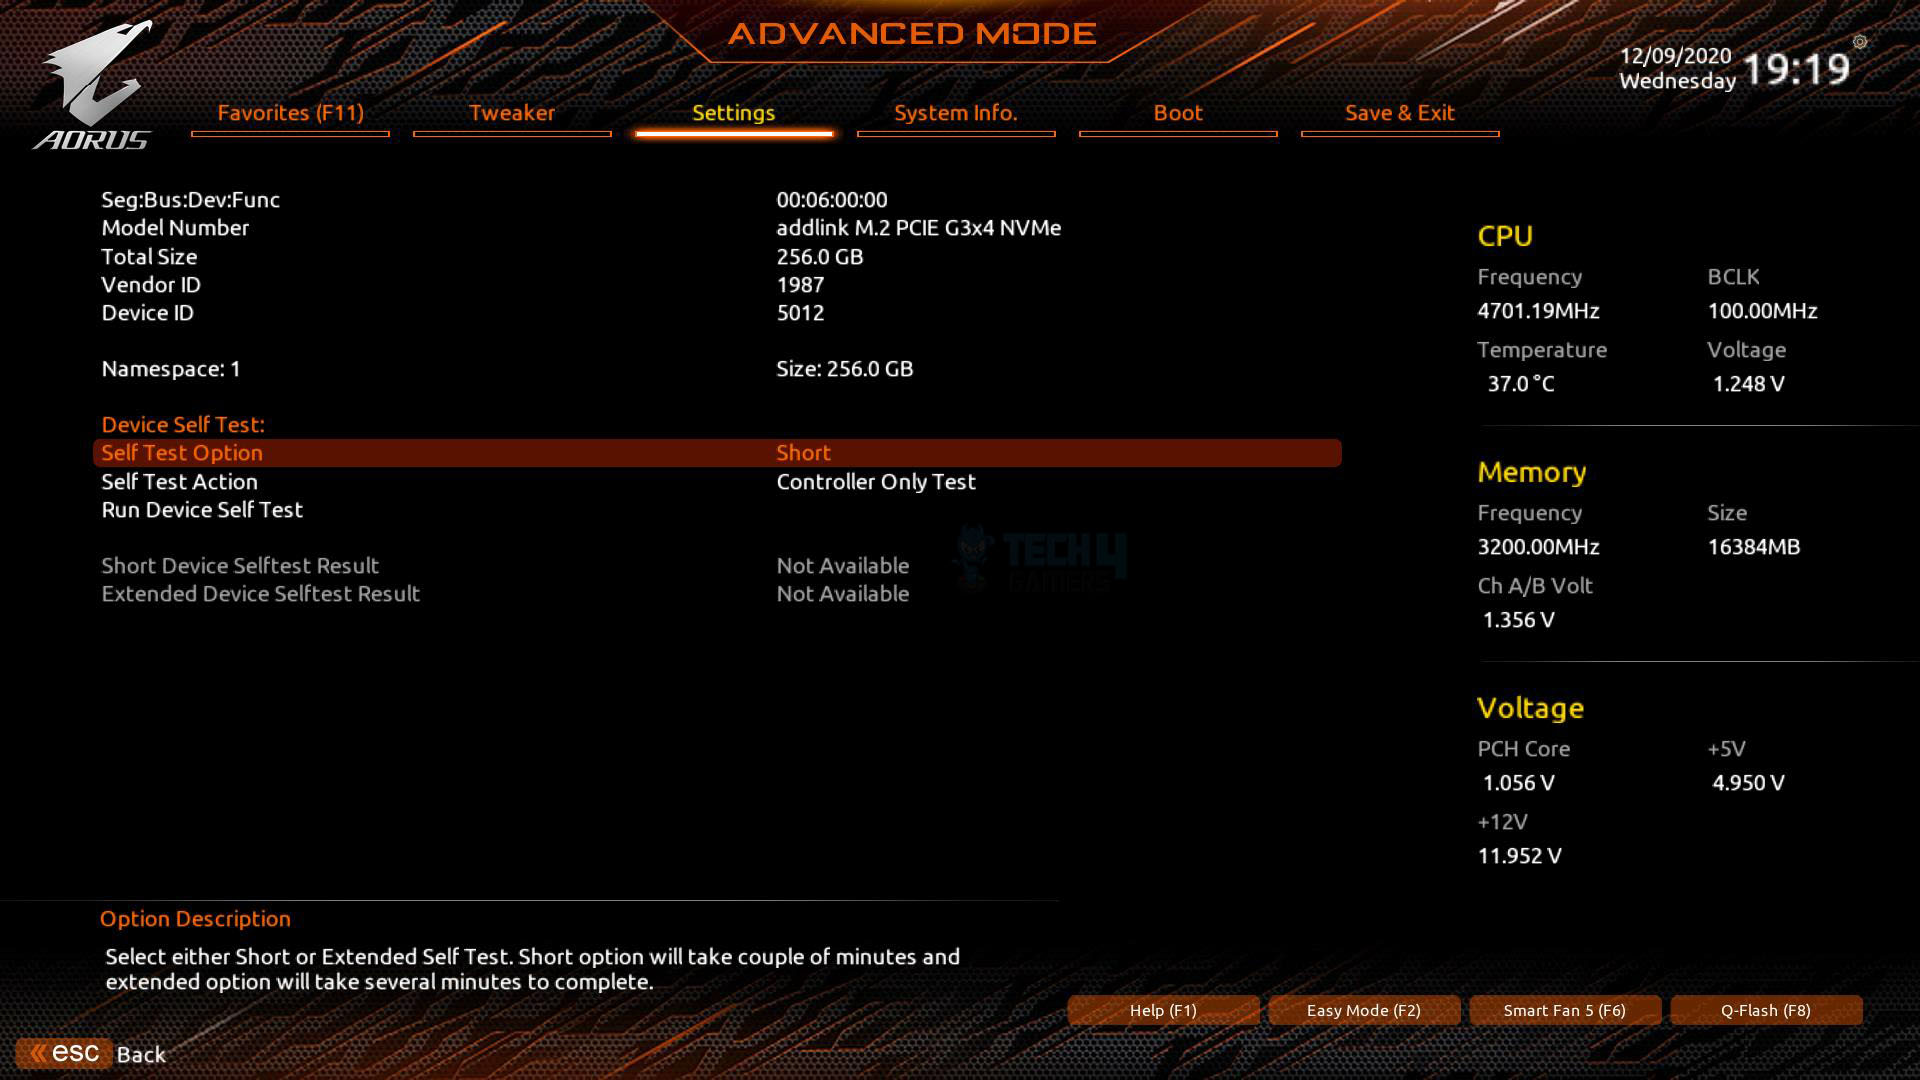
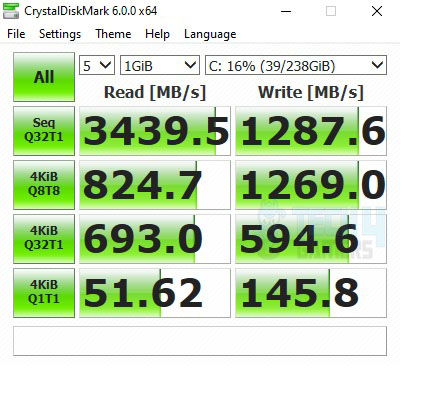
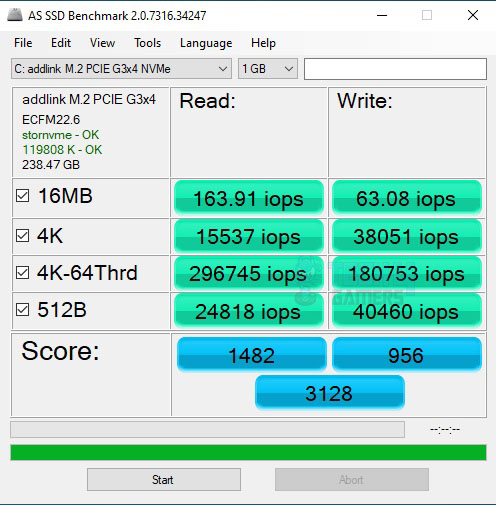
- Addlink S70 256 M.2 NVMe SSD for OS
- Samsung 840 EVO 1 TB SSD for the Games
There is no extra fan except two fans on the cooler, one in the PSU and the blower cooler on the graphics card.
Microsoft Windows 10 x64 Pro 20H2 (OS Build 19042.630) was used for all the testing. Nvidia 460.79 drivers were used for graphics card testing. The following software was used for performance evaluation: –
Overall System Tests
This section will show the results of the various test suites and gaming benchmarks that we have run on this Z490 AORUS PRO motherboard.
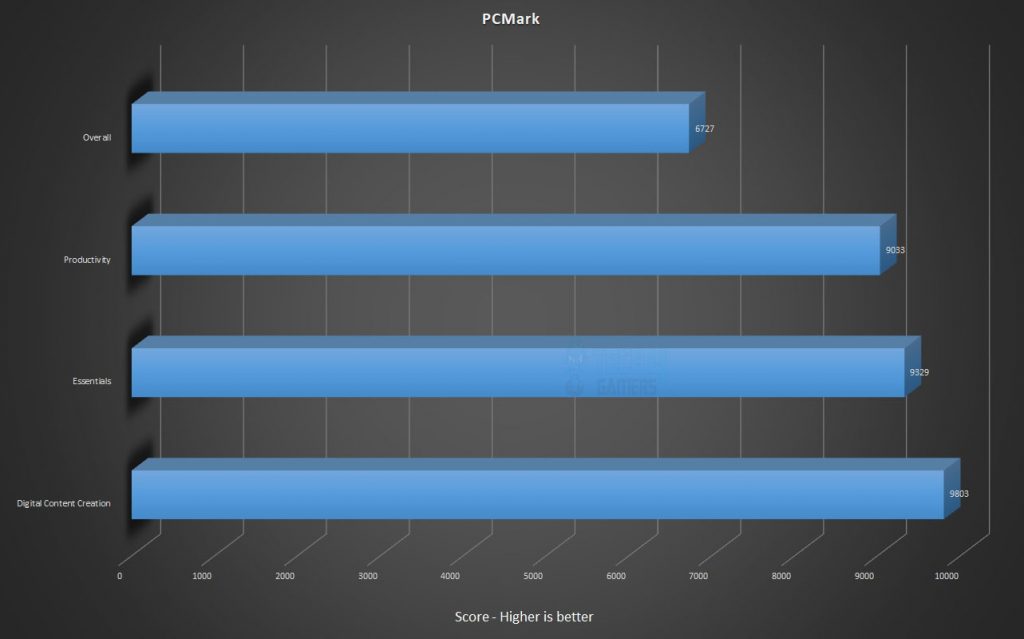
PCMark10 benchmarks
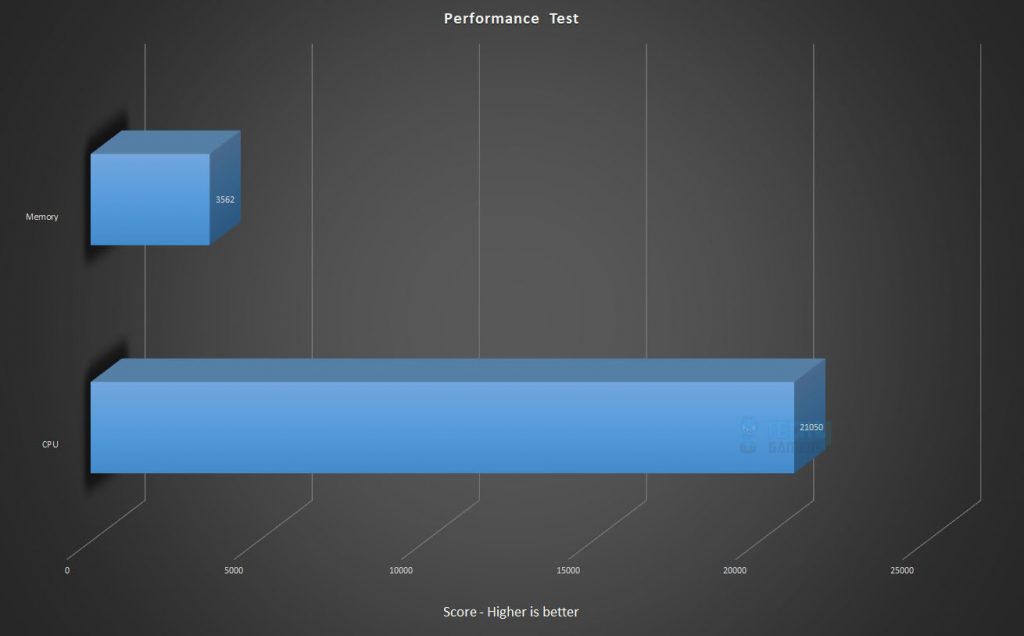
Performance Test
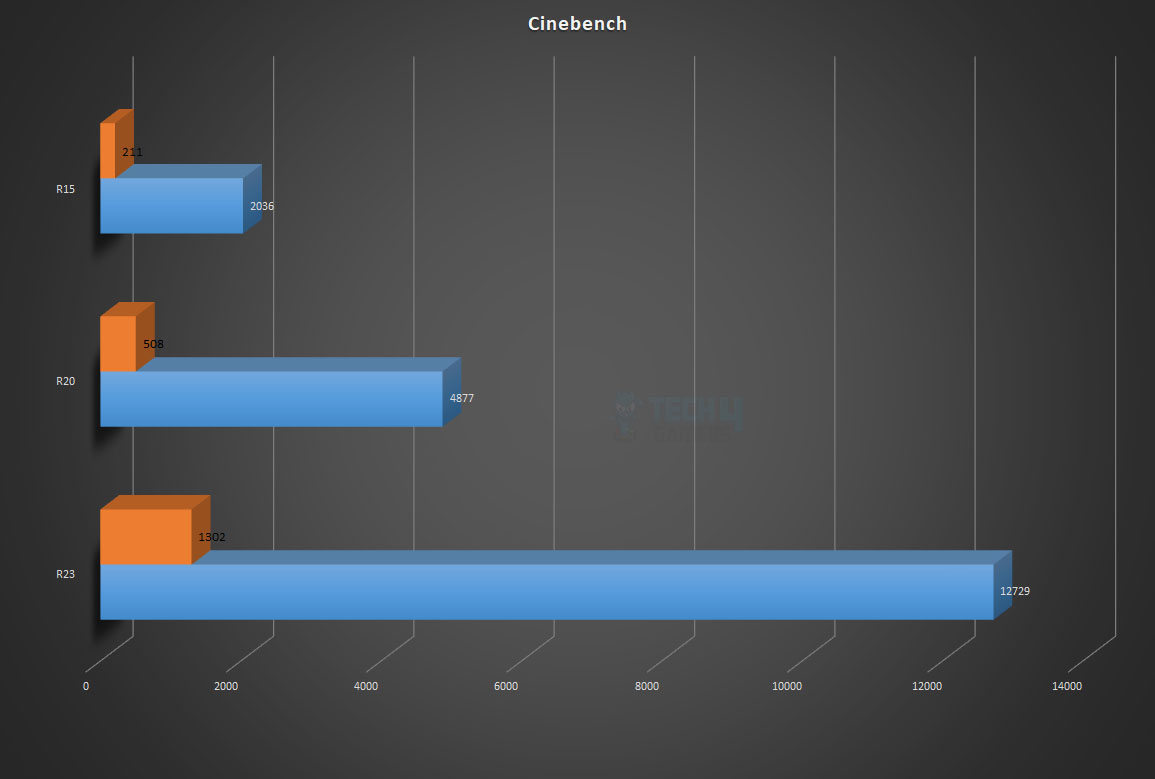
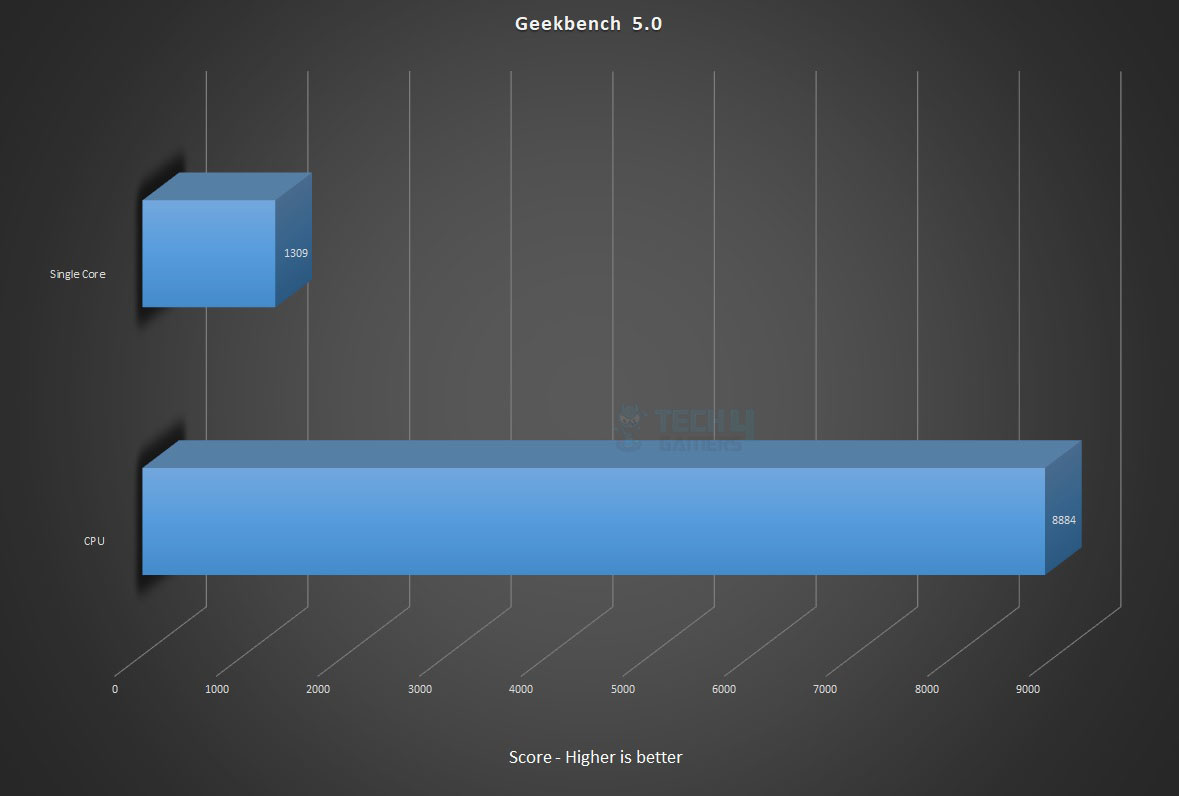
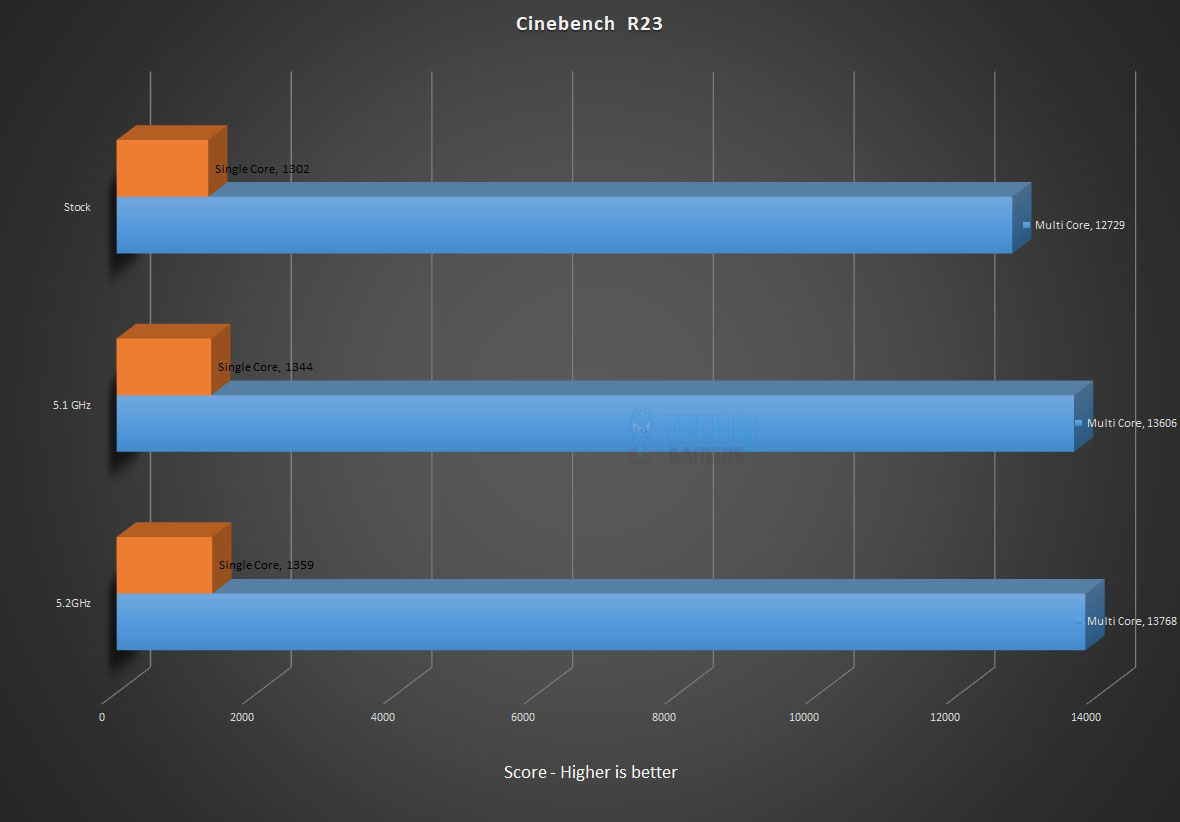
CPU Tests


Storage Drive Test

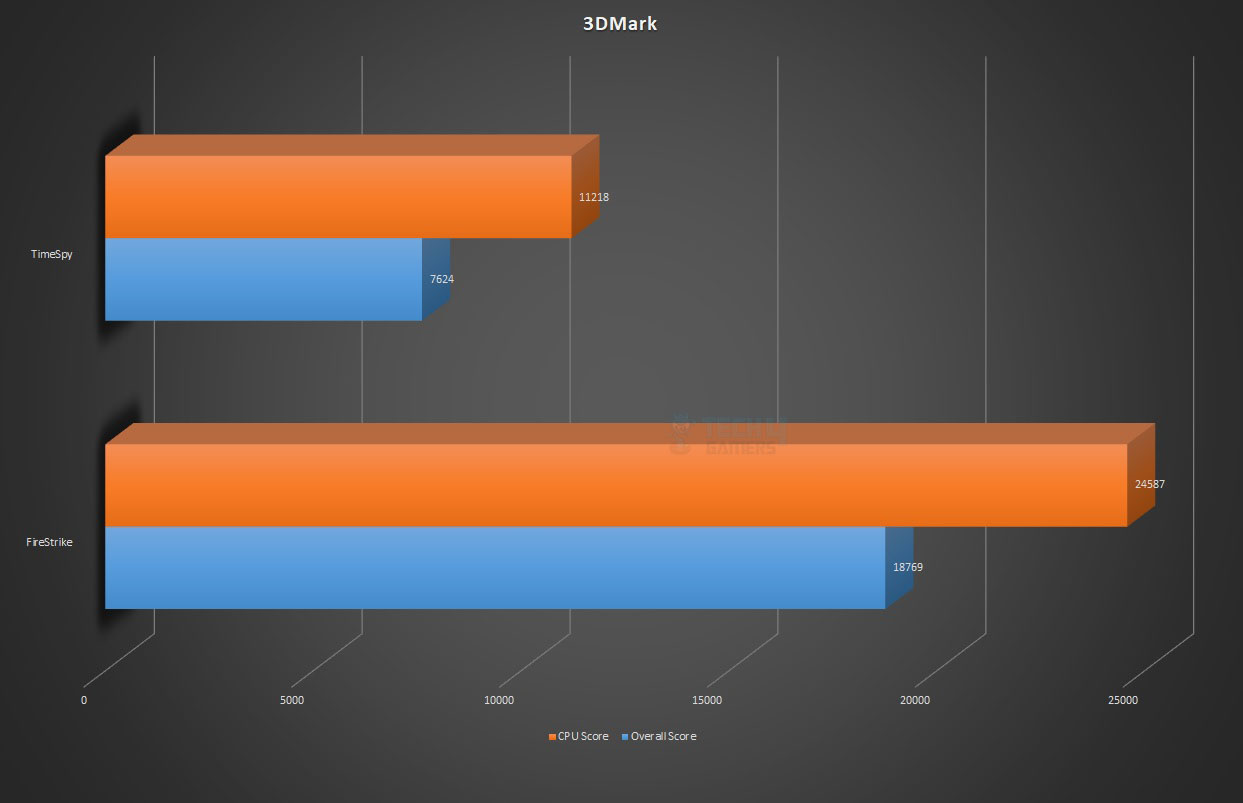
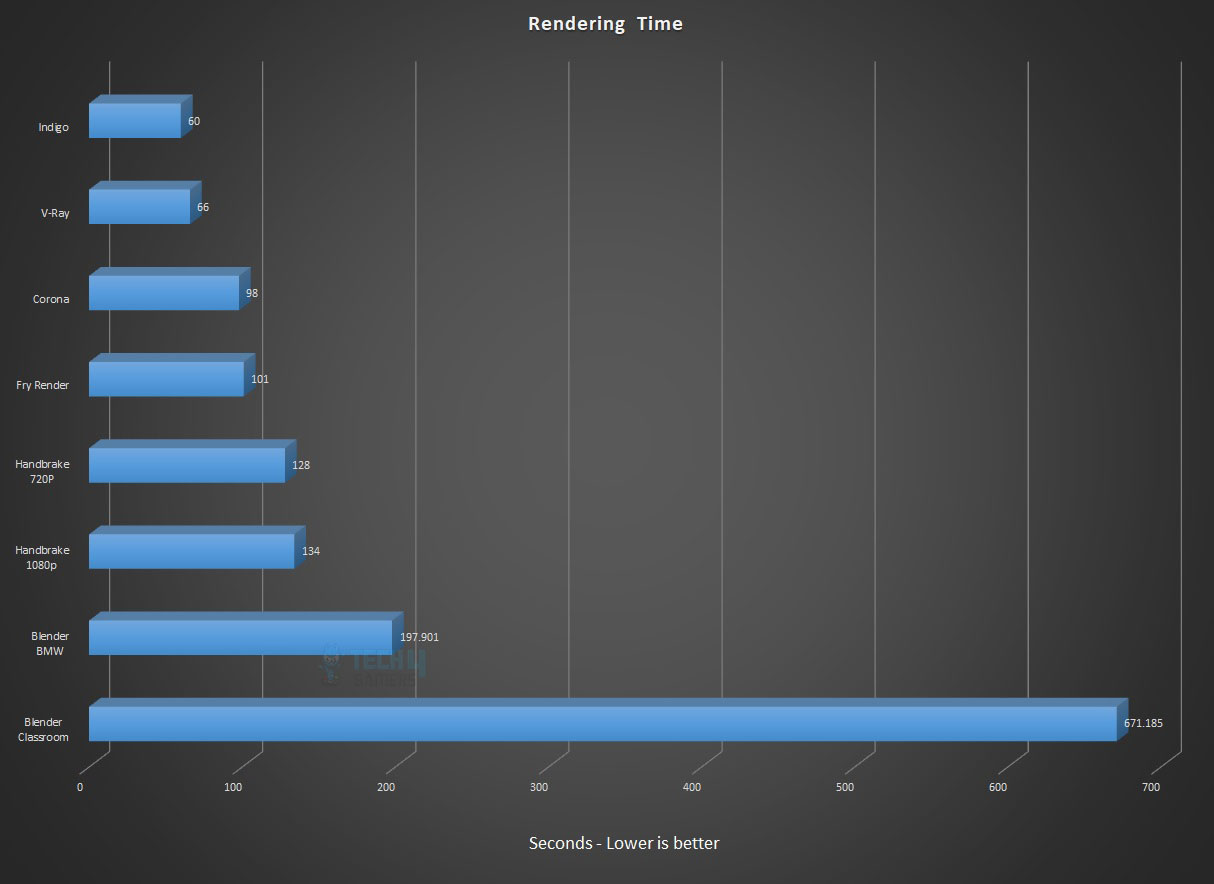
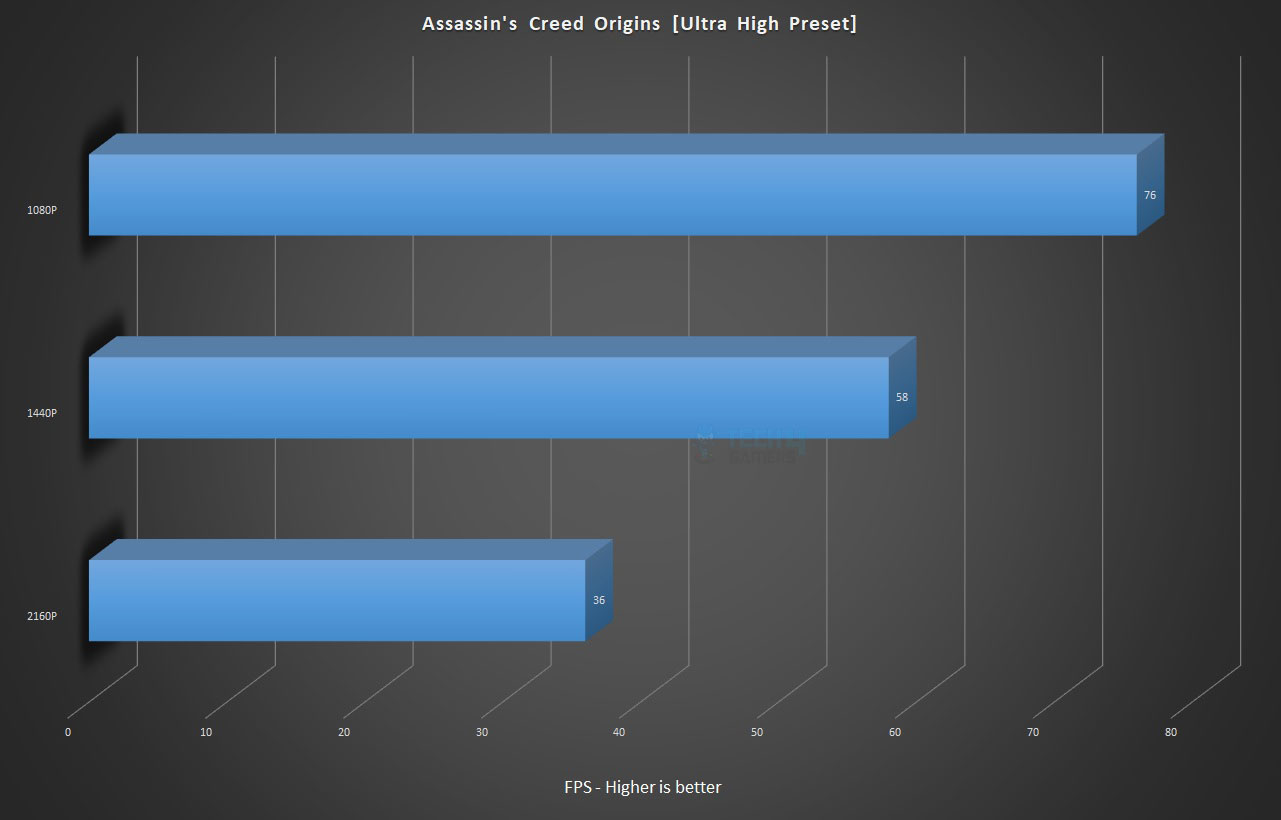
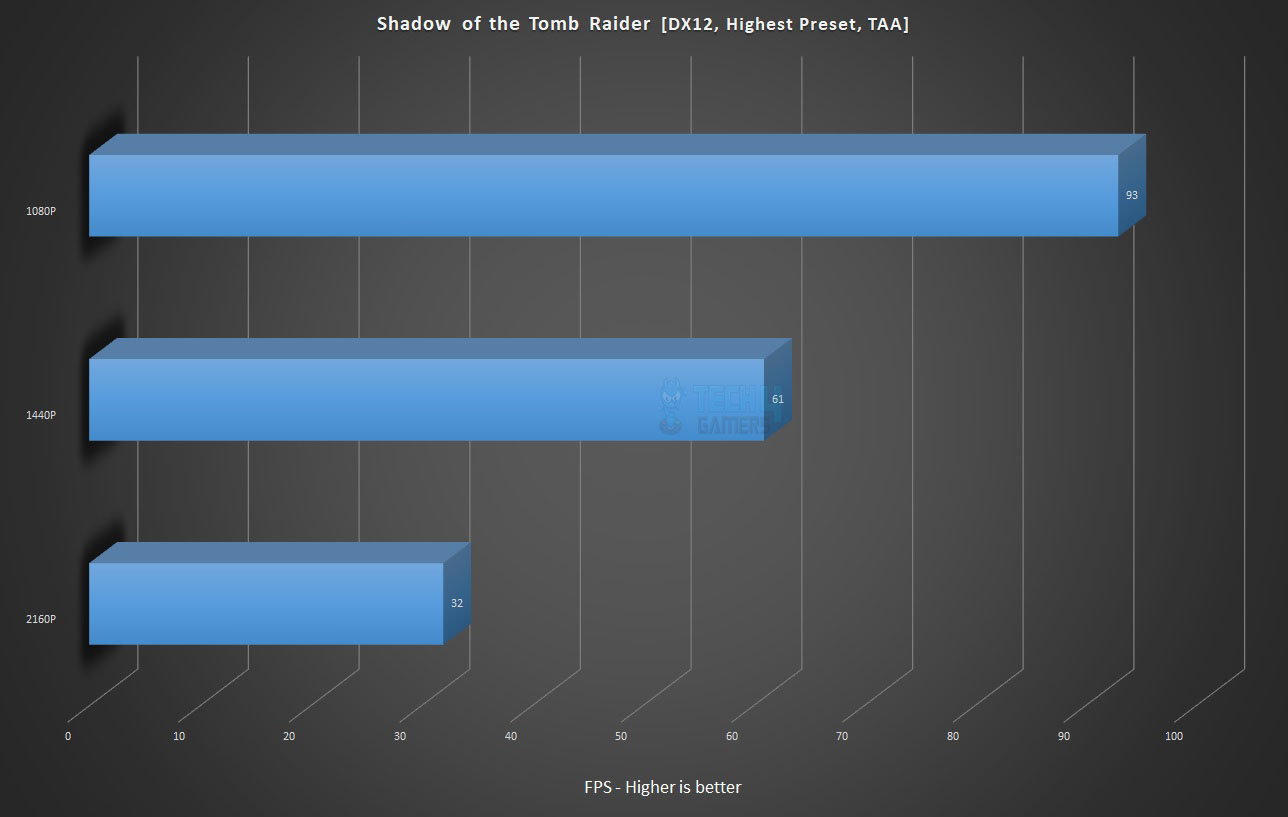
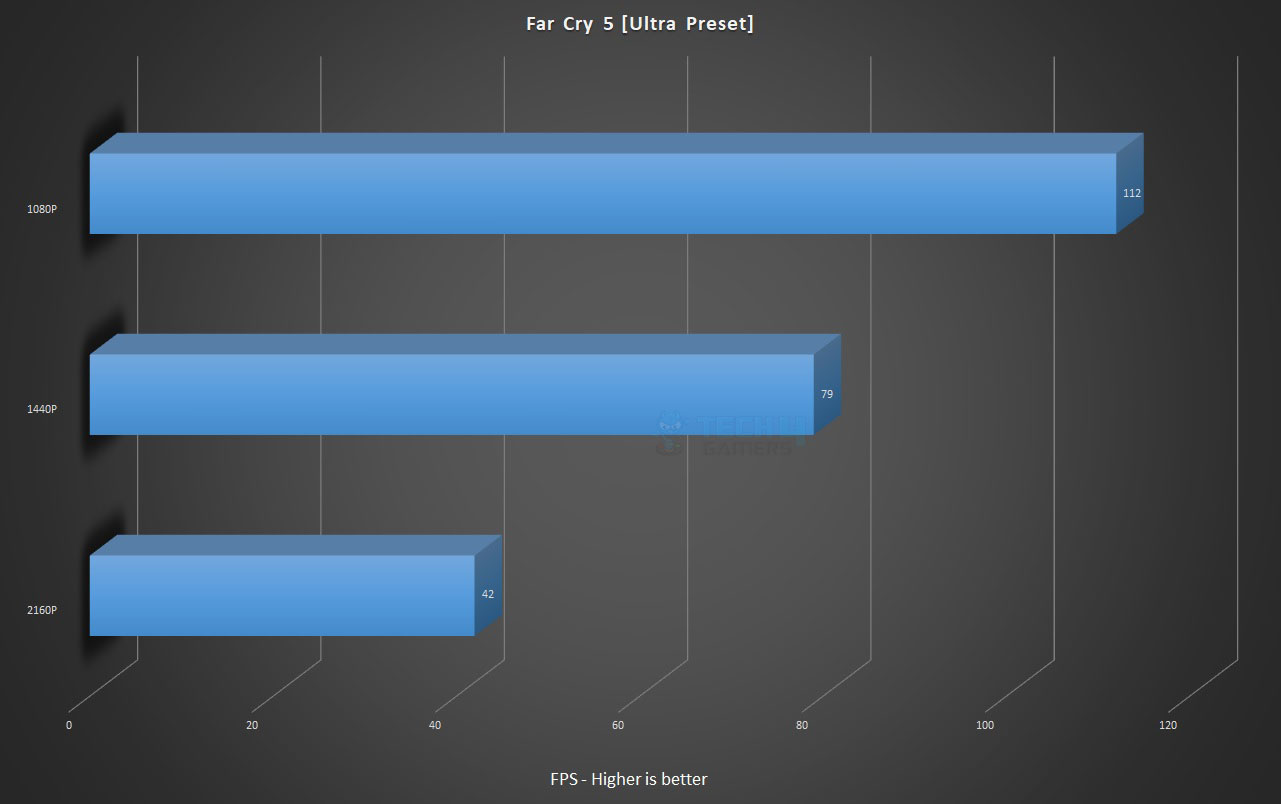
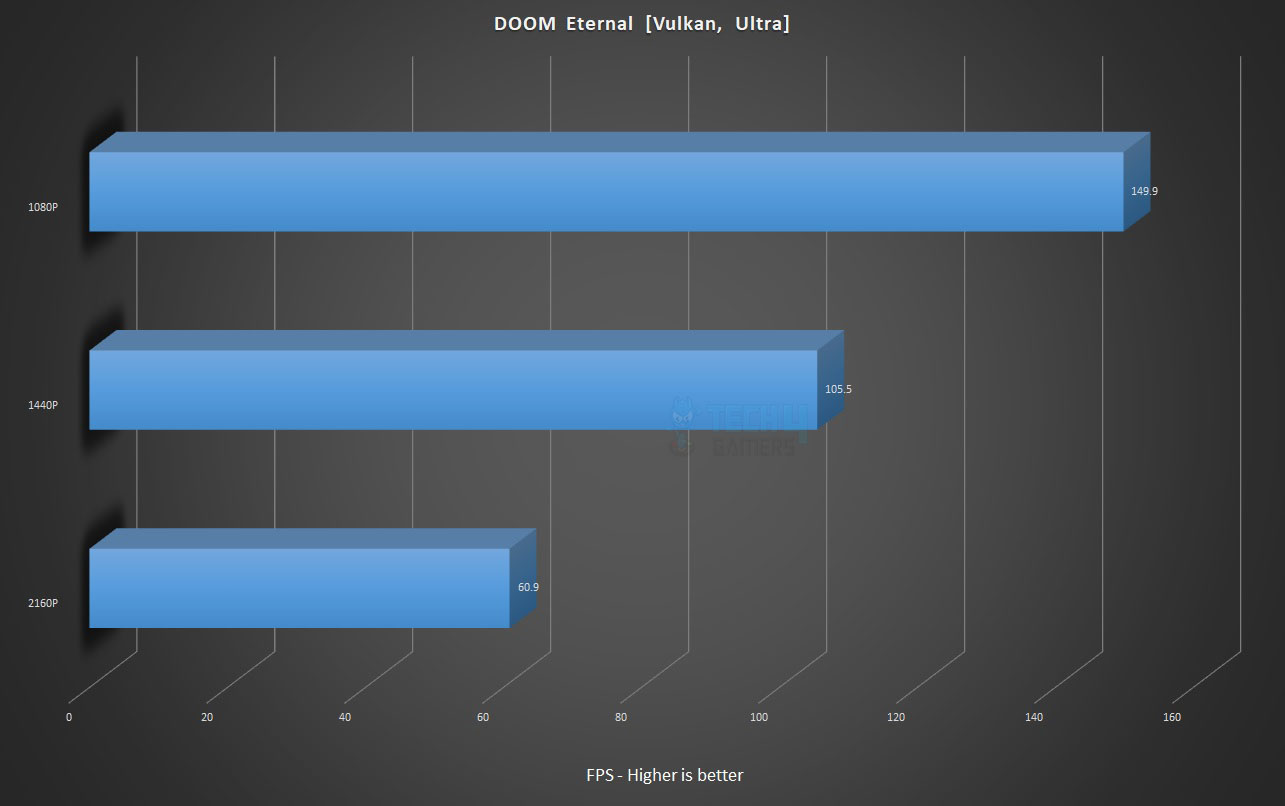
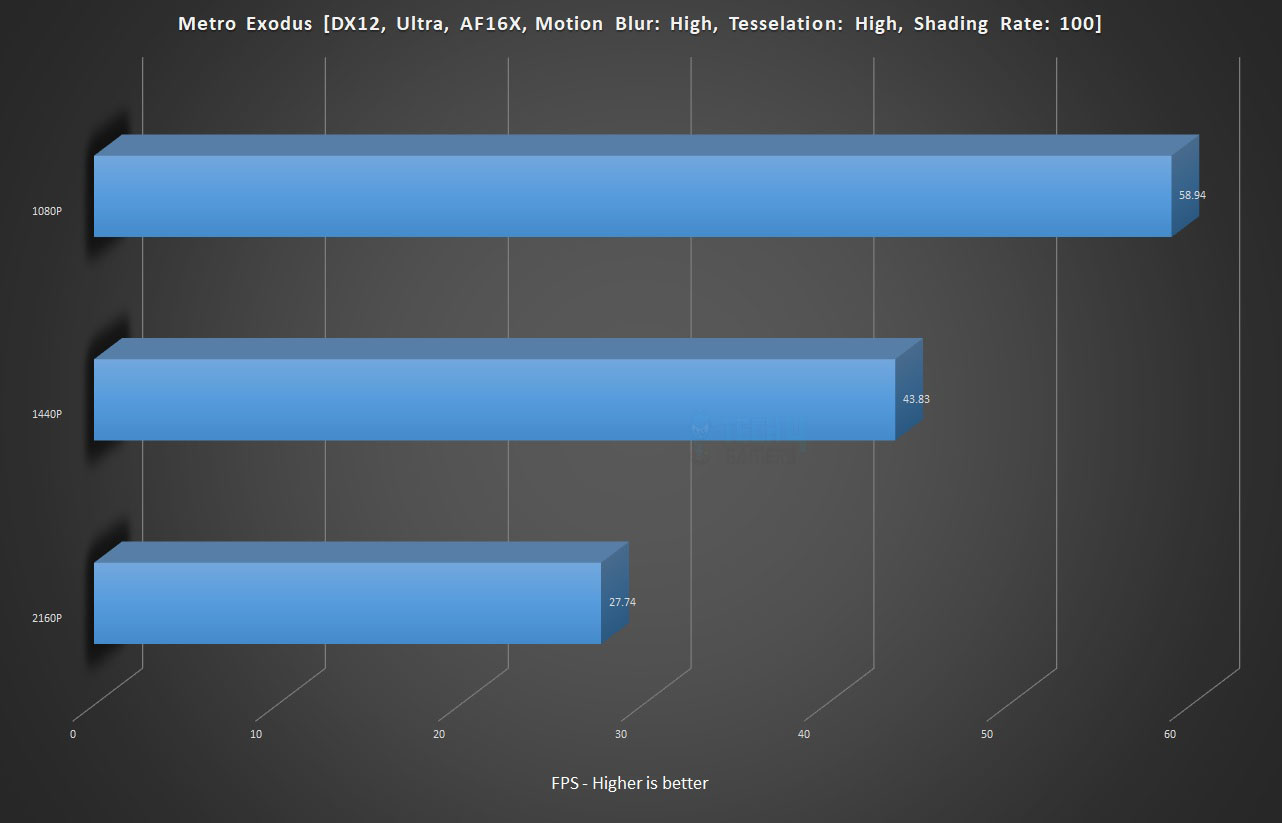
Gaming And Synthetic Benchmarks
Overclocking, Power Consumption, and Thermals
We disabled Gigabyte Core enhancement for focused testing, sticking to Intel defaults. All settings were on Auto except DRAM voltage and timings. Blender Benchmark assessed thermals and stability at both stock and overclocked settings. Power consumption was measured using CORSAIR Link software.
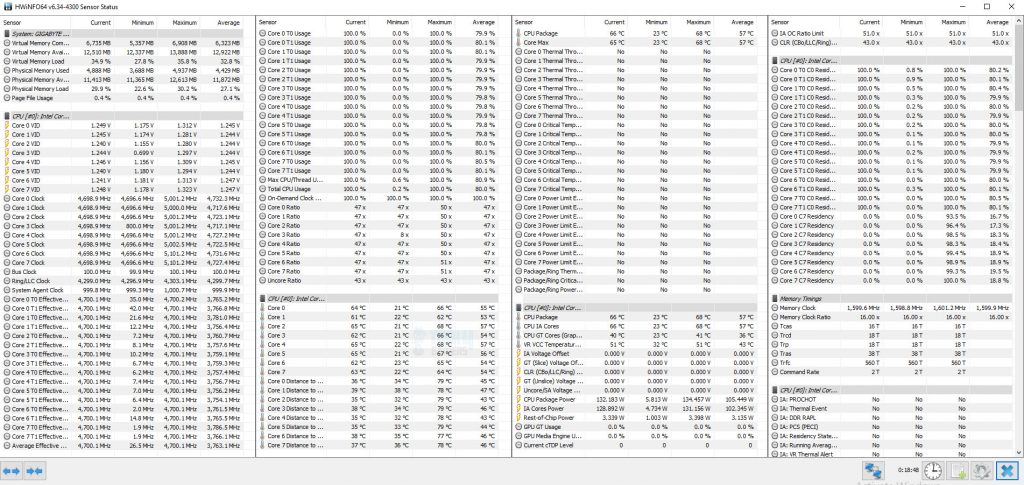
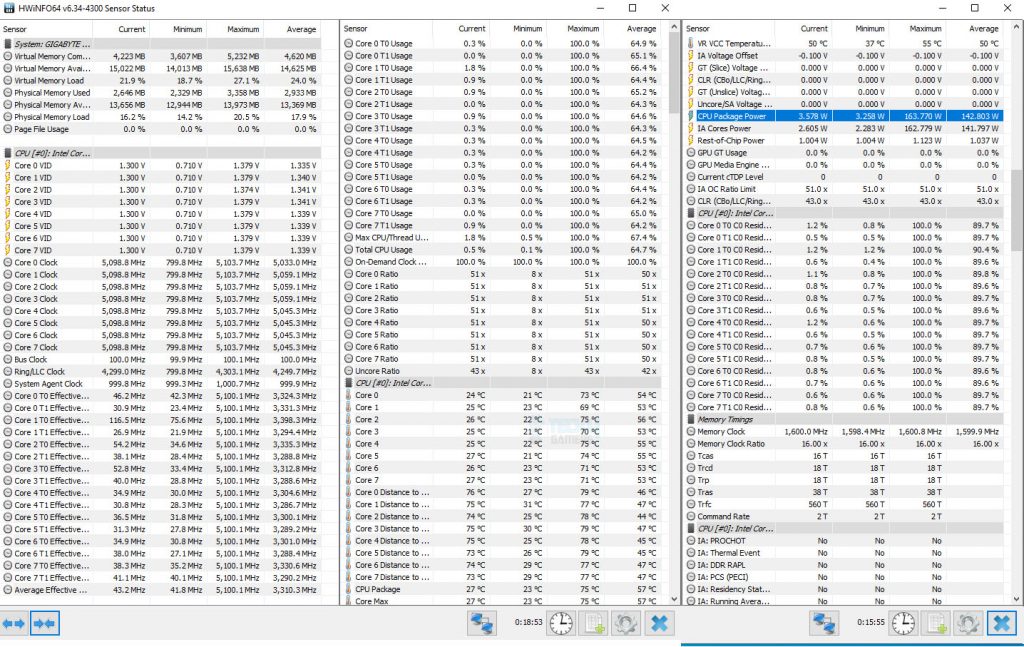
The above picture shows what it is like to have an Intel i7 10700k on the Auto and Stock settings. Two cores have hit the 5.1GHz mark, which is exactly the Turbo Boost Max Tech 3.0. The average temperature was 65.75°C with an ambient of 19.5°C. The maximum power package was 134.475W.
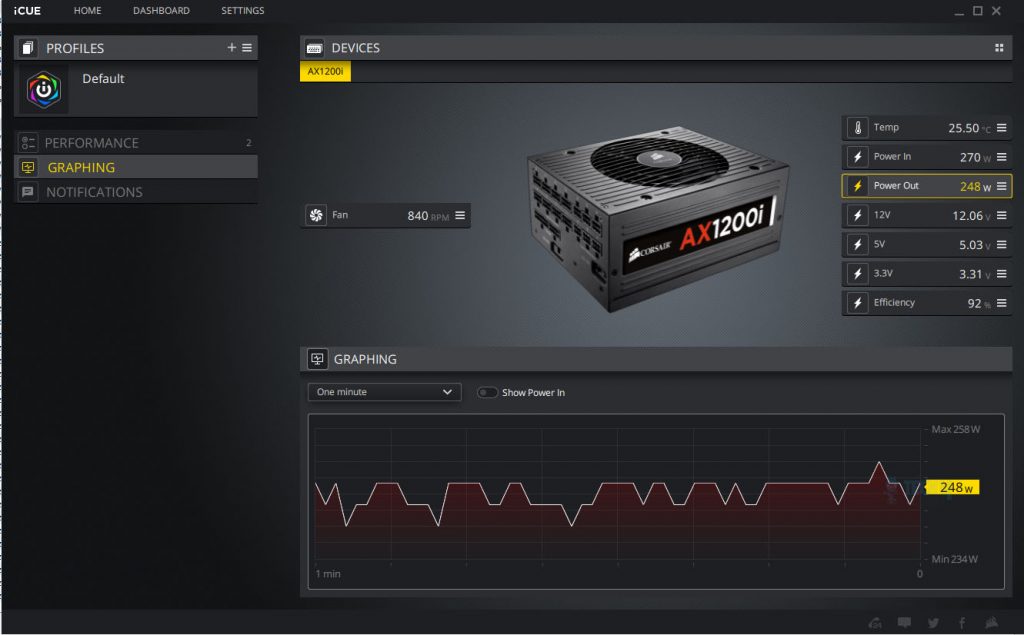
The above picture shows the power draw of the system as reported by CORSAIR iCUE coming off their AX1200i PSU. Please, note that the graphics card was not under any load. Your mileage would vary and there is no way this should be taken as a reference point.
I was able to overclock the chip with all cores on 5.1GHz using 1.379V. For this, I have to set the Voltage Control Mode to Normal and use the override method with a -0.100 offset. The LLC was set to Auto. Under the Blender Benchmark, the average temperature was 72.25°C at an ambient of 18.5°C. The maximum power on the package was 172.339W. The system power draw was around 332W without the graphics load.
Thermal Imaging
We have used the Hti HT18 Thermal camera to record the thermals of the VRM area of the motherboard under load using blender benchmark on the stock and with an overclock scenario.
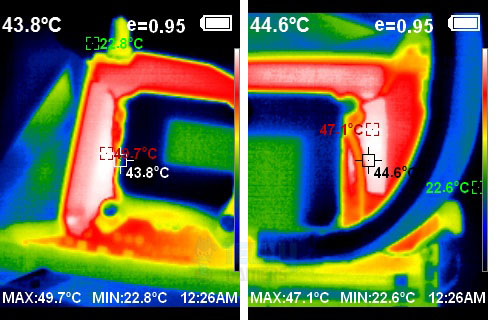
The maximum temperature on the MOSFETs was 49.7°C with an ambient of 19.5°C.
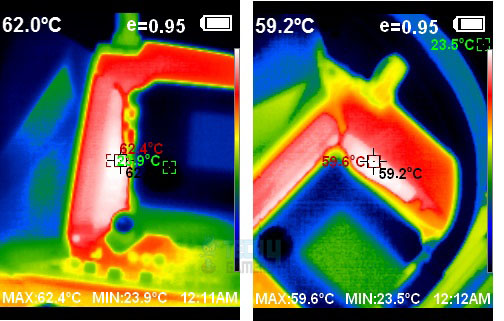
With 5.1GHz all core under Blender Benchmark testing, the maximum temperature on the MOSFETs was 62.4°C with an ambient of 18.5°C.
This shows the powerful cooling solution employed by AORUS on their Z490 PRO AX motherboard. I am expecting these values to be high with Intel i9 and more aggressive overclock, but given the result, these VRMs have enough cooling to handle any load.
Should You Buy It?
Buy It If:
✅You Want Intel CPU Compatibility: You want compatibility with both 10th and upcoming 11th-generation Intel Core CPUs.
✅You Prefer High RAM Capacity: You need a motherboard with 4 DIMM slots supporting up to 128GB DDR4 at 5000 MT/s.
✅You Like Robust Overclocking: You’re impressed by strong performance in handling loads, with the VRM reaching a maximum temperature of 62.4°C during overclocking to 5.1GHz all-core at 1.379V VCORE.
Don’t Buy It If:
❌You Don’t Need Advanced Features: You don’t plan on utilizing advanced features such as overclocking, and you want a motherboard with basic functionality.
❌You Are Fine With Limited Expansion: If future expandability is a priority, and you need more PCIe slots or additional M.2 slots than what this motherboard offers.
Conclusion
The GIGABYTE Z490 AORUS PRO AX Gaming Motherboard is an upper mid-range offering with a 12+1 power phase design, utilizing an Intersil ISL69269 PWM controller for clean power delivery to the CPU socket. The board supports Intel 10th-generation CPUs, with compatibility for upcoming 11th-generation CPUs.
Featuring 4 DIMM slots supporting up to 128GB DDR4 at 5000 MT/s, the motherboard includes dual M.2 ports with thermal guards, 5x PCIe slots (top two PCIe 4.0 ready), and 6x SATA3 ports. VRM/MOSFET cooling is robust, with aluminum louvered fins and an 8mm heat pipe using Direct-Touch II technology.
The motherboard boasts 8+4 pin EPS connectors, 7 thermal sensors, and 8 hybrid 4-pin fan/pump headers. It offers various USB ports, 2 RGB LED zones, and multiple lighting headers. Connectivity features include Intel 2.5 GbE NIC, 2×2 WiFi 6 201AX, and a Realtek ALC1220 audio solution with Chemicon capacitors.
In performance testing, the VRM handled loads well, reaching a maximum temperature of 62.4°C during overclocking to 5.1GHz all-core at 1.379V VCORE. However, attempts to reach 5.2GHz were limited by thermal constraints, requiring 1.5V. The audio solution and wireless connectivity performed smoothly, making the Z490 AORUS PRO a strong contender in its class.
Recent Updates
- December 12, 2023: A few text changes to improve readability.
Thank you! Please share your positive feedback. 🔋
How could we improve this post? Please Help us. 😔
[Hardware Reviewer & Editor]
Meet Nauman Siddique, a highly experienced computer science graduate with more than 15 years of knowledge in technology. Nauman is an expert in the field known for his deep understanding of computer hardware.
As a tech tester, insightful reviewer, and skilled hardware editor, Nauman carefully breaks down important parts like motherboards, graphics cards, processors, PC cases, CPU coolers, and more.
- 15+ years of PC Building Experience
- 10+ years of first-hand knowledge of technology
- 7+ years of doing in-depth testing of PC Hardware
- A motivated individual with a keen interest in tech testing from multiple angles.
- I majored in Computer Science with a Masters in Marketing
- Previously worked at eXputer, EnosTech, and Appuals.
- Completed Course in Computer Systems Specialization From Illinois Tech
Get In Touch: nauman@tech4gamers.com


