The “Your PC did not start correctly” error or the Blue Screen of Death in Windows often indicates a system startup issue. Common causes include recent hardware or software changes, system file corruption, or failed updates. To remedy this, users can attempt to boot into Safe Mode, use System Restore to revert to a previous stable state, or utilize Windows Startup Repair.
- The PC sometimes faces the error “Your PC did not start correctly” after a booting sequence.
- This issue mainly causes fresh updates in the hardware or software, faulty driver updates, or corrupt system files in the computer’s registries.
- The common remedies for the problem are reinstalling hardware and software drivers, checking for corrupt system files and registries, resetting the PC, and more.
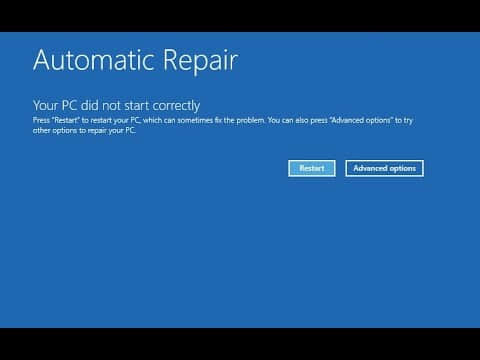
The error message is displayed as:
Method Difficulty Rating
Rated: 7/10
Rated: 9/10
Rated: 8/10
Rated: 8/10
Initiating The Startup Repair Facility
A startup facility can address the “Your PC did not start correctly” error by systematically troubleshooting and resolving issues that hinder the operating system’s boot process. This may involve diagnosing hardware failures, correcting corrupted system files, and ensuring proper configuration of startup settings. Additionally, implementing advanced recovery options within the startup facility, such as system restore or startup repair, can help restore the system to a stable state and eliminate the error message.
A simple and helpful method to get rid of the error is the Startup Repair tool. The Windows OS designed this tool to detect and solve computer startup behavior problems. This method was helpful to me and various Microsoft users as well. Follow these steps to initiate startup repair:
- Restart in Startup Repair: Hold the shift key on your keyboard while clicking the Power icon in the lock screen’s lower right corner > Select Restart.
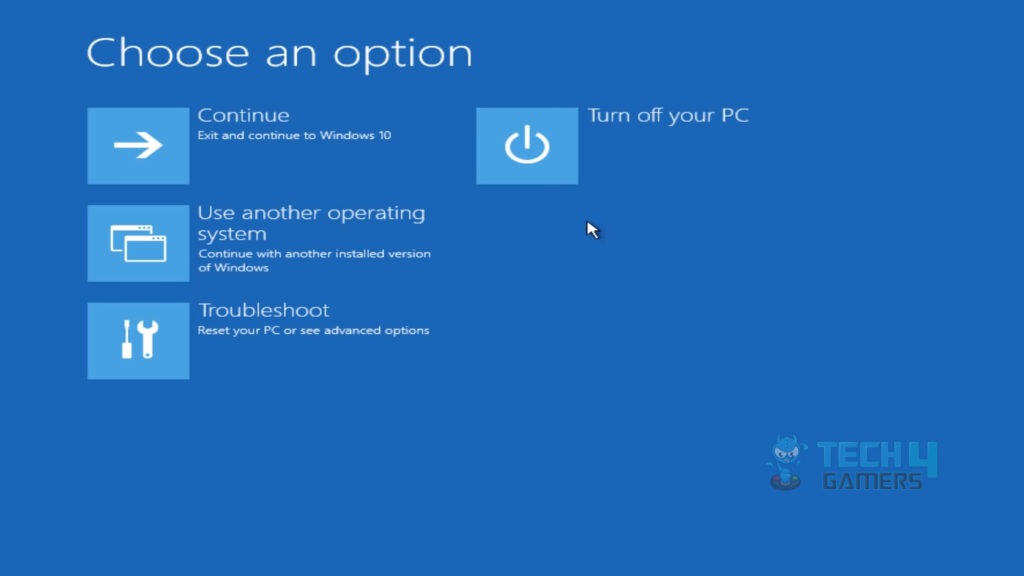
- Advanced Recovery Options menu: Hold the shift key while you click on the Advanced Recovery Options popup on the screen.

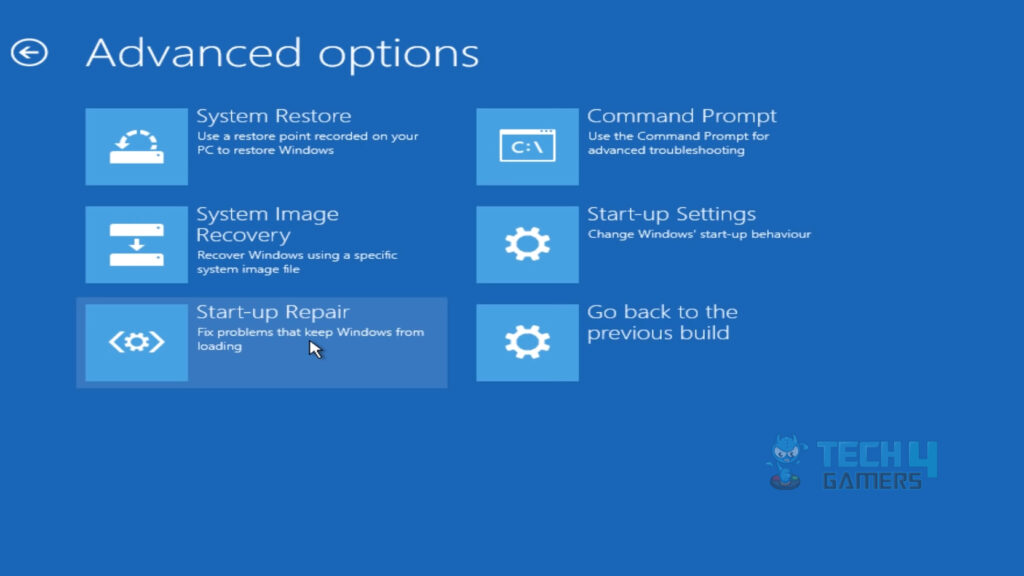
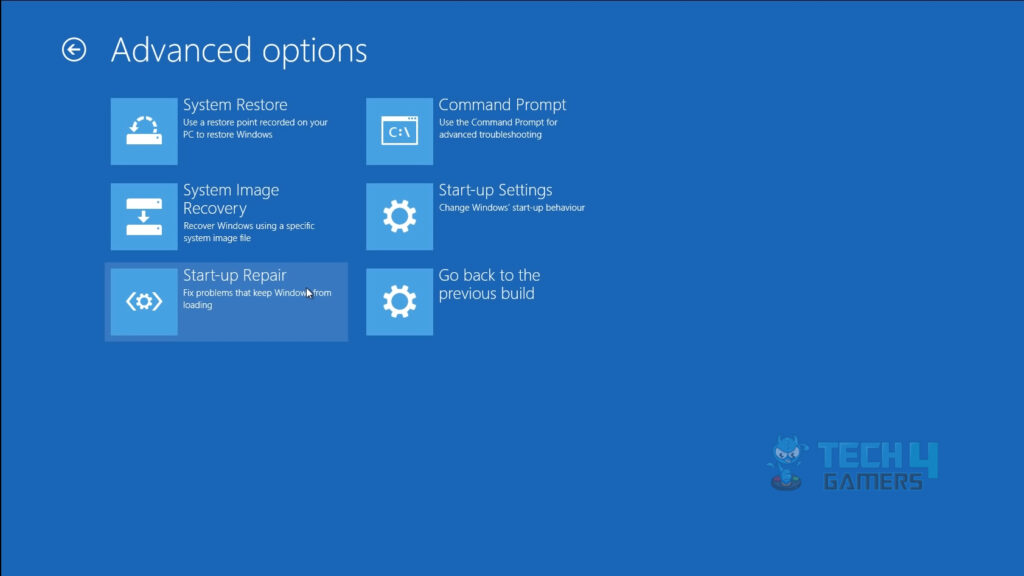
Advanced Recovery Options (Image By Tech4Gamers) - Proceed to Startup Repair: Select Troubleshoot> Advanced Options > Startup Repair.
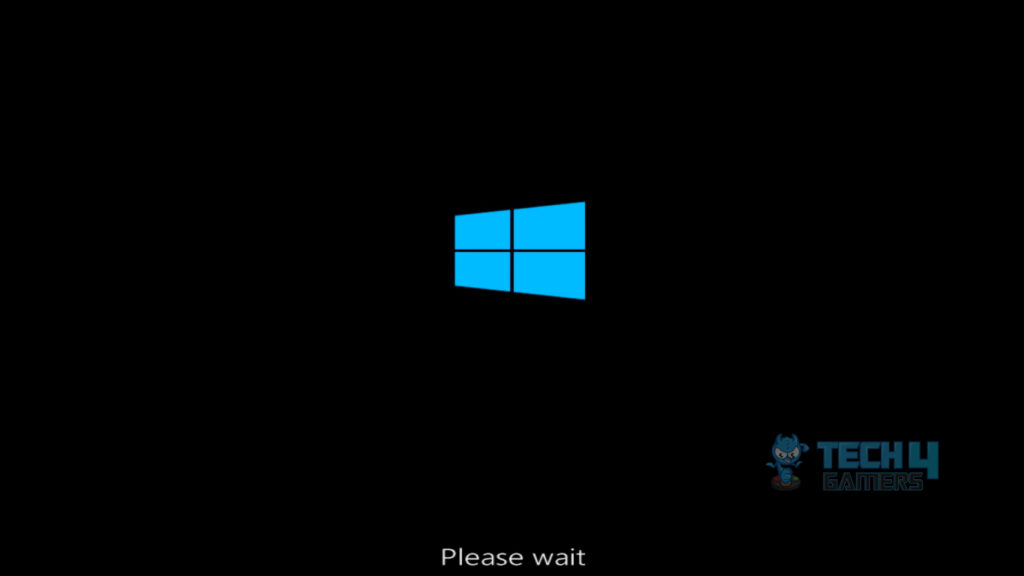
Startup Repair option (Image By Tech4Gamers) - Follow the instructions: Follow the upcoming instructions on the screen > Restart the computer once the above method is followed.
PC Starting (Image By Tech4Gamers) - Sign back in: Try signing in again once the lock screen appears.
Booting The PC In Safe Mode Sequence
If the problem persists after the above steps, log in after initiating Safe Mode. The computer gets affected by malware attacks the most when it starts up. Safe mode ensures the computer’s safety during this startup, which may remove the error.
I tried this method and was successful in resolving the issue, proving helpful for me. Follow these steps to initiate safe mode in Windows:
- Go into Startup repair mode: Hit and hold the shift key on your keyboard > Press the Power icon on the screen simultaneously > Press the shift key while selecting the Restart option from the Power menu.
- Account Recovery options: Afterward, the Account Recovery options will appear on the screen.
Advanced Recovery Options (Image By Tech4Gamers) - Proceed to the Restart option: Click on the Troubleshoot option > Advanced settings > Startup settings > Restart option.
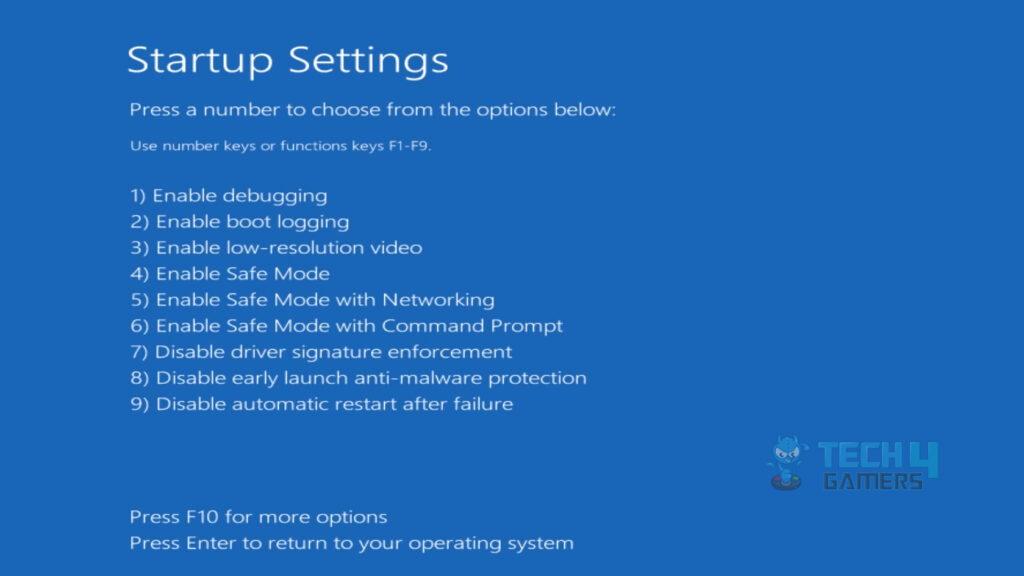
Advanced Options (Image By Tech4Gamers) - Enable Safe Mode option: Select option (4) labeled Enable Safe Mode.
Startup Behavior Modes (Image By Tech4Gamers) - Sign back in Safe mode: The Windows will launch in safe mode > Sign back into your computer once it restarts.
Repairing The Boot Configuration Data
The Windows directs the bootloader to the booting sequence through the boot configuration data. An error in the boot configuration data of the Windows Bootloader program can also display the issue.
I recommend users use the Boot Repair command, which I found helpful for me and several TenForums users. Follow the steps below to repair the Windows boot configuration data sequence:
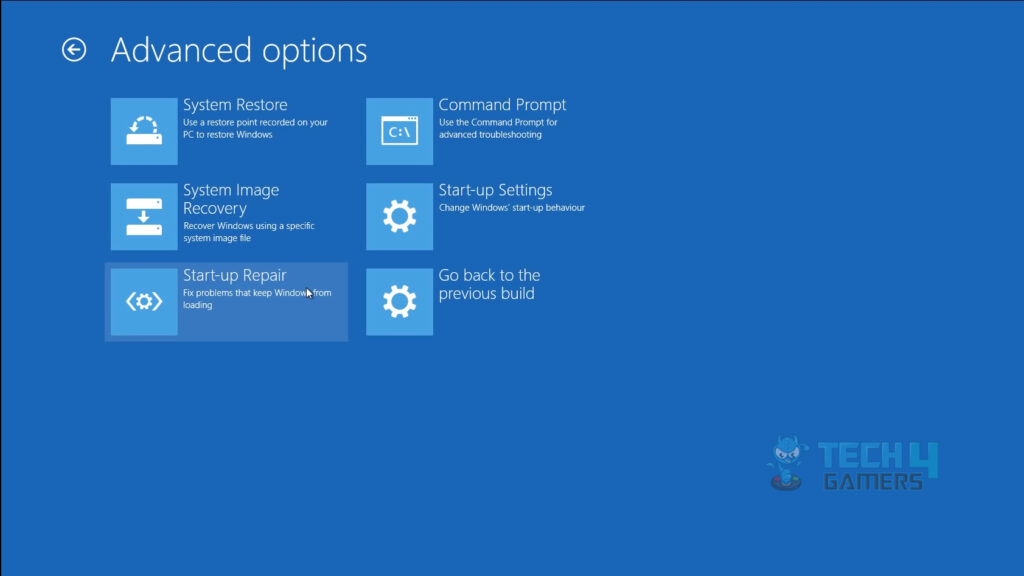
- Advanced CMD option: Proceed to the Advanced Options from the error message display screen > Command prompt.
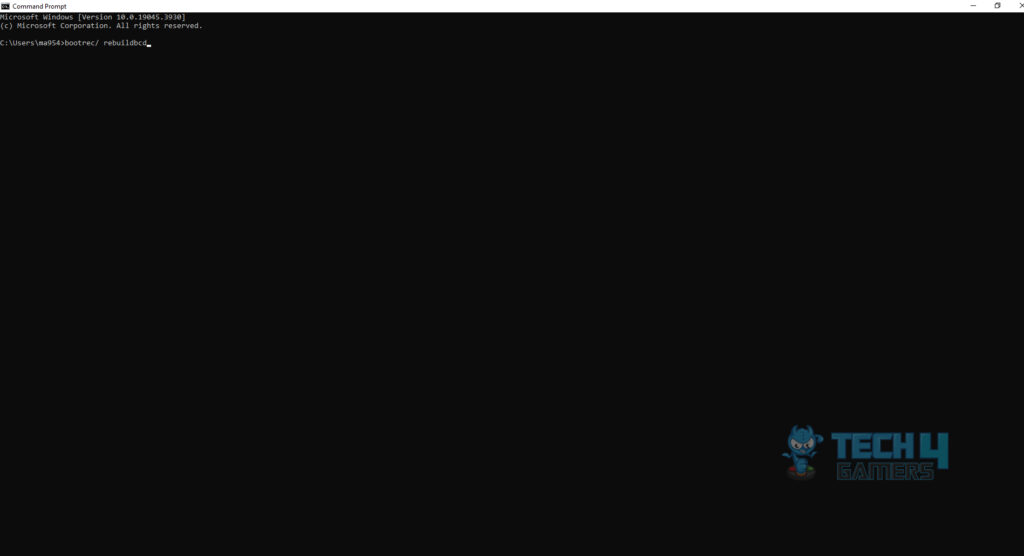
Command Prompt option (Image By Tech4Gamers) - Enter the command: Enter the following command into the command prompt:
bootrec /rebuildbcd

Bootrec command (Image By Tech4Gamers) - The Bootrec command you just entered will now scan the Windows installations on your PC > Hit the Y or A key on all the installations to add to the boot list.
- Hit the Y or Enter key on command > Restart your PC > Check whether the error is resolved.
Repairing The Master Boot Record
Repairing the Master Boot Record (MBR) can eliminate the “Your PC did not start correctly” error by addressing issues that may disrupt the proper booting sequence. The MBR repair process involves restoring the essential boot code and partition information, ensuring the operating system can be initiated successfully. By resolving MBR-related problems, a stable and functional boot environment is reinstated, resolving the error message and allowing the system to start correctly.
Master Boot Record or MBR is allocated in the first sector of a hard disk drive. It aids the system in locating the OS to be booted into the computer’s Random Access Memory (RAM). I repaired the MBR in my system, so the error in my PC was neutralized.
Follow these steps to repair the Master Boot Record cleanly:
- Advanced Options: Go to Advanced Options from the error message display > Command prompt.
Command Prompt option (Image By Tech4Gamers) - chkdsk Command: Enter the following command into the Command Prompt:
chkdsk /r
chkdsk Command (Image By Tech4Gamers) - Launch Commands: Launch all the following commands sequentially in case the command does not work on the error:
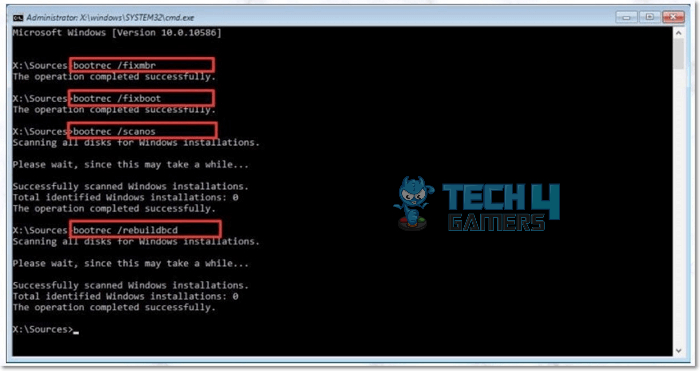
bootrec /rebuildbcd

bootrec /fixmbr

bootrec /fixboot

Bootrec Command (Image By Tech4Gamers) - Check error status: Once finished, restart your PC > Check whether the error is resolved.

Final Comments
The blue screen of death or BSOD errors are a nightmare to Windows users as they continuously crash the OS, preventing users from accessing or utilizing their system. Among these range of errors, the “Your PC did not start correctly” is a particular one as unlike other errors which crash your system spontaneously, this one doesn’t let the OS boot from the get-go.
@awdit Just tried to set up new PC but repeatedly getting blue screen “automatic repair” “PC did not start correctly”. Please help! pic.twitter.com/YujE9ngsXn
— Andy M (@Morjmeister) August 6, 2019
Since this error has been quite troublesome for users, it doesn’t even go away when users try to boot their PC in safe mode. That’s one of the reason why I would recommend you to follow the step-by-step methods provided above to resolve this issue easily.
After clicking on ‘safe mode’ it takes me back to ‘Your Pc did not start correctly’. 😔 pic.twitter.com/8DBVAnupvg
— Mlungisi Ngcobo 🥀 (@Tresphonic) October 18, 2021
FAQs
The PC sometimes faces the error “Your PC did not start correctly” after a booting sequence. This message is displayed continuously on a blue screen, so it is commonly referred to as the Blue Screen Of Death (BSOD).
You can resolve this issue by various methods, like restarting your computer and using the Startup Repair Tool.
Yes, the Automatic Repair tool has great potential to fix this error, as it detects and repairs any corrupted file on the system.
Relevant Articles:
- Automatic Repair Couldn’t Repair Your PC [16 FIXES]
- The computer has rebooted from a check
- Windows Update Error 0x800f0922 [FIXED 2024]
- How To Fix Windows Error 80072EFE?
- How To Fix Windows Update Error 0xc1900223?
Thank you! Please share your positive feedback. 🔋
How could we improve this post? Please Help us. 😔
[Error Fix Expert]
Hello, I’m Uzair Shabir, a tech enthusiast pursuing a Bachelor’s in Electrical Engineering. At Tech4Gamers, I’m an Error Fix Expert, crafting articles on different issues and how to fix them. With a Google IT Support Certificate, I navigate tech complexities to deliver insightful perspectives.
Get In Touch: UzairShabir@tech4gamers.com