 Threads

Error 80072EFE relates to the miscommunication between your computer and the Windows Update servers, particularly due to connectivity hurdles, hindrances from Windows Firewall or third-party antivirus apps, corrupt Windows components and cache, and wrong time and date settings on your PC. We could not perform OS updates on our Windows when this error happened.
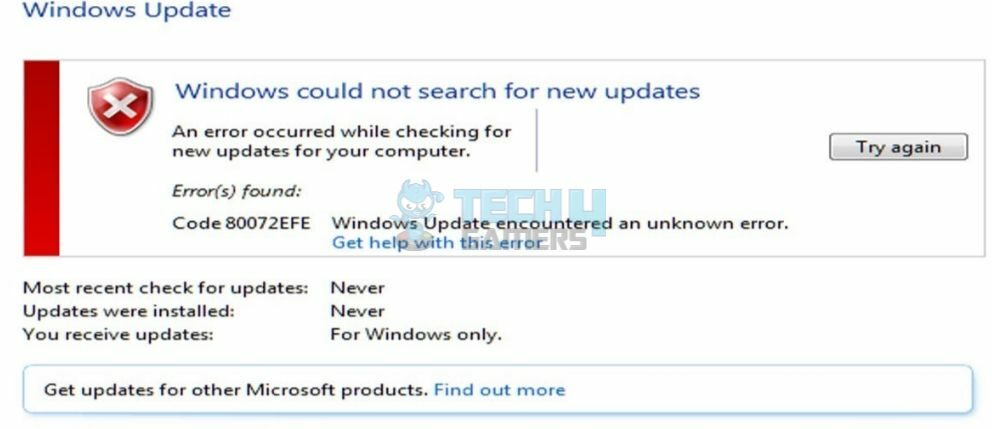
The error message appears as follows:
- Your computer cannot install the Windows updates when the error 80072EFE is present.
- It may appear due to bad internet, faulty Windows components, incorrect system configurations, and more.
- Resolve the error by using Windows update patches, installing Windows Update Client, and restarting Windows Update service.
We advise you to start with the most basic troubleshooting methods that usually solve computer errors.
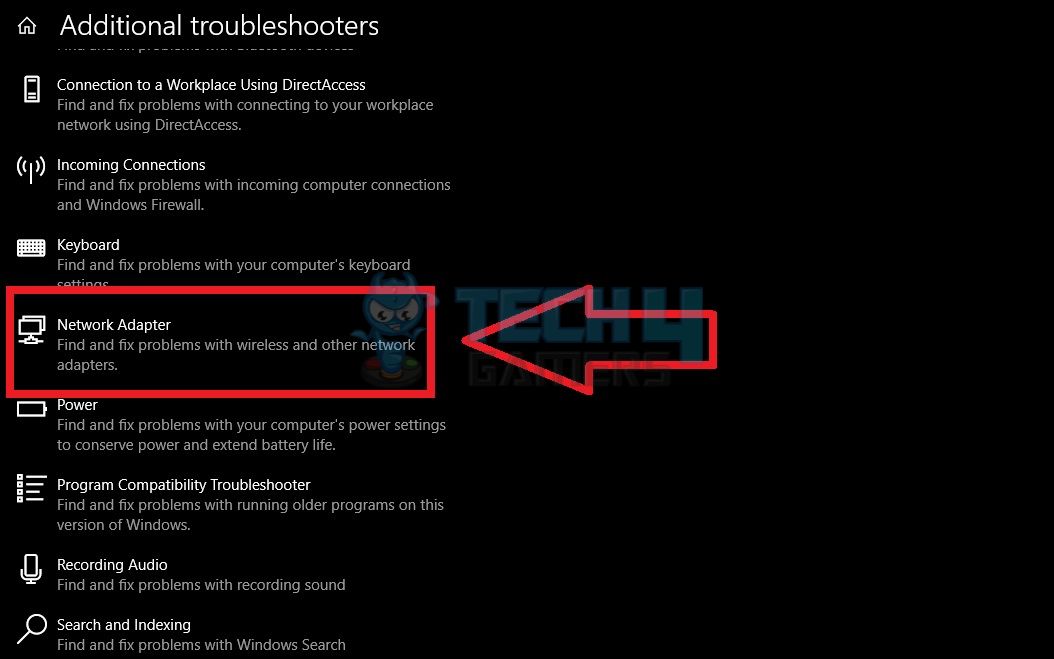
Use Windows Update Troubleshooter
Windows troubleshooters come in handy when you want to identify and resolve problems within your computer. Windows Update and Network Adapters are two tools we used to identify the cause behind this update error. Once identified, the troubleshooters will fix the problem or prompt you to resolve it.
Here are the quick steps to use built-in troubleshooters:
- Go to Settings > Update And Security > Highlight Troubleshoot on the left
- Press Additional Troubleshooters > Windows Update > Run The Troubleshooter.
- Wait for it to diagnose related issues and solve them.
- Repeat the same steps for the Network Adapter troubleshooter.

Network Adapter Troubleshooter (Image By Tech4Gamers)
Use Update Patches (Windows 7 Only)
Download the KB3138612, KB4474419, and KB4490628 Update Patches from Microsoft Update Catalog. Open each file once downloaded, and it will automatically install the latest updates on your system. Restart the computer to put the updates into function.
Perform SFC And DISM Scans
SFC and DISM scans are useful in identifying potential troubles with the system and Windows-related files. In the Command Prompt, enter the codes mentioned below one after another:
sfc/scannow
dism/online/cleanup-image /checkhealth
dism/online/cleanup-image /scanhealth
dism/online/cleanup-image /restorehealth
Download Windows Update Client
While testing the fixes, we found that installing the new Windows Update Client for Windows 7 works. So, we downloaded it and restarted the computer, and the error disappeared immediately for us and this user in the Microsoft Community.
Scan For Malware And Virus
We also ran a scan using the Microsoft Offline Defender tool to hunt for malware and viruses in our system. The presence of these can also lead to this error.
Important: Regularly scan your PC using an Antivirus to prevent viruses from ruining your experience.Turn Off Third-Party Antivirus And Other Software
Uninstall any third-party software you recently downloaded, after which you have faced the error. See if that fixes the trouble on your side.
Other than this, we disabled the third-party antivirus on our computer, like Avast or McAfee, because they may be blocking access to different Windows services.
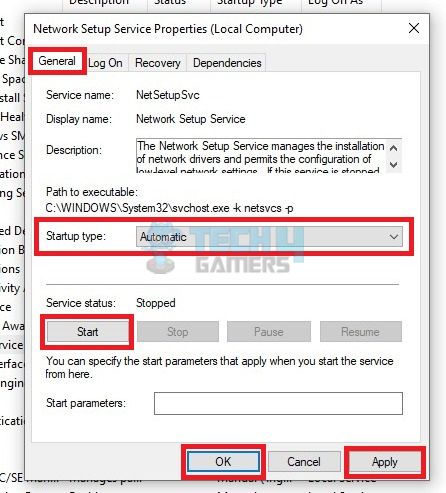
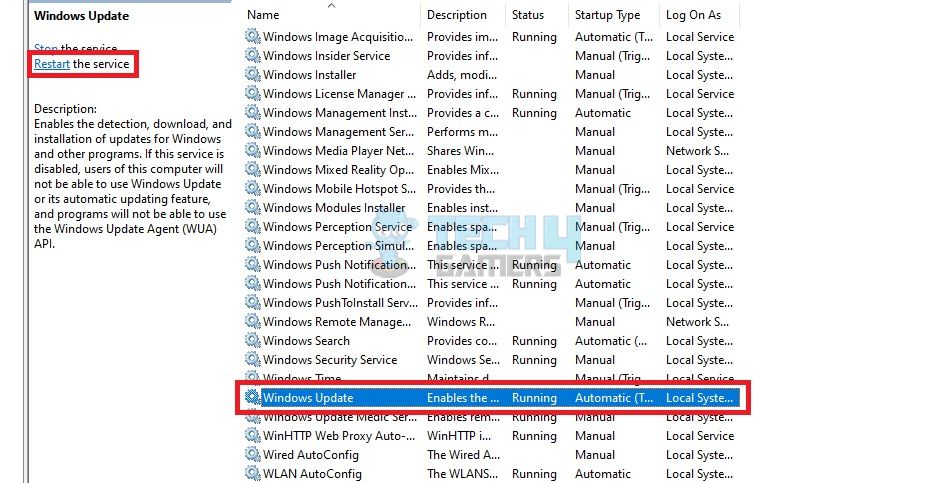
Restart Windows Update Service
We also tried restarting the Windows Update service that regulates the automatic downloading of Windows updates using the internet. Doing so cleared the bugs and temporary glitches that may have stopped the computer from installing the updates, consequently eliminating the error.
Carefully follow the method to avoid a malfunction:
- Open the Run > Search for services.msc.
- Find Windows Update Service > Right-click it > Properties.
- Keep the Startup Type as Automatic.

Automatic Startup (Image By Tech4Gamers) - Come back and highlight the service > Hit Restart in the top left corner.

Restart Windows Update (Image By Tech4Gamers) - Follow the same method for Background Intelligent Transfer Service.
- Once done, head to This PC> Local Disk C > Windows > Boot.
- Click on SoftwareDistribution folder > Select all the sub-folders > Delete them > Restart PC.
Reset Windows Update Components
We found that corrupt Windows Update components were a major hindrance to the OS update process on our PC since they aid the update process. Therefore, we reset the component configurations to eliminate unwanted cache and glitches, which worked like a charm.
Ensure you enter the right codes as instructed in the following steps:
- In the Command Prompt, enter these codes one by one:
net stop bits
net stop wuaserv
net stop appidevsc
net stop cryptsvc
- Execute the code
netsh winsock reset
- Next, rename the Software Distribution folder using the command,
ren C:\Windows\SoftwareDistribution SoftwareDistribution.old
- Resume the services
net start bits
net start wuaserv
net start appidevsc
net start cryptsvc
Install Windows 7 Updater
While searching for the fixes, we came across the Windows 7 updater. Hence, we installed and ran the program. Through the software, we could effectively install the latest updates. Besides, it was also effective for many other people, as noted in the comments of a YouTube video.
Erase CatRoot2 Folder
Another solution we applied was to delete the CatRoot2 folder. It is a known fix for troubleshooting Windows update errors because the Catroot2 folder contains signatures and files essential for the update.
Delete the CatRoot2 folder with this method:
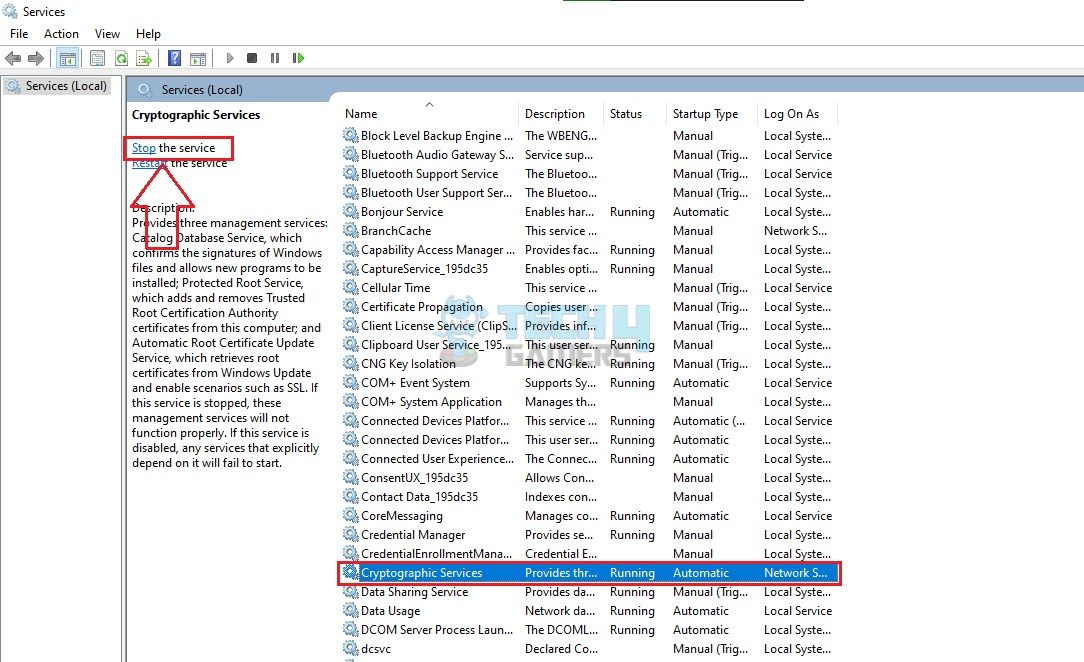
- Launch the Run box > Type services.msc.
- Highlight Cryptographic Services > Click Stop The Service > Exit the window.

Stop Cryptographic Service (Image By Tech4Gamers) - Go to This PC > Local Disk C or the relevant disk where Windows files are stored.
- Choose Windows > System32 > Right-click on Catroot2 > Delete it.
- Start the Cryptographic Service.
Upgrade Windows (Windows 7 Only)
If you are a Windows 7 user facing this error code, we recommend upgrading your Windows version to 10 or 11 to continue using your PC without errors. Microsoft has halted updates for Windows 7; therefore, there is a greater chance of such errors arising in the future. On the other hand, you can refer to the Microsoft Support team and request their assistance on the error 80072EFE.
More Windows Errors:
- Windows Update Error 0x800f0922
- Windows 11: Computer Won’t Wake Up From Sleep
- Windows Update Error 0xc1900204
Thank you! Please share your positive feedback. 🔋
How could we improve this post? Please Help us. 😔
[Errors Troubleshooting Expert]
Arsalan Shakil (aka GuyThatDoesEverything on YouTube) is a PC Tech Enthusiast and Electronic Geek. With over 10+ years of experience in Electronics, he then decided to explore Software Engineering to design embedded products and automate existing hardware solutions.
When he started tearing down old cameras to understand how they worked, he was shocked (literally, when he got zapped by a flash discharge capacitor), giving him the power (debatable) to fall in love with videography/photography. He also started making some fun videos that later became YouTube tech reviews.
Skills:
- 10+ years of experience in Electronics design, embedded solutions, and prototyping
- Majored in Software Engineering
- Research paper publication in IEEE for Embedded Military Uniform & LoRa WAN wireless technology
- Specialized in IoT Solutions
- PC Enthusiast & PC Modder
In his local region, he’s known to expose cheap PSU brands, often claiming fake certification or false claims on the box. He’s a true nerd and needed some friends in his life. Then he met some guys who work at Tech4Gamers, and they also came out to be equal nerds who suggested he join Tech4Gamers as a Hardware Expert.


