


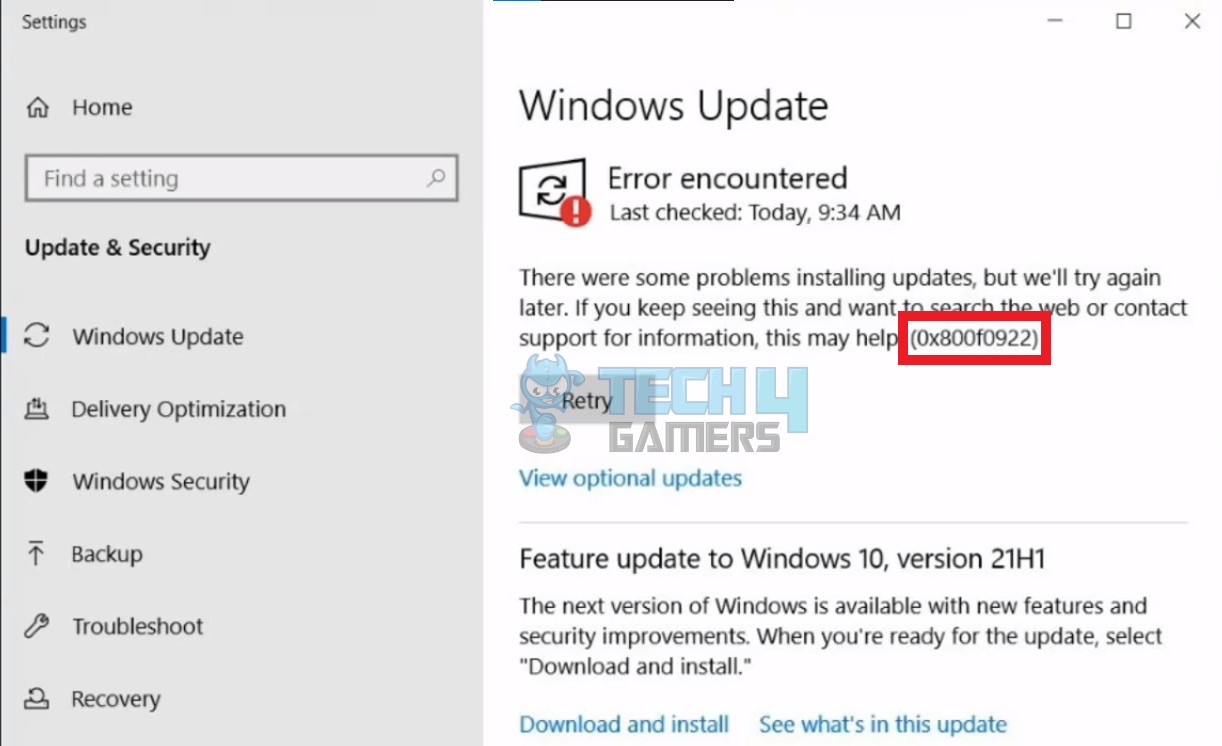
The Windows update error 0x800f0922 occurs when users attempt to initiate a Windows update through the Control Panel’s dedicated Windows Update feature. After confirming the update procedure, this error code materializes, accompanied by an error message that states:
-

Windows-10-Update-Error-0x800f0922 Message Screen (Image By Tech4Gamers)
Key Takeaways
- The Windows error 0x800f0922 arises when users attempt to update their Windows operating system with the most recently available updates.
- This issue may arise due to insufficient system-reserved partition space, unsuccessful communication with the Windows Update, corrupted update patch files, or blocked file installation by Windows Firewall.
- A remedy for the error involves utilizing the Windows Media Creation Tool, running the readiness app, SFC, and DISM scan, and resetting the Windows update.
Power Cycle Router/Modem
Power cycling your internet router is an amazing way to fix network-related problems. Keep in mind that this is different from a regular restart, as it requires you to keep the device turned off for a specific period.
Disable VPN And Proxy
If you’ve been using a VPN, now would be the right time to turn it off. We get it. Using a VPN has many benefits, but it can sometimes interfere with your other programs and start causing problems. Therefore, turning the VPN off can sometimes help fix the Windows Update error.
Run The Readiness App
Enabling the App Readiness service to Automatic aids in resolving Windows Update errors. This ensures the timely availability of the service, preventing conflicts and enhancing update reliability. The service readies the system for application deployment, promoting smoother updates and higher Windows Update process reliability. The issue has already been raised and solved via this method as discussed on the official Microsoft forums.
Follow these steps:
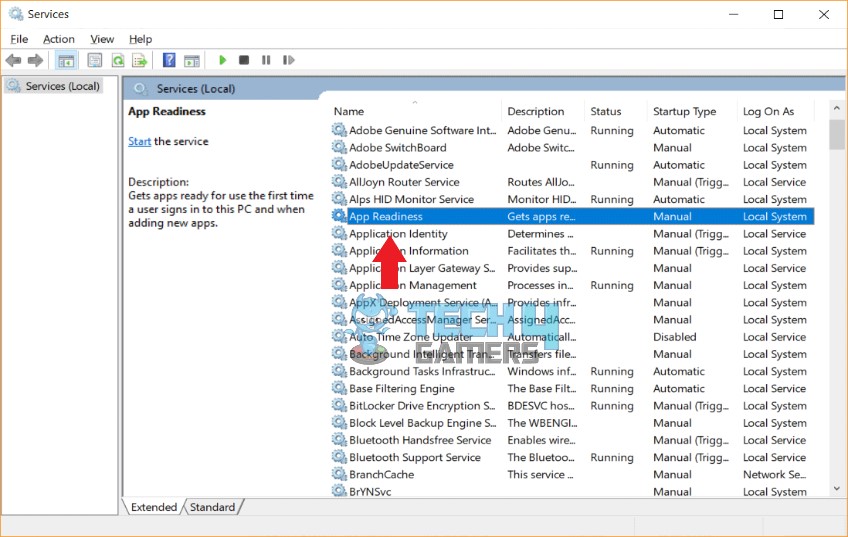
- Open Readiness App: Click on the Windows icon > Access the Start menu > Click Search bar > Enter services > Click Services > Find App Readiness and double-click on it.

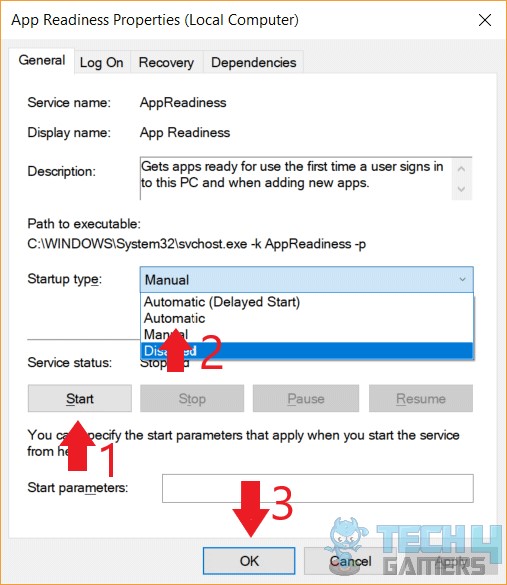
Click App Readiness (Image By Tech4Gamers) - Start Service: Click Startup Type > Select Automatic > Click on the Start button if the Service status is showing Stopped > Click OK.

Select Automatic (Image By Tech4Gamers) - Update Windows: Restart the system > Try running Windows Update.
Run SFC And DISM Scans
The SFC scans for damaged or missing files and repairs them, while DISM addresses issues from failed Windows updates for resolution. Many users on Microsoft Forum shared this method and have found it helpful as well.
Here are the steps and all the commands you need for this process:
- Execute Commands: Click on Windows Search Bar > Type cmd > Open Command Prompt as administrator > Execute these commands individually one after another:
Dism /Online /Cleanup-Image /CheckHealth
Dism /Online /Cleanup-Image /ScanHealth
Dism /Online /Cleanup-Image /RestoreHealth
sfc/scannow
Dism /online /Cleanup-Image /StartComponentCleanup
Dism /online /Cleanup-Image /StartComponentCleanup /ResetBase
net start w32time
w32tm/resync
gpupdate/force
chkdsk /f /r
- Update System: Press Y > Exit cmd > Try updating your system or using the MS MCT tool.
Utilizing The Windows Media Creation Tool
The Windows Media Creation Tool is an installation wizard for the Windows operating system. Additionally, it offers the capability to upgrade your existing Windows version to a more recent update as discussed on the official forums. Utilizing this later feature, I will guide you on successfully updating your Windows while avoiding the occurrence of the mentioned error.
Follow these steps:
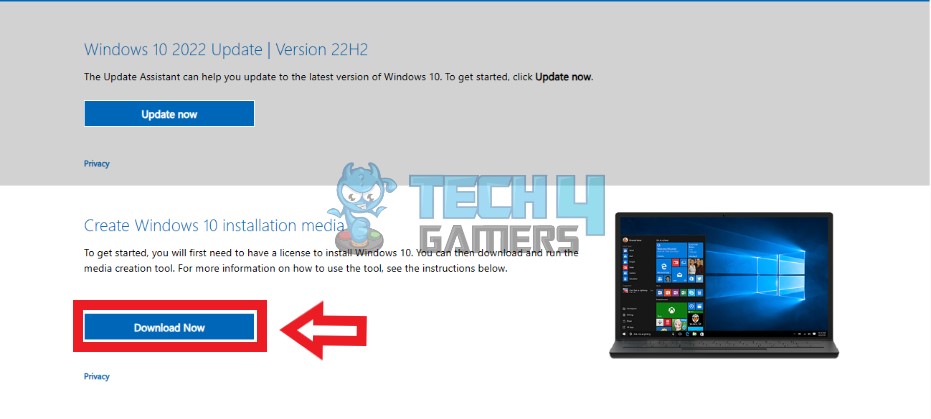
- Download MCT: Open Web browser > Official webpage (Windows 10 or Windows 11) for the Windows Media Creation Tool > Click Download Now.

Download Windows MCT (Image By Tech4Gamers) - Install Software: Click the downloaded file > Click Yes on the User Account Control (UAC) prompt > Accept terms and conditions > Upgrade This PC Now > Next.
- Complete Setup: After navigating through several windows, you’ll reach a screen to choose between clean Windows installation and updating the current version. Without making alterations, click Next > Wait for the Updates to install.
Reset Windows Update with Command Prompt
Resetting all of the Windows Update components can fix any update issue. After this whole process, the error should be resolved, as it is already claimed by users of Windows Ten Forums.
Here’s how to use Command Prompt to reset:
- Launch CMD: Click Start > Search Command Prompt > Run as administrator.
- Stop Services: Stop the Windows Update, Cryptographic Services, and Background Intelligent Transfer Service (BITS).
- Execute Commands: Type or paste the commands listed below in cmd, one at a time, and Enter after each:
net stop bits
net stop wuauserv
net stop appidsvc
net stop cryptsvc
Important: If you don’t see a notification on the screen saying that the service has stopped successfully after running the above commands, rerun the commands. - Remove File: To remove every qmgr*.dat\ file produced by BITS, copy and paste the following command and Enter:
Del "%ALLUSERSPROFILE%\ApplicationData\Microsoft\Network\Downloader\*.*"
- To confirm the deletion, enter Y.
- Download Updates: To force Windows 11 to download the updates again rather than using the downloaded files as they might be corrupted. The following commands should be copied and pasted and Enter after each:
rmdir %systemroot%\SoftwareDistribution /S /Q
rmdir %systemroot%\system32\catroot2 /S /Q
Tip: The rmdir command’s /S option deletes the given directory and subdirectories, whereas the /Q option deletes directories without confirmation. Repeat step 1 if you receive a notification, “The process cannot access the file because it is being used by another process,” since one of the services may have restarted automatically. - BITS and Windows Update Services: To return the services BITS and Windows Update to their pre-configured security descriptor, copy and paste the commands below one by one with an Enter after each:
sc.exe sdset bits D:(A;;CCLCSWRPWPDTLOCRRC;;;SY)A;;CCDCLCSWRPWPDTLOCRSDRCWDWO;;;BA)(A;;CCLCSWLOCRRC;;;AU)(A;;CCLCSWRPWPDTLOCRRC;;;PU)
sc.exe sdset wuauserv D:(A;;CCLCSWRPWPDTLOCRRC;;;SY)(A;;CCDCLCSWRPWPDTLOCRSDRCWDWO;;;BA)(A;;CCLCSWLOCRRC;;;AU)(A;;CCLCSWRPWPDTLOCRRC;;;PU)
- Open System32 Folder: To go into the System32 folder, copy/paste the command below and Enter:
cd /d %windir%\system32
- Register DLL: Now, to register Windows Update DLL files and BITS in the Registry, copy/paste and Enter the following commands one by one:
regsvr32.exe /s atl.dll
regsvr32.exe /s urlmon.dll
regsvr32.exe /s mshtml.dll
regsvr32.exe /s shdocvw.dll
regsvr32.exe /s browseui.dll
regsvr32.exe /s jscript.dll
regsvr32.exe /s vbscript.dll
regsvr32.exe /s scrrun.dll
regsvr32.exe /s msxml.dll
regsvr32.exe /s msxml3.dll
regsvr32.exe /s msxml6.dll
regsvr32.exe /s actxprxy.dll
regsvr32.exe /s softpub.dll
regsvr32.exe /s wintrust.dll
regsvr32.exe /s dssenh.dll
regsvr32.exe /s rsaenh.dll
regsvr32.exe /s gpkcsp.dll
regsvr32.exe /s sccbase.dll
regsvr32.exe /s slbcsp.dll
regsvr32.exe /s cryptdlg.dll
regsvr32.exe /s oleaut32.dll
regsvr32.exe /s ole32.dll
regsvr32.exe /s shell32.dll
regsvr32.exe /s initpki.dll
regsvr32.exe /s wuapi.dll
regsvr32.exe /s wuaueng.dll
regsvr32.exe /s wuaueng1.dll
regsvr32.exe /s wucltui.dll
regsvr32.exe /s wups.dll
regsvr32.exe /s wups2.dll
regsvr32.exe /s wuweb.dll
regsvr32.exe /s qmgr.dll
regsvr32.exe /s qmgrprxy.dll
regsvr32.exe /s wucltux.dll
regsvr32.exe /s muweb.dll
regsvr32.exe /s wuwebv.dll
- Reset Network Configuration: To reset any network configurations that could be conflicting with the system, copy and paste the following and press Enter after each:
netsh winsock reset
netsh winsock reset proxy
- Restart BITS: To restart the BITS, Cryptographic services, and Windows Update, the following should entered one by one:
net start bits
net start wuauserv
net start appidsvc
net start cryptsvc
- Restart the computer.
Reset PC
If the error 0x800F0922 persists, your Windows OS might have a significant problem. Consider a clean Windows installation, resetting your PC to eliminate troublesome files or programs causing the problem, and offering your system a fresh start.
Related Articles
Thank you! Please share your positive feedback. 🔋
How could we improve this post? Please Help us. 😔
[Errors Troubleshooting Expert]
Arsalan Shakil (aka GuyThatDoesEverything on YouTube) is a PC Tech Enthusiast and Electronic Geek. With over 10+ years of experience in Electronics, he then decided to explore Software Engineering to design embedded products and automate existing hardware solutions.
When he started tearing down old cameras to understand how they worked, he was shocked (literally, when he got zapped by a flash discharge capacitor), giving him the power (debatable) to fall in love with videography/photography. He also started making some fun videos that later became YouTube tech reviews.
Skills:
- 10+ years of experience in Electronics design, embedded solutions, and prototyping
- Majored in Software Engineering
- Research paper publication in IEEE for Embedded Military Uniform & LoRa WAN wireless technology
- Specialized in IoT Solutions
- PC Enthusiast & PC Modder
In his local region, he’s known to expose cheap PSU brands, often claiming fake certification or false claims on the box. He’s a true nerd and needed some friends in his life. Then he met some guys who work at Tech4Gamers, and they also came out to be equal nerds who suggested he join Tech4Gamers as a Hardware Expert.


