


The Automatic Repair tool is a handy feature in Windows OS that resolves troubles related to the system startup. However, I randomly encountered the error message, Automatic Repair Couldn’t Repair Your PC, which gave rise to a few problems, such as being unable to access the Windows; instead, the system boots into Blue Screen of Death (BSOD). When testing fixes for the error, some were quite effective, like performing a Startup Repair.
- The error hints at startup conflicts preventing Windows from launching normally.
- It could be due to corrupt files or data, unreliable power supply, or missing boot files.
- Fix the problem by checking the system disk for errors or corrupt data, updating necessary drivers, and more.
Method Difficulty Rating
Startup Repair
Rated: 2/10
Fix Boot
Rated: 3/10
System Restore
Rated: 4/10
Disable Early Launch
Rated: 1/10

In case of the error, you will see the following message:
Do A Startup Repair
Startup Repair is a valuable tool that automatically identifies and resolves ongoing problems preventing Windows startup, for instance, missing boot files, damaged data, and corrupt system files.
Running a Startup Repair can help eliminate the error message and return to normal PC usage. Just make sure not to turn off the system during the diagnosis.
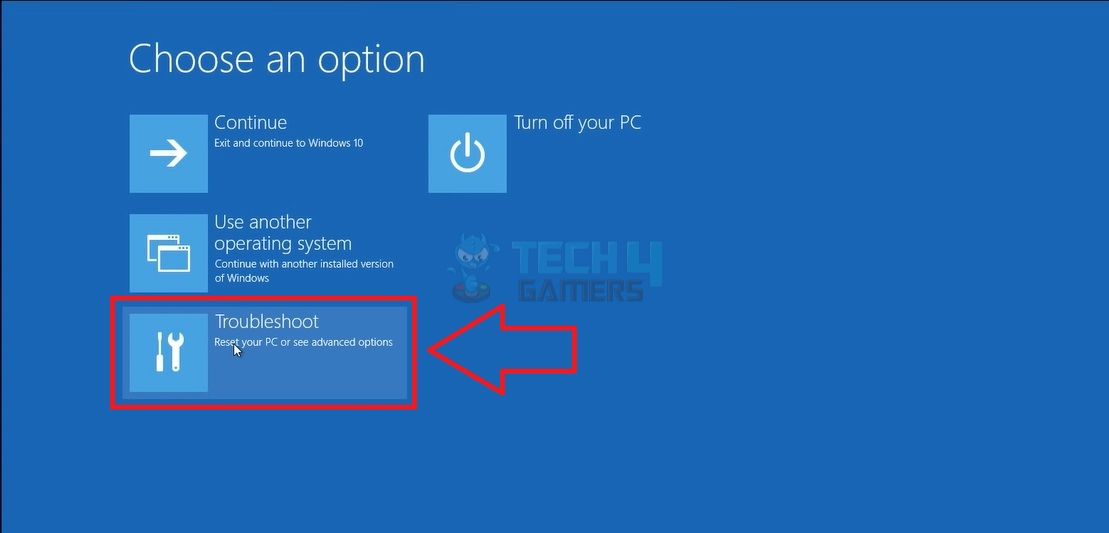
- Access Advanced Options: In Advanced Startup, choose Troubleshoot > Advanced Options.

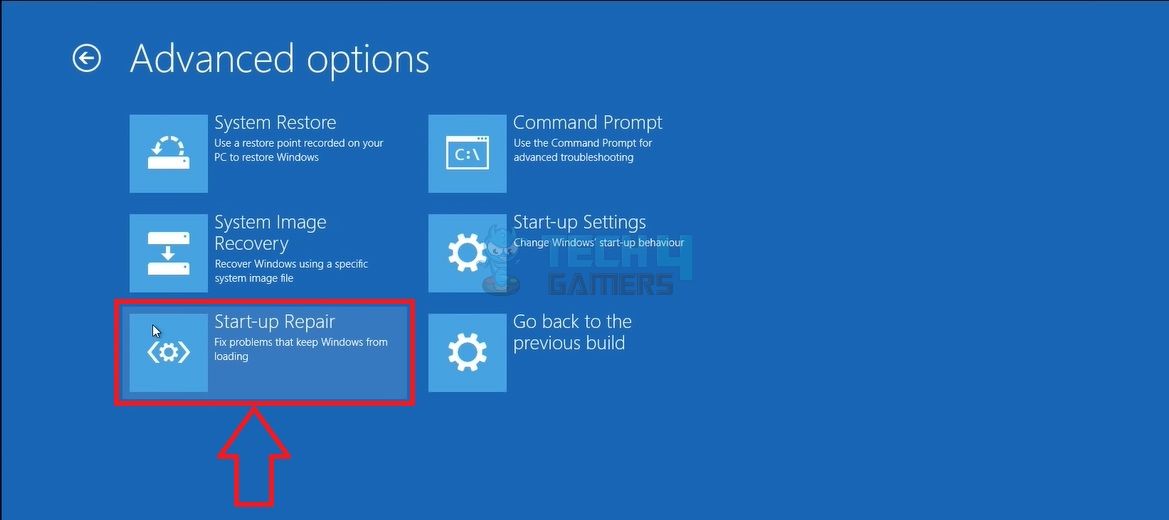
Select Troubleshoot (Image By Tech4Gamers) - Select Repair: Choose Startup Repair from the list of options.

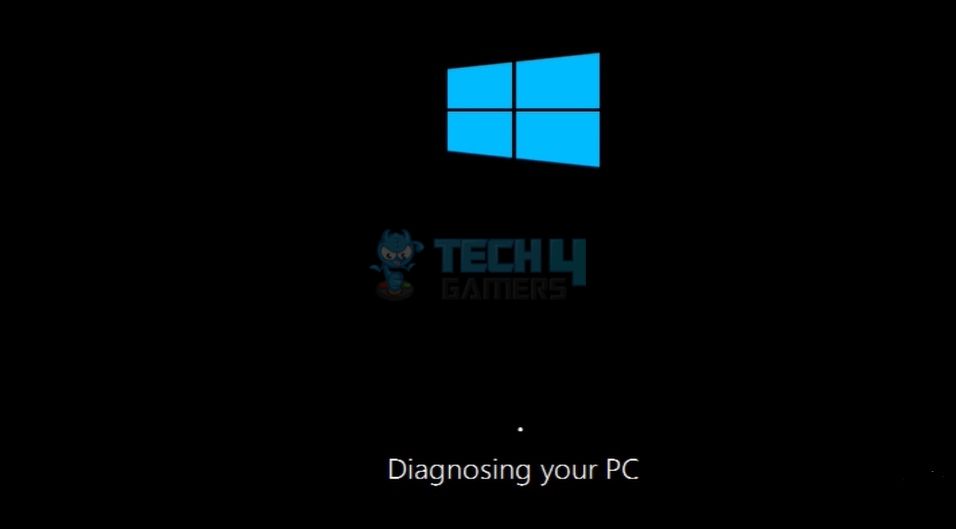
Pick Startup Repair (Image By Tech4Gamers - Confirm Credentials: Enter your profile credentials on the next screen > Windows will start Diagnosing Your PC.

Diagnosing PC Screen (Image By Tech4Gamers)
When someone encountered this BSOD error in the HP Support Community, an HP agent proposed the same fix.
Run A Fix Boot
The Fix Boot codes are designed to repair and recreate the boot sector on Windows’ drive to eliminate any corrupt data or glitches on the disk. These glitches can prevent Windows from starting smoothly.
Therefore, I executed the series of codes mentioned in the next steps to identify and delete any data hindering my Windows experience and solve Windows boot issues, as mentioned on Microsoft Learn.
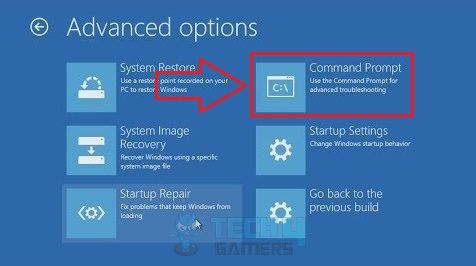
- Open CMD: Come to the Advanced Options > Launch Command Prompt.

Open Command Prompt (Image By Tech4Gamers) - Execute Codes: Run the following codes in the window one after the other:
bootrec.exe /rebuildbcd
bootrec.exe /fixmbr
bootrec.exe /fixboot
- Restart PC: Once done, restart the system and see if the issue is resolved.
Perform A System Restore
System Restore is a valuable troubleshooting step that comes in handy for fixing persistent Windows errors. It works by restoring your OS to a certain point in time before the error, thus undoing any changes made to the computer since then. By doing so, the cause of the error is also removed.
Microsoft Support also recommends this method as a valid solution for troubles related to Automatic Repair.
- Go With System Restore: Choose the System Restore option in Advanced Options.
Click On System Restore (Image By Tech4Gamers) - Select Restore Point: A dialog box will appear reading, Starting System Restore > When asked, choose the restore point created just before you started facing the error > Finalize the process.

Disable Early Launch
Another way that worked for me in ditching this BSOD error was to disable the Early Launch Anti-Malware Protection. It heightens the system’s security by ensuring anti-malware processes run before any other third-party software when Windows boots up. Thereby keeping your data protected from malware attacks.
I used these steps to disable the feature on my system, and it got me back to the OS within a few minutes. Remember to turn on the protection once the error goes away.
- Move To Startup Settings: Access Advanced Options > Startup Settings.
- Turn Off Early Launch: Press F8 to select the Disable Early Launch Anti-Malware Protection option.

Disable Early Launch With Anti-Malware (Image By Tech4Gamers)

The method also proved valuable for a user in the Spiceworks Community; however, for him, the BSOD returned after a system restart. Although, this was not the case on my end.
Last Words
The error message, Automatic Repair couldn’t repair your PC, has been prevalent across the previous versions; like for this user in Windows 10, the message appeared after a Windows update.
Automatic repair couldn’t repair your PC
byu/StarDustActual inpchelp
Lastly, you can also try resetting the PC in recovery mode, but there is a risk of losing the data forever if it is not backed up. Additionally, consult a computer technician to diagnose any underlying issues with the hardware.
Frequently Asked Questions
The error may occur if your computer has trouble loading the operating system or there are issues with the boot files.
Restore system settings, run a disk check, or do a system recovery to resolve the error.
If you have recently attached new hardware to your PC and began facing the error after that, it may be possible that the hardware is causing a conflict in the system’s running.
Similar Guides On Windows Troubleshooting:
- FIXED: The Computer Did Not Resync, No Data Was Available
- FIXED: Windows User Is Locked Out Of His/Her Computer
- There Was A Problem Resetting Your PC [Quick Fixes]
- My Computer Is Sending Automated Queries [Proven Fixes]
- Potential Windows Update Database Error Detected [FIXED]
Thank you! Please share your positive feedback. 🔋
How could we improve this post? Please Help us. 😔
[Errors Troubleshooting Expert]
Arsalan Shakil (aka GuyThatDoesEverything on YouTube) is a PC Tech Enthusiast and Electronic Geek. With over 10+ years of experience in Electronics, he then decided to explore Software Engineering to design embedded products and automate existing hardware solutions.
When he started tearing down old cameras to understand how they worked, he was shocked (literally, when he got zapped by a flash discharge capacitor), giving him the power (debatable) to fall in love with videography/photography. He also started making some fun videos that later became YouTube tech reviews.
Skills:
- 10+ years of experience in Electronics design, embedded solutions, and prototyping
- Majored in Software Engineering
- Research paper publication in IEEE for Embedded Military Uniform & LoRa WAN wireless technology
- Specialized in IoT Solutions
- PC Enthusiast & PC Modder
In his local region, he’s known to expose cheap PSU brands, often claiming fake certification or false claims on the box. He’s a true nerd and needed some friends in his life. Then he met some guys who work at Tech4Gamers, and they also came out to be equal nerds who suggested he join Tech4Gamers as a Hardware Expert.

![Host Does Not Support 'Intel EPT' Hardware-Assisted Error [FIXED]](https://tech4gamers.com/wp-content/uploads/2023/06/Error-Fixes-14-218x150.jpg "Host Does Not Support ‘Intel EPT’ Hardware-Assisted Error [Our Detailed Guide]")


