


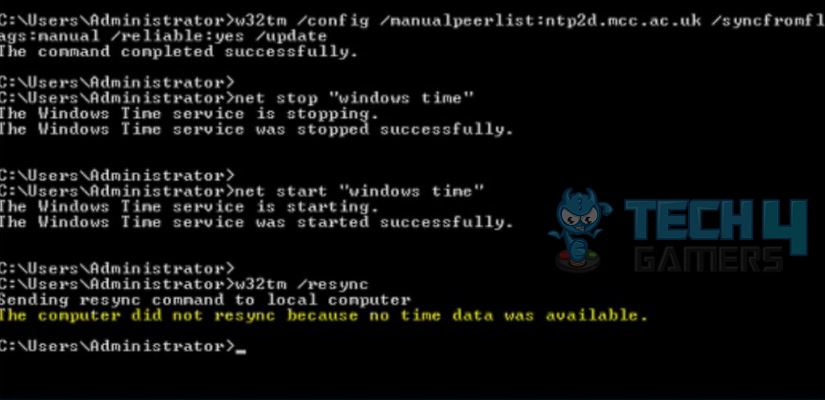
The “Computer did not resync because no time data was available” error occurs when using a Microsoft Windows Server computer and trying to sync its time data with an external source. The error can usually be fixed by modifying the registries.
- The error occurs whenever the user tries to sync the time data of their computer with an external device while using a Microsoft Windows Server.
- Corrupted group policies, improper registries, and time server issues are some of the reasons behind this issue.
- You can fix this error by modifying registries, changing group policies, running Windows time service commands, and disabling Windows Firewall.
The error usually appears in the following error message form:
Method Difficulty Rating
Rated: 7/10
Rated: 6/10
Rated: 5/10
Rated: 7/10
Editing Registry Keys
The best way to eliminate the “the computer did not resync because no time data available” error is to change registry keys, which helps you properly connect the Windows time sync server. We shot this method on our end, and it solved this error for us. This method was also suggested on the Seven forum and it worked for most of the users who tried it.
Follow the steps below to edit the registry keys:
- Registry Editor: Press Win+R > type “regedit” > Enter to open Registry Editor.
- Follow The Path: Now, follow this path from the menu to the left:
HKEY_LOCAL_MACHINE\SYSTEM\CurrentControlSet\Services\W32Time\Parameters
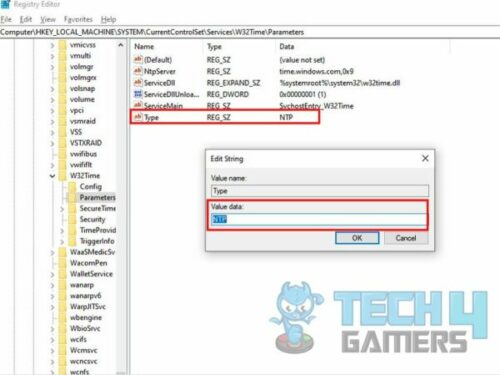
3. Select Type: Look for the Type file > right-click > Modify from the mini-menu > Select the proper type, like NT5DS, NTP, and others, if no value data is available > Click OK.
4. Verify: Restart your PC and check if the problem persists.
Run Windows Time Service Command
Because of the lack of time data availability, running the Windows time service command is one of the most appropriate solutions to the “PC didn’t resync” error. We gave this method a shot and it worked for us. This method also worked for many other users on Microsoft Ignite.
Here’s how you can run the Windows Time Service Command:
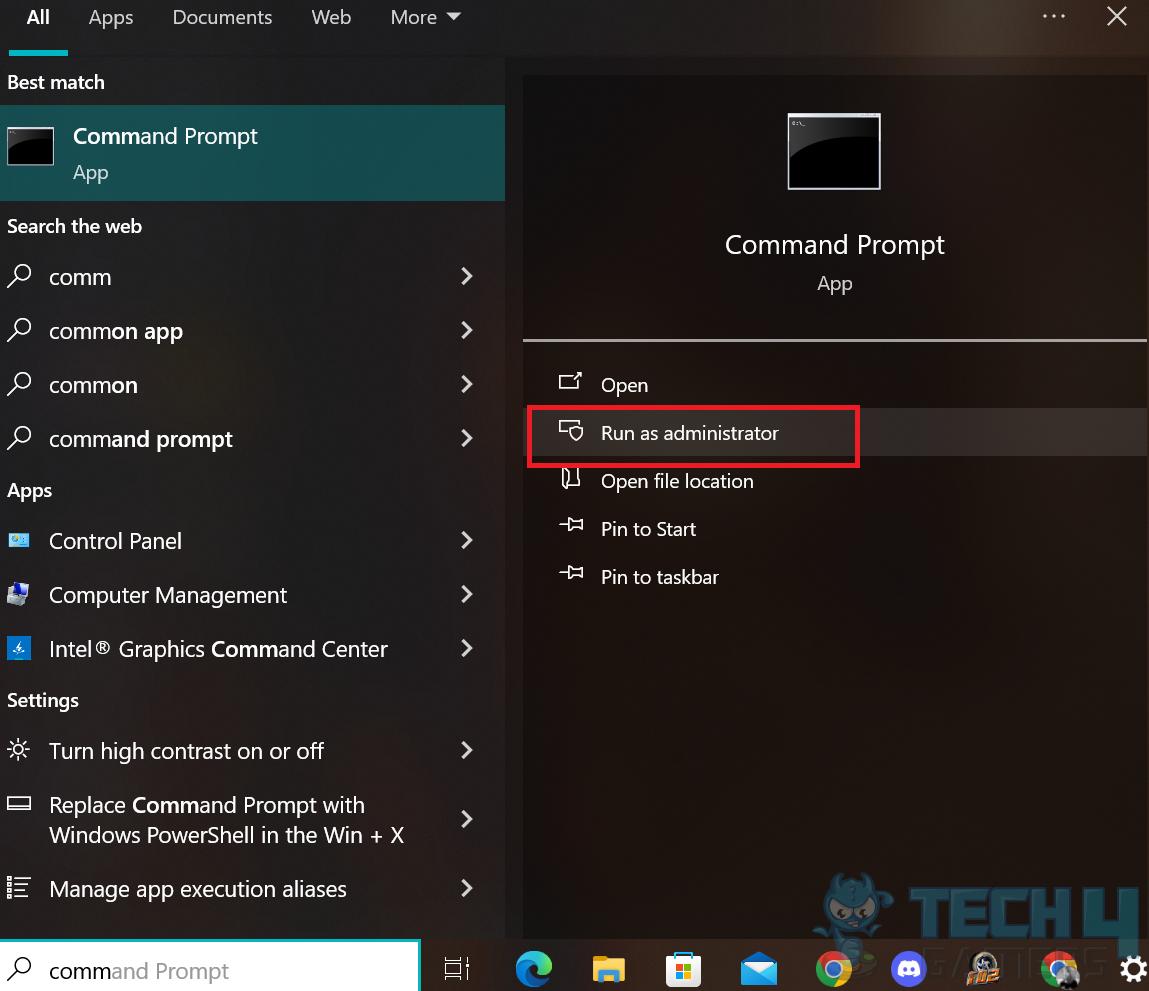
- Open Command Prompt: Press the Windows key > search for Command Prompt > Run as administrator.

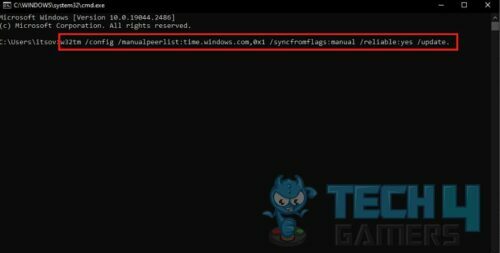
Type “Command Prompt” In The Search Option And Run It As An Administrator (Image By Tech4Gamers) - Enter The Given Command: Click the User account control prompt > Yes > Type in the command below > Enter.
w32tm /config /manualpeerlist:time.windows.com,0x1 /syncfromflags:manual /reliable:yes /update.
If you find the abovementioned method not working, go for the other solutions discussed below. Furthermore, you might want to check out our guide on fixing the NVIDIA user account locked issue.
Restart Windows Time Service
This error may also arise due to some issues with the Windows Time Service. So, you can restart and re-register the Windows Time Service. We recommend restarting Windows Time Service to fix the issue.
The steps below will guide you:
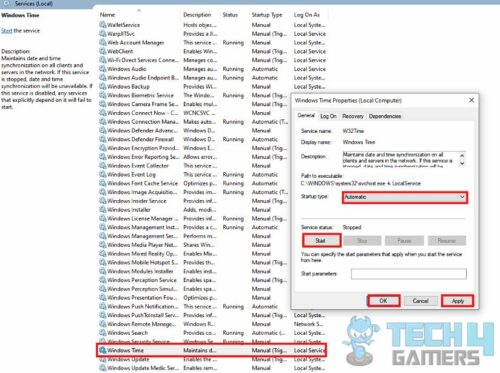
- Windows Services: Press Windows + R > Type “services.msc” > Enter.
- Windows Time Properties: Search for Windows Time Service on the list > double-click > Windows Time properties.

Editing The Windows Time Service Properties (Image By Tech4Gamers) - Re-run Windows Time Service: Stop the service (if it’s started) > Set the startup type to “Automatic” > Click “Start” to start it again.
- Save Changes: Hit Apply > OK to save changes.
Reconfigure Windows Time Service
It is possible that the “The computer did not resync because no time data was available” is occurring due to problems with the Windows Time Service. In that case, you can try reconfiguring the service and check if the issue is resolved. We tried this and found it to be working. Many users on Lenovo forums also claim that they have solved this error using this method.
Doing this is pretty simple:
- Enter The Commands: Open command prompt > enter and execute these commands individually:
Net Stop W32time > W32tm.exe /unregister > W32tm.exe /register > Net Start W32time
2. Reboot PC: Close the Command Prompt > restart your PC.
Doing this should reconfigure your Windows Time Service and fix the issue.
Final Thoughts
This was everything you need to know about the “the computer did not resync because no time data was available” error. It is a common error among Windows users, but editing registry keys will hopefully help you resolve this issue as it did for most of the users. If it doesn’t work, you can try the other solutions related to the Windows Time Service. Also, check out our How To Reset PC: The Definitive Guide and Intel WiFi AX201 Not Working guides.
Related Guides:
- How Often Should I Clean My PC?
- What Is Overclocking? [The Definitive Guide]
- Make Sure OneDrive Is Running On Your PC [FIXED]
Thank you! Please share your positive feedback. 🔋
How could we improve this post? Please Help us. 😔
[Errors Troubleshooting Expert]
Arsalan Shakil (aka GuyThatDoesEverything on YouTube) is a PC Tech Enthusiast and Electronic Geek. With over 10+ years of experience in Electronics, he then decided to explore Software Engineering to design embedded products and automate existing hardware solutions.
When he started tearing down old cameras to understand how they worked, he was shocked (literally, when he got zapped by a flash discharge capacitor), giving him the power (debatable) to fall in love with videography/photography. He also started making some fun videos that later became YouTube tech reviews.
Skills:
- 10+ years of experience in Electronics design, embedded solutions, and prototyping
- Majored in Software Engineering
- Research paper publication in IEEE for Embedded Military Uniform & LoRa WAN wireless technology
- Specialized in IoT Solutions
- PC Enthusiast & PC Modder
In his local region, he’s known to expose cheap PSU brands, often claiming fake certification or false claims on the box. He’s a true nerd and needed some friends in his life. Then he met some guys who work at Tech4Gamers, and they also came out to be equal nerds who suggested he join Tech4Gamers as a Hardware Expert.


