


The NVIDIA graphics card comes with the NVIDIA Control Panel, a subtle yet effective tool for graphic settings or personalizing your gaming experience. However, there were instances where the NVIDIA Control Panel was missing options or crashed on launch. Updating the graphics driver was a common fix in both situations.
- Outdated or incompatible drivers, faulty connectors/display ports or disabled NVIDIA services can cause the options to go missing.
- Resolve the issue by checking the connection cord, updating or reinstalling the driver, enabling or restarting all the services, or manually launching the Control Panel.
- Always download the correct update files based on your NVIDIA graphics card driver version.
Change Resolution
Rated: 3/10
Check Display Connection
Rated: 2/10
Enable Services
Rated: 2/10
Alter Display Resolution
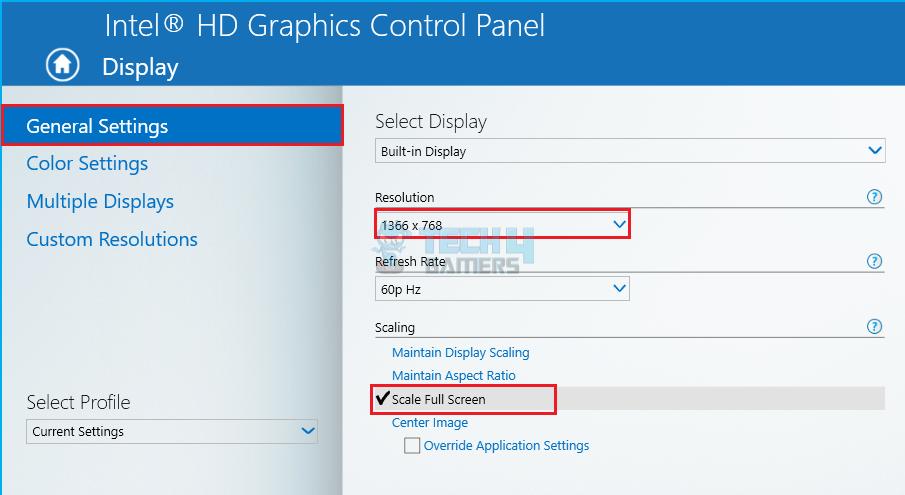
This problem often arises from a mismatch between the selected display resolution and the screen size of your laptop/PC, causing certain options to be unavailable. To counter this, I lowered the resolution in the Intel Graphics Settings and performed scaling with the following method.
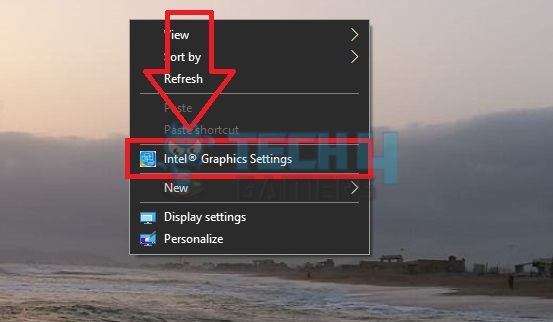
- Access Intel Graphics: Come to the Desktop > Right-click anywhere > Intel Graphics Settings.

Go To Intel Graphics Settings (Image By Tech4Gamers) - Alter Resolution: Select Display > General Settings > Change Resolution from the drop-down. Select the one lower than the current resolution.
- Change Scale: Mark the option, Scale Full Screen > Apply.

Change Intel Resolution And Scaling (Image By Tech4Gamers)
Multiple Acer Community members reported that this solution returned the missing NVIDIA options for them.
Check The Display Connection
If you are a PC user, the NVIDIA Control Panel won’t be able to detect the graphics card if your monitor is plugged into the wrong display port. Incorrect monitor connections are known to tamper with the NVIDIA options, as also faced by a user in Flight Simulator Forums.
Hence, connect the display port cable directly to the graphics card port, located under the motherboard port, as this is an often overlooked mistake. After you’ve fixed the connection, restart your computer to ensure everything is working.
Check And Enable All NVIDIA Services
NVIDIA Services are essential to the functioning of all NVIDIA tools, including the Control Panel. They manage the interaction between the NVIDIA Control Panel and Windows to maximize usability. When one or more of these services are non-operational, it can lead to software glitches or malfunctions.
So, turn on the necessary NVIDIA services and permit them to launch automatically at startup for smoother running.
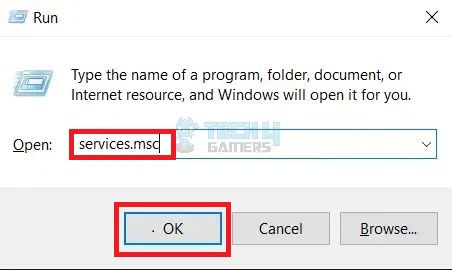
- Open Run Menu: Access the Run shortcut with Windows+R > Type services.msc > OK.

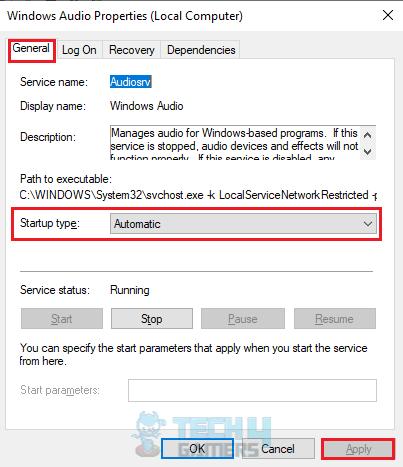
Execute services.msc In Run (Image By Tech4Gamers) - Modify Startup Type: Double-click on one of the NVIDIA services > Choose Startup Type as Automatic > Start > Apply > OK.

Set Automatic Startup Type (Image By Tech4Gamers) - Repeat For Others: Perform the same steps to activate all these NVIDIA services:
NVIDIA LocalSystem Container
NVIDIA Display Container LS
NVIDIA NetworkService Container
NVIDIA Telemetry Container
NVIDIA Frameview SDK Service
In my experience, changing the service Startup Type and restarting them has effectively solved errors, such as when the MSI Command Center failed to run.
Last Words
The NVIDIA Control Panel has been a recurring issue that has existed for a decade for people across Windows 10 in NVIDIA Forums. Moreover, Windows 11 users have also complained about the same.
So I'm having an issue with my GPU settings… it's missing the "preferred graphics processor" option from the Nvidia control panel (basically means I'm not using my GPU which isn't good)
any ideas on how to fix this?
Tag someone to help me!!!!— KESTEN TAYLOR (@KestenTaylor) June 17, 2020
Despite widespread reports of this issue, NVIDIA has not addressed the problem in any of its updates, and NVIDIA Support hasn’t been of much help either.
The techniques mentioned in this guide were of great help to our team in restoring the missing options in the NVIDIA Control Panel. Meanwhile, switching screen resolution was the quickest.
Common Questions Answered
Check Out Similar Guides:
- How To Fix Nvidia Container High Disk Usage? [10 Methods]
- Fixed: Nvidia Display Driver Failed To Start
- How To Fix NVIDIA User Account Is Locked
- Windows Not Detecting Second GPU [12 FIXES]
- FIXED: MSI Overclocking Scanner Failed To Start Scanning
Thank you! Please share your positive feedback. 🔋
How could we improve this post? Please Help us. 😔
[Errors Troubleshooting Expert]
Arsalan Shakil (aka GuyThatDoesEverything on YouTube) is a PC Tech Enthusiast and Electronic Geek. With over 10+ years of experience in Electronics, he then decided to explore Software Engineering to design embedded products and automate existing hardware solutions.
When he started tearing down old cameras to understand how they worked, he was shocked (literally, when he got zapped by a flash discharge capacitor), giving him the power (debatable) to fall in love with videography/photography. He also started making some fun videos that later became YouTube tech reviews.
Skills:
- 10+ years of experience in Electronics design, embedded solutions, and prototyping
- Majored in Software Engineering
- Research paper publication in IEEE for Embedded Military Uniform & LoRa WAN wireless technology
- Specialized in IoT Solutions
- PC Enthusiast & PC Modder
In his local region, he’s known to expose cheap PSU brands, often claiming fake certification or false claims on the box. He’s a true nerd and needed some friends in his life. Then he met some guys who work at Tech4Gamers, and they also came out to be equal nerds who suggested he join Tech4Gamers as a Hardware Expert.
![Unmountable Boot Volume [Windows 11 - FIXED]](https://tech4gamers.com/wp-content/uploads/2023/09/Unmountable-Boot-Volume-Windows-11-FIXED-218x150.jpg "How We Fixed The Unmountable Boot Volume Error In Windows 11")


