


The PS5 “Can’t voice chat due to network error” happened when I was trying to launch a voice chat with my online friends in PS Party. The error appeared despite my friend and I having a strong internet connection. Upon testing several fixes for the error, I found many that resolved the trouble, for instance, power cycling the internet router.
- The error occurs when you initiate an in-game/Party voice chat in PS5 with online friends. It is not only limited to PS5 but also faced by PS4 users.
- It could occur due to poor internet, server outages, and inaccurate voice chat configurations.
- Set the right audio output, change DNS to Google Servers, and use Open NAT Type to fix the error.
- Remember to use a stable internet connection with at least 50 Mbps of speed to use online features flawlessly.
Method Difficulty Rating
Change Audio Device
Rated: 2/10
Set Open NAT
Rated: 7/10
Change Audio Output
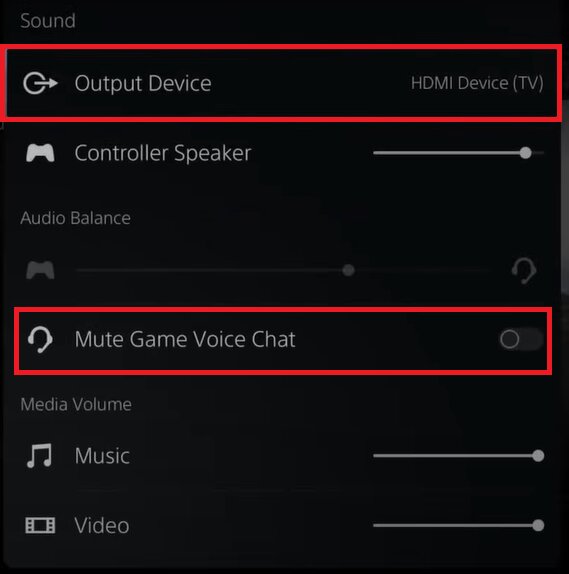
One of the troubleshooting steps mentioned on PlayStation Support is ensuring you have selected the correct audio output for sound. I checked if my device was set correctly and found it was set as Bluetooth speakers, but I was using a headset.
So, I entered the correct device using the method below and increased the headset’s volume, after which the voice chat worked fine.
- Open Party Sound: Go to Party > Access the Sound settings.
- Set Correct Device: Pick the Output Device you want to use for the console’s audio, such as Speakers or Headphones.

Select Correct Output Device (Image By Youtube – YourSixStudios)
Switch To Open NAT
Network Address Translation (NAT) is a firewall between the PS console on your LAN and those outside it. The NAT type decides how your console communicates with the PlayStation server and the other consoles linked to it.
There are three basic NAT types, as explained in our guide for changing Xbox NAT types. I prefer having Open NAT (Type 1) on my PS5 since it lets the console connect and communicate with other PS consoles outside the LAN without restrictions.
You can do this by port forwarding the router, which enhances the voice chat quality and eliminates network errors on PS5. Refer to the second method in this guide to open additional ports and configure your router accordingly. Remember to enter the console’s IP address when required.
Final Words
The PS5 “Can’t voice chat due to network error” began appearing for users soon after the feature was introduced. For instance, this user on X was randomly getting disconnected from online games apart from facing the voice chat error.
@AskPlayStation I'm constantly getting "Cannot voice chat with *insert name* due to a network connection failure" when I'm using party chat on PS5, I'm also being disconnected from games online randomly yet my other consoles have no issues.
— Yeetas (@YeetasTAD) January 10, 2021
By reaching out to @AskPlayStation on X or PlayStation Support, you can also get personalized assistance for your console. Other than that, the methods above were pretty useful, especially changing the DNS to Google servers to eliminate the network error.
If you cannot get the feature working on your PS5, I suggest temporarily using alternative options to voice chat with your buddies, such as Discord as PS5 officially supports it.
Troubleshooting Other Errors On PS5:
- How To Fix PS5 Spotify Error [Step By Step]
- FIXED: A DNS Server Cannot Be Used PS5
- 8 Ways To Fix PS5 Error Code WS-116521-6
- SOLVED: PS5 Error Code CE-109573-5
- FIXED: An Unidentified Error Occurred PS5 CE-100005-6
Thank you! Please share your positive feedback. 🔋
How could we improve this post? Please Help us. 😔
[Errors Troubleshooting Expert]
Arsalan Shakil (aka GuyThatDoesEverything on YouTube) is a PC Tech Enthusiast and Electronic Geek. With over 10+ years of experience in Electronics, he then decided to explore Software Engineering to design embedded products and automate existing hardware solutions.
When he started tearing down old cameras to understand how they worked, he was shocked (literally, when he got zapped by a flash discharge capacitor), giving him the power (debatable) to fall in love with videography/photography. He also started making some fun videos that later became YouTube tech reviews.
Skills:
- 10+ years of experience in Electronics design, embedded solutions, and prototyping
- Majored in Software Engineering
- Research paper publication in IEEE for Embedded Military Uniform & LoRa WAN wireless technology
- Specialized in IoT Solutions
- PC Enthusiast & PC Modder
In his local region, he’s known to expose cheap PSU brands, often claiming fake certification or false claims on the box. He’s a true nerd and needed some friends in his life. Then he met some guys who work at Tech4Gamers, and they also came out to be equal nerds who suggested he join Tech4Gamers as a Hardware Expert.


