")


Intel Wi-Fi 6 AX201 is a wireless network adapter that supports the Wi-Fi 6 standard. In short, it’s a WiFi card for your computer and Intel WiFi 6 AX201 not working happens to people often. WiFi not working with Intel AX201 can be caused by outdated drivers or router incompatibility with Wi-Fi 6. In that case, you won’t be able to use WiFi on your laptop.
- The Intel WiFi 6 AX201 adapter may not work correctly on your device due to outdated drivers, internet connectivity issues, and network problems.
- Such an issue can prevent you from accessing the internet as you won’t be able to connect to WiFi.
- You can solve this problem by running your internet troubleshooter, restarting the PC, updating the Intel drivers, and more.
Method Difficulty Rating
Update Intel
Rated: 3/10
Power Manage
Rated: 3/10
Reset Network
Rated: 4/10
Reinstall Driver
Rated: 3/10
Update Bluetooth
Rated: 4/10
Updating Intel WiFi 6 AX201 Driver
Updating outdated drivers can often resolve various issues, as I’ve encountered many situations where obsolete drivers were the root cause of problems. It can be done by using Device Manager. While you’re at it, you might want to power cycle your network adapter, as it helps fix this issue as users on MSI forum did. This is how you can update the driver on your PC:
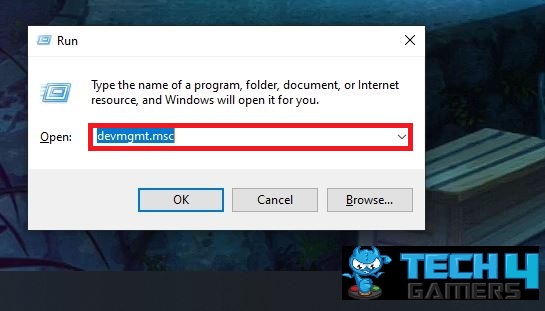
- Go to Run Dialog: Search Device Manager in the Start Menu > hit Open or press Windows + R keys together > open the Run dialog > type devmgmt. msc, > click Ok.

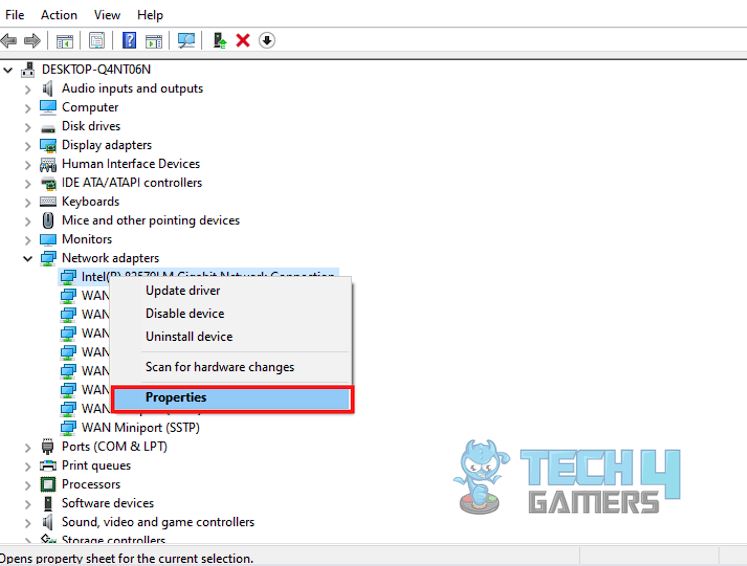
Open Device Manager from Run – Image Credits [Tech4Gamers] - Network Adapters: Once the Device Manager is open, you need to expand Network Adapters.

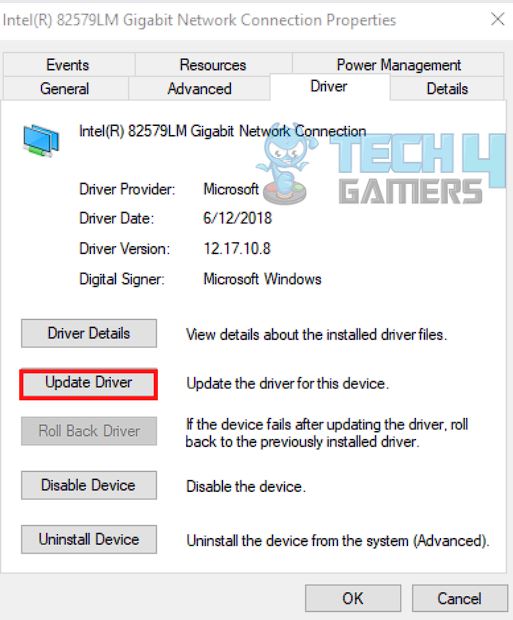
Properties – Image Credits [Tech4Gamers] - Select Update Driver: Then, select the Driver tab > click on Update Driver.

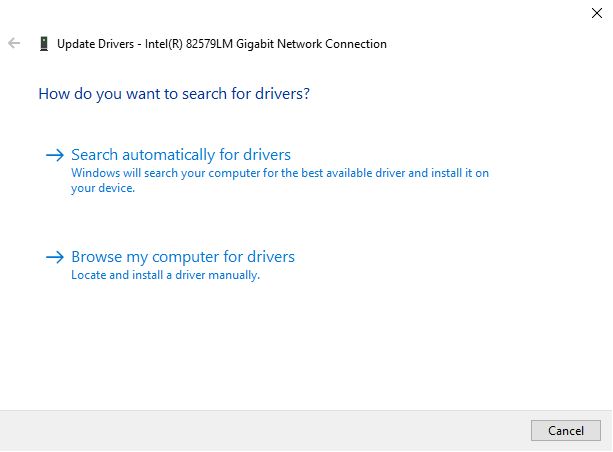
Update the network adapter’s drivers – Image Credits [Tech4Gamers] - Search Drivers: Select Search automatically for drivers.

Search automatically for drivers – Image Credits [Tech4Gamers] - Restart PC: Once the latest driver has been installed > restart your PC.
Change Wireless Mode and Power Management Settings
Another effective solution I discovered was tweaking the wireless mode and power management settings on my PC to address this issue. Users on the Bleeping Computer forum also discuss how this solution can resolve their issues. Steps are as follows:
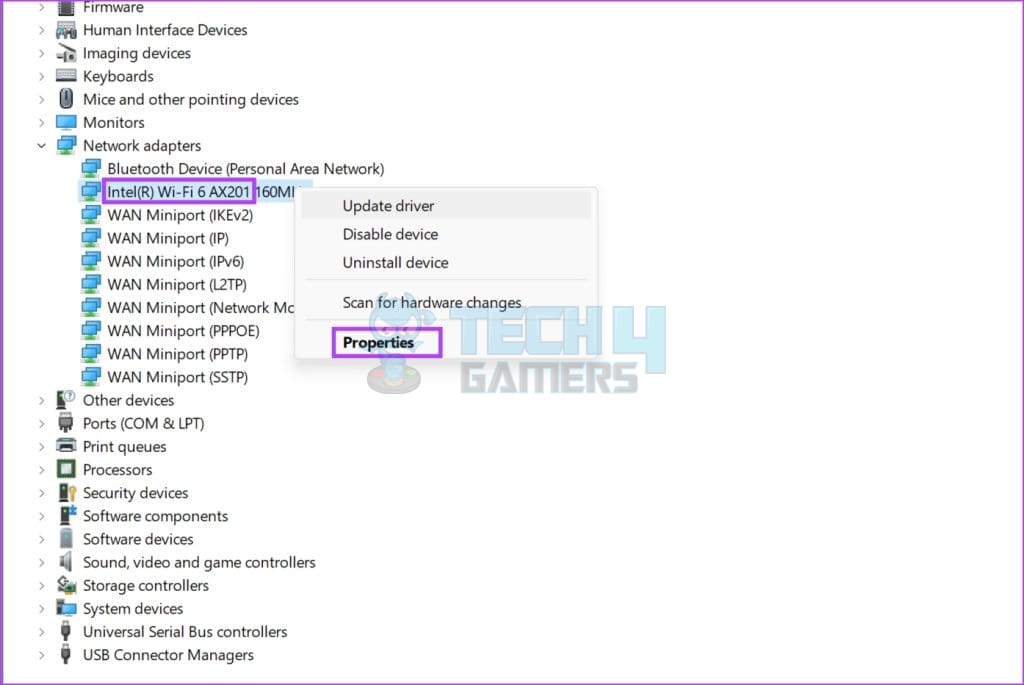
- Open Device Manager: Search for “Device Manager” in the start menu > open it.
- Expand Network Devices: In Device Manager, locate and click to expand the “Network Devices” section.

Wifi 6 AX201 Drivers – (Image by Tech4Gamers) - Access Wireless Card Properties: Right-click on your wireless card listed under Network Devices > select “Properties” from the context menu.
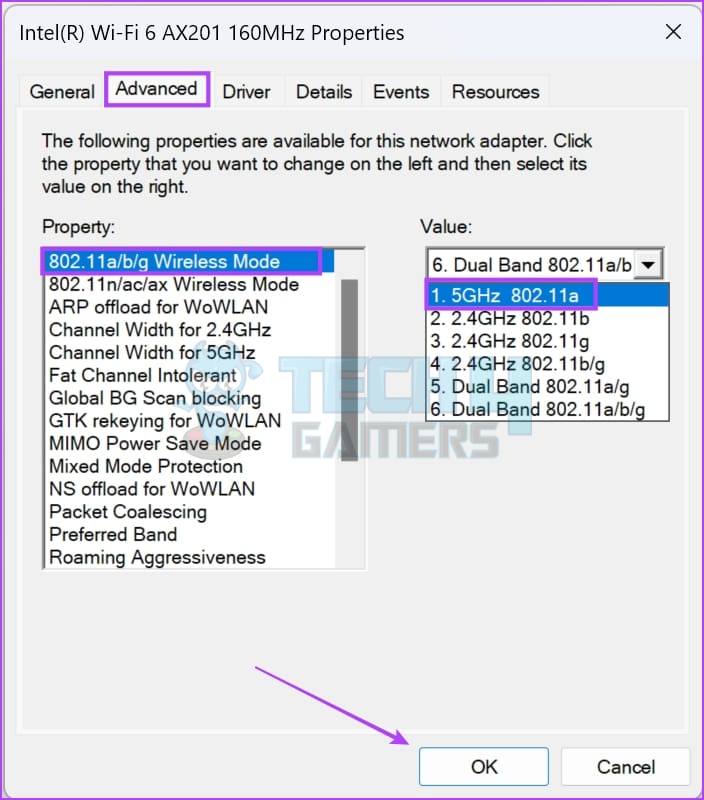
- Navigate to Advanced Settings: In the Properties window, select the “Advanced” tab.

Advanced – (Image by Tech4Gamers) - Change Wireless Mode: Find the option related to wireless mode settings (it might be named differently depending on your adapter) > Change the setting from “802.11a/b/g” to “5GHz 802.11a”.
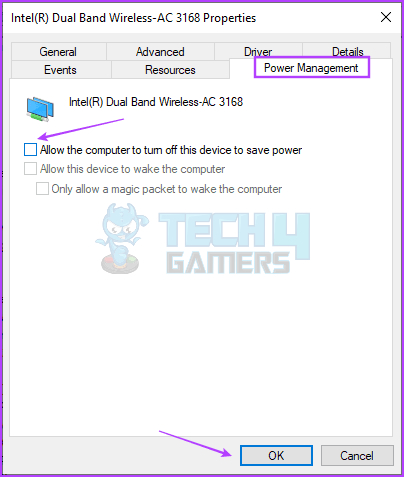
- Disable Power Saving: If you’re using Windows 10, switch to the “Power Management” tab in the same Properties window > Uncheck the option that allows Windows 10 to turn off the wireless adapter to save power.

Allow the computer to turn off this device to save power – (Image by Tech4Gamers) - Apply Changes and Check: Click “OK” or “Apply” to save the changes > check if the issue persists by testing your WiFi connection.
Resetting The Network Connection
A simple solution I often use to tackle network issues is resetting the connection. Often, it can aid you in fixing internet connection problems. A network reset may clear your system of these issues, allowing it to work correctly.
- Network & Internet: Press Windows + I keys together on your keyboard to open Windows Settings > click on Network & Internet > Click Network reset on the Status page.

Perform a network reset – Image Credits [Tech4Gamers] - Restart PC: Hit Reset now so that the process will get started > Restart your PC.

Re-Installing The Intel Driver
I have noticed that reinstalling the driver using the Device Manager is generally a more straightforward approach for fixing an Intel Wi-Fi 6 AX201 adapter that’s not working. Users on Microsoft used this method for which you must first uninstall the driver and install it from a known website.
Uninstalling The Driver
First you need to uninstall the already installed driver to proceed further. To uninstall follow these steps to do that:
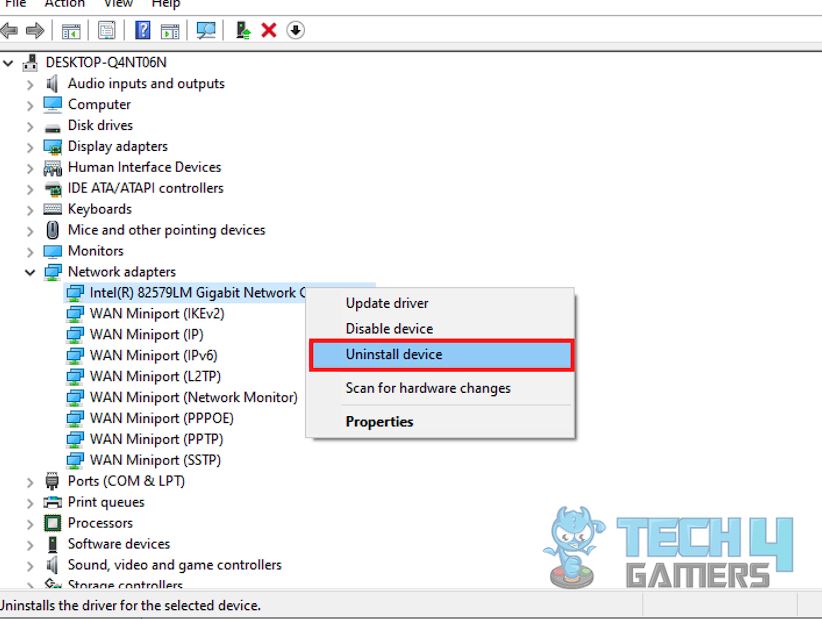
- Open Run Prompt: Open the Run prompt by pressing Windows + R keys together > type devmgmt.msc so that the Device Manager dialog box appears.
- Device Manager: Go to the Device Manager > expand on Network adapters > right-click Intel WiFi 6 AX201 Driver > select Uninstall device.

Uninstalling network adapter – Image Credits [Tech4Gamers] - Uninstall and Restart: Tick the box in front of Delete the driver software for this device > click Uninstall > Restart your PC.
Re-Installing The Driver
After uninstalling, now, you can download and run the Intel Driver from Intel’s official website, or you may also go to the Microsoft Support assistant and run it on your system so that you’ll get aware of the problems with your adapter.
Updating Network Drivers & Bluetooth Drivers
You can update network drivers with a tool called Driver Booster. I used this method to solve my problem. It will download the suitable updated drivers for your device and it worked for me by detecting and updating corrupt drivers on my PC.
- Install and run: Install and run Driver Booster.
- Scan: Scan the outdated drivers from the downloaded application.
- Select WiFi: Intel Select your Intel WiFi 6 AX201 adapter > click on the Update button.
You can try updating the Bluetooth drivers when the Intel WiFi 6 card doesn’t work. On Intel community, updating Bluetooth drivers’ method was widely praised to solve this problem.
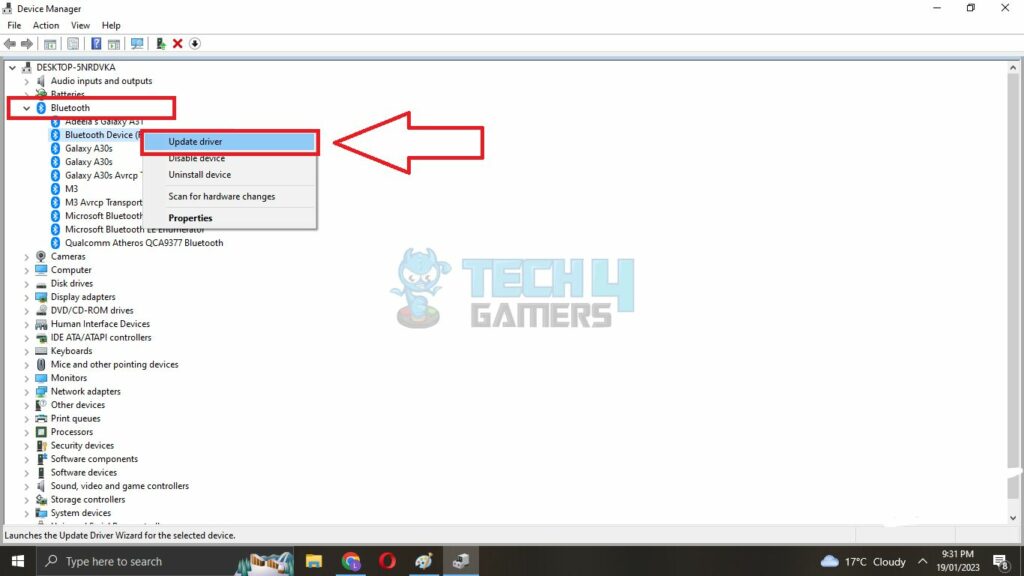
- Device Manager: Open the Device Manager.

Update Bluetooth Drivers – Image Credits [Tech4Gamers] - Choose Bluetooth driver: Select Bluetooth and expand it > Choose Bluetooth Driver > click on Update Driver from the mini menu.
- Drivers: Select Search Automatically for Drivers.
Final Thoughts
Intel WiFi 6 AX201 not working has been reported a lot by different users on different platforms specially X as you can see below. It mostly occurs because of the driver’s issue and it is simple to solve.
@IntelSupport IntelSupport
Hi. I have an Asus Tuf laptop which I use for https://t.co/mUqYrm4eq6 has been having Intel WiFi 6 AX201 driver issues since January and now it is getting pretty tiresome. I am a biologist and I have no idea as to how to deal with it. Little help,pls.— KingJulien4429 (@kjp4429) June 24, 2023
You can experiment with various methods to resolve the issue, such as updating drivers, adjusting power management settings, or switching between a wired connection and a wireless USB adapter to access the internet on your PC or laptop.
If none of these methods worked for you, it might be time to replace your network adapter as users discuss on Reddit that it can be bad card causing this all.
Related Articles:
- Intel Wireless AC 9560 Not Working
- Intel WiFi 6 AX200 Not Working [16 FIXES]
- PC Ran Into A Problem And Needs To Restart
- How To Fix Windows 10 “Diagnosing Your PC” Error
Thank you! Please share your positive feedback. 🔋
How could we improve this post? Please Help us. 😔
[How-To Guides Expert]
Laiba, our tech guru at Tech4Gamers, simplifies and crafts How-To Guides with a Google IT Support Certificate. Beyond tech, she captures the city’s aesthetics through her lens. Join her journey where tech meets creativity!
Get In Touch: Laiba@tech4gamers.com


