The “Diagnosing Your PC” error indicates an issue during the bootup. As a result, Windows takes matters into its own hands and starts diagnosing, which ultimately causes an endless loop. This error can occur due to corrupted system files or insufficient space.
- This endless diagnosis screen mainly appears due to insufficient space, corrupt system files, and Windows Update interruption.
- You can fix this error by running the System Restore, uninstalling the recent Windows Updates, and hard rebooting your system.
- In our experience, this “Diagnosing your PC” error can persevere for several hours, leading to lost productivity.
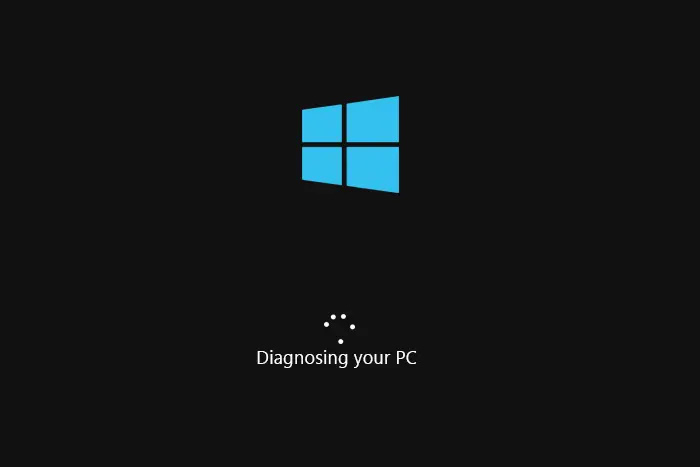
The error message will be displayed on the boot screen like this:
Method Difficulty Rating
Hard Reboot
Rated: 5/10
System Restore
Rated: 7/10
Repair System Files
Rated: 8/10
Disable Fast Startup
Rated: 6/10
Hard Reboot
A hard reboot restarts your device by completely switching off its power. It abruptly interrupts all processes and applications running on the computer. Hard rebooting PCs and laptops can resolve many bugs and errors, including the “Diagnosing your PC” error.
A hard reboot can sometimes set your PC straight when things get jammed. We’ve tried it, and it works! And it seems others on HP Forums have had luck with it, too. Give the following method a try:
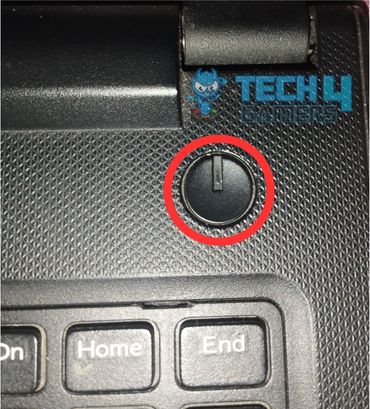
- PC Reboot: Press and hold the Power button for 15 seconds > Turn off the power outlet > Disconnect power cables and other devices > Wait for about a minute > Connect cable > Turn on the power supply > Start your PC.

Power Button – Image Credits[Tech4Gamers] - Laptop Reboot: Unplug the power cable > Disconnect all peripherals > Remove the battery > Wait for about a minute > Insert battery > Plug in the power cord > Press the power button to start your laptop.

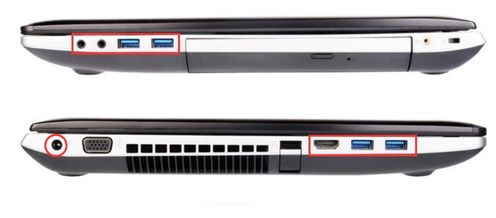
Laptop Side View – Image Credits[Shutterstock]
System Restore
System Restore is a Windows utility tool designed to revert the operating system to its previously saved state. Windows named those states as restore points. This utility is beneficial when an undo is needed for the system to solve any errors or glitches.
If you’re stuck with this stubborn problem, consider rolling back with a system restore. We’ve tried it ourselves, and it’s often the quickest way to restore normality. A Microsoft Vendor at Learn Microsoft has also recommended this solution. Here are the steps:
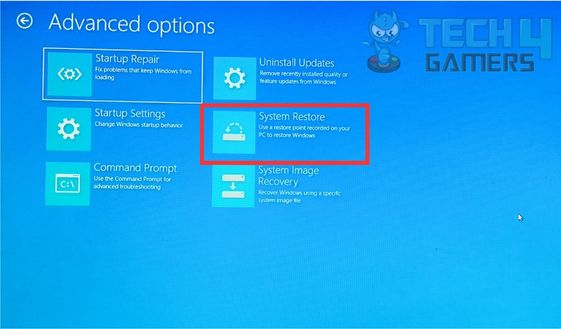
- Open System Restore: Boot into Windows RE > Click Advanced options > Troubleshoot > Advanced options > System Restore.

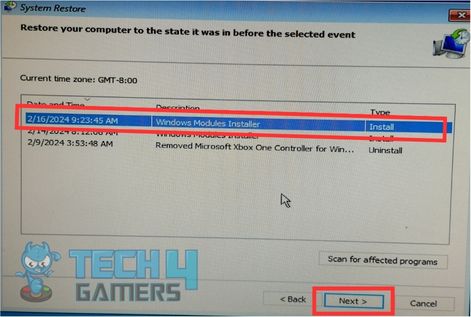
Advanced Options – Image Credits [Tech4Gamers] - Choosing Restore Point: Click Next > Choose the latest restore point > Click Next.

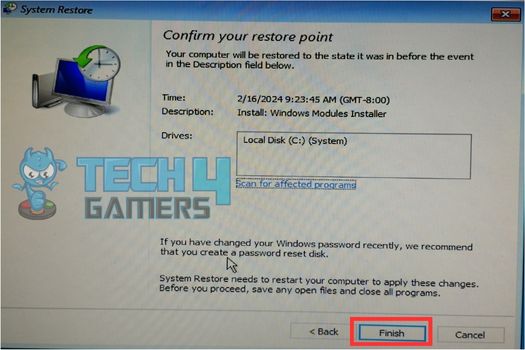
Restore Points – Image Credits [Tech4Gamers] - Commencing System Restore: Click on Finish.

Confirming System Restore – Image Credits [Tech4Gamers]
Repair System Files
System Files can corrupt for many reasons, including viruses or malware, improper shutdown, and incomplete Windows Updates. Corrupt files can also result from a system crash or a damaged sector on your hard drive, which can cause issues like this. To repair system files, you can run the SFC and DISM Scan commands on the Command Prompt.
These commands thoroughly scan your system while repairing faulty and corrupt system files. We at Tech4Gamers have personally executed these commands, and they resolved the issue for us. Here’s how you can successfully run these commands:
- Navigate to Command Prompt: Boot your system into the Windows Recovery Environment > Click Advanced Options > Go to Troubleshoot > Advanced Options > Command Prompt.

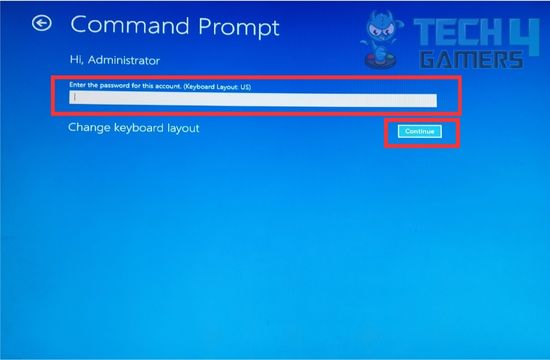
Advanced Options – Image Credits [Tech4Gamers] - Access Command Prompt: Select Administrator > Provide the password if available; otherwise, leave it blank > Hit Enter.

Command Prompt Password – Image Credits [Tech4Gamers] - Running Commands: Run these commands one by one:
1. chkdsk c: /r /x

2. sfc /scannow

3. DISM /online /cleanup-image /scanhealth

4. DISM /online /cleanup-image /startcomponentcleanup

5. DISM /online /cleanup-image /restorehealth

Disable Fast Startup
The Fast Startup feature allows a computer to boot up much faster after a proper shutdown. It puts the system in hibernation mode rather than shutting it down. If the system hardware can execute fast startup, it is usually enabled by default.
However, our research found that the Fast Startup feature is known to cause several bugs and errors in the system, especially in dual-booting cases. Disabling the Fast Startup Feature helped us recover our systems, and it also helped users resolve this “Diagnosing your PC” error on Ubuntu Forums. Follow the instructions below to give this method a shot:
- Opening Command Prompt: Power your system into the Windows RE > Go to Advanced Options > Troubleshoot > Advanced Options > Click Command Prompt.
Advanced Options – Image Credits [Tech4Gamers] - Access Command Prompt: Select Administrator account > Enter the password if available or leave it empty > Hit Enter.

Command Prompt Password – Image Credits [Tech4Gamers] - Disabling Fast Startup: In CMD, type powercfg /h off.
Final Words
Concluding the blog, we confirm that corrupt system files are the primary cause of this error. Since you are completely thrown out of your system, you need to access the recovery features to resolve this error, which can prove tricky for some people. Users have reported being stuck on the infamous “Diagnosing your PC” error.
It’s kinda stupid I’m asking twitter but My laptop is stuck in the infamous “automatic repair / diagnosing your PC loop” and i’ve tried everything and none of it has work
Pls help ;-; (if you can) pic.twitter.com/mhpFpkmi8Y— Timo (@loseroftheday2) November 12, 2023
Although Microsoft has explicitly detailed a blog revolving around this “Diagnosing your PC” error, their listed methods might not be sufficient. However, you can eliminate this error successfully by executing our approved methods, which are easy to follow as we have covered each step in detail.
FAQs
Your PC might be facing issues like improperly installed updates, corrupted system files, corrupted Windows registry, or lack of storage space, which can cause this problem.
You can fix this problem by utilizing the System Restore utility, uninstalling the recent Windows Updates, repairing the System Files and Registry using the Command Prompt, and turning off the fast startup feature.
Yes, the “Diagnosing your PC” error follows the “Automatic Repair” error loop. Some users see the former, while others see the latter.
Related Articles:
- PS5 Controller Not Working On PC [FIXED]
- How To Fix The CPU Fan Error In ASUS Motherboards
- Halo Infinite Not Launching PC
- 3 Ways To Fix Windows XP Sound Error
Thank you! Please share your positive feedback. 🔋
How could we improve this post? Please Help us. 😔
[Error Fix Expert]
Hello, I’m Uzair Shabir, a tech enthusiast pursuing a Bachelor’s in Electrical Engineering. At Tech4Gamers, I’m an Error Fix Expert, crafting articles on different issues and how to fix them. With a Google IT Support Certificate, I navigate tech complexities to deliver insightful perspectives.
Get In Touch: UzairShabir@tech4gamers.com