 Threads

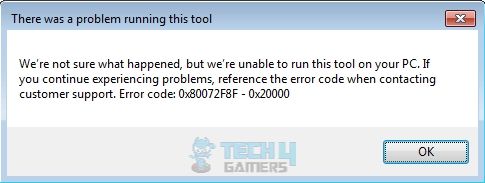
Most of the users opt for the Media Creation Tool, especially when upgrading from Windows 7 to 10, where the problem begins. Error 0X80072F8F-0X20000 appears due to disabled TLS 1.1 and TLS 1.2, restricted access to essential system services, or miscommunication between the PC and Microsoft servers. Usually, users get the error when attempting to use MCT to upgrade Windows.
Users who face this error will see the following error message on the screen:
Key Takeaways
- Error code 0X80072F8F-0X20000 won’t let you upgrade your PC to Windows 10, affecting the Media Creation Tool’s performance.
- You might face this error due to software conflicts, limited internet connection, disabled TLS, corrupted drive, or the hard disk being out of storage.
- Quickly solve the error by performing a clean boot, enabling TLS 1.1 and 1.2, deleting content from Downloads, using a third-party tool, or updating Windows.
Run A Clean Boot
Performing a clean boot on your computer means loading the system with only the most important set of drivers and software it requires to function. Thus, we did this step to help us check if the issue lies in third-party apps.
Enable TLS 1.1 And TLS 1.2
Transport Security Layer (TLS) protects your data while you surf the internet. Enabling TLS 1.1 and TLS 1.2 enables your computer to use the latest security protocols for accessing websites and other data on the internet, keeping away bugs and errors.
Here is the method to enable TLS on your PC:
- Open Notepad.
- Paste the following code:
Windows Registry Editor Version 5.00
[HKEY_LOCAL_MACHINE\SOFTWARE\Microsoft\Windows\CurrentVersion\Internet Settings\WinHttp] “DefaultSecureProtocols”=dword:00000a00
[HKEY_LOCAL_MACHINE\SOFTWARE\Wow6432Node\Microsoft\Windows\CurrentVersion\Internet Settings\WinHttp] “DefaultSecureProtocols”=dword:00000a00
[HKEY_LOCAL_MACHINE\SYSTEM\CurrentControlSet\Control\SecurityProviders\SCHANNEL\Protocols\TLS 1.1\Client] “DisabledByDefault”=dword:00000000 “Enabled”=dword:00000001
[HKEY_LOCAL_MACHINE\SYSTEM\CurrentControlSet\Control\SecurityProviders\SCHANNEL\Protocols\TLS 1.2\Client] “DisabledByDefault”=dword:00000000 “Enabled”=dword:00000001
- Click on File > Save As > Choose .reg extension.
- Once saved, double-click on the file, and it will make the desired changes to the Windows Registry.
Erase Contents In The Download Folder
Faulty or corrupt data related to Windows updates can lead to such errors. Therefore, delete the files and reinstall them to remove any faults. I implemented this strategy based on Microsoft’s Moderator Derrick19 suggestion, which worked wonders.
You can navigate to the Download folder and delete its contents with these instructions:
- Go to This PC > Local Disk C > Windows > SoftwareDistribution > Download.
- Select all the files and delete them.

Delete Files (Image By Tech4Gamers) - Open Command Prompt > Run this code:
wuauclt.exe /updatenow

Easy Fix
YouTuber Tech White proposed this method, which worked for many users, including me.
Here’s how to perform the method:
- For adding the DefaultSecureProtocols registry subkey, download the setup.
- Also, download an update patch for Windows 7.
- Now, open your system’s File Download or wherever you have downloaded the Easy Fix setup and click on the setup to run it.
- You will see the screen of the wizard. You will get the notification All done following the installation is complete on the screen. Close that Window.
Tip: You will probably see the English version of the wizard. But you may switch to a different language as well. - After this, install the Windows patch we downloaded earlier.
- Click Yes > Restart Now.
- You’ll see the update on the restart screen.
- Easy fix also adds the SecureProtocols for enabling TLS 1.1 and 1.2 for Internet Explorer at the paths given below:
HKEY_CURRENT_USER\Software\Microsoft\Windows\CurrentVersion\Internet Settings
HKEY_LOCAL_MACHINE\SOFTWARE\Microsoft\Windows\CurrentVersion\Internet Settings
Important: It only adds The SecureProtocols registry entry, 0xA80, for enabling TLS 1.1 and 1.2. - Now, run the Media Creation Tool you must have downloaded earlier to upgrade to Windows 10 > Yes.
- Your window will proceed to the update afterward without any errors.
- After agreeing to the terms and conditions, follow the on-screen steps to complete the process.
Use Third-Party Tool
Lotus Geek from YouTube explained this fix, and it turned out that most users found it helpful and got the error fixed. I also tried this, and it worked flawlessly!
Here’s how to download ISO:
- Go to the webpage and download the Windows ISO Downloader from Heidoc.net.
- Find the download option by scrolling down, which is Windows-ISO-Downloader.exe.

HeiDoc (Image By Tech4Gamers) - Now open the setup file from the location where you downloaded it, usually your downloads folder.
- There will be a list of Windows versions in a new window at the left.
- Choose Windows 10 > Select Version > Confirm.

- Select Language > Confirm > Choose system type 32-bit or 64-bit > Choose Destination > Start Download.
- When the file is downloaded, double-click setup after launching the folder.
- You will see an Install Windows 10 file when the setup completes.
- Click Next and comply with the steps to finish the installation


Uninstall Third Party Software And Antivirus
If the error is apparent after installing certain third-party software, we recommend you uninstall the app to see if the error resolves.
However, if that is not the case, delete third-party antivirus software from your computer, like Avast or McAfee, since it may block access to Windows services. However, reinstall them if that is not the cause since it helps prevent attacks from malware or viruses on the system.
Update Windows
Keep your Windows OS up-to-date with the latest changes at all times. Consequently, errors like this one will not occur in your system. So, look for Windows updates and install them right away.
Important: Regularly check for new Windows updates, as they can improve the overall performance of your system.Reset PC
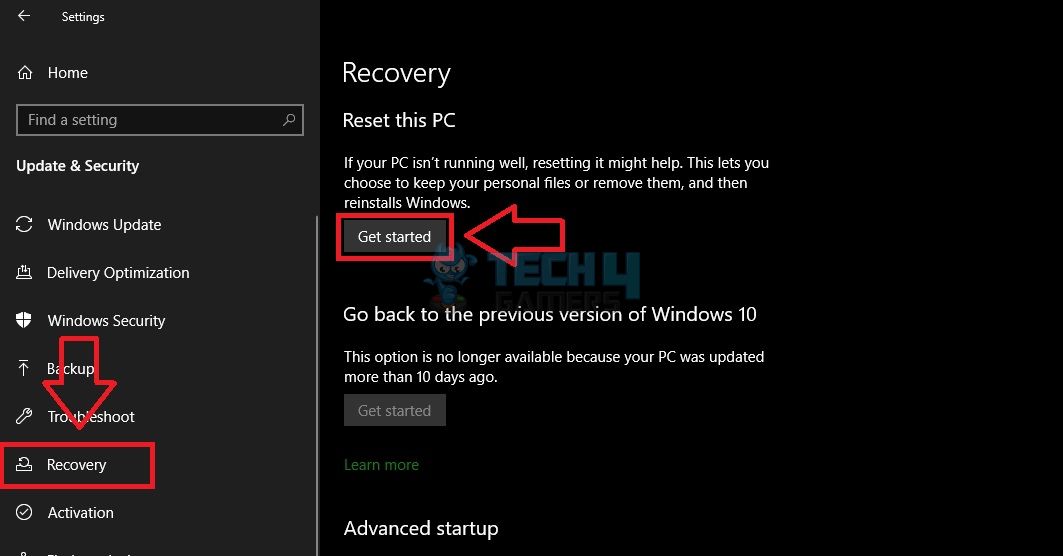
When nothing works, you need to reset your PC, which will automatically clear any faults or incorrect configurations to send away errors.
Related Articles
- How To Fix Windows Error 80072EFE?
- How To Fix Windows Update Error 0xc1900223?
- How To Fix Windows Update Error 0xc1900204
Thank you! Please share your positive feedback. 🔋
How could we improve this post? Please Help us. 😔
[Errors Troubleshooting Expert]
Arsalan Shakil (aka GuyThatDoesEverything on YouTube) is a PC Tech Enthusiast and Electronic Geek. With over 10+ years of experience in Electronics, he then decided to explore Software Engineering to design embedded products and automate existing hardware solutions.
When he started tearing down old cameras to understand how they worked, he was shocked (literally, when he got zapped by a flash discharge capacitor), giving him the power (debatable) to fall in love with videography/photography. He also started making some fun videos that later became YouTube tech reviews.
Skills:
- 10+ years of experience in Electronics design, embedded solutions, and prototyping
- Majored in Software Engineering
- Research paper publication in IEEE for Embedded Military Uniform & LoRa WAN wireless technology
- Specialized in IoT Solutions
- PC Enthusiast & PC Modder
In his local region, he’s known to expose cheap PSU brands, often claiming fake certification or false claims on the box. He’s a true nerd and needed some friends in his life. Then he met some guys who work at Tech4Gamers, and they also came out to be equal nerds who suggested he join Tech4Gamers as a Hardware Expert.


![The Computer has Rebooted From a Bugcheck Error [FIXED]](https://tech4gamers.com/wp-content/uploads/2024/03/BugcheckFeaturedImage-218x150.jpg "The Computer Has Rebooted From A Bugcheck Error [Our Ultimate Guide]")
