 Threads

Windows update error 0xc190023 usually appears when you try to update Windows or your system cannot link with Microsoft Update servers, preventing the computer from downloading and installing any updates. The problem arises from improper connection to the Microsoft update server, corrupt data in SoftwareDistribution or Catroot2 files, glitches in Windows Update components, and inactive Windows Update.
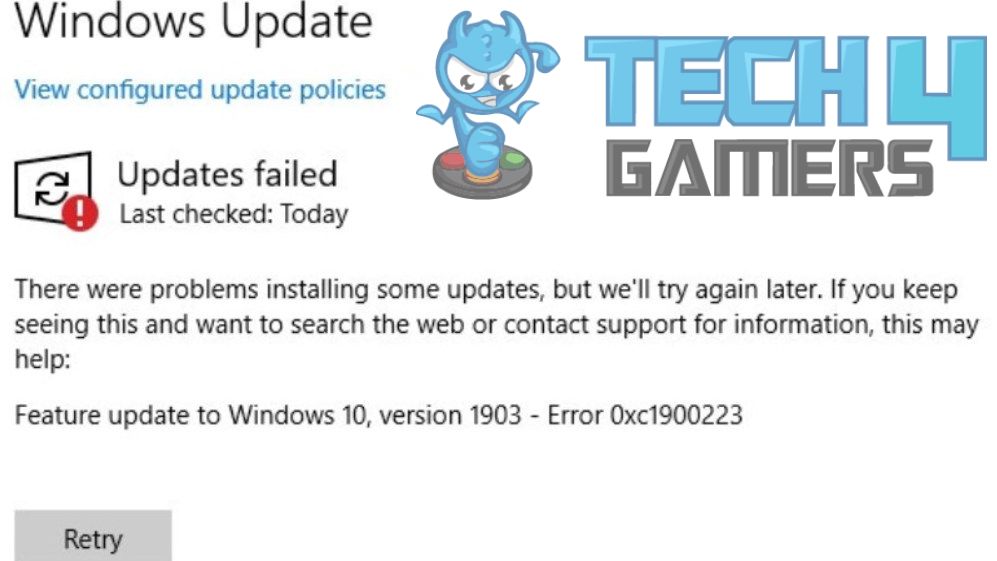
It appears on the screen as:
Key Takeaways
- When you attempt to update Windows, you might encounter the error 0xc1900223. It also appears when your computer loses the connection to Microsoft Update servers.
- Corrupt system files, glitches in Windows updates, and network problems can result in error 0xc1900223.
- Running SFC and DISM scans, using the Media Creation Tool, and updating your system manually or through the Microsoft Update Catalog will help you resolve the issue.
Run Windows Update Troubleshooter
We recommend utilizing the Windows Update Troubleshooter, a built-in tool that we have personally used to tackle various issues. It will identify the problems obstructing your system’s update process and swiftly resolve them.
To launch the Windows Update Troubleshooter, follow the procedure:
- Go to “System,” then “Update and Security” in “Settings,” and hit “Troubleshoot.”
- Run “Windows Update” troubleshooter under “Other Troubleshooters.”
- Now, try updating your PC after a restart.
Replace Hosts File
Every OS connects the domain name to the IP address through the Host file. However, a system cannot connect to a DNS server if the Host file corrupts. As a result, Windows updates will not work. So, we tried replacing the host file on our PC, which proved effective.
Here’s how:
- Open “Notepad.”
- Now, create a code like the one explained below in the Notepad file, as the “Microsoft TCP/IP” created for Windows. Start every line with #.
# Copyright (c) 1993-2006 Microsoft Corp.
#
# IP addresses to hostnames.
# Space between IP address and hostname
# Corresponding hostname.
#
For example:
# Copyright (c) 1993-2006 Microsoft Corp.
#
# 102.54.94.97 rhino.acme.com
# source server
# 38.25.63.10 x.acme.com
# x client host
# DNS itself handles localhost name resolution.
# 127.0.0.1 localhost
# ::1 localhost
- Now, save the file on the desktop as “hosts.txt.”
- Change the hosts.txt file’s name to hosts (no extension).
- Launch “Command Prompt” as administrator.
- Type “ipconfig /flushdns” in the box and hit “Enter.”
- After the execution of the command, exit Command Prompt.
- Copy this path “C:\Windows\System32\drivers\etc.”
- Open “File Explorer” and paste the path in the bar at the top of the screen.
- Go to the desktop, copy the host file by right-clicking it, and paste it into the folder opened in File Explorer.
- Choose “Replace The File.”
- Now, close the window and restart your computer.
Flush DNS Cache
The error 0xc1900223 indicates that the system cannot connect with Microsoft’s Update service. Sometimes, this is because of connection problems during a Windows update. Therefore, we cleared the DNS cache to rid the system of older IP addresses and network information.
Check Windows Update Services
The Windows update needs several services to run, but your computer may cease updating or trigger errors if some services are stopped. Hence, you want to ensure all the below-mentioned services are working fine.
Here’s how you can check if the Windows Update services are active:
- Hit “Windows+R,” and you will see the “Run” dialog box.
- To check which services are active, type “services.msc” and hit “Enter.”
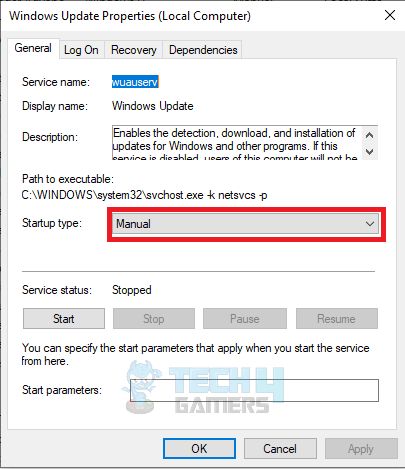
- Right-click on “Windows Update” to open it.
- From the context menu, select “Properties.”
- Make sure that either the “Automatic” or “Manual” startup type is selected.

Windows Update General (Image By Tech4Gamers) - For each of the services listed below, verify the “Startup type.”
Windows Update Service
Cryptographic Services
RPC Endpoint Mapper
DCOM Server Process Launcher
Background Intelligent Transfer Service
Windows Installer
Windows Update Medic Services
Refresh Windows Update Components
Resetting Windows Update Components was another way our team solved the Windows update error 0xc1900223. The process addresses corrupt or misconfigured settings related to the Windows update process, thereby eliminating the error.
Here’s how:
- Launch the “Run” dialog box by using “Windows+R” as a shortcut.
- When the box appears, type cmd and press “Ctrl+Shift+Enter” on the keyboard to access the “CMD Prompt” as administrator.
- Copy and paste the below commands and press “Enter.”
net stop wuauserv
net stop cryptSvc
net stop bits
net stop msiserver
After turning off all the services, rename the “SoftwareDistribution” and “Catroot2” folders with Windows update files.
Here’s how:
- Copy and paste the following commands in “Command Prompt” one by one and hit “Enter” after each one:
ren C:\Windows\SoftwareDistribution SoftwareDistribution.old
ren C:\Windows\System32\catroot2 Catroot2.old
- Start the services again, which you turned off previously after deleting the two folders. After pasting the commands below into CMD, press “Enter” after each one:
net start wuauserv
net start cryptSvc
net start bits
net start msiserver
Run SFC And DISM
We also ran the System File Checker (SFC) and Deployment Image Servicing Management (DISM) to fix and recover the missing or corrupted files that may hinder the Windows update process.
Here’s how:
- Using Windows search, look for “Command Prompt” and select “Run As Administrator.”
- Now, type “sfc/scannow” and hit “Enter.”
- Next, execute the commands individually:
DISM /Online /Cleanup-Image /Checkhealth
DISM /Online /Cleanup-Image /Scanhealth
DISM /Online /Cleanup-Image /Restorehealth
Use Media Creation Tool
You can install the latest Windows updates using Microsoft’s Media Creation Tool. It is an easy-to-use program that we used to install the latest version of the OS through a USB flash drive while all our data, apps, and files remained safe.
Download Windows 10 latest update with the Windows Media Creation Tool; here’s how:
- Go to Microsoft’s website.
- Search for Microsoft’s Windows 10 or 11 Media Creation Tool, and click the download button.
- Access the program as an administrator and log in to it.
- Comply with the installation instructions after opening the file you downloaded.
- A prompt will appear on the screen asking you for a PC upgrade or the Creation of installation media. Hit “Upgrade This PC Now.”
- Whether you wish to keep all your data or delete everything entirely, you can choose your desired option during installation. Choose and then hit “Install.”
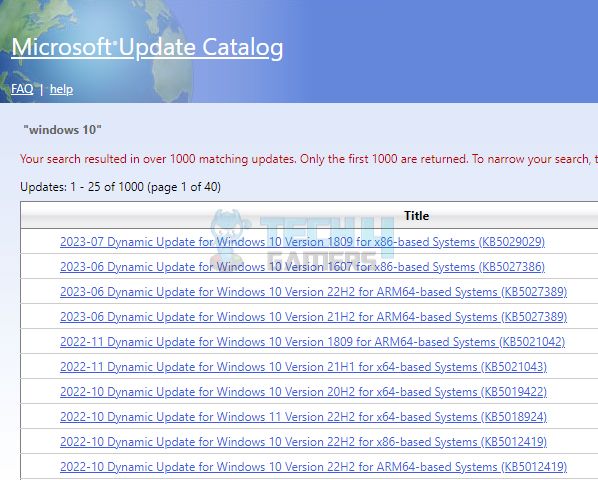
Manual Update Using Microsoft Update Catalog
If you’re facing issues in the Windows Update update process, you can do it manually. We went to Microsoft’s Update Catalog site and downloaded the latest update available. Once the file was downloaded, we launched it on the system to begin installing the newer version of Windows 10.
Disabling Pi-Hole
Unexpectedly, Pi-Hole or any other network-wide adblocker might also cause the Windows update error 0xc1900223 to appear. When starting the update, we temporarily disabled Pi-Hole, and the Windows updated successfully.
Here are the complete steps:
- Go to “Command Prompt” by typing “cmd” in the Windows search bar and always choose “Run As Administrator” because you will need administrator rights to perform this task.
- You will see a cmd box, type “pihole,” and hit Enter to launch the Pi-Hole tool.
- When the tool is launched, type “pihole disable” and hit “Enter” to make it inactive.
- Check to see if the error has been fixed by installing the update right away.
- Run this command: “pihole enable” in the cmd box if the update is successful.
Reset Windows
Resetting the Windows can be your way out of the error if nothing else seems to work. We went with a soft reset to prevent our files from getting deleted. However, you might have to do a hard reset if that doesn’t fix the error.
Thank you! Please share your positive feedback. 🔋
How could we improve this post? Please Help us. 😔
[Errors Troubleshooting Expert]
Arsalan Shakil (aka GuyThatDoesEverything on YouTube) is a PC Tech Enthusiast and Electronic Geek. With over 10+ years of experience in Electronics, he then decided to explore Software Engineering to design embedded products and automate existing hardware solutions.
When he started tearing down old cameras to understand how they worked, he was shocked (literally, when he got zapped by a flash discharge capacitor), giving him the power (debatable) to fall in love with videography/photography. He also started making some fun videos that later became YouTube tech reviews.
Skills:
- 10+ years of experience in Electronics design, embedded solutions, and prototyping
- Majored in Software Engineering
- Research paper publication in IEEE for Embedded Military Uniform & LoRa WAN wireless technology
- Specialized in IoT Solutions
- PC Enthusiast & PC Modder
In his local region, he’s known to expose cheap PSU brands, often claiming fake certification or false claims on the box. He’s a true nerd and needed some friends in his life. Then he met some guys who work at Tech4Gamers, and they also came out to be equal nerds who suggested he join Tech4Gamers as a Hardware Expert.


