


The connection error arises when there’s a problem with the network connection between two devices. Additionally, it prevents internet usage and inhibits any browser from establishing a link. While troubleshooting, I found multiple ways to fix this recurring error, such as clearing the DNS cache and turning off Firewall.
- The error stems from connectivity issues and is detected in the Network Diagnostics Tool.
- Antivirus restrictions, wrong proxy settings, bugs in OS, or incompatible drivers may be to blame for the remote device or resource refusing to accept the connection.
- Updating Network drivers, clearing the DNS cache, and reverting the IP address to default can fix the error.
Method Difficulty Rating
Disable LAN Proxy
Rated: 2/10
Reset Internet
Rated: 2/10
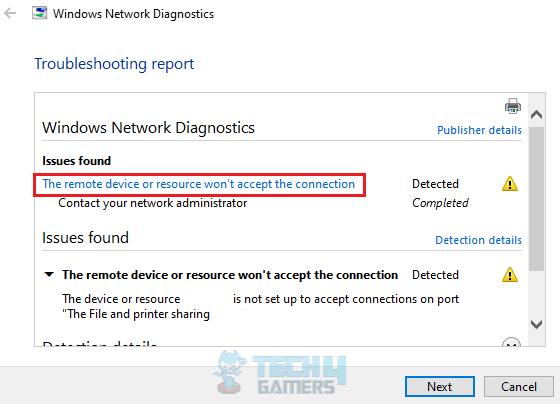
You will see the following error message:
Disable LAN Proxy
LAN Proxy acts as an intermediary between the user and the websites. The data travels from the website through the proxy to the user and vice versa. It acts as a security layer, protecting the computer from hacking attempts and data theft.
However, sometimes, it can impose unnecessary restrictions on devices and websites, thus preventing their access. Turn off the LAN Proxy setting on your PC so it can communicate directly with the internet.
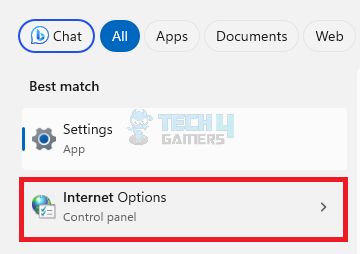
- Search Internet Options: Launch the Windows Search Bar > Enter Internet Options > Click on it.

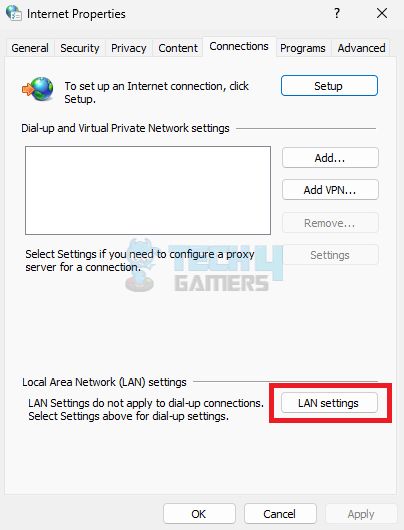
Navigate To Internet Options (Image By Tech4Gamers) - Choose LAN Settings: Go to the Connections tab > Press LAN Settings.

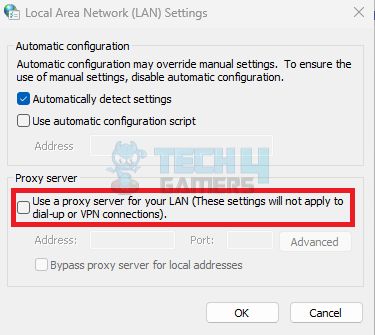
Select LAN Settings (Image By Tech4Gamers) - Turn Off LAN Proxy: You’ll see an option: Use a proxy server for your LAN > Uncheck it > OK.

Uncheck Proxy Box (Image By Tech4Gamers)
The fix was also upvoted as helpful by several members of the Microsoft Community when suggested by an Independent Advisor.
Reset Internet Settings
Another way I resolved the error message was to perform an internet reset. Additionally, I released the existing IP address to troubleshoot any network glitches or issues and requested a new one from the DHCP server.
Other than that, I reset the Windows Socket catalog used by the system applications to communicate with the network services. Here are all the codes I used to perform this method that successfully eliminated the trouble.
- Launch CMD: Open Run by pressing Windows+R > Type cmd > OK > Yes.
- Execute Commands: Run the following commands one after another into the Command Prompt window:
ipconfig /release
ipconfig /flushdns
ipconfig /renew
netsh winsock reset
netsh int ip reset
Wrap Up
Upon further investigation, I discovered that the error is not exclusive to Windows 11; users of earlier versions, such as Windows 7, have encountered the same issue on their computers.
WINDOWS 11 “The remote device or resource won’t accept the connection” error
byu/OttPlayz inpcmasterrace
The error mainly hints at a network misconfiguration; therefore, the techniques discussed above are reliable fixes for this error and can quickly make it disappear. In case the internet is not functioning properly on multiple devices, contact your ISP.
Fix More Windows Errors:
- FIXED: Windows 11 Error “No Such Interface Supported”
- How To Fix Google Drive Not Syncing On Windows 11
- Unusual Traffic From Your Computer Network [FIXED]
- Computer Correctly Configured, Device Not Responding [FIXED]
- FIXED: The Computer Did Not Resync, No Data Was Available
Thank you! Please share your positive feedback. 🔋
How could we improve this post? Please Help us. 😔
[Errors Troubleshooting Expert]
Arsalan Shakil (aka GuyThatDoesEverything on YouTube) is a PC Tech Enthusiast and Electronic Geek. With over 10+ years of experience in Electronics, he then decided to explore Software Engineering to design embedded products and automate existing hardware solutions.
When he started tearing down old cameras to understand how they worked, he was shocked (literally, when he got zapped by a flash discharge capacitor), giving him the power (debatable) to fall in love with videography/photography. He also started making some fun videos that later became YouTube tech reviews.
Skills:
- 10+ years of experience in Electronics design, embedded solutions, and prototyping
- Majored in Software Engineering
- Research paper publication in IEEE for Embedded Military Uniform & LoRa WAN wireless technology
- Specialized in IoT Solutions
- PC Enthusiast & PC Modder
In his local region, he’s known to expose cheap PSU brands, often claiming fake certification or false claims on the box. He’s a true nerd and needed some friends in his life. Then he met some guys who work at Tech4Gamers, and they also came out to be equal nerds who suggested he join Tech4Gamers as a Hardware Expert.


