


RAID stands for Redundant Array of Independent Disks. This is a data storage virtualization technology where multiple physical disk drives are employed in a logical unit. The main goal behind it is data redundancy in addition to performance gains where the failure of one drive may not result in data loss. This is except RAID 0, where there is no redundancy.
System Specs
Here is the rundown of the configuration that we used for the RAID setup and testing:
- GIGABYTE Z690 AERO G
- Intel i7-12700k [Stock, Auto]
- Sabrent Rocket 16GBx2 DDR5 kits
- Fractal Design Lumen S36 RGB
- Sabrent Rocket Q 1TB x 2 NVMe SSDs [For RAID]
- Sabrent Rocket Q 500GB NVMe SSD [For OS, Windows 10 already installed]
- be quiet! Straight Power 11 850W Platinum PSU
- Thermaltake Core P6 TG Snow Edition in an open frame layout
Setup
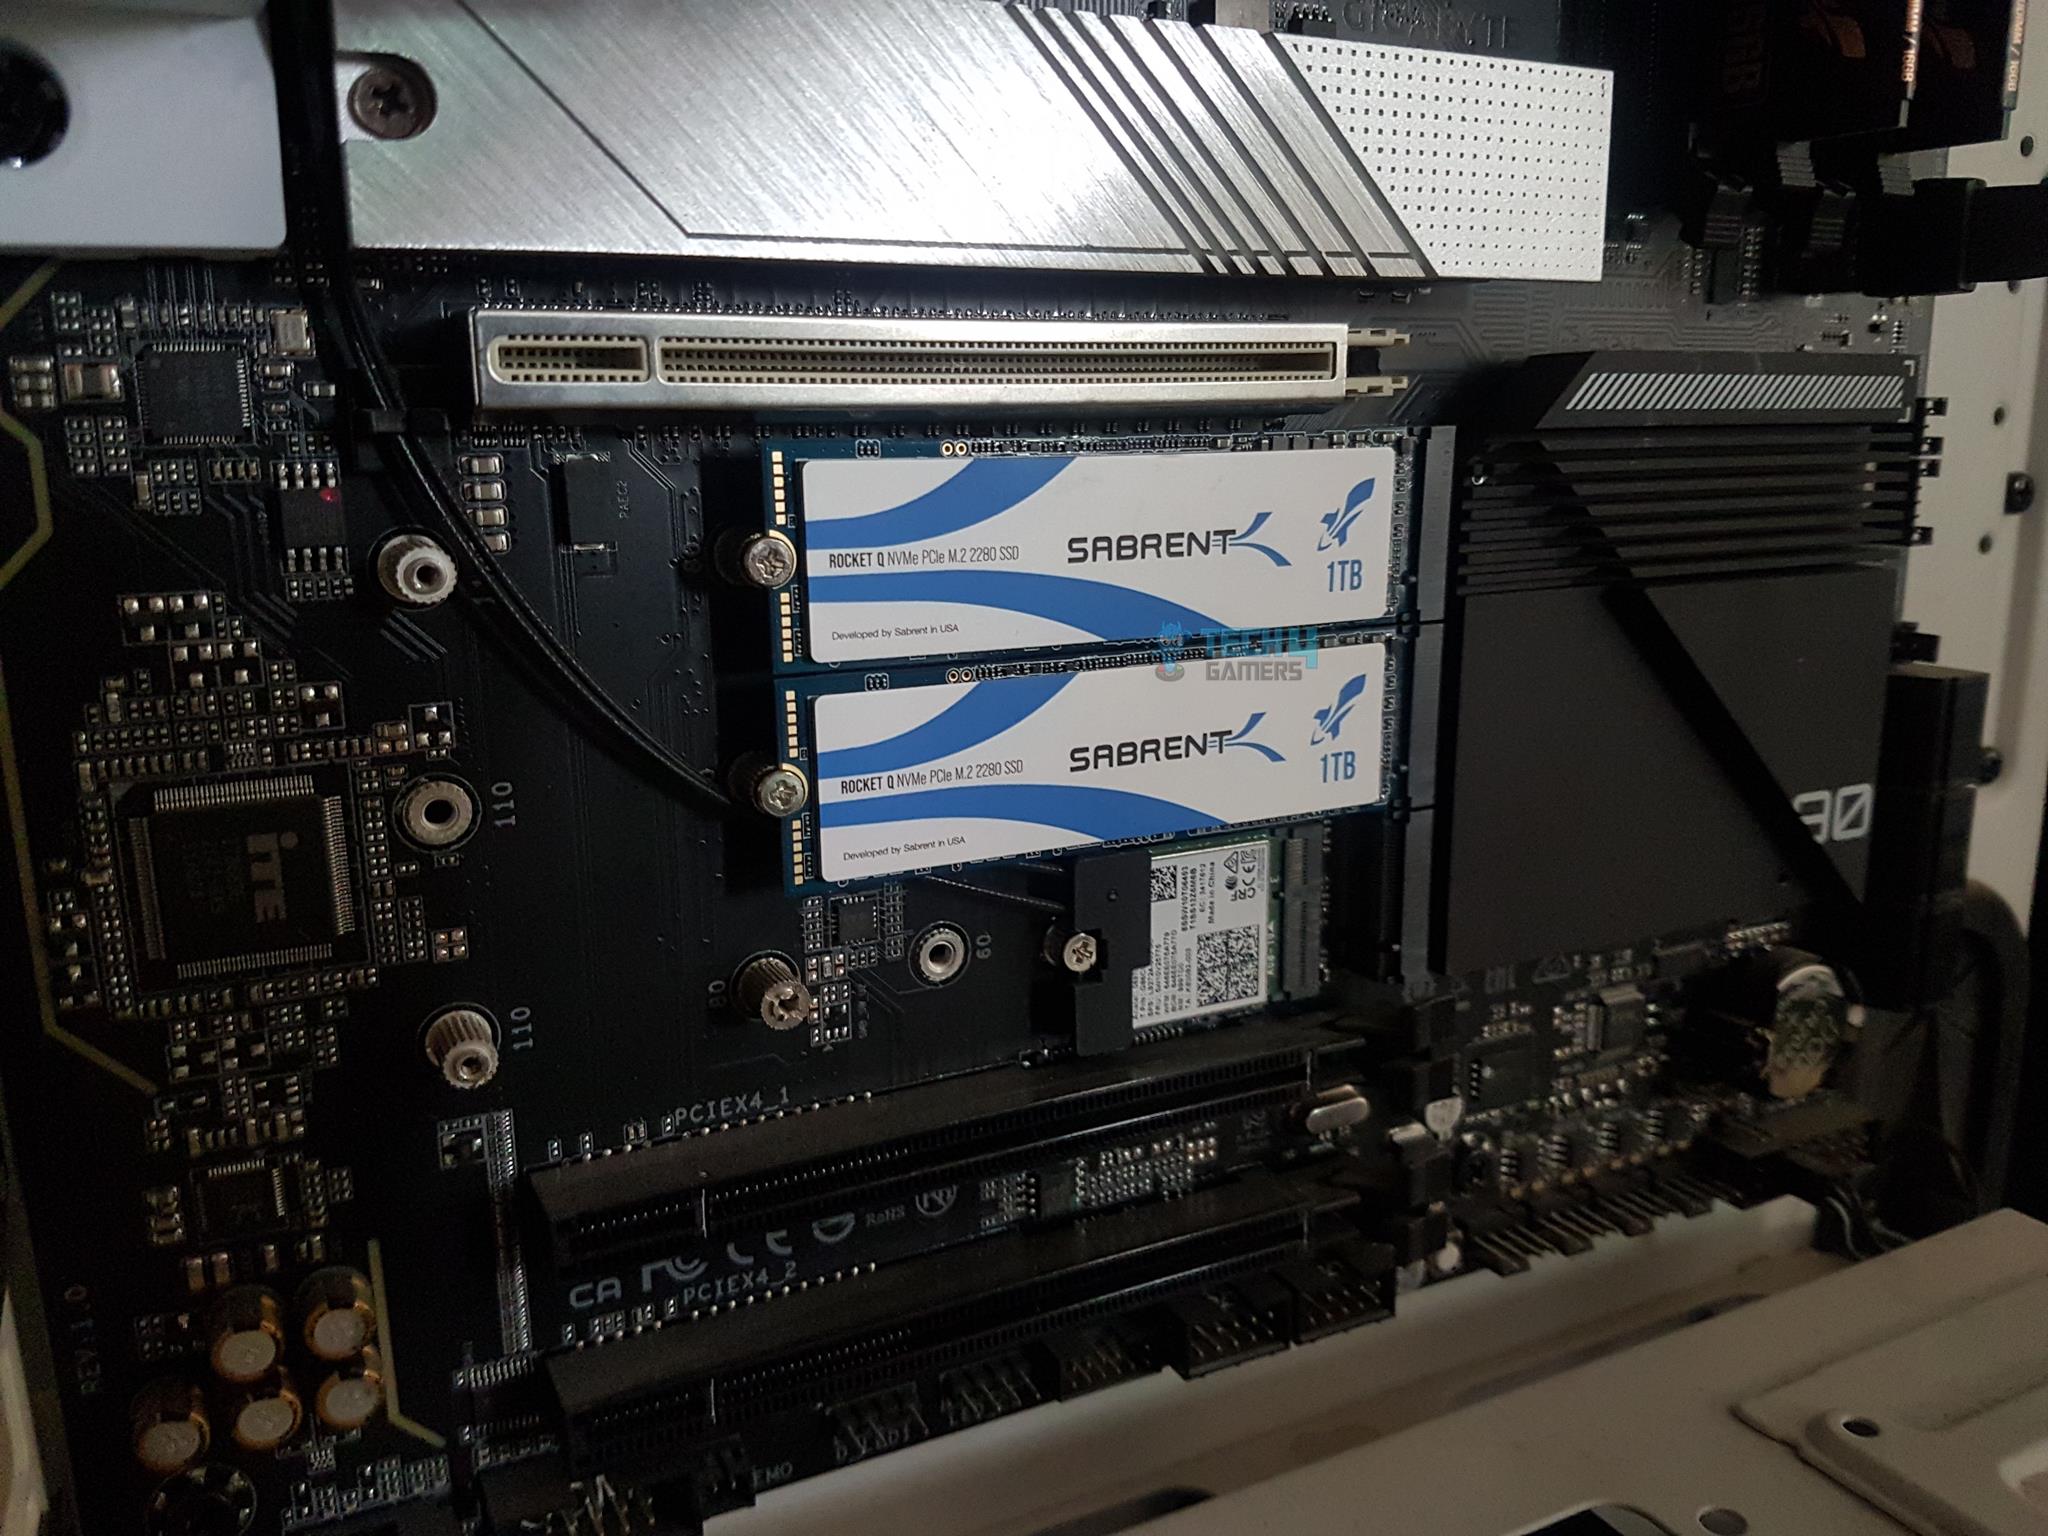
- Install Drives: Open your system case > Install PCIe-based drives on M2 ports.
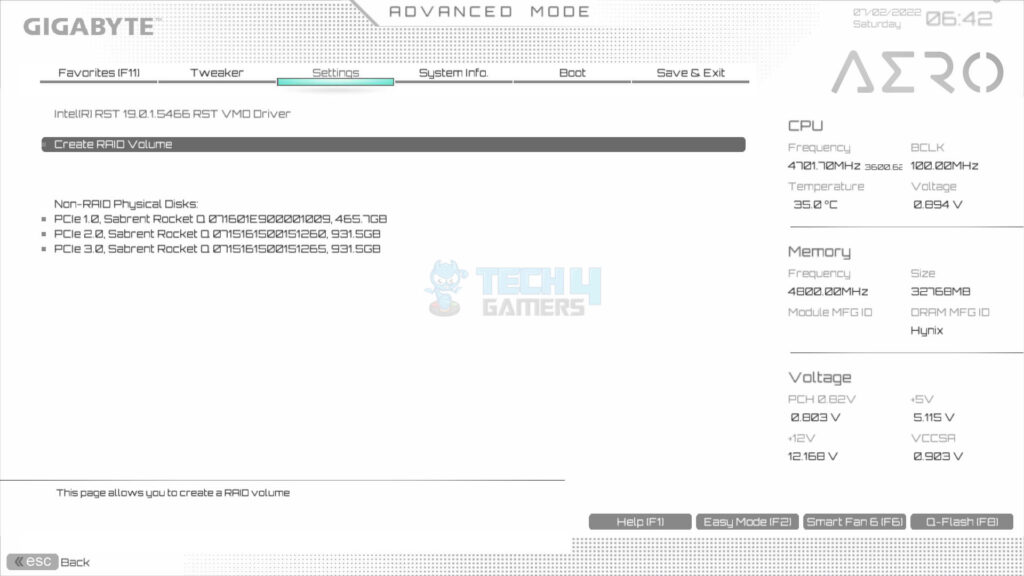
Note: We are not creating RAID on SATA drives, as shown in the following picture. The 2x Sabrent Rocket Q 1TB NVMe drives are installed on the two M.2 ports. These ports are wired with the chipset.
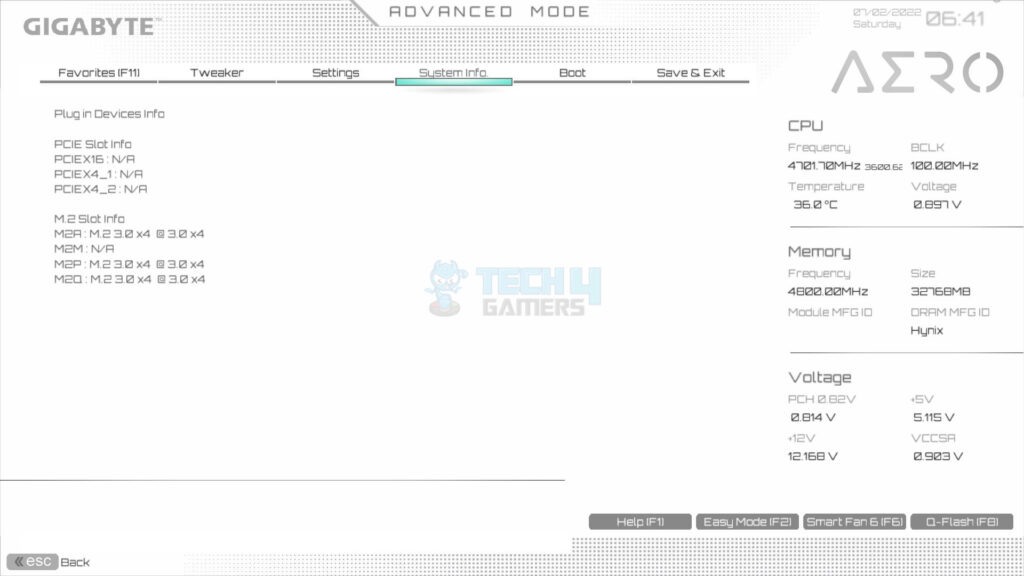
- Check Speed: Power on the PC > Enter in the UEFI/BIOS > Go to System Info > Validate three NVMe drives on x4 speed.

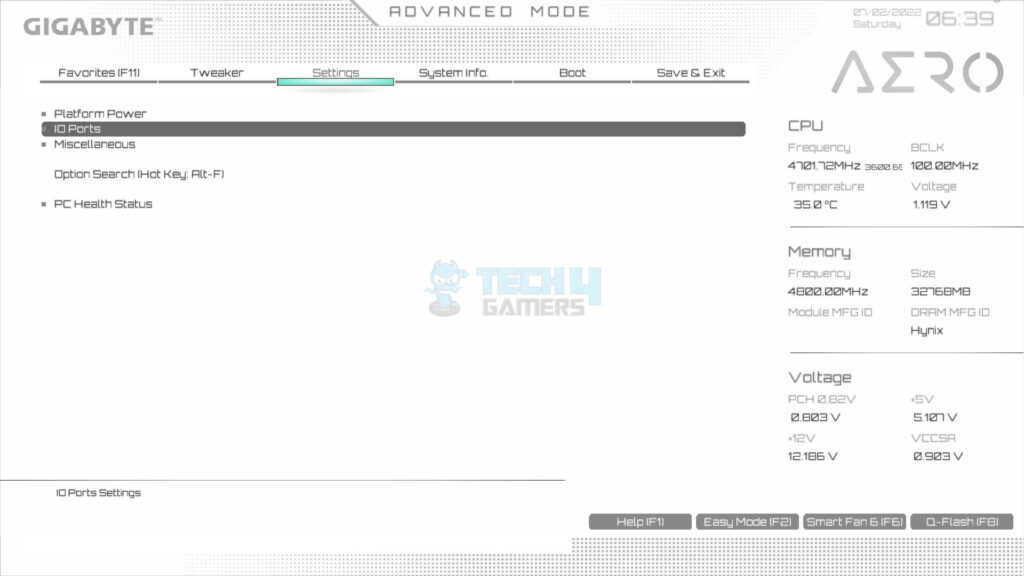
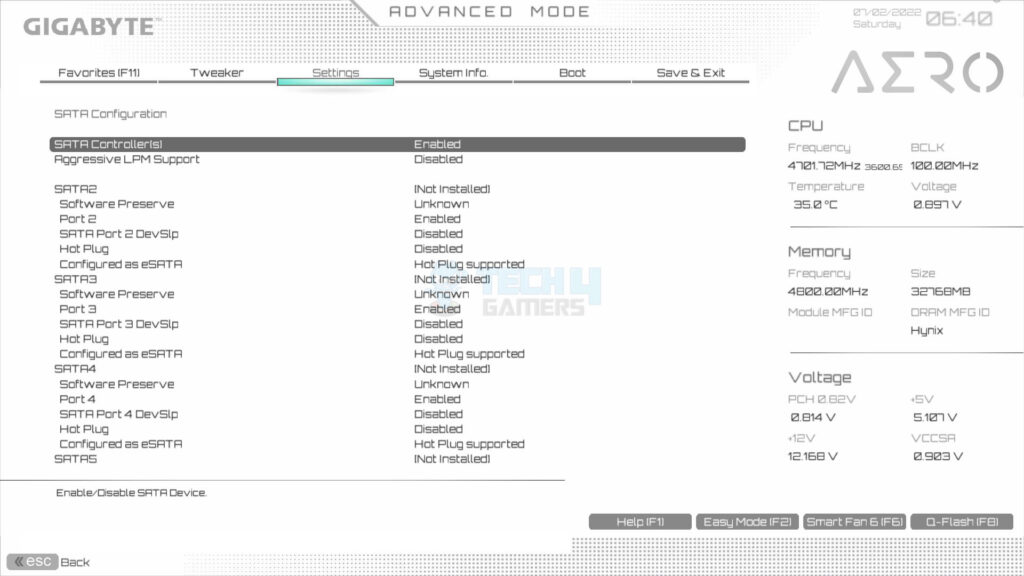
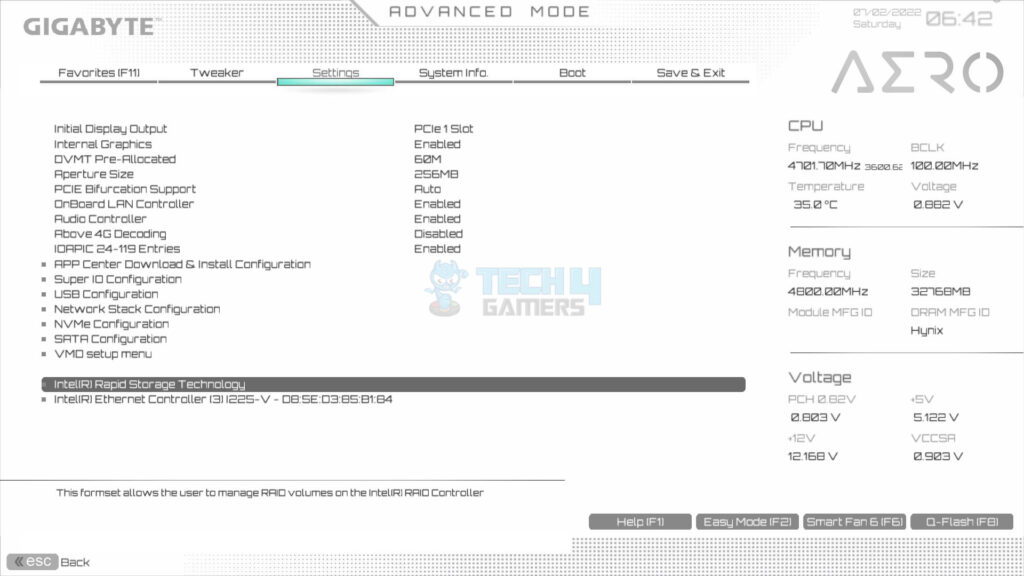
- Access Settings: Go to Settings > Select IO Ports.
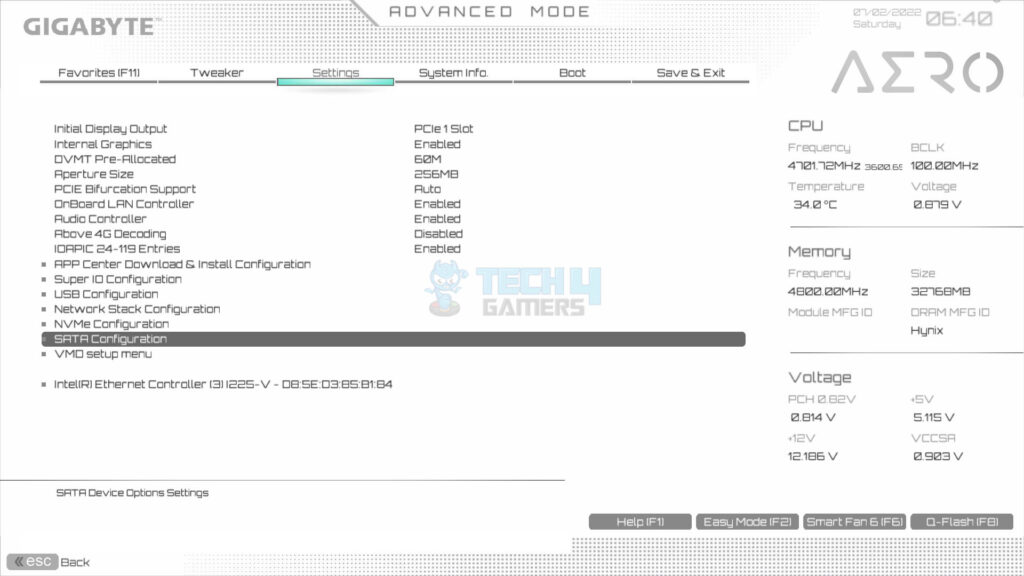
- Select the SATA Configuration.
- Ensure that the SATA Controller is enabled.
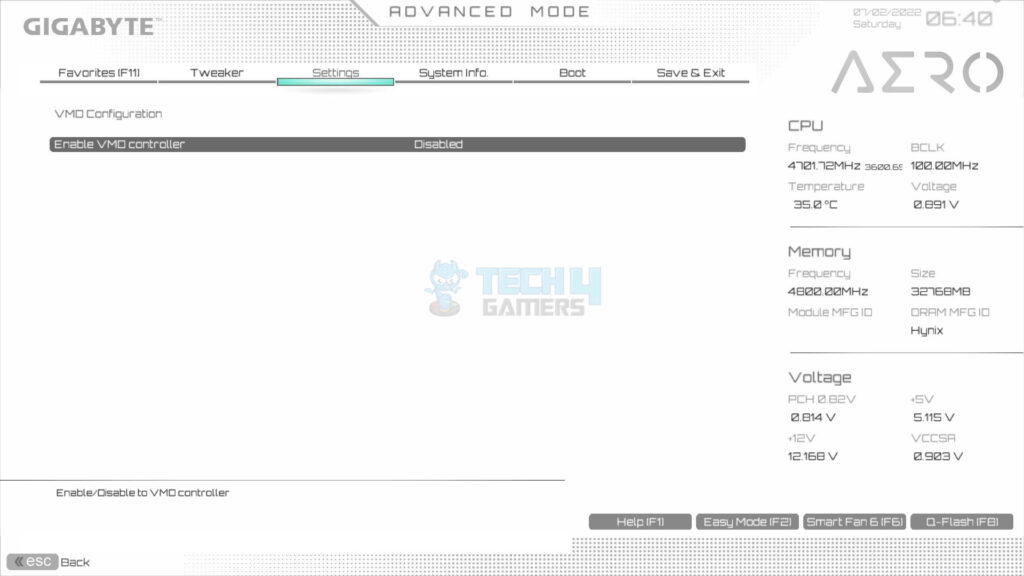
- Enable VMO Controller: Select the VMO Setup Menu > You will see one option: Enable VMO Controller > Set it to enabled.
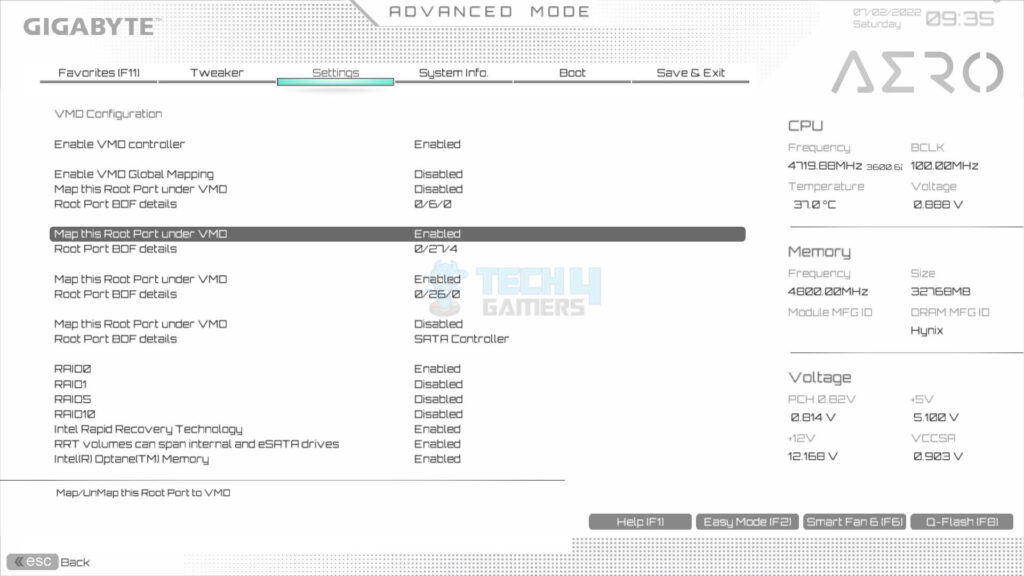
- Disable Mapping: Disable the mapping of the drives which will not be included in the RAID:
- Disable the VMO Global Mapping. This will enable us to disable/enable individual drive mapping.
- Disable the first Root port [0/6/0] as this pertains to our boot drive, which will not be included in the RAID.
- Enable the Root port [0/27/4 and 0/26/0], as these pertain to our two Rocket Q NVMe 1TB drives, which will be included in the RAID.
- Disable the Root Port under the SATA controller.
Warning: Pay attention here, as any wrong setting will result in controller conflict, and the OS will not boot.
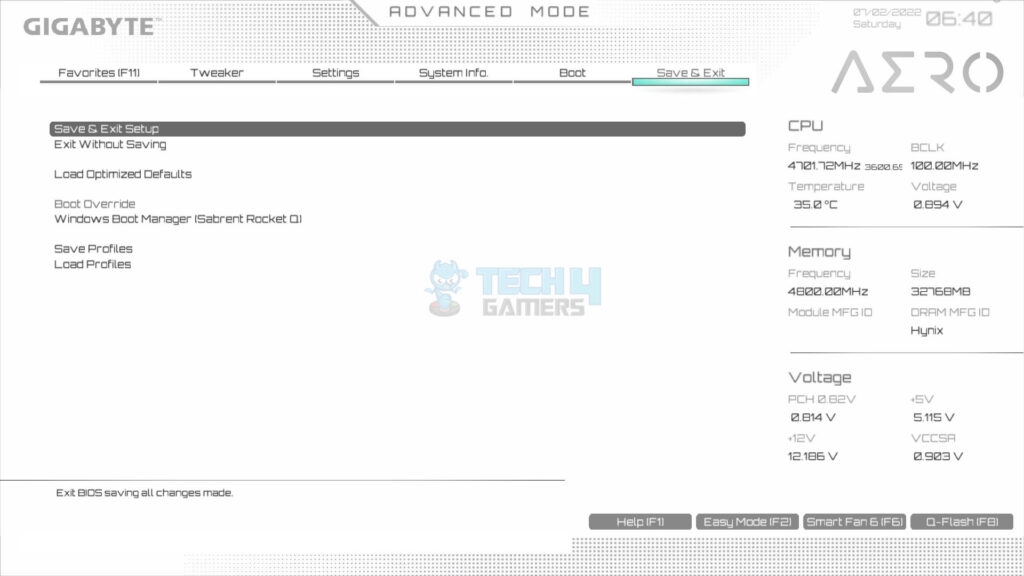
- Access BIOS: Save your settings > Exit the BIOS > The PC will restart > Enter the UEFI/BIOS again.
- Select Intel Rapid Storage Technology.
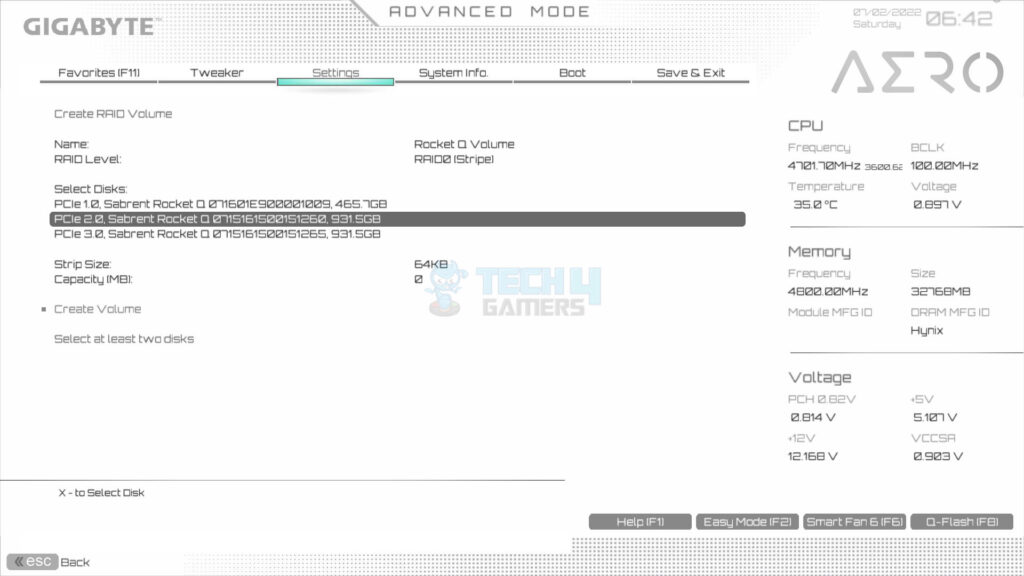
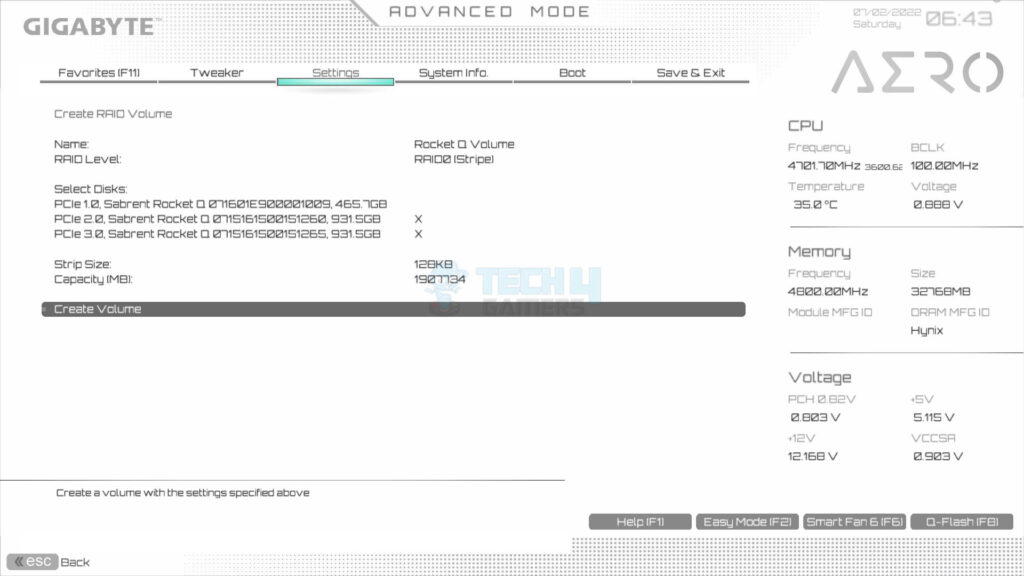
- Select Create RAID Volume.
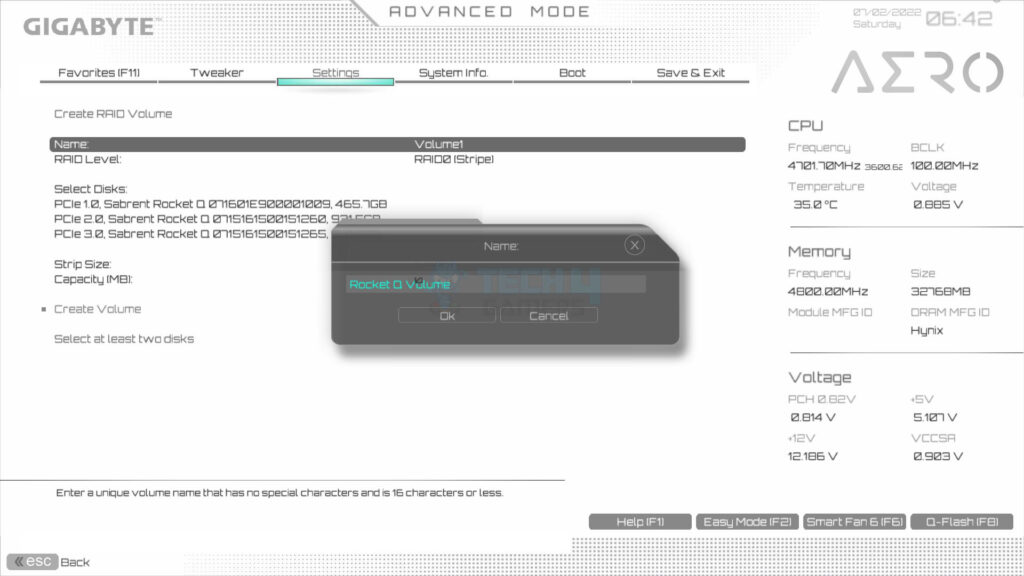
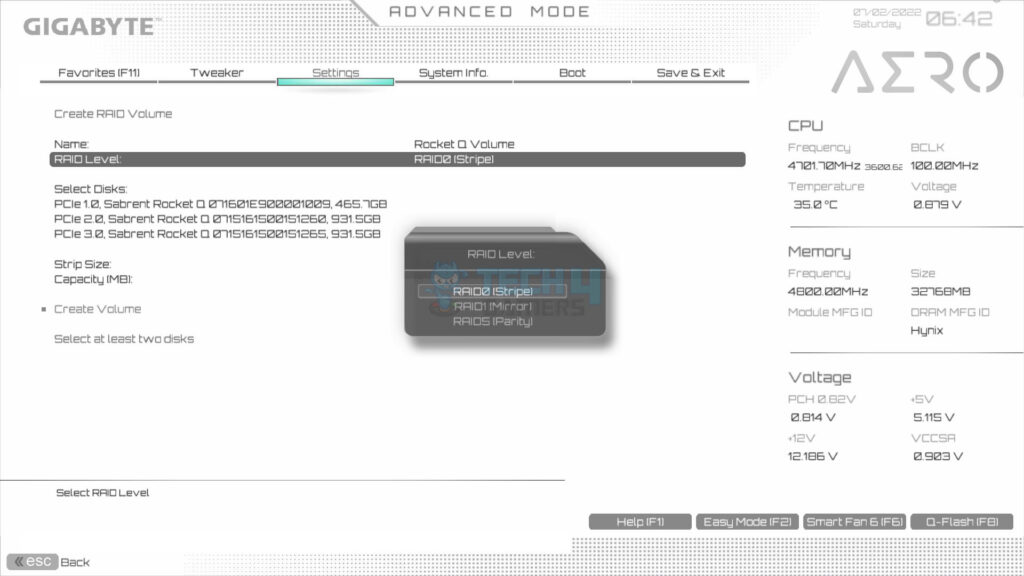
- Set the name of the Volume which we set to Rocket Q.
- Choose Level: Go to RAID level > We used RAID 0.
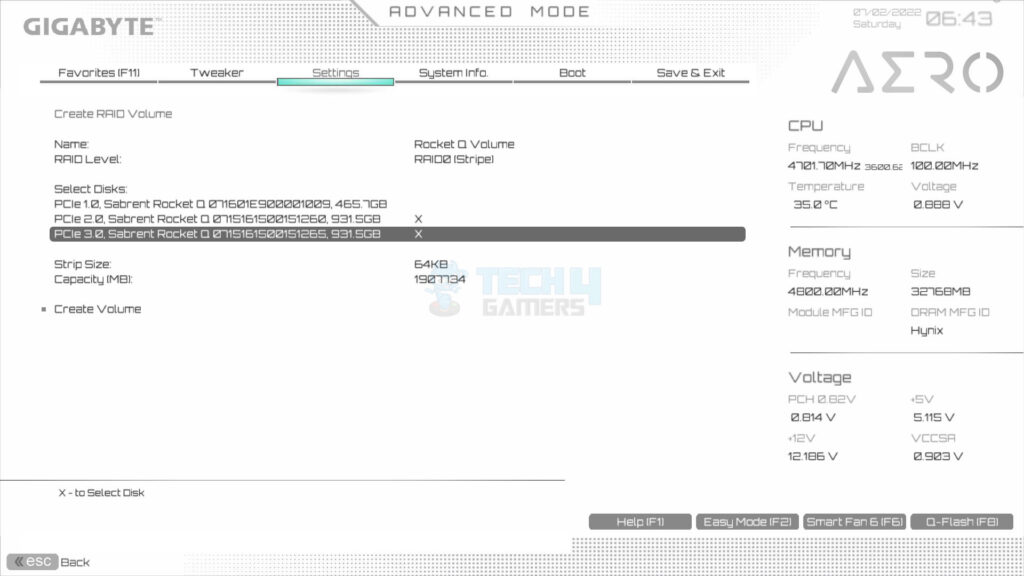
- Select the drives one by one to include in the RAID.
- The X mark is the confirmation of selection.
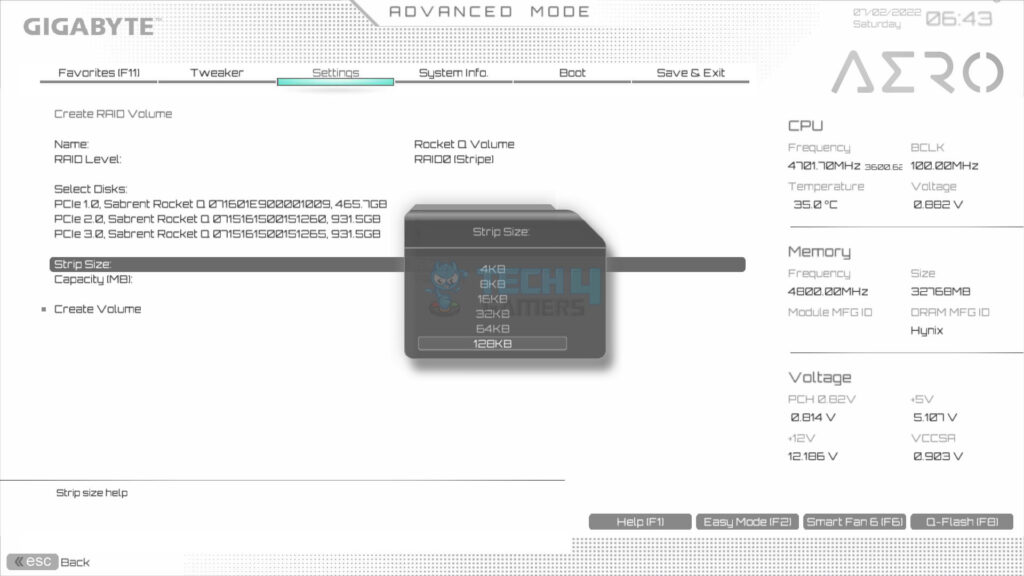
Choose Values
- Choose the strip size for the RAID volume. We selected 128KB. Values as per RAID level are:
- 128KB for RAID 0
- 64KB for RAID 5
- 64KB for RAID 10
Tip: Experts suggest using a smaller block size for the server system and a larger one for the multimedia system.
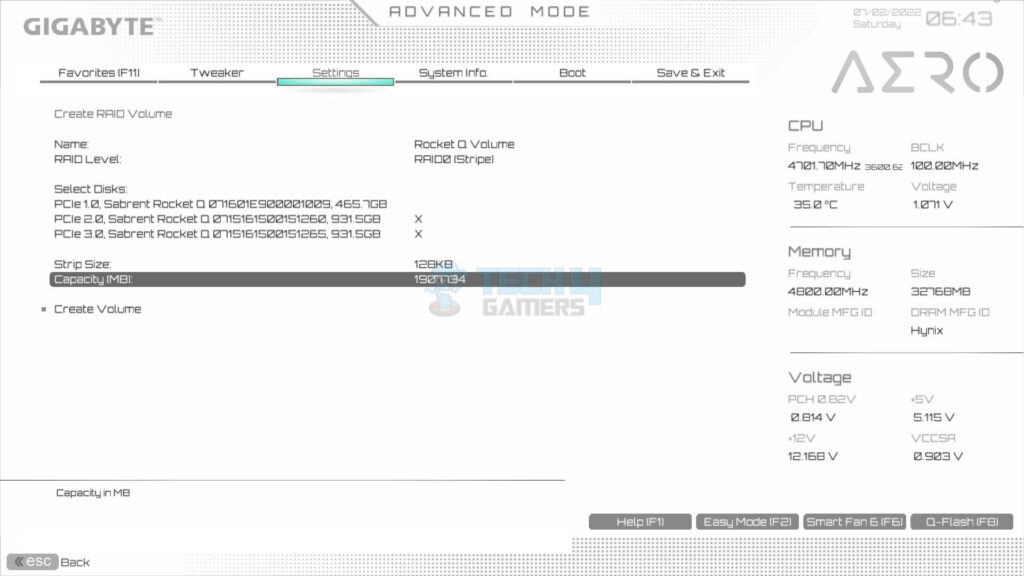
- Choose the maximum available capacity.
- Click Create Volume.
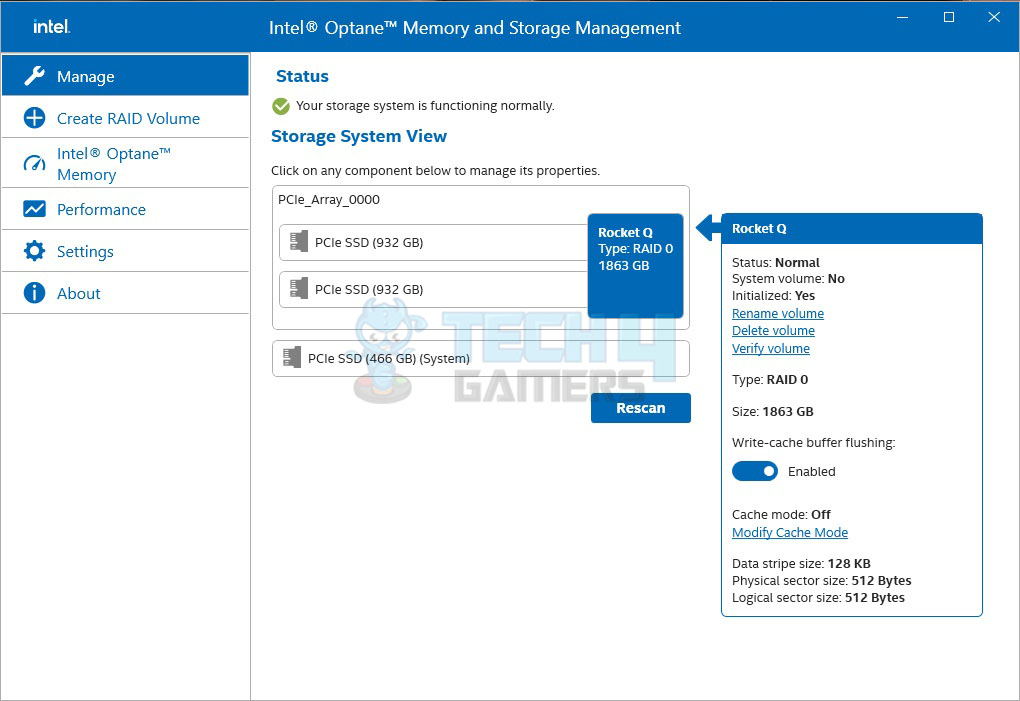
- Now, you can see the created RAID volume on the screen.
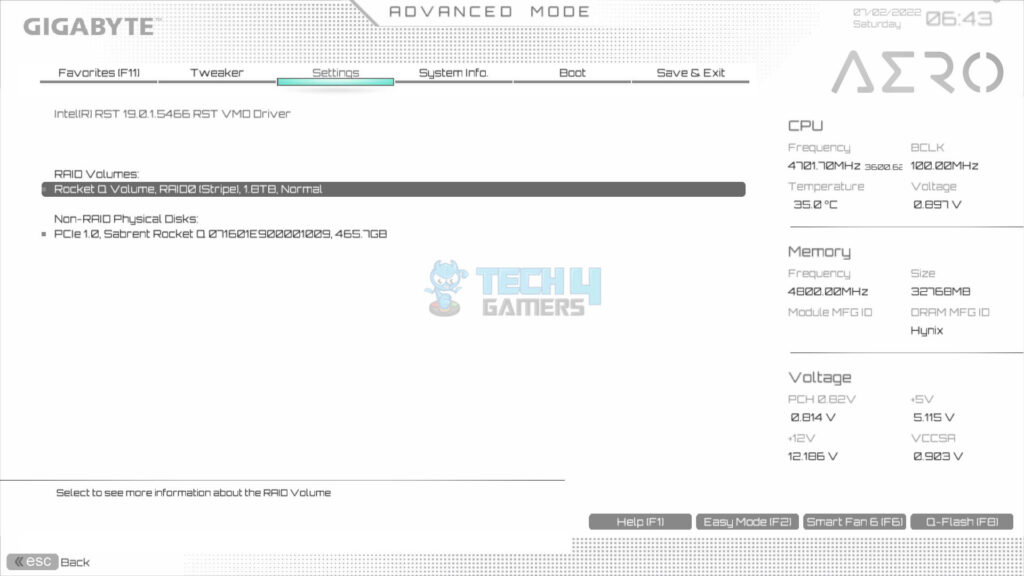
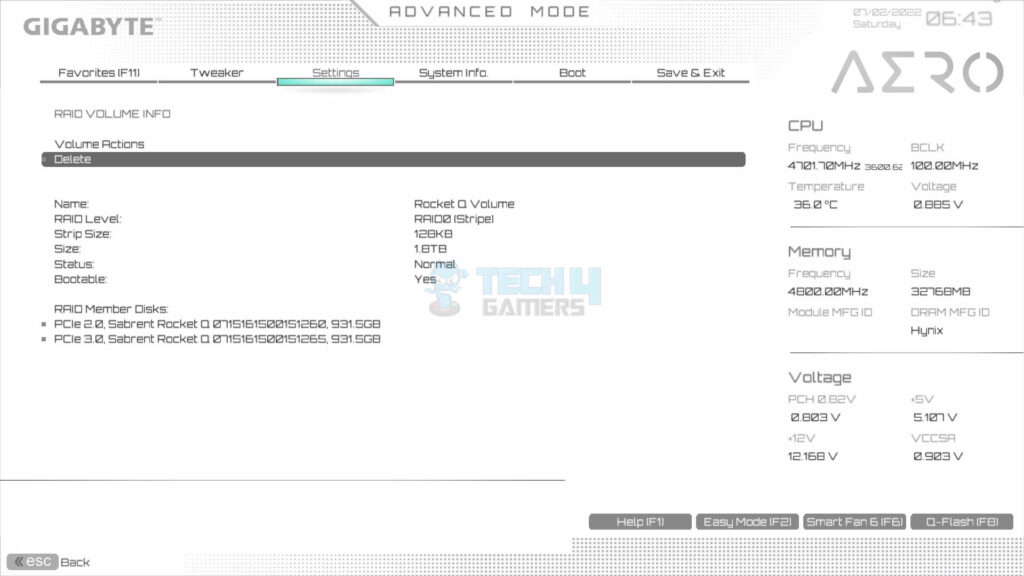
Check Details
- Click or select the RAID volume > See information, or delete the volume.
- Save settings > Exit BIOS.
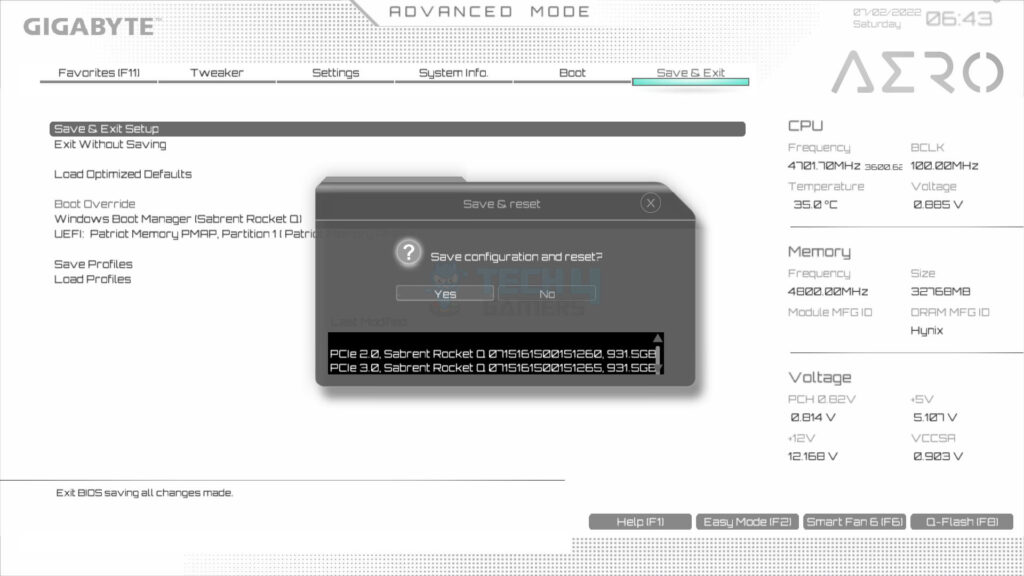
This will restart the system. Since we already have Windows 10 installed on the OS drive. The system booted in Windows. Download and install the Intel Rapid Storage driver package.
Windows Installation
In case you are installing Windows after creating the RAID volume, here are the steps:
- Go to the motherboard’s website > Download the Intel Rapid Storage package > Copy the IRST folder in the Windows installation drive.
- Setup will prompt the RAID controller driver > Browse on the drive to IRST > Select the listed driver > Launch the Intel Optane Memory and Storage Management software > You will see the RAID volume and its properties.
Benchmarks
We have used the following software:
- AS SSD 1.8.5636.37293
- ATTO Disk Benchmark 4.0
- CrystalDiskMark 6
- Anvil Pro Storage Utilities 1.1.0
- DiskBench
The Sabrent Rocket Q 1TB NVMe SSD boasts ratings of up to 3200MB/s sequential read and up to 2000MB/s sequential write. Its 4K IOPS ratings also stand at 125K random read and 500k random write at QD 32. Here are the results of all the software we used:
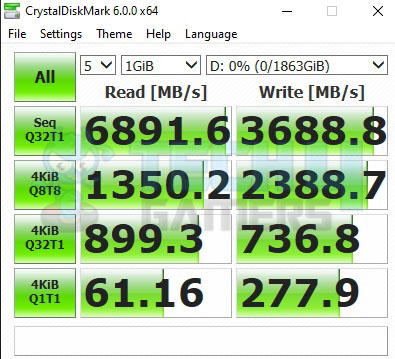
Impressive results as we are seeing almost double the rated sequential speeds. 4K QD32 performance is impressive as well.
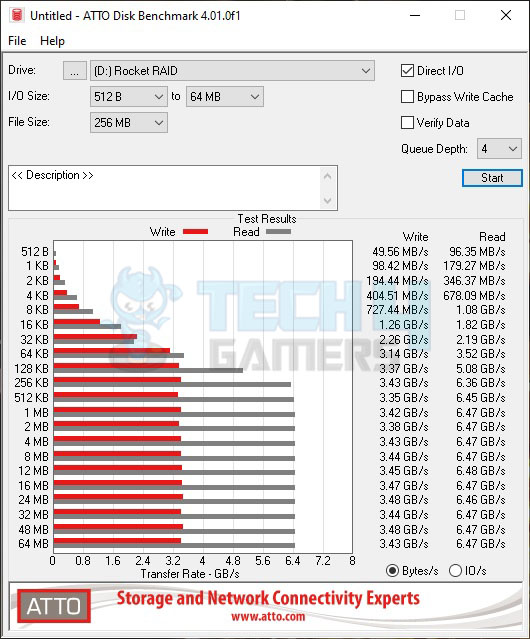
Impressive performance in ATTO as well. 6.47GB/s is the maximum sequential read speed, and 3.47GB/s is the maximum sequential write speed.
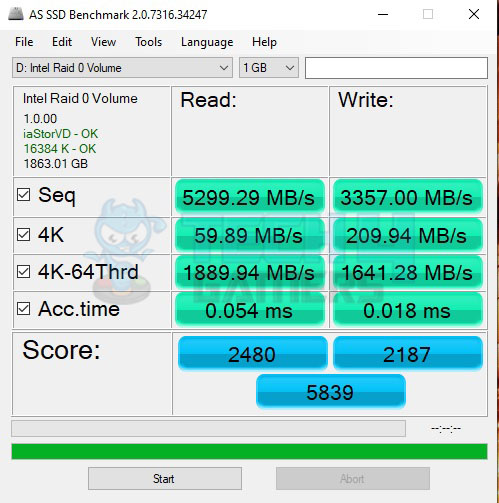
Similar results were seen in the AS SSD benchmark.
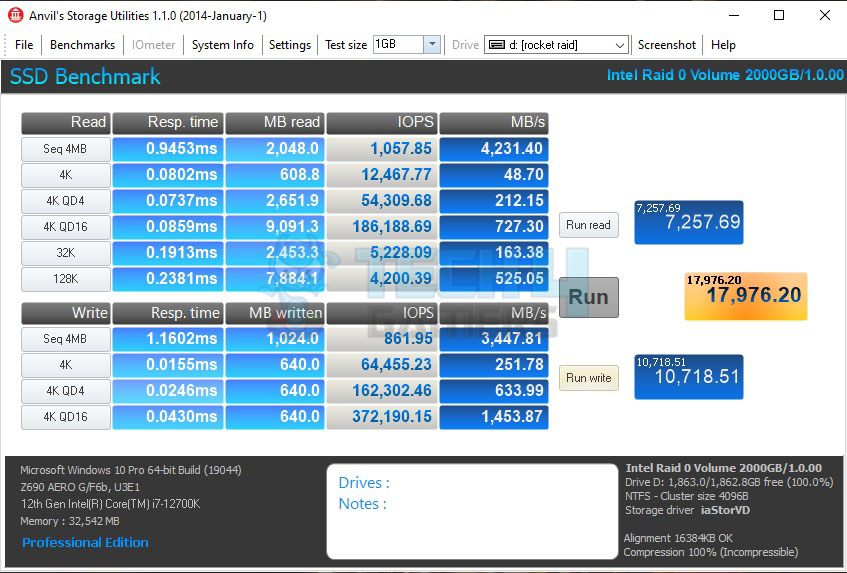
Anvil’s storage benchmark is no exception to the above results.
Real-World Testing
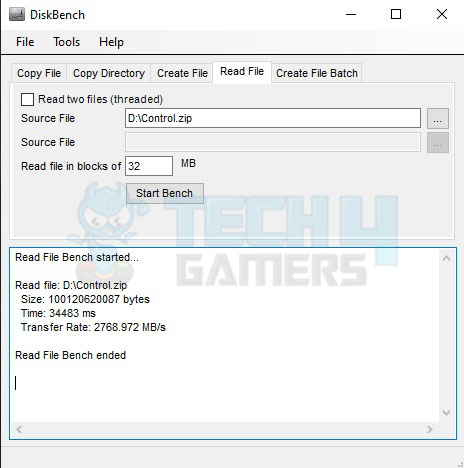
We have used DiskBench in multiple scenarios to check the real-world data transfer rates. Here are the results:
We copied a compressed file of 97GB, which contained multiple compressed files and folders of different sizes, to the Rocket Q volume. Then, we read the file from the DiskBench. We have a transfer rate of 2768972MB/s compared to a speed of 1873.454 MB/s for a single drive.
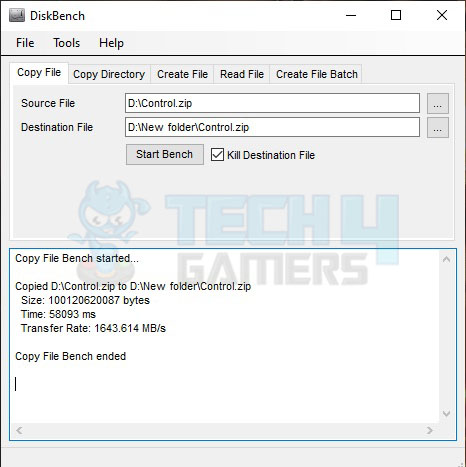
Next, we copied the same compressed file from one folder to another on the same drive. The transfer rate is 1643.614MB/s compared to the speed of a single drive which is 832.033MB/s.
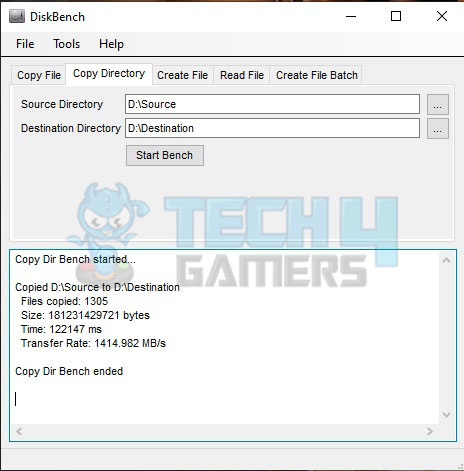
Next, we copied a folder of 167GB size containing multiple compressed files and sub-folders and mixed other files. The transfer rate was 1414.982MB/s as compared to the speed of 633.117MB/s for a single drive.
Pros & Cons
| How To | Pros | Cons |
|---|---|---|
| Setup Raid On Intel Z690 Motherboard With NVMe SSDs | ✅Improved Performance ✅Increased Data Redundancy ✅Scalability ✅Optimized Storage Management | ❌Risk of Data Loss ❌Higher Cost ❌Complexity ❌Performance Impact During Rebuilds |
Final Thoughts
Configuring RAID on an Intel Z690 motherboard with NVMe SSDs will improve system performance and protect your vital data. Additionally, it’s equivalent to having a supercharged engine with built-in safety features. We found a tweet highlighting the benefit of setting up RAID on your system.
Yesssss they are! 💪💪 running two on a z690 board so they have some kinda access to more than 7,000MBP in raid 🔥🔥🔥 pic.twitter.com/KAlmXtYWoO
— GameDevMicah🤩NaniteNiagaraPlugin UE5 UEFN (@GameDevMicah) August 26, 2022
However, select the appropriate RAID level and monitor maintenance to ensure smooth working.
Related Articles: Thank you! Please share your positive feedback. 🔋 How could we improve this post? Please Help us. 😔 [How To’s & Guides Editor] Haddi has been in the Gaming and tech Space for over 10 Years Now; he has worked on notable websites like eXputer, Gamepur, Gear Siege, Gearnuke, and plenty more. He is an expert at Games & PC Hardware; you can expect him to solve any problem. People often joke, that if there is any problem anyone can solve, Haddi can solve it faster. Currently, Haddi writes and manages a Team of Experts at Tech4Gamers. Contact: Haddi@tech4gamers.com
![]()


Feedback By: