A lot of essential settings lie in the BIOS of your Windows. Therefore, the need to access BIOS arises from time to time. Figuring out how to get into the BIOS of Windows 11 isn’t a difficult task either, and there are multiple ways to do it.
- Many Windows settings are only accessible through the BIOS; therefore, knowing how to enter BIOS becomes necessary.
- Entering BIOS can allow you to customize your system’s startup settings, monitor the device’s status on your system, and help troubleshoot several hardware-related issues.
- You can enter the BIOS during boot up, using the Run window or creating a shortcut to the BIOS launch command.
- To exit the BIOS, press “Esc” or any other button mentioned on your screen.
Methods Difficulty Rating
Rated: 2/10
Rated: 4/10
Rated: 6/10
During The Boot Process
This is the most common way to enter BIOS. It requires users to press a specific key during the boot process of their PC. The key that needs to be pressed during the boot process varies with the motherboard manufacturer of your PC.
All you have to do is restart your PC, and as soon as it boots up, press F2 or Del key. If that doesn’t work, you can also press F1, F9, or F10.
Via Windows Run
The RUN window can also lead you to the BIOS settings by entering a specific command. Follow these steps to enter BIOS settings via RUN.
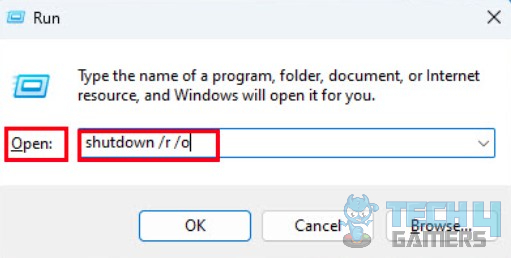
- Launch Command Prompt: Press the Windows + R keys to open the RUN window > Type “cmd.”
- Enter Command: Type in the following command:
shutdown / r / o

Enter The Mentioned Command (Image By Tech4Gamers) - Follow The Path In Advanced Options: In the advanced startup screen, go to the “Troubleshoot” tab > “Advanced Options” tab > “UEFI Firmware Settings” > “Restart”.

Click on ‘UEFI Firmware Settings (Image By Tech4gamers)

By Creating A Shortcut
This is another way to lead you to your Windows 11 BIOS settings. Moreover, this can be used later to access your BIOS settings quickly. All you will have to do is create a shortcut. The steps below can assist you in doing it:
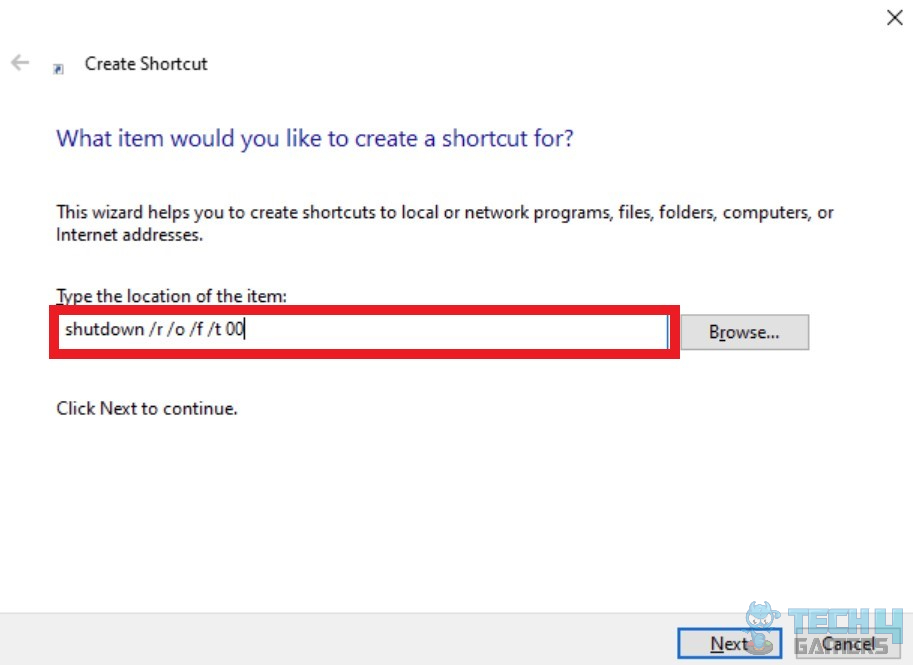
- Create New Shortcut: Head to the desktop screen on Windows 11 > Right-click your pointer/mouse > Click on “New” from the drop-down list > “Shortcut.”
- Enter Command: Enter the following command in the provided space under ‘Type the location of the item:’
shutdown /r /o /f /t 00

Create shortcut. Image credits: (Tech4Gamers) - Launch Shortcut: After creating the shortcut, double-click on it, and you will be led to the Advanced Startup.
- Follow The Path In Advanced Options: In the advanced startup screen, go to the “Troubleshoot” tab > “Advanced Options” tab > “UEFI Firmware Settings” > “Restart”.
Final Thoughts
Entering BIOS is a simple task and can be done using several methods. The easiest of which is entering when the system is booting up. If you cannot enter during the bootup, repeatedly press the designated button for entering BIOS, and verify if you are pressing the right button. If it still doesn’t work, try resetting the CMOS.
How can I enter BIOS settings, while my system boots so fast I'm not even able to press anything?
byu/GloomyJack intechsupport
To exit BIOS, look for the assigned key for saving and exiting, usually “F10” or “F12.” If you want to exit without saving, press the “Esc” button.
Frequently Asked Questions
Yes, you can enter the BIOS within the operating system of Windows 11. All you have to do is open Windows Settings>System>Recovery>Restart>Troubleshoot>Advanced Options> UEFI Firmware Settings>Restart.
The key that needs to be pressed to access BIOS during the boot process differs for every motherboard manufacturer. You can try pressing the keys F1, F2, F9, F10, Del, or Esc.
Sometimes, you cannot access BIOS using the same method. Therefore, you may have to try a different method if you cannot access the BIOS settings using the method you used on the previous PC.
Related Articles:
- How To Reset BIOS Settings [All Methods]
- Windows 11: Computer Won’t Wake Up From Sleep
- SOLVED: How To Reset BIOS Without Display
- How To Update Windows [11, 10, 8, And 7]
- How To Disable Rounded Corners In Windows 11?
Thank you! Please share your positive feedback. 🔋
How could we improve this post? Please Help us. 😔
[How To Guides Specialist]
Dayan Shahid is a skilled mechanical engineer passionate about technology. With certifications in various programming languages and subjects ranging from microcontrollers to aerial robotics, Dayan can effortlessly present complex technical topics in an engaging way. His ability to bridge the gap between theory and practical applications sets him apart as he continues to inspire others through their insightful content.