 Threads

With the introduction of wireless printers, connecting a printer to a laptop has become relatively easier. However, a lot of people are confused about how to connect a Brother printer to a laptop wirelessly.
Key Takeaways
- You can wirelessly connect a Brother printer to your laptop using a shared wireless network like Wi-Fi.
- You have to connect both devices to the same wireless network before adding the printer to your laptop as a new device for wireless connection.
- You can also connect a Brother printer to your laptop without a Wi-Fi router using the Wi-Fi Direct functionality.
Make Sure To Check Compatibility First
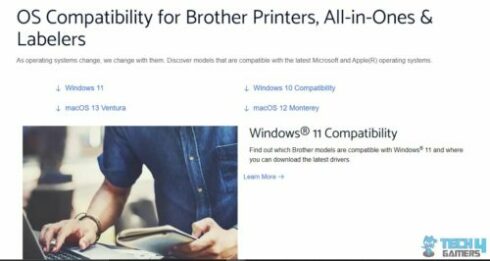
If you are wondering how to connect a Brother printer to a laptop wirelessly, a few noteworthy things should be considered. The first essential requirement is to check the compatibility of the Brother wireless printer with your laptop’s operating system.
You can check the compatibility by referring to the user manual of that specific model or by going to the official Brother support page and checking compatibility against your operating system.
The next step is to ensure your printer is within range of your Wi-Fi network. You won’t be able to connect it to your computer and print anything if it isn’t within the range. Also, read about how to fix the issue of computer restarting while trying to print.
How To Connect Brother Printer To Laptop Wirelessly
Once all the considerations have been met, you can connect your Brother wireless printer to your laptop. Turn on the Brother wireless printer and your laptop. Once both devices are completely booted, they can be connected using USB, Wi-Fi, and Wi-Fi Direct.
Configure The Printer MFC-J1012DW And Similar Models
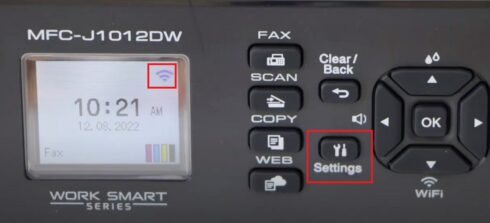
Most Brother printers, such as MFC-J1012DW, come with an LCD screen and a control panel with buttons for various controls. To connect the Brother printer to your laptop, you must first configure your printer for a wireless connection. We have successfully connected our printer using this method.
- Open Settings: Press the Settings button on the control panel of your Brother printer.

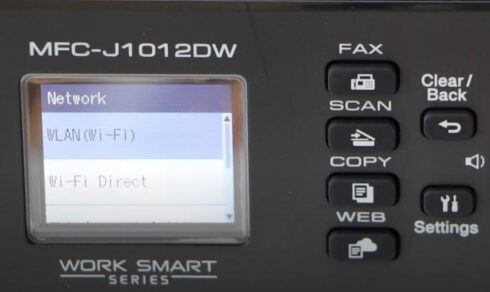
Press the Settings button – Image Credits (YouTube-Copy Print Scan) - Access Wi-Fi Settings: Press the down arrow > search for Network > Select Wi-Fi by pressing OK button.

Network Settings – Image Credits (YouTube-Copy Print Scan) - In some models, you must go through another step of selecting Setup Wizard after the previous step.
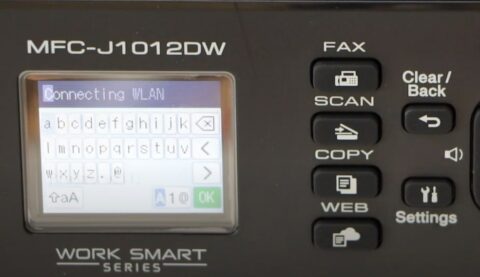
- Connect To Wi-Fi: Select Find Wi-Fi Network > Select the desired Wi-Fi network > OK > Enter the password.

Connecting WLAN – Image Credits (YouTube-Copy Print Scan)
Configure The Laptop
Once the printer has been configured for wireless connection, you must set up your laptop to connect with the printer. To do that:
- Connect To Wi-Fi: Connect your laptop to the Wi-Fi network you connected your Brother printer to.
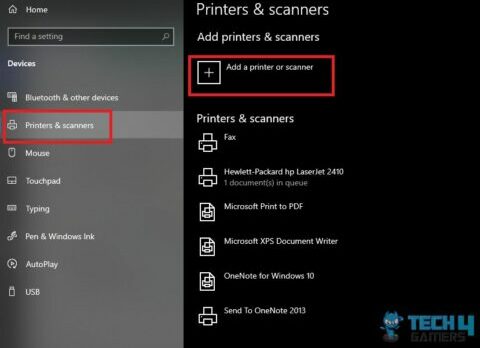
- Add Printer: Go to Settings > Devices > Printers and Scanners > Add a printer or scanner.

Add a printer or scanner – Image Credits (Tech4Gamers) - Your printer will be displayed amongst the list of printers if it is connected to the same Wi-Fi network.
- Add Device: Click on the Add Device button corresponding to your printer’s name > wait for installation > Ready icon will display once done.
Touch Screen Brother Printer MFC-J6930DW And Similar Models
Newer models of Brother printers, like the MFC-J6930DW, are equipped with a touch screen that enables you to operate the printer. We tried the following steps and successfully configured our Brother printer.
To configure such a printer for a wireless connection, do this:
- Open Wi-Fi Settings: Press the Wi-Fi icon on the touch screen of your Brother printer.

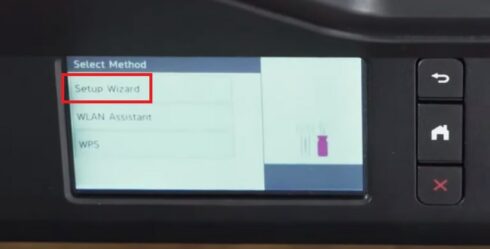
Wi-Fi icon – Image Credits (YouTube-Copy Print Scan) - Access Setup Wizard: Select the option of Setup Wizard > Select Yes when prompted.

Setup Wizard – Image Credits (YouTube-Copy Print Scan) - Select Network: Select the desired network > press OK > Enter the network password.

Enter the SSID and Password – Image Credits (YouTube – Copy Print Scan)

Configuring Brother Printer HL-L5200DW And Similar Models
Some earlier models, like the HL-L5200DW, have slightly different controls than the other commonly known models. We tested the method to configure this model and had success.
To configure such models for wireless connection, do the following steps:
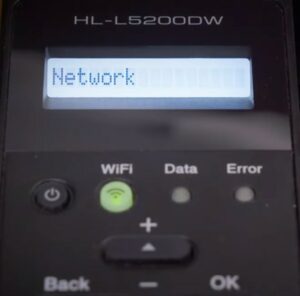
- Access Network Settings: Press the Up or Down button to find the option of Network displayed on the LED > Press OK to select Network.

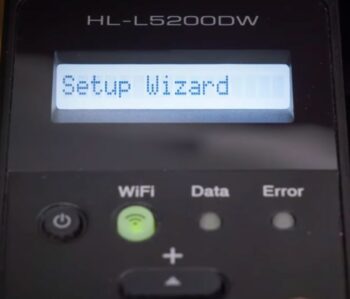
Network Settings – Image Credits (YouTube-Copy Print Scan) - Open Setup Wizard: Go to WLAN > Setup Wizard > OK.

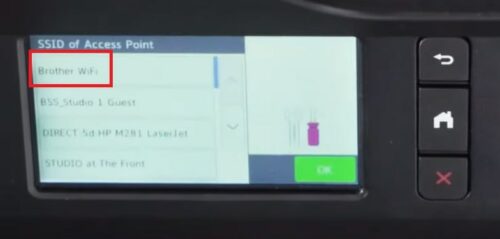
Setup Wizard – Image Credits (YouTube-Copy Print Scan) - Select Network: The printer will display the option of Searching SSID > Select the desired Wi-Fi network > Press OK.
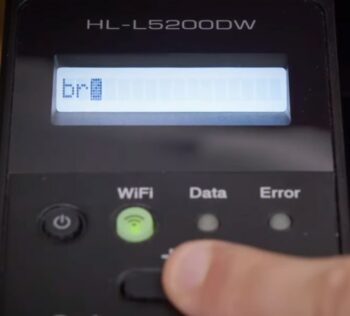
- Enter Password: Press the Up or Down button and then OK to toggle between the characters of the Network Key.

Enter SSID & Password – Image Credits (YouTube-Copy Print Scan) - Complete Connection: Press the Up button for Yes to connect the printer to the network.
Configure The Laptop Manually
If you cannot connect the printer to your laptop even after it has been connected to the same Wi-Fi network or are having trouble installing its software automatically, you can do it manually. To do that:
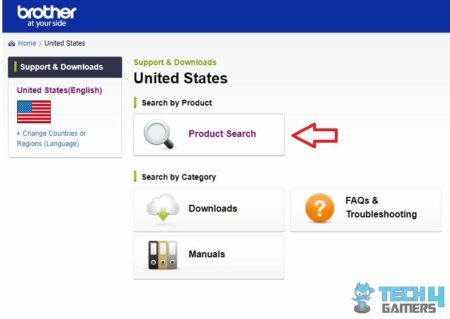
- Go To Brother Support: Open the official Brother support page in your browser > Click the Product Search button.

Product Search Button – Image Credits (Tech4Gamers) - Choose System: Enter the model number of your printer in the search bar > Press enter > Choose Downloads.

Downloads menu – Image Credits (Tech4Gamers) - Download Driver: Select your laptop’s Operating System > Click OK > Download Full Driver and Software Package > Install on your laptop.
- Connect: Now, try connecting your Brother printer to your laptop.

Installing Drivers Using The CD
Some models of Brother printers come with a CD that contains all the drivers required to operate the printer.
- Log In As Administrator: Insert the CD into your computer > Log in to your computer using the administrator account.
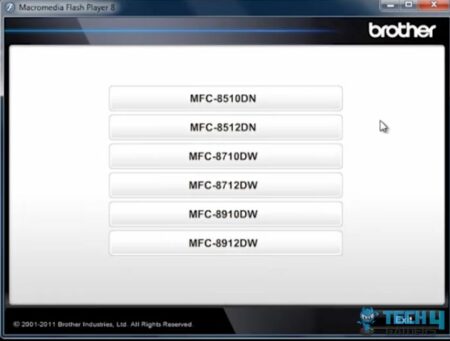
- Select Language: Open the CD drive > Select printer’s model > Select language.

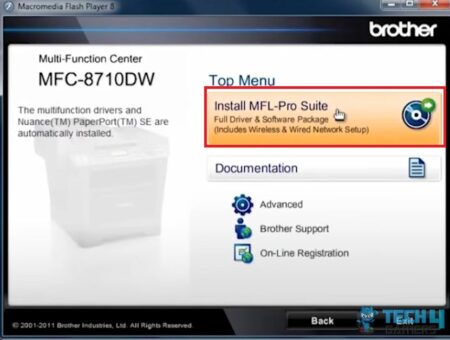
Select Model – Image Credits (Tech4Gamers) - Install MFL-Pro Suite: Choose Install MFL-Pro Suite > Select Yes on the license agreement screen > Select Yes on the Brother Licence screen.

Install MFL-Pro Suite – Image Credits (Tech4Gamers) - Choose Connection Type: On the Connection Type page, choose Wireless Network Connection > click Next > Leave the option of Firewall port settings as it is > click Next.
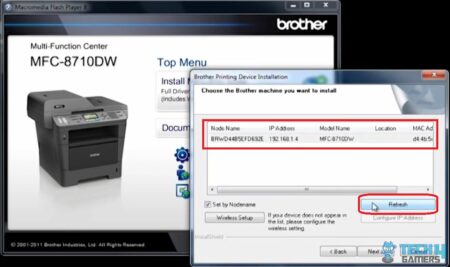
- Select Machine: A list of all the Brother machines will be displayed > Select your machine > Click Next.
- If your device’s name isn’t visible, click the Refresh button or check the network connection.

Refresh List – Image Credits (Tech4Gamers) - Complete Registration (Optional): Once the Registration page appears, you can register online > Click Next > Click Next on the next screen > Restart your computer once prompted to do so.
Configuring Brother Printer MFC-J1205W And Similar Models
To wirelessly connect specific Brother printers to your laptop, you must download and install the Brother Mobile Connect app on your phone first.
Once you have installed the app on your phone, enter the printer in the Setup Mode. Here’s how to do that:
- Access Wi-Fi Settings: Locate the Wi-Fi button on the Control Panel just above the power button > Press and hold it > release it after about 2 seconds
- Enter Setup Mode: Once the Power and Wi-Fi LEDs start blinking, it means that the printer has entered the Setup Mode.
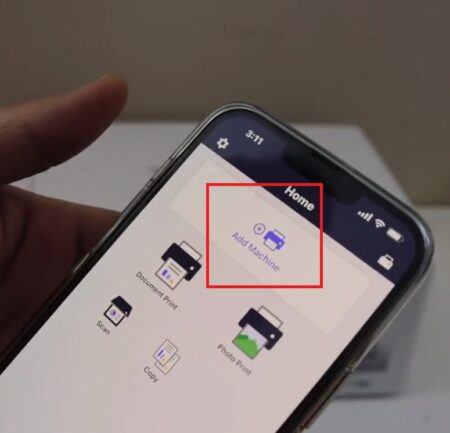
- Add Machine: Brother Mobile Connect App > Add Machine > Select Not Connected.

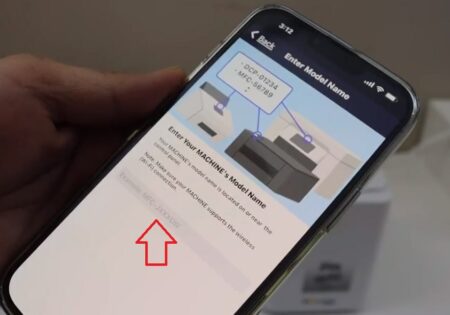
Add machine – Image Credits (YouTube-Brother USA) - Enter Name: Enter your Brother printer’s model number > Press Confirmed.

Enter Model Number – Image Credits (YouTube-Brother USA) - Setup Wi-Fi: Go to the Wi-Fi setup > Brother Setup network > Connect > Return to the app > Select Connected to the “SETUP Wi-Fi” network.
- Complete Setup: Follow the instructions on the screen for the Login procedure > Complete the setup > Connect the printer to the laptop.
- Add Device: Go to Settings on your laptop > Devices > Printers and Scanners > Add a printer or scanner > Find your printer’s name > Add Device.

Printers And Scanners – Image Credits (Tech4Gamers) - Complete Connection: You will see the Ready icon once the printer has successfully been connected to the laptop.

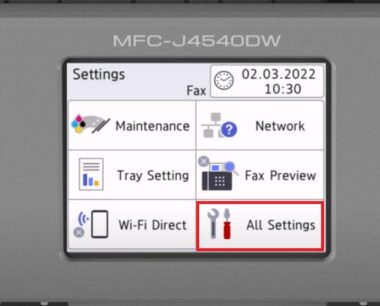
Connecting Via Wi-Fi Direct (J4540DW And Similar Models)
Some Brother printers come with a built-in Wi-Fi Direct functionality. Wi-Fi Direct is a convenient option to connect your Brother printer wirelessly to your phone, tablet, or PC. This feature is handy if you lack a wireless network.
- Access Network Settings: Turn on the printer > Go to Settings > All Settings > Network.

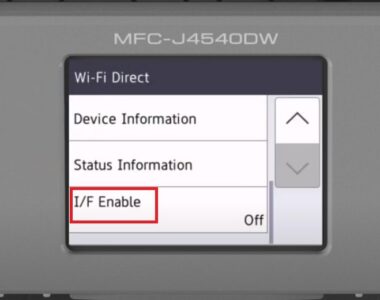
All settings – Image Credits (YouTube-Brother USA) - Turn On Group Owner: Go to Wi-Fi Direct > Group Owner > Turn it ON.

Group owner – Image Credits (YouTube-Brother USA) - Enable I/F: Scroll down > I/F Enable > Turn it On.

I/F enable – Image Credits (YouTube-Brother USA) - Create Wi-Fi Direct: Your Brother printer has now created a Wi-Fi Direct network.
- Note SSID And Password: Wi-Fi Direct menu > Select the Manual option > Note down the SSID and the password.

Connecting The Laptop To The Wi-Fi Direct Network
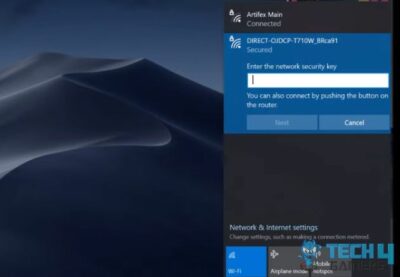
Now, you need to connect your laptop to the Wi-Fi Direct network created by your printer. According to our research, this method can be successfully used to connect your printer via a Wi-Fi network.
- Connect To Wi-Fi Direct: Open the Wi-Fi settings on your laptop > Look for the network named Direct, followed by your printer’s model number > Connect using the login credentials previously noted

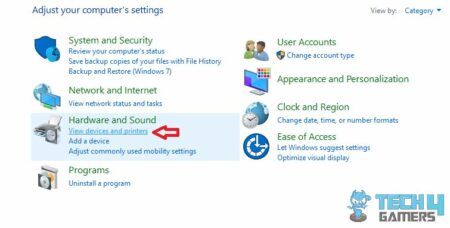
Connect to the network – Image Credits (Tech4Gamers) - Open Control Panel: Control Panel > Hardware and Sound > View devices and printers.

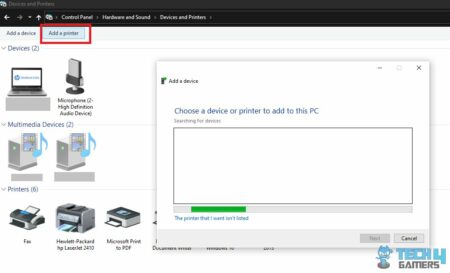
Hardware and Sound settings – Image Credits (Tech4Gamers) - Add Printer: Select Add a Printer > Select your printer > Click Next > If prompted, enter the WPS Pin displayed on your printer’s screen > Click Next.

Add a printer – Image Credits (Tech4Gamers) - Your printer will now be visible in the list named Direct, followed by the model number of your printer.
- Install Drivers: Click Add a printer > Repeat the previous process to install the required drivers on your laptop.
- Finish Installation: Click Finish to complete the process.
This guide is aimed to provide you with the know-how required to connect your Brother printer to your laptop wirelessly. Not all the models have been discussed in this guide; however, all the major categories have been covered. The connection procedures for the rest of the models are almost similar to the ones discussed in this guide.
Thank you! Please share your positive feedback. 🔋
How could we improve this post? Please Help us. 😔
[How To’s & Guides Editor]
Haddi has been in the Gaming and tech Space for over 10 Years Now; he has worked on notable websites like eXputer, Gamepur, Gear Siege, Gearnuke, and plenty more. He is an expert at Games & PC Hardware; you can expect him to solve any problem. People often joke, that if there is any problem anyone can solve, Haddi can solve it faster. Currently, Haddi writes and manages a Team of Experts at Tech4Gamers.
Contact: Haddi@tech4gamers.com


