Often, the DCOM has trouble connecting to the computer. This error usually arrives due to a port or network connection fault. A blockage or fault between the server and computer ports causes the error, so the computer often displays the error message “DCOM was unable to communicate with the computer.” Additionally, we can fix the issue by turning off the firewall and removing corrupt files and directories.
- The DCOM server often has trouble connecting to the computer, as shown in error code 10028.
- A blockage between the computer and server ports, firewall, corrupted registries, and invalid DCOM configuration causes this issue.
- Moreover, this issue can be resolved by turning off the network firewall, removing corrupt files and registries, and configuring your DNS configuration.
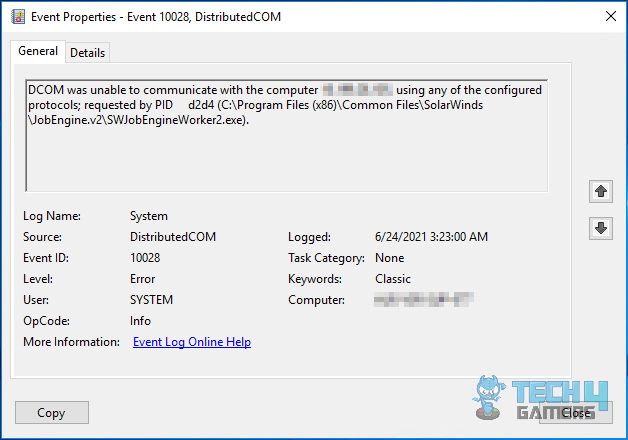
The error message may be displayed as below:
- Log Name: System
- Source: Microsoft-Windows-DistributedCOM
- Event ID: 100XX
- Level: Error
Method Difficulty Rating
DCOM Configuration
Rated: 6/10
Enabling Files & Printer Sharing
Rated: 7/10
Registry Editor
Rated: 10/10
Via DCOM Configuration
You can also resolve the issue using the DCOM configuration settings. This method comes in handy when the DCOM does not have the necessary permissions to communicate correctly. It is a valuable method that I tested on my system PC.
This method was similar to what I could think of as a solution to my problem, which proved right. Additionally, various Spiceworks Community users also gave the same feedback about this method. Follow the steps below to apply this method:
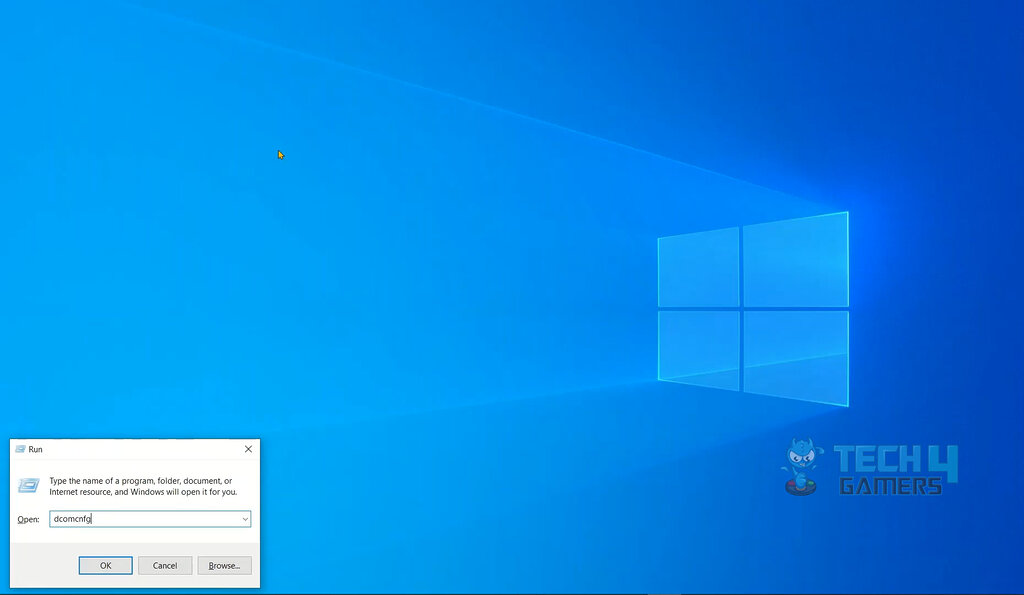
- Open DCOM Configuration: Click the Start menu icon > Type dcomcnfg in the search bar for the Windows start menu > Hit Enter on the resultant application.
dcomconfg Command (Image By Tech4Gamers) - Open Computer Properties: Select Component services > Click on Computers > My Computer icon in the list > Select the Properties option.
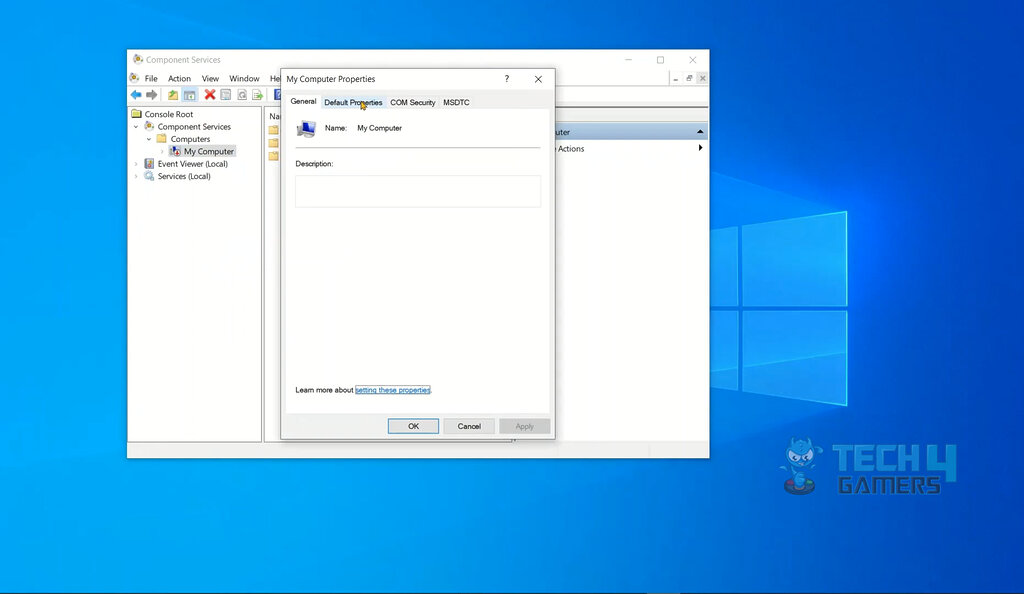
My Computer Properties Box (Image By Tech4Gamers) - Open Default Properties: Inside the properties window > Click on the Default Properties tab.
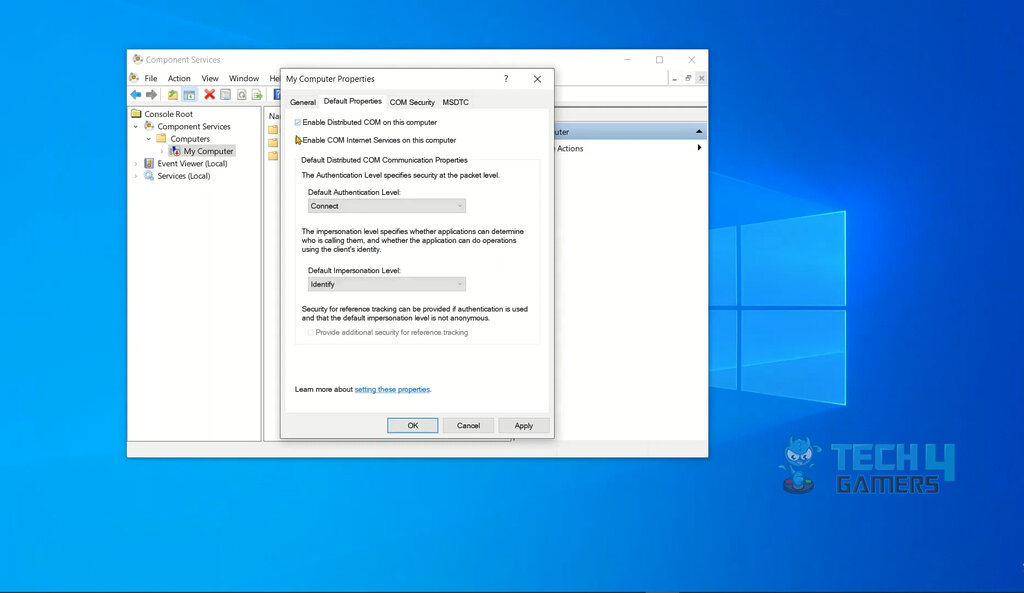
Default Properties (Image By Tech4Gamers) - Check relevant boxes: Check the boxes in the Default Properties section.
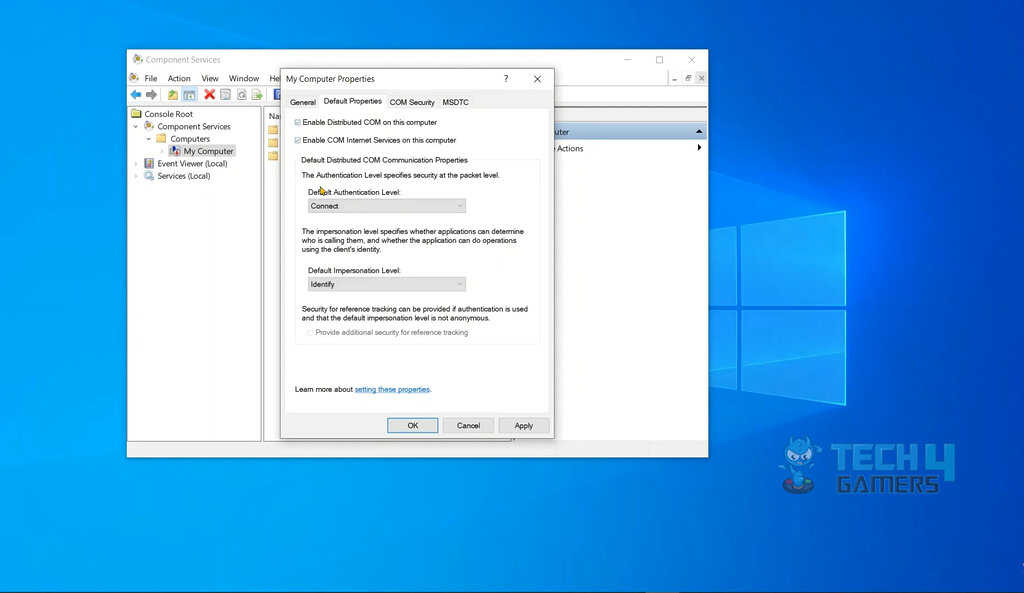
Enable Checks (Image By Tech4Gamers) - Hit OK: Click on Yes > Hit OK.
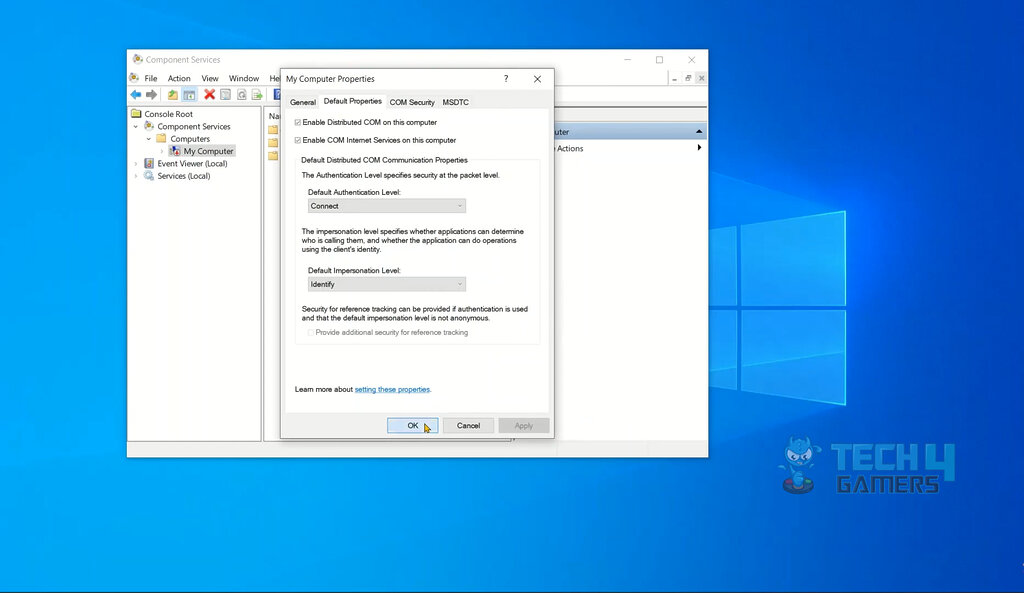
Hit OK (Image By Tech4Gamers) - Rerun the service: Rerun the service giving the issue > check if this method resolved the error.
Turning On Files And Printer Sharing On The PC
Another method to eliminate the error is to turn on the files and printing option on the computer. This method enables the computer to start sharing the necessary files and components with other services, which can also start the data transfer between the DCOM servers and the computer.
This removes the probable blockage from the sharing modules, thus providing a clear path to the DCOM servers. I implemented this method in my system, which resolved the DCOM issue. Additionally, when I researched online, I discovered this method was fruitful, according to users on forums like Microsoft. Follow the steps below:
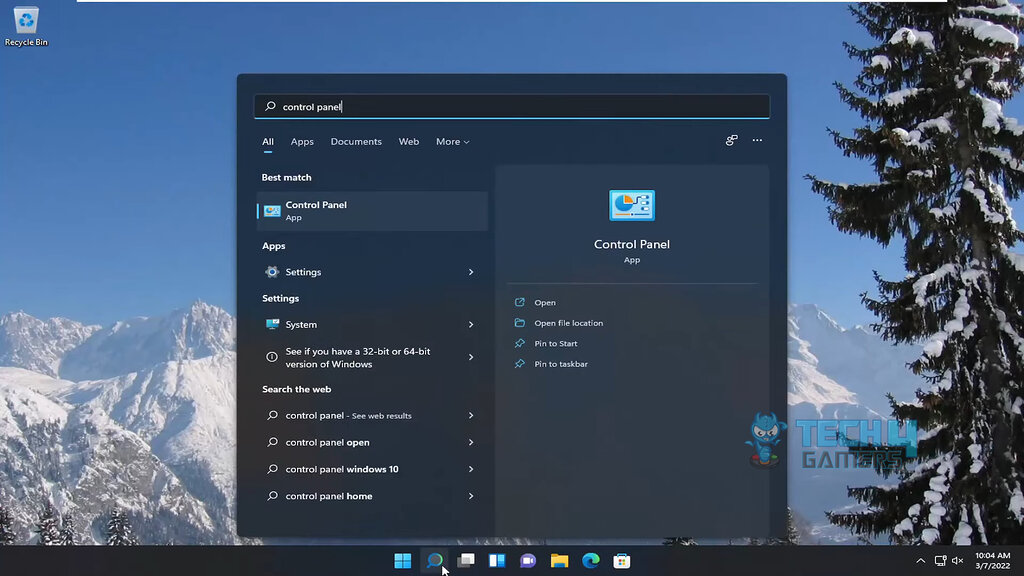
- Open Control Panel: Open the control panel > Press Enter.
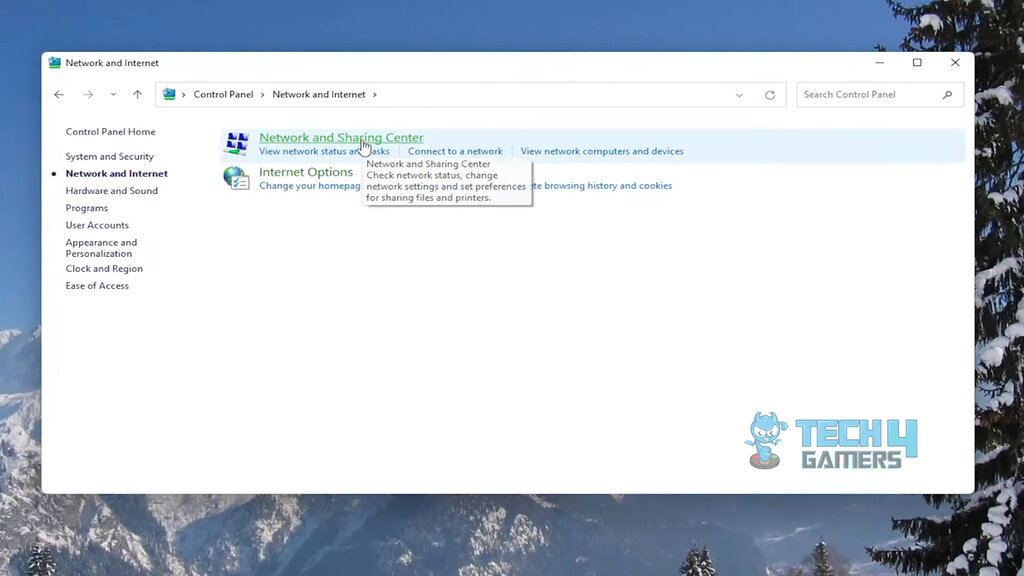
Control Panel (Image By Tech4Gamers) - Open Network & Sharing Center: Click on the network and internet option > Network and sharing center.
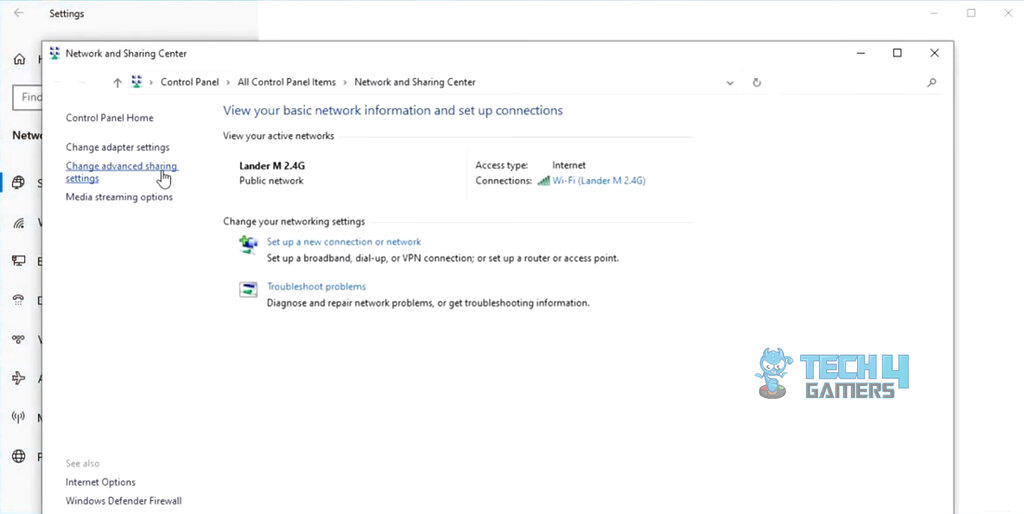
Network & Sharing Center (Image By Tech4Gamers) - Enable Files & Printer Sharing: Select the change advanced sharing settings > Turn on file and printer sharing.
Change Advanced Settings (Image By Tech4Gamers) - Recheck the issue: Close the window > Rerun the service > Check whether the error has been resolved.
Using Registry Editor
Using the Registry Editor can potentially resolve the DCOM error by allowing users to modify or repair registry entries related to DCOM (Distributed Component Object Model). Adjusting specific registry settings through the Editor can address communication issues between DCOM components, ensuring a smoother interaction and resolving errors.
However, caution should be exercised when making changes in the Registry Editor, as incorrect modifications can impact system stability. The following method is highly proficient as it tested positive for me. Additionally, I discovered that this method benefited users of the Lansweeper Community. I tested this method as well and found it helpful. You can also execute this method by following the steps discussed below:
Iteration 1
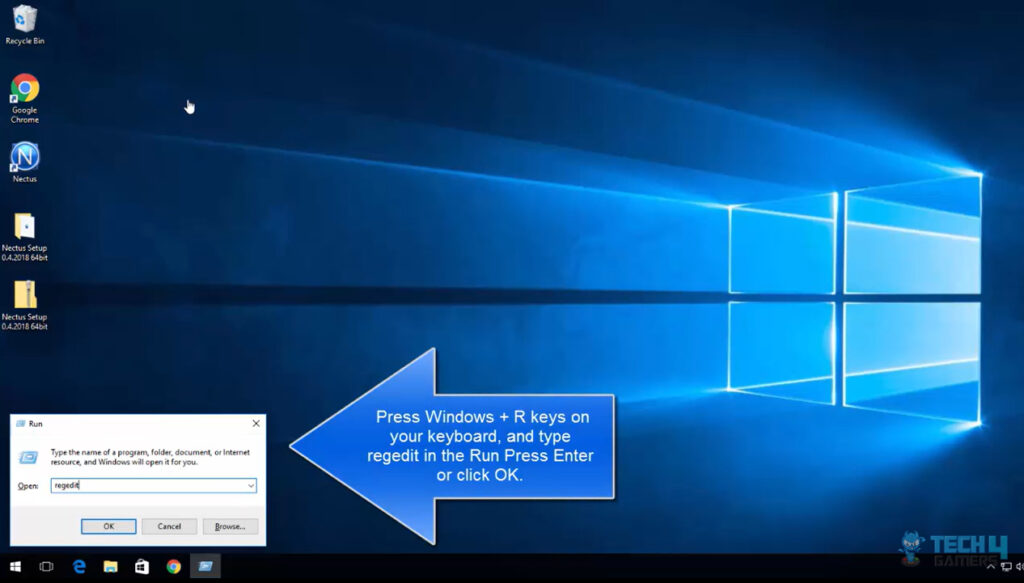
- Run Windows Registry: Execute the Run Utility by pressing your keyboard’s Windows + R key combination > Type regedit in the Run command bar > Press Enter > Click OK.
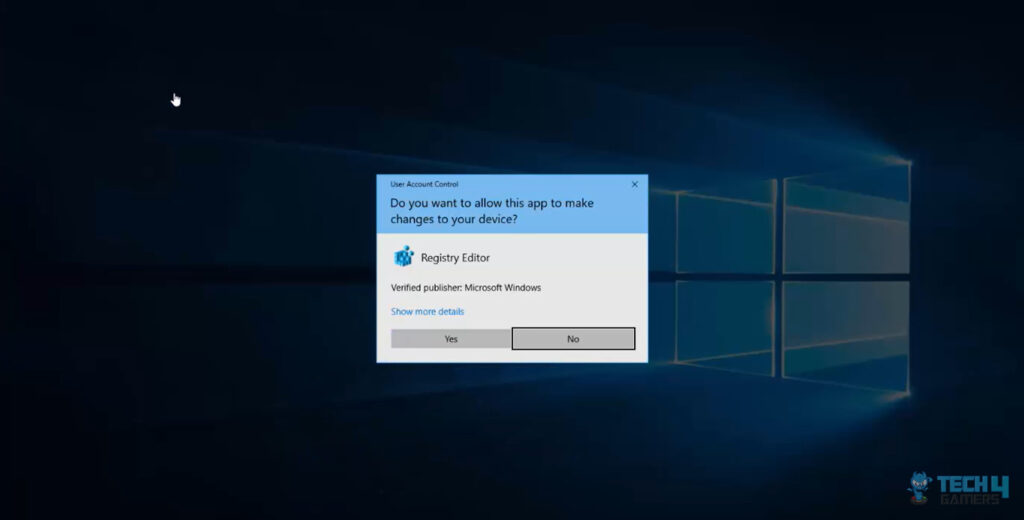
regedit.exe In Run Utility (Image Credits: Tech4Gamers) - Allow operation: Allow Windows to operate the Registry Editor by clicking on Yes.
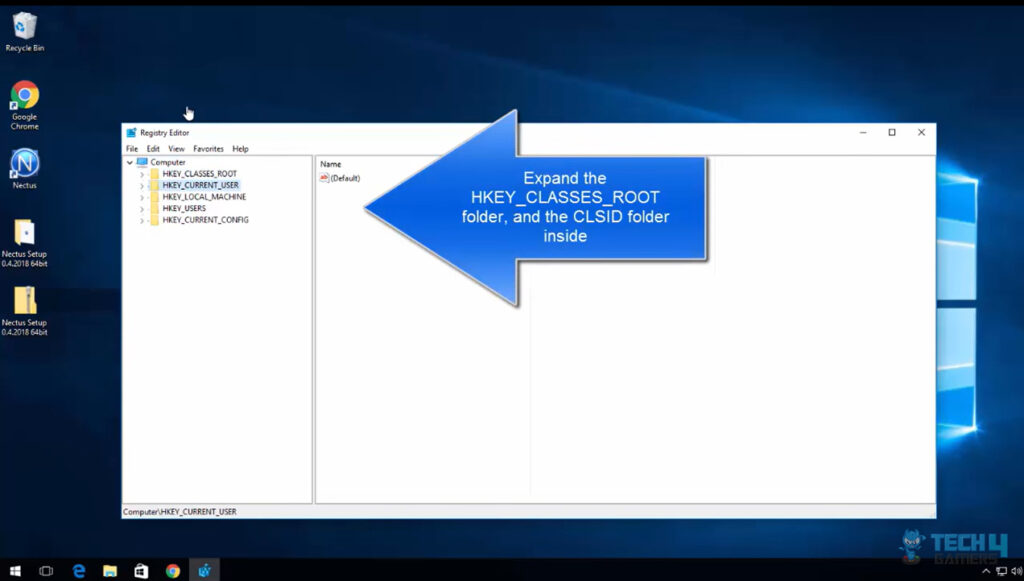
Permission Tu Run Registry Editor (Image Credits: Tech4Gamers) - Go to CLSID Directory: In the Registry Editor > Locate and expand the HKEY_CLASSES_ROOT folder by clicking on it > Do the same for the CLSID folder inside the directory.
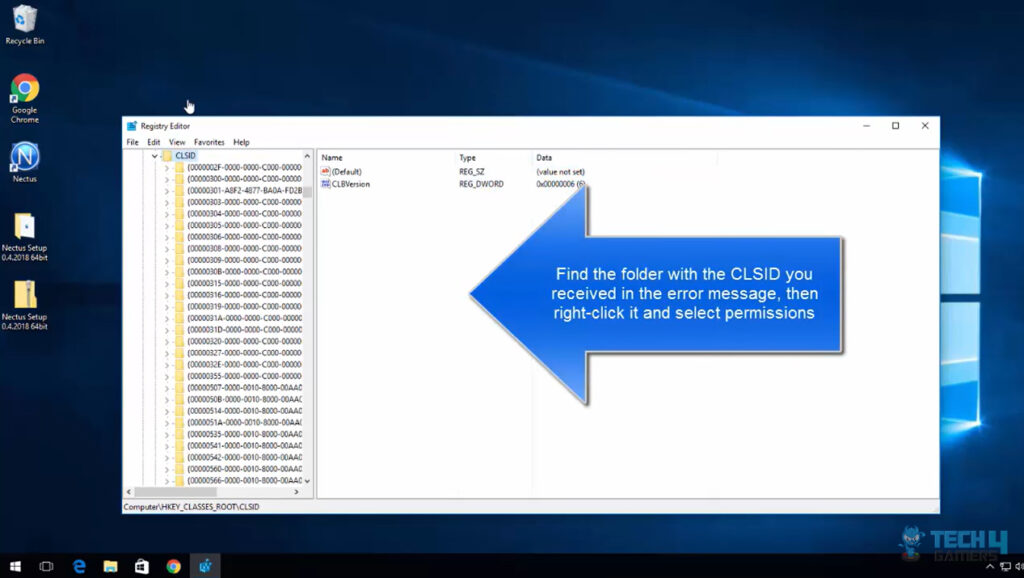
Registry Editor HKEY_CLASSES_ROOTS Directory (Image Credits: Tech4Gamers) - Go to the Error folder’s permissions: Right-click the error folder inside the CLSID directory > Go to its permissions.
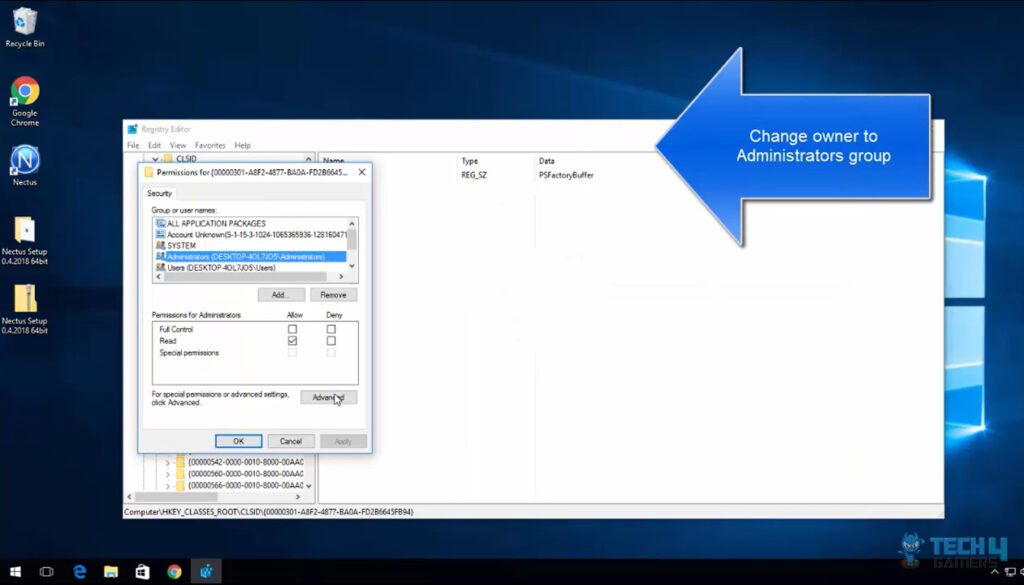
CLSID Directory Files (Image Credits: Tech4Gamers) - Change Owner to Administrator: In the permissions tab > Change the owner to Administrator’s Group.
Administrator’s Group (Image Credits: Tech4Gamers)
Iteration 2
- Repeat steps: Repeat steps 1-4 from Iteration 1.
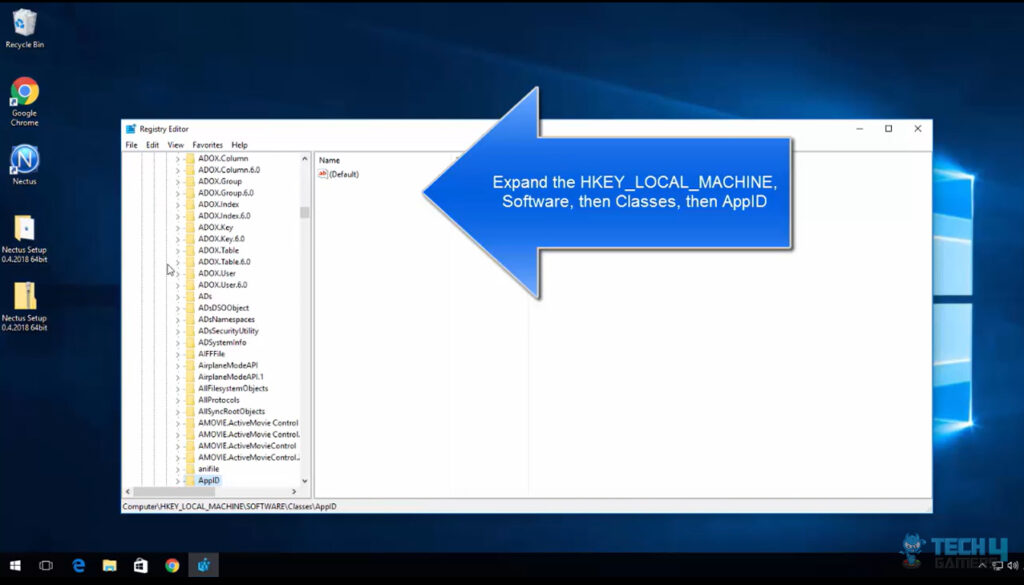
- Go to AppID Folder: Go to the CLSID folder > Locate the AppID folder > Click on it to expand it.
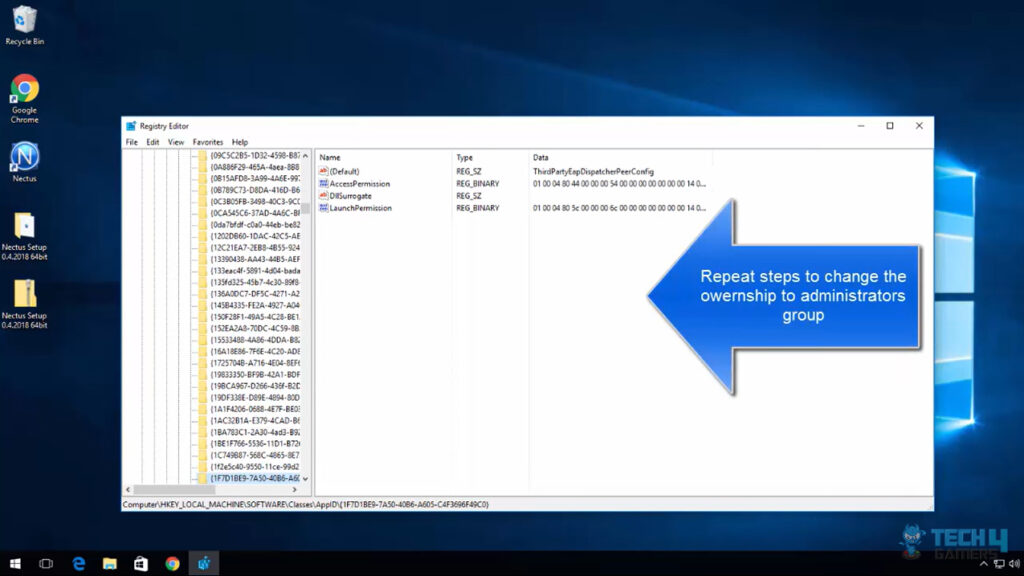
AppID In CLSID Folder (Image Credits: Tech4Gamers) - Go to the error folder’s permissions tab: Find the folder within the AppID folder you received in the error message > Right-click on it > Select permissions.
Desired Folder In AppID Directory (Image Credits: Tech4Gamers) - Change the owner to Administrator: In the permissions tab > Change the owner to Administrator’s Group.
Administrator’s Group (Image Credits: Tech4Gamers)
Iteration 3
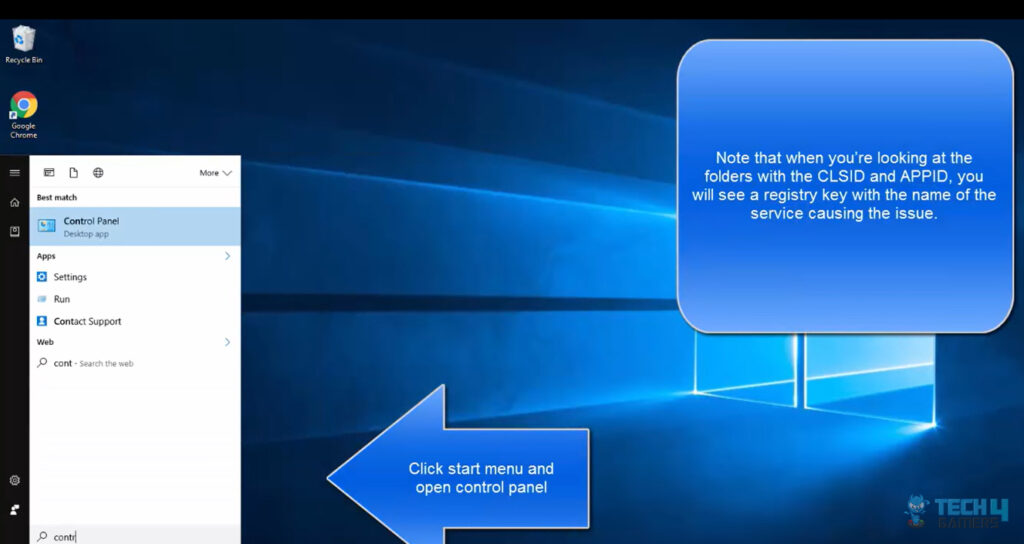
- Search Control Panel: Search the Control Panel in the Start menu.
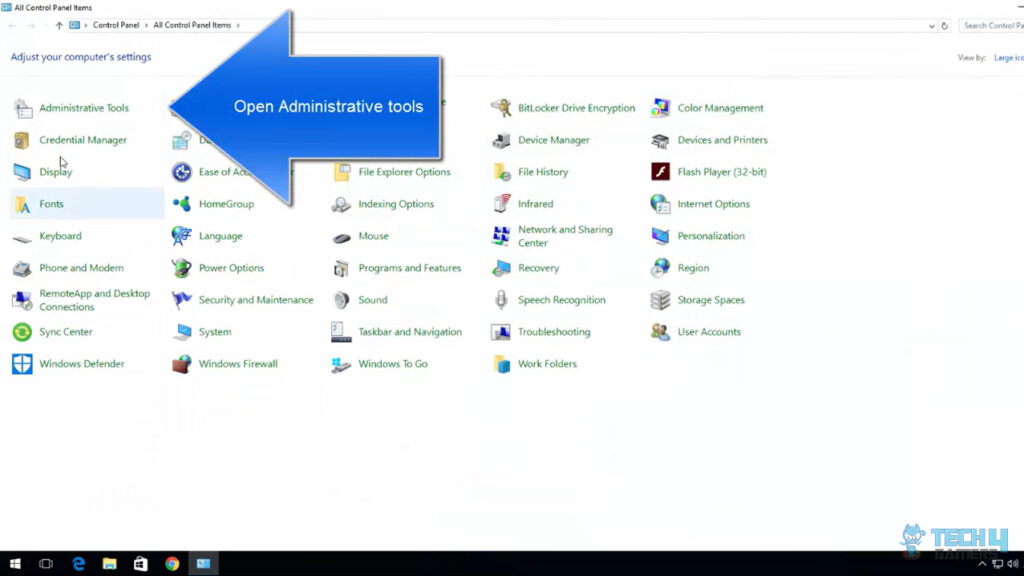
Opening The Control Panel (Image Credits: Tech4Gamers) - Open Administrative Tools: In the Control Panel > Locate and click on Administrative Tools.
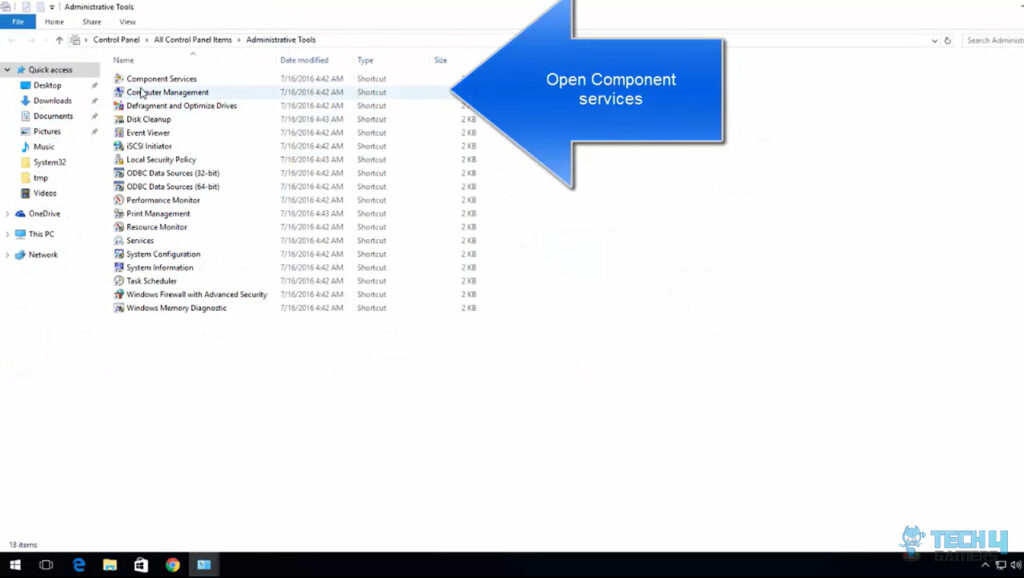
Administrative Tools In Control Panel (Image Credits: Tech4Gamers) - Open Component Services: Once inside the Administrative tools > Locate and click on the Component Services from the list.
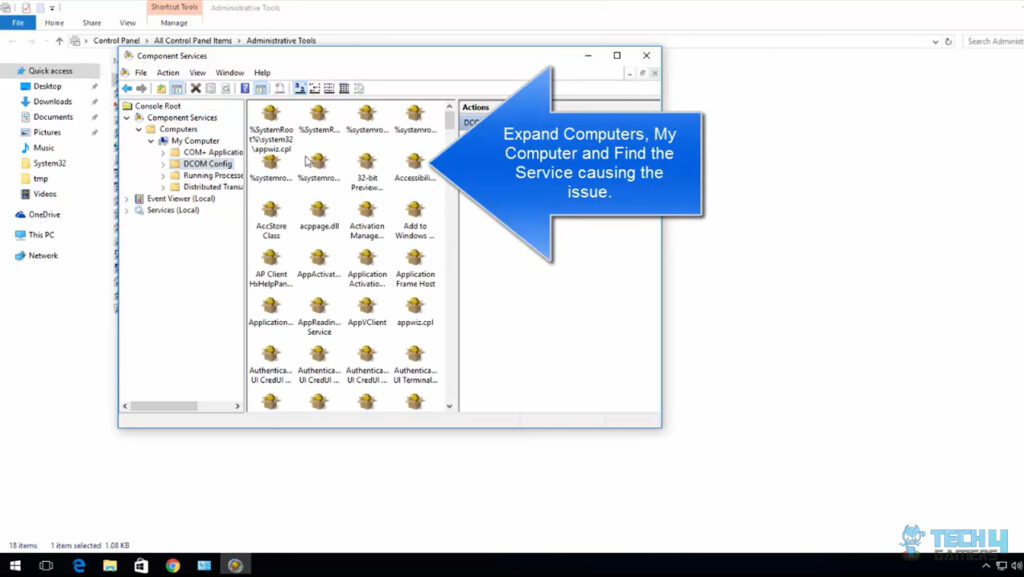
Component Services (Image Credits: Tech4Gamers) - Open My Computer Directory: Inside Component Services > Select Computers option > My Computer.
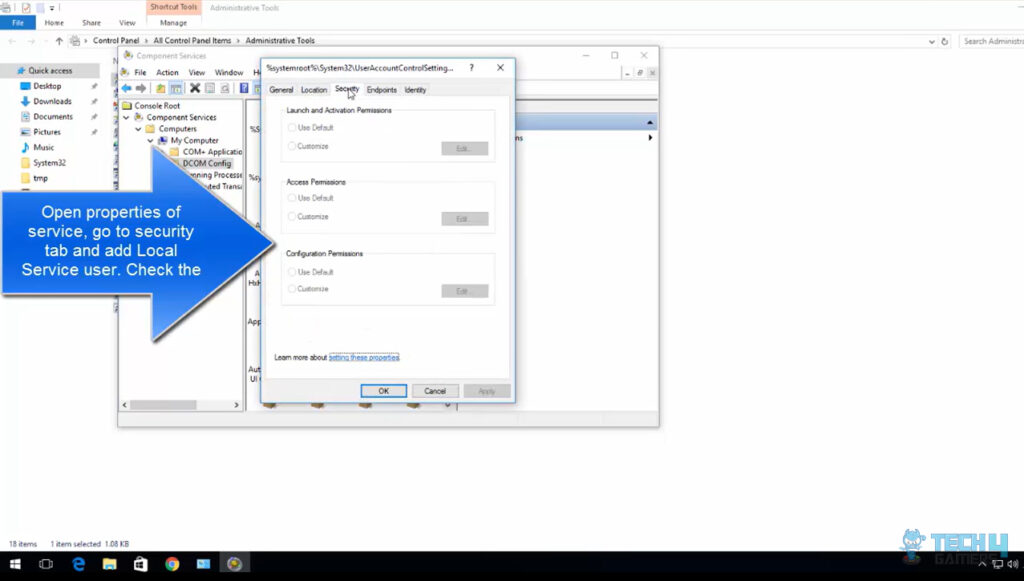
My Computer Folder (Image Credits: Tech4Gamers) - Select Security Tab: Locate the service from the list causing the DCOM connectivity issue > Click on the Services properties > Select the Security tab.
Security Tab (Image Credits: Tech4Gamers) - Locate Administrator Permissions box: Locate and select the Local Service User > Check the Administrative Permissions box option.
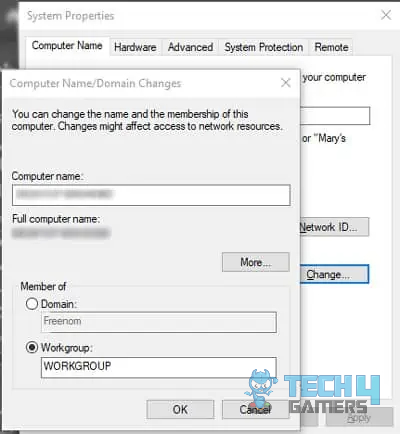
Change Domain To Workgroup System Properties (Image Credits: Tech4Gamers) - Apply Changes: Apply the change > Click on OK > Rerun the relevant process > Check if the computer has solved the error.
Wrap Up
Unlike the rest of the errors, this issue has a unique connection as it relates to the DCOM servers, used mainly in organizations over local or WLAN-connected computers. As the error mainly impacts organization and businesses I was not surprised to see user compaints on popular social media platforms.
Event Log System Error: ADMINSKXP – 10009:DCOM was unable to communicate with the computer ASHFORD06 using any of the configured
protocols.— Ashford Sch ICT Dept (@ictash) April 24, 2009
In my opinion, the people facing this error should check for the permissions of the computers in connection, because if any of the computers denies the connection, it can potentially cause a disruption in the entire network. Besides this, users have also reported of the error surfacing when they install a new update.
However, there has been no response from developers on the issue. so while we wait for an official response regarding a permanent solution, you can follow my guide to resolve the issue on your system.
Relevant Articles:
- Windows Update Error 0x800f0922
- Your PC is At Risk Updating It Now [FIXED 2024]
- How To Remove Malware And Viruses From PC?
- FIXED: Windows 11 Error “No Such Interface Supported”
- Undoing Changes Made To Your Computer [16 FIXES]
Thank you! Please share your positive feedback. 🔋
How could we improve this post? Please Help us. 😔
[Error Fix Expert]
Hello, I’m Uzair Shabir, a tech enthusiast pursuing a Bachelor’s in Electrical Engineering. At Tech4Gamers, I’m an Error Fix Expert, crafting articles on different issues and how to fix them. With a Google IT Support Certificate, I navigate tech complexities to deliver insightful perspectives.
Get In Touch: UzairShabir@tech4gamers.com




![Windows Error 80072EFE [Our Quick Fixes] Error 80072EFE](https://tech4gamers.com/wp-content/uploads/2023/08/HOW-TO-218x150.jpg)
![Xbox One Controller Flashing And Not Connecting [Our Fixes]](https://tech4gamers.com/wp-content/uploads/2023/08/How-TO-14-218x150.jpg)
![PC Stuck On Motherboard Screen [Our Tested Fixes]](https://tech4gamers.com/wp-content/uploads/2023/05/How-TO-42-218x150.jpg)
