")


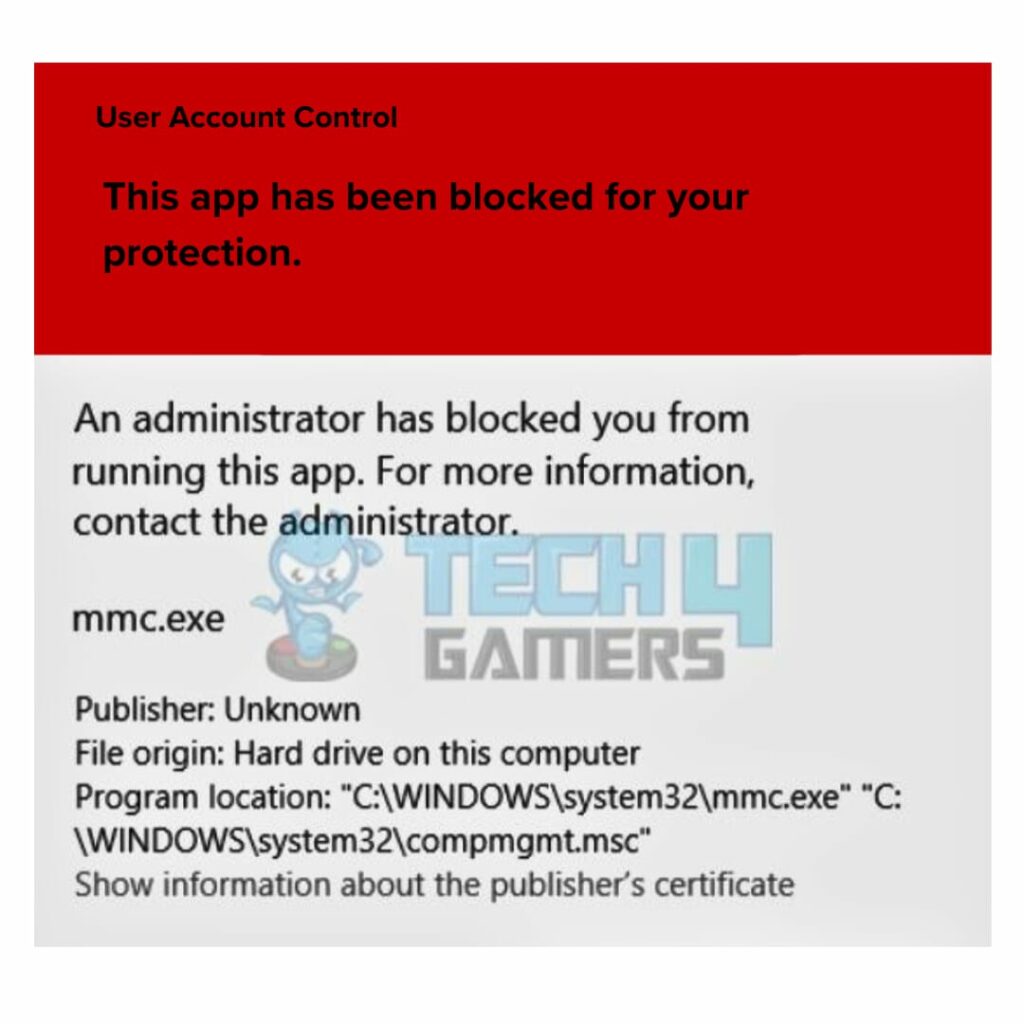
Windows 11 has a built-in feature that protects your PC from harm by blocking the applications it suspects as a threat. You might face the error message, “This app has been blocked for your protection,” when launching an application in Windows 11. It could be because of missing administrator privileges, overly restrictive antivirus software, outdated applications, virus and malware threats, or misconfigured SmartScreen settings.
- Windows 11 can block applications it deems threatening to system security and give out the error “This app has been blocked for your protection.”
- It might arise due to virus and malware threats, SmartScreen settings, restrictions from antivirus software, and missing admin privileges.
- Fix the error and unblock the application by tweaking Registry Editor, eliminating virus and malware threats, or running the application via Command Prompt.
Here is what the error message appears like:
Method Difficulty Rating
Rated: 3/10
Rated: 7/10
Rated: 5/10
Rated: 7/10
Rated: 7/10
Run The App Using The Command Prompt
If you cannot access the application from the File Explorer and are facing a protective blockage issue from the system, launch it through the Command Prompt using the application path. Here’s how to access via the prompt:
- Copy Path: Right-click the application > Properties > Shortcut tab > Copy its path from the Target bar > OK.
- Command Prompt: Right-click the Start menu > Command Prompt > Paste the application’s path in the prompt > Hit Enter.
Disable Smart App Control
Smart App Control is a built-in feature that provides security and system functionality improvement by blocking untrustworthy or harmful apps. Also, the apps that slow down or show ads are also restricted by the feature. Disabling Smart App Control immediately resolved the app blockage issue in my Windows 11. Here’s how to turn off the feature:
- Go to Windows Security: Access Settings > Privacy and Security > Windows Security.
- Smart App Control: On the left pane, select App & Browser Control > Smart App Control > Click on the Off button.
Run The Program As An Administrator
Several programs require elevated access for their prompt performance. If a user tries to access such applications without granting them administrator rights, the system will restrict it, and an app blockage error message will pop up on the screen. Here’s how to perform the task:
- Type App in Search: Open the Start menu > Type the app’s name in the Search Bar.
- Run as Admin: Right-click the app > Run as Admin.
Tweak The Registry Editor
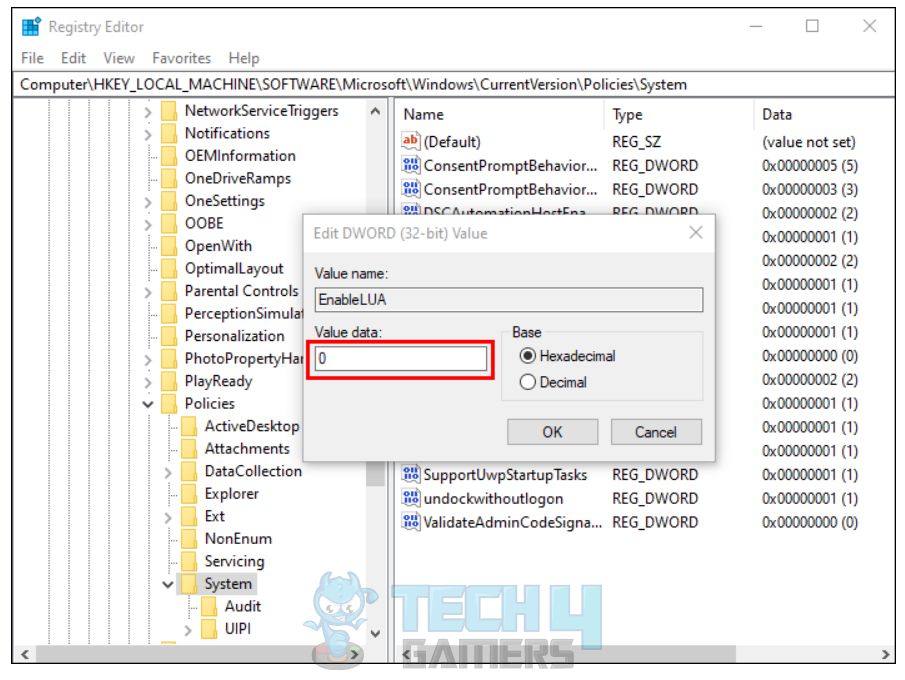
Sometimes, the system settings are the culprit behind the app blockage issue in Windows 11. In this case, tweak the Registry Editor and unblock the app by adjusting the User Account Control settings. Here’s how to adjust the settings:
- Open Run Dialog: Launch Run dialog box > Type regedit > Enter.
- Hit Yes: When the UAC prompt appears, hit Yes.
- Navigate: Now, navigate to the given path:
-
Computer\HKEY_LOCAL_MACHINE\SOFTWARE\Microsoft\Windows\CurrentVersion\Policies\System
- EnableLUA and Save: In the left pane, look for EnableLUA > Double-click on it > Set the value as 0 > OK > Restart PC.
The method also seems to be working for several people , so you can give it a good to see if it fixes the issue for you.
Modify The Group Policy Settings
Through Group Policy Editor, Windows 11 users can modify the system security settings and manage application allowance and blockage matters. Therefore, adjusting settings via the editor may be an effective fix for you, as it also worked for me. Here’s how to adjust the settings:
- Type gpedit.msc: Launch Run > Type gpedit.msc > Enter.
- Security Options: Navigate to Local Computer Policy > Computer Configuration > Windows Settings > Security Settings > Local Policies > Security Options.
- Apply these and Save: Double-click on User Account Control > Find Run all administrators in Admin Approval Mode > Mark Disabled option > Apply > OK > Restart.
As per my experience, malware and virus threats, if not taken seriously, can cause severe damage to your system functionality, privacy, and security and harm the stored data. Therefore, remove malware and viruses from your system by running antivirus scans promptly to see if the app unblocks.
In my opinion, this is a useful security feature in Windows 11 that protects a computer from malware attacks and data theft. However, oftentimes, I received the pop-up without any legitimate reasons, and users across the Microsoft Community also reported the same.
Final Thoughts
While this error can be frustrating, I found it’s often triggered by security measures and is usually fixable with a few tweaks. It halts app execution, hindering productivity and potentially blocking essential tools. Frequent occurrences can create frustration and distrust in system reliability.
More From Windows 11:
- How To Fix User Profile Cannot Be Loaded In Windows 11
- How To Fix Google Drive Not Syncing On Windows 11
- FIXED: Local Security Authority Protection Is Off In Windows 11
- How To Fix Windows 11 Screen Saver Not Working
- 4 Ways To Fix Docker Desktop Starting Forever In Windows 11
Thank you! Please share your positive feedback. 🔋
How could we improve this post? Please Help us. 😔
[Errors Troubleshooting Expert]
Arsalan Shakil (aka GuyThatDoesEverything on YouTube) is a PC Tech Enthusiast and Electronic Geek. With over 10+ years of experience in Electronics, he then decided to explore Software Engineering to design embedded products and automate existing hardware solutions.
When he started tearing down old cameras to understand how they worked, he was shocked (literally, when he got zapped by a flash discharge capacitor), giving him the power (debatable) to fall in love with videography/photography. He also started making some fun videos that later became YouTube tech reviews.
Skills:
- 10+ years of experience in Electronics design, embedded solutions, and prototyping
- Majored in Software Engineering
- Research paper publication in IEEE for Embedded Military Uniform & LoRa WAN wireless technology
- Specialized in IoT Solutions
- PC Enthusiast & PC Modder
In his local region, he’s known to expose cheap PSU brands, often claiming fake certification or false claims on the box. He’s a true nerd and needed some friends in his life. Then he met some guys who work at Tech4Gamers, and they also came out to be equal nerds who suggested he join Tech4Gamers as a Hardware Expert.


