![This Effect Requires GPU Acceleration [FIXED]](https://tech4gamers.com/wp-content/uploads/2023/03/Error-Fixes-9-1068x580.jpg "This Effect Requires GPU Acceleration [FIXED]")


The “This effect requires GPU acceleration” often occurs when using Adobe Premiere. This may be because your GPU doesn’t support GPU acceleration, Adobe can’t identify your GPU, or your Windows has outdated graphic drivers. Luckily, this issue has many solutions, from which enabling the GPU acceleration and changing the order of the effect that requires GPU acceleration are most likely to work.
- This error can appear for many reasons, including old graphic drivers, your GPU not supporting graphic acceleration, and Adobe Premiere failing to connect to the GPU.
- There are several ways to fix this error. You can restart the computer, enable GPU acceleration, reorder the effects, uninstall third-party plug-ins, update the graphics driver, and more.
- Reinstalling Adobe Premiere may also fix the issue, but this should be kept for last.
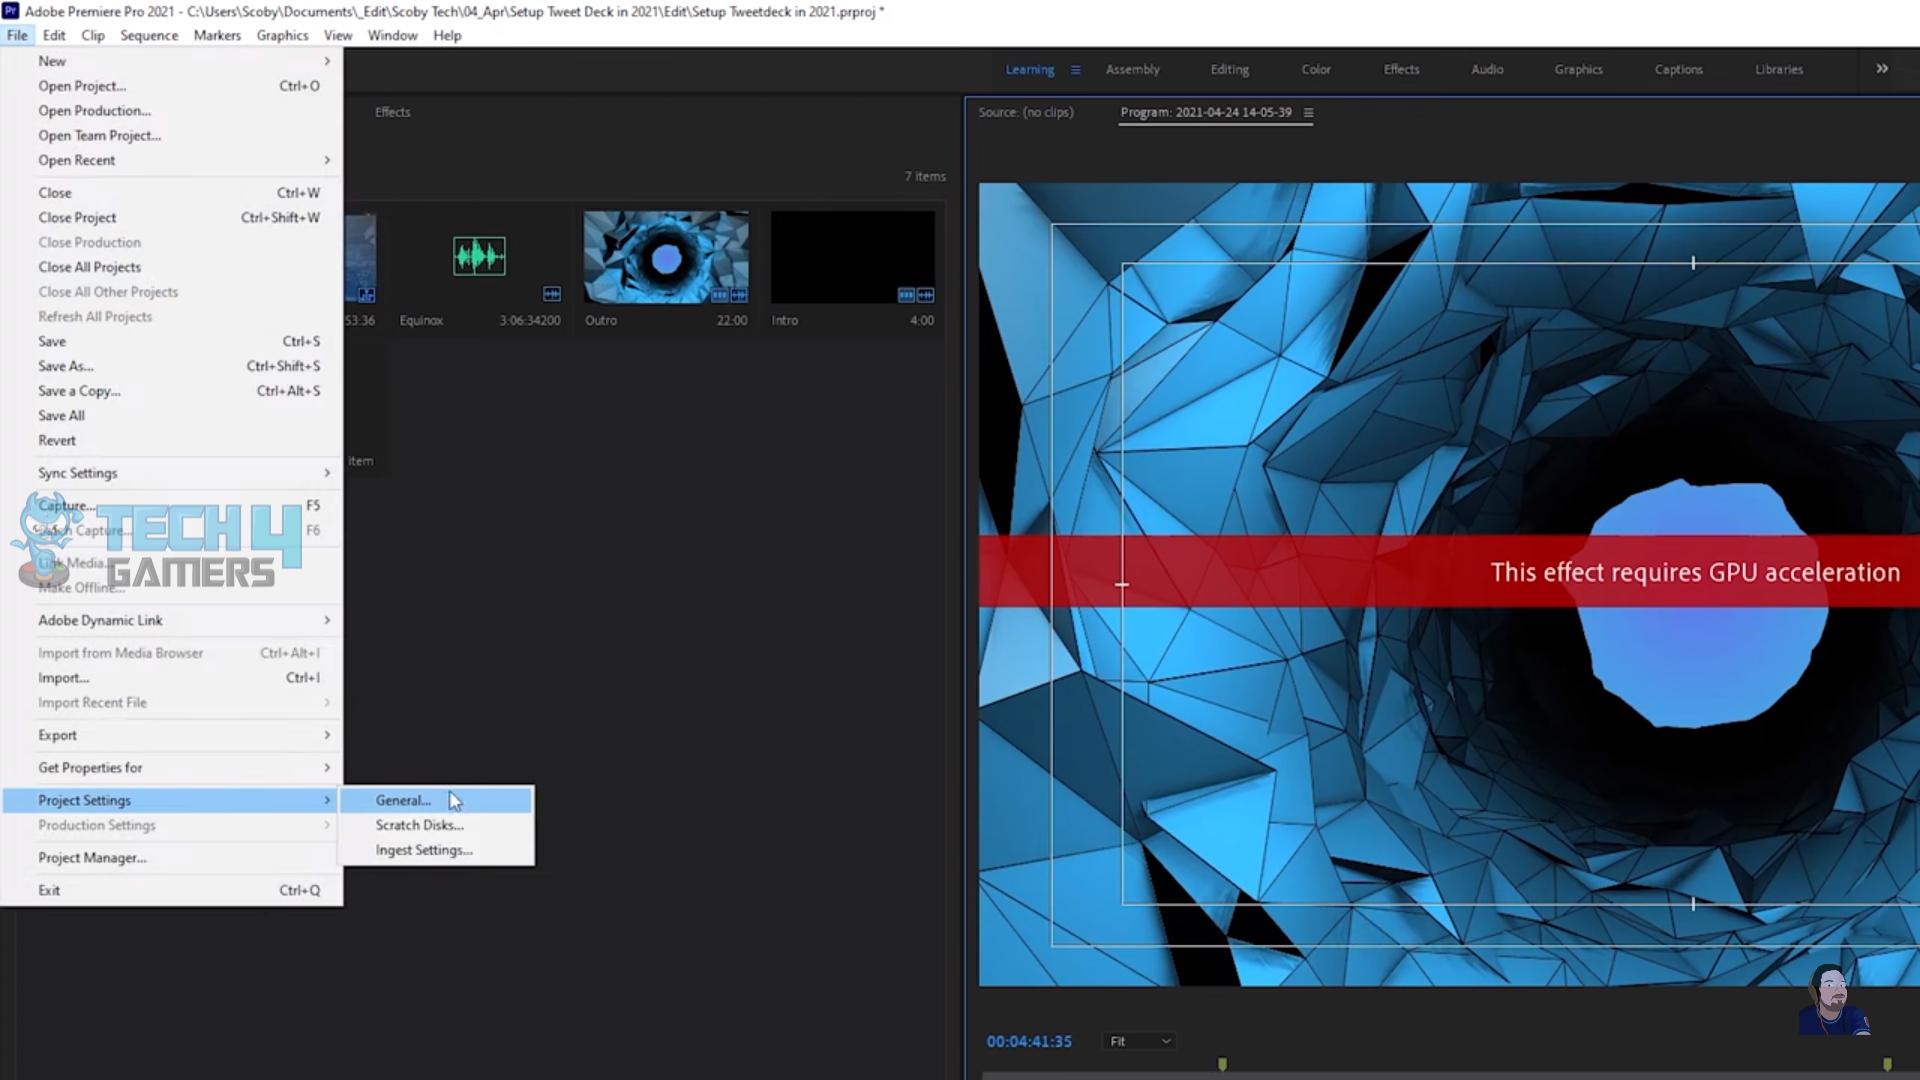
This is the message you will see on Adobe Premiere when this error occurs:

Method Difficulty Rating
Rated: 2/10
Rated: 2/10
Rated: 3/10
Enable GPU Acceleration
Since many effects require GPU acceleration to provide real-time high-quality playback without rendering, it is necessary to enable GPU acceleration for these certain effects to work. This method has also helped many Adobe Premiere users on the Adobe forum. The steps to enable it are the same on both Adobe Premiere Pro and After Effects; follow along:
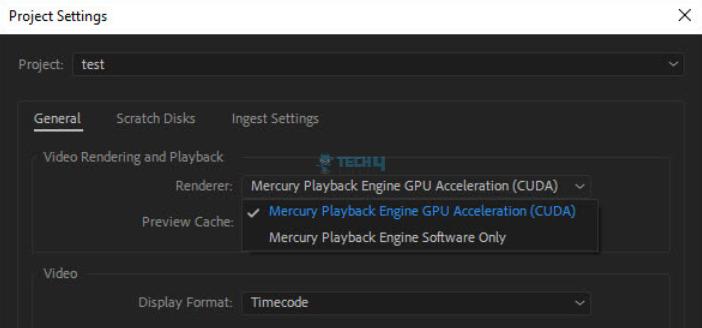
- Project Settings: On the top-left corner of the screen, click “Files” >” Project Settings” > “General.”

Go To The General Options Of The Project Settings (Image By Tech4Gamers) - Select Renderer: Click the Renderer pop-up menu under the Video Renderer and Playback section.

Enable GPU Acceleration From Project Settings (Image By Tech4Gamers) - Finalize And Save: Click Mercury Playback Engine GPU Acceleration > OK to save changes.
Once you have enabled GPU acceleration, try to apply the same effects and transitions again to check if the error is resolved.
Change Effects Order
You will often get this error when certain effects are stacked incorrectly. So, if you’re using multiple effects, and one of them requires GPU acceleration, then drag and drop the effects in the Effects Control panel to rearrange their order. This technique also helped many users on the Adobe forum fix the issue. However, if that doesn’t work for you, try to change the order of the effects.
You can also directly apply the effect causing the error to the clip and remove it from the Effects Control panel. This trick may seem unlikely, but it has solved many users’ issues.
Uninstall Third-Party Plug-ins
One of the best things about Adobe Premiere Pro and After Effects is that you can install third-party plug-ins to increase their capabilities. However, these plug-ins can sometimes create all sorts of issues. So, it is likely that you’re getting the effect that requires GPU acceleration error because of an outdated plug-in. Therefore, removing it may fix the issue. This method was also brought up on the Adobe forum, which assisted most users in countering the error.
Head over to Adobe After Effects or Premiere Pro’s installation folder, navigate to the Plug-Ins folder and uninstall the plug-ins. You can also use the Adobe Extension Manager to uninstall the third-party plug-ins. Check whether the Extension Manager you’re installing supports your Adobe product. Restart your computer and open Premiere Pro or After Effects to check if the issue has been resolved.
Final Thoughts
As per my research, most Adobe Premiere Pro and After Effects users who have faced the “This effect requires GPU acceleration” error have countered it by enabling their GPU acceleration or changing the effect order, which requires GPU acceleration. Therefore, this method should also fix the issue for you, but if it doesn’t, you can try other solutions I have shared above.
Frequently Asked Questions
GPU acceleration performs specific tasks on GPU hardware instead of software in the CPU. This way, you get better performance in your applications.
Related Articles:
- FIXED: Valorant Unsupported Operating System [Windows 11]
- How To Fix EA App Not Installing Windows 11
- 5 Ways To Fix Docker Desktop Starting Forever In Windows 11
- [FIXED] You Do Not Have Permission To Open The Application
- How To Fix CapCut Network Error In Windows 11
Thank you! Please share your positive feedback. 🔋
How could we improve this post? Please Help us. 😔
[Errors Troubleshooting Expert]
Arsalan Shakil (aka GuyThatDoesEverything on YouTube) is a PC Tech Enthusiast and Electronic Geek. With over 10+ years of experience in Electronics, he then decided to explore Software Engineering to design embedded products and automate existing hardware solutions.
When he started tearing down old cameras to understand how they worked, he was shocked (literally, when he got zapped by a flash discharge capacitor), giving him the power (debatable) to fall in love with videography/photography. He also started making some fun videos that later became YouTube tech reviews.
Skills:
- 10+ years of experience in Electronics design, embedded solutions, and prototyping
- Majored in Software Engineering
- Research paper publication in IEEE for Embedded Military Uniform & LoRa WAN wireless technology
- Specialized in IoT Solutions
- PC Enthusiast & PC Modder
In his local region, he’s known to expose cheap PSU brands, often claiming fake certification or false claims on the box. He’s a true nerd and needed some friends in his life. Then he met some guys who work at Tech4Gamers, and they also came out to be equal nerds who suggested he join Tech4Gamers as a Hardware Expert.


