 Threads

The Trusted Platform Module (TPM) is a critical yet frequently unnoticed chip located on motherboards or CPUs. Functioning as a crypto processor, it employs cryptographic keys to safeguard data, thereby significantly improving computer security. It protects encryption keys, user credentials, and sensitive data. In Windows 11, features like Windows Hello and BitLocker utilize TPM for identity and data protection.
Key Takeaways
- TPM 2.0 is vital for running Windows 11 and is primarily used for identity and data protection.
- Enabling TPM 2.0 involves accessing BIOS/UEFI settings, finding the TPM option in the Security or Advanced section, and enabling it to enhance security.
- Check whether your PC has TPM 2.0 through the PC Health Check app.
Verify TPM 2.0 Compatibility
To install Windows 11, confirm that your PC has TPM 2.0. You can utilize Microsoft’s PC Health Check tool for compatibility verification. After running the test, the tool will indicate whether your device meets the requirements. For a more detailed evaluation, click See All Results to check if TPM 2.0 is enabled on your PC, as activation may be necessary.
Verify TPM 2.0 status:
- Open PC Settings > Update and Security option > Windows Security.
- Ensure that you choose Specification 2.0 Version in the Security Processor section. If the number differs, your computer may be incompatible with the latest Windows.
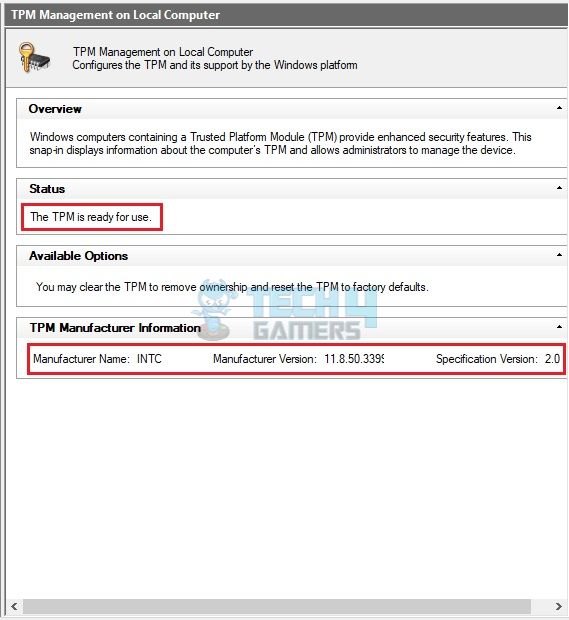
Determine whether TPM 2.0 is available by checking the Microsoft Management Console:
- Press Windows + R keys > In the Run box, enter tpm. msc.
- The TPM could be inactive on your computer if it displays the warning, Compatible TPM Cannot Be Detected. Otherwise, check the Specification Version in TPM Manufacturer Information. If it is lower than 2.0, the TPM may not work.
How To Activate Through BIOS?
The BIOS contains and manages the crucial PC settings, including the TPM. If you have the right TPM installed, the next step is to activate it in the BIOS.
AMD Motherboards
Follow these steps:
- Press F2 or Delete continuously when the computer is booting to access BIOS.
- Press F7 to enter Advanced Mode > Click on the drop-down > Choose Settings.
- Look for Security > Choose Security Device Support.
- Go to AMD fTPM Switch > Change AMD fTPM to [AMD fTPM].
Intel Motherboards
Here are the steps you must follow:
- Open BIOS > Press F7 for Advanced Mode.
- Enter Settings > Security.
- Click on Trusted Computing > Security Device Support > Change the status to Enable.
- Finally, head to TPM Device Selection > Enable PTT security.
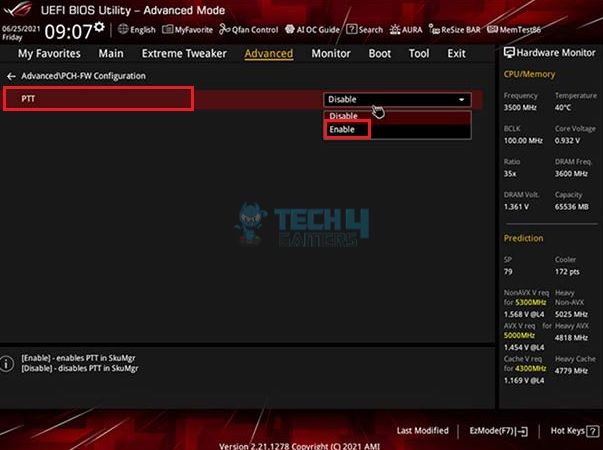
ASUS Motherboards
Take note of the following steps:
- Continue pressing the Delete button while the computer is booting up.
- Go to Advanced > PCH-FW > Look for PTT > Select Enable > OK.
- Press F10 > Restart the computer.
Can I Activate TPM 2.0 In Gigabyte BIOS Auros?
I used the following methods to enable TMP 2.0 Gigabyte BIOS for AMD and Intel motherboards, and they were quick and effective in performing the required task.
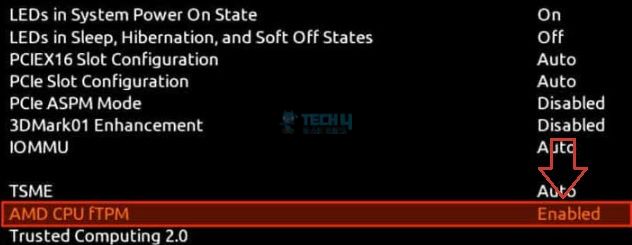
AMD Motherboards
Here is what I did:
- Restart PC > Press the Delete key > Hold it once the boot screen pops up.
- Go to Advanced Mode > Press F2 to activate TPM.
- Navigate to Settings > Miscellaneous > Choose AMD CPU FtPM > Save and Exit > Restart your PC.
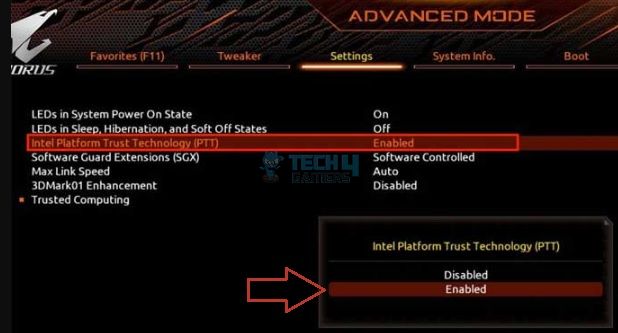
Intel Motherboards
These are the steps you should follow:
- Restart your computer > Hold the Delete key until there is a beep.
- Hit F2 for Advanced Settings > Navigate to Intel Platform Trust Technology (PTT) > Select Enabled > Save the changes and exit.
Primary Functions Of TPM
Here is a look at the primary reasons for incorporating TPM:
- Managing And Storing Passwords
- Encrypting Hard Disk Partitions
- Maintaining Platform Integrity
As per my research, enabling TPM 2.0 brings several security perks, as discussed above. Therefore, I recommend making the best use of this feature if it is compatible with your Windows. Remember that different manufacturers have varying terms for the TPM. So, double-check by learning about the specific name used by your CPU’s manufacturer on their official website.
Similar PC Guides:
- How To Check What Motherboard I Have? [All Methods]
- How To Change IP Address? [PC And Smartphone]
- How To Turn Off Overclocking? [Explained]
Thank you! Please share your positive feedback. 🔋
How could we improve this post? Please Help us. 😔
[How To’s & Guides Editor]
Haddi has been in the Gaming and tech Space for over 10 Years Now; he has worked on notable websites like eXputer, Gamepur, Gear Siege, Gearnuke, and plenty more. He is an expert at Games & PC Hardware; you can expect him to solve any problem. People often joke, that if there is any problem anyone can solve, Haddi can solve it faster. Currently, Haddi writes and manages a Team of Experts at Tech4Gamers.
Contact: Haddi@tech4gamers.com


