

Aura sync not getting detected by the motherboard can be a very frustrating issue that can affect your PC customization experience. This can lead to the failure of the other compatible parts to sync with the Aura sync software, which will shatter all your dreams of customizing your system.
Key Takeaways
- Sometimes the Aura sync software might not detect the motherboard preventing you from controlling the RGB lights on your system.
- The issue can arise due to different reasons, such as faulty or improper connections and bad wiring.
- Updating the Aura sync, turning off fast boot, and uninstalling other conflicting RGB-controlling applications might can help resolve the issue.
Why Does Aura Sync Fail To Detect Motherboard?
This Aura Sync Detection issue can be caused by a wide range of circumstances, many of which are likely resolvable, so read through.
Also Read: Can Motherboard Bottleneck Your PC?
The most common cause of this error might arise due to faulty or improper connections or bad wiring. The same holds true if Asus Aura fails to recognize any connected RGB peripheral. Another factor that can contribute to your Aura Sync not identifying the motherboard is the possibility that you’re using peripherals from some other manufacturer with an Asus product. Alternatively, you might be using Asus peripherals with a motherboard that Asus doesn’t recognize or support.
You must have the appropriate application for the RGB system that you wish to implement for the system to work smoothly. It’s important to note that Aura Sync only functions with ASUS motherboards that are Aura Sync compatible. Also, before proceeding further, make sure to read about how to connect power button to motherboard.
How To Fix “Aura Sync Not Detecting Motherboard” Error
You can try following the methods mentioned below to fix the issue. We also have detailed guides on other issues, such as red light on motherboard and white VGA light on motherboard.
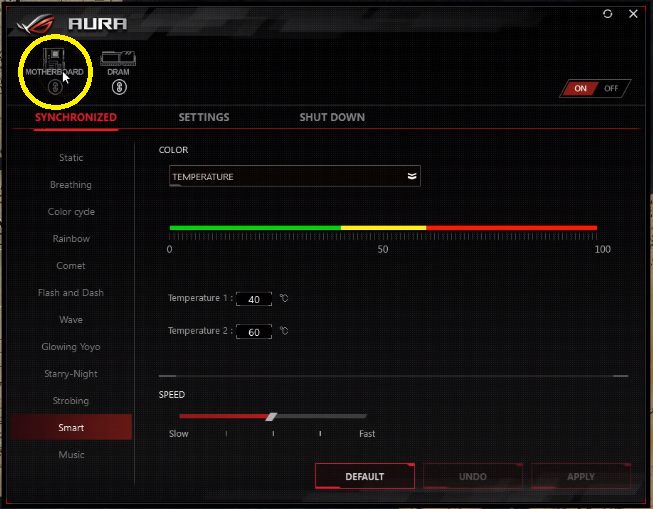
Restart The Application
Oftentimes, this issue is the result of just a software glitch in the Aura sync software. The first step in fixing an AURA sync error is to quit the application, restart the computer, and then launch it again. This is a simple yet necessary step because it is possible that your issue will be resolved at this very step, and you don’t have to waste your time trying all other methods.
Check Motherboard Compatibility
The next thing to check if your motherboard is not being detected by the Aura sync software is whether your motherboard is compatible with Aura sync or not. If it isn’t, Aura sync will not detect the motherboard. To check compatibility:
- Go to https://www.asus.com/campaign/aura/global.
- Or open your web browser and type in “Aura Sync compatible motherboards,” and open the first link.
- You will land on the Asus Campaigns home page.

ASUS campaign homepage – Image Credits [Tech4Gamers] - You can look up your motherboard here to find out if it is compatible with Aura or not.
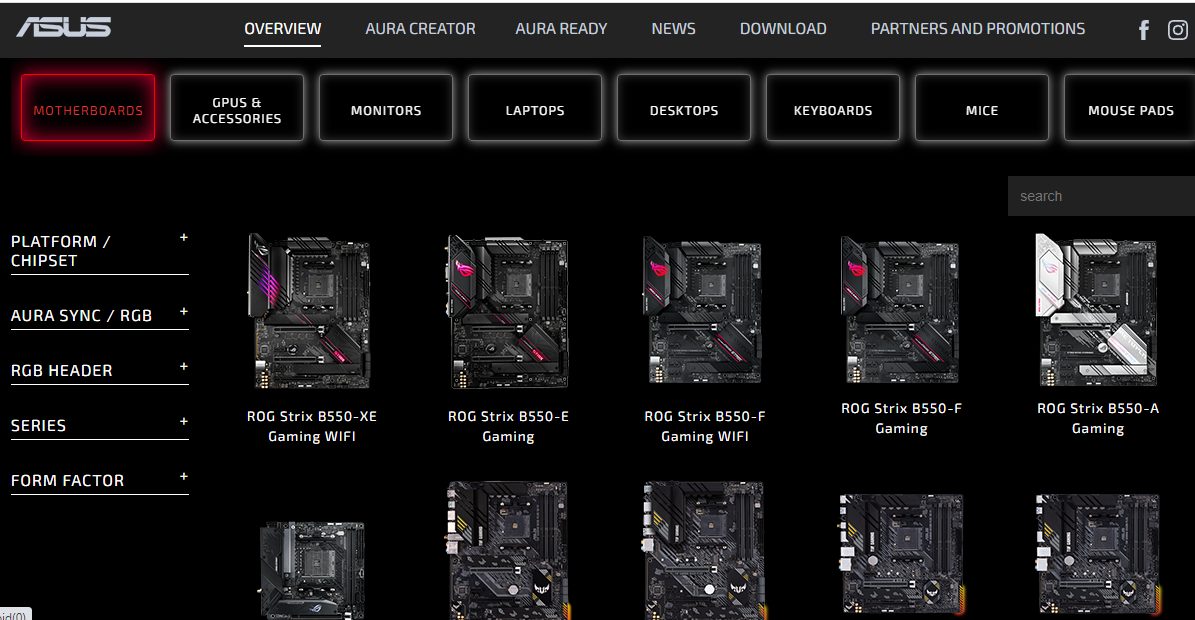
If your motherboard is not present on this list, you won’t be able to use Aura Sync with your current motherboard, but if it is compatible and you are still getting this issue, you can proceed to the next steps. Also, if you don’t know about the manufacturer, you can read our guide on how to check which motherboard you have.
Run Aura Sync As Administrator
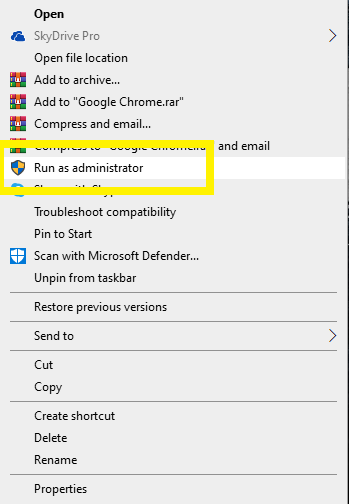
Sometimes the applications on your computer don’t work properly because they do not have administrator privileges granted to them. This might be the reason behind the Aura sync application behaving strangely. To need to run Aura sync as administrator to grant administrator privilege. To do that:
- Right-click on the Aura Sync application icon.
- Choose the option of “Run as Administrator.”

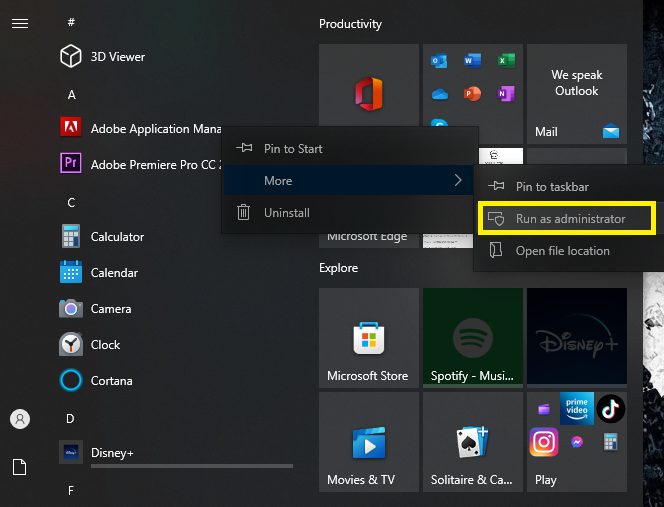
Run as administrator on right-click menu – Image Credits [Tech4Gamers] - You can also go to the Start menu and right-click on the Aura sync icon.
- Select the option of “More” and click on “Run as administrator.”

Run as administrator in start menu – Image Credits [Tech4Gamers]
If the issue is still there, follow the following instructions.
Reconnect the RGB headers
For your motherboard to be detected by the Aura sync, connecting the RGB headers correctly to the motherboard is very crucial. RGB headers with poor connections won’t function at all. A few people make mistakes when making connections. Therefore, ensure that the RGB headers are perfectly connected to your motherboard. Even when cables are properly attached, it is still advisable to reattach them. Just disassemble them and carefully reassemble them. Make sure that the 3-pin or 4-pin RGB headers are properly connected for smooth functioning.
If you are not sure how to connect RGB to your motherboard for Aura sync, here is a quick guide:
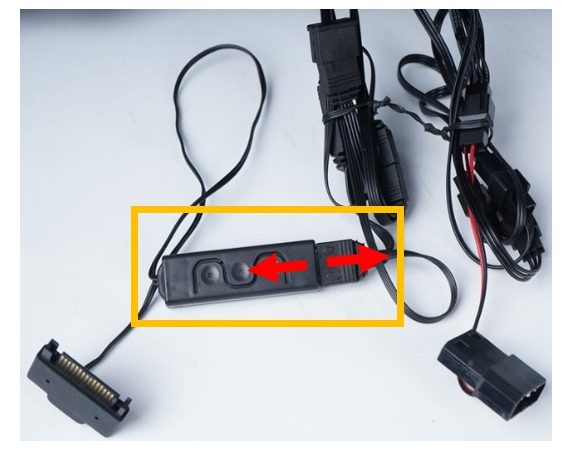
- First, unplug the RGB controller from the four-pin daisy cable circuit.

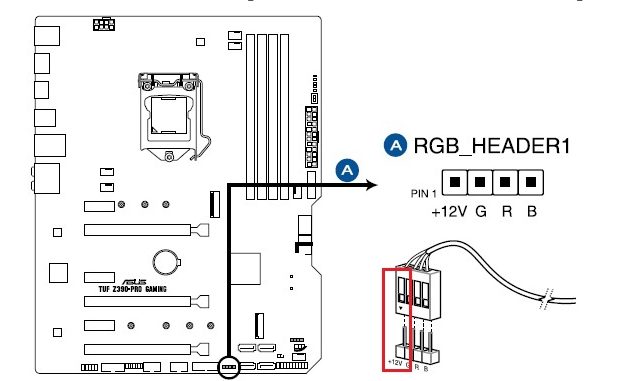
4 pin Daisy Connector - Next, you have to connect it to the 12V RGB header of the motherboard.

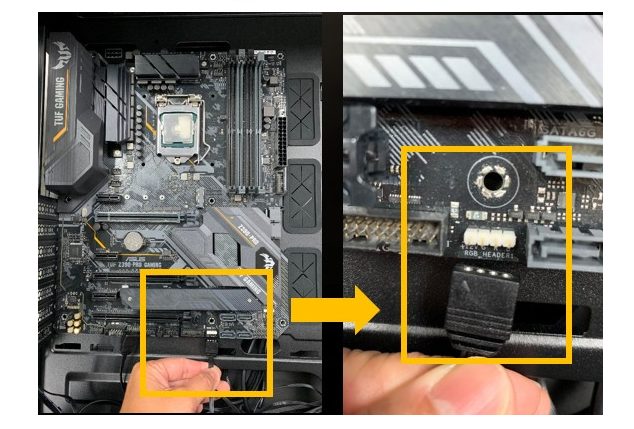
12 V RGB header connections - Make sure to follow the direction of the arrow sign on the cable while connecting.

Location of RGB header on the motherboard
Restart the system to see if the issue has been resolved or not. If Aura sync is still unable to detect your motherboard, follow the next steps. Also read our guide on how to connect RG fans to a motherboard in case you are confused with the process.
Avoid Fast Start-up
The fast start-up also referred to as quick boot, is a feature of Windows that allows you to launch and set up your computer quickly and speeds up getting you to your desktop screen. The Asus Aura Sync software plays poorly with rapid start-up, despite the fact that it allows you to access your desktop more quickly. The installation files for the software are unaffected, but it may stop the program from starting when your machine boots up, or it may start acting weirdly. Thus, it is preferable to uncheck the rapid start-up. The actions below must be taken in order to achieve this:
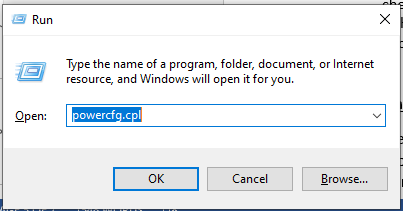
- Press the Windows Key + R to bring up the Run dialog box.
- Type in “powercfg.cpl” and press Enter to open the Power Options window.

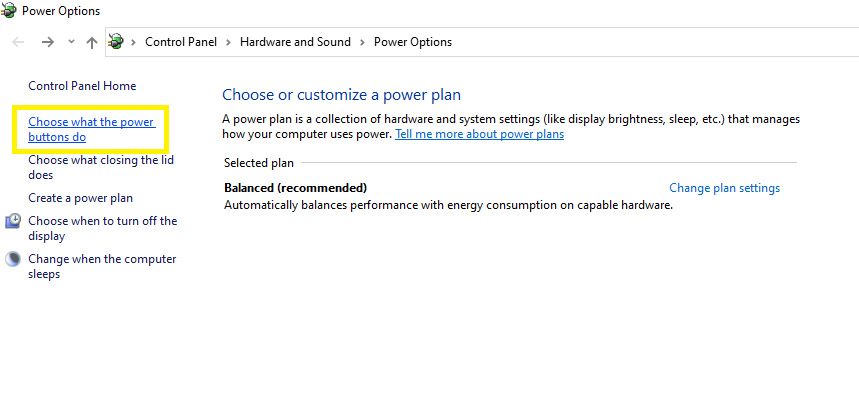
Run Window – Image Credits [Tech4Gamers] - From the column on the left, select the option of “Choose what the power buttons do.”

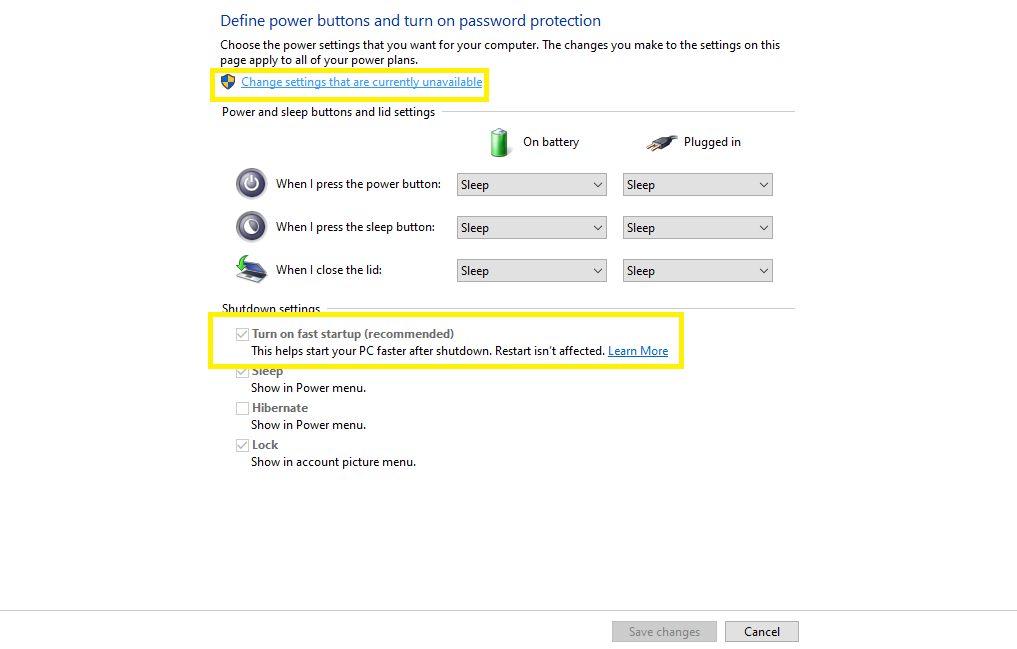
Choose what power buttons do – Image Credits [Tech4Gamers] - Navigate to the “Shutdown settings” and unselect the option “Turn on fast start-up” if it is selected.
- If this option is unclickable, select the option of “Change settings that are currently unavailable.”

Turn on/off fast startup – Image Credits [Tech4Gamers] - Select the “Save Changes” option to apply the changes.
Also Read: How To Test Motherboard Without CPU
Update The Aura Sync
Make sure you have the most recent version of the application because an outdated version may also prevent AURA sync from detecting the motherboard. It’s possible that the app’s expired version has bugs that could lead to incompatibility issues. To update the app, follow these steps:
- If Aura sync is outdated, it will automatically give you a notification that you need to update it. If so, click on “Update” to start the update process.
- If the automatic update notification doesn’t show up, you can still check whether Aura sync requires an update or not.
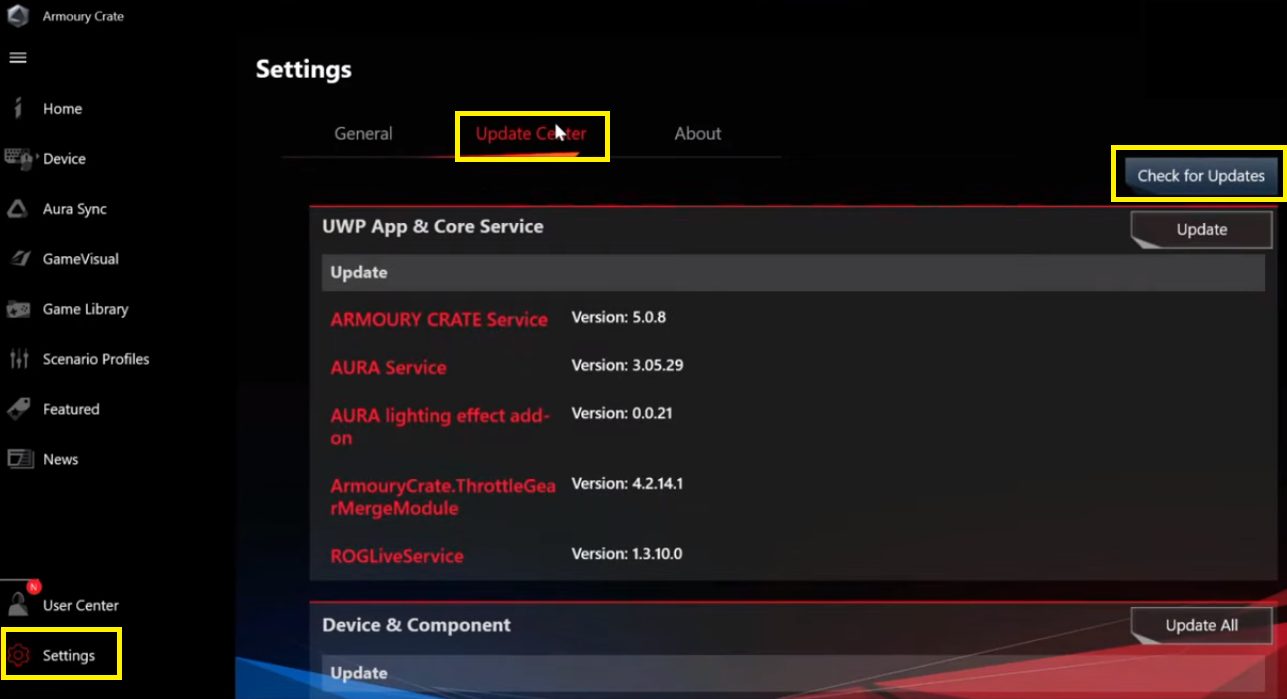
- Go to “Settings” in Armoury Crate and click on “Update Center.”

Update center of Armoury Crate – Image Credits [Tech4Gamers] - Now click on “Check for Updates” to check if your Armoury Crate or Aura sync needs to be updated.
- You can also see a list of services that need to be updated here. Click on “Update All” if you want to update everything.
Uninstall Other RGB Light Syncing Apps
If you have other RGB syncing applications installed on your system, they might be interfering with Aura sync’s ability to detect your motherboard. You must delete the other RGB Lighting apps in order for Asus Aura sync to function properly.
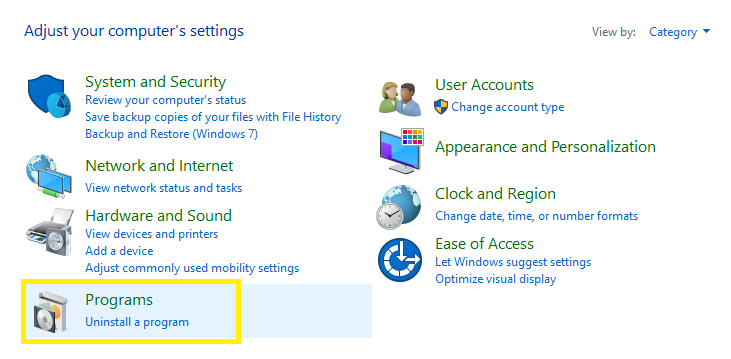
- You may simply uninstall RGB applications by going Control Panel.
- Select “Uninstall a program” under the Programs option.

Uninstall a program from control panel – Image Credits [Tech4Gamers] - You can uninstall the application by right-clicking on it and selecting “Uninstall.”
Reset The LEDs
In some cases of this issue, the RGB LEDs keep turning on or stuck on a rainbow pattern even when you turn off your computer. If the situation is such, you have to reset the LEDs. To do that:
- Go to the BIOS menu by restarting the computer and pressing “F2” or “Delete” while it is booting up.
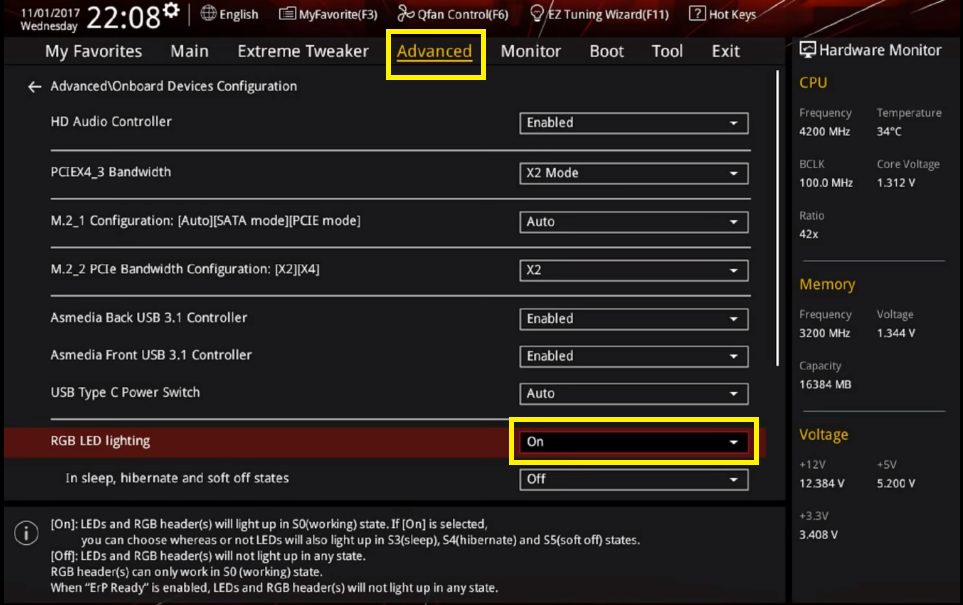
- Go to the option of “Advanced.”
- Under “Advanced,” go to “Onboard Device Configuration.”
- Scroll down to the “RGB LED lighting” option and turn it OFF.

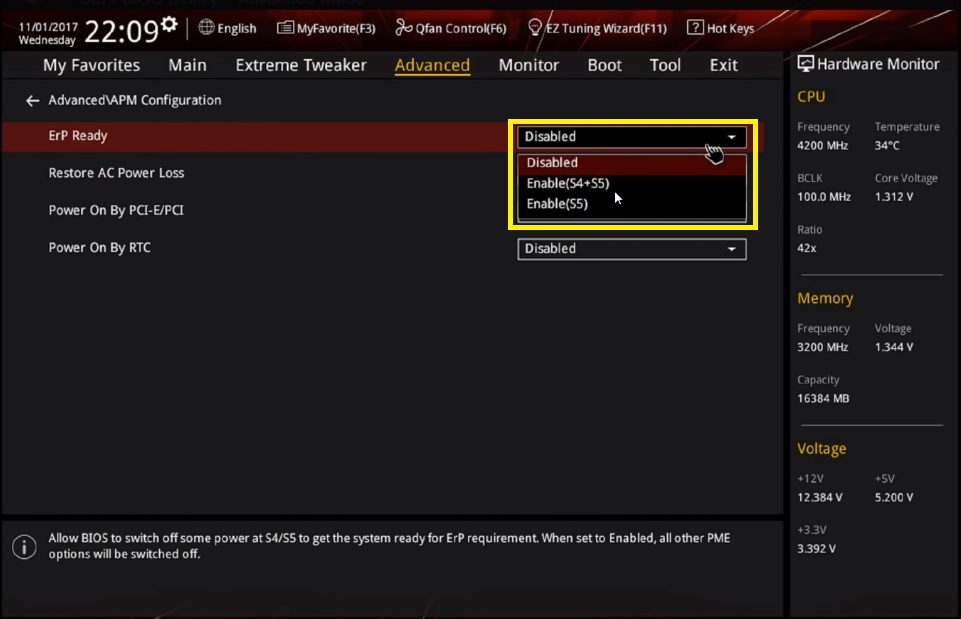
Advanced settings in BIOS – Image Credits [Tech4Gamers] - Next, go to “APM Configuration” under the “Advanced” menu.
- Set the “ErP Ready” state to “Enable(S4+S5)”. This is to make turn the lights off when the computer turns off.

Enable(S4+S5) in Advanced settings – Image Credits [Tech4Gamers] - Click “F10” to save the settings.
- Once your computer has restarted, turn it off again and make sure your RGB lights are completely off.
- Boot back into BIOS and turn the option of “RGB LED lighting” back on.
- Check if the problem is resolved. It usually takes about 3 to 4 reboots to solve this issue.
Similar Guide: How To Test Motherboard With A Multimeter
Reinstall Aura Sync
If none of the above fixes are working, you should reinstall the Aura sync software to make sure there are no issues with the software. To do that:
- Uninstall Aura by following the steps mentioned above.
- Reinstall the Aura software.
- If you don’t have the installation files, you can download them from the ASUS Support website against your corresponding motherboard.
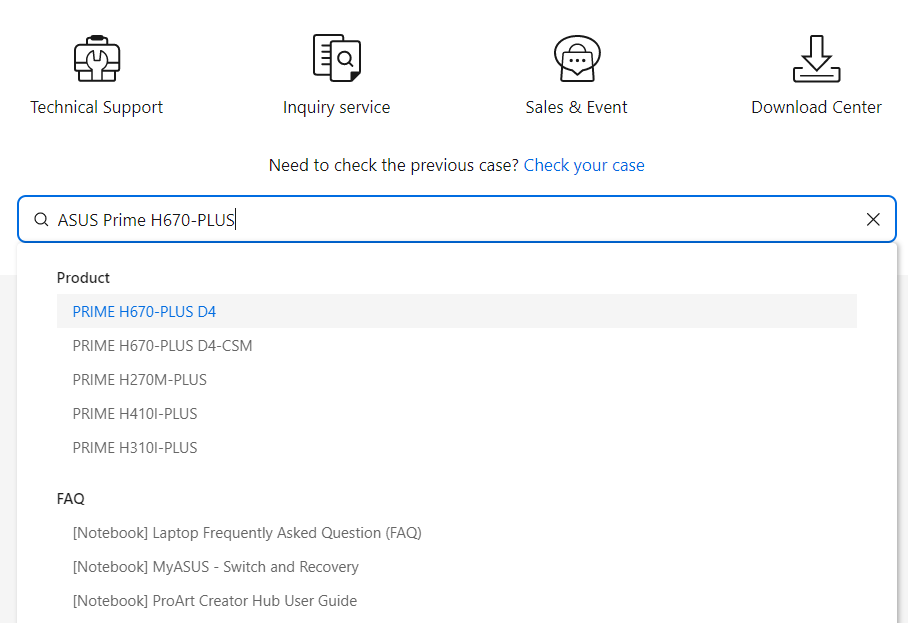
- Go to https://www.asus.com/support.
- Enter your motherboard’s model name.

ASUS support page – Image Credits [Tech4Gamers] - Go to “Driver and Utility” and select your OS version.
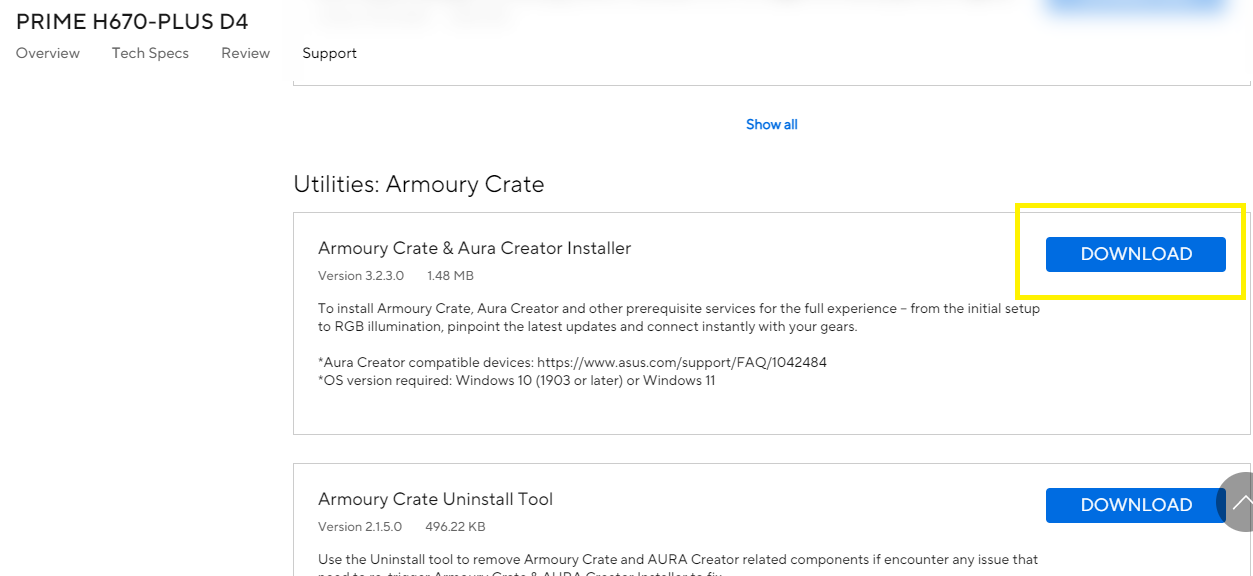
OS version selection in drivers and utility menu – Image Credits [Tech4Gamers] - Scroll down, download, and install Armoury Crate and Aura package.

Downloading the required software from the support page – Image Credits [Tech4Gamers] - Once Aura is installed, open the software to make sure the motherboard option is available.

Update BIOS
If the issue is still there even after trying the fixes mentioned above, it is possible that the BIOS of your motherboard is outdated, due to which your motherboard isn’t being detected by the Aura sync software. You can update your BIOS to the latest version, and the issue will hopefully be resolved.
Final Word
This was everything you needed to know about Aura sync not detecting motherboard error. These fixes should help you out in most cases. Although, if the error refuses to be fixed, you need to take your PC to a repair shop and have experts take a look at it.
There might be several reasons behind this issue, including faulty header connections, outdated Aura software or BIOS, compatibility issues, and the fast boot option being enabled. You can solve this issue by making sure the RGB headers are connected correctly, the Aura software is updated, the fast boot option is disabled, and there are no other RGB-controlling applications on your system. You can sync your entire setup with Aura sync by using all the products that are Aura Sync compatible. You may also use RGB LED strips that are Aura Sync compatible.Common Questions Answered
Similar Motherboard Guides:
- Do Motherboards Have Integrated Graphics Cards?
- How To Connect SSD To A Motherboard.
- How To Clean A Motherboard?
Thank you! Please share your positive feedback. 🔋
How could we improve this post? Please Help us. 😔
[Wiki Editor]
Ali Rashid Khan is an avid gamer, hardware enthusiast, photographer, and devoted litterateur with a period of experience spanning more than 14 years. Sporting a specialization with regards to the latest tech in flagship phones, gaming laptops, and top-of-the-line PCs, Ali is known for consistently presenting the most detailed objective perspective on all types of gaming products, ranging from the Best Motherboards, CPU Coolers, RAM kits, GPUs, and PSUs amongst numerous other peripherals. When he’s not busy writing, you’ll find Ali meddling with mechanical keyboards, indulging in vehicular racing, or professionally competing worldwide with fellow mind-sport athletes in Scrabble. Currently speaking, Ali’s about to complete his Bachelor’s in Business Administration from Bahria University Karachi Campus.
Get In Touch: alirashid@tech4gamers.com


")
