 Threads
Reliable And Effective!
Review Summary
The Antec Neptune 240 ARGB offers a sleek 240mm AIO liquid CPU cooler with an integrated pump, ARGB lighting, and PWM fans. It provides compatibility with various Intel and AMD sockets, making it an appealing choice for users looking for a cooling solution with aesthetic appeal. However, it lacks precise control over pump speed, and potential design flaws, such as banged-up fins and a loose power cable, should be considered.
Hours Tested: 5

Overall
-
Performance - 8/10
8/10
-
Design - 8/10
8/10
-
Features - 8/10
8/10
-
Value - 7/10
7/10
Pros
- Aesthetically pleasing
- Compatibility with Intel and AMD sockets
- Efficient PWM control
- ARGB lighting
- Includes 3-year warranty
Cons
- Limited control over pump speed
- Design flaws
- Banged-up fins
- Loose power cable


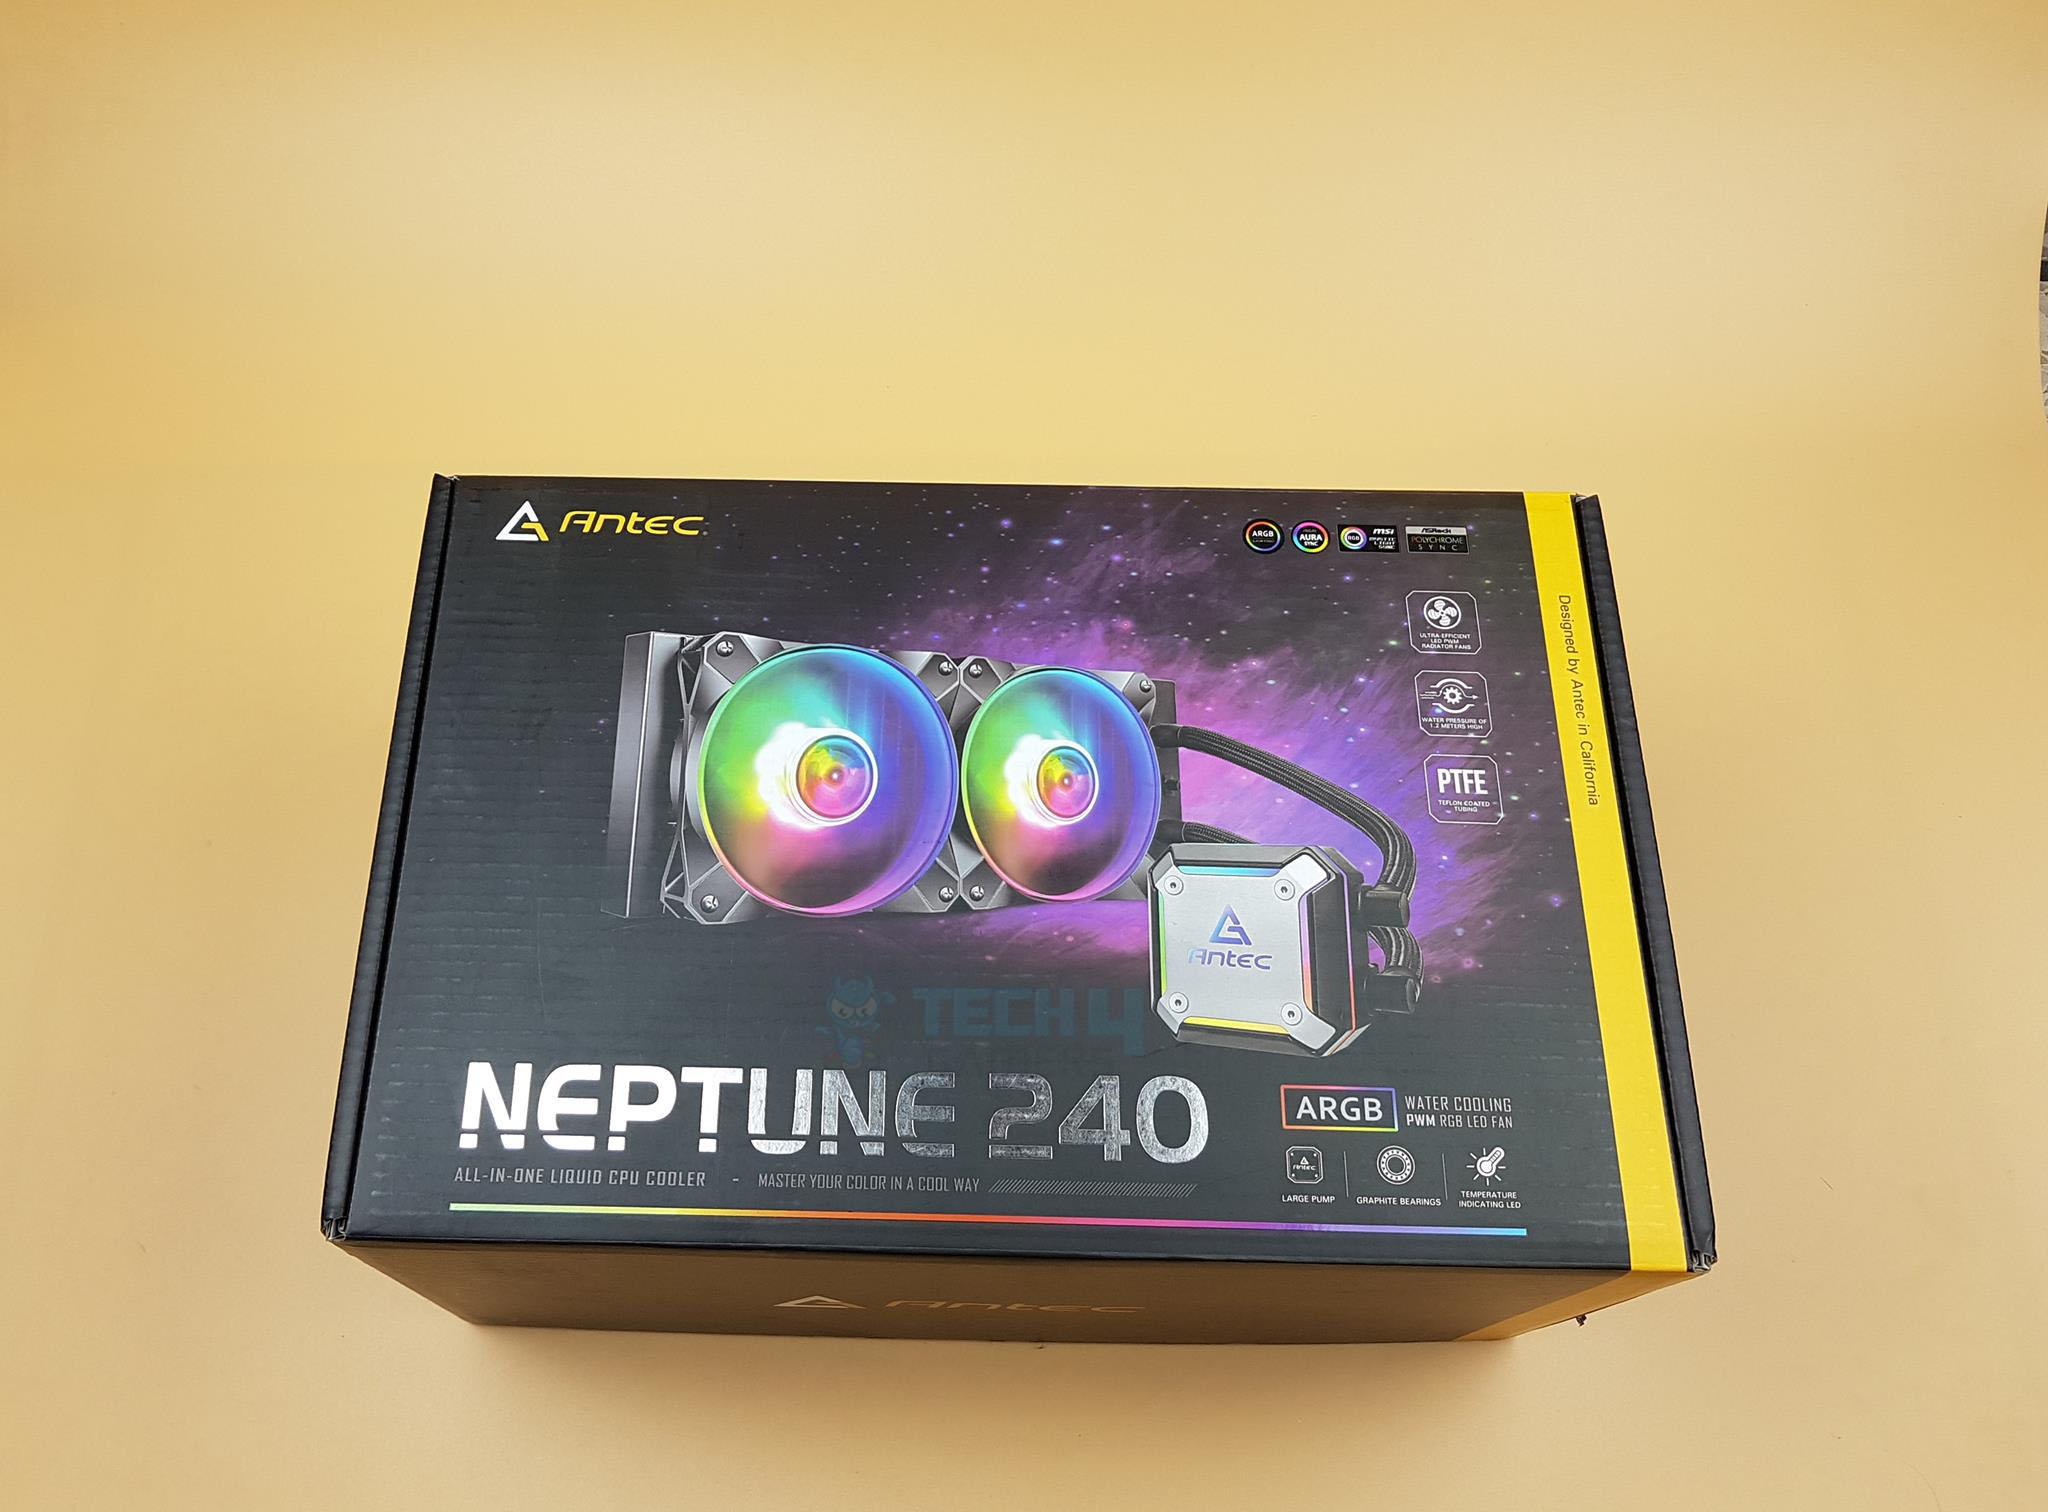
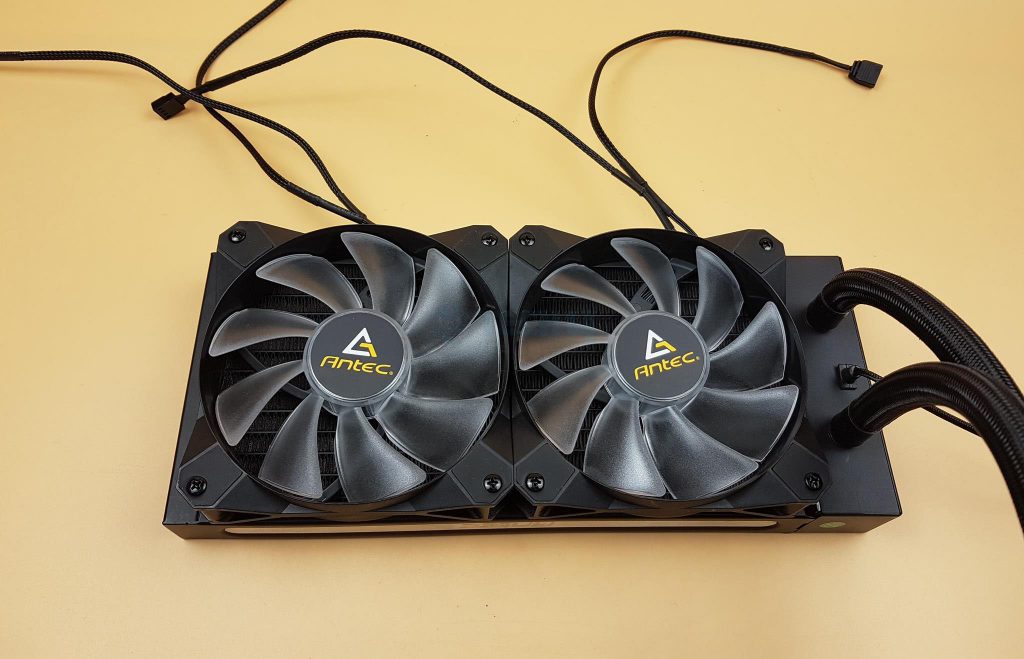
Antec sent us their Neptune 240 cooler for review. It’s a 240mm cooling solution with an integrated pump in the radiator housing. The package includes 2x ARGB 120mm fans, lighting, and a PWM controller. The block showcases a stunning ARGB light show on the top and in the middle. Compatible with Intel LGA 1200/115x/1366/20xx and AMD FM2/FM1/AM3+/AM2+/AM4/xTR4 sockets.How will it perform? Let’s find out.
Key Takeaways
- Antec Neptune 240 ARGB is a 240mm AIO liquid CPU cooler with an integrated pump, ARGB lighting, and PWM fans.
- It is for users needing compatibility with Intel and AMD sockets, featuring ARGB lighting and efficient PWM control, as it includes comprehensive mounting hardware and a user guide.
- It is not for users who want sufficient control over pump speed. Its design flaws include finishing issues such as banged-up fins and a loose power cable.
- Why you can trust Tech4Gamers: Our reviews are based on dedicated hands-on testing by our team of experienced hardware experts. Find out more about how we test.
Here are the specifications of the Antec Neptune 240 ARGB:
| Antec Neptune 240 ARGB | Specifications |
|---|---|
| Dimensions | 120 x 120 x 25mm |
| Type | PWM ARGB LED Fan |
| Speed | 900 – 1600rpm ± 100 |
| Airflow | 77 CFM max. |
| Noise | 20 – 36db (A) |
| Lifespan | 40000 hours at 25°C room, ambient 15 – 65% RH |
| Connector | Fan – 4pin, ARGB – 3pin |
| Net Weight | 0.8 Kgs |
| Gross Weight | 1.9 Kgs |
| Package Size | 327 x 207 x 158mm (DWH) |
| Radiator Dimensions | 287 x 121 x 27mm |
| Material | Aluminum |
| Head Dimensions | 65 x 65 x 40 mm |
| Connector | SATA power |
| Water Pressure | 1m ± 0.2m |
| Flow rate | 1.5L / min |
| Lifespan | 50000 hours at 25°C room, ambient 15 – 65% RH |
| Noise | ≤ 36dB (A) |
| Tube Dimensions | 8 x 10 x 348 mm |
| Intel Socket | LGA 1150 / 1151 / 1155 / 1156 / 1366 / 1200 / 2011-V3 / 2066 |
| AMD Socket | FM2 / FM1 / AM3+ / AM3 / AM2+ / AM2 / AM4 / x TR4 |
| Warranty | 3 years |
Packaging and Unboxing
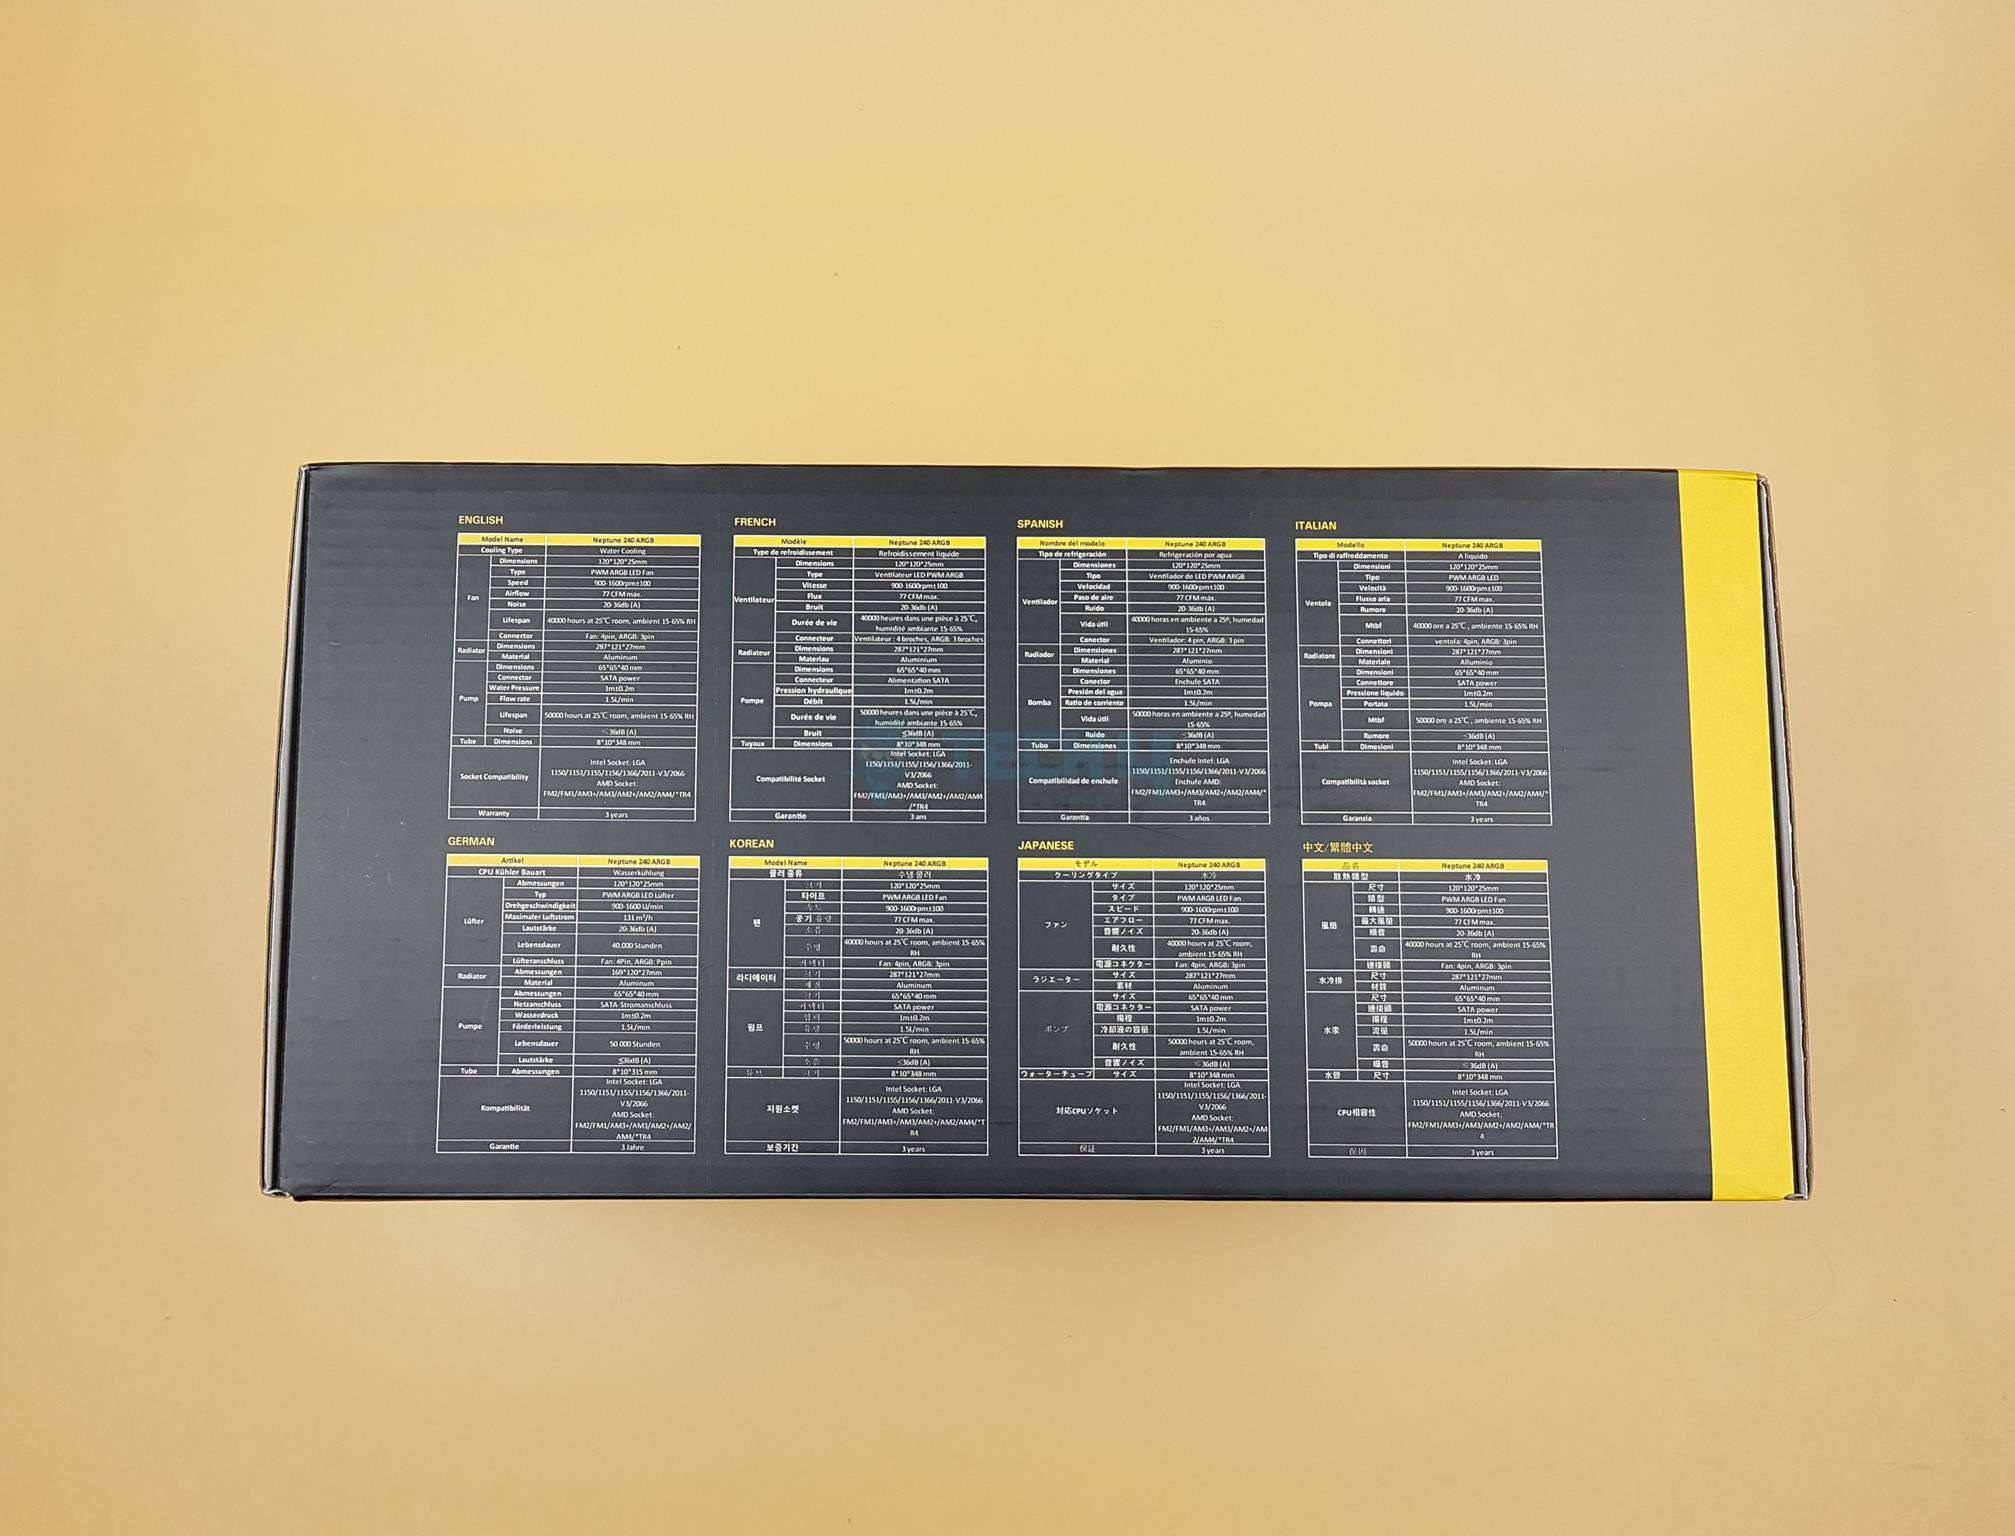
The cooler is shipped inside a cardboard box. The cooler is compatible with ASUS, MSI, GIGABYTE, and ASRock motherboard lighting.

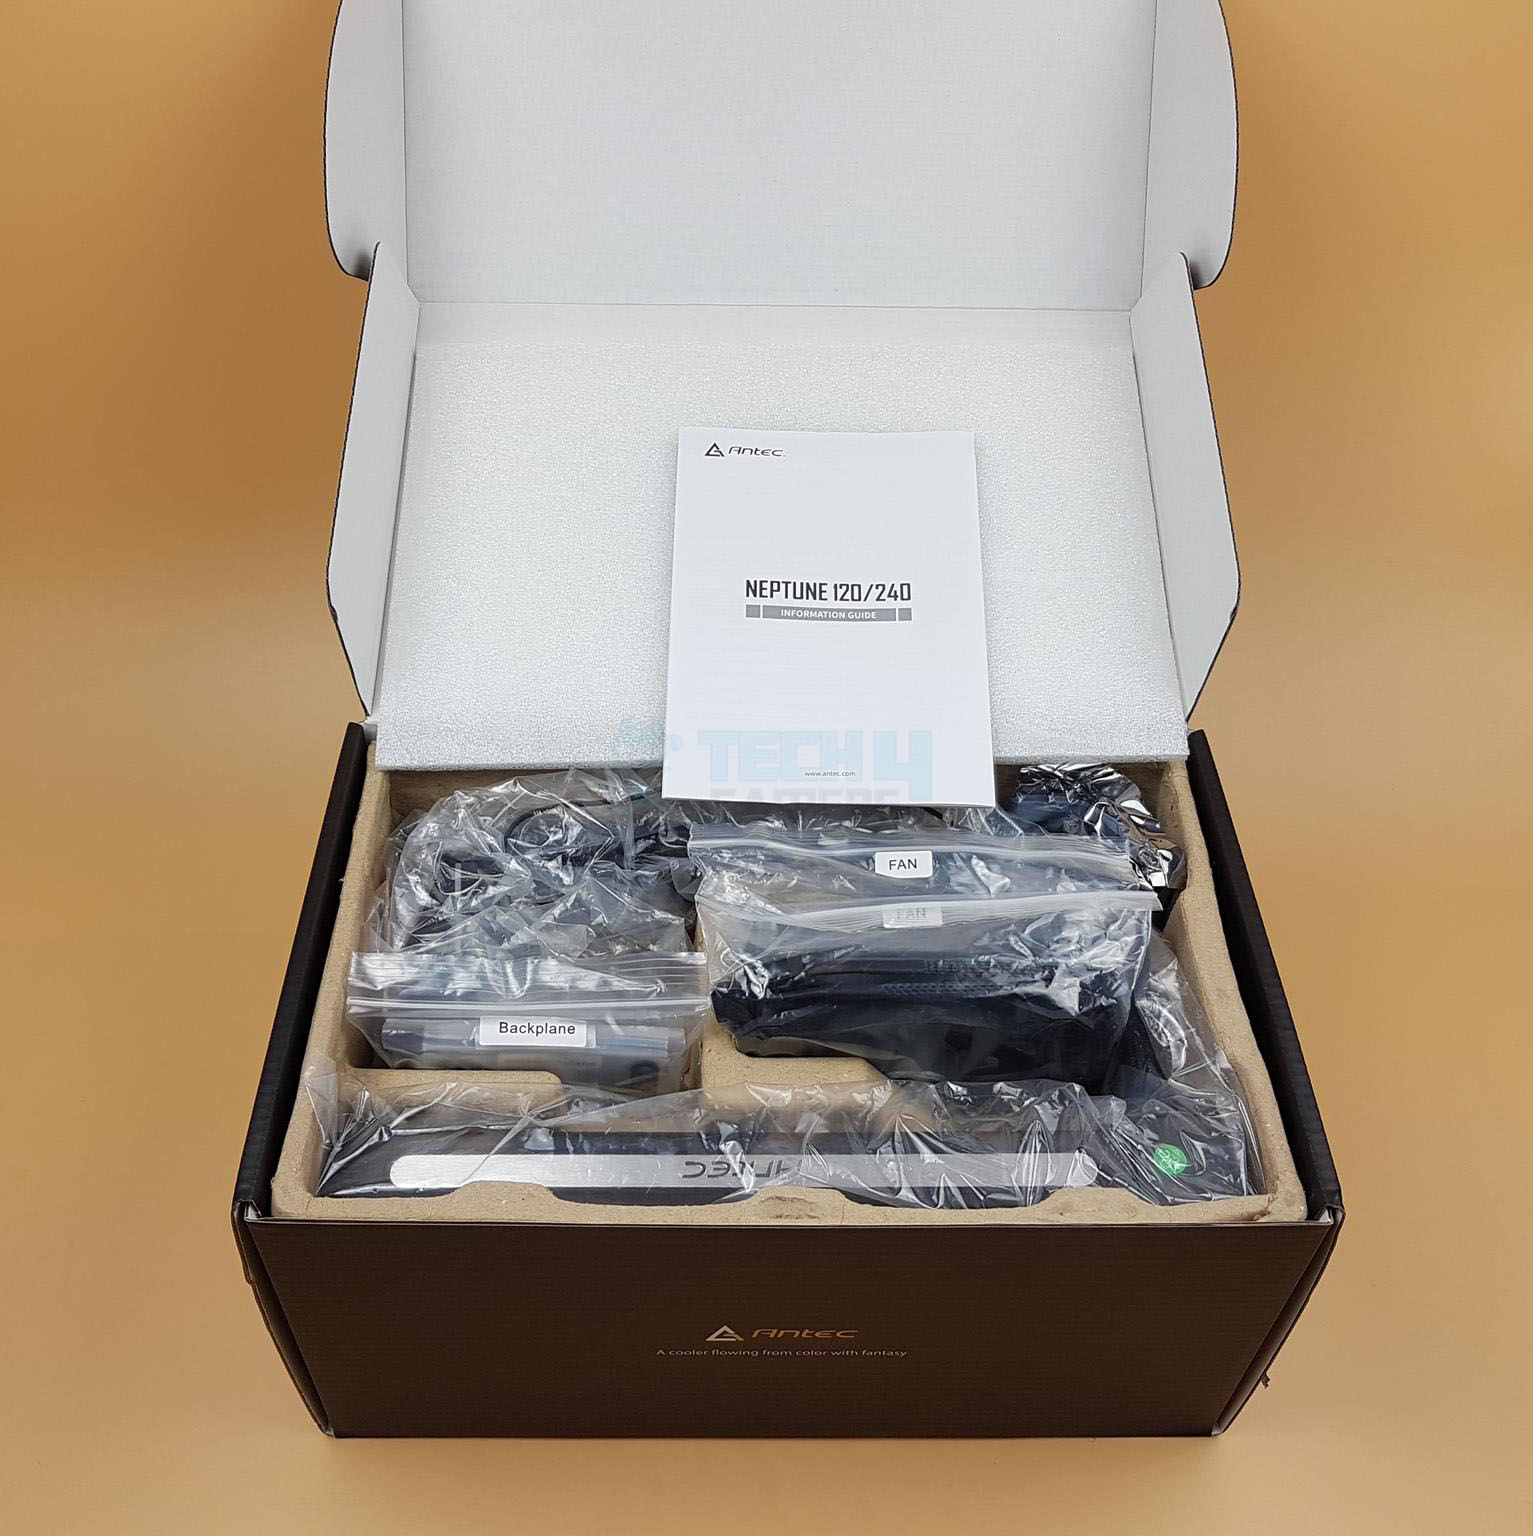
Box Contents
The box’s contents are placed inside egged carton packing to ensure safe shipping. A white Styrofoam pad is placed on the top.

Design
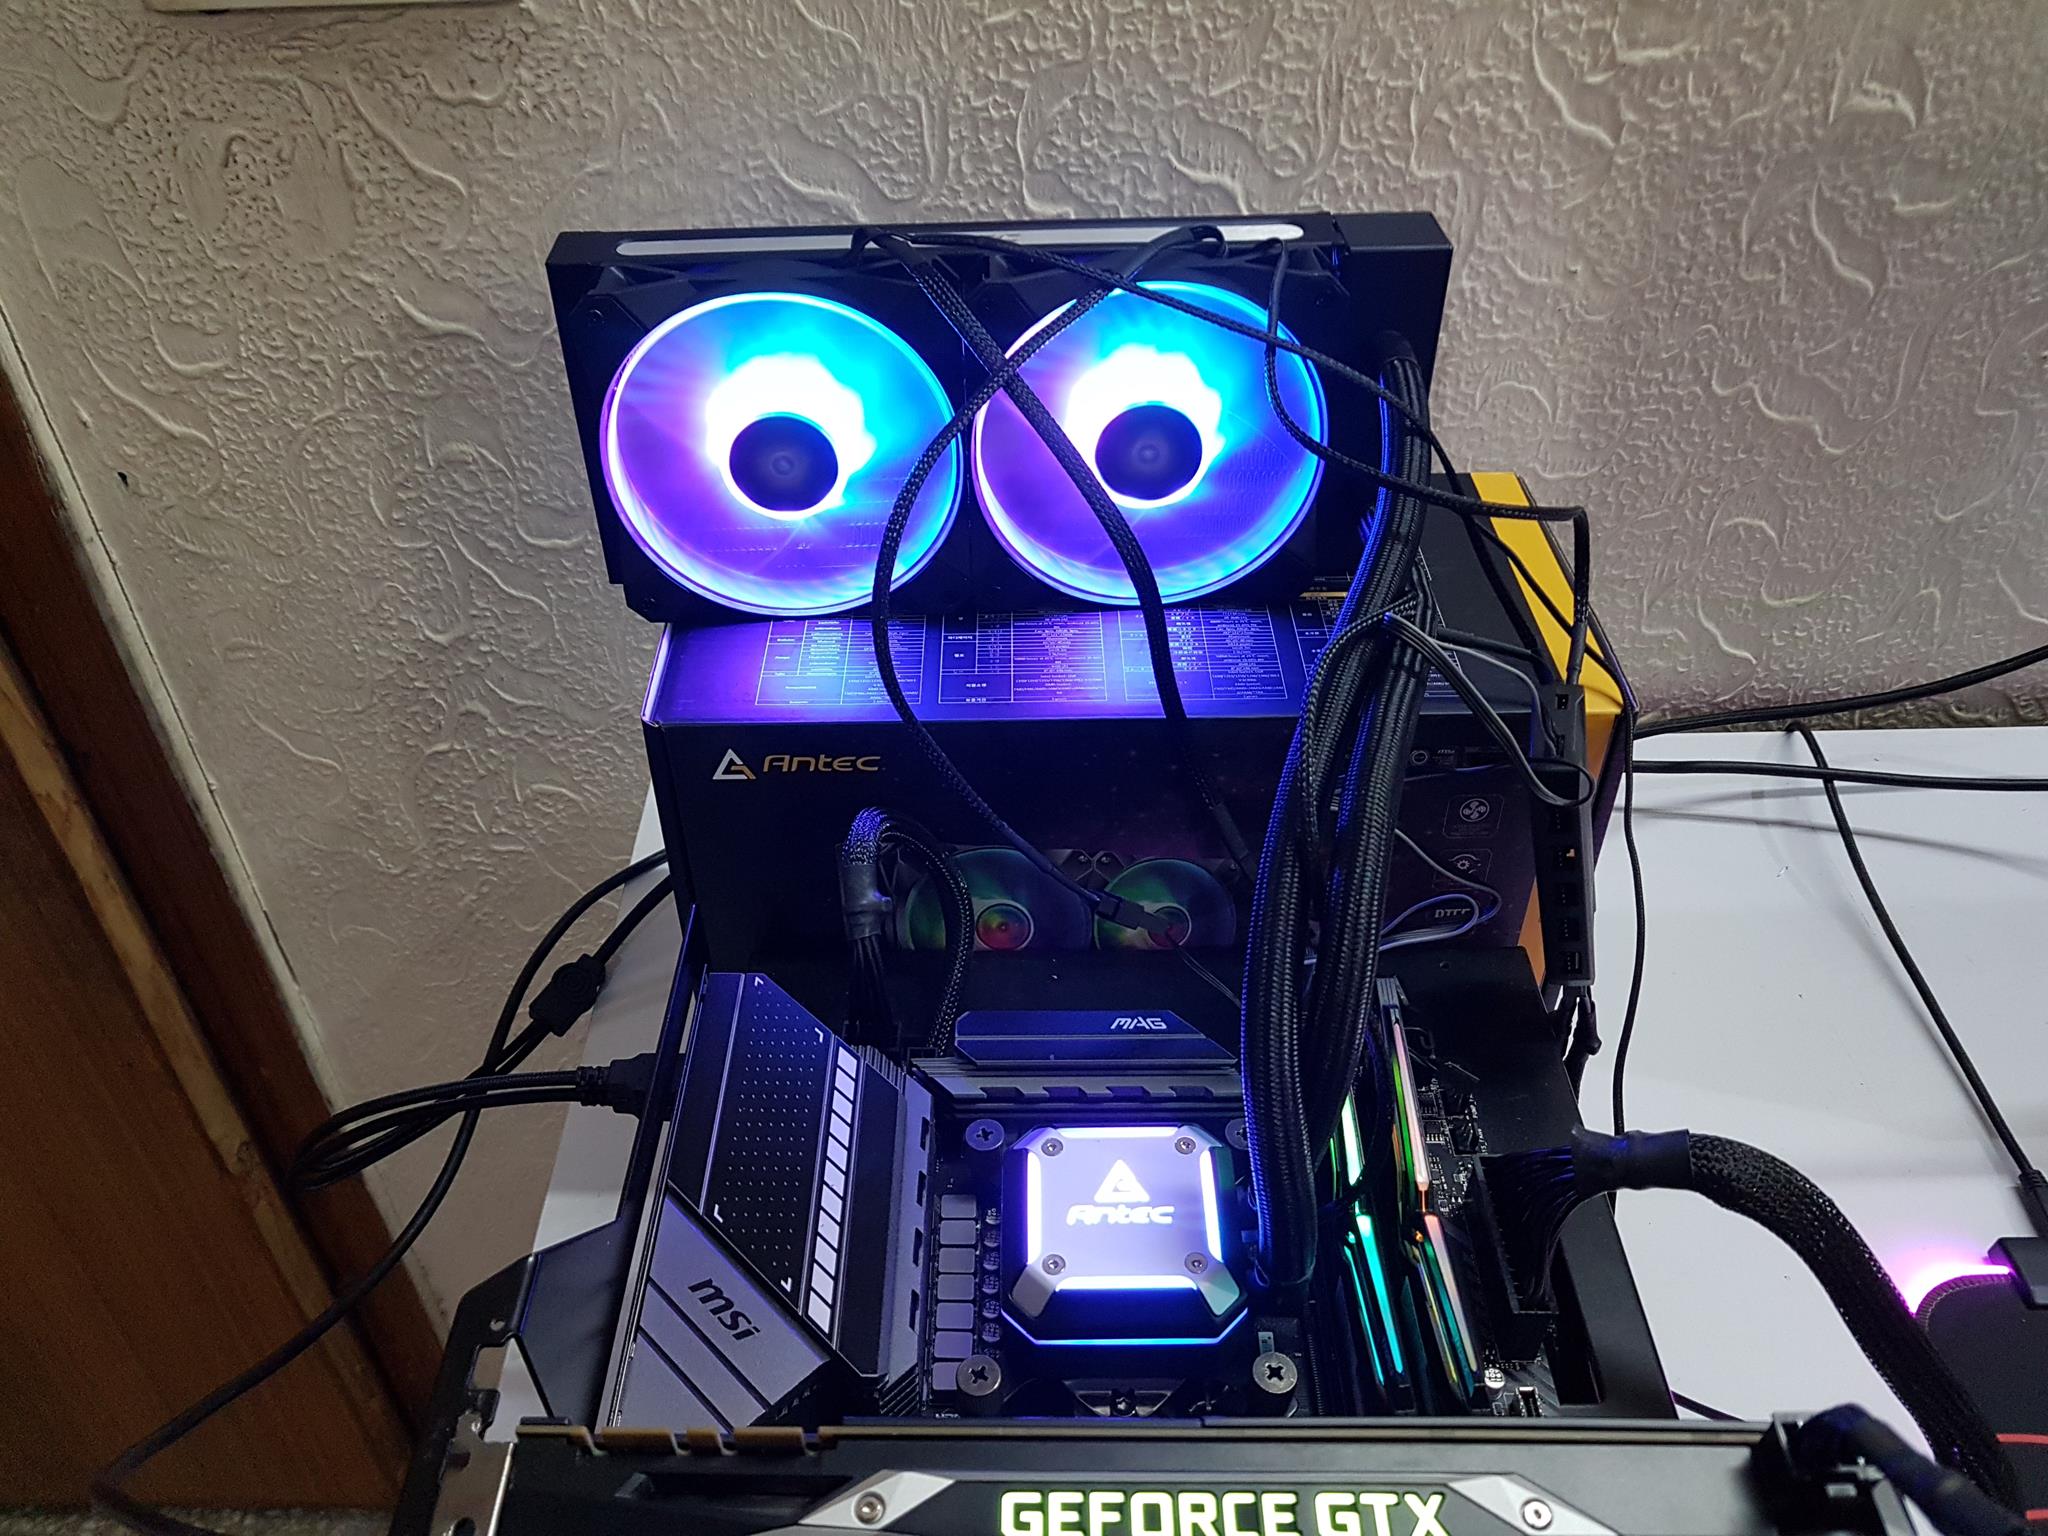
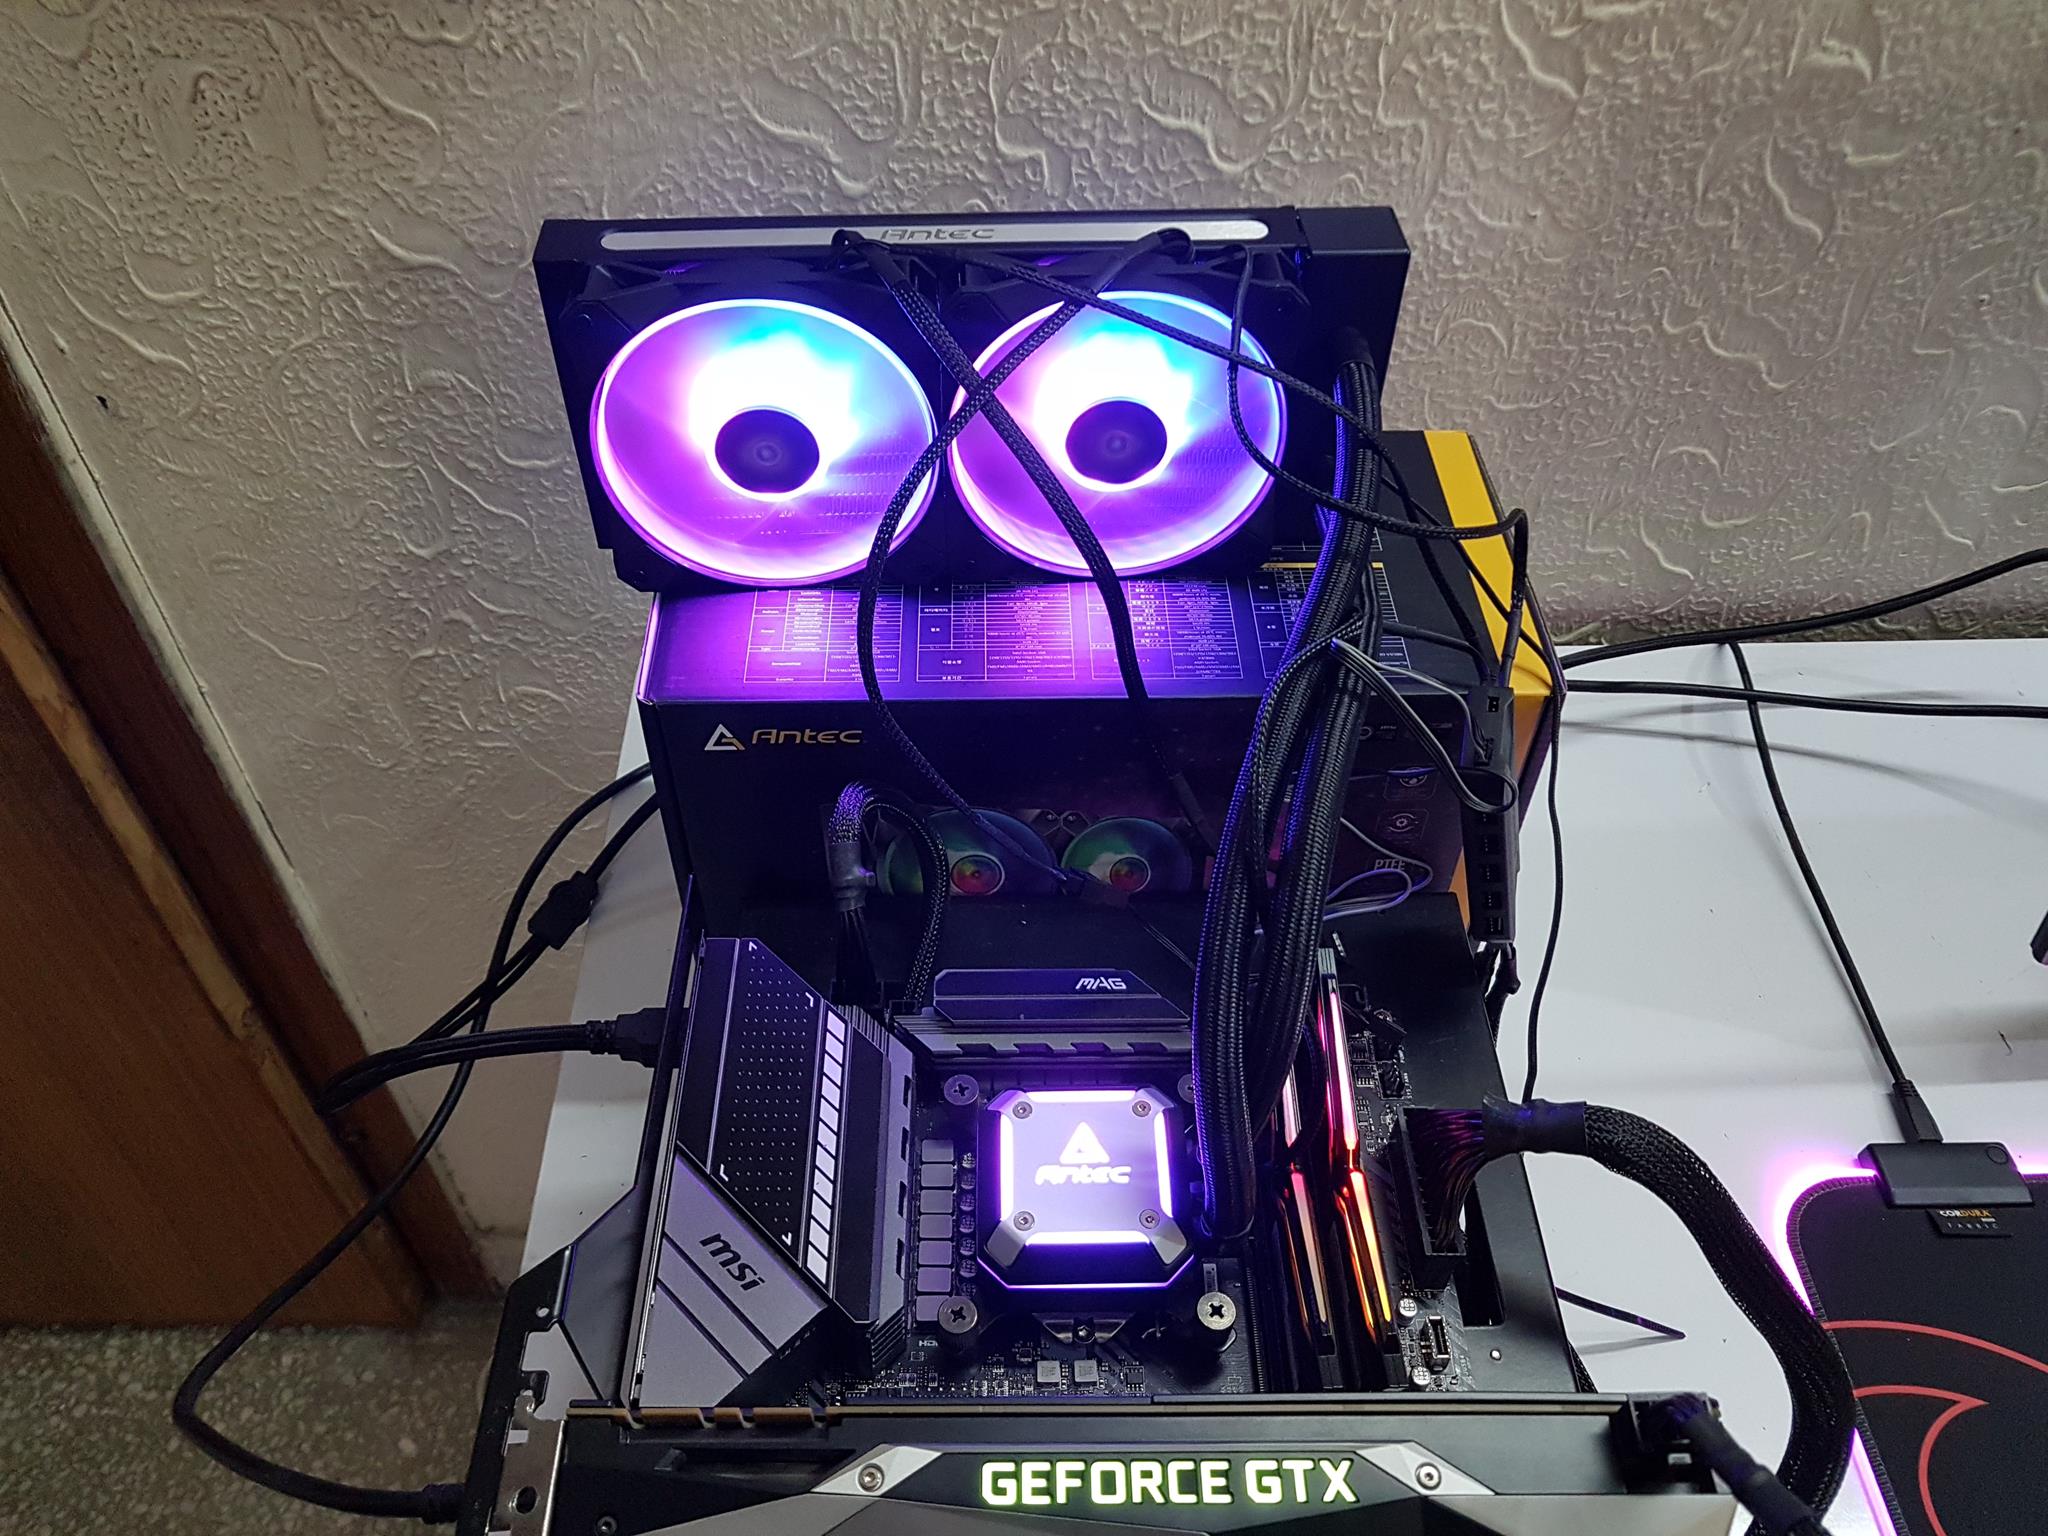
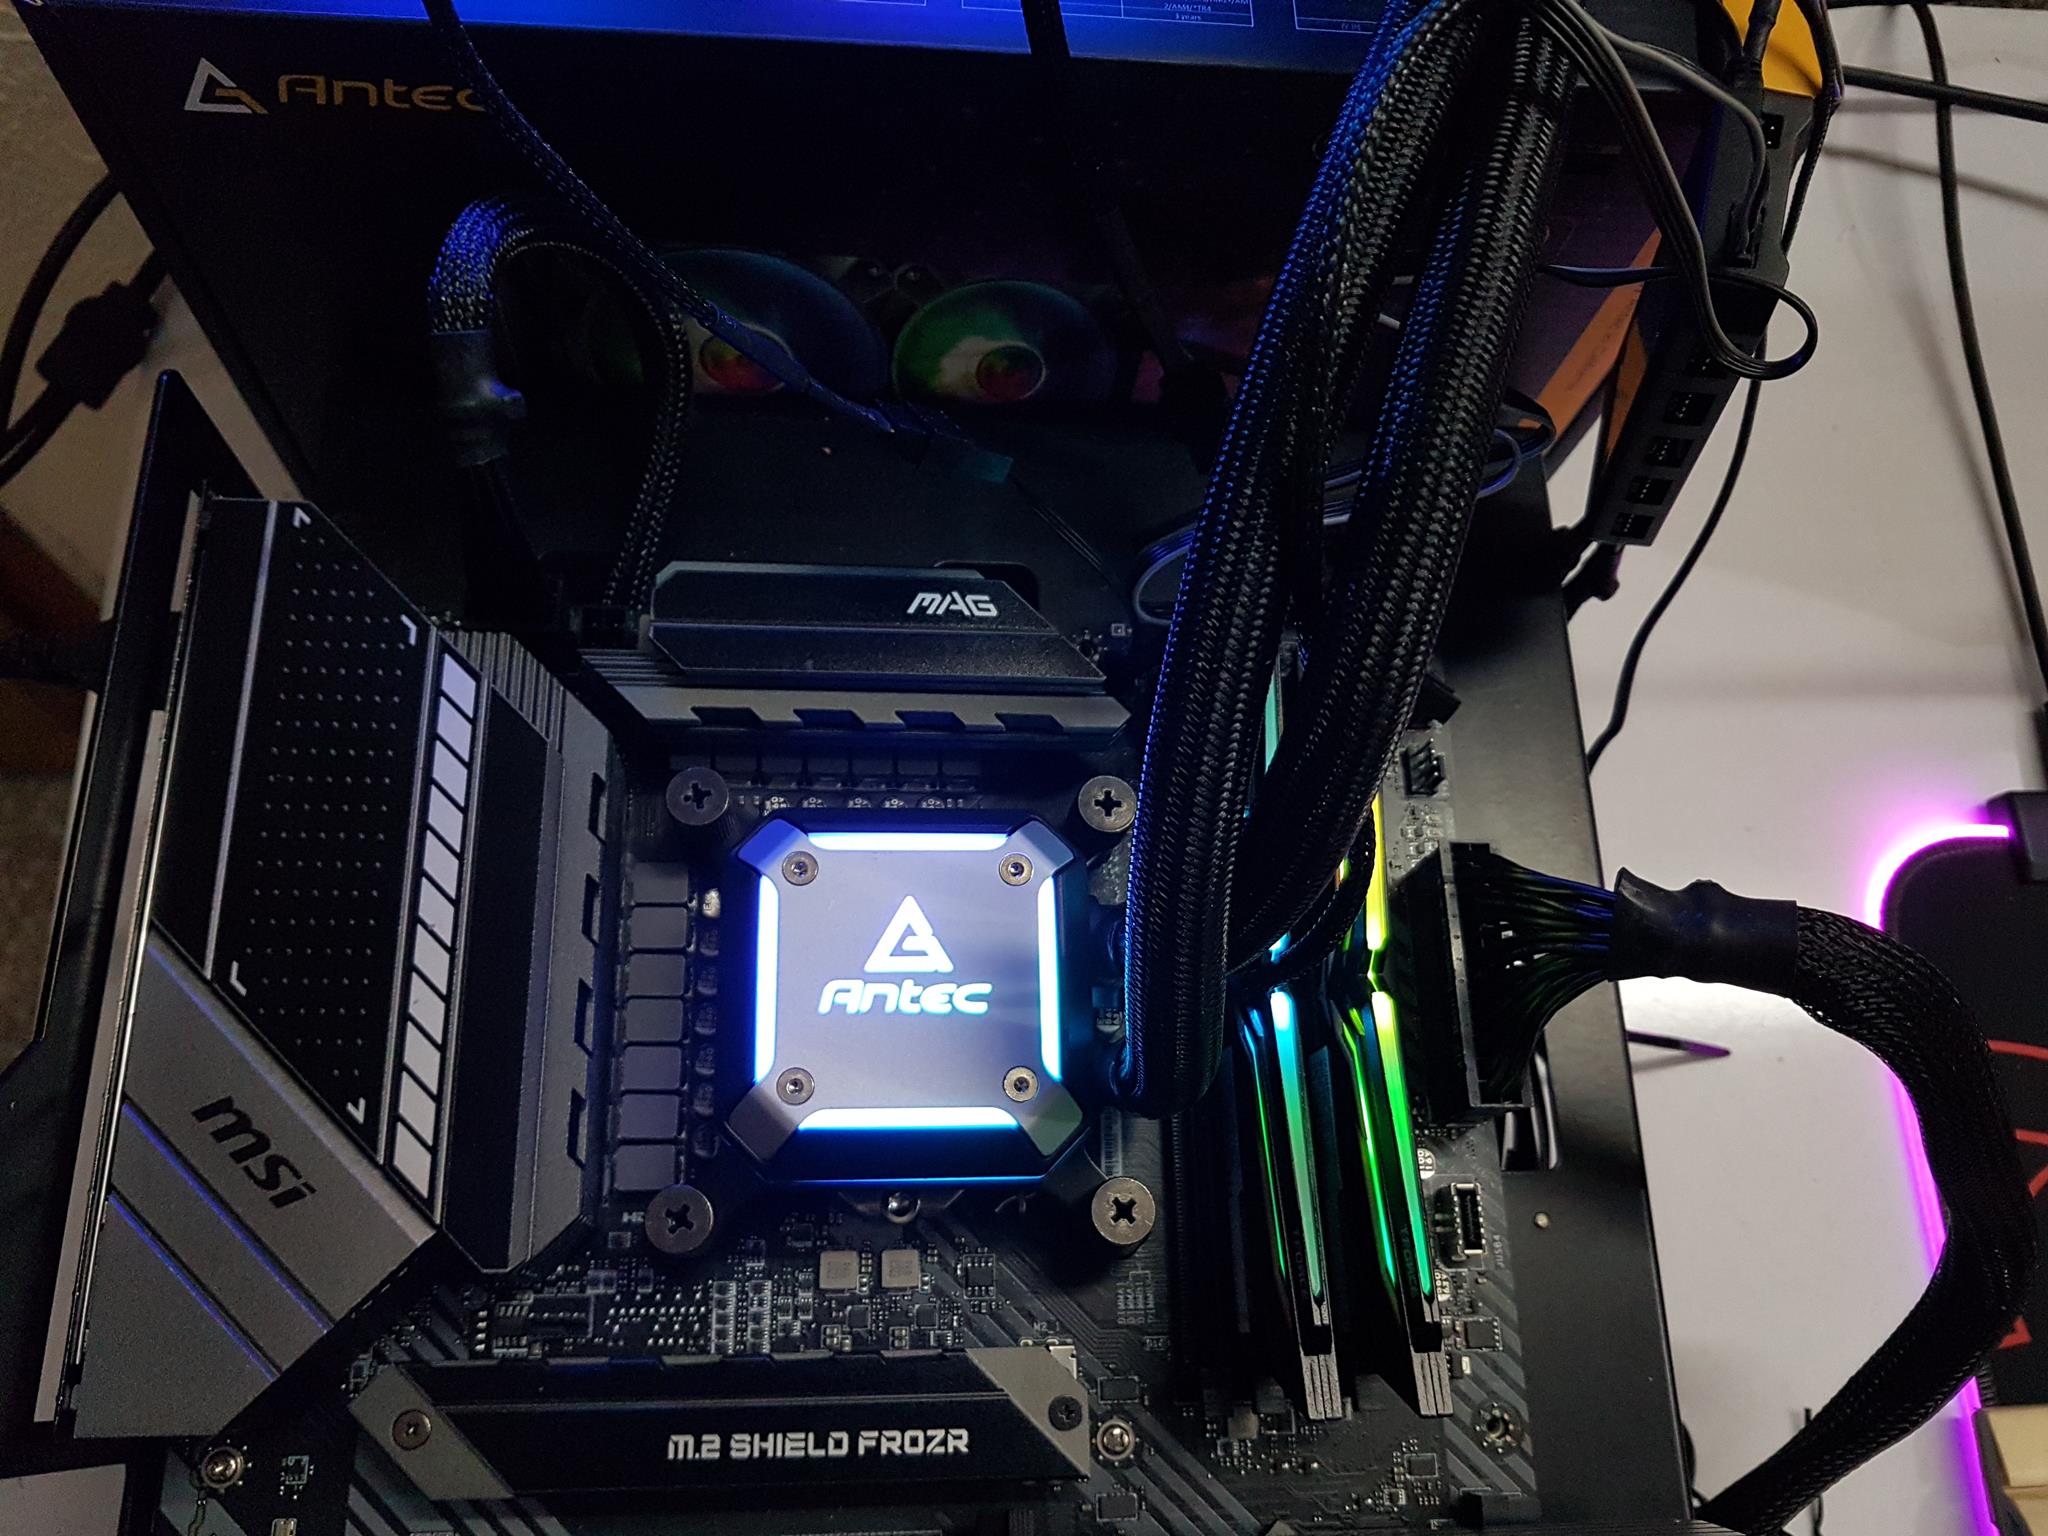
Antec’s new Neptune 240 ARGB cooler elevates your build with an integrated water pump and radiator, safeguarding your CPU from damaging vibration. The slim pump head enhances aesthetics and thermal efficiency. Compatible with Intel and AMD sockets, including AMD xTR4.
Radiator
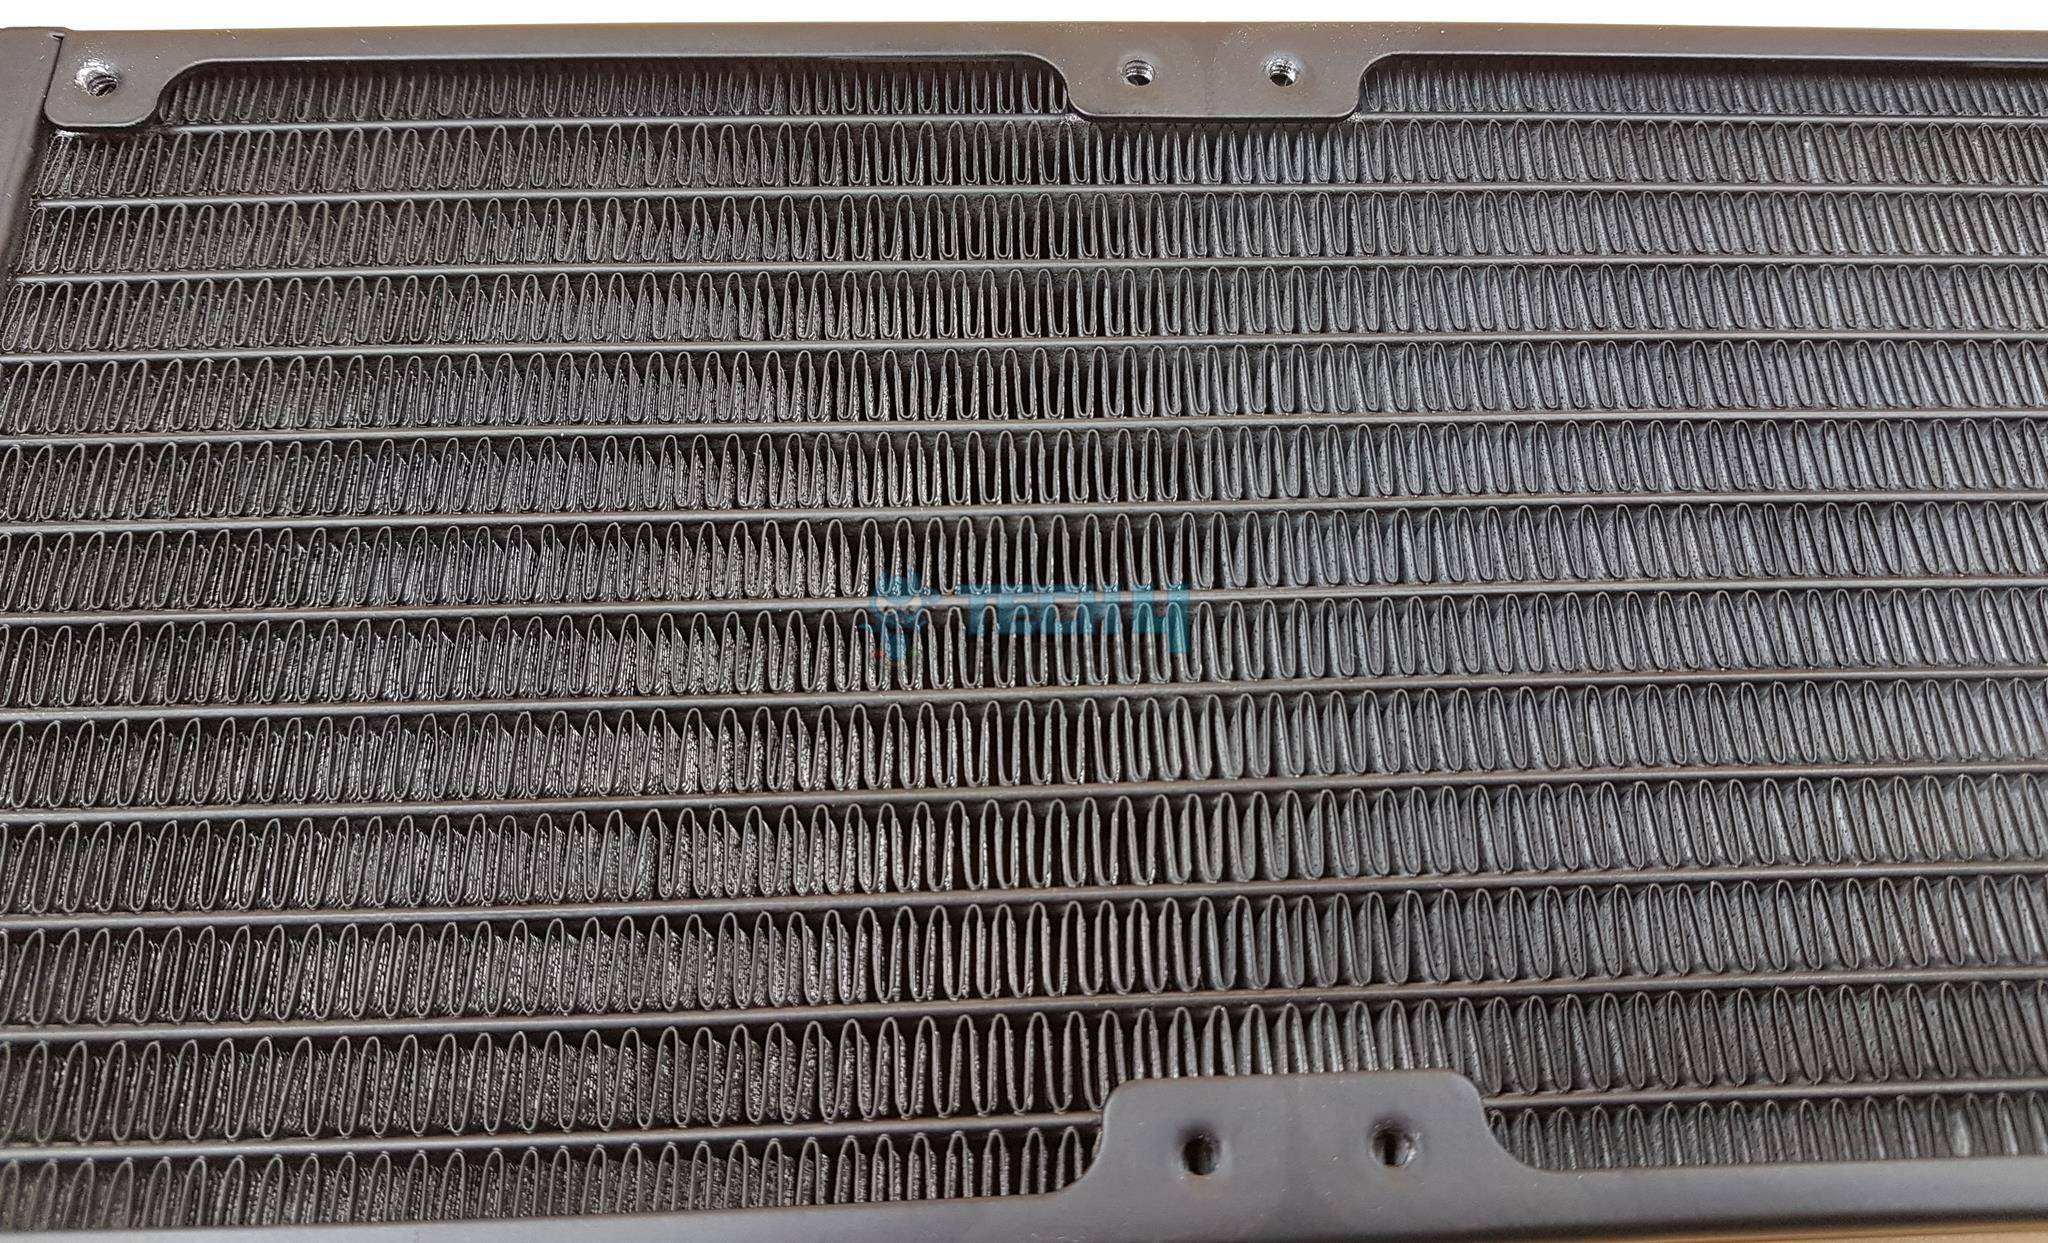
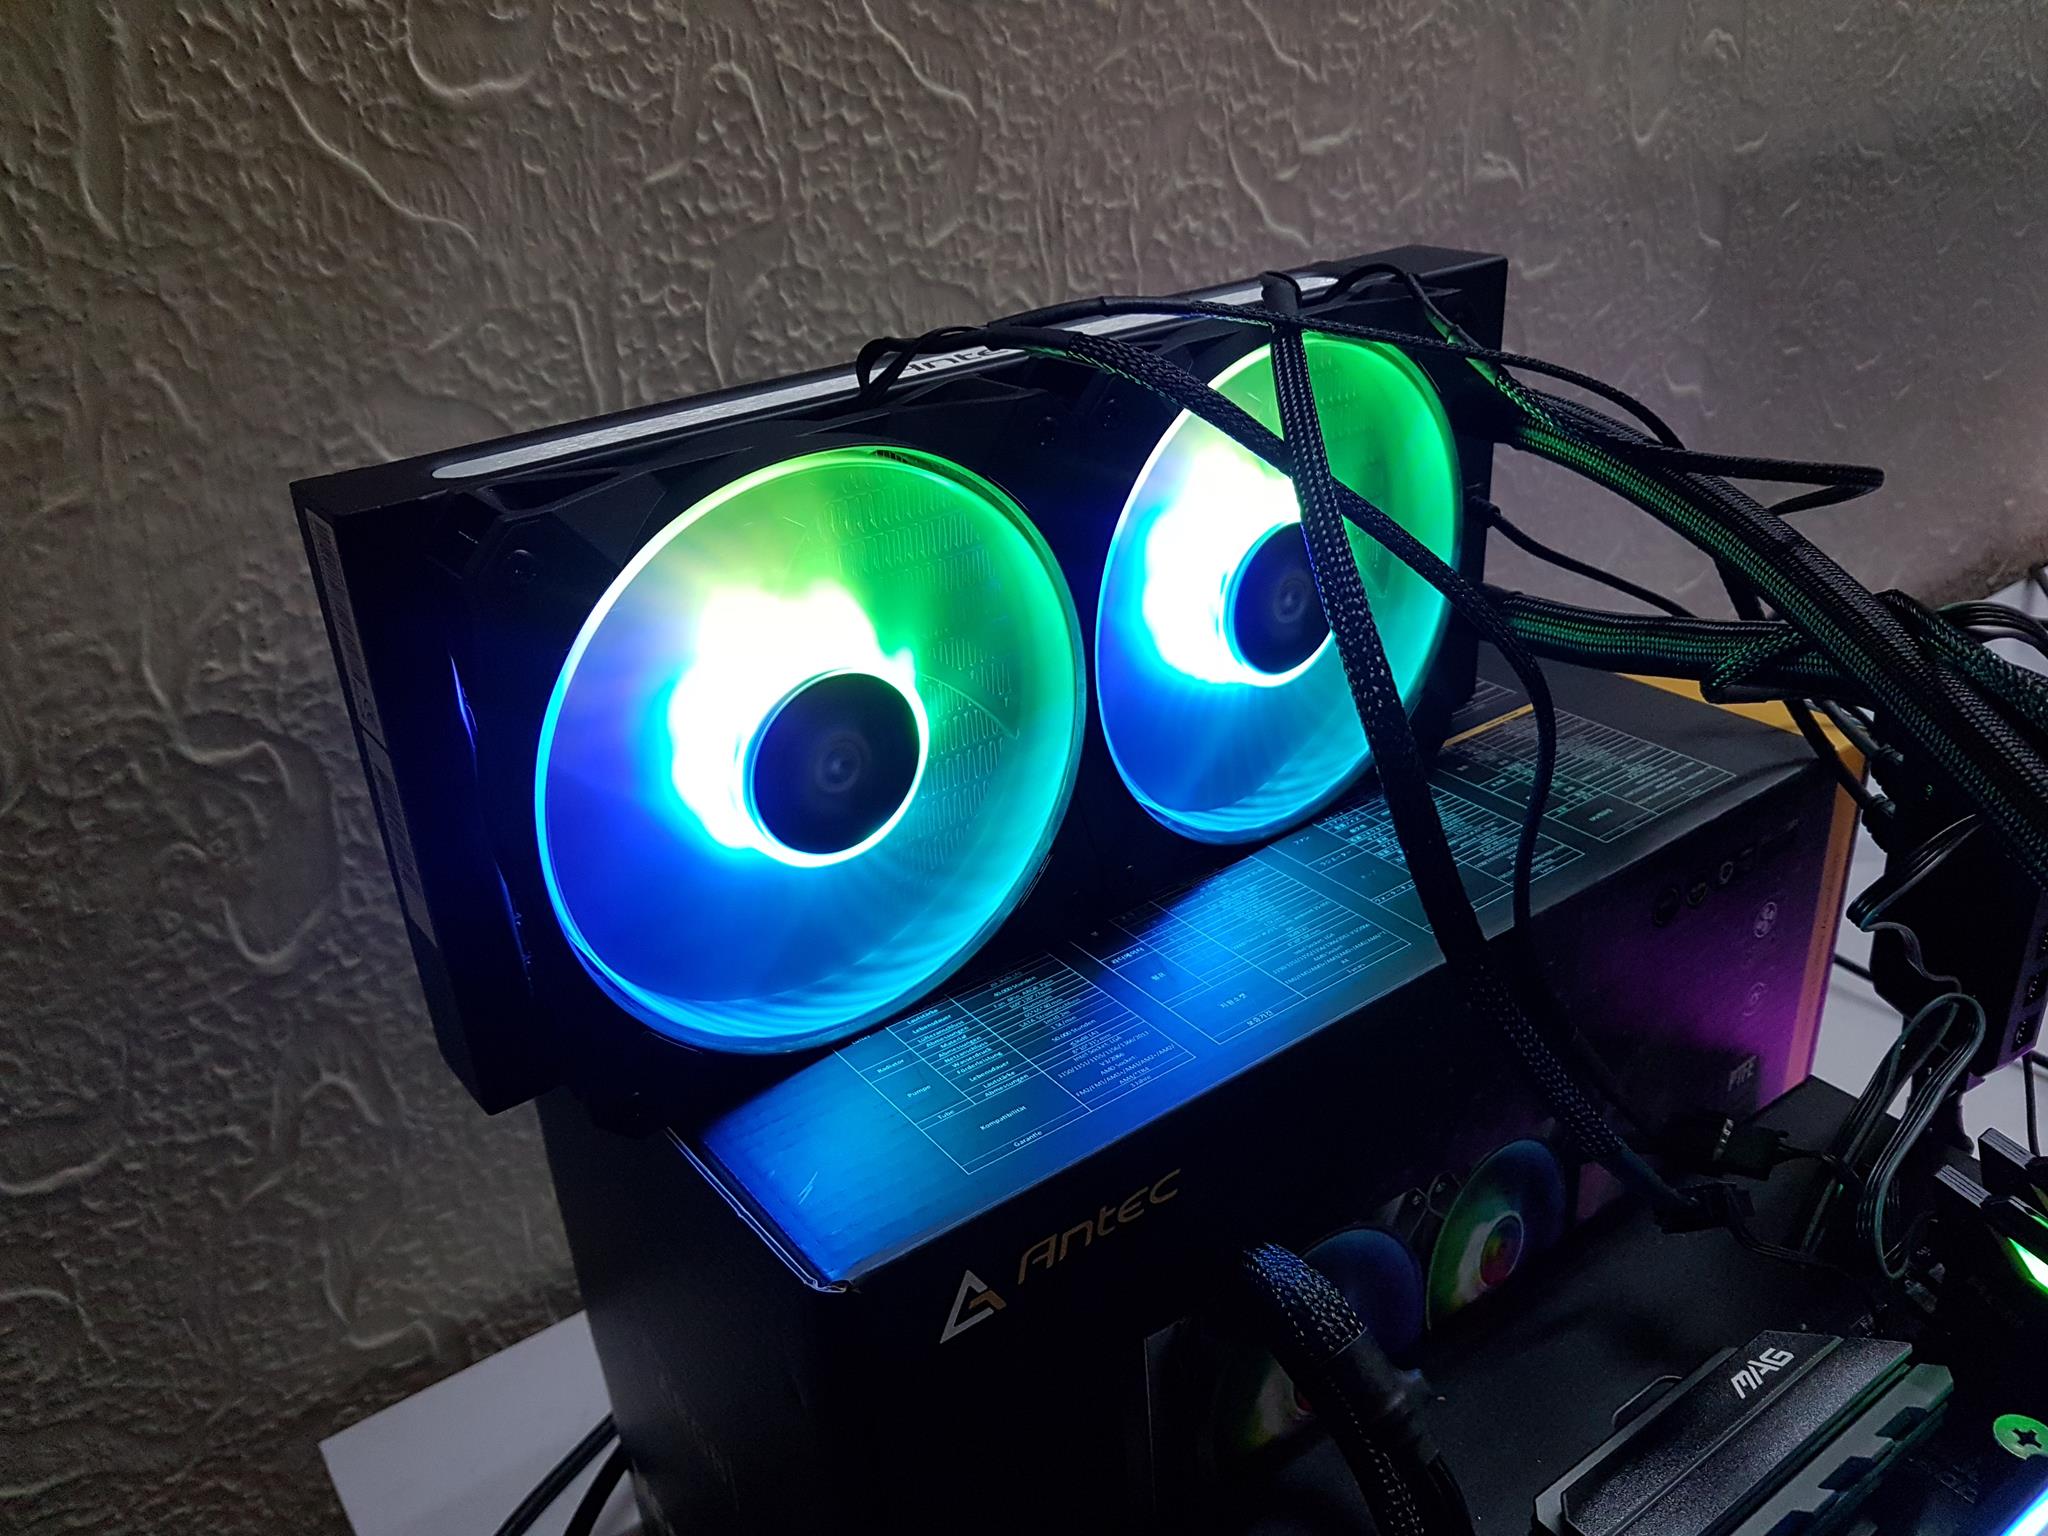
Featuring a sleek 27mm-thick aluminium radiator with two vibrant 120mm ARGB fans, it’s lightweight and efficient. It’s a cooling marvel with 18 fins per inch, a 105mm gap between fan mounting holes, and 12 channels for water flow. It’s not your typical Asetek design – this one’s unique! The blocks on both ends of the radiator are rectangular. The wall thickness is 0.28mm.

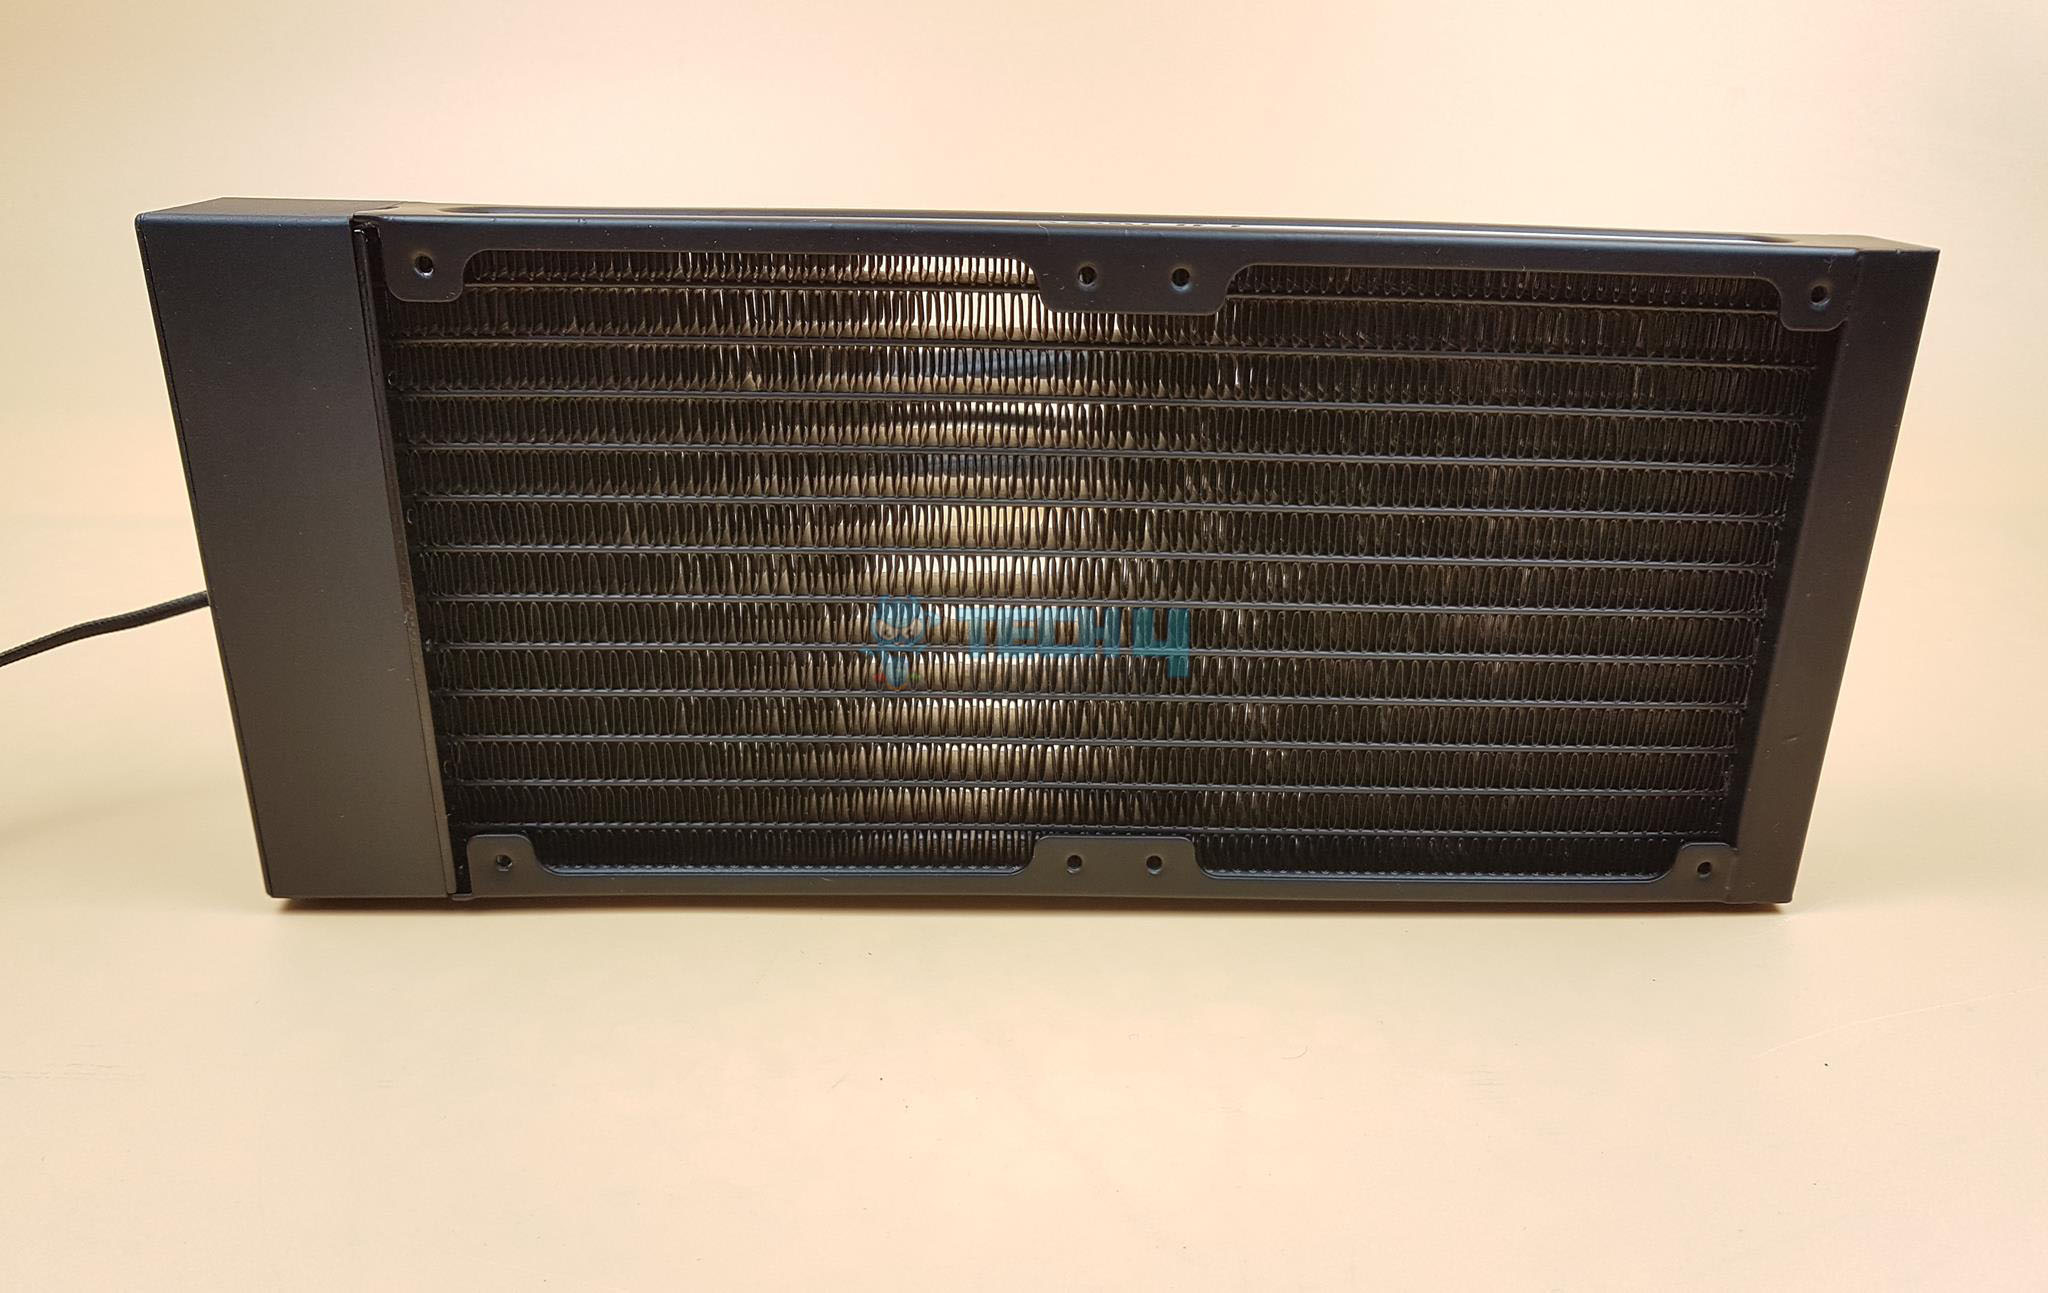
Antec has done a neat job with the fin stack. We have an aluminium façade on both sides with Antec branding in the centre.

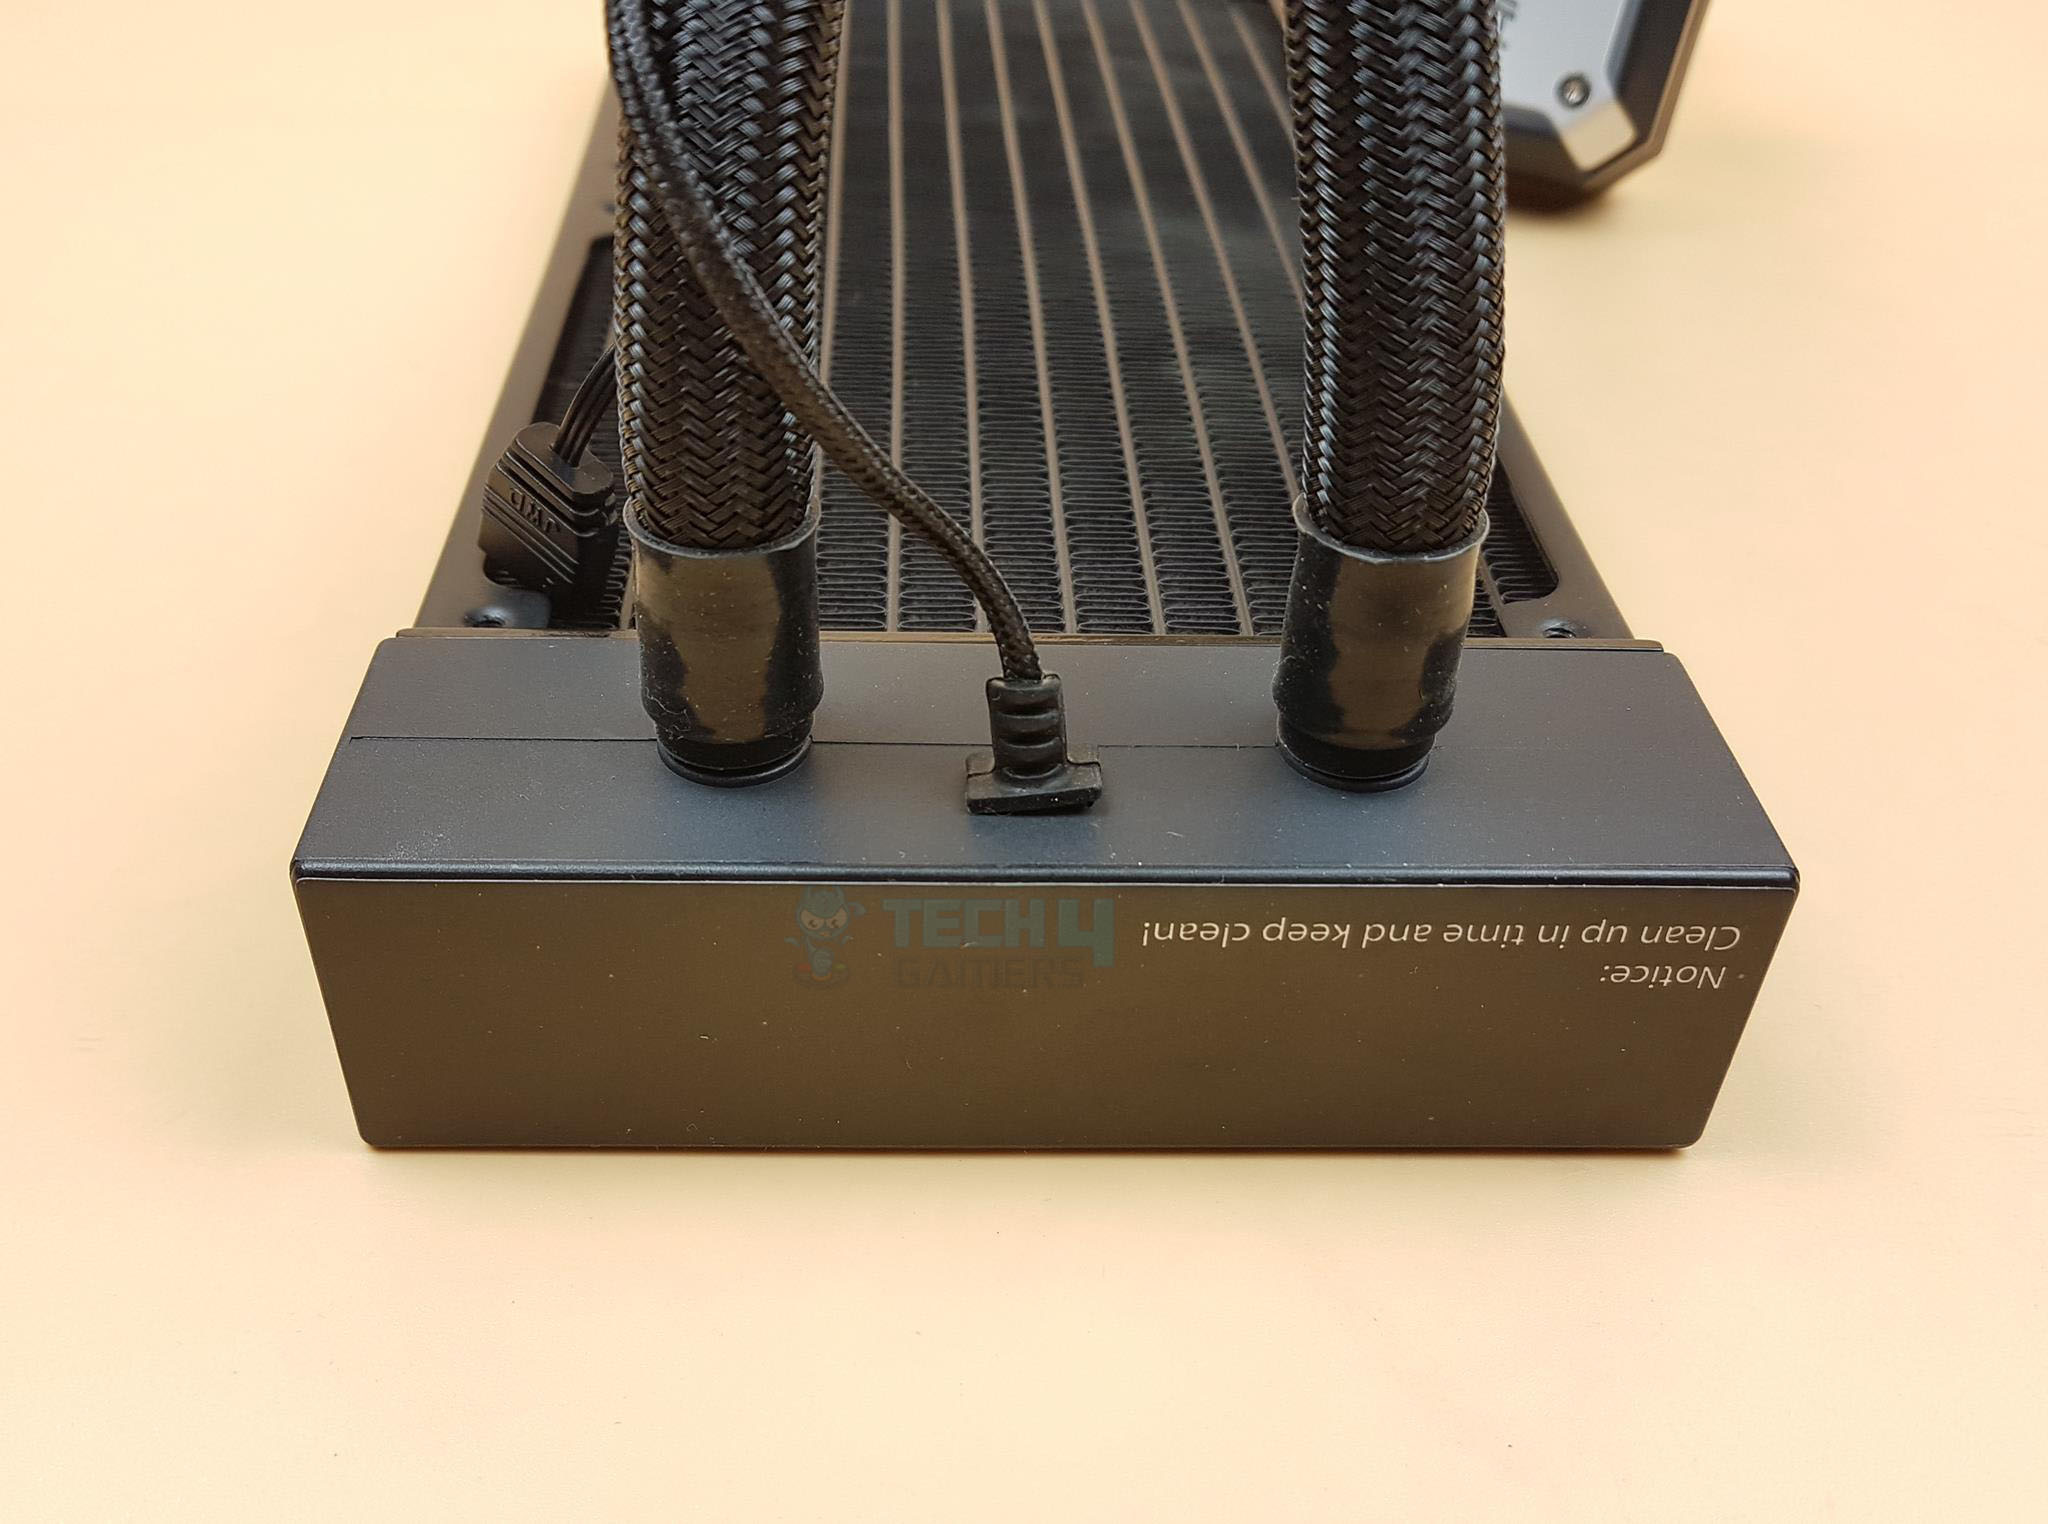
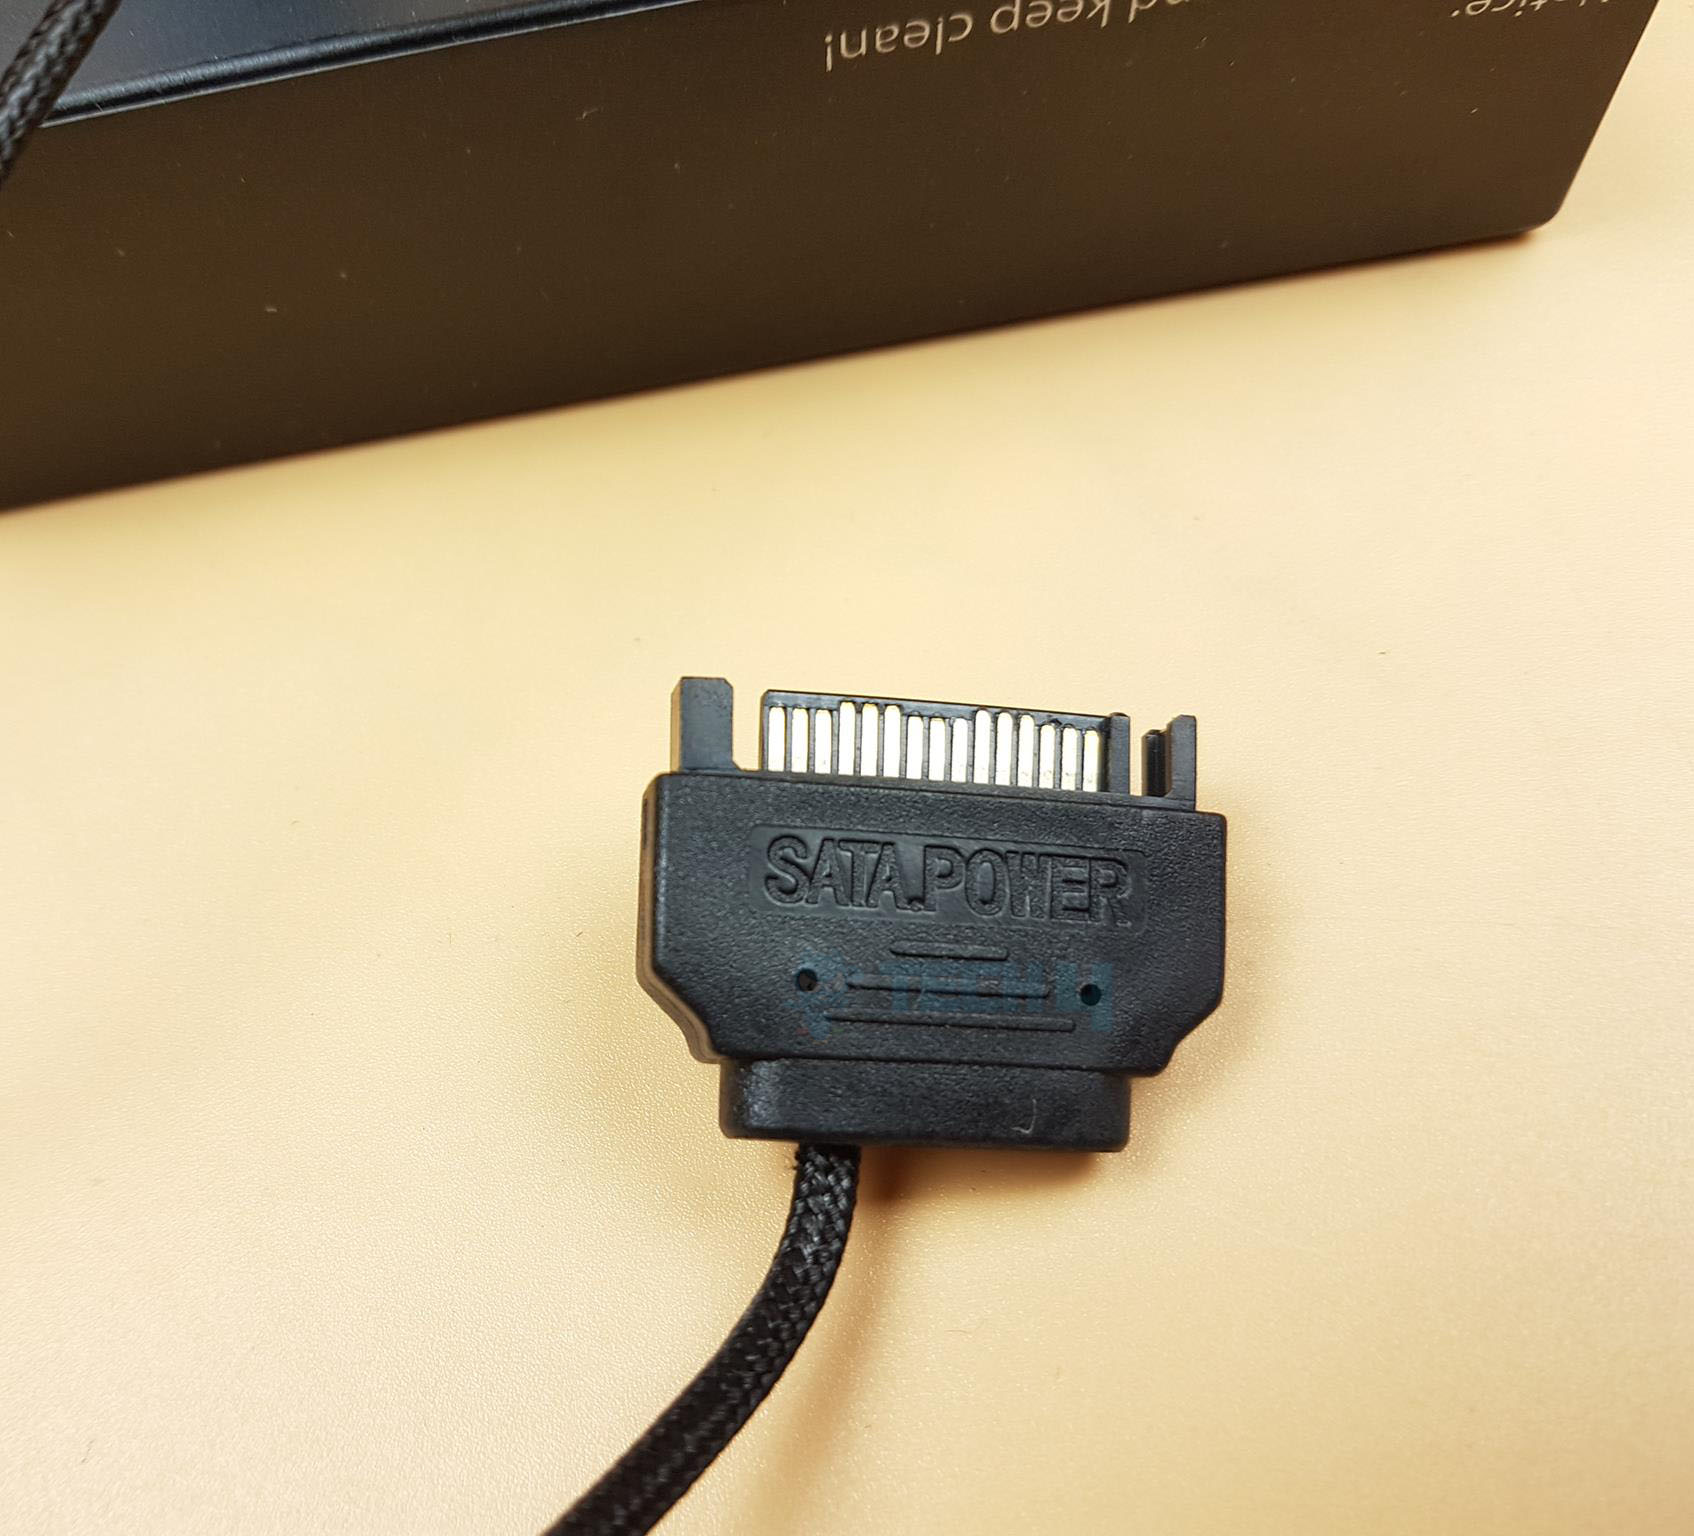
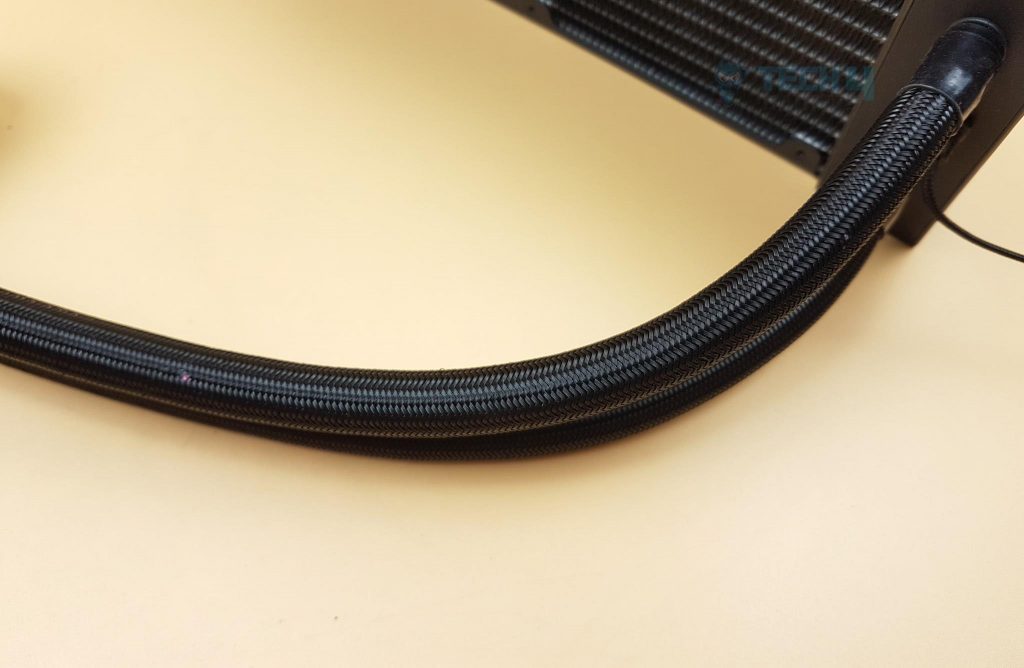
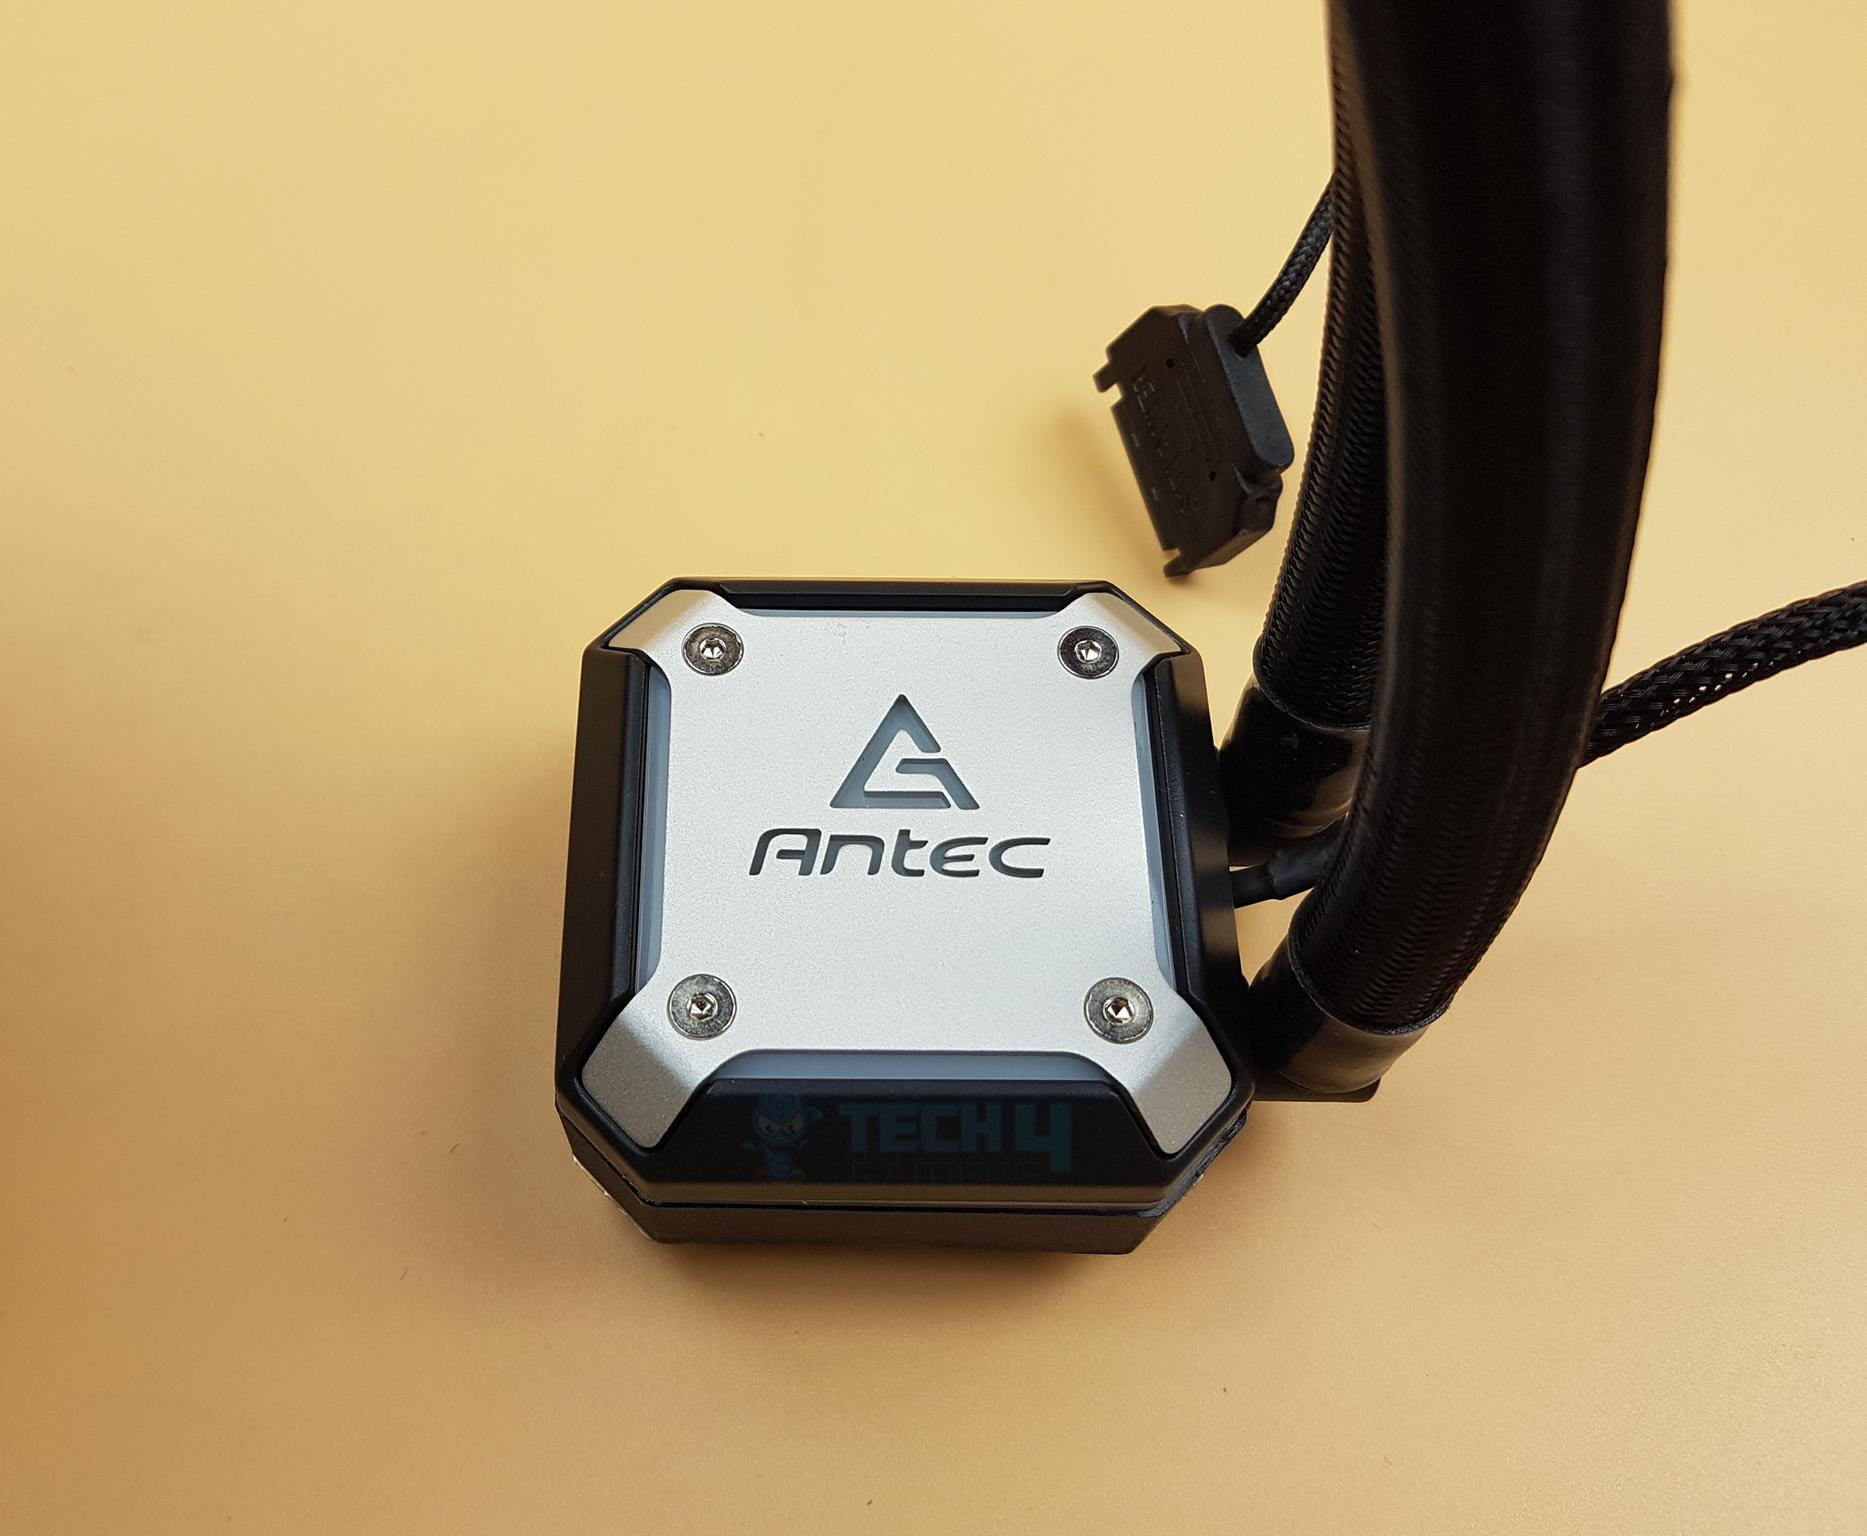
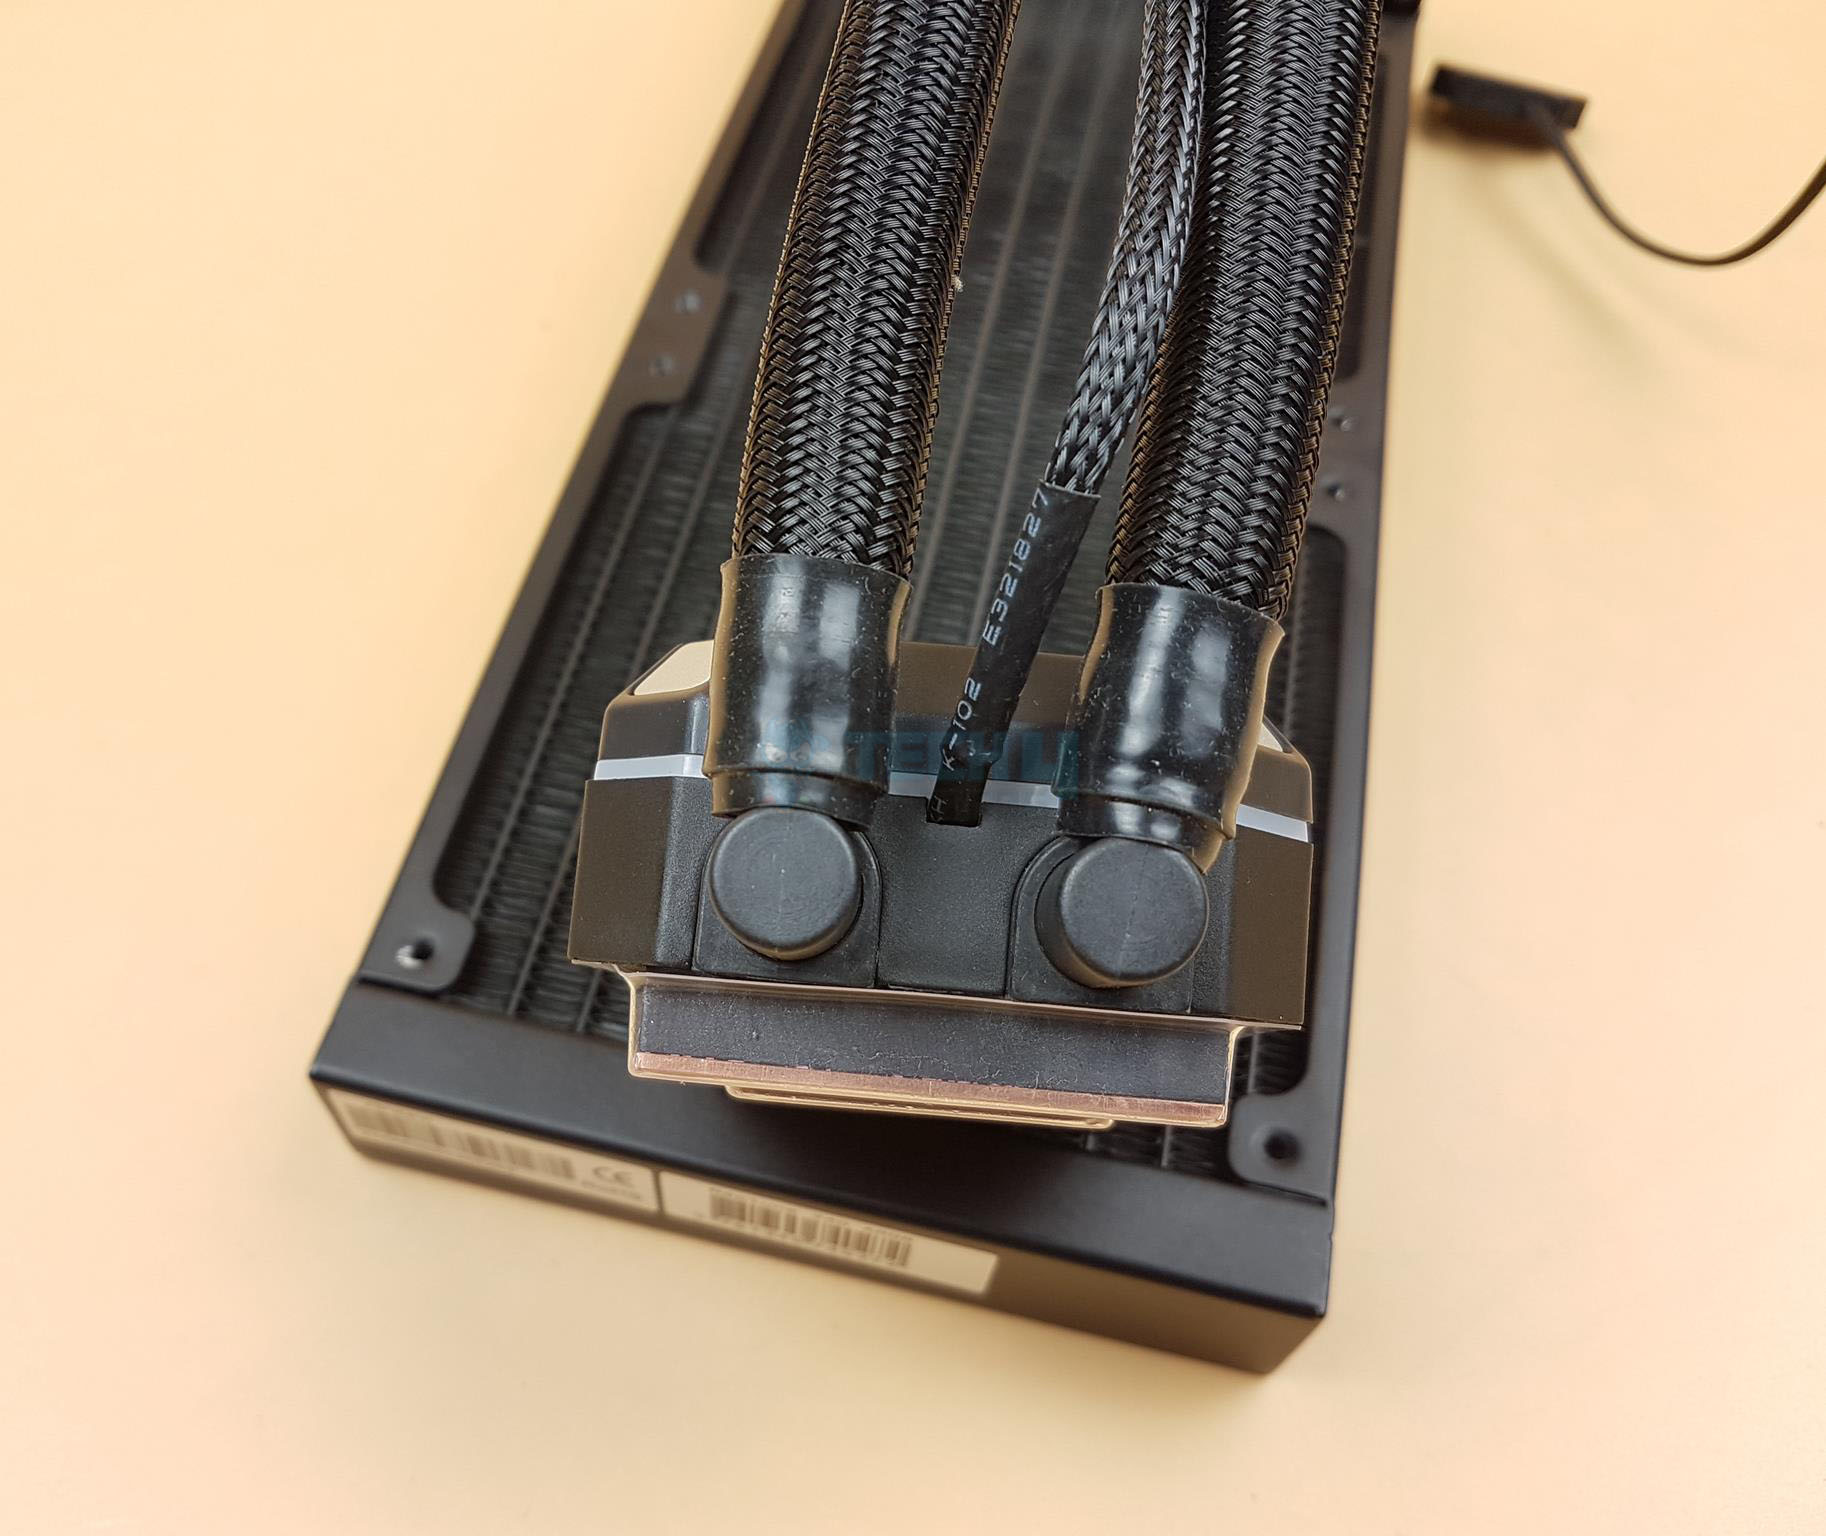
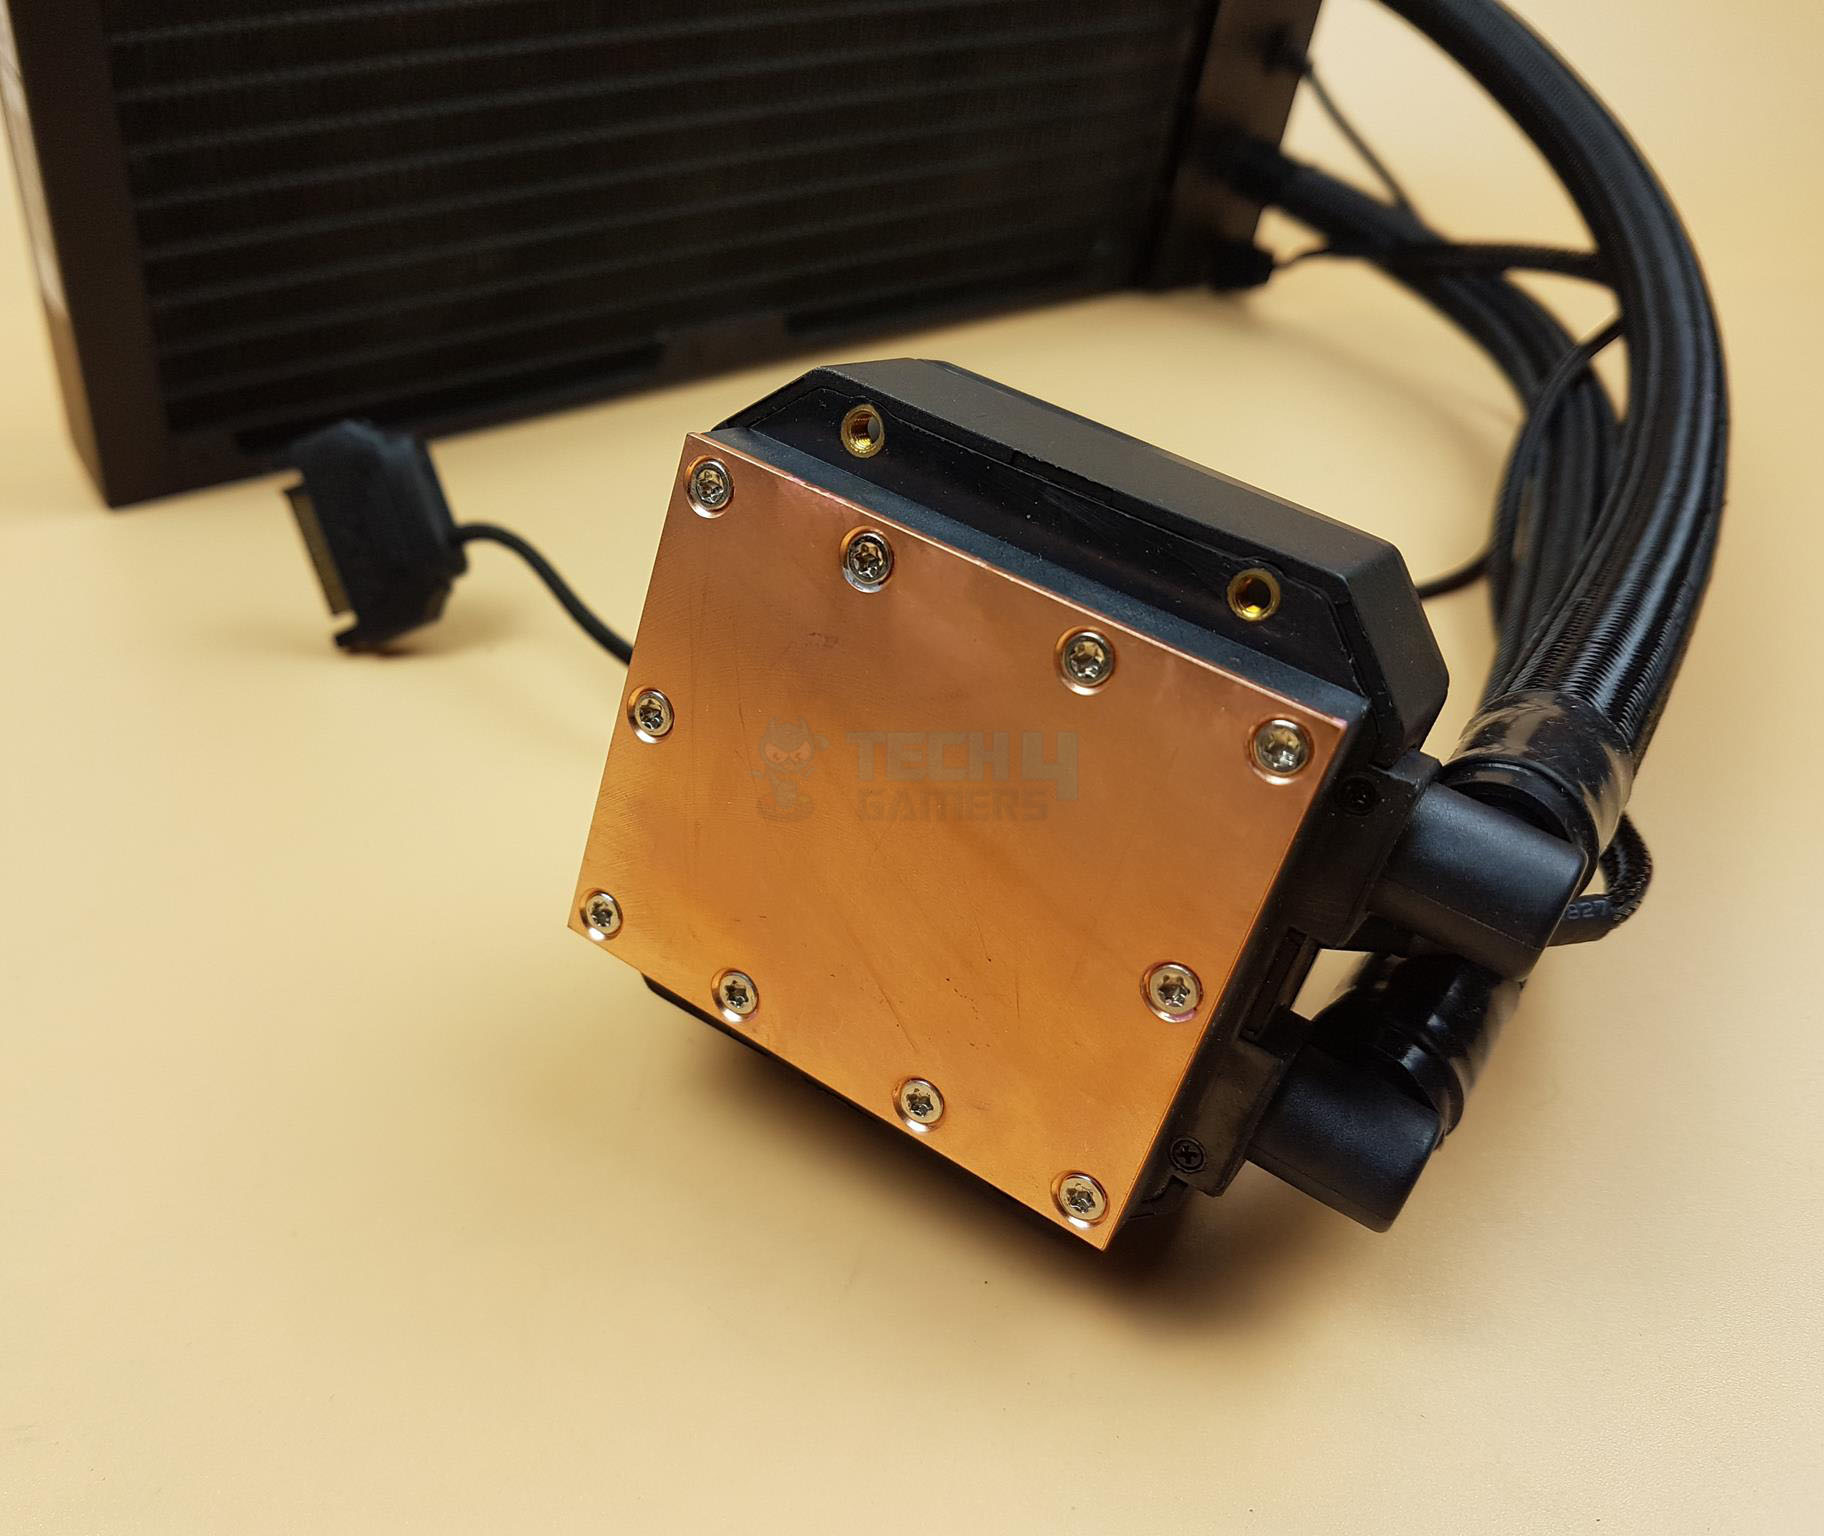
The Antec Neptune 240 ARGB’s pump is housed in the radiator, positioned near the block where tubes emerge. The enlarged block on one end measures 34x121x30mm (height x depth x block height). A power cable, seeming a bit lose, extends from the center. The pump draws power directly from the SATA cable with no speed control. Hoses are securely connected to straight barbs with heat shrinks. A caution sticker advises regular cleaning. The 392mm SATA cable falls short; ideally, it should be at least 500mm, accommodating various chassis placements.
Specifications of the pump are:
| Water Pressure | 1.0 ± 0.2m |
| Flow Rate | 1.5 L/H |
| Lifespan | 50000 hours at 25°C ambient 15-65% RH |
| Noise | ≤36 dBA |
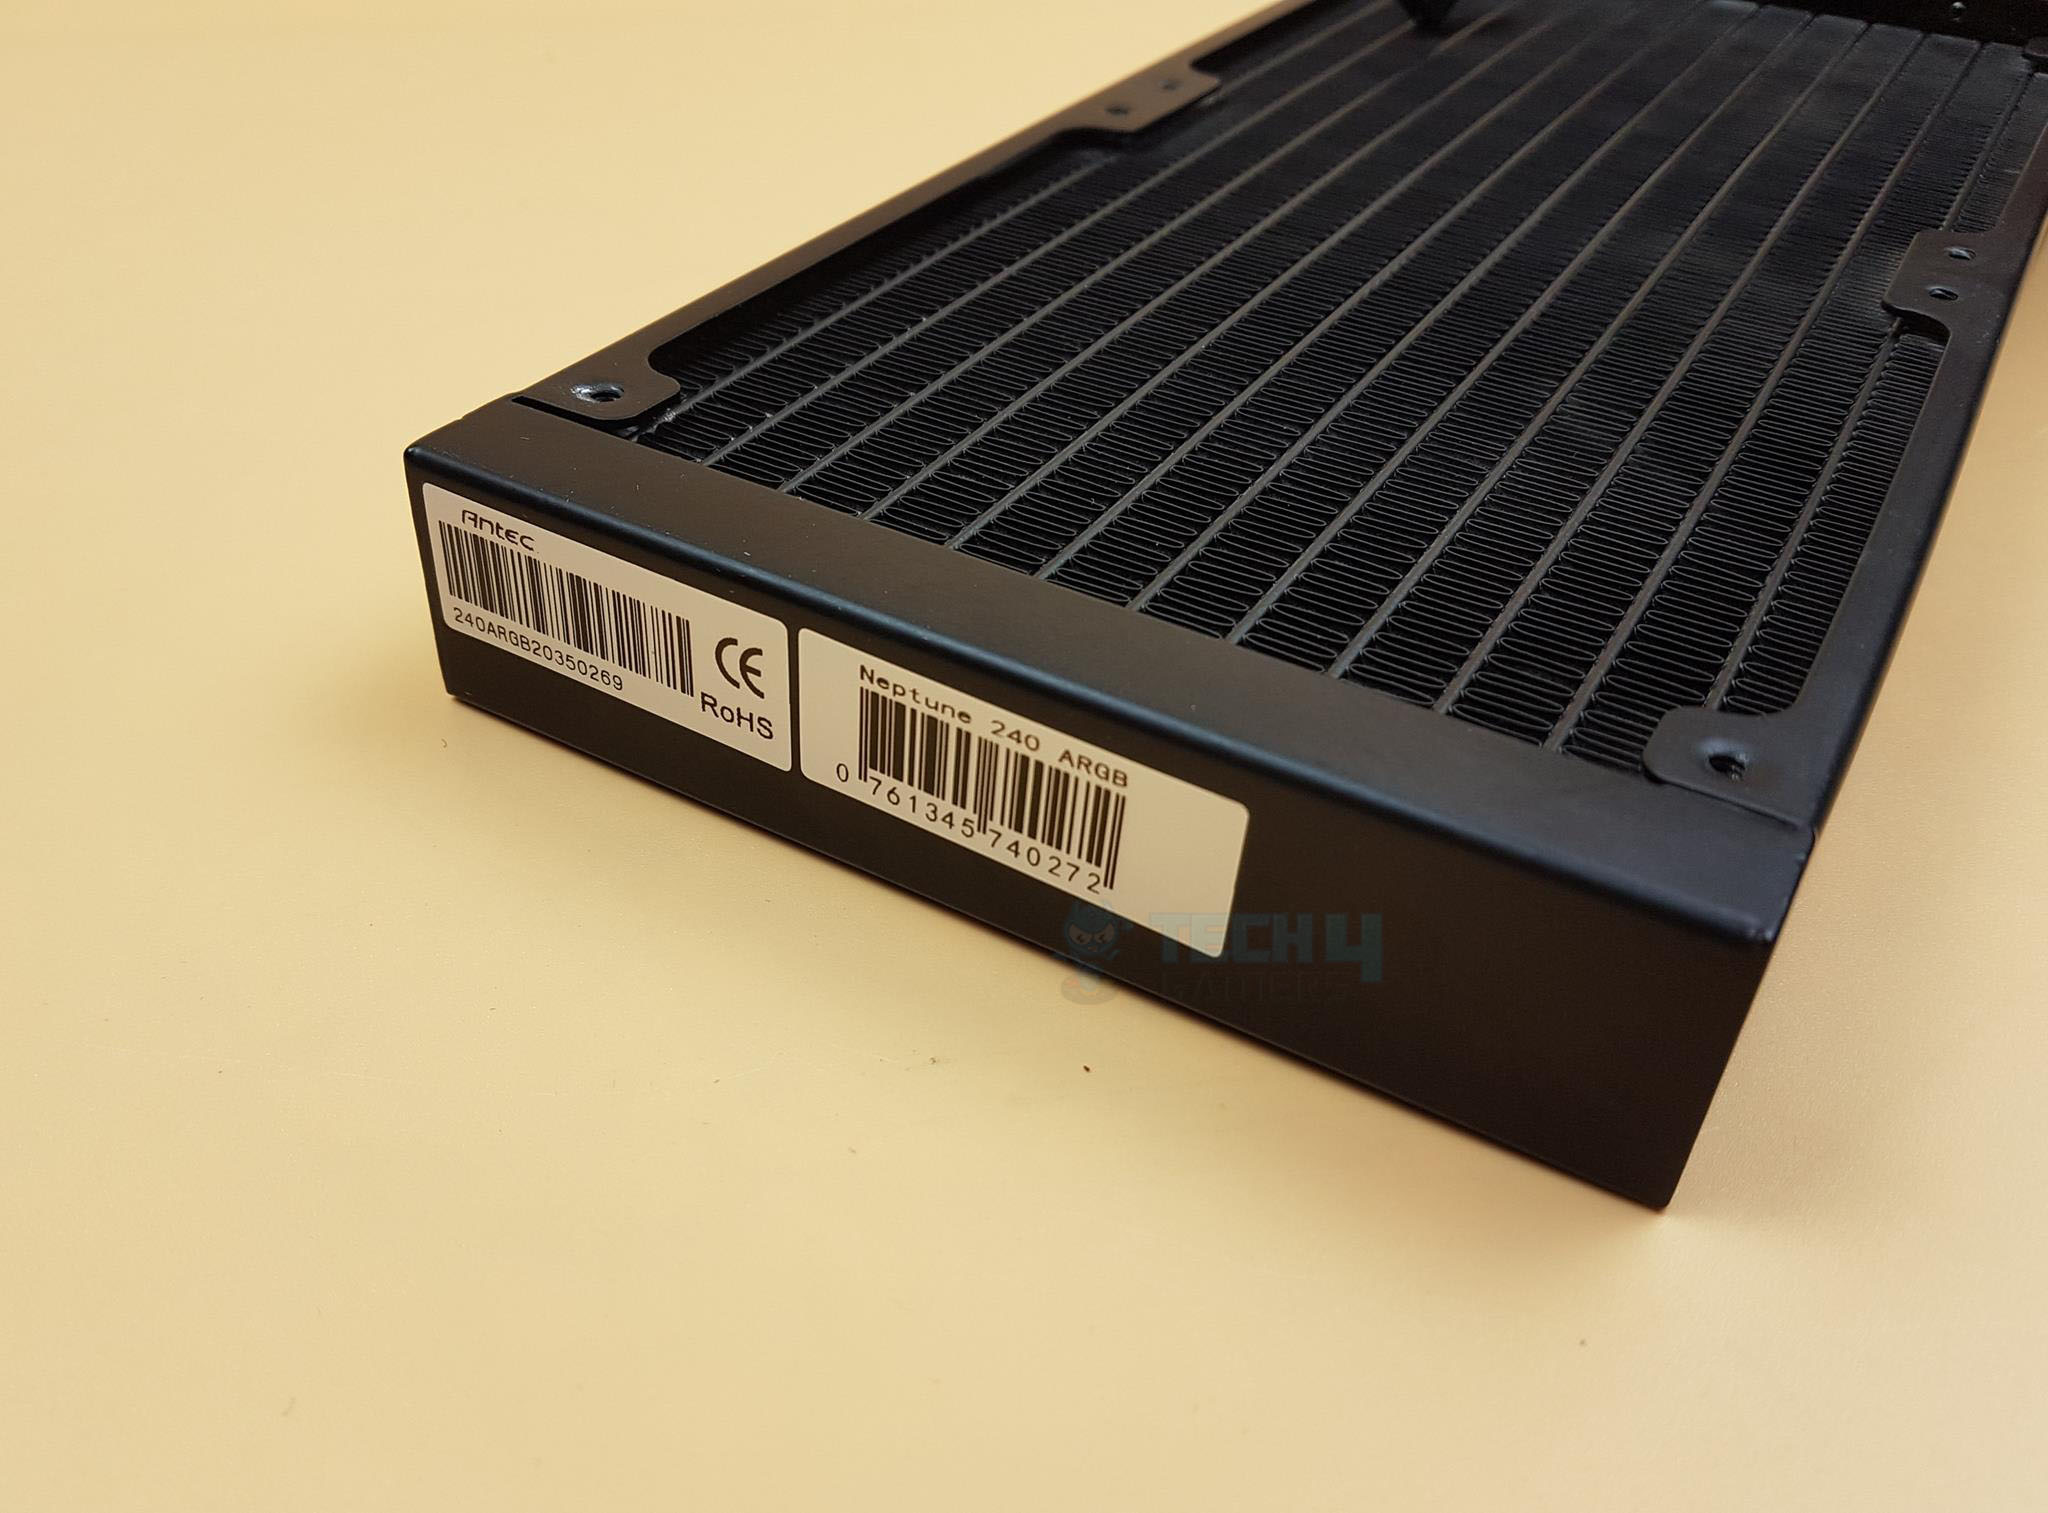
Check out the block at the far end—it’s got stickers with part and serial numbers but no protective sheet under the mountings. The picture shows that the radiator’s fin stack is offset, creating a wider gap. Plus, one corner has banged-up fins.

Antec Neptune 240 has PTFE Teflon-Coating tubes. The length of these tubes is 350mm. The PTFE coating reduces liquid loss and resists corrosion.
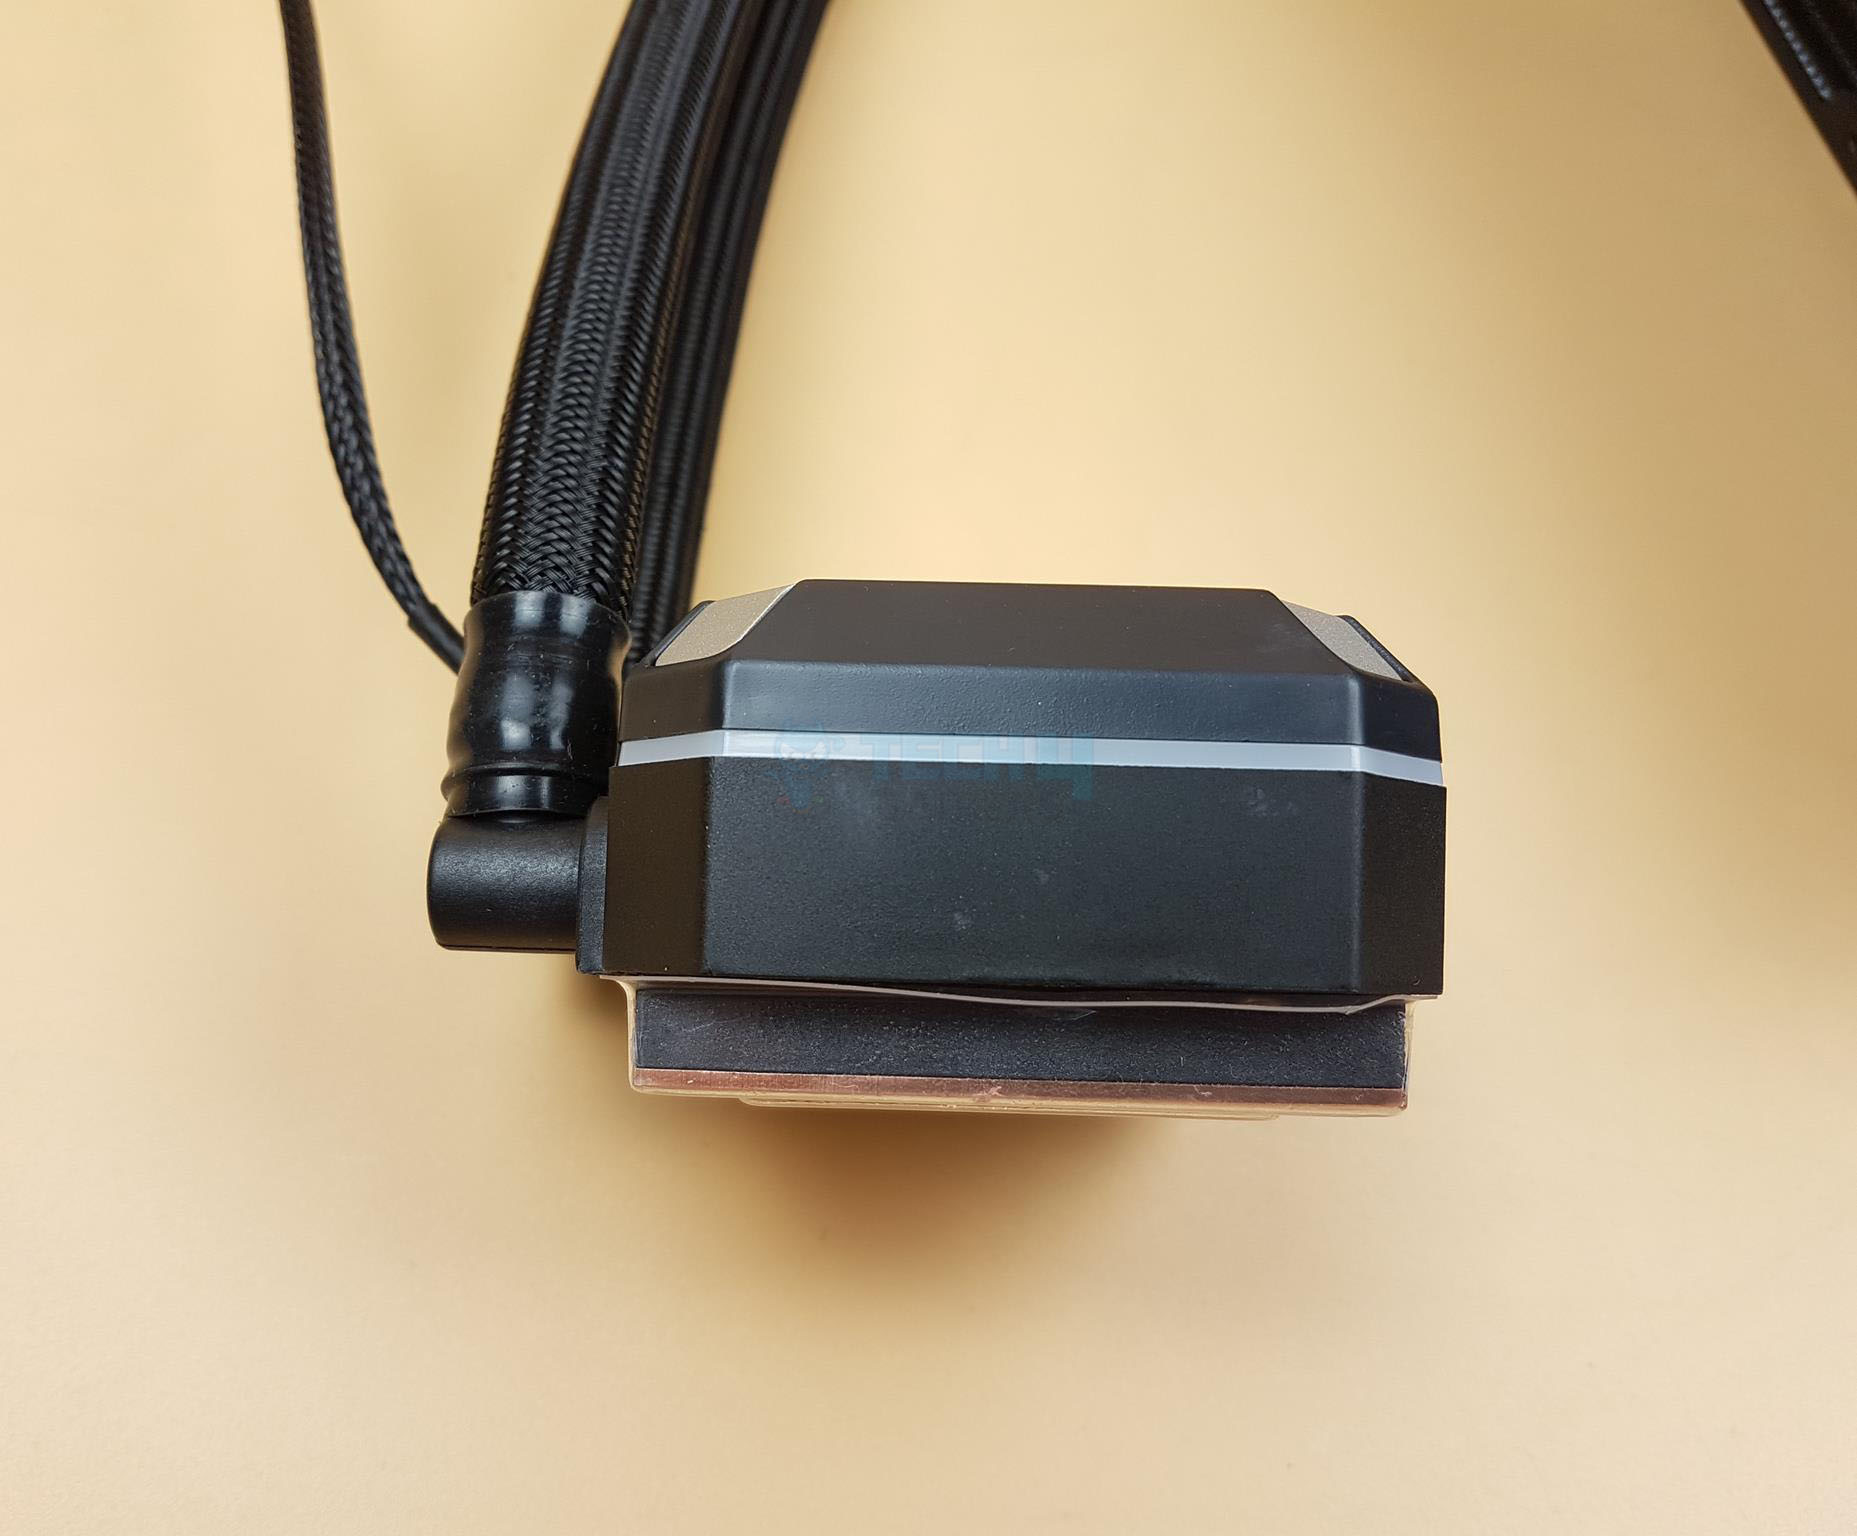
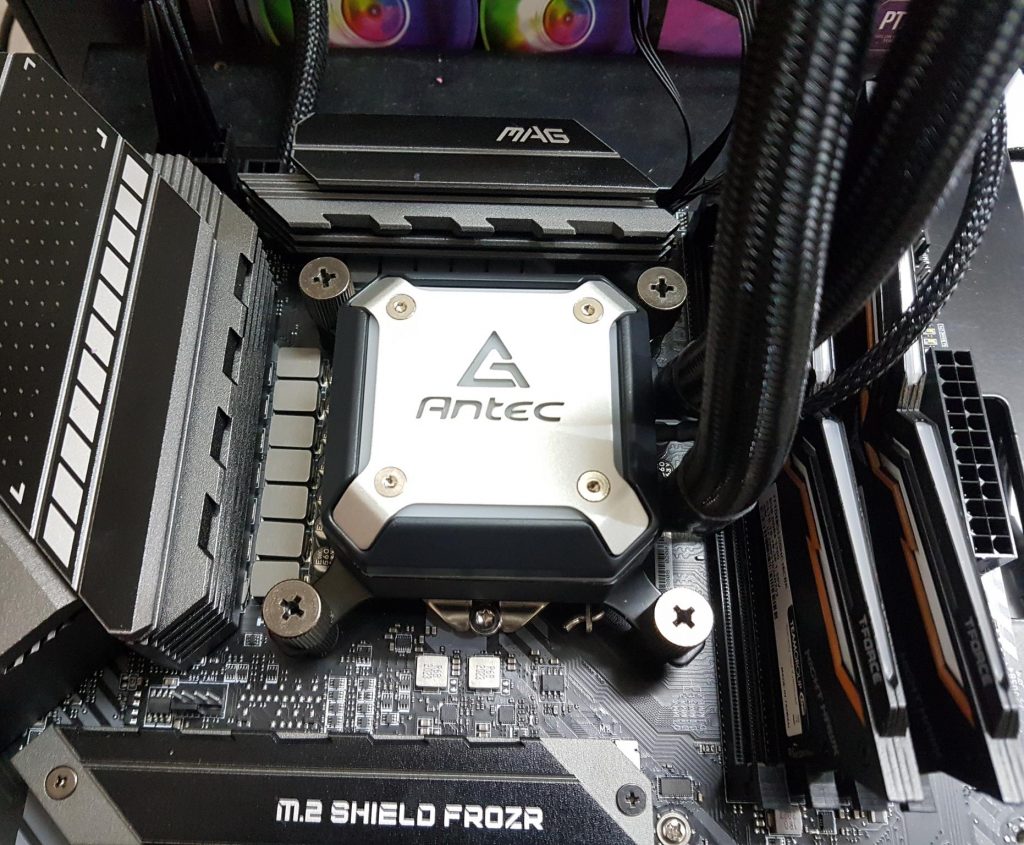
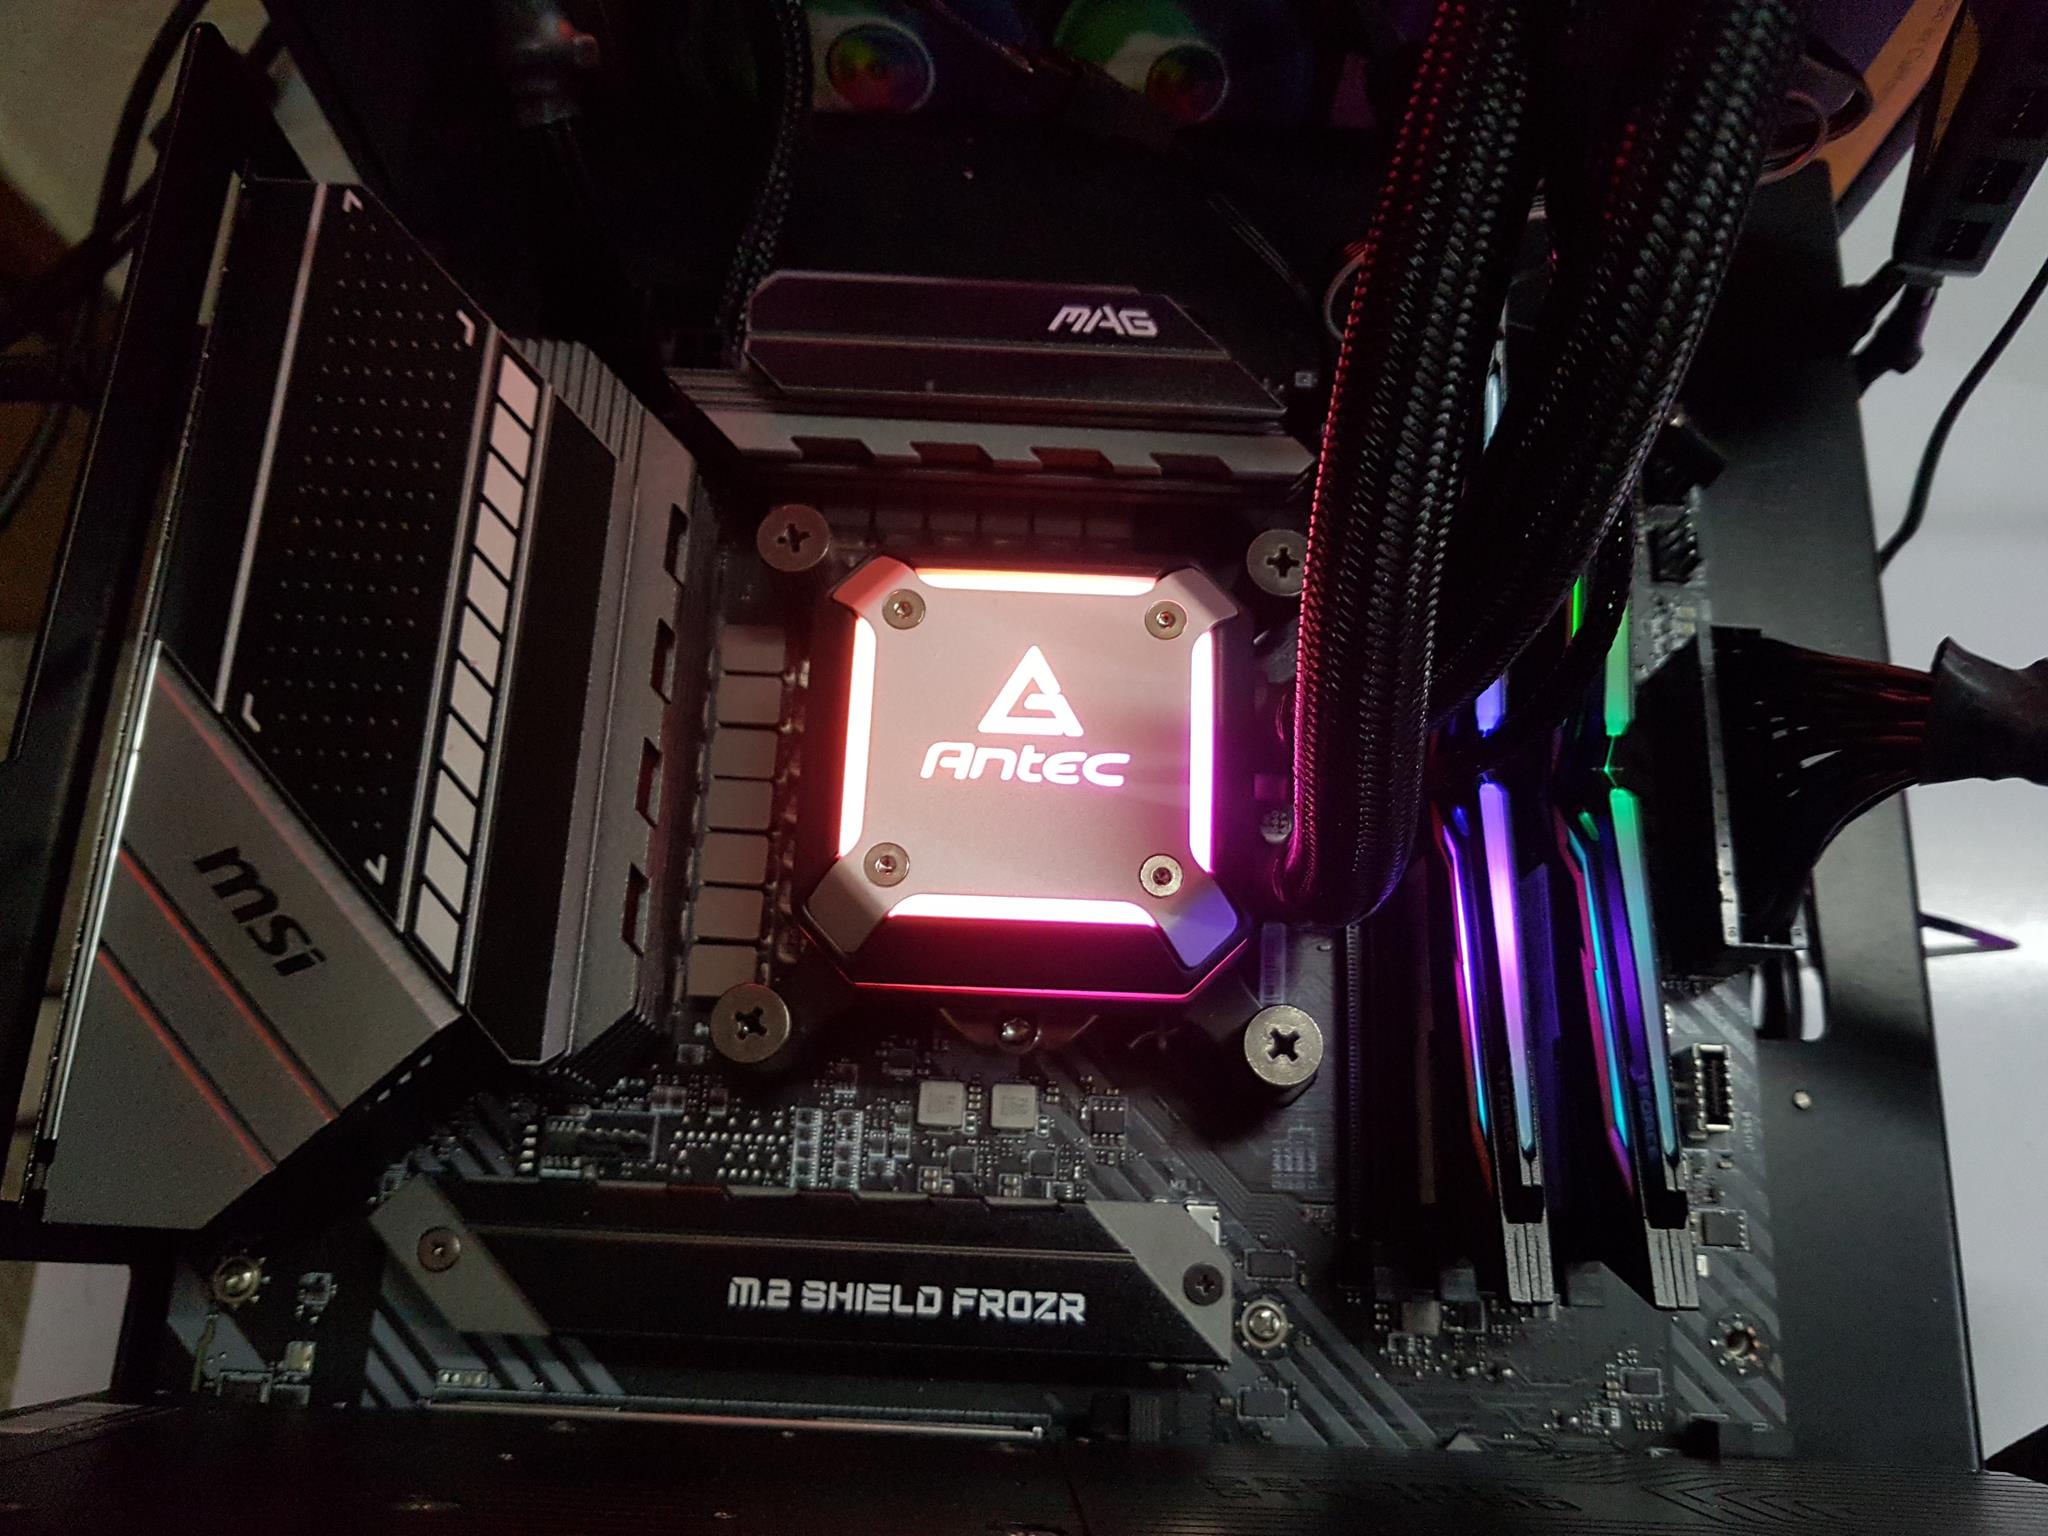
Block
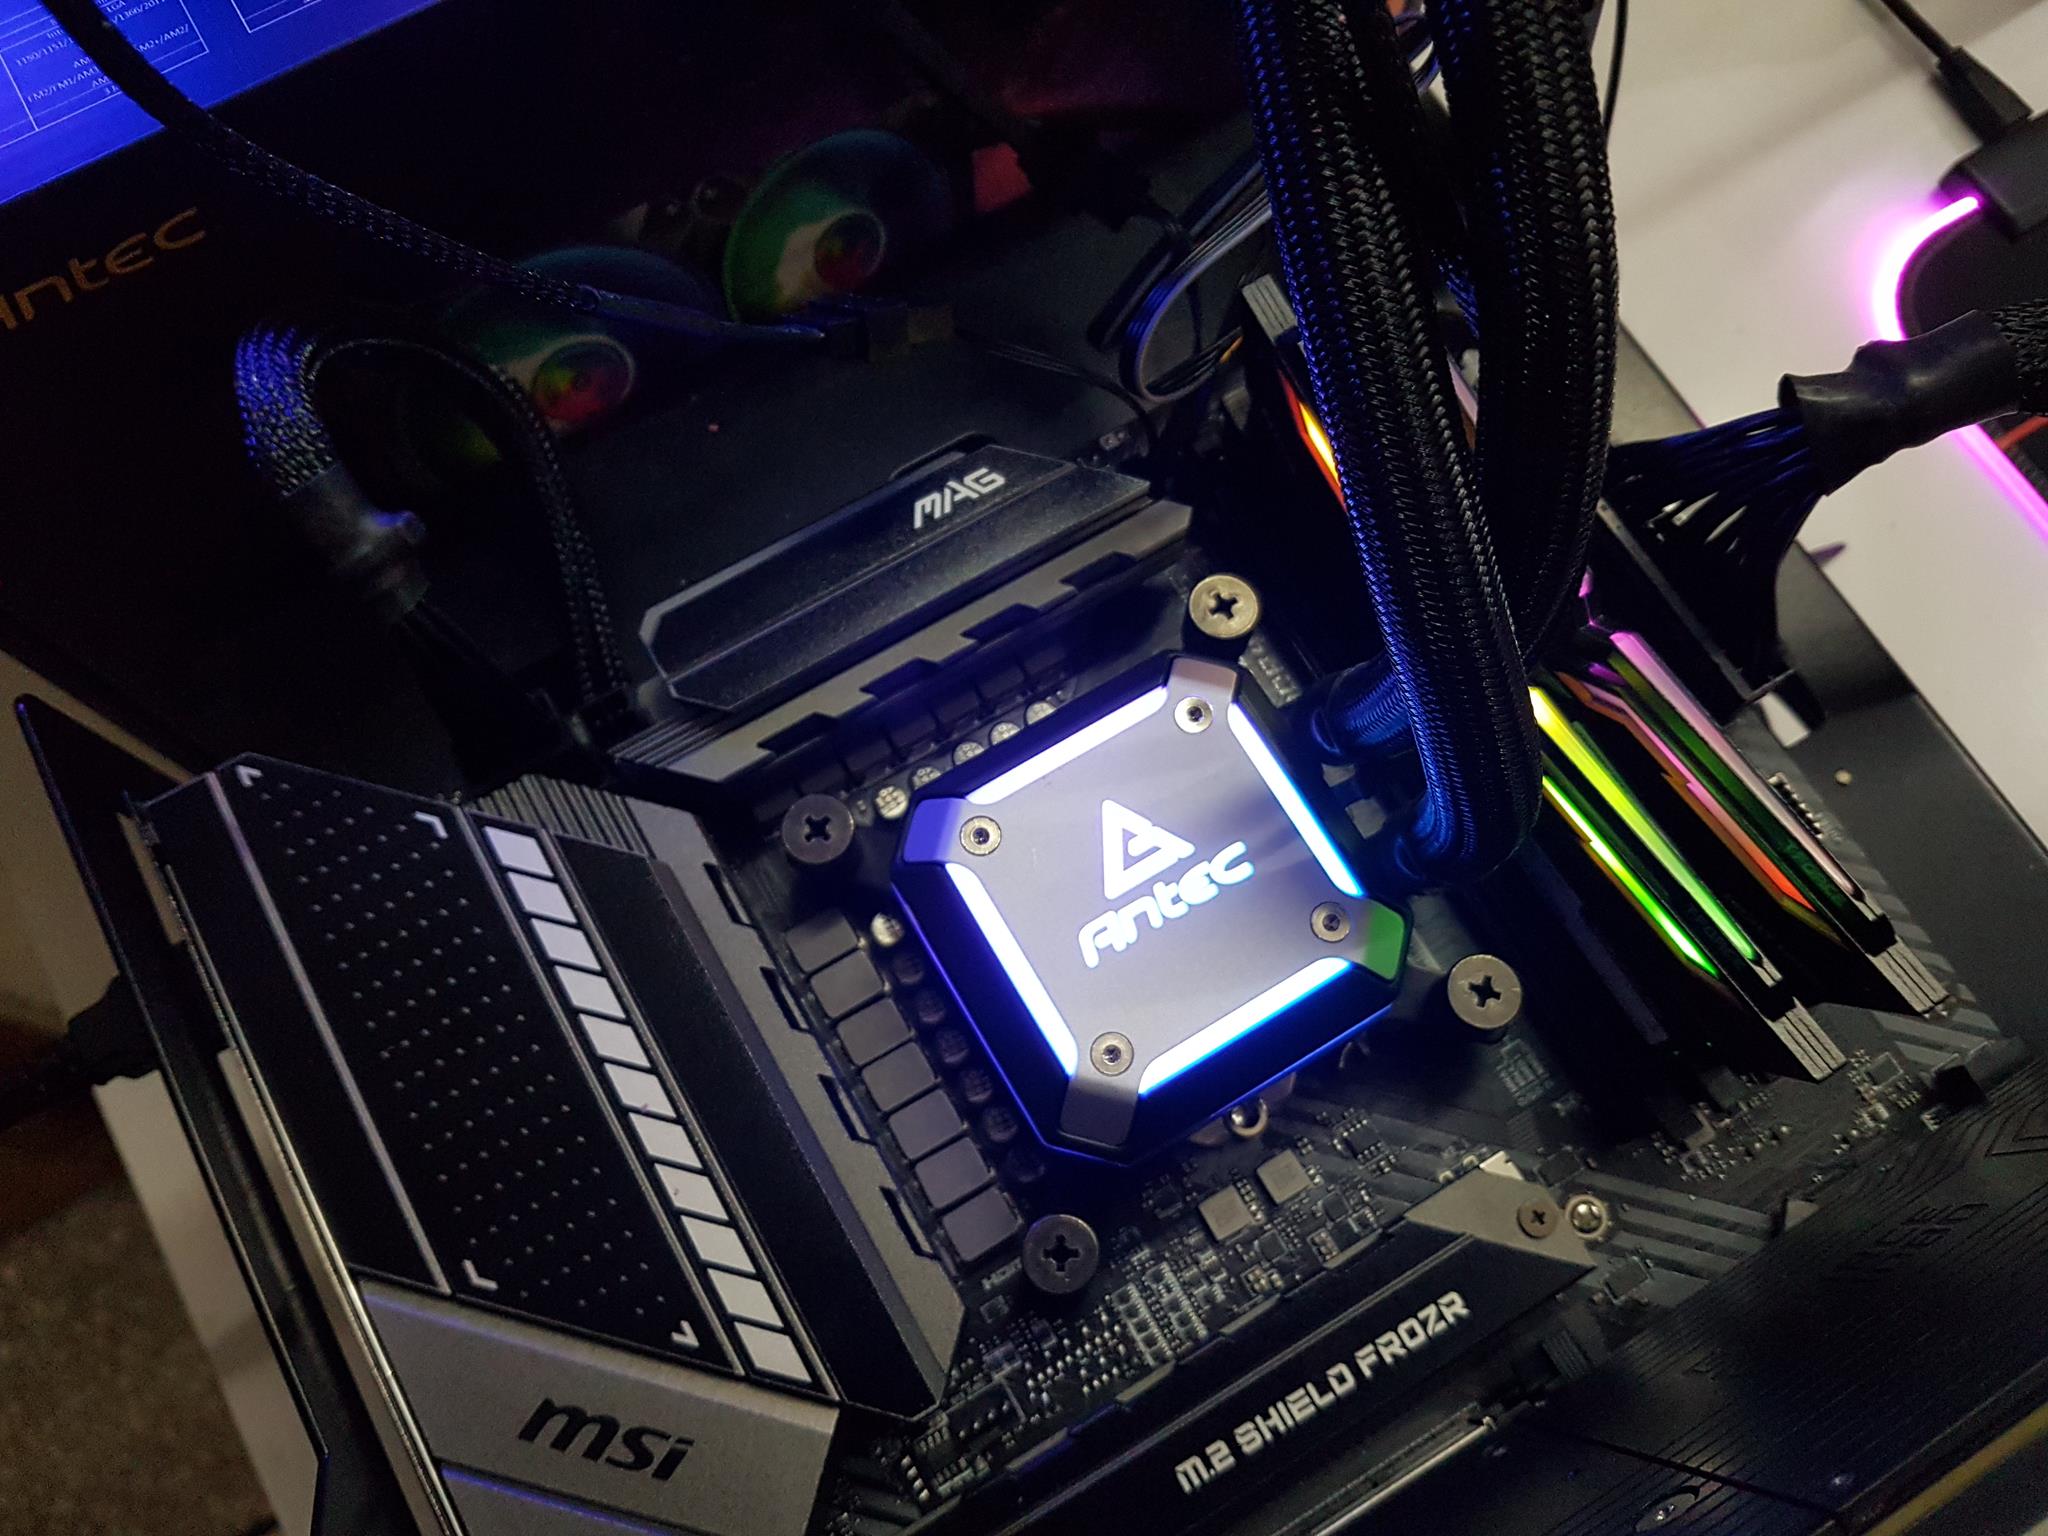
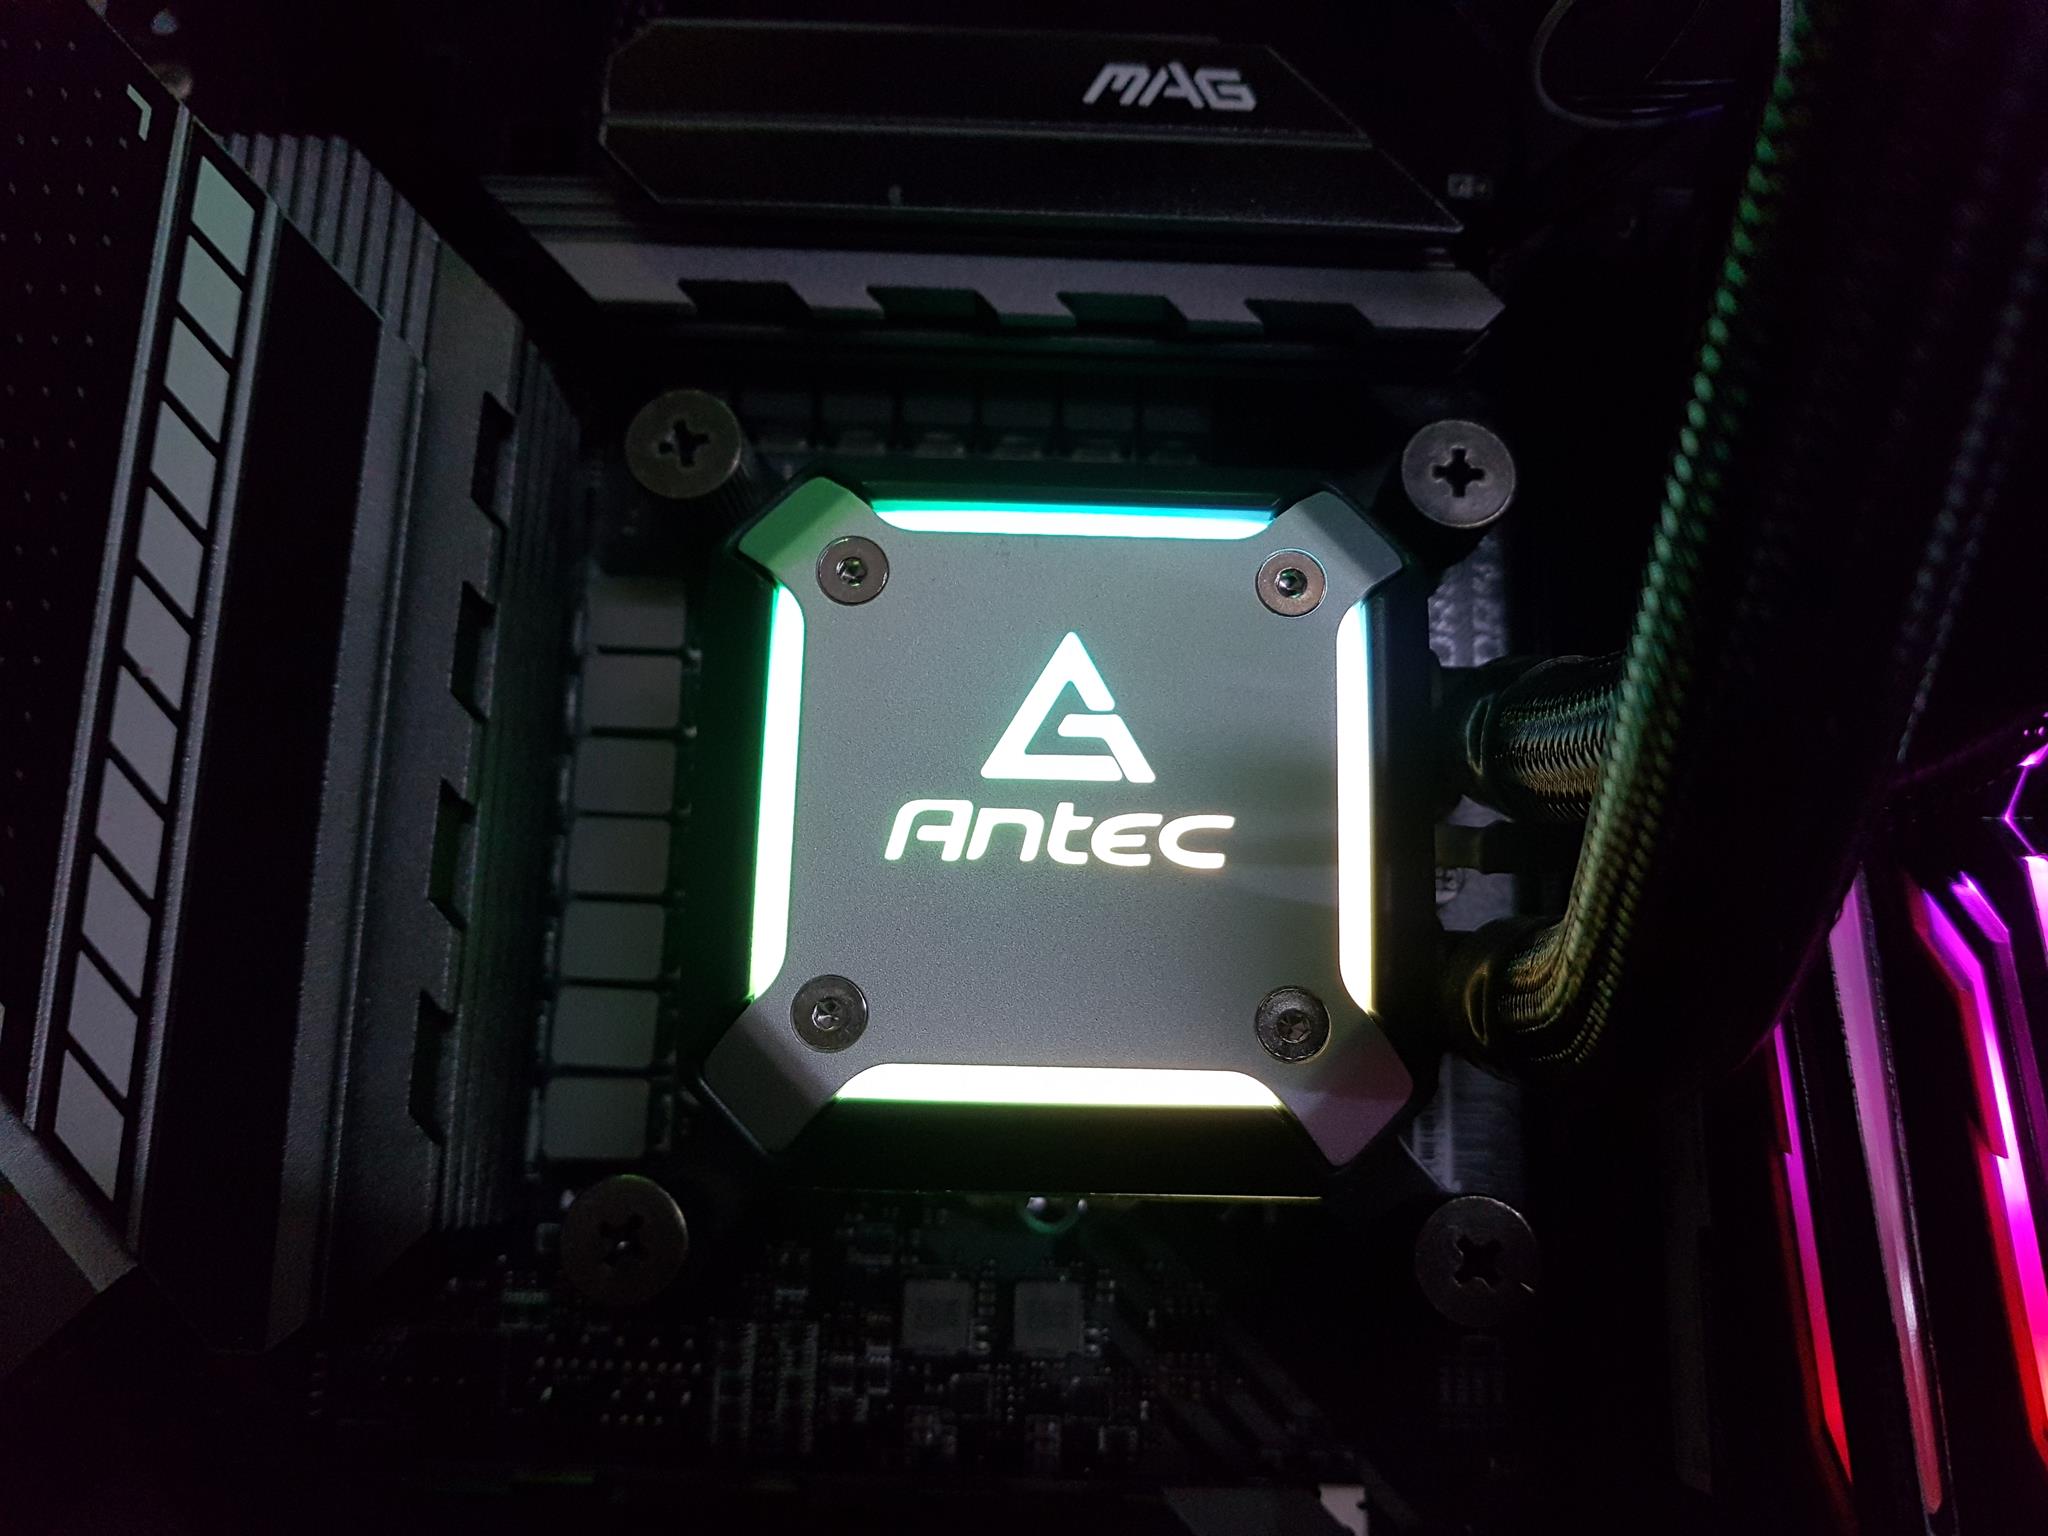
Check out the cooler block! It’s got a cool aluminium face plate on top with RGB-lit Antec branding in the centre. The face plate doesn’t fully cover the top so you can see the diffuser on four open sides. The tubes are installed at 90° with heat shrinks on barb fittings. And there’s a 3-pin ARGB cable, approximately 355mm long, coming out from this side.
A sleek diffuser runs along the entire block, backlit for added flair. The block’s three sides boast a smooth, unbranded finish. Quality construction and a flat 59x55mm copper base, pre-applied with thermal paste, enhance the overall appeal. Antec employs 0.8mm micro fins on the cold plate. The base portion protrudes from the upper section. Each side has 2 mounting holes. This is where the brackets are installed.
Fan
Each fan has 9 transparent blades with a black colour frame. There is an Antec branding on the centre. The ARGB LEDs are housed inside the centre. Each mounting corner has an anti-vibration pad. The frame is circular. There is a 4-arm assembly on the backside. One of the arms is wider to carry the cables from the centre to the outer frame. There is an Antec branding on the centre.
The specifications of the fans are:
| Dimension | 120x120x25mm |
| Type | PWM ARGB LED Fan |
| Speed | 900-1600±100 RPM |
| Airflow | 77 CFM |
| Noise | 20-36 dB(A) |
| Lifespan | 40000 hours at 25°C ambient 15-65% RH |
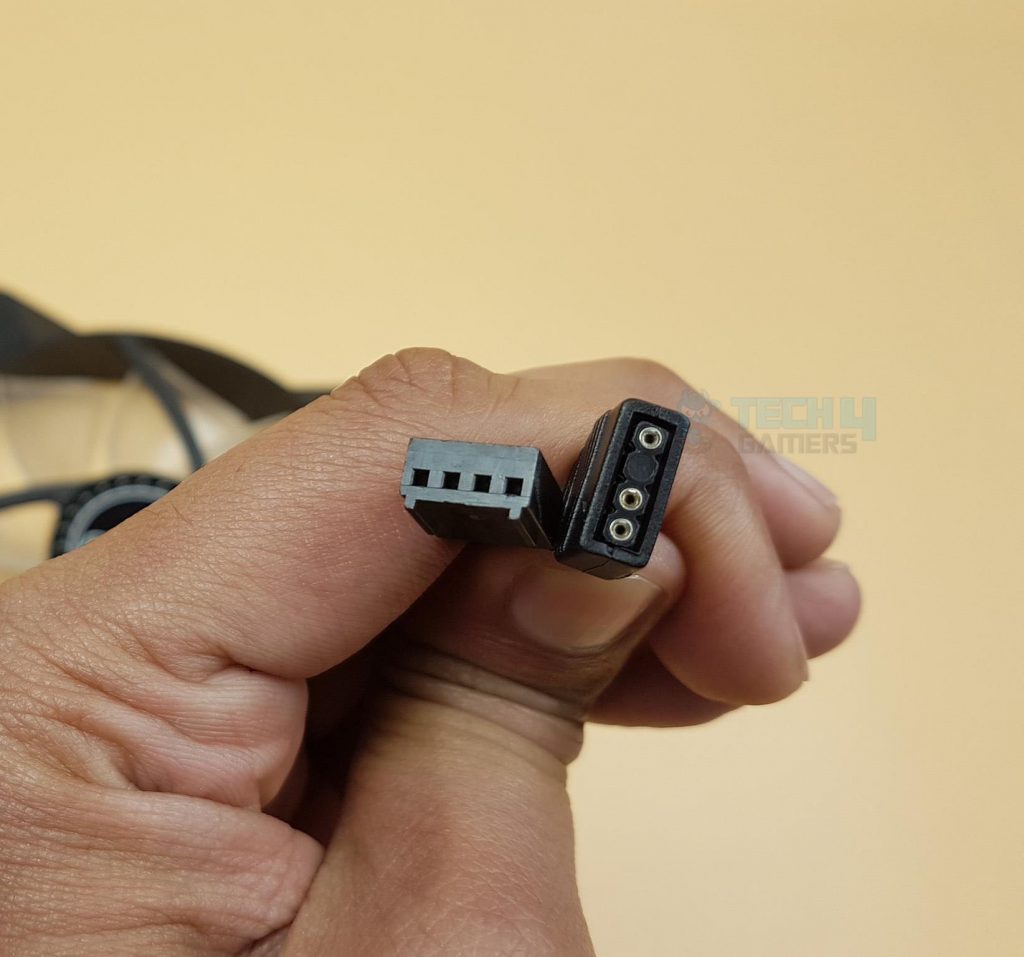
| Connector | 4-pin PWM and 3-pin ARGB connectors |
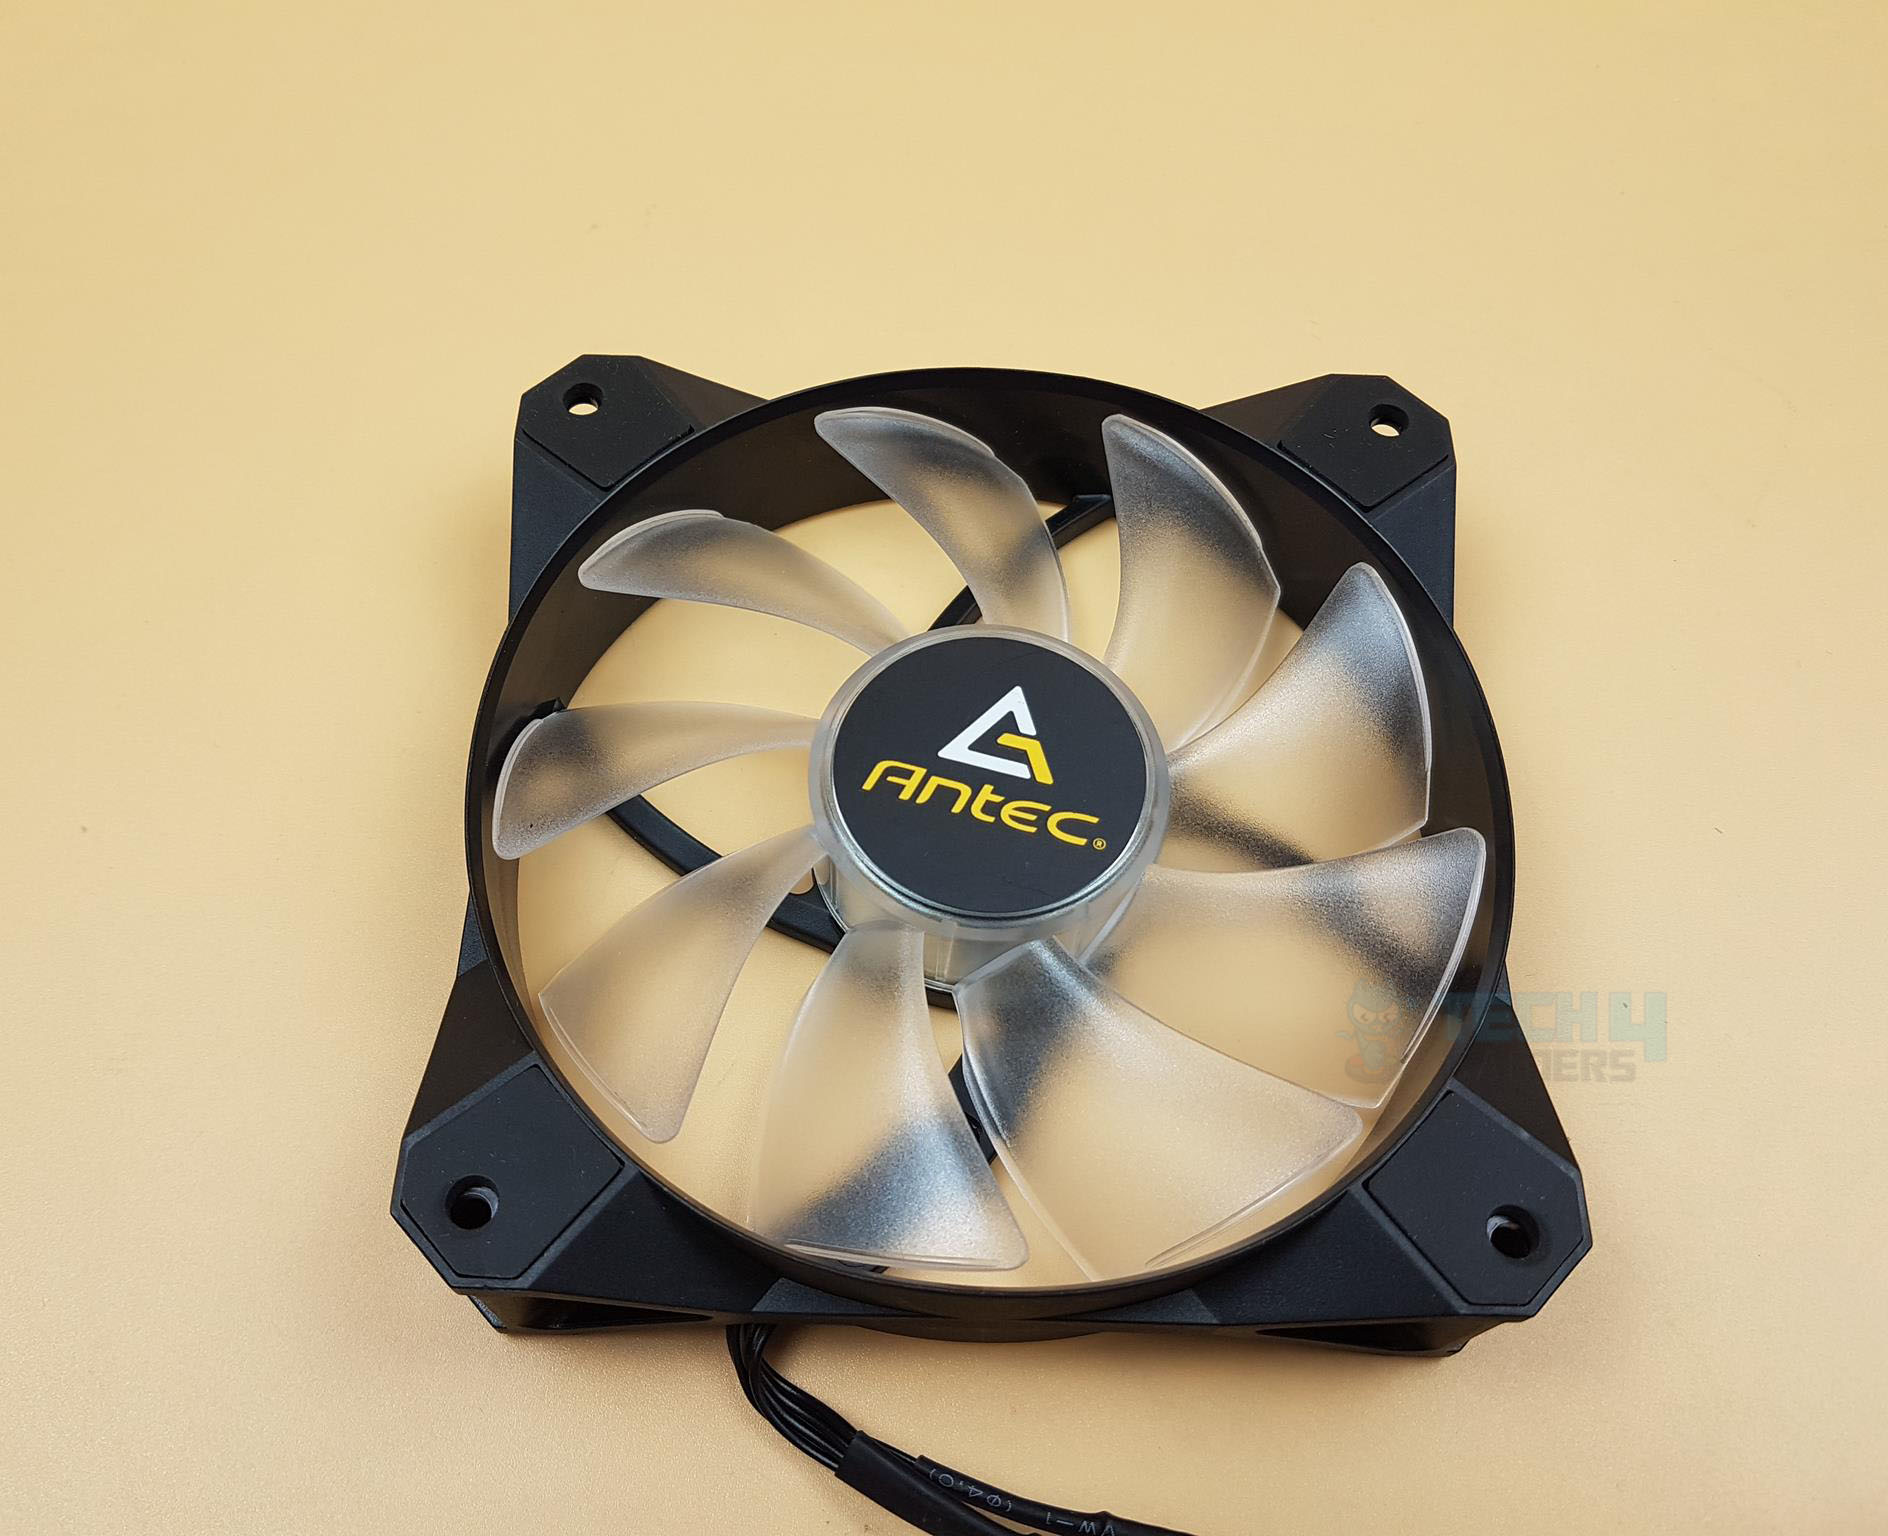
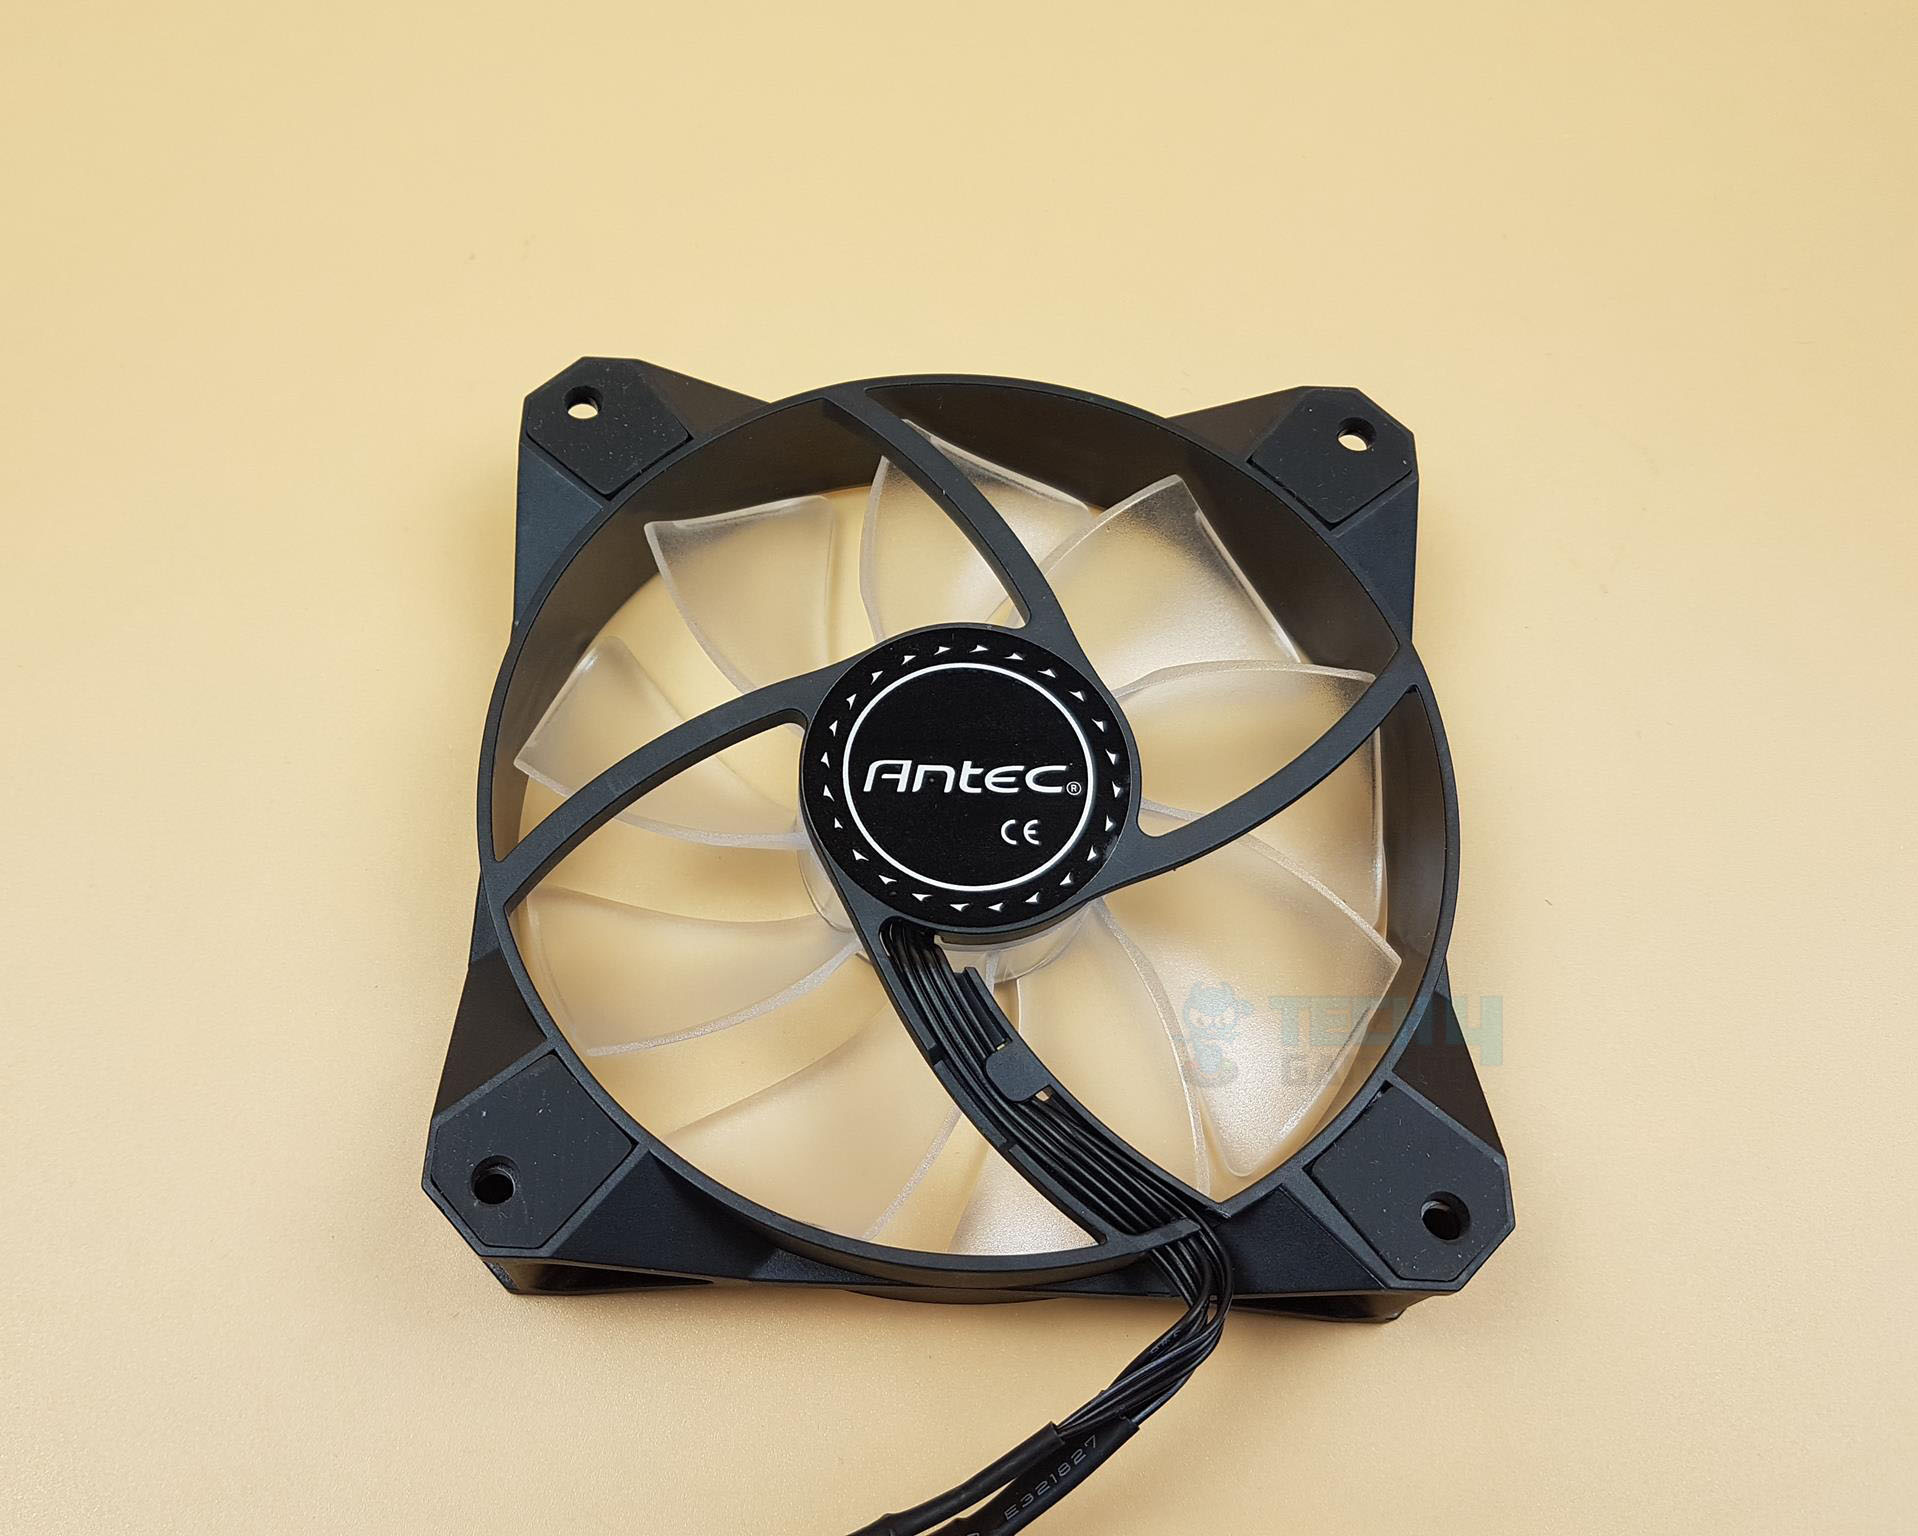
There are two cables per fan, which are sleeved, not flat. The length of a 4-pin PWM connector cable is approximately length 323mm, whereas the length of a 3-pin ARGB cable is approximately 325mm.
Installation
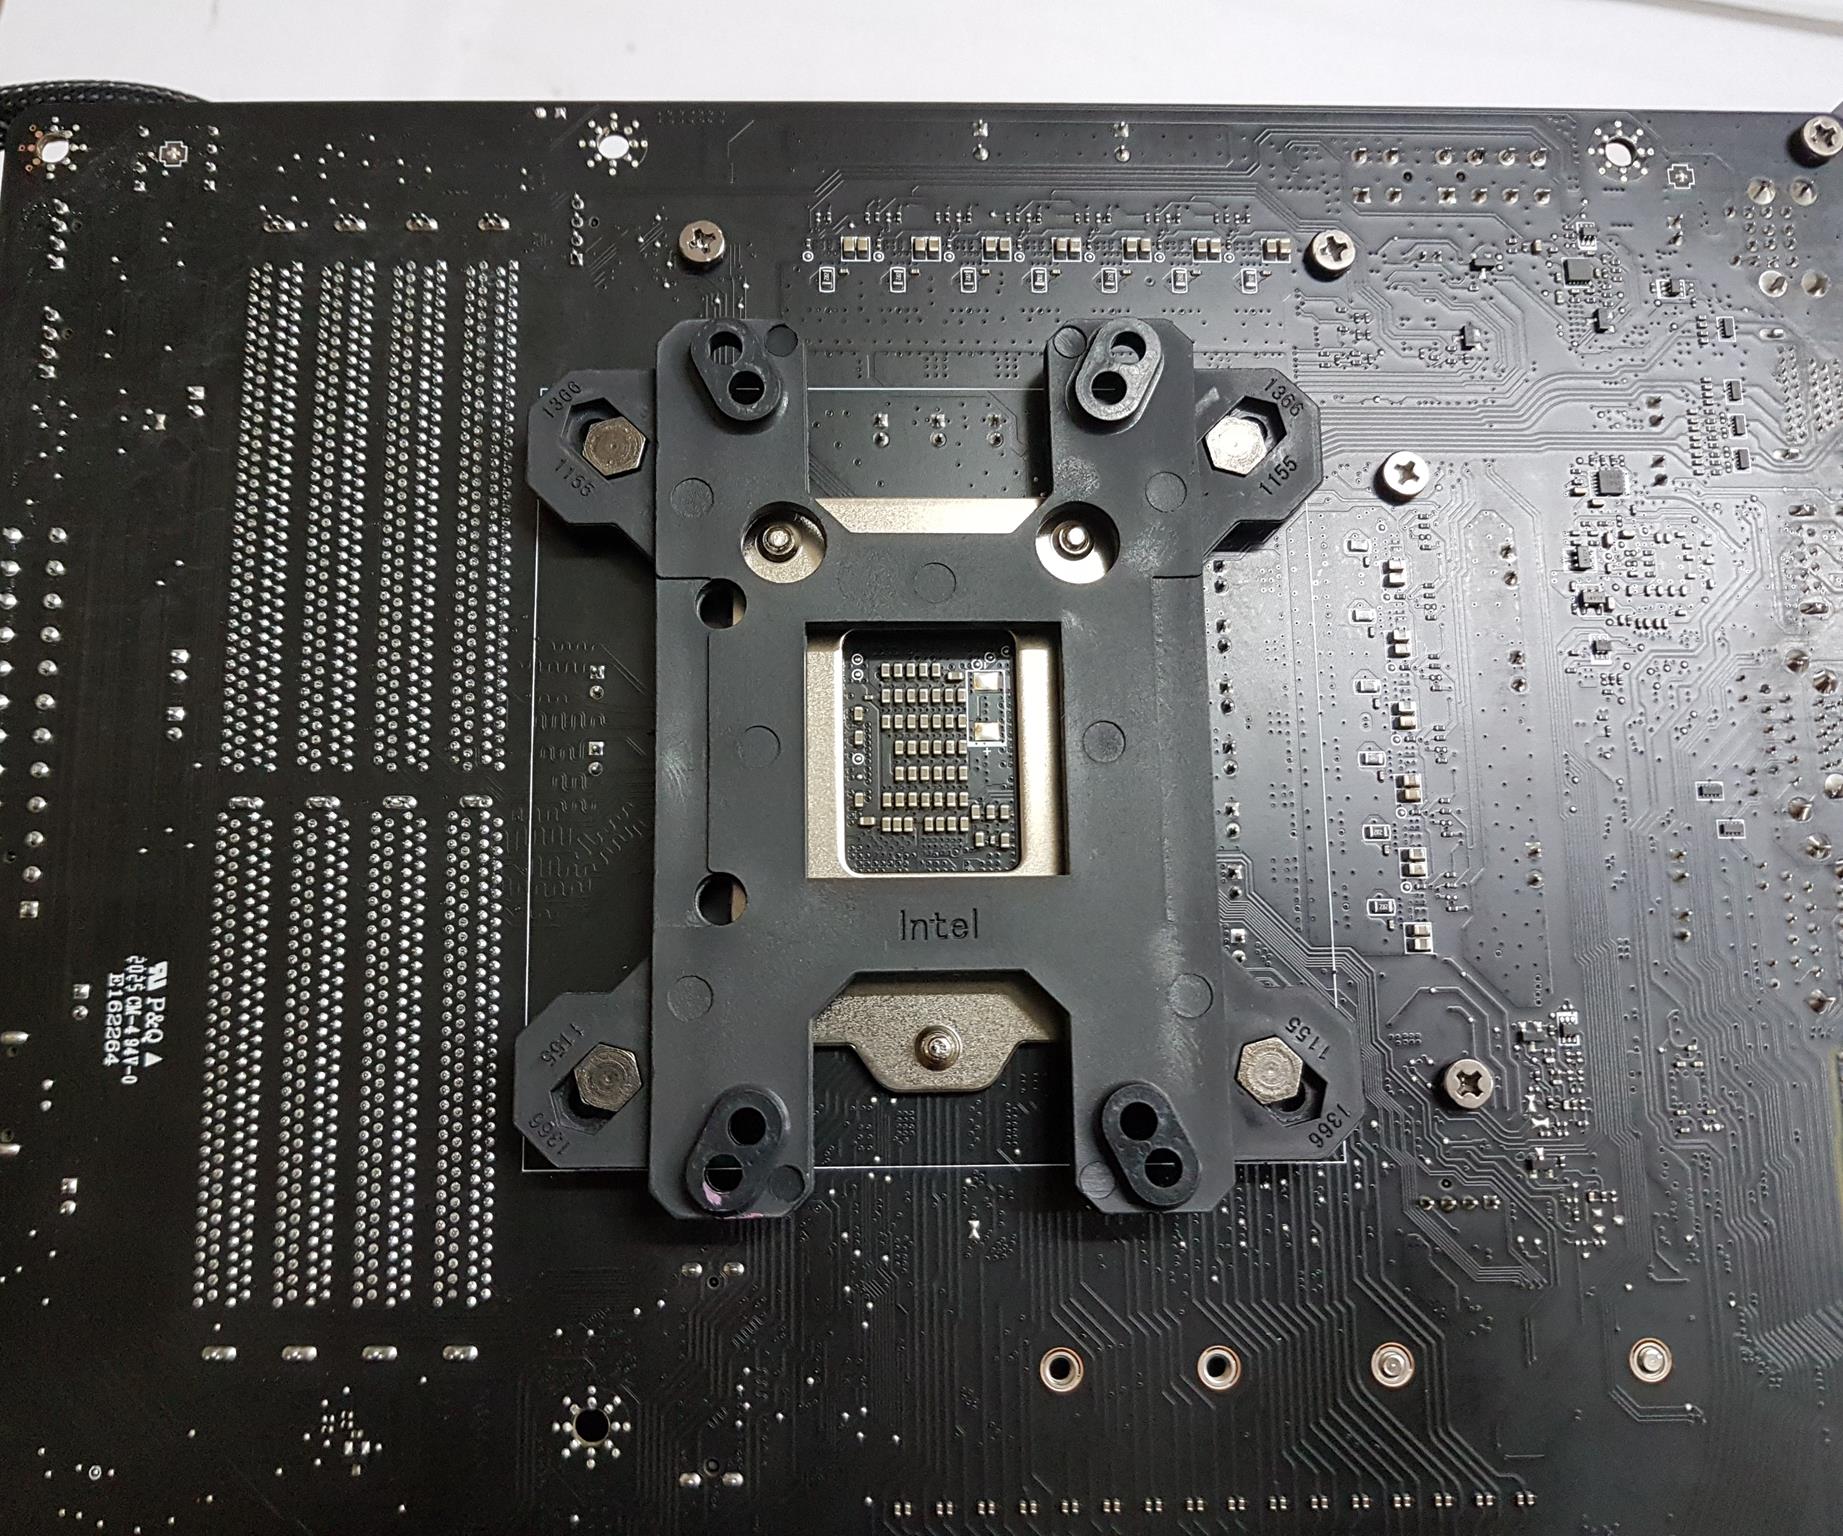
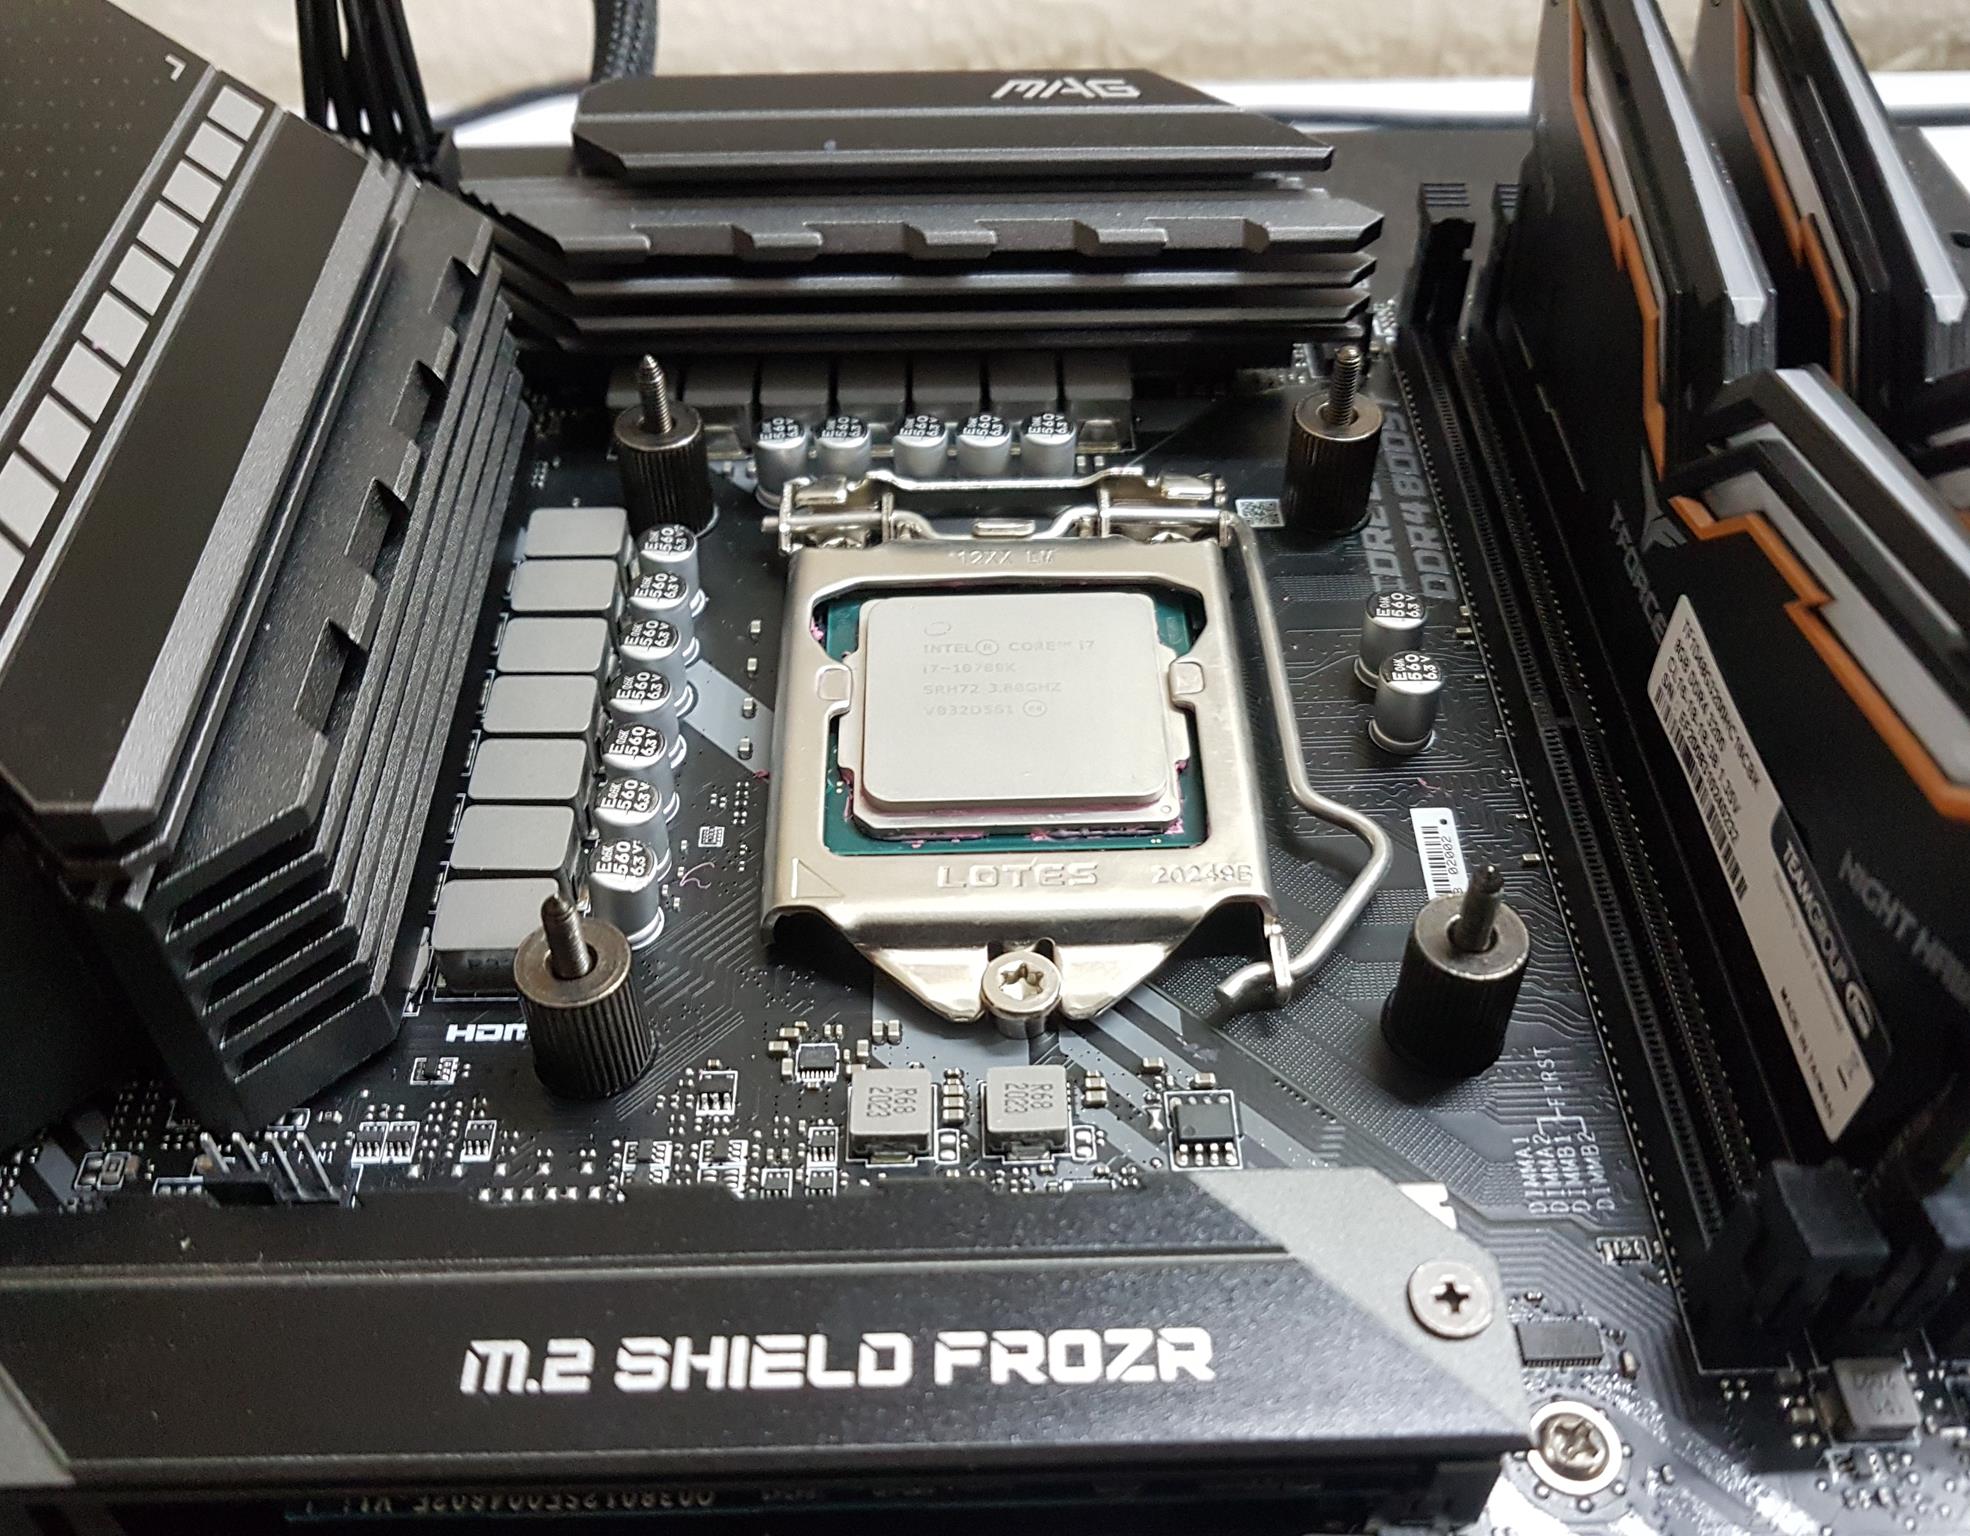
We have upgraded our test bed based on Intel’s 10th generation. The cooler is tested on an MSI MAZG Z490 TOMAHAWK motherboard using an LGA1200 socket.
Here are the installation steps:
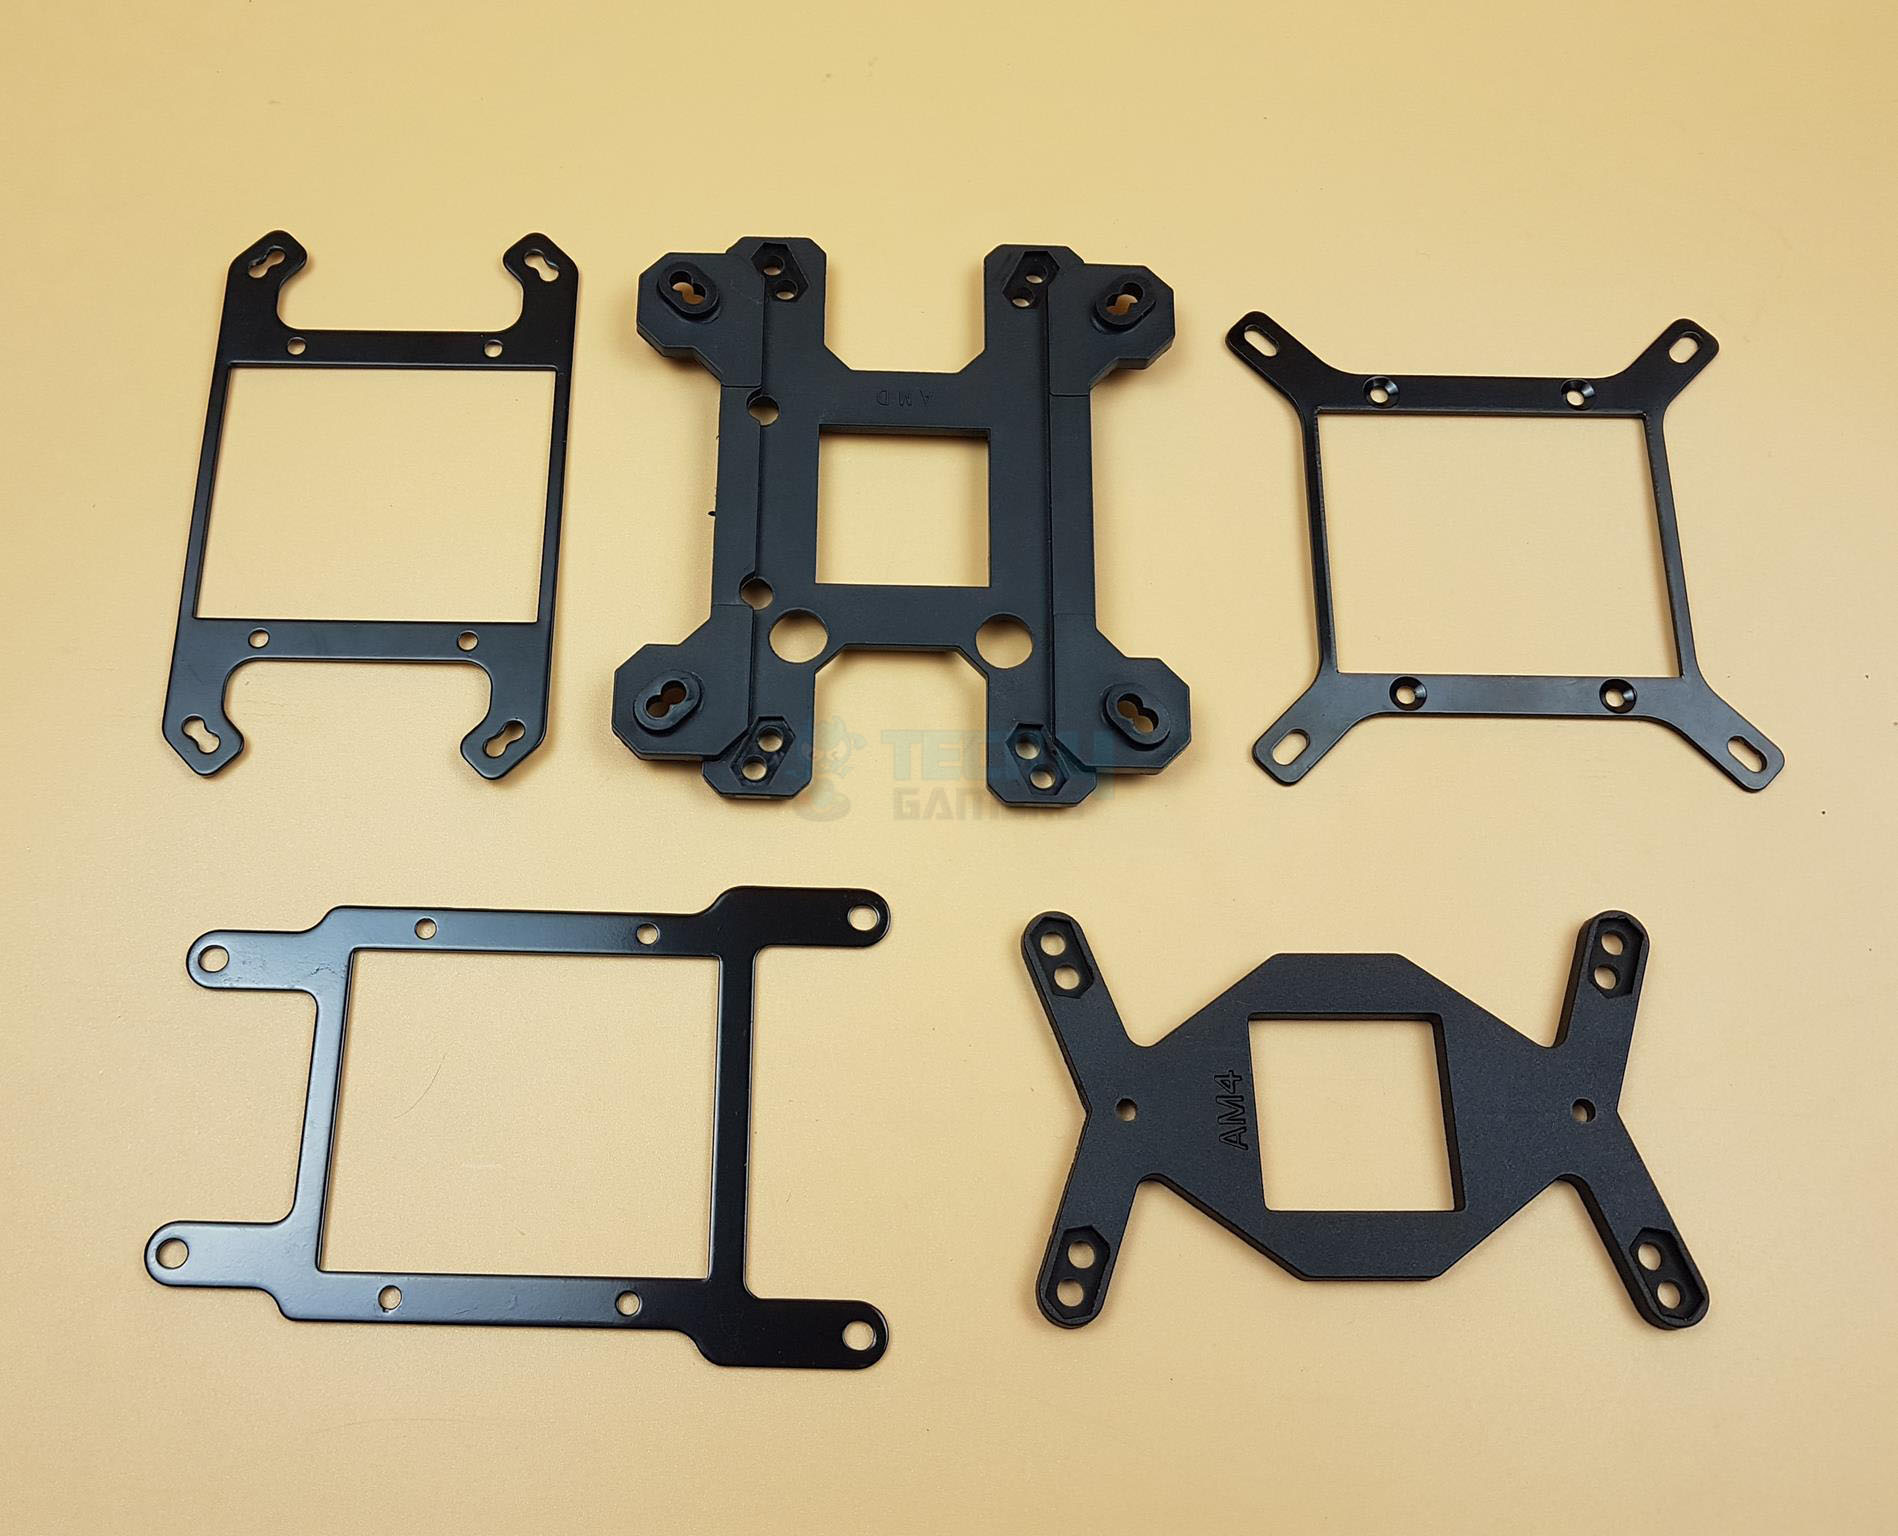
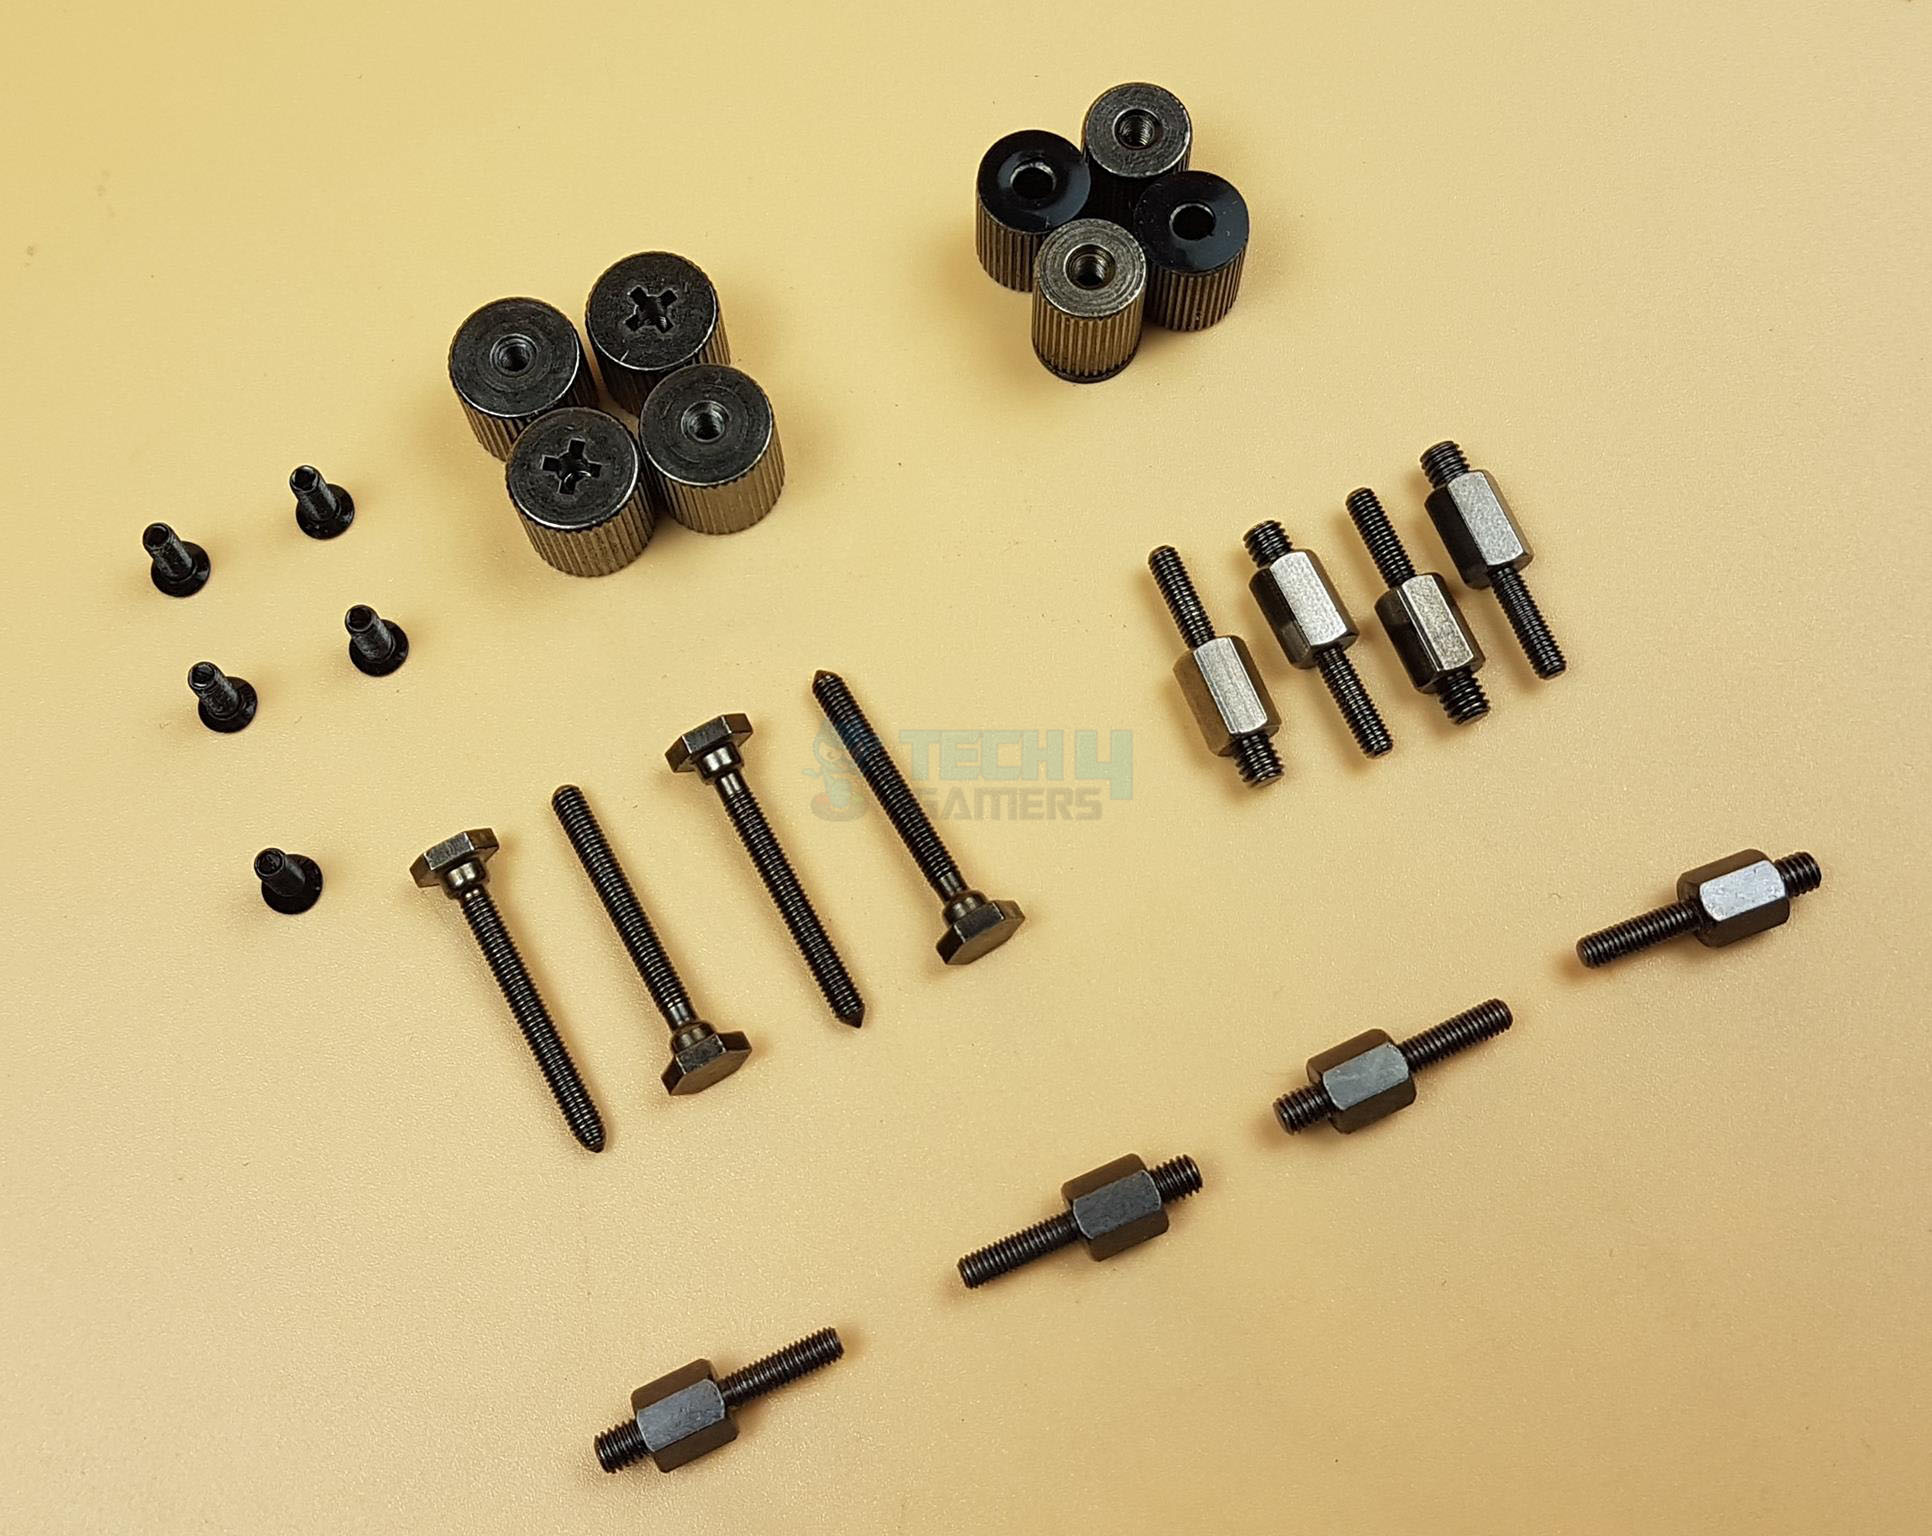
- Pass long screws through designated holes on the Intel backplate.
- Align the backplate with the motherboard socket and secure using spacers on threaded screws.
- Ensure the washer side faces the motherboard PCB.
- Install fans on radiators without using washers.
- Attach the Intel mounting bracket to the base.
- Apply thermal paste if necessary.
- Align holes on mounting bracket with threaded sides of standoffs and place block on CPU.
- Secure installation using thumb nuts.
- Connect SATA cable to PSU.
- Connect ARGB and PWM cables to the control hub or motherboard headers.
RGB Lighting
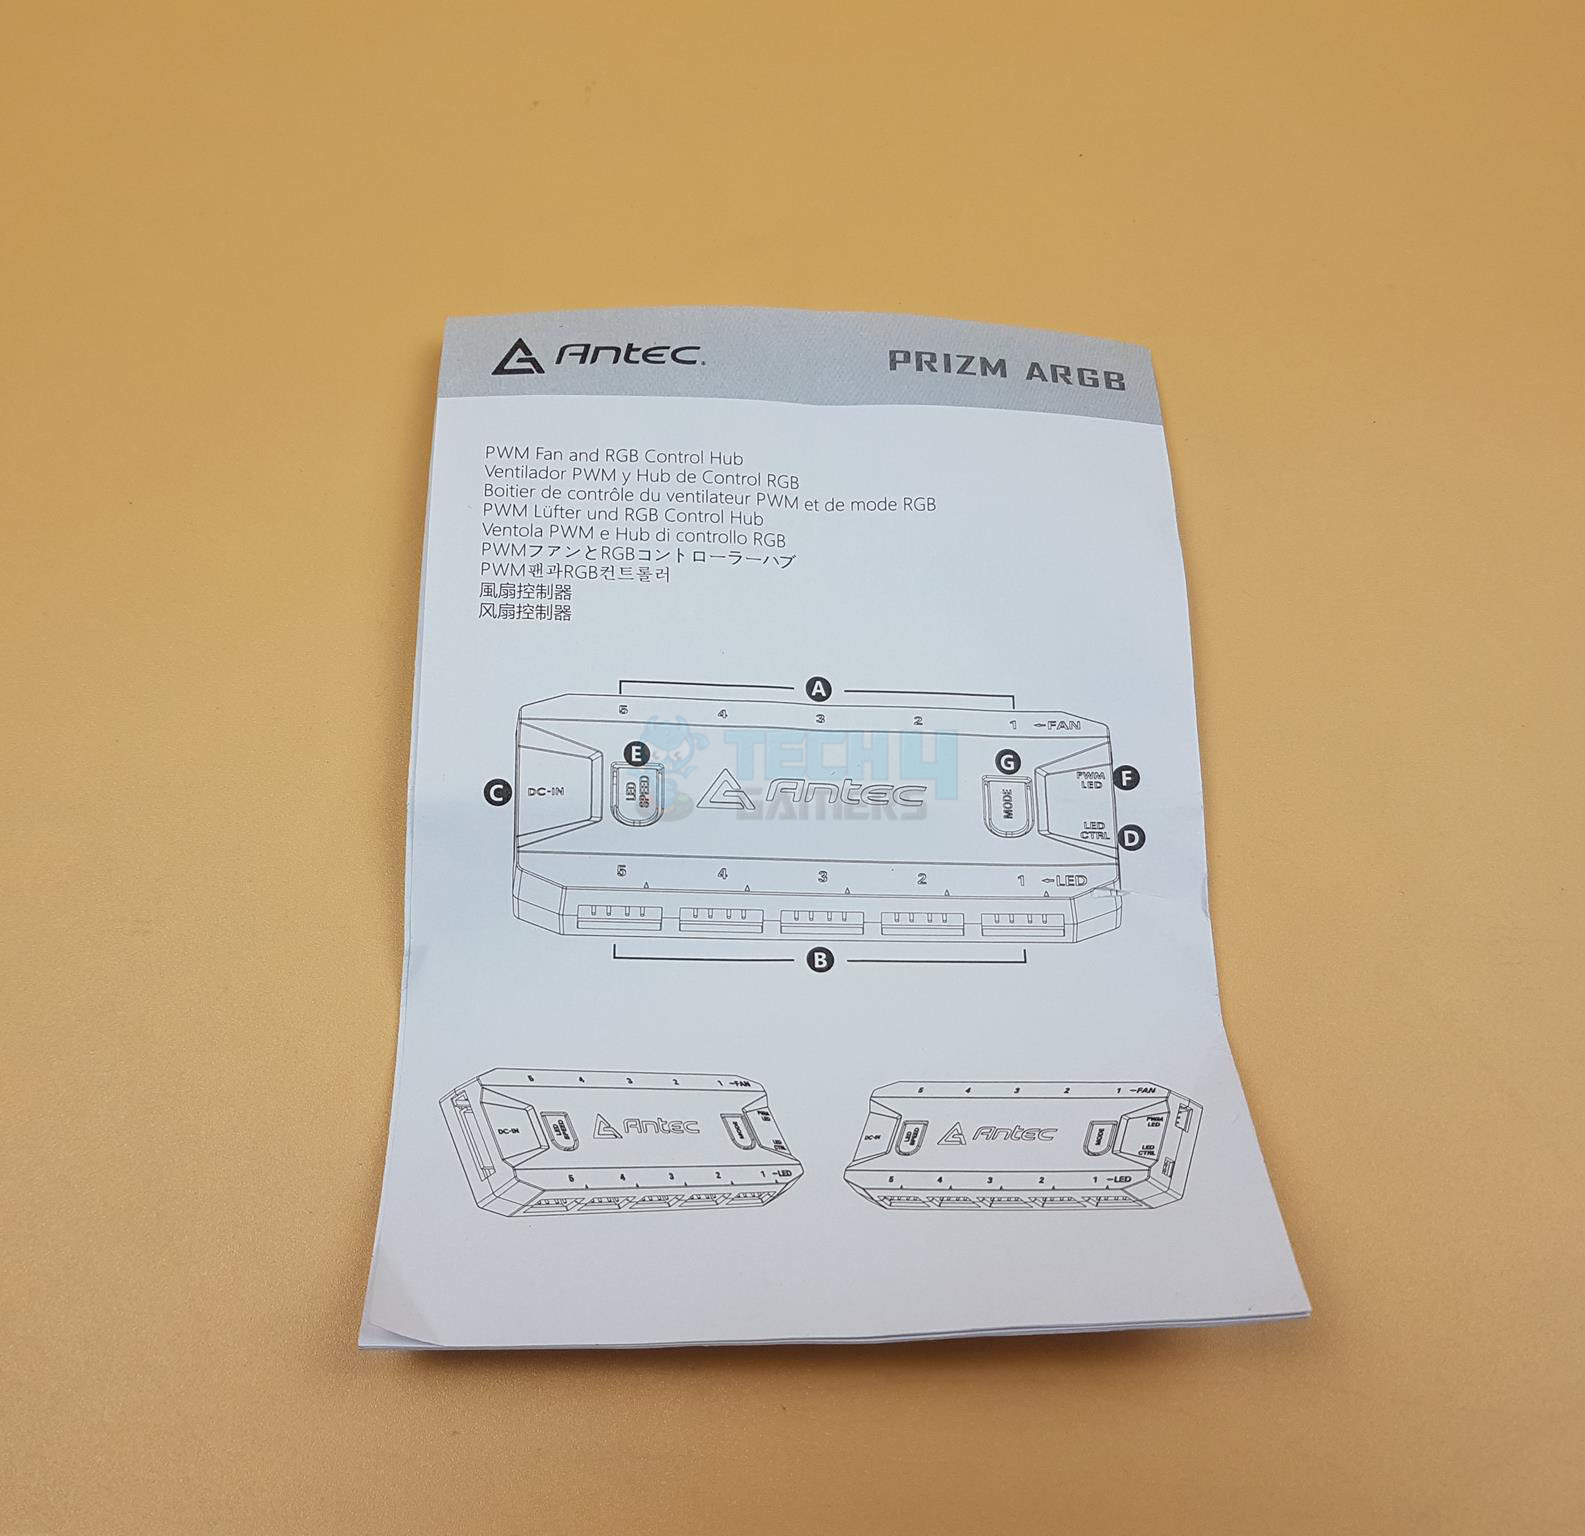
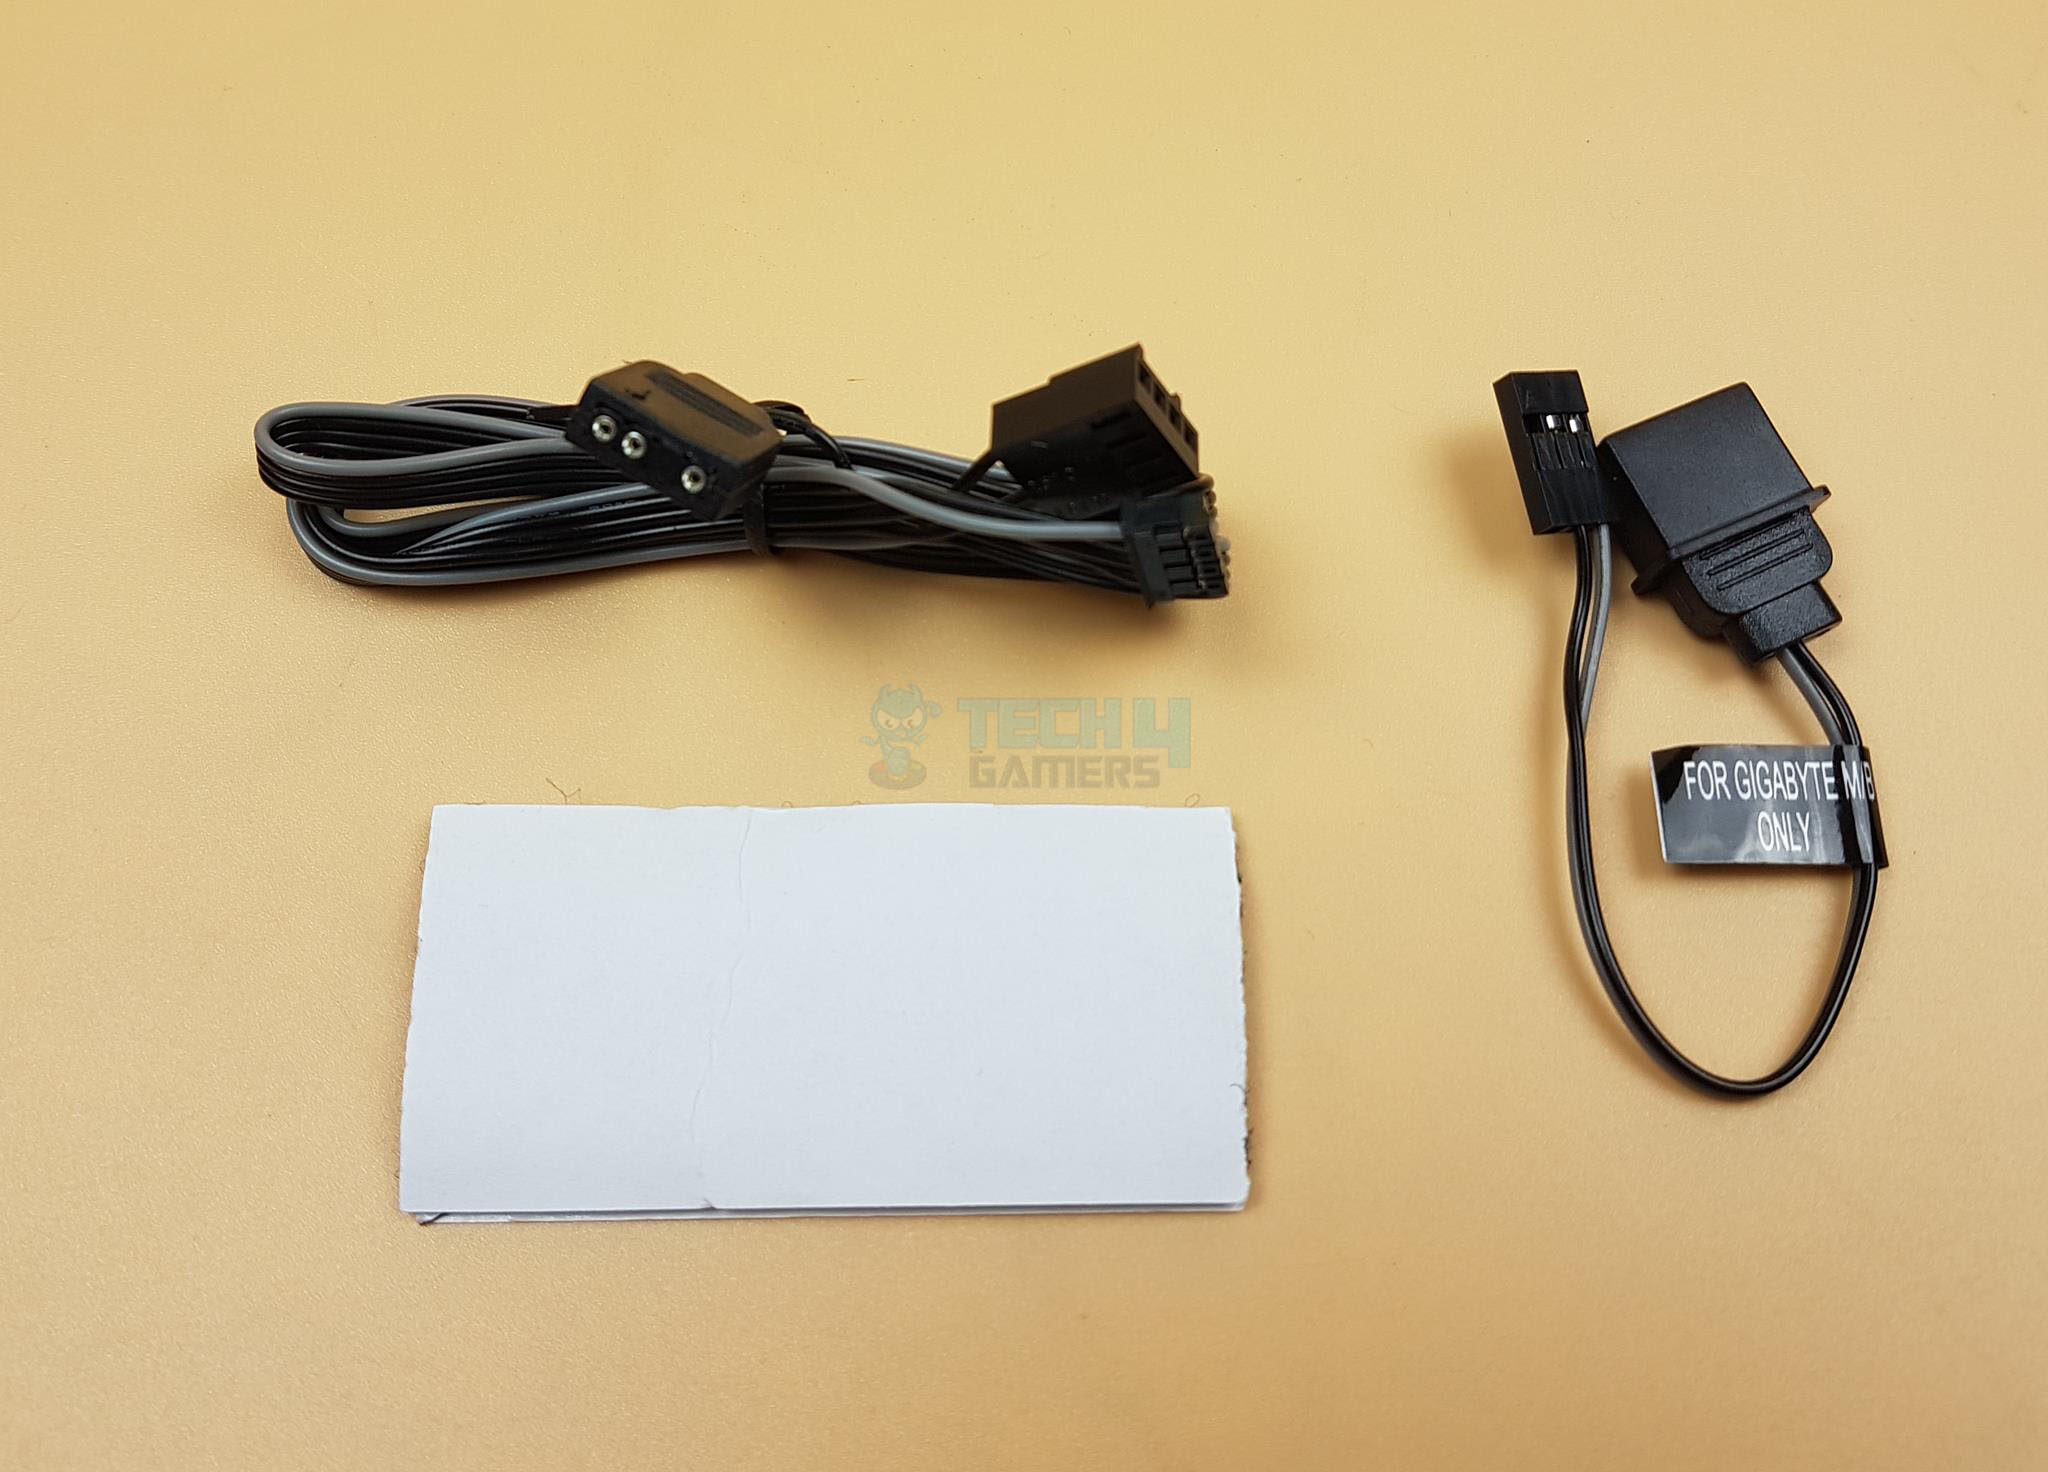
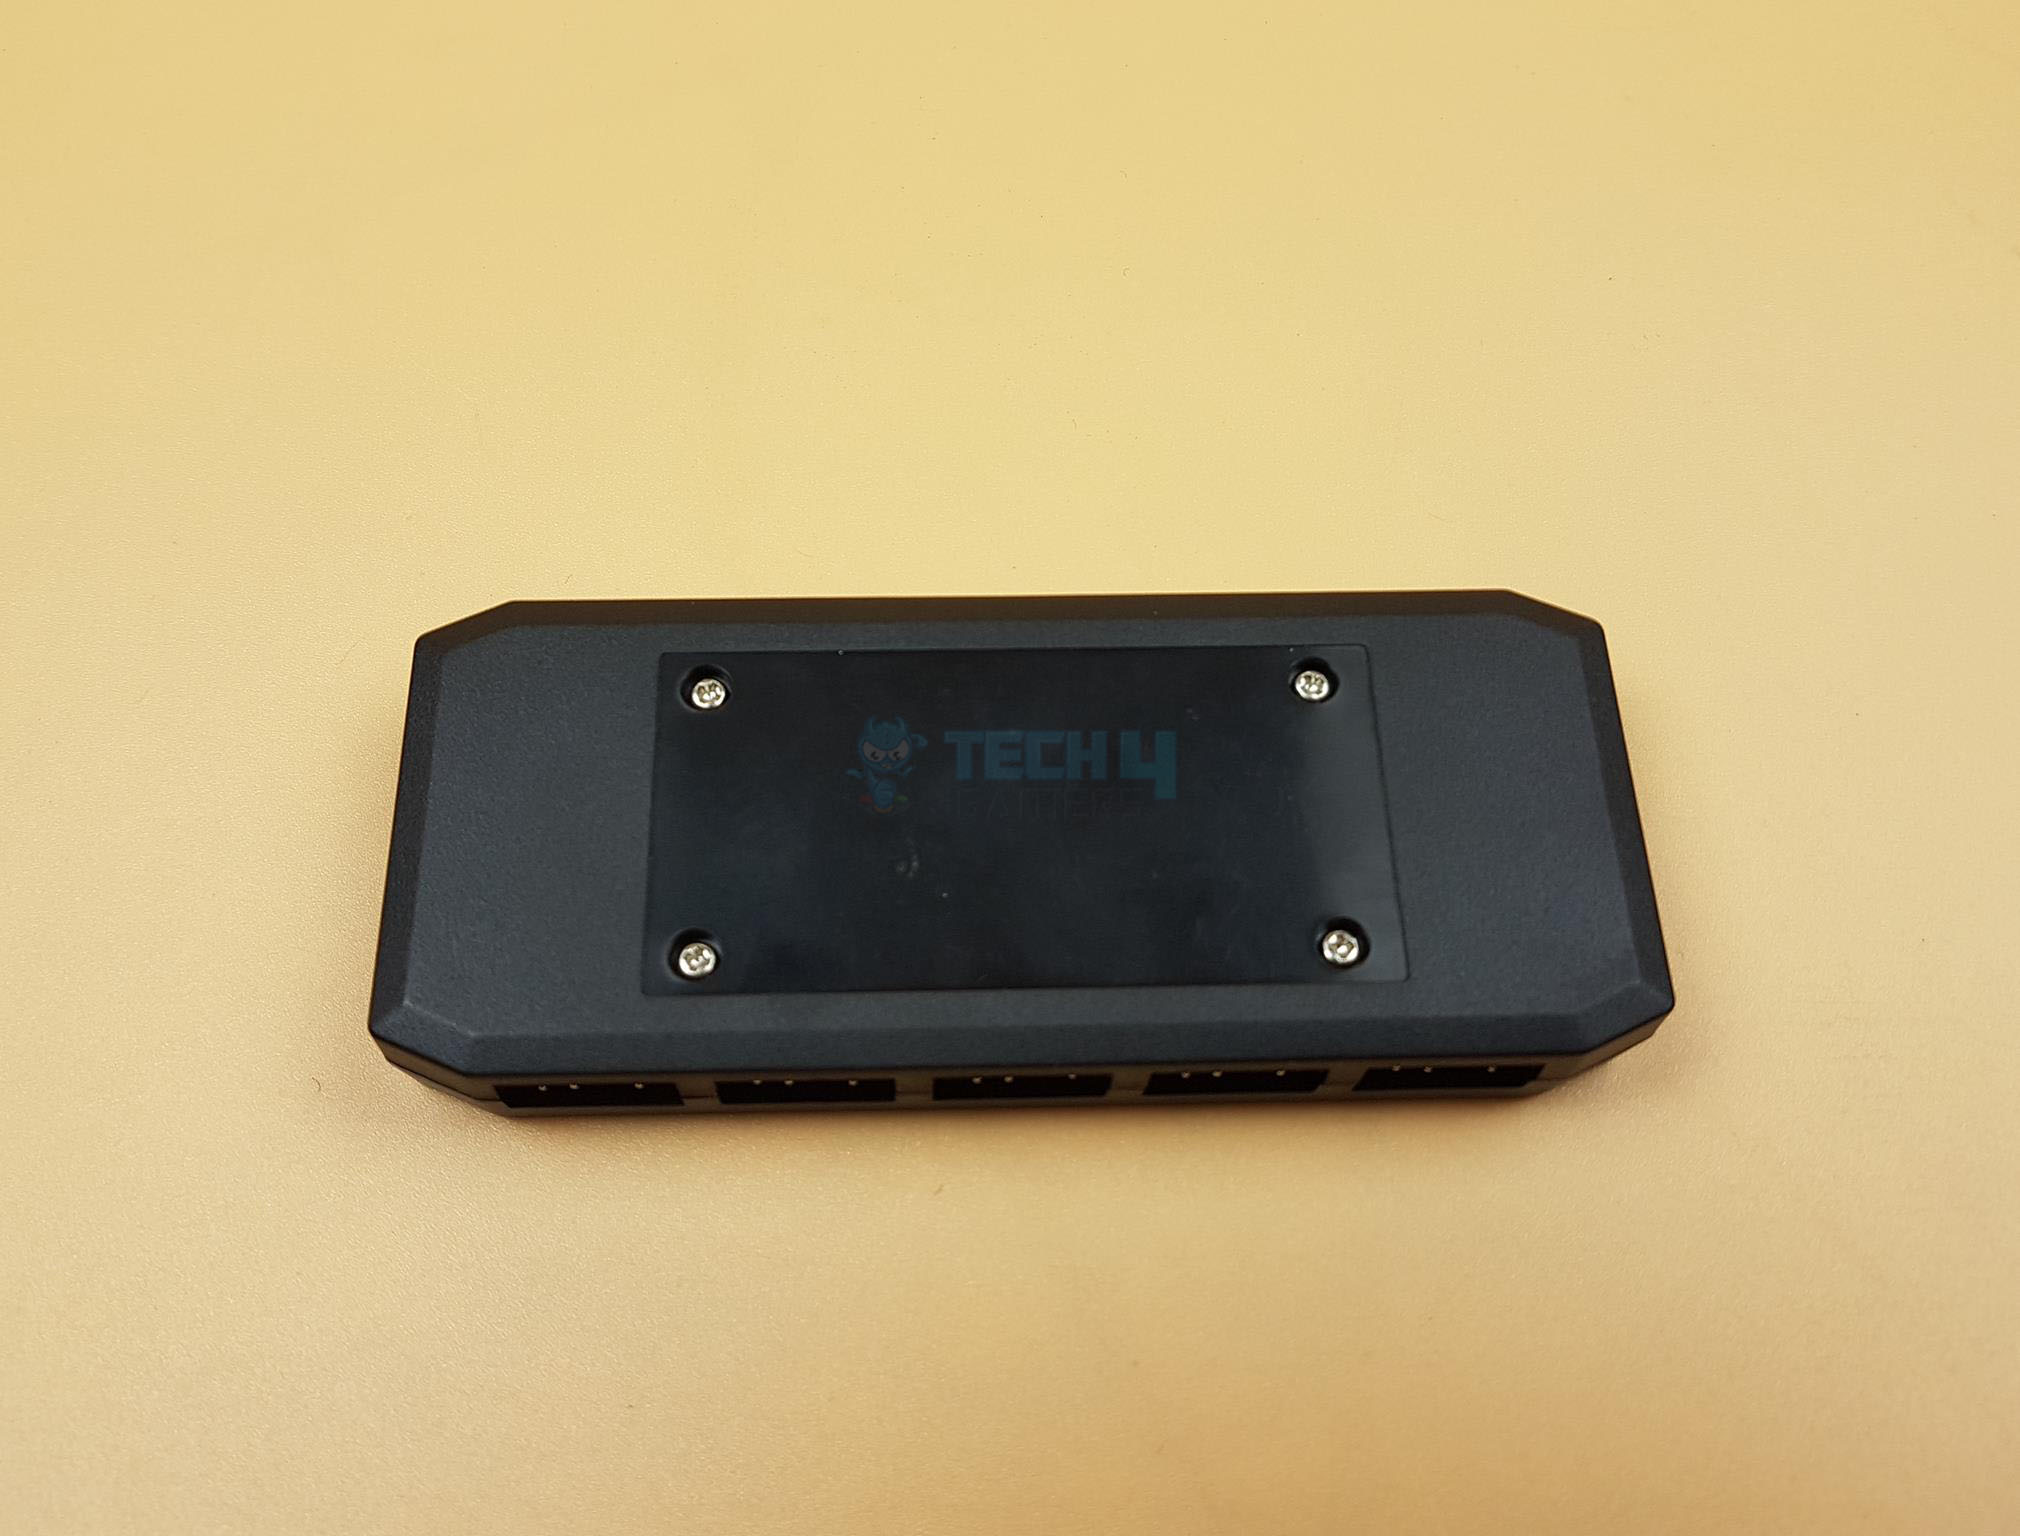
Antec hooked you up with a cool 2-in-1 control hub! Stick it securely in your chassis using the dual-sided adhesive strip provided. Check out the slick Antec branding on the top centre of the control box. Tweak the dynamic effects speed with the left button and switch up the lighting mode with the right one. Plus, connect up to 5 ARGB (3-pin) devices because we’ve got 5x ARGB headers on this bad boy – all in that 3-pin format.
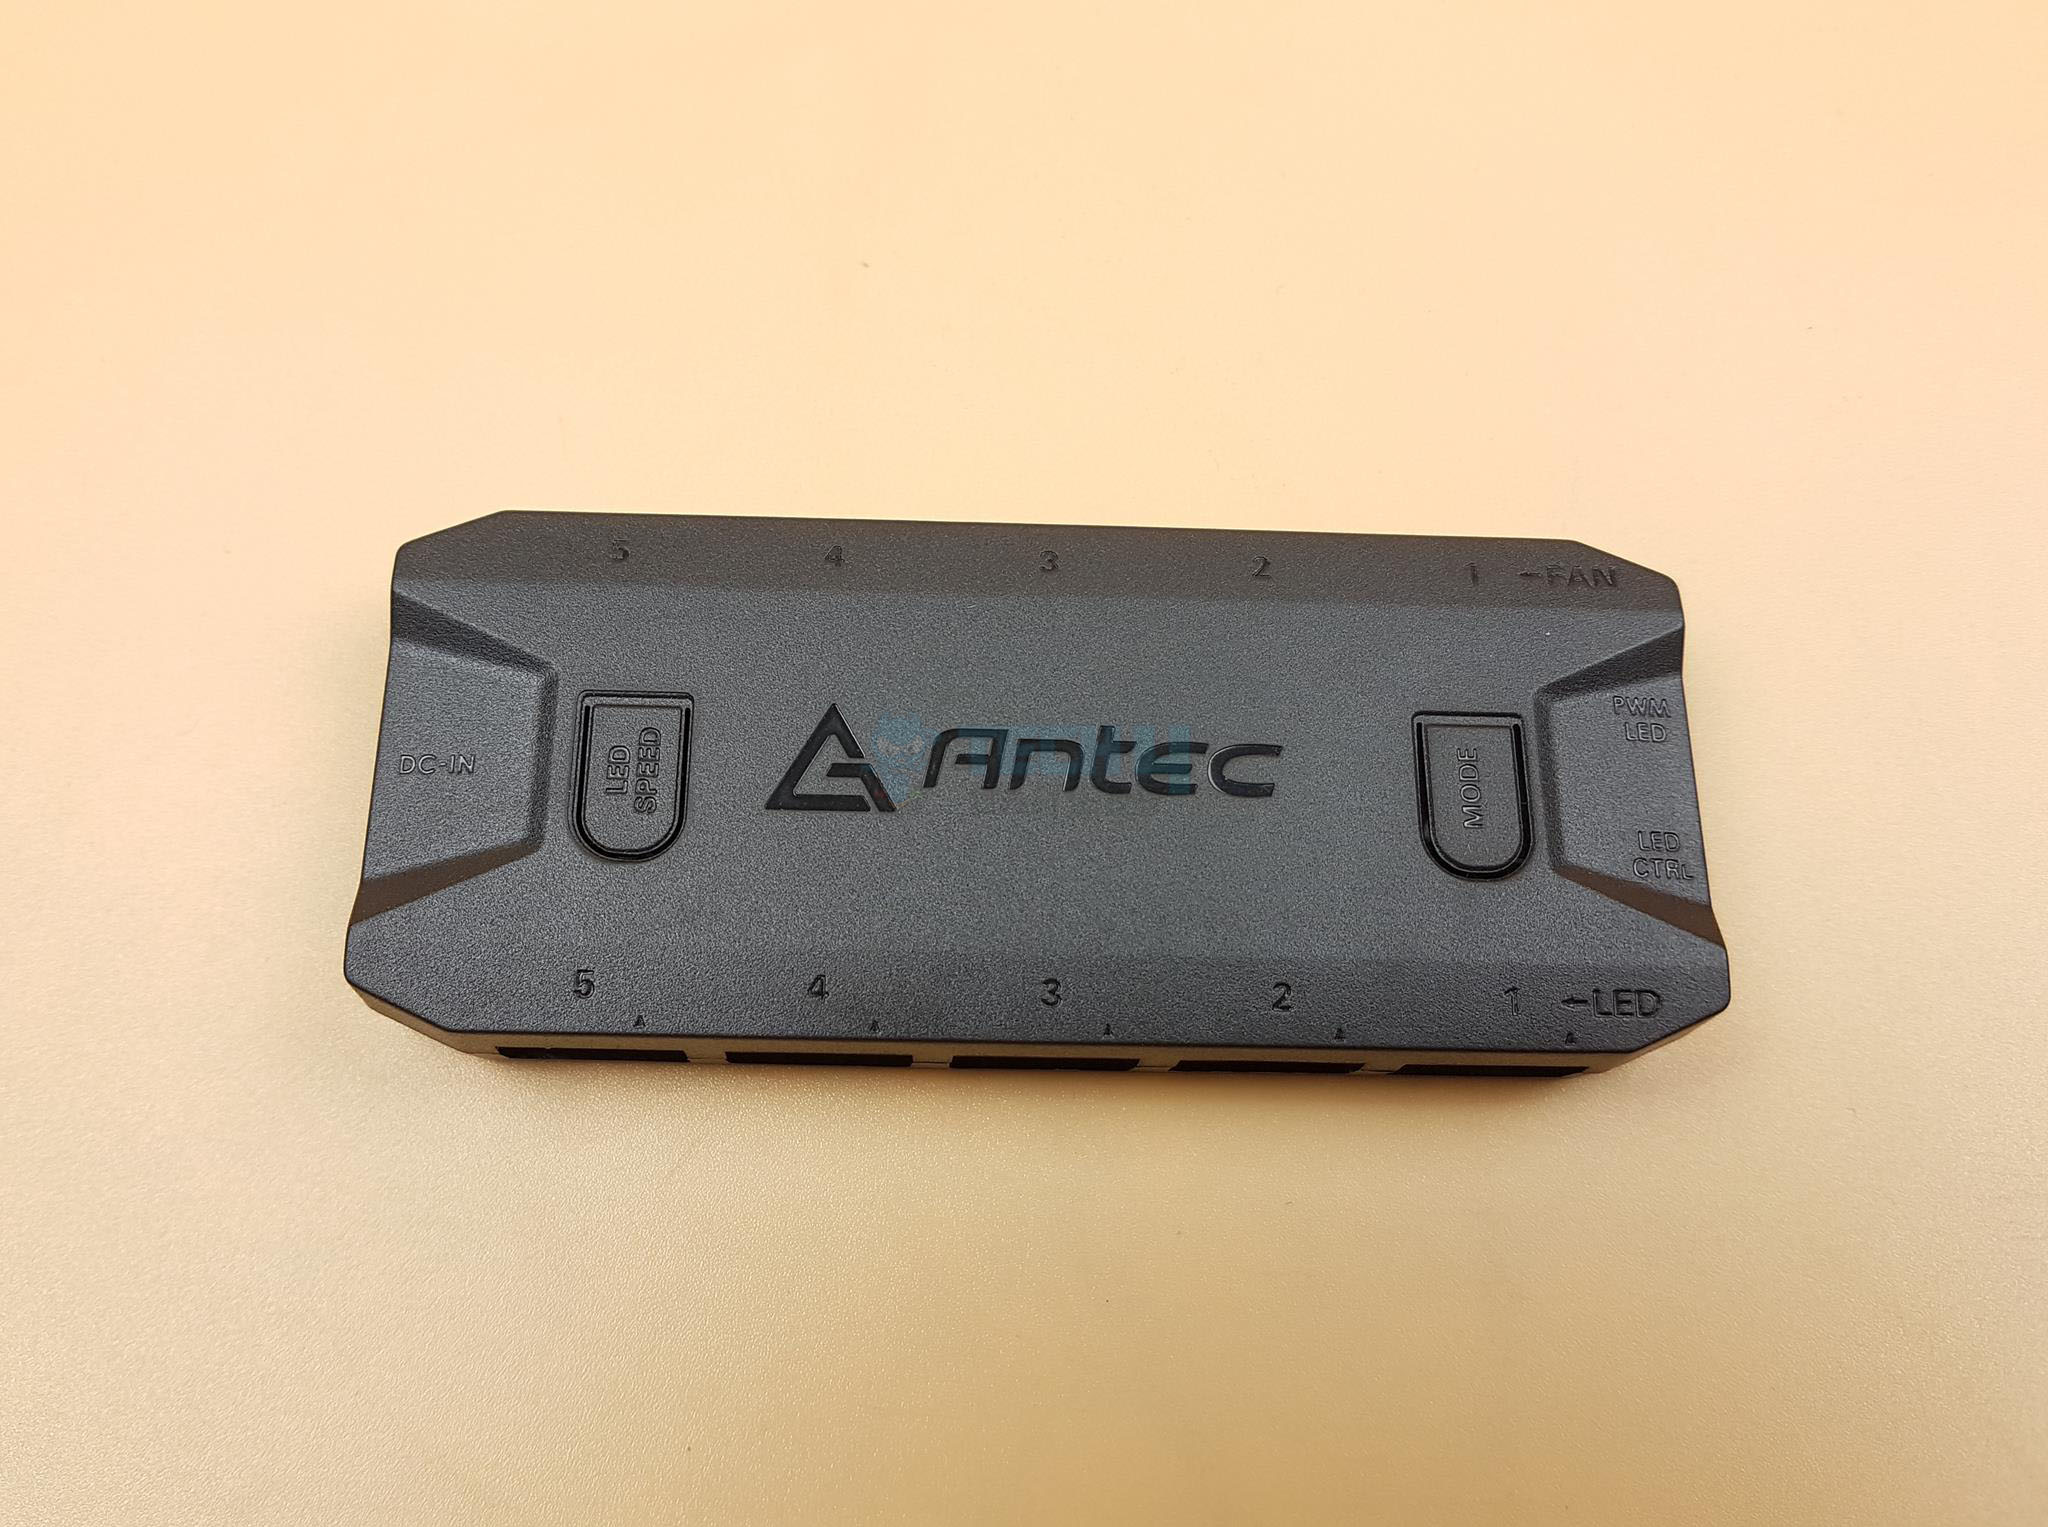
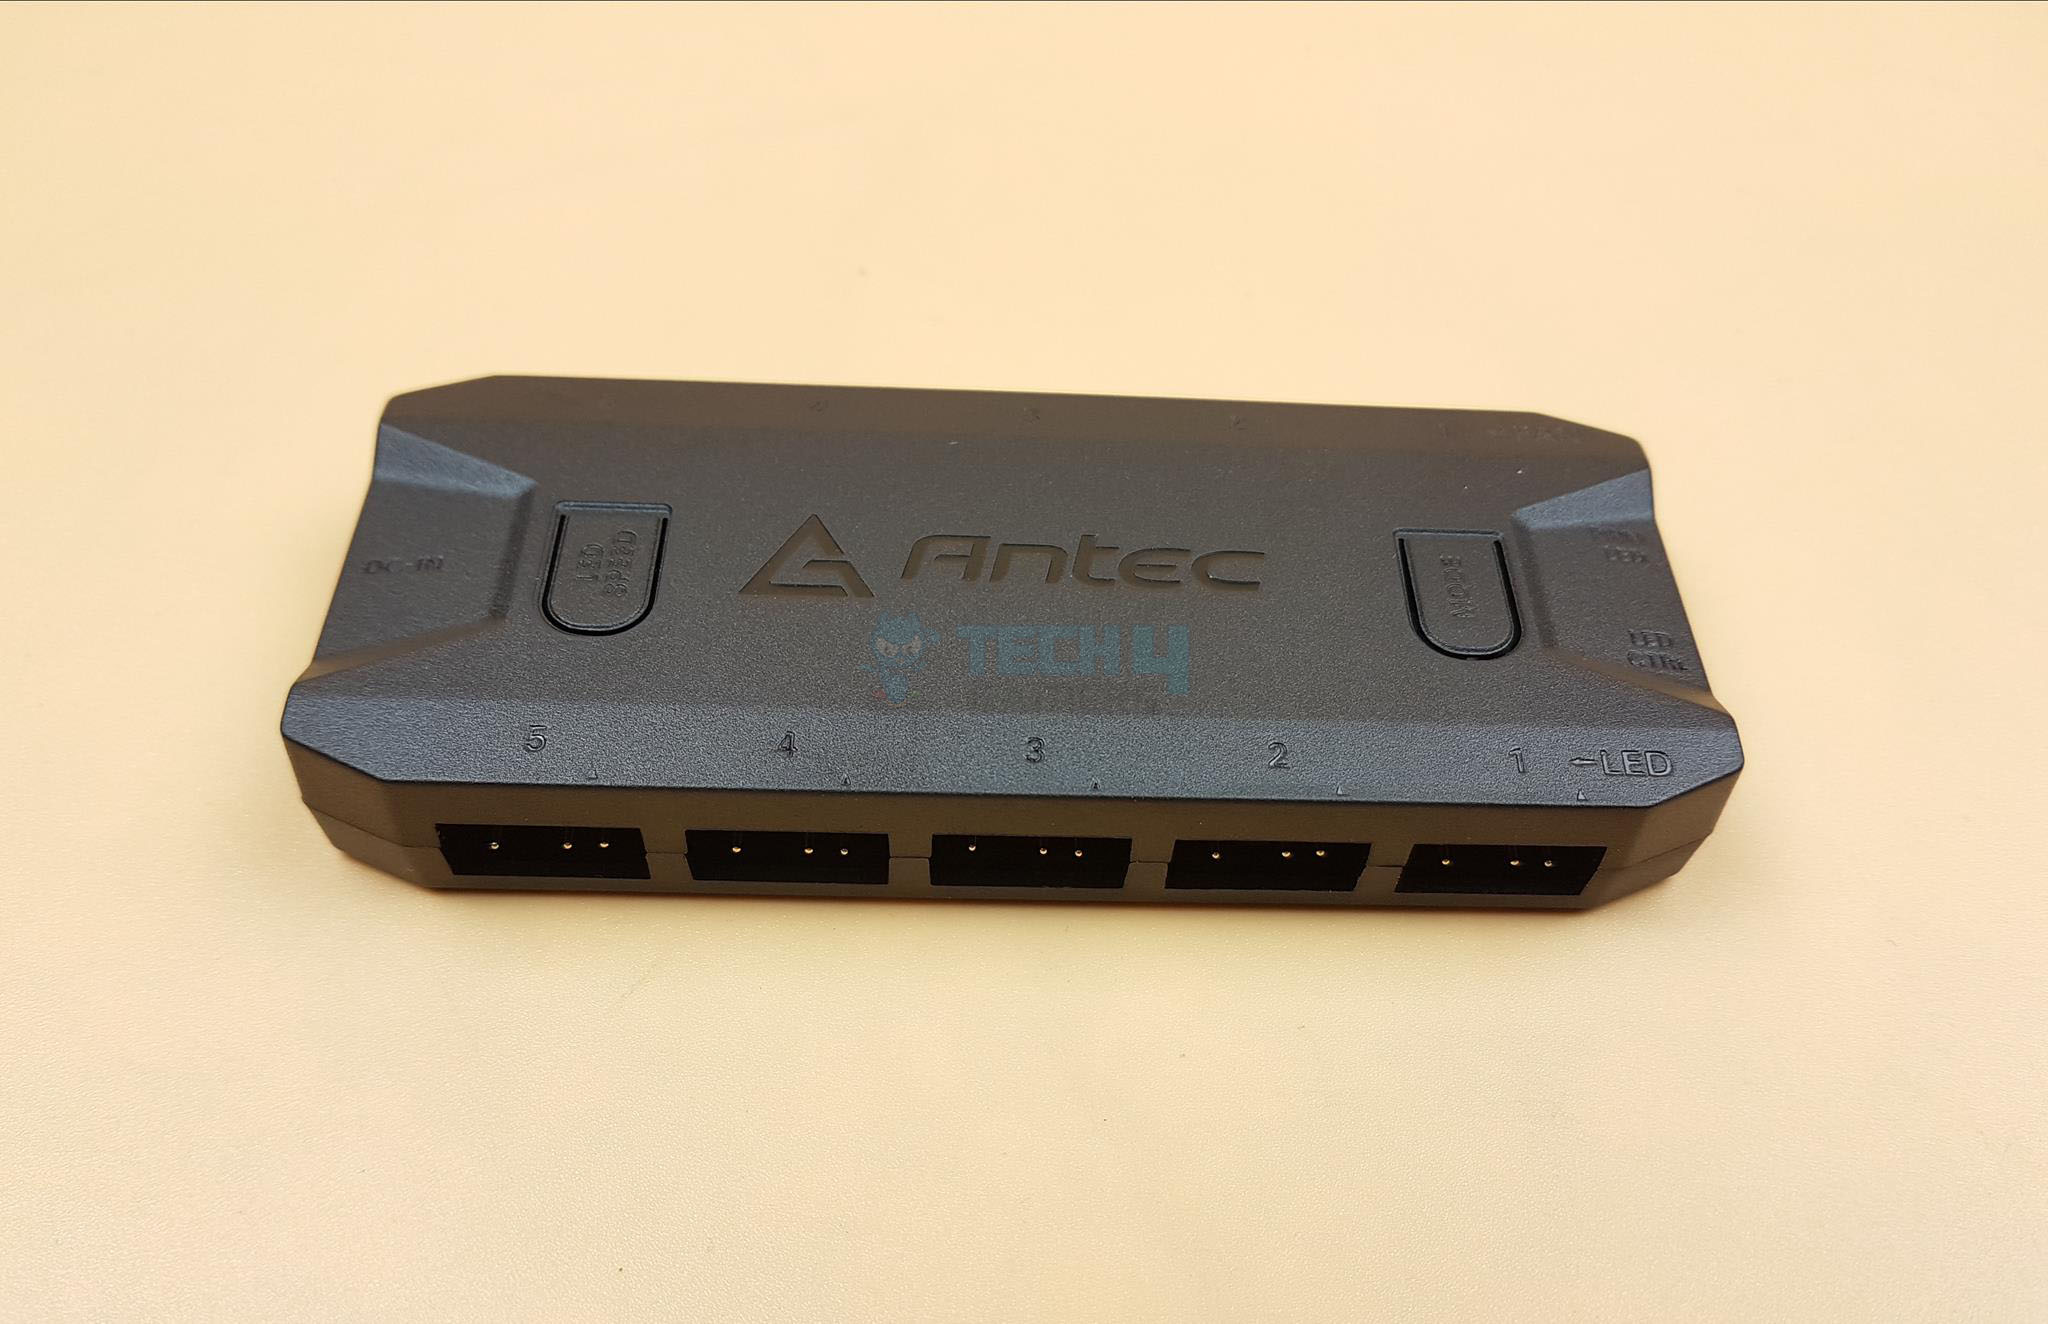
Plug your Reset button cable into the 2-pin header labelled LED Ctrl on the controller. This smart setup lets you change lighting modes without opening the chassis, thanks to the thoughtful design by the team. Additionally, connect up to 5x 4-pin PWM fans to the controller.
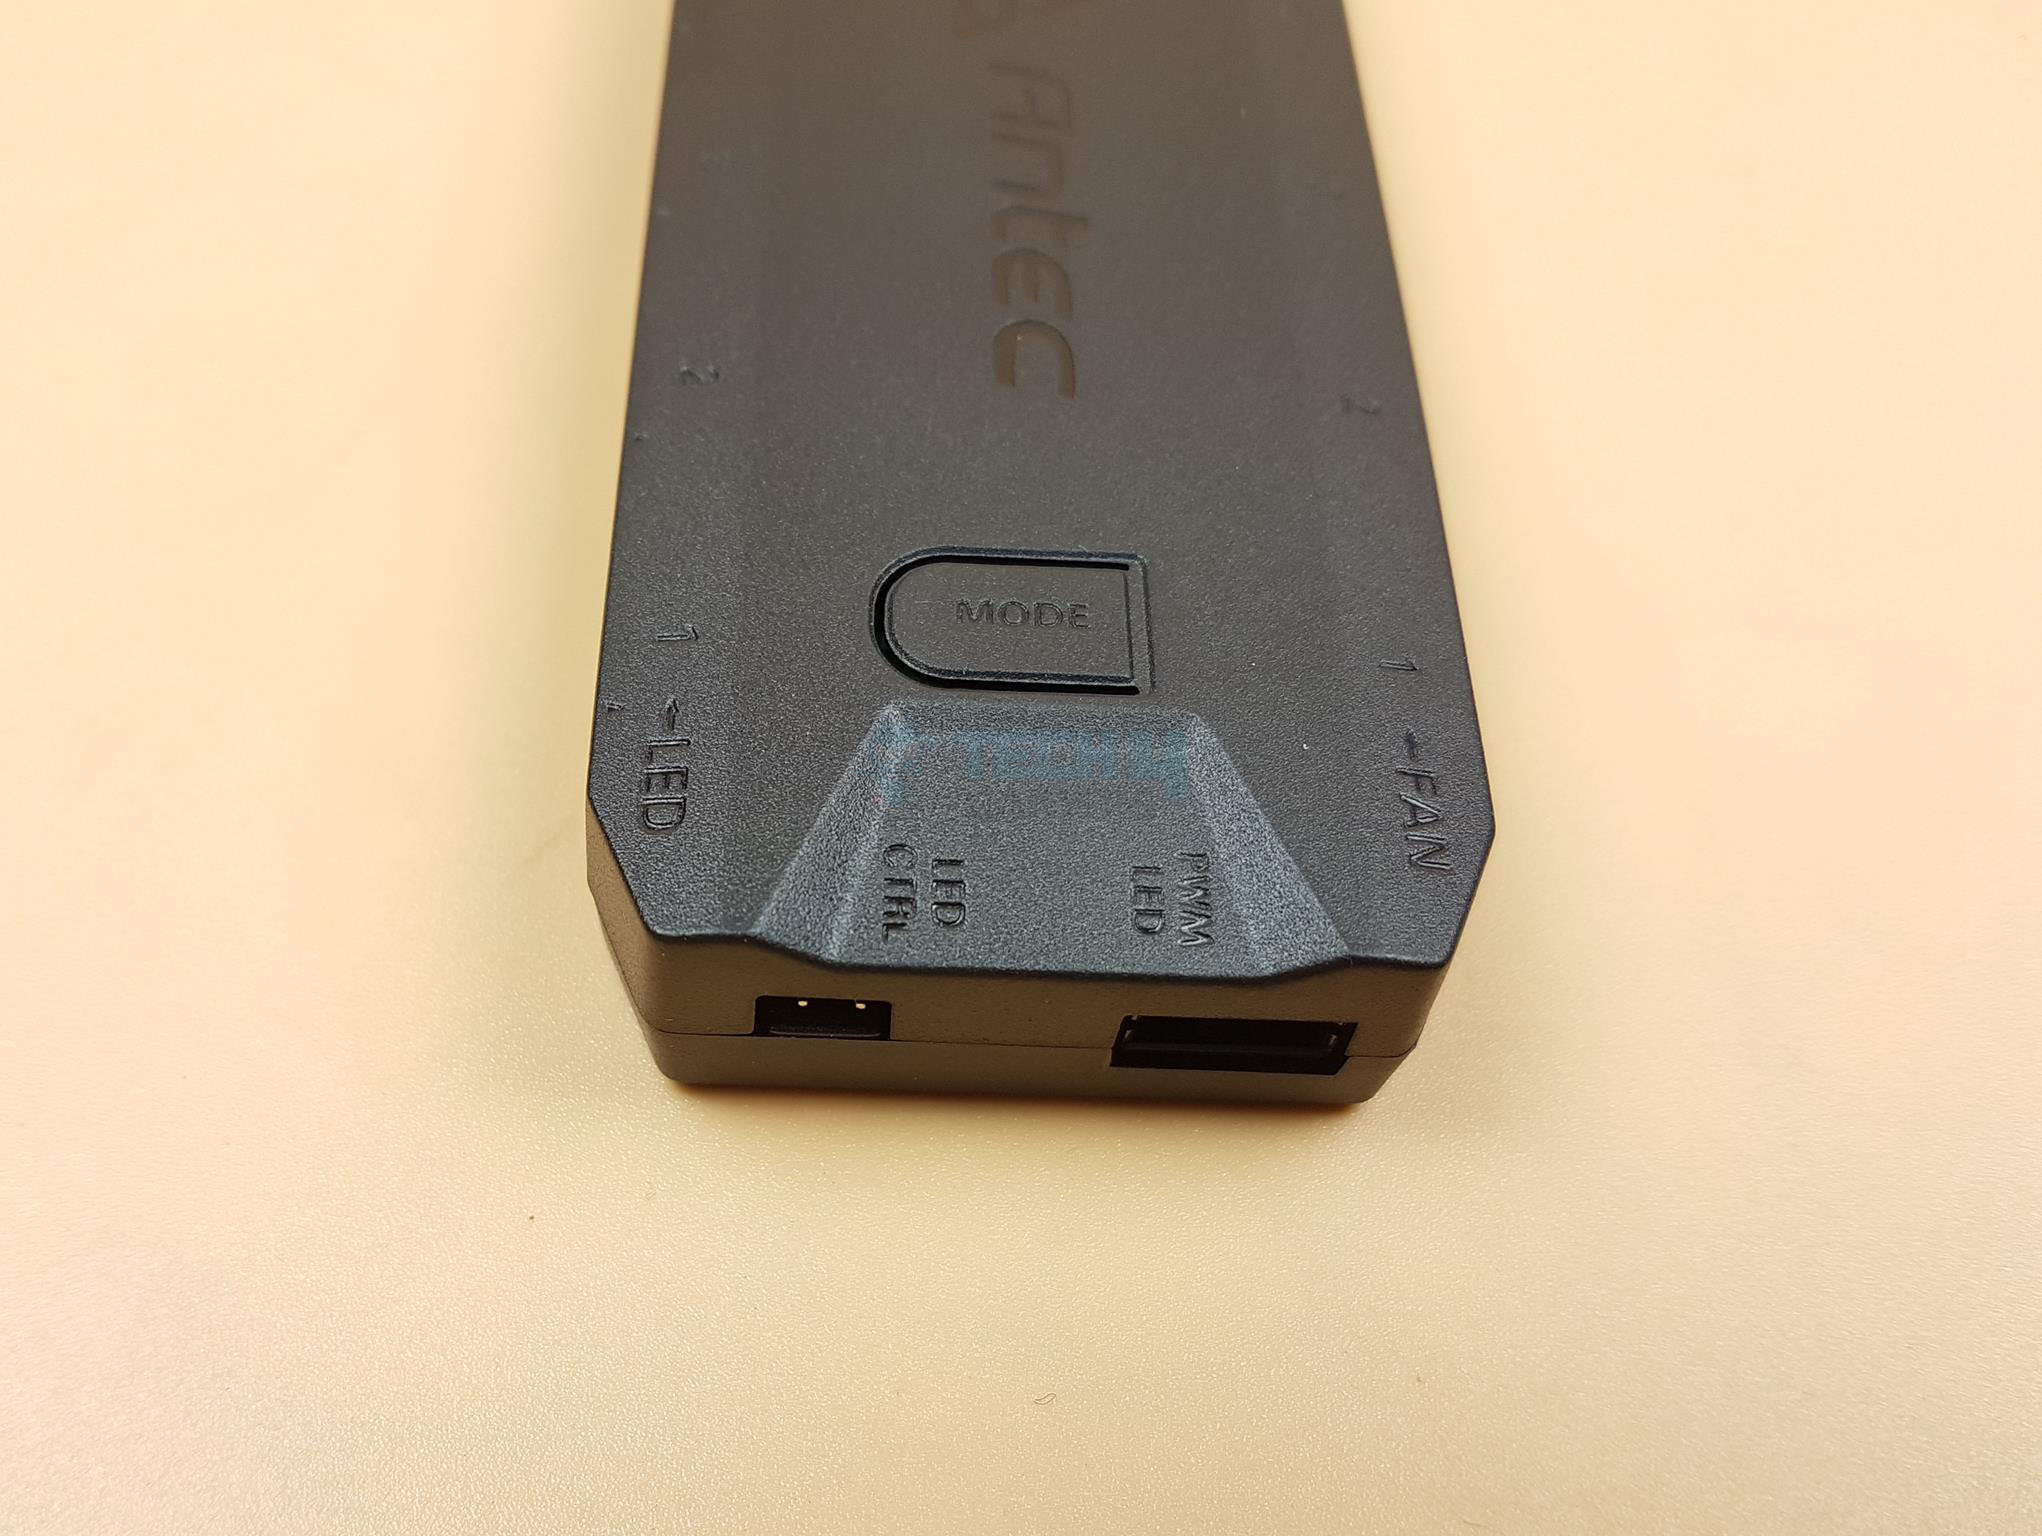
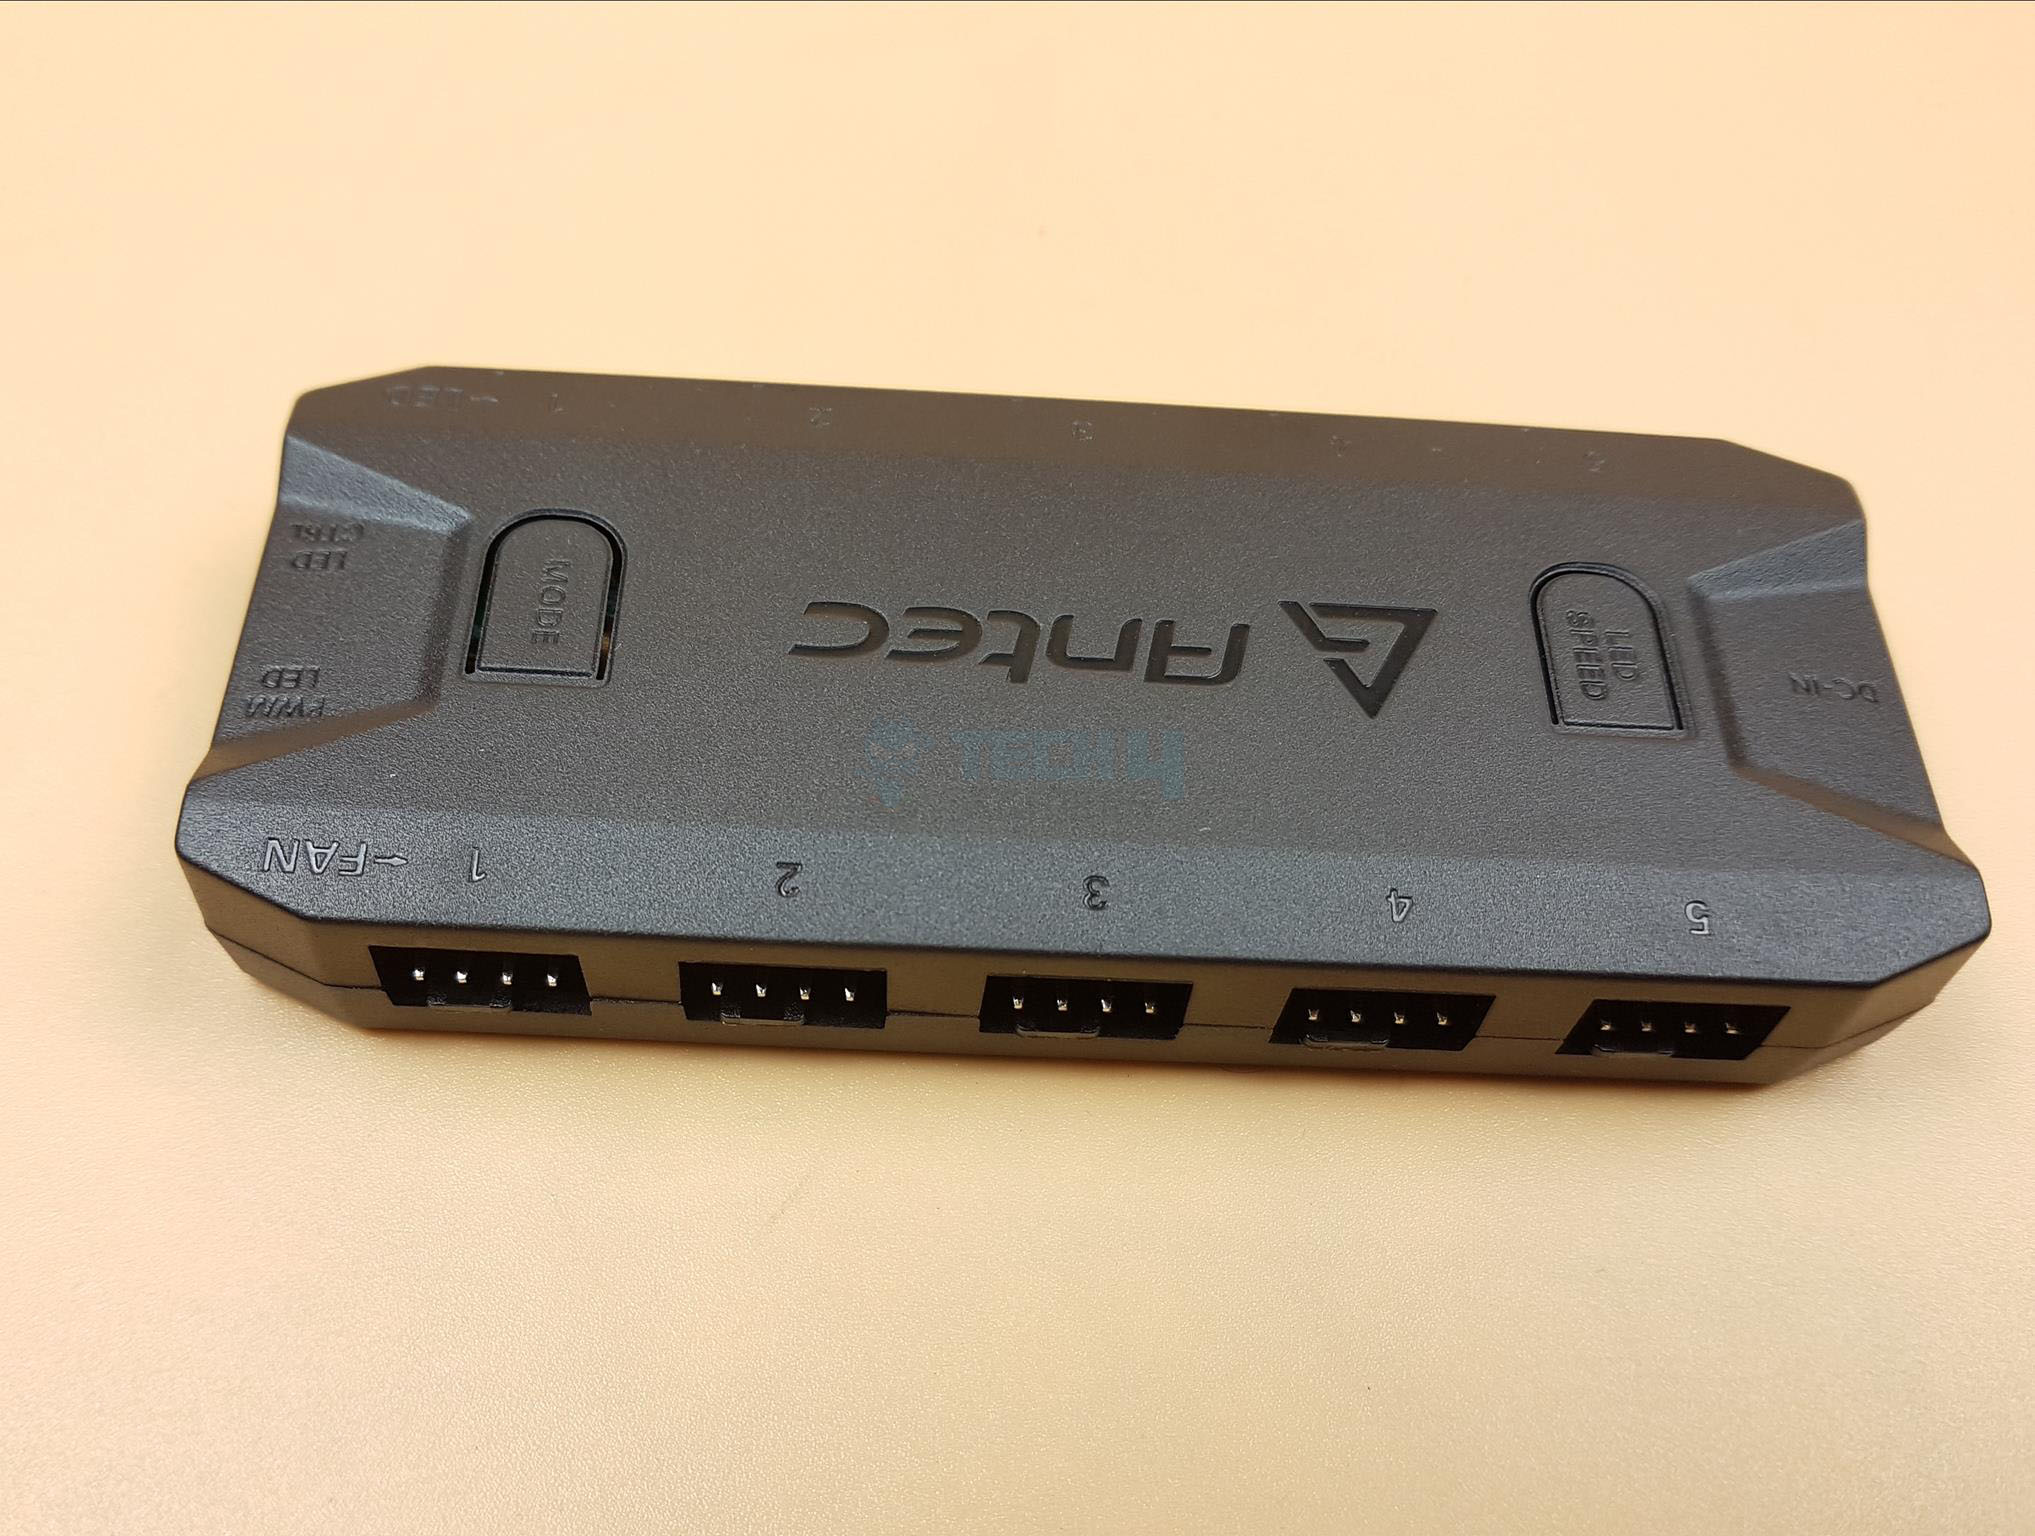
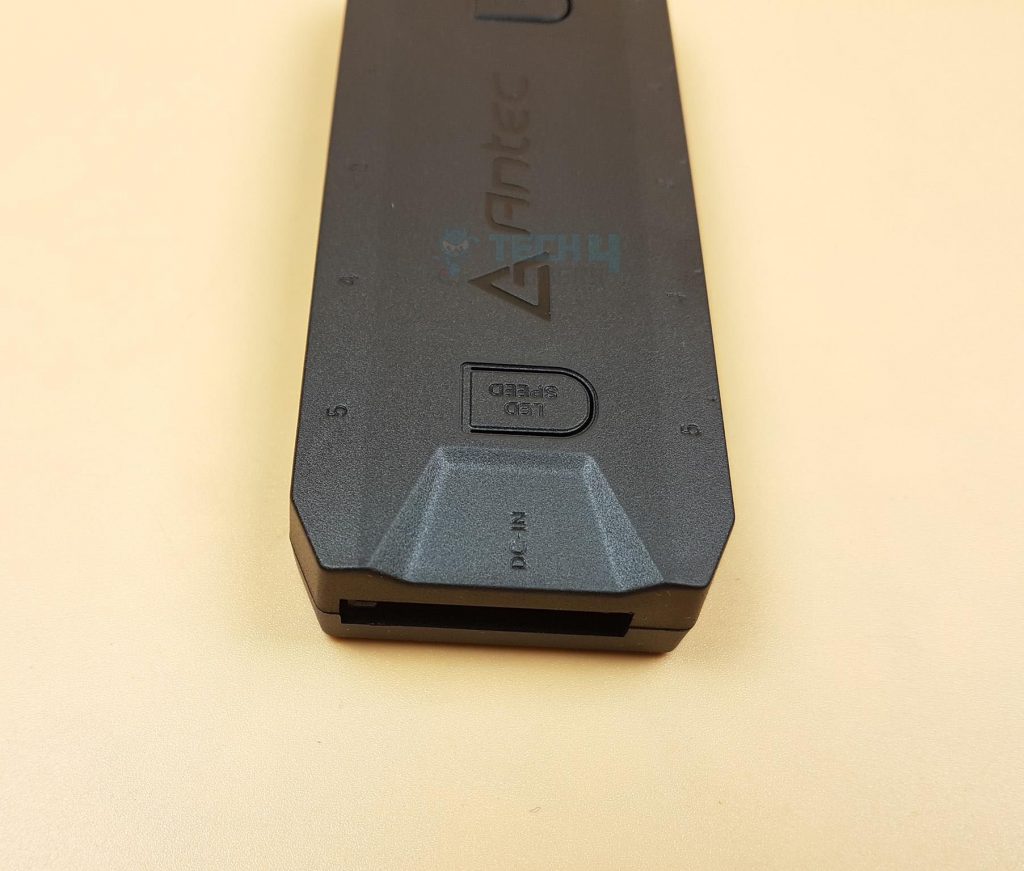
The controller is SATA powered. There is a SATA port labelled DC IN, which is where the SATA cable from the PSU needs to be attached.
Attach the dual-sided tape to the glossy back. Use magnetic mounting instead of adhesive. Connect the 4-pin proprietary connector to the controller’s labelled port. Connect the 4-pin PWM connector to the motherboard’s fan header and the 3-pin ARGB connector to the digital lighting header. Easily switch control between the controller and motherboard. Antec includes a sync cable for GIGABYTE motherboards. The cooler features a vibrant lighting effect on the block, enhanced by the dual-sided tape in white.
Here are the results with RGB lighting.
Testing
The following test benches have been used:
- MSI MAG Z490 TOMAHAWK
- Intel i7 10700k
- T-Force NightHawk RGB 16GB 3200 DDR4 kit
- Nvidia GeForce GTX 1080 FE
- addlink S70 256GB NVMe SSD
- bequiet! Straight Power 11 850W Platinum PSU
- Open-air test bench
AIDA64 Extreme 6.30 is used to stress the CPU.
Here is the settings table for testing:
| Clock (MHz) | 3800 All Core |
| Voltage (V) | 1.022 |
| Clock (MHz) | 4700 All Core |
| Voltage (V) | 1.255 |
| Clock (MHz) | 5100 All Core |
| Voltage (V) | 1.345 |
| Turbo Boost | Disabled |
| C-States | Disabled |
| Speed Step | Disabled |
| Thermal Paste | Noctua NT-H1 |
| Thermal Paste Application | Dot method on the centre |
| Test Run Time | 30 minutes |
| Idling Time | 10 minutes |
| Fan Speed | Fans are set to run at 100% duty cycle on the CPU Fan Header. Auto PWM using CPU Fan Header |
| Pump Speed | Connected to the AIO Pump header to run at 100% speed |
Testing coolers with Noctua NT-H1 thermal paste for standardization. Graphs show delta temperatures. Tests were done on an open-air bench system; inside a chassis, temperatures may vary based on airflow. Results may differ due to mounting pressure, thermal paste application, and ambient temperature fluctuations. Mentioning testing methodology and specifics is crucial.
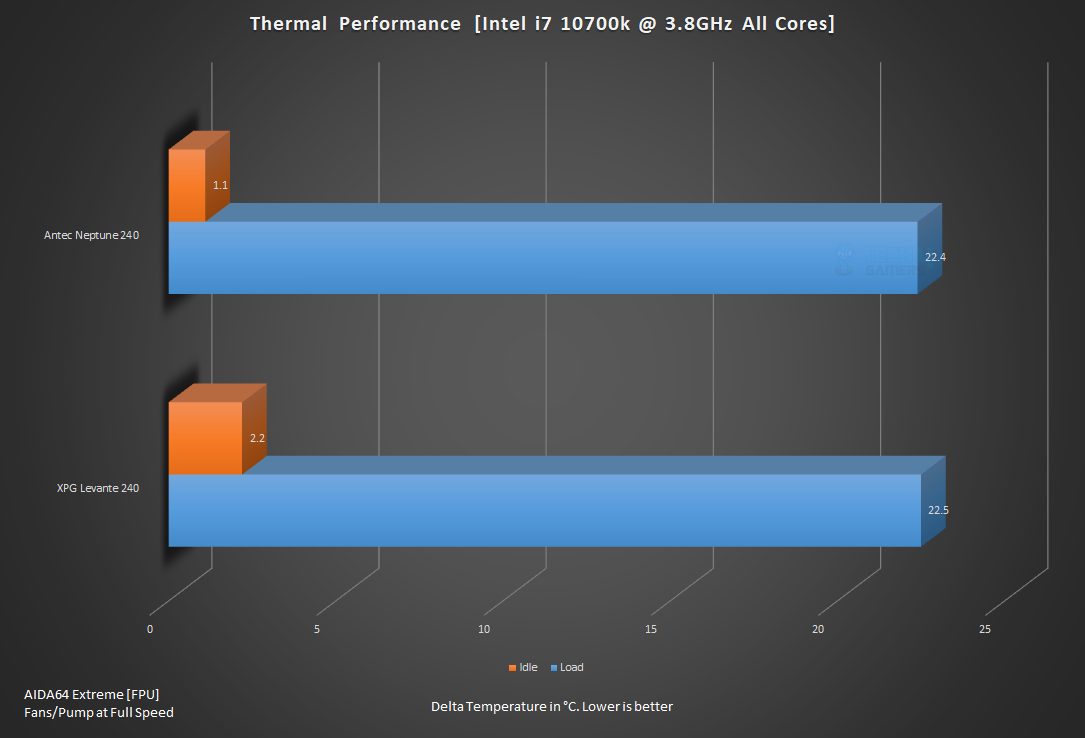
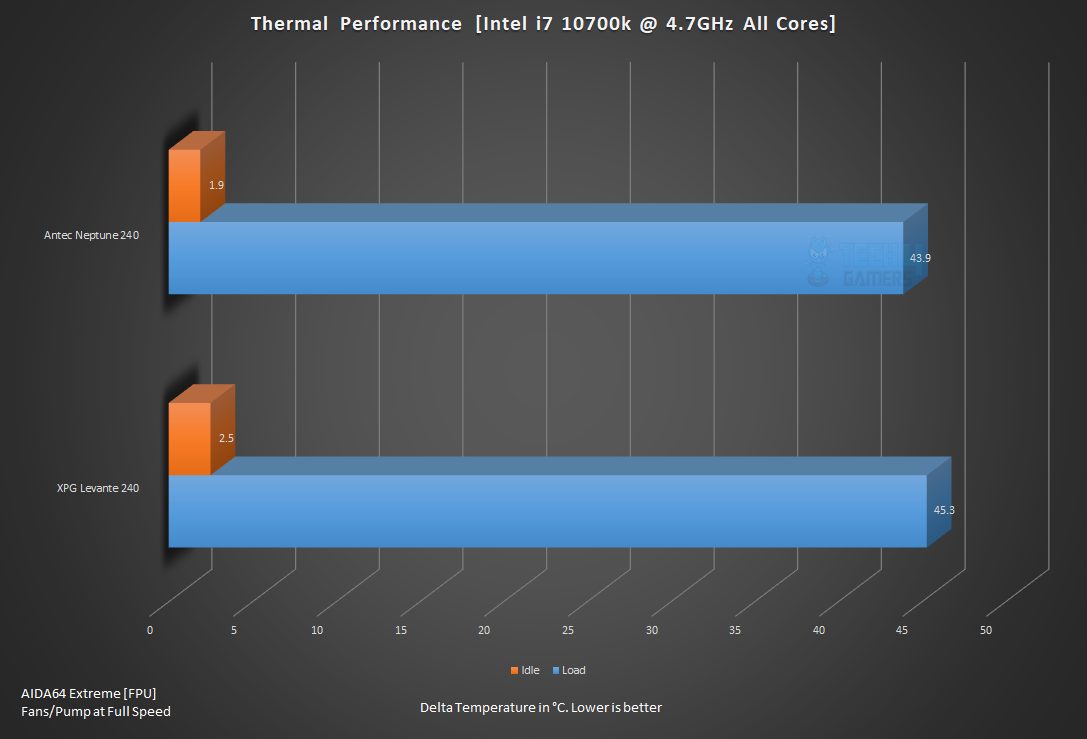
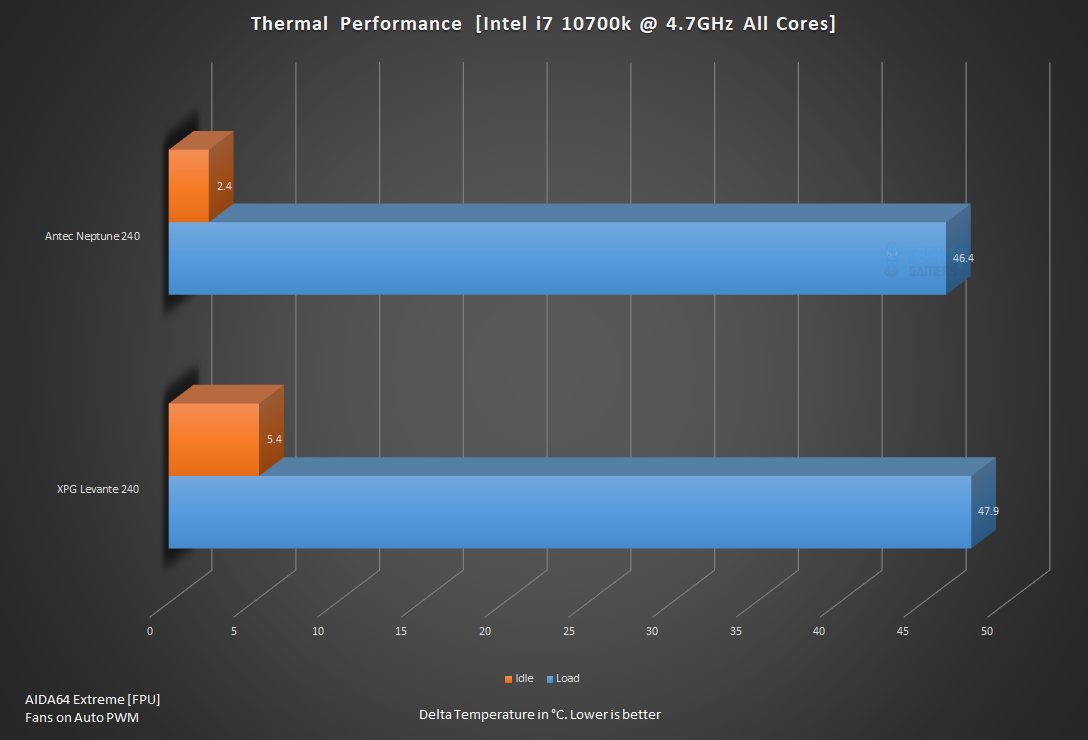
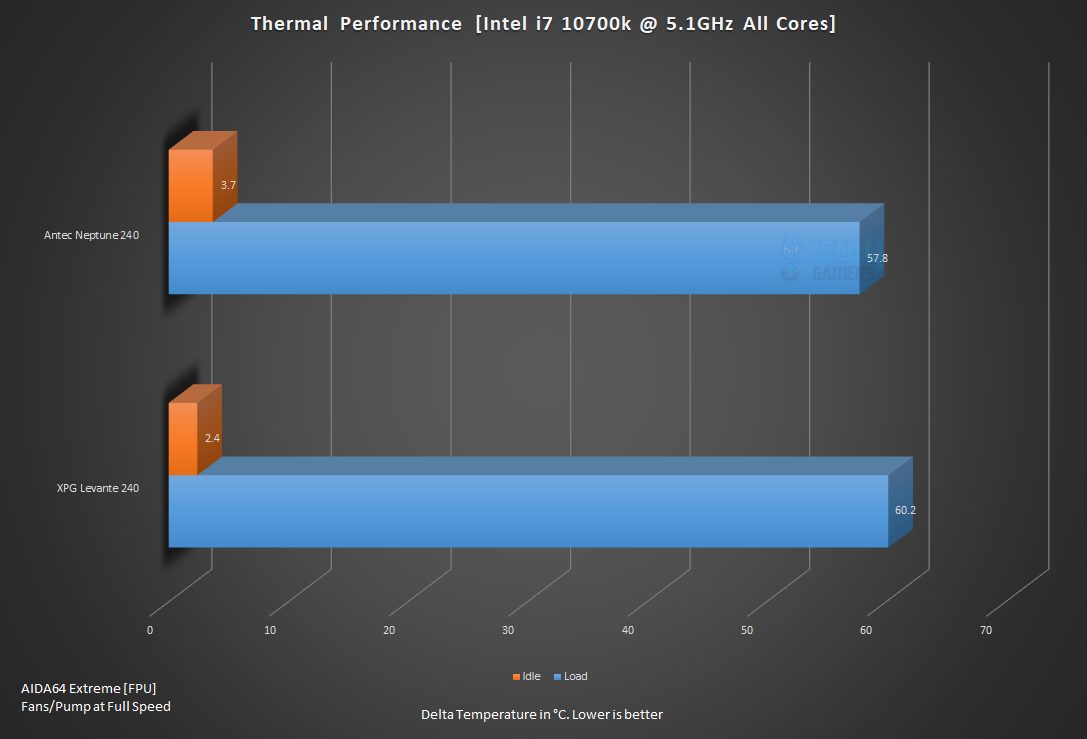
Thermals
We have recently upgraded our test bench, which is why there are only two coolers in the graphs. We will add more coolers’ data soon. The thermal performance of Antec Neptune 240 is self-explanatory.
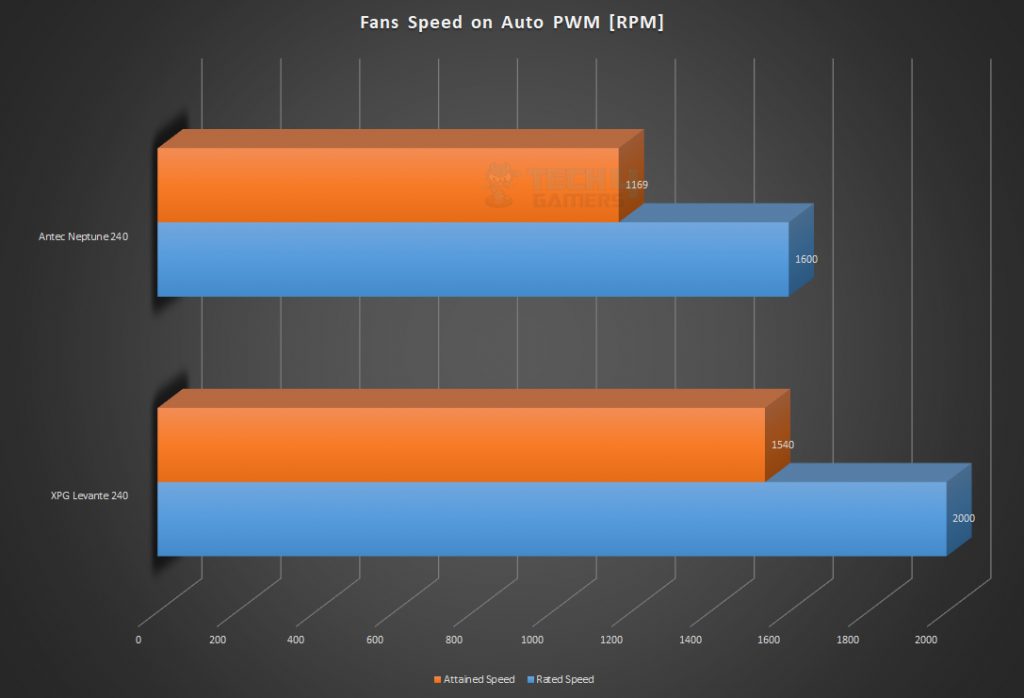
Fan Speed
Acoustics
The fans are not loud under 100% duty cycle mode, but the pump is very loud, and we measure 56 dBA on 32~34 dBA ambient noise.
Should You Buy It?
Following my in-depth analysis of the Antec Neptune 240 ARGB, I conclude that:
Buy It If
✅ You need an optimal 240mm AIO cooler: If you want a 240mm AIO liquid CPU cooler with an integrated pump, ARGB lighting, and PWM fans.
✅ You need compatibility: If you want compatibility with various Intel and AMD sockets, including Intel LGA 1200/115x/1366/20xx and AMD FM2/FM1/AM3+/AM2+/AM4/xTR4.
✅ You prefer aesthetic looks: If you appreciate a sleek design with ARGB lighting and want a cooling solution that adds aesthetic appeal to your build.
Don’t Buy It If
❌ You want pump speed under control: If you prioritize precise control over pump speed, as the Antec Neptune 240 ARGB lacks sufficient control.
❌ You can’t deal with design flaws: If you are concerned about potential design flaws, such as finishing issues like banged-up fins and a loose power cable.
❌ You prefer a silent pump: If you are sensitive to pump noise, as the pump in the radiator is reported to be loud, measuring 56 dBA on 32~34 dBA ambient noise during testing.
Final Words
Antec Neptune 240 is a 240mm liquid cooler with vibrant A-RGB lighting. It features a pump in the radiator, reducing CPU socket/motherboard risk. The aluminium radiator is 27mm thick, with 18 FPI and flexible rubber tubing. It’s compatible with various Intel and AMD sockets. The pump is SATA-powered, a bit loud, with a 50,000-hour lifespan. The low-profile water block and the copper base have 0.8mm micro fins. The unit includes two 120mm A-RGB fans and a control hub, supporting major motherboard lighting systems. Comes with a 3-year limited Antec warranty. Great performance and RGB at an affordable price, but the pump noise needs improvement.
Recent Updates
- January 23, 2024: A few text changes to improve readability. Image galleries added.
Thank you! Please share your positive feedback. 🔋
How could we improve this post? Please Help us. 😔
[Hardware Reviewer & Editor]
Meet Nauman Siddique, a highly experienced computer science graduate with more than 15 years of knowledge in technology. Nauman is an expert in the field known for his deep understanding of computer hardware.
As a tech tester, insightful reviewer, and skilled hardware editor, Nauman carefully breaks down important parts like motherboards, graphics cards, processors, PC cases, CPU coolers, and more.
- 15+ years of PC Building Experience
- 10+ years of first-hand knowledge of technology
- 7+ years of doing in-depth testing of PC Hardware
- A motivated individual with a keen interest in tech testing from multiple angles.
- I majored in Computer Science with a Masters in Marketing
- Previously worked at eXputer, EnosTech, and Appuals.
- Completed Course in Computer Systems Specialization From Illinois Tech
Get In Touch: nauman@tech4gamers.com


