 Threads
Enough For Your Fan Controlling Needs?
Review Summary
The Reeven Polariz RFC-04 Fan Controller offers powerful three-channel control with an appealing car-dashboard-like design and temperature monitoring capabilities for up to three surfaces. It’s suitable for users seeking precise fan control and temperature monitoring, fitting into a 5.25″ drive bay with a sleek metallic build. However, it lacks convenient features like an accessible power on/off button, automatic fan power restoration, and an easy alarm mute option, making it less ideal for those prioritizing quick adjustments without chassis access or silent alarm systems.
Hours Tested: 4-5

Overall
-
Design - 8/10
8/10
-
Functionality - 7/10
7/10
-
User-Friendliness - 7/10
7/10
-
Compatibility - 8/10
8/10
Pros
- Powerful three-channel control (up to 36W per channel)
- Sleek metallic design with LCD digital display
- Temperature monitoring
- Alarm system and quarter bay compatibility
Cons
- Inconvenient alarm mute process
- No automatic fan power restoration
- Lack of accessible power on/off button


Today, I will take a look at the Polariz Fan Controller. POLARIZ is a stylish fan controller with a design concept similar to that of a car dashboard. It actually goes beyond being a simple fan controller to the extent that user can monitor the temperature of different surfaces/areas like VRM, Chipset, CPU etc using the supplied thermal probes. Let’s dive in.
Key Takeaways
- The controller is good for users seeking powerful fan control with monitoring capabilities for up to three fans and surfaces, offering a sleek metallic design and 25″ quarter bay compatibility.
- This fan controller is not for users who prioritize easy access to mute alarms or want automatic fan power restoration options in case of stoppage without resetting the PC or manually manipulating cables.
- The standout features of the Polariz Fan Controller include powerful 3-channel control (36W per channel), LCD digital display for fan speed, temperature, and voltage, monitoring functionality for up to 3 surfaces, an alarm system, 25″ quarter bay compatibility, and included cables for extended accessibility.
- Why you can trust Tech4Gamers: Our reviews are based on dedicated hands-on testing by our team of experienced hardware experts. Find out more about how we test.
Let’s look at the specifications first.
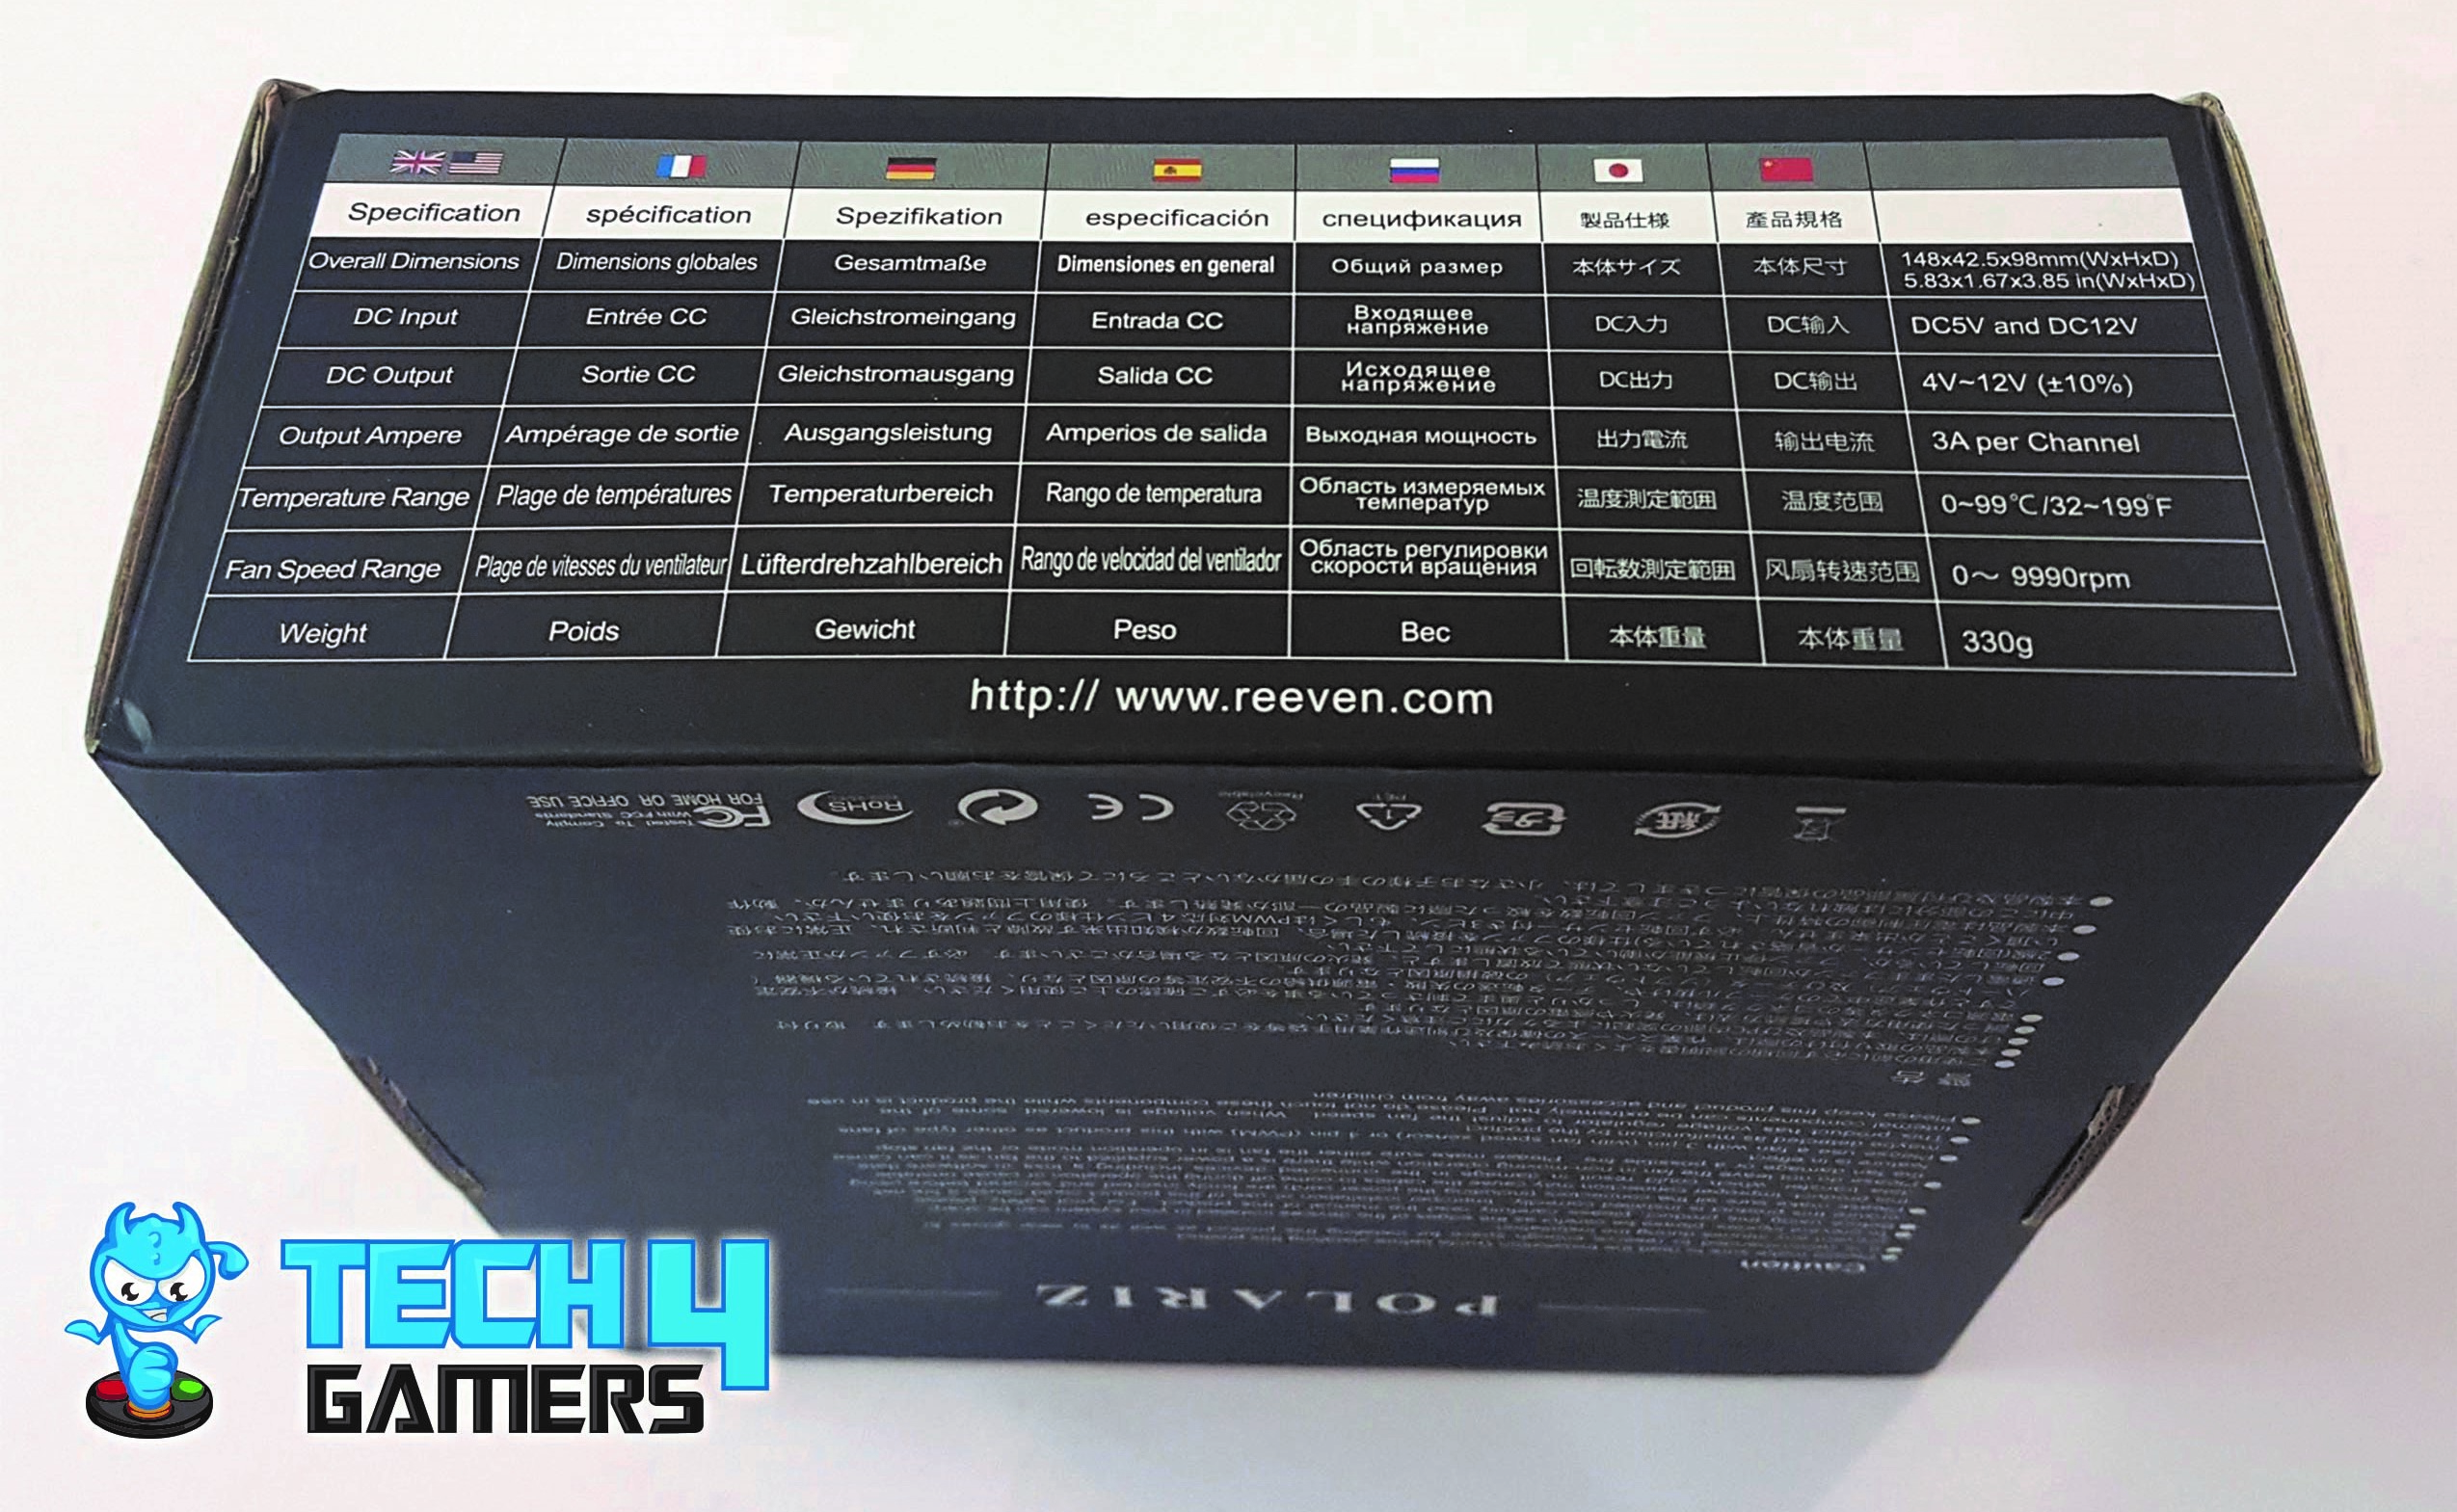
| Model No | RFC-04 |
| Overall Dimension | 148 x 42.5 x 98mm (W x H x D) |
| DC Input | 5V and 12V |
| DC Output | 4V to 12V +/-10% |
| Output Ampere | 3.0 Amp per channel |
| Temperature Range | 0 to 99C |
| Fan Speed Range | 0~9990 RPM |
| Weight | 330g |
| Fits into | 5.25” Drive Bay |
| Compatible Fan | 4-Pin PWM and 3-Pin |
Packaging and Unboxing
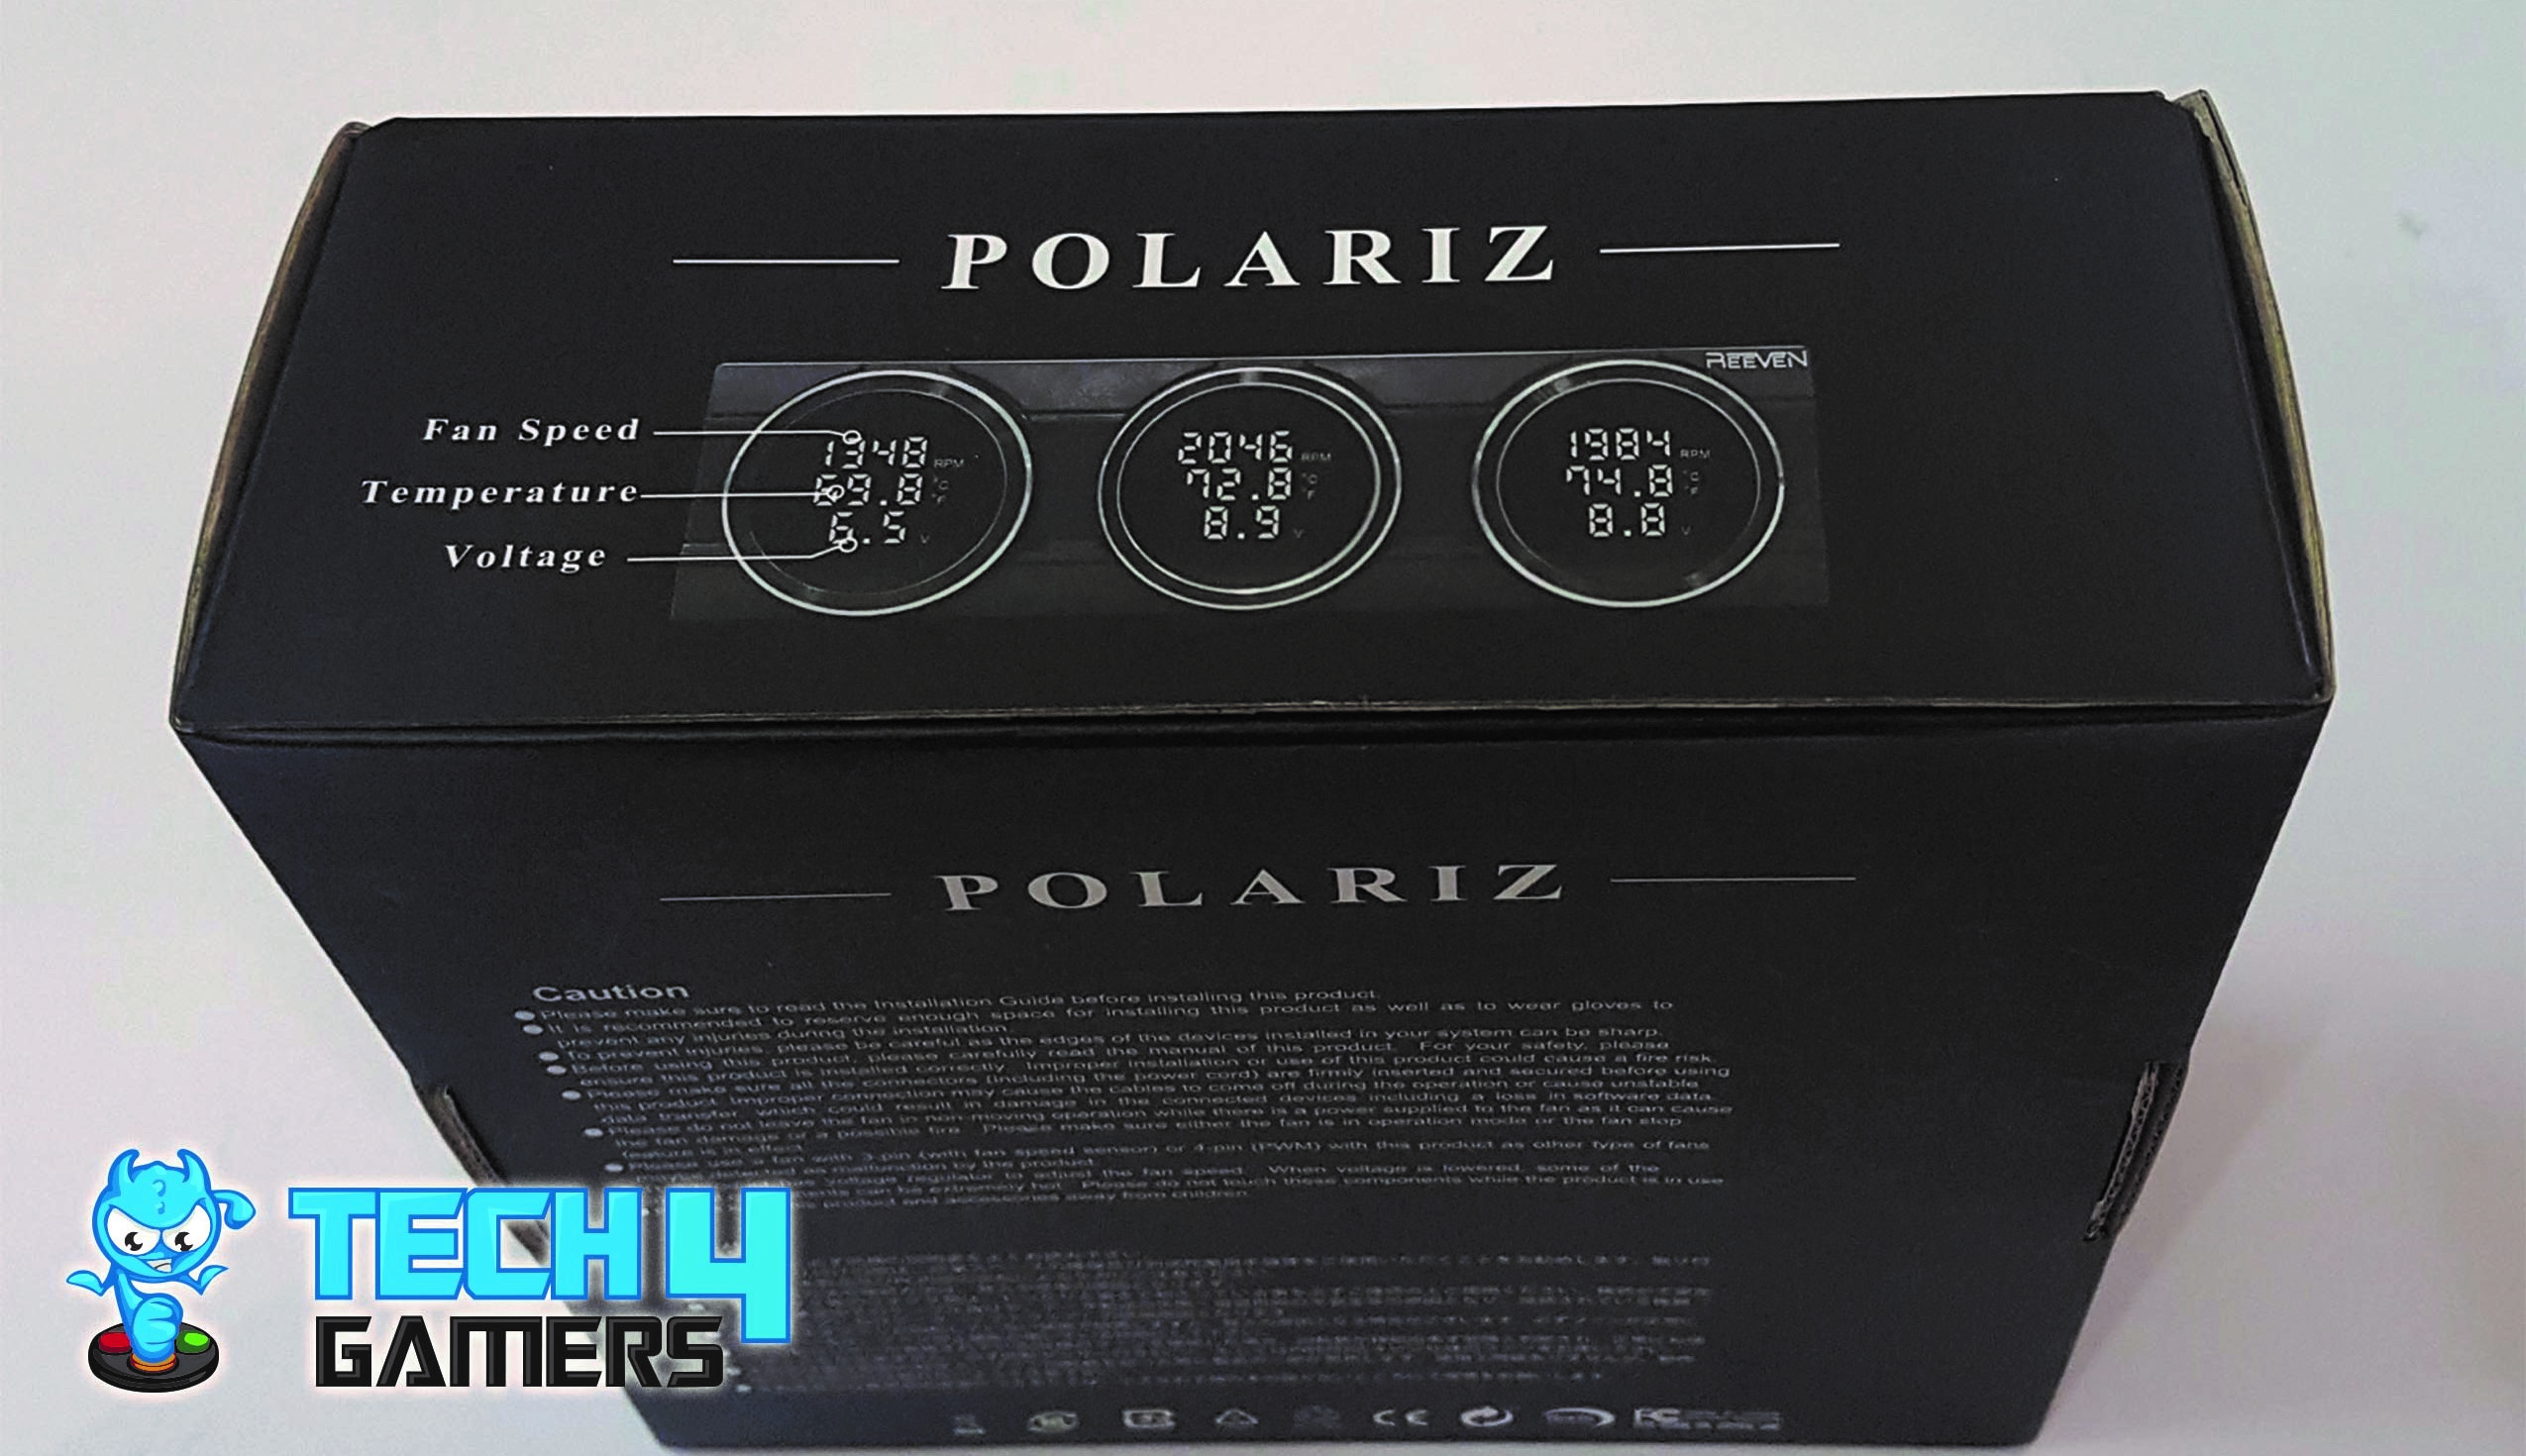
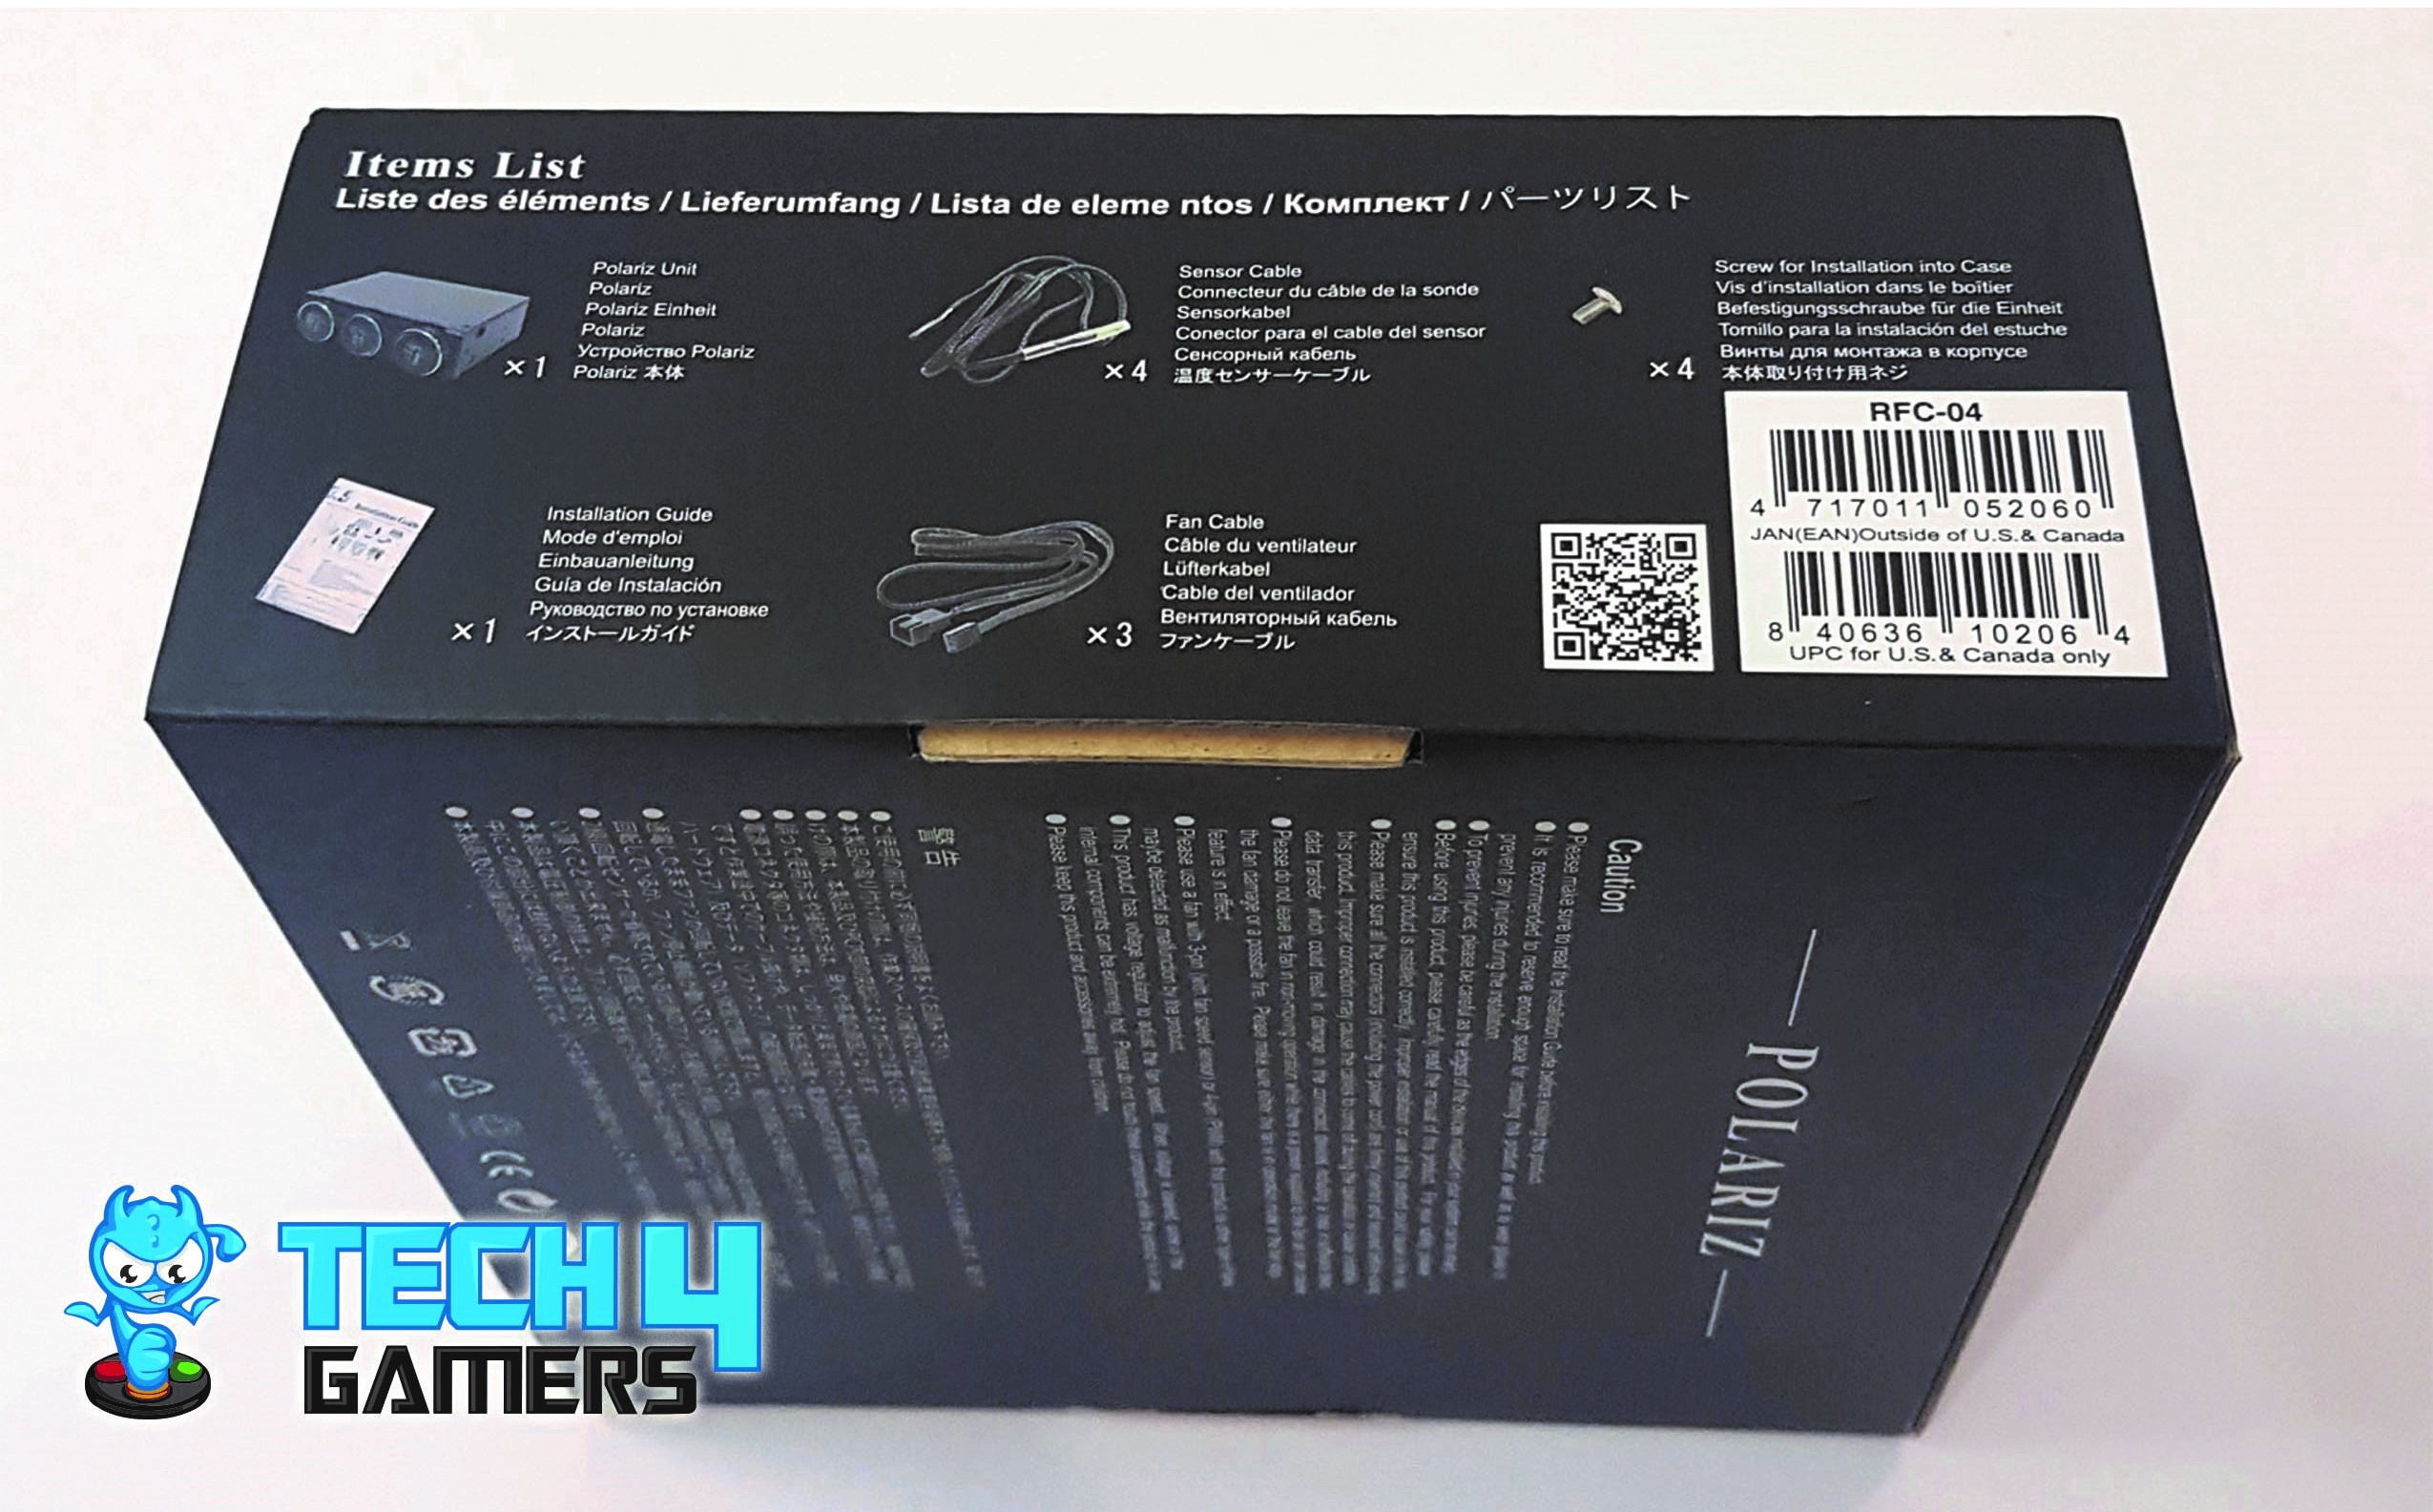
The Reeven Polariz comes in a black color cardboard box.


Accessories
Let’s see what we have in terms of accessories.
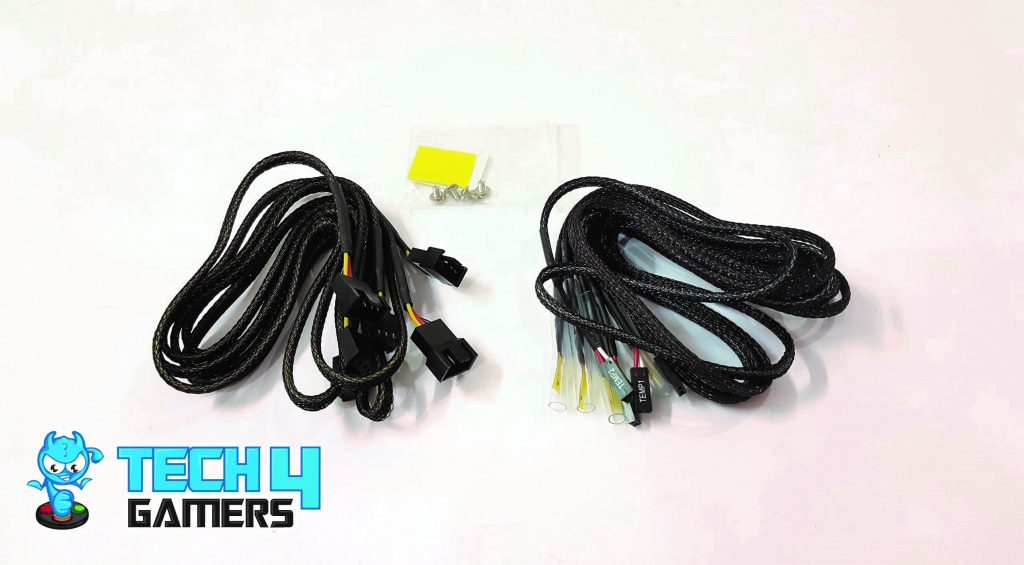
The Reeven has provided 3 fan extension cables, 3 thermal sensor cables, 4 M3 screws and the tape bundled with the unit. All cables are braided and will not hinder in good cable management. The Polariz Fan Controller fan extension cables have approximately 712mm of length, whereas the sensor cables have approximately 718mm of length.
Closer Look
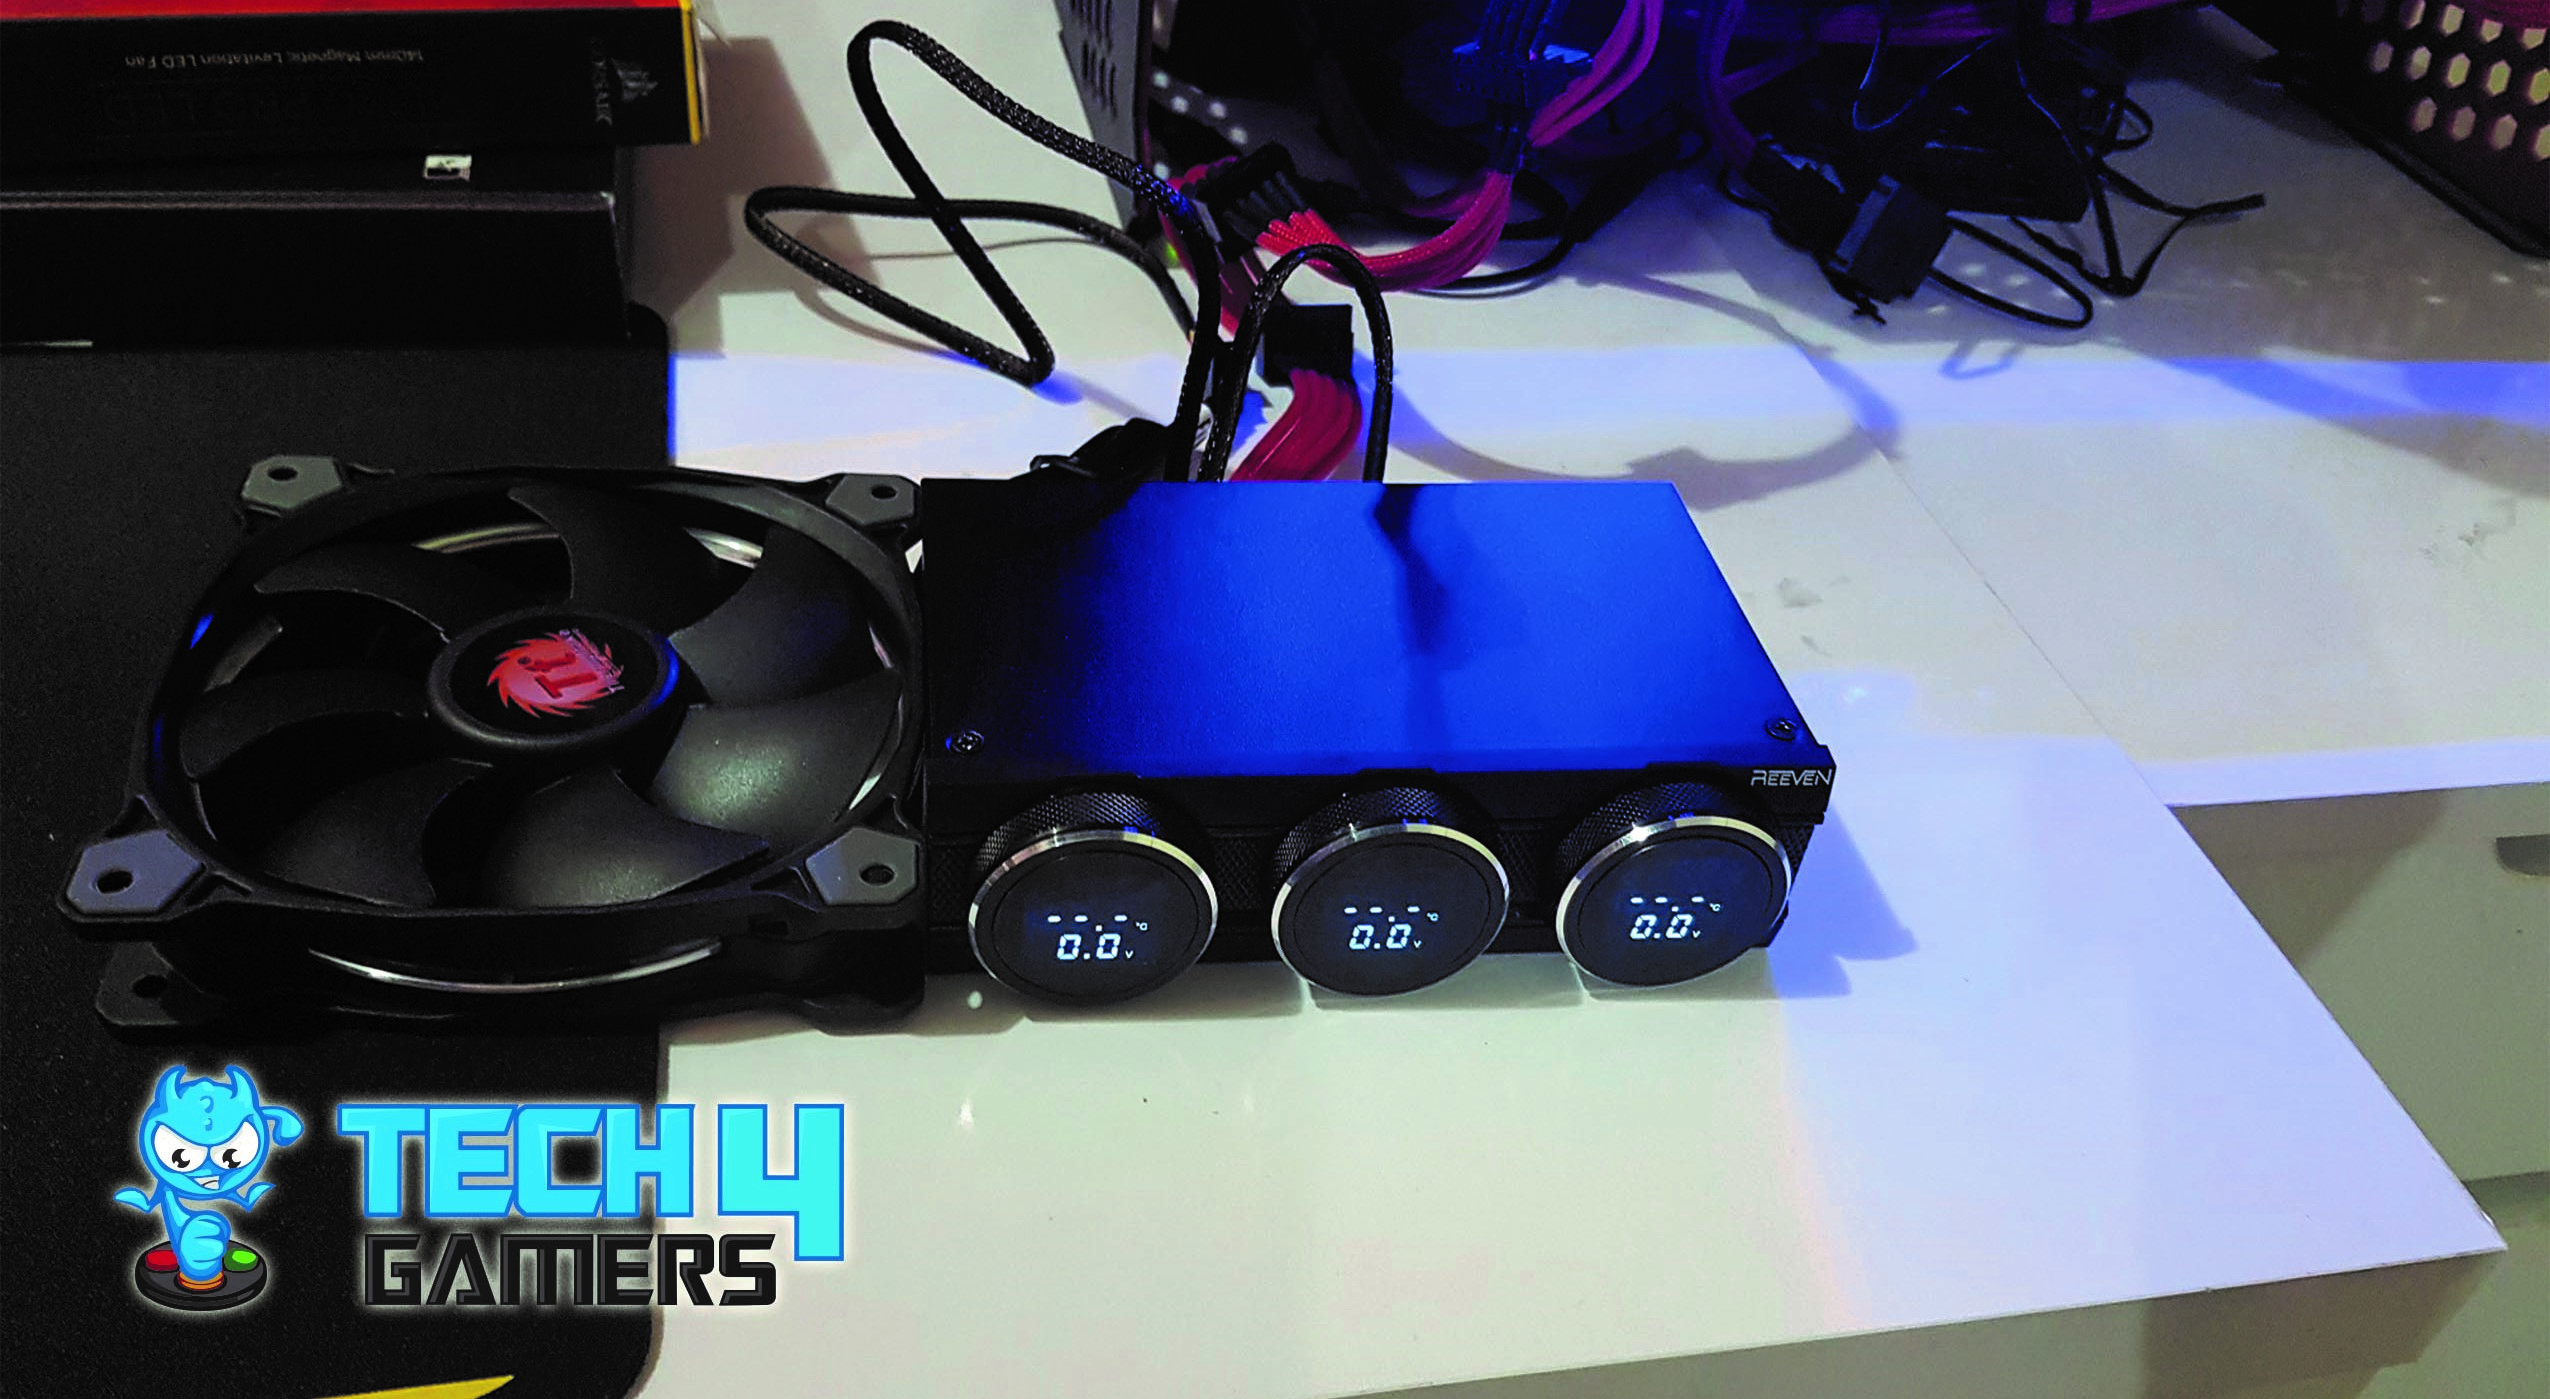
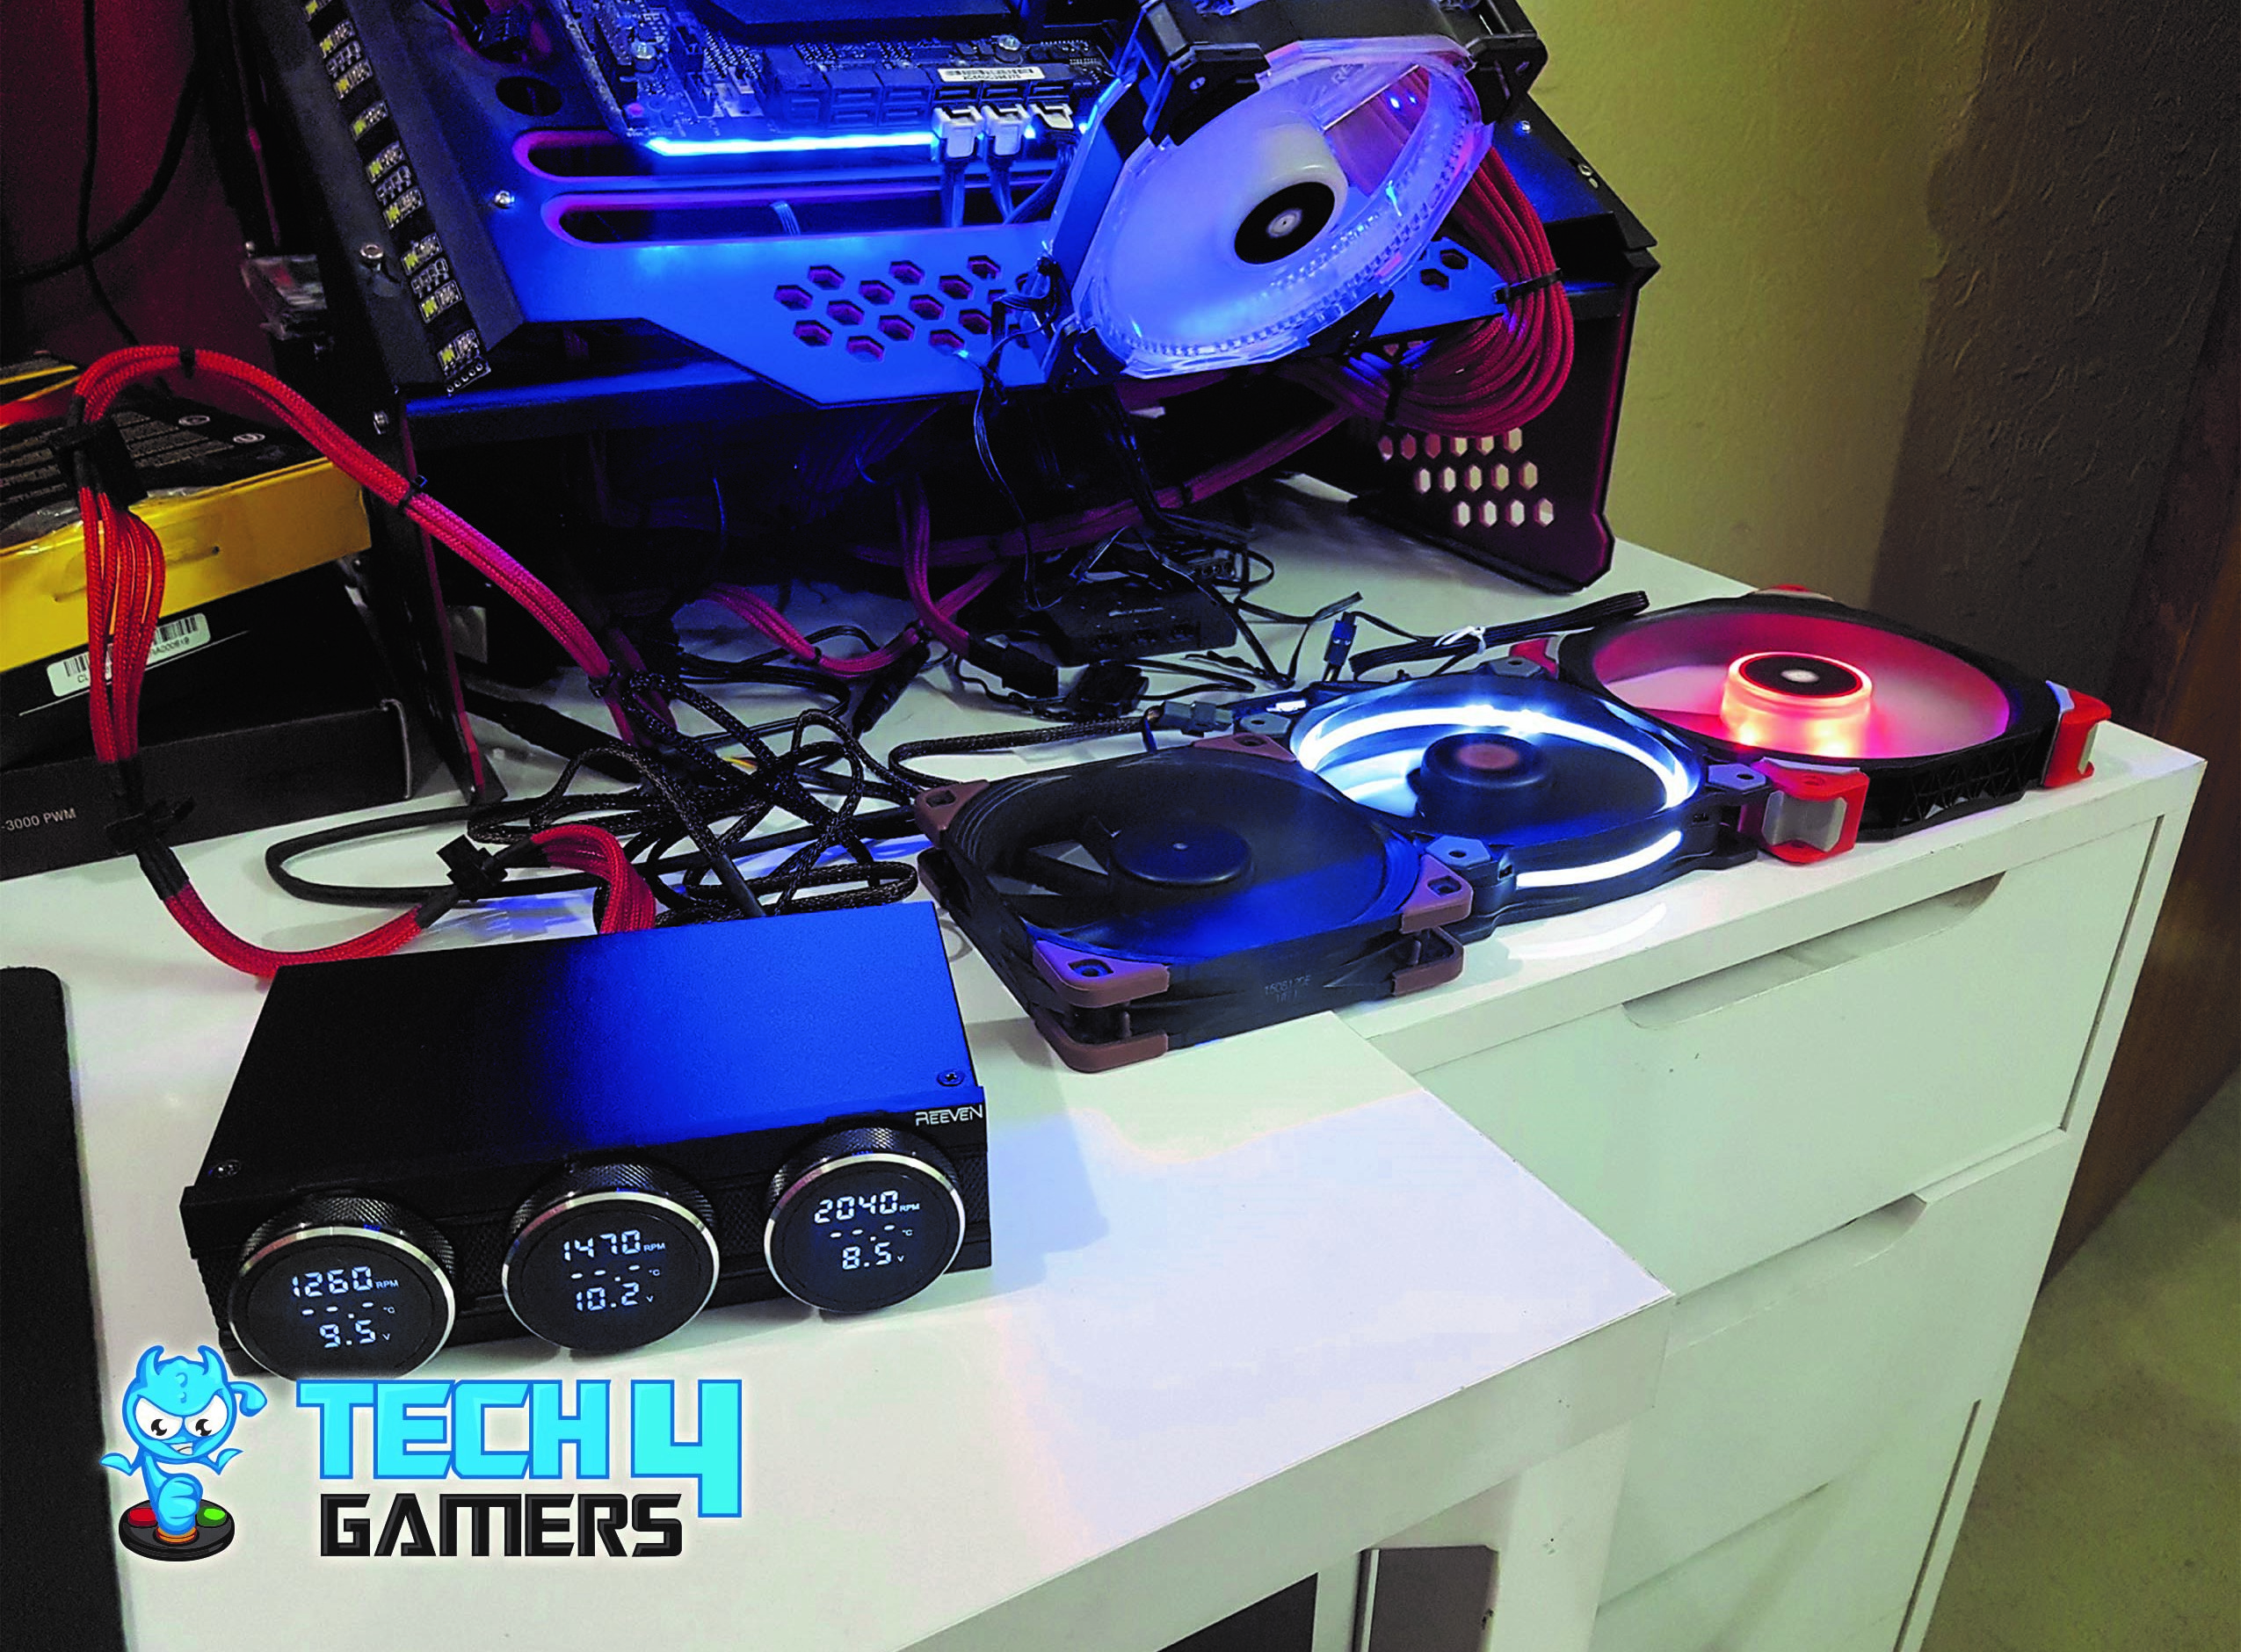
The Reeven Polariz RFC-04 is a stylish 3 channeled Fan Controller designed on the concept of the car dashboard. The previous fan controllers from the Reeven featured 4 and 6 channels respectively, but they are following a traditional look and feel to them as compared to the Polariz.
With upto 36W per channel, this beautiful unit has still got the same power to drive your fans like its predecessors. Let’s dive in and see what magic the Reeven has done with the Polariz to make it stand out.
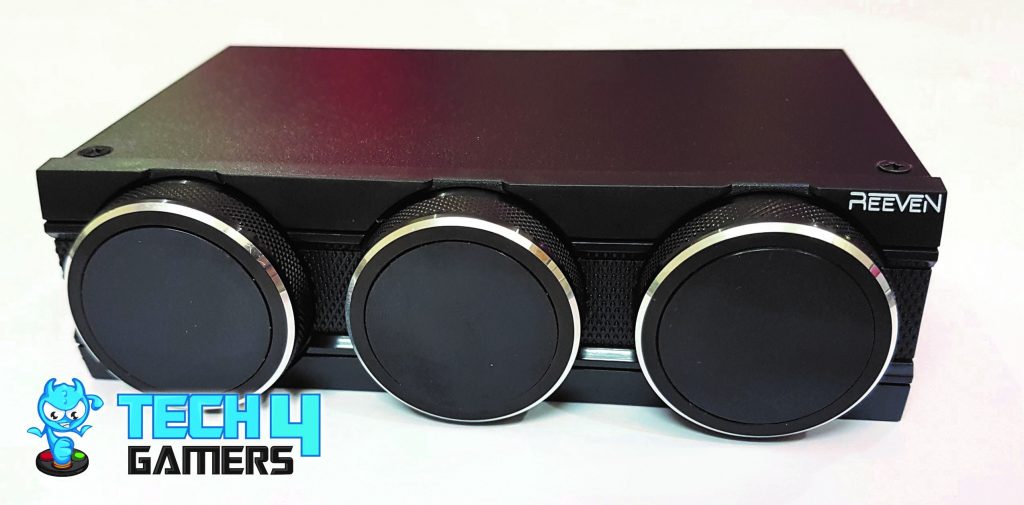
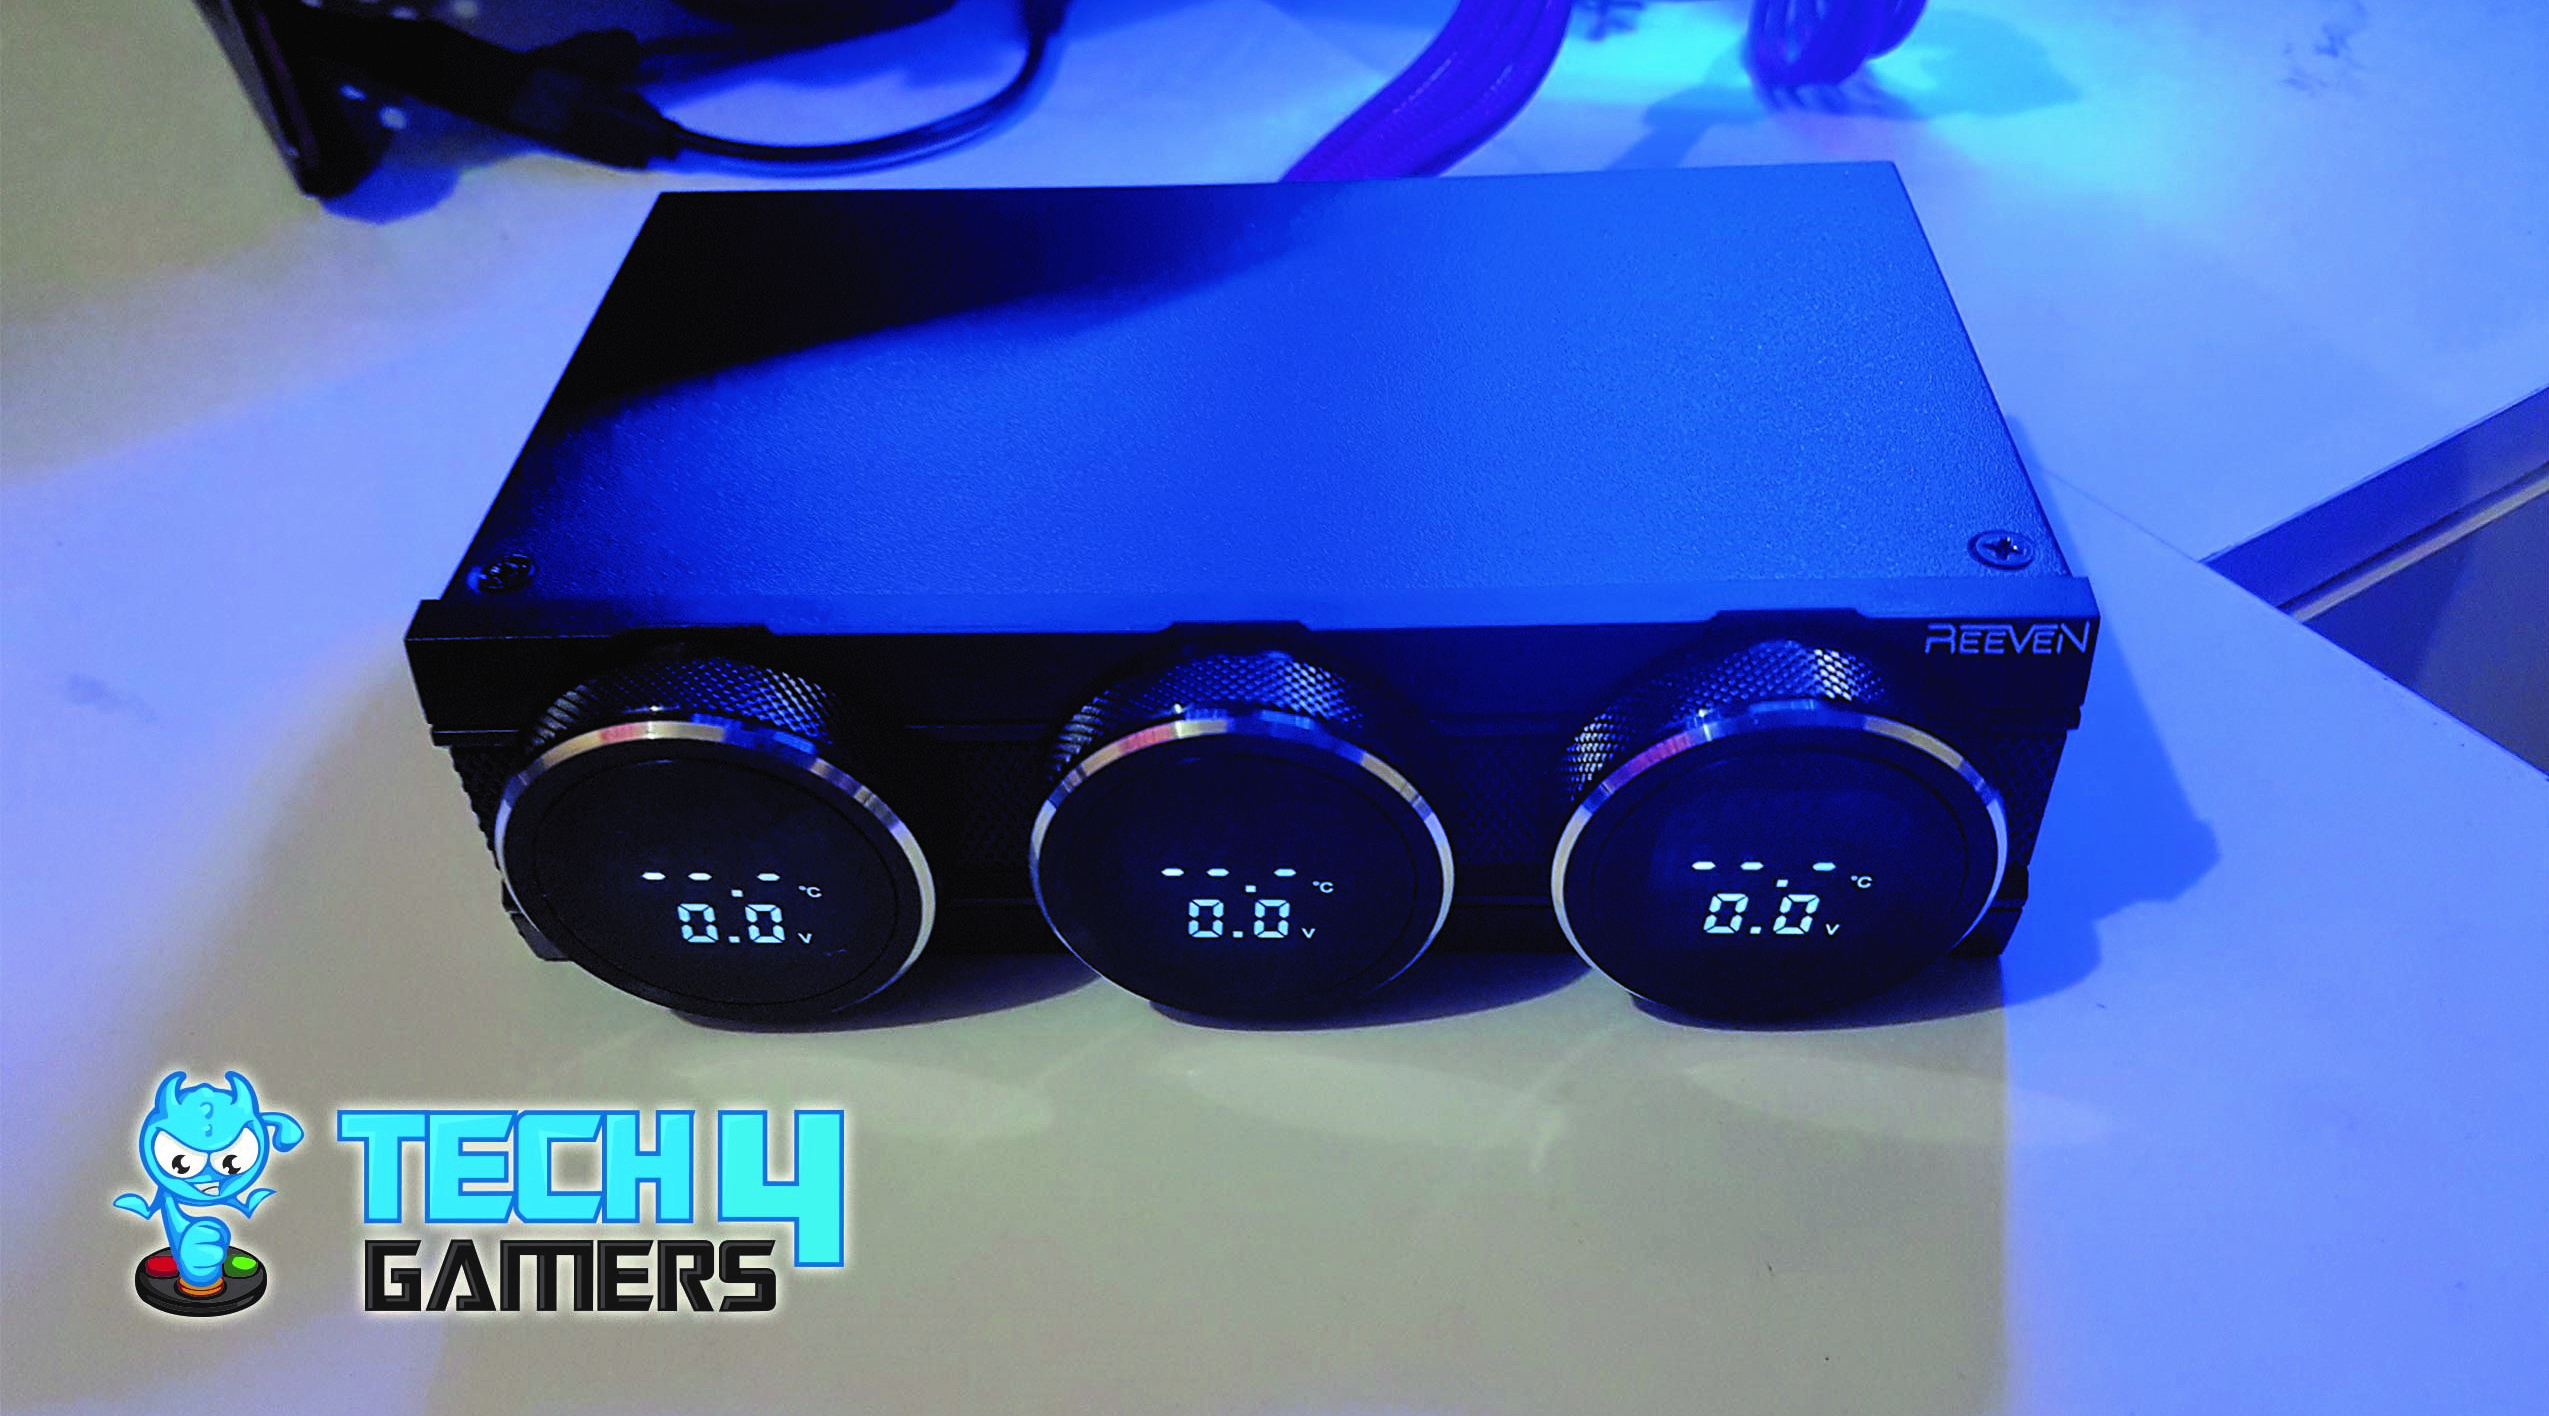
The unit’s metal frame houses its beauty on the front. A metal face plate covers the entire front, featuring an inset middle section that matches the diamond grip texture on each knob. This adds symmetry and enhances the unit’s appearance. Notably, there’s no power on/off button.


We’ve got three sizable 48mm knobs on the front, each with an LCD displaying fan speed in RPM, temperature in C/F, and the supplied voltage from top to bottom. Turning the knob right increases fan speed, while left decreases it by 0.5V increments.
Each knob has a metallic ring across the body in the black color. There is a diamond grip texture on the rotating parts of the knobs. There is a silver colored ring right above the textured portion. The overall design is symmetric and well laid out. The Reeven brand name is printed on the top right section of the front faceplate in white color.
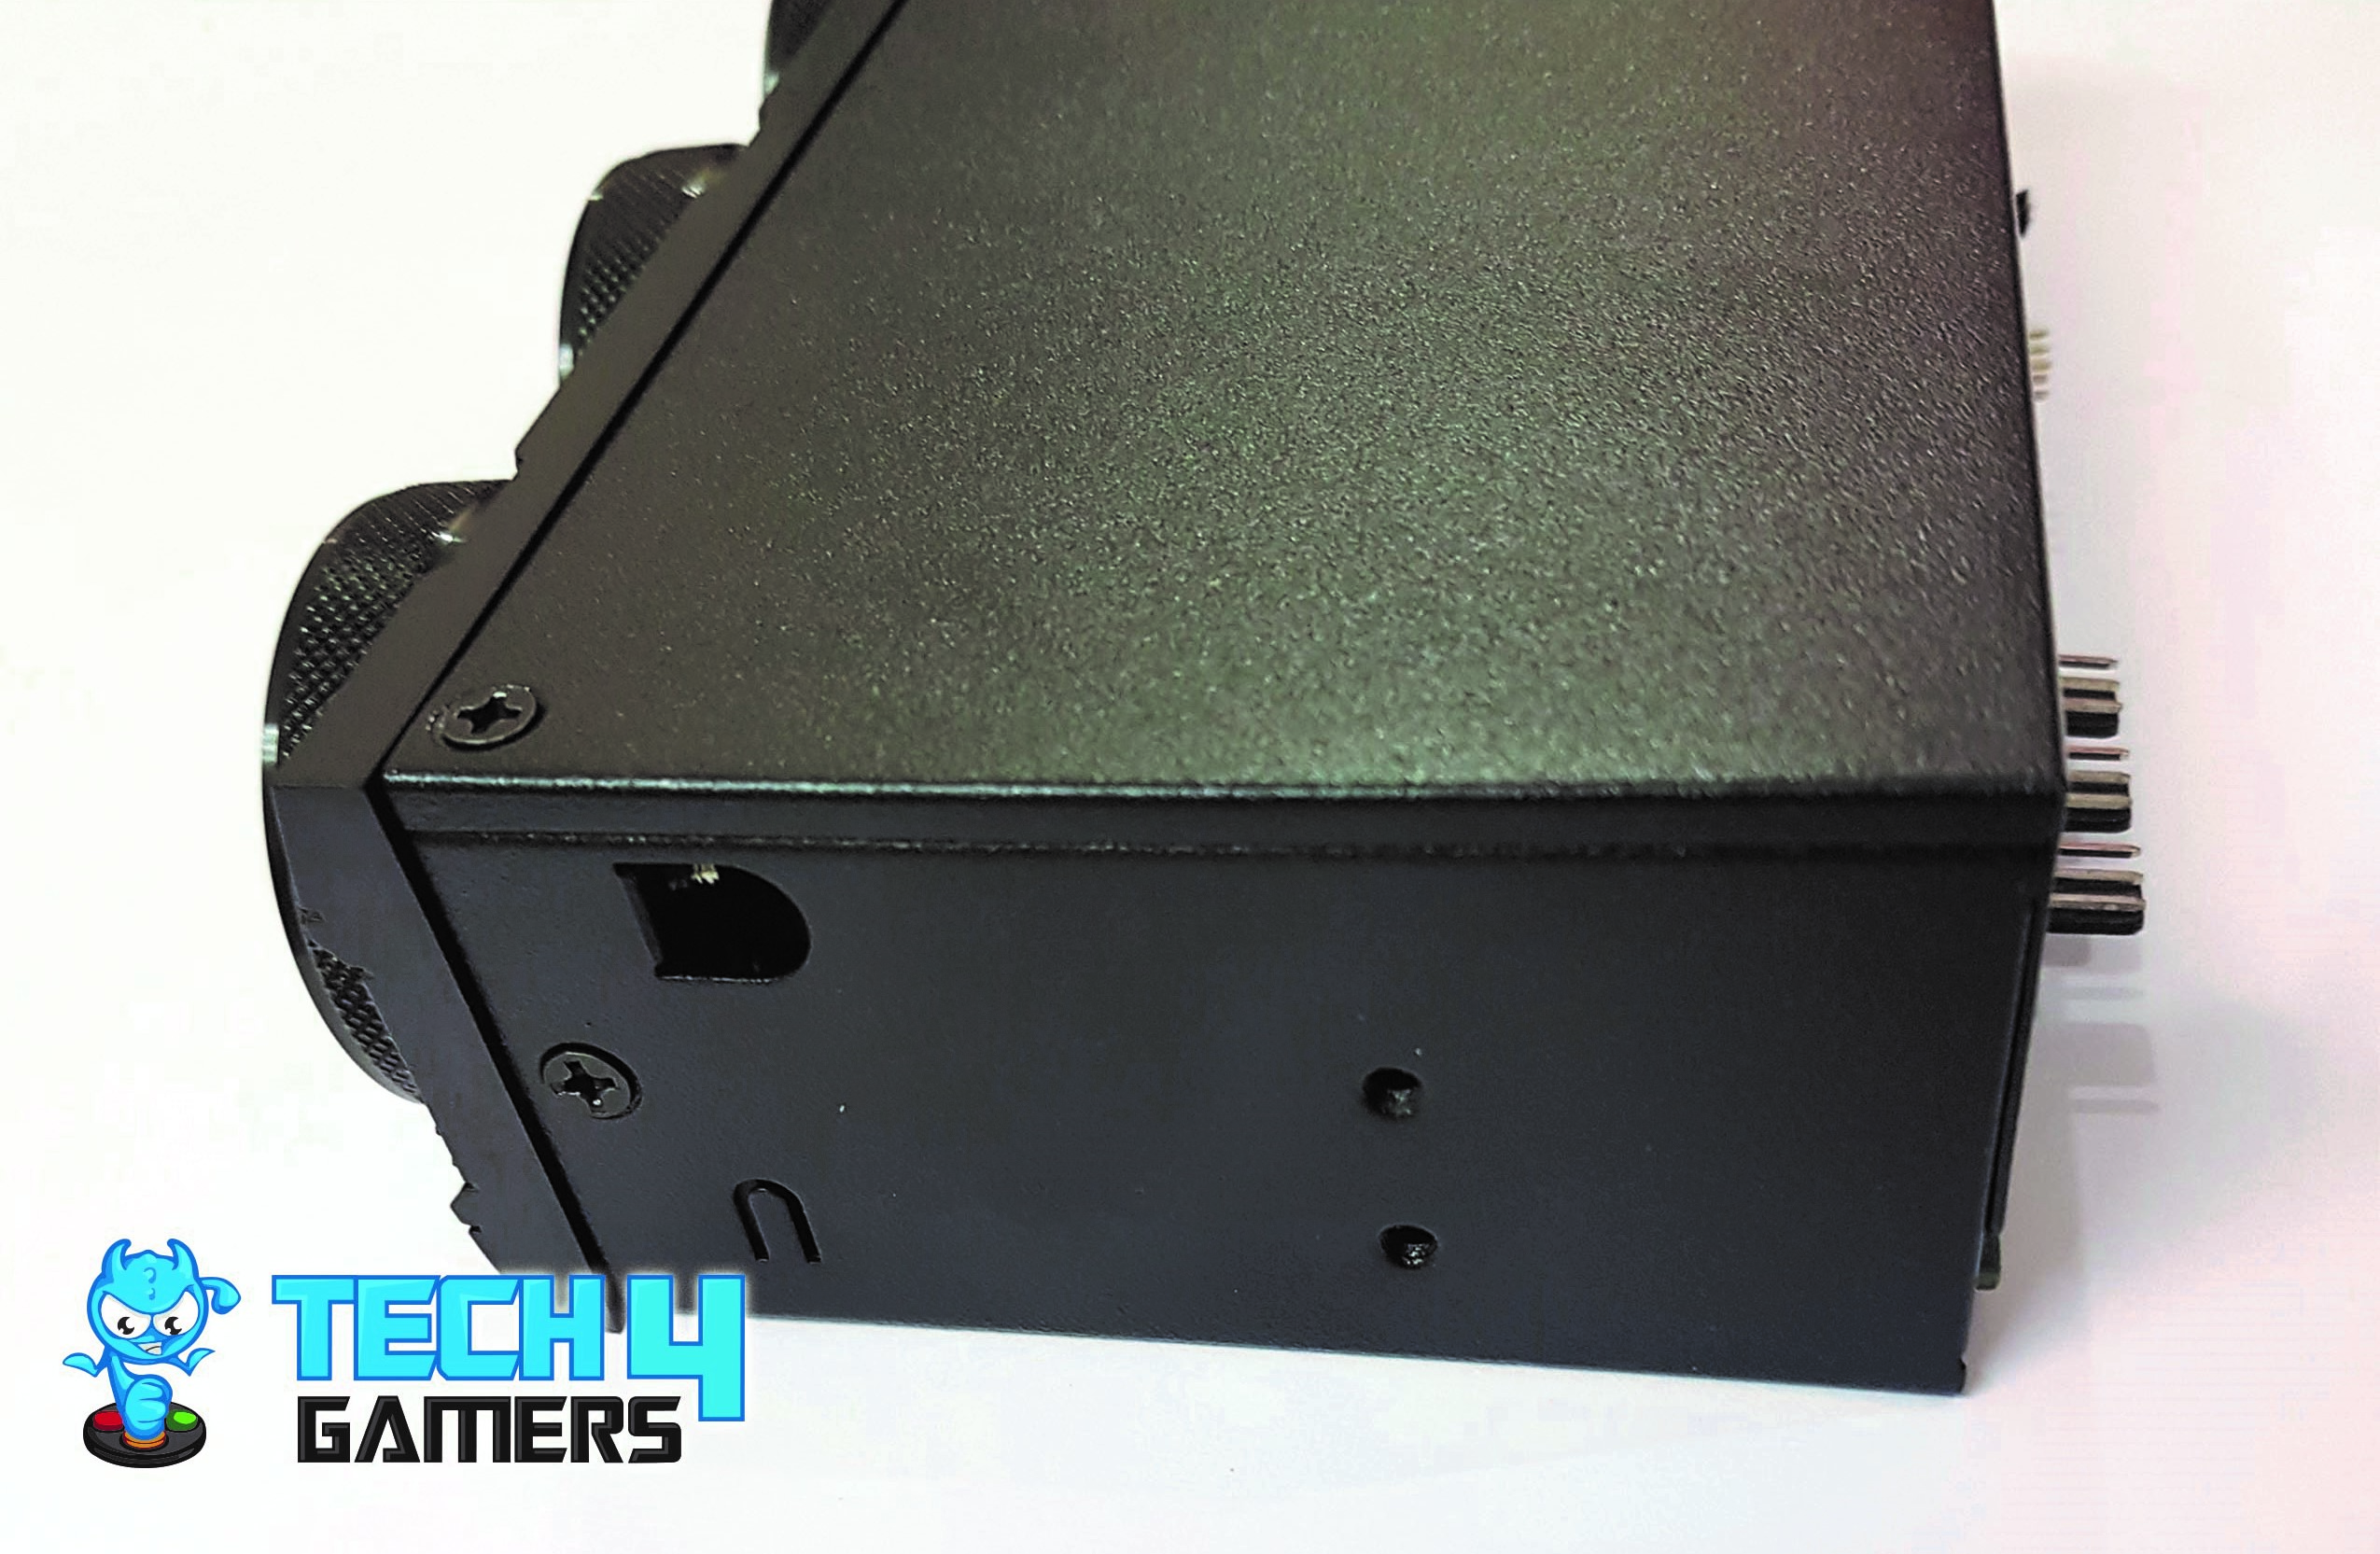
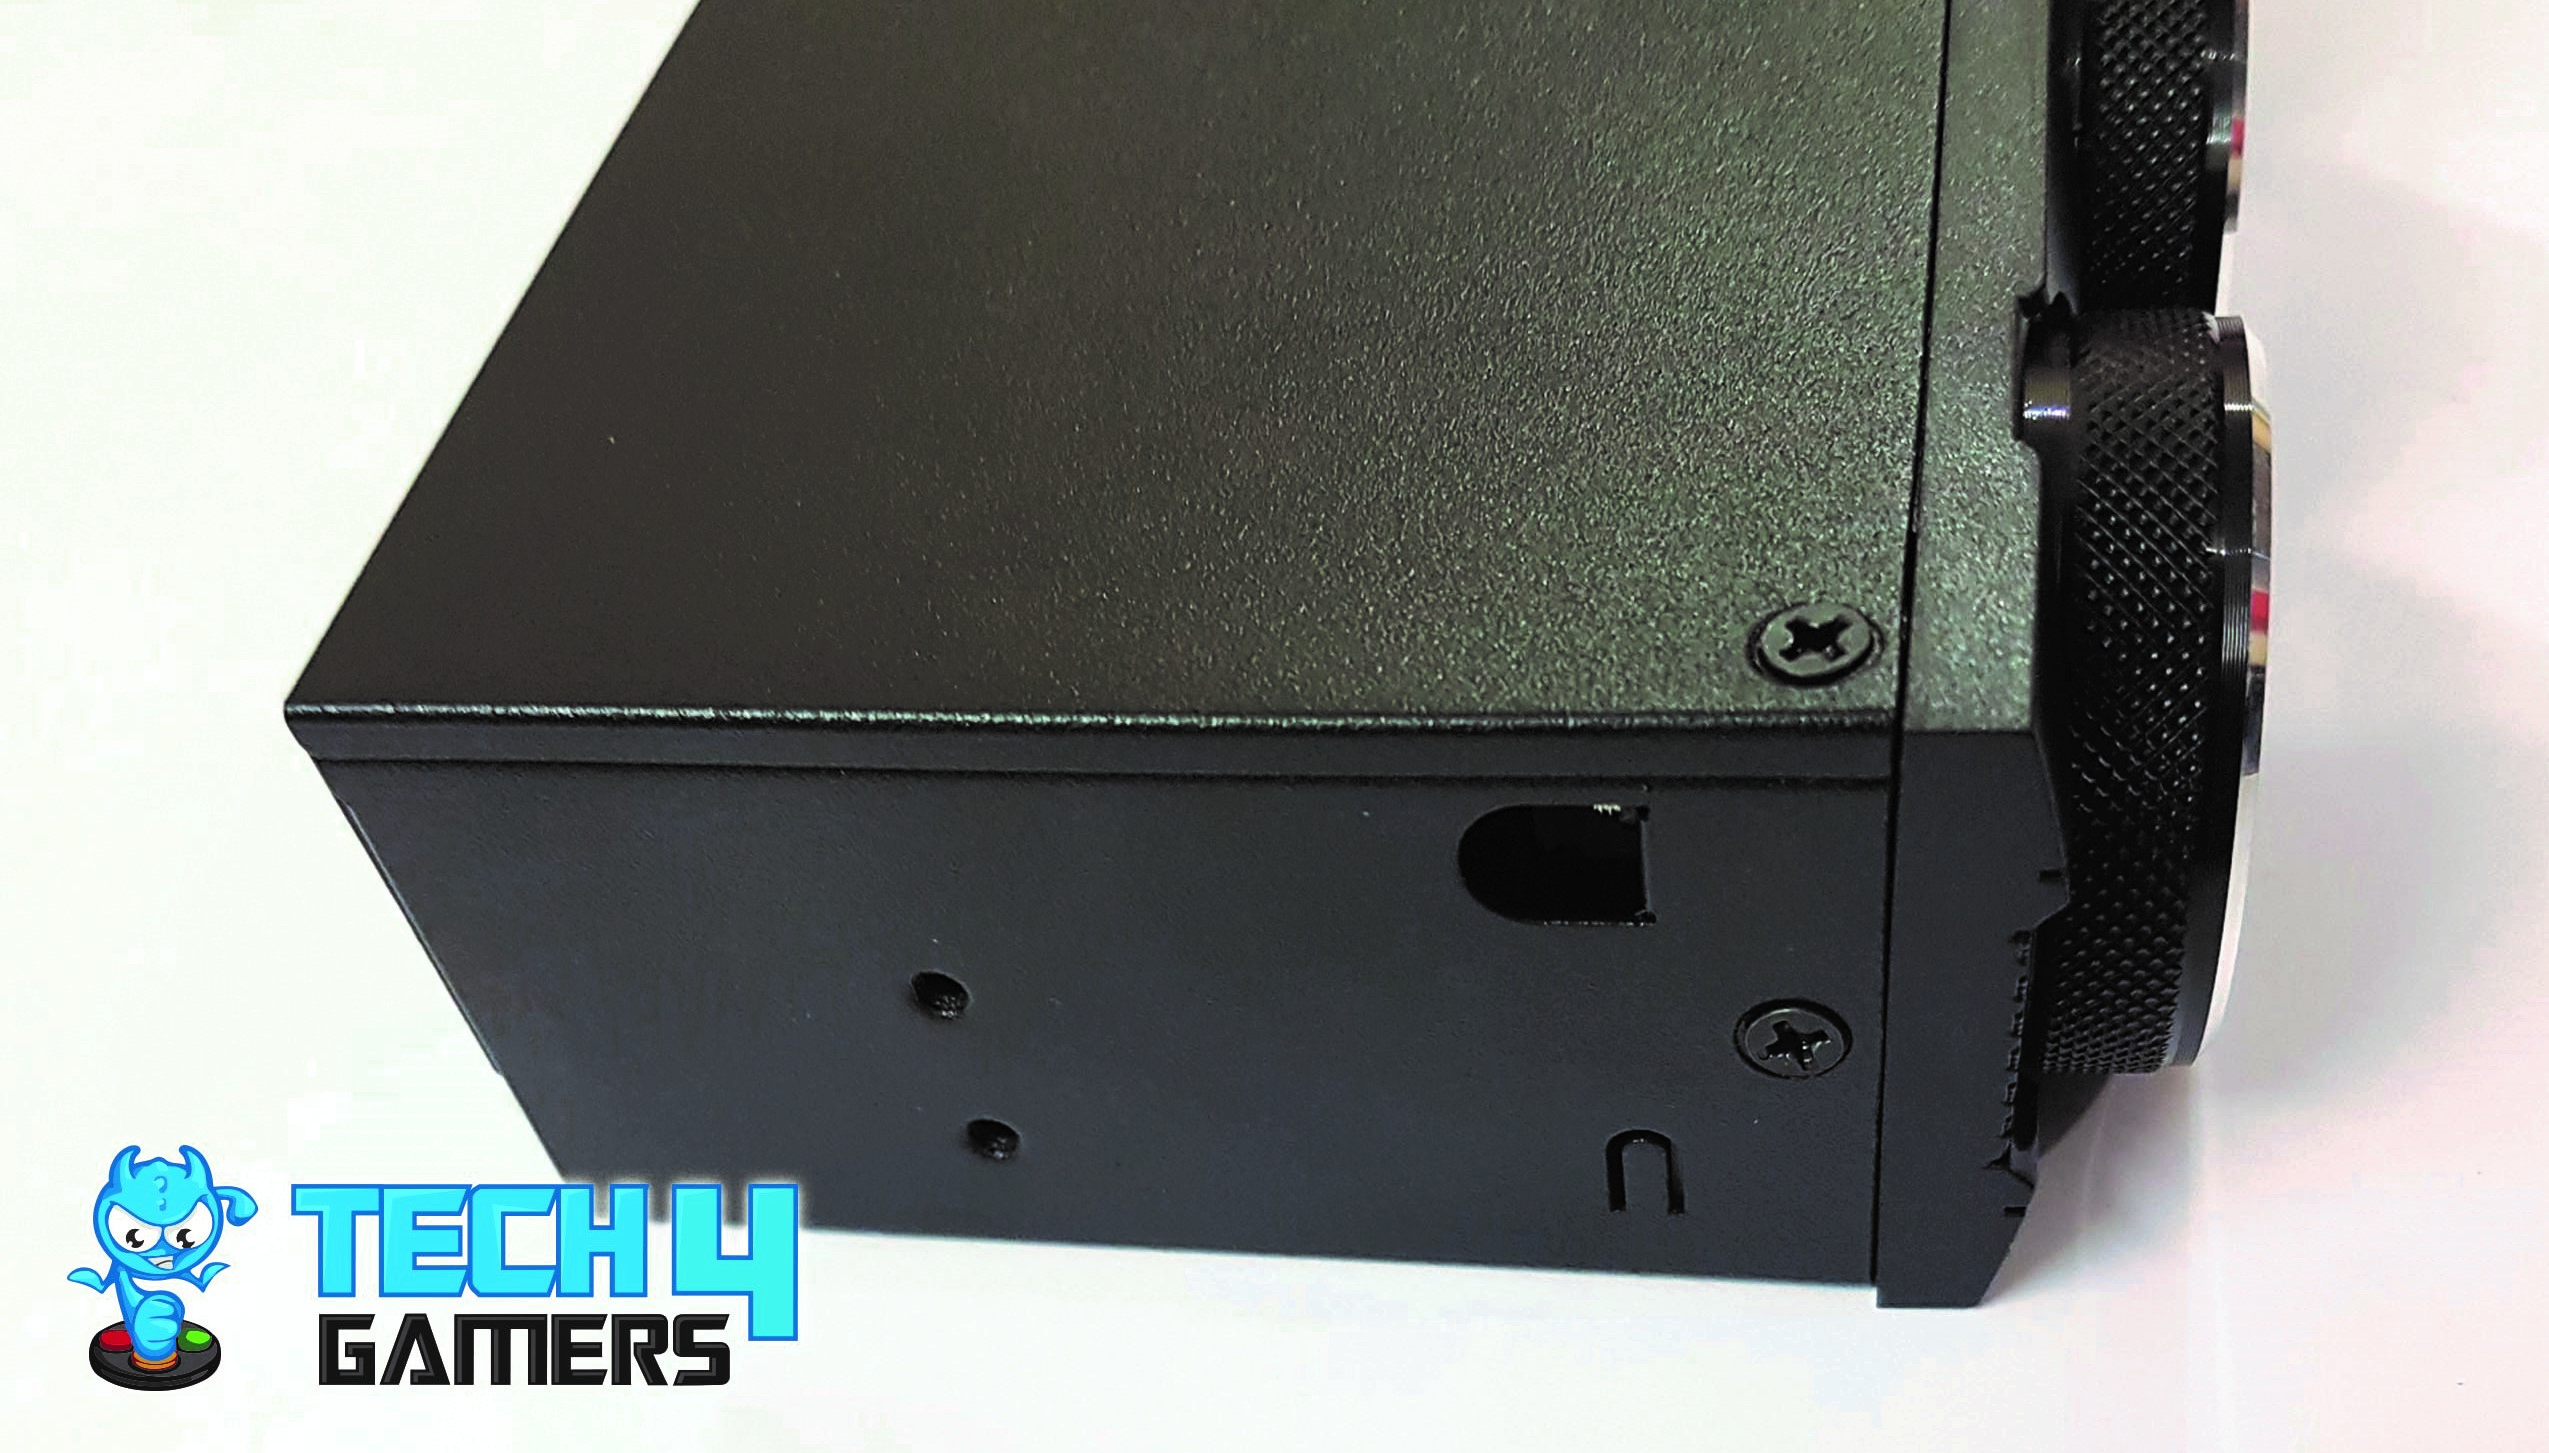
The left and the right sides of the Polariz Fan Controller unit are same. They are held using a single screw on each side. Please note that in order to access the PCB or the circuitry of the unit, there is no need to remove the left and the right side screws. There are two holes on the far right side of each side.
These are standard mounting for 5.25” quarter bay drive. Essentially, this is a 5.25” drive. Take a note that many modern chassis, these days lack front bay for 5.25” drives so do check the chassis before buying this Polariz Fan Controller unit for compatibility and installation.


The top and the bottom sides of the unit are plain and in black metallic. The bottom side does not have any screw on it. The PCB is mounted on the bottom side using 4 screws. Their ends can be seen from the bottom side of the unit.
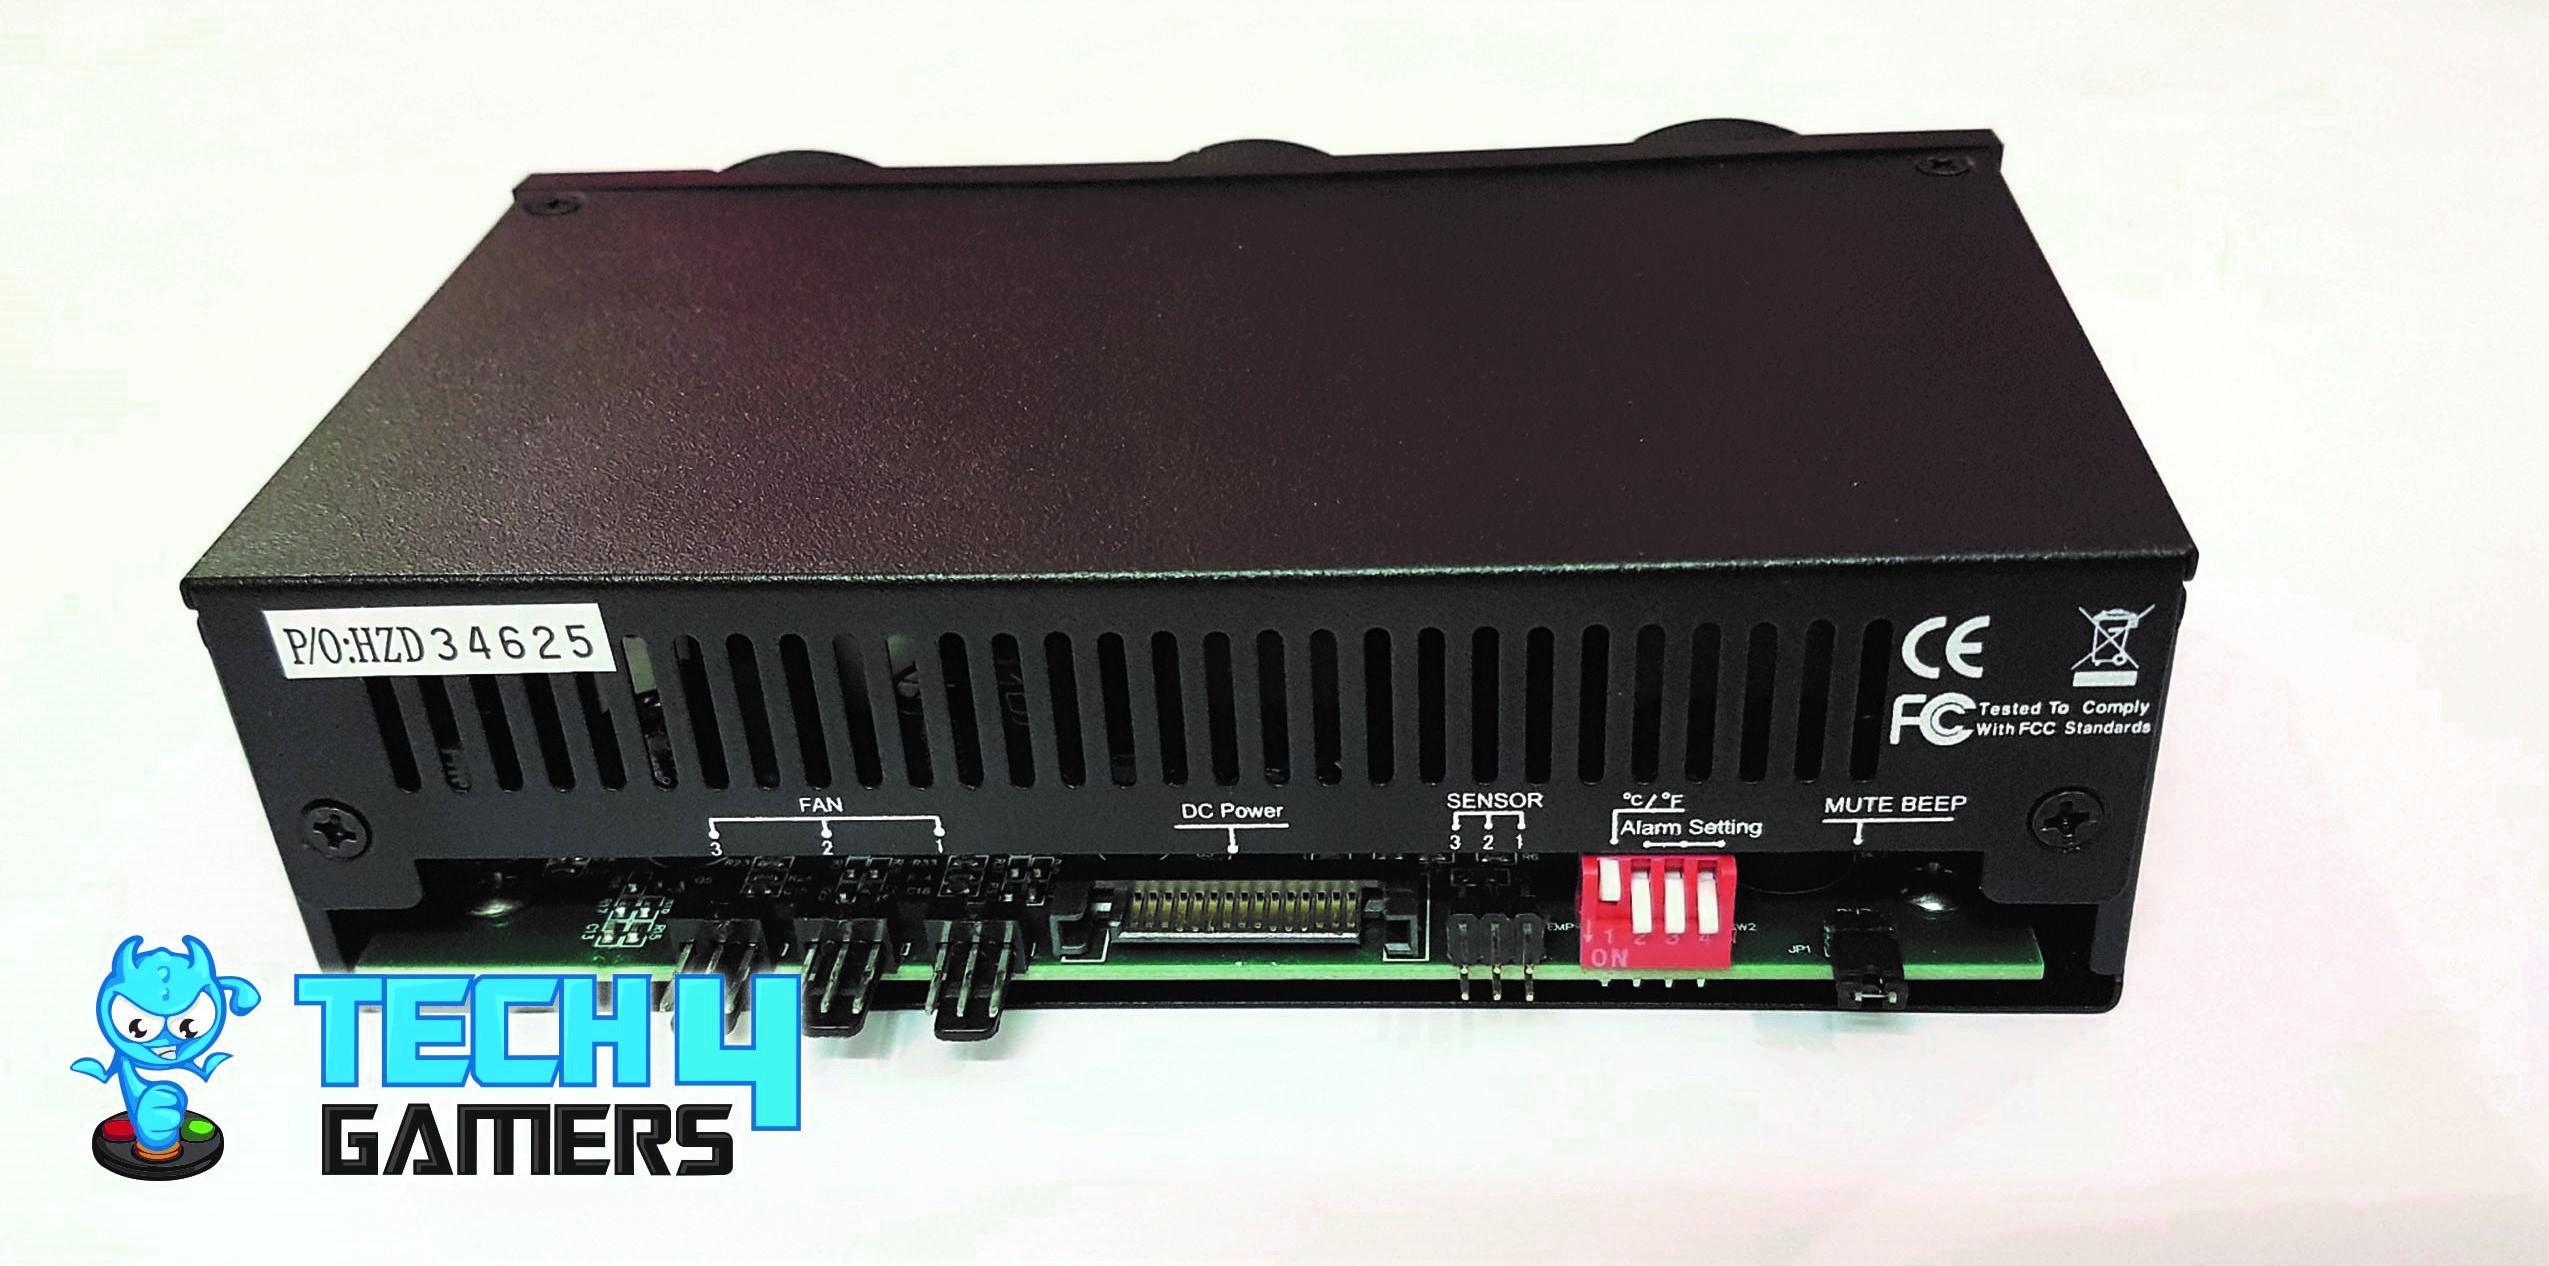
Let’s examine the connectivity on the backside of the Polariz Fan Controller unit. The top cover and back cover form a single body held by four screws—two on top and two at the back. Ventilation is facilitated through the top side of the back cover. Notably, the unit adheres to FCC Standards, evident from the printed certification on the top right.
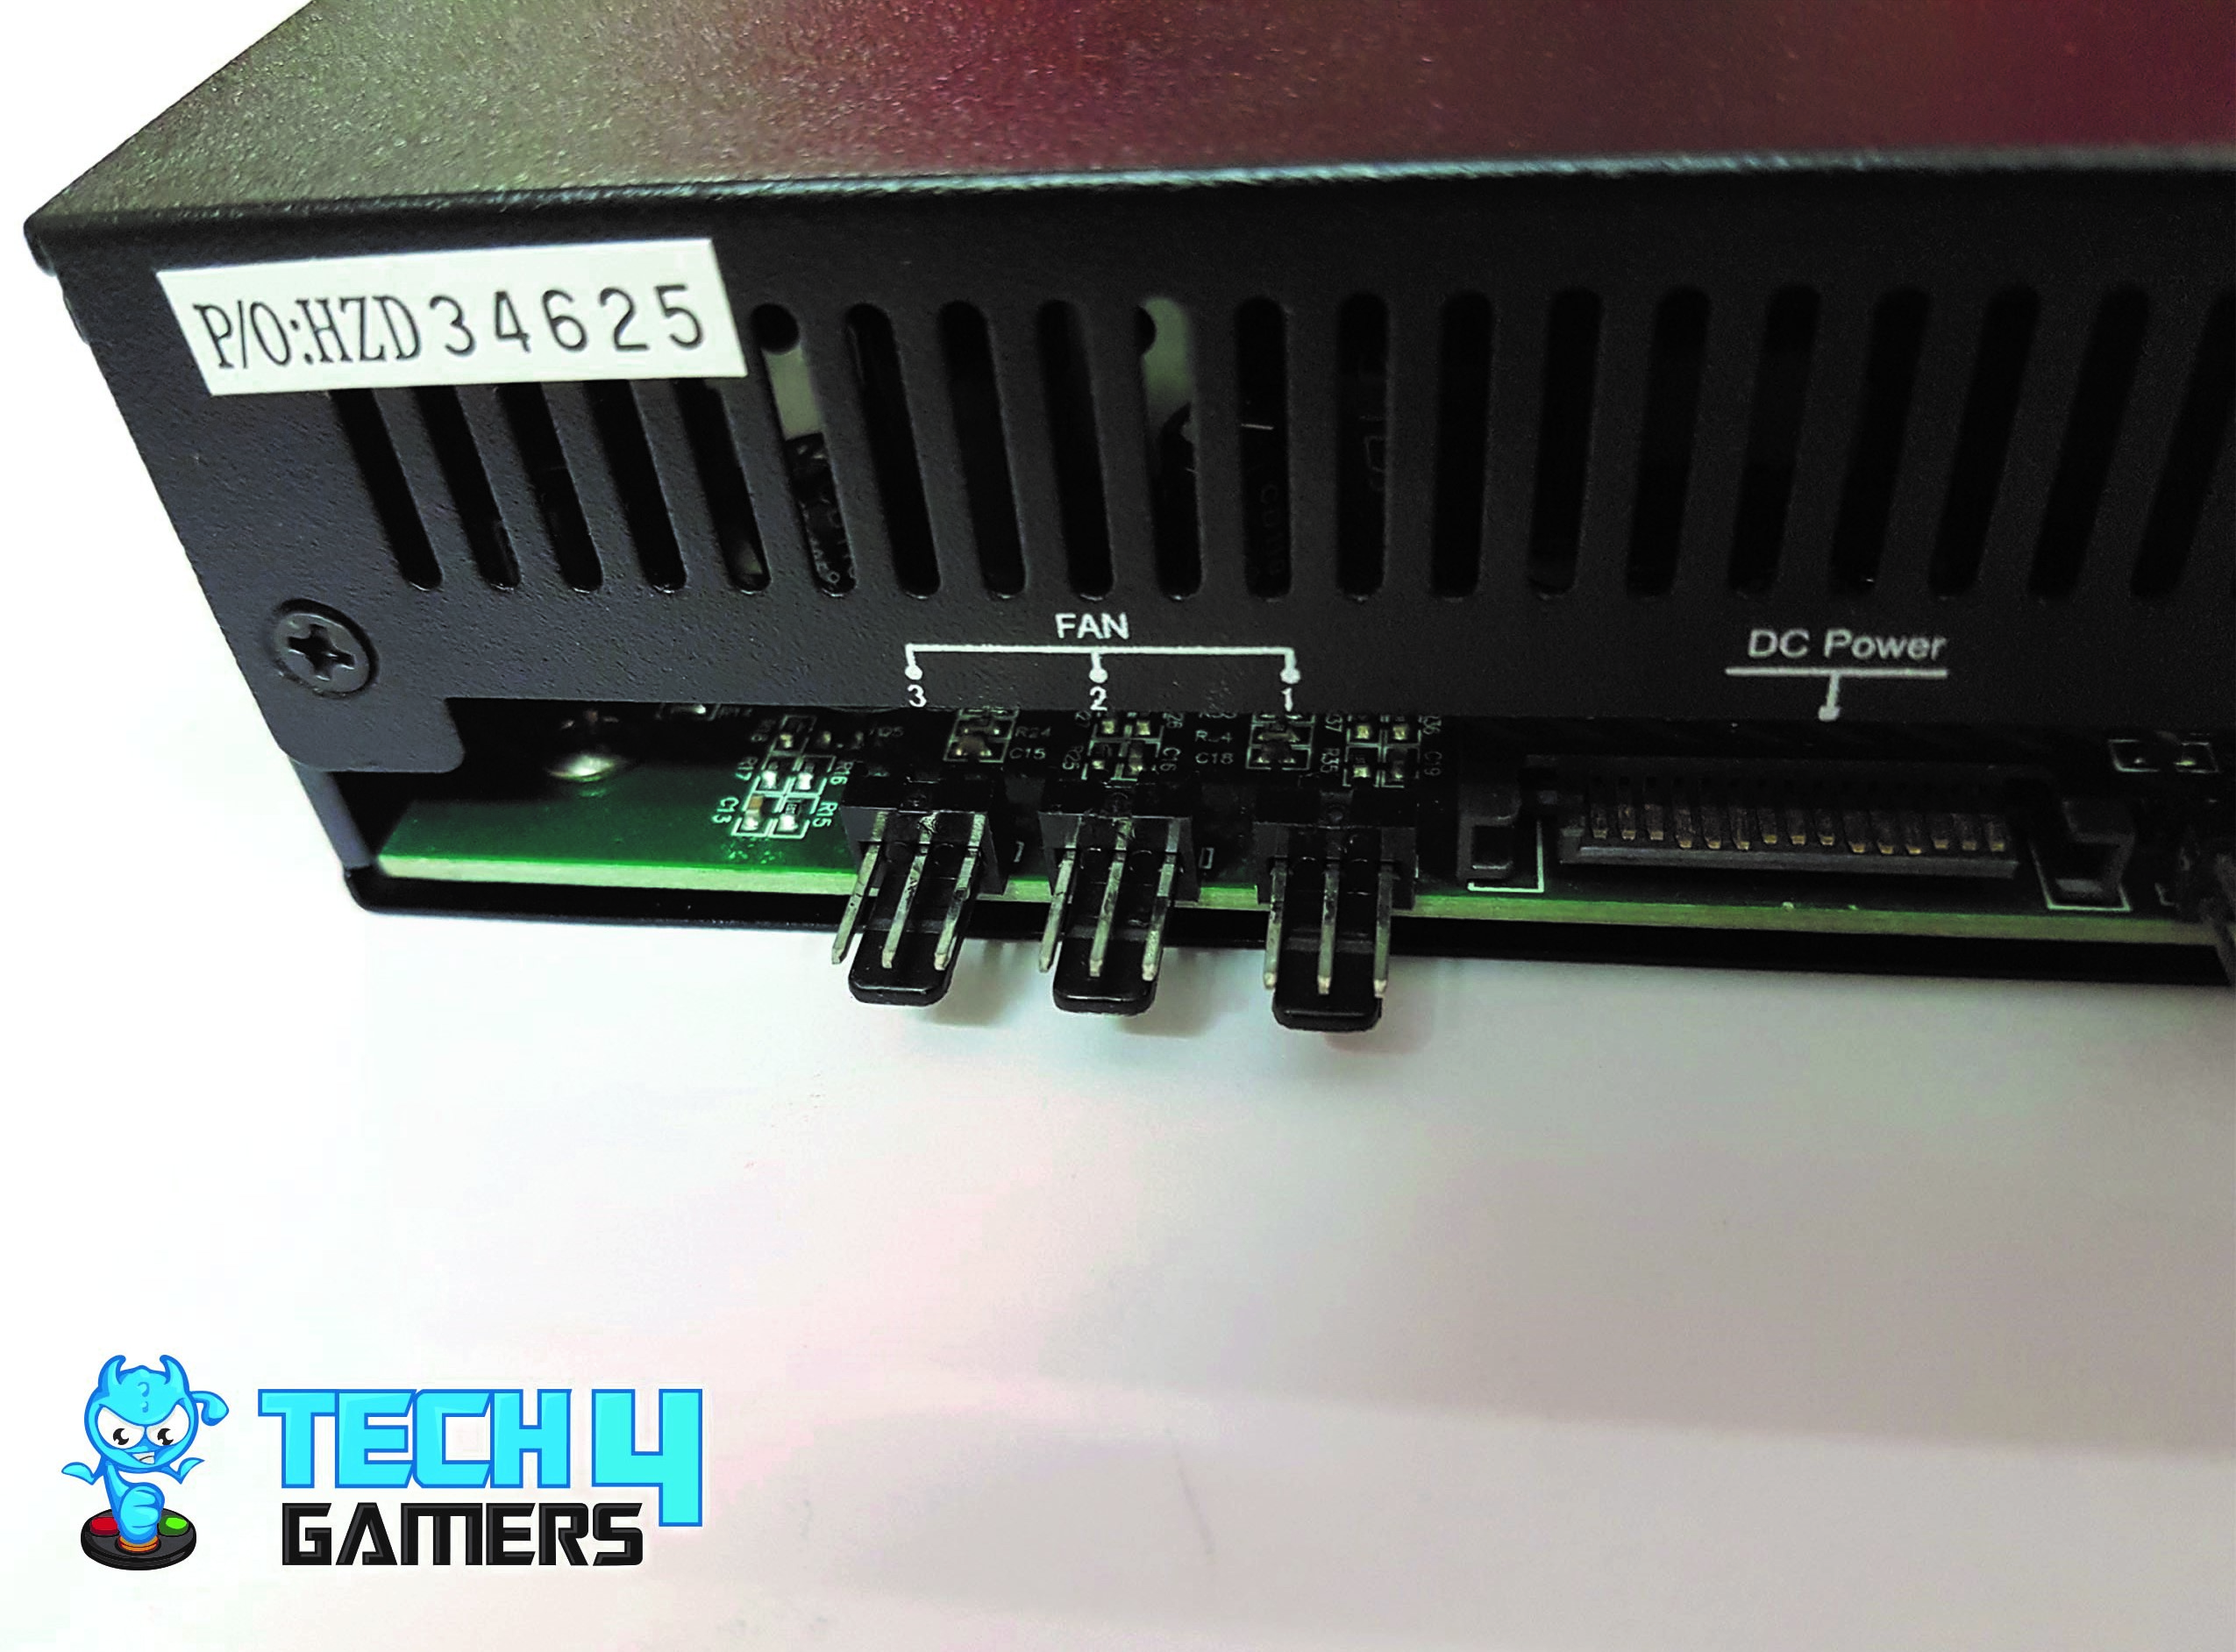
Let’s start looking up the various connectivity options that we have at the backside of the unit. Starting from the left side of the unit, there are three 3-Pin fan headers labeled 1 to 3 from right to the left side.
This Polariz Fan Controller Review can be used to monitor and regulate the 4-Pin (PWM) and the 3-Pin fans only. Any other type like 2-Pins fan will not be registered with the unit. It is mentioned in the manual that any other type of the fan will be reported as malfunction by the unit.
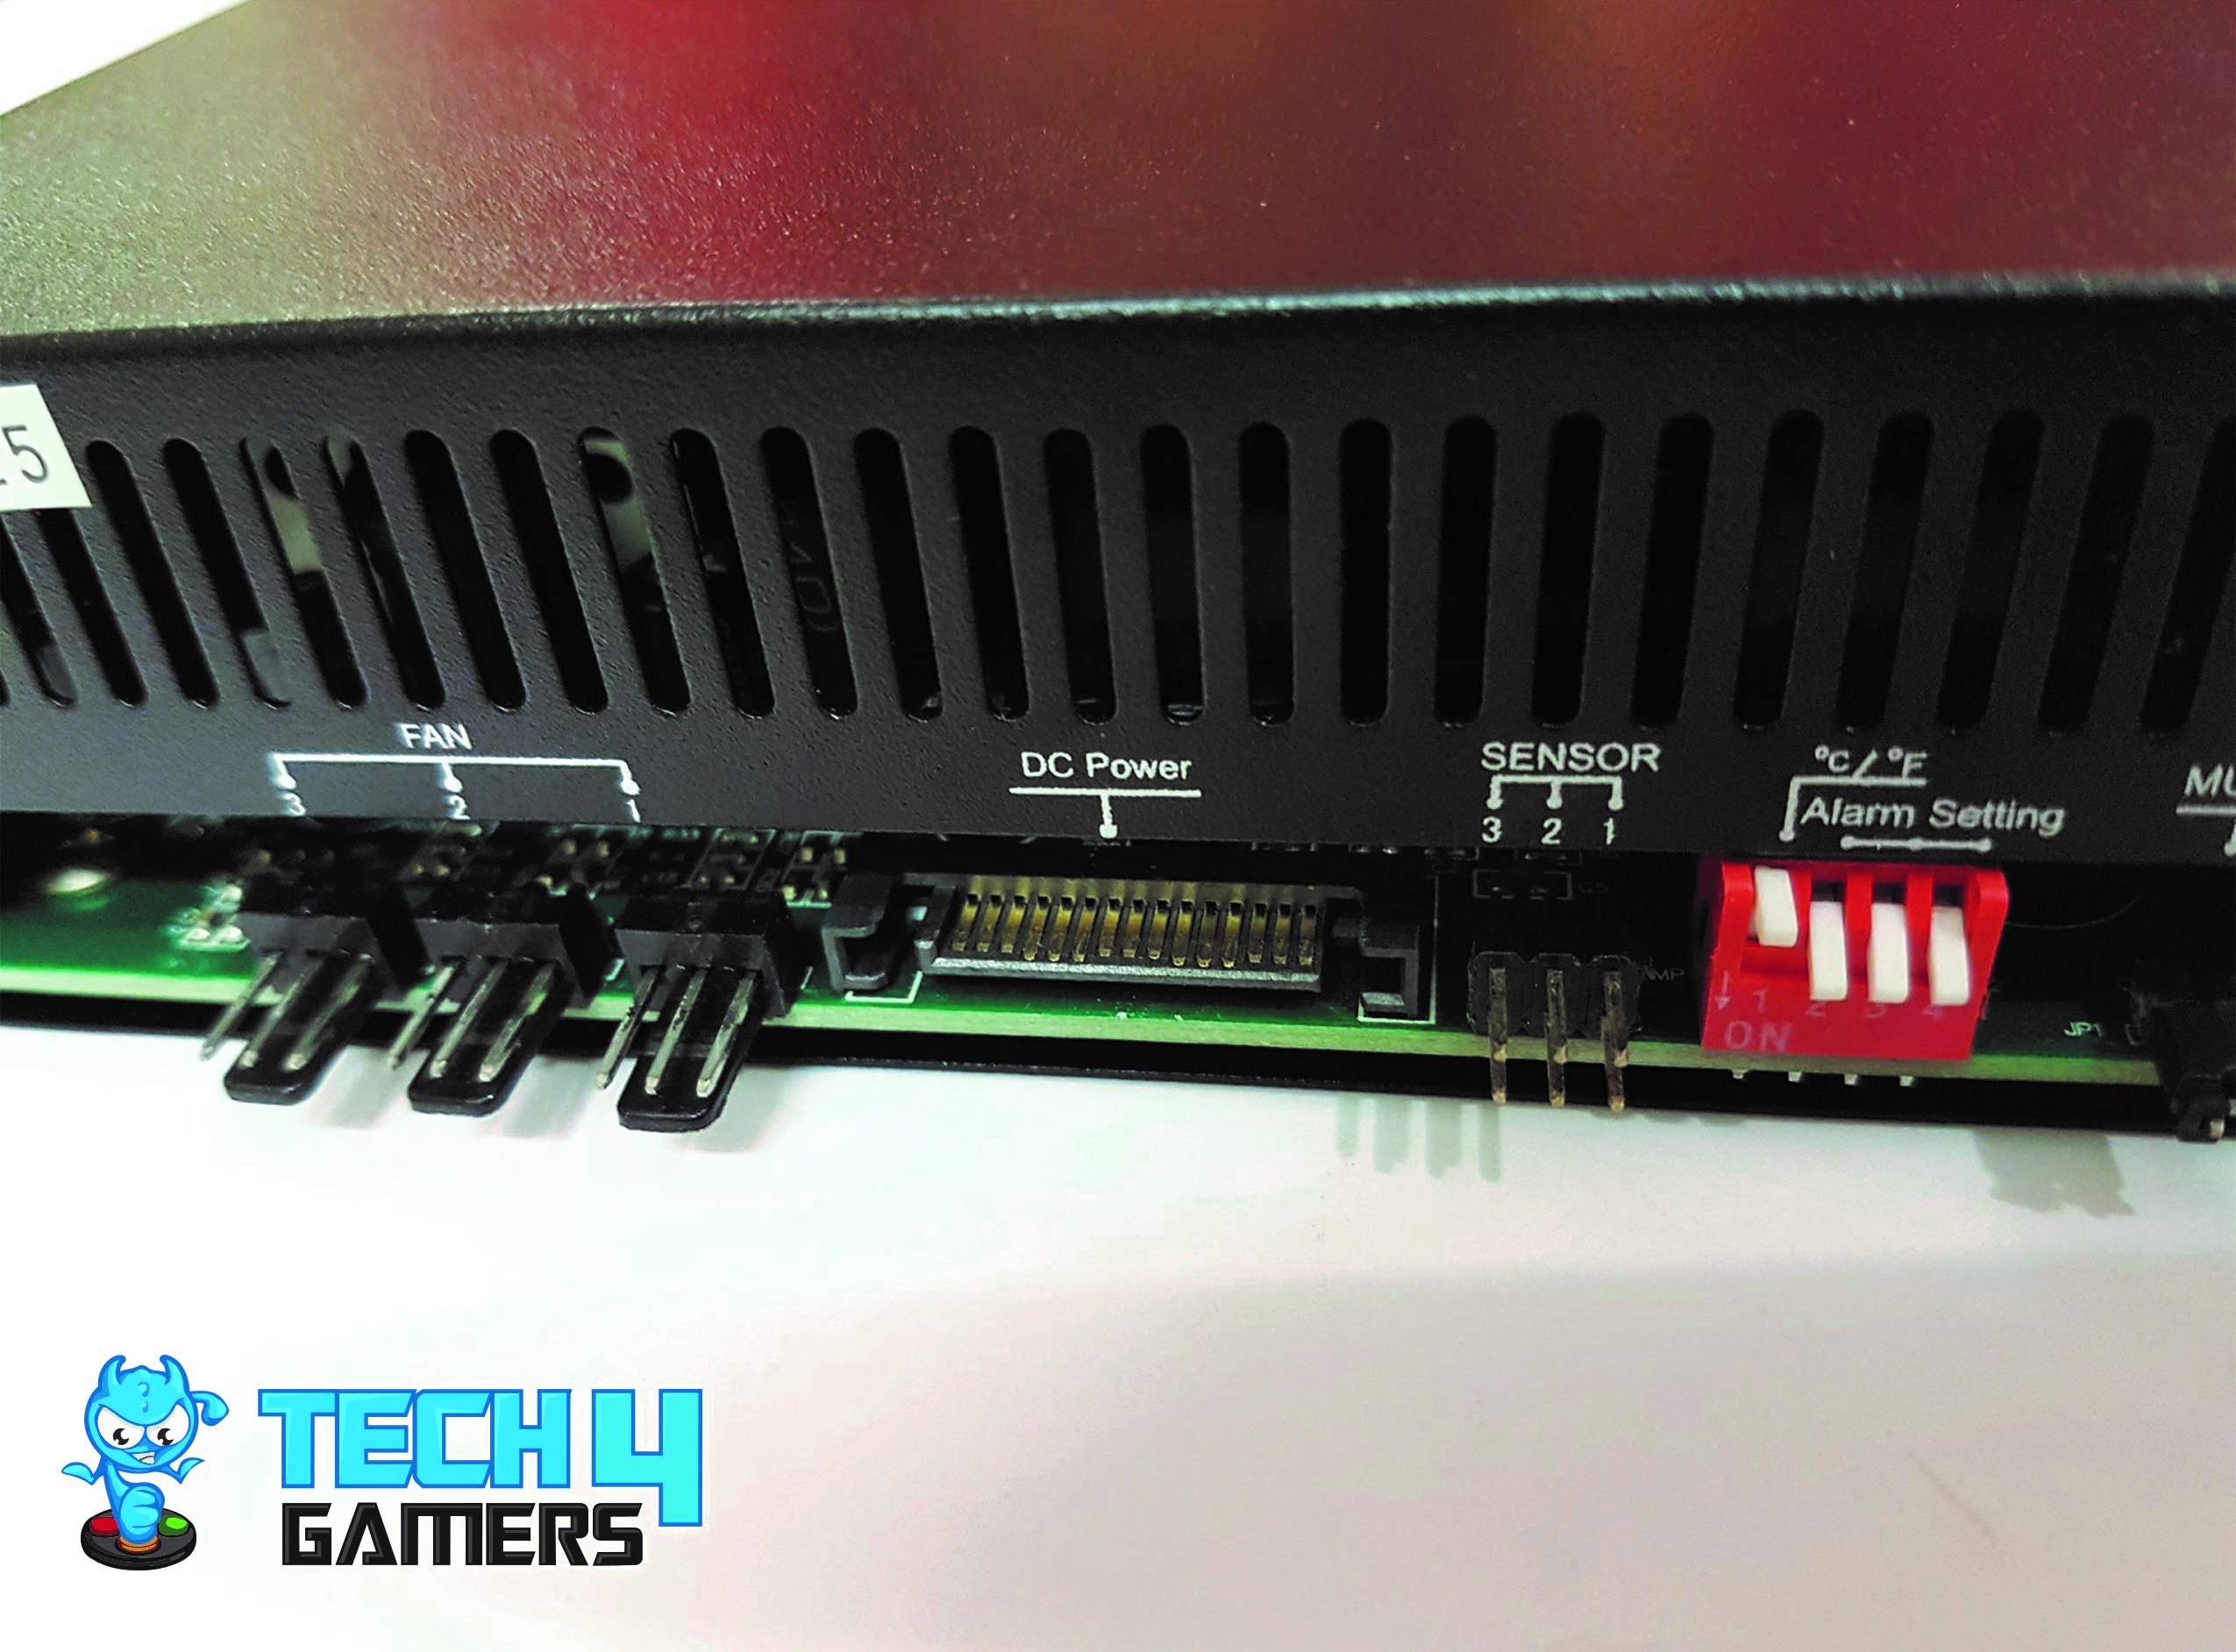
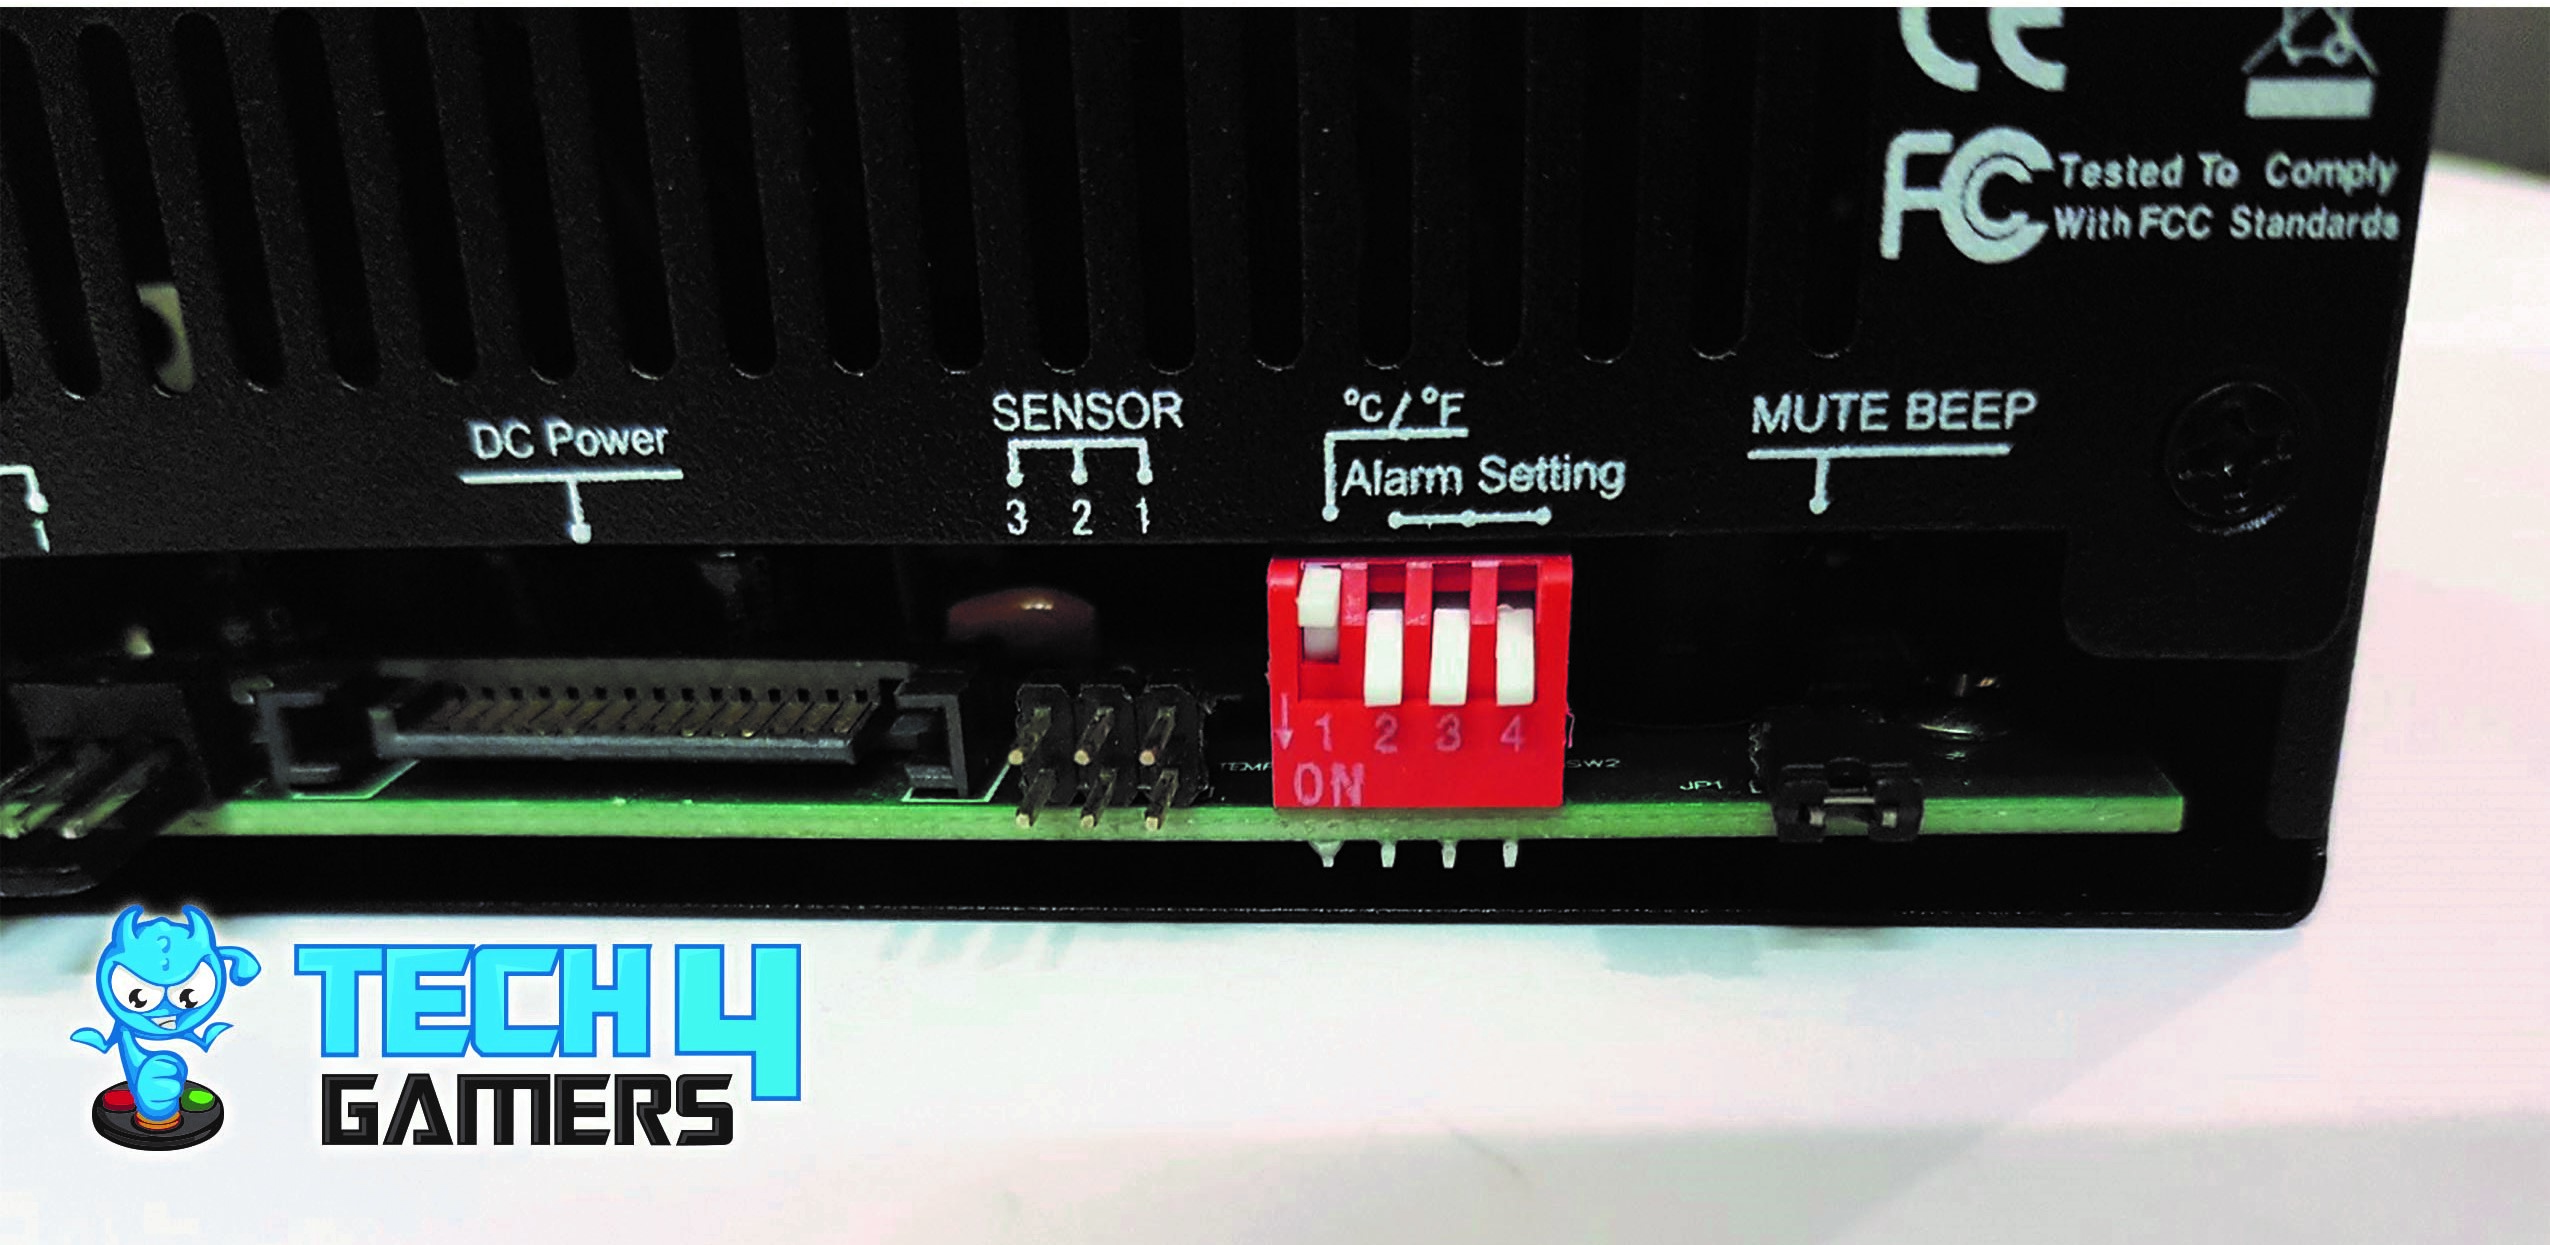
Next to the Polariz Fan Controller fan headers is the power source of the unit. This unit takes power using SATA connector which is 5V and 12V DC. This DC power is converted into DC output of 4V to 12V with upto +/-10%.
Next, we have three headers for the thermal sensor cables. They are labeled 1 to 3 from the right to the left side. The Reeven has provided the three sensor cables for this purpose. The length of each cable is approx. 718mm which is enough for most of our needs.
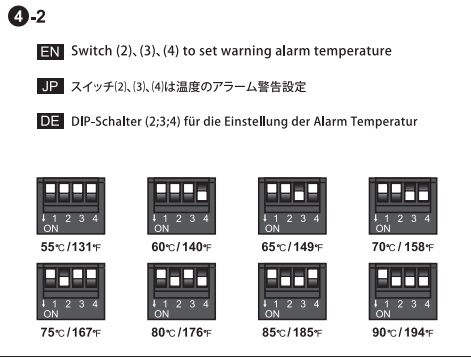
The combination of the Dip switches 2, 3, and 4 will determine the maximum temperature after which the alarm beep sounds on. The default setting has all 3 switches in downward position making the maximum temperature setting of 90C. The above picture has shown all the possible configurations along with their corresponding temperature threshold values.
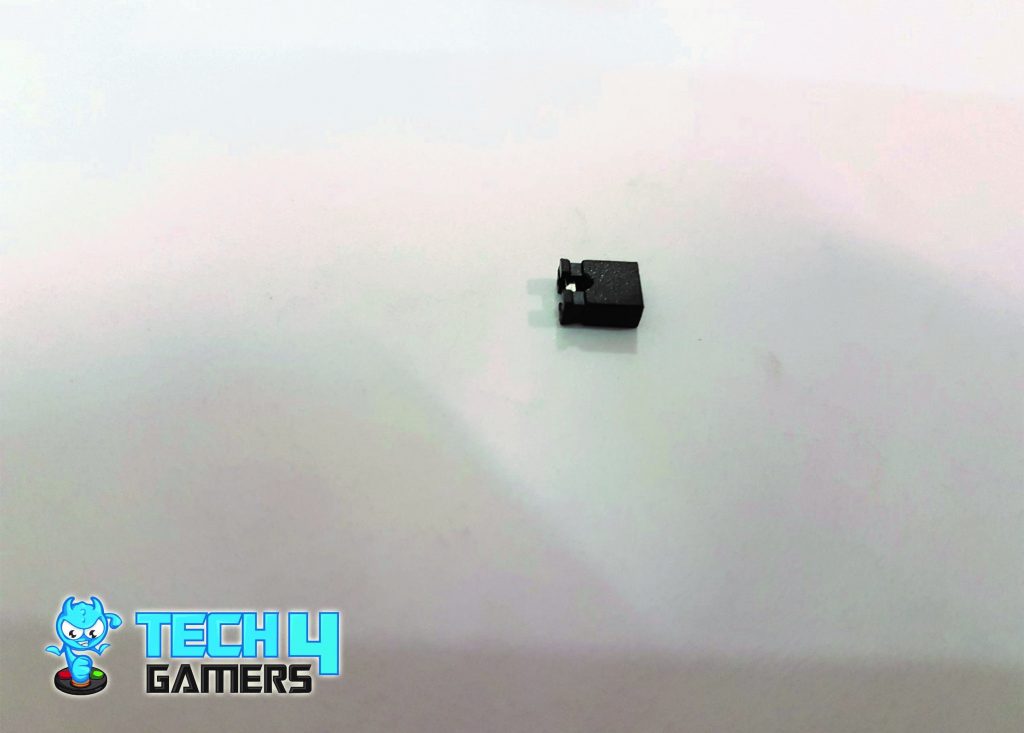
The last option on the right side of the Alarm Setting is a jumper to mute the sounding alarm. One would need to remove the jumper to mute the alarm. Keep in mind that you would need to open the chassis to access this portion in case unit starts beeping. This is not a handy implementation.
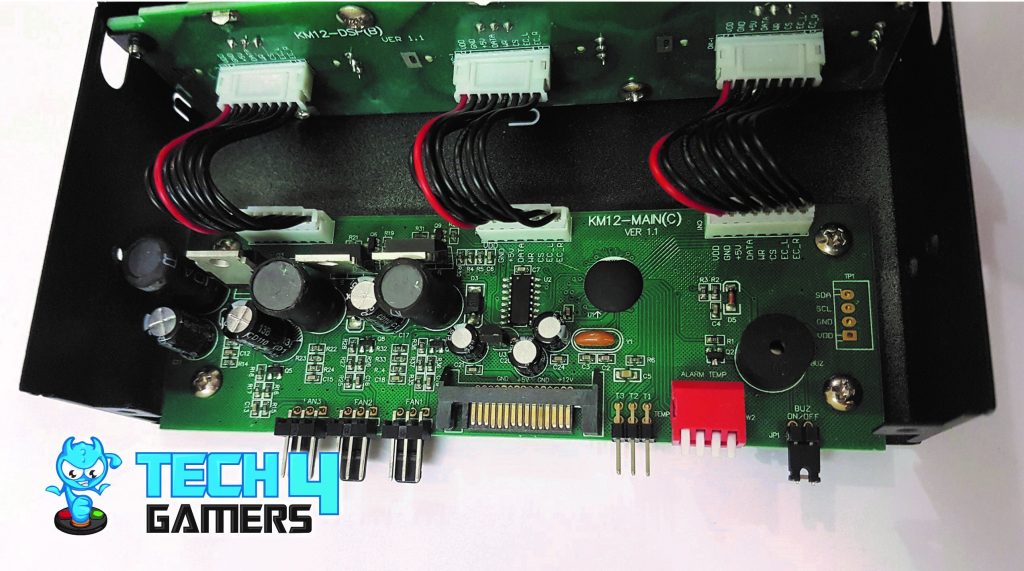
Let’s take a quick look at the Polariz Fan Controller Review circuit of the unit. In order to access the circuit board, you would need to remove the two screws on the top cover of the unit and the two screws on the backside of the unit. The Polariz Fan Controller Review circuit is well and clean laid out. We can see choke and capacitors per channel.
Testing
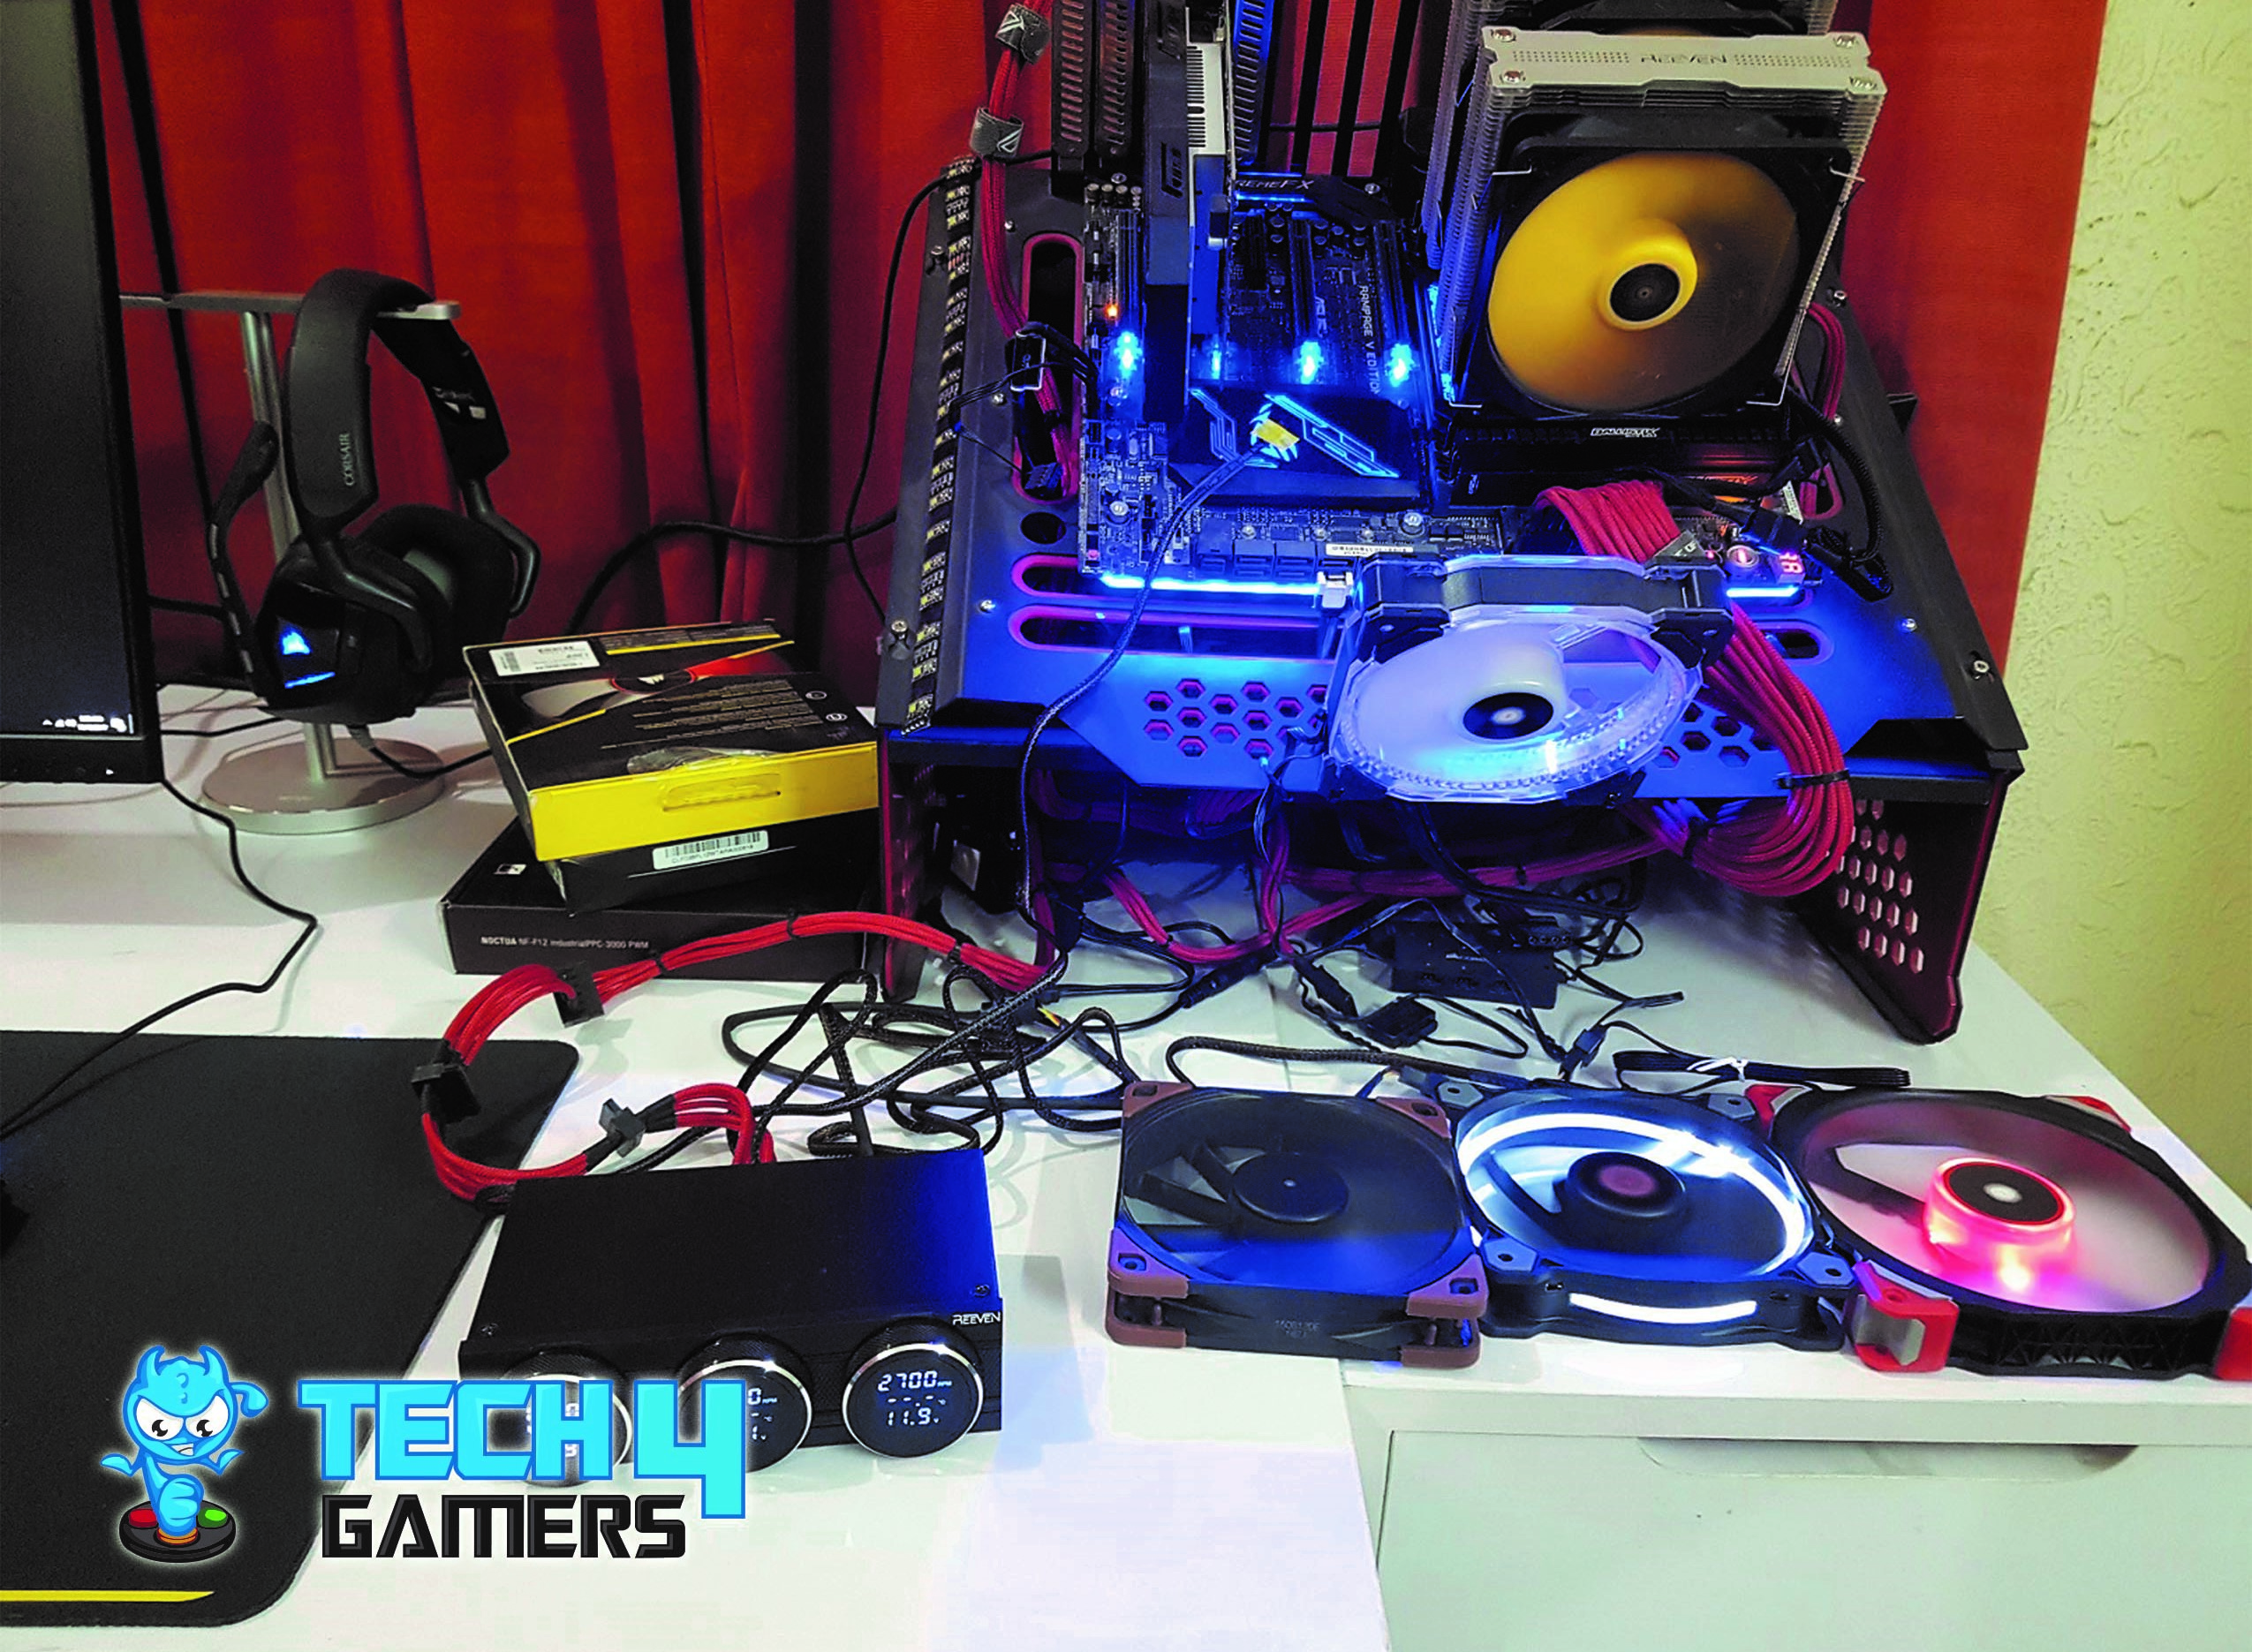
Now that we have looked at the design of the Polariz Fan Controller Review unit, let’s put it to some testing.
Following fans were used to test the unit:
- Corsair ML Pro 140 Red
- Noctua NF-F12 iPPC-300 PWM
- Thermaltake Riing White 120
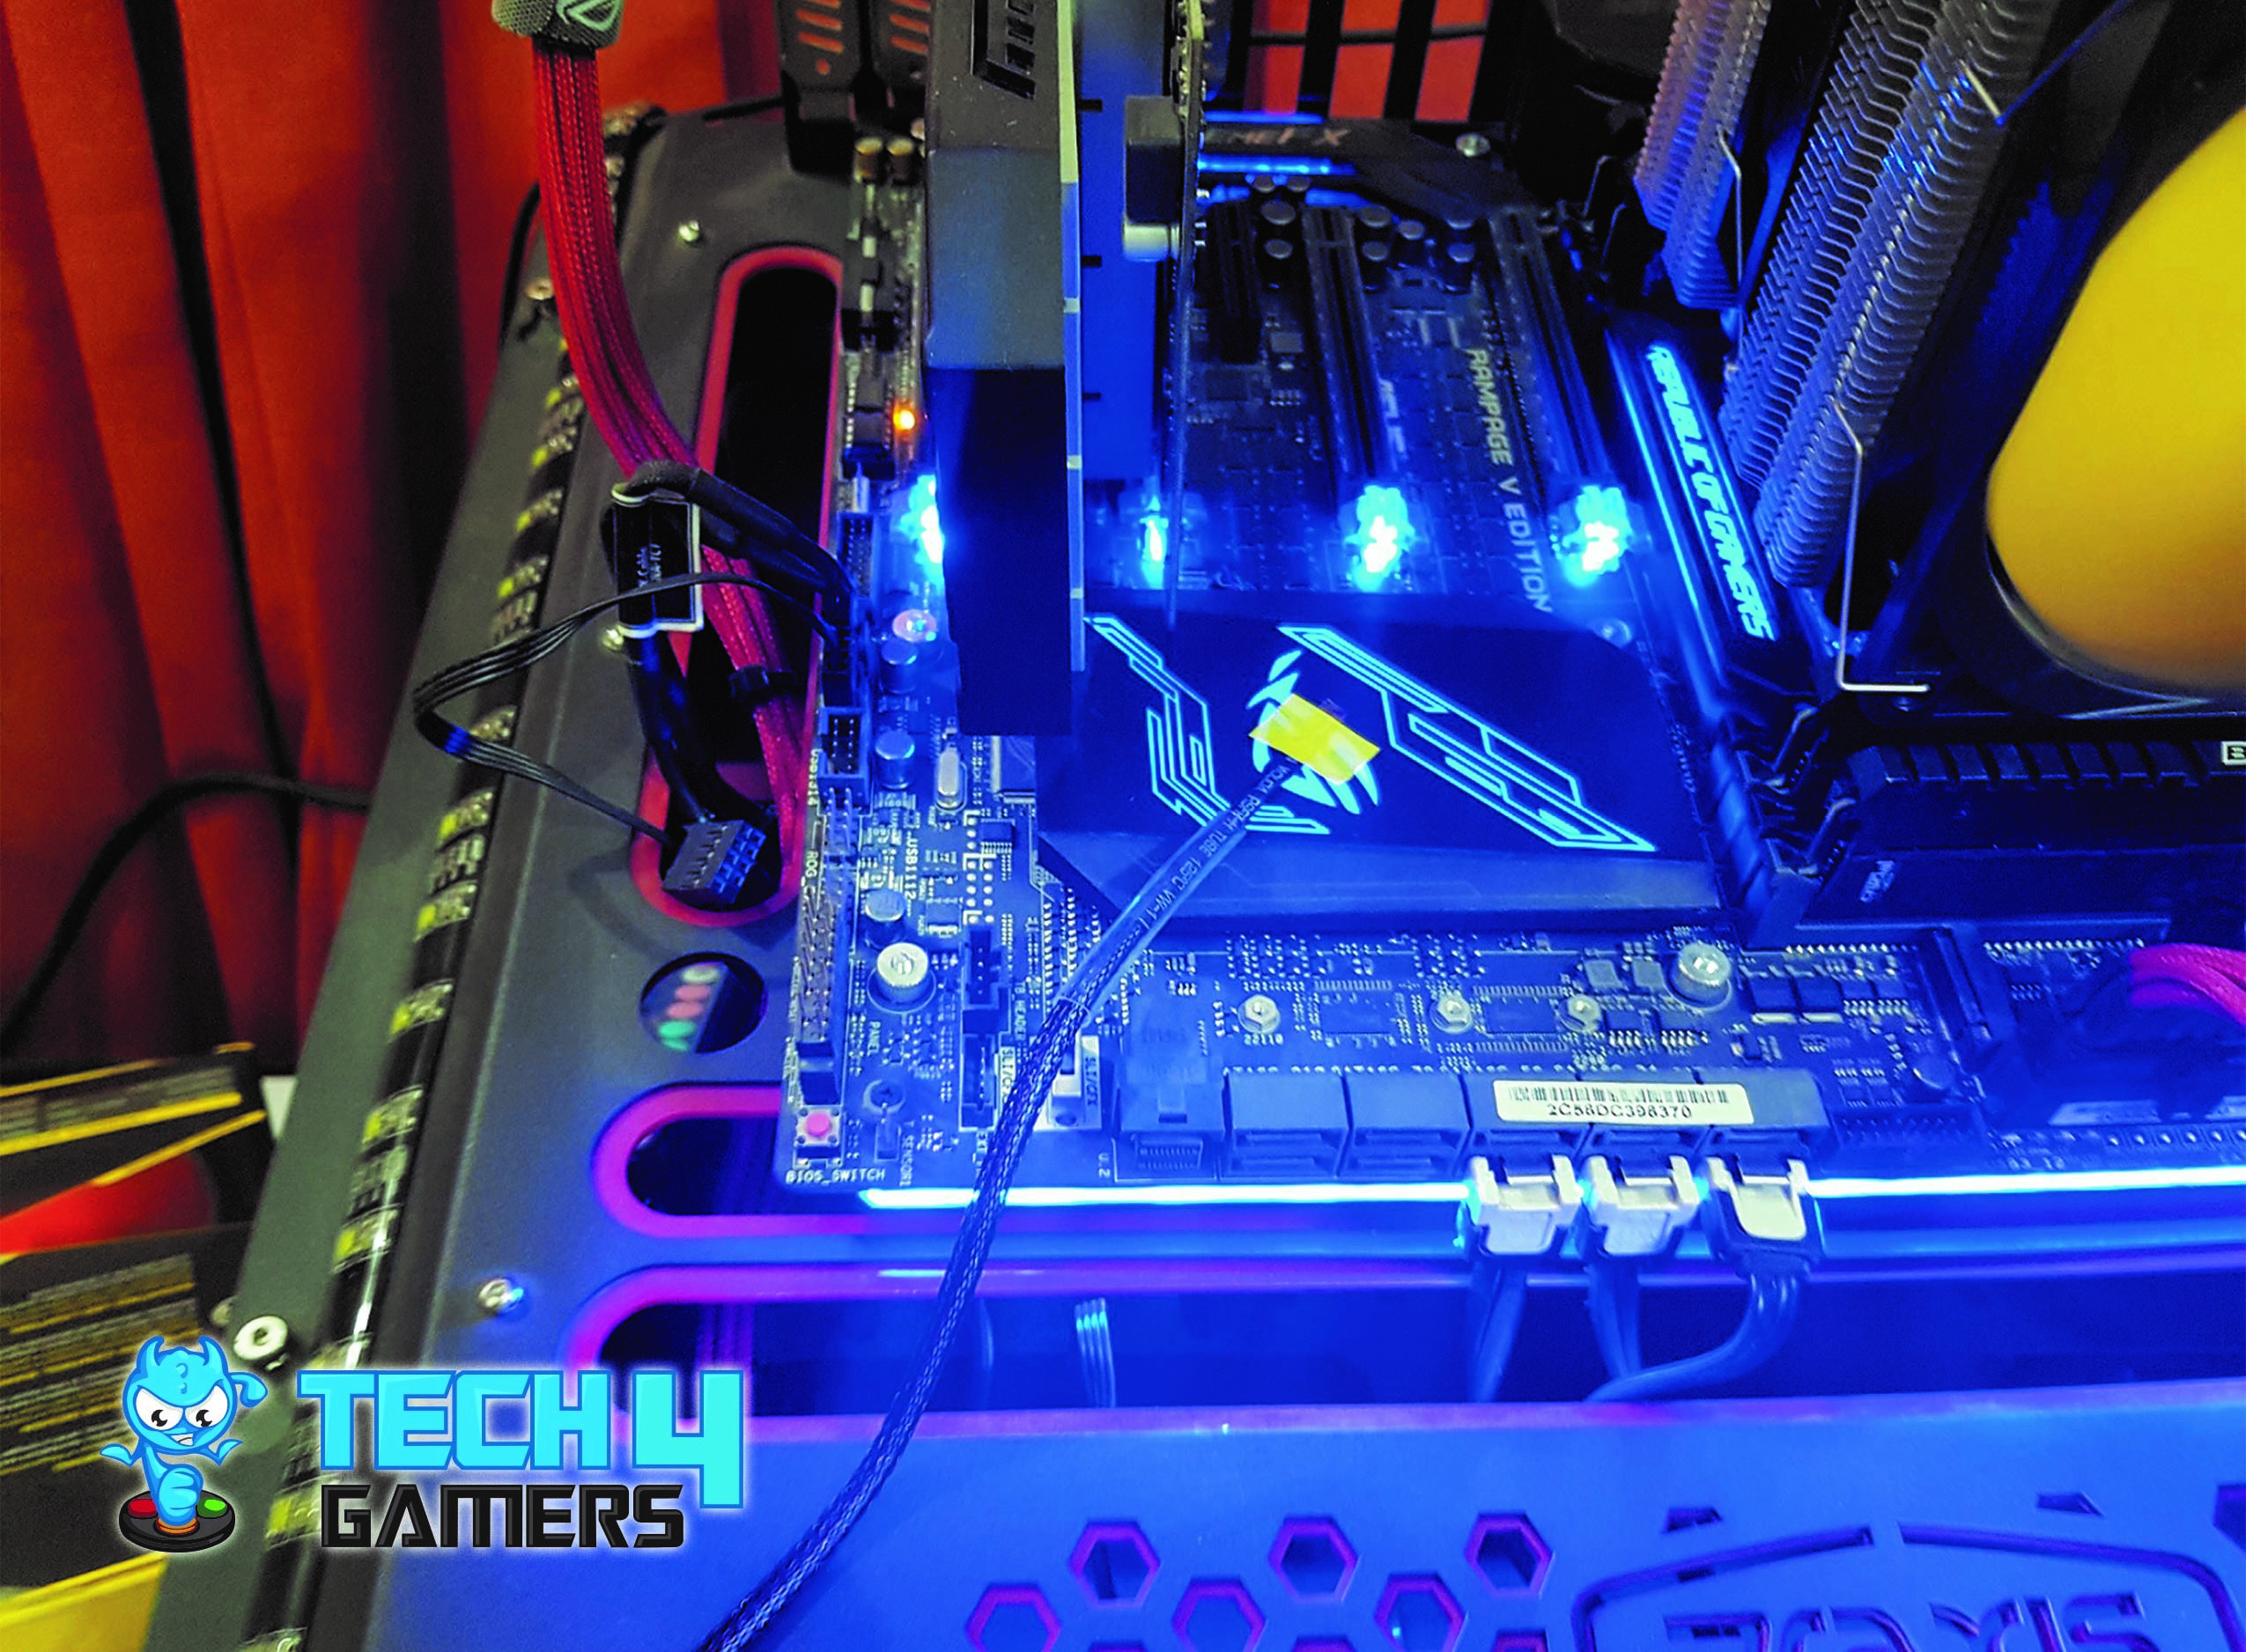
The Corsair AX1200i was used to power the unit. I only used one thermal sensor cable which was attached on the top of the chipset area on the Asus ROG (Republic of Gamers) Rampage V Edition 10 motherboard.
As this Polariz Fan Controller Review unit takes power using SATA (5V and 12V DC) it is important to connect all the fans and the thermal sensor cables before connecting the SATA cable otherwise unit will not detect any of the attached components. Just to demonstrate this, have a look at these two pictures.
I connected the SATA power cable without connecting any fan or thermal sensor cable. The unit turned on with — line for the RPM, C for the temperature and the 0.0 V for the voltage being shown on the LCD. No value or reading was shown as nothing was connected with the unit.
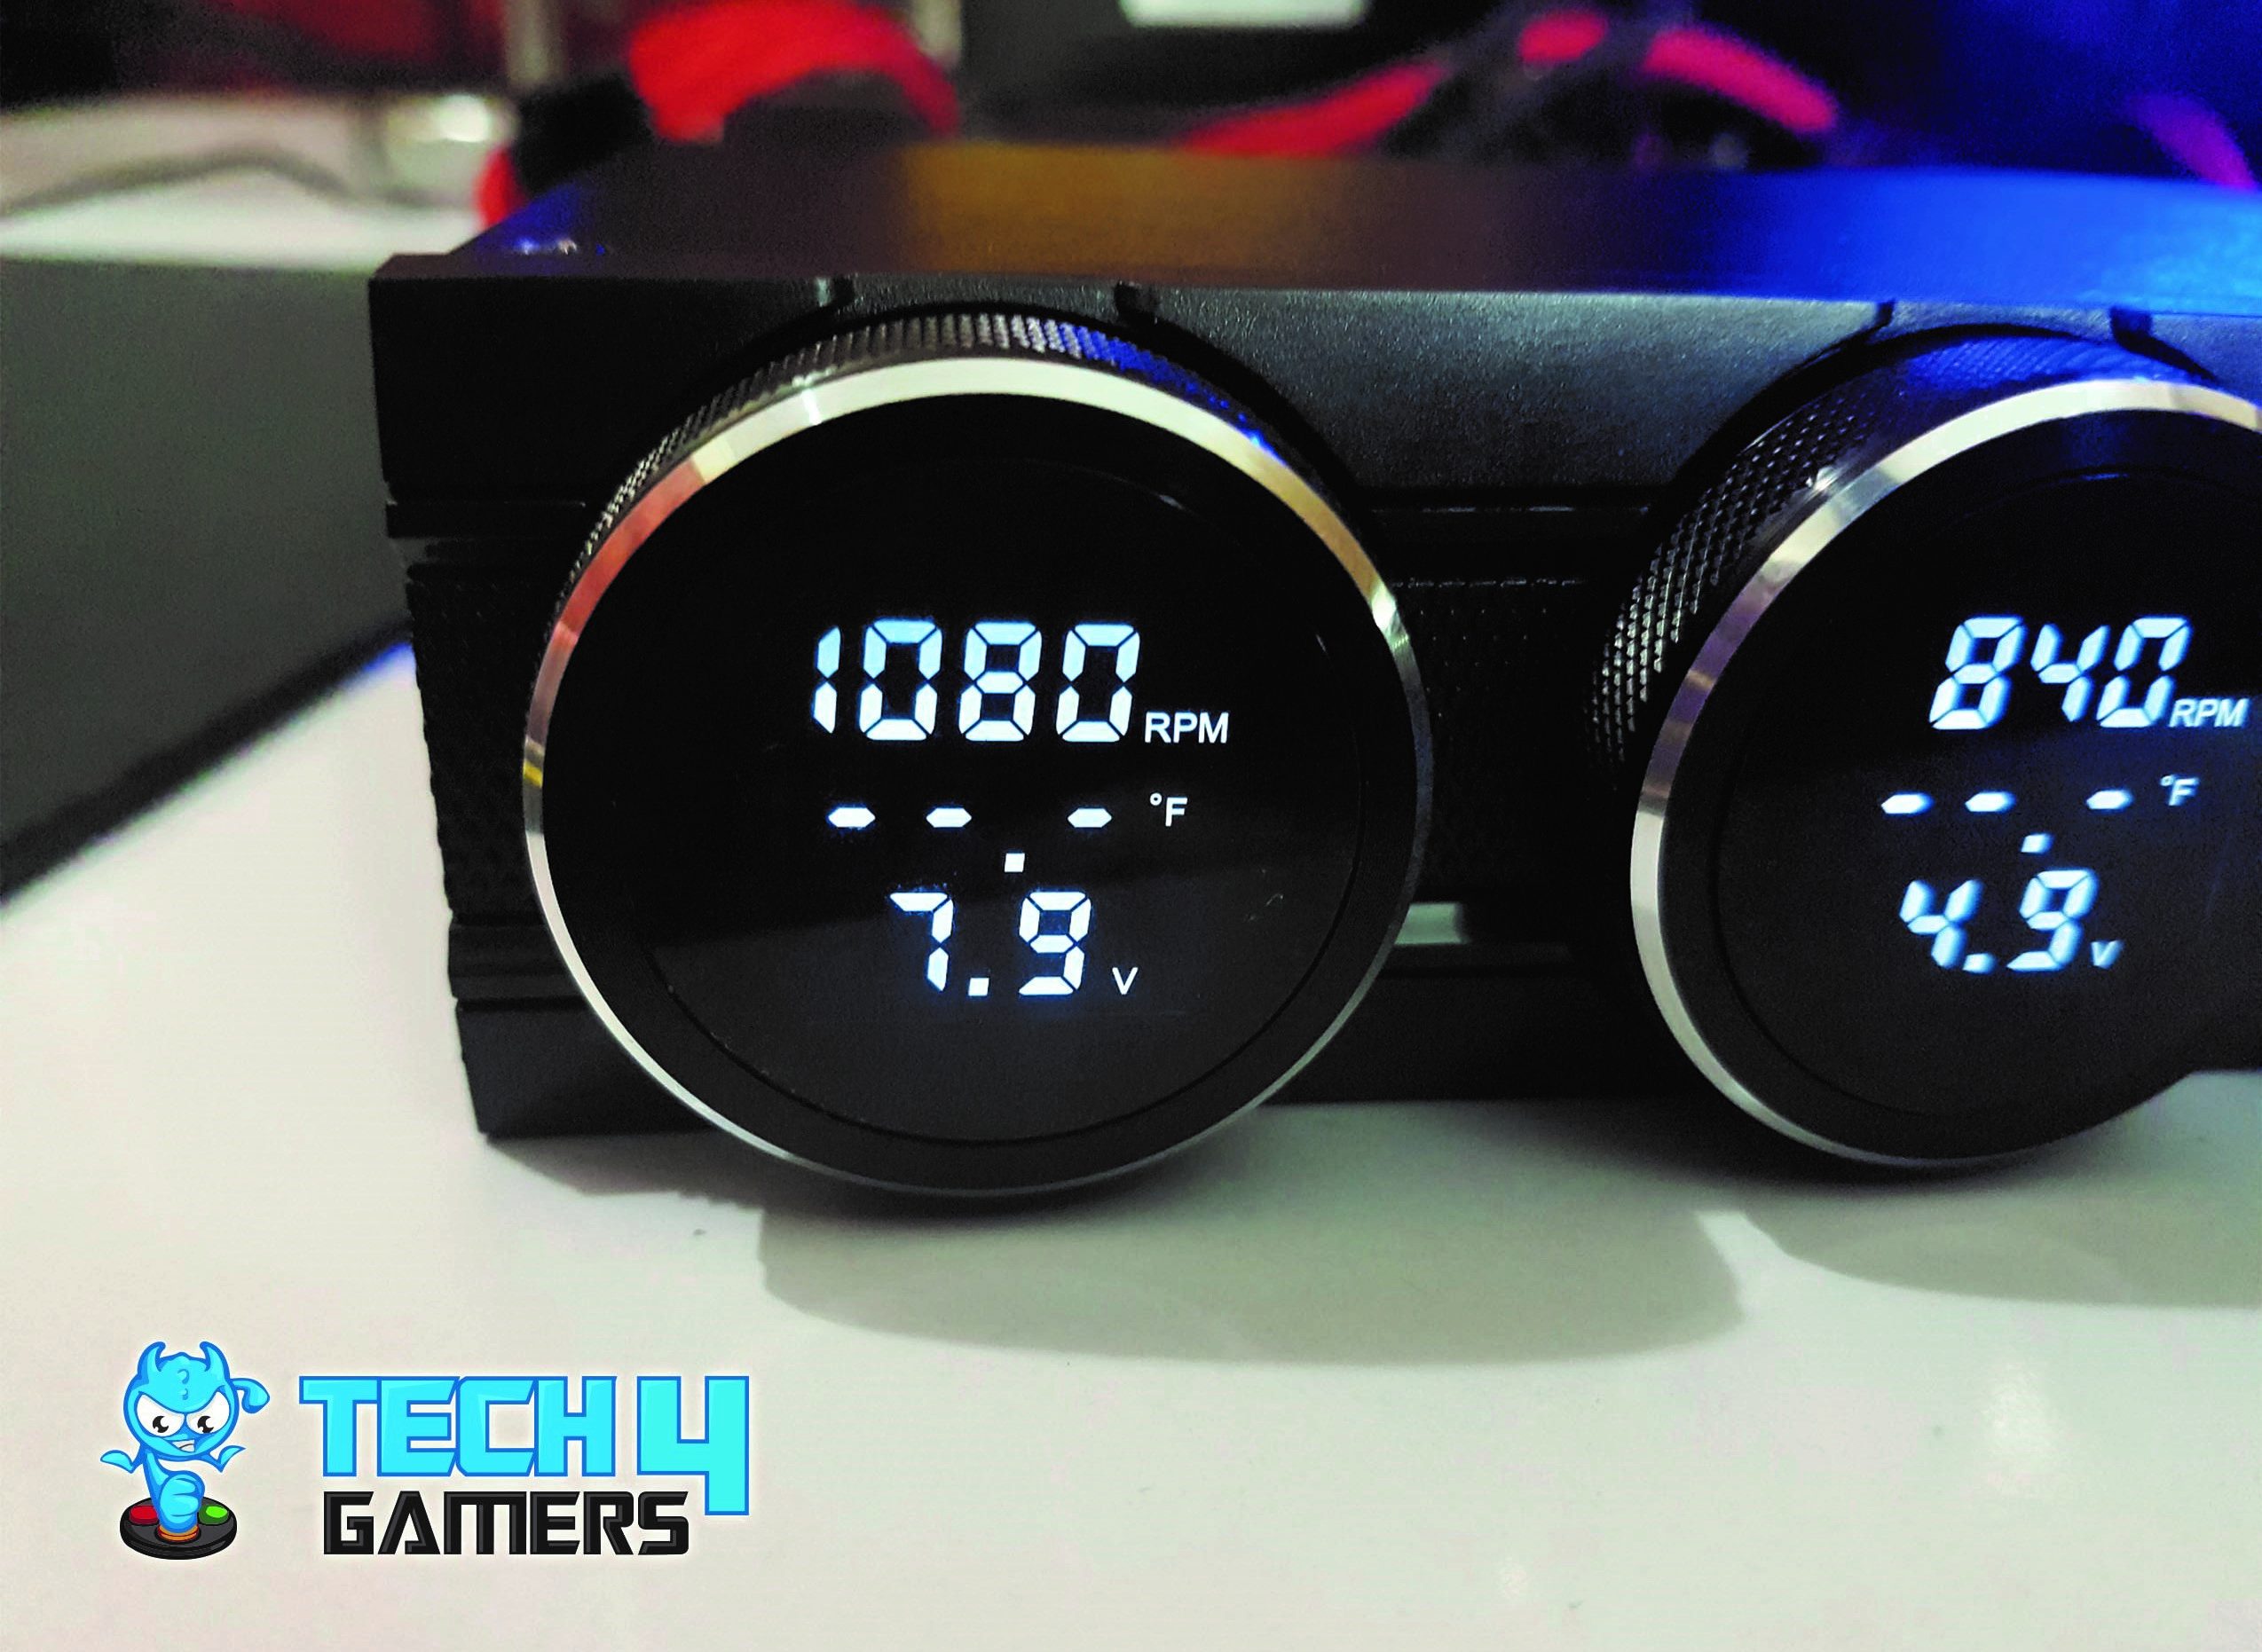
Next, I connected all the three fans with the unit and powered it up. The RPMs of the fans and their corresponding voltages were shown on the LCDs of the knobs.
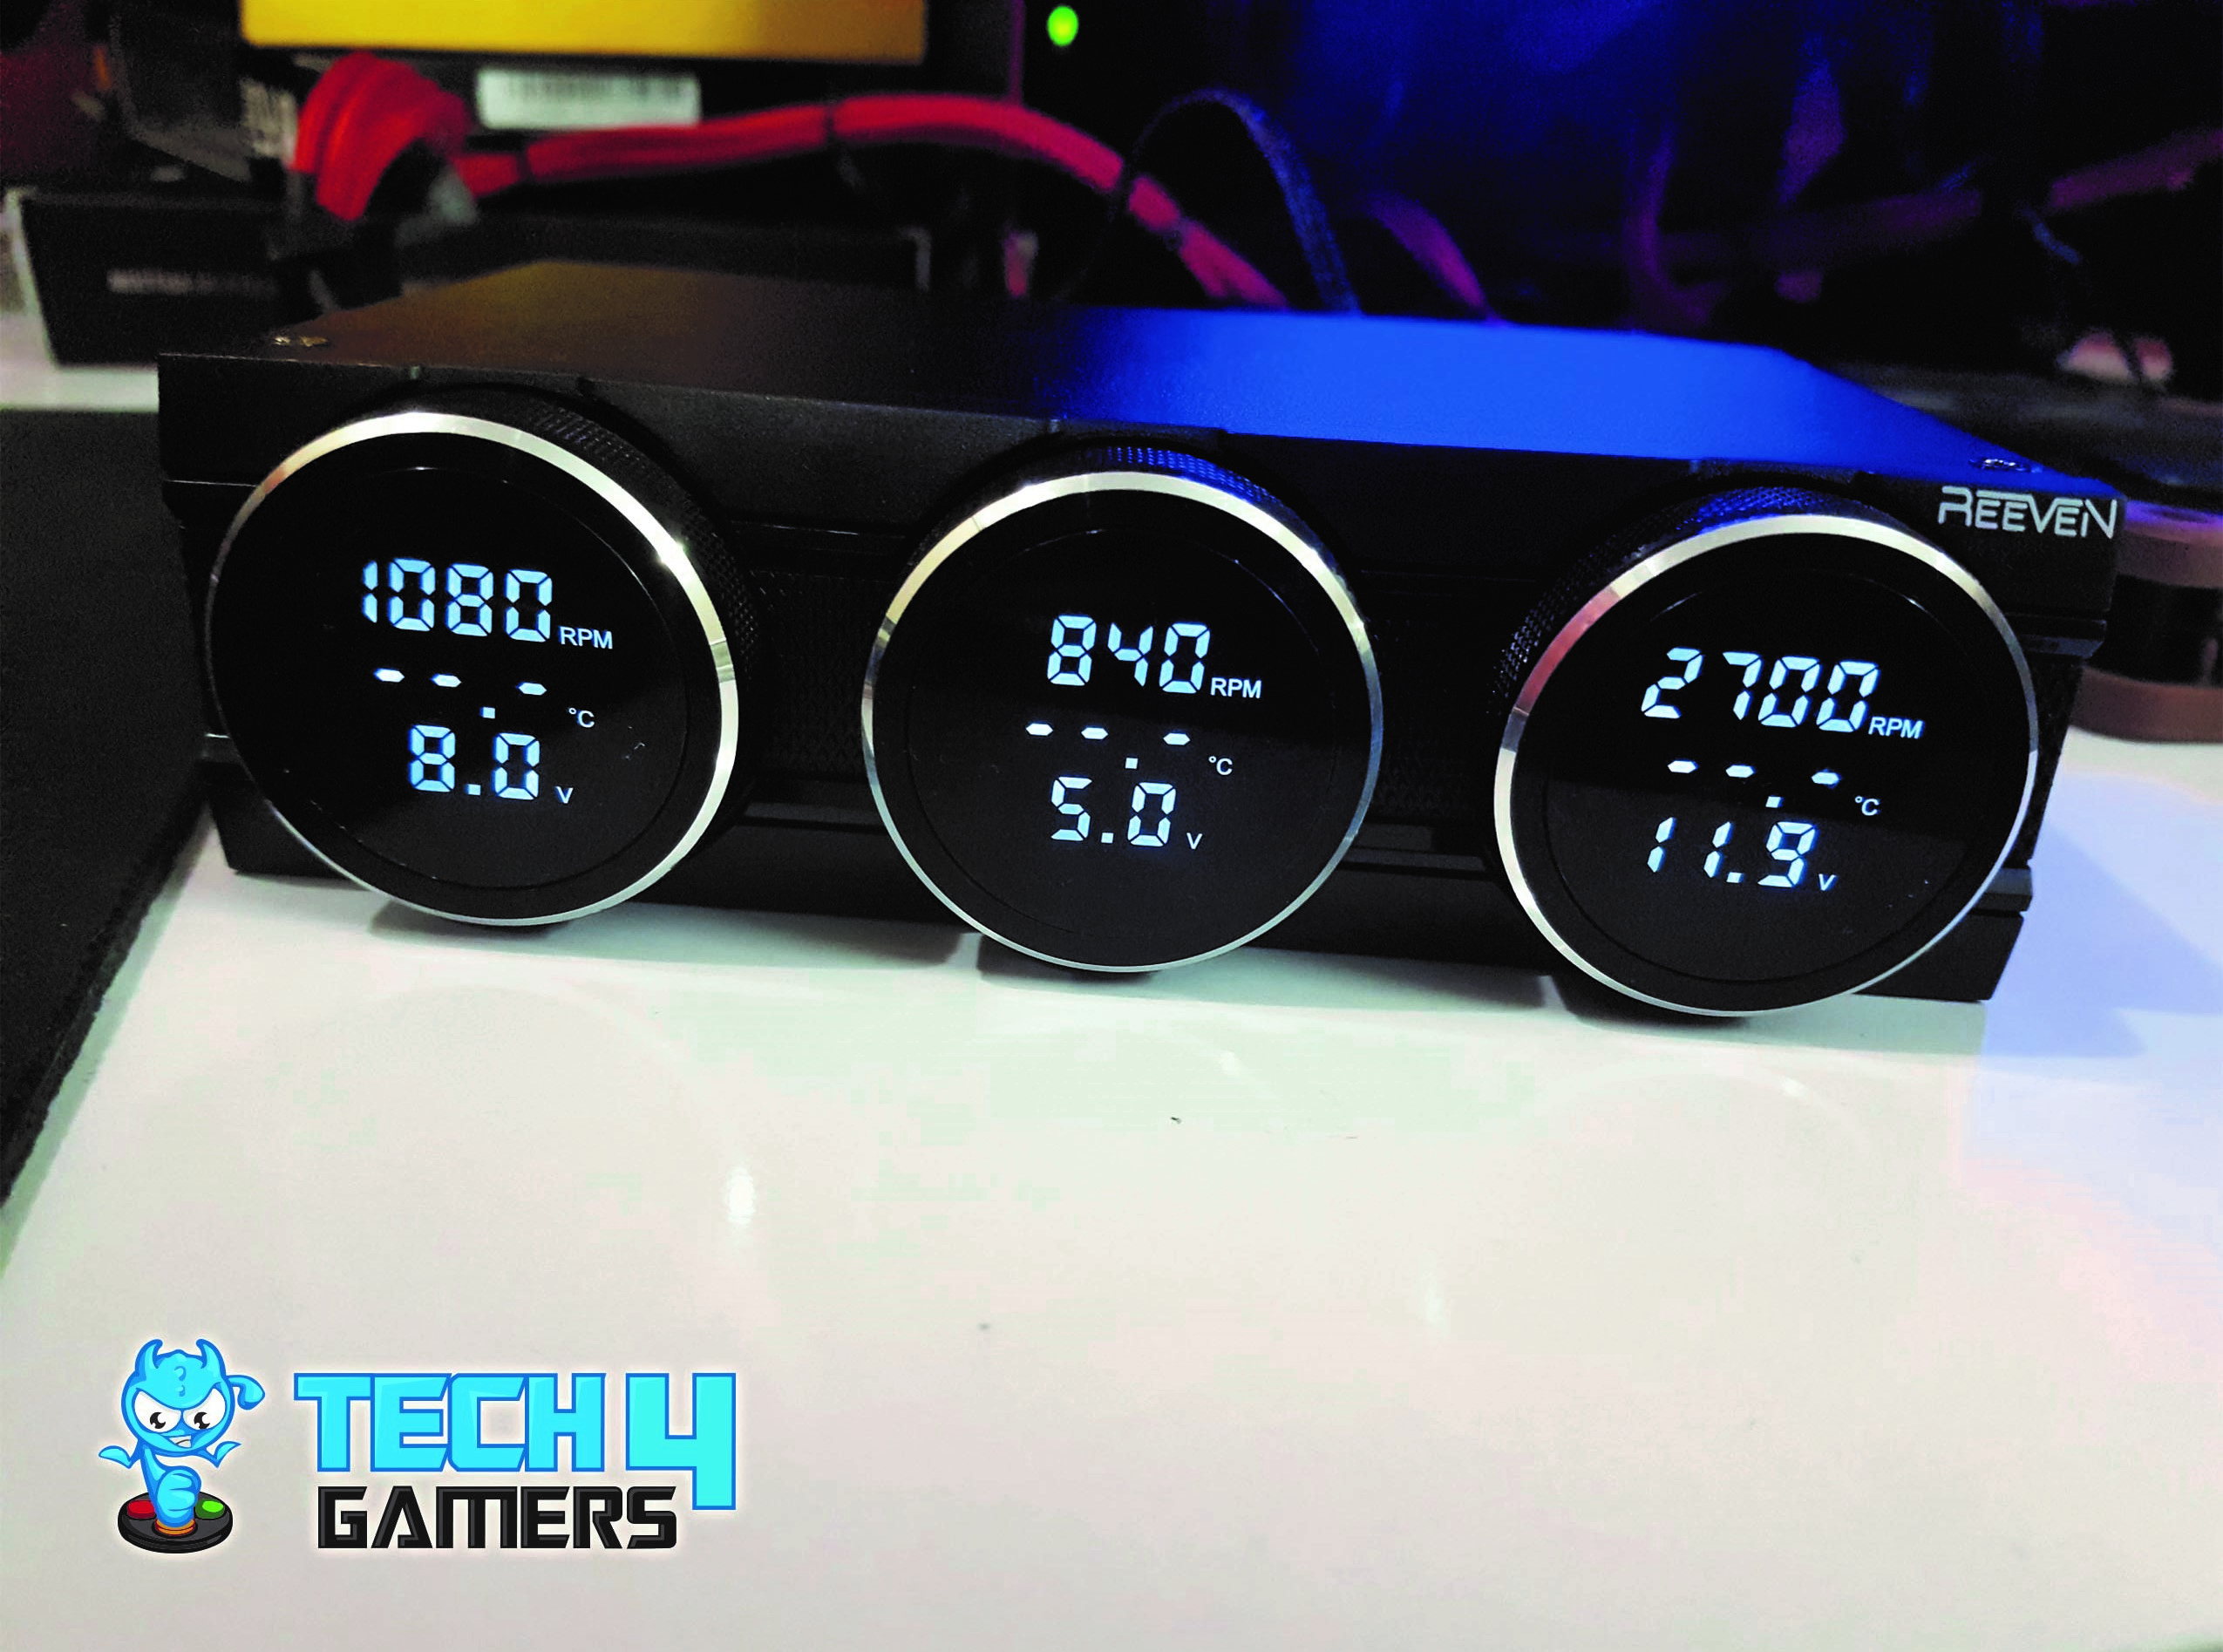
Turning the knobs rightwards would increase the speed and leftwards would decrease the speed by 0.5V at a time. Just to show the effect, I set one fan at the max, one at the 5.0V and the other at 8.0V. Above pictures shows that with corresponding RPMs of the fan.
In case you are wondering which knob corresponds to what numbered header on the backside, the left knob is numbered 1, the middle knob is numbered 2 and the right knob is the third one.
Fan Speed Test
Fans configuration is as under:
- The Thermaltake Riing White 120mm fan is connected on the first header.
- The Corsair ML Pro 140 is connected on the second header.
- The Noctua NF-F12 iPPC 3000 PWM is connected on the third header.
| Fan | Rated Max Speed (RPM) | Max speed as reported by the Polariz (RPM) | Max Speed as reported by the SpeedFan ( RPM) |
| Thermaltake Riing White 120mm | 1500 | 1470 | 1456 |
| Corsair ML Pro 140 | 2000 | 1710 | 1689 |
| Noctua NF-F12 iPPC | 3000 | 2700 | 2606 |
I tested the fans one by one by connecting them on the motherboard 4-Pin PWM header and setting that header to run the connected fan at 100% of the speed in the BIOS. SpeedFan version 4.52 was used to monitor the speed of the connected fan.
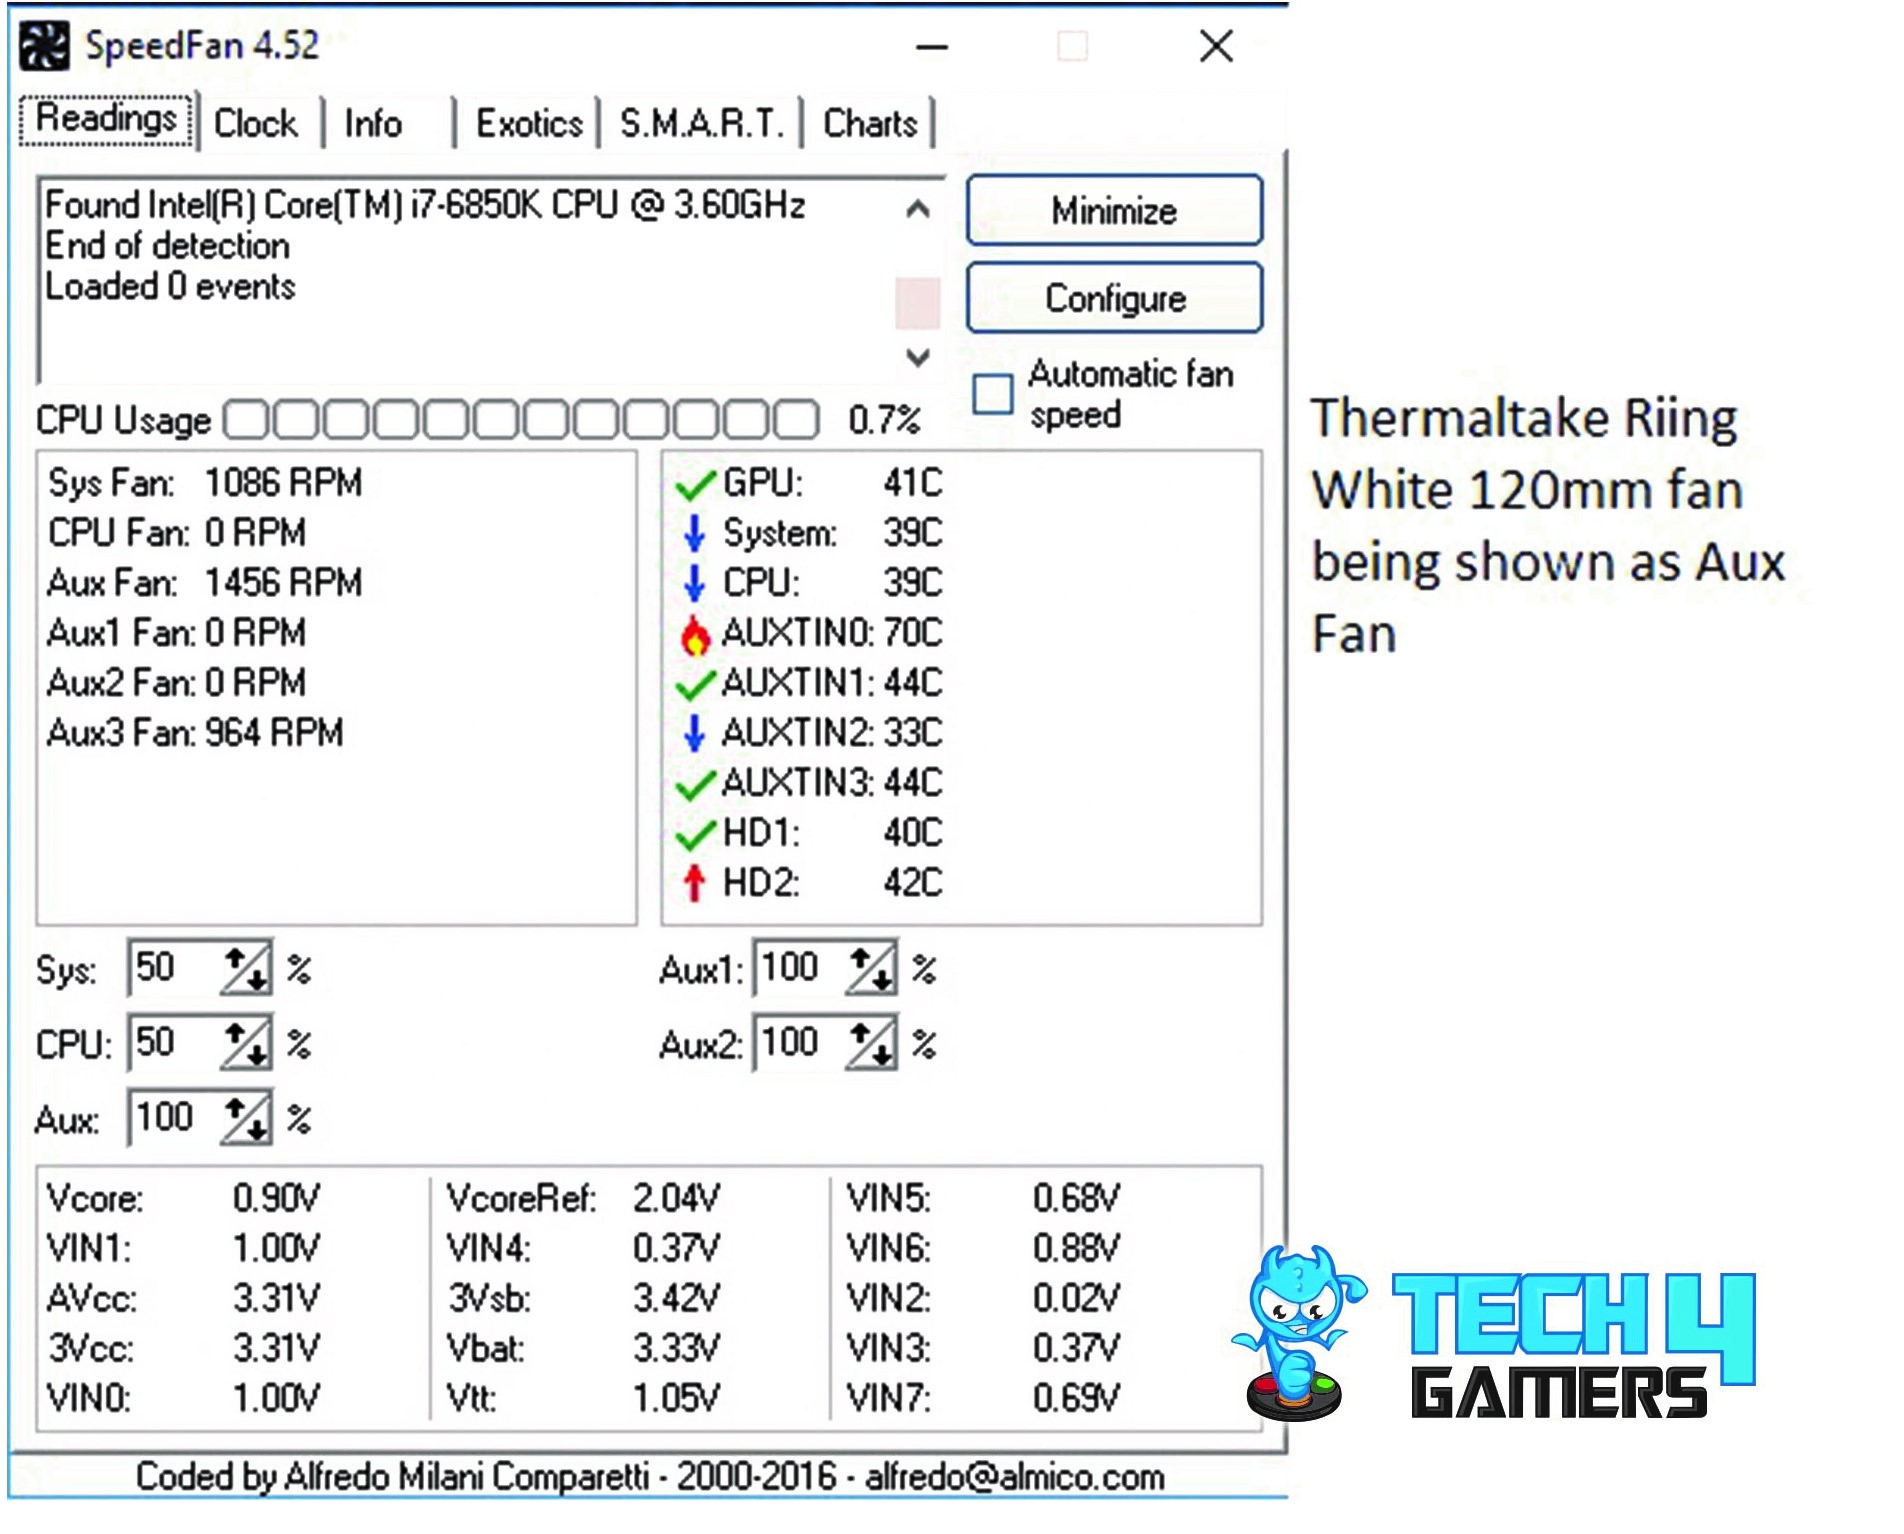
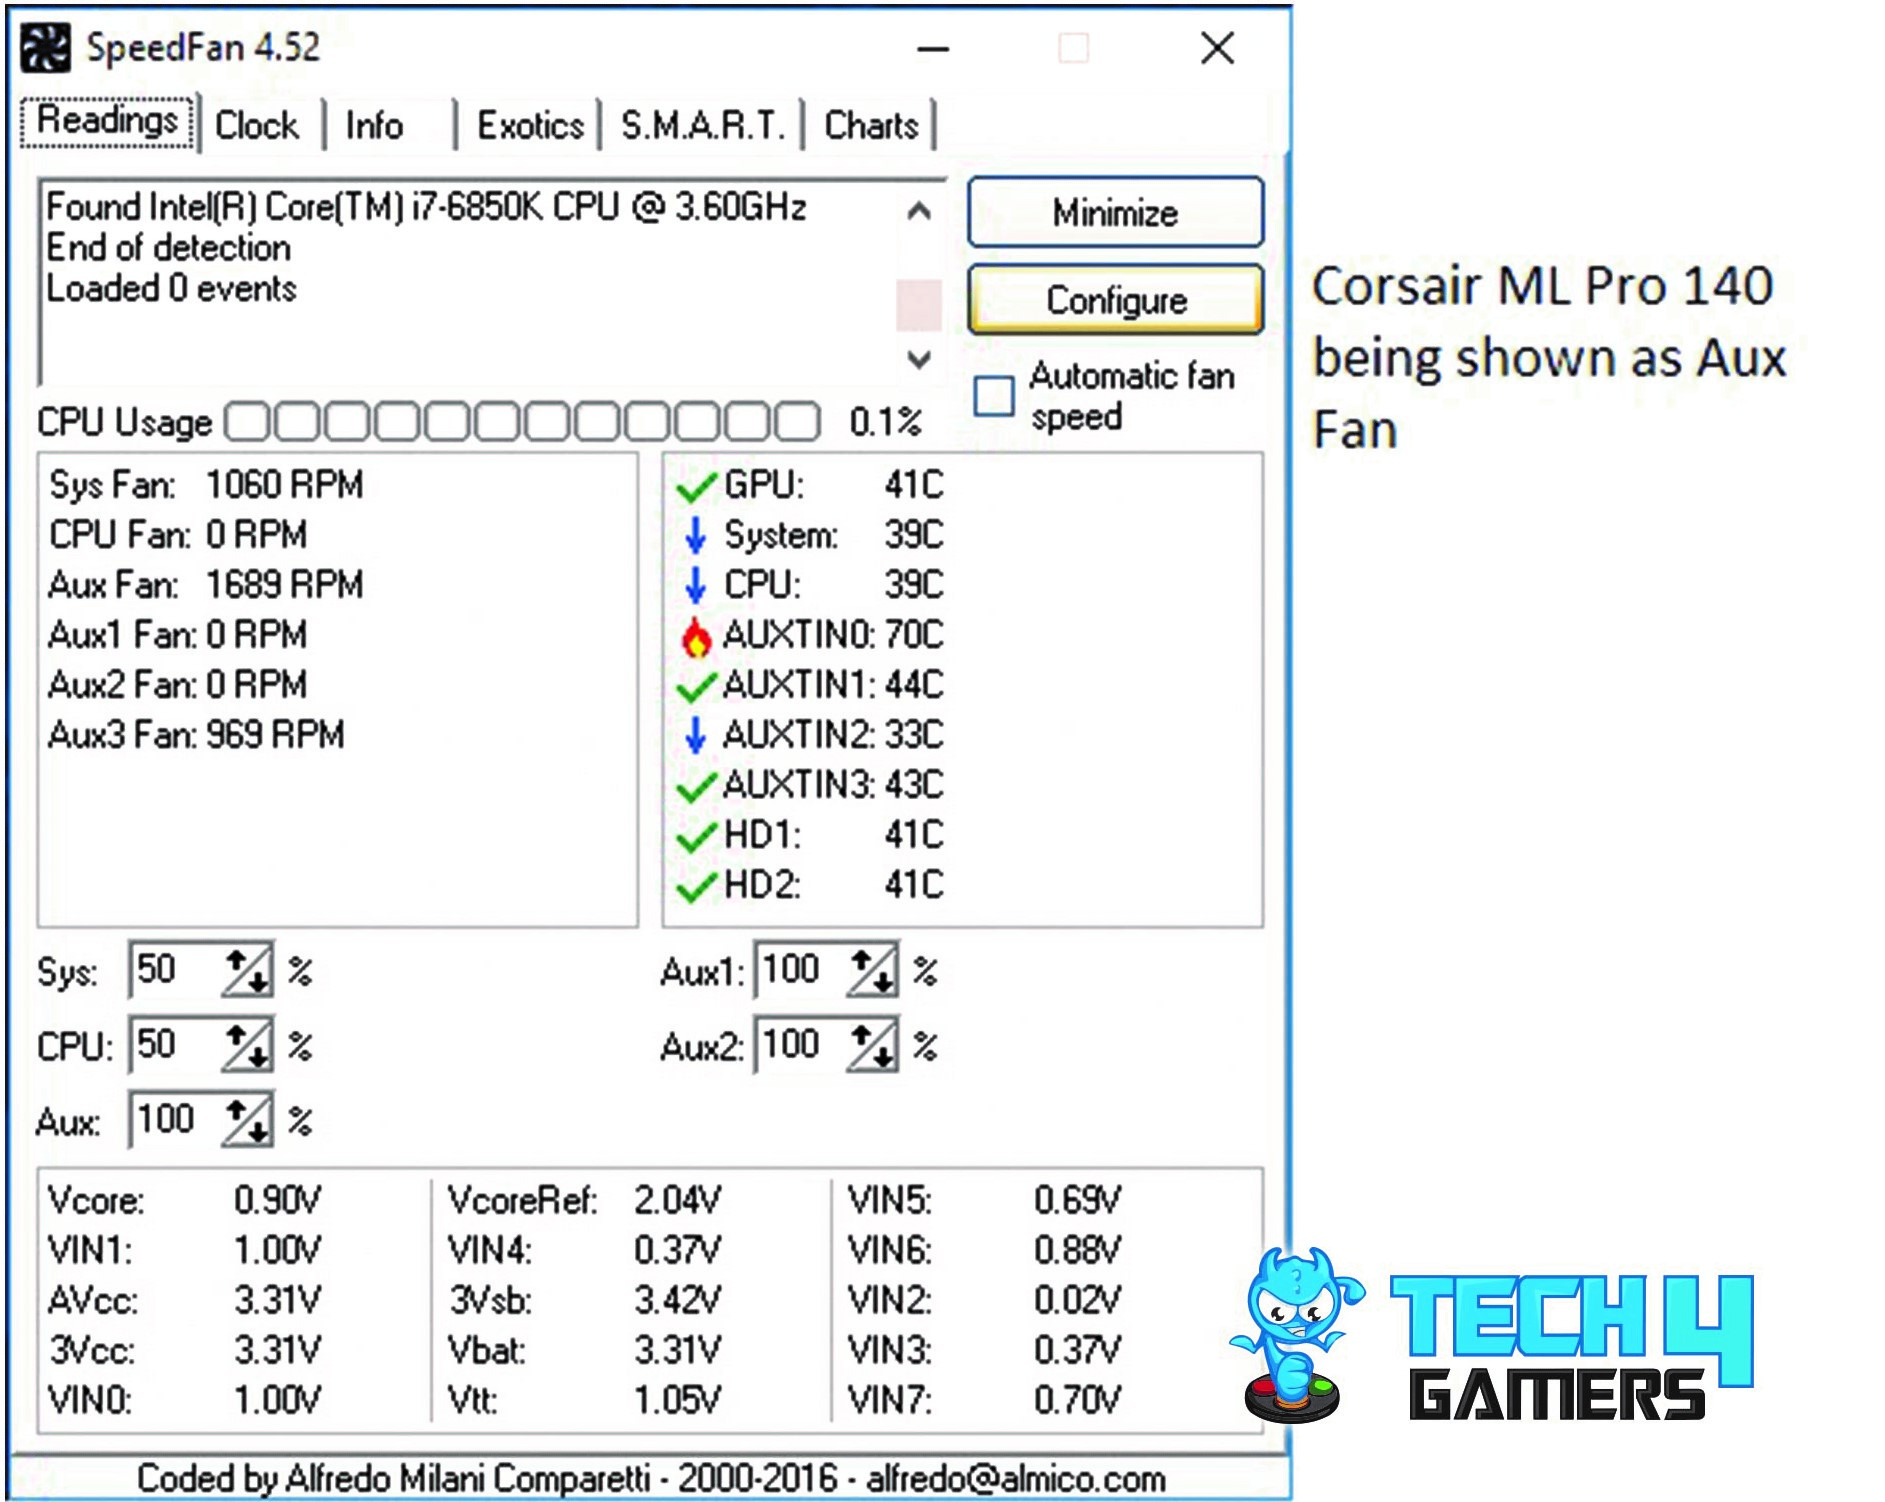

The Reeven Polariz RFC-04 definitely did the better job than the on-board fan controller. This Polariz Fan Controller Review testing eliminates any doubt that unit could be faulty for not being able to reach near to the rated maximum speed of the fans.
Thermal Test
Next up, one thermal sensor cable was attached on the topside of the Asus ROG Ramapge V Edition 10 motherboard’s chipset cover. It was connected with the Sensor header numbered 1 on the unit.
To do that, the unit had to be powered off by disconnecting the SATA cable.

41.8C was reported as the chipset’s temperature. Next two pictures will show the change in thermal unit by toggling the dip switch number 1.

A few words on the alarm side of the unit. It is mentioned in the user manual not to leave the fan(s) in non-moving operation while the power is still connected with the unit as this can cause a fan damage or possible fire. Please make sure that the fan is in operation mode or the fan stop feature is in effect.
Testing this, I turned the Thermaltake Riing White 120mm fan knob left until it stopped, triggering the unit’s alarm. To stop it, the user must remove the jumper from the Mute Beep header, accessed by opening the chassis side panel.
Additionally, I noticed that trying to power on the fan while it’s stopped didn’t work. A power on/off button would be useful in these situations. Reeven might consider this for future design improvements, as users might need to reset or power cycle their PCs in such cases.
Alarm will sound as well when the temperature threshold set by the dip switches 2 to 4 combination is crossed.
Should You Buy It?
Buy It If
✅Precise Fan Control is Important: This controller offers robust control over up to 3 fans, providing a maximum of 36W per channel and 3Amps, ensuring precise cooling adjustments tailored to your system’s needs.
✅Temperature Monitoring is a Priority: If monitoring temperatures across multiple surfaces is crucial, the included thermal sensor cables and capacity to monitor up to 3 surface temperatures simultaneously are highly beneficial.
✅You Prefer Hardware-Based Control: Those favoring hardware-based controls over software-based solutions will appreciate the tactile knobs and LCD interface for direct, on-the-fly adjustments without relying on computer-based software.
Don’t Buy It If
❌You Have Accessibility Concerns: Lack of an easily accessible power on/off button and the need to remove a jumper to mute alarms might be inconvenient for users seeking quick adjustments without accessing the chassis.
❌You Need Automatic Fan Recovery: If automatic fan recovery is a priority in case of fan stoppage, this controller doesn’t offer this feature, requiring manual intervention to restart the fans.
❌You Prefer Silent Alarms: Users preferring silent alarm systems or finding the process of accessing the jumper to mute alarms disruptive might not find the controller’s alarm setup suitable for their preferences.
Final Words
I tested the Reeven Polariz RFC-04 fan controller. Known for top-tier air cooling solutions, Reeven’s now stepped into the CLC market, extending their range beyond accessories for their cooling products.
This fan controller nails the car dashboard concept. Reeven’s design hits the mark, merging aesthetics and performance seamlessly. Despite fewer channels, limiting connections to three fans (supporting 4-Pin and 3-Pin types), the unit impresses. Its metallic black chassis delivers a bold look.
Featuring three 48mm knobs with individual LCDs displaying fan RPM, connected surface temperatures, and fan voltage (in blue, unchangeable), it’s a sleek setup. Powered by a SATA cable (5V/12V DC) and supporting 4VG to 12V output with a 10% variance, it maxes out at 9990 RPM. Additionally, it includes fan extension cables. The temperature-monitoring function and alarm system, triggered by fan stoppage or preset temperature thresholds, are standouts. Plus, it offers thermal probing cables for surface temperature readings.
Recent Updates
December 30, 2023: Few text changes to improve readability. Also added image galleries.
Thank you! Please share your positive feedback. 🔋
How could we improve this post? Please Help us. 😔
[Hardware Reviewer & Editor]
Meet Nauman Siddique, a highly experienced computer science graduate with more than 15 years of knowledge in technology. Nauman is an expert in the field known for his deep understanding of computer hardware.
As a tech tester, insightful reviewer, and skilled hardware editor, Nauman carefully breaks down important parts like motherboards, graphics cards, processors, PC cases, CPU coolers, and more.
- 15+ years of PC Building Experience
- 10+ years of first-hand knowledge of technology
- 7+ years of doing in-depth testing of PC Hardware
- A motivated individual with a keen interest in tech testing from multiple angles.
- I majored in Computer Science with a Masters in Marketing
- Previously worked at eXputer, EnosTech, and Appuals.
- Completed Course in Computer Systems Specialization From Illinois Tech
Get In Touch: nauman@tech4gamers.com


