Push Configuration
Rated: 8/10
Pull Configuration
Rated: 8.5/10
Push-Pull Configuration
Rated: 9/10
Pros And Cons
| Technology | Pros | Cons |
|---|---|---|
| Push | ✅Simple installation | ❌Difficult cleaning ❌Limited aesthetics |
| Pull | ✅Better aesthetics ✅Easy cleaning | ❌Not the best performance |
| Push-Pull | ✅Optimal cooling performance ✅Higher performance per cost | ❌Higher noise levels ❌Complex installation |
- Each configuration directs airflow differently through the radiator, with push, pull, and push-pull setups offering distinct advantages.
- Push-pull configurations outperform pull-only setups by approximately 1.25°C, with thicker radiators demonstrating superior cooling.
- Despite the added complexity and cost, push-pull configurations are recommended for optimal cooling performance, especially with high FPI radiators.
Liquid cooling can be a bit of a conundrum with all the similar-sounding terms being thrown around. In this article, we will examine the difference between Push vs Pull vs Push-Pull Radiators to show the target demographic of each definitively.
Push vs Pull vs Push-Pull Configuration
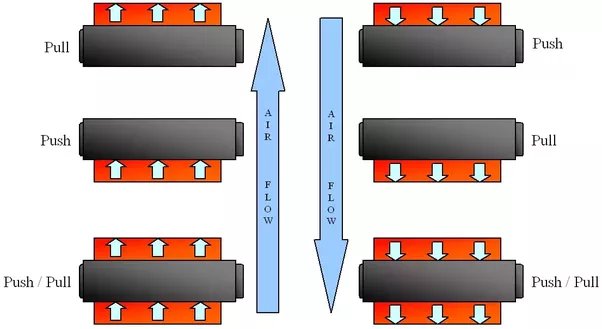
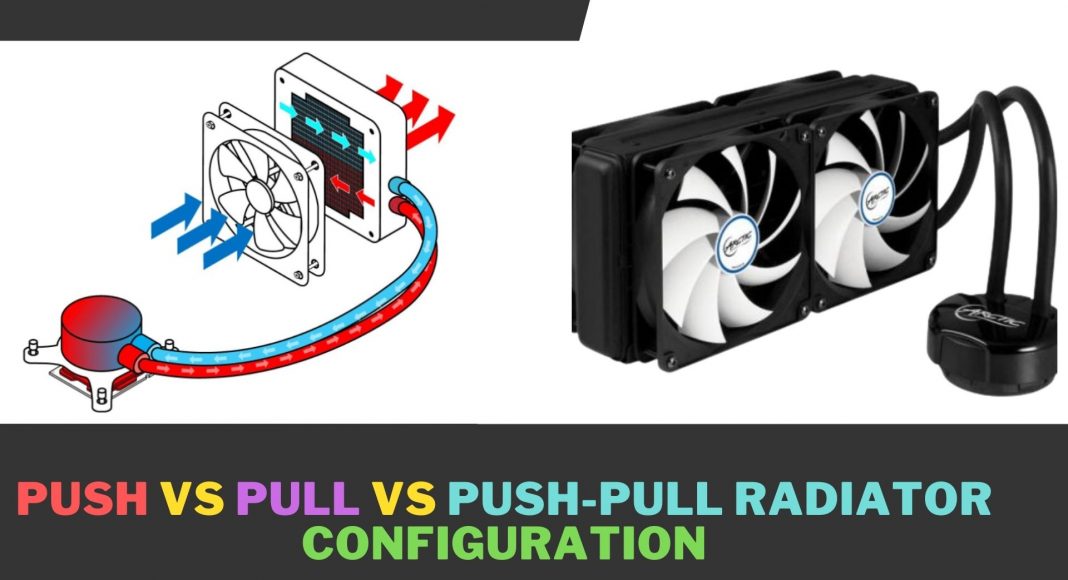
Push or pull configuration basically refers to the direction in which the radiator’s fans direct the air.
In a push configuration, the fans are mounted before the radiator. The fans push air through the radiator, which moves out of the case (Exhaust).
In a pull configuration, the fans are mounted behind the radiator, which directs fresh air from inside the case (Intake). This air then passes through the radiator. The air becomes warm after passing through the radiator and normally moves out through the case fans.
In a push-pull configuration, fans are mounted on both sides of the radiator, the fans on the back push air toward the radiator and the fans on the front direct air away from the radiator. The push-pull configuration can be used as either an exhaust or an intake.
Depending on the airflow across the rest of your case, there might be a slight difference in cooling performance between push and pull. However, the significant performance difference comes with a push-pull configuration.
Without further talk, let us dive into the nitty gritty differences between all of these fan configurations.
Cooling Performance
We will perform our tests with EK’s 240mm SE (28mm thick, 22 FPI) and the thicker XE (60mm thick, 16 FPI) radiators, using a GPU and a four-core CPU to generate heat for our tests. Performing our tests with 240mm radiators gives us a good middle ground between 120mm and 360mm radiators (Read: 240mm vs 280mm AIO).
800 RPM
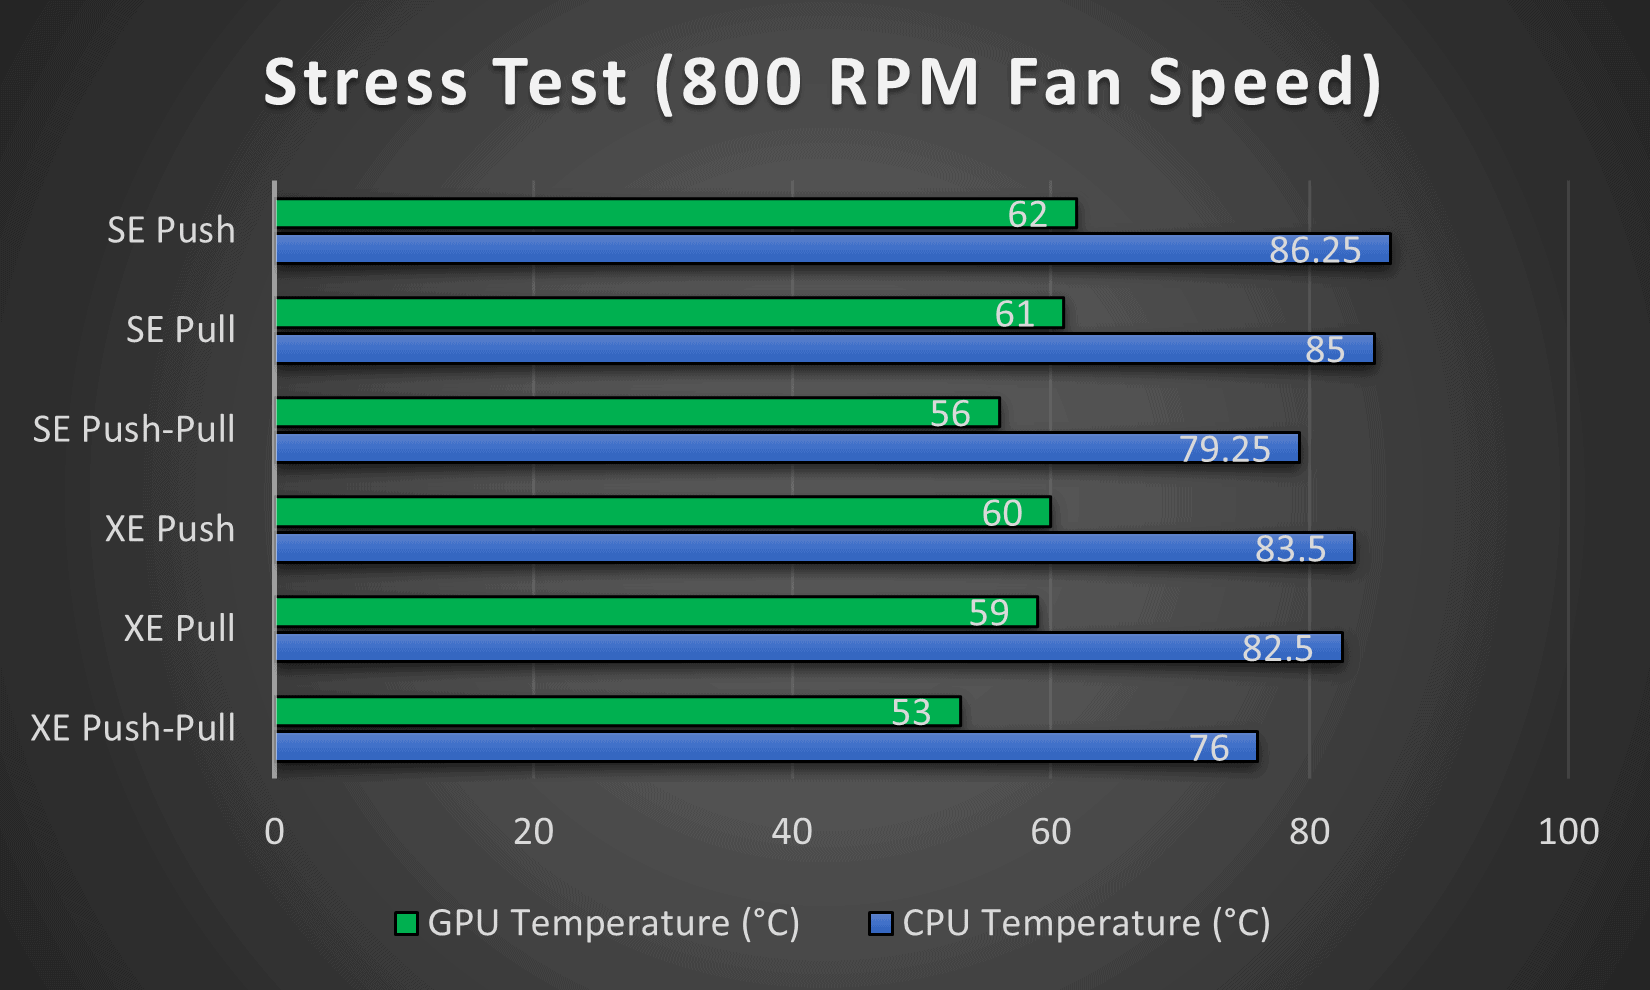
- In our testing, pull radiators showed significantly better performance than push radiators at 800 RPM. On average, the pull configuration ran 1°C cooler than its push counterpart.
- The push-pull configuration emerged even further, showing over 5°C lower temperatures than its respective pull configuration counterpart.
1600 RPM
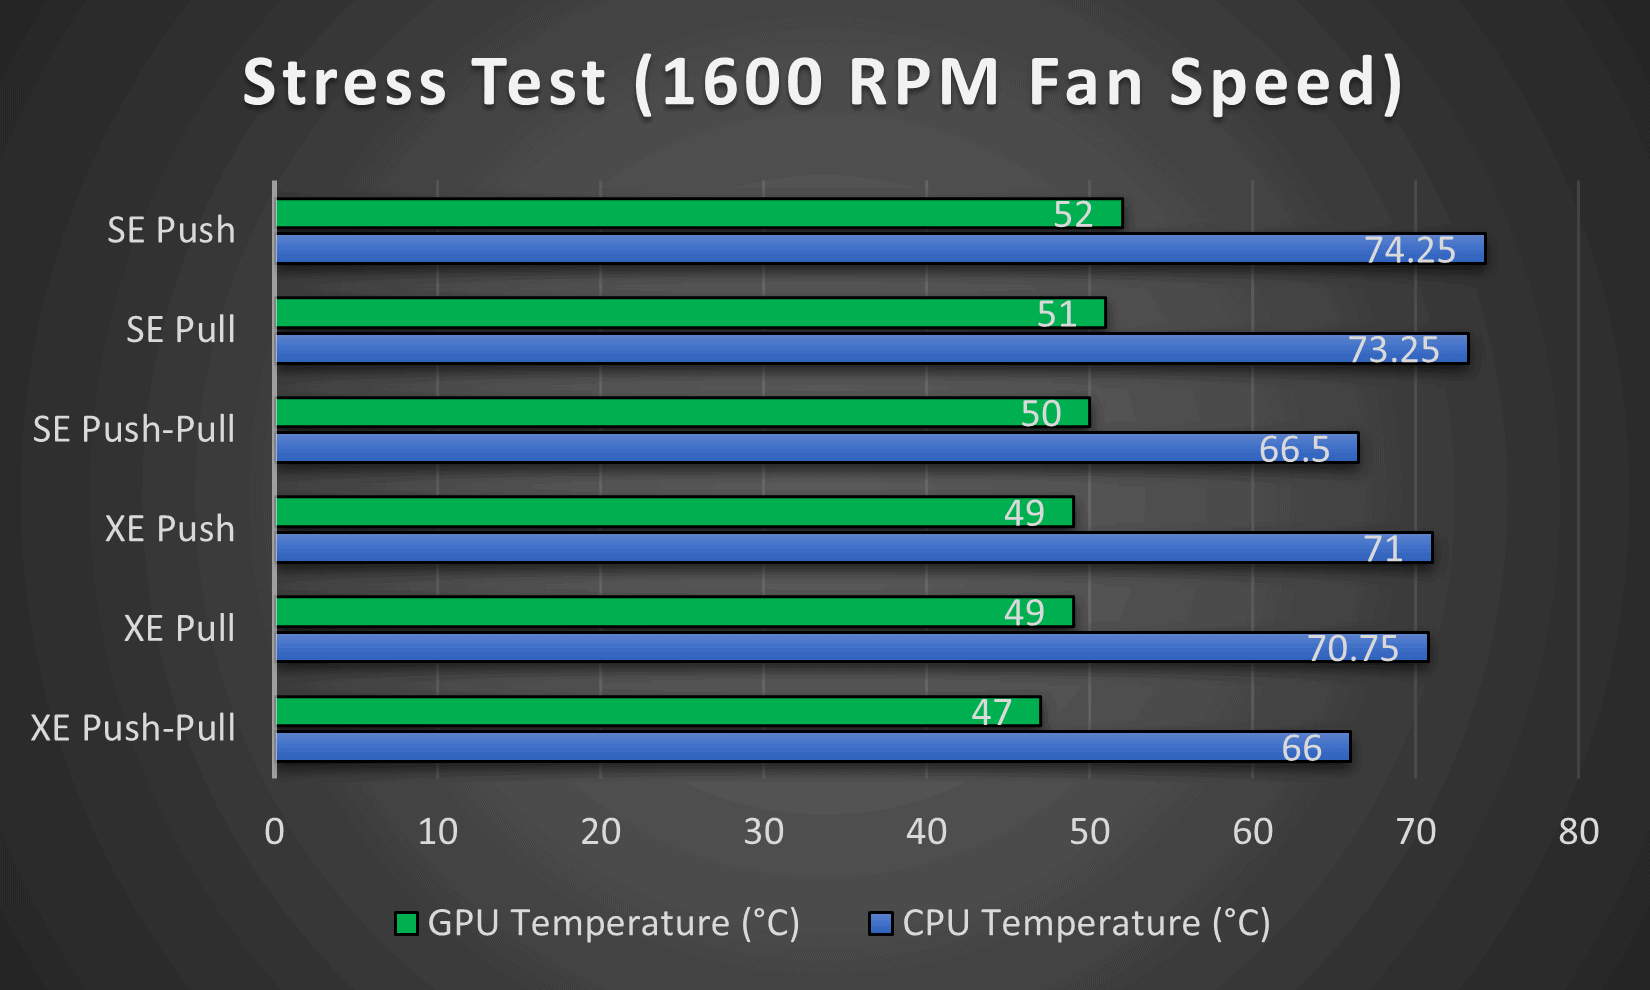
- When we ramped up the fan speed, the difference between these configurations became less significant, but the pull configuration still ran around 0.625°C cooler on average.
- The push-pull configuration took the spotlight again, with at least a 4.75°C advantage in our extensive stress test.
Takeaways From the Performance Tests
Aesthetics
The push-pull configuration will take the prize in aesthetics, but this is purely a personal preference.
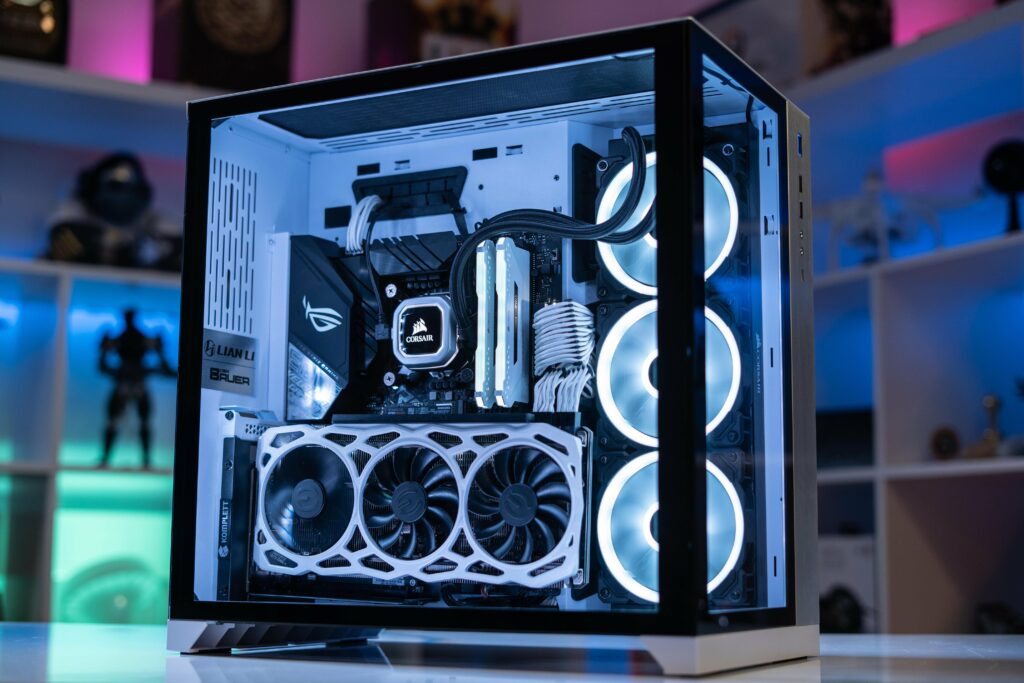
In a push-pull setup, you can mix RGB fans at the front of the radiator with non-RGB fans inside the case, or use RGB fans inside and outside for full RGB aesthetics. However, in a push or pull setup, the radiator faces outward, so aesthetics are limited to the fans inside the case, visible through a see-through side panel casing.
Noise
Noise is also something to keep in mind when comparing push, pull, and push-pull configurations. While there is no difference in noise when comparing push and pull, there is a significant difference in noise when you’re running a push-pull configuration, as double the fans will essentially double the noise.
However, a push-pull configuration allows you to run fans at lower speeds without sacrificing much on performance. This means that with this configuration, you can choose some noise for performance gains, which is an appreciated addition.
Compatibility
Compatibility is also a factor to be wary of when comparing push, pull, and push-pull configurations. A push-pull configuration may cause clearance issues, especially when installed at the top of cases where it may interfere with the motherboard.
Moreover, case manufacturers do not label cases for push-pull compatibility when it comes to liquid cooling so you need to figure out for yourself whether your case will accommodate your push-pull configuration, by measuring the clearance.
Ease of Installation and Cleaning
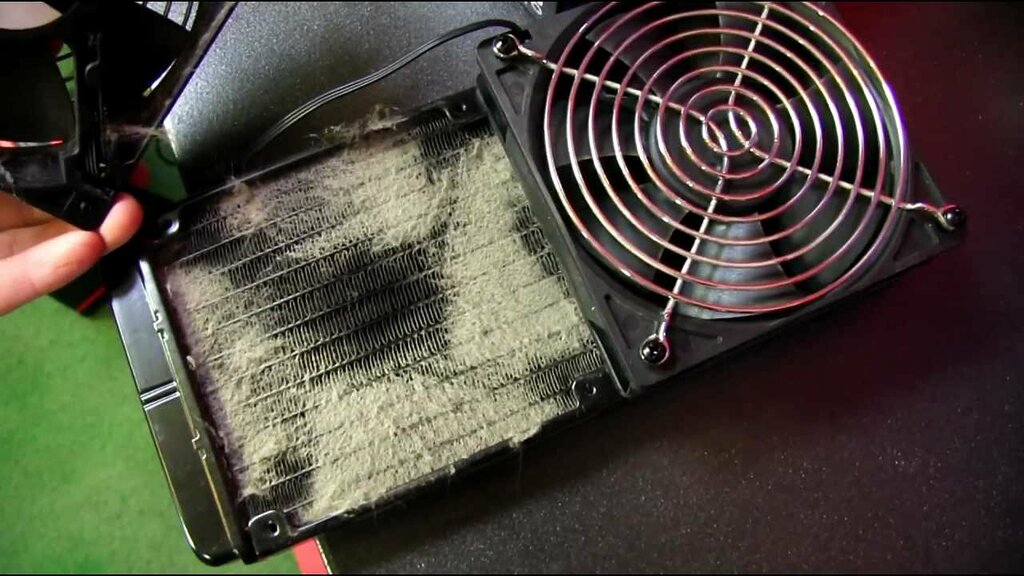
Differentiating between push, pull, and push-pull setups involves considering cleaning and ease of installation. Installing a pull configuration at the front (intake) of the case is easiest while installing a push setup requires screwing in the radiator fans first, which can be tricky.
Conversely, setting up a push configuration at the top (exhaust) is simpler, as installing the radiator inside the case can be awkward. Cleaning the radiator is challenging with a push setup, as you need to remove the fans. In contrast, you can easily clean the radiator inside the case with a pull setup.
Installing a push-pull setup is similar to installing a pull configuration at the top of the case, with awkward positioning. However, installing it at the front is more straightforward. Cleaning a push-pull setup requires removing the inner fans.
Cost
Cost is a major factor when comparing push or pull against push-pull since push-pull requires extra fans. Some 120mm all-in-one coolers ship with two fans, such as Corsair’s H80i v2, but these coolers are expensive. The larger the radiator (240 mm to 360mm to 420mm), the more you’ll spend on extra fans.
In the case of an open-loop liquid cooling setup, the same applies as you’ll be spending an extra on fans for your push-pull configurations.
What We Recommend
Push: The push configuration offers simplicity and ease of installation, making it popular for exhaust setups at the top of the case. While straightforward to install, cleaning accumulated dust within the radiator can be cumbersome, requiring fan removal. Despite this drawback, push configurations remain popular.
Pull: Positioned at the front of the case, pull configurations offer better aesthetics and simplified radiator cleaning, ensuring cleaner airflow and easier maintenance. Unlike push setups, they facilitate the convenient removal of dust buildup within the radiator, improving appearance and cooling efficiency.
Push-Pull: Ideal for high FPI radiators, this setup offers a top cooling performance by boosting pressure, which is particularly beneficial for larger radiators. Despite installation challenges in larger cases, push-pull setups significantly enhance cooling for high-performance systems.
Choosing a push-pull setup delivers better cooling, though at an added expense. Opting for a thicker radiator may offer improved performance per cost. While push and pull setups yield similar results, focusing on radiator thickness and size is key for optimal cooling.
Common Questions
In terms of performance, there is a minimal difference, and there is no evident winner between the push vs pull competition.
Push-pull configuration performs better than push or pull; however, it costs more, and you need to remove the fans pushing the air to clean your radiator.
No compelling reason to choose push or pull over the other; they offer identical cooling. Push-pull delivers superior performance but at a higher cost. Opting for a larger or thicker radiator is often a more cost-effective choice.
Radiator size, radiator thickness, and fin density greatly affect performance. Fan size and fan blade design also affect performance.
Thank you! Please share your positive feedback. 🔋
How could we improve this post? Please Help us. 😔
[Comparisons Expert]
Abdemanaf is a skilled creative writer who has been honing his craft since 2011. While initially working in different fields, he found a passion for technology and has been exploring the tech world since early 2015. Over the years, he has developed an in-depth knowledge of the latest tech trends and product offerings by various companies.
Abdemanaf’s writing reflects his analytical mindset and ability to think critically. He has a knack for breaking down complex technical information into easily digestible pieces, making his articles engaging and accessible to readers from all backgrounds. In February 2022, he joined Tech4Gamers as a blog and product comparison writer, where he has been able to hone his skills further.
As a writer, Abdemanaf is dedicated to staying up-to-date with the latest technological advancements and trends, enabling him to provide readers with the most relevant and accurate information. He is always eager to learn more and is constantly seeking new challenges to improve his skills.
Get In Touch: manaf@tech4gamers.com


![Core i9-13900KF Vs Ryzen 9 7900X3D [We Tested Both]](https://tech4gamers.com/wp-content/uploads/2023/03/Core-i9-13900KF-vs-Ryzen-9-7900X3D-218x150.jpg)


Feedback By: