Threads

There will be moments when you want to avoid using the laptop’s built-in keyboard, either because of a malfunction or because you want to connect an external keyboard. Hence, you need to learn how to disable the laptop keyboard using the system settings or third-party applications.
Key Takeaways
- Temporarily deactivate your laptop’s keyboard through “Device Manager” or third-party software.
- You can edit “Group Policy” or turn off “PS/2 Port Service” to permanently deactivate the built-in keyboard.
- Running the code, sc config i8042prt start= auto in “Command Prompt” will resume the keyboard’s operation.
Turn Off Laptop Keyboard In Windows
You can turn off your laptop’s keyboard through various means, like disabling “PS/2 Port Service” and more. Before proceeding to the methods, read our extensive guides on changing colors on the Alienware Keyboard, MageGee Keyboard, and Havit Keyboard.
The following are the methods:
- Disable Temporarily Through Device Manager
- Disable Laptop Keyboard Permanently
- Turn Off The PS/2 Port Service
- Use Incompatible Driver
Disable Temporarily Through Device Manager
First, we disabled the default keyboard through the “Device Manager” menu since it recognizes and displays all the functioning keyboards, including the external ones.
Below are the instructions to temporarily deactivate your keyboard:
- Right-click the “Start Menu” to bring up the “WinX Menu” and then pick “Device Manager” from there.
- Find “Keyboards” in “Device Manager” and double-click to see the contents.
- This section will list all the keyboards currently connected to your computer. Find the built-in keyboard and right-click it.
- Select “Disable Device” from the resulting sub-menu.
- To complete the operation and turn off the laptop’s internal keyboard, click the “Yes” button in the confirmation window.
- If the context menu that appears doesn’t include a “Disable” option, don’t worry; you’ll still be able to remove drivers for the internal keyboard by selecting the “Uninstall Device” option.
- As soon as you do, a confirmation dialog will appear. Click “OK” to confirm the removal of drivers for the internal keyboard.
- “Restart” your device to complete this procedure.
Also Read: How To Unlock Keyboard On HP Laptop
Disable Laptop Keyboard Permanently
Microsoft makes it somewhat more difficult to deactivate the keyboard permanently. To do so, you must halt the Windows’ capability to reinstall the driver automatically. If you don’t do this, the keyboard will start functioning again once you restart your laptop. Hence, we enabled the relevant policy from the Local Group Policy Editor.
Follow these steps to deactivate the keyboard permanently:
- To access group policy, click “Start,” then type “Group Policy” into the search bar.
- After selecting the result labeled “Edit Group Policy,” a “Local Group Policy Editor” window should appear.
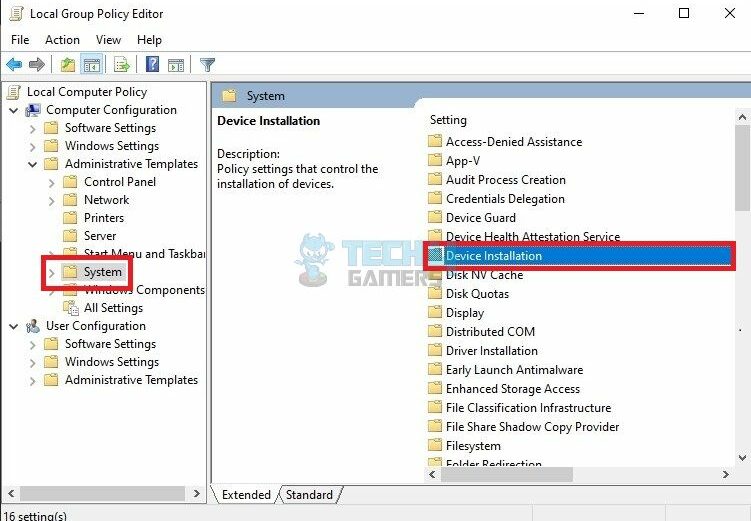
- Select “Computer Configuration.”
- To proceed, double-click “Administrative Templates.”

Open Computer Configuration (Image By Tech4Gamers) - Then pick “System” and finally, “Device Installation.”

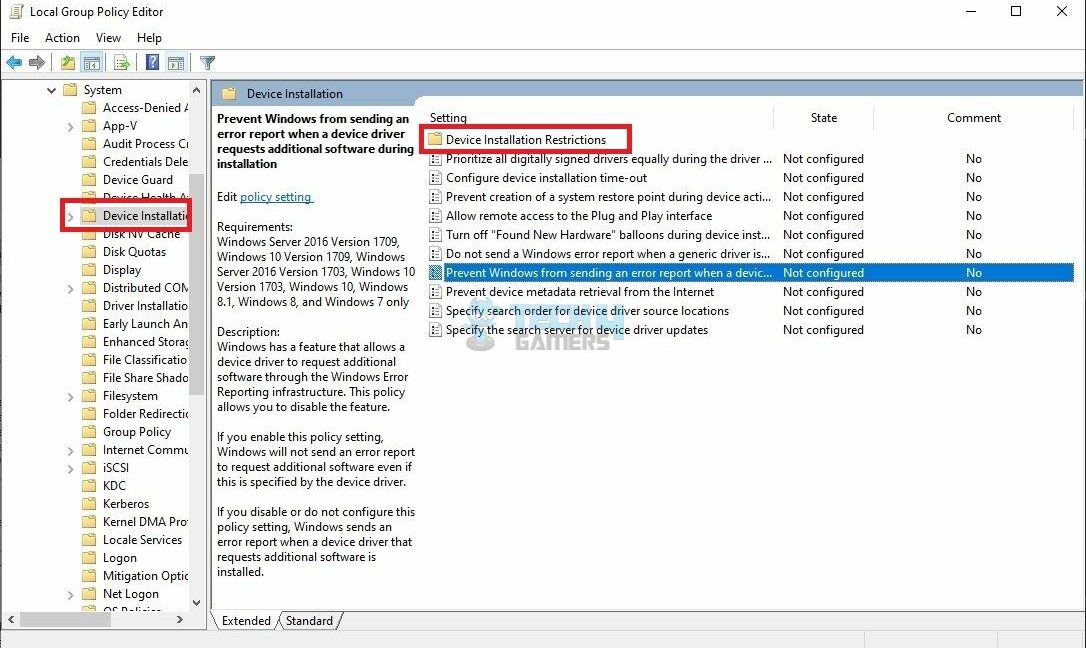
Select Device Installation (Image By Tech4Gamers) - The folder labeled “Device Installation Restrictions” may be accessed by double-clicking.
- Select “Edit” from the context menu after right-clicking the “Prevent Installation Of Devices Not Defined By Other Policy Settings” option.

Policy Settings (Image By Tech4Gamers) - Select “Enabled” by clicking the checkbox and then clicking “OK” in the resulting window.

Turn Off The PS/2 Port Service
Most laptop keyboards are linked internally by a PS/2 connector. Therefore, disabling the connection effectively disabled the keyboard for us. You can just turn off the power to that port since there won’t be anything controlling its data once the service is turned off.
Here are the instructions to promptly carry out the process:
- Click the Search box and enter “Command Prompt” followed by “Run As Administrator.”
- Enter the following command:
sc config i8042prt start= disabled. - After restarting your computer, your laptop’s keyboard should no longer function.
- The following command can be used if you ever decide to turn the keyboard back on:
sc config i8042prt start= auto.
Using Third-Party Software For Windows OS
The approaches mentioned above make it easier to comprehend the process. On the other hand, third-party solutions can also assist you in deactivating the keyboard.
BlueLife KeyFreeze
We can confirm the effectiveness of BlueLife KeyFreeze from our own experience. This software lets us disable our Windows laptop’s keyboard by pressing “Ctrl+Alt+F.” However, you can customize this combination for convenience. It efficiently disables the keyboard while leaving the screen unlocked.
Download the utility from the official website, double-click the “Setup File,” and you’re good. A taskbar countdown simplifies keyboard locking and unlocking.
KeyboardLock
Keyboard lock is an application that uses fewer system resources to lock your keyboard. To do so, specify a password and press the “Start” button. This tool will not affect your open programs. Type the password again when you wish to unlock it. Besides, it can also be used for external keyboards.
Use Incompatible Driver
The technique was tested and it proved effective for us. We found that the keyboard stops working when a driver is installed for a keyboard incompatible with the device. If the same driver controls the touchpad and keyboard, you will lose the capability of both. Hence, have a USB keyboard or mouse on hand.
Use the instructions below to halt the built-in keyboard:
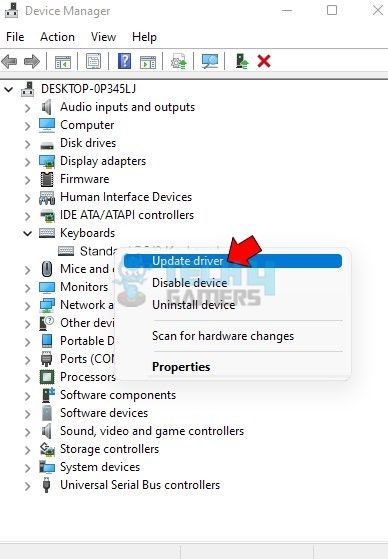
- On “Device Manager,” go to the “Keyboards” section, expand “Standard PS/2 Keyboard,” and right-click it.
- Choose “Update Driver” from the sub-box.

Update Driver (Image By Tech4Gamers) - Select “Browse My Computer” to locate the driver software on your computer.
- Select “Let Me Choose From My Computer’s Drivers.”
- De-select the box labeled “Show Compatible Hardware.”
- Choose a brand from the drop-down menu (other than the one associated with your regular keyboard).
- Next, choose a model and go on to the next step.
- Choose “Yes” in the next window.
- Select “Close” after updating the driver.
- Reboot by selecting “Yes.”
- The built-in keyboard stops working after the reboot.
Turn Off Laptop Keyboard On macOS
This section will discuss two methods to how to disable a laptop keyboard on macOS:
- Using The macOS Command Terminal.
- Using Karabiner Elements.
Using The macOS Command Terminal
We entered a script in the “Terminal” window to permanently deactivate our MacBook’s keyboard.
Here are the steps we used:
- To access “Utilities,” open “Applications.”
- Double-click “Terminal” to launch it.
- Input the code, sudo kextunload /System/Library/Extensions/AppleUSBTopCase.kext/Contents/PlugIns/AppleUSBTCKeyboard.kext/
- Enter your password to proceed.
Also Read: How To Play Windows Games On Mac
Using Karabiner Elements
Using additional software is another way to deactivate the keyboard. To complete the task, we installed Karabiner Elements on our Mac laptop.
The software will only stop the functioning of the internal keyboard on your Mac when another keyboard is attached. That is, disabling the built-in keyboard necessitates using an external keyboard.
Once you have the software downloaded and installed, proceed as described below:
- Connect your MacBook to an external keyboard.
- Launch the software “Karabiner Elements.”
- Choose “Preferences.”
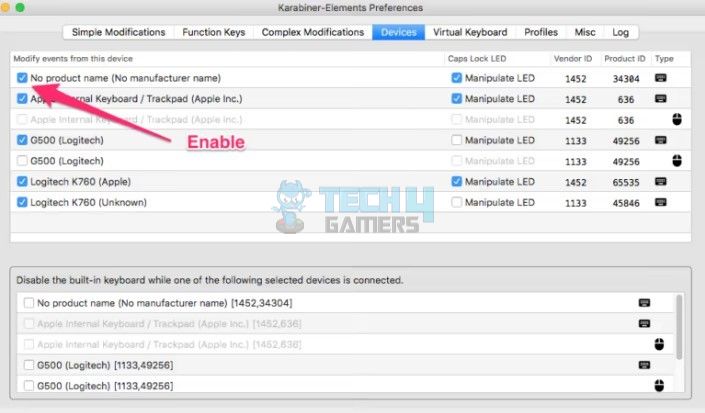
- After selecting the “Devices” tab, choose “Advanced.”
- In the section “Disable The Built-In Keyboard, When One Of The Following Chosen Devices Is Attached,” select the box next to your external keyboard and click the “OK” button.

Disable Keyboard (Image By Tech4Gamers)
Thank you! Please share your positive feedback. 🔋
How could we improve this post? Please Help us. 😔
[How To Guides Specialist]
Dayan Shahid is a skilled mechanical engineer passionate about technology. With certifications in various programming languages and subjects ranging from microcontrollers to aerial robotics, Dayan can effortlessly present complex technical topics in an engaging way. His ability to bridge the gap between theory and practical applications sets him apart as he continues to inspire others through their insightful content.