


An environment with polluted air always ends up with dust covering everything inside your house. Therefore, learning how to clean the Xbox Console & Controller is essential to prevent dust and debris from causing any damage.
- Clean your Xbox every 2-3 months to prevent damage from dust and debris. Also, cleaning the controller is just as crucial as cleaning the console.
- Cleaning your Xbox improves aesthetics and performance and guards against hardware damage; however, it carries risks of component damage and voiding the warranty.
- You can clean your Xbox One, Xbox One S, Xbox Series X, and Xbox Series S using a compressed air can, a small brush, and a microfiber cloth.
- For proper aftercare of the Xbox, ensuring its safety from grease, liquids, sunlight, polluted air, and animal fur is important.
Methods Difficulty Rating
Xbox One
Rated: 7/10
Xbox One S
Rated: 6/10
Xbox Series X
Rated: 8/10
Xbox Series S
Rated: 7/10
Xbox Controller
Rated: 4/10
Why Should I Clean My Xbox?
Cleaning your gaming console is an essential task you must carry out every 2-3 months. It should be done even more if you live in a dusty environment. You should be cleaning your Xbox often; some are stated below.
- The dust gets in between components like fan bearings and lowers their lifespan.
- The dust does not let components radiate heat. Hence, overheating.
- Dust in the disc drive can scratch your CDs, preventing them from being read.
- Your Xbox setup becomes unpleasant to look at.
- A greasy controller makes it hard to have a firm grip on.
- Dust in between controller buttons prevents them from giving proper commands.
Xbox One
Ensure optimal performance and longevity of your Xbox One by regularly cleaning it to prevent the accumulation of dust and debris, which can compromise its functionality. Additionally, you need a Torx 8 and 10 screwdrivers, a spudger, a small brush, a microfiber cloth, and a compressed air can. Following are the steps on how to open and clean the console:
- Open Casing: Power off your Xbox > Unplug any connected cables > Place your Xbox One on a clean and smooth surface > Take a spudger > Pull out the casing with air vents on the side.

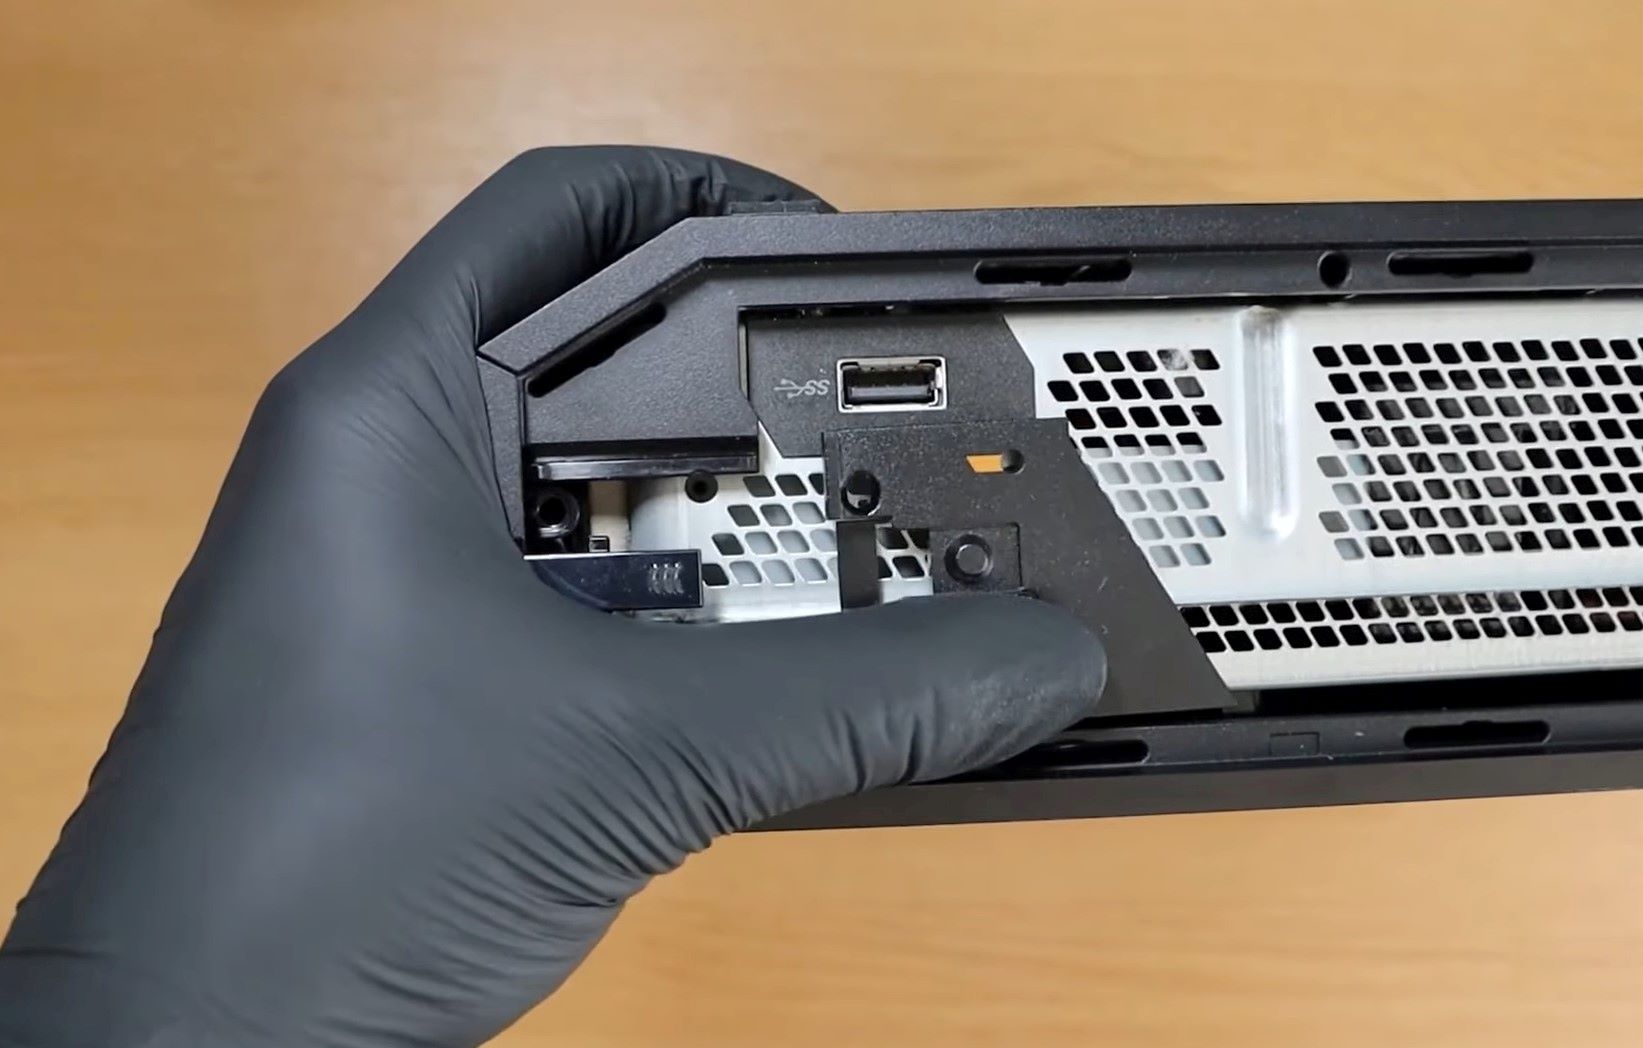
Removing side case by spudger. Image credit: YouTube: (Joey Does Tech) - Remove Piece: Slide out the slightly pointy piece on the corner beneath the USB port.

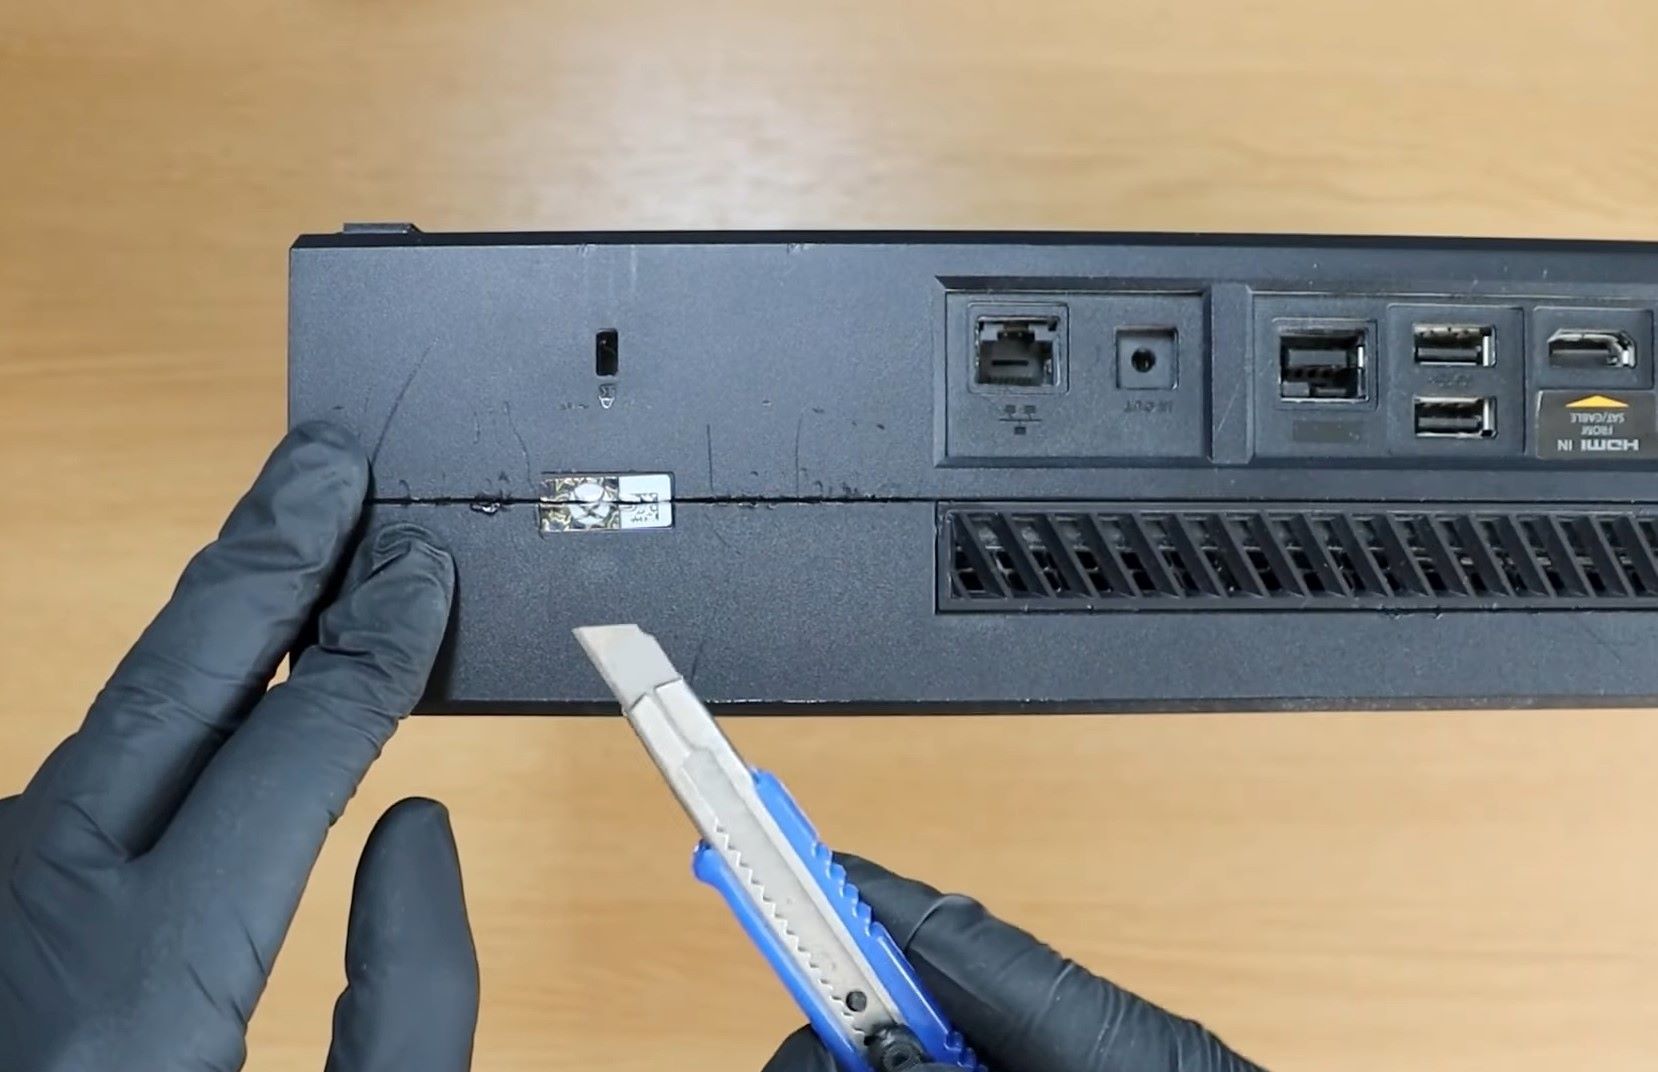
Sliding out the pointy piece. Image credit: YouTube: (Joey Does Tech) - Cut Sticker: If you have the warranty sticker, you must cut it to remove the casing.

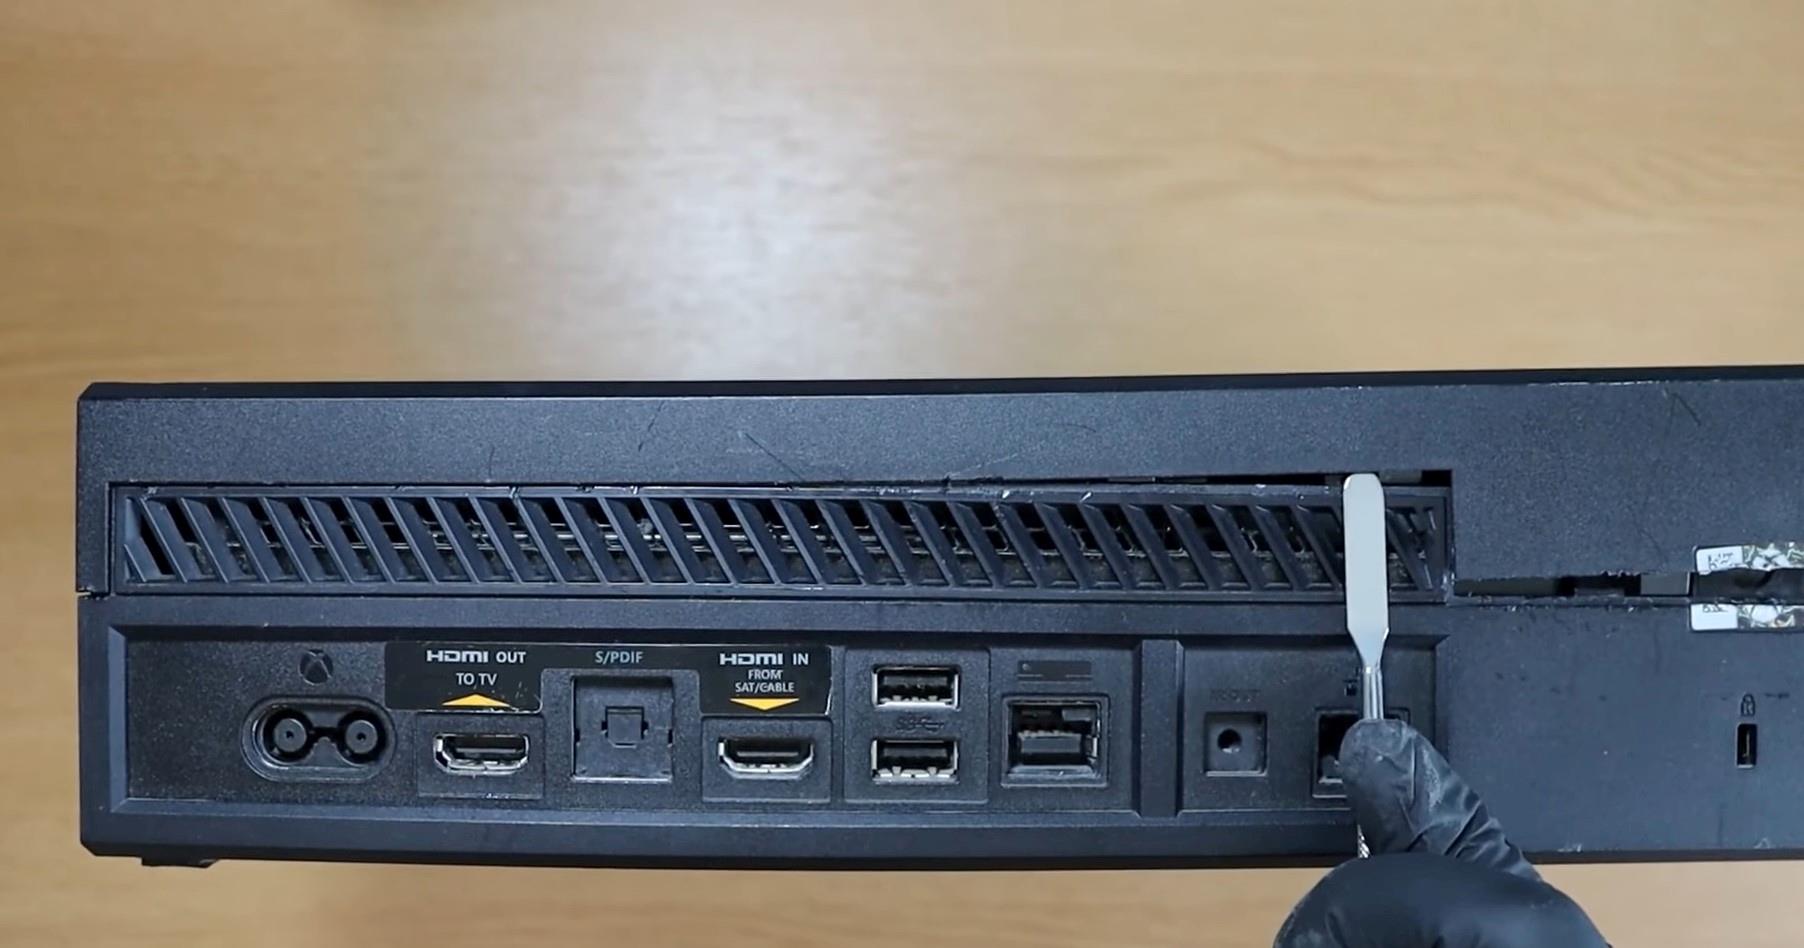
Cut the sticker. Image credit: YouTube: (Joey Does Tech) - Remove Clips: Unclip the clips above the Xbox One ports using a spudger.

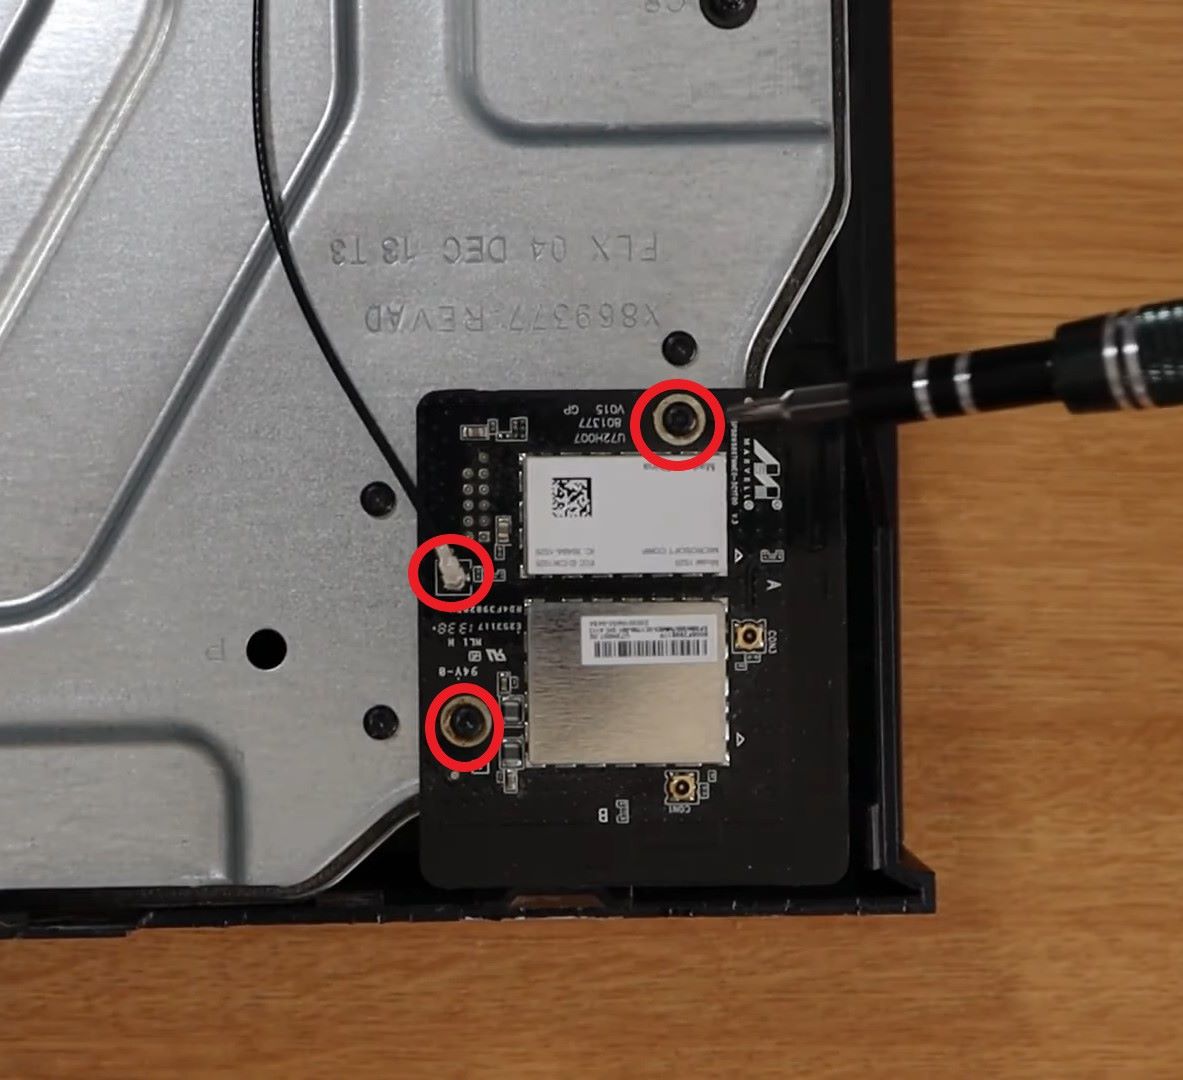
Using a spudger to open clips. Image credit: YouTube: (Joey Does Tech) - Remove Cable: Take off the case > Take out the black cable on the side > Remove the Wi-Fi card by unscrewing the 2 screws on it using Torx 8 screwdriver > Remove the black cable.

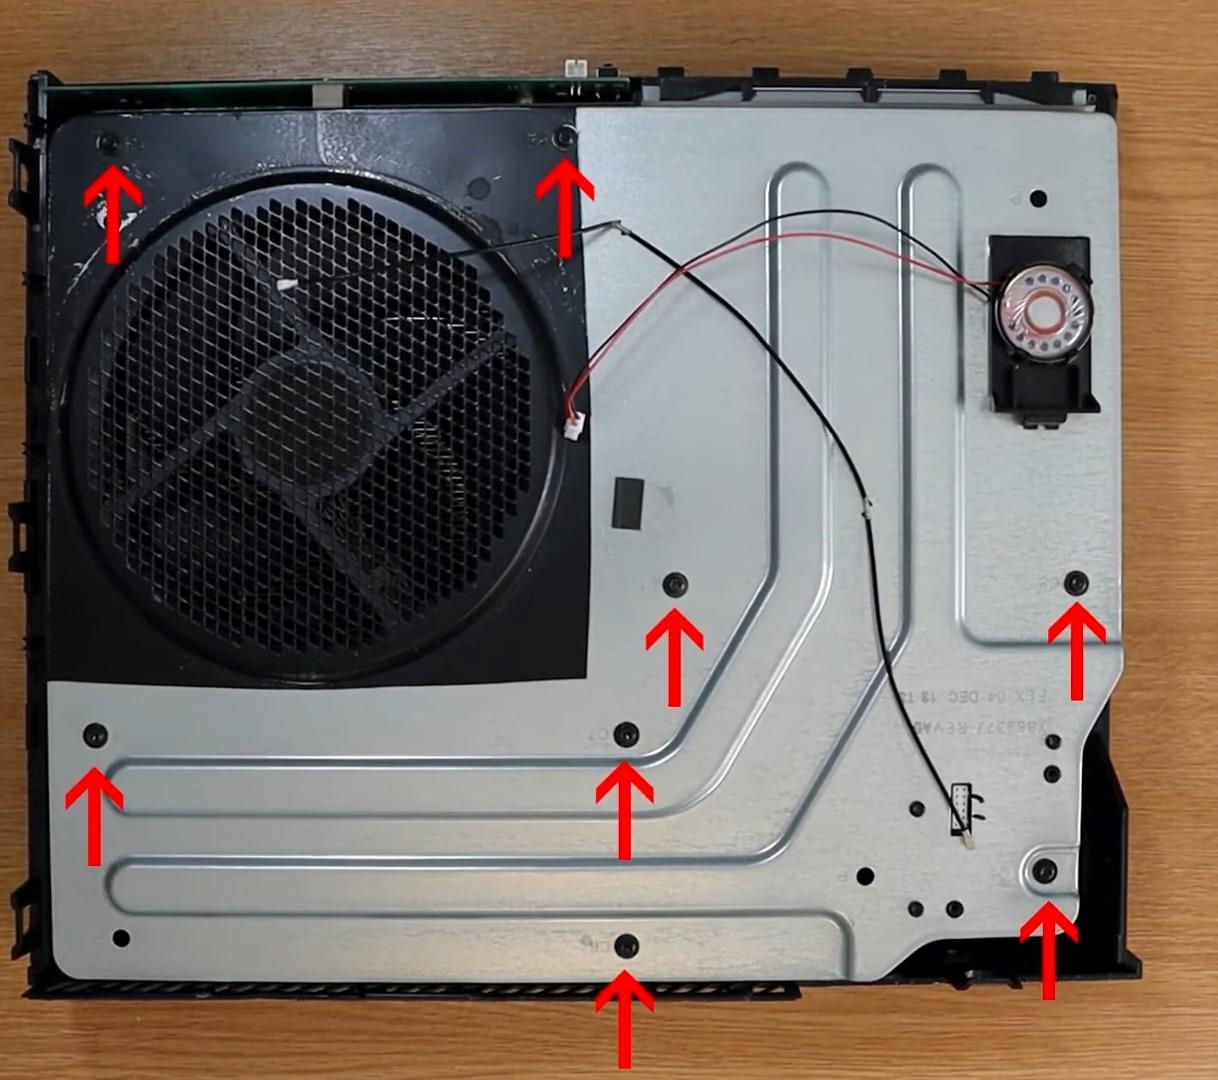
Wi-Fi card screws and cable. Image credit: YouTube: (Joey Does Tech) - Remove Screws: Once the Wi-Fi card is removed, unscrew the 8 screws using Torx 10 screwdriver.

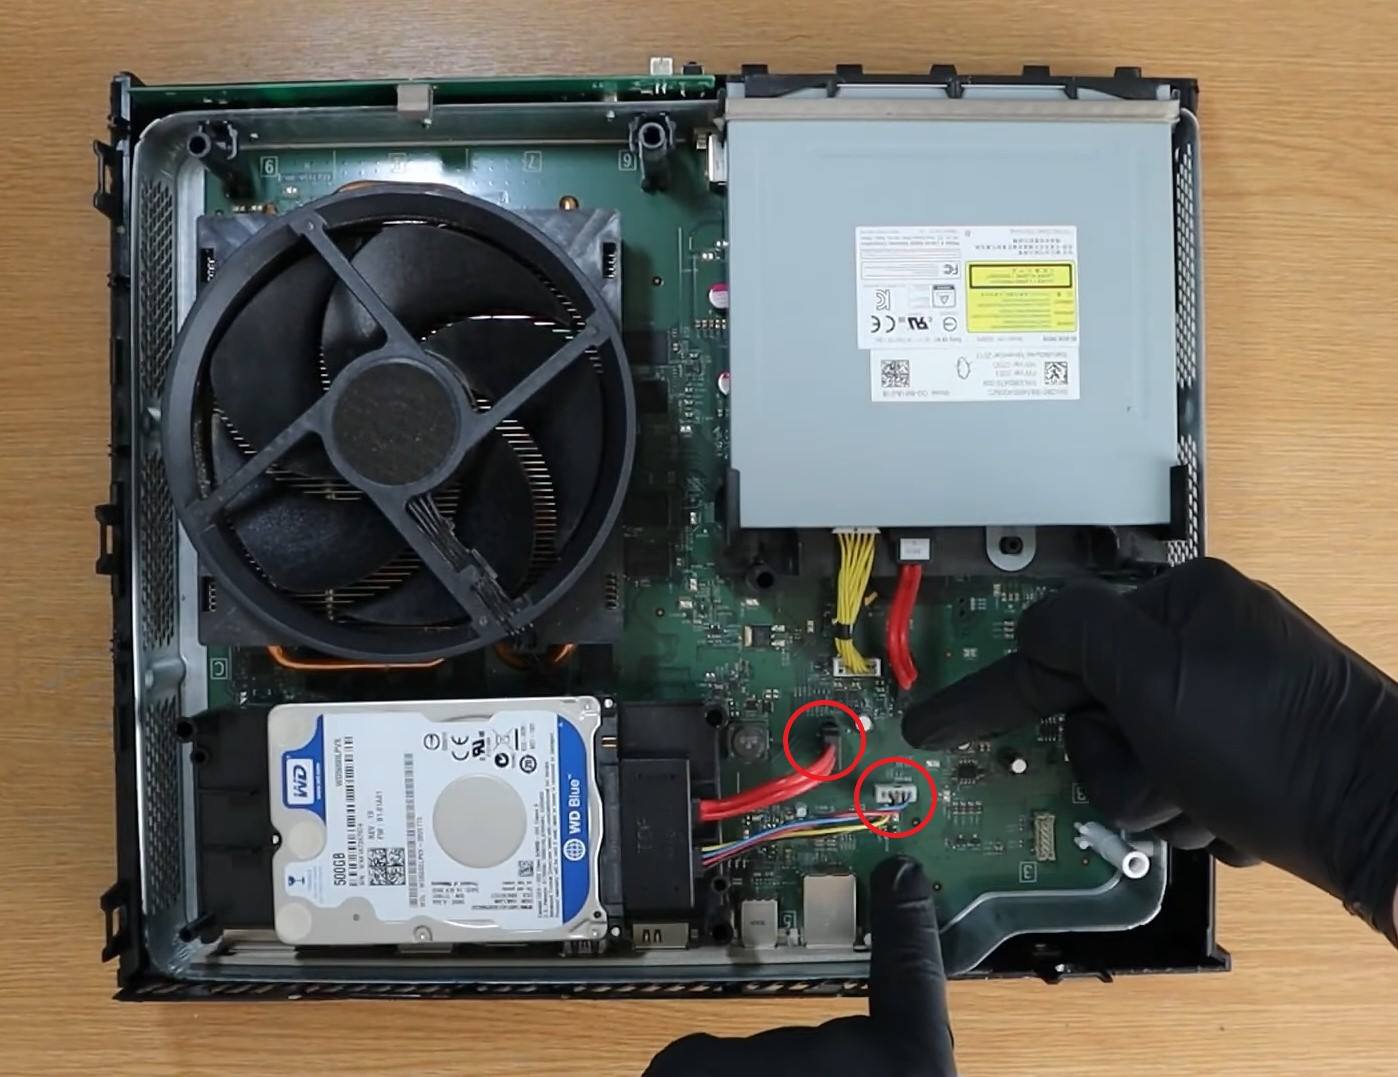
Remove the screws and the cable. Image credit: YouTube: (Joey Does Tech) - Unplug Components: Unplug the black connector > Remove the metal casing > Remove the hard drive connectors.

Hard drive pin connectors. Image credit: YouTube: (Joey Does Tech) - Use Compressed Air: Now, you can blow the dust off using a compressed air can.

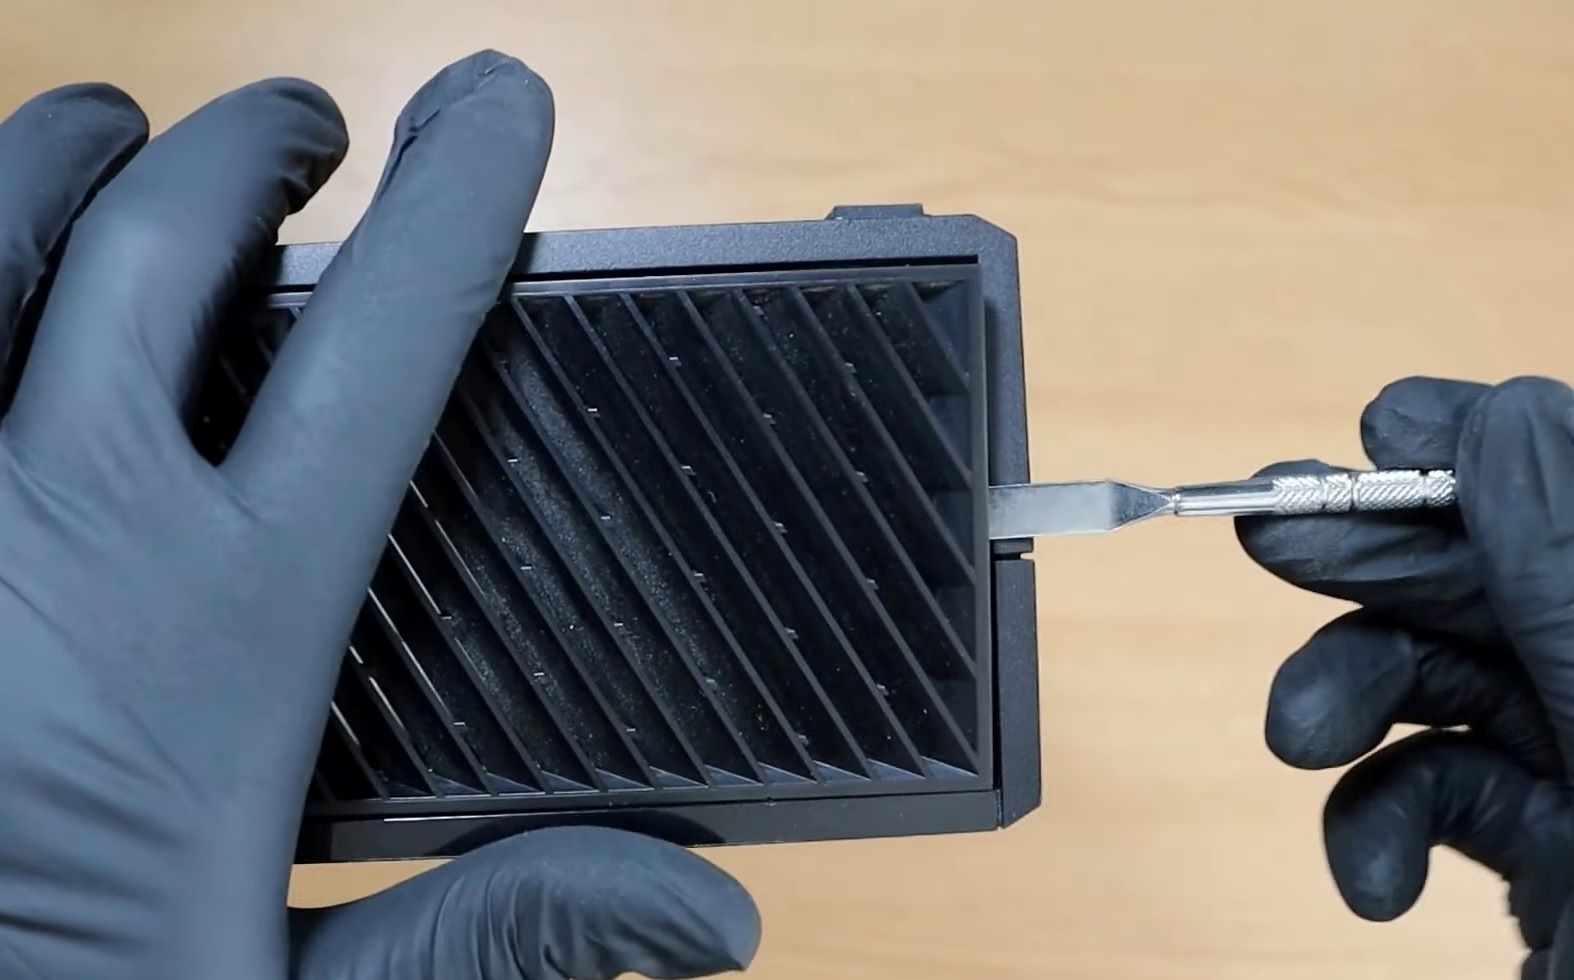
Removing dust using a compressed air can. Image credit: YouTube: (Joey Does Tech) - Clean Fan And Case: Take a brush > Clean the fan blades > Take a slightly damp microfiber cloth > Clean the Xbox casing.

Cleaning fan using the brush. Image credit: YouTube: (Joey Does Tech) - Close Xbox One: Once you are done cleaning, reattach all the connector pins, the Wi-Fi card, the cables, and the casing of the Xbox One.


Xbox One S
Consistent cleaning is key to preserving the Xbox One S’s performance and durability. Moreover, regular maintenance helps prevent dust and debris buildup, safeguarding its performance. You’ll need a spudger, a Torx 10 screwdriver, a small brush, a compressed air can, and a Microfiber cloth. Here’s how you can clean your console without damaging it:
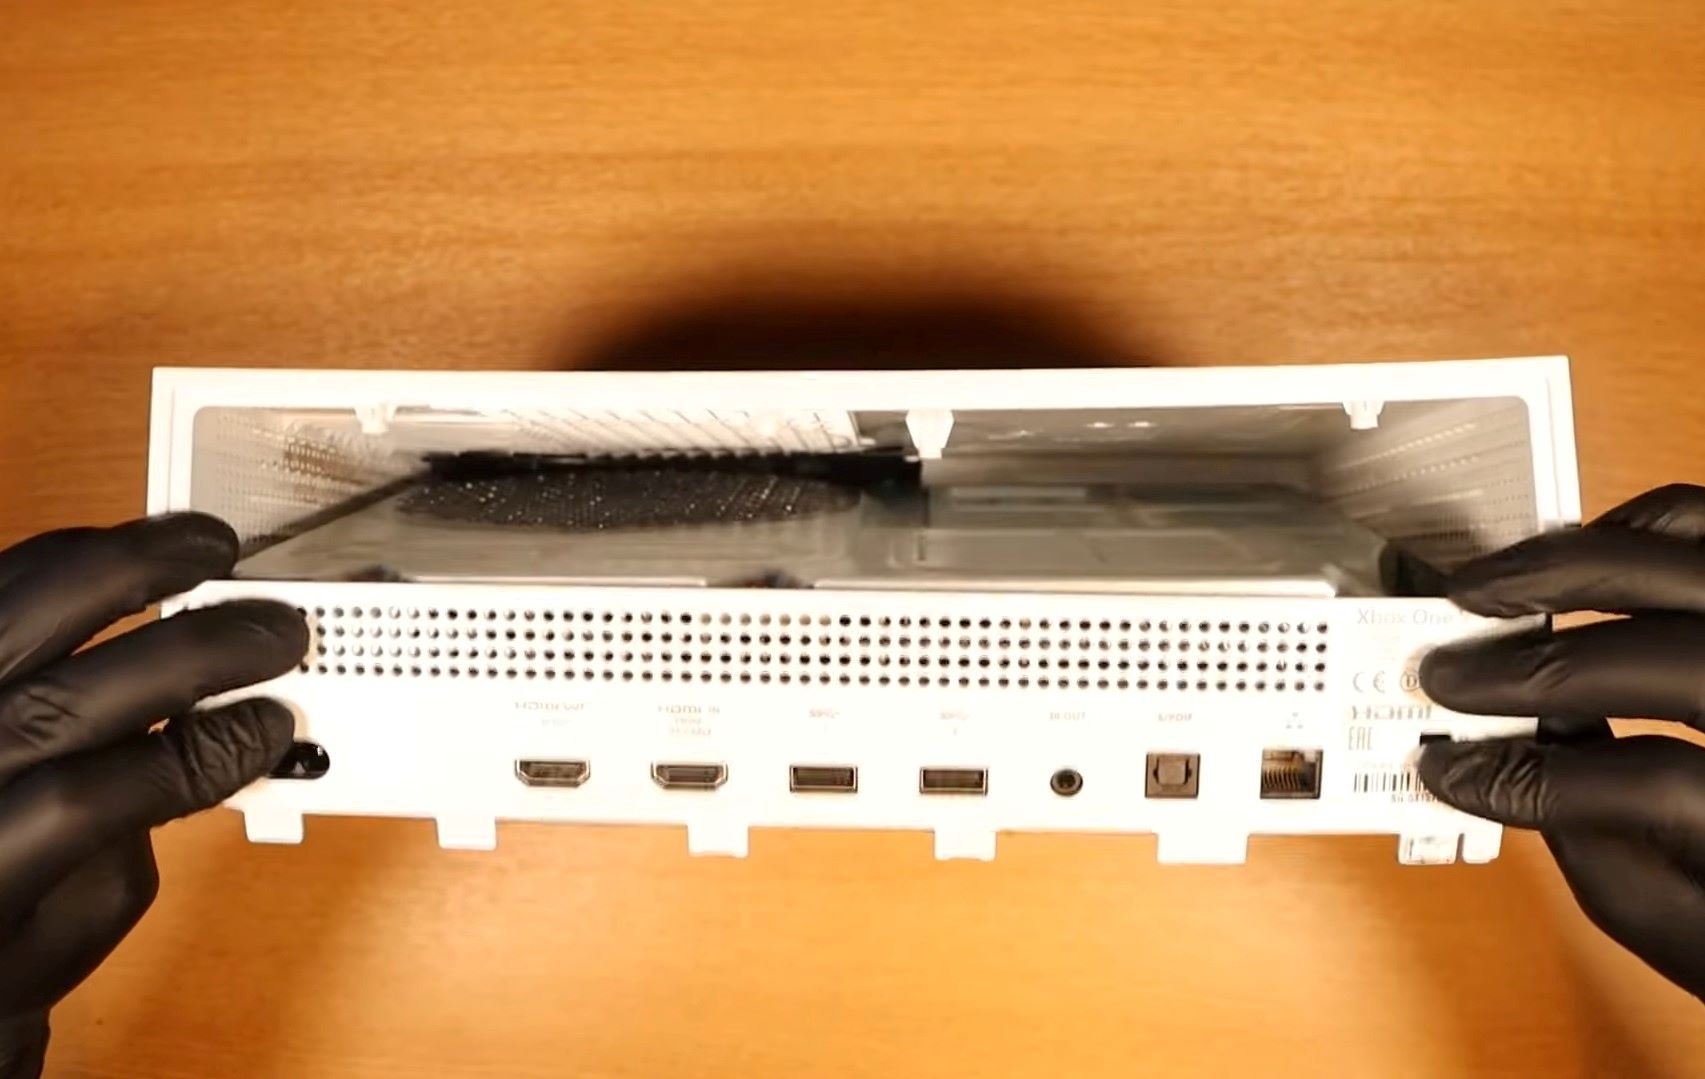
- Remove Casing: Power off your Xbox One S > Unplug cables > Place it on a smooth, clean surface > Start pushing off the casing using a spudger from where there’s a small warranty sticker until you’re able to take it off > Remove casing and clean it with a brush.

Using a spudger to remove the case. Image credit: YouTube: (Joey Does Tech) - Remove Screws: You’ll see another silver metal casing > Take your Torx 10 screwdrivers > Remove the screws on that casing.

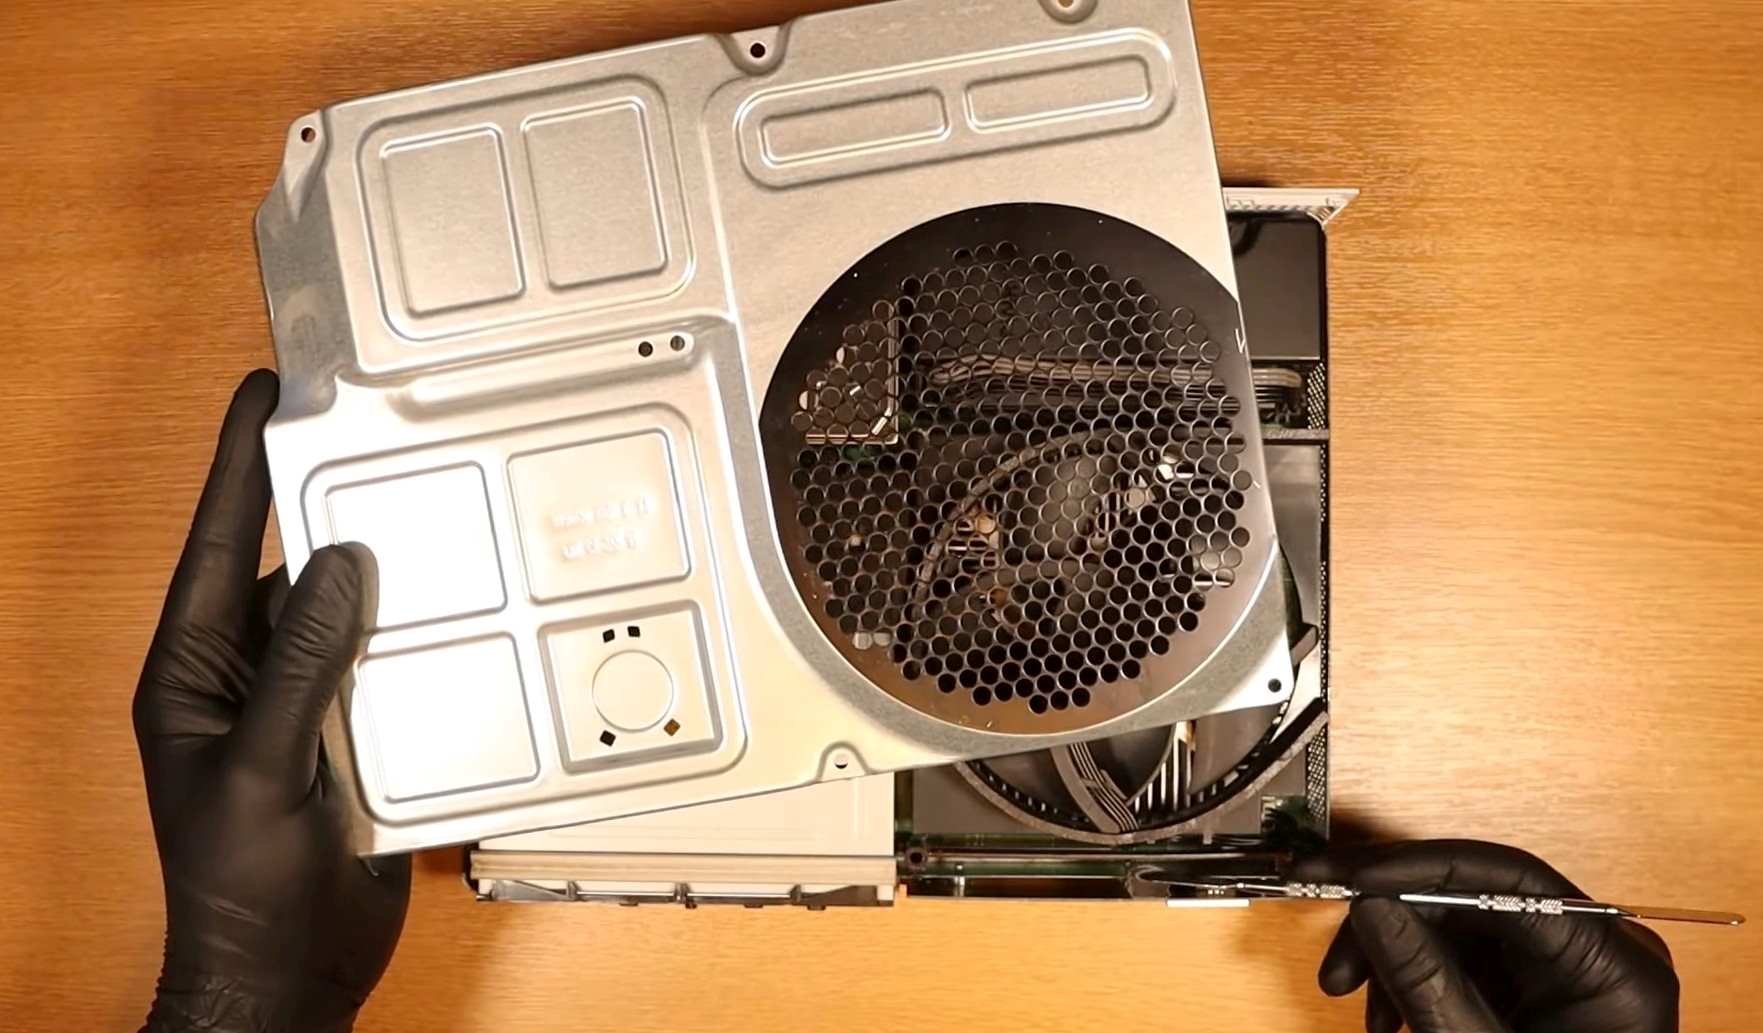
Remove Screws – Image credit: YouTube: (Joey Does Tech) - Remove Casing: Take off the white casing > Remove the metal casing with fan vents beneath it.

Removing the other side of the white casing. Image credit: YouTube: (Joey Does Tech) - Clean Casing: Clean the metal casing with a slightly damp microfiber cloth.

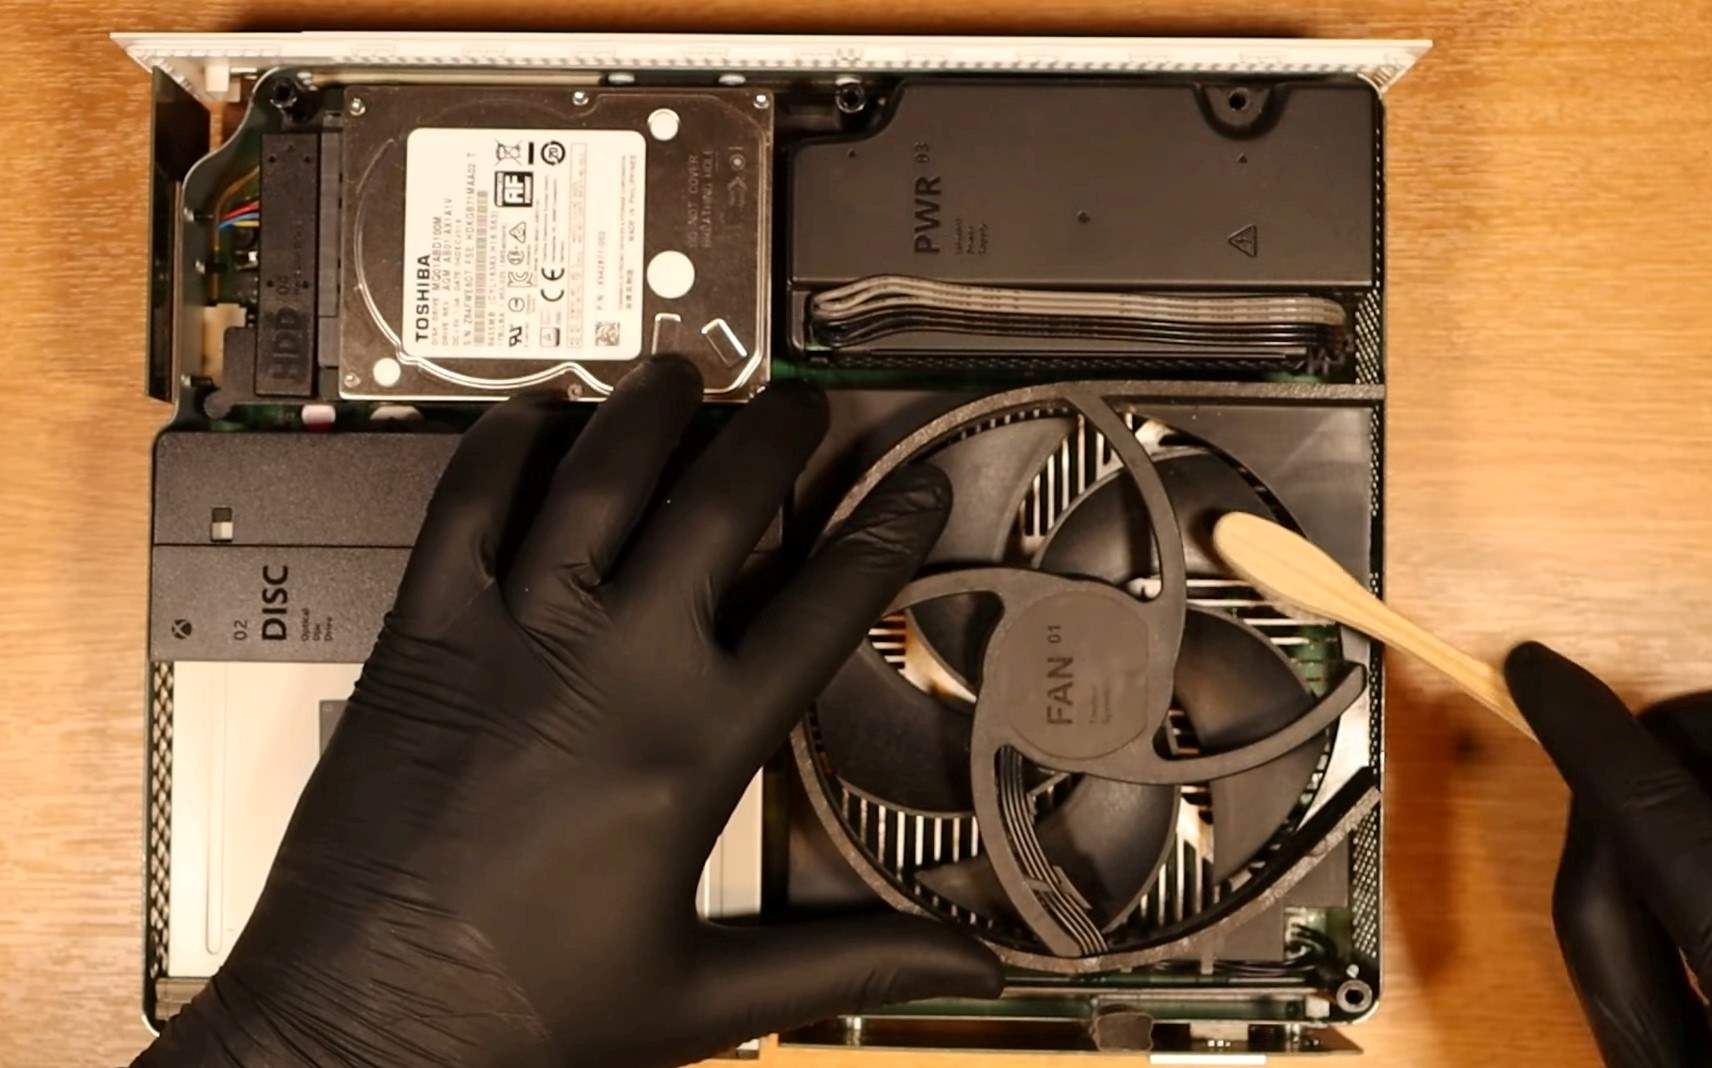
Taking out the case. Image credit: YouTube: (Joey Does Tech) - Clean Fan: Take a small brush > Clean the fan blades.

Cleaning fan with a brush. Image credit: YouTube: (Joey Does Tech) - Clean Dust: Take the compressed air can > Blow the dust off the Xbox.
Using compressed air can clean Xbox. Image credit: YouTube: (Joey Does Tech) - Close Xbox: Reattach the casings once you are sure it’s clean.


Xbox Series X
Keep your Xbox Series X running smoothly by regularly cleaning it to prevent dust from damaging its components. Additionally, this is the latest higher-end series of Xbox One. You will need a Torx 8 screwdriver, a small brush, a spudger, pliers, compressed air can, and a microfiber cloth. Here’s how I clean my Series X console:
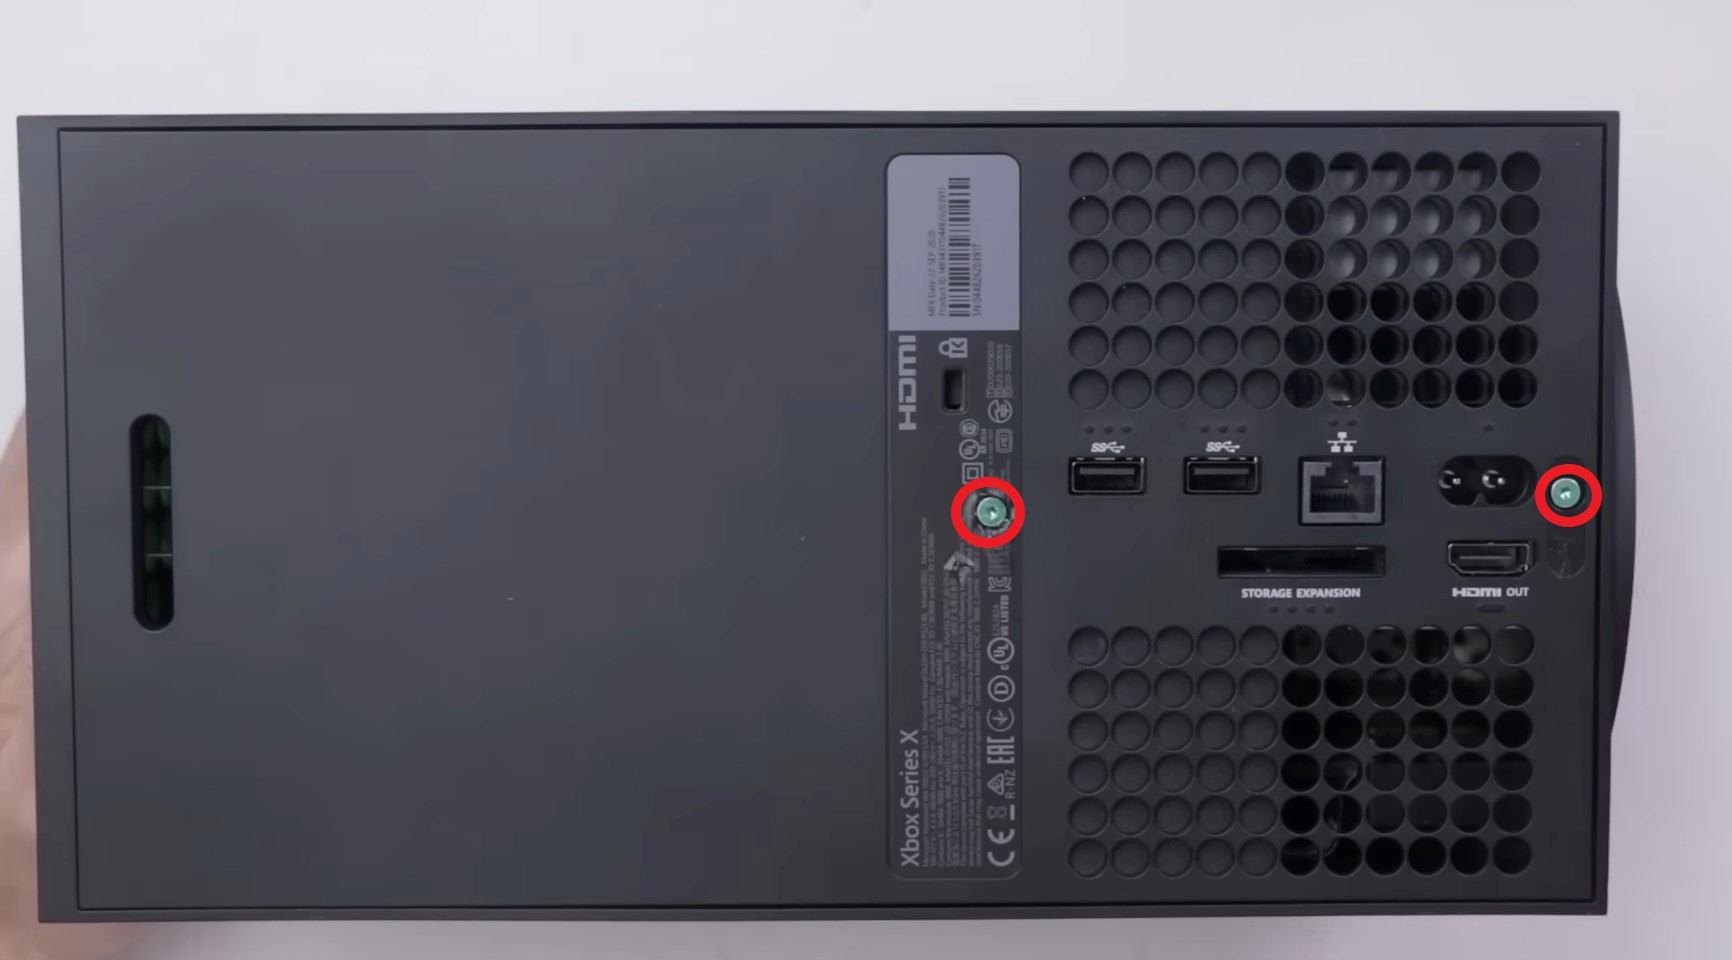
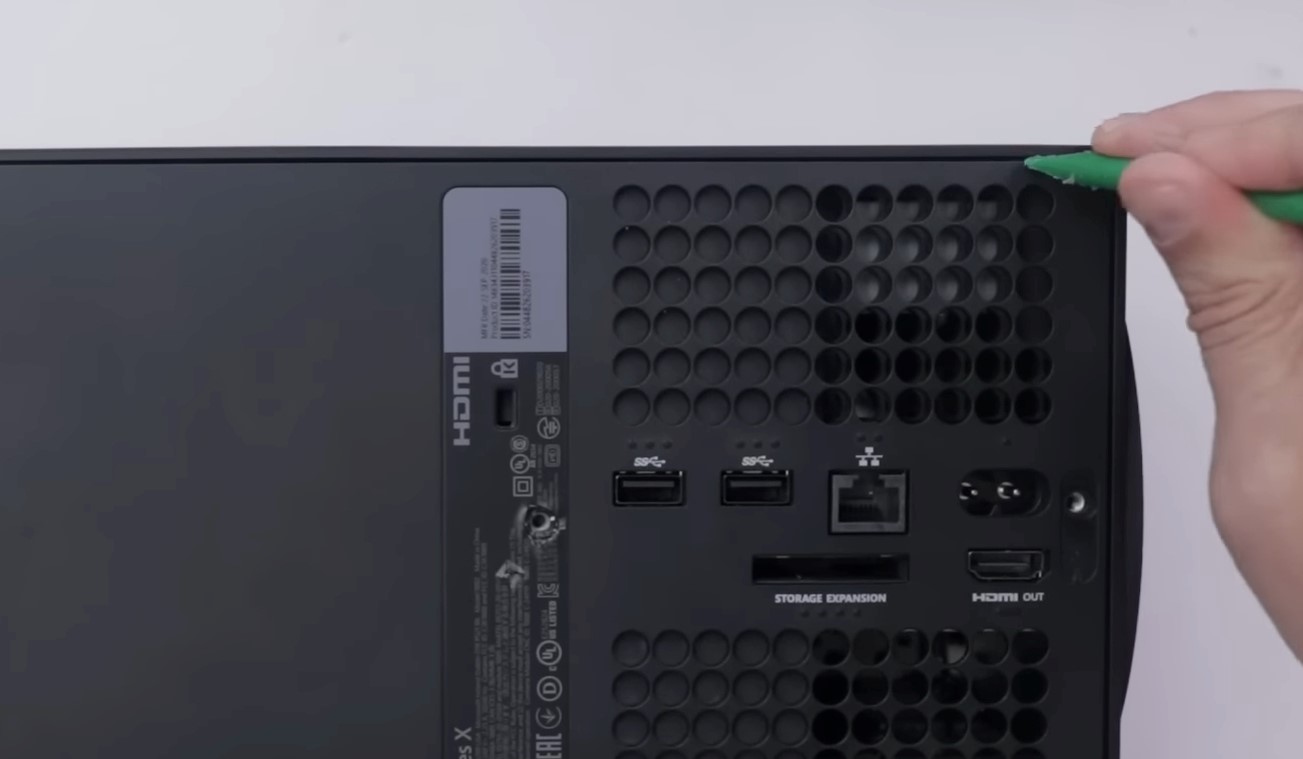
- Remove Screws: Power off the Xbox > Unplug all the cables > Place it on a smooth, clean surface > Open the 2 screws on the side where you see the ports of the Xbox. One of the screws will be beneath the sticker.

Remove the 2 screws on the case. Image credit: YouTube: (TronicsFix) - Remove Case: After removing the screws, use a spudger to pull out the case.

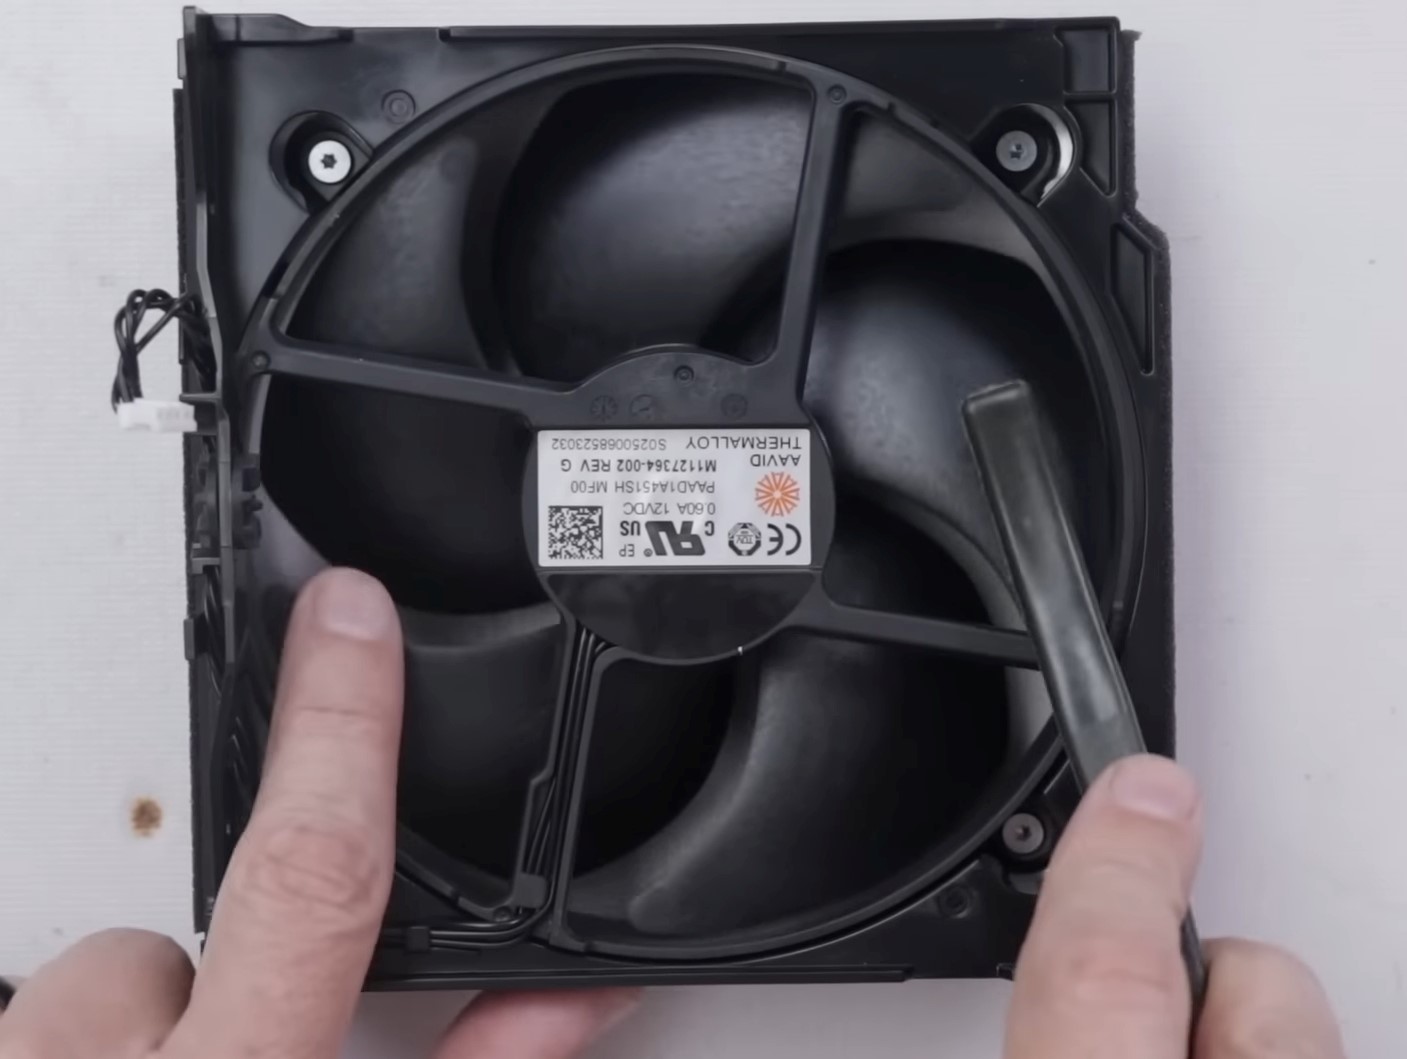
Use a spudger to pull out the case. Image credit: YouTube: (TronicsFix) - Remove Fan: Open the 2 screws on the sides > Detach fan.
Fan screws and pin connector. Image credit: YouTube: (TronicsFix) - Clean Fan: Use pliers to remove the pin connector > Pull out the fan > Take a brush to clean its blades.

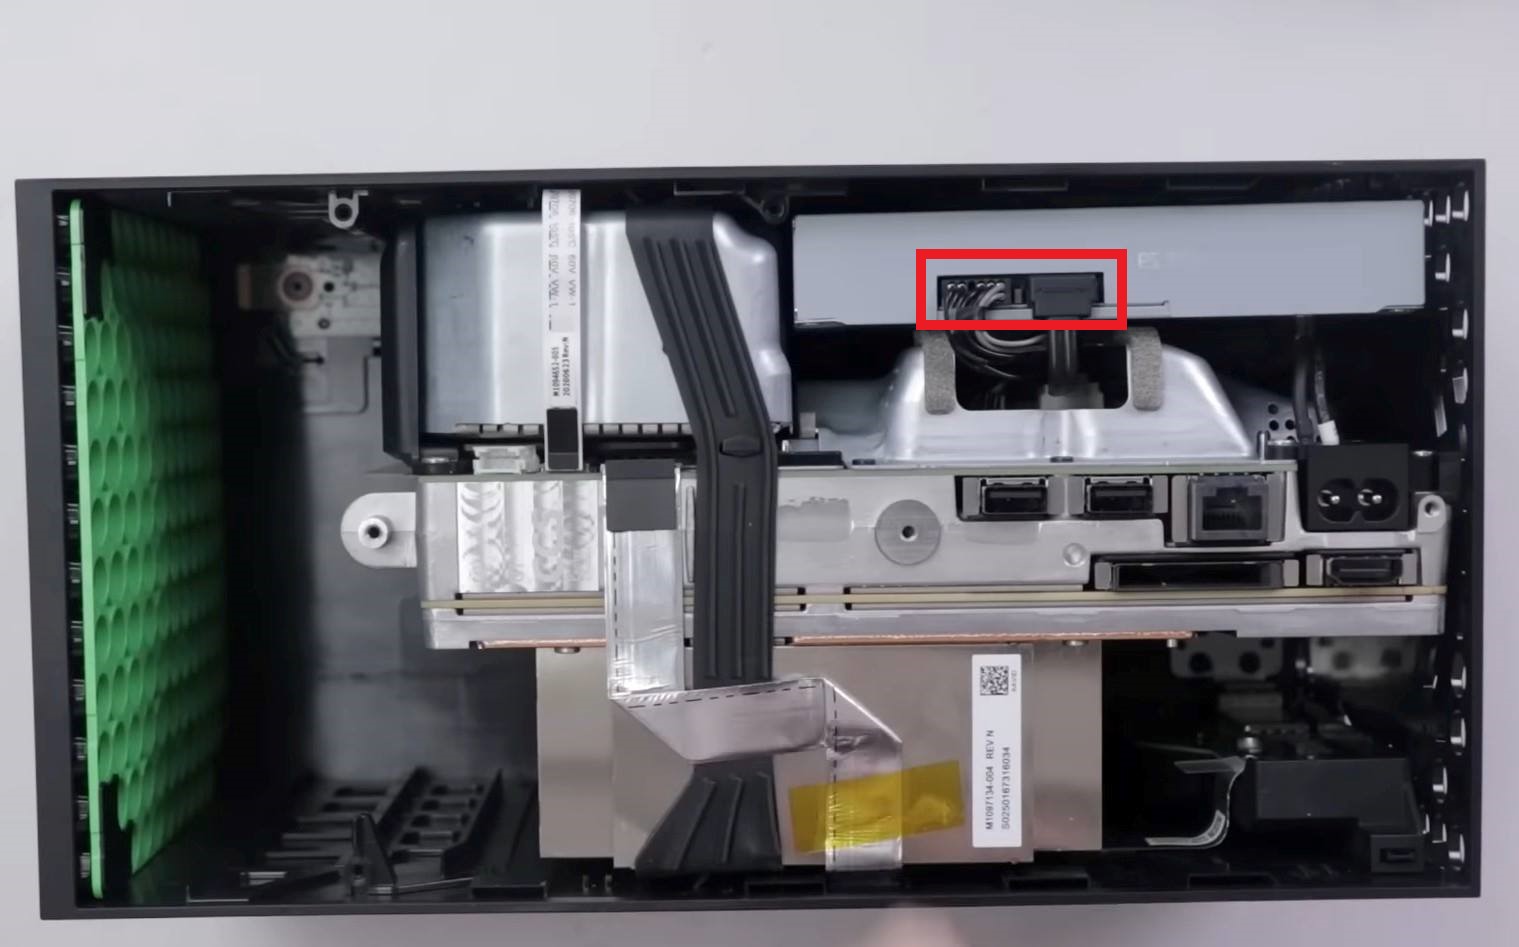
Cleaning fan with a brush. Image credit: YouTube: (TronicsFix) - Remove Disc Drive: Remove the screws from the small plastic covering > Remove the covering > Take out pin connectors > Remove disc drive > Use a slightly damp microfiber cloth to clean it.
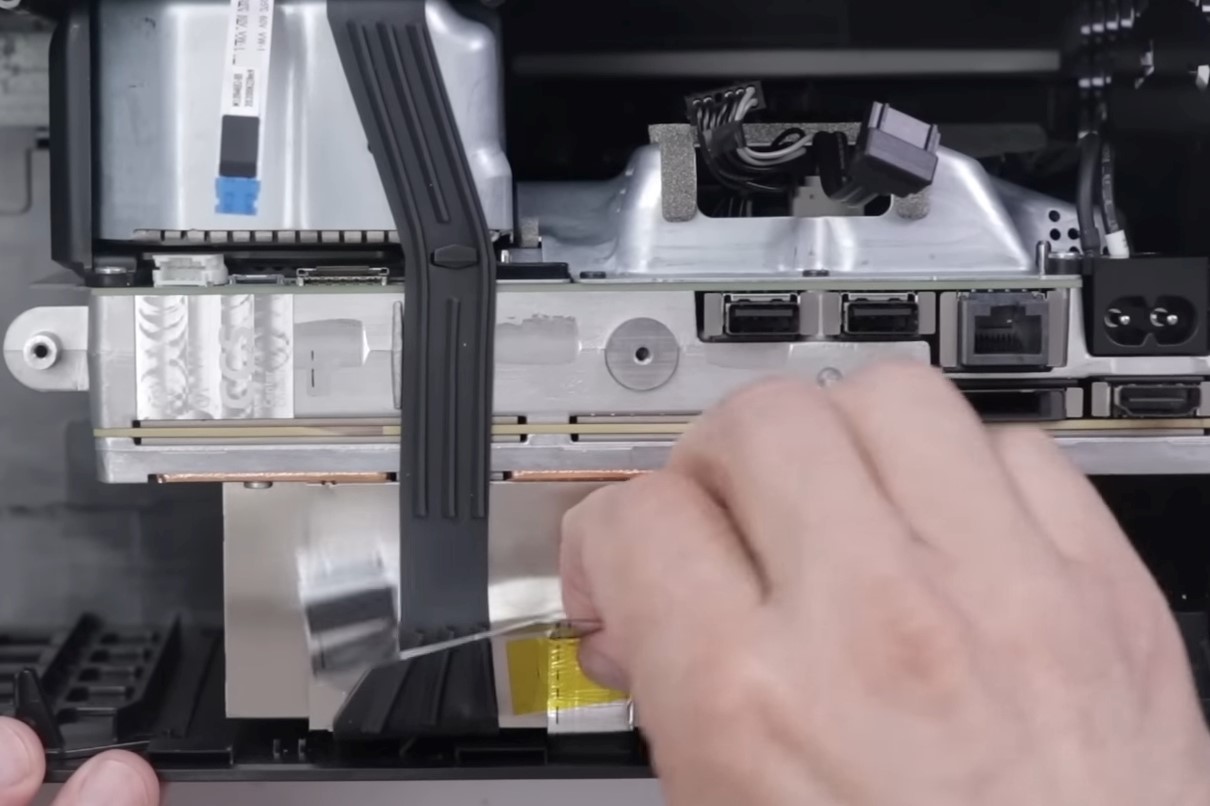
Disc drive pin connectors. Image credit: YouTube: (TronicsFix) - Remove Other Components: Pull out the ribbon cable connectors > Take out the remaining components > Pull the ribbon cable itself.

Removing ribbon cables. Image credit: YouTube: (TronicsFix) - Remove Plate: Rotate the plate for support beneath the Xbox > Remove it > Unscrew the 3 screws you find beneath the plate.

Remove screws beneath the plate. Image credit: YouTube: (TronicsFix) - Clean Heat Sink: Pull out the remaining components of the Xbox > Use a brush to loosen up the stubborn dust on the heat sink > Use compressed air to blow away the rest of the dust.

Cleaning heat sink vents using the brush. Image credit: YouTube: (TronicsFix) - Clean Case: Clean the case of the Xbox with a damp microfiber cloth.
- Reassemble Xbox Components: You can put all the components back in, reattach all those cables, and tighten the screws once you are done cleaning.

Xbox Series S
Your Xbox Series S will remain in top shape if you regularly clean it. Furthermore, this prevents dust and dirt from causing problems and helps it last longer. You will need tweezers, a spudger, a Torx T8, and T10 screwdriver, a compressed air can, a microfiber cloth, and a small brush. Follow the method below to clean your Xbox Series S:
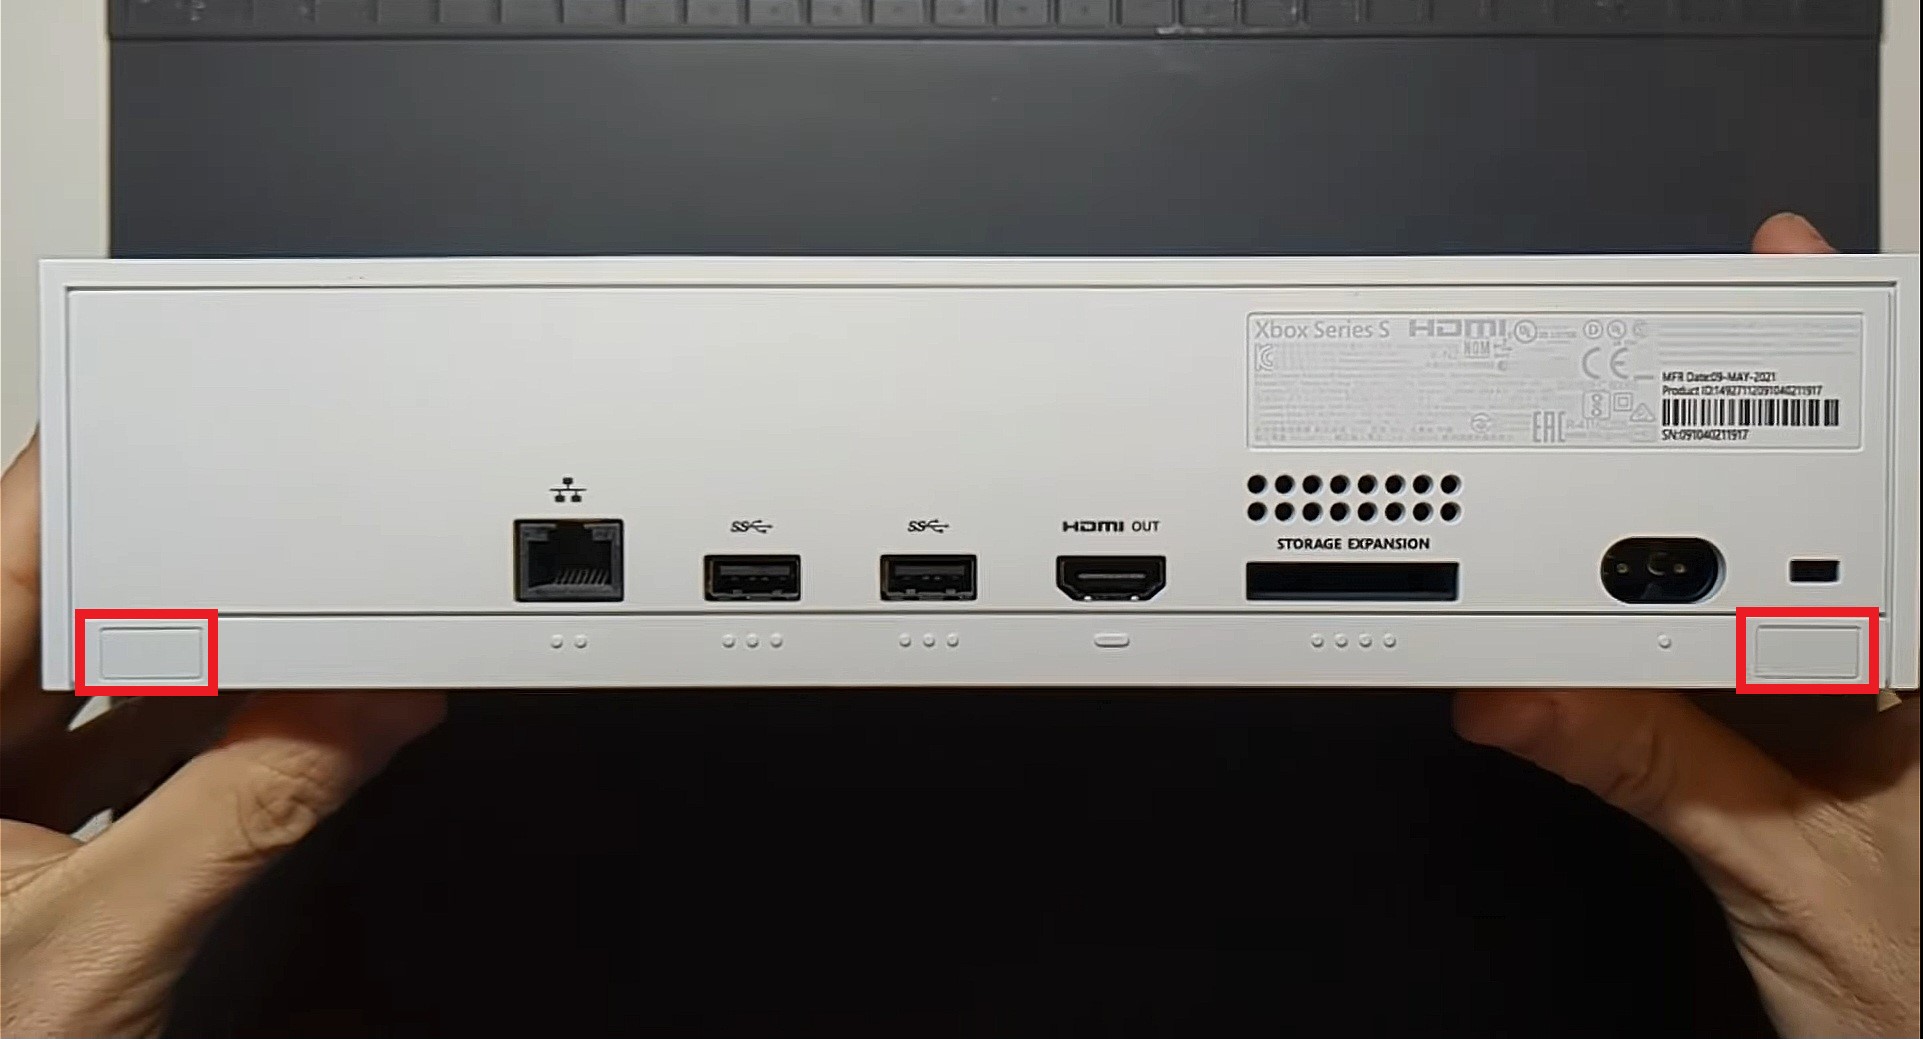
- Remove Stickers: Power off the console > Place it on a clean and smooth surface > Locate two stickers on the bottom at both sides of the ports > Pull off the white stickers using tweezers.

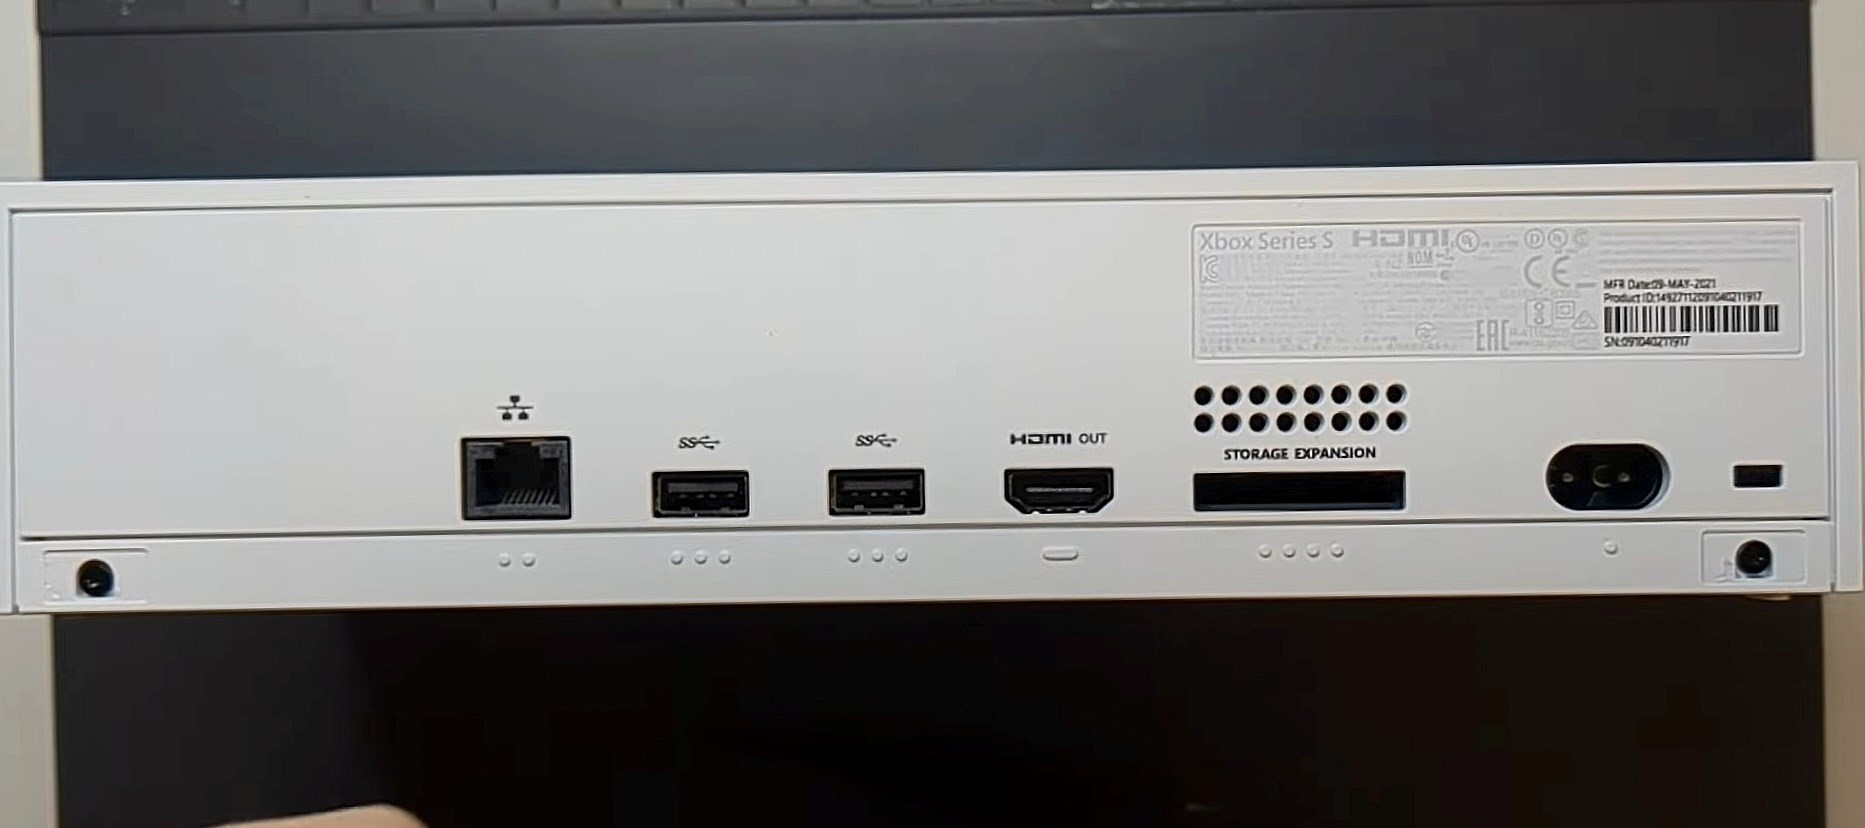
White sticker on Xbox. Image credit: YouTube: (Joe Bleeps) - Remove Screws: Remove screws that you have just found after removing stickers > Use a Torx T8 screwdriver to remove these screws.

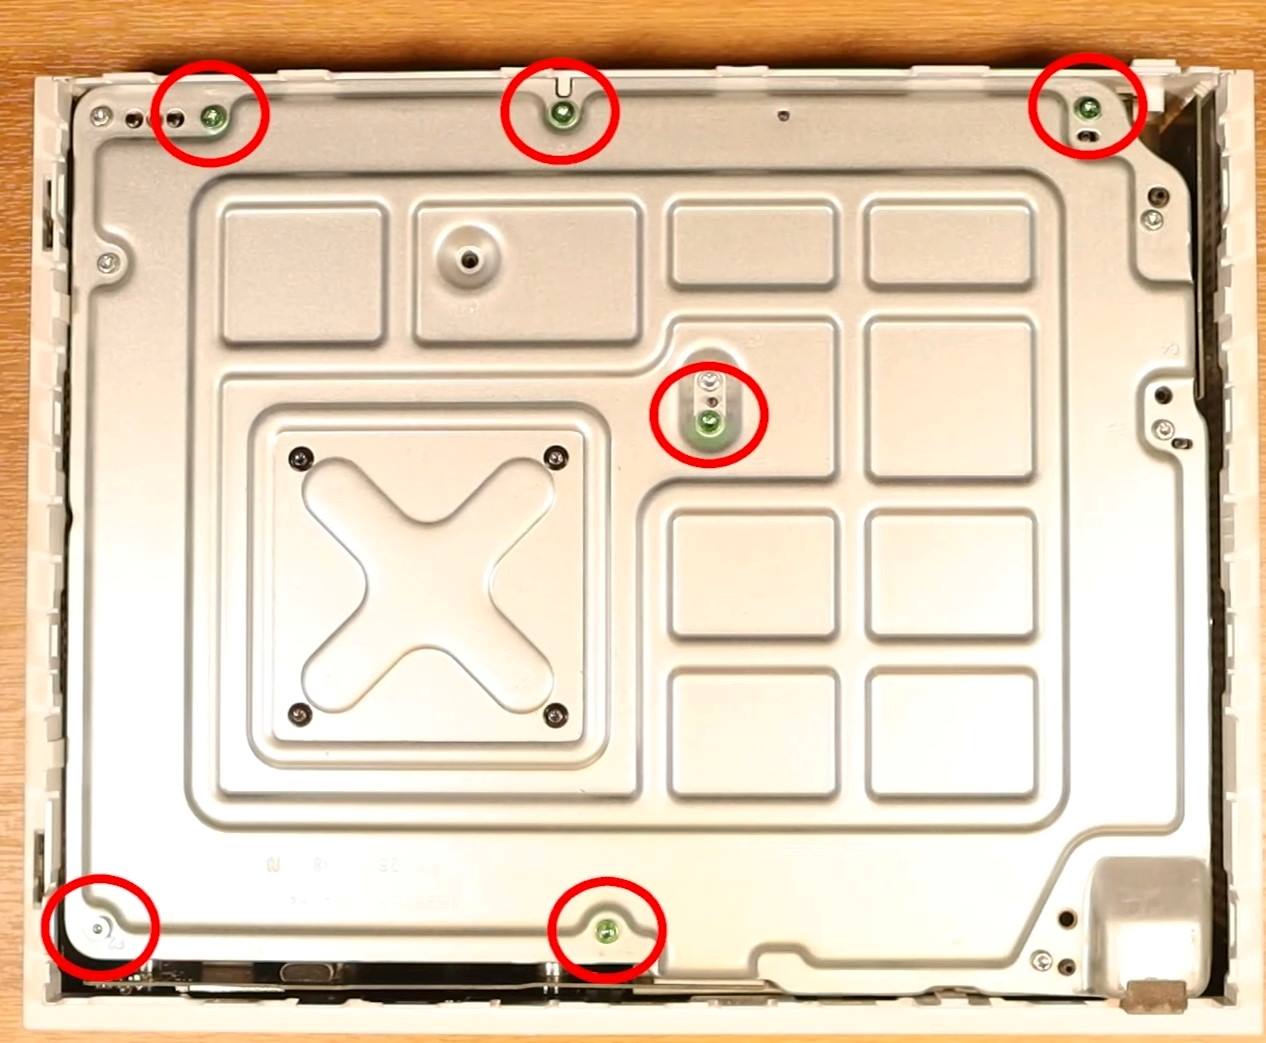
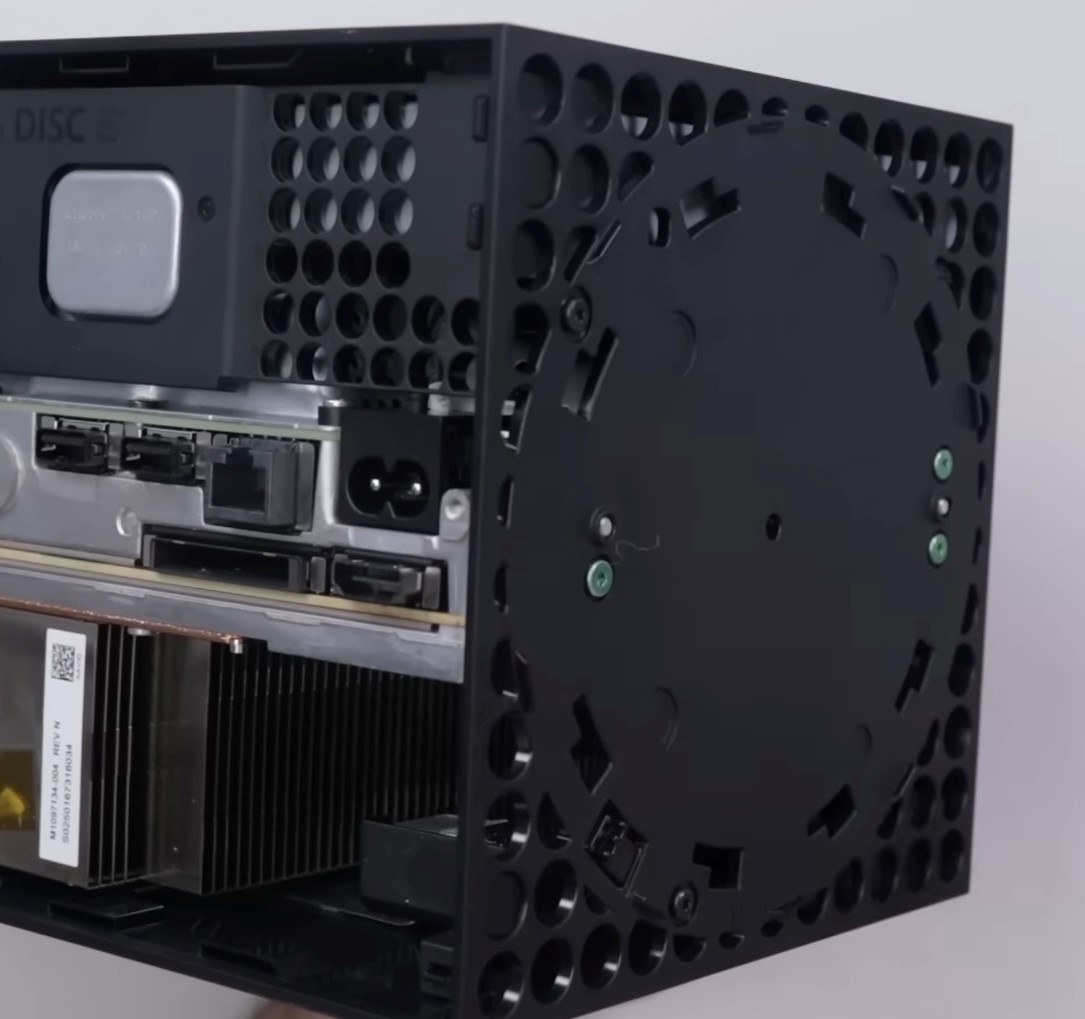
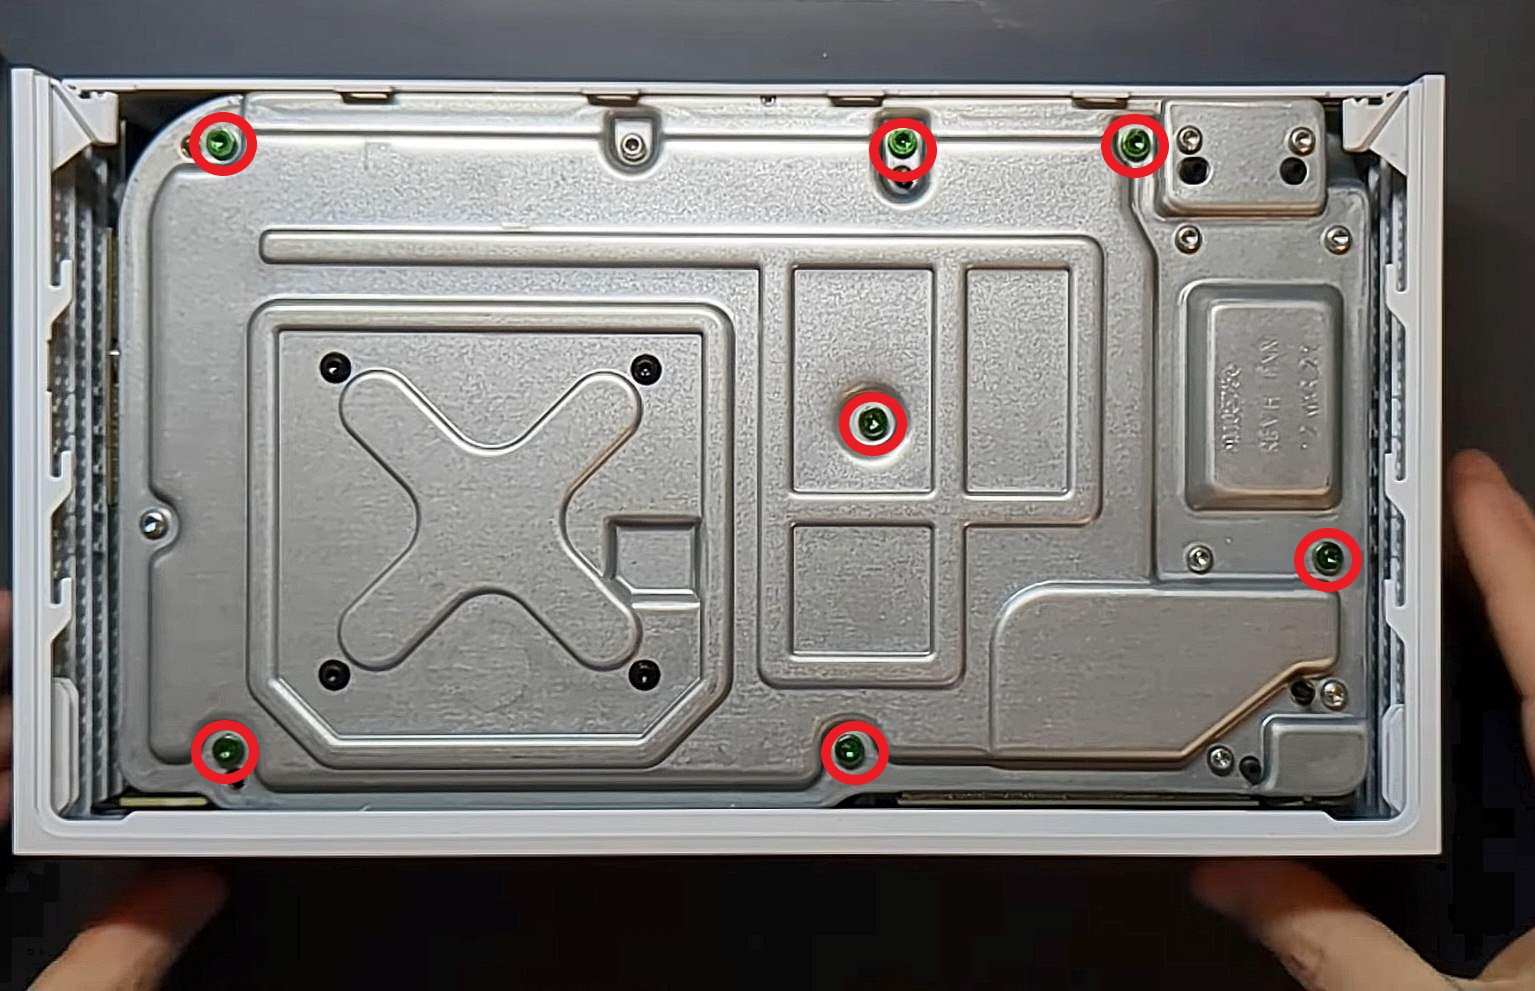
Screws underneath Xbox sticker. Image credit: YouTube: (Joe Bleeps) - Remove Casing: Pull off the white case of the Xbox series S console > Use a slightly damp microfiber cloth to clean the case > Remove the seven green screws using a Torx T10 screwdriver on the metal casing.
Screws to be removed. Image credit: YouTube: (Joe Bleeps) - Remove Screws: Pull off the other side of the metal casing > You will then see the fan vents > Use a Torx T8 to remove the screws on the boards so that the boards can come off.

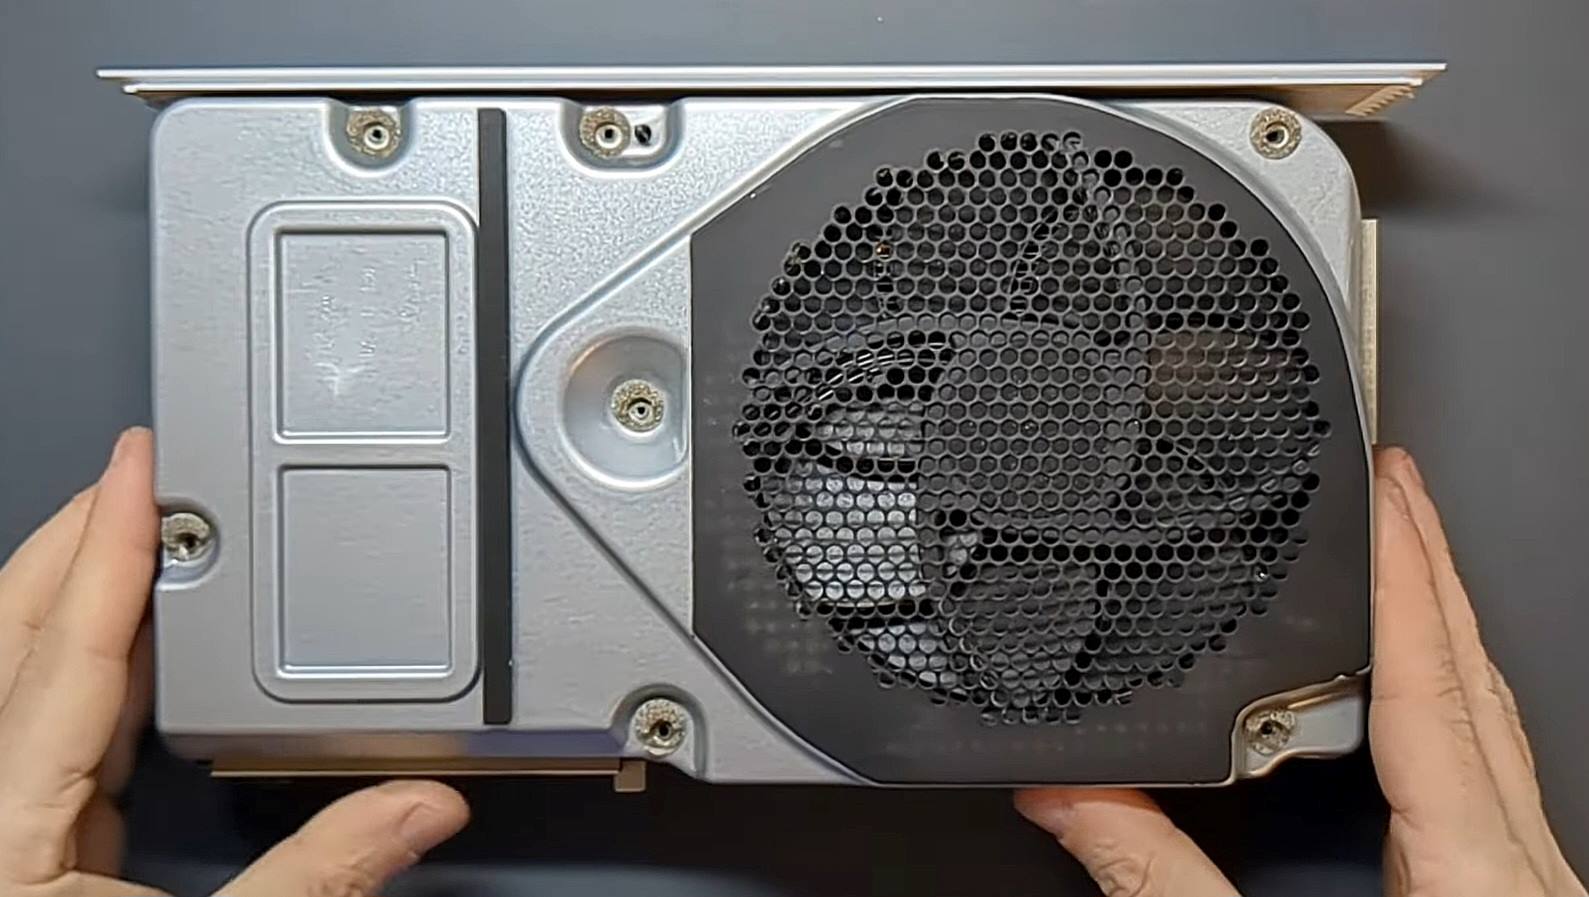
You will find 2 more similar boards. Image credit: YouTube: (Joe Bleeps) - Remove Casing: Pull the silver metal casing from the side where you face the fan vent.

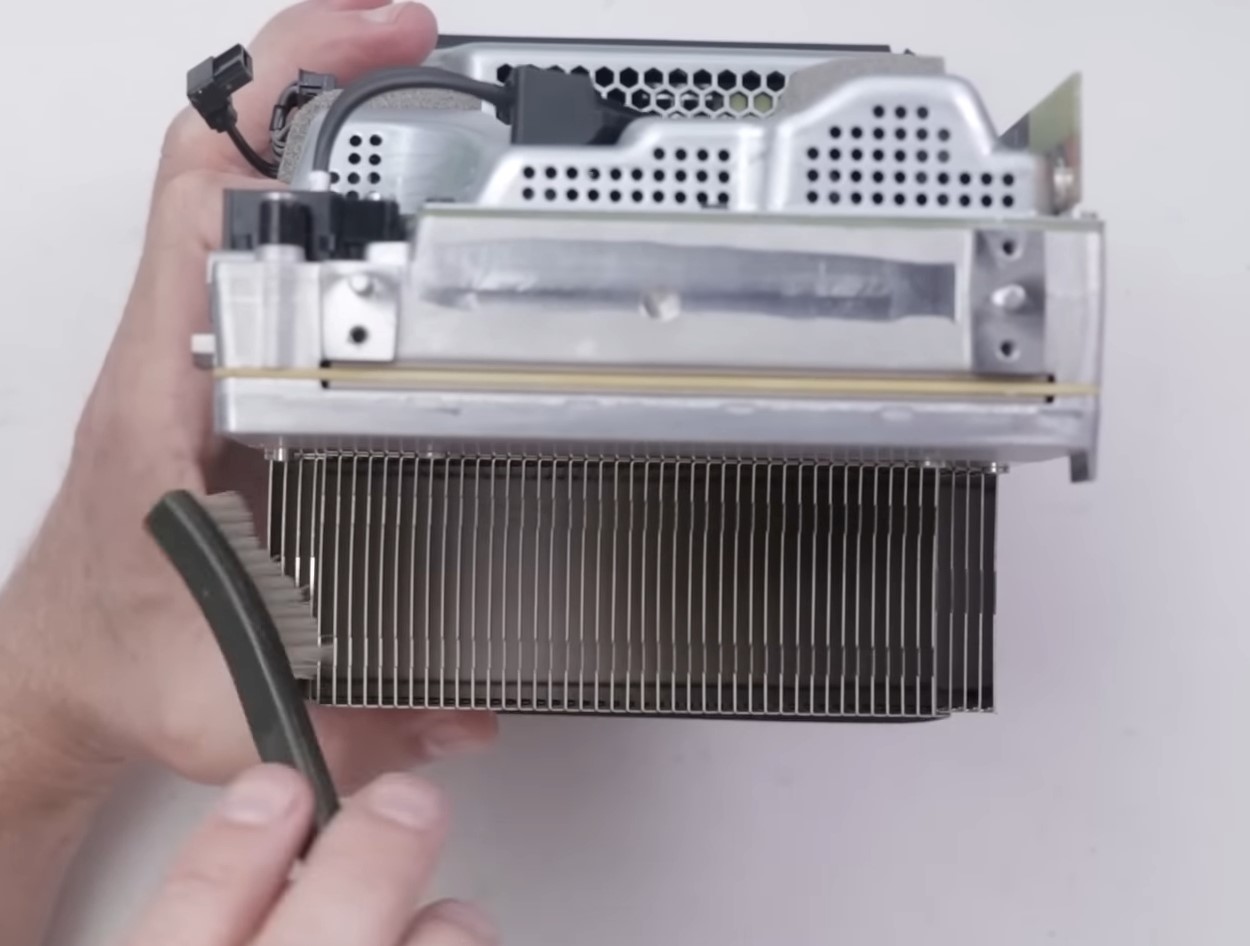
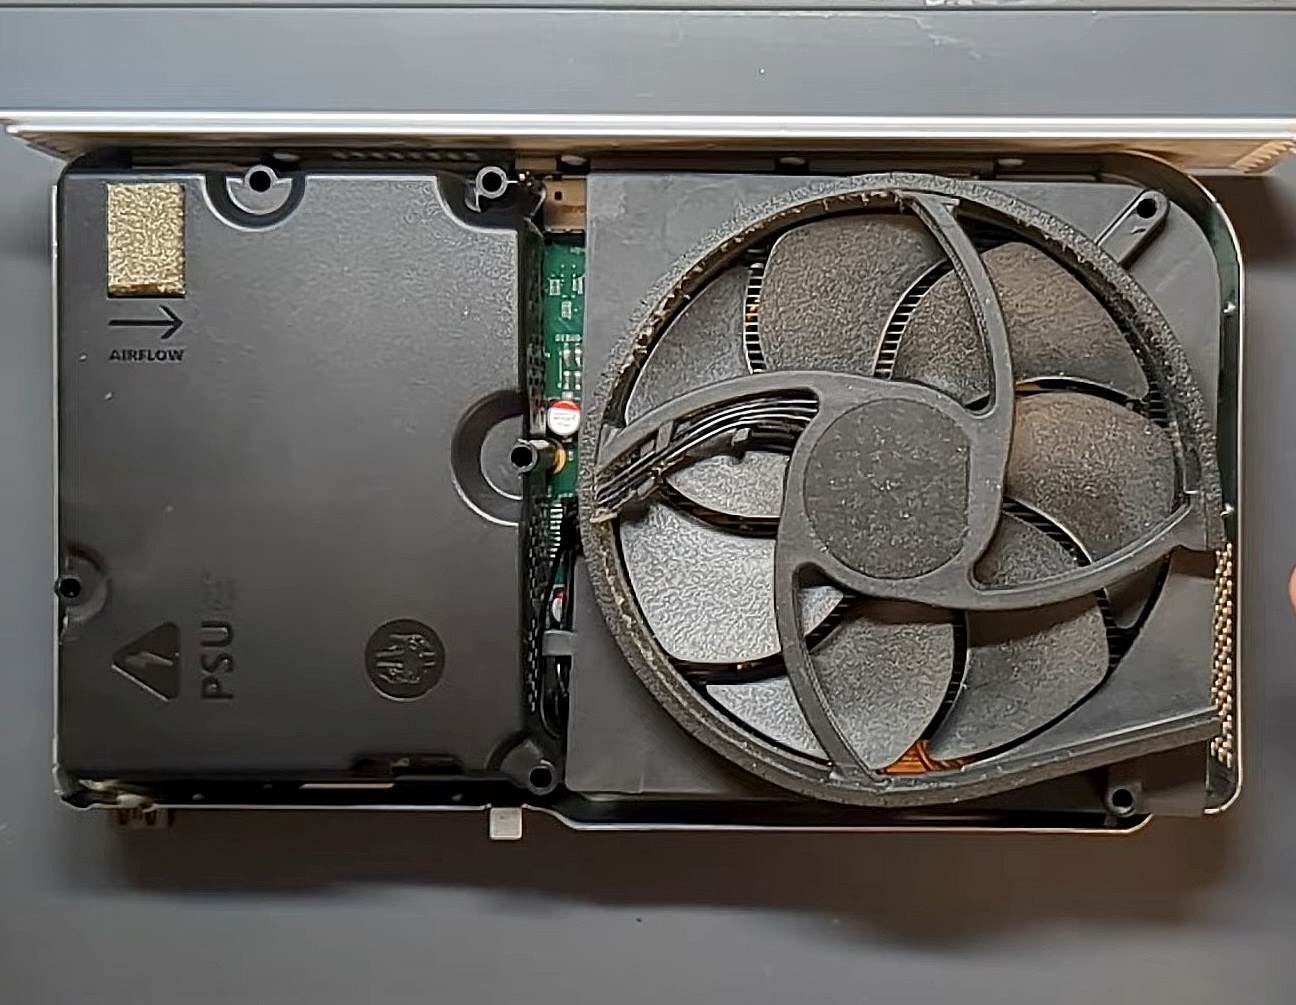
Case to be pulled. Image credit: YouTube: (Joe Bleeps) - Clean Fan: Use a brush to clean the fan blades > Take a compressed air can and blow the rest of the dust off.

Clean the dirty Xbox. Image credit: YouTube: (Joe Bleeps) - Reassemble Console: Once you’re done cleaning, reattach all of the parts back in.

Xbox Controller
The controller is a part of your Xbox, regardless of your model. It is essential to clean your Xbox controller as much as it is to clean your Xbox console.
- Compressed Air Can: Place your controller on a clean and smooth surface > Blow off the dust and debris inside the openings.
- Microfiber Cloth: Take a microfiber cloth slightly dipped in isopropyl alcohol to remove stubborn stains on your controller > Wipe your controller with a microfiber cloth slightly dampened by water > Leave it to dry before using it again.
Pros & Cons
| Feature | Pros | Cons |
|---|---|---|
| Cleaning Xbox Console | ✅Improved Performance ✅Prevent Hardware Damage ✅Better Aesthetics | ❌Risk of Damage ❌Voided Warranty ❌Temporary Disruption |
Final Verdict
Regularly cleaning your Xbox enhances its performance and appearance and helps avoid hardware damage. Moreover, by cleaning your Xbox correctly using some basic materials, you invest in its lifetime and improve the gaming experience.
Also, there is a tweet giving a pro-tip on cleaning Xbox X:
Pro tip:
To clean the dust out of your Xbox Series X console, simple unplug it and lay it on its side, then use a leaf blower from the top of the console to blow the dust out. pic.twitter.com/hhHZHLd8Cf— Ashtrey Gaming 🗯 (@AshtreyGaming) January 1, 2024
It’s a relatively simple task but very important as we found Xbox Support giving tips.
Frequently Asked Questions
You can use an air compressor. If you do not have an air compressor, use a vacuum.
Avoid bringing liquid and greasy substances close to your Xbox. Furthermore, avoid keeping your Xbox close to open windows that expose it to sunlight and polluted air.
If you live somewhere where the air is polluted and dusty, it’s completely fine to clean your Xbox every month.
Related Articles:
- How To Turn Off Xbox Controller On PC [Answered]
- How To Reset Xbox? [360, One & Series X]
- How To Clear Cache On Xbox? [All Methods]
- The Right Way To Power Cycle Xbox [All Models]
- How To Change DNS On Xbox? [360, One, Series X/S]
Thank you! Please share your positive feedback. 🔋
How could we improve this post? Please Help us. 😔
[How To’s & Guides Editor]
Haddi has been in the Gaming and tech Space for over 10 Years Now; he has worked on notable websites like eXputer, Gamepur, Gear Siege, Gearnuke, and plenty more. He is an expert at Games & PC Hardware; you can expect him to solve any problem. People often joke, that if there is any problem anyone can solve, Haddi can solve it faster. Currently, Haddi writes and manages a Team of Experts at Tech4Gamers.
Contact: Haddi@tech4gamers.com


