The newest Windows 11 from Microsoft comes packed with many functionalities, and the Xbox Game Bar is among them, where you can record gameplay, capture screenshots/videos, join Xbox game parties and more. However, some users find it unnecessary and want to get rid of it but don’t know how to disable the Xbox Game Bar on Windows 11.
- The Xbox Game Bar grants users access to various features, such as recording gameplay, taking screenshots or videos, joining Xbox game parties, monitoring hardware statistics, and finding fellow players.
- While the Xbox Game Bar provides a wide range of functionalities, it can occasionally lead to glitches and system slowdowns in specific scenarios. This is why users who aren’t primarily focused on gaming often choose to keep it disabled.
- There are several methods to disable the Xbox Game Bar on Windows 11, including using the Settings menu, PowerShell, Registry Editor, and Group Policy.
Methods Difficulty Rating
Rated: 3/10
Rated: 7/10
Rated: 6/10
Rated: 5/10
Using Settings
The most straightforward method to disable the Xbox Game Bar is through the Windows 11 settings menu. But to carry this out, I had to disable the Game DVR option first to prevent overlays and game notifications on my system. Check out the steps below to see how I proceeded with the method.
- Access Settings > Highlight Gaming section on the left > Captures.

Open Captures Tab (Image By Tech4Gamers) - Disable the Record What Happened toggle switch.
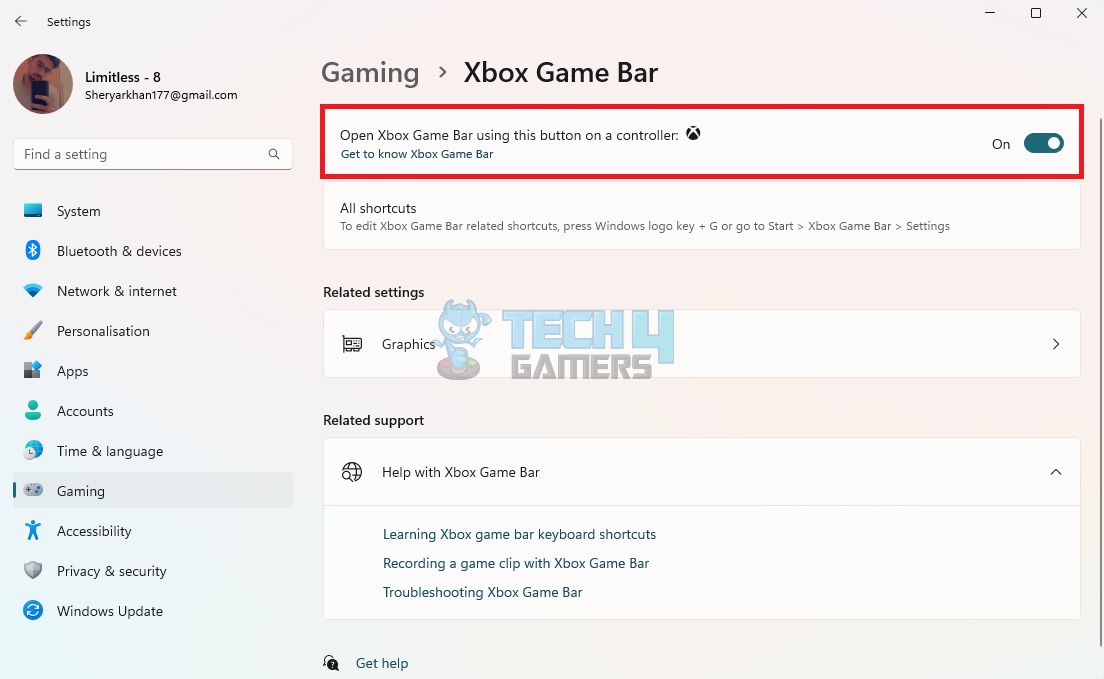
- Return to the Gaming options > Choose Xbox Game Bar > Switch off the toggle for Open Xbox Game Bar Using This Button On A Controller.

Toggle Off Xbox Game Bar (Image By Tech4Gamers)

Using Windows 11 Powershell
PowerShell is a Windows scripting language-based program where you can perform administrative tasks or configure system settings using commands. By running the dedicated code in PowerShell, I could quickly turn off the Xbox Game Bar on my PC. Here are the steps that you can follow to execute this effortlessly.
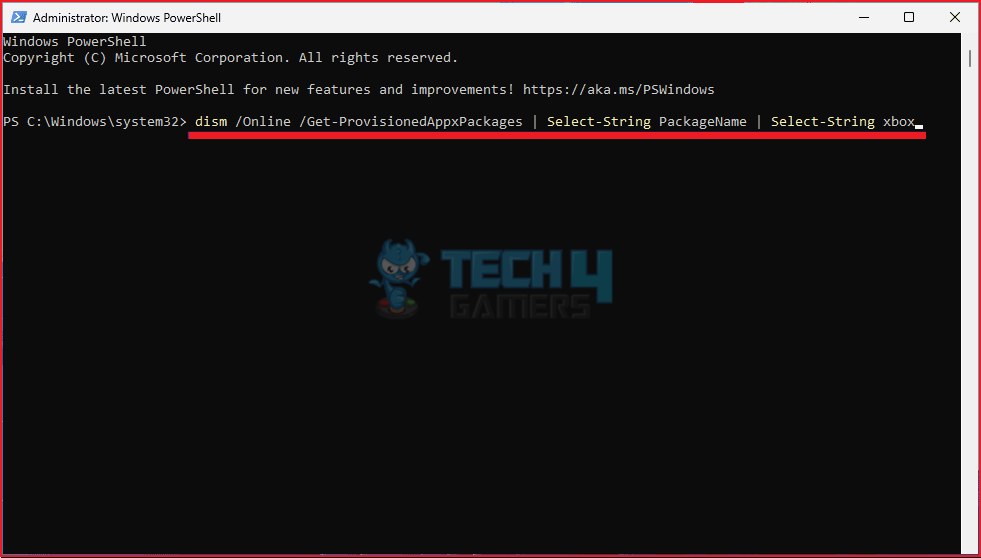
- Press the Windows key > Type PowerShell > Right-click on the result > Run As Administrator > Yes.
- In the PowerShell window, input or copy and paste the first command provided > Press Enter.
dism /Online /Get-ProvisionedAppxPackages | Select-String PackageName | Select-String xbox

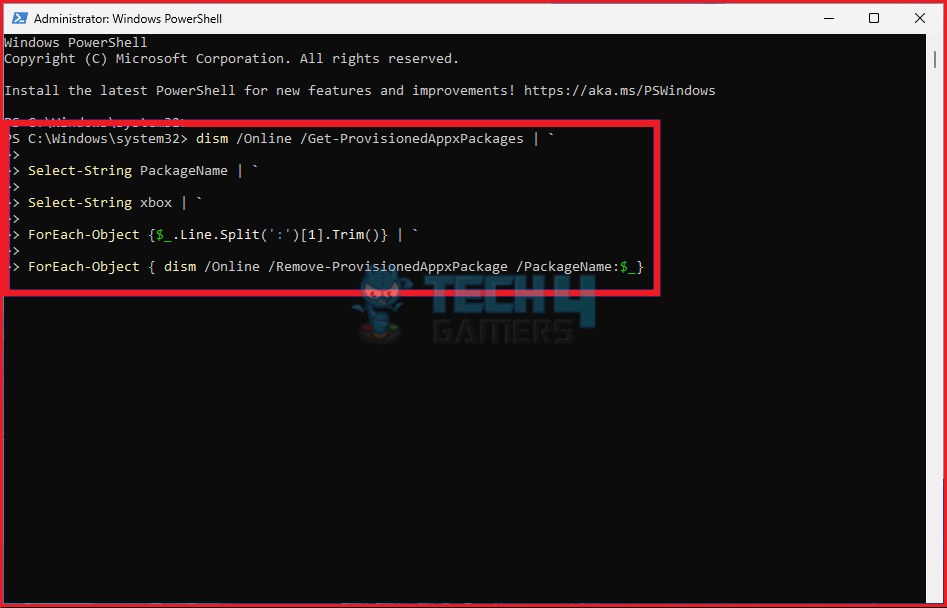
Enter Command (Image By Tech4Gamers) - Next, input or copy and paste the second command > Press Enter.
dism /Online /Get-ProvisionedAppxPackages | `Select-String PackageName | `Select-String xbox | `ForEach-Object {$_.Line.Split(':')[1].Trim()} | `ForEach-Object { dism /Online /Remove-ProvisionedAppxPackage /PackageName:$_}
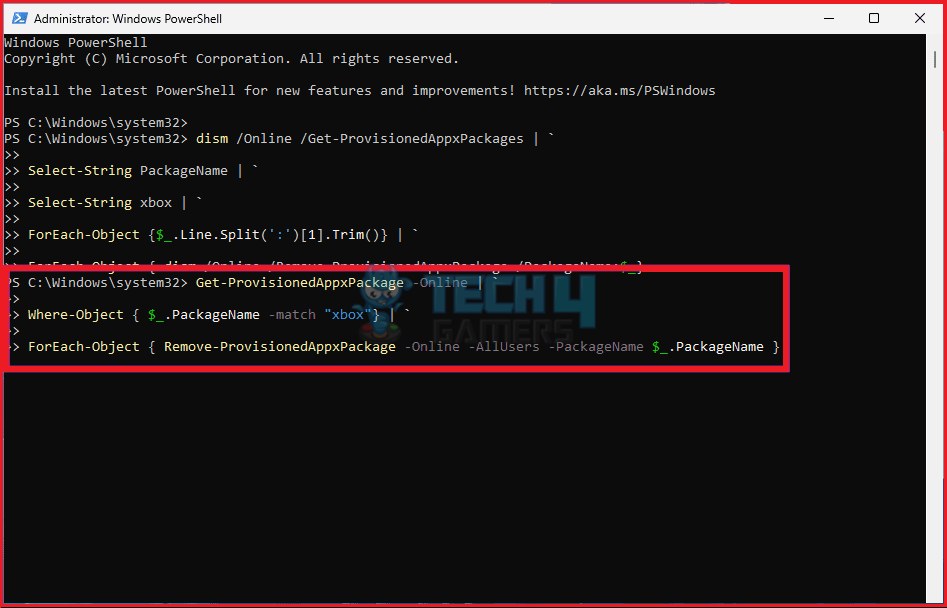
Enter Second Command (Image By Tech4Gamers) - To uninstall Xbox packages, execute the final command:
Get-ProvisionedAppxPackage -Online | `Where-Object { $_.PackageName -match "xbox"} | `ForEach-Object { Remove-ProvisionedAppxPackage -Online -AllUsers -PackageName $_.PackageName }
Enter Last Command (Image By Tech4Gamers)
Using Windows 11 Registry Editor
With Windows Registry Editor, I often modify various aspects of my system, such as removing the Chat option in Windows 11. Editing the game-related registry allowed me to disable this Xbox feature on my Windows computer.
Carefully follow each step to avoid messing anything:
- Press the Windows key > Type Registry Editor > Right-click on the search result > Run As Administrator > Yes.
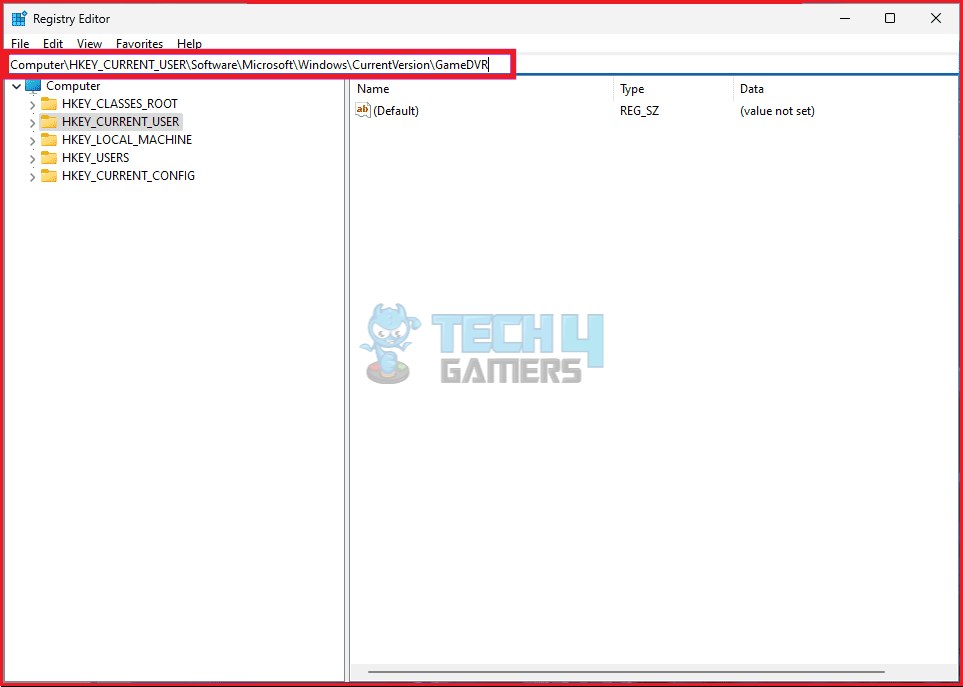
- In the Registry Editor, go to the top address bar and run the following address:
Computer\HKEY_CURRENT_USER\SOFTWARE\Microsoft\Windows\CurrentVersion\GameDVR

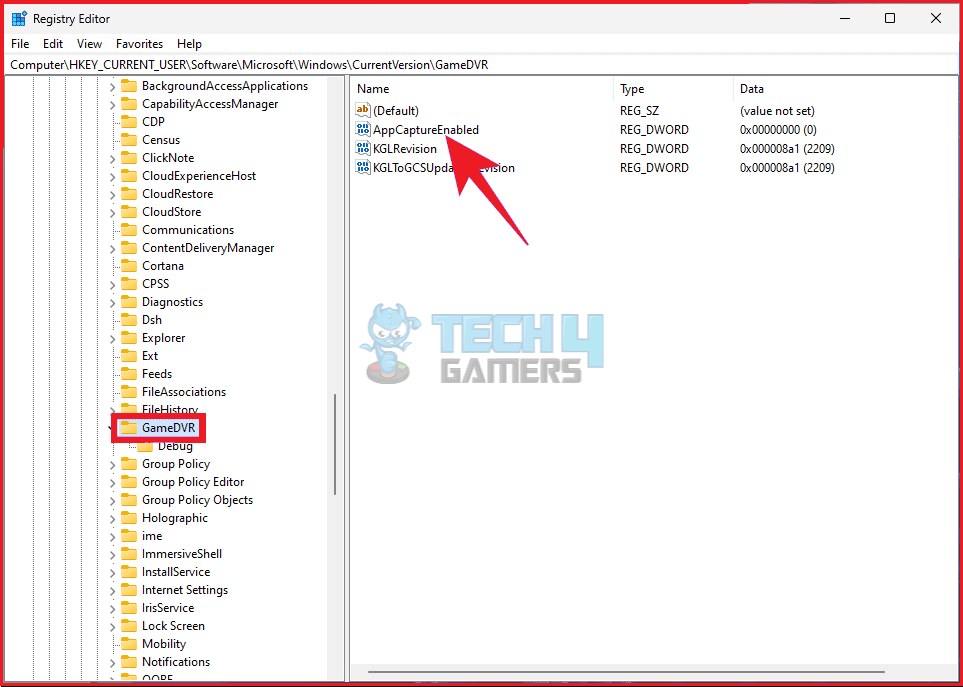
Head To Respective Directory (Image By Tech4Gamers) - Inside the GameDVR folder, select the AppCaptureEnabled option in the right pane.

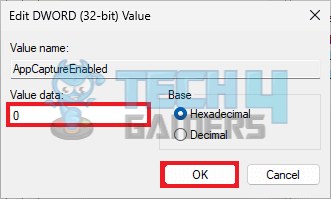
Locate Respective File (Image By Tech4Gamers) - Enter 0 in the Value Data field > OK > Restart PC.

Change Respective Value (Image By Tech4Gamers)
Using Local Group Policy Editor
This interface is home to system policies that help run and manage different aspects of a Windows OS. I disabled the Windows Game Recording policy in Local Group Policy Editor to hide the Xbox Game Bar. You can also execute this method with the technique below.
- Hit Windows + R for Run box > Type gpedit.msc > OK.
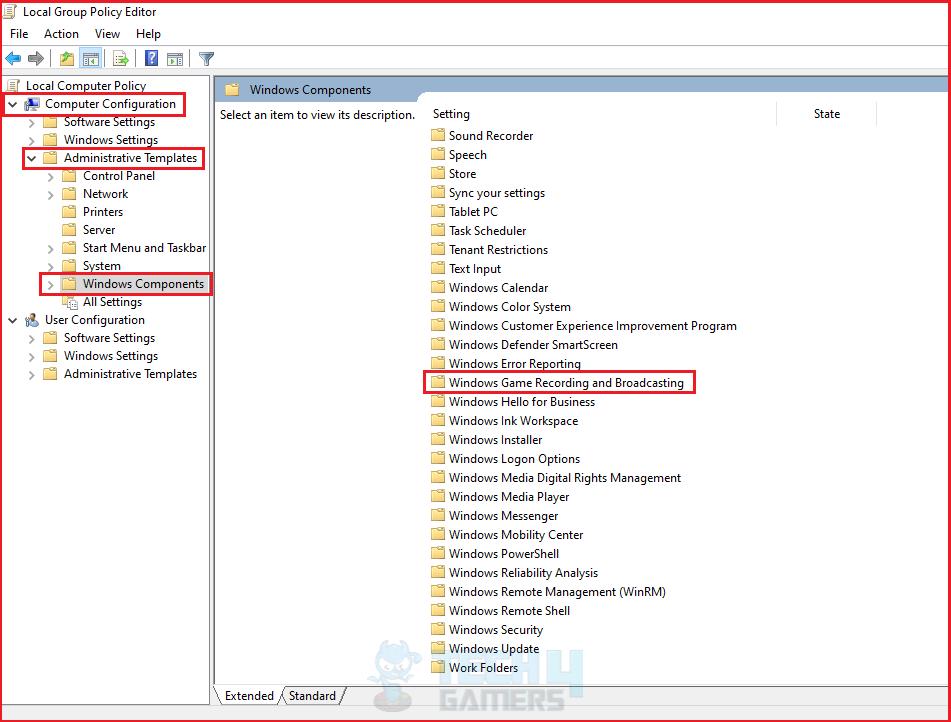
- Expand Local Computer Policy > Computer Configuration > Administrative Templates > Windows Components > Windows Game Recording And Broadcasting.

Go To Windows Game Recording (Image By Tech4Gamers) - Select the option Enables Or Disables Windows Game Recording And Broadcasting.

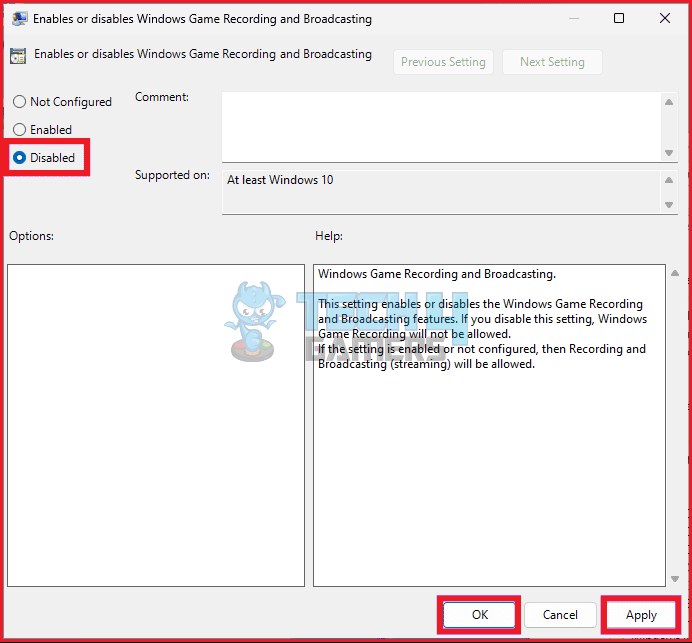
Choose Enable Or Disable Recording (Image By Tech4Gamers) - Once the new window opens, mark Disabled > Apply > OK.

Disable And Apply Changes (Image By Tech4Gamers)

Pros And Cons Of Disabling Xbox Game Bar
| Pros | Cons |
|---|---|
| ✅ Reduces distractions | ❌ Restricts access to gaming features |
| ✅ Enhances gaming experience | ❌ Removes access to gameplay recording |
| ✅ Frees background space | ❌ Affects Xbox integration into Windows |
Conclusion
After disabling the Xbox Game Bar in Windows 11 using the above techniques, there was less distraction during PC gaming, and performance was slightly improved. This is because the Game Bar also took up resource space on the system, and turning it off freed up the space for smoother functioning.
FAQs
The Xbox Game Bar provides an overlay to users, which lets them access different features like recording gameplay, capturing screenshots/videos, joining Xbox game parties, checking the statistics of your components, and looking for other players.
Although the Xbox Game Bar gives a lot of functionalities, in certain situations, it can sometimes produce glitches and even slow down the system, which is why non-gaming users prefer to keep it disabled.
There are multiple ways to disable the Xbox Game Bar on Windows 11, and some of them include using the Settings menu, Powershell, Registry Editor, and the Group Policy on Windows 11.
More About Windows 11:
- How To Remove PIN From Windows 11? [ALL METHODS]
- How To Find MAC Address In Windows 11?
- How To Unlock Taskbar In Windows 11?
Thank you! Please share your positive feedback. 🔋
How could we improve this post? Please Help us. 😔
[How To Guides Specialist]
Dayan Shahid is a skilled mechanical engineer passionate about technology. With certifications in various programming languages and subjects ranging from microcontrollers to aerial robotics, Dayan can effortlessly present complex technical topics in an engaging way. His ability to bridge the gap between theory and practical applications sets him apart as he continues to inspire others through their insightful content.