You may want to unlock the Taskbar in Windows 11 to move it to a different edge of the screen or to modify the Taskbar shortcuts. I tested various ways to do so, such as through the Windows 11 Settings interface.
- The simplest method to unlock the Taskbar is via Windows 11 or Taskbar Settings.
- Changing Registry Editor and Local Group Policy Editor configurations can also free the Taskbar.
- Be vigilant while handling the Registry and Group Policy since they are crucial to your computer’s smooth performance, and any mistakes may lead to system malfunction.
Methods Difficulty Rating
Rated: 3/10
Rated: 4/10
Rated: 6/10
Use Settings
The Windows 11 Settings is pretty handy in controlling various aspects of the system, including Sound and Peripherals. There is a dedicated Taskbar section in the menu where I unlocked the Taskbar to move it to a different side of my screen. Here are the quickest steps.
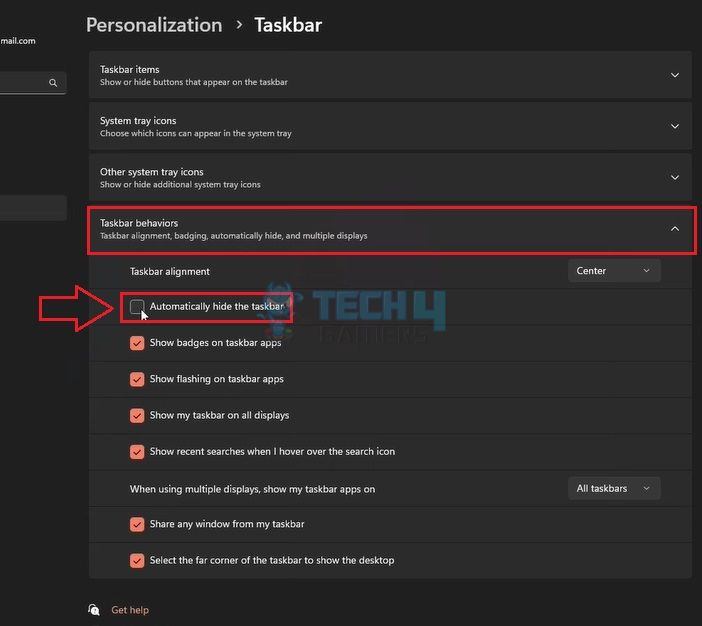
- Open Taskbar Settings: Launch Settings > Highlight Personalization > Taskbar.
- Turn Off Taskbar Lock: Scroll to and expand Taskbar Behaviours > Remove the tick beside Automatically Hide The Taskbar.
Use Local Group Policy Editor
The Local Group Policy Editor lets you control and modify various aspects of your Windows 11 computer, including the Taskbar configurations. I used it to unrestrict the Taskbar before repositioning it.
These are the detailed steps you need to follow:
- Enter Code In Run: Access Run > Type gpedit.msc.
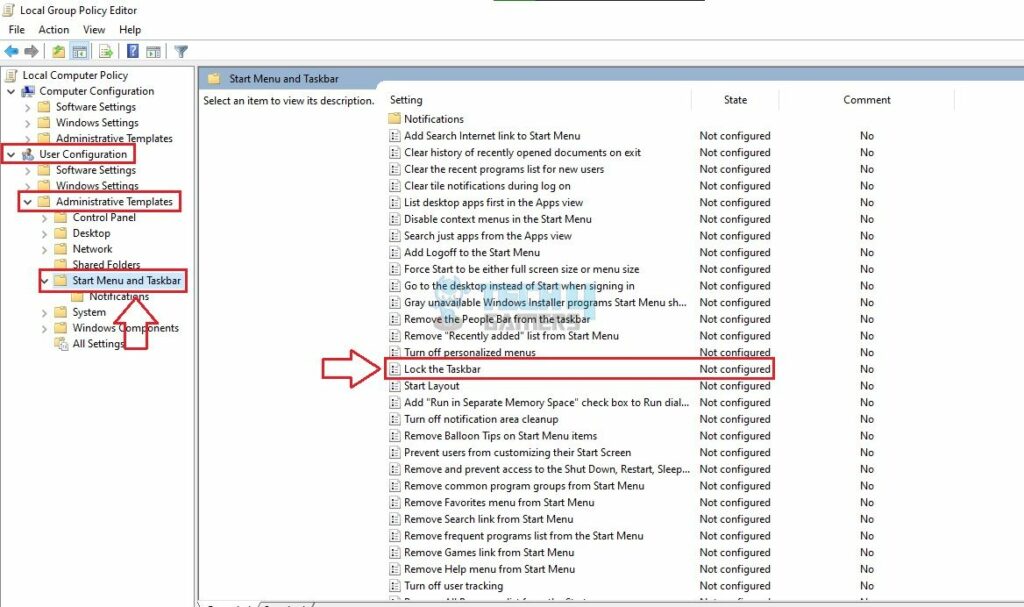
- Select Taskbar Settings: Click on Administrative Template under User Configuration > Start Menu And Taskbar > Lock All Taskbar Settings.

Lock Taskbar (Image By Tech4Gamers) - Disable Lock: Mark Disabled > Apply > OK.
Use Registry Editor
Registry Editor holds all the essential data and settings necessary to enhance the user experience in Windows 11. While exploring the interface, I learned it can also help modify Taskbar settings and lift off the restrictions, so I could move it around the screen. Refer to the following steps for this method, which proved super effective for me.
- Execute Code In Run: In the Run box, execute regedit > Yes.
- Enter Address: Type or paste this address in the Address Bar:
HKEY_CURRENT_USER\Software\Policies\Microsoft\Windows
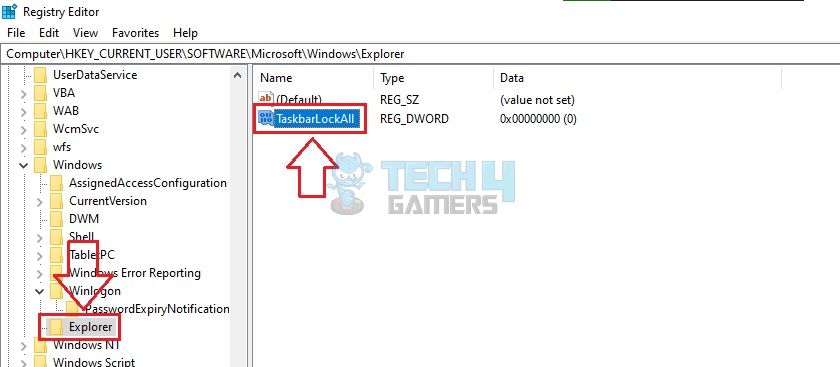
- Create A New Key: Right-click anywhere on the white part of the screen > New > Key > Name it Explorer.
- Create DWORD Value: Again, right-click on the white screen > New > DWORD (32-bit) Value > Rename it to TaskbarLockAll.

Taskbar Lock (Image By Tech4Gamers) - Change Value Data: Double-click this DWORD Value > Set Value Data to 0 > OK.
Final Words
Unlocking the Taskbar from its default position is simple, and the above methods helped me do it quickly. However, if you want to reposition the Taskbar, do it so that it does not disrupt the view of your screen. Personally, the bottom edge works best for me.
More From Windows 11:
- How To Turn Off Mouse Acceleration In Windows 11
- How To Find MAC Address In Windows 11?
- How To Fix Windows 11 Crackling Audio? [21 FIXES]
Thank you! Please share your positive feedback. 🔋
How could we improve this post? Please Help us. 😔
[How To Guides Specialist]
Dayan Shahid is a skilled mechanical engineer passionate about technology. With certifications in various programming languages and subjects ranging from microcontrollers to aerial robotics, Dayan can effortlessly present complex technical topics in an engaging way. His ability to bridge the gap between theory and practical applications sets him apart as he continues to inspire others through their insightful content.