


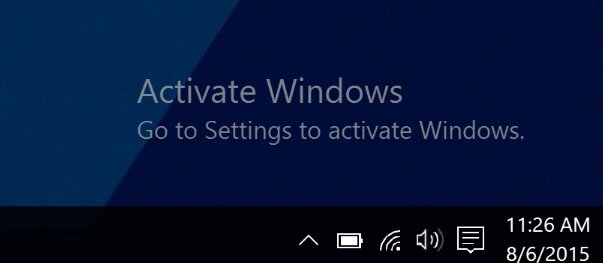
If you see the “You need to activate Windows before you can personalize your PC” error, your copy isn’t legally activated. Without activation, you’ll miss personalization options like changing backgrounds and themes. The best thing to do in such a situation is to buy a legitimate copy and activate the Windows. If purchasing a verified copy is not an option, a few workarounds can help with the personalization.
- Non-activated Windows indicates you lack a legally purchased copy, restricting specific personalization options like changing wallpapers and applying new themes.
- You can apply wallpapers using built-in Windows tools like MS Paint, Photos, Internet Explorer, and File Explorer, even with a non-activated Windows system.
- Access to the Group Policy Editor option to unlock themes on non-activated Windows is exclusive to Windows 10 and 11 Pro; it’s unavailable for those using Windows 10 Home or other editions.
The following watermark will be visible on your screen:
Inserting The Product Key To Activate Windows
The best way to eliminate the error is to activate your Windows. Perhaps you bought a fresh copy of Windows but forgot to install the product key at the time of installation. You can always insert it later.
Before providing these steps, I assume you have a valid product key to insert and activate your Windows. So, here are the steps to do it.
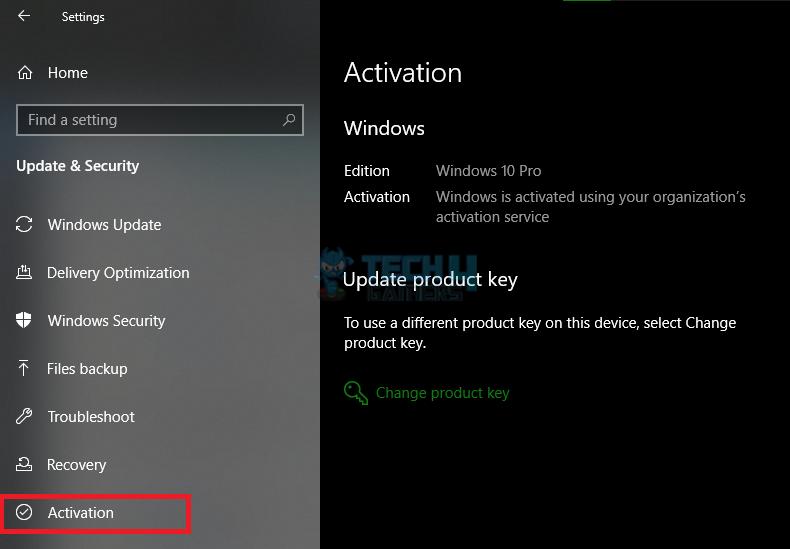
- Head To Activation: Go to Settings > Update and Security > Activation.
- Enter Product Key: Now select the Update Product Key option > Insert the valid product key > Enter.

Enter Product Key (Image By Tech4Gamers)
Applying Wallpaper On Non-activated Windows
A significant issue with a non-activated copy of Windows is the inability to change wallpapers through the Personalization menu. However, I tested various available workarounds to address this limitation, and each successfully modified the wallpaper.
Using MS Paint
These are the steps you can follow to apply your favorite wallpaper as a Desktop background:
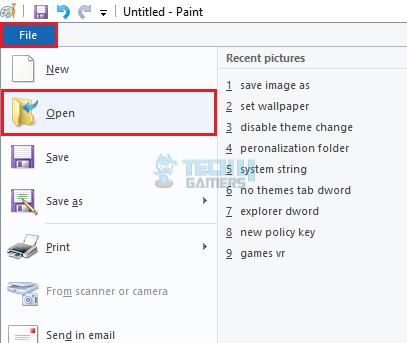
- Access Paint: Open MS Paint > From the top left, click on File > Open.

Open A File In MS Paint (Image By Tech4Gamers) - Find The Image: Look for the desired image in the folder and open it.
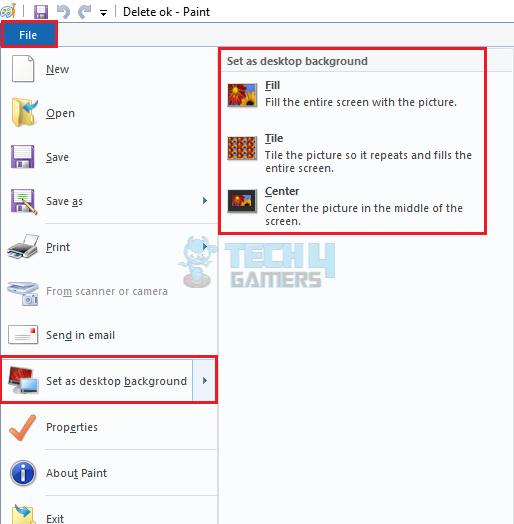
- Modify Wallpaper: Click on File > Set As Desktop Background. You can select from the Fill, Tile, and Center options to get the desired result.

Set Wallpaper With Paint (Image By Tech4Gamers)
Using Browser
Any browser works for this step, but in my case, I used Google Chrome:
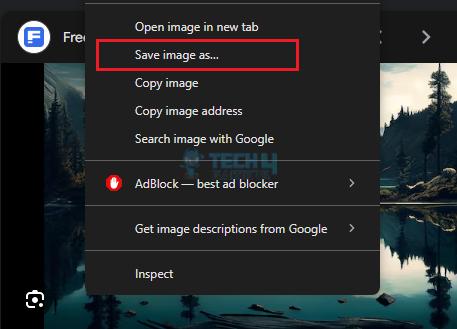
- Search Image: Open any browser > Search for an image > Click on the desired image > Right-click.
- Save Image: Select Save Image As from the drop-down > Save it on your Desktop.

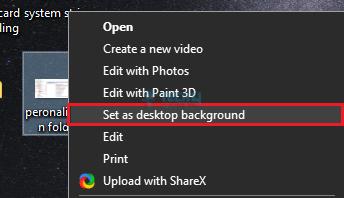
Save Image On Desktop (Image By Tech4Gamers) - Change Wallpaper: Go to the Desktop > Right-click the image > Set As Desktop Background.

Set Wallpaper (Image By Tech4Gamers)
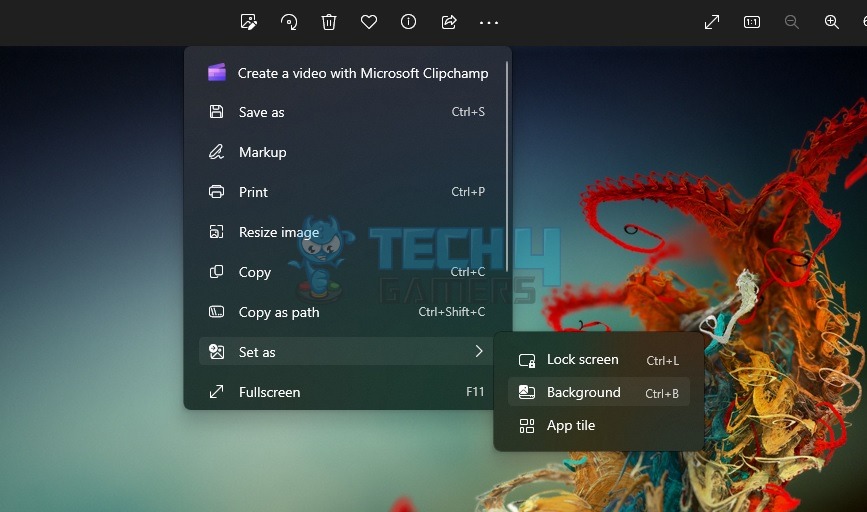
Using Photos
The Photos app is an excellent option as it allows you to set the image as your lock screen background or even as an app tile:
- View Wallpapers: Open the folder where you saved the wallpaper > Right-click on the wallpaper you wish to apply > Open With > Photos.
- Set Wallpaper: Once the image opens, click on the Three Dots in the top ribbon menu > Set As > Background.

MS Photos Image Menu (Image By Tech4Gamers)
Using Registry Files
This method involves several steps and is relatively riskier as it involves modifying registry files, which can potentially cause problems with your operating system. But if handled correctly using the following method, you should face no problem performing the task.
- Launch Run: Press the Windows + R key on your keyboard to open the Run window > Type regedit > OK.
- Go To Policies: Here’s the path you will follow from the menu to the left:
HKEY_CURRENT_USER\SOFTWARE\Microsoft\Windows\CurrentVersion\Policies
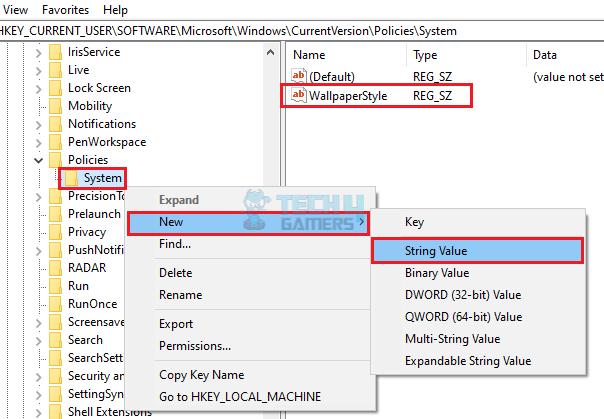
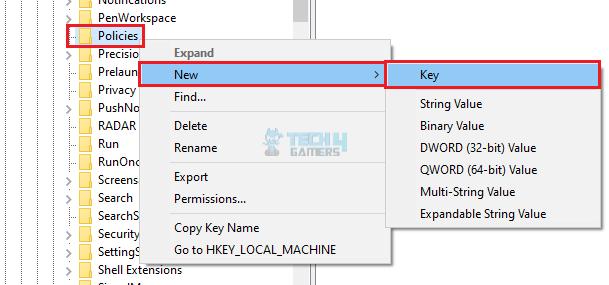
- Create New Key: Right-click on Policies > New > Key > Name it as System.
- Name The Key: Right-click on this System key > New > String Value > Rename this to WallpaperStyle.

Create New String Value (Image By Tech4Gamers) - Select Wallpaper: Open the Wallpaper key > Choose the path to the desired wallpaper > OK.
Applying Themes On Non-activated Windows
Like wallpapers, you can install and apply themes to your Windows operating system even if it is not activated. However, in this particular case, you will only use the Registry Files and Group Policy options. Let’s take a look at both methods.
Using Registry Editor
Before proceeding, set up a restore point for your computer that you can revert to later if things go south:
- Follow Navigation: Head to the Registry Editor and paste path:
Computer\HKEY_CURRENT_USER\SOFTWARE\Microsoft\Windows\CurrentVersion\Policies
- Create Key: Right-click Policies > Key > New > Name it Explorer.

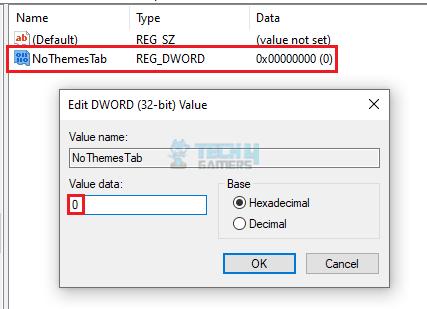
Create New Key In Policy (Image By Tech4Gamers) - Create DWORD: Right-click on Explorer > New > DWORD (32-bit) Value > Name as NoThemesTab.

Create DWORD In Explorer (Image By Tech4Gamers) - Change Value: Double-click this DWORD > Enter the value as 0 > OK > Restart PC.

Modify DWORD Value (Image By Tech4Gamers)

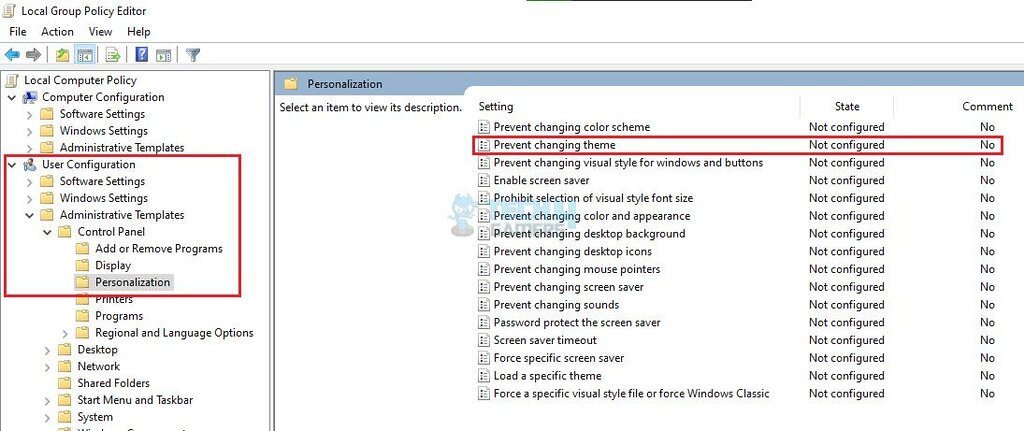
Using Group Policy Editor
You can follow this method for both Windows 11 and Windows 10, but both should have the Pro edition for the changes to take effect:
- Execute Run Code: Launch Run > Type gpedit > OK.
- Choose Administrative Templates: Select User Configuration in the left menu > Administrative Templates > Control Panel > Personalization > Prevent Changing Theme.

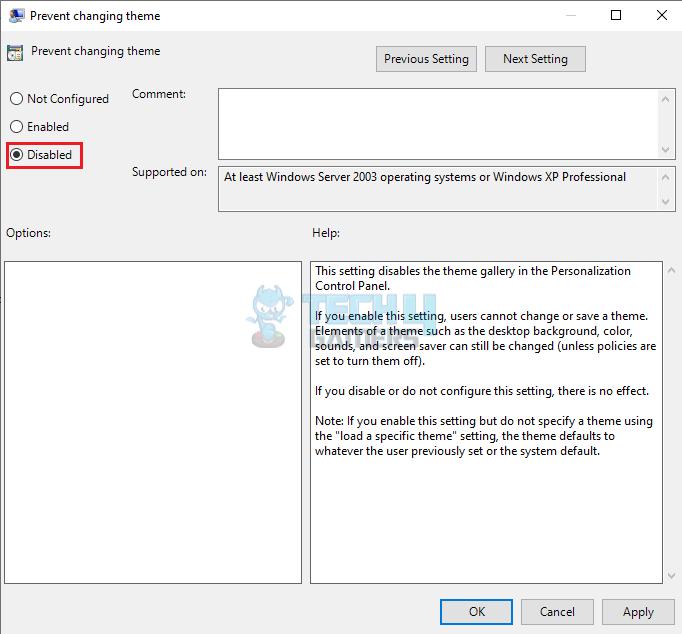
Head To Themes Settings In Registry (Image By Tech4Gamers) - Remove Restrictions: Mark Disabled > Apply > OK > Reboot your PC.

Remove Theme Restrictions (Image By Tech4Gamers)
Final Thoughts
These methods effectively applied new favorite themes and Desktop wallpapers to my PC despite having the “You need to activate Windows before you can personalize your PC” watermark at the bottom right of the screen.
The crucial recommendation is to avoid altering options other than those necessary when modifying registry files and group policies. Additionally, consider investing in a valid copy of Windows to eliminate these concerns and ensure long-term usability without such issues.
Frequently Asked Questions
You can always use the Update & Security option in the Settings. From there, click “Activation” on the left menu to learn the status.
No, you can use the group policy editor option to change wallpapers on the non-activated Windows 10 Pro edition.
You can’t change the default light theme on your non-activated Windows unless you use one of the workarounds we have shared.
Read Similar Windows Guides:
- SOLVED: How To Unlock Taskbar In Windows 11?
- How To Shut Down PC With A Keyboard [All Methods]
- How To Remove PIN From Windows 11? [ALL METHODS]
- How To Uninstall Microsoft Edge [All Methods 2024]
- How To Disable Rounded Corners In Windows 11?
Thank you! Please share your positive feedback. 🔋
How could we improve this post? Please Help us. 😔
[Errors Troubleshooting Expert]
Arsalan Shakil (aka GuyThatDoesEverything on YouTube) is a PC Tech Enthusiast and Electronic Geek. With over 10+ years of experience in Electronics, he then decided to explore Software Engineering to design embedded products and automate existing hardware solutions.
When he started tearing down old cameras to understand how they worked, he was shocked (literally, when he got zapped by a flash discharge capacitor), giving him the power (debatable) to fall in love with videography/photography. He also started making some fun videos that later became YouTube tech reviews.
Skills:
- 10+ years of experience in Electronics design, embedded solutions, and prototyping
- Majored in Software Engineering
- Research paper publication in IEEE for Embedded Military Uniform & LoRa WAN wireless technology
- Specialized in IoT Solutions
- PC Enthusiast & PC Modder
In his local region, he’s known to expose cheap PSU brands, often claiming fake certification or false claims on the box. He’s a true nerd and needed some friends in his life. Then he met some guys who work at Tech4Gamers, and they also came out to be equal nerds who suggested he join Tech4Gamers as a Hardware Expert.


