")

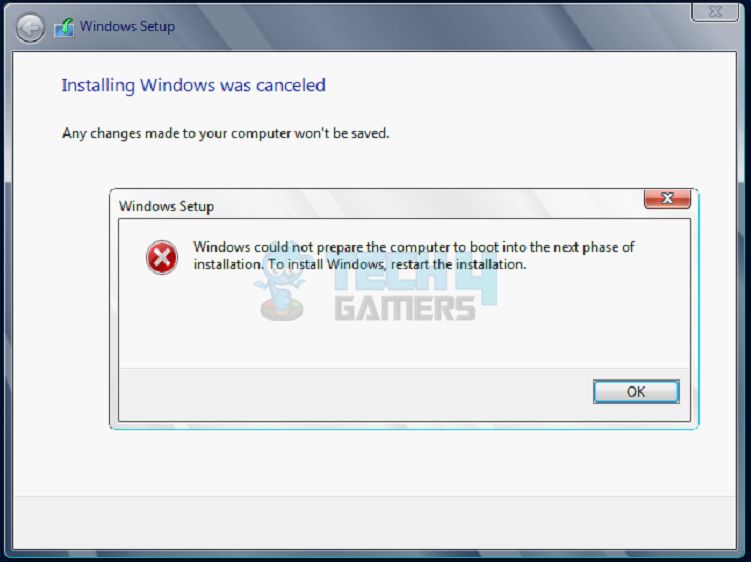
The error “Windows could not prepare the computer to boot” occurs when a user tries to update their Windows to the latest version or wants to install a new one on their computer.
Your computer may fail to proceed with the installation for many reasons, one being an outdated BIOS, which can prevent the motherboard’s smooth working and disrupt communication with newer software or hardware. Hard drive issues, disk errors on the PC, incomplete or corrupted installation files, and third-party software conflicts may prevent the update.
- When a person attempts to install a new version of Windows on their computer or update their current one, they might get the “Windows could not prepare the computer to boot” error.
- The error may occur due to a corrupt drive, insufficient storage on the system disk, or incompatibility between the motherboard and Windows version.
- You can fix the error by updating BIOS, deleting partitions, removing external devices from your computer, and more.
The error message looks like this:
Method Difficulty Rating
Rated: 5/10
Rated: 7/10
Rated: 6/10
Rated: 6/10
Rated: 6/10
Run CHKDSK
Your computer’s operating system checks its hard drives for malfunctions, corrupted data, and other anomalies that might compromise its functionality when you run a Disk Check. This error of blue screen like we are dealing with above can be caused by any of these reasons hence Running disk check is my go-to solution for this.
The scan will identify any disk issues with the system and correct them or ask you to do so. Thus, the procedure promotes your computer’s hassle-free operation while helping you keep the disk data safe.
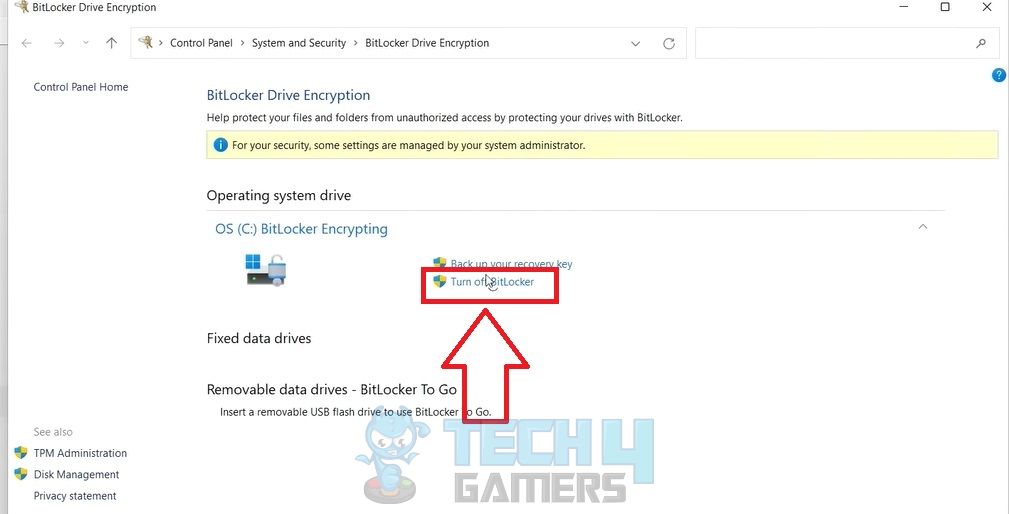
Turn Off BitLocker Drive Encryption
My second go-to solution is related to BitLocker which is a built-in encryption feature in Microsoft Windows that helps protect your data by encrypting the entire drive where the operating system is installed. Turning off this feature will allow you to change the drive, like installing new software or system settings.
- Turn Off BitLocker: Click Windows Search bar > Type BitLocker > Open Program > Choose Turn Off BitLocker > Yes.

Turn Off BitLocker – Image Credits [Tech4Gamers]
Enable UEFI On BIOS
UEFI, an advanced iteration of BIOS, offers faster boot times, improved security features, and enhanced compatibility with contemporary hardware. This solution is considered fundamental in mitigating the mentioned error.
Forum MacRumors users, having encountered the error themselves, have suggested that enabling UEFI could effectively resolve the issue.
- Enter Boot Mode: Click Power menu > Restart > Enter Boot Mode by pressing the relevant key according to your computer’s manufacturer.
MANUFACTURER BOOT MENU KEY Lenovo F1, F2 or F12 HP F10, Esc, Or F9 Dell F2 Or F12 Asus F2 or Esc Acer F2 Or F12 Samsung F2 Or Esc Sony F1, F2, F3, Or F11 - Choose UEFI: Head to the Boot menu > Boot Mode > Choose UEFI.

UEFI Settings – Image Credits [Tech4Gamers] - Save: Save the settings with F10 and exit the menu.

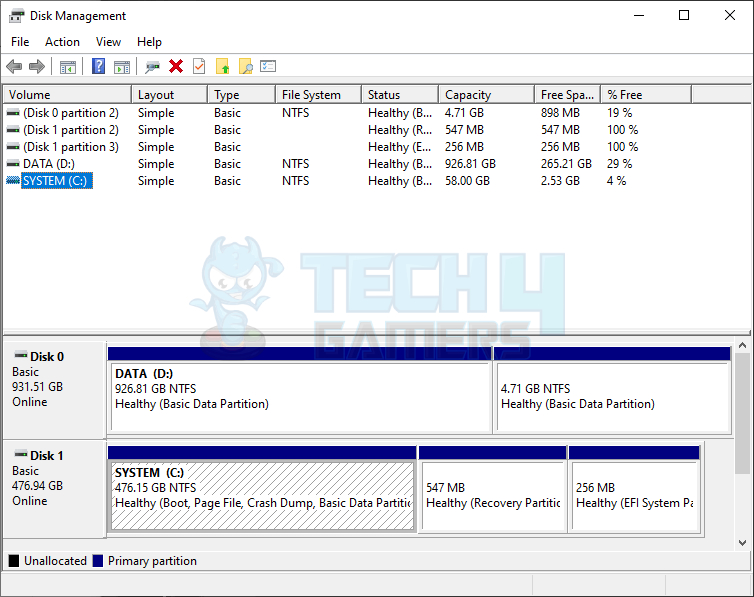
Drive Partition Recognition
A drive partition recognition problem causes the error to trigger. After partitioning the internal M2 drive, the installer attempts to install the files on the USB.
While researching the error, I found that this method was also being used to fix the error by users on the Microsoft forum. Here’s how to solve the partitioning issue:
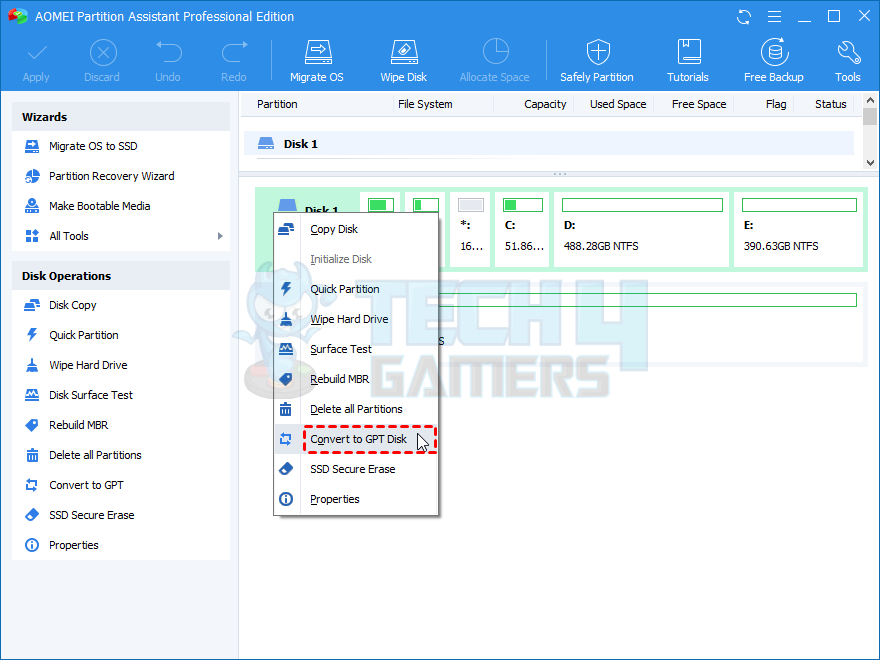
- Command Prompt: Boot using USB drive > Command Prompt > diskpart > Enter.
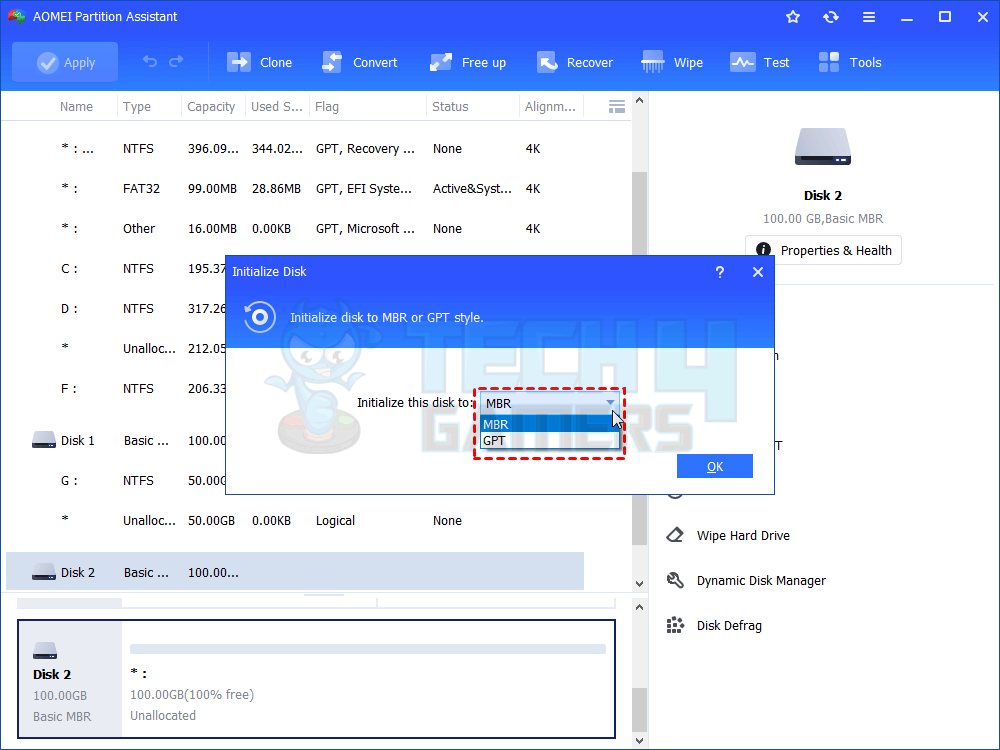
- Convert GPT to UEFI: Delete partitions > Convert to GPT to boot in UEFI.

Convert to GPT – (Image by Tech4Gamers) - Create Partition: Now, create a partition in an M2 drive of 10GB and format it as NTFS.

Create Partitions of Disk – (Image by Tech4Gamers) - Partition: Keep a letter for this partition and the other partition as Unallocated.
- Relocate Files: Cut/Paste the files from the USB to the drive partition.
- Restart: Eject USB > Restart system.
- Boot: The system will boot from the installer and install Windows.
- Restart: Again, boot your system, and it will automatically boot to the partition we created before, as it was assigned as the first partition.
- Remove: To remove that partition from the boot list, go to Command Prompt > diskpart > Enter > Restart the system.
After working around this error, the primary root cause I came to know is that my system has several SSDs and HDDs, which created conflict as the Windows installer could not determine which drive to choose to install files.
I removed all the extra memory drives, even the external ones, and left one in the system where I wanted the installer to save the files. And voila! It worked. The system successfully booted after this fix!
Format USB as MBR/GPT
Windows can be installed in both MBR (Master Boot Record) and GPT (GUID Partition Table) modes, depending on the configuration of the disk. For several reasons, formatting your USB drive for MBR can potentially fix some Windows errors.
MBR is a format that works better with older computers and can function as a bootable drive, which comes in handy when installing an operating system on a computer.
Partitioning MBR drives is more accessible than the other formatted drives. Formatting drive to MBR also successfully tackled the error for Ventoy forum users, underscoring its effectiveness. Here’s how to format a USB drive for MBR:
- Choose MBR: Connect a USB to the system > Open a disk management program > Right-click USB > Choose Create Partition > Choose MBR.

Choose MBR – (Image by Tech4Gamers) - Select and Label Partition: Select NTFS or FAT32 file system > Label partition > Click OK.
Last Words
A critical error often emerges during Windows installation: “Windows Could Not Prepare to Boot.” This unexpected roadblock impedes system upgrades and fresh installations and has prompted user frustration across forums and support channels. The underlying cause can be multifaceted, ranging from hardware incompatibilities and software conflicts to corrupted installation media.
When i try to install windows 7 it comes up a error saying?: ‘windows could not prepare the computer to boot int… http://bit.ly/ijUTuP
— iask (@iaskws) July 2, 2011
Microsoft has acknowledged the issue and is actively seeking solutions. However, the inconvenience and lost productivity endured by affected users remain significant. In response, I present a comprehensive guide outlining effective troubleshooting techniques to combat this boot-halting error. By adopting these strategies, you can navigate the installation process more confidently and efficiently.
Remember, even seasoned tech experts encounter occasional glitches. So, let’s tackle this issue head-on and restore your system to its full potential.

Windows could not prepare the computer to boot” error during installation can come up for several reasons, and users find it troublesome to figure out the exact cause. After trying out all the fixes above, I recommend that users still experiencing this error contact Microsoft support directly to receive personalized help to fix the issue.
– Uzair Shabir
Related Articles
- How To Update Windows [Mac, Windows & Linux]
- How To Modify DNS Settings?
- How To Fix Windows Update Error 0xc1900223?
- Windows Update Error 0x800f0922
- Fixing Windows 10 Version 1511 Failed
Thank you! Please share your positive feedback. 🔋
How could we improve this post? Please Help us. 😔
[Error Fix Expert]
Hello, I’m Uzair Shabir, a tech enthusiast pursuing a Bachelor’s in Electrical Engineering. At Tech4Gamers, I’m an Error Fix Expert, crafting articles on different issues and how to fix them. With a Google IT Support Certificate, I navigate tech complexities to deliver insightful perspectives.
Get In Touch: UzairShabir@tech4gamers.com