


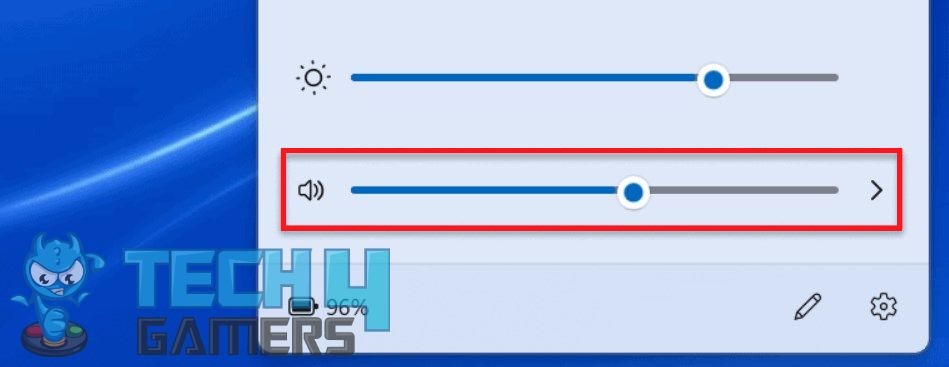
The Windows 11 volume slider not working is a minor but commonly occurring problem. Upon searching further, I found that the issue is not only limited to Windows 11, but Windows 10 users have been facing the same problem on their computers. However, it is a minor error, and I tested a few fixes that quickly restored its functioning.
- The volume slider may not function due to restrictive settings, outdated Audio drivers, or problematic hardware.
- To fix this issue, use the Audio troubleshooter, turn off Absolute Volume, or restart Windows Audio Service.
- If the slider fails to control sound on the connected hardware, ensure you are not using a faulty device and the USB port is functioning fine.
Method Difficulty Rating
Restart Audio Services
Rated: 2/10
Disable Absolute Volume
Rated: 3/10
Use ExplorerPatcher
Rated: 6/10
Restart Audio Services
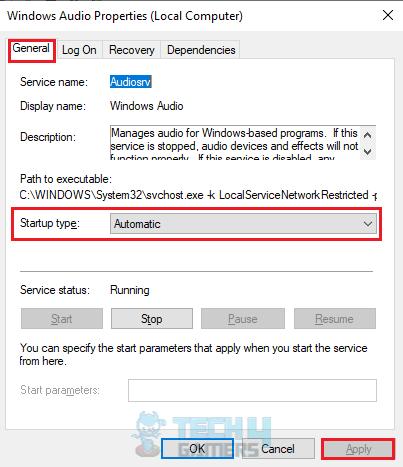
First, I made sure that the Windows Audio Service, which is responsible for handling audio devices on the PC, was enabled to launch automatically as soon as the PC started. Then, I restarted the service to remove any glitches affecting its performance, leading to sound and control issues on the computer. Use the following instructions carefully.
- Launch Run Box: Open the Run box with Windows+R > Type services.msc > Enter.
- Head To Windows Audio: Scroll down Windows Audio service > Click on it.
- Change Startup Type: In the General tab, make sure the Startup Type is set to Automatic. If not, change the settings > Apply.

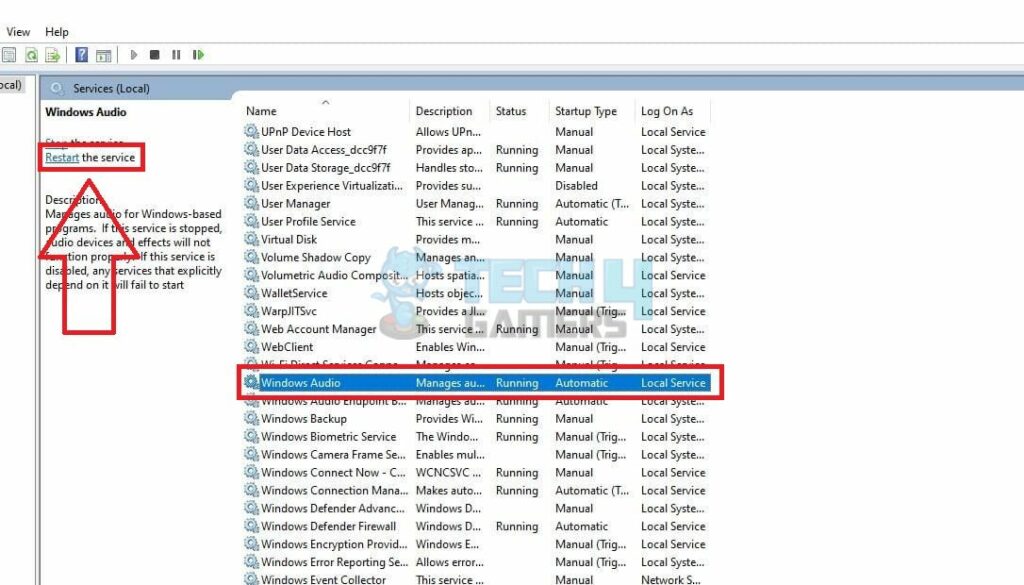
Set Automatic Startup Type (Image By Tech4Gamers) - Restart The Service: Return to the previous window > Highlight Windows Audio > Press Restart option on the top left corner of the screen.

Restart Audio Service (Image By Tech4Gamers) - Restart Other Services: Repeat the same for Windows Audio Endpoint Builder and Remote Procedure Call services.
This is an official troubleshooting method posted on Microsoft Support to troubleshoot sound and audio hassles.
Disable Absolute Volume
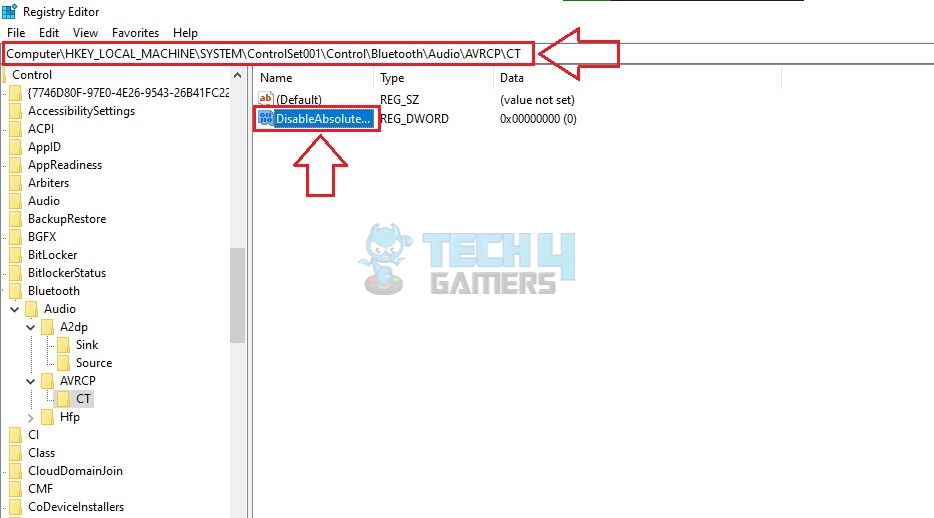
The Absolute Volume feature lets you control the sound on connected Bluetooth speakers or headphones via the volume slider. Some users can misjudge this as if the slider is not working to adjust the PC sound. Turn it off in the Windows Registry so the volume slider solely controls the computer’s audio.
- Enter Run Code: Execute regedit in the Run box.
- Navigate To Relevant Section: In the address bar, search for
Computer\HKEY_LOCAL_MACHINE\SYSTEM\ControlSet001\Control\Bluetooth\Audio\AVRCP\CT
- Choose DWORD: Now, click on DisableAbsoluteVolume.

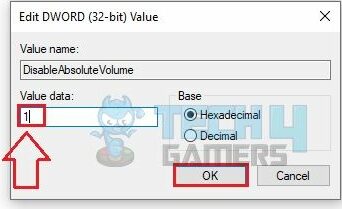
Click On DisableAbsoluteVolume (Image By Tech4Gamers) - Modify DWORD Value: Keep the Value Data to 1 > OK > Restart PC.

Change Value (Image By Tech4Gamers)
Use ExplorerPatcher
I installed ExplorerPatcher, an open-source software through which I could apply Windows 10 looks and features on my Windows 11 and use the older version of the volume slider. For me, it was more of a temporary fix until the problem was properly addressed and resolved. However, some users prefer integrating it into their PCs for regular usage.
Final Words
During my research, I noticed that it is a prevalent error occurring in many PCs/laptops, as users have been complaining about it in Lenovo and HP Support forums. While some of them eliminated the issue by updating/reinstalling the audio drivers, others never found a good solution to it.
On the other hand, I stumbled upon a few alternatives to resort to when the Windows 11 volume slider is not working. For instance, I used the in-app audio settings to control the sound levels, which is available in almost all music apps, like YouTube and Spotify.
Furthermore, pressing the keyboard volume buttons to adjust the audio levels also worked on my end. However, not all keyboards may have such options.
Find Solutions To Other Windows 11 Issues:
- Windows 11: Computer Won’t Wake Up From Sleep [SOLVED]
- 5 Ways To Fix No Power Options Available In Windows 11
- 5 Ways To Fix File Explorer Crashing In Windows 11
- FIXED: App Has Been Blocked For Your Protection Windows 11
- How To Fix User Profile Cannot Be Loaded In Windows 11
Thank you! Please share your positive feedback. 🔋
How could we improve this post? Please Help us. 😔
[Errors Troubleshooting Expert]
Arsalan Shakil (aka GuyThatDoesEverything on YouTube) is a PC Tech Enthusiast and Electronic Geek. With over 10+ years of experience in Electronics, he then decided to explore Software Engineering to design embedded products and automate existing hardware solutions.
When he started tearing down old cameras to understand how they worked, he was shocked (literally, when he got zapped by a flash discharge capacitor), giving him the power (debatable) to fall in love with videography/photography. He also started making some fun videos that later became YouTube tech reviews.
Skills:
- 10+ years of experience in Electronics design, embedded solutions, and prototyping
- Majored in Software Engineering
- Research paper publication in IEEE for Embedded Military Uniform & LoRa WAN wireless technology
- Specialized in IoT Solutions
- PC Enthusiast & PC Modder
In his local region, he’s known to expose cheap PSU brands, often claiming fake certification or false claims on the box. He’s a true nerd and needed some friends in his life. Then he met some guys who work at Tech4Gamers, and they also came out to be equal nerds who suggested he join Tech4Gamers as a Hardware Expert.


