")


Sometimes, your Windows 11 may get stuck in a permanent restarting loop, and an error code stating “Critical Process Died” appears on the screen. This BSOD error with reference code 0x000000EF indicates that a process critical to the system has failed to function and results in a system functionality crash.
There are several possible causes behind the error, such as malicious applications installed on the system, corrupt or outdated drivers, wrong system updates, and hard drive malfunctioning.
- Critical Process Died is a BSOD error that arises in Windows 11 when one or more essential OS tasks fail to perform.
- The factors behind the error include faulty system updates, malware attacks, outdated drivers, and memory issues.
- You can try running system file scans, repairing boot files, reinstalling drivers, and scanning for viruses to fix the error.
When the issue arises, this error message will be displayed on your screen:

Method Difficulty Rating
Rated: 6/10
Rated: 8/10
Rated: 7/10
Rated: 8/10
Rated: 7/10
Safe Mode
Windows 11 users may face login issues caused by the troublesome BSOD error. However, they can resolve this problem by accessing Safe Mode for error troubleshooting. Members of the Windows Eleven forum have recognized this solution as effective. Here’s how to boot into Safe Mode:
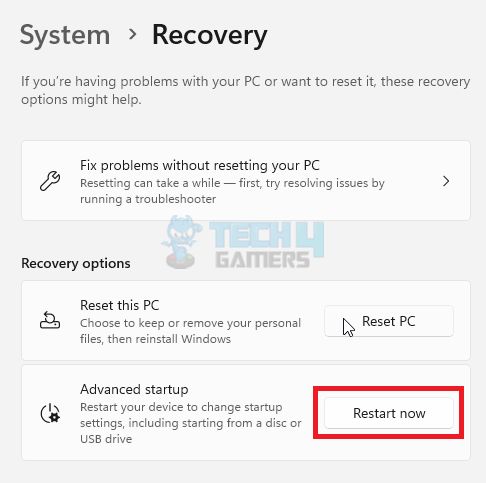
- Do Advanced Startup: Press Windows + I > Windows Settings > Update and Security > Recovery > Advanced Startup > Restart Now.

Restart Now – Image Credit (Tech4Gamers) - Restart from Start-up: Choose an Options > Hit Troubleshoot > Advanced Options > Start-up Settings > Restart.

Startup Settings – Image Credit (Tech4Gamers) - Execute: Then, according to your preference, select one of the two below-available ways to boot into Safe Mode:
- Press 4 or F4 to enable the option Safe Mode without the internet.
- Press 5 or F5 to launch Safe Mode with Networking.

After applying these steps, Safe Mode will be enabled. Work on the potential fixes listed below to work around the BSOD error.
Execute SFC, DISM, and CHKDSK
In my observations, I’ve noticed that system errors like the BSOD in Windows 11 can often stem from corrupted system files or faulty disks. To address this issue, Windows offers built-in scanning utilities such as the System File Checker (SFC), Check Disk (CHKDSK) scan, and Deployment Image Servicing and Management (DISM).
Users of the Windows forum have suggested that utilizing these tools could potentially resolve this frustrating error, as they have personally tested them. Here’s a guide on how to run these system-scanning utilities:
- Run as Admin: Click Start > Search bar > Type cmd > Run as administrator.
- Use scannow: Execute the SFC scan by entering the below-given command line:
sfc /scannow
- Enter and wait: Hit the Enter key, wait patiently for the scan to finish, restart your system, and see if the error disappeared.
- Use commands: Next is a DISM scan. Type in these three commands one by one and press Enter after each to execute them:
dism /online /cleanup-image /checkhealth
dism /online /cleanup-image /scanhealth
dism /online /cleanup-image /restorehealth
- Disk Check: Performing a disk check on your computer is essential to detect and fix challenging drive glitches, which could be the culprit behind the error. By conducting regular scans, you can keep your disk and operating system safe from various mistakes.
During my research, I also found that outdated or corrupt drivers also become the causing factor behind the BSOD errors. To fix the issue, I discovered that reinstalling or updating the system drivers is an effective problem solver.
Use Bootrec Command
Another way many Windows 11 users, including us, found helpful in solving the BSOD issue is by running the bootrec command. Windows Recovery Environment utility for repairing critical disk structures is bootrec, Which updates the partition boot sector code and master boot record code.
It’s a very useful built-in command-line troubleshooter for boot-related glitches in Windows. Here’s how to execute the command:
- Run as Administrator: Open Command Prompt > Run as administrator.
- Copy the Commands and Run: The following commands and press Enter after pasting each one given below in the command line.
bootrec /fixmbr
bootrec /fixboot
bootsect /nt60sys
bootrec /fixboot
bootrec /rebuild
- Wait: Wait for the commands to run promptly, and it may resolve the error.
Use System Restore
Another method that I have come to discover is that restoring your system to a predate before the appearance of the obnoxious error; you can fix the issue and continue working peacefully on your Windows 11. The steps to execute a system restore are as follows:
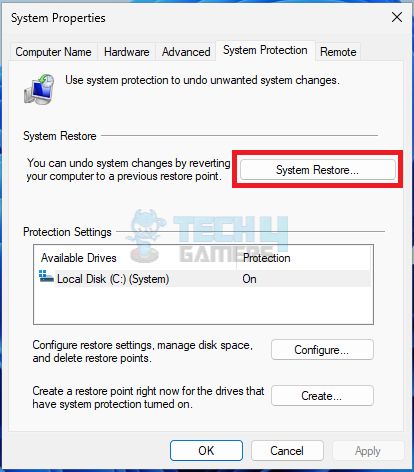
- Go to system Restore: Hit Start > Search bar > Type restore > Create a restore point > System Restore > OK.

Hit the system Restore button – Image Credits (Tech4Gamers) - Select Date or Event: To restore the system to the error-free point, select a date or event before the error.
- Hit Scan: To learn about the drivers and programs affected by the restoration hit the Scan for affected programs button or click Next > Finish.
Windows operating systems frequently experience the “Critical Process Died” error, leading to abrupt system crashes and making the computer unusable. This common issue often results in data loss and workflow disruptions for many users. Microsoft has been working to fix the error through system updates and bug patches.
Creating USB Installation Media
If logging in continues to be problematic or if previous solutions fail to yield results, I recommend resorting to an alternative approach: creating a USB installation media using another device and subsequently reinstalling Windows 10.
This method is considered a last resort option, with members of the Microsoft Community suggesting it when other fixes prove ineffective. Here are the steps to create a USB installation media and reinstall Windows 10:
- Prepare Flash Drive: Use an 8GB+ flash drive (backup data).
- Download MCT: Visit Download Windows 10 > Click Download Now > under Create Windows 10 installation media.
- Run MCT: Execute the downloaded tool.
- Select Media Type: Choose Create installation media and click Next > Select language, version, architecture, and USB flash drive.
Reinstalling Windows 10
- Boot from USB: Insert flash drive > Restart and access the boot menu (F2, F12, Esc, or Del).
- Install Windows: Follow on-screen prompts > Enter the product key if needed > Choose “Custom: Install Windows only”.
- Complete Installation: Set up Windows > Once you have a fresh Windows 10 installation.
Final Thoughts
The dreaded “Critical Process Died” error in Windows 11 is like a sudden power outage during an intense gaming session, plunging your PC into darkness and leaving you frustrated.
Windows users have taken to Twitter and other forums, their cries echoing the pain of unexpected crashes and lost work.
Six hours of troubleshooting later, stop code critical process died bluescreen over and over, trying to get Win 10 on a flash drive to reinstall it, life is suffering. Send new pc pls pic.twitter.com/lqcHdKYMeQ
— Naomi (@NaomiOop) March 30, 2021
Microsoft, of course, is aware of this gremlin lurking in the system, and let’s hope they’re working on a permanent fix. In the meantime, this guide equips you with the knowledge to tame the beast and keep your PC running smoothly. Stay tuned for further updates from the dev team, but I’m cautiously optimistic for now.
Relevant Articles
- Windows 11: Choose Where To Get Apps Missing
- Windows 11 Error “No Such Interface Supported”
- How To Fix Unmountable Boot Volume Error In Windows 11
- Windows 11 Time Zone Greyed Out
- How To Fix “KMODE_EXECPTION_NOT_HANDLED Error
Thank you! Please share your positive feedback. 🔋
How could we improve this post? Please Help us. 😔
[Error Fix Expert]
Hello, I’m Uzair Shabir, a tech enthusiast pursuing a Bachelor’s in Electrical Engineering. At Tech4Gamers, I’m an Error Fix Expert, crafting articles on different issues and how to fix them. With a Google IT Support Certificate, I navigate tech complexities to deliver insightful perspectives.
Get In Touch: UzairShabir@tech4gamers.com