




Modern Warfare 4 Beta may refuse to launch on PC if TPM 2.0 or Secure Boot is disabled. Activision lists TPM 2.0 and Secure Boot as part of its PC security requirements for Call of Duty under Trusted Platform Module, so the fix usually means changing BIOS/UEFI settings rather than reinstalling the game.
Before You Open BIOS/UEFI
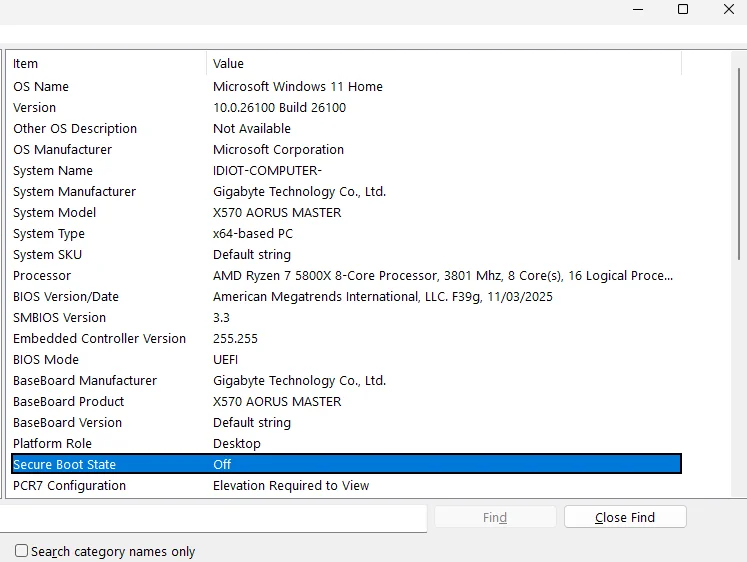
Check your current Windows status first.
- Press
Windows + R. - Type:
msinfo32

- Press
Enter. - Check these entries:
| Field | Required value |
|---|---|
| BIOS Mode | UEFI |
| Secure Boot State | On |
| TPM status | Present and ready in Windows Security or tpm.msc |
If BIOS Mode says Legacy, do not enable Secure Boot yet. Secure Boot needs UEFI, and disabling CSM on a Legacy/MBR Windows install can stop Windows from booting.
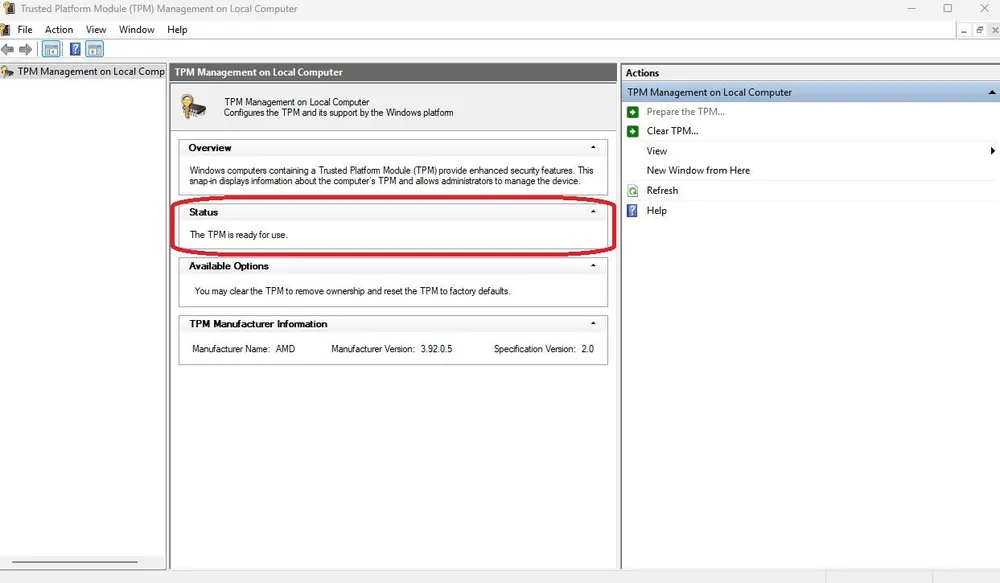
Check TPM separately:
- Press
Windows + R. - Type:
tpm.msc
- Press
Enter. - Look for Specification Version: 2.0.
If TPM is missing, it may be disabled in BIOS, or your CPU/motherboard may not support firmware TPM.
BIOS Safety Warnings
Before changing TPM 2.0 or Secure Boot settings:
- Save open work.
- Back up important files.
- If BitLocker or Device Encryption is enabled, save your recovery key first.
- Do not interrupt a BIOS firmware update.
- Do not change CPU, memory, voltage, or storage settings while following this guide.
- Take a photo of each BIOS screen before changing a setting.
This is not difficult, but BIOS settings can affect boot behavior. Change only the options listed here.
Open BIOS/UEFI
Use the Windows method first if your system boots normally.
- Open Settings.
- Go to System.
- Select Recovery.
- Under Advanced startup, select Restart now.
- After the restart, select Troubleshoot.
- Open Advanced options.
- Select UEFI Firmware Settings.
- Select Restart.
Alternatively, restart the PC and press the motherboard key during startup.
Common BIOS keys:
| Brand | Usual key |
|---|---|
| ASUS | Delete or F2 |
| MSI | Delete |
| Gigabyte | Delete |
| Many laptops | F2, F10, or Esc |
Press the key repeatedly as soon as the PC powers on.
Enable TPM 2.0 In BIOS/UEFI
TPM 2.0 may appear under different names depending on your CPU platform.
- AMD systems usually call it AMD fTPM.
- Intel systems usually call it Intel PTT or Platform Trust Technology.
Enable the firmware option. You do not need to buy a separate TPM module on most modern consumer motherboards.
ASUS Motherboards
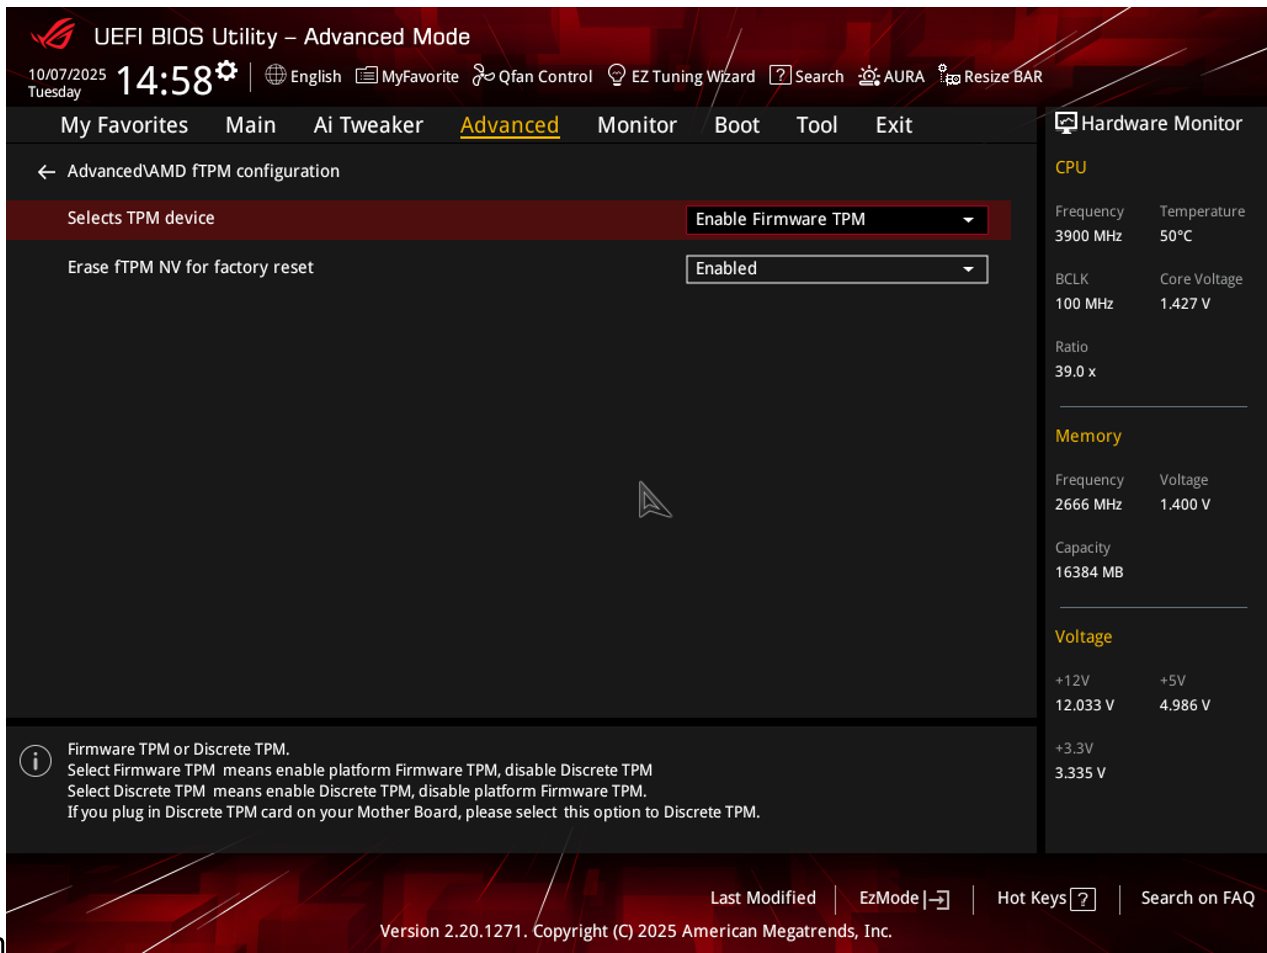
For AMD systems:
- Open Advanced Mode with
F7if needed. - Go to Advanced.
- Open AMD fTPM configuration.
- Set TPM Device Selection to Firmware TPM or enable AMD fTPM.
- Save with
F10.
For Intel systems:
- Open Advanced Mode.
- Go to Advanced.
- Open PCH-FW Configuration.
- Enable PTT.
- Save with
F10.
Some ASUS BIOS versions place TPM under Trusted Computing instead.
MSI Motherboards
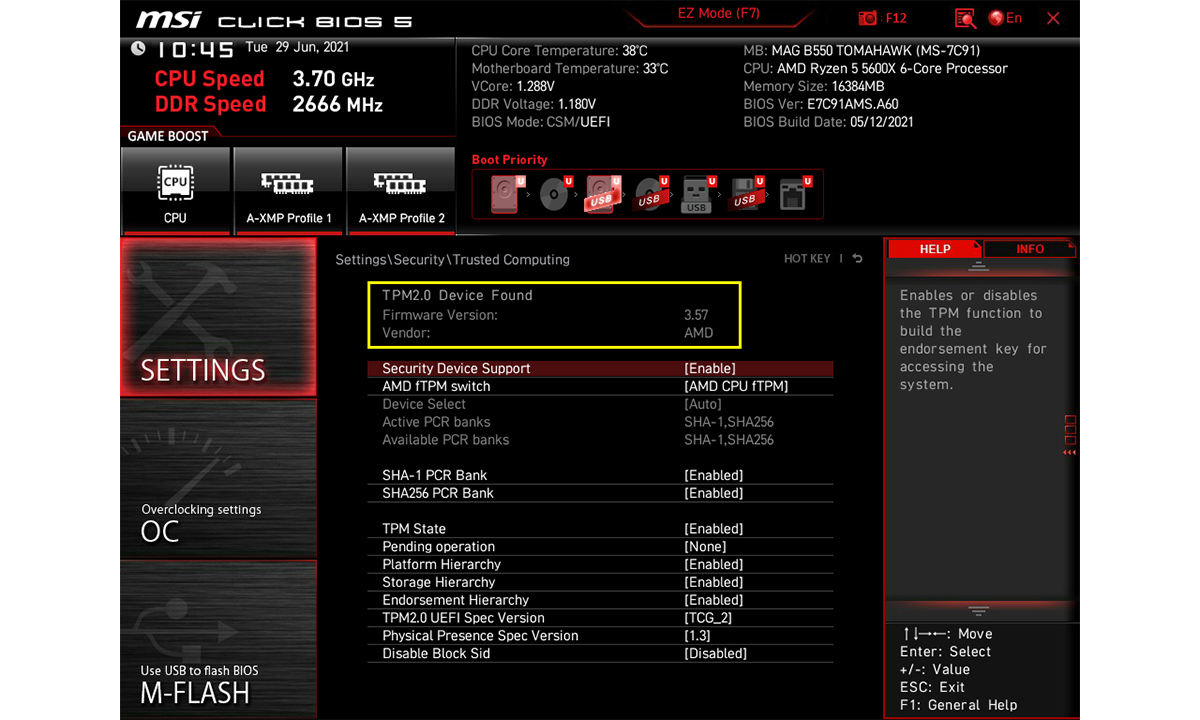
- Open Settings.
- Go to Security.
- Open Trusted Computing.
- Set Security Device Support to Enabled.
- Enable AMD fTPM or Intel PTT, depending on your CPU.
- Press
F10to save.
If you do not see the option, switch to Advanced mode first.
Gigabyte Motherboards

- Open Settings.
- Go to Miscellaneous or Trusted Computing.
- Enable AMD CPU fTPM on AMD systems.
- Enable Intel Platform Trust Technology on Intel systems.
- Save and restart.
Gigabyte menu names vary by board generation, so check both Settings and Peripherals if the option is not visible.
Enable Secure Boot In BIOS/UEFI
Secure Boot helps verify that trusted boot components load during startup. RICOCHET Anti-Cheat uses platform security checks, and reports around the beta also point to TPM 2.0 and Secure Boot being enforced for PC players, as covered by Eurogamer.
Before continuing, confirm BIOS Mode: UEFI in msinfo32.
ASUS Secure Boot
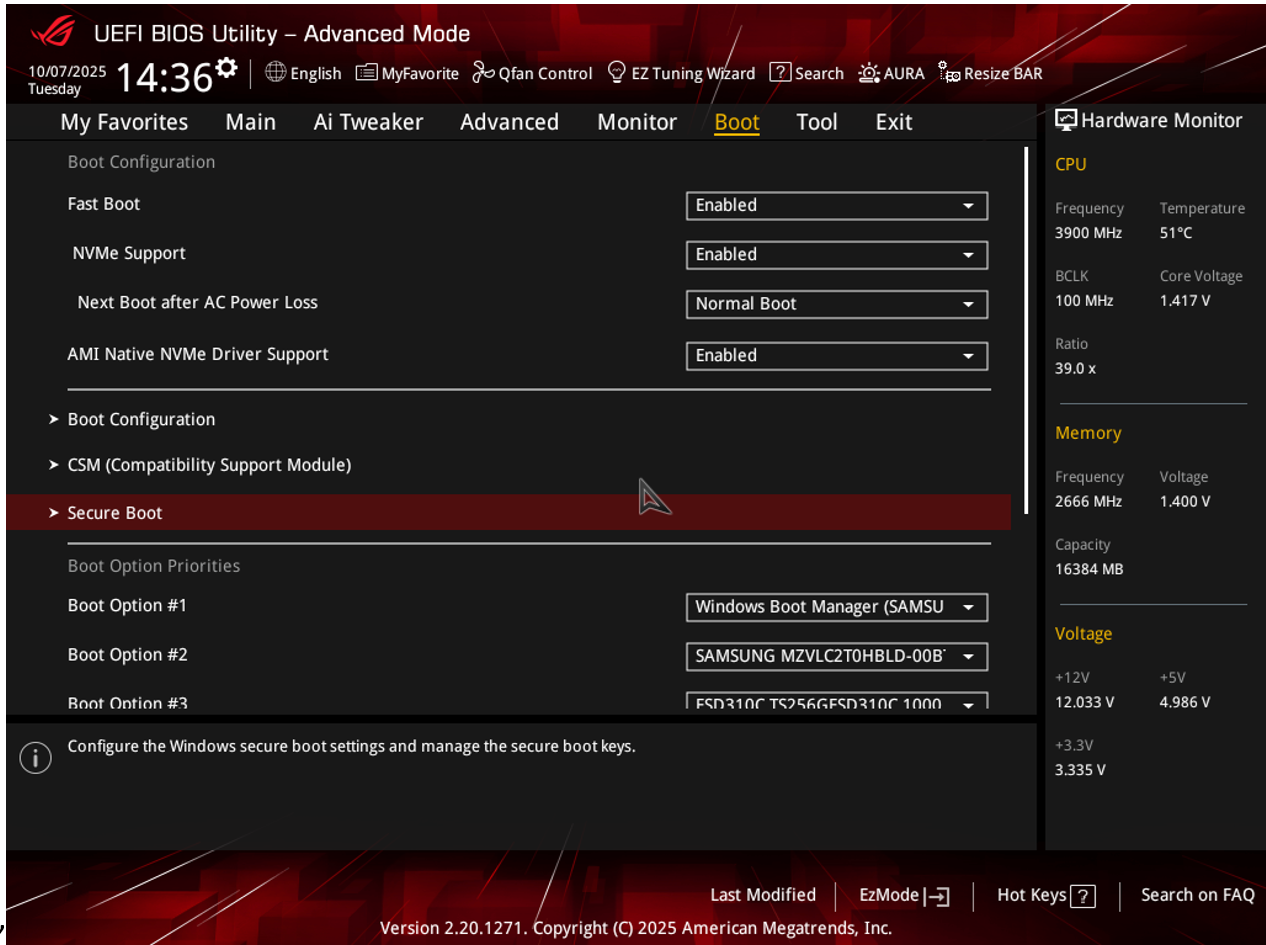
- Open Boot.
- Set CSM to Disabled if Windows is already using UEFI.
- Open Secure Boot.
- Set OS Type to Windows UEFI Mode.
- Set Secure Boot to Enabled.
- If asked, install or restore the default Secure Boot keys.
- Save with
F10.
MSI Secure Boot
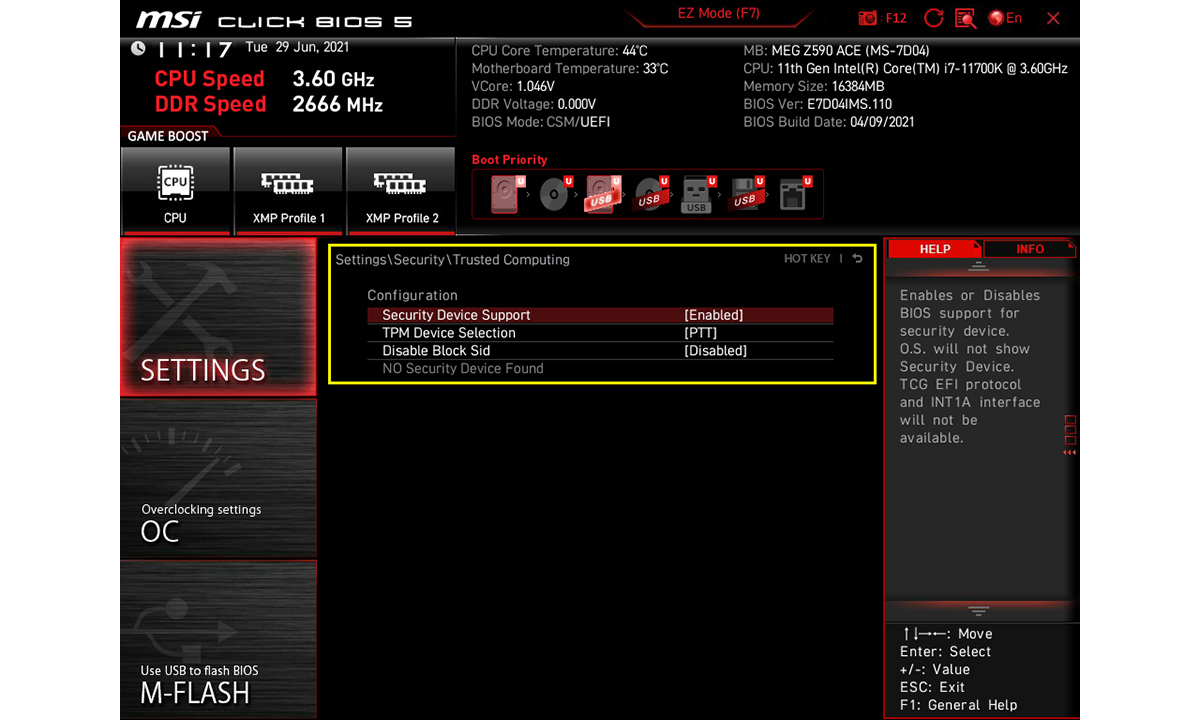
- Open Settings.
- Go to Advanced.
- Open Windows OS Configuration.
- Set BIOS UEFI/CSM Mode to UEFI.
- Enable Secure Boot.
- Install default Secure Boot keys if prompted.
- Save and restart.
Gigabyte Secure Boot
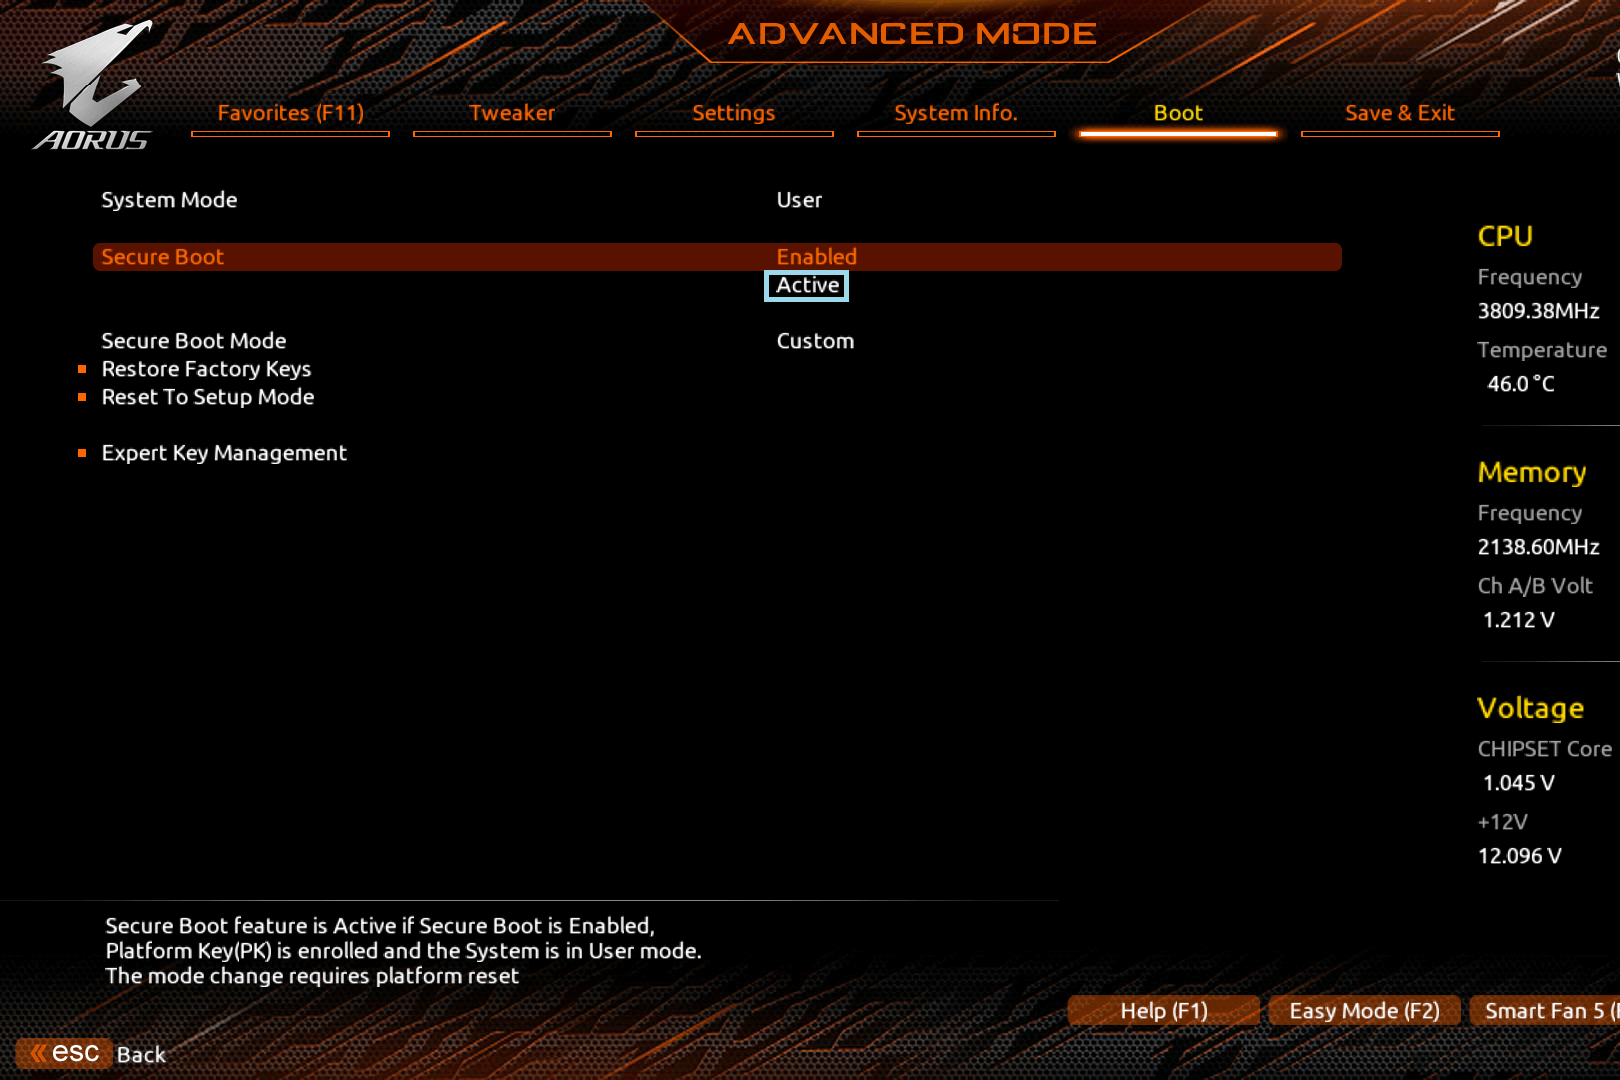
- Open Boot.
- Disable CSM Support only if Windows is installed in UEFI mode.
- Open Secure Boot.
- Set Secure Boot to Enabled.
- If the option is grayed out, set Secure Boot Mode to Standard and restore factory keys.
- Save with
F10.
Corsair’s MW4 Secure Boot guide also notes that Secure Boot settings are handled from BIOS/UEFI and may require enabling UEFI mode first, depending on the system, as shown in its Secure Boot guide.
Verify TPM 2.0 And Secure Boot In Windows
After saving BIOS settings, let Windows boot normally.
Check Secure Boot:
- Press
Windows + R. - Type:
msinfo32
- Press
Enter. - Confirm:
Secure Boot State: On
BIOS Mode: UEFI
Check TPM:
- Press
Windows + R. - Type:
tpm.msc
- Press
Enter. - Confirm:
The TPM is ready for use.
Specification Version: 2.0
You can also check through Windows Security:
- Open Windows Security.
- Go to Device security.
- Open Security processor details.
- Confirm TPM status and version.
Fix Secure Attestation Errors
Use this section if Modern Warfare 4 Beta still fails after TPM 2.0 and Secure Boot are enabled.
Restart After Saving BIOS Changes
Restart once more before launching the game.
Some firmware changes are applied during the next full boot, not while Windows is resuming from a fast startup state.
Update Windows
Install pending Windows updates.
- Open Settings.
- Go to Windows Update.
- Select Check for updates.
- Restart if prompted.
Update BIOS/UEFI Firmware
Older motherboard firmware can expose TPM and Secure Boot options but still fail security checks or behave inconsistently.
Use the BIOS update tool built into your motherboard:
| Brand | BIOS update tool |
|---|---|
| ASUS | EZ Flash |
| MSI | M-Flash |
| Gigabyte | Q-Flash |
Use the exact motherboard model page from the manufacturer’s support site. Do not download BIOS files for a similar-looking model.
Before updating:
- Check your current BIOS version in
msinfo32. - Download the correct BIOS file for your exact motherboard.
- Copy it to a USB drive if your board requires it.
- Keep the PC plugged in.
- Do not shut down the system during the update.
A BIOS update is often the missing step when Secure Boot is enabled but Secure Attestation still fails.
Restore Secure Boot Keys
If Secure Boot shows as enabled in BIOS but off in Windows:
- Open the Secure Boot menu in BIOS.
- Choose Install default keys, Restore factory keys, or a similar option.
- Save and restart.
- Check
msinfo32again.
Do not clear keys unless you know why you need to. Restoring default keys is the safer option for most gaming PCs.
Check For Legacy Boot Or CSM
If CSM is enabled, Secure Boot may not fully activate.
- Open
msinfo32. - Confirm BIOS Mode is UEFI.
- If it says Legacy, stop here and back up your data before converting the boot drive.
Windows includes an MBR2GPT tool for supported conversions, but that process is separate from enabling Secure Boot. Do not disable CSM first on a Legacy install.
Hardware Compatibility Or Configuration Problem?
Use this checklist before replacing hardware.
| Check | If it passes | If it fails |
|---|---|---|
tpm.msc shows TPM 2.0 |
TPM is enabled and detected | Enable AMD fTPM or Intel PTT |
msinfo32 shows UEFI |
Secure Boot can usually be enabled | Windows may be installed in Legacy mode |
| Secure Boot State is On | Secure Boot is active | Disable CSM and restore default keys |
| BIOS is current | Firmware is less likely to be the issue | Update BIOS/UEFI carefully |
| CPU supports fTPM/PTT | Firmware TPM should work | Older hardware may be incompatible |
Most errors are configuration issues, not broken hardware.
If your motherboard is very old and has no TPM, fTPM, PTT, Secure Boot, or UEFI options, the system may not meet the requirement for the beta.
Final Check Before Launching MW4 Beta
Confirm these values before opening the game:
TPM Specification Version: 2.0
TPM Status: Ready for use
BIOS Mode: UEFI
Secure Boot State: On
If all four are correct and the error remains, update BIOS/UEFI firmware, restart, and check again. After that, reinstall or repair the game’s anti-cheat component only if the launcher still reports a RICOCHET or Secure Attestation issue.
Thank you! Please share your positive feedback. 🔋
How could we improve this post? Please Help us. 😔

[Comparisons Expert]
Shehryar Khan, a seasoned PC hardware expert, brings over five years of extensive experience and a deep passion for the world of technology. With a love for building PCs and a genuine enthusiasm for exploring the latest advancements in components, his expertise shines through his work and dedication towards this field. Currently, Shehryar is rocking a custom loop setup for his built.
Get In Touch: shehryar@tech4gamers.com