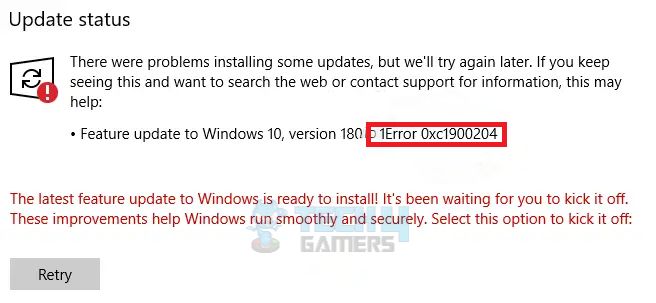
The Windows Update Error 0xc1900204 arises when you try to download the system updates on your Windows, and the process fails. Sometimes, the download is successful, but the installation won’t even start or crashes. The causes attached to it are misconfigured system files, file corruption, or accidentally deleting some important OS files.
Users who face the error will see the following message on their screens:

Key Takeaways
- When you try to install or update Windows, the error code 0xc1900204 may pop up.
- The error occurs due to misconfigured or corrupted system files or important OS files missing from the system.
- You can fix this error by tweaking the registry, running the Windows Update Troubleshooter, or resetting Windows update components.
Use The Following Registry Tweak
If some process has changed your system’s default Program Files directory where Windows-based programs are installed, this might cause the error. To correct it, you need to edit the registry.
Follow the steps with full concentration:
- Type regedit in the run dialogue box or the Start search bar. A prompt might appear saying that the tool will alter settings on your system; you need to confirm it. In the Registry Editor, browse to the specified directory after copying the path.
HKEY_LOCAL_MACHINE\SOFTWARE\Microsoft\Windows\CurrentVersion
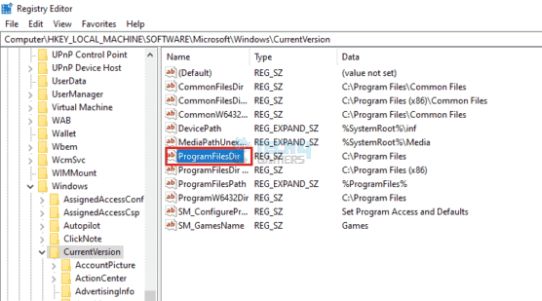
- An entry named ProgramFilesDir will be seen under the folder CurrentVersion. Right-click on it and then select Modify.
Program Files Directory – Image Credits (Tech4Gamers) - In the Program Files folder, beneath the Value data entry, cut the incorrect path and paste the proper one.
- The correct path for the 32-bit operating system must be X:\Program Files (x86) and X:\Program Files for the 64-bit. Here, the X represents the drive where you installed the Windows. Carefully place all the backslashes and letters; otherwise, it can seriously harm the system.
- Hit OK to confirm the settings, and then reboot your system. Try the Update process again and see if the error is no longer there.
Launch The Built-In Windows Troubleshooter
Windows has numerous good troubleshooters to diagnose and fix basic Windows errors. This troubleshooter has been tried and tested by a YouTuber, MDTechVideos and is therefore recommended.
Here is how to do it:
- Press Win + I > Settings > Update and Security > Troubleshoot.
- Go for Windows Update > Windows Update Troubleshooter > Run the Troubleshooter.
- Follow the instructions provided on the screen to see what’s wrong with the Windows Update services and processes.
Windows Update Troubleshooter – Image Credits (Tech4Gamers) - Once the troubleshooting is completed, open Troubleshoot > Internet Connections troubleshooter.
- Restart your system and open Windows Update again. Hopefully, the error will be dismissed.
Disable Windows Defender Firewall
The error may also arise while installing PC updates because antiviruses create firewall hindrances that block updates. If this is the reason for the glitch in Windows updates, you can try to resolve the issue by disabling the Windows firewall.
Important: We advise turning the Windows Defender Firewall back on right after testing the method, as keeping it disabled for long can end up doing more harm than good.Perform An In-Place Upgrade
Performing an in-place upgrade is an easy fix to try, which is also implemented by user Indoorcat from Bleeping Computer. This upgrade will install the latest Windows on your system, and your files and apps will stay safe.
Follow the steps to carry out the in-place upgrade:
- Download and install the Media Creation Tool.
- Run the tool > Upgrade this PC now.
- Once the process finishes, go for Download and install updates.
- Wait patiently for the updates to be downloaded completely. Follow the directions provided on the screen.
- On the Ready to Install > Choose what to keep > Keep personal files and apps.
- Some directions will be provided on the screen to finish the process.
After the process has finished, your system will have the latest Windows installed, and the error must have been resolved.
Reset Windows Update Components
You can also fix the error by resetting the Windows Update component. Upon trying this method as per YouTuber Murugan S’s recommendation, I experienced positive results, just like the users in the comment section.
Important: In this fix, you will be editing the Windows registry. So, create a proper backup for all your precious files and programs to prevent data loss while following this method.Here is how to reset components:
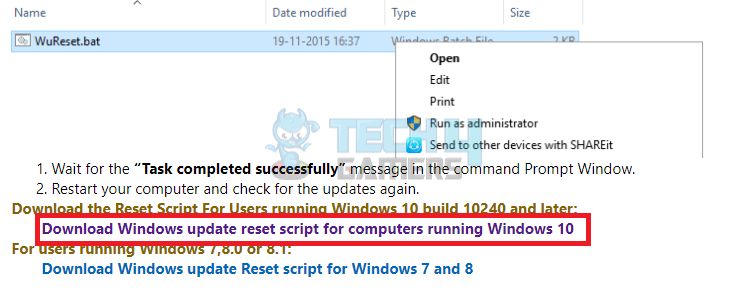
- Click on the link to download the Windows update reset script.
- Scroll down and click on the download link for Windows 10.
Download Script For Win10 – Image Credits (Tech4Gamers) - Go to Downloads > Extract folder > Right-click on the Wureset.bat file.
- Click Run as administrator > Yes.
- The file will take some time to run and complete the process.
- When you see the notification on the screen that says “Task completed successfully,” close the file and restart your PC.
Try updating Windows again when your system is started. Hopefully, this time, the process finishes successfully, and you won’t be facing the update error anymore.
Related Articles
- How To Fix Windows Error Code 0x80042405-0xA001A
- Error 0xc00000e On Windows?
- Windows Update Error 0xc1900223
Thank you! Please share your positive feedback. 🔋
How could we improve this post? Please Help us. 😔
[Errors Troubleshooting Expert]
Arsalan Shakil (aka GuyThatDoesEverything on YouTube) is a PC Tech Enthusiast and Electronic Geek. With over 10+ years of experience in Electronics, he then decided to explore Software Engineering to design embedded products and automate existing hardware solutions.
When he started tearing down old cameras to understand how they worked, he was shocked (literally, when he got zapped by a flash discharge capacitor), giving him the power (debatable) to fall in love with videography/photography. He also started making some fun videos that later became YouTube tech reviews.
Skills:
- 10+ years of experience in Electronics design, embedded solutions, and prototyping
- Majored in Software Engineering
- Research paper publication in IEEE for Embedded Military Uniform & LoRa WAN wireless technology
- Specialized in IoT Solutions
- PC Enthusiast & PC Modder
In his local region, he’s known to expose cheap PSU brands, often claiming fake certification or false claims on the box. He’s a true nerd and needed some friends in his life. Then he met some guys who work at Tech4Gamers, and they also came out to be equal nerds who suggested he join Tech4Gamers as a Hardware Expert.


 Threads


![Computer Correctly Configured, Device Not Responding [Our Tested Fixes] Computer Appears To Be Correctly Configured But The Device Or Resource Is Not Responding](https://tech4gamers.com/wp-content/uploads/2023/06/Error-Fixes-3-218x150.jpg)
![How To Fix Windows 10 “Diagnosing Your PC” Error [Detailed Guide]](https://tech4gamers.com/wp-content/uploads/2024/02/How-TO3-218x150.jpg)
![WHEA_UNCORRECTABLE_ERROR [Our Fixes]](https://tech4gamers.com/wp-content/uploads/2023/08/Error-Fixes-20-218x150.jpg)
![Xbox One Stuck At Green Screen [Our 3 Quick FIXES 2024]](https://tech4gamers.com/wp-content/uploads/2024/01/Error-Fixes-3-218x150.jpg)
