The process of PC building can seem overwhelming at first, but it can quickly become one of the most fun experiences you’ve ever had. An important aspect of PC building that most tech-related forums often gloss over is how long it takes to build a PC. Every novice has pondered this question when building their own custom PC for the first time.
Key Takeaways
- There are multiple factors that affect the time it takes to build a PC, such as experience, research, the parts you’re using, and so on.
- Organizing the parts can take several hours or a few days, depending on where you’re getting them from.
- With all the parts in front of you, it can take you between 2 to 3 hours to build the entire PC.
Related: How Long Does It Take To Reset A PC
Factors Affecting The Time Of Building A PC
First, you must evaluate some factors before building your own PC. These can affect the overall time it takes to build and get the system working.
Experience
Arguably, the most critical factor affecting the build time of your PC is your experience.
Typically, the more experience you have building PCs, the faster you can build them. This is true in most cases, as prior experience allows you not to make the same mistake that you might have made before.

But without a doubt, once you’ve built your first PC, you will gain a lot of experience.
Ask yourself, have you done proper research? Do you know how to troubleshoot if anything goes wrong? Is there someone who can help you out if any issue comes up?
Also Read: How Much Does It Cost To Build A PC
Experience in building PCs is a critical factor in determining the time it would take for the process to be completed. It’s also vital to gain because this is not something that can just be gained by reading on the internet.
Research
Another critical factor in determining how long it takes to build a PC is the amount of research you’ve done. The more knowledge you have about PC components and how to install them properly, the faster you’d be able to complete your build.
If you don’t have adequate knowledge about building a PC, it’s advised that you don’t attempt it because this process can quickly turn from fun and creative to an absolute nightmare.
Figuring out the compatibility and quality of the components is important to reduce issues in the build regarding hardware incompatibility. This can also save you a lot of time later when you assemble the build.
In addition, it’s essential to organize all your components carefully and in accordance with your budget. Looking for alternatives if some part is unavailable, custom add-ons and peripherals are also part of this process.
Without proper research, you can run into common problems such as incompatible RAM, underpowered PSU, cable length being too short or too long, and more. There are also online tools that you can use to help pick your PC parts and also check their compatibility, so make use of them.
Research is important for saving time and saving yourself from many issues, so always be prepared before you start building your PC. It’s better to spend a little time getting properly informed so you can build a PC that you’re happy with, rather than spending your money on something you regret down the line.
Troubleshooting
When building a PC for the first, it’s not uncommon for newbies to run into some problems as it can be a complex process. These problems could be so random and unexpected that you might need hours to fix them.
Troubleshooting plays a major role in the overall time it takes to build a PC. It is the most tedious part of the whole PC building process. For newbies, anything could go wrong when building a PC for the first time. For example, maybe you forgot to switch on the power supply, or perhaps the hardware is faulty. Problems like these could take a few minutes to weeks to resolve, thereby increasing the total time it takes to build a PC.

- HDMI/VGA cables are attached to the motherboard instead of the GPU
- GPU attached to the wrong PCIe slot
- RAM clearance issues
- BIOS is incompatible with the processor
- Cables being too short or plugged improperly
- Twisted pins of the CPU
Fixing such problems is a big part of the building process. It requires a lot of patience to search for these problems and find their solutions. The process can be difficult for newbies and add to the overall build time.
It is advised that you reach out to a friend who has built a PC before to help you troubleshoot these problems, as there could be more than one issue, and it could take you a lot more time to figure out the fix all by yourself.
Customizability
Everybody wants to customize their PC to best suit their tastes. This is why you pick the best parts according to your budget and any additional add-ons such as RGB fans and AIO coolers. This adds to your PC’s aesthetic appeal and enhances the gaming experience.
And while it sounds like an enjoyable experience, it also adds a lot of time to properly install those extra components. Typically, most budget-oriented PC builds are the ones that take the least amount of time to be built. While on the other hand, the more aesthetically pleasing RGB-lit mini-ITX builds can take much longer because everything has to be placed carefully inside a small space.
This can either dull the process or make it more exciting, depending on your build type, but any additional customization does increase the overall time it takes to build a PC. So that’s why if you’re planning to build your own custom PC, figure out what type of building you want and put in the effort to neatly organize all the parts that you want according to that type.
Delivery Time
Most PC builders buy their components online, so they have to wait for the components to arrive at their house. This adds to the build time of your PC.
Depending on how fast the delivery service is, it could take anywhere from a day to many weeks, especially when products have to be shipped from another country. A number of factors also play a huge role in impacting the time it takes for all components to be delivered. This includes the availability of the products, the country that the products have to be shipped to, and any unforeseen problems that might occur when shipping.
It’s better to buy products from hardware stores in person, so you don’t have to wait for the products to be delivered and to start building your PC as soon as possible. But it’s also worth noting that the products you need might be out of stock in those stores.
Type Of Cooling
Depending on the type of cooler you’ve purchased, the build time could either be minimized or increased. Typically, air coolers are easier to install than liquid coolers, which means that they also take less time to install.
Air coolers don’t require thorough planning to install as there’s nothing that could actually damage other components of your PC. On the other hand, liquid coolers need to be carefully planned out on how to install them without any leaks or problems. This process could take up a lot of time when building your PC.

How Long Does It Take To Build A PC?
Following is the overall timeline of building a PC.
Organizing The Parts And Tools (Up to 5 hours)
Research is extremely important and requires a lot of time to do when building a PC for the first time. To ensure that your build doesn’t have any compatibility issues, you should pick your parts carefully and use online tools such as pcpartpicker.com.
Also, if you’re having a hard time deciding on which PC components to choose, you can look online for setups that suit your needs and order the parts that are used in them. First, you should decide your budget and then figure out why you need the PC. For example, if you require a PC for working and editing, you don’t need a very high-end graphics card.
In total, if you’re a complete beginner, this process could take up to 5 hours or more depending on how much research you do. If you have prior knowledge, you can speed up this process by a lot. Once your products have arrived, you can start building the PC.
Preparing Motherboard (15-20 minutes)
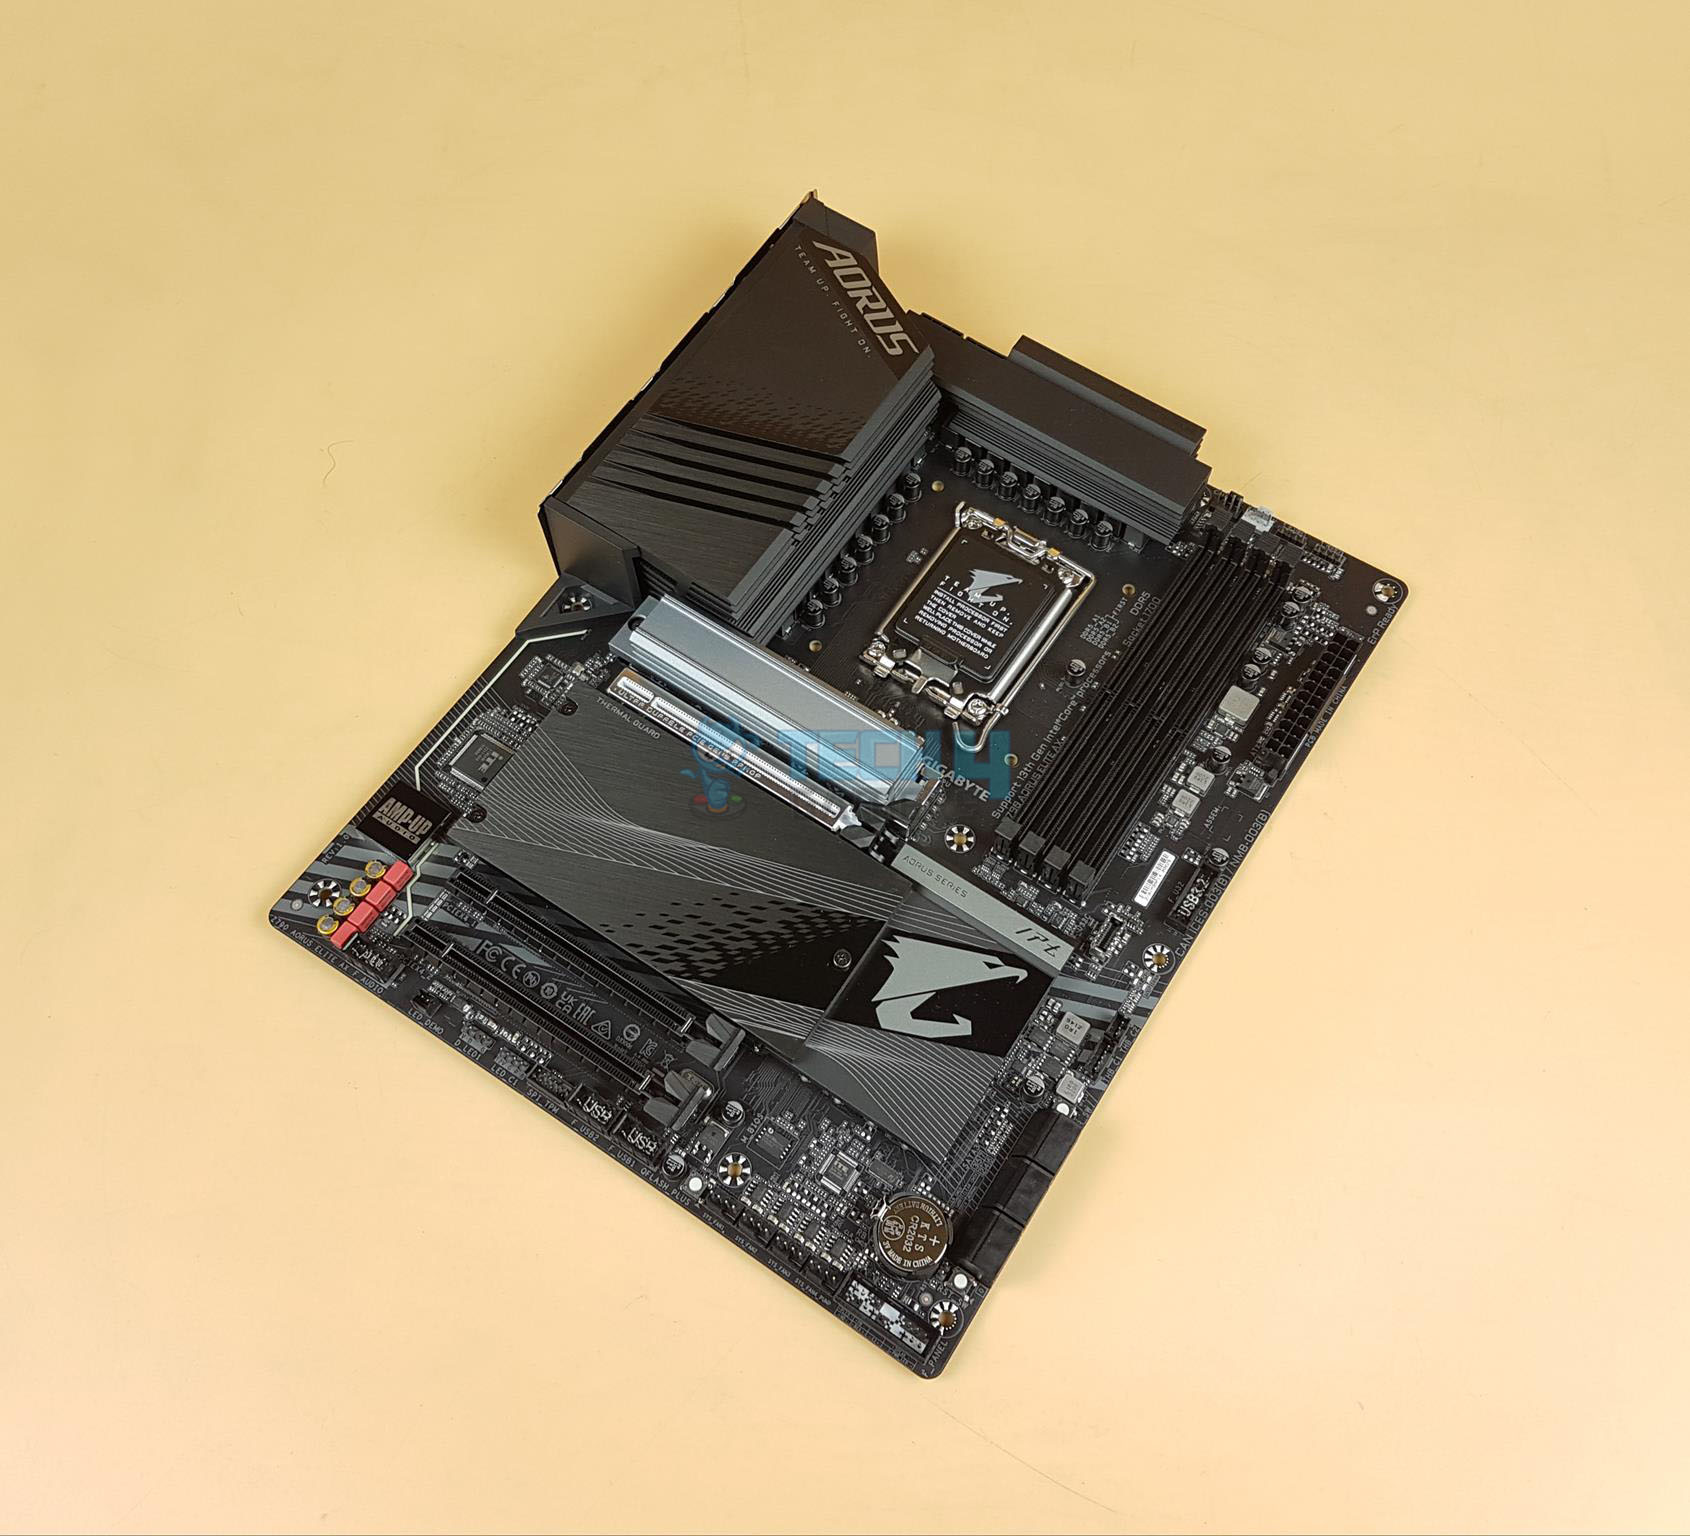
The first step in starting your build is with the motherboard. All main components of the PC are attached to the motherboard so it can be seen as a base for assembling your build. When picking a motherboard, make sure it’s compatible with your graphics card and CPU and allows them to operate at its full potential.
Firstly, you should start assembling the motherboard by installing the processor. It is arguably the most crucial part of building the PC. To install it, you need to be very careful. It’s worth mentioning that processors (in the case of AMD) or motherboards (in the case of Intel) can be damaged easily, so never touch the CPU base. Carefully place the CPU inside the socket and make sure to align it with the socket perfectly. Don’t apply too much pressure, and just let the CPU slide down.

You should hear a clicking sound once it’s placed in the right position. Then lock the clips, and you’re done. Also, check the notch in the RAM and the RAM slot, and align it carefully.
Now, it’s time to install the M.2 storage devices. If you’re using an NVMe SSD, you can attach it by sliding it down the allocated space on the motherboard using the screws that come with it. If you’ve bought a SATA SSD and HDD, you can place them inside the allocated space on your chassis and attach them to the motherboard via a SATA cable. We also have a detailed guide on how to connect the SSD to the motherboard.
And that’s about it. Give yourself a pat on the back if you’ve reached this far. This stage could take 15 minutes to an hour, depending on your experience.
Since it’s such a delicate process, it’s recommended to take your time and follow all instructions carefully to avoid any unforeseen issues.
Preparing The Case (20-40 minutes)
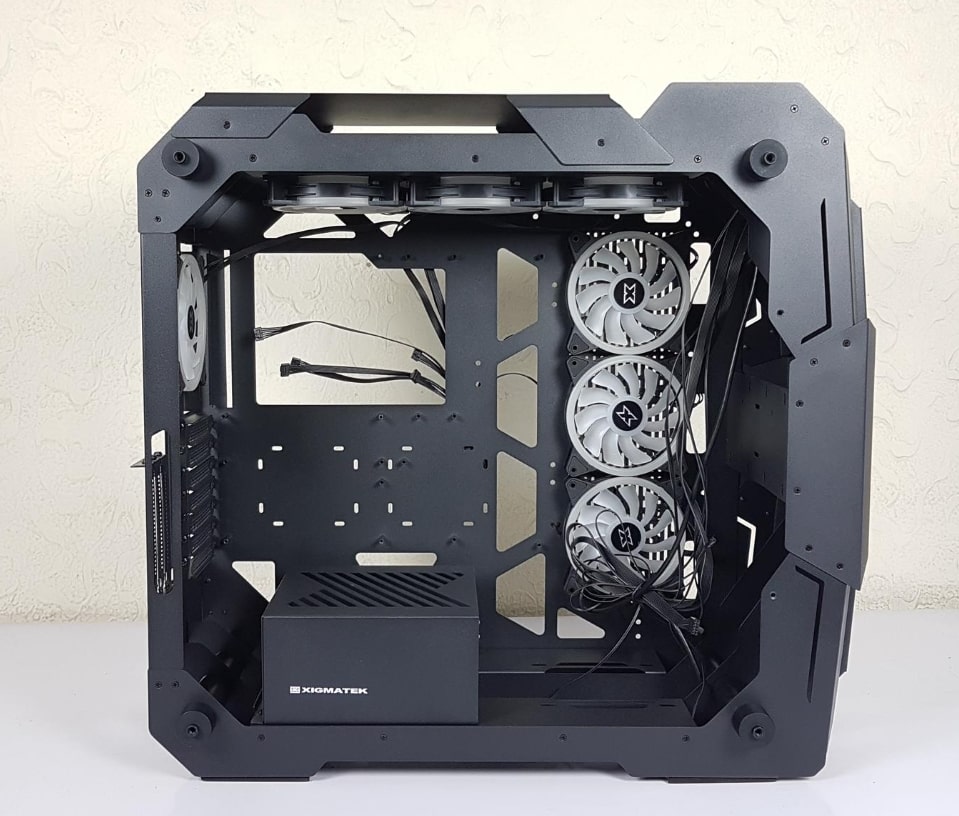
Alright, so the next stage in building your PC is to put everything into the case, including the graphics card, the power supply, the cooler, and the motherboard. Depending on the case size, this process could get easier or more difficult.
First, you have to safely remove the front panel and back panel and make sure they don’t receive any damage. Next, you have to install the PSU, which should always have more power than the total requirements of your PC.
When installing the PSU, pay attention to the fan’s position so the warm air can be ventilated out of the CPU case and prevent the case from getting hot. Once you’ve lined up the power supply correctly, it’s time to screw it in place.

Then assemble the cooler separately and install it on the mounting brackets by screwing it in. Make sure to apply your own thermal paste on the CPU if there isn’t any that comes with the cooler.
All that’s left now is installing the graphics card onto the motherboard and cabling everything together.
To install the graphics card, but the graphics inside the right PCIe slot of the motherboard. You may need to remove the cover plate of the PC chassis for the graphics card to fit in. Align the graphics card with the slot and push it down to connect it to the motherboard.
Cable Management (10-20 minutes)
We’re at the last stages of building a PC now. To complete the build, you have to connect all the cables correctly to all components. If you know each cable and where to plug them, this process will be easy, but for newbies, it’s better to watch a step-by-step tutorial for this online.
Also, cable management is an important process that can take a little time to nail down perfectly. The goal is to make the PC look pleasing to the eye and remove the crowdedness of cables and wires.
Each case has a different way of managing cables, and you might require different lengths of cables to reach the best management. This process is especially hard for small cases because lack of space to manage cables.
But once you’re done with this step, connect all the power cables and chords with your peripherals. It’s time to give your PC its first boot.
Installing The OS (10-20 minutes)
Before installing Windows, make sure to go to BIOS and select the Boot priority at first for the storage device in which you want to install windows. Now that you know your PC is working, it’s time to install the OS and get to use it for your task.
Typically, Windows 10 takes a max of 10 minutes to install; if you are using M.2 drive and in case of HDD, expect at least 20 minutes. Once it’s installed, let the Windows update install all the required drivers, and you’re done! You can benchmark and test if everything functions fine using online tools and also overclock your components.
Similar Reads: How to reset a PC?
Is Building A New Gaming PC Difficult?
If you go through the correct instructions and keep following the right guidelines, you will definitely end up with a setup that you’ll love to operate and brag about.
If you think you know a lot about gaming PCs and their assembly and are still reading this, then it means you could get some extra help.
It is always better to be safe and do things the right way. At first, you may feel it is nothing but a complex process and a hassle but by the time you’re done, you’ll love the entire experience.
More often than not, gaming PC gurus are able to finish the entire assembly process in less than 60 minutes because they have been doing it for ages.
If you’re about to do it the first time, then get ready to spend hours or at the least, more than an hour to finish the assembly. In some cases, the process can even take days if you have not done the research and gathered the knowledge you need to familiarize yourself fully with each component and problem. However, once you get the hang of things, the next time you build your PC will be a fun and hassle-free process.
Should I Build My PC Myself Or Take It To The Shop?
To be honest, the decision is completely your call because it is your gaming PC and the money that you are spending buying every component.
You have to decide whether it is the right choice to assemble a gaming PC all by yourself or let a PC store do it for you. Here are the pros and cons of both approaches so you can decide what would be more advantageous.
Building The Gaming PC Yourself
Here are the pros and cons of building the gaming PC yourself:
Pros
- You do not have to pay anyone to build your PC.
- You learn about all the components and know where each one is placed inside the gaming PC.
- You will find it easier to upgrade your components in the future and do not need anyone’s help installing the new device.
- You become the final decision maker and customize the PC’s look and details all by yourself.
- You decide the budget for your build and can upgrade or downgrade the components as you see fit.
- You understand the compatibility of each component with each other, so you do not end up installing devices that are not compatible, thus lowering your build’s performance.

Cons
- You may save money, but you may take too much time to finalize the build. A simple 1-2 hour work may be extended to days of hard work without a desirable outcome.
- You are playing with extremely sensitive components, and if you lose concentration for once, you may break something.
- Your gaming PC can heat up if you install the components but do not fix the cables and wires in the right manner. The overheating can cause system failures and can damage your components.
Gaming PC Build From A Shop
Similar to building a gaming PC by yourself, getting it done by a professional also has some pros and cons:
Pros
- Your gaming PC is built in a couple of hours, and there are minimal chances of things going wrong.
- It may be your components, but the store is assembling them, so if they break it, they buy you a new component.
- They install every component correctly and make sure the cables/wires are well placed. They have a standard to maintain so they cannot take any risks.
- If anything goes wrong with the installation of the components or the software, then they are the ones to fix it for you. This way, you are covered from the hassle and the troubles before and after the build.
Cons
- You put extra weight on your budget by paying the store to assemble your build, which may cost up to $150.
- They may assemble the build in less than an hour but may ask you to collect it later due to a long queue of customers. Remember, you are not the only one who wants to build a gaming PC.
- The assembly may not be made as per your standards, and they may not do it because their service does not cover it.
- They may not be as careful as you would be when building the gaming PC and may install the wrong software or miss out on adding screws, which could be problematic.
Conclusion
In the end, there’s no clear answer to the question: how long does it take to build a PC? There are too many factors that can affect the overall build time of a PC, but one thing is assured a veteran will always be faster than a newbie.
As a tech enthusiast, there are few things that can replace the joy of building your own custom PCs and gaming on them. With that said, we hope you found this article helpful.
Frequently Asked Questions
It can take you anywhere between 2 to 3 hours to build a PC.
Factors such as experience, the parts, and research can affect the time it takes to build a PC.
If you don’t have a lot of knowledge about PC hardware, it will be wise to get it built from a shop the first time
Thank you! Please share your positive feedback. 🔋
How could we improve this post? Please Help us. 😔