 Threads
Overclocking memory used to be a complicated process, but these days, motherboard makers have made it significantly easier by including pre-configured profiles (like AMD EXPO and Intel XMP) right in the BIOS. As such, most high-end RAM kits have XMP/EXPO branding, which means they already have profiles with optimized configuration, you just need to enable them from the BIOS.
But that doesn’t mean more affordable kits can’t be tuned. Even budget-friendly RAM can perform surprisingly well if the binning quality of the DRAM chips is decent. Of course, they may not reach the same level as high-end kits like the G.Skill Trident or Corsair Dominator, which are built with better components and cooling.
In this guide, I will walk you through the step-by-step process of tuning a DDR5 kit for optimal performance. I have chosen the XPG Lancer Blade RGB 6000MT/s CL30-40-40, which is reasonably priced at around $75 for a 16×2 setup, and I will be tuning it on Zen 5.
Simply put, tighter memory timings can improve in-game responsiveness, especially when it comes to frame times, and can even boost average FPS, but it’s important to note that memory tuning isn’t just about changing a few settings. It can take weeks to get a truly stable configuration. Sometimes, a kit may seem stable for days, only to show issues later, so there’s no perfect tool that guarantees 100% stability. Memory overclocking can definitely be rewarding, but it can also be frustrating if you’re not sure what you’re doing.
Before you start tuning your kit, think about what you want to achieve: lower timings for better latency or higher memory frequency for more bandwidth. Each approach has its trade-offs, and not all games benefit the same way. In general, games respond better to lower latency than to higher speeds, but some workloads may prefer raw bandwidth.
Lastly, I highly recommend going through my breakdown of RAM timings. I have explained the difference between primary, secondary, and tertiary timings, and which of them you need to tune (and how) for optimal performance.
Overclock The Frequency First (Optional)
Generally, while tweaking memory, the rule of thumb that most of the tuners and overclockers follow as well is that they tinker with the frequency first to achieve the maximum figure. For instance, if your EXPO/XMP profile on DDR5 is set to 6000 MT/s, you should aim at 6200 MT/s before you tweak the timings of your DRAM.
Combining the transfer speed overclocking with the tuned timings can boost the performance. If you’re on the DDR4 platform and 3000MT/s speed, you should be aiming for 3200 MT/s and run the desired stress tests to ensure stability, and then keep pushing the clocks until you find the right frequency, which is where you will be tweaking your memory timings. However, sometimes, when you overclock, the frequency is too high, and you also need to adjust the memory timings to stabilize the performance.
My recommended target range for AM5 Platform (DDR5):
| XMP/EXPO/DOCP Profile | Recommended OC Target Range |
|---|---|
| 5600 MT/s | 5800 MT/s – 6000 MT/s |
| 6000 MT/s | 6000 MT/s – 6200 MT/s |
| 6400 MT/s | 6600 MT/s – 6800 MT/s |
| 6600 MT/s | 6800 MT/s – 7200 MT/s |
Similarly, my recommended target range for the AM4 Platform (DDR4):
| XMP/DOCP Profile | Recommended OC Target Range |
|---|---|
| 3000 MT/s | 3200 MT/s – 3333 MT/s |
| 3200 MT/s | 3466 MT/s – 3600 MT/s |
| 3600 MT/s | 3733 MT/s – 3800 MT/s |

AM5 (DDR5): AM5 Processors (Ryzen 7000/9000 Series) tops out at 6000MT/s to 6400MT/s for 1:1 MCLK (Memory Clock) to UCLK (Memory Controller Clocks) stability. They need to be synchronized for optimal performance. If you target the frequency beyond 6400, your memory control clocks will run at half of the MCLK (Memory Clock) speed, increasing the latency of your system. Some AM5 CPUs would lock at 6200MT/s and would not do more than 6400 MT/s. So, while tweaking your transfer speeds on your AM5 system, your targeted overclocking frequency should not exceed 6400MT/s or 6200MT/s.
AM4 Processors Ryzen 1000/2000/3000 series tops at 3800MT/s to 4000MT/s and needs synchronized 1:1 with the infinity fabric clock (IF Clocks). For example, if you’re a 3200MT/s, your memory transfer speed is 1600MT/s, and your (IF Clocks) should always be 1600MT/s. On AM4, the memory controller clocks (UCLK) are always synchronized, unlike the AM5, so you should be only focusing on Infinity Fabric Clocks and Memory Clock (MCLK).
– Usman Sheikh
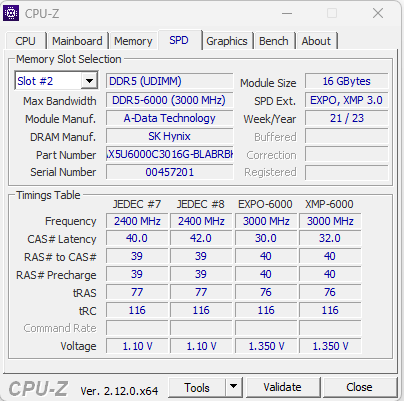
Our Test Kit: XPG Lancer Blade 16X2 CL30 6000MT/s
We’re using XPG Lancer Blade CL30 6000MT/s for our tests, and the benchmarks will be included. We have first achieved the maximum stable frequency of 6400MT/s at a reasonably high VDD voltage, but it’s in the safer range for the Hynix-A die. After we had run through multiple stress tests at 6400MT/s, we then jumped to the timings section where we had tuned primary timings first, and after many trials and errors, we then jumped to the secondary and tertiary.
XPG Lancer Blade EXPO Profile vs. Our Tuned Timings + 6400MT/s
| Primary Timing Parameter | EXPO Profile (6000MT/s) | Manual OC + Tuned Timings |
| Transfer Speed | 6000 MT/s | 6400 MT/s |
| CAS Latency (CL) | 30 | 28 |
| tRCD (RAS to CAS) | 40 | 38 |
| tRP (Precharge) | 40 | 36 |
| tRAS (Active Time) | 76 | 32 |
| tRC (Row Cycle) | 116 | 68 |
| tWR | 90 | 48 |
| tRFC | 884 | 421 |
| tREFI | 11677 | 5000 |
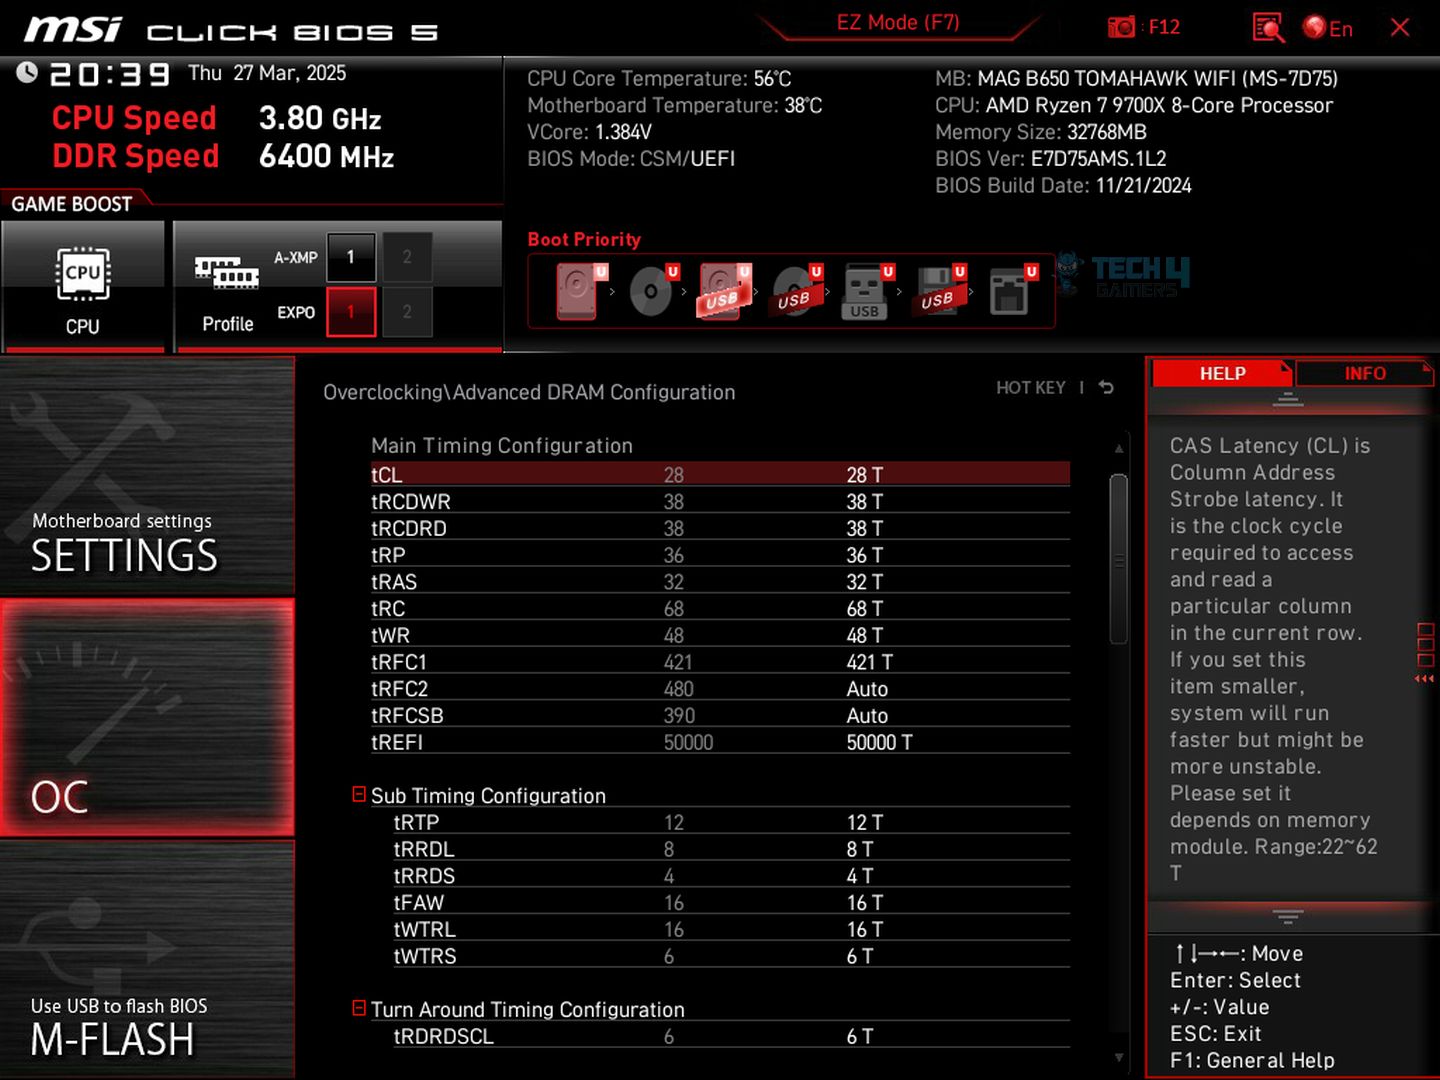
In our motherboard, the MSI B650 Tomahawk, we have tRFC and tREFI in the primary timings, which is strange as in some motherboards, these times have always been in the tertiary. However, these timings significantly impact on the performance of AM5.
Our kit achieved a CAS Latency of 28ns at 6400MT/s, which is incredible. The tRCD is very stubborn timing. We can do 36 here, but we risk stability and need more voltage. The die on our KIT is a Hynix-A die. The tRP should be aligned with the tRCD; in that case, it should have been 38, but we have managed to reduce it to 36.
Regarding the tRAS, the general rule is that the tRCD + TCL is used to get the tRAS value. In our case, it could have been 66; however, in DDR5 Hynix-A dies, tRAS can actually be tightened up by a lot. Timings are very tricky. Sometimes, general rules cannot be applied.
For the tRFC, we have managed to lower it down to 421, however finding the tRFC is very tricky you have to go through a lot of trial and error, and tRFC heavily relies on the memory ICs. Samsung and Micron may struggle in lowering down the tRFC but Hynix-A is truly a god-sent for the memory-overclocking.
After we had set the tRFC, we moved to the tREFI since both are very much connected. Traffic is how often refresh happens, and tRFC is how long the refresh operation takes when initiated. For the tREFI, it is always recommended to go for the higher values; the less the refresh is, the better the performance will be. We have managed to increase the tREFI to 50000, but you need to be cautious as higher tREFI is very temperature sensitive; on the AM5 DDR5 platform, higher tREFI considerably lowers the latency.
| Secondary Timing Parameter | EXPO Profile (6000MT/s) | Manual OC + Tuned Timings |
|---|---|---|
| tRTP | 23 | 12 |
| tRRDL | 15 | 8 |
| tRRDS | 8 | 4 |
| tFAW | 32 | 16 |
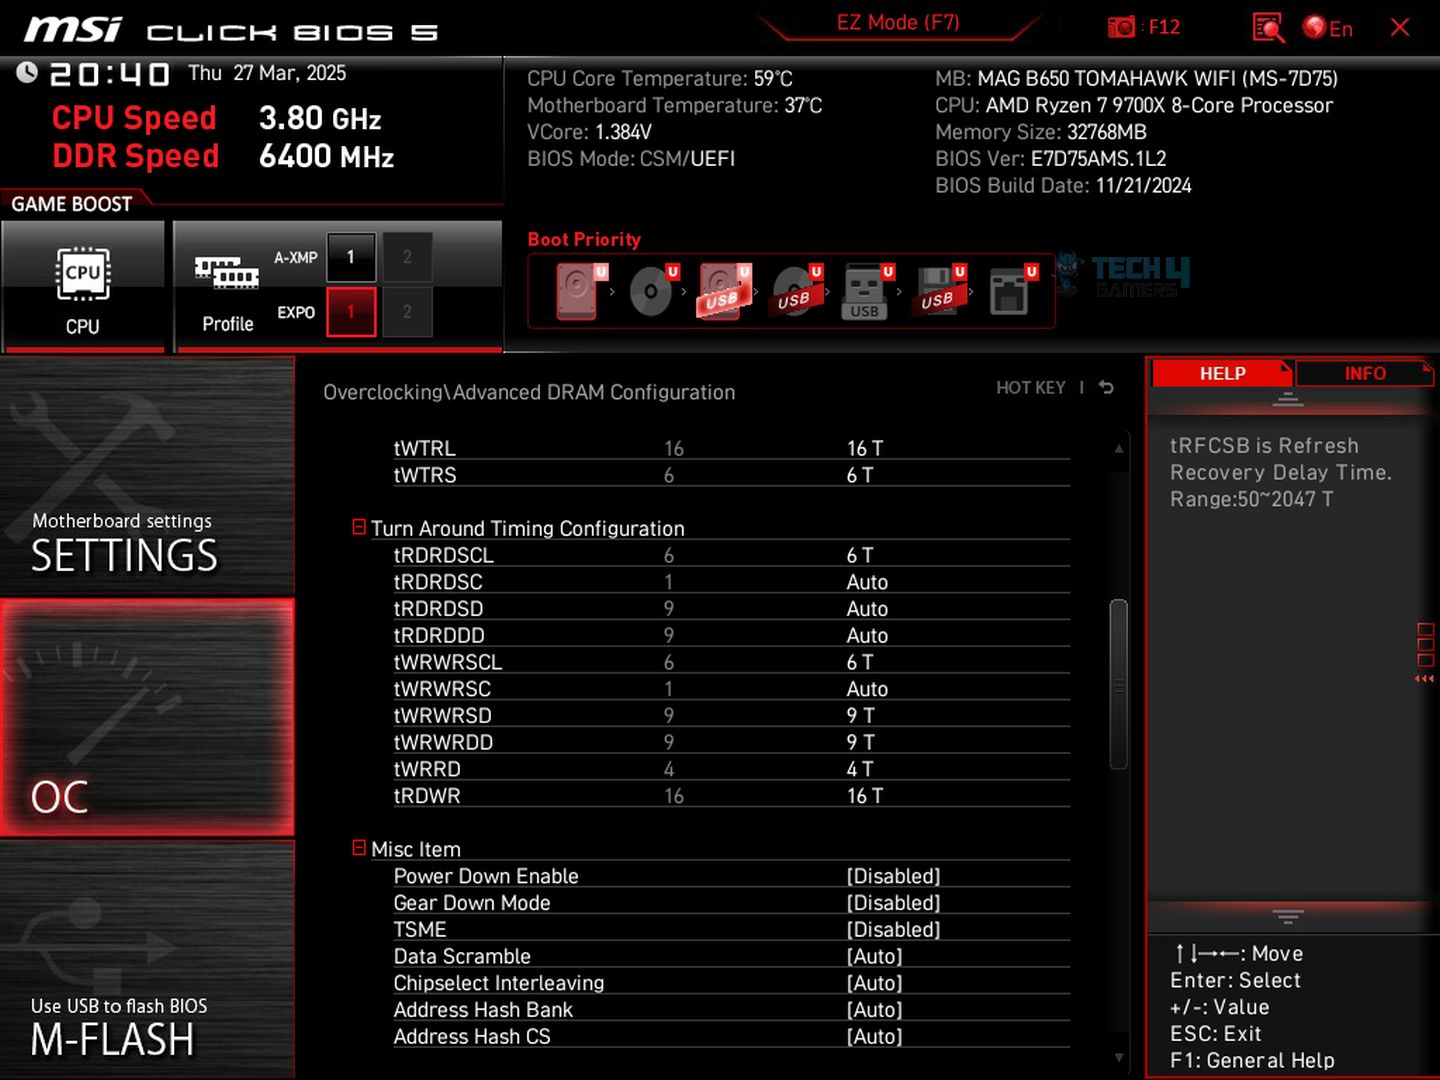
| tWTRL | 30 | 16 |
| tWTRS | 8 | 6 |
The general rule for tRTP is to calculate this timing using the formula tWR ÷ 2 for the starters. Usually, it ranges from 8 to 20 depending on the ICs; Hynix can achieve much lower tWR; we were settled at 12.
The tRRDL ranges from 14 to 6, depending on your ram’s IC. Our Hynix A kit does eight on tRRDL and tRRDs; it’s 4. However, the general rule is to tighten the tRRDs first and then tRRDL. Finding the tRRDL is easy; you can do tRRDs + 2 or 4 to see the tRRDL value.
tFAW can be combined with the trend, but the values must be greater than the tRRDs; if the tRRDS is 4, then the tFAW should be 16; the general rule is to multiply the tRRDS value by 4 to get the tFAW in our case, we get 16
tWTRS usually scales with the DRAM voltage on the HYNIX A die; we find the sweet spot of 4, which is extremely tight. However, you can relax to 6 or 8 without sacrificing much of the performance. However, tWTRS + 8 or 10 for the tWTRL is mandatory.
Finalizing RAM OC
BIOS Settings

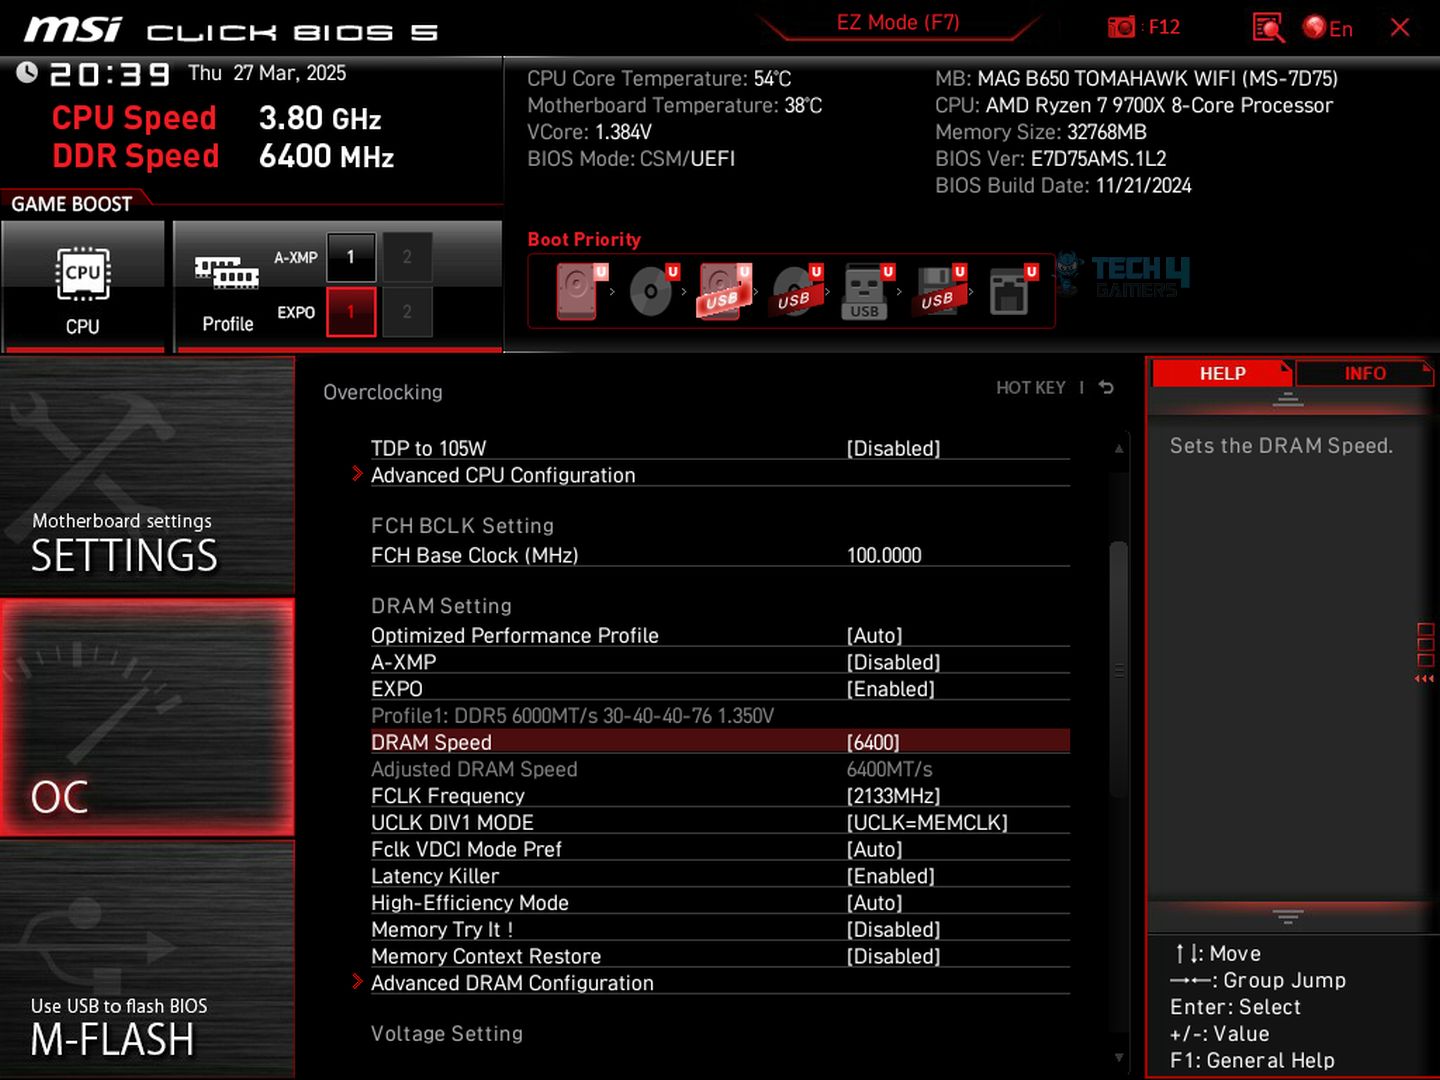
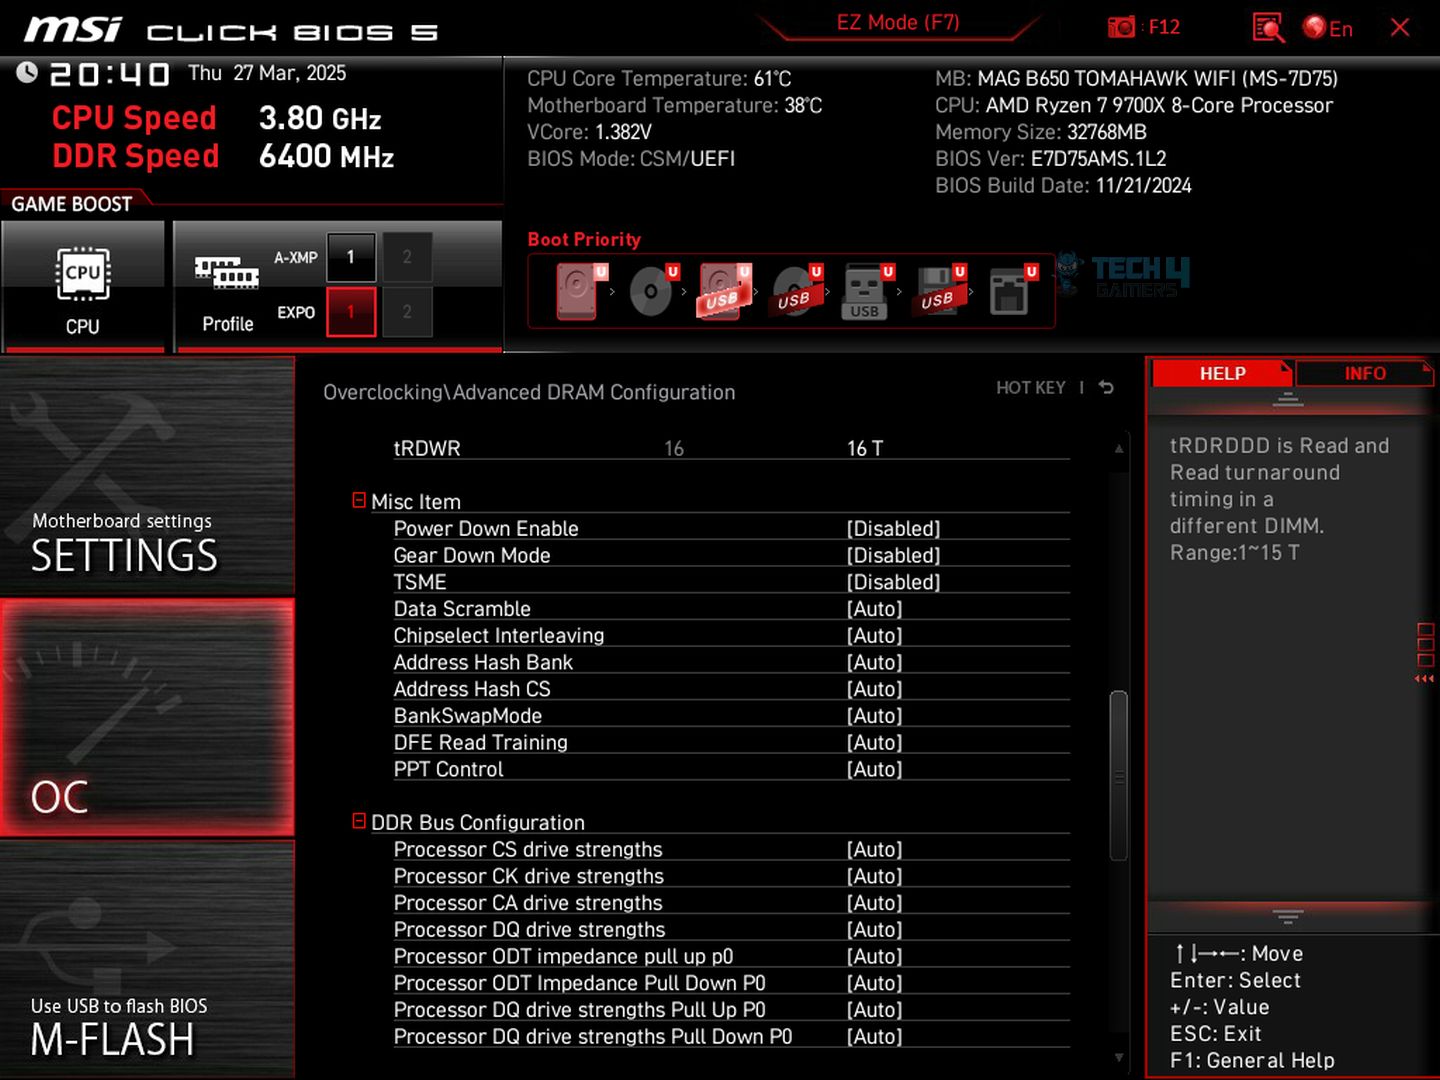
We have enabled the Latency Killer in the BIOS, The Memory Context Restore + Power-Down is disabled, Gear-Mode and TSME is also disabled and we have forced UCLK=MCLK.
CPU Z & Zen Timings
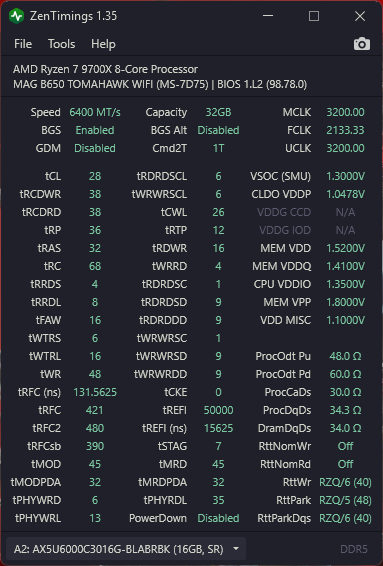
The voltage reading on the ZEN-timings might not be accurate, as we have set the SOC voltage to 1.25v; the infinity fabric clock does not like higher SOC voltage. We’re running the FCLK to 2133MT/s. The MEM VDD is the DRAM voltage, and the CPU VDDIO is the memory controller voltage.
However, in some cases, the VDDIO should be higher to attain the highest UCLK (memory controller clocks) to sync with the MCLK Memory Clock. In our case, we have managed to put 1.41v, and for DRAM, we put 1.51v. The XPG Lancer has a small form factor heatsink on it, and the PC case has ample airflow, so this shouldn’t be a problem.
Finalizing Voltages: VSOC, VDDIO, VDD, VDDQ
Here are the finalized voltage values for our RAM overclocking. First of all, we have tuned the SOC voltage; our FCLK is at the slightly higher side, which is 2133MT/s; increasing the SOC can result in negative scaling of the FCLK on the AM5.
However, this is adequate voltage even for the memory clocks. We have increased the VDD (Dram Voltage) to 1.52v to ensure maximum stability as we are running extremely low CAS (CL) and a higher memory transfer speed of 6400MT/s.
| Voltage | Values | Key Role |
|---|---|---|
| SoC Voltage | 1.2500V | Supplies power to the Memory Controller, Infinity Fabric, PCI-E Controller, etc. |
| DRAM Voltage (VDD) | 1.520V | Main power rail for the memory sticks. |
| DRAM VDDQ Voltage | 1.410V | Powers the DQ buffers inside the CPU’s Memory Controller. |
| CPU VDDIO Voltage | 1.350V | Supplies power to the I/O portion of the Memory Controller. |
We can shave the DRAM voltage to 1.4V, but that would require hours of stress testing or even days. The VDDQ voltage is 1.41v, which is usually aligned with the VDD voltage, but you can tweak the VDDQ to operate at lower values. Last, one of the most important ones is VDDIO voltage; it supplies power to the CPU memory controller and can be beneficial if you push the UCLK (Memory Controller Clocks) to higher clocks.
Methodology & Test Setup
This is how we tested:
- We have tested the RAM kit on both the stock and the overclocked configuration.
- We have evaluated the performance numbers in 3 Games, Cyberpunk 2077, Assassin’s Creed Shadows, Counterstrike:2 and AIDA 64 and PyPrime 2.0 for memory bandwidth and latency. We have used CapFrameX for the average FPS and calculated 1% lows in games.
- The GPU drivers and software version has remained unchanged in all the tests. We are not using any overclocks on the GPU.
- The CPU was overclocked with the PBO at unlocked settings.
- MSI Latency Killer enabled in BIOS.
- The FCLK on both configurations is set to 2133MT/s.
- For the temperature numbers and stability tests, we are using the Y-Cruncher VT3 for 1 hour respectively.
- We have disabled the power-down mode and memory context restore as it hurts the memory performance in the tuning process but remains auto on the stock settings.
Here is the setup used:
- CPU: AMD Ryzen 7 9700X, PBO Tuned, TDP 170W, Curve Optimizer -5
- RAM: XPG Lancer 16×2 6000MT/s | CL28 6400MT/s OC
- Motherboard: MSI B650 TOMAHAWK WIFI
- Cooler: Deepcool Mystique 360 Liquid Cooler (ARGB fans)
- GPU: ZOTAC RTX 5080 | Colorful iGame Ultra RTX 5070 | ASUS Dual RTX 4070 Super | ASRock RX 9070 Steel Legend OC
- BIOS: 7D75v1L AGESA ComboAM5 1.2.0.2b
- Drivers: GeForce Game Ready 572.75
- Windows Version: Windows 11 24H2 (OS Build 26100.3194)
- Storage: WD SN 770 1TB, Samsung 970 EVO 500GB for OS
- Softwares: CapframeX v1.7.4, HWINFO Pro v8.22, AIDA64 Extreme 7.60.7317 Beta
Benchmarks
AIDA64 Results

We’re seeing an enormous jump in the Write MB/s of 17%, 8% in Read MB/s, and 12% in the copy. That’s a massive jump from the default EXPO configuration, which is 6000MT/s. The extra frequency aids in memory bandwidth performance.
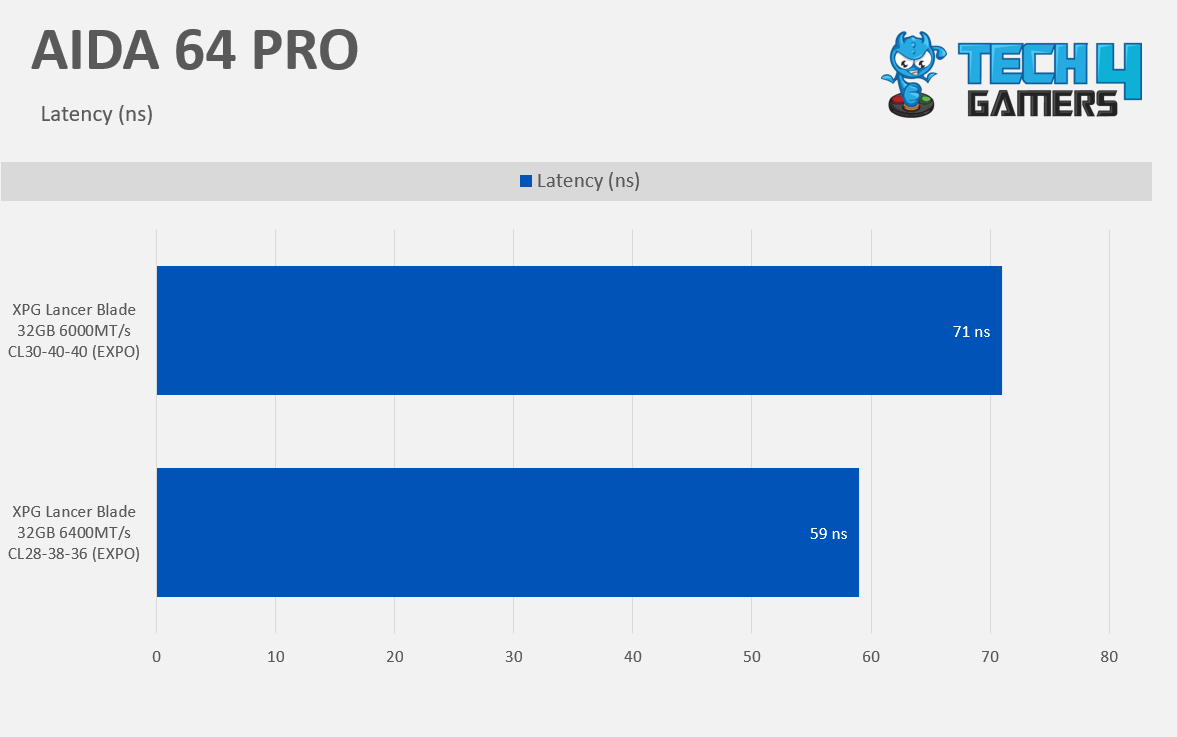
In the latency, we are seeing a massive improvement of 20%, which is incredible; this might aid in the gaming performance, especially at the 1% lows and overall snappiness in the Windows.
Gaming Results
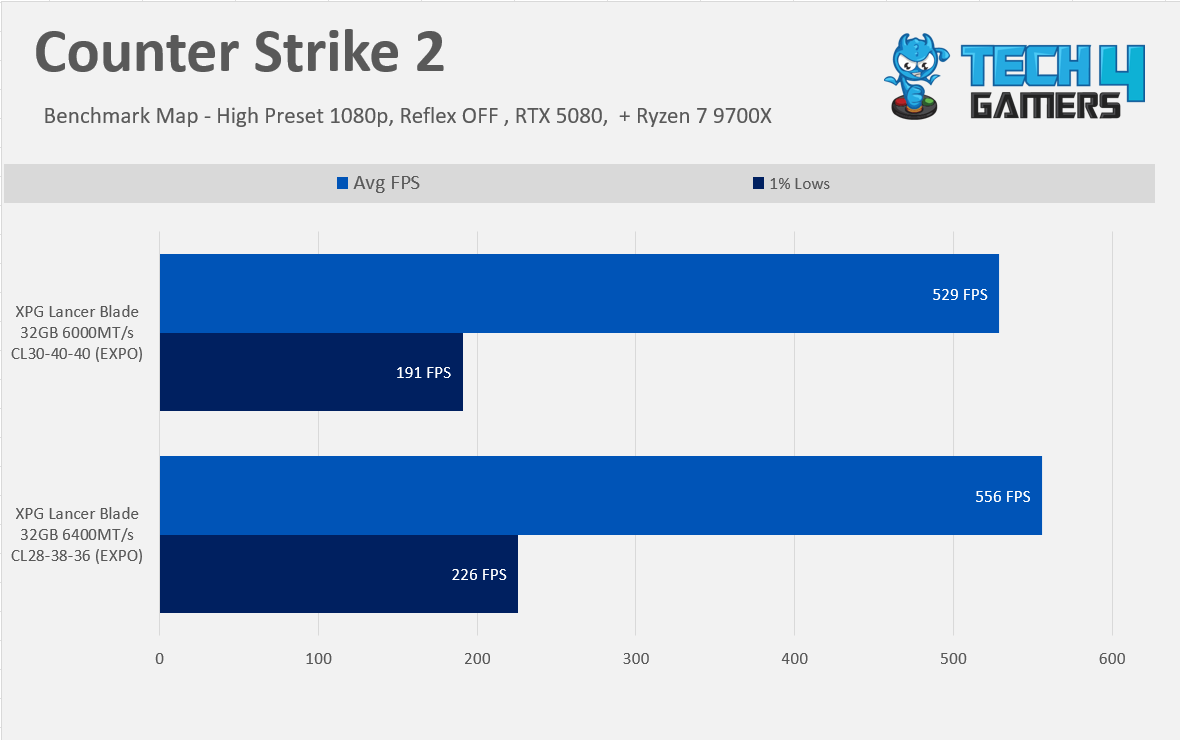
In Counter-Strike 2, we see almost 5.70% up-lift, but the 1% lows are much better, which is 18% on average. The faster memory brings more smoothness to the game.
Cyberpunk 2077 Results
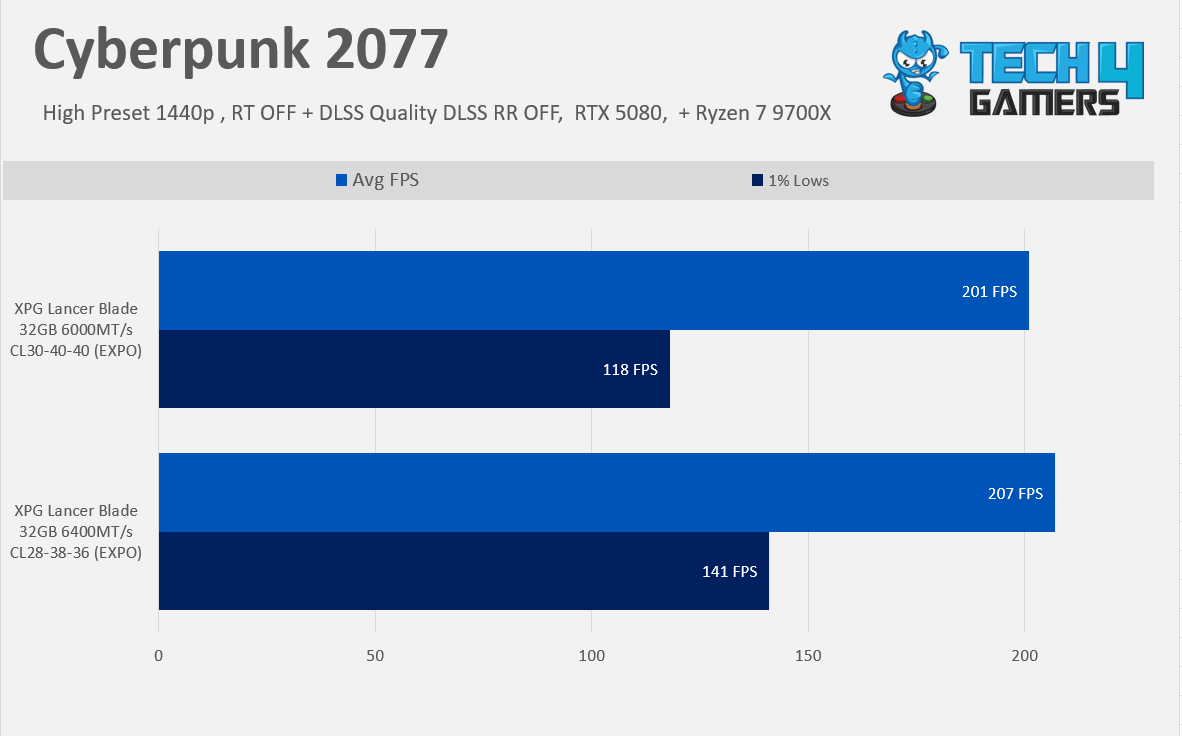
In Cyberpunk 2077, we gained 3% more performance, but that would not be so noticeable. The 1% lows are wild here, which is 19.49%, which is massive.
Assassin’s Creed: Shadows
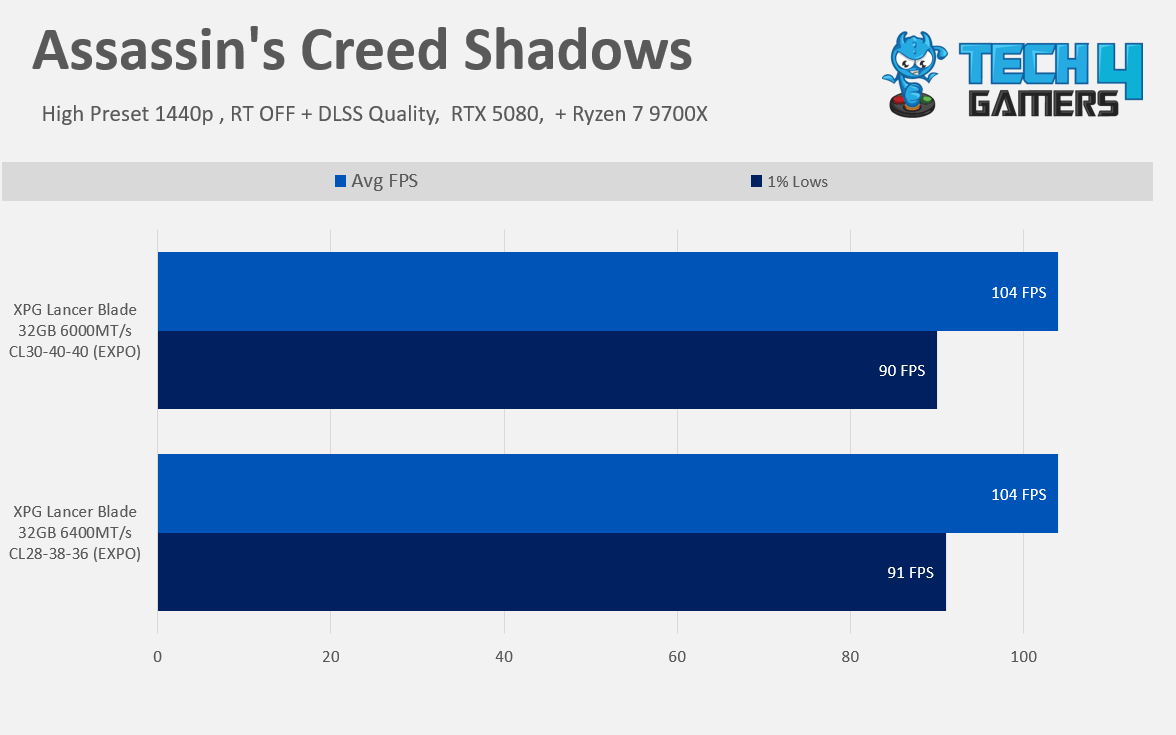
In Assassin’s Creed Shadows, the performance difference is within the margin of error; the new installment of Assassin’s Creed is very GPU intensive, even when the RT is off.
Summary
Overclocking RAM and tuning its timings can bring enormous gains depending on your task or game. We’ve noticed that sometimes there are not many gains on the average FPS, but the 1% lows were significantly better, and the frame-pacing is so much improved.
We have used the Ryzen 7 9700X CPU; the CPU does not have the large L3 cache die like the 9800X3D; if you’re using the X3D CPU, you are likely not to see that performance improvement as extra L3 cache can compensate for the lost performance due to the memory bandwidth.
In AIDA64, there is a massive jump in the write speeds, which would AID in the content creation, and if you’re the creator, you will find more snappiness after tuning the memory. However, it’s entirely subjective whether you should tune it or not. The high frequency and low timings RAM would be expensive, almost doubling in price.
Of course, you can also get cheap RAM and tune it to the maximum, but that involves so much trial and error, so it entirely depends on the user’s choice of the path he wants to choose.
Thank you! Please share your positive feedback. 🔋
How could we improve this post? Please Help us. 😔
Senior Hardware Reviewer at Tech4Gamers with over a decade of experience in the tech industry. My journey began in 2014 as a senior administrator for Pakistan’s largest gaming community forum. I specialize in testing and reviewing components like graphics cards, CPU coolers, and motherboards, while also sharing insights on overclocking and system optimization.


 [Explained]")

