The bootable discs and USB drives containing the files required to install Windows 10 are made using the Media Creation Tool (MCT). This tool is generally used for installing Windows on computers. Users may run across the error 0x80042405-0xA001A when attempting to install or update Windows 10 due to an MCT bug, incorrect disk drive settings or USB required to be formatted as NTFS or FAT32.
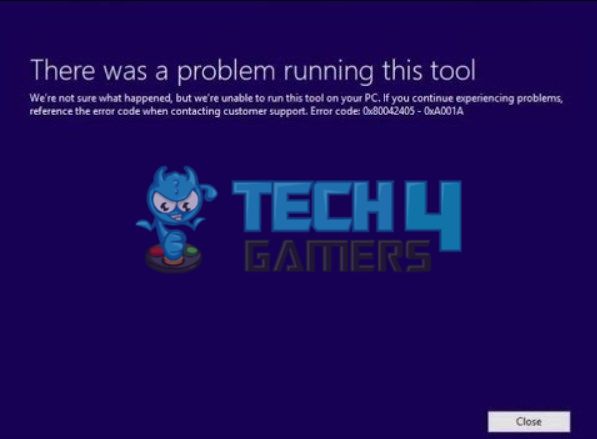
When the error appears, you’ll see the following message:
Key Takeaways
- Error 0x80042405-0xA001A appears when you try to install/update Windows 10/11, preventing users from accessing the Media Creation Tool.
- It usually happens when the ISO files you use for Windows 10/11 have issues or the drive format isn’t NTFS. A bug in the MCT, active antivirus programs, or incorrect disc settings could also be a culprit.
- You can fix this error by correcting drive formatting, ensuring the drive has enough space, setting GPT (GUID Partition Table) to MBR (Master Boot Record), changing the start-up type, or running MCT as administrator.
Run CHKDSK
Window’s CHKDSK (check disc) utility finds and fixes system issues. It assesses whether a file’s size, location, and other system details correspond to the data stored on the disc. CHKDSK additionally scans the complex drive parts that corrupt system data and looks for the files that aren’t located where they should be.
Disable Antivirus Software
Antivirus software interferes with internet connections, prevents apps and services from operating properly, and causes PC problems. Media Creation Tool faces issues due to third-party antivirus software like McAfee, F-Secure SENSE, and BitDefender.
This method, shared by a Reddit user, SauceSarcastic, proved to be an excellent solution
Here’s how you can turn off antivirus:
- Right-click on the taskbar and opt for Task Manager.
- Expand the taskbar if it shows the compact mode by selecting the Mode details option.
- Go to the header menu and move to the Startup tab.
- Please browse the list until you find your antivirus program, then click once to select it.
- To prevent the software from running when your PC turns on, look for the Disable button at the bottom of the window and click on it.
Now, restart your system and try to use the MCT or update Windows through it.
Run Windows Services
This method will teach you how to run the Windows services and which ones are required for Windows updates.
Altoelder from YouTube showed this method, and users got the error fixed by following it.
Here are the steps to run services:
- Hit Win+R to launch the Run dialogue box.
- Type services.msc and Enter.
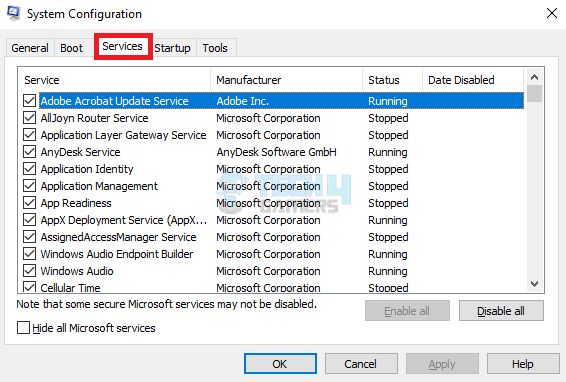
- You will see a new window with a list of all the services available for your system. Some might be running, and some will not.
Services tab – Image Credits (Tech4Gamers) - First, look for the Windows Update service at the bottom and click on it.
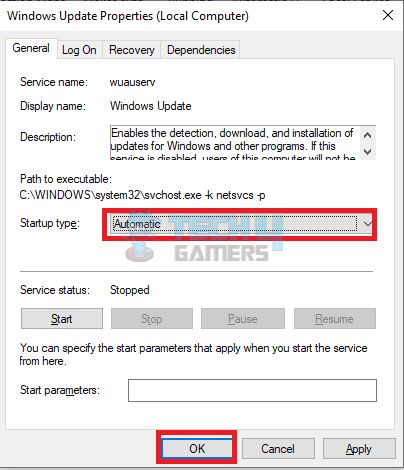
- Look for the service status. If it doesn’t say Running, then hit the Start button below it.
- Now, go to Startup type > choose Automatic for every service we have listed below and OK.
Windows Update Service – Image Credits (Tech4Gamers) - Here’s the list of services that you need to run the same way, explained in the steps above:
Background Intelligent Transfer Service
Server
Workstation
TCP/IP NetBIOS Helper
IKE and AuthIP IPSec Keying Modules
- Now, restart your system.
Format USB To FAT32
A Reddit user suggested formatting the USB to FAT32 that you are using. I gave it a shot to check if this approach works, too, and it resolved the error.
Tip: Always take a backup of your USB drive whenever you format it to keep your data safe.Here’s how to format a USB:
- Go to This PC > USB drive and right-click on it.
- Click on Format > choose FAT32 > Start.
- You’ll receive a pop-up warning before all the data is deleted.
- Click OK and sit patiently until the formatting is completed.
- When done, you will see a new pop-up notifying you that your USB is formatted to FAT32. Hit OK.
Format USB As NTFS
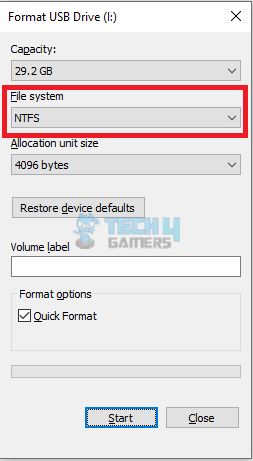
Check the format of your USB drive, and if it is set to FAT32, then this might be triggering the error 0x80042405-0xA001A. Always keep the USB drive format to NTFS while using it to create a bootable drive.
As suggested by R-Tech from YouTube, after experimenting with various methods, I found this one effective, as well as the viewers.
Here’s how:
- Press Ctrl+E to launch the File Explorer > This PC.
- You will see a format window. From the file system, choose NTFS > Start to begin formatting.
USB Format NTFS – Image Credits (Tech4Gamers)
Now, go for installing and running the Media Creation Tool, and it will be successful.
Use Rufus
Rufus is a tool that helps create bootable USB drives and is a well-known substitute for Windows Media Creation Tool.
Here’s how to use it:
- Go to the Rufus website, look for the latest version under Download, and click on it.
Rufus Download – Image Credits (Tech4Gamers) - From the downloads folder, run Rufus to install the tool.
- When the tool is launched, go to Settings > Check for updates and select it.
- Check mark on Daily > then Close.
- Relaunch Rufus > Device > USB from the drop-down to start creating bootable media.
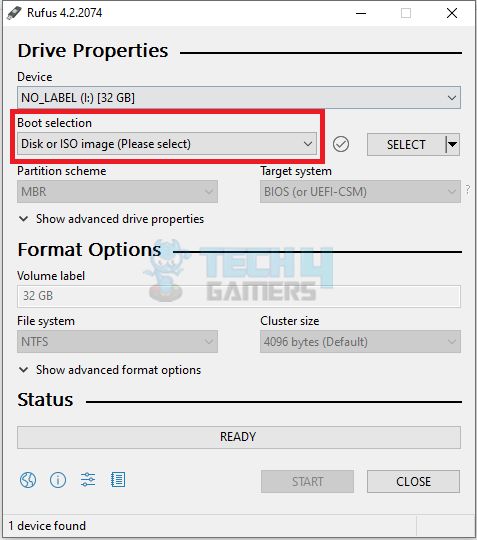
- Jump to the drop-down menu of Boot selection and opt for the Disk or ISO image.
Rufus ISO – Image Credits (Tech4Gamers) - Hit on the down arrow button on the right and click Download.
- Here, go for Windows 10 > Continue > Release.
- Choose the version of Windows 10 > Continue > Edition setting.
- Select Language > Continue.
- Now, opt for the OS architecture you want, either 64-bit or 32-bit, according to your system.
- Hit Download and select the location to save the ISO file.
- Give your USB device a name if you wish to, as it’s optional in the Volume label.
- Go with the default settings when it is downloaded and hit the Start button.
- You will have the option to install customization settings, so skip it cause you need a normal bootable drive.
- Click OK and then again to continue.
Once you finish the process, you can boot Windows 10 and install it on your computer.
Download MCT On USB
The Media Creation Tool helps fix the error when downloaded straight to the USB drive you wish to use as the bootable device. When you download the tool’s setup, select USB as the location.
Here are the steps:
- Plug a USB drive with sufficient storage into your PC and open the browser.
- Go to the Microsoft website and select a version of Windows 10 MCT.
- Download the file on a 64-bit or 32-bit OS per your system configuration.
- When the downloader prompts to choose the location, click This PC > USB drive.
- Open File Explorer > This PC > USB drive > MCT and comply with the instructions appearing on the screen.
GPT To MBR
The Master Boot Record (MBR) rather than the GUID Partition Table (GPT) setting is required for the Media Creation Tool to function properly.
Areshiyo, a YouTuber, put forth the method, and it has been tried and tested by various users.
Here’s how you can alter settings:
- Hit Windows+R to launch the Run dialogue box.
- Type diskpart > Enter > Yes for User Account Control (UAC) confirmation.
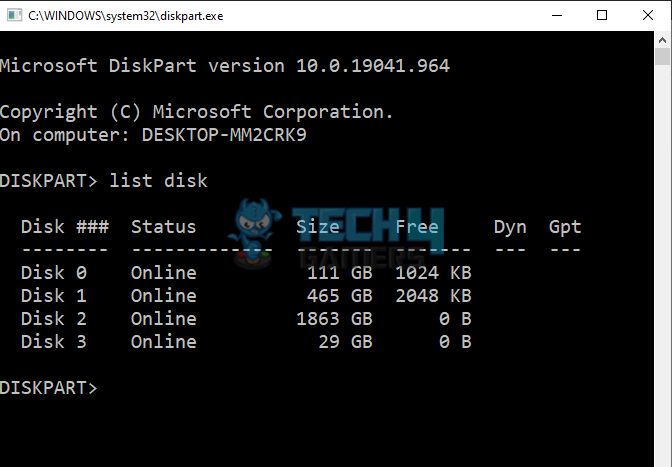
- Copy the command: list disk and Enter to execute.
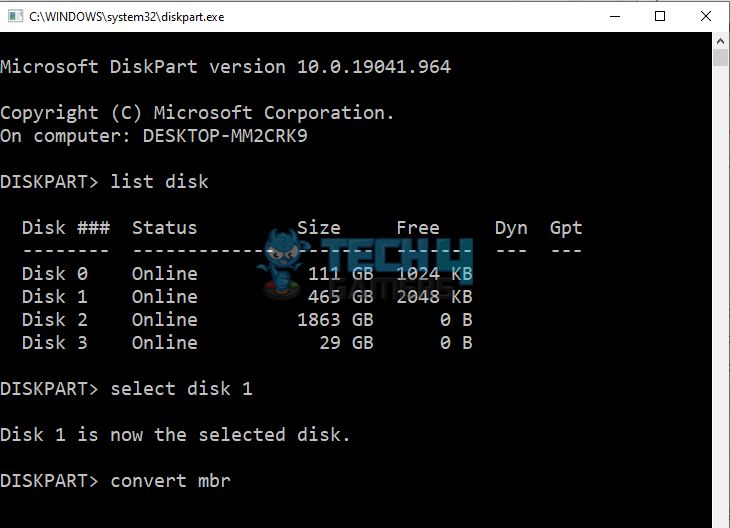
List Disk – Image Credits (Tech4Gamers) - A list of connected disks will appear. Now copy this command: select disk # ( replace # with the number of the disk you use) and hit Enter.
- Next, type this command: clean and Enter to execute. It will clean previous data.
- Now, copy and paste the command: convert mbr.
Convert MBR – Image Credits (Tech4Gamers)
Once all the steps are done, try to launch the Windows 10 Media Creation Tool and check if the issue has been fixed.
Common Questions Answered
When you try to update Windows 10 or launch Media Creation Tool (MCT), an error appears. It might happen because of issues with Windows 10/11 ISO files or because the drive format isn’t correct.
Try downloading the setup directly to USB, check the drive format, which should be NTFS, use a different USB port, change the start-up type, use Rufus or turn off the antivirus program.
Download the setup from the Microsoft website. When asked to save the files, go to This PC, choose USB drive, and click Start to download the files.
Related Articles
- Malware Found In Popular Windows 10 Activation Tool
- How To Fix Windows 10 “Diagnosing Your PC” Error
Thank you! Please share your positive feedback. 🔋
How could we improve this post? Please Help us. 😔
[Errors Troubleshooting Expert]
Arsalan Shakil (aka GuyThatDoesEverything on YouTube) is a PC Tech Enthusiast and Electronic Geek. With over 10+ years of experience in Electronics, he then decided to explore Software Engineering to design embedded products and automate existing hardware solutions.
When he started tearing down old cameras to understand how they worked, he was shocked (literally, when he got zapped by a flash discharge capacitor), giving him the power (debatable) to fall in love with videography/photography. He also started making some fun videos that later became YouTube tech reviews.
Skills:
- 10+ years of experience in Electronics design, embedded solutions, and prototyping
- Majored in Software Engineering
- Research paper publication in IEEE for Embedded Military Uniform & LoRa WAN wireless technology
- Specialized in IoT Solutions
- PC Enthusiast & PC Modder
In his local region, he’s known to expose cheap PSU brands, often claiming fake certification or false claims on the box. He’s a true nerd and needed some friends in his life. Then he met some guys who work at Tech4Gamers, and they also came out to be equal nerds who suggested he join Tech4Gamers as a Hardware Expert.


 Threads


![Intel WiFi 6 AX201 Not Working [Our Recommended Fixes]](https://tech4gamers.com/wp-content/uploads/2023/04/Error-Fixes-9-218x150.jpg)
![This Effect Requires GPU Acceleration [Our Recommended Solutions] This Effect Requires GPU Acceleration [FIXED]](https://tech4gamers.com/wp-content/uploads/2023/03/Error-Fixes-9-218x150.jpg)
![How To Clean PC Fans? [Step By Step]](https://tech4gamers.com/wp-content/uploads/2022/09/how-to-clean-pc-fans-218x150.jpg)
