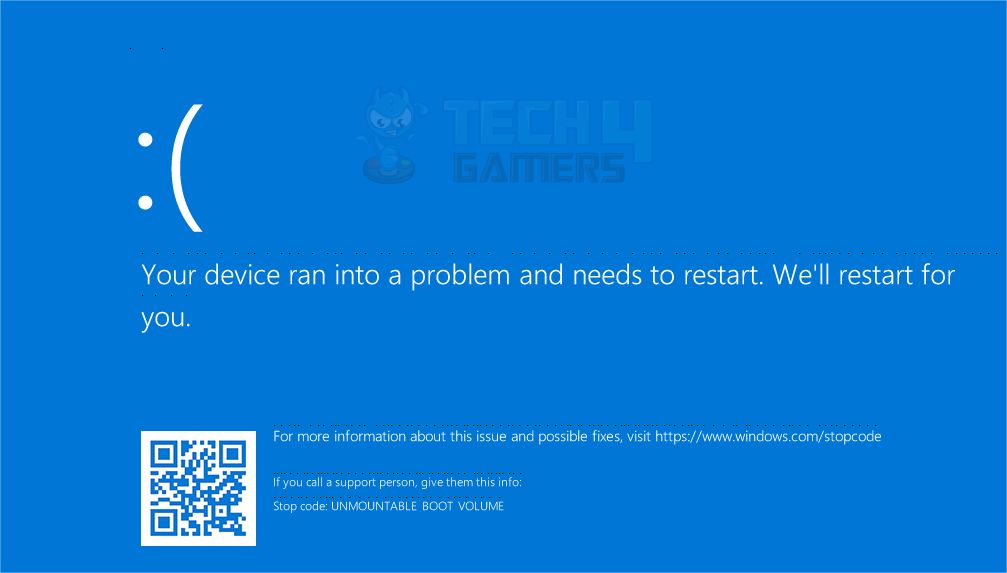
Windows users often encounter the error that gives out the message “Unmountable Boot Volume.” When there is an issue with the boot volume, Windows can’t load correctly on your machine and shows the error while showing a blue screen of death. The error can be caused due to issues with the HDD, BIOS, or RAM. Other frequent reasons are corrupt Windows files, incorrect BIOS settings, or drivers are conflicting.
If you face the error, you will see the following message on the screen:
Key Takeaways
- The Unmountable Boot Volume error in Windows 11 is a stop code / BSOD error that occurs when the boot volume is having any issue, and it won’t let your system boot into Windows.
- Causes behind the error could be the incorrect setting of BIOS, RAM, HDD, or SSD malfunctioning, any external devices conflicting, or Windows files getting corrupted.
- To fix the error, check and repair hardware issues, run the Memory Diagnostic Tool, Windows Automatic Repair, SFC, CHKDSK, or repair MBR or GPT.
Run CHKDSK
The Check Disc utility, generally known as CHKDSK, scans your hard drive. It does this to identify and repair issues such as errors or bugs in the system, corrupted disk files, and also make some space by deleting unnecessary data. The CHKDSK scan can take time but helps avoid worse situations and data loss.
Create Windows Installation Drive
Try booting from a bootable device if you can’t get Windows to start. This way, you can access Windows troubleshooting tools as well. If you already have a bootable USB or DVD, then plug it into your computer; otherwise, you will need another system to make a bootable USB or DVD.
This approach, suggested by PassFab from YouTube, proved to be the perfect solution to enter BIOS for system recovery.
Following are the steps to create a bootable USB:
- Plug a formatted and empty device you want to make bootable in another system.
- Go to the Microsoft website > Download the Installation media.
- Go to your system downloads and double-click on the setup to start the installation.
- Hit Accept > Next.
- If you are creating a bootable device for another system, then clear the checkmark from the option “Use the recommended options for this PC,” and it will enable the language and edition fields above for you to add the correct details of the system you want to use the bootable device for. Click Next.
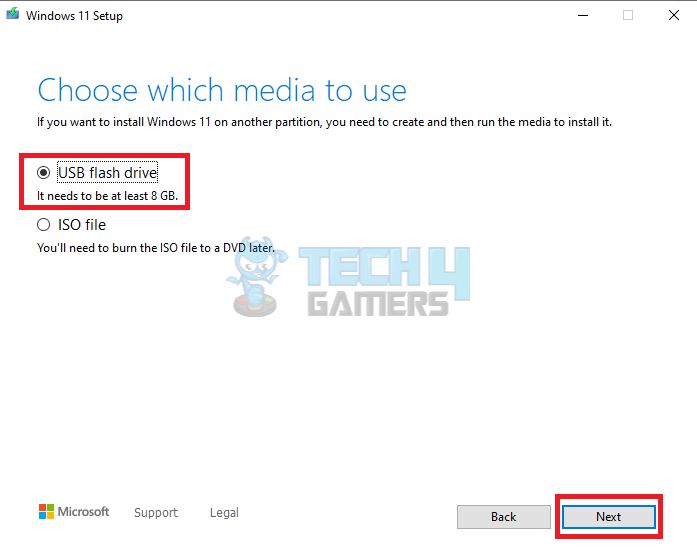
- Choose USB > Next.
Select USB Flash Drive – Image Credits (Tech4Gamers) - You will see a list of attached devices on that system, and the setup will ask you to choose the one for the bootable purpose. Remember that all the data will be deleted from your selected device once you hit Next > Finish.
Once the setup is finished, that device will be ready to boot another system.
Boot Into BIOS
You’ll probably need to modify the PC’s boot order, as that can help fix the issue.
Here’s how:
- Start your computer by connecting the bootable USB.
- Keep pressing the Del, F8, or F10 keys to boot into BIOS.
- The bootable device should be at the top of the list, so move it up if not.
- Save changes and restart.
Repair MBR / GPT
Master Boot Record (MBR) or GUID Partition Table (GPT) has the information of Windows’ location in your system, which causes a swift and quick startup. And if you are getting the boot volume error, MBR or GPT might get corrupted.
Here are the steps to repair the MBR / GPT:
- Follow the steps given above to boot into BIOS.
- Open Troubleshoot > Advanced Options > Command Prompt and click on it.
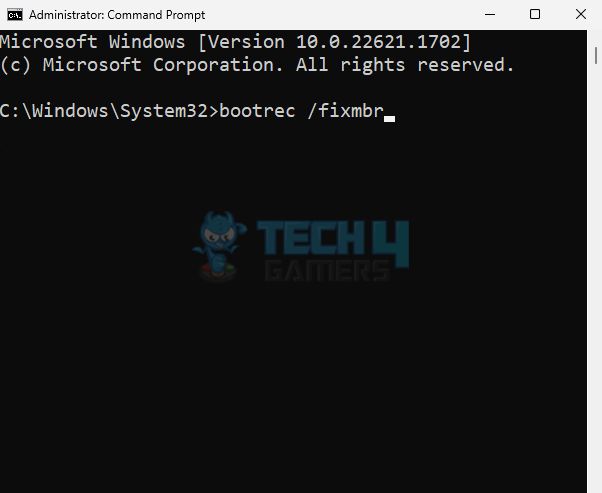
- Copy the command bootrec /fixmbr, paste it into cmd, and hit Enter.
bootrec /fixmbr – Image Credits (Tech4Gamers) - Once the above command finished repairing MBR, copy the following commands one by one with an Enter to fix GPT:
bootrec /fixboot
bootrec /rebuildbcd
- After completing the above commands, type exit on cmd and Enter to close the Command Prompt.
See whether the problem has been resolved by restarting the computer.
Start-up Repair
Windows Automatic Repair helps in solving boot issues and other technical glitches. Continue with this fix after the method above to boot into BIOS, which is also a method used by a YouTuber, and it turned out to be incredibly effective for the viewers.
Here’s how to run Start-up repair:
- Once Windows has started from the bootable drive, hit the Next button.
- You will see the Install Now > Repair your computer > Troubleshoot.
- Jump to Advanced Options > Startup Repair.
- Now, you will see a screen saying Diagnosing your PC and end up doing automatic repair.
- Close the installer and restart your system. This method must have fixed the boot volume error.
Check Hardware
Your hardware might be problematic if none of the methods worked for you to fix the boot volume error. The HDD or SSD might be dead, corrupted, or poorly seated.
After following a thread on Reddit, I tested this method and discovered that the wires weren’t correctly connected.
Do the following to fix the hardware:
- Open your computer if it is a desktop and if you are aware of assembling the parts. If not, or you have a laptop, then take it to an expert’s outlet. Ensure that the drive’s wires are all attached properly. Make sure the RAM is correctly positioned.
- You must have an 80-connector cable rather than the standard 40-connector IDE cable if you’re employing ATA-66 or ATA-100 drivers.
- Check if the hard drive or RAM is malfunctioning. Then, replacing it would be better or getting it done by a computer expert.
- Check the disk controller driver compatibility if you see this error while updating to a newer version of Windows.
Restore System
If implementing the methods given above didn’t resolve the error, Windows continued to restart with a BSOD error. You need to restore system settings while keeping the data safe, as shown by YouTuber TechFixIT.
Here are the steps to restore your system:
- Press the power button, and once you see the Windows blue logo, press the button again, and your system will shut down.
- Till you reach the Windows Recovery screen, repeat the first step.
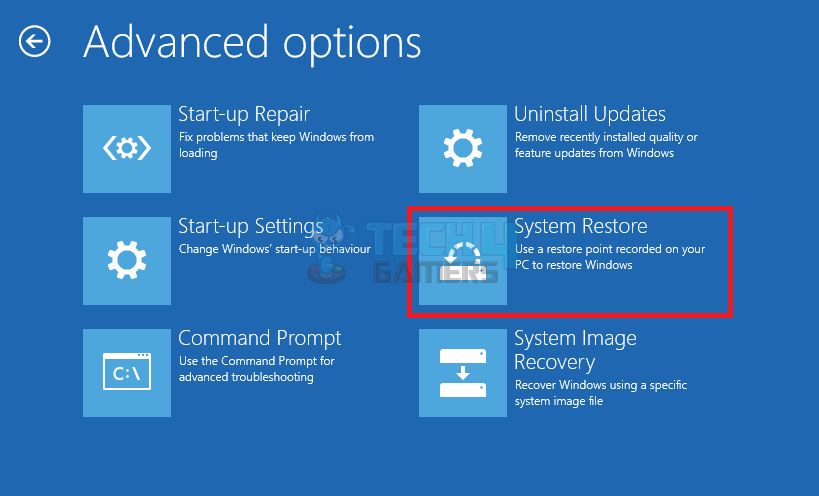
- Go to Troubleshoot > Advanced options > System Restore.
System Restore – Image Credits (Tech4Gamers) - Click Next > Choose Restore point.
- Opt for Scan for affected programs, but this is optional.
- Choose programs that should be reinstalled once your system is restored.
- Hit Close > Finish.
Your system will start now without any BSOD and boot volume error.
Reinstall Windows
Fresh installation of Windows is sometimes a way to fix the BSOD errors.
Here’s how to do it:
- Connect the bootable USB you created in the above method to your system.
- Turn off the PC and then press the Power button while holding it till the Windows startup screen appears. Now press the F2 or F12 key to boot into BIOS.
- Open Boot Manager > USB > Enter.
- Select language, time, and keyboard layout > Next.
- Click Install Now > Activate Windows, or I don’t have a product key > Select version > Next.
- Now, accept the terms by checking the box in front of the option I accept the Microsoft Software Licence Terms.
- You will have 2 options for installation: Upgrade or Custom. Choose one to proceed!
- You must select a partition for the one you want to use for Windows first. Click Next > OK.
- The installation process will start, and when it’s done, you will be asked to choose a region.
- Give your computer a name on the next screen, or press Skip.
- Your system will start checking for updates right after this and ask you to enter a password.
- Security questions are the last thing it will ask you to avoid any inconvenience in the future. Click Next after entering.
- Choose one option from Backup files with One Drive or Only save files to this PC.
Reset PC
Resetting a computer to its factory default settings is possible with the help of the Reset PC option. All installed software, drivers, and data in your PC are deleted if you choose that option. Otherwise, you can choose to keep your data safe. Windows OS will also get reinstalled, resolving all the system errors and bugs while improving your system’s performance.
Related Articles
- How To Fix Google Drive Not Syncing On Windows 11
- FIXED: Windows 11 Error “No Such Interface Supported”
- How To Turn Off Efficiency Mode In Windows 11?
Thank you! Please share your positive feedback. 🔋
How could we improve this post? Please Help us. 😔
[Errors Troubleshooting Expert]
Arsalan Shakil (aka GuyThatDoesEverything on YouTube) is a PC Tech Enthusiast and Electronic Geek. With over 10+ years of experience in Electronics, he then decided to explore Software Engineering to design embedded products and automate existing hardware solutions.
When he started tearing down old cameras to understand how they worked, he was shocked (literally, when he got zapped by a flash discharge capacitor), giving him the power (debatable) to fall in love with videography/photography. He also started making some fun videos that later became YouTube tech reviews.
Skills:
- 10+ years of experience in Electronics design, embedded solutions, and prototyping
- Majored in Software Engineering
- Research paper publication in IEEE for Embedded Military Uniform & LoRa WAN wireless technology
- Specialized in IoT Solutions
- PC Enthusiast & PC Modder
In his local region, he’s known to expose cheap PSU brands, often claiming fake certification or false claims on the box. He’s a true nerd and needed some friends in his life. Then he met some guys who work at Tech4Gamers, and they also came out to be equal nerds who suggested he join Tech4Gamers as a Hardware Expert.


 Threads
![Atibtmon.exe Runtime Error AMD [Our Proven Fixes] Atibtmon.exe runtime error](https://tech4gamers.com/wp-content/uploads/2024/02/Atibtmon.exe-runtime-error-218x150.jpg)

![Corsair Fan Not Lighting Up [Our Top Fixes]](https://tech4gamers.com/wp-content/uploads/2023/03/Error-Fixes11-218x150.jpg)
