


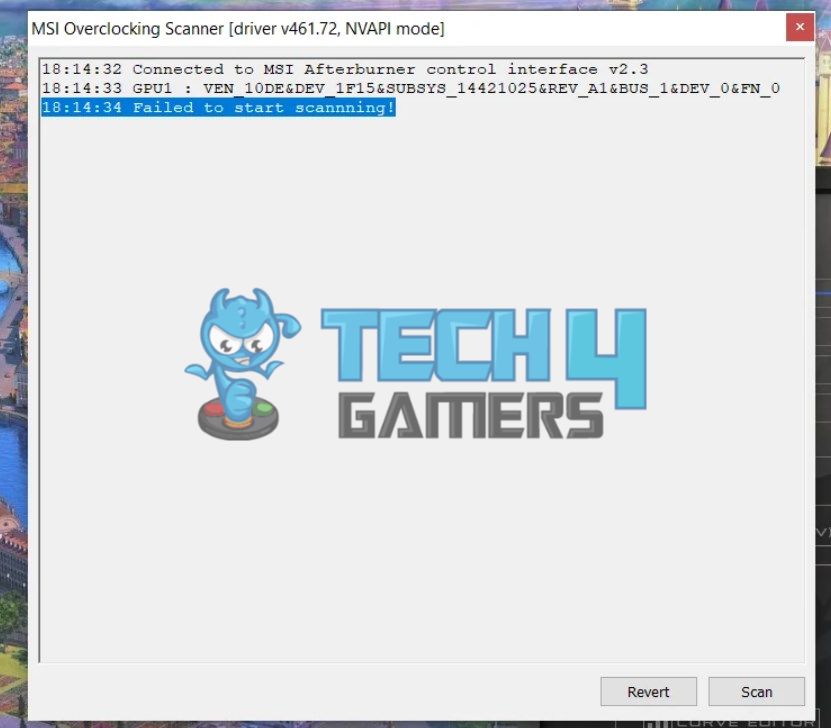
Despite a smooth installation, the MSI Overclocking Scanner failed to start scanning on my PC. The error was quite annoying as it impacted the performance of my GPU and CPU and made it difficult to keep track of the component statistics. Luckily, I found a few fixes that got me out of the scanning error.
- Rely on software like MSI Afterburner to monitor the components’ performance during overclocking.
- It can be caused by incorrect graphic settings, software bugs, conflicts with other apps, or outdated drivers.
- Allow GPU performance access, activate CUDA in the NVIDIA control panel, and run the legacy scanning process to resolve the trouble.
Method Difficulty Rating
Grant GPU Access
Rated: 3/10
Activate CUDA
Rated: 2/10
Unlock Controls
Rated: 2/10
Grant GPU Performance Access
Like other software, the MSI Afterburner also requires specific permissions to run correctly. One of these permissions involves allowing the software to access the GPU performance statistics.
So, before proceeding, I used the following steps to ensure that the application had the necessary access to my GPU.
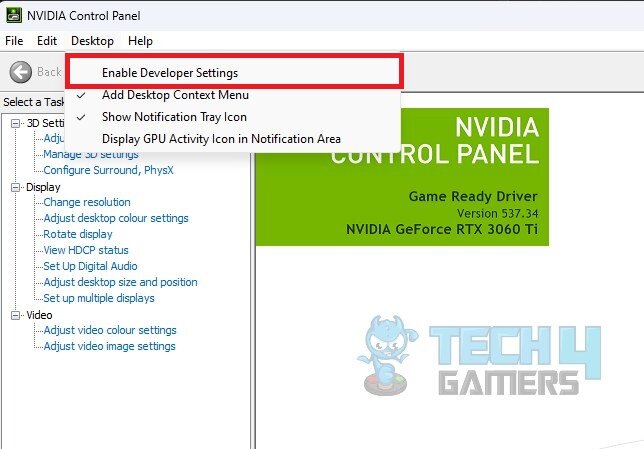
- Launch NVIDIA Panel: Right-click on the Desktop > Open NVIDIA Control Panel.
- Pick Developer Settings: Select Desktop on the upper pane > Enable Developer Settings.

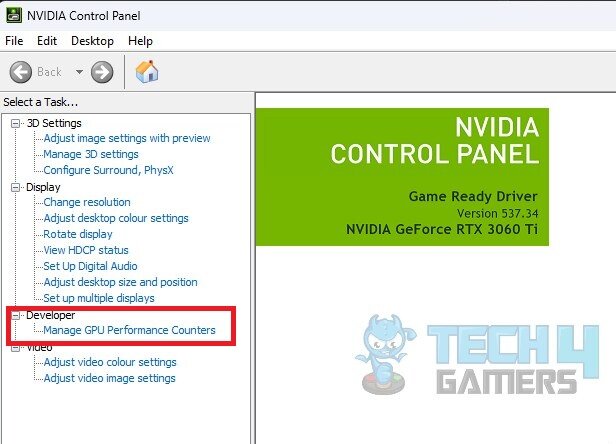
Enable Developer Options (Image By Tech4Gamers) - Move To GPU Performance: Navigate to Manage GPU Performance Counters in the side panel.

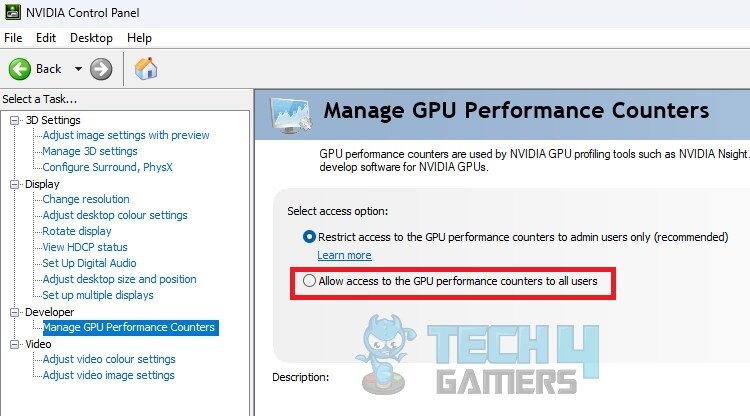
Navigate To GPU Performance Counters (Image By Tech4Gamers) - Provide Access: Enable the option, Allow Access To The GPU Performance Counters To All Users > Yes > Restart PC.

Allow Access To GPU Performance Counters (Image By Tech4Gamers)
Activate CUDA In The NVIDIA Control Panel
CUDA is a programming platform developed by NVIDIA that utilizes the GPU to enhance PC computing performance. A CUDA-enabled GPU can provide better performance and prevent errors like the OC scanner not scanning. Therefore, use the following technique to enable CUDA in the NVIDIA Control Panel.
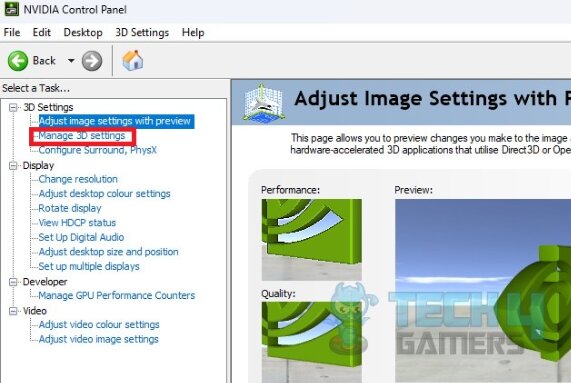
- Go To 3D Settings: Access the NVIDIA Control Panel > Navigate to Manage 3D Settings in the left-hand pane.

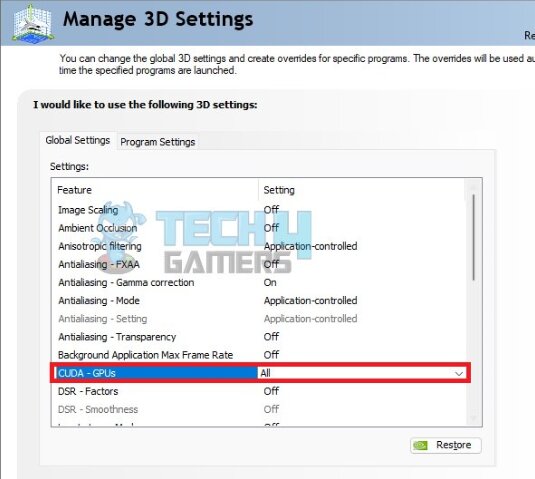
Go To Manage 3D Settings (Image By Tech4Gamers) - Allow CUDA: Find the CUDA- GPUs entry > Choose All from the dropdown menu > Save the changes > Restart your computer.

Change CUDA Setting (Image By Tech4Gamers)
This method also worked for another user in the NVIDIA Forums. Upon testing, I obtained similar results.
Unlock Voltage Control Within MSI Afterburner
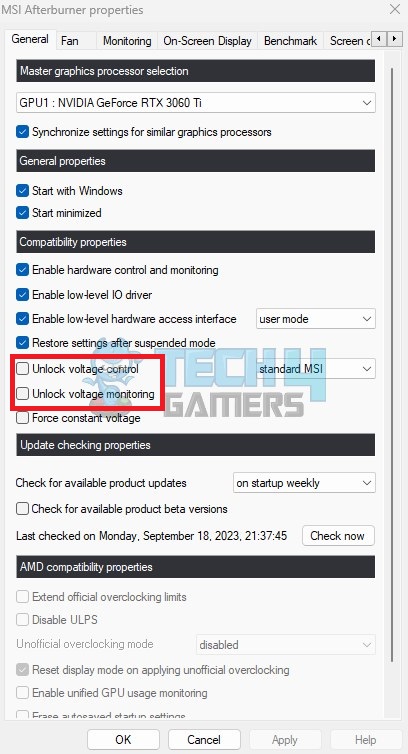
This is a crucial step to ensure that the OC scanner works flawlessly per the MSI Afterburner guide. Unlocking the Voltage Control and Voltage Monitoring features allows the MSI software to obtain a baseline for your GPU’s performance by executing a benchmark.
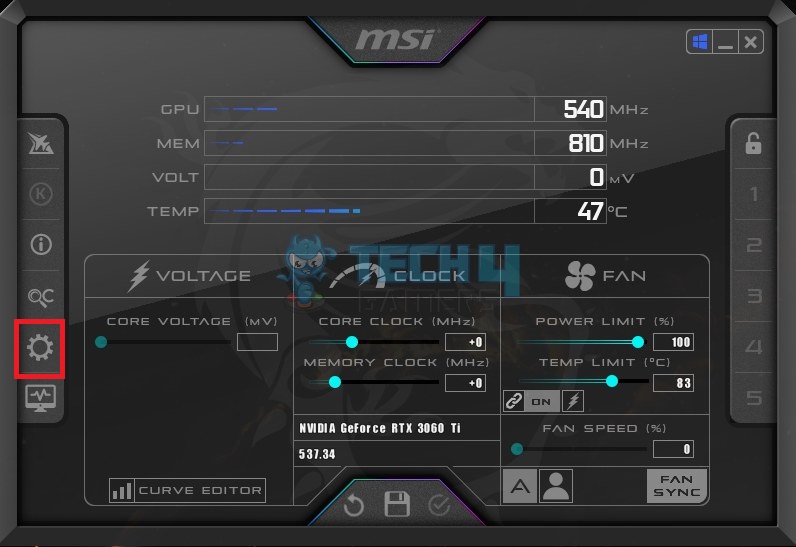
- Access Settings: Open MSI Afterburner > Settings.

Accessing Settings On MSI Afterburner (Image By Tech4Gamers) - Unlock Voltage Control: Mark the boxes for Unlock Voltage Control and Unlock Voltage Monitoring > Apply > OK > Yes.

Enabling Options (Image By Tech4Gamers)
Wrap Up
While browsing different forums on the internet, I noticed many users complaining about one problem: the MSI overclocking scanner failed to start scanning. For this particular Reddit user, it didn’t work right after the installation.
MSI Overclocking scanner failed to start scanning
byu/super_coconut11 inoverclocking
Despite numerous complaints on public forums, MSI has not officially responded to the issue. The abovementioned workarounds were very helpful in tackling this situation. You can also contact MSI Support to get more insight into the problem.
Thank you! Please share your positive feedback. 🔋
How could we improve this post? Please Help us. 😔
[Errors Troubleshooting Expert]
Arsalan Shakil (aka GuyThatDoesEverything on YouTube) is a PC Tech Enthusiast and Electronic Geek. With over 10+ years of experience in Electronics, he then decided to explore Software Engineering to design embedded products and automate existing hardware solutions.
When he started tearing down old cameras to understand how they worked, he was shocked (literally, when he got zapped by a flash discharge capacitor), giving him the power (debatable) to fall in love with videography/photography. He also started making some fun videos that later became YouTube tech reviews.
Skills:
- 10+ years of experience in Electronics design, embedded solutions, and prototyping
- Majored in Software Engineering
- Research paper publication in IEEE for Embedded Military Uniform & LoRa WAN wireless technology
- Specialized in IoT Solutions
- PC Enthusiast & PC Modder
In his local region, he’s known to expose cheap PSU brands, often claiming fake certification or false claims on the box. He’s a true nerd and needed some friends in his life. Then he met some guys who work at Tech4Gamers, and they also came out to be equal nerds who suggested he join Tech4Gamers as a Hardware Expert.


