Media Access Control (MAC) address is uniquely assigned to each device and helps identify it on a network. You may want to find the MAC address in Windows 11 when troubleshooting network errors or enhancing your computer’s privacy.
Key Takeaways
- The quickest methods to fetch the MAC address in Windows 11 are through the Command Prompt and Windows PowerShell.
- You can also use Settings or the Control Panel to find the MAC address on your computer.
- It is advised not to change your computer’s MAC address unless necessary since it may lead to compatibility issues or make the device prone to network errors.
Using Settings
One of the common ways to view the MAC address is through the Windows Settings interface, and this was my go-to method as well.
Here are the complete steps you need to follow:
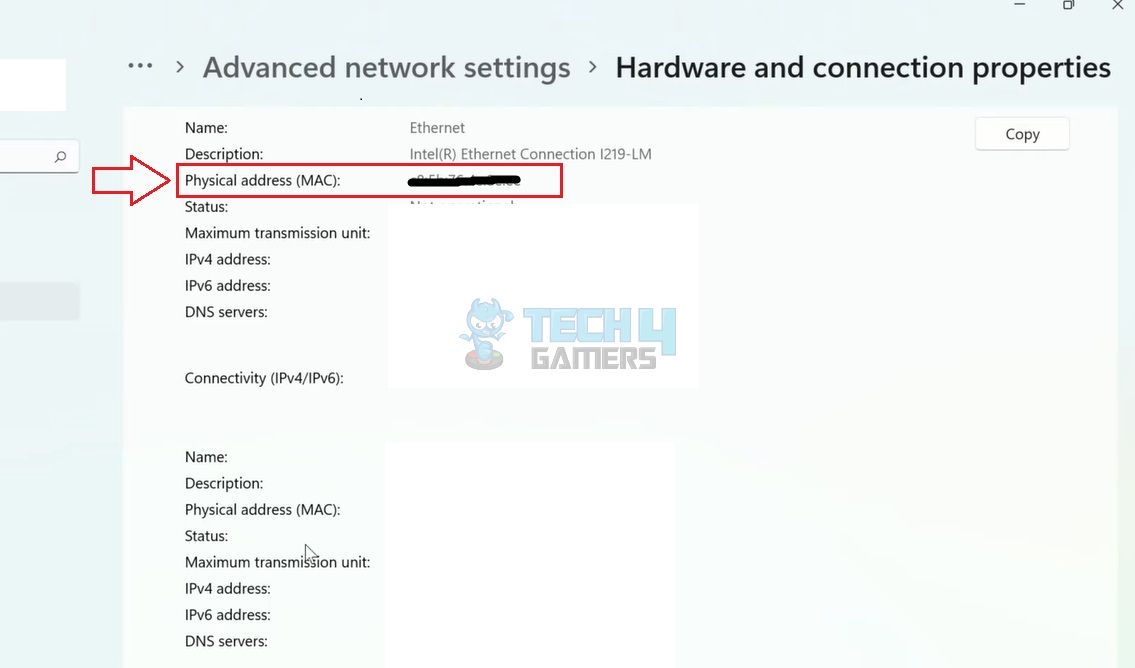
- Head to Settings > Highlight Network And Internet > Advanced Network Settings > Hardware And Connection Properties.
- The Physical Address (MAC) is given in this section.
MAC Address In Settings (Image By Tech4Gamers)
Using Ethernet Settings
Alternatively, you can view the MAC address in the Ethernet settings of your computer, specifically under the active network. On the other hand, try power cycling the router if the internet is not working properly.
Use the instructions below for this method:
- Come to Settings > Network And Internet > Ethernet.
- Scroll down to find the Physical Address (MAC) section.
Using System Information
The System Information menu contains all the details about your computer and its network, hardware, and software. Thus, I checked if I could find the MAC address in this section, and it was there.
This is how you use the menu to search for the MAC address:
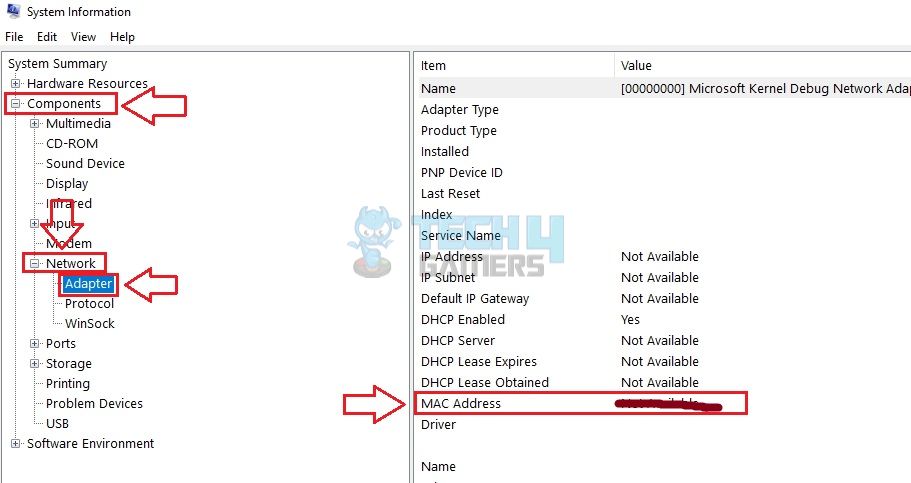
- Click Windows symbol > Search > Type System Information.
- Click on the + symbol beside Components > Network > Adapter.
- Find the network adapter under use and notice the MAC Address.
MAC Address In System Information (Image By Tech4Gamers)
Using Control Panel
Another method I discovered to be effective in locating the MAC address is via the Control Panel. It comprises all the computer settings and information a user may require.
Navigate through the Network And Internet section to get the MAC address:
- Open Control Panel > Network And Internet > Network And Sharing Center.
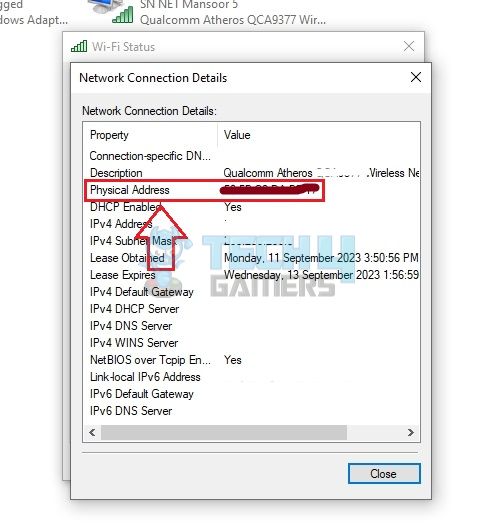
- Select Change Adapter Settings on the left > Right-click on the concerned network adapter > Status.
Status (Image By Tech4Gamers) - Access General > Press Details.
- The Physical Address will tell you the MAC address of your device.
MAC Address In Control Panel (Image By Tech4Gamers)
Using Command Prompt
Running a specific code in the Command Prompt window helped load the MAC address. Along with that, it also gave other details about the connection, such as DHCP status.
Follow the steps below to use the Command Prompt for noting the MAC address:
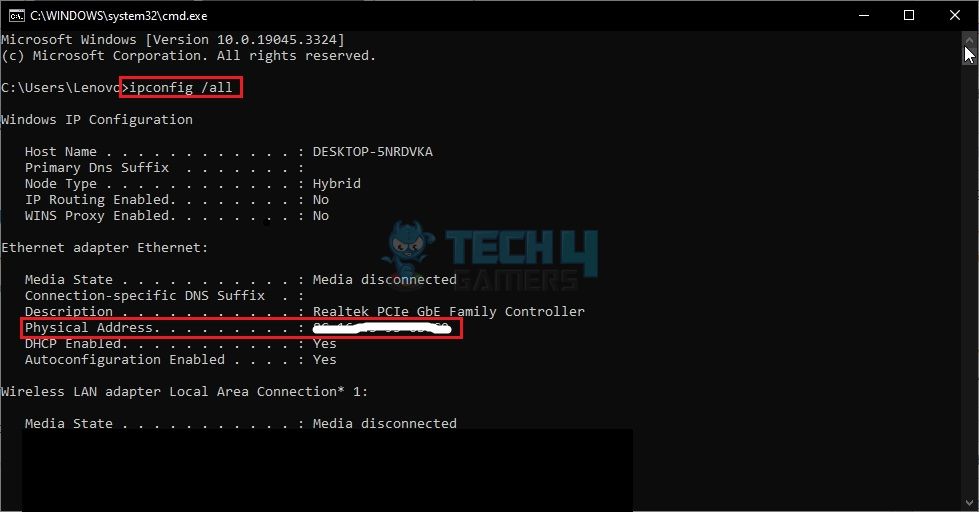
- Launch Command Prompt > Run the code ipconfig /all > Look for the concerned network adapter.
- The MAC address would be present in front of the Physical Address.
MAC Address In Command Prompt (Image By Tech4Gamers)
Using Windows PowerShell
Lastly, this is the technique to find the MAC address in Windows 11. Windows PowerShell lets you give instructions to the system in the form of commands to get the required output. However, be careful of the spacing while typing the code in PowerShell.
These are the instructions to use PowerShell:
- Open Search > Type Windows PowerShell > Run It As Administrator.
- Enter the following code: getmac /v /fo list.
- Find the connected network adapter and notice the MAC address written under Physical Address.
MAC Address In PowerShell (Image By Tech4Gamers)
All these techniques were equally effective in fetching the MAC address, although it took me the least time to find it using the Windows Settings. Additionally, I was super careful while typing the code in PowerShell to avoid messing up any important settings.
More Guides on Windows:
- How To Update Windows [11, 10, 8, And 7]
- How To Turn Off Caps Lock Notification On Windows 11?
- How To Remove PIN From Windows 11?
- How To Show Battery Percentage In Windows 11?
Thank you! Please share your positive feedback. 🔋
How could we improve this post? Please Help us. 😔
[How To Guides Specialist]
Dayan Shahid is a skilled mechanical engineer passionate about technology. With certifications in various programming languages and subjects ranging from microcontrollers to aerial robotics, Dayan can effortlessly present complex technical topics in an engaging way. His ability to bridge the gap between theory and practical applications sets him apart as he continues to inspire others through their insightful content.


 Threads


![How To Clean Boot Your Computer? [Quick Guide]](https://tech4gamers.com/wp-content/uploads/2023/03/How-TO-21-218x150.jpg)

![How To Turn Off VPN [Ultimate Guide] How To Turn Off VPN](https://tech4gamers.com/wp-content/uploads/2023/02/How-TO-1-5-218x150.jpg)
![How To Connect SSD To Motherboard [All Types]](https://tech4gamers.com/wp-content/uploads/2022/12/Error-Fixes-11-218x150.jpg)
![How To Remove AMD CPU Fan [All Steps] How to Remove AMD CPU FAN](https://tech4gamers.com/wp-content/uploads/2023/02/HOW-TO-2-2-218x150.jpg)